

Page 1

Instructions for use
WASHING MACHINE
GB
English,1
WMSG 602
UA
Українська,13
Contents
Installation, 2-3
Unpacking and levelling
Connecting the electricity and water supplies
The first wash cycle
Technical data
Care and maintenance, 4
Cutting off the water and electricity supplies
Cleaning the washing machine
Cleaning the detergent dispenser drawer
Caring for the door and drum of your appliance
Cleaning the pump
Checking the water inlet hose
Precautions and tips, 5
General safety
Disposal
Opening the porthole door manually
Description of the washing machine, 6-7
Control panel
Display
GB
Running a wash cycle, 8
Wash cycles and options, 9
Table of programmes and wash cycles
Wash options
Detergents and laundry, 10
Detergent dispenser drawer
Preparing the laundry
Special wash cycles
Troubleshooting, 11
Service, 12
1
Page 2

Installation
GB
! This instruction manual should be kept in a
safe place for future reference. If the washing
machine is sold, transferred or moved, make
sure that the instruction manual remains with
the machine so that the new owner is able to
familiarise himself/herself with its operation
and features.
! Read these instructions carefully: they
contain vital information relating to the safe
installation and operation of the appliance.
Unpacking and levelling
Unpacking
1. Remove the washing machine from its
packaging.
2. Make sure that the washing machine has
not been damaged during the transportation
process. If it has been damaged, contact the
retailer and do not proceed any further with
the installation process.
3. Remove the 4
protective screws
(used during
transportation)
and the rubber
washer with the
corresponding
spacer, located on
the rear part of the
appliance (see figure).
4. Close off the holes using the plastic plugs
provided.
5. Keep all the parts in a safe place: you will
need them again if the washing machine
needs to be moved to another location.
! Packaging materials should not be used as
toys for children.
Levelling
1. Install the washing
machine on a flat
sturdy floor, without
resting it up against
walls, furniture
cabinets or anything
else.
compensate for any unevenness by tightening
or loosening the adjustable front feet (see
figure); the angle of inclination, measured in
relation to the worktop, must not exceed 2°.
Levelling the machine correctly will provide
it with stability, help to avoid vibrations and
excessive noise and prevent it from shifting
while it is operating. If it is placed on carpet or
a rug, adjust the feet in such a way as to allow
a sufficient ventilation space underneath the
washing machine.
Connecting the electricity and
water supplies
Connecting the water inlet hose
1. Connect the inlet
hose by screwing it to
a cold water tap using
a 3/4 gas threaded
connection (see
figure).
Before performing
the connection, allow
the water to run freely
until it is perfectly
clear.
2. Connect the
inlet hose to the
washing machine by
screwing it onto the
corresponding water
inlet of the appliance,
which is situated on
the top right-hand
side of the rear part
of the appliance (see
figure).
3. Make sure that the hose is not folded over
or bent.
! The water pressure at the tap must fall within
the range of values indicated in the Technical
data table (see next page).
! If the inlet hose is not long enough, contact a
specialised shop or an authorised technician.
! Never use second-hand hoses.
! Use the ones supplied with the machine.
2. If the floor is
not perfectly level,
2
Page 3
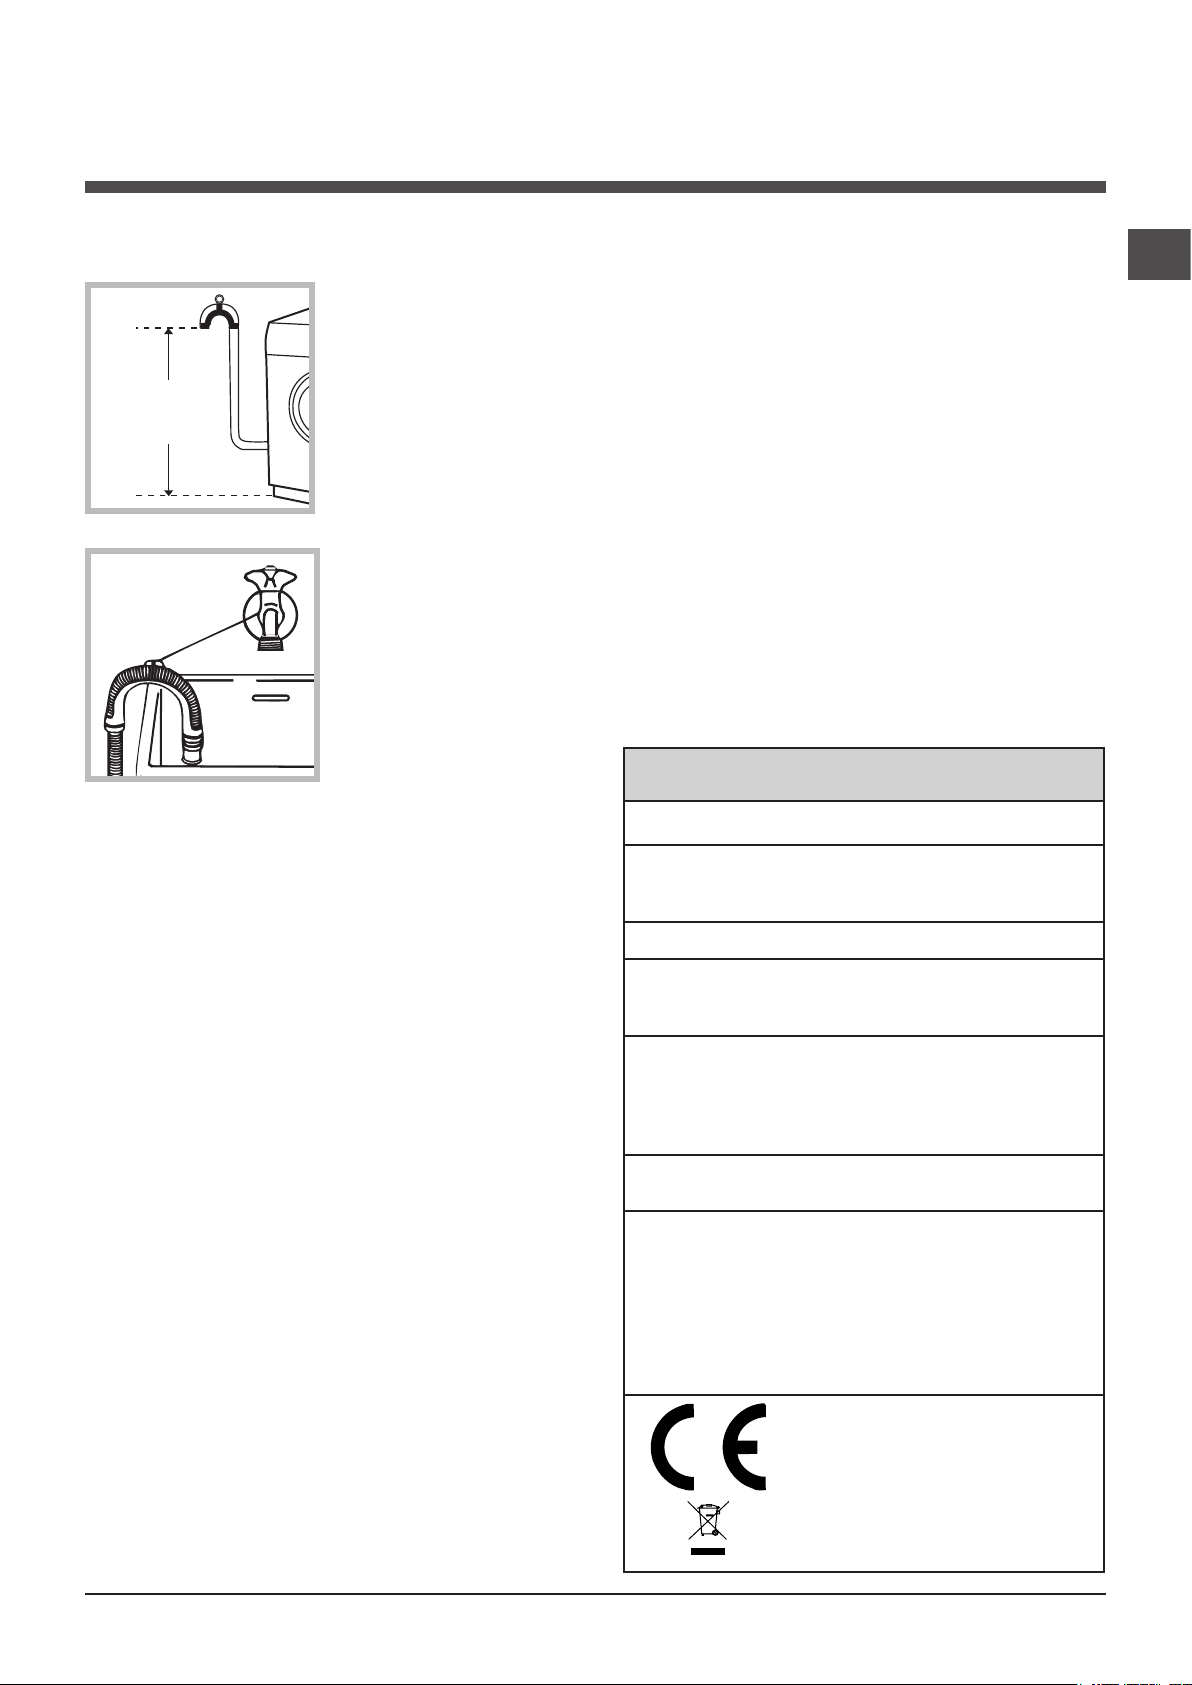
Connecting the drain hose
65 - 100 cm
Connect the drain
hose, without bending
it, to a drain duct or
a wall drain situated
between 65 and 100
cm from the floor;
alternatively, placed
it over the edge
of a basin, sink or
tub, fastening the
duct supplied to
the tap (see figure).
The free end of the
hose should not be
underwater.
! When the washing machine has been
installed, the electricity socket must remain
within easy reach.
! Do not use extension cords or multiple
sockets.
! The cable should not be bent or
compressed.
! The power supply cable must only be
replaced by authorised technicians.
Warning! The company shall not be held
responsible in the event that these standards
are not observed.
The first wash cycle
Once the appliance has been installed, and
before you use it for the first time, run a
wash cycle with detergent and no laundry,
using wash cycle number “Auto Clean” (see
“Cleaning the washing machine”).
Technical data
GB
! We advise against the use of hose
extensions; if it is absolutely necessary, the
extension must have the same diameter as the
original hose and must not exceed 150 cm in
length.
Electrical connections
Before plugging the appliance into the
electricity socket, make sure that:
• the socket is earthed and complies with all
applicable laws;
• the socket is able to withstand the
maximum power load of the appliance as
indicated in the Technical data table (see
opposite);
• the power supply voltage falls within the
values indicated in the Technical data table
(see opposite);
• the socket is compatible with the plug of
the washing machine. If this is not the case,
replace the socket or the plug.
! The washing machine must not be installed
outdoors, even in covered areas. It is
extremely dangerous to leave the appliance
exposed to rain, storms and other weather
conditions.
Model
Dimensions
Capacity
Electrical
connections
Water connections
Spin speed
Test wash
cycles in
accordance with
directives
1061/2010
1015/2010
WMSG 602
width 59.5 cm
height 85 cm
depth 42,5 cm
from 1 to 6 kg
please refer to the technical
data plate fixed to the machine
maximum pressure
1 MPa (10 bar)
minimum pressure
0.05 MPa (0.5 bar)
drum capacity 40 litres
up to 1000 rotations per
minute
programme 3
;
Cotton Standard 60°C;
programme 4
;
Cotton Standard 40°C.
This appliance conforms to
the following EC Directives:
- 2004/108/EC (Electromagnetic Compatibility)
- 2006/95/EC (Low Voltage)
- 2012/19/EU
3
Page 4
Care and maintenance
1
2
GB
Cutting off the water and
electricity supplies
• Turn off the water tap after every wash cycle.
This will limit wear on the hydraulic system
inside the washing machine and help to
prevent leaks.
• Unplug the washing machine when cleaning
it and during all maintenance work.
Cleaning the washing machine
• The outer parts and rubber components
of the appliance can be cleaned using a soft
cloth soaked in lukewarm soapy water. Do not
use solvents or abrasives.
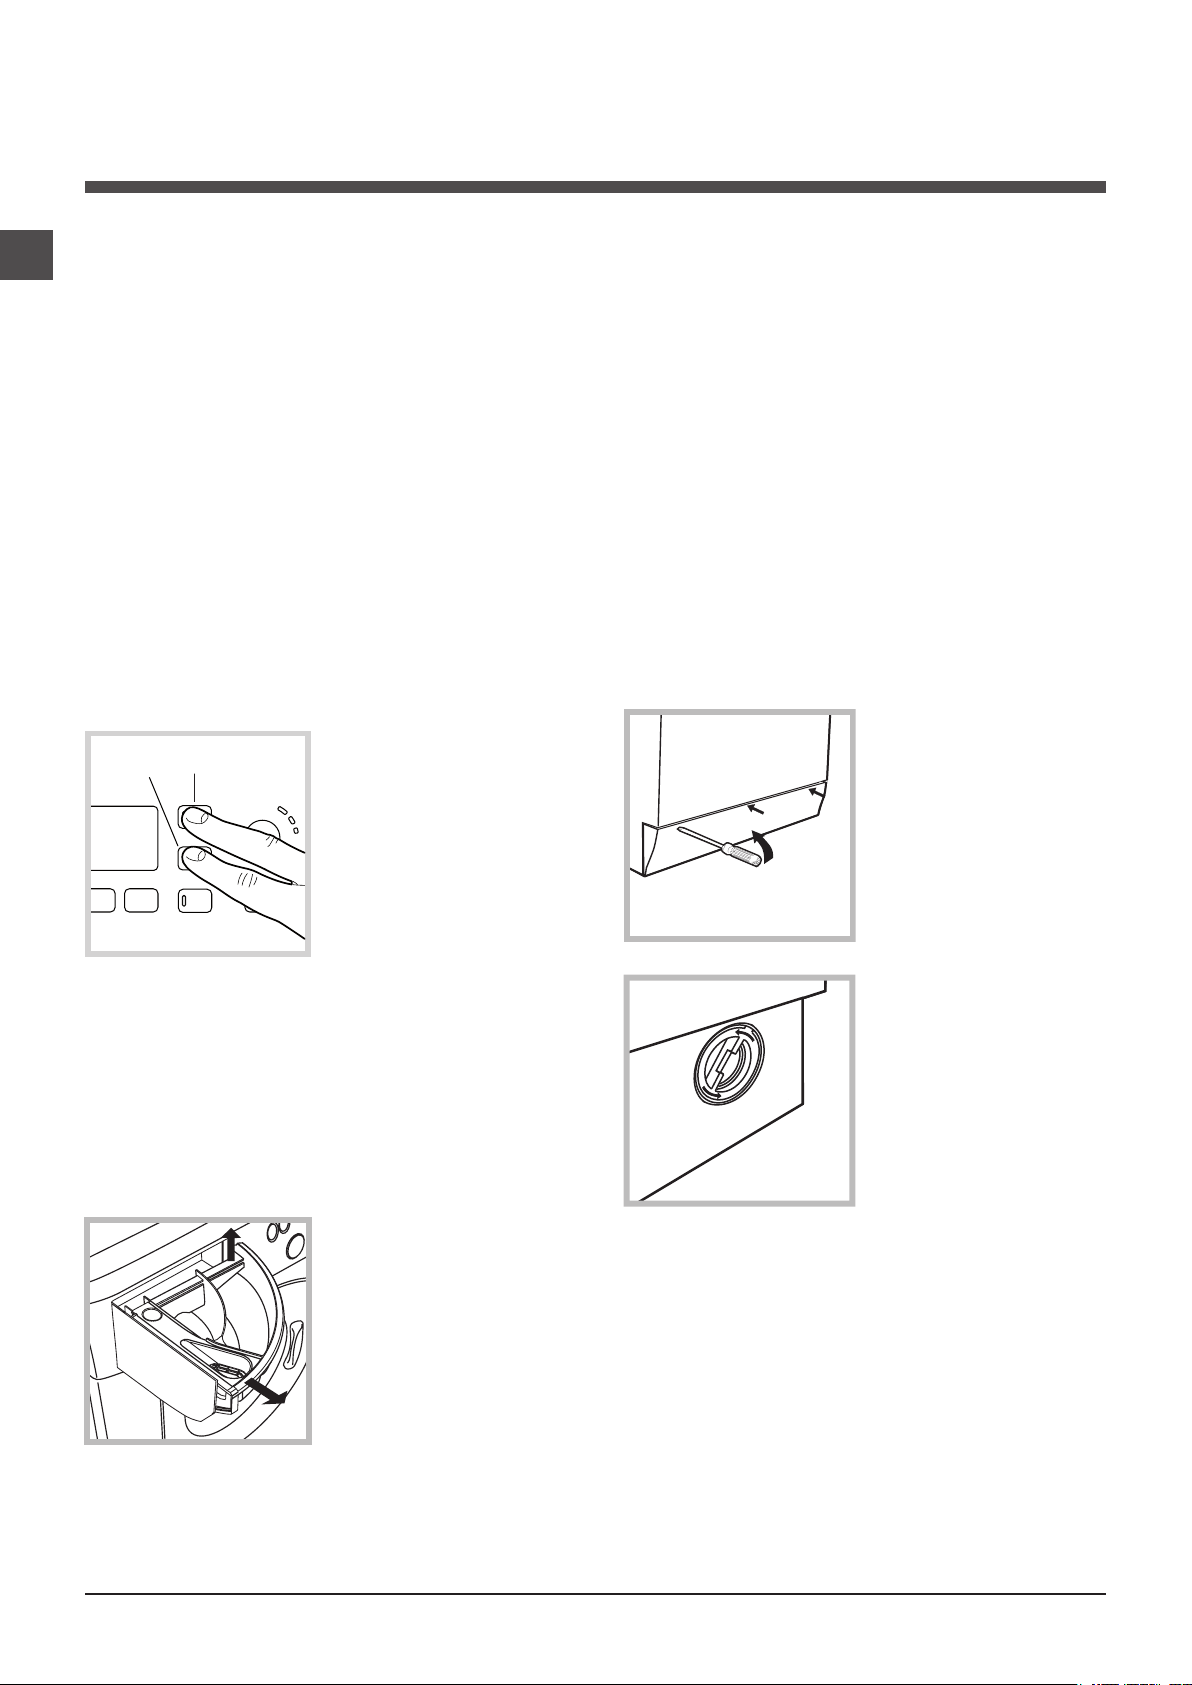
• The washing machine has a “Auto Clean”
programme for its internal parts that must be
run with no load in the drum.
B
A
cleaning programme every 40 wash cycles.
To start the programme press buttons A and
B simultaneously for 5 seconds (see figure).
The programme will start automatically and will
run for about 70 minutes. To stop the cycle
press the START/PAUSE button.
To help the wash cycle
you may want to use
either the detergent
(i.e. a quantity 10%
the quantity specified
for lightly-soiled
garments) or special
additives to clean the
washing machine. We
recommend running a
Caring for the door and drum of
your appliance
• Always leave the porthole door ajar in order
to prevent unpleasant odours from forming.
Cleaning the pump
The washing machine is fitted with a selfcleaning pump which does not require any
maintenance. Sometimes, small items (such as
coins or buttons) may fall into the pre-chamber
which protects the pump, situated in its bottom
part.
! Make sure the wash cycle has finished and
unplug the appliance.
To access the pre-chamber:
1. using a
screwdriver, remove
the cover panel on
the lower front part of
the washing machine
(see figure);
2. unscrew the lid
by rotating it anticlockwise (see figure):
a little water may
trickle out. This is
perfectly normal;
Cleaning the detergent dispenser
drawer
Remove the dispenser
by raising it and
pulling it out (see
figure).
Wash it under running
water; this operation
should be repeated
frequently.
4
3. clean the inside thoroughly;
4. screw the lid back on;
5. reposition the panel, making sure the hooks
are securely in place before you push it onto
the appliance.
Checking the water inlet hose
Check the inlet hose at least once a year. If
there are any cracks, it should be replaced
immediately: during the wash cycles, water
pressure is very strong and a cracked hose
could easily split open.
! Never use second-hand hoses.
Page 5
Precautions and tips
20
! This washing machine was designed and constructed
in accordance with international safety regulations. The
following information is provided for safety reasons and
must therefore be read carefully.
General safety
• This appliance was designed for domestic use only.
• This appliance can be used by children
aged from 8 years and above and
persons with reduced physical, sensory or
mental capabilities or lack of experience
and knowledge if they have been given
supervision or instruction concerning use of
the appliance in a safe way and understand
the hazards involved. Children shall not
play with the appliance. Cleaning and user
maintenance shall not be made by children
without supervision.
• Do not touch the machine when barefoot or with wet or
damp hands or feet.
• Do not pull on the power supply cable when unplugging
the appliance from the electricity socket. Hold the plug
and pull.
• Do not open the detergent dispenser drawer while the
machine is in operation.
• Do not touch the drained water as it may reach
extremely high temperatures.
• Never force the porthole door. This could damage the safety
lock mechanism designed to prevent accidental opening.
• If the appliance breaks down, do not under any
circumstances access the internal mechanisms in an
attempt to repair it yourself.
• Always keep children well away from the appliance while
it is operating.
• The door can become quite hot during the wash cycle.
• If the appliance has to be moved, work in a group of two
or three people and handle it with the utmost care. Never
try to do this alone, because the appliance is very heavy.
• Before loading laundry into the washing machine, make
sure the drum is empty.
Disposal
• Disposing of the packaging materials: observe local
regulations so that the packaging may be re-used.
• The European Directive 2012/19/EU on Waste Electrical
and Electronic Equipment, requires that old household
electrical appliances must not be disposed of in the
normal unsorted municipal waste stream. Old appliances
must be collected separately in order to optimise the
recovery and recycling of the materials they contain and
reduce the impact on human health and the environment.
The crossed out “wheeled bin” symbol on the product
reminds you of your obligation, that when you dispose of
the appliance it must be separately collected. Consumers
should contact their local authority or retailer for information
concerning the correct disposal of their old appliance.
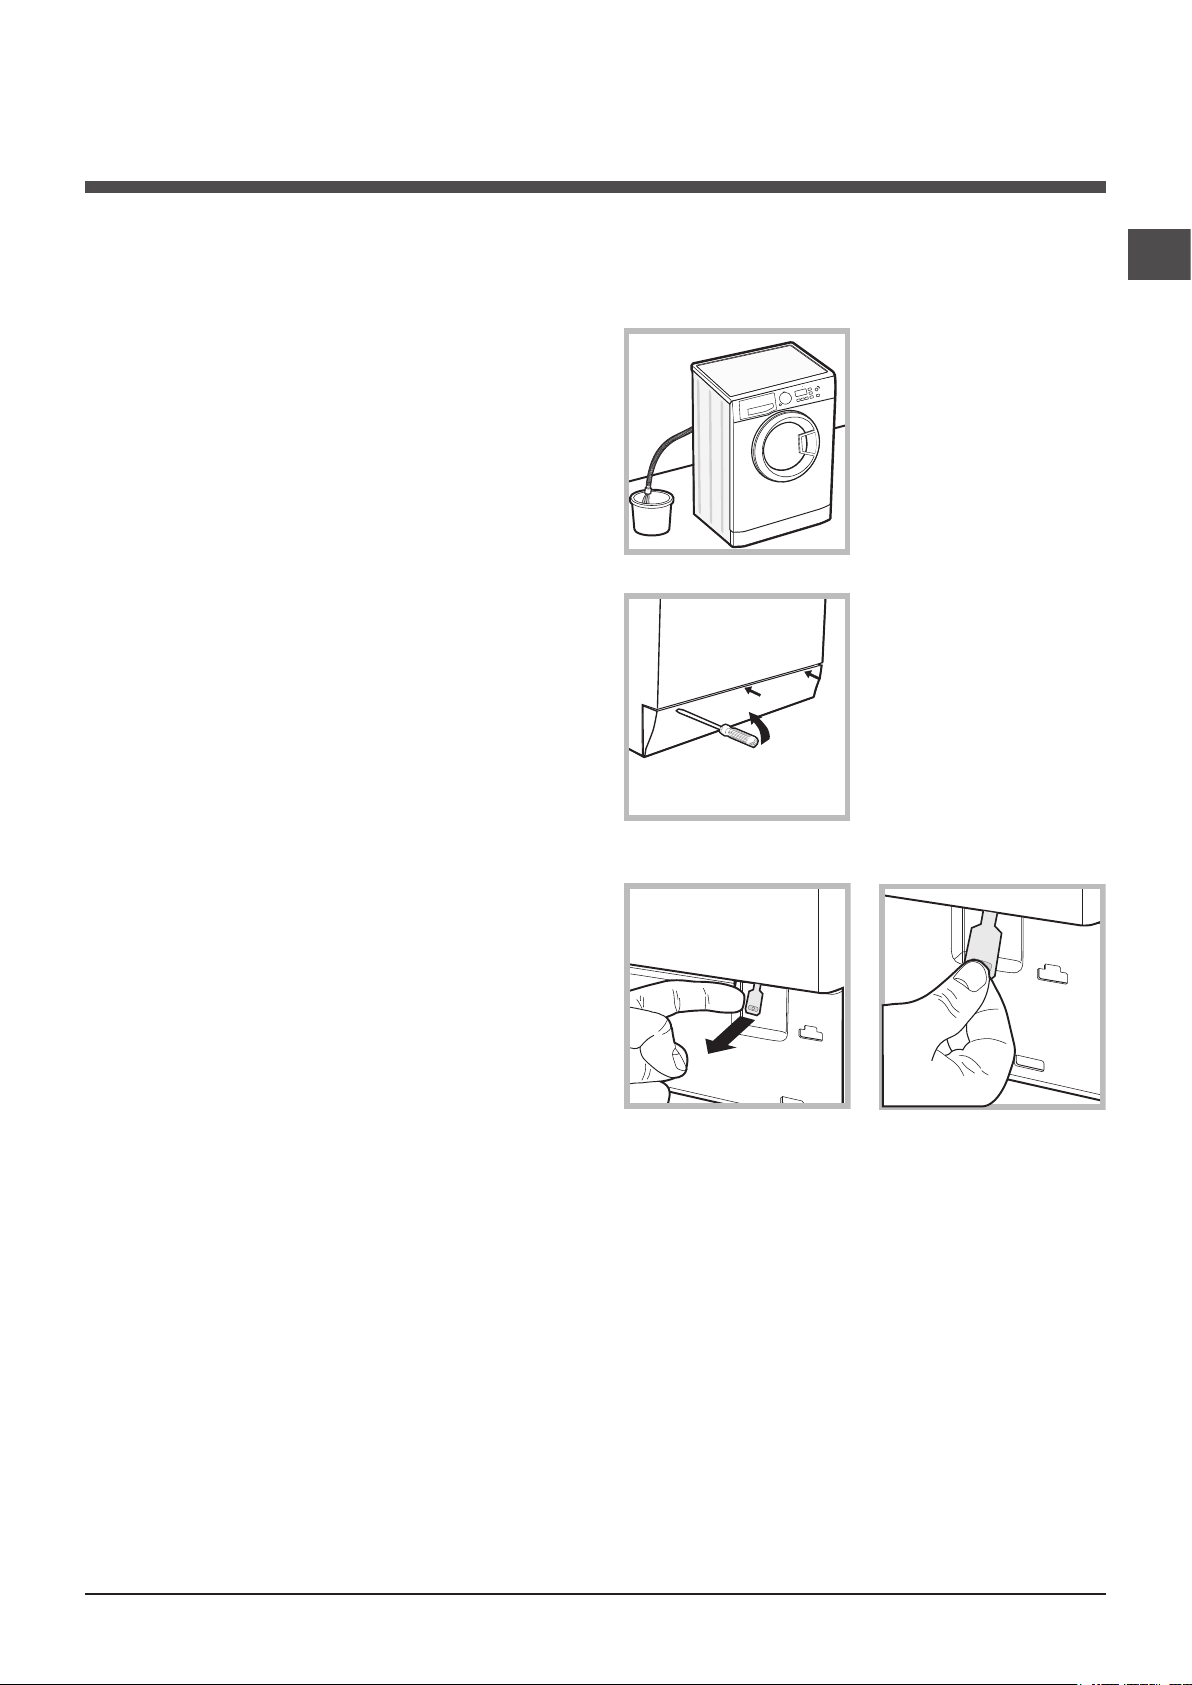
Opening the porthole door manually
In the event that it is not possible to open the porthole
door due to a powercut, and if you wish to remove the
laundry, proceed as follows:
1. remove the plug from the
electrical socket.
2. make sure the water level
inside the machine is lower
than the door opening; if
it is not, remove excess
water using the drain hose,
collecting it in a bucket as
indicated in the figure.
3. using a screwdriver,
remove the cover panel on
the lower front part of the
washing machine (see figure).
4. pull outwards using the tab as indicated in the figure,
until the plastic tie-rod is freed from its stop position; pull
downwards and open the door at the same time.
5. reposition the panel, making sure the hooks are securely
in place before you push it onto the appliance.
GB
5
Page 6

Description of the washing
machine
GB
Control panel
Detergent dispenser drawer
ON/OFF
button
SELECTOR
TEMPERATURE
button
WASH
CYCLE
KNOB
DISPLAY
SPIN
button
OPTION
buttons and
indicator lights
CHILD
LOCK
button
DELAY
TIMER
button
CLEANING
ACTION
button
START/PAUSE
button and indicator
light
Detergent dispenser drawer: used to dispense
detergents and washing additives (see “Detergents and
laundry”).
ON/OFF button: press this briefly to switch the
machine on or off. The START/PAUSE indicator light which
flashes slowly in a green colour shows that the machine is
switched on. To switch off the washing machine during the
wash cycle, press and hold the button for approximately 3
seconds; if the button is pressed briefly or accidentally the
machine will not switch off.
If the machine is switched off during a wash cycle, this
wash cycle will be cancelled.
WASH CYCLE SELECTOR KNOB: used to set the
desired wash cycle (see “Table of programmes and wash
cycles”).
OPTION buttons and indicator lights: press to select the
available options. The indicator light corresponding to the
selected option will remain lit.
CLEANING ACTION
wash intensity.
TEMPERATURE button: press to reduce or
completely exclude the temperature; the value appears on
the display.
button : to select the desired
DELAYED START button: press to set a delayed start
for the selected wash cycle; the delay period appears on
the display.
START/PAUSE button and indicator light: when the green
indicator light flashes slowly, press the button to start a
wash cycle. Once the cycle has begun the indicator light
will remain lit in a fixed manner. To pause the wash cycle,
press the button again; the indicator light will flash in an
amber colour. If the symbol is not illuminated, the door
may be opened. To start the wash cycle from the point at
which it was interrupted, press the button again.
CHILD LOCK button : to activate the control panel
lock, press and hold the button for approximately 2
seconds. When the symbol is illuminated, the control
panel is locked (apart from the ON/OFF button). This
means it is possible to prevent wash cycles from being
modified accidentally, especially where there are children in
the home. To deactivate the control panel lock, press and
hold the button for approximately 2 seconds.
Standby mode
This washing machine, in compliance with new energy
saving regulations, is fitted with an automatic standby
system which is enabled after about 30 minutes if no
activity is detected. Press the ON-OFF button briefly and
wait for the machine to start up again.
SPIN button: press to reduce or completely exclude
the spin cycle; the value appears on the display.
6
Page 7
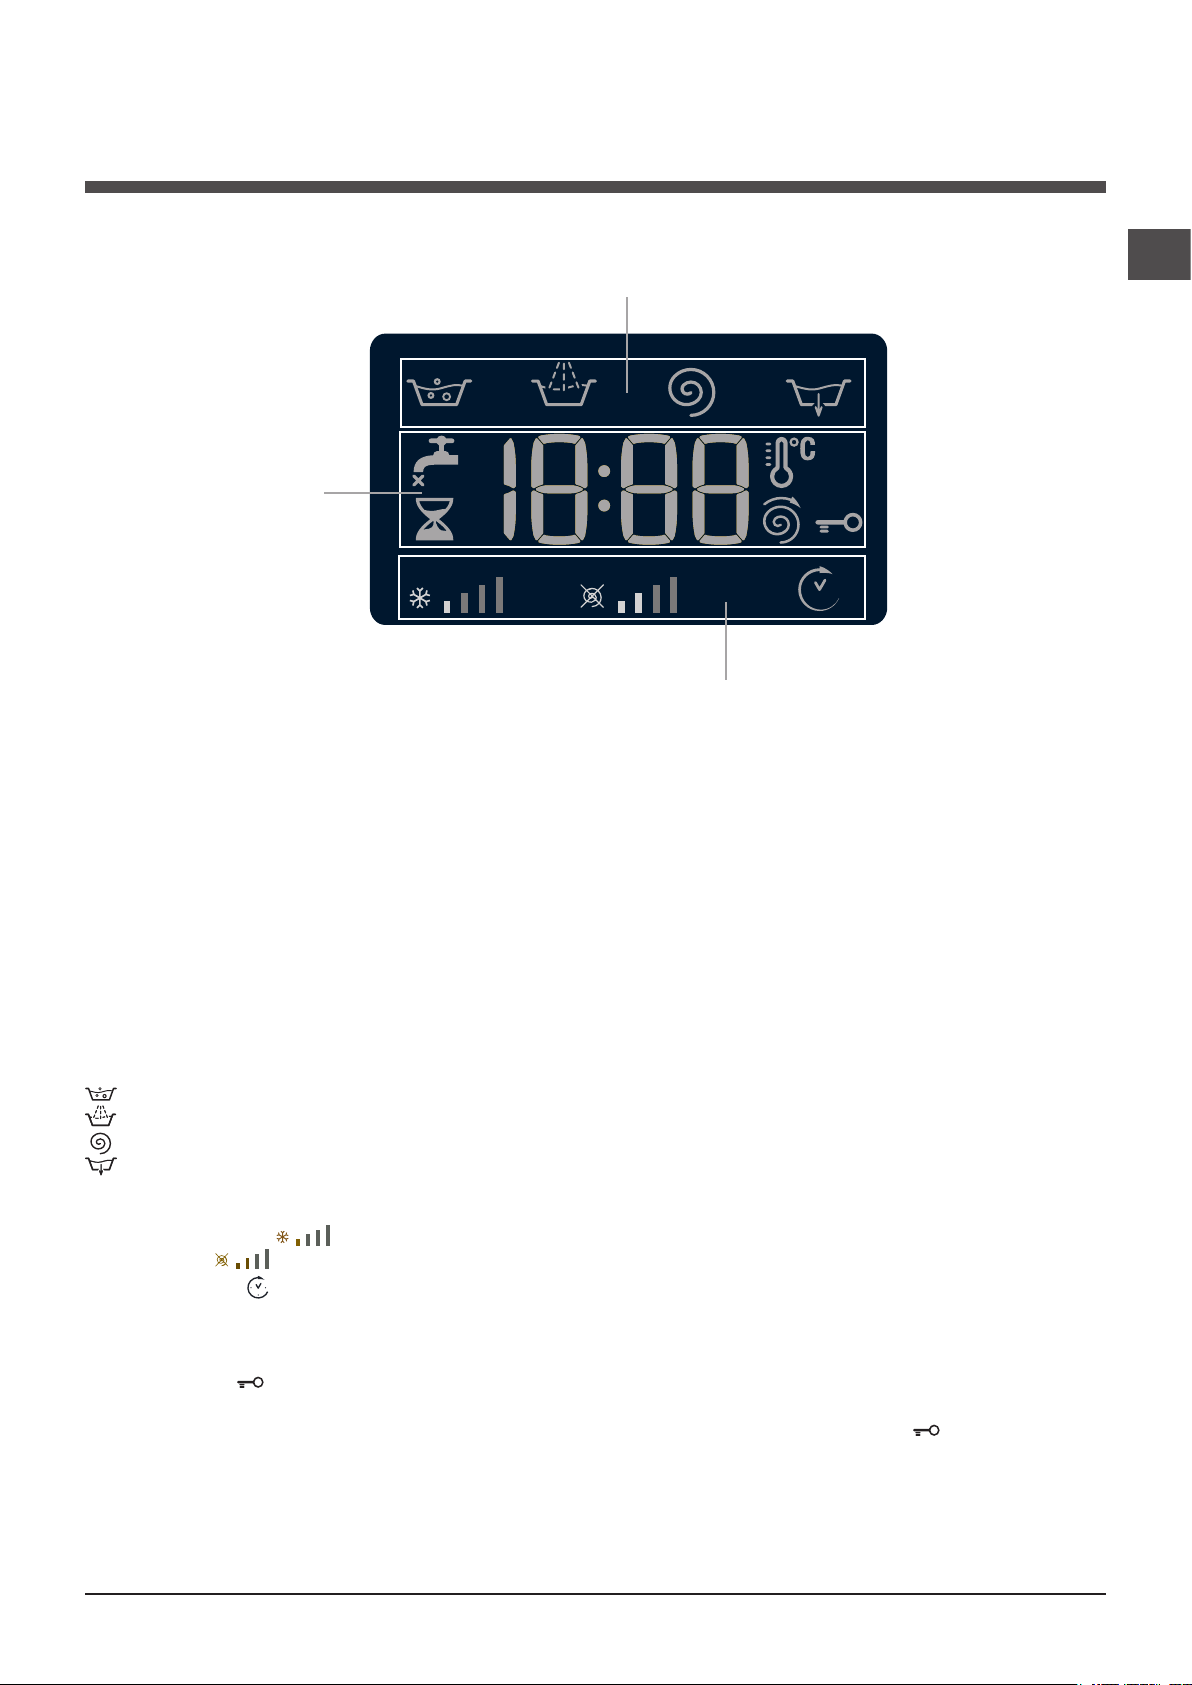
Display
GB
B
A
C
The display is useful when programming the machine and provides a great deal of information.
The duration of the available wash cycles and the remaining time of a running cycle appear in section A; if the DELAYED
START option has been set, the countdown to the start of the selected wash cycle will appear.
Pressing the corresponding button allows you to view the maximum spin speed and temperature values attained by the
machine during the set wash cycle, or the values selected most recently, if these are compatible with the set wash cycle.
The “wash cycle phases” corresponding to the selected wash cycle and the “wash cycle phase” of the running wash cycle
appear in section B:
Main wash
Rinse
Spin
Pump out
The icons corresponding to “temperature”, “spin” and “delayed start” (working from the left) are displayed in section C.
The “temperature” bars indicate the maximum temperature level which may be selected for the set cycle.
The “spin” bars indicate the maximum spin level which may be selected for the set cycle.
The “delay” symbol , when lit, indicates that the set “delayed start” value has appeared on the display.
DOOR LOCKED indicator light:
The lit symbol indicates that the door is locked. To prevent any damage, wait until the symbol turns off before opening the door.
To open the door while a cycle is in progress, press the START/PAUSE button; if the DOOR LOCKED symbol is switched
off the door may be opened.
7
Page 8
Running a wash cycle
GB
1. SWITCH THE MACHINE ON. Press the button;
the START/PAUSE indicator light will flash slowly in a
green colour.
2. LOAD THE LAUNDRY. Open the porthole door.
Load the laundry, making sure you do not exceed
the maximum load value indicated in the table of
programmes and wash cycles on the following page.
3. MEASURE OUT THE DETERGENT. Pull out the
detergent dispenser drawer and pour the detergent into
the relevant compartments as described in “Detergents
and laundry”.
4. CLOSE THE DOOR.
5. SELECT THE WASH CYCLE. Use the WASH CYCLE
SELECTOR knob to select the desired wash cycle. A
temperature and spin speed is set for each wash cycle;
these values may be adjusted. The duration of the cycle
will appear on the display.
6. CUSTOMISE THE WASH CYCLE. Use the relevant
buttons:
Modify the temperature and/or spin
speed. The machine automatically displays the
maximum temperature and spin speed values set for
the selected cycle, or the most recently-used settings
if they are compatible with the selected cycle. The
temperature can be decreased by pressing the
button, until the cold wash “OFF” setting is reached.
The spin speed may be progressively reduced by
pressing the button, until it is completely excluded
(the “OFF” setting). If these buttons are pressed again,
the maximum values are restored.
! Exception: if the 3 programme is selected, the
temperature can be increased up to a value of 90°C.
Setting a delayed start.
To set a delayed start for the selected cycle, press the
corresponding button repeatedly until the required delay
period has been reached. When this option has been
activated, the symbol lights up on the display. To
remove the delayed start setting, press the button until
the text “OFF” appears on the display.
Set the desired wash intensity.
Option makes it possible to optimise washing based
on the level of soil in the fabrics and on desired wash
cycle intensity.
Select the wash programme: the cycle will be
automatically set to “Normal” as optimised for garments
with an average level of soil (this setting is not applicable
to the “Wool” cycle, which is automatically set to
“Delicate”).
For heavily-soiled garments press button until
the “Intensive” level is reached. This level ensures
a high-performance wash due to a larger quantity of
water used in the initial phase of the cycle and due to
increased drum rotation. It is useful when removing the
most stubborn stains.
It can be used with or without bleach. If you desire
bleaching, insert the extra tray compartment (4) into
compartment 1. When pouring in the bleach, be careful
not to exceed the “max” level marked on the central
pivot (see figure pag. 10).
For lightly-soiled garments or a more delicate treatment
of the fabrics, press button until the “Delicate”
level is reached. The cycle will reduce drum rotation
to ensure washing results that are perfect for delicate
garments.
Modify the cycle settings.
• Press the button to enable the option; the indicator
light corresponding to the button will switch on.
• Press the button again to disable the option; the
indicator light will switch off.
! If the selected option is not compatible with the set
wash cycle, the indicator light will flash and the option
will not be activated.
! If the selected option is not compatible with a previously
selected one, the indicator light corresponding to the first
function selected will flash and only the second option will
be activated; the indicator light for the option which has
been activated will be illuminated.
! The options may affect the recommended load value
and/or the duration of the cycle.
7. START THE WASH CYCLE. Press the START/
PAUSE button. The corresponding indicator light will
turn green, remaining lit in a fixed manner, and the door
will be locked (the DOOR LOCKED symbol will
be lit). To change a wash cycle while it is in progress,
pause the washing machine using the START/PAUSE
button (the START/PAUSE indicator light will flash
slowly in an amber colour); then select the desired cycle
and press the START/PAUSE button again.
To open the door while a cycle is in progress, press
the START/PAUSE button; if the DOOR LOCKED
symbol is switched off the door may be opened. Press
the START/PAUSE button again to restart the wash
cycle from the point at which it was interrupted.
8. THE END OF THE WASH CYCLE. This will be
indicated by the text “END” on the display; when the
DOOR LOCKED symbol switches off the door may
be opened. Open the door, unload the laundry and
switch off the machine.
! If you wish to cancel a cycle which has already begun,
press and hold the button. The cycle will be stopped
and the machine will switch off.
8
Page 9

Wash cycles and options
Table of programmes and wash cycles
Description of the wash cycle
Wash cycles
Anti Stain
1
Whites
2
3
Cotton Standard 60° (1): heavily soiled whites and resistant colours.
Cotton Standard 40° (2): lightly soiled resistant and delicate colours.
4
Synthetics: heavily soiled resistant colours.
5
Synthetics (4): lightly soiled resistant colours.
5
Anti allergy
6
Baby
7
Wool: for wool, cashmere, etc.
8
Delicates
9
Fast Wash 60’: to refresh normal soiled garments quickly (not
10
suitable for wool, silk and clothes which require washing by hand).
Cotton Standard 20°: lightly soiled resistant and delicate colours.
11
Eco Cottons
12
Eco Synthetics
13
Eco Fast 30’
14
Rinse
Spin and Pump out
The length of cycle shown on the display or in this booklet is an estimation only and is calculated assuming standard working conditions. The actual duration can vary according
to factors such as water temperature and pressure, the amount of detergent used, the amount and type of load inserted, load balancing and any wash options selected.
1) Test wash cycle in compliance with directive 1061/2010: set wash cycle 3 with a temperature of 60°C.
This cycle is designed for cotton loads with a normal soil level and is the most efficient in terms of both electricity and water consumption; it should be used for garments which can be washed at
60°C . The actual washing temperature may differ from the indicated value.
2) Test wash cycle in compliance with directive 1061/2010: set wash cycle 4 with a temperature of 40°C.
This cycle is designed for cotton loads with a normal soil level and is the most efficient in terms of both electricity and water consumption; it should be used for garments which can be washed at
40°C . The actual washing temperature may differ from the indicated value.
3) At 60 °C the “Prewash” function cannot be selected.
For all Test Institutes:
2) Long wash cycle for cottons: set wash cycle 4 with a temperature of 40°C.
4) Long wash cycle for synthetics: set wash cycle 5 with a temperature of 40°C.
Max.
temp.
(°C)
40° 1000
60° 1000
60°
(Max. 90°)
40° 1000 -
60° 800
40° 800
60° 1000 40° 1000
40° 800 30° 0 -
60° 1000 -
20° 1000 -
Cold
Water
Cold
Water
Cold
Water
Max.
spe-
ed
(rpm)
1000
1000 -
800 -
800 -
- 1000 - - -
- 1000 - - - - 6 - - - 16’
Detergents
Wash
Prewash
(3)
Bleach
-
-
-
-
-
-
-
-
Fabric
softener
3 - - - 170’
3 - - - 165’
pness%
Max. load (kg)
Energy con-
Residual dam-
6 62 0.91 50 190’
6 62 0.80 64 175’
3 44 0.70 40 105’
3 44 0.47 38 95’
3 - - - 165’
3 - - - 140’
1 - - - 55’
1 - - - 75’
3.5 62 0.71 35 60’
5 - - - 170’
6 62 0.15 54 85’
3 48 0.06 25 70’
3 71 0.04 32 30’
6 - - - 36’
Total water lt
sumptionkWh
GB
Cycle duration
Wash options
Extra Rinse
By selecting this option, the efficiency of the rinse is
increased and optimal detergent removal is guaranteed. It
is particularly useful for sensitive skin.
! It cannot be used in conjunction with wash cycles 6, 9,
14, .
Prewash
If this function is selected, the pre-wash cycle will run; this
is useful for removing stubborn stains.
N.B.: Put the detergent in the relevant compartment.
! It cannot be used in conjunction with wash cycles
3 (60°), 4, 6, 8, 9, 10, 11, 12, 13, 14, , .
9
Page 10

Detergents and laundry
M
AX
1
2
4
3
A
B
GB
Detergent dispenser drawer
Successful washing results also depend on the correct
dose of detergent: adding too much detergent will not
necessarily result in a more efficient wash, and may in
fact cause build up on the inside of your appliance and
contribute to environmental pollution.
! Use powder detergent for white cotton garments, for prewashing, and for washing at temperatures over 60°C.
! Follow the instructions given on the detergent packaging.
! Do not use hand washing detergents; they create too
much foam.
Open the detergent
dispenser drawer and pour
in the detergent or washing
additive, as follows.
compartment 1: Prewash detergent (powder)
Before pouring in the
detergent, make sure that
extra compartment 4 has
been removed.
compartment 2:
Detergent for the wash cycle (powder or liquid)
If liquid detergent is used, it is recommended that the
removable plastic partition A (supplied) be used for proper
dosage.
If powder detergent is used, place the partition into slot B.
compartment 3: Additives (fabric softeners, etc.)
The fabric softener should not overflow the grid.
extra compartment 4: Bleach
Preparing the laundry
• Divide the laundry according to:
- the type of fabric/the symbol on the label
- the colours: separate coloured garments from whites.
• Empty all garment pockets and check the buttons.
• Do not exceed the listed values, which refer to
the weight of the laundry when dry: see “Table of
programmes and wash cycles”.
How much does your laundry weigh?
1 sheet 400-500 g
1 pillow case 150-200 g
1 tablecloth 400-500 g
1 bathrobe 900-1,200 g
1 towel 150-250 g
Special wash cycles
Anti Stain: the programme 1 is suitable to heavily-soiled
garments with resistant colours. It ensures a washing class
that is higher than the standard class (A class).
When running the programme, do not mix garments of
different colours. We recommend the use of powder
detergent. Pre-treatment with special additives is
recommended if there are obstinate stains.
Whites: use this cycle 2 to wash white clothes. The
programme is designed to maintain the brightness of white
clothes over time. Use powder detergent for best results.
Anti allergy: use programme 6 to remove major allergens
such as pollen, mites, cat’s and dog’s hair.
Baby: use the special wash cycle 7 to remove the soiling
typically caused by babies, while removing all traces of
detergent from nappies in order to prevent the delicate
skin of babies from suffering allergic reactions. The cycle
has been designed to reduce the amount of bacteria by
using a greater quantity of water and optimising the effect
of special disinfecting additives added to the detergent.
Wool: the wool wash cycle on this Hotpoint-Ariston
machine has been tested and approved by The Woolmark
Company for washing wool garments labelled as hand
washable provided that the garments are washed
according to the instructions on the garment label and
those issued by the manufacturer of this washing machine.
Hotpoint-Ariston is the first washing machine brand to be
approved by The Woolmark Company for Apparel CarePlatinum for its washing performance and consumption of
energy and water. (M1128)
Delicates: use programme 9 to wash very delicate
garments with decorative features, such as diamantes and
sequins.
To wash silk garments and curtains select the cycle 9 and
set the “Delicate” level from option .
We recommend turning the garments inside out before
washing and placing small items into the special bag
for washing delicates. Use liquid detergent on delicate
garments for best results.
Eco cycles
The Eco Cycles assure energy saving by eliminating the
need of heating water and it’s an advantage both to
your energy bill and the environment! These innovative
Eco programmes (
and
14
Eco Fast 30’) are available for various fabrics
12
Eco Cottons,
13
Eco Synthetics
and different quantity of garment; they have been
designed to guarantee a high cleaning action even at
low temperature and can be used for lightly to medium
soiled loads. Eco Cycles give the best results thanks
to an intensified wash action, water optimization and
are carried out in the same average time of a standard
cycle. For the best washing results with Eco Cycles we
recommend the usage of a liquid detergent.
Cotton Standard 20° ideal for lightly soiled cotton
loads. The effective performance levels achieved at cold
temperatures, which are comparable to washing at 40°,
are guaranteed by a mechanical action which operates at
varying speed, with repeated and frequent peaks.
Load balancing system
Before every spin cycle, to avoid excessive vibrations
before every spin and to distribute the load in a uniform
manner, the drum rotates continuously at a speed which
is slightly greater than the washing rotation speed. If,
after several attempts, the load is not balanced correctly,
the machine spins at a reduced spin speed. If the load is
excessively unbalanced, the washing machine performs
the distribution process instead of spinning. To encourage
improved load distribution and balance, we recommend
small and large garments are mixed in the load.
10
Page 11

Troubleshooting
Your washing machine could occasionally fail to work. Before contacting the Technical Assistance Service (see “ Service”),
make sure that the problem cannot be solved easily using the following list.
Problem:
The washing machine does not
switch on.
The wash cycle does not start.
The washing machine does not fill
with water (the text “H2O” flashes
on the display).
The washing machine continuously
takes in and drains water.
The washing machine does not
drain or spin.
Possible causes / Solutions:
• The appliance is not plugged into the socket fully, or not enough to make contact.
• There is no power in the house.
• The washing machine door is not closed properly.
• The ON/OFF button has not been pressed.
• The START/PAUSE button has not been pressed.
• The water tap has not been opened.
• A delayed start has been set.
• The water inlet hose is not connected to the tap.
• The hose is bent.
• The water tap has not been opened.
• There is no water supply in the house.
• The pressure is too low.
• The START/PAUSE button has not been pressed.
• The drain hose is not fitted at a height between 65 and 100 cm from the floor
(see “Installation”).
• The free end of the hose is under water (see “Installation”).
• The wall drainage system is not fitted with a breather pipe.
If the problem persists even after these checks, turn off the water tap, switch the
appliance off and contact the Technical Assistance Service. If the dwelling is on one
of the upper floors of a building, there may be problems relating to water drainage,
causing the washing machine to fill with water and drain continuously. Special antidraining valves are available in shops and help to prevent this inconvenience.
• The wash cycle does not include draining: some cycles require the draining
process to be enabled manually.
• The drain hose is bent (see “Installation”).
• The drainage duct is clogged.
GB
The washing machine vibrates a
lot during the spin cycle.
The washing machine leaks.
The “option” and START/PAUSE
indicator lights flash rapidly and an
error code appears on the display (e.g.:
F-01, F-..).
There is too much foam.
• The drum was not unlocked correctly during installation (see “Installation”).
• The washing machine is not level (see “Installation”).
• The washing machine is trapped between cabinets and walls (see “Installation”).
• The water inlet hose is not screwed on properly (see “Installation”).
• The detergent dispenser drawer is blocked (for cleaning instructions, see “Care
and maintenance”).
• The drain hose is not fixed properly (see “Installation”).
• Switch off the machine and unplug it, wait for approximately 1 minute and then
switch it back on again.
If the problem persists, contact the Technical Assistance Service.
• The detergent is not suitable for machine washing (it should display the text “for
washing machines” or “hand and machine wash”, or the like).
• Too much detergent was used.
11
Page 12

Service
GB
Before contacting the Technical Assistance Service:
• Check whether you can solve the problem alone (see “Troubleshooting”);
• Restart the wash cycle to check whether the problem has been solved;
• If this is not the case, contact an authorised Technical Assistance Centre.
! Always request the assistance of authorised technicians.
Have the following information to hand:
• the type of problem;
• the appliance model (Mod.);
• the serial number (S/N).
This information can be found on the data plate applied to the rear of the washing machine, and can also be found on the
front of the appliance by opening the door.
12
Page 13

Довiдник користувача
ПРАЛЬНА МАШИНА
UA
Українська
WMSG 602
Зміст
Встановлення, 14-15
Розпакування й вирiвнювання
Підключення води й електроенергії
Перший цикл прання
Технiчнi данi
Опис пральної машини, 16-17
Панель команд
Дисплей
Як здійснювати цикл прання, 18
Програми й опції, 19
Таблиця програм
Опції прання
Пральні засоби і білизна, 20
Касета з пральним засобом
Підготовка білизни
Спецiальнi програми
Запобіжні заходи та поради, 21
Загальна безпека
Утилiзацiя
Ручне відкривання дверцят люку
UA
Технічне обслуговування та догляд, 22
Відключення води й електричного живлення
Очищення пральної машини
Чистка касети для миючих засобів
Догляд за люком та барабаном
Миття насосу
Контроль шланга для подачі води
Несправності та засоби їх усунення, 23
Допомога, 24
13
Page 14

Встановлення
UA
! Зберігайте дану брошуру, щоб мати нагоду
звернутися до неї у будь-який момент. У раз продажу,
передачі іншій особі або переїзду переконайтеся в
тому, що інструкція перебуває разом із пральною
машиною й новий власник може ознайомитися з її
принципами роботи й відповідними запобіжними
заходами.
! Уважно вивчіть інструкцію: в ній міститься важлива
інформація щодо встановлення, використання та
безпеки.
Розпакування й вирiвнювання
Розпакування
1. Розпакування пральної машини
2. Вдоскональтеся, що машина не зазнала ушкоджень
пiд час транспортування. Якщо такі є, не виконуйте
нiяких пiдключень та негайно зверніться до
постачальника.
3. Видаліть 4
запобіжнi гвинти для
транспортування та
гумову прокладку з
відповідною розпірною
деталлю, якi знаходяться
позаду (див. малюнок).
4. Закрийте отвори пластмасовими пробками з
комплекту постачання.
5. Зберiгайте всi компоненти: у разi транспортування
пральної машини їх потрiбно повернути на мiсце.
! Забороняйте дiтям гратися з упаковками.
Вирiвнювання
Належне вирiвнювання забезпечить стабiльнiсть
машинi та запобiжить вiбрацiям, шуму та
пересуванням пiд час роботи. У випадку
встановлення машини на килимовому покритті або
килимах, ніжки необхідно відрегулювати таким чином,
щоб гарантувати під пральною машиною необхідний
простір для вентиляції.
Підключення води й електроенергії
Пiд’єднання труби для подачі води
1. Підключити трубу
подачi, прикрутивши її
до крану холодної води
за допомогою штуцеру з
газовою різьбою 3/4 (див.
схему).
Перед пiдключенням
зливайте воду, доки вона
не стане прозорою.
2. Підключіть трубу
подачі води до пральної
машини, під’єднавши
його до водорозбiрного
крану, який знаходиться
угорі праворуч на
задньому боцi машини
(див. малюнок).
3. Зверніть увагу, щоб труба не мала згинів та утисків.
! Тиск води в крані має відповідати значенням у
таблиці Технічних даних (див. сторінку поруч).
1. Встановіть пральну машину на плоскій та твердій
підлозі, не притуляючи її до стін, меблів, тощо.
2. Якщо пiдлога
не є iдеально
горизонтальною,
компенсуйте нерiвностi
за допомогою переднiх
нiжок (див. малюнок)
– розкручуючи чи
закручуючи їх; кут
нахилу вiдносно робочої
поверхнi не повинен
перевищувати 2°.
14
! Якщо довжини труби для води не вистачає,
зверніться у спеціалізовану крамницю або до
уповноваженого фахівця.
! Не користуйтеся трубами, якi були вже у вживаннi.
! Використовуйте труби з комплекту постачання.
Page 15

Пiд’єднання шлангу злива води
65 - 100 cm
Пiд’єднайте зливний
шланг, не згинаючи його,
до каналізації або до
зливного отвору у стіні на
висоті від 65 до 100 см
від підлоги.
! Коли машину вже встановлено, забезпечте вільний
доступ до електричної розетки.
! Не використовуйте подовжувачі й трійники.
! Шнур не повинен мати згинів або утисків.
! Замiна шнура живлення має виконуватися тiльки
вповноваженими фахiвцями.
Увага! Підприємство знімає з себе відповідальність у
разi недотримання вказаних правил.
UA
Або покладіть його на
край вмивальника або
ванни; прив’язавши
направляючу з
комплекту постачання
докрана (див.малюнок).
Не залишайте вільний
кінець зливного шланга
зануреним у воду.
! Використання подовжувача шланга не
рекомендоване. При використаннi подовжувача
шланга (якщо це дiйсно є необхiдним), переконайтеся
у тому, що він має той самий діаметр та його довжина
не перевищує 150 см.
Електричні підключення
Перш нiж увiмкнути вилку в електричну розетку,
переконайтеся в тому, що:
• розетка має заземлення у відповідності до
встановлених норм;
• розетка розрахована на максимальне
навантаження у межах потужності машини,
зазначене у таблиці Технічних даних (див. малюнок
поруч);
• напруга живлення перебуває у межах, зазначених у
таблиці Технічних даних (див. малюнок поруч);
Перший цикл прання
Пiсля встановлення, перш нiж розпочати
використання машини, виконайте цикл прання з
пральним засобом, але не завантажуючи бiлизну,
встановивши програму «Самоочищення» (див.
“Очищення пральної машини”).
Технiчнi данi
Модель WMSG 602
ширина 59,5 см
Розмiри
Кiлькiсть бiлизни вiд 1 до 6 кг
Електричні
підключення
Водопровднi
пiдключення
Швидкiсть
центрифуги
Програми
контролю згiдно з
нормою
EN 60456
висота 85 см
глибина 42,5 см
див. шильдік з технiчними даними на
машинi
максимальний тиск 1 мПа (10 бар)
мiнiмальний тиск 0,05 мПа (0,5 бар)
об’єм баку – 40 лiтри
до 1000 обертiв на хвилину
програма 3; температура 60°C;
виконується з завантаженням 6 кг.
• розетка підходить до вилки пральної машини. В
іншому випадку замініть розетку або вилку.
! Машину не можна встановлювати поза
приміщенням, навіть в захищених мiсцях, тому що
дуже небезпечно піддавати її впливу дощу і грози.
Цей прилад вiдповiдає таким
європейським директивам:
- 2004/108/CE (Електромагнітна
сумiснiсть)
- 2012/19/EU
- 2006/95/CE (Низька напруга)
15
Page 16

Опис пральної машини
UA
Панель команд
Кнопка ON/OFF
РУЧКА
ПРОГРАМ
Касета з пральним засобом
Касета з пральним засобом: для завантаження
пральних засобiв та присадок (див. “Пральнi засоби
та бiлизна”).
Кнопка ON/OFF : швидко натисніть і відпустіть кнопку
для увiмкнення або вимикання машини. Iндикаторна
лампа START/PAUSE блимає зеленим свiтлом з
повільними інтервалами, вказуючи на те, що машину
ввiмкнено. Для вимикання пральної машини під час
прання необхідно утримувати кнопку натиснутою
приблизно більш ніж 3 сек.; короткочасне або випадкове
натискання не дозволить вимкнути машину. Вимикання
машини під час циклу прання вiдмiнює це прання.
РУЧКА ПРОГРАМ: для задання бажаної програми
(див. “Таблиця програм”).
Кнопки з iндикаторними лампами ОПЦIЯ: для вибору
наявних опцій. Iндикаторна лампаопцiї залишається
увiмкненою.
Кнопка
бажаної інтенсивності прання.
Кнопка ТЕМПЕРАТУРА : натискання викликає
зменшення або виключення температури взагалi;
значення вiдображується на дисплеї.
ТИП ПРАННЯ
: натиснути для вибору
Кнопка
ТЕМПЕРАТУРА
ВIДЖИМУ
Кнопка з індикаторною лампою START/PAUSE: коли
зелена індикаторна лампа блимає з повільними
інтервалами, натисніть на кнопку для запуску прання.
Якщо цикл розпочався, індикаторна лампа горить
постійно. Щоб увійти в режим паузи під час прання,
знову натисніть на кнопку; індикаторна лампа почне
горіти померанцевим кольором. Якщо позначка не
свiтиться, ви можете вiдкрити люк. Щоб продовжити
прання з місця, де воно було перерване, знову
натисніть на кнопку.
Кнопка БЛОКУВАННЯ КНОПОК : щоб активувати
блокування панелі управління натиснiть та утримуйте
кнопку впродовж 2 секунд. Ввімкнена позначка
показує, що панель управління заблоковано. У цей
спосіб перешкоджають випадковій зміні програм,
передусім, якщо у домі є діти. Для вiдключення
блокування панелi управління натиснiть та утримуйте
кнопку впродовж 2 секунд.
Режим очiкування
Вiдповiдно до норм, пов’язаних з заощадження
енергiї, цю пральну машину оснащено системою
автовимкнення (stand by), яка активується через
декiлька (30) секунд вiдсутностi роботи з боку
машини. Швидко натиснiть кнопку ON/OFF та
зачекайте вiдновлення роботи машини.
Кнопки з iндикаторними
лампами ОПЦIЯ
ДИСПЛЕЙ
Кнопка
Кнопка
ВIДСТРОЧЕНИЙ
ПУСК
Кнопка
ТИП
ПРАННЯ
Кнопка з iндикаторною
лампою START/PAUSE
Кнопка
БЛОКУВАННЯ
КНОПОК
Кнопка ВIДЖИМУ : натискання викликає
зменшення або виключення вiджиму взагалi;
значення вiдображується на дисплеї.
Кнопка ВIДСТРОЧЕНИЙ ПУСК : натискання
викликає вiдкладення пуску обраної програми;
значення затримки вiдображується на дисплеї.
16
Page 17

Дисплей
B
A
C
Дисплей є зручним для програмування машини; вiн надає рiзноманiтну iнформацiю.
В роздiлi A вiдображується тривалiсть рiзних наявних програм; при розпочатому циклi – відображується час, який
залишився до завершення цього циклу; якщо встановлено ВIДСТРОЧЕНИЙ ПУСК, вiдображується час, якого
бракує до початку вибраної програми.
Крiм того, при натисканнi на вiдповiдну кнопку з’являються максимальнi значення швидкостi центрифуги (вiджиму)
та температури, з якими машина може виконувати задану програму. Або з’являються останнi заданi значення,
сумiснi з обраною програмою.
UA
В роздiлi B вiдображуються “стадiї прання”, передбаченi для обраного циклу, та при розпочатiй програмi “стадiї
прання”:
Прання
Ополiскування
Вiджим
Злив
В роздiлi C маються такi iндикаторнi лампи (злiва направо): “температура”, “вiджим” та “вiдкладений пуск”.
Штриховi позначки “температури” вказують на рiвень поточної температури вiдносно максимальної для
заданого циклу.
Штриховi позначки “вiджиму” вказують на рiвень поточного вiджиму вiдносно максимальної для заданого циклу.
Увiмкнена iндикаторна лампа вiдкладеного пуску “вiдкладений пуск” вказує на те, що на дисплеї
вiдображується значення запрограмованого “Вiдкладеного прання”.
Iндикаторна лампа ЛЮК ЗАБЛОКОВАНО
Якщо iндикаторна лампа свiтиться, це означає, що люк заблоковано. З метою запобiгання ушкодженням, перш нiж
вiдкрити люк, вдоскональтеся, що iндикаторна лампа не горить.
Щоб відкрити дверцята люку під час виконання циклу натисніть на кнопку START/PAUSE; якщо індикаторна лампа
ЛЮК ЗАБЛОКОВАНО згасне, це означає, що люк можна відкрити.
17
Page 18

Як здійснювати цикл прання
UA
1. УВІМКНУТИ МАШИНУ. Натиснiтьна кнопку
; iндикаторна лампа START/PAUSE блиматиме
зеленим свiтлом з повiльними iнтервалами.
2. ЗАВАНТАЖИТИ БІЛИЗНУ. Вiдкрити люк.
Завантажити білизну, намагаючись не перевищити
кількість білизни, зазначену в таблиці програм на
наступній сторінці.
3. ВIДМIРЯТИ ПРАЛЬНИЙ ЗАСIБ. Витягнути касету
і додати пральний засіб у відповідні ванночки, як
вказано в роздiлi “Пральнi засоби i бiлизна”.
4. ЗАКРИТИ ЛЮК.
5. ВИБРАТИ ПРОГРАМУ. Вибрати за допомогою
ручки ПРОГРАМ бажану програму ; кожна програма
має параметри температури та швидкостi вiджиму
(центрифуги), якi можна налаштовувати. На
дисплеї з’явиться тривалiсть циклу.
6. НАЛАШТУВАТИ ЦИКЛ ПРАННЯ ПIД ВЛАСНI
ПОТРЕБИ. Це здiйснюється за допомогою
вiдповiдних кнопок:
Змінити температуру і/або швидкість
віджиму. На дисплеї автоматично вiдображується
максимальна температура i швидкiсть центрифуги,
передбаченi для заданої програми. Або останнi
заданi параметри, якщо вони є сумiсними з
вибраною програмою. Натисканням на кнопку
отримується поступове зменшення температури аж
до холодного прання “OFF”. Натисканням на кнопку
отримується поступове зменшення швидкостi
вiджиму аж до його виключення взагалi “OFF”.
Наступне натискання на кнопки призводить до
повернення до максимальних значень.
! Виключення: при виборі програми 3, температура
може збільшитися до 90 градусів.
Задати вiдстрочений пуск.
Для встановлення вiдстроченого пуску обраної
програми натискати на вiдповiдну кнопку, доки
не з’явиться необхiдний час вiдстрочення. При
увiмкненiй опцiї на дисплеї горить iндикаторна
лампа . Щоб скасувати вiдстрочений пуск,
натискати на кнопку до появи на дисплеї напису
“OFF”.
Як задати бажану інтенсивність прання.
За допомогою кнопки можна оптимізувати
прання залежно від ступеню забруднення речей і
від бажаної інтенсивності прання.
Виберіть програму прання, автоматично задається
цикл “Normal” прання, який передбачає прання
речей з середнім ступенем забруднення (цей
параметр не буде дійсним для циклу «Вовна», під
час якого автоматично задається “Delicate” прання).
Для дуже забруднених речей слід натиснути кнопку
і вибрати “Intensive”.
На цьому рівні гарантується високоефективне
прання завдяки використанню більшої кількості води
на початку циклу і значнішої механічної роботи;
рекомендується для видалення стійких плям. Може
використовуватися з вибілювачем або без.
Щоб відбілити речі, вставте додаткову ванночку
4 з комплекту постачання у ванночку 1. Пiд
час дозування вiдбiлювача не перевищуйте
максимальний рiвень «max» на центральному
стрижнi (див.малюнок на стор. 20).
Якщо речі не дуже забруднені або потребується
делікатне поводження з тканинами, натисніть на
кнопку , щоб обрати “Delicate”.
У цьому циклі механічна робота зменшується, щоб
гарантувати оптимальні результати прання для
делікатних речей.
Змiнити характеристики циклу.
• Натиснути на кнопку для увiмкнення опцiї; при
цьому спалахне вiдповiдна iндикаторна лампа.
• Натиснути знову на кнопку, щоб скасувати вибір;
індикаторна лампа згасне.
! Якщо вибрана опція несумісна з заданою
програмою, індикаторна лампа почне блимати й
вибір не буде активований.
! Якщо вибрана опцiя несумiсна з iншою,
попередньо заданною, iндикаторна лампа першої
вибраноїфункцiї почне блимати й увiмкнеться тiльки
друга, iндикаторна лампа активованої опцiїспалахує.
! Опцiї можутьзмiнювати рекомендоване
завантаження та/або тривалiсть циклу.
7. ЗАПУСТИТИ ПРОГРАМУ. Натиснути на кнопку
START/PAUSE. Вiдповiдна iндикаторна лампа
засвiтиться зеленим свiтлом, при цьому люк буде
заблоковано (свiтитиметься iндикаторна лампа
ЛЮК ЗАБЛОКОВАНО ). Для змiни програми
пiд час виконання циклу призупинiть машину,
натиснувши на кнопку START/PAUSE (iндикаторна
лампа START/PAUSE блиматиме янтарним свiтлом
з повiльними iнтервалами); виберiть бажаний цикл
та знову натиснiть на кнопку START/PAUSE.
Щоб відкрити дверцята люку під час виконання
циклу, натисніть на кнопку START/PAUSE; якщо
індикаторна лампа ЛЮК ЗАБЛОКОВАНО
згасне, це означає, що люк можна відкрити.
Знову натисніть на кнопку START/PAUSE, щоб
продовжити програму з того мiсця, де її було
перервано.
8. ЗАВЕРШЕННЯ ПРОГРАМИ. На це вказує напис
“END” на дисплеї; коли згасне iндикаторна лампа
ЛЮК ЗАБЛОКОВАНО , люк можна вiдкрити.
Відкрити люк, витягнути білизну й вимкнути
машину.
! Якщо необхідно анулювати вже розпочатий цикл,
утримуйте кнопку натиснутою відносно тривалий
час. Цикл буде перерваний, і машина вимкнеться.
18
Page 19

Програми й опції
Таблиця програм
Опис програми
програми
Антикорозійний
1
Білі речі
2
Бавовна (1): дуже забрудненi стiйкi бiлi та кольоровi
3
тканини.
Бавовна (2): Злегка забрудненi делiкатнi бiлi та кольоровi
4
тканини.
Синтетичнi: дуже забрудненi кольоровi стiйкi тканини
5
Синтетичнi (4): Злегка забрудненi кольоровi делiкатнi тканини
5
Протиалергійне прання
6
Дитина
7
Шовк/Портьєри: для речей з шовку, вiскози, для нижньої
8
бiлизни.
Делікатне
9
Mix 60’: Для швидого освiження злегка забруднених речей (не
рекомендоване для вовняних, шовкових речей або речей для
10
ручного прання)
Бавовна: Злегка забрудненi делiкатнi бiлi та кольоровi тканини.
11
Бавовна
12
Синтетичнi
13
Швидке прання 30’
14
Ополiскування
Вiджим + Злив
Пральнi засоби та
Макс.
Макс.
темп. (єС)
швидкiсть
(обертiв
за хвилину)
40° 1000
60° 1000
60°
(Max. 90°)
1000
40° 1000 -
60° 800
40° 800
60° 1000 40° 1000
40° 800 -
30° 0 -
60° 1000 -
20° 1000 -
холодна
вода
холодна
вода
холодна
вода
1000 -
800 -
800 -
додатковi засоби
Попе-
реднє
прання
(3)
Прання
ювач
Відбіл-
-
-
-
-
-
-
-
-
- 1000 - - -
- 1000 - - - - 6
Пом’
Макс.
завантаження
якшувач
(кг)
3
3
6
6
3
3
3
3
1
1
3.5
5
6
3
3
6
UA
Трива-
лiсть
циклу
Тривалiсть програм вiдображується на дисплеї.
Тривалість циклу, вказана на дисплеї або в керівництві, разрахована на основі стандартних умов роботи. Фактичний час може залежати від чисельних факторів, таких як температура і
тиск подаваної води, температура у приміщенні, кількість миючого засобу, кількість і тип завантаженої білизни, зрівноваження завантаженої білизни, додаткові обрані опції.
1) Програма керування згiдно до норми 1061/2010: встановити програму 3 з температурою 60°C.
Цей цикл призначений для прання бавовняних речей із звичайним ступенем забруднення. Ефективність циклу підвищується завдяки комбінованому споживанню енергії та води. Він
має використовуватися для речей, які придатні для прання при температурі 60°C. Фактична температура прання може дещо відрізнятися від заявленої.
2) Довга програма бавовна: встановити програму 4 з температурою 40°C.
Цей цикл призначений для прання бавовняних речей із звичайним ступенем забруднення. Ефективність циклу підвищується завдяки комбінованому споживанню енергії та води. Він
має використовуватися для речей, які придатні для прання при температурі 40°C. Фактична температура прання може дещо відрізнятися від заявленої.
3) При температурі 60°C функцію “Попереднє прання” не можна буде активувати.
Для всiх Установ з проведення випробувань:
2) Програма тривалого прання речей з бавовни: встановити програму 4 з температурою 40°C.
4) Програма тривалого прання синтетичних речей: встановити програму 5 з температурою 40°C.
Опції прання
Додаткове полоскання
При виборi цiєї опцiї збiльшується ефективнiсть
полос кання, забе зпе чуючи по внi ше видаленн я
прального засобу. Вона є зручною для осіб зі шкірою,
особливо чутливою до пральних засобів.
! Не працює з програмами 6, 9, 14, .
Попереднє прання
Вибiр цiєї функцiї вмикає попереднє прання, яке є
корисним для видалення стiйких плям.
Увага: Додайте миючий засiб у вiдповiдне вiддiлення.
! Не активується у програмах 3 (60°), 4, 6, 8, 9, 10, 11,
12, 13, 14, , .
19
Page 20

Пральні засоби і білизна
M
AX
1
2
4
3
A
B
UA
Касета з пральним засобом
Добрий результат прання залежить також вiд
правильного дозування прального засобу: надлишок
прального засобу приведе до неефективного прання
та сприятиме утворенню накипу всереденi пральної
машини, а також забрудненню довкiлля.
! Не використовуйте засоби для ручного прання, тому
що вони утворюють надто багато піни.
Витягнiть касету для
пральних засобiв та
додайте пральнi засоби
або засоби з догляду, як
вказано нижче.
ванночка 1: Засiб для попереднього прання
(порошковий)
Перш нiж додати пральний засіб, перевірте, щоб не
була вставлена додаткова ванночка 4.
ванночка 2: Засiб для прання
(порошковий чи рiдкий)
Якщо використовується рідкий пральний засіб,
рекомендується застосовувати вимірювальний
компонент A з комплекту постачання для правильного
дозування. При використанні порошкового прального
засобу вставьте цей компонент у нішу B.
ванночка 3: Засоби з догляду
(пом’якшувач, тощо)
Пом’якшувач не має витікати з решітки.
додаткова ванночка 4: Відбілювач
Підготовка білизни
• Роздiлiть бiлизну, враховуючи:
тип тканини / позначку на етикетцi.
кольори: вiдокремте кольоровi речi вiд бiлих.
• Перевірте кишені й ґудзики.
• Не перевищуйте вказанi значення щодо ваги сухої
бiлизни: (див. “Таблиця програм”).
Скільки важить білизна?
1 простирадло 400-500 г
1 наволочка 150-200 г
1 скатертина 400-500 г
1 махровий халат 900-1200 г
1 рушник 150-250 г
Особливi речi
Антикорозійний: Програма 1 призначена для прання
дуже забруднених речей зі стійким фарбуванням.
Програма гарантує вищий у порівнянні зі стандартним
клас прання (клас A). Не застосовуйте у цій програмі
речі різних кольорів. Рекомендується використання
миючих засобів у порошку. Стійкі плями краще
обробити попередньо спеціальними засобами.
Білі речі: цей цикл 2 використовується для прання білих
речей. Завдяки цій програмі забезпечується тривале
зберігання сяючого білого кольору.
Кращі результати отримуються при використанні
порошкового миючого засобу.
Протиалергійне прання: використовуйте програму
6 для видалення основних алергенів, таких як пилок,
кліщі, котяча і собача шерсть.
Дитина: використовуйте спецiальну програму 7
для видалення забруднень, типових для дiтей, а
також для видалення прального засобу з речей з
метою запобiгання алергiчним реакцiям тендiтної
шкiри малюкiв. Цикл розраховано для зменшення
бактерiологiчного потенцiалу, за допомогою бiльшої
кiлькостi води та оптимiзуючи ефект спецiальних
гiгiєнiзуючих присадок у миючому засобi.
Вовна: Цикл прання “Вовна” цієї пральної машини
Hotpoint-Ariston протестований і затверджений
компанією Woolmark у відношенні до прання вовняних
речей, класифікованих як для “ручного прання”,
за умови виконання прання згідно до інструкцій,
наведених на етикетці виробу, і вказівок виробника
електропобутового приладу. Hotpoint-Ariston - перша
марка пральних машин, яка отримала від компанії
Woolmark сертифікацію Woolmark Apparel Care Platinum за власні показники прання і витрати води й
електроенергії. (M1128)
Делікатне: використовуйте програму 9 для прання
дуже делікатних речей, наприклад, зі стразами або
іншими оздобленнями.
Для прання шовкових речей або портьєр оберіть 9
“Delicate” прання в опції .
Перш ніж запускати прання, рекомендується
вивернути речі навиворіт і вкласти дрібні речі в
спеціальний мішечок для прання делікатних речей.
Кращі результати досягаються при використанні
рідкого прального засобу для делікатних речей.
Програми Eco
Програми Eco пропонують добру якість прання при
низьких температурах із заощадженням електричної
енергії, що позитивно впливає на довкілля і забезпечує
економічну вигоду користувачеві.
Програми Eco (Бавовна 12, Синтетичнi 13 і Швидке
прання 30’ 14) призначені для різних типів тканин і для
речей з легкими забрудненнями Для гарантованого
оптимального результату рекомендується
використовувати рідкий пральний засіб; краще зробити
попередню обробку манжетів, коміру і плям.
Бавовна 20° ідеальна для бавовняних забруднених
речей. Добре прання, в тому числі у холодній воді,
яке можна порівняти з пранням при 40°, гарантується
механічною роботою, яка здійснюється на змінній
швидкості із частими повторюваними піками.
20
Page 21

Запобіжні заходи та поради
20
! Машину була спроектовано і вироблено у
відповідності з міжнародними нормами безпеки. Дані
попередження складені для забезпечення безпеки і
тому їх треба уважно прочитати.
Загальна безпека
• Дане обладнання було розроблене виключно для
побутового використання.
• Цей апарат не має використовуватися дітьми або
особами з обмеженими фізичними, сенсорними чи
розумовими можливостями, або якщо їм бракує досвіду
та необхідних знань. Винятки складають ситуації,
коли користування відбувається під наглядом або за
вказівками осіб, відповідальних за їхню безпеку. Дорослі
мають стежити, щоб діти не гралися з апаратом.
• Машина має використовуватися тільки повнолітніми
особами і згідно з інструкціями, наведеними у даній брошурі.
• Не торкайтеся до машини голими ногами або
мокрими чи вологими руками й ногами.
• Не виймайте штепсель з електричної розетки, витягуючи
його за провід, тримайтеся тільки за самий штепсель.
• Не вiдкривайте касету з миючими засобами пiд час
роботи машини.
• Будьте обережні: вода, що зливається, може мати
високу температуру.
• У жодному випадку не застосовуйте силу до люку:
це може ушкодити запобiжний механiзм проти
випадкових вiдкривань.
• Якщо машина не працює у разi поломки, у жодному
випадку не намагайтеся дiстатися внутрiшнiх
механiзмiв з метою самостійного ремонту.
• Слiдкуйте, щоб дiти не наближалися до працюючої
машини.
• Пiд час прання люк нагрiватиметься.
• Пересування машини має здiйснюватися двома або
трьома особами за умови максимальної уваги. Нi в якому
разi - однiєю особою, тому що машина дуже важка.
• Перш ніж завантажити білизну, перевірте, щоб
барабан був порожній.
можуть перероблятися у звичайному порядку
для твердих міських відходів. Зняті з експлуатації
побутові прилади мають бути зібрані окремо для
оптимізації ступеню відновлення й рециклювання
матеріалів, що входять до їхнього складу, і з метою
усунення потенційної шкоди для здоров’я та
навколишнього середовища. Символ закресленої
корзини, зображений на всіх виробах, нагадує про
необхідність окремої утилізації. Для подальшої
інформації про правильне зняття з експлуатації
побутових електроприладів, їхні власники можутьз
вернутися у відповідну муницiпальну службу або до
продавця приладу.
Ручне відкривання дверцят люку
У випадку, якщо неможливо відкрити дверцята люку
із-за відсутності електроенергії і ви хотіли б розвісити
речі, треба діяти таким чином:
1. витягніть штепсель з
електричної розетки.
2. перевірте, щоб рівень
води усередині машини
був нижчим за рівень
отвору люку; якщо це не
так, злийте надлишок
води через зливний шланг,
збираючи її у відрі, як
показано на малюнку.
3. зніміть декоративну
панель на лицевому
боці пральної машини за
допомогою викрутки (див.
малюнок).
UA
Система балансування завантаження
Перед кожним віджимом, для запобігання надмірній
вібрації та для рівномірного розподілу навантаження,
барабан здійснює оберти на дещо більшій швидкості, ніж
швидкість прання. Якщо по закінченні декількох спроб
завантажені речі ще не були правильно відбалансовані,
машина здійснює віджим на швидкості, нижчій від
передбаченої. У випадку надмірної незбалансованості
пральна машина здійснює розподіл замість віджиму. З
метою оптимального розподілу завантаження та його
правильного балансування рекомендується одночасне
прання великих і малих речей.
Утилізація
• Утилізація пакувального матеріалу: додержуйтесь
місцевих норм, так як пакування може бути
використане повторно.
• Європейська директива 2012/19/EU з відходів
від електричної й електронної апаратури
передбачає, що побутові електроприлади не
4. За допомогою вказаного на малюнку язичка тягнiть
пластмасову тягу з упору назовнi, аж доки її не буде
звiльнено; потiм протягнiть її донизу, одночасно
вiдкриваючи дверцята.
5. встановіть панель на місце, пересвідчіться у тому,
що крюки були вставлені у спеціальні петлі, пiсля чого
притиснiть її до машини.
21
Page 22

Технічне обслуговування
1
2
A
B
та догляд
UA
Відключення води й електричного
живлення
• Закривайте водопровідний кран після кожного
прання. У такий спосіб зменшується знос
гідравлічної частини машини й усувається
небезпека витоку.
• Виймайте штепсель з розетки під час миття машини
та під час робіт з технічного обслуговування.
Очищення пральної машини
• Зовнішня частина і гумові деталі можуть бути
вимиті тканиною, змоченою у теплій воді й милі. Не
використовуйте розчинники або абразиви.
• Пральна машина оснащена програмою
«Самоочищення» внутрішніх частин, яку слід
запускати без будь-яких речей всередині
барабану.
Пральний засіб (його кількість має складати 10% від
рекомендованої для злегка забруднених речей) або
спеціальні засоби для очищення пральної машини
можна використовувати як допоміжні у программі
прання. Рекомендується виконувати програму
очищення через кожні 40 циклів прання.
Для пуску програми слід одночасно натиснути на
кнопки A і B впродовж 5 сек. (див. малюнок).
Програма запускається автоматично і триває
приблизно 70 хвилин. Для припинення циклу
натиснiть на кнопку START/PAUSE.
Догляд за люком та барабаном
• Завжди залишайте відкритими дверцята люку, тоді
не утворюватимуться неприємні запахи.
Миття насосу
Пральну машину обладнано насосом з автоматичною
чисткою, який не вимагає технічного обслуговування.
Може трапитися так, що малі предмети (монети,
ґудзики) потраплять до форкамери, що захищає
насос, розташований у її нижній частині.
! Переконайтеся у тому, що цикл прання закінчено, і
витягніть штепсель з розетки.
Щоб потрапити до форкамери:
1. зніміть декоративну
панель на лицевому
боці пральної машини за
допомогою викрутки (див.
малюнок);
2. відкрутіть кришку,
обертаючи її проти
годинникової стрілки
(див. малюнок): виток
незначної кiлькостi води
є нормальним;
Чистка касети для миючих засобів
Виймiть касету, пiднявши
її та витягнувши назовнi
(див. малюнок).
Промийте під проточною
водою; ця процедура має
проводитися регулярно.
22
3. акуратно очистіть внутрішню частину;
4. накрутіть кришку;
5. встановіть панель на місце, пересвідчіться у тому,
що крюки були вставлені у спеціальні петлі, пiсля чого
притиснiть її до машини.
Контроль шланга для подачі води
Перевіряйте шланг для подачі води не менше одного
разу на рік. Якщо на ньому є тріщини, він підлягає
заміні: під час прання високий тиск може призвести
до розірвання.
! Не користуйтеся шлангами, якi були вже у вживаннi.
Page 23

Несправності та засоби
їх усунення
Може трапитися так, що пральна машина не працюватиме. Перш нiж зателефонувати у Сервiсний центр
(див. “Допомога”), перевірте, чи не є дана несправність проблемою, що легко вирішується за допомогою
наведеного нижче списка.
Несправності:
Пральна машина не вмикається.
Цикл прання не розпочинається.
Пральна машина не завантажує
воду (на дисплеї розпочинає
блимати напис “H2O”).
Машина безперервно завантажує і
зливає воду.
Можливі причини/Рішення:
• Вилка не вставлена в електричну розетку або вставлена не до кiнця.
• У будинку немає електроенергії.
• Люк погано закрито.
• Кнопку ON/OFF не було натиснуто.
• Кнопку START/PAUSE не було натиснуто.
• Водопровідний кран закритий.
• Якщо вiдстрочення задане на час пуску.
• Шланг подачі води не під’єднано до водопровiдного крану.
• Перегин у шлангу.
• Водопровідний кран закритий.
• У водопроводі немає води.
• Недостатній тиск.
• Кнопку START/PAUSE не було натиснуто.
• Зливний шланг не знаходиться на відстані від 65 до 100 см від підлоги
(див. “Встановлення”).
• Кінець зливного шланга занурений у воду (див. “Встановлення”).
• Стiнний каналiзацiйний злив не має віддушини для виходу повiтря.
Якщо після таких перевірок проблема залишається, закрийте
водопровідний кран, вимкніть машину і зателефонуйте у Сервiсний центр.
Якщо квартира знаходиться на верхніх поверхах будинку, можливо,
відбувається сифонний ефект, при якому машина безперервно завантажує
й зливає воду. Щоб його ліквідувати, існують спеціальні антисифонні
клапани, які можна придбати у торговельній мережі.
UA
Пральна машина не зливає воду
чи не вiджимає.
Пральна машина дуже вiбрує пiд
час вiджиму.
Пральна машина пропускає воду.
Iндикаторнi лампи “Опцiй” та
“START/PAUSE” блимають,
та на дисплеї виводиться код
несправностi (напр.: F-01, F-..).
Утворюється занадто багато піни.
• Програма не передбачає зливання: в деяких програмах його необхiдно
робити вручну.
• Перегин зливного шланга (див. “Встановлення”).
• Засмітився зливний шланг.
• Барабан, у момент встановлення, не був правильно розблокований (див.
“Встановлення”).
• Машина стоїть не на плоскій поверхні (див. “Встановлення”).
• Машину затиснуто між меблями і стіною (див. “Встановлення”).
• Погано пригвинчений шланг подачі води (див. “Встановлення”).
• Забруднена касета для пральних засобів (очищення касетидив. “Технічне
обслуговування і догляд”).
• Погано закріплений зливний шланг (див. “Встановлення”).
• Вимкніть машину й витягніть вилку з розетки, зачекайте близько 1
хвилини й увімкніть її знову.
Якщо несправність не усунено, зателефонуйте у Сервiсний центр.
• Пральний засіб не підходить для пральної машини (має бути напис “для
машинного прання”, “для ручного й машинного прання”, або подібний).
• Перевищена доза прального засобу.
23
Page 24

Допомога
195117745.00
10/2013 - Xerox Fabriano
UA
Перш ніж зателефонувати у Сервiсний центр:
• Перевірте, чи можна самостійно вирішити проблему (див. “Несправності і засоби їх усунення”);
• Запустіть програму повторно, щоб перевірити чи усунено несправність;
• Якщо несправнiсть не усунено, звернiться до Сервiсного центру.
! Звертайтеся виключно до уповноважених фахівців.
Cлiд повiдомити:
• тип несправності;
• модель машини (Мод.);
• серійний номер (С/Н);
Цю iнформацiю ви знайдете на заводськiй табличцi позаду пральної машини та в її переднiй частинi, якщо ви
вiдкриєте люк.
24
ТОВ «Індезіт Україна»
Україна, 01001, м. Київ,
пров. Музейний, 4
 Loading...