

Page 1

Instructions for use
WASHING MACHINE
GB
English,1
CZ
Česky,37
WMSD 723
PL
Polski,13
HU
Magyar,25
Contents
Installation, 2-3
Unpacking and levelling
Connecting the electricity and water supplies
The first wash cycle
Technical data
Description of the washing machine, 4-5
Control panel
Display
Running a wash cycle, 6
Wash cycles and functions, 7
Table of wash cycles
Wash functions
Detergents and laundry, 8
Detergent dispenser drawer
Preparing the laundry
Special wash cycles
Load balancing system
Precautions and tips, 9
General safety
Disposal
Opening the porthole door manually
GB
Care and maintenance, 10
Cutting off the water or electricity supply
Cleaning the washing machine
Cleaning the detergent dispenser drawer
Caring for the door and drum of your appliance
Cleaning the pump
Checking the water inlet hose
Troubleshooting, 11
Service, 12
1
Page 2

Installation
GB
! This instruction manual should be kept in a safe place for
future reference. If the washing machine is sold, transferred
or moved, make sure that the instruction manual remains
with the machine so that the new owner is able to familiarise himself/herself with its operation and features.
! Read these instructions carefully: they contain vital infor-
mation relating to the safe installation and operation of the
appliance.
Unpacking and levelling
Unpacking
1. Remove the washing machine from its packaging.
2. Make sure that the washing machine has not been
damaged during the transportation process. If it has been
damaged, contact the retailer and do not proceed any
further with the installation process.
3. Remove the 4 protective
screws (used during transportation) and the rubber
washer with the corresponding spacer, located on the
rear part of the appliance
(see figure).
Levelling the machine correctly will provide it with stability,
help to avoid vibrations and excessive noise and prevent it
from shifting while it is operating. If it is placed on carpet or
a rug, adjust the feet in such a way as to allow a sufficient
ventilation space underneath the washing machine.
Connecting the electricity and water
supplies
Connecting the water inlet hose
1. Connect the supply pipe
by screwing it to a cold
water tap using a ¾ gas
threaded connection (see
figure).
Before performing the connection, allow the water to
run freely until it is perfectly
clear.
2. Connect the inlet hose
to the washing machine by
screwing it onto the corresponding water inlet of the
appliance, which is situated on the top right-hand
side of the rear part of the
appliance (see figure).
4. Close off the holes using the plastic plugs provided.
5. Keep all the parts in a safe place: you will need them
again if the washing machine needs to be moved to another location.
! Packaging materials should not be used as toys for
children.
Levelling
1. Install the washing machine on a flat sturdy floor, without
resting it up against walls, furniture cabinets or anything
else.
2. If the floor is not perfectly
level, compensate for any
unevenness by tightening
or loosening the adjustable front feet (see figure);
the angle of inclination,
measured in relation to the
worktop, must not exceed
2°.
3. Make sure that the hose is not folded over or bent.
! The water pressure at the tap must fall within the values
indicated in the Technical details table (see page 3).
! If the inlet hose is not long enough, contact a specialised
shop or an authorised technician.
! Never use second-hand hoses.
! Use the ones supplied with the machine.
2
Page 3

65 - 100 cm
Connecting the drain hose
- 2004/108/EC (Electromagnetic Compatibility)
Connect the drain hose,
without bending it, to a drainage duct or a wall drain
located at a height between
65 and 100 cm from the
floor;
! Do not use extension cords or multiple sockets.
! The cable should not be bent or compressed.
! The power supply cable must only be replaced by autho-
rised technicians.
Warning! The company shall not be held responsible in the
event that these regulations are not respected.
The first wash cycle
GB
alternatively, rest it on
the side of a washbasin
or bathtub, fastening the
duct supplied to the tap
(see figure). The free end
of the hose should not be
underwater.
! We advise against the use of hose extensions; if it is
absolutely necessary, the extension must have the same
diameter as the original hose and must not exceed 150 cm
in length.
Electrical connections
Before plugging the appliance into the electricity socket,
make sure that:
• thesocketisearthedandcomplieswithallapplicable
laws;
Once the appliance has been installed, and before you use
it for the first time, run a wash cycle with detergent and no
laundry, using the wash cycle (60°C).
Technical data
Model
Dimensions
Capacity
Electrical
connections
WMSD 723
width 59.5 cm
height 85 cm
depth 43,5 cm
from 1 to 7 kg
please refer to the technical data plate
fixed to the machine
• thesocketisabletowithstandthemaximumpowerload
of the appliance as indicated on the Technical Data Plate
fixed on the machine;
• thepowersupplyvoltagefallswithinthevaluesindicated
on the Technical Data Plate fixed on the machine;
• thesocketiscompatiblewiththeplugofthewashing
machine. If this is not the case, replace the socket or the
plug.
! The washing machine must not be installed outdoors,
even in covered areas. It is extremely dangerous to leave
the appliance exposed to rain, storms and other weather
conditions.
! When the washing machine has been installed, the elec-
tricity socket must be within easy reach.
Water connections
Spin speed
Test wash cycles
in accordance
with directives
1061/2010 and
1015/2010
maximum pressure 1 MPa (10 bar)
minimum pressure 0.05 MPa (0.5 bar)
drum capacity 48 litres
up to 1200 rotations per minute
programme
temperature 60°C (2nd press of the button);
temperature 40°C (3rd press of the button).
This appliance conforms to the following
EC Directives:
- 2006/95/EC (Low Voltage)
- 2002/96/EC
;
3
Page 4

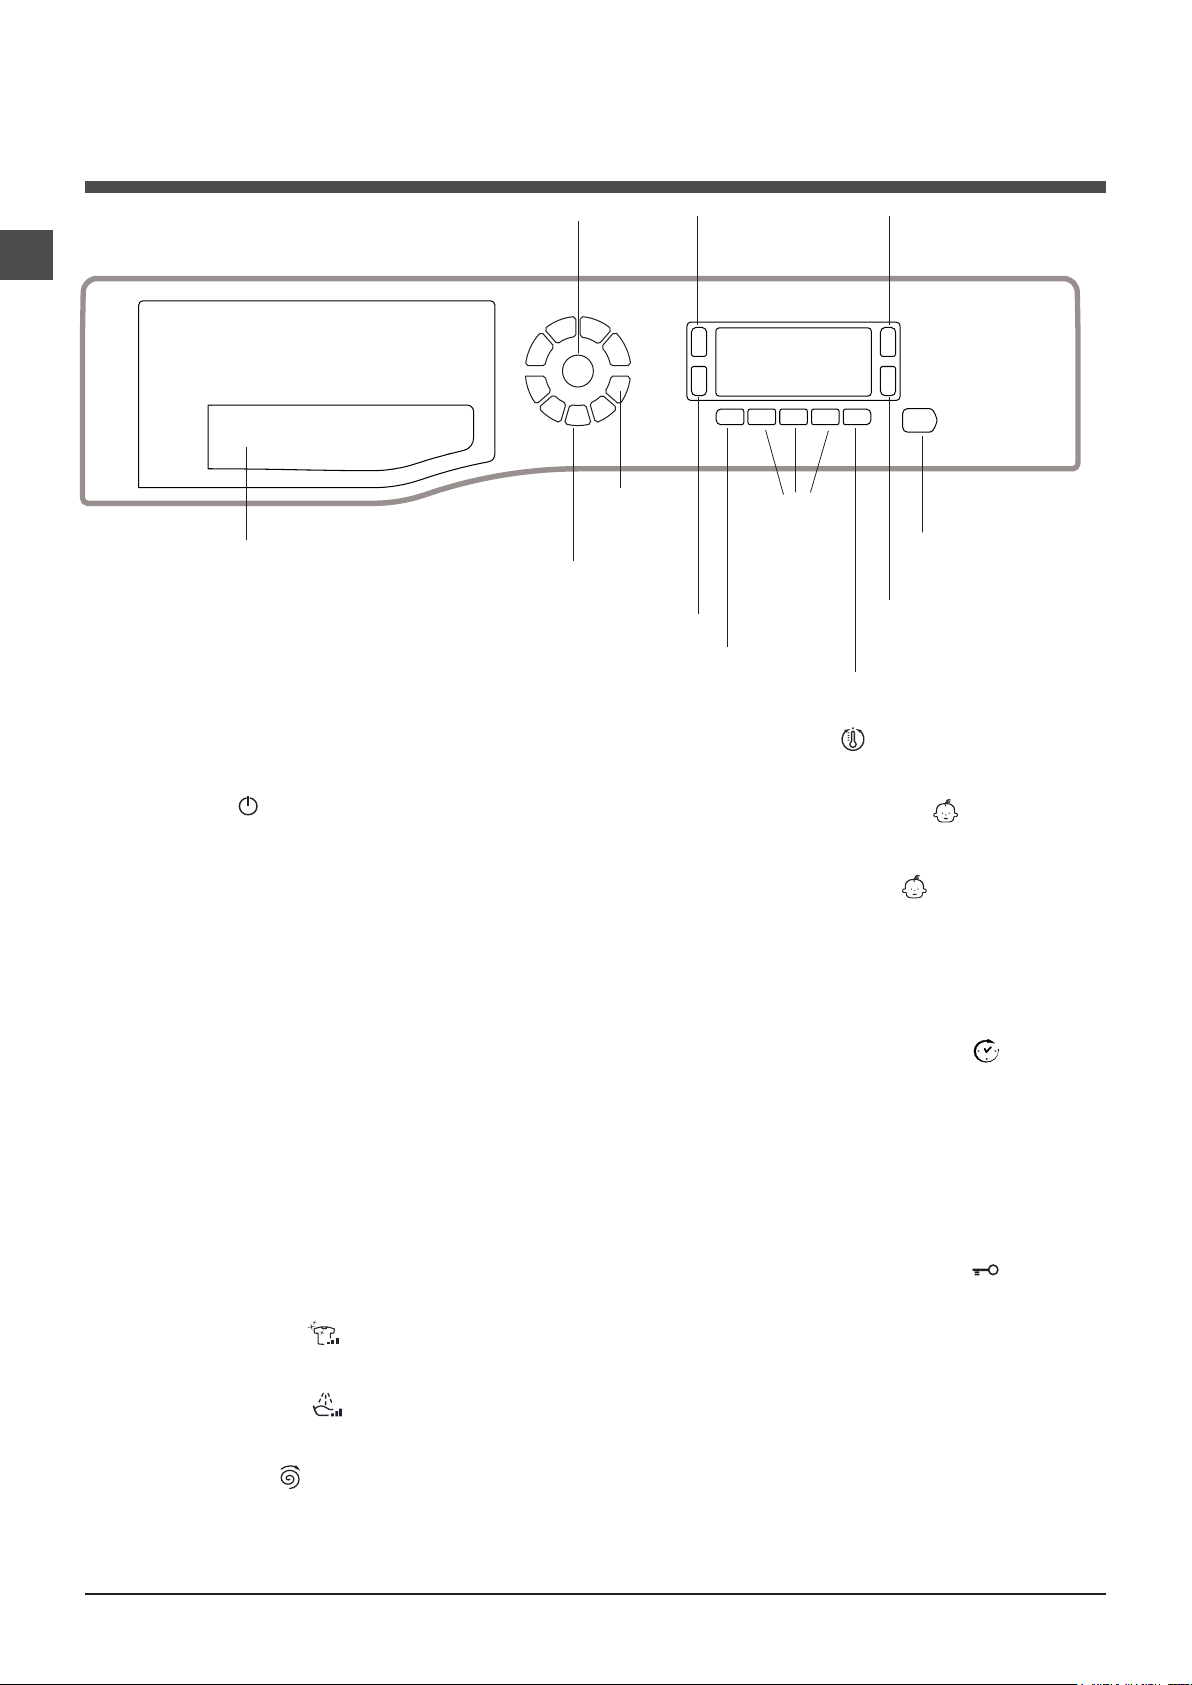
Description of the washing machine
GB
Control panel
ON/OFF
WASH
Detergent dispenser drawer
Detergent dispenser drawer: used to dispense deter-
gents and washing additives (see “Detergents and laundry”).
CYCLE
SELECTOR
buttons
button
CLEANING
ACTION
button
DISPLAY
MY
CYCLE
button
ANTI
ALLERGY
RINSE
button
TEMPERATURE button : press to decrease the tem-
perature: the value will be shown on the display.
FUNCTION
buttons
DELAY
TIMER
button
SPIN SPEED
button
START/PAUSE
button with
indicator light
TEMPERATURE
button
CHILD LOCK
button
ON/OFF button : press this briefly to switch the machine on or off. The START/PAUSE indicator light, which
flashes slowly in a green colour shows that the machine is
switched on. To switch off the washing machine during the
wash cycle, press and hold the button for approximately 3
seconds; if the button is pressed briefly or accidentally the
machine will not switch off. If the machine is switched off
during a wash cycle, this wash cycle will be cancelled.
WASH CYCLE SELECTOR buttons: used to set the
desired wash cycle (see “Table of wash cycles”).
MY CYCLE button: press and hold the button to store a
cycle with your own set of preferences in the memory of
the machine. To recall a previously stored cycle, press the
MY CYCLE button.
FUNCTION buttons: press the button to select the
desired function. The corresponding indicator light on the
display will switch on.
CLEANING ACTION
wash intensity.
ANTI ALLERGY RINSE
the desired rinse type.
SPIN button : press to reduce or completely exclude
the spin cycle - the value is indicated on the display.
button : to select the desired
button : press to select
CHILD LOCK button : to activate the control panel
lock, press and hold the button for approximately 2
seconds. When the symbol is illuminated, the control
panel is locked. This means it is possible to prevent wash
cycles from being modified accidentally, especially where
there are children in the home. To deactivate the control
panel lock, press and hold the button for approximately 2
seconds.
DELAY TIMER button : press to set a delayed start
time for the selected wash cycle. The delay time will be
shown on the display.
START/PAUSE button with indicator light: when the green indicator light flashes slowly, press the button to start a
wash cycle. Once the cycle has started the indicator light
will remain lit in a fixed manner. To pause the wash cycle,
press the button again; the indicator light will flash in an
orange colour. If the symbol is not illuminated, the door
may be opened. To start the wash cycle from the point at
which it was interrupted, press the button again.
Standby mode
This washing machine, in compliance with new energy saving regulations, is fitted with an automatic standby system
which is enabled after about 30 minutes if no activity is
detected. Press the ON-OFF button briefly and wait for the
machine to start up again.
Consumption in off-mode: 1 W
Consumption in Left-on: 1 W
4
Page 5

Display
GB
Z
B
A
X
D
C
E
Y
F
The display is useful when programming the machine and provides a great deal of information.
The two upper strings A and B provide details of the wash cycle selected, the wash cycle phase in progress and all information relating to the progress status of the wash cycle.
String C shows the time remaining until the end of the wash cycle in progress and, if a DELAYED START has been set, the
time remaining until the start of the selected wash cycle.
String D shows the maximum spin speed value (this depends on the selected wash cycle); if the wash cycle does not include
a spin cycle, the string remains unused.
String E shows the maximum temperature value which may be selected (this depends on the wash cycle used); if the temperature of the wash cycle cannot be modified, the string remains unused.
Indicator lights F correspond to the functions and light up when the selected function is compatible with the set wash cycle.
Door locked symbol
If the symbol is lit, this indicates that the washing machine door is blocked to prevent it from being opened accidentally. To
prevent any damage from occurring, wait for the symbol to switch itself off before opening the appliance door.
N.B.: if the DELAYE TIMER function has been activated, the door cannot be opened; pauses the machine by pressing the
START/PAUSE button if you wish to open it.
! The first time the machine is switched on, you will be asked to select the language and the display will automatically show
the language selection menu.
To select the desired language press the X and Y buttons; to confirm the selection press the Z button.
To change the language switch off the machine and press buttons X, Y, Z simultaneously until an alarm is heard: the
language-selection menu will be displayed again.
5
Page 6

Running a wash cycle
GB
1. SWITCH THE MACHINE ON. Press the On/Off
button ; the text POWER ON will appear on the
display and the START/PAUSE indicator light will flash
slowly in a green colour.
2. LOAD THE LAUNDRY. Open the porthole door.
Load the laundry, making sure you do not exceed
the maximum load value indicated in the table of
programmes on the following page.
3. MEASURE OUT THE DETERGENT. Open the
detergent dispenser drawer and pour the detergent into
the relevant compartments as described in “Detergents
and laundry”.
4. CLOSE THE DOOR.
5. SELECT THE WASH CYCLE. Press one of the WASH
CYCLE SELECTOR buttons to select the required wash
cycle; the name of the wash cycle will appear on the
display. A temperature and spin speed is set for each
wash cycle; these may be adjusted. The duration of the
cycle will appear on the display.
6. CUSTOMISE THE WASH CYCLE. Use the relevant
buttons:
Modifying the temperature and/or spin
speed. The machine automatically selects the
maximum temperature and spin speed set for the
selected wash cycle; these values cannot therefore
be increased. The temperature can be decreased by
pressing the button, until the cold wash “OFF”
setting is reached. The spin speed may be progressively
reduced by pressing the button, until it is completely
excluded (the “OFF” setting). If these buttons are
pressed again, the maximum values are restored.
! Exception: if the
is selected, the temperature can be increased up to a
value of 90°C.
Setting a delayed start.
To set a delayed start for the selected programme,
press the corresponding button repeatedly until the
required delay period has been reached. When this
option is enabled, the symbol lights up on the
display. To remove the delayed start function press the
button until the text “OFF” appears on the display.
Set the desired wash intensity.
Option makes it possible to optimise washing
based on the level of soil in the fabrics and on desired
wash cycle intensity.
Select the wash programme: the cycle will be
automatically set to “Normal” as optimised for garments
with an average level of soil (this setting is not applicable to
the “Wool” cycle, which is automatically set to “Delicate”).
For heavily-soiled garments press button until
the “Super Wash” level is reached. This level ensures
a high-performance wash due to a larger quantity of
water used in the initial phase of the cycle and due to
increased drum rotation. It is useful when removing the
most stubborn stains.
It can be used with or without bleach. If you wish to
bleach the items insert the additional compartment
(4) into compartment 1. When pouring the bleach, be
careful not to exceed the “max” level marked on the
central pivot (see figure pag. 8).
(2nd press of the button)
programme
For lightly-soiled garments or a more delicate treatment
of the fabrics, press button until the “Delicate” level
is reached.
The cycle will reduce the drum rotation to ensure
washing results are perfect for delicate garments. If the
current selection can be neither set nor changed, the
display will show “Not allowed”.
Set the rinse type.
Option makes it possible to select the desired rinse
type for sensitive skin. Press the button once for the
“Extra Rinse” level, which makes it possible to select
an additional rinse after the standard cycle rinse and
remove all traces of detergent. Press the button again
for the “Sensitive Skin” level, which makes it possible to
select two additional rinses to the standard cycle rinses; it
is recommended for very sensitive skin. Press the button
for the third time for the “Anti allergy Rinse” level, which
makes it possible to select three additional rinses to the
standard cycle rinses and remove major allergens such as
pollen, mites, cat and dog hair. Press the button again to
go back to the “Normal Rinse” rinse type. If the current
adjustment can be neither set nor changed, the display will
show “Not allowed”.
Modifying the cycle settings.
• Pressthebuttontoenablethefunction;theindicator
light corresponding to the button will switch on.
• Pressthebuttonagaintodisablethefunction;the
indicator light will switch off.
! If the selected function is not compatible with the
programmed wash cycle, the indicator light will flash
and the function will not be activated.
! If the selected function is not compatible with
another function which has been selected previously,
the indicator light corresponding to the first function
selected will flash and only the second function will
be activated; the indicator light corresponding to the
enabled function will remain lit.
! The functions may affect the recommended load value
and/or the duration of the cycle.
7. START THE PROGRAMME. Press the START/PAUSE
button. The corresponding indicator light will become
green, remaining lit in a fixed manner, and the door will be
locked (the DOOR LOCKED symbol will be on). During
the wash cycle, the name of the phase in progress will
appear on the display. To change a wash cycle while
it is in progress, pause the washing machine using the
START/PAUSE button (the START/PAUSE indicator light
will flash slowly in an orange colour); then select the
desired cycle and press the START/PAUSE button again.
To open the door while a cycle is in progress, press
the START/PAUSE button; if the DOOR LOCKED
symbol is switched off the door may be opened. Press
the START/PAUSE button again to restart the wash cycle
from the point at which it was interrupted.
8. THE END OF THE WASH CYCLE. This will be
indicated by the text “END OF CYCLE” on the display;
when the DOOR LOCKED symbol switches off
the door may be opened. Open the door, unload the
laundry and switch off the machine.
! If you wish to cancel a cycle which has already begun,
press and hold the button. The cycle will be stopped
and the machine will switch off.
6
Page 7

Wash cycles and functions
Table of wash cycles
Description of the wash cycle
Wash cycles
Anti Stain
Cotton Prewash (1st press of the button): extremely soiled whites
and resistant colours.
White Cottons (1) (2nd press of the button): heavily soiled whites
and delicate colours.
Cottons Coloured (1-2) (3rd press of the button): lightly soiled whites
and delicate colours.
Synthetics Resistant (1st press of the button): heavily soiled resi-
stant colours.
Synthetics Resistant (4) (1st press of the button): heavily soiled
resistant colours.
Synthetics Delicate (2nd press of the button): lightly soiled resistant
colours.
Fastwash 60' (1st press of the button): to refresh normal soiled
garments quickly (not suitable for wool, silk and clothes which
require washing by hand).
Fastwash 30' (2nd press of the button): to refresh lightly soiled
garments quickly (not suitable for wool, silk and clothes which
require washing by hand).
M
My Cycle: allows for any wash cycle to be stored.
Bed & Bath (3): washes bathroom laundry and bedlinen. 60° 1200 -
Woolmark Platinum (Wool): for wool, cashmere, etc. 40° 800 -
Delicates
Fast Spin Cottons (1st press of the button) - 1200 - - - - 7 - - - 16’
Rinse (2nd press of the button) - 1200 - - -
Pump out (3rd press of the button) - 0 - - - - 7 - - - 2’
The length of cycle shown on the display or in this booklet is an estimation only and is calculated assuming standard working conditions. The actual duration can
vary according to factors such as water temperature and pressure, the amount of detergent used, the amount and type of load inserted, load balancing and any
wash options selected.
Max.
temp. (°C)
40° 1200 -
90° 1200
60°
(Max. 90°)
40° 1200 -
60° 800 -
40° 800 -
40° 800 -
60° 1200 -
30° 800 -
30° 0 -
Max.
speed
(rpm)
1200 -
Detergents
PreWash
Wash
Bleach
-
-
-
-
-
-
-
(kg)
pness %
Max. load
Fabric
softener
Residual dam-
4
- - -
7 53 2,47 97 185’
7 53 0,99 64 190’
7 53 0,94 72 175’
3 49 0,87 42 90’
3 49 0,56 42 80’
3 - - - 75’
3.5 53 0,81 36 60’
3 71 0,19 39 30’
7 - - - 135’
1.5 - - - 80’
1 - - - 75’
7 - - - 49’
Energy con-
Total water lt
sumption kWh
180’
GB
Cycle duration
For all Test Institutes:
1) Test wash cycle in compliance with directive 1061/2010: set wash cycle 60°C (2nd press of the button); set wash cycle 40°C (3rd press of the button).
This cycle is designed for cotton loads with a normal soil level and is the most efficient in terms of both electricity and water consumption; it should be used for garments which can be
washed at 60°C and 40°C. The actual washing temperature may differ from the indicated value.
2) Long wash cycle for cottons: set wash cycle 40°C (3rd press of the button).
3) Short wash cycle for cottons: set wash cycle ; temperature of 40°C (press TEMPERATURE button).
4) Long wash cycle for synthetics: set wash cycle 60°C (1st press of the button); temperature of 40°C (press TEMPERATURE button).
Wash functions
Timer Saver
If you select this option, the wash cycle duration will be reduced by up to 50%, depending on the selected cycle, thereby
guaranteeing simultaneous water and energy saving. Use this
cycle for lightly soiled garments.
! It cannot be used with the , “Fastwash 60’”, , , .
Easy Iron
By selecting this function, the wash and spin cycles will be
modified in order to reduce the formation of creases.
At the end of the cycle the washing machine will perform
slow rotations of the drum; the “Easy Iron” indicator light
will flash (and the text “END OF CYCLE” will appear on the
display. To end the cycle, press the START/PAUSE button
or the “Easy Iron” button.
! It cannot be used with the , “Fastwash 30’”, , ,
“Fast Spin Cottons” and “Pump out”.
Eco Wash
The Eco Wash function saves energy by not heating the
water used to wash your laundry – an advantage both to
the environment and to your energy bill. Instead, intensified
wash action and water optimisation ensure great wash
results in the same average time of a standard cycle.
For the best washing results we recommend the usage of
a liquid detergent.
! It cannot be used with the , (90°C), , , , .
7
Page 8

M
AX
1
2
4
3
A
B
Detergents and laundry
GB
Detergent dispenser drawer
Good washing results also depend on the correct dose of
detergent: adding too much detergent will not necessarily
result in a more efficient wash, and may in fact cause a
build up on the inside of your appliance and contribute to
environmental pollution.
! Use powder detergent for white cotton garments, for
pre-washing, and for washing at temperatures over 60°C.
! Follow the instructions given on the detergent packaging.
! Do not use hand washing detergents because these
create too much foam.
Open the detergent dispenser drawer and pour
in the detergent or washing
additive, as follows.
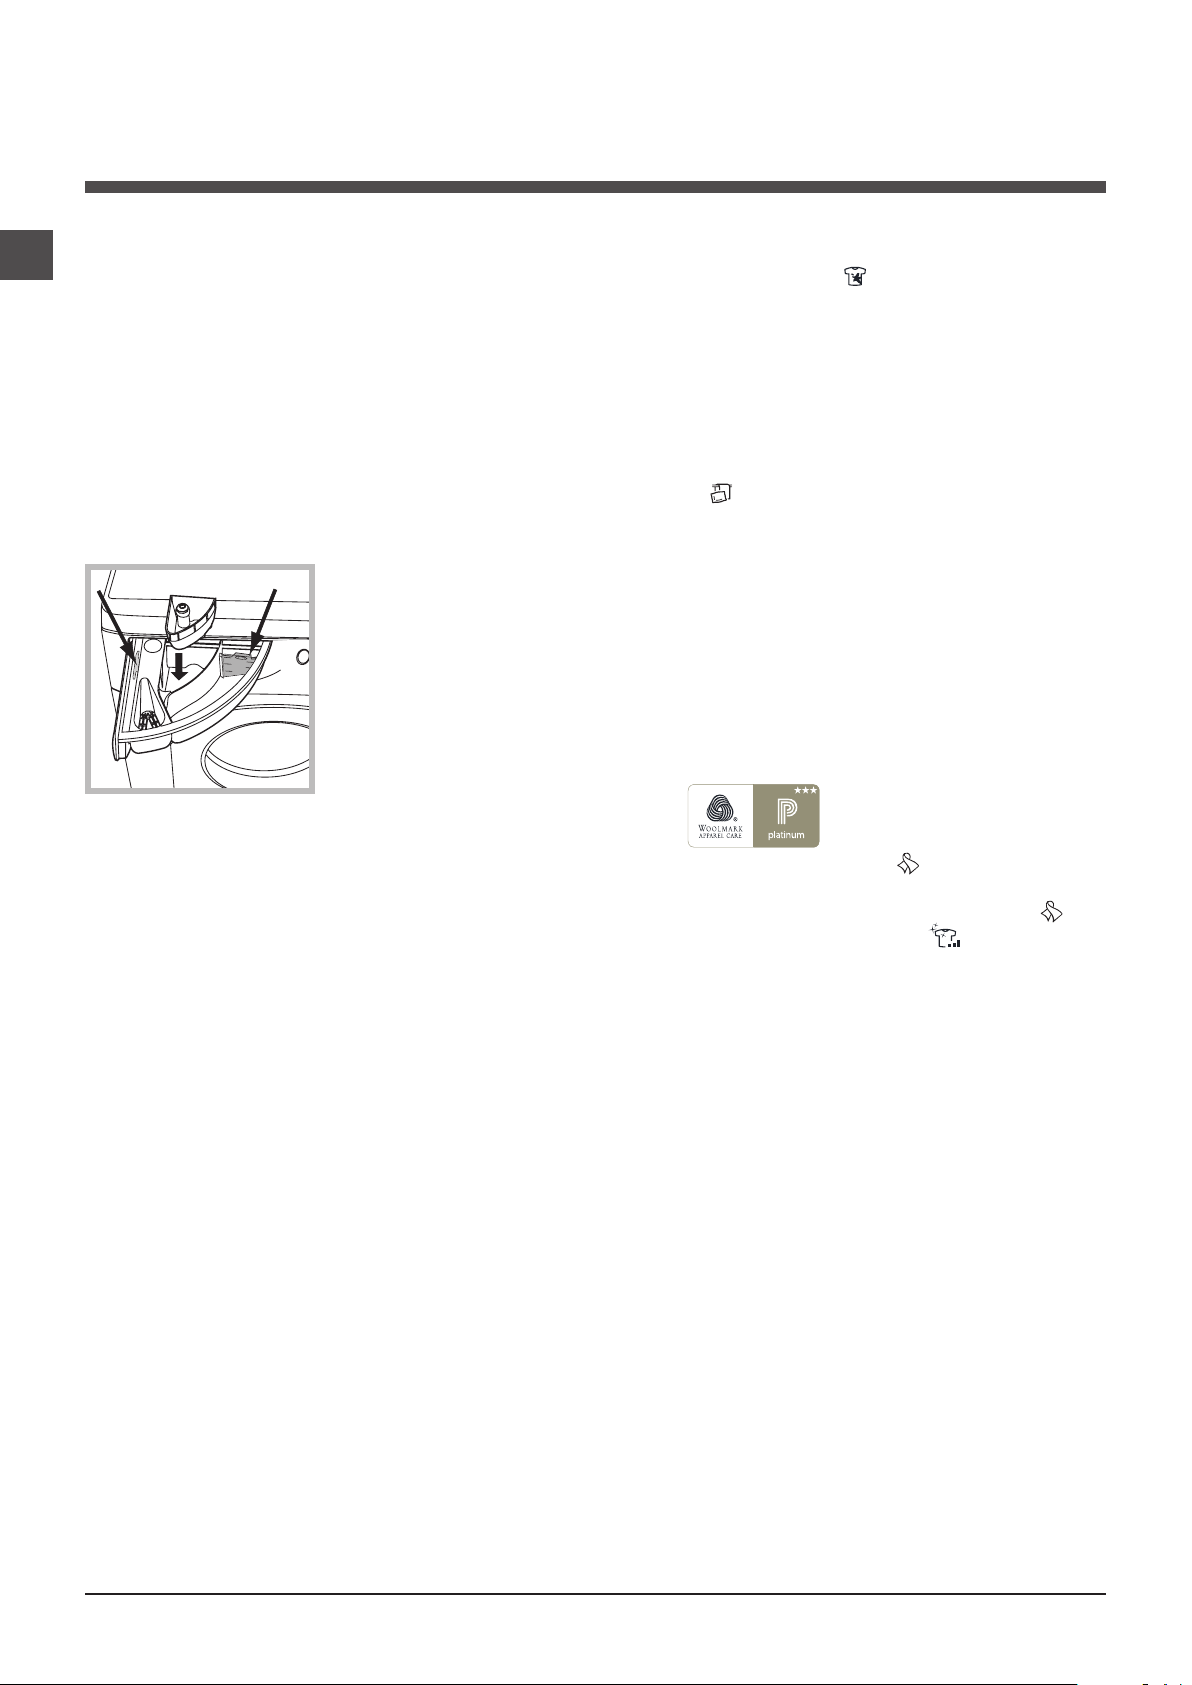
compartment 1: Pre-wash detergent (powder)
Before pouring in the detergent, make sure that extra compartment 4 has been removed.
compartment 2: Detergent for the wash cycle
(powder or liquid)
If liquid detergent is used, it is recommended that the
removable plastic partition A (supplied) be used for proper
dosage.
If powder detergent is used, place the partition into slot B.
compartment 3: Additives (fabric softeners, etc.)
The fabric softener should not overflow the grid.
extra compartment 4: Bleach
Special wash cycles
Anti Stain : this programme is suitable to heavily-soiled
garments with resistant colours. It ensures a washing
class that is higher than the standard class (A class). When
running the programme, do not mix garments of different
colours. We recommend the use of powder detergent.
Pre-treatment with special additives is recommended if
there are obstinate stains.
Bed & Bath: use programme to wash bed linen and
towels in one single cycle: it optimises softener performance and helps you save time and energy. We recommend
the use of powder detergent.
Wool: the wool wash cycle on this Hotpoint-Ariston machine has been tested and approved by The Woolmark
Company for washing wool garments labelled as hand
washable provided that the garments are washed according to the instructions on the garment label and those
issued by the manufacturer of this washing machine.
Hotpoint-Ariston is the first washing machine brand to be
approved by The Woolmark Company for Apparel CarePlatinum for its washing performance and consumption
of energy and water.
Delicates: use programme to wash very delicate
garments having strasses or sequins.
To wash silk garments and curtains select the cycle
and set the “Delicate” level from option .
We recommend turning the garments inside out before
washing and placing small items into the special bag
for washing delicates. Use liquid detergent on delicate
garments for best results.
Load balancing system
Preparing the laundry
•Dividethelaundryaccordingto:
- the type of fabric/the symbol on the label
- the colours: separate coloured garments from whites.
•Emptyallgarmentpocketsandcheckthebuttons.
•Donotexceedthelistedvalues,whichrefertotheweight
of the laundry when dry:
Durable fabrics: max. 7 kg
Synthetic fabrics: max. 3 kg
Delicate fabrics: max. 2 kg
Wool: max. 1,5 kg
Silk: max. 1 kg
How much does your laundry weigh?
1 sheet 400-500 g
1 pillow case 150-200 g
1 tablecloth 400-500 g
1 bathrobe 900-1200 g
1 towel 150-250 g
8
Before every spin cycle, to avoid excessive vibrations and
to distribute the load in a uniform manner, the drum rotates
continuously at a speed which is slightly greater than the
washing rotation speed. If, after several attempts, the load
is not balanced correctly, the machine spins at a reduced
spin speed. If the load is excessively unbalanced, the
washing machine performs the distribution process instead
of spinning. To encourage improved load distribution and
balance, we recommend small and large garments are
mixed in the load.
Page 9

Precautions and tips
20
! This washing machine was designed and constructed in
accordance with international safety regulations. The following information is provided for safety reasons and must
therefore be read carefully.
General safety
• Thisappliancewasdesignedfordomesticuseonly.
• Thisapplianceisnotintendedforusebypersons(inclu-
ding children) with reduced physical, sensory or mental
capabilities, or lack of experience and knowledge, unless
they have been given supervision or instruction concer-
ning use of the appliance by a person responsible for
their safety. Children should be supervised to ensure that
they do not play with the appliance.
• Donottouchthemachinewhenbarefootorwithwetor
damp hands or feet.
• Donotpullonthepowersupplycablewhenunplugging
the appliance from the electricity socket. Hold the plug
and pull.
• Donotopenthedetergentdispenserdrawerwhilethe
machine is in operation.
• Donottouchthedrainedwaterasitmayreachextreme-
ly high temperatures.
• Neverforcetheportholedoor.Thiscoulddamagethesafety
lock mechanism designed to prevent accidental opening.
• Iftheappliancebreaksdown,donotunderanycircum-
stances access the internal mechanisms in an attempt
to repair it yourself.
• Alwayskeepchildrenwellawayfromtheappliancewhile
it is operating.
• Thedoorcanbecomequitehotduringthewashcycle.
• Iftheappliancehastobemoved,workinagroupoftwo
or three people and handle it with the utmost care. Never
try to do this alone, because the appliance is very heavy.
• Beforeloadinglaundryintothewashingmachine,make
sure the drum is empty.
Disposal
•Disposingofthepackagingmaterials:observelocalregu-
lations so that the packaging may be re-used.
•TheEuropeanDirective2002/96/EConWasteElectrical
and Electronic Equipment, requires that old household
electrical appliances must not be disposed of in the normal
unsorted municipal waste stream. Old appliances must be
collected separately in order to optimise the recovery and
recycling of the materials they contain and reduce the impact on human health and the environment. The crossed
out “wheeled bin” symbol on the product reminds you of
your obligation, that when you dispose of the appliance it
must be separately collected. Consumers should contact
their local authority or retailer for information concerning the
correct disposal of their old appliance.
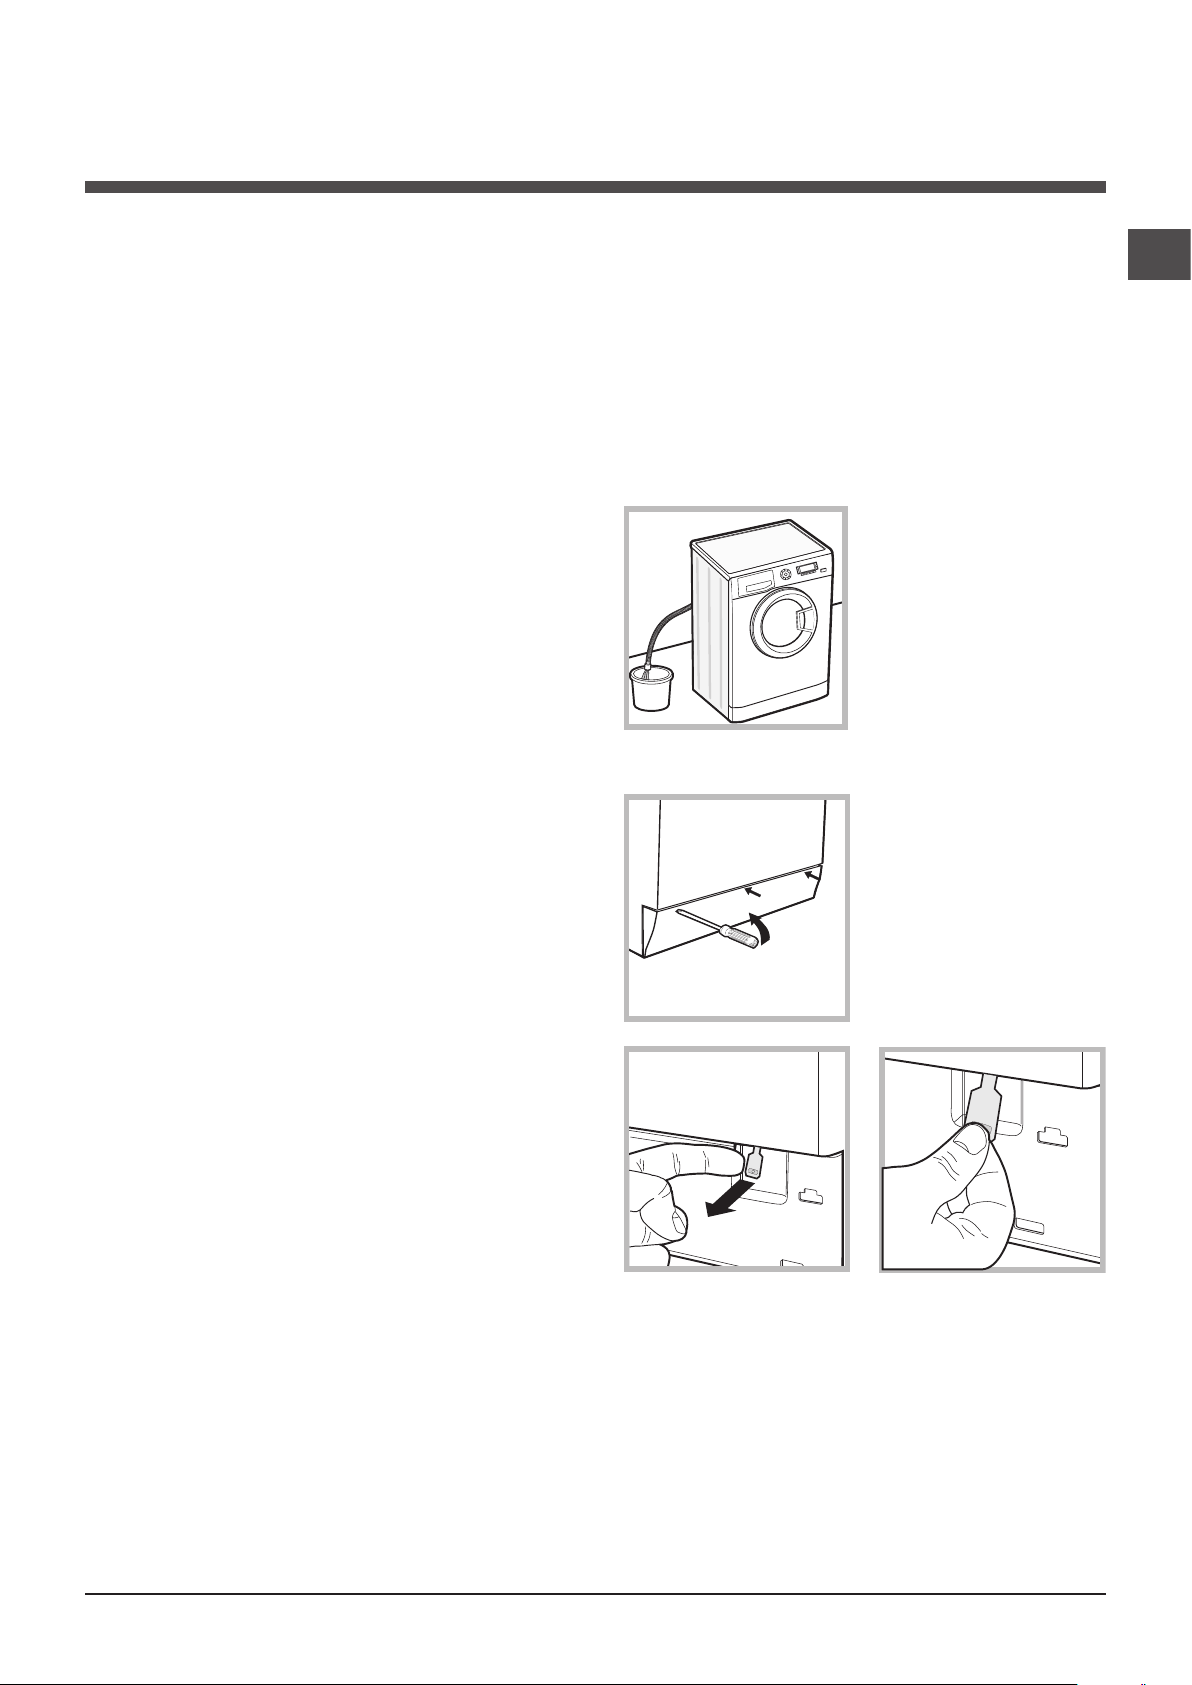
Opening the porthole door manually
In the event that it is not possible to open the porthole
door due to a powercut, and if you wish to remove the
laundry, proceed as follows:
1. remove the plug from the
electrical socket.
2. make sure the water level
inside the machine is lower
than the door opening; if it
is not, remove excess water
using the drain hose, collecting it in a bucket as indicated
in the figure.
3. using a screwdriver, remove the cover panel on the lower front part of the washing
machine (see figure).
4. pull outwards using the tab as indicated in the figure,
until the plastic tie-rod is freed from its stop position; pull
downwards and open the door at the same time.
5. reposition the panel, making sure the hooks are securely
in place before you push it onto the appliance.
GB
9
Page 10

Care and maintenance
1
2
A
B
GB
Cutting off the water and electricity
supplies
• Turnoffthewatertapaftereverywashcycle.Thiswilllimit
wear on the hydraulic system inside the washing machine
and help to prevent leaks.
• Unplugthewashingmachinewhencleaningitanddu-
ring all maintenance work.
Cleaning the washing machine
•Theouterpartsandrubbercomponentsoftheappliance can be cleaned using a soft cloth soaked in lukewarm
soapy water. Do not use solvents or abrasives.
•Thewashingmachinehasa“AutoClean”programme
for its internal parts that must be run with no load in the
drum.
For maximum performance you may want to use either
the detergent (i.e. a quantity 10% the quantity specified
for lightly-soiled garments) or special additives to clean
the washing machine. We recommend running a cleaning
programme every 40 wash cycles.
To start the programme press buttons A and B simultaneously for 5 seconds (see figure).
The programme will start automatically and will last approximately 70 minutes. To stop the cycle press the START/
PAUSE button.
Caring for the door and drum of your
appliance
• Alwaysleavetheportholedoorajarinordertoprevent
unpleasant odours from forming.
Cleaning the pump
The washing machine is fitted with a self-cleaning pump
which does not require any maintenance. Sometimes, small
items (such as coins or buttons) may fall into the pre-chamber which protects the pump, situated in its bottom part.
! Make sure the wash cycle has finished and unplug the
appliance.
To access the pre-chamber:
1. using a screwdriver,
remove the cover panel
on the lower front part of
the washing machine (see
figure);
Cleaning the detergent dispenser drawer
Remove the dispenser by
raising it and pulling it out
(see figure).
Wash it under running water; this operation should be
repeated frequently.
2. unscrew the lid by rotating it anti-clockwise (see
figure): a little water may
trickle out. This is perfectly
normal;
3. clean the inside thoroughly;
4. screw the lid back on;
5. reposition the panel, making sure the hooks are securely
in place before you push it onto the appliance.
Checking the water inlet hose
Check the inlet hose at least once a year. If there are any
cracks, it should be replaced immediately: during the wash
cycles, water pressure is very strong and a cracked hose
could easily split open.
! Never use second-hand hoses.
10
Page 11

Troubleshooting
Your washing machine could fail to work. Before contacting the Technical Assistance Centre (see “Assistance”), make sure
that the problem cannot be not solved easily using the following list.
Problem:
The washing machine does not
switch on.
The wash cycle does not start.
The washing machine does not
take in water (the text “NO WATER,
CHECK SUPPLY” appears on the
display).
The washing machine continuously
takes in and
drains water.
Possible causes / Solutions:
• Theapplianceisnotpluggedintothesocketfully,orisnotmakingcontact.
• Thereisnopowerinthehouse.
• Thewashingmachinedoorisnotclosedproperly.
• TheON/OFFbuttonhasnotbeenpressed.
• TheSTART/PAUSEbuttonhasnotbeenpressed.
• Thewatertaphasnotbeenopened.
• Adelayedstarthasbeenset(see “Running a wash cycle”).
• Thewaterinlethoseisnotconnectedtothetap.
• Thehoseisbent.
• Thewatertaphasnotbeenopened.
• Thereisnowatersupplyinthehouse.
• Thepressureistoolow.
• TheSTART/PAUSEbuttonhasnotbeenpressed.
• Thedrainhoseisnotfittedataheightbetween65and100cmfromthefloor
(see “Installation”).
• Thefreeendofthehoseisunderwater(see “Installation”).
• Thewalldrainagesystemisnotfittedwithabreatherpipe.
If the problem persists even after these checks, turn off the water tap, switch
the appliance off and contact the Assistance Service. If the dwelling is on one of
the upper floors of a building, there may be problems relating to water drainage,
causing the washing machine to fill with water and drain continuously. Special
anti-draining valves are available in shops and help to avoid this inconvenience.
GB
The washing machine does not
drain or spin.
The washing machine vibrates a lot
during the spin cycle.
The washing machine leaks.
The machine is locked and the display
flashes, indicating an
error code (e.g. F-01, F-..).
There is too much foam.
• Thewashcycledoesnotincludedraining:somewashcyclesrequirethedrain
phase to be started manually (see “Wash cycles and functions”).
• TheEASYIRONfunctionhasbeenactivated:Tocompletethewashcycle,
press the START/PAUSE button (see “Wash cycles and functions”).
• Thedrainhoseisbent(see “Installation”).
• Thedrainageductisclogged.
• Thedrumwasnotunlockedcorrectlyduringinstallation(see “Installation”).
• Thewashingmachineisnotlevel(see “Installation”).
• Thewashingmachineistrappedbetweencabinetsandwalls(see “Installation”).
• Thewaterinlethoseisnotscrewedonproperly(see “Installation”).
• Thedetergentdispenserdrawerisblocked(forcleaninginstructions,see “Care
and maintenance”).
• Thedrainhoseisnotfixedproperly(see “Installation”).
• Switchoffthemachineandunplugit,waitforapproximately1minuteandthen
switch it back on again.
If the problem persists, contact the Technical Assistance Service.
• Thedetergentisnotsuitableformachinewashing(itshoulddisplaythetext
“for washing machines” or “hand and machine wash”, or the like).
• Toomuchdetergentwasused.
11
Page 12

Service
GB
Before calling for Assistance:
• Check whether you can solve the problem alone (see “Troubleshooting”);
• Restarttheprogrammetocheckwhethertheproblemhasbeensolved;
• Ifthisisnotthecase,contactanauthorisedTechnicalAssistanceCentreusingthetelephonenumberprovidedonthe
guarantee certificate.
! Always request the assistance of authorised technicians.
Have the following information to hand:
• thetypeofproblem;
• theappliancemodel(Mod.);
• theserialnumber(S/N).
This information can be found on the data plate applied to the rear of the washing machine, and can also be found on the
front of the appliance by opening the door.
12
Page 13

Instrukcja obsługi
PRALKA
PL
Polski
WMSD 723
Spis treści
Instalacja, 14-15
Rozpakowanie i wypoziomowanie
Podłączenia hydrauliczne i elektryczne
Pierwszy cykl prania
Dane techniczne
Opis pralki, 16-17
Panel sterowania
Wyświetlacz
W jaki sposób wykonać cykl prania, 18
Programy i funkcje, 19
Tabela programów
Funkcje prania
Środki piorące i bielizna, 20
Szuadka na środki piorące
Przygotowanie bielizny
Programy specjalne
System równoważenia ładunku
Zalecenia i środki ostrożności, 21
Ogólne zasady bezpieczeństwa
Utylizacja
Ręczne otwieranie okrągłych drzwiczek
PL
Utrzymanie i konserwacja, 22
Odłączenie wody i prądu elektrycznego
Czyszczenie pralki
Czyszczenie szuadki na środki piorące
Konserwacja okrągłych drzwiczek i bębna
Czyszczenie pompy
Kontrola przewodu doprowadzającego wodę
Nieprawidłowości w działaniu i sposoby
ich usuwania, 23
Serwis Techniczny, 24
13
Page 14

Instalacja
PL
! Należy zachować niniejszą książeczkę, aby móc z niej
skorzystać w każdej chwili. W przypadku sprzedaży,
odstąpienia lub przeniesienia pralki w inne miejsce
należy zadbać o przekazanie instrukcji wraz z maszyną,
aby nowy właściciel mógł zapoznać się z działaniem
urządzenia i z dotyczącymi go ostrzeżeniami.
! Należy uważnie przeczytać instrukcję obsługi: za-
wiera ona ważne informacje dotyczące instalacji oraz
właściwego i bezpiecznego użytkowania pralki.
Rozpakowanie i wypoziomowanie
Rozpakowanie
1. Rozpakować pralkę.
2. Sprawdzić, czy nie doznała ona uszkodzeń w czasie
transportu. W przypadku stwierdzenia uszkodzeń nie
podłączać jej i skontaktować się ze sprzedawcą.
3. Odkręcić 4 śruby
zabezpieczające maszynę
na czas transportu oraz
zdjąć gumowy element z
podkładką, znajdujący się
w tylnej części pralki (patrz
rysunek).
4. Zatkać otwory przy pomocy plastikowych zaślepek,
znajdujących się w wyposażeniu maszyny.
5. Zachować wszystkie części: w razie konieczności
przewiezienia pralki w inne miejsce, powinny one zostać
ponownie zamontowane.
! Części opakowania nie są zabawkami dla dzieci.
Poziomowanie
1. Ustawić pralkę na płaskiej i twardej podłodze, nie
opierając jej o ściany, meble itp.
Staranne wypoziomowanie pralki zapewnia jej stabilność
i zapobiega wibracjom, hałasowi oraz przesuwaniu się
maszyny w czasie pracy. W razie ustawienia na dywanie lub wykładzinie dywanowej należy tak wyregulować
nóżki, aby pod pralką pozostawała wolna przestrzeń
niezbędna dla wentylacji.
Podłączenia hydrauliczne i elektryczne
Podłączenie przewodu doprowadzającego wodę
1. Podłączyć przewód
zasilający poprzez
przykręcenie do zaworu
wody zimnej z końcówką
gwintowaną ¾ gas (patrz
rysunek).
Przed podłączeniem
spuszczać wodę do momentu, aż stanie się ona
całkowicie przezroczysta.
2. Podłączyć do maszyny
przewód doprowadzający
wodę, przykręcając go
do odpowiedniego otworu dopływowego,
znajdującego się w tylnej
części pralki, z prawej
strony u góry
(patrz rysunek).
3. Zwrócić uwagę, aby na przewodzie nie było zagięć ani
zwężeń.
! Ciśnienie wody w kurku powinno mieścić się w prze-
dziale podanym w tabeli Danych technicznych (patrz
strona obok).
! Jeśli długość przewodu doprowadzającego wodę jest
niewystarczająca, należy zwrócić się do specjalistycznego sklepu lub do autoryzowanego technika.
14
2. Jeśli podłoga nie
jest idealnie pozioma,
należy skompensować
nierówności, odkręcając
lub dokręcając przednie
nóżki (patrz rysunek); kąt
nachylenia, zmierzony na
górnym blacie pralki nie
powinien przekraczać 2°.
! Nigdy nie instalować już używanych przewodów.
! Stosować przewody znajdujące się w wyposażeniu
maszyny.
Page 15

65 - 100 cm
Podłączenie przewodu odpływowego
Podłączyć przewód
odpływowy, nie zginając
go, do rury ściekowej lub
do otworu odpływowego
w ścianie, które powinny znajdować się na
wysokości od 65 do 100
cm od podłogi;
! Nie używać przedłużaczy ani rozgałęźników.
! Przewód nie powinien być pozginany ani przygnieciony.
! Przewód zasilania elektrycznego może być wymieniany
wyłącznie przez autoryzowanych techników.
Uwaga! Producent nie ponosi żadnej odpowiedzialności
w przypadku nieprzestrzegania powyższych zasad.
Pierwszy cykl prania
PL
ewentualnie oprzeć go na
brzegu zlewu lub wanny,
przymocowując do kranu
prowadnik, znajdujący
się w wyposażeniu (patrz
rysunek). Wolny koniec
przewodu odpływowego
nie powinien być zanurzony w wodzie.
! Odradza się stosowanie przewodów przedłużających;
jeśli to konieczne, przewód przedłużający powinien mieć
taką samą średnicę jak oryginalny, a jego długość nie
może przekraczać 150 cm.
Podłączenie elektryczne
Przed włożeniem wtyczki do gniazdka elektrycznego
należy się upewnić, czy:
• gniazdko posiada uziemienie i jest zgodne z
obowiązującymi przepisami;
• gniazdko jest w stanie wytrzymać maksymalne
obciążenie mocy maszyny, wskazane w tabeli Danych
technicznych (patrz obok);
• napięcie zasilania mieści się w wartościach wskazany-
ch w tabeli Danych technicznych
(patrz obok);
• gniazdko pasuje do wtyczki pralki. W przeciwnym razie
należy wymienić gniazdko lub wtyczkę.
! Nie należy instalować pralki na otwartym powietrzu, na-
wet w osłoniętym miejscu, gdyż wystawienie urządzenia
na działanie deszczu i burz jest bardzo niebezpieczne.
! Po zainstalowaniu pralki gniazdko elektryczne powinno
być łatwo dostępne.
Po zainstalowaniu pralki, przed przystąpieniem do jej
użytkowania, należy wykonać jeden cykl prania ze środkiem
piorącym, ale bez wsadu, nastawiając program (60°C).
Dane techniczne
Model WMSD 723
szerokoϾ cm 59,5
Wymiary
PojemnoϾ od 1 do 7 kg
Dane pr¹du
elektrycznego
Dane sieci
wodoci¹gowej
SzybkoϾ
wirowania
Programy testowe
zgodnie z dyrekty-
wami 1061/2010 i
1015/2010
wysokoϾ cm 85
g³êbokoœæ cm 43,5
dane techniczne umieszczone s¹ na
tabliczce na maszynie
Maksymalne ciœnienie 1 MPa (10 barów)
ciœnienie minimalne 0,05 MPa (0,5 barów)
pojemnoœæ bêbna 48 litrów
do 1200 obrotów na minutê
program
temperatura 60°C
temperatura 40°C (3. naciśnięcie przycisku).
Urz¹dzenie to zosta³o wyprodukowane
zgodnie z nastêpuj¹cymi przepisami EWG:
- 2004/108/CE (o Kompatybilnoœci
Elektromagnetycznej)
- 2006/95/CE (o Niskim Napiêciu)
- 2002/96/CE
;
(2. naciśnięcie przycisku);
15
Page 16
Opis pralki
PL
Panel sterowania
Szuadka na środki piorące
Szuadka na środki piorące: do dozowania środków
piorących i dodatków (patrz „Środki piorące i bielizna”).
PRZEŁĄCZNIKA
PROGRAMÓW
Przycisk
ON/OFF
Przyciski
Przycisk
OPCJE
PRANIA
Wyświetlacz
Przycisk
MY CYCLE
Przycisk
TYP
PŁUKANIA
Przycisk
URUCHOMIENIE
OPÓŹNIONE
Przycisk TEMPERATURY : nacisnąć w celu zmniejsze-
nia temperatury: wartość zostaje wyświetlona na ekranie.
Przyciski
FUNKCJI
Przycisk
WIROWANIA
Przycisk z
kontrolką
START/PAUSE
Przycisk
TEMPERATURY
Przycisk
BLOKADA
PRZYCISKÓW
Przycisk ON/OFF : nacisnąć krótko przycisk w celu
włączenia lub wyłączenia maszyny. Kontrolka START/
PAUSE, która pulsuje powoli w kolorze zielonym wskazuje, że maszyna jest włączona. W celu wyłączenia pralki
podczas prania konieczne jest dłuższe przytrzymanie
naciśniętego przycisku, przez około 3 sek.; krótkie lub
przypadkowe naciśnięcie wystarczy do wyłączenia maszyny. Wyłączenie maszyny podczas trwającego prania
anuluje program prania.
Przyciski PRZEŁĄCZNIKA PROGRAMÓW: w celu wybra-
nia potrzebnego programu (patrz „Tabela programów”).
Przycisk
w celu zapisania w pamięci cyklu oraz własnych preferowanych personalizacji. W celu przywołania cyklu zapisanego uprzednio należy nacisnąć przycisk
Przyciski FUNKCJI: nacisnąć przycisk w celu wybrania potrzebnej funkcji. Na wyświetlaczu zaświeci się
odpowiednia kontrolka.
Przycisk
żądanego stopnia intensywności prania.
Przycisk
nia żądanego rodzaju płukania.
Przycisk WIROWANIA : nacisnąć w celu zmniejszenia
lub całkowitego wyłączenia wirówki – wartość ukazana
zostanie na wyświetlaczu.
MY CYCLE
OPCJE PRANIA
TYP PŁUKANIA
: przytrzymać naciśnięty przycisk
MY CYCLE
: nacisnąć w celu wybrania
: nacisnąć w celu wybra-
.
Przycisk BLOKADA PRZYCISKÓW : w celu
uruchomienia lub wylaczenia blokady panelu sterowania
nalezy przytrzymac nacisniety przycisk przez okolo
2 sekundy. Podswietlony symbol wskazuje, ze
panel sterowania zostal zablokowany. W ten sposób
uniemozliwia sie dokonywanie przypadkowych zmian w
programach, zwlaszcza, jesli w domu obecne sa dzieci.
W celu wylaczenia blokady panelu sterowania nalezy
przytrzymac nacisniety przycisk przez okolo 2 sekundy.
Przycisk URUCHOMIENIE OPÓZNIONE : nacisnąc w
celu ustawienia opóźnionego uruchomienia wybranego
programu. Opóźnienie wyświetlone zostanie na ekranie.
Przycisk z kontrolką START/PAUSE: kiedy zielona kon-
trolka pulsuje powoli, nacisnąć przycisk w celu uruchomienia prania. Po uruchomieniu cyklu kontrolka świeci w
sposób ciągły. W celu wybrania pauzy w praniu należy
nacisnąć ponownie przycisk, kontrolka zacznie pulsować
w kolorze pomarańczowym. Jeśli symbol nie świeci
się, można otworzyć drzwiczki. W celu ponownego uruchomienia prania od miejsca, w którym zostało przerwane, należy ponownie nacisnąć przycisk.
Funkcja stand by
Pralka ta, w myśl nowych norm europejskich związanych
z oszczędnością elektryczną, posiada system auto
wyłączenia (stand by), który włącza się po 30 minutach
nie użytkowania. Ponownie lekko wcisnąć przycisk
ON/OFF i poczekać, aż pralka ponownie włączy się.
Zużycie w trybie wyłączenia: 1W
Zużycie w trybie czuwania: 1W
16
Page 17

Wyświetlacz
PL
Z
B
A
X
D
C
E
Y
F
Wyświetlacz potrzebny jest w celu programowania maszyny i dostarcza wielu informacji.
W obu wierszach górnych A i B wyświetlane są: wybrany program prania, faza prania bieżącego oraz wszelkie wskazania związane ze stanem zaawansowania programu.
W wierszu C wyświetlany jest czas pozostały do końca cyklu prania bieżącego oraz, jeśli zaprogramowano URUCHOMIENIE OPÓŹNIONE, czas brakujący do uruchomienia wybranego programu.
W wierszu D wyświetlana jest maksymalna wartość szybkości wirówki, jaką maszyna może uzyskać w przypadku wybranego programu; jeśli program nie przewiduje wirowania wiersz pozostaje wygaszony.
W wierszu E wyświetlana jest maksymalna wartość temperatury, jaką można wybrać w przypadku wybranego programu,
jeśli program nie przewiduje ustawiania temperatury, wiersz pozostaje wygaszony.
Kontrolki F związane są z funkcjami i włączają się, kiedy wybrana funkcja zgodna jest z wybranym programem.
Symbol zablokowanych drzwiczek
Zapalony symbol oznacza, że okrągłe drzwiczki pralki są zablokowane, aby zapobiec przypadkowemu ich otworzeniu.
Aby uniknąć uszkodzenia pralki, należy odczekać, aż symbol ten zgaśnie, zanim przystąpi się do otwierania drzwiczek
pralki.
Uwaga: jeśli aktywna jest funkcja URUCHOMIENIE OPÓŹNIONE drzwiczek nie można otworzyć. W celu ich otwarcia
należy ustawić maszynę w pauzie poprzez naciśnięcie przycisku START/PAUSE.
! Podczas pierwszego uruchomienia wymagane będzie dokonanie wyboru języka a wyświetlacz ustawi się automatycznie
na menu wyboru języka.
W celu wybrania żądanego języka nacisnąć przyciski X i Y, dla potwierdzenia wyboru nacisnąć przycisk Z.
Aby zmienić język, należy wyłączyć urządzenie, nacisnąć równocześnie przyciski X, Y, Z, aż do usłyszenia sygnału
dźwiękowego, wyświetli się menu wyboru języka.
17
Page 18

W jaki sposób wykonać cykl prania
PL
1. WŁĄCZENIE MASZYNY. Nacisnąć przycisk , na
wyświetlaczu pojawi się napis WŁĄCZENIE, kontrolka
START/PAUSE zacznie powoli pulsować w kolorze zielonym.
2. WKŁADANIE BIELIZNY. Otworzyć szklane drzwiczki.
Włożyć bieliznę uważając, aby nie przekroczyć wielkości
wsadu wskazanej w tabeli programów na następnej stronie.
3. DOZOWANIE ŚRODKA PIORĄCEGO. Wysunąć
szuadkę i wsypać detergent do odpowiednich komór w
sposób wyjaśniony w „Środki piorące i bielizna”.
4. ZAMKNĄĆ DRZWICZKI.
5. WYBÓR PROGRAMU. Nacisnąć jeden z przycisków
PRZEŁĄCZNIKA PROGRAMÓW w celu wybrania
potrzebnego programu, nazwa programu pojawi się na
wyświetlaczu; z nim powiązana jest temperatura oraz
prędkość wirowania, które mogą zostać zmienione. Na
wyświetlaczu pojawi się czas trwania cyklu.
6. PERSONALIZACJA CYKLU PRANIA.
Przy pomocy odpowiednich przycisków:
Zmienić temperaturę i/lub wirówkę. Maszyna
wybierze automatycznie temperaturę oraz wirówkę
maksymalne przewidziane dla danego programu, dlatego
nie mogą one być zwiększane. Poprzez naciskanie
przycisku stopniowo zmniejsza się temperaturę aż do
prania w zimnej wodzie „OFF”. Naciskając przycisk
stopniowo zmniejsza się wirówkę aż do jej wyłączenia
„OFF”. Dodatkowe naciśnięcie przycisków przywróci
maksymalne wartości przewidywane.! Wyjątek:
wybierając program
(2. naciśnięcie przycisku)
temperaturę
można podnieść aż do 90°.
Ustawienie opóźnionego rozpoczęcia.
W celu ustawienia opóźnionego rozpoczęcia wybranego
programu należy naciskać odpowiedni przycisk aż do
osiągnięcia żądanego czasu opóźnienia. Kiedy opcja ta jest
aktywna, na wyświetlaczu pojawia się symbol . W celu
usunięcia opóźnionego uruchomienia należy naciskać
przycisk aż do pojawienia się napisu “OFF”.
Ustawić żądany stopień intensywności prania.
Opcja umożliwia optymalizację prania w
zależności od stopnia zabrudzenia tkanin oraz żądanej
intensywności prania.
Wybrać program prania, cykl zostanie automatycznie
ustawiony na poziomie „NORMALNY”, przeznaczonym
dla średnio zabrudzonej odzieży, (ustawienie to
nie stosuje się dla cyklu „Wełna”, który ustawia się
automatycznie na poziomie „DELIKATNE”).
W przypadku silnie zabrudzonej odzieży, należy nacisnąć
przycisk aż do przejścia do poziomu „SUPER
PRANIE”. Poziom ten gwarantuje wysokiej jakości
pranie, dzięki użyciu większej ilości wody w początkowej
fazie cyklu i intensywniejszym ruchom mechanicznym
służy do usuwania najoporniejszych plam. Może być
używany z wybielaczem i bez niego.
Jeśli chce się przeprowadzić wybielanie, należy włożyć
dodatkową szuadkę 4, znajdującą się w wyposażeniu,
do szuadki 1. Nie przekraczać poziomu „max”
wybielacza w płynie, podanej na środkowym wskaźniku
(zobacz rysunek na str. 20).
W przypadku lekko zabrudzonej odzieży lub w celu
delikatnego obchodzenia się z tkaninami, należy
nacisnąć przycisk aż do przejścia do poziomu
„DELIKATNE”. Cykl zredukuje ruchy mechaniczne,
aby zagwarantować doskonały efekt prania delikatnej
odzieży. Jeśli któreś z ustawień lub zmiana ustawienia
nie jest możliwe, na wyświetlaczu pojawi się napis
„ZABLOKOWANE”.
Ustawić rodzaj płukania.
Opcja umożliwia wybranie rodzaju płukania
przeznaczonego do jak największej ochrony delikatnej
skóry. Po pierwszym naciśnięciu przycisku, zostaje
ustawiony poziom „EXTRA PŁUKANIE”, który pozwala
wybrać dodatkowe płukanie, oprócz standardowego,
w celu usunięcia wszelkich pozostałości detergentu.
Po drugim naciśnięciu przycisku, zostaje ustawiony
poziom „WRAŻLIWA SKÓRA”, który pozwala wybrać
dwa dodatkowe płukania, oprócz standardowego, w
celu jak najlepszej ochrony delikatnej skóry. Po trzecim
naciśnięciu przycisku, zostaje ustawiony poziom
„ANTYALERGICZNE”, który pozwala wybrać trzy
dodatkowe płukania, oprócz standardowego, w celu
usunięcia głównych alergenów, takich jak pyłki, roztocza,
sierść psów i kotów. Nacisnąć ponownie przycisk, aby
powrócić do „PŁUKANIE STANDARDOWE” rodzaju
płukania. Jeśli któreś z ustawień lub zmiana ustawienia
nie jest możliwe, na wyświetlaczu pojawi się napis
„ZABLOKOWANE”.
Zmiana charakterystyki cyklu.
• Naciskać przycisk w celu uruchomienia funkcji;
zaświeci się kontrolka odpowiadająca przyciskowi.
• Nacisnąć ponownie przycisk w celu wyłączenia funkcji,
kontrolka zgaśnie.
! Jeśli wybrana funkcja nie jest zgodna z wybranym
programem, kontrolka będzie pulsować, a funkcja nie
zostanie uruchomiona.
! Jeśli wybrana funkcja nie jest zgodna z inną, ustawioną
uprzednio, kontrolka odpowiadająca pierwszej funkcji
będzie pulsowała i uruchomiona zostanie jedynie druga
funkcja a kontrolka uruchomionej funkcji zaświeci się.
! Funkcje mogą zmieniać zalecane obciążenie i/lub czas
trwania cyklu.
7. URUCHOMIENIE PROGRAMU. Nacisnąć przycisk
START/PAUSE. Odpowiednia kontrolka zaświeci się
kolorem zielonym i drzwiczki zostaną zablokowane
(symbol ZABLOKOWANYCH DRZWICZEK świeci
się). Podczas prania na wyświetlaczu pojawi się nazwa
bieżącej fazy. W celu zmiany programu w czasie trwania
cyklu należy ustawić pralkę w pauzie naciskając przycisk
START/PAUSE (kontrolka START/PAUSE zacznie powoli
pulsować w kolorze pomarańczowym); następnie wybrać
potrzebny cykl i ponownie nacisnąć przycisk START/
PAUSE. W celu otwarcia drzwiczek w trakcie wykonywania
cyklu należy nacisnąć przycisk START/PAUSE; jeśli
symbol ZABLOKOWANYCH DRZWICZEK jest
wyłączony możliwe będzie otwarcie drzwiczek Nacisnąć
ponownie przycisk START/PAUSE, aby uruchomić
program od punktu, w którym został przerwany.
8. KONIEC PROGRAMU. Wskazywany jest napisem
„KONIEC CYKLU” na wyświetlaczu, kiedy symbol
ZABLOKOWANYCH DRZWICZEK wyłączy się,
możliwe będzie otwarcie drzwiczek. Otworzyć drzwiczki,
wyjąć bieliznę i wyłączyć maszynę.
! Jeśli zamierza się anulować uruchomiony juz cykl,
przytrzymać dłużej naciśnięty przycisk . Cykl zostanie
przerwany i maszyna wyłączy się.
18
Page 19

Programy i funkcje
Tabela programów
Prêd-
Opis programu
Programy
ODPLAMIANIE
PRANIE WSTĘPNE (1° naciœniêcie przycisku): bielizna bia³a silnie
zabrudzona.
BAWEŁNA BIAŁE (1) (2° naciœniêcie przycisku): tkaniny bia³e i koloro-
we, wytrzyma³e, mocno zabrudzone.
BAWEŁNA KOLOROWE (1-2) (3° naciœniêcie przycisku): tkaniny kolo-
rowe, wytrzyma³e, lekko zabrudzone.
SYNTETYCZNE INTENSYWNY (1° naciœniêcie przycisku): tkaniny
kolorowe, wytrzyma³e, mocno zabrudzone.
SYNTETYCZNE INTENSYWNY (4) (1° naciœniêcie przycisku): tkaniny
kolorowe, wytrzyma³e, mocno zabrudzone.
SYNTETYCZNE DELIKATNE (2° naciœniêcie przycisku): tkaniny kolo-
rowe, wytrzyma³e, lekko zabrudzone.
SZYBKIE PRANIE 60’ (1° naciœniêcie przycisku): w celu szybkie-
go odœwie¿enia mocno zabrudzonych tkanin (niewskazany dla
we³ny, jedwabiu i tkanin przeznaczonych do prania rêcznego).
SZYBKIE PRANIE 30’ (2° naciœniêcie przycisku): w celu szybkiego
odœwie¿enia lekko zabrudzonych tkanin (niewskazany dla we³ny,
jedwabiu i tkanin przeznaczonych do prania rêcznego).
MY CYCLE (PAMIEÆ): pozwala na zmemoryzowanie ka¿dego typu prania.
M
POŚCIEL I RĘCZNIKI (3): do bielizny poœcielowej i k¹pielowej.
Woolmark Platinum (WE£NA): do we³ny, kaszmiru, itp.
DELIKATNE
WIROWANIE (1° naciœniêcie przycisku).
PŁUKANIE (2° naciœniêcie przycisku).
ODPROWADZANIE WODY (3° naciœniêcie przycisku).
Czas trwania cyklu wskazany na wyświetlaczu lub w instrukcji jest czasem oszacowanym dla standardowych warunków. Rzeczywisty czas trwania cyklu może się
zmieniać w zależności od wielu czynników, takich jak temperatura i ciśnienie wody na wlocie, temperatura otoczenia, ilość detergentu, ilość i rodzaj pranej odzieży,
wyważenie ładunku, wybrane opcje dodatkowe.
Dla wszystkich Instytucji homologacyjnych:
(1) Program kontrolny zgodny z normą 2010/1061: ustawić program w 60 °C (2. naciśnięcie przycisku); ustawić program na 40 °C (3. naciśnięcie przycisku).
Ten cykl jest odpowiedni do prania średnio zabrudzonej odzieży bawełnianej i jest najbardziej wydajnym cyklem pod względem łącznego zużycia energii elektrycznej i wody; należy go używać do
odzieży przeznaczonej do prania w 60°C i 40°C. Rzeczywista temperatura prania może się różnić od podanej.
(2)
Program bawełna, długi:
(3)
Program bawełna, krótki:
(4) Program tkaniny syntetyczne długi: ustawić program w 60 °C (1. naciśnięcie przycisku); temperatura na 40 °C (nacisnąć przycisk TEMPERATURA).
ustawić program na 40 °C (3. naciśnięcie przycisku).
ustawić program ; temperatura na 40 °C (nacisnąć przycisk TEMPERATURA).
Temp. max.
(°C)
40° 1200 -
90° 1200
60°
(Max. 90°)
40° 1200 -
60° 800 -
40° 800 -
40° 800 -
60° 1200 -
30° 800 -
60° 1200 -
40° 800 -
30° 0 -
koϾ
max
(obrotów na
minutê)
1200 -
- 1200 - - - - 7 - - - 16’
- 1200 - - -
- 0 - - - - 7 - - - 2’
Œrodki pior¹ce
Pranie
wstępne
Pranie
Wybielacz
-
-
-
-
-
-
-
zmiêk-
Œrodek
czaj¹cy
Wilgotno�� resztko-
£adunek max (kg)
4
- - -
7 53 2,47 97 185’
7 53 0,99 64 190’
7 53 0,94 72 175’
3 49 0,87 42 90’
3 49 0,56 42 80’
3 - - - 75’
3.5 53 0,81 36 60’
3 71 0,19 39 30’
7 - - - 135’
1.5 - - - 80’
1 - - - 75’
7 - - - 49’
wa %
Woda ł�cznie lt
Zu�ycie energii kWh
180’
Czas trwania cyklu
PL
Funkcje prania
Pranie szybkie
Wybierając tę opcję, skraca się czas trwania programu nawet do 50%, w zależności od wybranego cyklu, gwarantując
równocześnie oszczędność wody i energii. Z cyklu należy
korzystać do prania niezbyt zabrudzonej odzieży.
! Nie można jej uruchomić w programach , “Szybkie
Pranie 60’”, , , .
Łatwe prasowanie
Po wybraniu tej funkcji, pranie oraz wirówka zostaną
odpowiednio zmienione w celu ograniczenia
powstawania zgnieceń.
Po zakończeniu cyklu pralka wykona powolne obroty
bębna, kontrolka funkcji ŁATWE PRASOWANIE zaświeci
się, będzie pulsowała powoli. W celu zakończenia cyklu
należy nacisnąć przycisk START/PAUSE lub przycisk
ŁATWE PRASOWANIE.
! Nie można go uruchomić w programach , “Szybkie
Pranie 30’”, , , “Wirowanie” i “Odprowadzamie wody”.
Eco wash
Funkcja Eco Wash umożliwia oszczędności pod
względem zużywanej energii, nie podgrzewając wody
używanej do prania, co niesie za sobą korzyści zarówno
dla środowiska naturalnego, jak i dla rachunku za prąd.
Wzmocniona siła działania i zoptymalizowane zużycie
wody gwarantują doskonałe rezultaty przy długości
cyklu takiej samej, jak w przypadku cyklu standard. Aby
uzyskać jak najlepsze rezultaty, zalecamy korzystać z
płynu do prania.
! Nie można jej uruchomić w programach , (90°C),
, , , .
19
Page 20
Środki piorące i bielizna
M
AX
1
2
4
3
A
B
PL
Szuadka na środki piorące
Dobry rezultat prania zależy również od prawidłowego
dozowania środka piorącego: użycie jego nadmiernej
ilości nie poprawia skuteczności prania, lecz przyczynia
się do powstawania nalotów na wewnętrznych częściach
pralki i do zanieczyszczania środowiska.
! Środki piorące w proszku należy stosować do tkanin z
białej bawełny i do prania wstępnego oraz do prania w
temperaturze przekraczającej 60°C.
! Należy stosować się do zaleceń podanych na opako-
waniu środka piorącego.
! Nie stosować środków do prania ręcznego, ponieważ
tworzą one za dużo piany.
Wysunąć szuadkę i
umieścić w niej środek
piorący lub dodatkowy w
następujący sposób.
Przegródka 1: Środek
piorący do prania
wstępnego (w proszku)
Przed wsypaniem
środka piorącego należy
sprawdzić, czy nie jest włożony dodatkowy pojemnik 4.
Przegródka 2: Środek piorący do prania zasadniczego (w proszku lub w płynie)
W przypadku stosowania środka piorącego w płynie, zaleca się użycie ścianki A dostarczonej na wyposażeniu,
która ułatwia prawidłowe dozowanie. W celu użycia
środka piorącego w proszku, należy wsunąć ściankę w
zgłębienie B.
Przegródka 3: Środki dodatkowe (zmiękczające, itp.)
Środek zmiękczający nie powinien wypływać poza kratkę.
dodatkowy pojemnik 4: Wybielacz
Przygotowanie bielizny
• Podzielić bieliznę do prania według:
- rodzaju tkaniny / symbolu na etykietce.
- kolorów: oddzielić tkaniny kolorowe od białych.
• Opróżnić kieszenie i sprawdzić guziki.
• Nie przekraczać wskazanego ciężaru suchej bielizny:
Tkaniny wytrzymałe: max 7 kg
Tkaniny syntetyczne: max 3 kg
Tkaniny delikatne: max 2 kg
Wełna: max 1,5 kg
Jedwab: max 1 kg
Ile waży bielizna?
Programy specjalne
ODPLAMIANIE: program odpowiedni do prania silnie
zabrudzonej odzieży o trwałych kolorach. Program gwarantuje klasę prania wyższą od standardowej (klasa A).
Nie używać programu, gdy miesza się odzież w różnych
kolorach. Zalecamy stosowanie środka piorącego w
proszku. W przypadku szczególnie opornych plam, zalecamy wcześniej zastosowanie specjalnych dodatków.
POŚCIEL I RĘCZNIKI: w celu wyprania bielizny
kąpielowej i pościelowej w jednym cyklu, należy użyć
programu , który optymalizuje zużycie środka
piorącego i pozwala oszczędzać czas i pieniądze. Zalecamy stosowanie środka piorącego w proszku.
WEŁNA: cykl prania „Wełna” niniejszej pralki Hotpoint-Ariston został przetestowany i zatwierdzony przez Woolmark
Company jako odpowiedni do prania odzieży wełnianej
przeznaczonej wyłącznie do prania ręcznego, pod warunkiem, że pranie jest przeprowadzane zgodnie z instrukcjami
podanymi na etykiecie ubrania oraz ze wskazówkami dostarczonymi przez producenta urządzenia. Hotpoint-Ariston
to pierwsza marka pralek, która uzyskała od Woolmark
Company certykat Woolmark Apparel Care - Platinum ze
względu na osiągane rezultaty prania oraz zużycie wody i
energii.
DELIKATNE: używać programu do prania bardzo
delikatnej odzieży, ozdobionej cekinami lub koralikami.
Do prania jedwabiu i zasłon, należy wybrać cykl i
ustawić poziom „DELIKATNE” opcji .
Zalecamy wywrócenie ubrań na lewą stronę i włożenie
małych części odzieży do woreczka przeznaczonego
specjalnie do prania delikatnych ubrań.
Dla osiągnięcia najlepszych efektów, zalecamy
stosowanie środka piorącego w płynie do tkanin
delikatnych.
System równoważenia ładunku
Przed każdym wirowaniem, aby uniknąć nadmiernych
drgań oraz jednorodnie rozłożyć wsad, bęben wykonuje obroty z prędkością nieco większą niż podczas
prania. Jeśli pomimo kolejnych prób wsad nie zostanie
równomiernie rozłożony, maszyna wykona wirowanie
z prędkością mniejszą od przewidzianej. W przypadku nadmiernego niezrównoważenia pralka wykona
rozłożenie wsadu zamiast wirowania. Aby zapewnić lepsze rozłożenie wsadu oraz jego właściwe zrównoważenie,
zaleca się wymieszanie dużych i małych sztuk bielizny.
1 prześcieradło 400-500 gr.
1 poszewka 150-200 gr.
1 obrus 400-500 gr.
1 szlafrok 900-1.200 gr.
1 ręcznik 150-250 gr.
20
Page 21
Zalecenia i środki
20
ostrożności
! Pralka została zaprojektowana i wyprodukowana zgodnie
z międzynarodowymi normami bezpieczeństwa. Niniejsze ostrzeżenia zostały tu zamieszczone ze względów
bezpieczeństwa i należy je uważnie przeczytać.
Ogólne zasady bezpieczeństwa
• Urządzenie to nie jest przeznaczone do użytkowania
przez osoby (w tym dzieci) o ograniczonej sprawności
zycznej, zmysłowej lub umysłowej oraz nieposiadające
odpowiedniego doświadczenia i wiedzy, chyba że
używają go pod nadzorem lub po otrzymaniu wskazówek
od osoby odpowiedzialnej za ich bezpieczeństwo. Należy
pilnować, aby dzieci nie bawiły się urządzeniem.
• Urządzenie to zostało zaprojektowane wyłącznie do
użytkowania w warunkach domowych.
• Nie dotykać pralki, stojąc przy niej boso lub mając
mokre lub wilgotne ręce albo stopy.
• Nie wyjmować wtyczki z gniazdka, ciągnąc za kabel,
lecz trzymając za wtyczkę.
• W trakcie pracy maszyny nie otwierać szuadki na
środki piorące.
• Nie dotykać odprowadzanej wody, gdyż może ona
osiągać wysokie temperatury.
• W żadnym wypadku nie otwierać okrągłych drzwiczek
pralki na siłę: grozi to uszkodzeniem mechanizmu
zabezpieczającego drzwiczki przed przypadkowym
otwarciem.
• W razie wystąpienia usterki nie należy w żadnym
wypadku próbować dostać się do wewnętrznych części
pralki z zamiarem samodzielnego dokonania naprawy.
• Zawsze uważać, aby dzieci nie zbliżały się do
pracującej pralki.
• W czasie prania okrągłe drzwiczki pralki nagrzewają się.
• Jeśli trzeba przenieść pralkę w inne miejsce, należy to robić
bardzo ostrożnie, w dwie lub trzy osoby. Nigdy nie przenosić
pralki samodzielnie, gdyż jest ona bardzo ciężka.
• Przed włożeniem bielizny sprawdzić, czy bęben jest
pusty.
Konsumenci powinni kontaktować się z władzami
lokalnymi lub sprzedawcą w celu uzyskania informacji
dotyczących postępowania z ich zużytymi urządzeniami
gospodarstwa domowego.
Ręczne otwieranie okrągłych drzwiczek
Jeśli z powodu przerwy w dostawie energii elektrycznej nie jest możliwe otwarcie okrągłych drzwiczek,
w celu wyjęcia i rozwieszenia prania należy wykonać
następujące czynności:
1. wyjąć wtyczkę z gniazdka
elektrycznego.
2. sprawdzić, czy poziom
wody wewnątrz maszyny
znajduje się poniżej poziomu
otwarcia drzwiczek; w przeciwnym wypadku usunąć
nadmiar wody przez przewód odpływowy, zbierając
ją do wiaderka w sposób
wskazany na rysunku.
3. zdjąć panel pokrywy z
przedniej strony pralki przy
pomocy śrubokrętu (patrz
rysunek).
PL
Utylizacja
• Utylizacja opakowania: stosować się do lokalnych przepisów, dzięki temu opakowanie będzie mogło zostać
ponownie wykorzystane.
• Europejska Dyrektywa 2002/96/EC dotycząca Zużytych
Elektrycznych i Elektronicznych Urządzeń zakłada zakaz
pozbywania się starych urządzeń domowego użytku
jako nieposortowanych śmieci komunalnych. Zużyte
urządzenia muszą być osobno zbierane i sortowane
w celu zoptymalizowania odzyskania oraz ponownego
przetworzenia pewnych komponentów i materiałów.
Pozwala to ograniczyć zanieczyszczenie środowiska i
pozytywnie wpływa na ludzkie zdrowie. Przekreślony
symbol „kosza” umieszczony na produkcie przypomina
klientowi o obowiązku specjalnego sortowania.
4. pociągnąć na zewnątrz klapkę wskazaną na rysunku,
aż do wyzwolenia się z zacisku plastikowego zaczepu;
następnie pociągnąć go w dół i równocześnie otworzyć
drzwiczki.
5. ponownie założyć panel upewniwszy się, przed
dociśnięciem go do maszyny, czy zatrzaski zostały umieszczone w odpowiednich otworach.
21
Page 22

Utrzymanie i konserwacja
1
2
A
B
PL
Odłączenie wody i prądu elektrycznego
• Zamknąć kurek dopływu wody po każdym praniu. W
ten sposób zmniejsza się zużycie instalacji hydraulicznej pralki oraz eliminuje się niebezpieczeństwo wycieków.
• Przed przystąpieniem do czyszczenia pralki oraz do
czynności konserwacyjnych wyjąć wtyczkę z gniazdka.
Czyszczenie pralki
• Obudowę zewnętrzną i gumowe części pralki można
myć ściereczką zmoczoną w letniej wodzie z mydłem.
Nie stosować rozpuszczalników ani ściernych środków
czyszczących.
• Pralka jest wyposażona w program “OPCJA CZY-
SZCZENIA PRALKI” części wewnętrznych, który należy
przeprowadzać nie wprowadzając niczego do kosza
pralki.
Środek piorący (w ilości równej 10% ilości zalecanej dla
lekko zabrudzonej odzieży) lub dodatki przeznaczone
specjalnie do czyszczenia pralek, mogą zostać użyte
jako środki pomocnicze podczas programu czyszczenia.
Zaleca się przeprowadzanie programu czyszczenia co
40 cykli prania.
W celu uruchomienia programu należy nacisnąć
równocześnie przyciski A i B przez 5 sek. (zob. rysunek).
Program rozpocznie się automatycznie i będzie trwał
około 70 minut. W celu zakończenia cyklu, należy
nacisnąć przycisk START/PAUSE.
Konserwacja okrągłych drzwiczek i bębna
• Drzwiczki pralki należy zawsze pozostawiać uchylone,
aby zapobiec tworzeniu się nieprzyjemnych zapachów.
Czyszczenie pompy
Pralka wyposażona jest w pompę samoczyszczącą,
która nie wymaga zabiegów konserwacyjnych. Może się
jednak zdarzyć, że drobne przedmioty (monety, guziki)
wpadną do komory wstępnej zabezpieczającej pompę,
która znajduje się w jej dolnej części.
! Należy się upewnić, że cykl prania został zakończony i
wyjąć wtyczkę z gniazdka.
Aby dostać się do komory wstępnej:
1. zdjąć panel pokrywy z
przedniej strony pralki przy
pomocy śrubokrętu (patrz
rysunek);
2. odkręcić pokrywę,
obracając ją w kierunku
przeciwnym do ruchu
wskazówek zegara (patrz
rysunek): wypłynięcie
niewielkiej ilości wody jest
normalnym zjawiskiem;
Czyszczenie szuadki na środki piorące
Wysunąć szuadkę,
unosząc ją lekko ku górze
i wyciągając na zewnątrz
(patrz rysunek).
Wypłukać szuadkę pod
bieżącą wodą. Czynność tę
należy wykonywać stosun-
22
kowo często.
3. dokładnie wyczyścić wnętrze;
4. ponownie przykręcić pokrywę;
5. ponownie założyć panel upewniwszy się, przed
dociśnięciem go do maszyny, czy zatrzaski zostały umieszczone w odpowiednich otworach.
Kontrola przewodu doprowadzającego wodę
Przynajmniej raz w roku należy sprawdzić przewód
doprowadzający wodę. Jeśli widoczne są na nim
pęknięcia i rysy, należy go wymienić: w trakcie prania
duże ciśnienie może bowiem spowodować jego nagłe
rozerwanie.
! Nigdy nie instalować już używanych przewodów.
Page 23

Nieprawidłowości w działaniu
i sposoby ich usuwania
Może się zdarzyć, że pralka nie działa. Przed wezwaniem Serwisu Technicznego (patrz „Serwis Techniczny”) należy
sprawdzić, czy problemu nie da się łatwo rozwiązać przy pomocy poniższego wykazu.
Nieprawidłowości w działaniu:
Pralka nie włącza się.
Cykl prania nie rozpoczyna się.
Pralka nie pobiera wody (na
wyświetlaczu pojawi się napis „BRAK
WODY, SPRAWDŹ DOPŁYW WODY”).
Pralka cały czas pobiera i odprowadza wodę.
Możliwe przyczyny / Rozwiązania:
• Wtyczka nie jest włączona do gniazdka lub jest wsunięta za słabo, tak że nie
ma styku.
• W domu nastąpiła przerwa w dostawie prądu.
• Drzwiczki pralki nie są dobrze zamknięte.
• Nie został wciśnięty przycisk ON/OFF.
• Nie został wciśnięty przycisk START/PAUSE.
• Kurek dopływu wody jest zamknięty.
• Zostało nastawione opóźnienie startu (patrz “W jaki sposób wykonać cykl
prania”).
• Przewód doprowadzający wodę nie jest podłączony do kurka.
• Przewód jest zgięty.
• Kurek dopływu wody jest zamknięty.
• W domu nastąpiła przerwa w dostawie wody.
• Ciśnienie wody nie jest wystarczające.
• Nie został wciśnięty przycisk START/PAUSE.
• Przewód odpływowy nie został zainstalowany na wysokości między 65 a
100 cm od podłogi (patrz „Instalacja”).
• Końcówka przewodu odpływowego jest zanurzona w wodzie (patrz „Instalacja”).
• Otwór odpływowy w ścianie nie posiada odpowietrznika.
Jeśli po sprawdzeniu tych możliwości problem nie zostanie rozwiązany, należy
zamknąć kurek dopływu wody, wyłączyć pralkę i wezwać Serwis Techniczny. Jeśli mieszkanie znajduje się na najwyższych piętrach budynku, może
wystąpić efekt syfonu, w wyniku którego pralka cały czas pobiera i odprowadza wodę. W celu wyeliminowania tej niedogodności należy zakupić specjalny
zawór, zapobiegający powstawaniu efektu syfonu.
PL
Pralka nie odprowadza wody i nie
odwirowuje prania.
Pralka mocno wibruje w fazie wirowania.
Z pralki wycieka woda.
Maszyna jest zablokowana, wyświetlacz
pulsuje i sygnalizuje kod anomalii (np.:
F-01, F-..).
Tworzy się zbyt duża ilość piany.
• Program nie przewiduje odprowadzania wody: w przypadku niektórych programów należy uruchomić je ręcznie (patrz „Programy i funkcje”).
• Włączona jest funkcja ŁATWE PRASOWANIE: aby zakończyć program,
należy nacisnąć przycisk START/PAUSE („Programy i funkcje”).
• Przewód odpływowy jest zgięty (patrz „Instalacja”).
• Instalacja odpływowa jest zatkana.
• Podczas instalacji pralki bęben nie został prawidłowo odblokowany (patrz
„Instalacja”).
• Pralka nie jest właściwie wypoziomowana (patrz „Instalacja”).
• Pralka, zainstalowana pomiędzy meblami a ścianą, ma za mało miejsca
(patrz „Instalacja”).
• Przewód doprowadzający wodę nie jest dobrze przykręcony (patrz „Instalacja”).
• Szuadka na środki piorące jest zatkana (w celu jej oczyszczenia patrz „Utr-
zymanie i konserwacja”).
• Przewód odpływowy nie jest dobrze zamocowany(patrz „Instalacja”).
• Wyłączyć maszynę i wyjąć wtyczkę z gniazdka, odczekać około 1 minuty,
następnie włączyć ją ponownie.
Jeśli problem nie ustępuje, należy wezwać Serwis Techniczny.
• Środek piorący nie jest odpowiedni do pralek automatycznych (na opakowaniu musi być umieszczony napis: „do pralek”, „do prania ręcznego i w
pralce” lub podobny).
• Użyto za dużo środka piorącego.
23
Page 24

Serwis Techniczny
PL
Przed skontaktowaniem się z Serwisem Technicznym:
• Sprawdzić, czy problemu nie można rozwiązać samodzielnie (patrz„Nieprawidłowości w działaniu i sposoby ich usuwania”);
• Ponownie uruchomić program i sprawdzić, czy problem nie zniknął;
• Jeśli nie, zwrócić się do autoryzowanego Serwisu Technicznego, dzwoniąc pod numer podany w karcie gwarancyjnej.
! Nigdy nie wzywać nieautoryzowanych techników.
Należy podać:
• rodzaj nieprawidłowości;
• model maszyny (Mod.);
• numer seryjny (S/N).
Informacje te znajdują się na tabliczce umieszczonej w tylnej części pralki oraz widocznej z przodu po otwarciu drzwiczek.
24
Page 25

Használati utasítás
MOSÓGÉP
HU
Magyar
WMSD 723
Összefoglalás
Üzembe helyezés, 26–27
Kicsomagolás és vízszintbe állítás
Víz- és elektromos csatlakozás
Első mosási ciklus
Műszaki adatok
A mosógép leírása, 28-29
Kezelőpanel
Kijelző
A mosási ciklusok végrehajtása, 30
Programok és funkciók, 31
Programtáblázat
Mosási funkciók
Mosószerek és mosandók, 32
Mosószer-adagoló ók
A mosandó ruhák előkészítése
Különleges programok
A bepakolt ruhák kiegyensúlyozására szolgáló rendszer
Óvintézkedések és tanácsok, 33
Általános biztonság
Hulladékelhelyezés
Az ajtó kézi nyitása
HU
Karbantartás és ápolás, 34
A víz elzárása és az elektromos áram kikapcsolása
A mosógép tisztítása
A mosószer-adagoló ók tisztítása
Az ajtó és a forgódob ápolása
A szivattyú tisztítása
A vízbevezető cső ellenőrzése
Rendellenességek és elhárításuk, 35
Szerviz, 36
25
Page 26

Üzembe helyezés
HU
! Fontos, hogy megőrizze ezt a kézikönyvet, hogy mindig
kéznél legyen. Ha a mosógépet eladná, átadná vagy másnál helyezné el, gondoskodjon arról, hogy e kézikönyv
a mosógéppel együtt maradjon, hogy az új tulajdonos is
megismerhesse a készülék funkcióit és az ezekre vonatkozó gyelmeztetéseket.
! Figyelmesen olvassa el az utasításokat: fontos infor-
mációkat tartalmaznak az üzembe helyezésről, a használatról és a biztonságról.
Kicsomagolás és vízszintbe állítás
Kicsomagolás
1. Csomagolja ki a mosógépet.
2. Ellenőrizze, hogy a mosógép nem sérült-e meg a szállítás során. Ha a gépen sérülést talál, ne csatlakoztassa,
és forduljon a viszonteladóhoz.
3. Csavarozza ki a gép
hátsó részén található, a
szállításhoz szükséges 4
védőcsavart, és távolítsa el
a gumibakot (lásd ábra).
A pontos vízszintezés biztosítja a gép stabilitását, így
az a működés során nem fog rezegni, zajt okozni, illetve
elmozdulni. Szőnyegpadló vagy szőnyeg esetén a lábakat úgy állítsa be, hogy a mosógép alatt elegendő hely
maradjon a szellőzésre.
Víz- és elektromos csatlakozás
Vízbevezető cső csatlakoztatása
1. A vízbevezető cső csatlakoztatásához csavarozza
fel a csövet egy 3/4”-os
külső menettel rendelkező
hidegvíz csapra (lásd
ábra).
A csatlakoztatás előtt eressze meg a csapot addig,
amíg a víz teljesen átlát-
szóvá nem válik.
2. A vízbevezető cső csatlakoztatásához csavarozza
a csövet a mosógép hátoldalán jobbra fent található
vízbemeneti csonkra (lásd
ábra)!
4. Zárja le a furatokat a mellékelt műanyag dugókkal.
5. Minden darabot őrizzen meg: ha a mosógépet szállítani kell, előtte ezeket vissza kell szerelni.
! A csomagolóanyag nem gyermekjáték!
Vízszintbe állítás
1. A mosógépet sík és kemény padlóra állítsa, úgy, hogy
ne érjen falhoz, bútorhoz vagy máshoz.
2. Ha a padló nem töké-
letesen vízszintes, azt az
első lábak be-, illetve kicsavarásával kompenzálhatja (lásd ábra). A gép felső
burkolatán mért dőlés nem
haladhatja meg a 2°-ot.
3. Ügyeljen arra, hogy a csövön ne legyen törés vagy
szűkület!
! A csap víznyomásának a műszaki adatok táblázatában
szereplő határértékek között kell lennie (lásd a szemben
lévő oldalt).
! Amennyiben a vízbevezető cső nem elég hosszú,
forduljon szaküzlethez vagy engedéllyel rendelkező
szakemberhez.
! Soha ne használjon korábban már használt csöveket.
! Használja a készülékhez mellékelteket.
26
Page 27

A leeresztőcső csatlakoztatása
65 - 100 cm
Csatlakoztassa a
leeresztőcsövet a lefolyóhoz vagy a padlótól 65
és 100 cm közötti magas-
ságban lévő fali szifonhoz
anélkül, hogy megtörné;
illetve akassza a mosdó
vagy a kád szélére úgy,
hogy a mellékelt csővezető
ívet a csaphoz erősíti (lásd
ábra). A leeresztőcső szabad végének nem szabad
vízbe merülnie.
! A kábel ne legyen se megtörve, se összenyomva.
HU
! A tápkábelt csak engedéllyel rendelkező szakember
cserélheti.
Figyelem! A fenti előírások gyelmen kívül hagyása esetén a gyártó elhárít minden felelősséget.
Első mosási ciklus
Üzembe helyezés után – mielőtt a mosógépet használni
kezdené – mosószerrel, mosandó ruha nélkül futtassa le
az (60°)-es mosási programot.
! Toldások használata nem javasolt. Amennyiben feltét-
lenül szükséges, a toldás átmérője egyezzen meg az
eredeti csőével és semmiképpen se legyen 150 cm-nél
hosszabb.
Elektromos csatlakoztatás
Mielőtt a csatlakozódugót az aljzatba dugná, bizonyosodjon meg arról, hogy:
• az aljzat földelése megfelel a törvény által előírtnak;
• az aljzat képes elviselni a készülék műszaki adatait
tartalmazó táblázatban megadott maximális teljesítmény-
felvételt (lásd szemben);
• a hálózat feszültsége a műszaki adatokat tartalmazó
táblázatban szereplő értékek közé esik (lásd szemben);
• az aljzat kompatibilis a mosógép csatlakozódugójával.
Ellenkező esetben cserélje ki az aljzatot vagy a csatlakozódugót!
! A mosógép nem állítható fel nyílt téren, még akkor sem,
ha tető van fölötte, mivel nagyon veszélyes, ha a gép
esőnek vagy zivataroknak van kitéve.
! A csatlakozódugónak a mosógép üzembe helyezett
állapotában is könnyen elérhető helyen kell lennie.
! Ne használjon hosszabbítót vagy elosztót.
Mûszaki adatok
Modell WMSD 723
szélesség 59,5 cm
Méretek
Ruhatöltet: 1-tõl 7 kg-ig
Elektromos
csatlakozás
Vízcsatlakozások
Centrifuga
fordulatszám
Az 1061/2010 és
1015/2010 rendele-
tek szerinti vizsgálati
programok
magasság 85 cm
mélység 43,5 cm
lásd a készüléken található, muszaki
jellemzoket tartalmazó adattáblát!
maximális nyomás 1 MPa (10 bar)
minimális nyomás 0,05 MPa (0,5 bar)
dob ûrtartalma 48 lite
1200 fordulat/perc-ig
-as program;
hõmérséklet 60°C
gombot);
hõmérséklet 40°C
gombot).
Ez a berendezés megfelel a következõ
Uniós Elõírásoknak:
- 2004/108/CE (Elektromágneses összeférhetõség)
- 2002/96/CE
- 2006/95/CE (Alacsony feszültség
(nyomja meg 2-szer a
(nyomja meg 3-szer a
27
Page 28

A mosógép leírása
HU
Kezelőpanel
Mosószer-adagoló ók
Mosószer-adagoló ók: a mosószerek és adalékanya-
gok betöltésére szolgál (lásd „Mosószerek és mosandók”).
PROGRAMVÁLASZTÓ
ON/OFF
gomb
gombok
MY CYCLE
gomb
ÖBLÍTŐ
PROGRAMOK
gomb
KÉSLELTETETT
HŐMÉRSÉKLET gomb: A hőmérséklet csökkentéséhez
nyomja meg ezt a gombot – az érték megjelenik a kijelzőn.
MOSÁSI
INTENZITÁS
gomb
Kijelző
FUNKCIÓ
gombok
INDÍTÁS
gomb
CENTRIFUGÁLÁS
gomb
START/PAUSE
jelzőlámpás gomb
HŐMÉRSÉKLET
gomb
LEZÁRVA
gomb
ON/OFF gomb : a készülék be-, vagy kikapcso-
lásához nyomja meg röviden ezt a gombot. Amennyiben
az START/PAUSE lámpa zöld fénnyel lassan villog, a
készülék be van kapcsolva. A mosógép mosás közben
történő leállításához hosszan, kb. 3 másodpercig tartsa
lenyomva a nyomógombot – a gomb rövid, vagy véletlen
megnyomása nem kapcsolja le a készüléket. A mosógép
mosás közben történő leállítása magát a mosás programot is törli. A kívánt programot újból be kell állítani.
PROGRAMVÁLASZTÓ gombok: a kívánt program beál-
lítására szolgálnak (lásd „Programtáblázat”).
MY CYCLE
beállított program tárolásához tartsa lenyomva ezt a
gombot. A korábban eltárolt programokat a MEMÓRIA
gomb megnyomásával lehet előhívni.
FUNKCIÓ gombok: a kívánt funkció kiválasztásához
nyomja meg ezt a gombot. A kijelzőn világít a megfelelő
jelzőlámpa.
MOSÁSI INTENZITÁS
intenzitás kiválasztására szolgál.
ÖBLÍTŐ PROGRAMOK
stípus kiválasztására szolgál.
CENTRIFUGÁLÁS gomb: a centrifugálás sebességé-
nek csökkentéséhez, vagy annak teljes kikapcsolásához
nyomja meg ezt a gombot – az érték megjelenik a kijelzőn.
gomb: az egyéni igényeknek megfelelően
gomb: A kívánt mosási
gomb: A kívánt öblíté-
LEZÁRVA gomb: a kezelőpanel letiltásához
nagyjából 2 másodpercig tartsa lenyomva ezt a gombot.
Ha a szimbólum világít, az azt jelenti, hogy a
gyerekzár aktiválva van. Ez a funkció megakadályozza
a programok véletlen átállítását, főképp, ha gyerekek
is vannak a lakásban. A kezelőpanel letiltásának
kikapcsolásához nagyjából 2 másodpercig tartsa
lenyomva ezt a gombot.
KÉSLELTETETT INDÍTÁS gomb: a kiválasztott program késleltetett elindításához nyomja meg ezt a gombot. A késleltetés értéke megjelenik a kijelzőn.
START/PAUSE jelzolámpás gomb: ha a zöld jelzőlámpa
lassan villog, a mosás indításához nyomja meg ezt a gombot. A ciklus elindításával a jelzőlámpa állandó fénnyel kezd
világítani. A mosás szüneteltetéséhez ismételten nyomja
meg ezt a gombot; a jelzőlámpa narancssárga fénnyel kezd
el villogni. Amennyiben a szimbólum nem világít, az
ajtót ki lehet nyitni. A mosásnak a megszakítás időpontjától
való folytatásához nyomja meg ismét ezt a gombot.
Készenléti üzemmód
Ez a mosógép - az energiatakarékosságra vonatkozó
legújabb eloírásoknak megfeleloen - automatikus kikapcsolási (készenléti) rendszerrel van ellátva, mely a
használat 30 percnyi szüneteltetése esetén bekapcsol.
Nyomja meg röviden a ON/OFF gombot, és várjon, amíg
a készülék újrabekapcsol.
Fogyasztás off üzemmódban: 1 W
Fogyasztás bekapcsolva hagyott üzemmódban: 1 W
28
Page 29
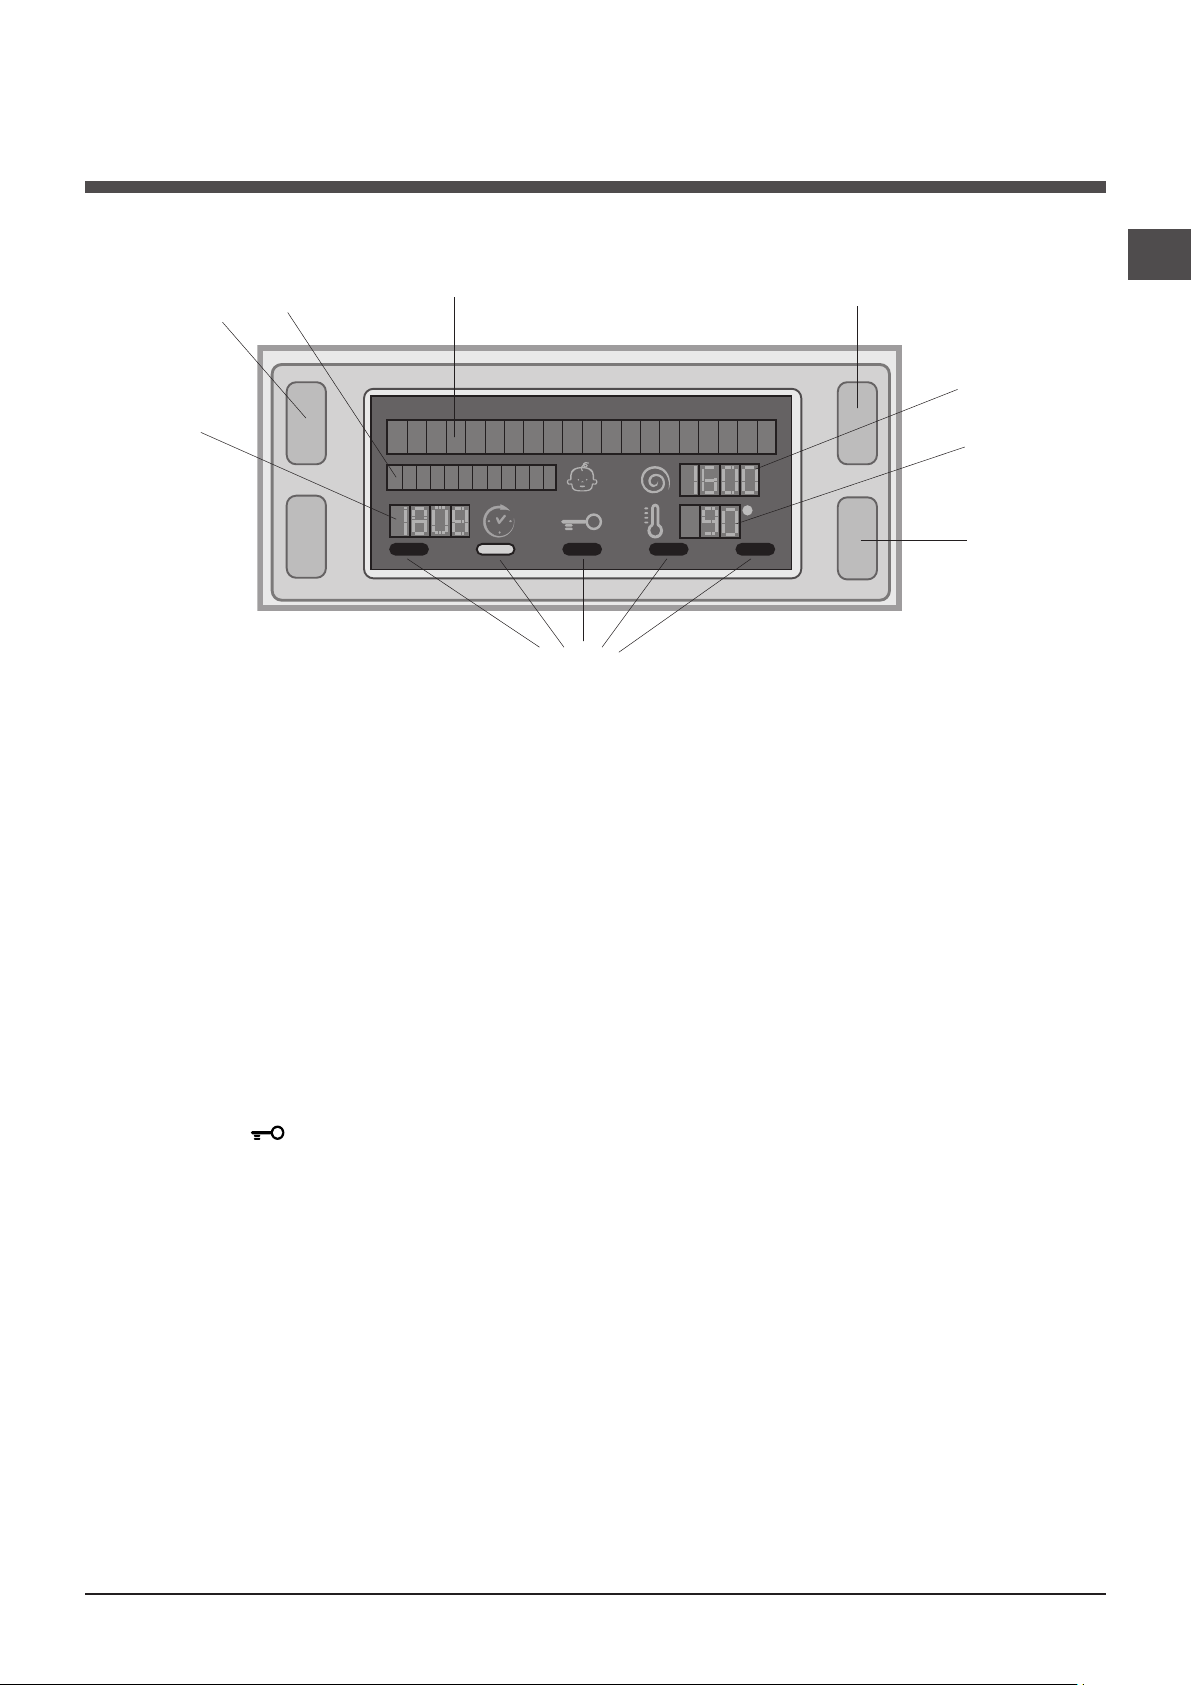
Kijelző
Z
B
A
HU
X
D
C
E
Y
F
A kijelző a készülék programozásához nyújt segítséget, és számos információt szolgáltat.
A felső A és B feliratmező a kiválasztott mosási programot, a folyamatban lévő mosási fázist és az összes, a program
előrehaladásával kapcsolatos információt jeleníti meg.
A C feliratmező a folyamatban lévő mosási ciklus végéig hátralévő maradékidőt, illetve KÉSLELTETETT INDÍTÁS beál-
lítása esetén a kiválasztott program elindulásáig hátralévő időt jeleníti meg.
A D feliratmező a beállított programhoz választható centrifugasebesség maximális értékét jeleníti meg – amennyiben a
program nem tartalmaz centrifugálást, a feliratmező üres marad.
Az E feliratmező a beállított programhoz választható hőmérséklet maximális értékét jeleníti meg – amennyiben a programhoz nem kell beállítani a hőmérsékletet, a feliratmező üres marad.
Az F jelzőlámpák a funkciókhoz tartoznak, és akkor kapcsolnak be, ha a kiválasztott funkció kompatibilis a beállított programmal.
Ajtózár szimbólum
A világító jelzőlámpa azt jelenti, hogy az ajtó a véletlen kinyitás megakadályozása érdekében be van zárva. A károk
elkerülése érdekében az ajtó kinyitása előtt meg kell várni, hogy a jelzőlámpa kialudjon.
Megjegyzés: Amennyiben a KÉSLELTETETT INDÍTÁS funkció be van kapcsolva, az ajtót nem lehet kinyitni. Az ajtó
kinyitásához az START/PAUSE gomb megnyomásával szüneteltesse le a készülék működését.
! Az első bekapcsoláskor a készülék kérni fogja a nyelv kiválasztását, és a kijelző automatikusan belép a nyelvválasztás
menübe.
A kívánt nyelv kiválasztásához nyomja meg a X és a Y gombokat, a kiválasztás jóváhagyásához pedig a Z gombot.
Amennyiben módosítani szeretné a nyelvet, kapcsolja ki a készüléket, és tartsa egyszerre lenyomva az X, Y, Z gombokat
a hangjelzésig. A kijelzőn újra megjelenik a nyelvválasztás menü.
29
Page 30

A mosási ciklusok végrehajtása
HU
1. A KÉSZÜLÉK BEKAPCSOLÁSA. Nyomja meg a
gombot – a kijelzőn megjelenik az PROGRAM
FOLYAMATBAN felirat, az START/PAUSE lámpa pedig
lassan, zöld fénnyel villogni kezd.
2. A MOSANDÓ RUHÁK BEPAKOLÁSA. Nyissa
ki az ajtót! Tegye be a mosandó ruhákat, ügyelve
arra, hogy ne lépje túl a következő oldalon található
programtáblázatban feltüntetett ruhatöltet-mennyiséget.
3. A MOSÓSZER ADAGOLÁSA. Vegye ki a ókot, és a
„Mosószerek és mosandók” fejezetben leírtak szerint
öntse a mosószert a megfelelő tégelybe.
4. CSUKJA BE AZ AJTÓT.
5. A PROGRAM KIVÁLASZTÁSA. A kívánt
program kiválasztásához nyomja meg az egyik
PROGRAMVÁLASZTÓ gombot – a program neve
megjelenik a kijelzőn. Mindegyik programhoz tartozik
egy hőmérséklet és egy centrifugasebesség, melyek
megváltoztatható értékek. A kijelzőn megjelenik a ciklusidő.
6. A MOSÁSI CIKLUS EGYÉNI BEÁLLÍTÁSAI. Használja
a megfelelő gombokat:
A hőmérséklet és/vagy a centrifugasebesség
megváltoztatása. A készülék automatikusan kiválasztja
az elindított programhoz tartozó legmagasabb
hőmérsékletet és centrifugasebességet. Ezen
értékek további növelése nem lehetséges. A
gomb nyomogatásával a hőmérséklet fokozatosan
csökkenthető egészen a hidegmosásig „OFF”. A gomb
nyomogatásával a centrifugasebesség fokozatosan
csökkenthető egészen annak kikapcsolásáig „OFF”.
A gomb legalsó értéken történő megnyomásával
visszatérhet a maximális értékekhez.
! Kivétel: a (nyomja meg 2-szer a gombot ) program kiválasztása
esetén a hőmérséklet egészen 90°C-ig növelhető.
Késleltetett indítás beállítása.
A kiválasztott program késleltetett indításához
nyomogassa a megfelelő gombot addig, míg a késleltetés
kívánt értékét el nem éri. Ha a funkció be van kapcsolva,
a kijelzőn világít a szimbólum. A késleltetett indítás
törléséhez nyomogassa a gombot mindaddig, míg a
kijelzőn meg nem jelenik az OFF felirat.
A kívánt mosási intenzitás beállítása.
Az opció a mosásnak az anyagok szennyezettségétől
és a kívánt mosási intenzitástól függő optimalizálására
szolgál.
Válassza ki a mosási programot, mire a rendszer ciklust
automatikusan a közepesen szennyezett ruhadarabokra
optimalizált “NORMÁL”” szintre állítja be – a beállítás nem
érvényes a „Gyapjú” ciklusra, melynél a rendszer a ciklust
automatikusan a „KÉNYES” szintre állítja).
Erősen szennyezett ruhadarabok esetén nyomogassa
a gombot addig, amíg a kívánt „SUPER MOSÁS”
szintet el nem éri. Ez a szint, a ciklus kezdetén felhasznált
nagy mennyiségű víznek és a nagyobb mechanikai
átmozgatásnak köszönhetően nagy mosóhatást biztosít,
ezért alkalmas a makacs szennyeződések eltávolítására.
Használható fehérítőszerrel vagy anélkül. Ha fehéríteni
szeretne, tegye be a mellékelt, 4-es berakható rekeszt az
1-es rekeszbe. A fehérítőszer betöltése közben vigyázzon
arra, hogy az a központi csapon jelzett „max” szintet ne
lépje túl (lásd 32. oldali ábra).
Enyhén szennyezett ruhadarabok esetén vagy ha
a szövetek kíméletesebb kezelésére van szükség,
nyomogassa a gombot addig, amíg a kívánt
“KÉNYES” szintet el nem éri. A ciklus a kényes anyagok
tökéletes mosási eredménye érdekében lecsökkenti a
mechanikus mozgatás mértékét. Ha nem lehet beállítani
vagy módosítani a meglévő beállítást, a kijelzőn a “NEM
ELÉRHETŐ” szöveg jelenik meg.
Az öblítéstípus beállítása.
Az opció az érzékeny bőrről való maximális
gondoskodást biztosító öblítéstípus kiválasztására
szolgál. A gomb első megnyomásakor a ciklust a
rendszer „EXTRA ÖBLÍTÉS” szintre állítja, mely a ciklus
normál öblítéséhez egy további öblítést tesz hozzá,
hogy a mosószer minden nyoma el legyen távolítva. A
gomb második megnyomásakor a ciklust a rendszer
“ÉRZÉKENY BŐR” szintre állítja, mely a ciklus normál
öblítéséhez két további öblítést tesz hozzá, ezért
használata az érzékenyebb bőrrel rendelkezők számára
javasolt. A gomb harmadik megnyomásakor a ciklust a
rendszer “ANTIALLERGÉN” szintre állítja, mely a ciklus
normál öblítéséhez három további öblítést tesz hozzá,
hogy az elsődleges allergének (pl. pollenek, atkák,
macska- és kutyaszőr) el legyenek távolítva. A “NORMÁL
ÖBLÍTÉS” öblítéstípushoz való visszatéréshez nyomja
meg újból a gombot. Ha nem lehet beállítani vagy
módosítani a meglévő beállítást, a kijelzőn a “NEM
ELÉRHETŐ” szöveg jelenik meg.
A program tulajdonságainak módosítása.
• A funkció bekapcsolásához nyomja meg ezt a gombot
– a gombon található jelzőlámpa világít.
• A funkció kikapcsolásához ismételten nyomja meg a
gombot – a lámpa kialszik.
! Ha a kiválasztott funkció a beállított programmal nem
kompatibilis, a jelzőlámpa villogni kezd, és a funkció nem
lesz bekapcsolva.
! Ha a kiválasztott funkció egy korábban beállított
programmal nem kompatibilis, az elsőként kiválasztott
funkció lámpája villogni kezd, és csak a második
funkció lesz bekapcsolva, a bekapcsolt funkció lámpája
folyamatosan világít.
! A funkciók megváltoztathatják az ajánlott ruhatöltetmennyiséget és/vagy a ciklusidőt.
7. A PROGRAM INDÍTÁSA. Nyomja meg az START/
PAUSE gombot. A megfelelő jelzőlámpa állandó zöld
fénnyel világítani kezd, és az ajtózár bekapcsol (az
AJTÓZÁR szimbólum világítani kezd). A mosás ideje alatt
a kijelzőn a folyamatban lévő mosási fázis neve látható.
A program menet közben történő megváltoztatásához
az START/PAUSE gomb megnyomásával szüneteltesse
le a készülék működését – az START/PAUSE lámpa
narancssárga fénnyel lassan villogni kezd. Ezután
válassza ki a kívánt programot, és nyomja meg újból
az START/PAUSE gombot. Az ajtó menet közbeni
kinyitásához nyomja meg az START/PAUSE gombot – ha
az AJTÓZÁR szimbólum kialudt, kinyithatja az ajtót. A
mosásnak a megszakítás időpontjától való folytatásához
nyomja meg ismét az START/PAUSE gombot.
8. A PROGRAM VÉGE. Ezt a kijelzőn megjelenő „CIKLUS
VÉGE” felirat jelzi. Ha az AJTÓZÁR szimbólum kialszik,
ki lehet nyitni az ajtót. Nyissa ki az ajtót, szedje ki a mosott
ruhákat, és kapcsolja ki a készüléket.
! Amennyiben nullázni szeretne egy már elindított
programot, tartsa hosszan lenyomva a gombot. A
program megszakad, és a készülék kikapcsol.
30
Page 31
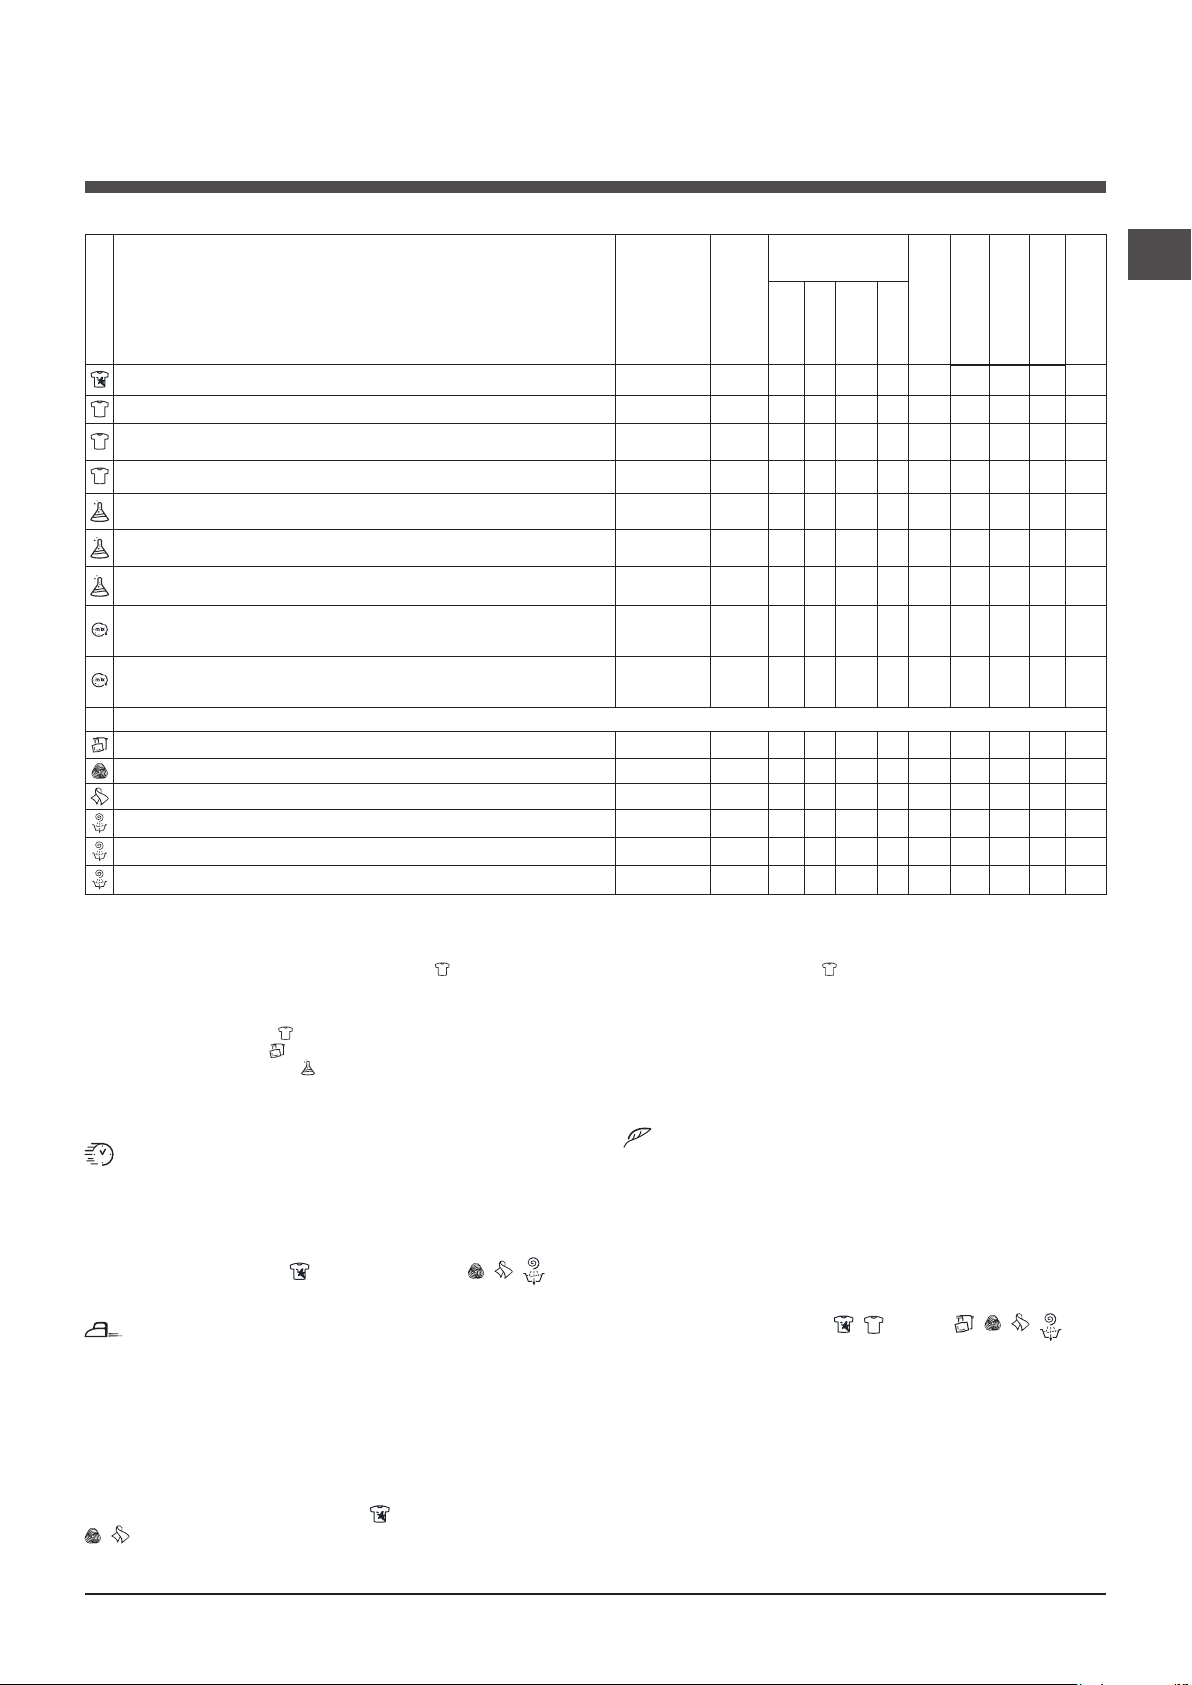
Programok és funkciók
Programtáblázat
Mosószerek és
Max.
Szimbólum Programleírás
Programok
FOLTELTÁVOLÍTÁS
PAMUT ELŐMOSÁS (nyomja meg 1-szer a gombot): erősen szennyezett fehér ruhák.
FEHÉR PAMUT (1) (nyomja meg 2-szer a gombot): erősen szennyezett fehér és
magasabb hőmérsékleten mosható színes ruhák.
SZÍNES PAMUT (1-2) (nyomja meg 3-szer a gombot): erősen szennyezett
kényes fehér és színes ruhák.
SZINTETIKUS/ELLENÁLLÓ (nyomja meg 1-szer a gombot): erősen szennyezett,
magasabb hőmérsékleten mosható színes ruhák.
SZINTETIKUS/ELLENÁLLÓ (4) (nyomja meg 1-szer a gombot): erősen szennye-
zett, magasabb hőmérsékleten mosható színes ruhák.
SZINTETIKUS/KÉNYES (nyomja meg 2-szer a gombot): enyhén szennyezett,
magasabb hőmérsékleten mosható színes ruhák.
GYORSMOSÁS 60’ (nyomja meg 1-szer a gombot): Az erősen szennyezett
ruhadarabok gyors átöblítésére (nem javasolt gyapjú, selyem és kézzel
mosandó ruhaneműkhöz).
GYORSMOSÁS 30’ (nyomja meg 2-szer a gombot): Az enyhén szennyezett
ruhadarabok gyors átöblítésére (nem javasolt gyapjú, selyem és kézzel
mosandó ruhaneműkhöz).
MY CYCLE (MEMÓRIA): bármilyen mosási típus memorizálását engedélyezi.
M
7 NAP FEHÉRNEMŰ (3): ágynemûkhöz és törölközõkhöz.
PLATINUM GYAPJÚ MOSÁS: gyapjú, kasmír stb. ruhaneműk mosásához.
KÉNYES RUHÁK
CENTRIFUGA (nyomja meg 1-szer a gombot)
ÖBLÍTÉS (nyomja meg 2-szer a gombot)
SZIVATTYÚZÁS (nyomja meg 3-szer a gombot)
A kijelzőn megjelenő vagy a kézikönyben feltüntetett ciklusidők szokásos körülmények alapján becsült értékek. A tényleges időt számos tényező befolyásolhatja – pl. a
bemeneti víznyomás, a környezeti hőmérséklet, a mosószer mennyisége, a ruhatöltet mennyisége és típusa, a ruhatöltet kiegyensúlyozása, a kiválasztott további opciók.
A viszgálószervek számára:
1) 1061/2010 szabvány szerinti vezérlőprogramok: A program 60 °C-ra állításához nyomja meg 2-szer a gombot; a program 40 °C-ra állításhoz nyomja meg
3-szor a gombot.
Ez a ciklus egy adag, nem különösebben koszos pamut ruhadarabok mosására alkalmas, és ez a leghatékonyabb a víz- és energiafogyasztás szempontjából is. 60°C és 40°C-on mosható
termékekhez. A mosás tényleges hőmérséklete eltérhet a megjelölt értéktől.
2) Hosszú pamut program: a program 40 °C-ra állításhoz nyomja meg 3-szor a gombot.
3) Rövid pamut program: A program40 °C-ra állításához nyomja meg a HŐMÉRSÉKLET gombot.
4) Hosszú műszálas program: A program 60 °C-ra állításához nyomja meg 1-szer a gombot; a 40 °C-ra állításhoz nyomja meg a HŐMÉRSÉKLET gombot.
Max. hőm
(°C)
40° 1200 -
90° 1200
60°
(Max. 90°C)
40° 1200 -
60° 800 -
40° 800 -
40° 800 -
60° 1200 -
30° 800 -
60° 1200 -
40° 800 -
30° 0 -
sebes-
ség
(ford./
perc)
1200 -
- 1200 - - - - 7 - - - 16’
- 1200 - - -
- 0 - - - - 7 - - - 2’
adalékok
Előmosás
Fehér-
Mosás
-
-
-
-
-
-
-
(kg)
Max. töltet
Öblítő
ítőszer
ségtartalom %
Maradék nedves-
4
- - -
7 53 2,47 97 185’
7 53 0,99 64 190’
7 53 0,94 72 175’
3 49 0,87 42 90’
3 49 0,56 42 80’
3 - - - 75’
3.5 53 0,81 36 60’
3 71 0,19 39 30’
7 - - - 135’
1,5 - - - 80’
1 - - - 75’
7 - - - 49’
sztás kWh
Energiafogya-
Progr-
Összes víz lt
180’
HU
amidő
Mosási funkciók
Gyorsmosás
Ezzel az opcióval a kiválasztott ciklustól függően akár
50%-kal alacsonyabb programidő érhető el, egyúttal
csökken a víz- és energiafogyasztás is. Ezt a ciklust a
nem különösen koszos ruhadarabokhoz használja.
! Nem kapcsolható be a , Gyorsmosás 60’, , ,
programoknál.
Vasaláskönnyítés
Ez a funkció a gyűrődések keletkezésének
csökkentése érdekében a megfelelő időben módosítja
a mosási beállításokat és a centrifugasebességet. A
VASALÁSKÖNNYÍTÉS lámpa fénnyel villogni kezd, a
kijelzőn pedig megjelenik a „CIKLUS VÉGE” felirat. A
program befejezéséhez nyomja meg az START/PAUSE
gombot vagy a VASALÁSKÖNNYÍTÉS gombot.
! Ez a funkció nem használható a , Gyorsmosás 30’,
, , “Centrifuga”, “Szivattyúzás” programoknál.
Eco wash
Az Eco Wash funkció a mosandó ruhák mosóvizének fel
nem melegítésével energiát takarít meg – ez előnyös mind a
környezet, mind a villanyszámla szempontjából. Valóban, a
fokozott teljesítmény és az optimalizált vízfogyasztás kitűnő
eredményt biztosít normál ciklus átlagos időtartama alatt.
A legjobb mosási eredmény elérése érdekében folyékony
mosószer használatát javasoljuk.
! Nem kapcsolható be a , (90°C), , , ,
programoknál.
31
Page 32
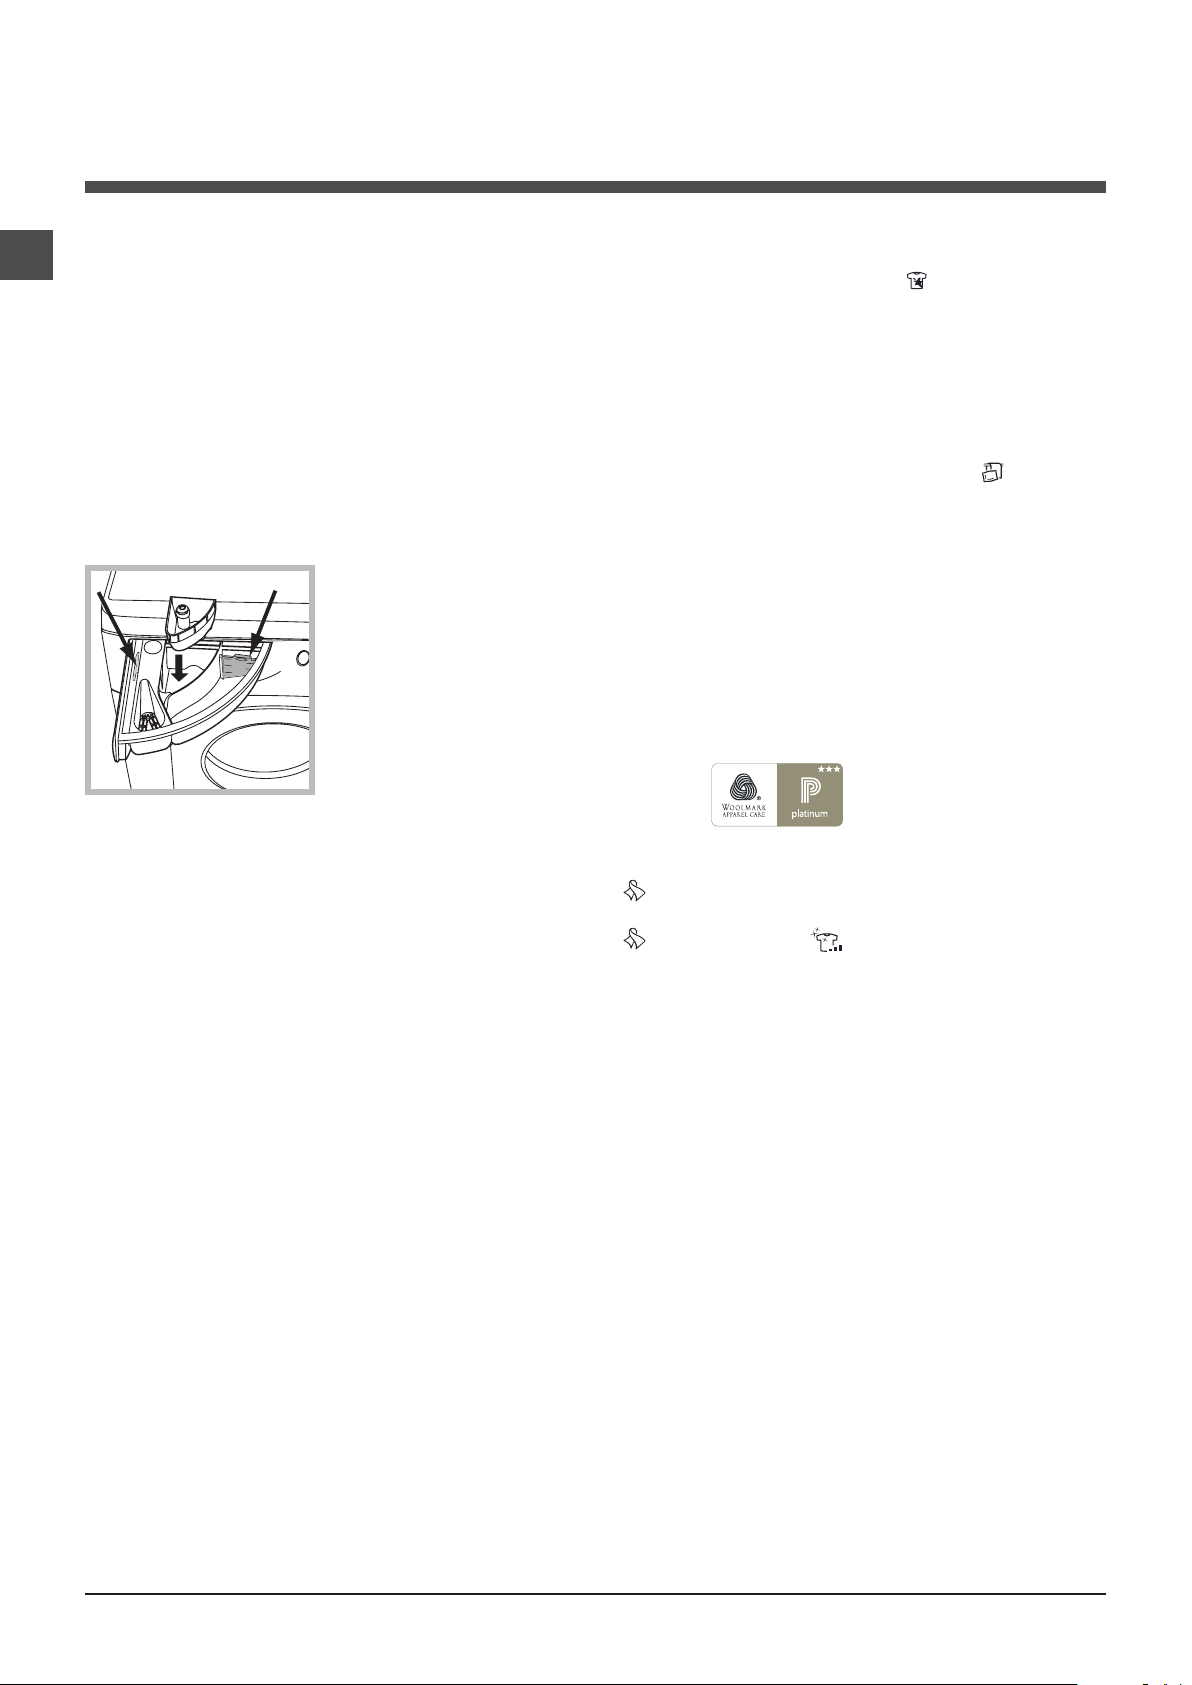
Mosószerek és mosandók
M
AX
1
2
4
3
A
B
HU
Mosószer-adagoló fiók
A mosás eredményessége függ a mosószer helyes
adagolásától is: ha túl sokat adagol belőle, a mosás nem
lesz hatékonyabb, de hozzájárul ahhoz, hogy lerakódás
képződjön a mosógépben, valamint a környezetet is
jobban szennyezi.
! Fehér színű pamut ruhadarabokhoz, előmosáshoz és
60 °C-nál magasabb hőmérsékleten történő mosásokhoz
mosóport használjon.
! Kövesse a mosópor csomagolásán feltüntetett utasítá-
sokat.
! Ne használjon kézi mosószert, mert túlzottan sok hab
képződik.
Húzza ki a mosószeradagoló ókot, és a
következők szerint tegye
bele a mosószert, illetve az
adalékot.
Különleges programok
FOLTELTÁVOLÍTÁS: A program az ellenálló színnel
rendelkező, erősen szennyezett ruhadarabok mosására
szolgál. A program a normálnál jobb (A osztályú) mosóhatást biztosít. Ne mosson együtt különböző színű
ruhadarabokat. Folyékony mosószer használatát javasoljuk. Makacs szennyeződések esetén tanácsos különleges adalékkal előkezelni a szövetet.
7 NAP FEHÉRNEMŰ: Az ágyneműk és törölközők egyetlen ciklus alatti mosásához használja a programot.
Ez a program optimalizálja az öblítőszer adagolását,
valamint időt és energiát takarít meg önnek. Folyékony
mosószer használatát javasoljuk.
GYAPJÚ: ezen Hotpoint-Ariston mosógép gyapjú” mo-
sási ciklusát a Woolmark Company tesztelte és engedélyezte “kézzel mosható” gyapjú ruhaneműk mosásához,
amennyiben a mosást a ruhanemű címkéjén feltűntetett
és a háztartási gép gyártója által előírt útmutatásoknak
megfelelően hajtja végre. Hotpoint-Ariston az első mosógép márka, mely megszerezte a Woolmark Company
Woolmark Apparel Care - Platinum igazolását a mosási
teljesítményéért és a gazdaságos víz- és energiafogyasztásáért.
1-es rekesz: Mosószer előmosáshoz (por)
A mosószer betöltése előtt győződjön meg arról, hogy a
4-es berakható rekesz nincs ebben a rekeszben.
2-es rekesz: Mosószer mosáshoz (por vagy folyadék)
Ha folyékony mosószert használ, a megfelelő adagolás
érdekében tanácsos az A elválasztólapot használni. Ha
mosóport használ, tegye az elválasztólapot a B térbe.
3-as rekesz: Adalékok (öblítők stb.)
Az öblítő ne érjen a rács fölé.
4-es berakható rekesz: Fehérítőszer
A mosandó ruhák előkészítése
• Osztályozza a mosandókat a következők szerint:
- Szövet típusa / címkén lévő szimbólum.
- Színek Válogassa külön a színes és fehér ruhákat.
• Ürítse ki a zsebeket, és vizsgálja meg a gombokat.
• Ne lépje túl a mosandók száraz súlyára vonatkozóan
megadott értékeket:
Magasabb hőmérsékleten mosható anyagok: max. 7 kg
Műszálas anyagok: max. 3 kg
Kényes anyagok: max. 2 kg
Gyapjú: max. 1,5 kg
Selyem: max. 1 kg
Milyen nehezek a mosandó ruhák?
1 lepedő: 400–500 g
1 párnahuzat: 150–200 g
1 asztalterítő: 400–500 g
1 fürdőköpeny: 900–1200 g
1 törölköző: 150–250 g
KÉNYES RUHÁK: A nagyon kényes – pl. itterekkel,
csillogókkal ellátott – anyagok mosásához használja a
programot.
A selyem ruhadarabokhoz és függönyökhöz válassza a
ciklust, és állítsa a opcióban a szintet „KÉNYES”
értékre.
A mosás előtt tanácsos kifordítani a ruhadarabokat, és
a kisebb holmikat a kényes anyagok mosására szolgáló
megfelelő mosózsákba rakni.
A jobb mosási eredmény érdekében kényes anyagokhoz
való folyékony mosószer használatát javasoljuk.
A bepakolt ruhák kiegyensúlyozására
szolgáló rendszer
A túlzott zajhatás megelőzésére, valamint a mosandók
egyenletes eloszlása érdekében a forgódob a centrifugafázis előtt a mosási centrifugasebességnél kicsit
nagyobb sebességre kapcsol. Amennyiben a töltet kiegyensúlyozására irányuló próbálkozások nem vezetnek
eredményre, a készülék az elméleti centrifugasebességnél lassabb centrifugálásra kapcsol. Jelentős kiegyensúlyozatlanság esetén a mosógép, centrifugálás előtt
megpróbálja a töltetet megfelelően eloszlatni. A töltet
megfelelő eloszlásának biztosítása érdekében ajánlatos
a nagy ruhaneműket a kicsikkel összekeverni.
32
Page 33

Óvintézkedések és
20
tanácsok
! A mosógép a nemzetközi biztonsági szabványoknak
megfelelően lett tervezve és gyártva. Ezeket a gyelmeztetéseket biztonsági okokból írjuk le, kérjük, olvassa
el őket gyelmesen!
Általános biztonság
• A készüléket működtetésre alkalmatlan személyek (a
gyerekeket is beleértve) nem használhatják, kivéve,
amennyiben ezeket a személyeket egy, a biztonságukért felelős személy felügyeli, illetve a készülék használatát nekik elmagyarázza. Ne hagyja a gyerekeket
felügyelet nélkül, és győződjön meg arról, hogy nem
játszanak a készülékkel.
• Ez a készüléket háztartási használatra lett tervezve.
• Ne érjen a géphez mezítláb, illetve vizes vagy nedves
kézzel vagy lábbal!
• A csatlakozódugót az aljzatból ne a kábelnél, hanem a
csatlakozónál fogva húzza ki!
• Működés közben ne nyissa ki a mosószer-adagoló
ókot.
• Ne nyúljon a leeresztett vízbe, mert forró lehet!
• Semmiképpen ne feszegesse az ajtót: megsérülhet a
véletlen nyitást megakadályozó biztonsági retesz.
• Hiba esetén semmiképpen se nyúljon a gép belső részeihez, és ne próbálja megjavítani!
• Mindig ügyeljen arra, hogy gyermekek ne mehessenek
a működő gép közelébe.
• A mosás során az ajtó meleg lehet.
• Amennyiben a gépet át kell helyezni, az áthelyezést
két vagy három személy végezze, maximális odagyeléssel. Soha ne próbálja egyedül elmozdítani, mert a
készülék nagyon nehéz.
• A mosandó berakása előtt ellenőrizze, hogy a forgódob
üres-e.
Az ajtó kézi nyitása
HU
Amennyiben ki akarja teregetni a mosott ruhaneműt, de
áramhiány miatt nem tudja kinyitni a mosógép ajtaját,
tegye a következőket:
1. Húzza ki a dugót a konnektorból.
2. Győződjön meg arról,
hogy a készülékben maradt
víz szintje az ajtószint alatt
van – ellenkező esetben
eressze le a fölösleges vizet
a leeresztőcsövön keresztül
egy vödörbe, ahogy azt az
ábra is mutatja.
3. Egy csavarhúzó
segítségével távolítsa el a
burkolópanelt a mosógép
elejéről (lásd ábra).
4.
Hulladékelhelyezés
• A csomagolóanyag megsemmisítése: tartsa be a helyi
előírásokat, így a csomagolás újrahasznosítható.
• Az elektromos készülékek megsemmisítéséről szóló
európai direktíva 2002/96/EC előírja, hogy a régi
háztartási gépeket nem szabad a normál nem szelektív
hulladékgyűjtési folyamat során összegyűjteni. A régi
gépeket szelektíven kell összegyűjteni, hogy optimalizálni lehessen a bennük lévő anyagok újrahasznosítását és csökkenteni lehessen az emberi egészségre
és környezetre gyakorolt hatásukat. Az áthúzott “szemeteskuka” jele emlékezteti Önt arra, hogy kötelessége ezeket a termékeket szelektíven összegyűjteni.
A fogyasztóknak a helyi hatóságot vagy kereskedőt
kell felkeresniük a régi háztartási gépek helyes elhelyezését illetően.
Az ábrán látható fülecske kihúzásával szabadítsa
ki a műanyag húzókát; húzogassa lefelé, és ezzel
egyidejűleg nyissa ki az ajtót.
5. Szerelje vissza a panelt – mielőtt a gép felé nyomná,
győződjön meg arról, hogy a horgok a hozzájuk tartozó
furatokba illeszkednek.
33
Page 34
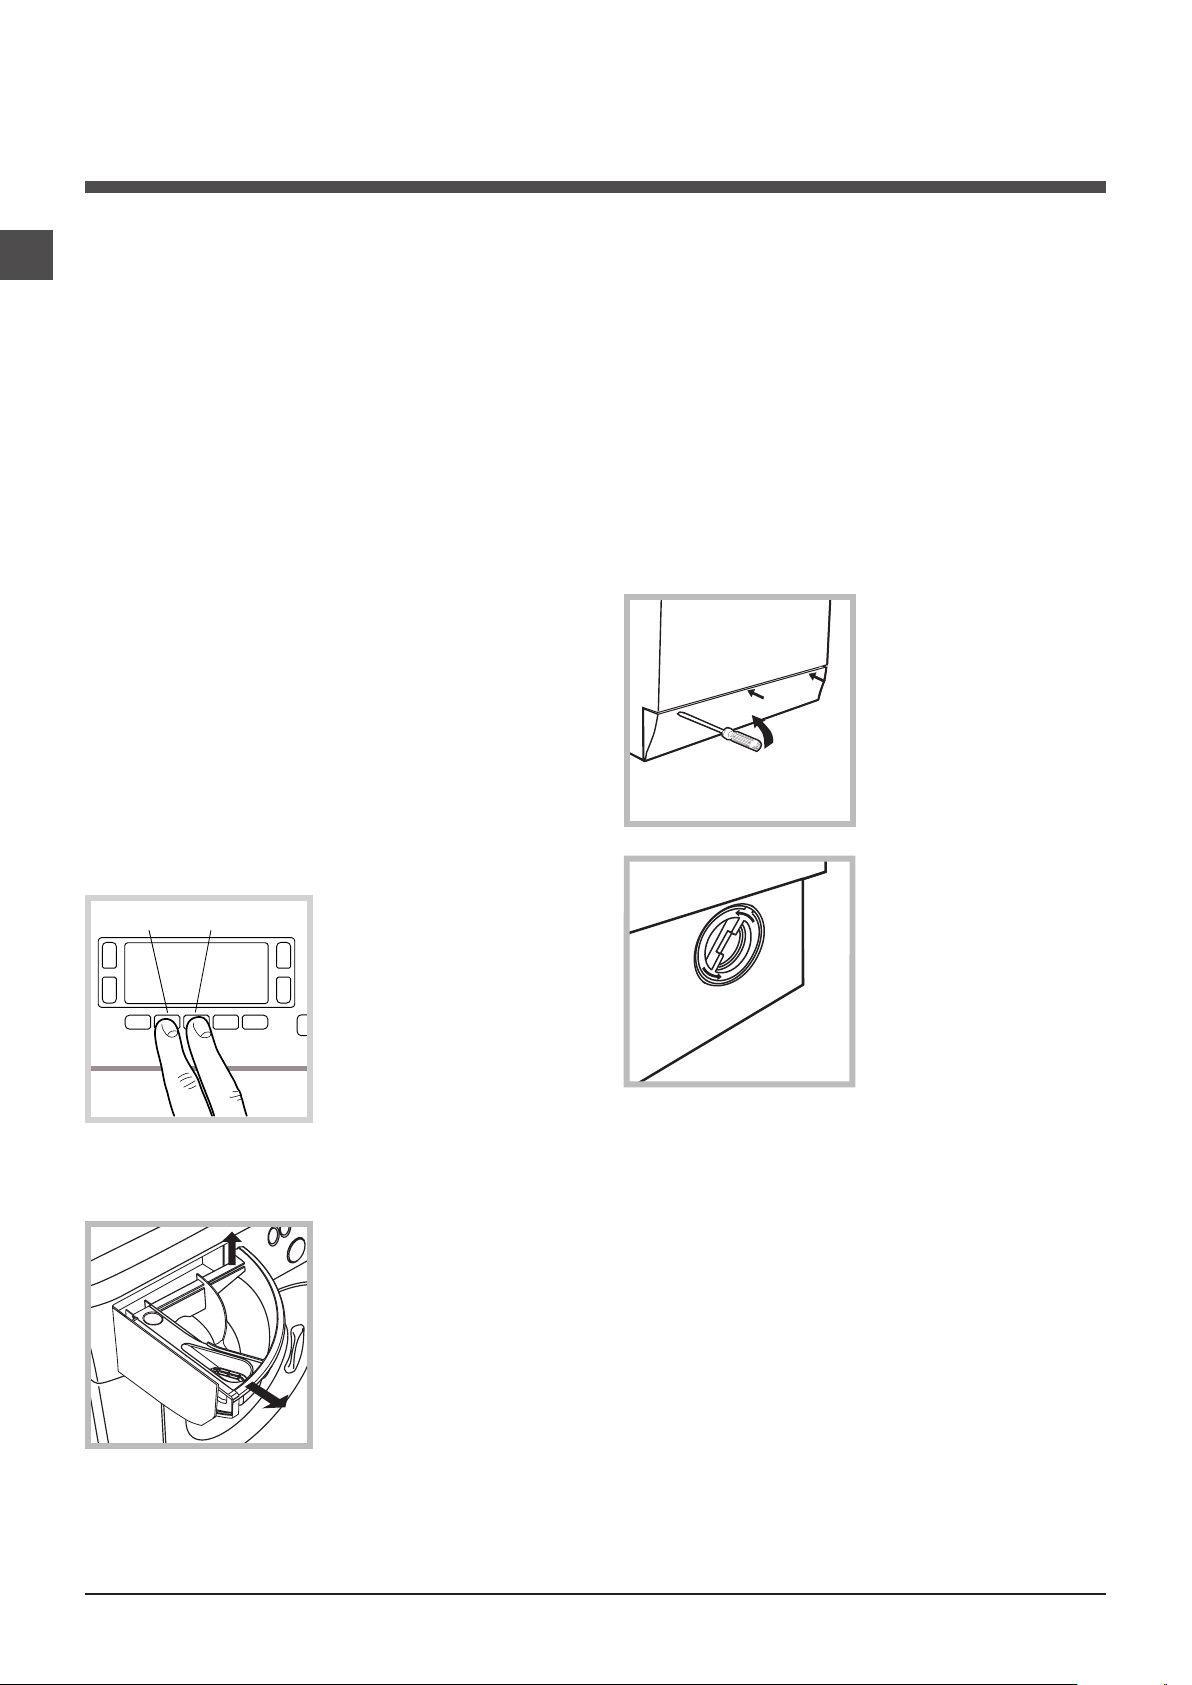
Karbantartás és ápolás
1
2
A
B
HU
A víz elzárása és az elektromos áram kikapcsolása
• Minden mosás után zárja el a vízcsapot. Így kíméli a
mosógép vízrendszerét és megszünteti a vízszivárgás
kockázatát.
• A mosógép tisztításakor, illetve karbantartásakor húzza
ki a hálózati csatlakozódugót az aljzatból.
A mosógép tisztítása
• A külső részeket és a gumirészeket langyos, szappa-
nos vizes ronggyal tisztíthatja. Ne használjon oldószert
vagy súrolószert!
• A mosógép a belső részegységek tisztítása érdekében
„AUTOMATA TISSZTÍTÁS” programmal rendelkezik, melyet a dob üres állapotában kell végrehajtani.
A mosószer (az enyhén szennyezett ruhadarabokhoz
javasolt mennyiség 10%-ának megfelelő mennyiség)
vagy a mosógéptisztító különleges adalékanyag a mosási program segédanyagaként használható. A tisztítási
programot 40 mosási ciklusonként tanácsos lefuttatni.
A program bekapcsolásához nyomja meg egyidejűleg
5 másodpercig az A és B gombot (lásd ábra).
A program automatikusan elindul, és nagyjából 70 percig
tart. A ciklus leállításához nyomja meg az START/PAUSE
gombot.
A szivattyú tisztítása
A mosógép öntisztító szivattyúval van felszerelve,
melynek nincs szüksége tisztítási és karbantartási
műveletekre. Előfordulhat azonban, hogy apró tárgyak
(aprópénz, gomb) esnek a szivattyú alsó részén található
szivattyúvédő előkamrába.
! Győződjön meg róla, hogy a mosóprogram véget ért, és
húzza ki a hálózati csatlakozót.
Az előkamrához való hozzáférés érdekében tegye a
következőket:
1. Egy csavarhúzó
segítségével távolítsa el a
burkolópanelt a készülék
elejéről (lásd ábra);
2. Órairánnyal ellentéte-
sen forgatva csavarja le a
fedelet (lásd ábra). Termé-
szetes, hogy egy kevés víz
kifolyik;
A mosószer-adagoló fiók tisztítása
A ók felemelésével és
kifelé húzásával vegye ki a
ókot (lásd ábra).
Folyó víz alatt mossa ki!
Ezt a tisztítást gyakran el
kell végezni.
Az ajtó és a forgódob ápolása
• Az ajtót hagyja mindig résre nyitva, nehogy rossz szagok keletkezzenek.
34
3. Gondosan tisztítsa ki az üreg belsejét;
4. Csavarja vissza a fedelet;
5. Szerelje vissza a panelt – mielőtt a gép felé nyomná,
győződjön meg arról, hogy a horgok a hozzájuk tartozó
furatokba illeszkednek.
A vízbevezető cső ellenőrzése
Évente legalább egyszer ellenőrizze a vízbevezető
csövet. Ha repedezett vagy hasadozott, ki kell cserélni – a mosás során a nagy nyomás hirtelen szakadást
okozhat.
! Soha ne használjon korábban már használt csöveket.
Page 35

Rendellenességek és
elhárításuk
Előfordulhat, hogy a mosógép nem működik. Mielőtt felhívná a szervizt (lásd „Szerviz”), ellenőrizze, hogy nem olyan
problémáról van-e szó, amely a következő lista segítségével egyszerűen megoldható!
Rendellenességek:
A mosógép nem kapcsol be.
A mosási ciklus nem indul el.
A mosógép nem kap vizet (a ki-
jelzon megjelenik a “VÍZHIÁNY,
ELLENŐRIZZE!”felirat).
A mosógép folytonosan szívja, és
üríti a vizet.
Lehetséges okok / megoldás:
• A hálózati csatlakozódugó nincs bedugva az aljzatba, vagy nem eléggé
ahhoz, hogy jól érintkezzen.
• Nincs áram a lakásban.
• A mosógép ajtaja nincs jól bezárva.
• Nem nyomta meg a ON/OFF gombot.
• Nem nyomta meg az START/PAUSE gombot.
• A vízcsap nincs nyitva.
• Az indítás időjelzőjén késletetés lett beállítva – késleltetésidőzítő (lásd „A
mosási ciklusok végrehajtása”).
• A vízbevezető cső nincs csatlakoztatva a csaphoz.
• A cső meg van törve.
• A vízcsap nincs nyitva.
• A lakásban nincs víz.
• Nincs elegendő nyomás.
• Nem nyomta meg az START/PAUSE gombot.
• A leeresztőcső nem a padlószinttől 65 és 100 cm közötti magasságban van
felszerelve (lásd „Üzembe helyezés”).
• A leeresztőcső vége vízbe merül (lásd „Üzembe helyezés”).
• A fali szifonnak nincs szellőzése.
Ha ezen vizsgálatok után a probléma nem oldódik meg, zárja el a vízcsapot, kapcsolja ki a mosógépet, és hívja ki a szervizszolgálatot. Ha a lakás
egy épület legfelsőbb emeleteinek egyikén található, lehetséges, hogy a
csatornaszellőző eltömődésének jelensége (szivornyahatás) lépett fel, ezért a
mosógép folytonosan szívja, és leereszti a vizet. E kellemetlenség elkerülésére a kereskedelmi forgalomban rendelkezésre állnak csatornaszellőzőszelepek.
HU
A mosógép nem üríti le a vizet, vagy
nem centrifugál.
A mosógép nagyon rázkódik a centrifugálás alatt.
A mosógépből elfolyik a víz.
A készülék lezár – a kijelző villogni
kezd, és a hiba kódját mutatja (pl.:
F-01, F-..).
Sok hab képződik.
• A program nem ereszti le a vizet: néhány programnál a vizet kézileg kell
leereszteni (lásd „Programok és funkciók”).
• A VASALÁSKÖNNYÍTÉS funkció be lett kapcsolva – a program befejezéséhez nyomja meg az START/PAUSE gombot (lásd „Programok és
funkciók”).
• A leeresztőcső meg van törve (lásd „Üzembe helyezés”).
• A lefolyó el van dugulva.
• Az üzembe helyezéskor a forgódob rögzítése nem lett eltávolítva (lásd
„Üzembe helyezés”).
• A készülék nincs vízszintben (lásd „Üzembe helyezés”).
• A mosógép bútorok és falak közé van szorítva (lásd „Üzembe helyezés”).
• A vízbevezető cső nincs jól felcsavarva (lásd „Üzembe helyezés”).
• A mosószer-adagoló ók eltömődött (tisztításához lásd „Karbantartás és
ápolás”).
• A leeresztőcső nincs szorosan rögzítve (lásd „Üzembe helyezés”).
• Kapcsolja ki a készüléket, és húzza ki a dugót a konnektorból, várjon körülbelül 1 percet, majd indítsa újra!
Ha a hiba továbbra is fennáll, forduljon a szervizhez!
• A mosószer nem mosógépekhez való (kell, hogy szerepeljen rajta, hogy
„gépi”, „kézi vagy gépi mosáshoz”, vagy hasonló).
• Túl sok mosószert használt.
35
Page 36

Szerviz
HU
Mielőtt a szervizhez fordulna:
• Győződjön meg arról, hogy a hibát nem tudja saját maga is elhárítani (lásd „Rendellenességek és elhárításuk”);
• Indítsa újra a programot, hogy lássa, elhárította-e a hibát;
• Ellenkező esetben forduljon az engedéllyel rendelkező szakszervizhez a garanciajegyen található telefonszámon.
! Soha ne forduljon engedéllyel nem rendelkező szerelőhöz!
Közölje:
• a meghibásodás jellegét;
• a mosógép típusát (Mod.);
• a gyártási számot (S/N).
Ezek az adatok a mosógép hátoldalán, illetve az elülső oldalon az ajtó belsején elhelyezett adattáblán találhatók.
36
Page 37

Návod k použití
PRAČKA
CZ
Česky
WMSD 723
Obsah
Instalace, 38-39
Rozbalení a vyrovnání do vodorovné polohy
Připojení k elektrické a k vodovodní síti
První prací cyklus
Technické údaje
Popis pračky, 40-41
Ovládací panel
Displej
Jak provést prací cyklus, 42
Programy a funkce, 43
Tabulka pracích programů
Funkce praní
Prací prostředky a prádlo, 44
Dávkovač pracích prostředků
Příprava prádla
Speciální programy
Systém automatického vyvážení náplně
Opatření a rady, 45
Základní bezpečnostní pokyny
Likvidace
Manuální otevření dvířek
CZ
Údržba a péče, 46
Uzavření přívodu vody a vypnutí elektrického napájení
Čištění pračky
Čištění dávkovače pracích prostředků
Péče o dvířka a buben
Čištění čerpadla
Kontrola přítokové hadice na vodu
Poruchy a způsob jejich odstranění, 47
Servisní služba, 48
37
Page 38

Instalace
CZ
! Je důležité uschovat tento návod tak, abyste jej mohli
kdykoli konzultovat. V případě prodeje, darování nebo
přestěhování pračky se ujistěte, že zůstane uložen
v blízkosti pračky, aby mohl posloužit novému majiteli při
seznámení s její činností a s příslušnými upozorněními.
! Pozorně si přečtěte uvedené pokyny: obsahují důležité in-
formace týkající se instalace, použití a bezpečnosti při práci.
Rozbalení a vyrovnání do vodorovné
polohy
Rozbalení
1. Rozbalte pračku.
2. Zkontrolujte, zda během přepravy nedošlo k jejímu
poškození. V případě, že je poškozena, ji nezapojujte a
obraťte se na prodejce.
3. Odstraňte 4 šrouby
chránící před poškozením
během přepravy a gumovou podložku s příslušnou
rozpěrkou, které se
nacházejí v zadní části (viz
obrázek).
Dokonalé vyrovnání do vodorovné polohy zabezpečí
stabilitu zařízení a zamezí vzniku vibrací a hluku během
činnosti. V případě instalace na podlahovou krytinu nebo
na koberec nastavte nožky tak, aby pod pračkou zůstal
dostatečný volný prostor pro ventilaci.
Připojení k elektrické a k vodovodní síti
Připojení přítokové hadice vody
1. Připojte přívodní hadici
jejím zašroubováním ke
kohoutku studené vody
s hrdlem se závitem 3/4“
(viz obrázek).
Před připojením hadice
nechte vodu odtékat, dokud nebude čirá.
2. Připojte přítokovou hadici k pračce prostřednictvím
příslušné přípojky na vodu,
umístěné vpravo nahoře
(viz obrázek).
4. Uzavřete otvory po šroubech plastovými krytkami z
příslušenství.
5. Uschovejte všechny díly: v případě opětovné přepravy
pračky je bude třeba namontovat zpět.
! Obaly nejsou hračky pro děti!
Vyrovnání do vodorovné polohy
1. Pračku je třeba umístit na rovnou a pevnou podlahu,
aniž by se opírala o stěnu, nábytek či něco jiného.
2. V případě, že podlaha
není dokonale vodorovná, mohou být případné
rozdíly vykompenzovány
šroubováním předních
nožek (viz obrázek); Úhel
sklonu, naměřený na
pracovní ploše, nesmí
přesáhnout 2°.
3. Dbejte na to, aby hadice nebyla příliš ohnutá ani
stlačená.
! Tlak v rozvodu vody se musí pohybovat v rozmezí hod-
not uvedených v tabulce s technickými údaji
(viz vedlejší strana).
! V případě, že délka přítokové hadice nebude
dostatečná, obraťte se na specializovanou prodejnu
nebo na autorizovaný technický personál.
! Nikdy nepoužívejte již použité hadice.
! Používejte hadice z příslušenství zařízení.
38
Page 39
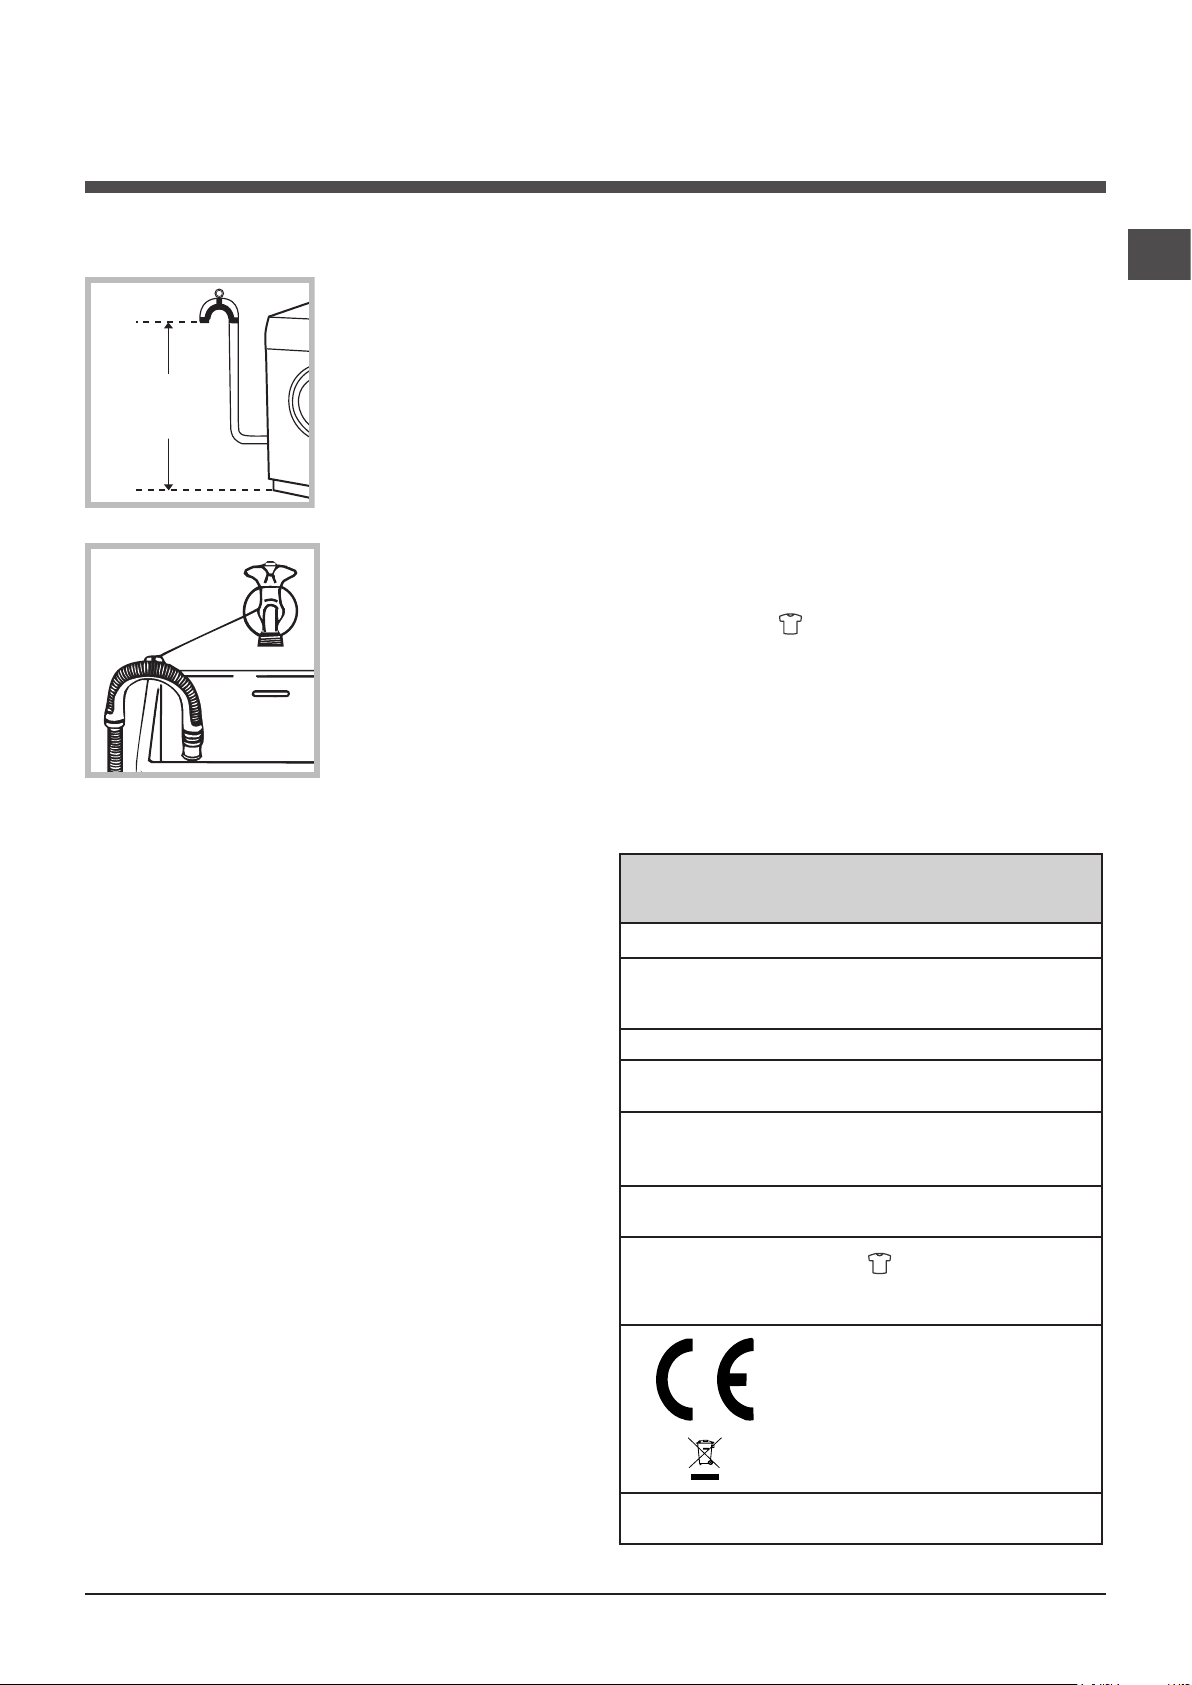
65 - 100 cm
Připojení vypouštěcí hadice
Připojte vypouštěcí hadici, aniž byste ji ohýbali,
k odpadovému potrubí
nebo k odpadu ve stěně,
který se nachází od 65 do
100 cm nad zemí;
! Nepoužívejte prodlužovací kabely a rozvodky.
! Kabel nesmí být ohnutý ani stlačený.
! Výměna kabelu musí být svěřena výhradně autorizo-
vanému technickému personálu.
Upozornění! Výrobce neponese žádnou odpovědnost za
následky nerespektování uvedených předpisů.
První prací cyklus
CZ
nebo ji uchyťte k okraji umývadla či vany a
připevněte vodicí držák
z příslušenství ke kohoutu
(viz obrázek). Volný konec
vypouštěcí hadice nesmí
zůstat ponořený do vody.
! Použití prodlužovacích hadic se nedoporučuje; je-li
však nezbytné, prodlužovací hadice musí mít stejný
průměr jako originální hadice a její délka nesmí
přesáhnout 150 cm.
Připojení k elektrické síti
Před zasunutím zástrčky do zásuvky se ujistěte, že:
• Je zásuvka uzemněna a že vyhovuje normám;
• je zásuvka schopna snést maximální zátěž odpovídající jmenovitému příkonu zařízení, uvedenému v tabulce s technickými údaji
(viz vedle);
• hodnota napájecího napětí odpovídá údajům uvedeným v tabulce s technickými údaji
(viz vedle);
• je zásuvka kompatibilní se zástrčkou pračky.
V opačném případě je třeba vyměnit zásuvku nebo
zástrčku.
! Pračka nesmí být umístěna venku – pod širým nebem,
a to ani v případě, že by se jednalo o místo chráněné
před nepřízní počasí, protože je velmi nebezpečné vystavit ji působení deště a bouří.
Po instalaci zařízení je třeba ještě předtím, než je
použijete na praní prádla, provést jeden zkušební cyklus
s pracím prostředkem a bez náplně prádla nastavením
pracího programu (60°C).
Technické údaje
Model WMSD 723
šíøka 59,5 cm
Rozmìry
Kapacita od 1 do 7 kg
Napájení
Pøipojení k
rozvodu vody
Rychlost
odstøeïování
Kontrolní programy
podle směrnic
1061/2010 a
1015/2010
výška 85 cm
hloubka 43,5 cm
Viz štítek s technickými údaji, aplikovaný na zarízení.
maximální tlak 1 MPa (10 bar)
minimální tlak 0.05 MPa (0.5 bar)
kapacita bubnu 48 litrù
a¡z do 1200 otáèek za minutu
program
teplota 60° (2. stisknutí tlačítka);
teplota 40° (3. stisknutí tlačítka).
Toto zaøízení odpovídá následujícím
normám Evropské unie:
- 2004/108/CE (Elektromagnetická
kompatibilita)
- 2006/95/CE (Nízké napìtí)
- 2002/96/CE
;
! Po denitivní instalaci pračky musí zásuvka zůstat
snadno přístupná.
Hluènost
(dB(A) re 1 pW)
Praní: 55
Odstøeïování: 70
39
Page 40

Popis pračky
CZ
Ovládací panel
Dávkovač pracích prostředků
Dávkovač pracích prostředků: slouží k dávkování
pracích prostředků a přídavných prostředků (viz „Prací
prostředky a prádlo“).
Tlačítko ON/OFF : zapněte nebo vypněte pračku
krátkým stisknutím tlačítka. Kontrolka START/PAUSE
pomalu blikající zeleným světlem poukazuje na to, že je
stroj zapnutý. Za účelem vypnutí pračky během praní je
třeba držet tlačítko stisknuté déle, přibližně 3 sek.; krátké
nebo náhodné stisknutí neumožní vypnutí pračky. Vypnutí zařízení během praní způsobí zrušení probíhajícího
pracího programu.
Tlačítka VOLBY PROGRAMŮ: slouží k nastavení
požadovaného programu (viz “Tabulka pracích programů”).
Tlačítko PAMĚŤ: držte stisknuté toto tlačítko za účelem
uložení cyklu do paměti spolu s vlastními uživatelskými
nastaveními. Pro vyvolání cyklu, který byl předem
uložen do paměti, stiskněte tlačítko PAMĚŤ.
FUNKČNÍ tlačítka: stiskněte tlačítko kvůli volbě
požadované funkce. Na displeji se rozsvítí příslušná
kontrolka.
Tlačítko
vést volbu požadované intenzity praní.
Tlačítko
provést volbu požadovaného máchání.
Tlačítko ODSTŘEĎOVÁNÍ : stiskněte za účelem
snížení nebo úplného vyloučení odstřeďování - hodnota
bude uvedena na displeji.
TYP PRANÍ
TYP MÁCHÁNÍ
: jeho stisknutím můžete pro-
: jeho stisknutím můžete
Tlačítko
ON/OFF
Tlačítka
VOLBY
PROGRAMŮ
Tlačítko
TYP PRANÍ
Displej
Tlačítko
PAMĚŤ
Tlačítko
TYP
MÁCHÁNÍ
Tlačítko
ODLOŽENÉHO
STARTU
Tlačítko TEPLOTY : stiskněte za účelem snížení teploty: Příslušná hodnota bude zobrazena na displeji.
Tlačítko ZABLOKOVÁNÍ TLAČÍTEK : aktivace
zablokování ovládacího panelu se provádí tak, že podržíte
stisknuté tlačítko přibližně na 2 sekundy. Rozsvícená
kontrolka poukazuje na to, že je ovládací panel
zablokován. Tímto způsobem se zamezí náhodným
změnám programů, zejména když jsou v domácnosti děti.
Zrušení zablokování ovládacího panelu se provádí tak, že
podržíte stisknuté tlačítko přibližně na 2 sekundy.
Tlačítko ODLOŽENÉHO STARTU : stiskněte za
účelem nastavení odloženého startu zvoleného programu. Doba, o kterou bude start odložen, bude zobrazena
na displeji.
Tlačítko s kontrolkou START/PAUSE: když zelená
kontrolka začne pomalu blikat, stiskněte toto tlačítko pro
zahájení praní. Po zahájení cyklu se kontrolka rozsvítí
stálým světlem. Přejete-li si přerušit praní, opětovně
stiskněte tlačítko; kontrolka bude blikat oranžovým
světlem. Když symbol není rozsvícen, je možné
otevřít dvířka. Za účelem opětovného zahájení cyklu
z místa, v němž byl přerušen, opětovně stiskněte tlačítko.
Pohotovostní režim
Za účelem shody s novými předpisy souvisejícími s
energetickou úsporou je tato pračka vybavena systémem
automatického vypnutí (přechodu do pohotovostního
režimu – standby), který je aktivován po uplynutí 30 minut, když se pračka nepoužívá. Krátce stiskněte tlačítko
ON/OFF a vyčkejte na obnovení činnosti zařízení.
Spotřeba v off-mode: 1 W
Spotřeba v Left-on: 1 W
FUNKČNÍ
tlačítka
Tlačítko
ODSTŘEĎOVÁNÍ
Tlačítko s kontrolkou
START/PAUSE
Tlačítko
TEPLOTY
Tlačítko
ZABLOKOVÁNÍ
TLAČÍTEK
40
Page 41
Displej
Z
B
A
CZ
X
D
C
E
Y
F
Displej slouží k naprogramování zařízení a poskytuje četné informace.
Ve dvou horních řetězcích A a B je zobrazen zvolený prací program, probíhající fáze praní a všechny informace o postupu programu.
V řetězci C je zobrazena doba zbývající do konce probíhajícího pracího cyklu a v případě nastavení ODLOŽENÉHO
STARTU také doba chybějící do zahájení zvoleného programu.
V řetězci D je zobrazena maximální hodnota rychlosti odstřeďování, které zařízení může dosáhnout na základě zvoleného programu; když není odstřeďování součástí zvoleného programu, tento řetězec zůstane zhasnutý.
V řetězci E je zobrazena maximální hodnota teploty, kterou lze zvolit na základě zvoleného programu; když není nastavení teploty součástí zvoleného programu, tento řetězec zůstane zhasnutý.
Kontrolky F se týkají funkcí a jsou rozsvícené, když je zvolená funkce kompatibilní s nastaveným programem.
Symbol Zablokovaných dvířek
Rozsvícení uvedeného symbolu poukazuje na zablokování dvířek kvůli zabránění jejich náhodnému otevření. Aby se
předešlo poškození, před otevřením dvířek je třeba vyčkat na zhasnutí uvedeného symbolu.
POZN.: Když je aktivována funkce ODLOŽENÉHO STARTU, nebude možné otevřít dvířka a pro jejich otevření bude
třeba přerušit činnost zařízení stisknutím tlačítka START/PAUSE.
! Při prvním zapnutí budete vyzváni, abyste provedli volbu jazyka, a poté bude na displeji automaticky zvoleno menu
volby jazyka.
Za účelem volby požadovaného jazyka stiskněte tlačítka X a Y a potvrďte voblu stisknutím tlačítka Z.
Když si přejete provést změnu jazyka, vypněte zařízení, stiskněte současně tlačítka X, Y, Z a držte je stisknutá, dokud
neuslyšíte akustický signál a neobjeví se menu pro volbu jazyka.
41
Page 42

Jak provést prací cyklus
CZ
1. ZAPNUTÍ ZAŘÍZENÍ. Stiskněte tlačítko a na displeji
se zobrazí nápis ZAPNUTO; kontrolka START/PAUSE
bude pomalu blikat zelenou barvou.
2. NAPLŇTE PRAČKU PRÁDLEM. Otevřete dvířka.
Naplňte pračku prádlem a dbejte přitom, aby nedošlo
k překročení množství náplně, uvedeného v tabulce
programů na následující straně.
3. DÁVKOVÁNÍ PRACÍHO PROSTŘEDKU. Vytáhněte
dávkovač pracích prostředků a naplňte prací prostředek
do příslušných přihrádek způsobem vysvětleným v části
„Prací prostředky a prádlo“.
4. ZAVŘETE DVÍŘKA.
5. ZVOLTE PRACÍ PROGRAM. Stiskněte jedno z tlačítek
VOLBY PROGRAMŮ za účelem volby požadovaného
programu; název programu bude zobrazen na displeji;
ke zvolenému programu je přiřazena teplota a rychlost
odstřeďování, které se dají měnit. Na displeji bude
zobrazena doba trvání cyklu.
6. PROVEĎTE UŽIVATELSKÁ NASTAVENÍ PRACÍHO
CYKLU. Použijte příslušná tlačítka:
Změňte teplotu a/nebo odstřeďování.
Zařízení automaticky zvolí teplotu a maximální rychlost
odstřeďování přednastavené pro zvolený program;
tyto hodnoty se nesmí zvyšovat. Stisknutím tlačítka
je možné postupně snížit teplotu až po praní ve
studené vodě „OFF“. Stisknutím tlačítka je možné
postupně snížit rychlost odstřeďování až po jeho úplné
vyloučení „OFF“. Další stisknutí tlačítek obnoví nastavení
maximálních přednastavených hodnot.
! Výjimka: při volbě programu (2. stisknutí tlačítka) bude
možné zvýšit teplotu až na 90°C.
Nastavte odložený start.
Pro nastavení odloženého startu zvoleného programu
stiskněte příslušné tlačítko až do dosažení požadované
doby odložení. Po zvolení této volitelné funkce se
zobrazí symbol . Zrušení odloženého startu se
provádí stisknutím tlačítka až do zobrazení nápisu OFF.
Nastavte požadovanou intenzitu praní.
Tlačítko umožňuje provést optimalizaci praní na
základě stupně znečištění tkanin a požadované intenzity
praní.
Zvolte program praní; cyklus bude automaticky
nastaven na úroveň „NORMÁLNÍ“ a bude provedena
jeho optimalizace pro středně znečištěné prádlo
(toto nastavení neplatí pro cyklus „Vlna“, který se
automaticky nastaví na úroveň „JEMNÉ“).
Pro značně znečištěné prádlo stiskněte tlačítko
, dokud nebude nastavena úroveň „SUPER
WASH“. Tato úroveň zaručuje dokonalé praní díky
použití většího množství vody v počáteční fázi cyklu a
větší mechanický pohyb a je užitečná pro odstranění
nejodolnějších skvrn.
Může se používat s bělicím prostředkem nebo bez něj.
Když si přejete provést bělení, vložte přídavnou nádobku
4 z příslušenství do přihrádky 1. Při dávkovaní bělicího
prostředku nepřekračujte úroveň „max“, vyznačenou na
středovém čepu (viz obrázek na str. 44).
Pro mírně znečištěné prádlo nebo pro choulostivější
zacházení s látkami stiskněte tlačítko až po
42
dosažení úrovně „JEMNÉ“. Cyklus omezí mechanický
pohyb pro zajištění dokonalých výsledků praní u
choulostivého prádla. Když není možné provést
požadované nastavení nebo změnit existující nastavení,
na displeji se zobrazí „NEDOSTUPNÉ“.
Nastavte druh máchání.
Volitelná funkce umožňuje zvolit požadovaný druh
máchání pro maximální péči o citlivé druhy pokožky. Při
prvním stisknutí tlačítka bude nastavena úroveň „EXTRA
MÁCHÁNÍ“, která umožní provést volbu přídavného
máchání ve srovnání se standardním mácháním cyklu,
aby se odstranily všechny stopy po pracím prostředku.
Při druhém stisknutí tlačítka bude nastavena úroveň
„MÁCHÁNÍ CITLIVÁ PLEŤ“, která umožňuje provést volbu
dvou přídavných máchání ve srovnání se standardním
mácháním cyklu a doporučuje se pro citlivější pokožky.
Při třetím stisknutí tlačítka bude nastavena úroveň
„ANTIALERG. MÁCHÁNÍ“, která umožňuje provést
volbu tří přídavných máchání ve srovnání se standardním
cylkem máchání, aby se odstranily hlavní alergeny, jako
jsou pyl, roztoči, kočičí a psí chlupy. Opětovným stisknutím
tohoto tlačítko se můžete vrátit na úroveň máchání
„NORMÁLNÍ MÁCHÁNÍ“. Když není možné provést
požadované nastavení nebo změnit existující nastavení,
na displeji se zobrazí „NEDOSTUPNÉ“.
Změňte vlastnosti cyklu.
• Stiskněte tlačítka aktivace funkce; dojde k rozsvícení
odpovídající kontrolky tlačítka.
• Opětovným stisknutím můžete zvolenou funkci zrušit;
příslušná kontrola zhasne.
! V případě, že zvolená funkce není kompatibilní
s nastaveným pracím programem, příslušná kontrolka
začne blikat a funkce nebude aktivována.
! V případě, že zvolená funkce není kompatibilní s jinou
předem zvolenou funkcí, kontrolka první funkce bude
blikat a bude aktivována pouze druhá, přičemž kontrolka
zvolené funkce se rozsvítí stálým světlem.
! Funkce mohou změnit doporučenou náplň a/nebo
dobu trvání cyklu.
7. SPUSŤTE PROGRAM. Stiskněte tlačítko START/
PAUSE. Příslušná kontrolka se rozsvítí stálým zeleným
světlem a dojde k zablokování dvířek (rozsvícený symbol
ZABLOKOVANÝCH DVÍŘEK ). Během praní se na
displeji zobrazí název probíhající fáze. Za účelem změny
programu během probíhajícího cyklu přerušte činnost
pračky stiknutím tlačítka START/PAUSE (kontrolka
START/PAUSE bude pomalu blikat oranžovým světlem);
zvolte požadovaný cyklus a opětovně stiskněte tlačítko
START/PAUSE. Za účelem otevření dvířek v průběhu
pracího cyklu stiskněte tlačítko START/PAUSE; když
bude symbol ZABLOKOVANÝCH DVÍŘEK zhasnutý,
bude možné otevřít dvířka. Opětovným stisknutím tlačítka
START/PAUSE znovu uveďte do činnosti prací program
z bodu, ve kterém byl přerušen.
8. UKONČENÍ PROGRAMU. Bude oznámeno zobrazením
nápisu „KONEC CYKLU“ na displeji. Po zhasnutí
symbolu ZABLOKOVANÝCH DVÍŘEK bude možné
otevřít dvířka. Otevřete dvířka, vyložte prádlo a vypněte
zařízení.
! Přejete-li si zrušit již zahájený cyklus, znovu dlouze
stiskněte tlačítko . Cyklus bude přerušen a dojde k
automatickému vypnutí zařízení.
Page 43
Programy a funkce
Tabulka pracích programů
Max. ry-
Popis programu
Programy
ODSTRAŇOVÁNÍ SKVRN
BAVLNA S PŘEDPÍR. (1° stisknutí tlacítka): mimořádně znečištěné bílé
prádlo.
BAVLNA BÍLÁ (1) (2° stisknutí tlacítka): mimořádně znečištěné bílé
prádlo.
BAVLNA BAREVNÁ (1-2) (3° stisknutí tlacítka): částečně znečišteně
barevné prádlo z odolných tkanin.
SYNTETIKA ODOLNÁ (1° stisknutí tlacítka): velmi znečištěné barevné
prádlo z odolných tkanin
.
SYNTETIKA ODOLNÁ (4) (1° stisknutí tlacítka): velmi znečištěné bare-
vné prádlo z odolných tkanin
SYNTETIKA JEMNÁ (2° stisknutí tlacítka): částečně znečištěné barevné
prádlo z odolných tkanin
RYCHLÉ PRANÍ 60' (1° stisknutí tlacítka): k rychlému oživení
znečištěného prádla (nedoporučuje se pro vlnu, hedvábí a prádlo určené
pro ruční praní).
RYCHLÉ PRANÍ 30' (2° stisknutí tlacítka): k rychlému oživení mírně
znečištěného prádla (nedoporučuje se pro vlnu, hedvábí a prádlo určené pro
ruční praní).
PAMĔŤ: Slouží k uložení libovolného způsobu praní do paměti.
M
.
POVLEČENÍ, RUČNÍKY (3):
VLNA A KAŠMÍR: pro vlnu, kašmír apod.
JEMNÉ
Max. teplot
(°C)
40° 1200 -
90° 1200
60°
(Max. 90°C)
40° 1200 -
60° 800 -
40° 800 -
40° 800 -
60° 1200 -
30° 800 -
60° 1200 -
40° 800 -
30° 0 -
OTÁČKY (1° stisknutí tlacítka)
OPLACHOVÁNÍ (2° stisknutí tlacítka)
VYPOUŠTĚNÍ VODY (3° stisknutí tlacítka)
Doba trvání cyklu uvedená na displeji nebo v návodu představuje odhad vypočítaný na základě standardních podmínek. Skutečná doba se může měnit v závislosti na četných faktorech, jako je
např. teplota a tlak vody na vstupu, teplota prostředí, množství pracího prostředku, množství a druh náplně, vyvážení náplně a zvolené volitelné funkce.
Pro všechny Kontrolní ústavy:
(1) Kontrolní program podle normy 2010/1061: nastavte program
Tento cyklus je vhodný pro praní běžně znečištěné bavlny a jedná se o nejúčinnější cyklus z hlediska kombinované spotřeby energie a vody určený pro prádlo, které
lze prát při teplotě do 60°C a 40°C. Skutečná teplota praní se může lišit od uvedené.
(2)
Dlouhý program pro praní bavlny
(3)
Krátký program pro praní bavlny:
(4) Dlouhý program pro syntetiku:
: nastavte program 40°C
nastavte program
60°C (1. stisknutí tlačítka); teplota 40°C (Stisknutím tlacítka TEPLOTY).
; teplota 40°C (Stisknutím tlacítka TEPLOTY).
60°C (2. stisknutí tlačítka);
(3. stisknutí tlačítka).
chlost
(otácky
minutu)
1200 -
- 1200 - - - - 7 - - - 16’
- 1200 - - -
- 0 - - - - 7 - - - 2’
Prací prostředky
za
Praní
Předpírka
nastavte program
%
Bělicí
Aviváž
Max. náplň (kg)
prostředek
-
-
Zbytková vlhkost
4
- - -
7 53 2,47 97 185’
7 53 0,99 64 190’
7 53 0,94 72 175’
3 49 0,87 42 90’
3 49 0,56 42 80’
3 - - - 75’
-
-
-
-
-
3.5 53 0,81 36 60’
3 71 0,19 39 30’
7 - - - 135’
1,5 - - - 80’
1 - - - 75’
7 - - - 49’
40°C (3. stisknutí tlačítka).
kWh
vody lt
Spotřeba energie
Doba trvání cyklu
Celkové množství
180’
Funkce praní
Rychlé praní
Při volbě této volitelné funkce dojde ke zkrácení doby
trvání programu až o 50% v závislosti na zvoleném cyklu
a současně bude zaručena úspora vody a energie. Tento
cyklus použijte na nepříliš znečištěné kusy prádla.
! Není možné ji aktivovat u programů , “RYCHLÉ
PRANÍ 60’”, , , .
Snadné žehlení
Volbou této funkce budou praní a odstřeďování náležitě
změněny za účelem snížení tvorby záhybů. Na konci
cyklu pračka provede pomalá otáčení bubnu; kontrolka
funkce SNADNÉ ŽEHLENÍ budou blikat a na displeji se
zobrazí nápis „KONEC CYKLU“. K ukončení cyklu je třeba
stisknout tlačítko START/PAUSE nebo tlačítko SNADNÉ
ŽEHLENÍ.
! Není možné ji aktivovat u programů , “RYCHLÉ
PRANÍ 30’”, , , “OTÁČKY” a “VYPOUŠTĚNÍ VODY”.
Eco wash
Funkce Eco Wash přispívá k energetické úspoře tím,
že neohřívá vodu použitou pro praní prádla – jedná se
o výhodu pro životní prostředí i pro účet za elektrickou
energii. Zesílený účinek a optimalizovaná spotřeba
vody vskutku zaručují optimální výsledky během stejné
průměrné doby odpovídající standardnímu cyklu. Pro
dosažení lepších výsledků praní se doporučuje použít
tekutý prací prostředek.
! Není možné ji aktivovat u programů , (90°C), ,
, , .
CZ
43
Page 44

Prací prostředky a prádlo
M
AX
1
2
4
3
A
B
CZ
Dávkovač pracích prostředků
Dobrý výsledek praní závisí také na správném dávkování
pracího prostředku: použití jeho nadměrného množství
snižuje efektivitu praní a napomáhá tvorbě vodního
kamene na vnitřních částech pračky a zvyšuje znečištění
životního prostředí.
! Pro předpírku a praní při teplotě vyšší než 60 °C používejte
práškové prací prostředky pro bílé bavlněné prádlo.
! Dodržujte pokyny uvedené na obalu pracího
prostředku.
! Nepoužívejte prací prostředky určené pro ruční praní,
protože způsobují tvorbu nadměrného množství pěny.
Při vytahování dávkovače
pracích prostředků a při
jeho plnění pracími nebo
přídavnými prostředky
postupujte následovně.
Přihrádka 1: Prací prostředek (práškový) pro
předpírku
Před naplněním přihrádky pracím prostředkem se ujistěte,
že v dávkovači není vložena přídavná přihrádka 4.
Přihrádka 2: Prací prostředek (v prášku nebo tekutý)
V případě použití tekutého pracího prostředku se
doporučuje použít pro správné dávkování malou
přepážku A z příslušenství. Pro použití práškového
pracího prostředku vložte malou přepážku do prohloubeniny B.
Přihrádka 3: Přídavné prostředky (aviváž atd.)
Aviváž nesmí vytékat z mřížky.
přídavná přihrádka 4: Bělicí prostředek
Speciální programy
Odstraňování Skvrn: cyklus vhodný pro praní
značně znečištěného prádla s odolnými barvami. Tento
program zaručuje vyšší třídu praní než standardní třída
(třída A). Při použití tohoto programu nemíchejte spolu
prádlo různých barev. Doporučuje se použití práškového
pracího prostředku. Pro odolné skvrny se doporučuje
provést předošetření specickými přídavnými prostředky.
POVLEČENÍ, RUČNÍKY: pro praní ložního a koupelnového prádla v jediném cyklu použijte program , který
optimalizuje použití aviváže a umožňuje uspořit čas
a energii. Doporučuje se použití práškového pracího
prostředku.
Vlna: prací cyklus „Vlna“ této pračky Hotpoint-Ariston
byl testován a schválen společností Woolmark Company
pro praní prádla z vlny, které je klasikováno jako „prádlo
určené pro ruční praní“, za podmínky, že bude praní
provedeno v souladu s pokyny uvedenými na visačce
oblečení a s pokyny dodanými výrobcem elektrického
spotřebiče. Hotpoint-Ariston je první značkou praček,
která získala od společnosti Woolmark Company certikát Woolmark Apparel Care - Platinum za svou výkonnost při praní a spotřebu vody a energie.
JEMNÉ: pro praní velmi choulostivého prádla, které
obsahuje aplikace, jako je štras nebo pajetky, použijte
program .
Pro praní hedvábného prádla a záclon zvolte cyklus a
nastavte úroveň “Jemné” volitelné funkce .
Doporučuje se prádlo před praním převrátit naruby a
vložit malé kusy prádla do příslušného sáčku pro praní
choulostivého prádla.
Pro dosažení nejlepších výsledků se doporučuje použít
tekutý prací prostředek pro choulostivé prádlo.
Příprava prádla
• Roztřiďte prádlo podle:
- druhu tkaniny / symbolu na visačce.
- barvy: oddělte barevné prádlo od bílého.
• Vyprázdněte kapsy a zkontrolujte knoíky.
• Nepřekračujte povolenou náplň, vztahující se na hmotnost suchého prádla:
Odolné tkaniny: max. 7 kg
Syntetické tkaniny: max. 3 kg
Choulostivé tkaniny: max. 2 kg
Vlna: max. 1,5 kg
Hedvábí: max. 1 kg
Kolik váží prádlo?
1 prostěradlo 400-500 g
1 povlak na polštář 150-200 g
1 ubrus 400-500 g
1 župan 900-1.200 g
1 ručník 150-250 g
44
Systém automatického vyvážení náplně
Před každým odstřeďováním buben provede otáčení rychlostí lehce převyšující rychlost praní, aby se odstranily
vibrace a aby se náplň rovnoměrně rozložila. V případě,
že po několikanásobných pokusech o vyvážení prádlo
ještě nebude správně vyváženo, zařízení provede
odstřeďování nižší rychlostí, než je přednastavená
rychlost. Za přítomnosti nadměrného nevyvážení pračka
provede namísto odstřeďování vyvážení. Za účelem
dosažení rovnoměrnějšího rozložení náplně a jejího
správného vyvážení se doporučuje míchat velké a malé
kusy prádla.
Page 45

Opatření a rady
20
! Pračka byla navržena a vyrobena v souladu s platnými
mezinárodními bezpečnostním předpisy. Tato upozornění
jsou uváděna z bezpečnostních důvodů a je třeba si je
pozorně přečíst.
Základní bezpečnostní pokyny
• Toto zařízení bylo navrženo výhradně pro použití v
domácnosti.
• Zařízení nesmí být používáno osobami (včetně dětí)
se sníženými fyzickými, senzorickými nebo mentálními
schopnostmi a s nedostatečnými zkušenostmi a znalostmi, s výjimkou případu, kdy toto použití probíhá pod
dozorem nebo na základě pokynů osoby zodpovědné
za jejich bezpečnost. Děti musí být pod dohledem, aby
se zajistilo, že si nebudou se zařízením hrát.
• Pračku mohou používat pouze dospělé osoby podle
pokynů uvedených v tomto návodu.
• Nedotýkejte se zařízení bosí nebo v případě, že máte
mokré ruce či nohy.
• Nevytahujte zástrčku ze zásuvky tahem za kabel, ale
uchopením za zástrčku.
• Neotvírejte dávkovač pracích prostředků během
činnosti zařízení.
• Nedotýkejte se odčerpávané vody, protože může mít
velmi vysokou teplotu.
• Nepokoušejte se o násilné otevření dvířek: mohlo
by dojít k poškození bezpečnostního uzávěru, který
zabraňuje náhodnému otevření.
• Při výskytu poruchy se v žádném případě nepokoušejte
o opravu vnitřních částí zařízení.
• Vždy mějte pod kontrolou děti a zabraňte tomu, aby se
přibližovaly k zařízení během pracího cyklu.
• Během pracího cyklu mají dvířka tendenci ohřát se.
• V případě potřeby přemísťujte pračku ve dvou nebo
ve třech a věnujte celé operaci maximální pozornost.
Nikdy se nepokoušejte zařízení přemísťovat sami, je
totiž velmi těžké.
• Před zahájením vkládání prádla zkontrolujte, zda je
buben prázdný.
Spotřebitelé by měli kontaktovat příslušné místní
úřady nebo svého prodejce ohledně informací týkajících se správné likvidace starého zařízení.
Manuální otevření dvířek
V případě, že není možné otevřít dvířka s průzorem
z důvodu výpadku elektrické energie a hodláte pověsit
prádlo, postupujte následovně:
1. vytáhněte zástrčku ze
zásuvky elektrické sítě.
2. Zkontrolujte, zda je
hladina vody uvnitř zařízení
nižší, než je úroveň otevření
dvířek; v opačném případě
vypusťte přebytečnou
vodu vypouštěcí hadicí a
zachyťte ji do vědra, jak je
znázorněno na obrázku.
3. pomocí šroubováku
odstraňte krycí panel nacházející se v přední části
pračky (viz obrázek).
CZ
Likvidace
• Likvidace obalových materiálů: při jejich odstranění
postupujte v souladu s místním předpisy a dbejte na
možnou recyklaci.
• Evropská směrnice 2002/96/EC o odpadních
elektrických a elektronických zařízeních stanovuje, že
staré domácí elektrické spotřebiče nesmí být odkládány do běžného netříděného domovního odpadu.
Staré spotřebiče musí být odevzdány do odděleného
sběru, a to za účelem recyklace a optimálního využití
materiálů, které obsahují, a z důvodu předcházení
negativním dopadům na lidské zdraví a životní
prostředí. Symbol “přeškrtnuté popelnice” na výrobku
vás upozorňuje na povinnost odevzdat zařízení po
skončení jeho životnosti do odděleného sběru.
4. s použitím jazýčku označeného na obrázku potáhněte
směrem ven z dorazu plastové táhlo až do jeho uvolnění;
následně jej potáhněte směrem dolů a současně
otevřete dvířka.
5. namontujte zpět panel, přičemž se před jeho
přisunutím k zařízení ujistěte, že došlo ke správnému
zachycení háčků do příslušných podélných otvorů.
45
Page 46

Údržba a péče
1
2
CZ
Uzavření přívodu vody a vypnutí
elektrického napájení
• Po každém praní uzavřete přívod vody. Tímto
způsobem dochází k omezení opotřebení pračky a ke
snížení nebezpečí úniku vody.
• Před zahájením čištění pračky a během operací údržby
vytáhněte zástrčku napájecího kabelu z elektrické
zásuvky.
Čištění pračky
• Vnější části a části z gumy se mohou čistit hadrem
navlhčeným ve vlažné vodě a saponátu. Nepoužívejte
rozpouštědla ani abrazivní látky.
• Pračka je vybavena programem „SAMOČIŠTĚNÍ“
vnitřních částí, který musí být proveden bez jakéhokoli
druhu náplně v bubnu.
Prací prostředek (množství rovnající se 10% množství
doporučeného pro částečně znečištěné prádlo) nebo
specické přídavné prostředky pro čištění pračky budou
moci být použity jako pomocné prostředky v pracím
programu. Doporučuje se provést samočisticí program
každých 40 cyklů praní.
Pro aktivaci programu stiskněte současně tlačítka A a B
na dobu 5 sekund (viz obrázek).
Program bude zahájen automaticky a bude trvat přibližně
70 minut. Cyklus je možné ukončit stisknutím tlačítka
START/PAUSE.
A
B
Čištění čerpadla
Součástí pračky je samočisticí čerpadlo, které
nevyžaduje údržbu. Může se však stát, že se v jeho
vstupní části, určené k jeho ochraně a nacházející se
v jeho spodní části, zachytí drobné předměty (mince,
knoíky).
! Ujistěte se, že byl prací cyklus ukončen, a vytáhněte
zástrčku ze zásuvky.
Přístup ke vstupní části čerpadla:
1. pomocí šroubováku
odstraňte krycí panel nacházející se v přední části
pračky (viz obrázek);
2. Odšroubujte víko jeho
otáčením proti směru
hodinových ručiček (viz
obrázek): vytečení malého
množství vody je zcela
běžným jevem;
Čištění dávkovače pracích prostředků
Vytáhněte dávkovač jeho
nadzvednutím a vytažením
směrem ven (viz obrázek).
Umyjte jej pod proudem vody; tento druh
vyčištění je třeba provádět
pravidelně.
Péče o dvířka a buben
• Dvířka ponechte pokaždé pootevřená, aby se zabránilo
tvorbě nepříjemných zápachů.
46
3. dokonale vyčistěte vnitřek;
4. zašroubujte zpět víko;
5. namontujte zpět panel, přičemž se před jeho
přisunutím k zařízení ujistěte, že došlo ke správnému
zachycení háčků do příslušných podélných otvorů.
Kontrola přítokové hadice na vodu
Stav přítokové hadice je třeba zkontrolovat alespoň jednou ročně. Jsou-li na ní viditelné praskliny nebo trhliny,
je třeba ji vyměnit: silný tlak působící na hadici během
pracího cyklu by mohl způsobit její náhlé roztržení.
! Nikdy nepoužívejte již použité hadice.
Page 47

Poruchy a způsob jejich
odstranění
Může se stát, že pračka nebude fungovat. Dříve, než zatelefonujete na Servisní službu (viz „Servisní služba“), zkontrolujte, zda se nejedná o problém, který lze snadno vyřešit s pomocí následujícího seznamu.
Poruchy:
Pračku nelze zapnout.
Nedochází k zahájení pracího cyklu.
Pračka nenapouští vodu (Na displeji
se zobrazí nápis „CHYBÍ VODA,
OVĚŘ ZDROJ“).
Dochází k nepřetržitému napouštění a
odčerpávání vody.
Možné příčiny / Způsob jejich odstranění:
• Zástrčka není zasunuta v zásuvce nebo není zasunuta natolik, aby došlo ke
spojení kontaktů.
• V celém domě je vypnutý proud.
• Nejsou řádně zavřená dvířka.
• Nebylo stisknuto tlačítko ON/OFF.
• Nebylo stisknuto tlačítko START/PAUSE.
• Nebyl otevřen kohout přívodu vody.
• Byl nastaven odložený start (viz „Jak provést prací cyklus“).
• Přívodní hadice není připojena k vodovodnímu kohoutu.
• Hadice je příliš ohnutá.
• Nebyl otevřen kohout přívodu vody.
• V celém domě je uzavřený přívod vody.
• V rozvodu vody není dostatečný tlak.
• Nebylo stisknuto tlačítko START/PAUSE.
• Vypouštěcí hadice se nachází mimo určené rozmezí od 65 do 100 cm nad
zemí (viz „Instalace“).
• Koncová část vypouštěcí hadice je ponořena ve vodě (viz „Instalace“).
• Odpad ve stěně není vybaven odvzdušňovacím otvorem.
Když ani po uvedených kontrolách nedojde k odstranění problému, uzavřete
přívod vody, vypněte pračku a přivolejte Servisní službu. V případě, že se byt
nachází na jednom z nejvyšších poschodí, je možné, že dochází k sifonovému
efektu, jehož následkem pračka nepřetržitě napouští a odčerpává vodu. Pro
odstranění uvedeného efektu jsou v prodeji běžně dostupné speciální protisifonové ventily.
CZ
Nedochází k vyčerpání vody nebo
k odstřeďování.
Během odstřeďování je možné pozorovat silné vibrace pračky.
Dochází k úniku vody z pračky.
Stroj je zablokován, displej bliká a
signalizuje poruchový kód (např.:
F-01, F-..).
Dochází k tvorbě nadměrného
množství pěny.
• Odčerpání vody netvoří součást nastaveného programu: u některých
programů je třeba jej aktivovat manuálně (viz „Programy a funkce“).
• Je aktivní funkce SNADNÉ ŽEHLENÍ: na dokončení programu stiskněte
tlačítko START/PAUSE („Programy a funkce”).
• Vypouštěcí hadice je ohnutá (viz „Instalace“).
• Odpadové potrubí je ucpáno.
• Během instalace nebyl buben odjištěn předepsaným způsobem
(viz „Instalace“).
• Pračka není dokonale vyrovnána do vodorovné polohy (viz „Instalace“).
• Pračka je stlačena mezi nábytkem a stěnou (viz „Instalace“).
• Přítoková hadice není správně zašroubována (viz „Instalace“).
• Dávkovač pracích prostředků je ucpán (způsob jeho vyčištění je uveden v
části „Údržba a péče“).
• Vypouštěcí hadice není upevněna předepsaným způsobem (viz „Instalace“).
• Vypněte zařízení a vytáhněte zástrčku ze zásuvky, vyčkejte přibližně 1 minutu a opětovně jej zapněte.
Když porucha přetrvává, obraťte se na Servisní službu.
• Použitý prací prostředek není vhodný pro použití v automatické pračce
(musí obsahovat označení „pro praní v pračce“, „pro ruční praní nebo pro
praní v pračce“ nebo podobné označení).
• Bylo použito jeho nadměrné množství.
47
Page 48

Servisní služba
195097940.01
12/2011 - Xerox Fabriano
CZ
Před přivoláním Servisní služby:
• Zkontrolujte, zda nejste schopni poruchu odstranit sami (viz „Poruchy a způsob jejich odstranění“);
• Opětovně uveďte do chodu prací program, abyste ověřili, zda byla porucha odstraněna;
• V opačném případě se obraťte na Centrum servisní služby na telefonním čísle uvedeném na záručním listu.
! Nikdy se neobracejte s žádostí o pomoc na techniky, kteří nejsou k výkonu této činnosti oprávněni.
Při hlášení poruchy uveďte:
• druh poruchy;
• model zařízení (Mod.);
• výrobní číslo (S/N).
Tyto informace jsou uvedeny na štítku aplikovaném na zadní částí pračky a v její přední části, dostupné po otevření
dvířek.
48
 Loading...