

Hotpoint TVF 651 EU/HA User Manual

Instruction booklet
TUMBLE DRYER
GB
English, 1
I
Italiano, 15
E
Español, 43P Português, 57
TVF651
F
Français, 29
Contents
Important Information, 2
Installation, 3-4
Where to put your dryer
Ventilation
Electrical connection
Levelling
Before you start using your dryer
Dryer description, 5
The front
The back
Control panel
Start and programmes, 6-8
Choosing a programme
Table of programmes
The controls
Laundry, 9-10
Sorting your laundry
Wash care labels
Special clothing items
Drying times
GB
Warnings and Suggestions, 11
General safety
Disposal
Saving energy and respecting the environment
Maintenance and Care, 12
Switching off the electricity
Cleaning the filter after each cycle
Check the drum after each cycle
Cleaning the drum
Cleaning the dryer
Troubleshooting, 13
Service, 14
Spare parts
! Keep this instruction booklet on hand in order to refer to it when necessary. Take it with you when you move, and
should you sell this appliance or pass it on to another party, make sure that this booklet is supplied along with the
dryer so that the new owner may be informed about warnings and suggestions on how the appliance works.
! Read these instructions carefully; the following pages contain important information on installation and suggestions
on how the appliance works.
1
Important Information
GB
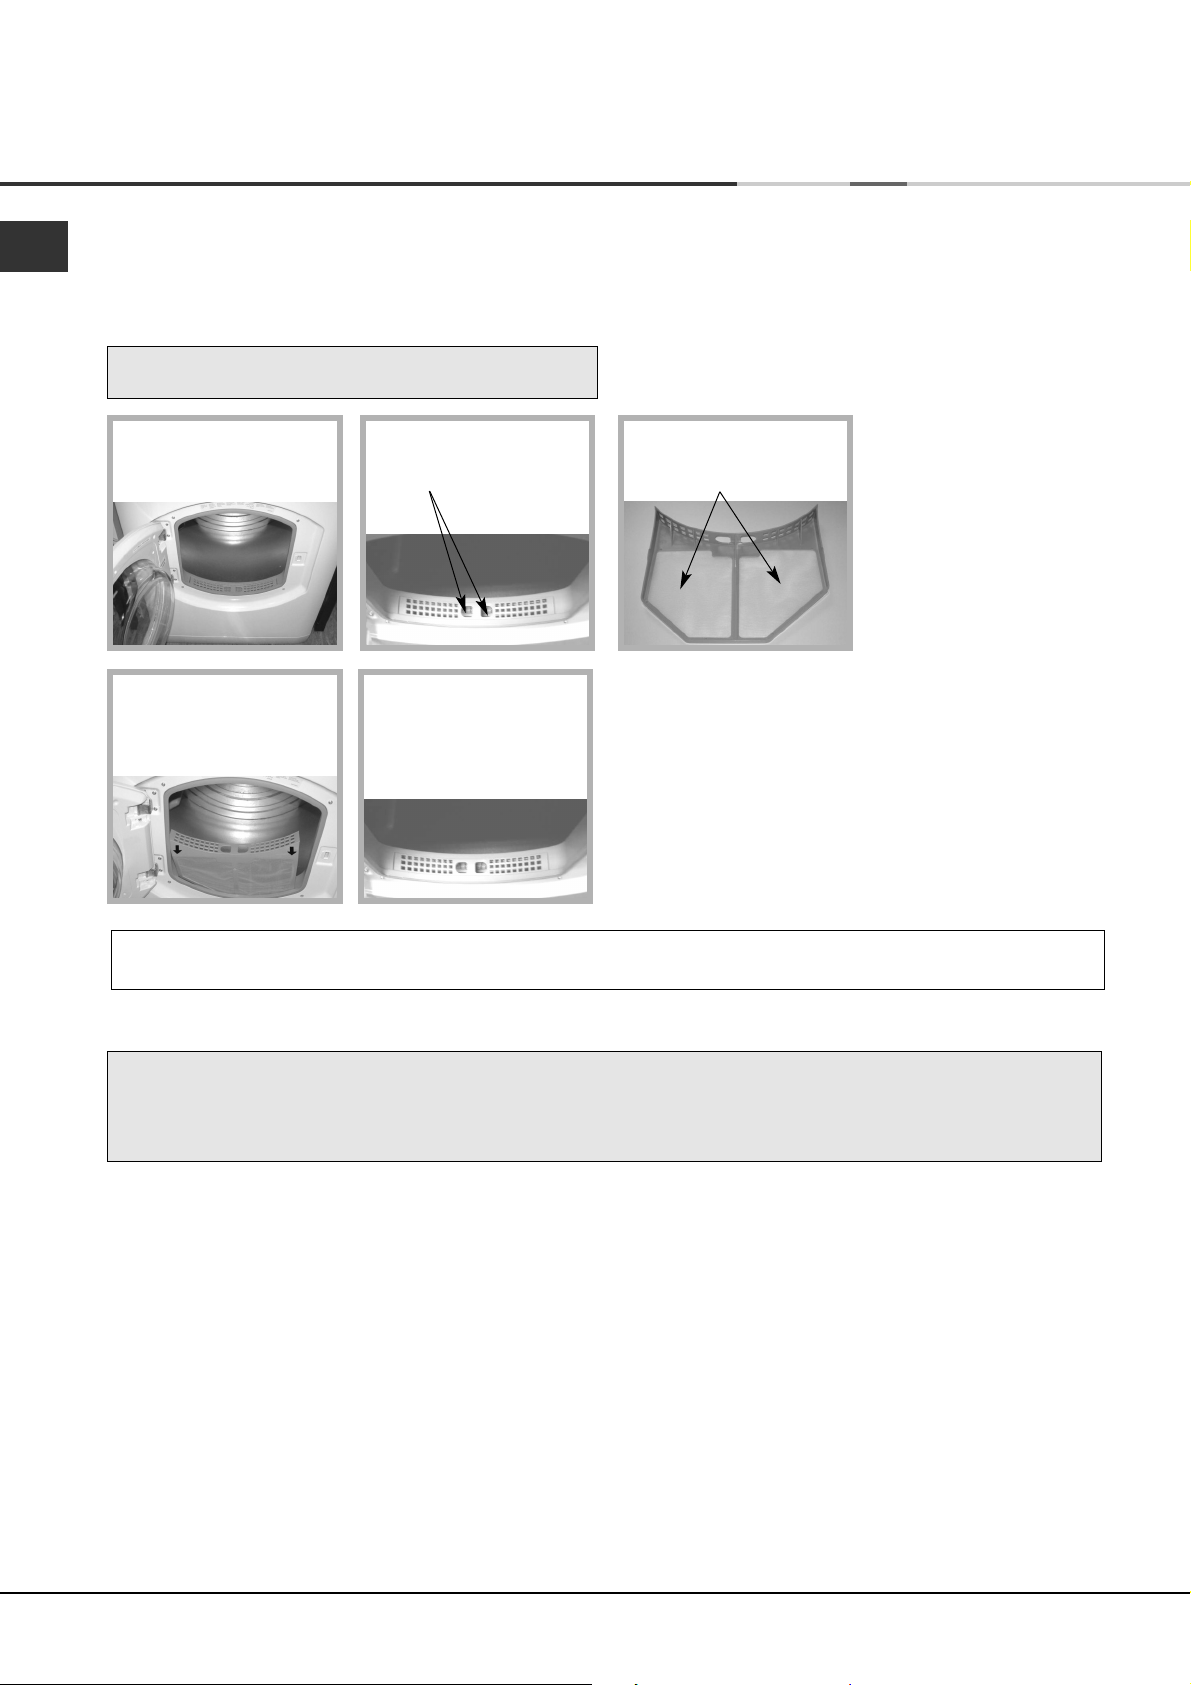
For your Venting dryer to operate efficiently, you must follow the regular maintenance schedule shown below:
Fluff Filter...
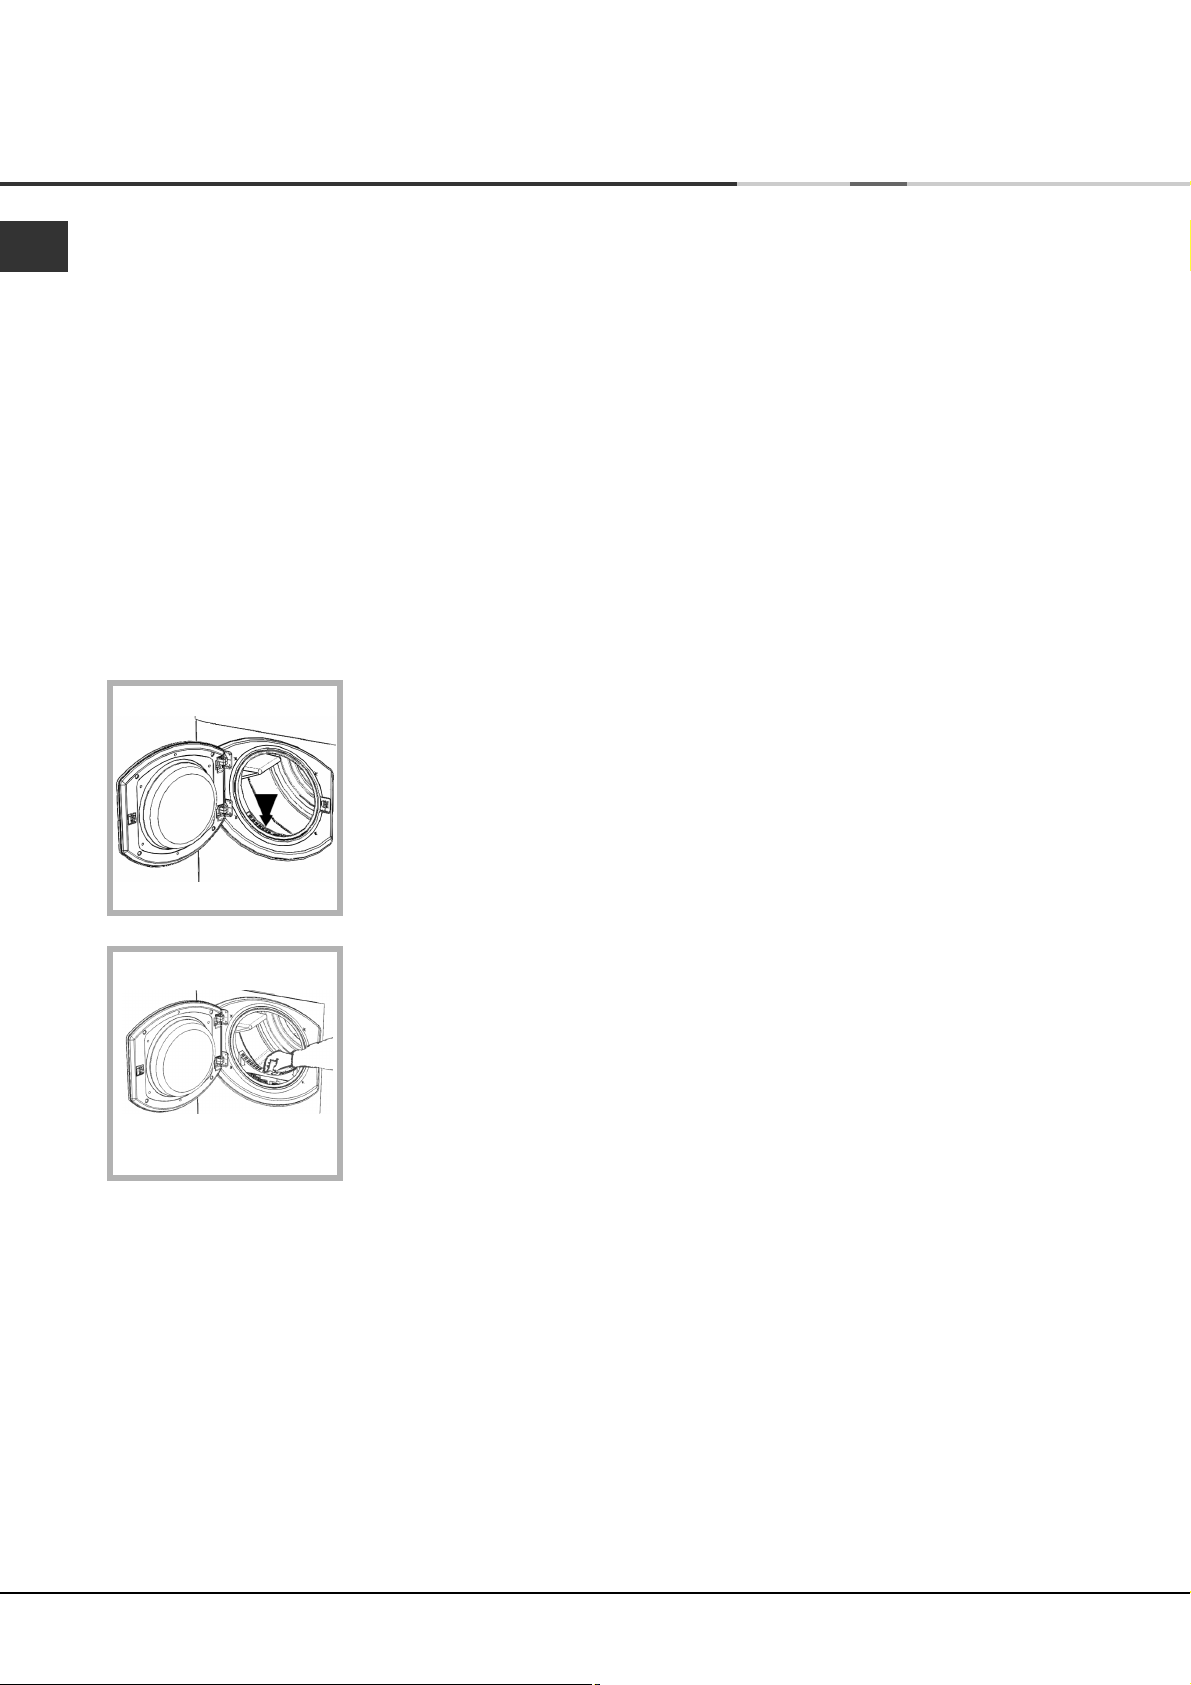
! You MUST clean the fluff filter after EVERY drying
cycle.
STEP 1.
Open the door of your
dryer.
STEP 4.
Refit the filter.
- Make sure the arrows
are facing you.
STEP 2.
Pull out the filter (using
the two finger grips).
STEP 5.
Make sure the filter is
pushed fully home.
- NEVER run the dryer
without the filter in position.
STEP 3.
Clean any fluff deposits
from the filter mesh.
! Failure to clean the filter after EVERY drying cycle will affect the drying performance of your machine.
- It will take longer to dry and as a result will use more electricity during drying.
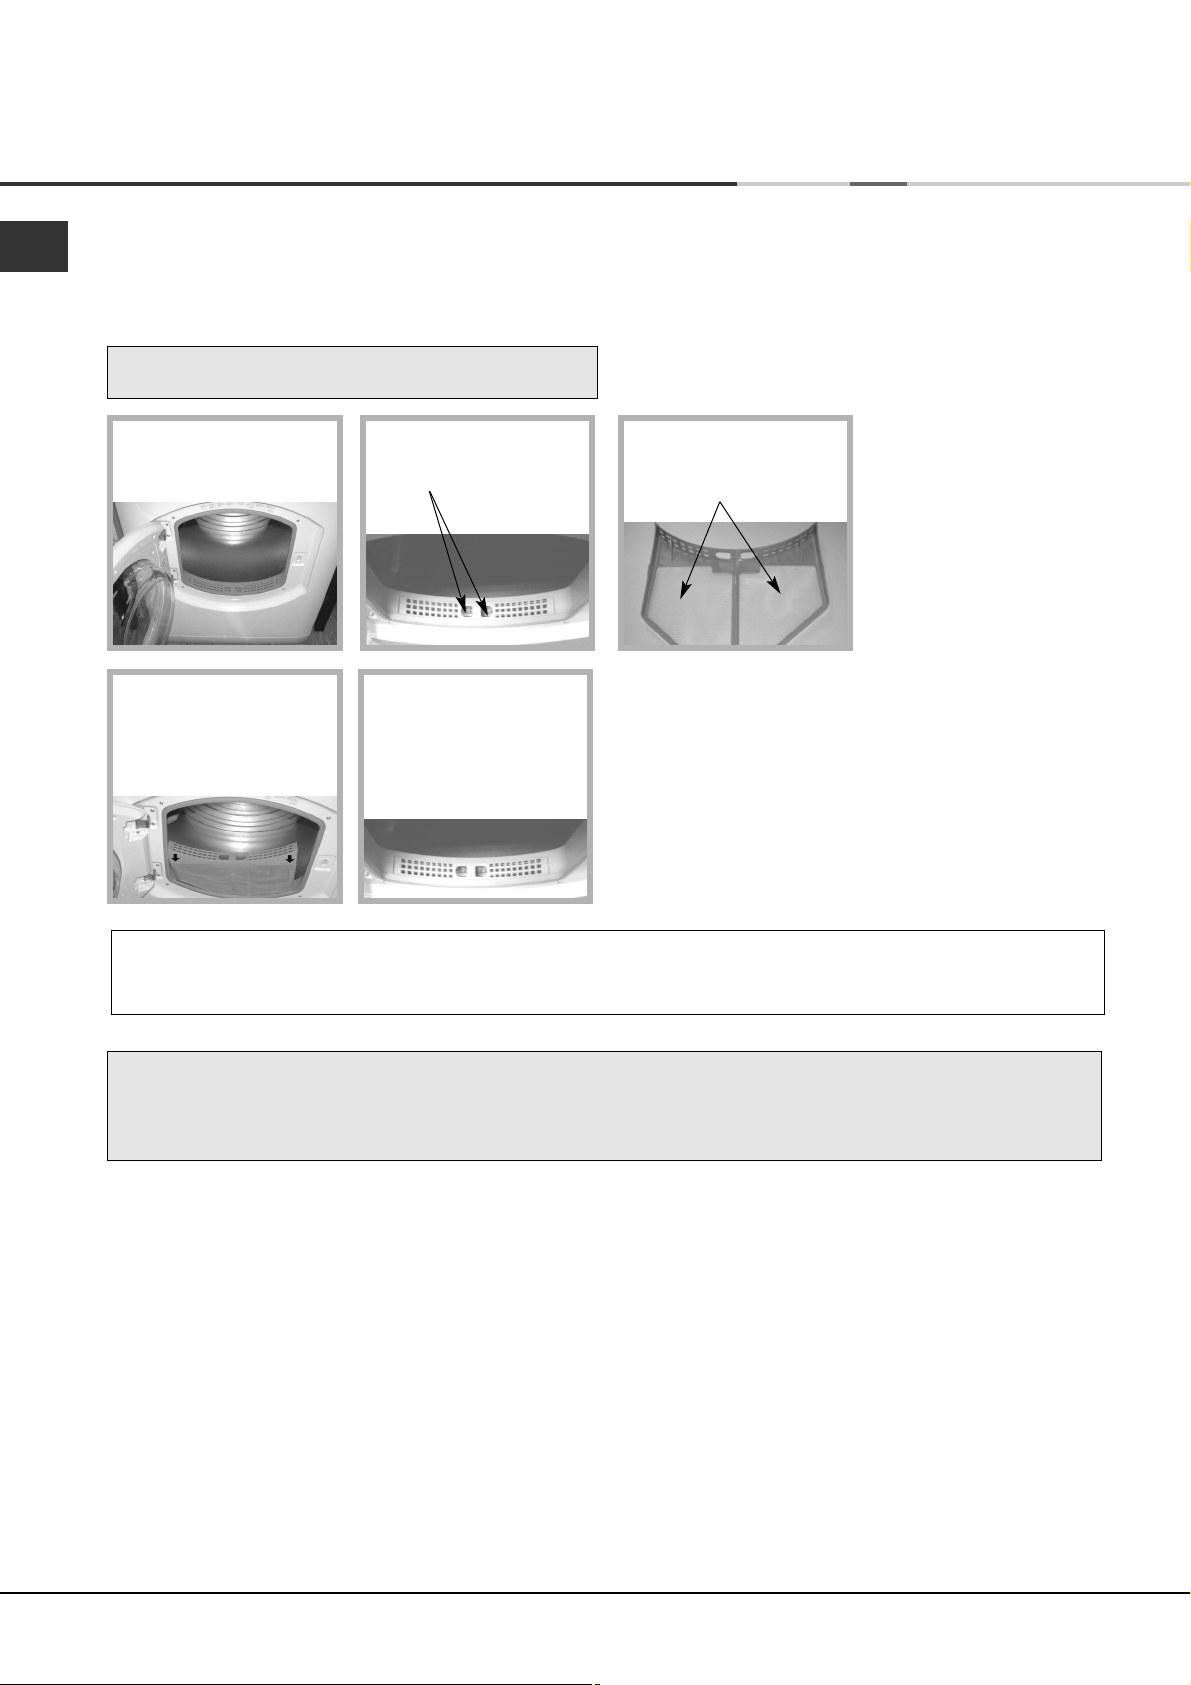
! You MUST clean fluff build up around the filter housing and the vent tube periodically, EVERY two or three months:
- Check the vent tube and any permanent venting fixture to make sure that there has been no accumulation
of fluff or lint, and remove it.
- Remove lint that collects around the filter and the outlet vents.
2
Installation
Where to put your dryer
●
Place your dryer at a distance from gas ranges,
stoves, heaters, or cook tops because flames can
damage the appliance.
●
Minimum gap 10mm
Minimum gaps
15mm
proper air circulation. Make sure that the back
vents are not obstructed.
●
Make sure you put your dryer in an environment
that is not damp and has proper air circulation
throughout, the dryer will not operate efficiently in
an enclosed space or cupboard.
! We do not recommend that the dryer is installed in a
cupboard but the dryer must never be installed
behind a lockable door, a sliding door or a door with a
hinge on the opposite side to that of the dryer door.
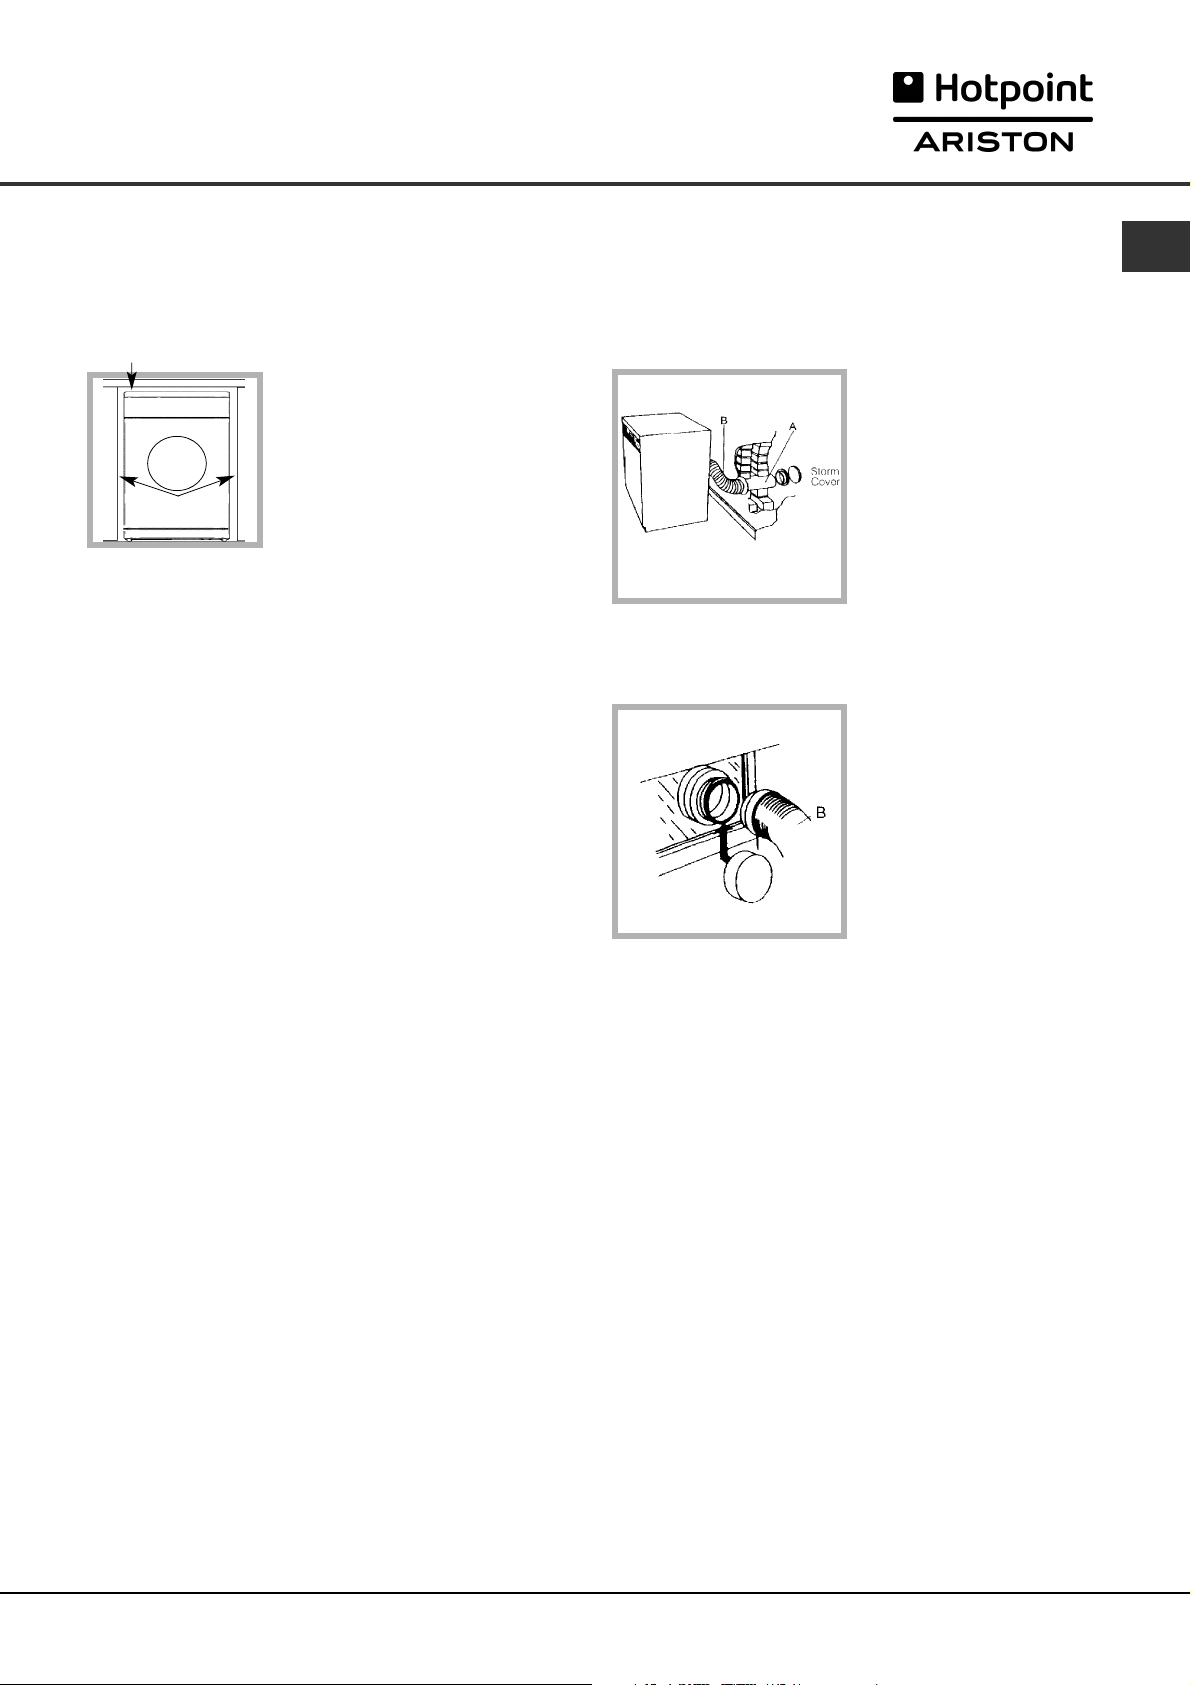
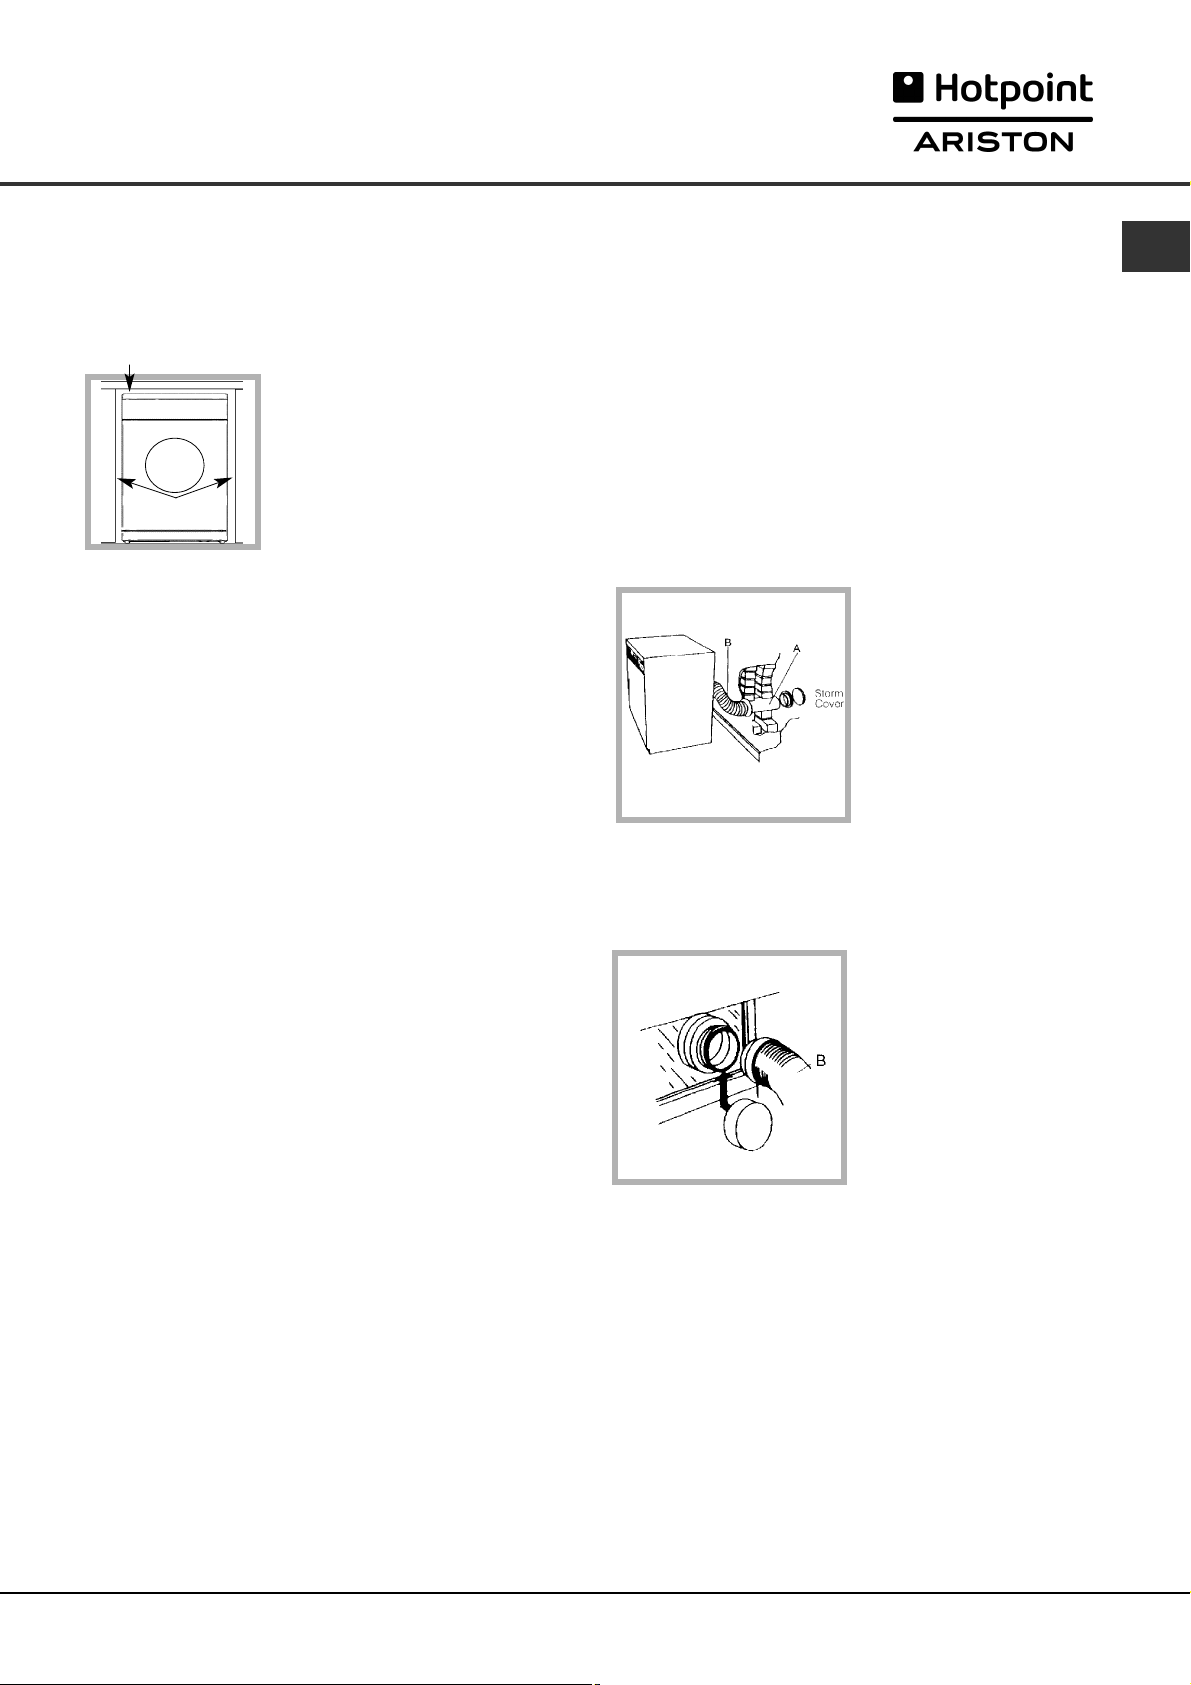
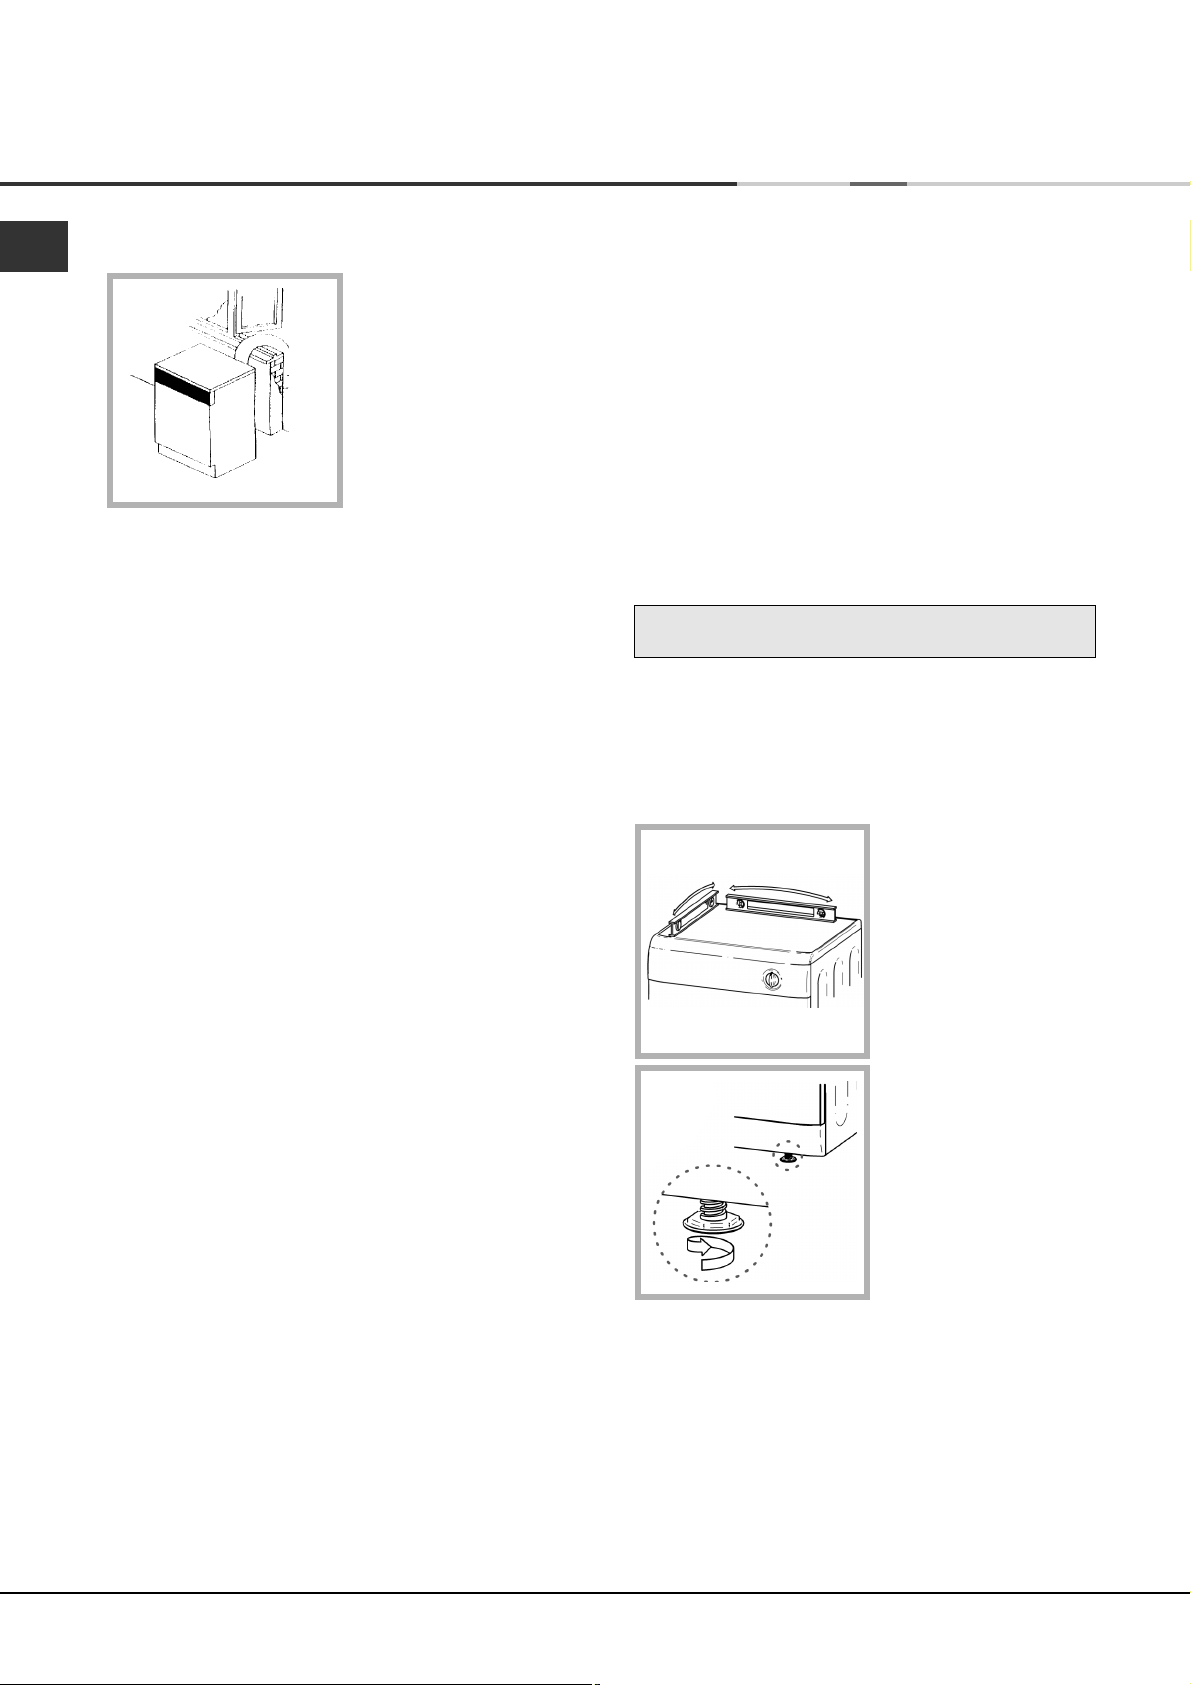
If you are going to install the
appliance under a work
counter, be sure to leave a
10mm space between the
top and any other objects on
or above the machine and a
15mm space between the
sides and lateral furnishings
or walls. This is to ensure
Ventilation
Permanent venting
In conjunction with the vent tube we recommend
using a Wall/Window Vent Kit, available at a retail
location or the nearest Spare Parts Dealer.
Wall mounting
1. Leave an opening in
the wall to the left of the
dryers proposed position.
2. Keep the tube as short
and straight as possible
to prevent condensed
moisture from backing up
into the dryer.
3. Similarly, the duct in
the wall should slope
downwards towards the
outside.
Window mounting
1. With a stacked dryer
the hole in the window
should ideally be made
below the vent.
2. The tube should be
kept as short as possible.
GB
The Dryer dries your laundry by drawing in cool, clean
and relatively dry air, heating it, and then distributing it
through the clothes as they are gently tumbled. For
optimum performance, the moist air is then blown out
through a vent tube at the back of the dryer.
When the dryer is in use, there has to be adequate
ventilation to avoid the back flow of gases into the room
from appliances burning other fuels, including open fires.
Mobile venting
A vent tube must always be fitted when the dryer is
used in conjunction with Mobile Venting.
The tube must be fitted securely into the back of the
dryer (see Dryer Description). If possible, it is always
best to connect the tube to a permanent
outlet close to the dryer. If permanent installation is
not possible, the dryer will work just as well with the
tube passing through a partly-opened window.
! Ensure that the end of the tube is not directed
toward the air intake vent at the rear of the dryer.
! The vent tube should not exceed 2.4 metres in
length and should be kept free of any possible
accumulation of fluff, lint and water by shaking it out
frequently. Always ensure that the tube is not
squashed.
Depending on how often you use your dryer, it is
essential that areas A and B are checked periodically
to remove lint or debris.
The vent tube adaptor must be fitted securely thus
preventing any humid air from being emitted back into
the room.
! The Dryer should not be pushed so far back that the
tube adaptor is pulled out of position or the tube is
squashed or bent.
! The tube should be kept clear of the air intake vent
and kinks or ‘U’ bends must be avoided as these will
obstruct the tube or trap condensation.
3

Installation
GB
Open window venting
The end of the tube
should be directed
downwards, to prevent
warm moist air from
condensing in the room or
in the dryer.
! Ensure that the dryer is adequately ventilated and
that the end of the vent tube is not directed towards
the air intake duct.
! The vent tube must always be fitted for optimum
performance.
! Make sure that the vent tube and air intake vents are
not obstructed or blocked.
! The dryer must not recycle exhaust air.
! Misusing a tumble dryer may create a fire hazard.
! Do not discharge exhaust air into a flue which is
used for exhaust fumes from other appliances that
burn gas or other fuels.
! Do not discharge exhaust air into an extraction
system or any duct with an extractor fan. This will
affect the way the thermal controls operate and can
result in a fire hazard.
! Do not use extension cords.
! The power cord must not be bent or squashed.
! The power supply cord should be checked periodically
and replaced by a cord specially prepared for this dryer
and fitted only by authorised technicians (see
Service). New or longer power cords are supplied at
an extra charge by authorised dealers..
! The manufacturer denies any responsibility should
any of these rules not be followed.
! If in doubt about any of the above consult a qualified
electrician.
Levelling your dryer
The dryer must be installed level for correct operation.
When you have installed
your dryer in its final
location check that it is
level first side to side,
then front to back.
Electrical connections
Make sure of the following before you insert the plug
into the the electrical socket:
●
The socket must be grounded.
●
The socket must be able to sustain the machines
maximum power, which is indicated on the rating
label (see Dryer Description).
●
Power voltage must be within the values indicated
on the rating label (see Dryer Description).
●
The socket must be compatible with the dryers
plug. Should this not be the case, replace the
plug or the socket.
! The dryer must not be installed outdoors, even if the
space is sheltered. It can be very dangerous if it is
exposed to rain or storms.
! Once installed, the dryers electrical wire and plug
must be within easy reach.
If the dryer is not level,
use a wooden block to
support it while adjusting
the two front legs up or
down, until your dryer is
level.
Before you start using your dryer
Once you have installed your dryer and before you
use it, clean the inside of the drum to remove any
dust that could have accumulated during transport.
4
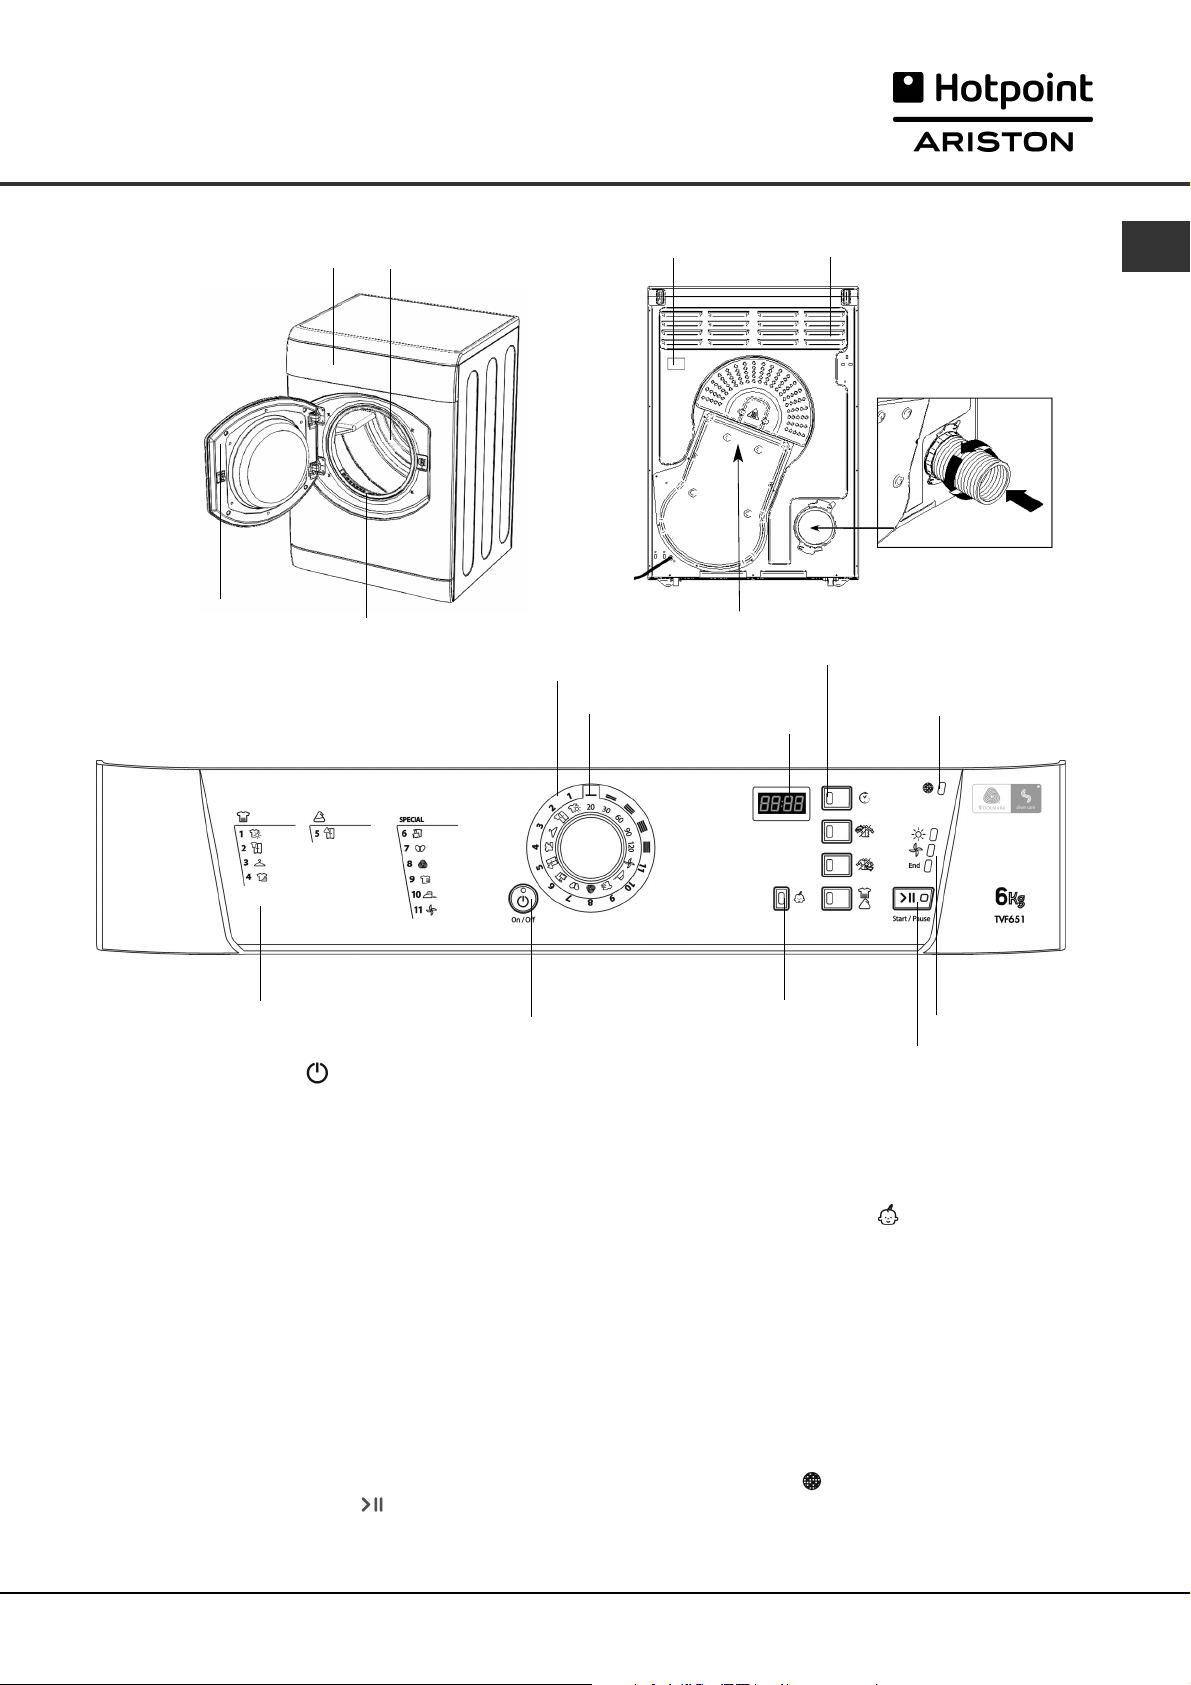
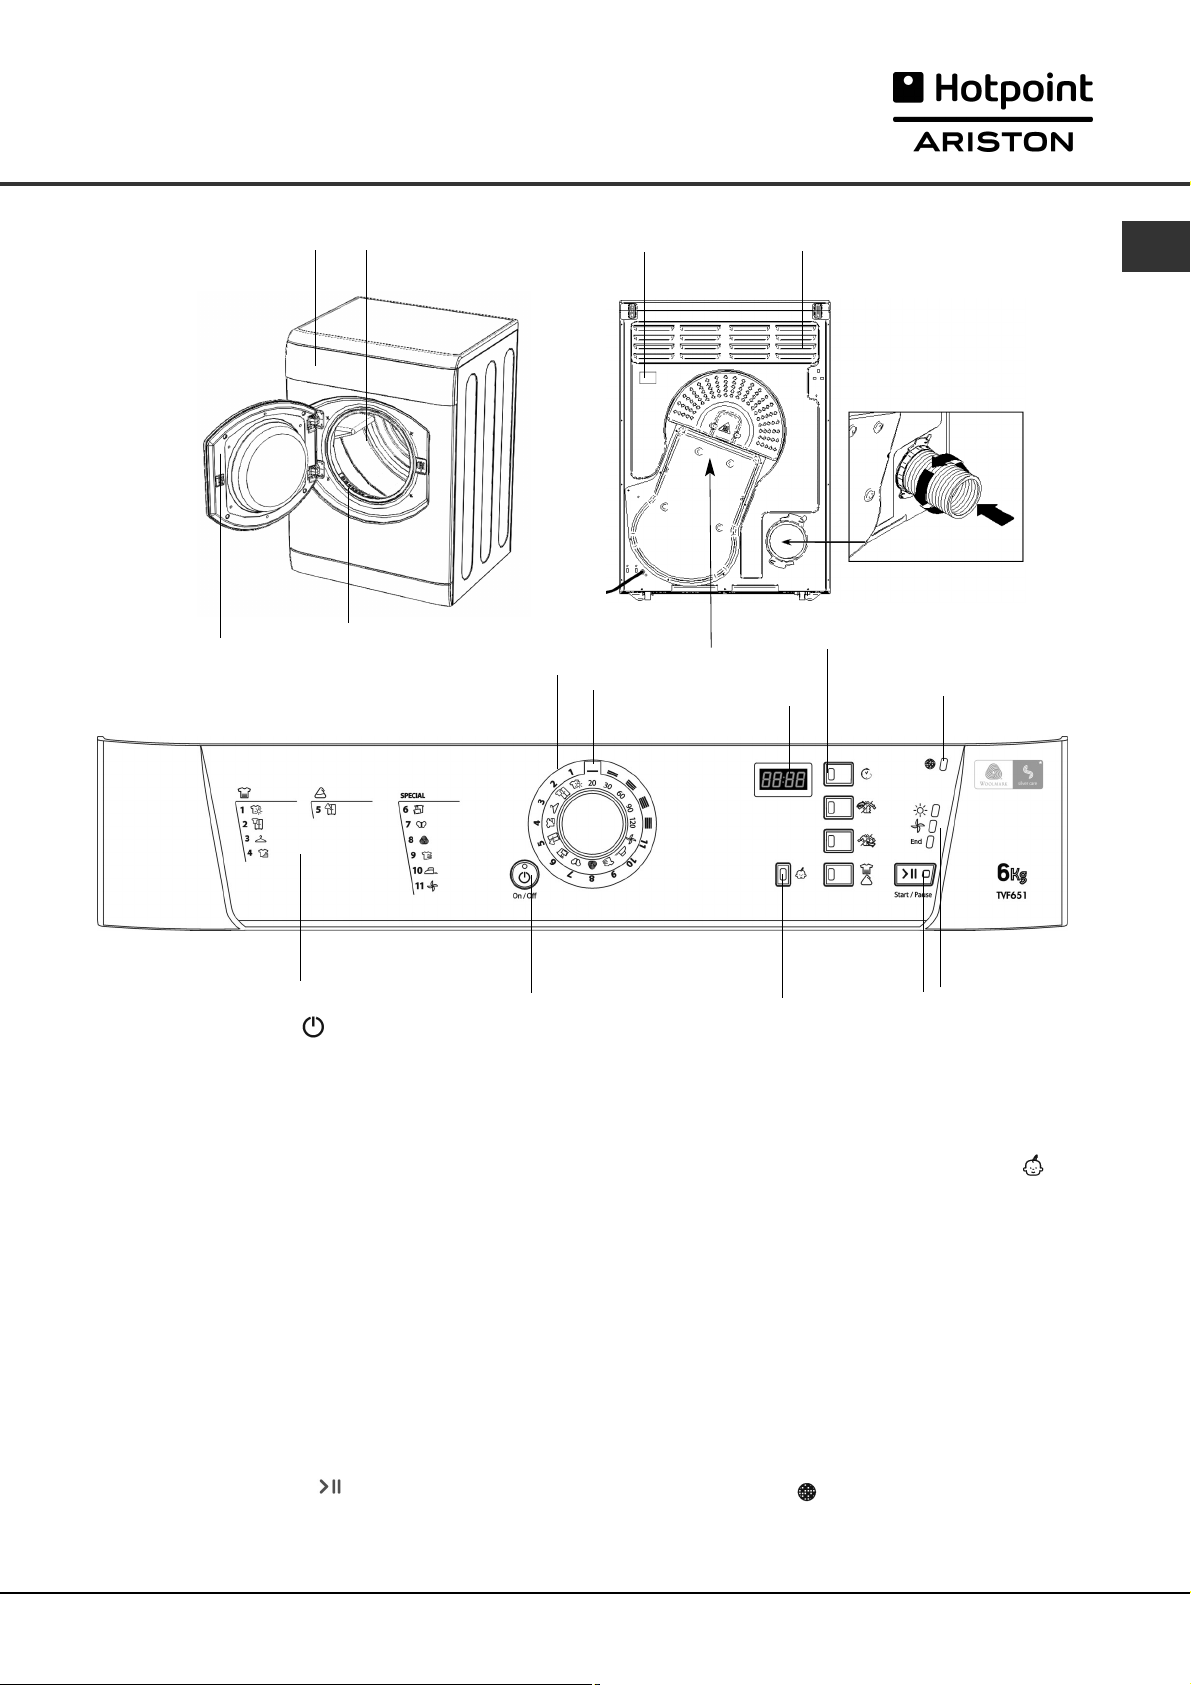
Dryer Description
The front The back
Control Panel
Model & Serial
numbers
Drum
Filter
Caution: Hot!
Control panel
PROGRAMMES
Knob
Indicator
Rating plate
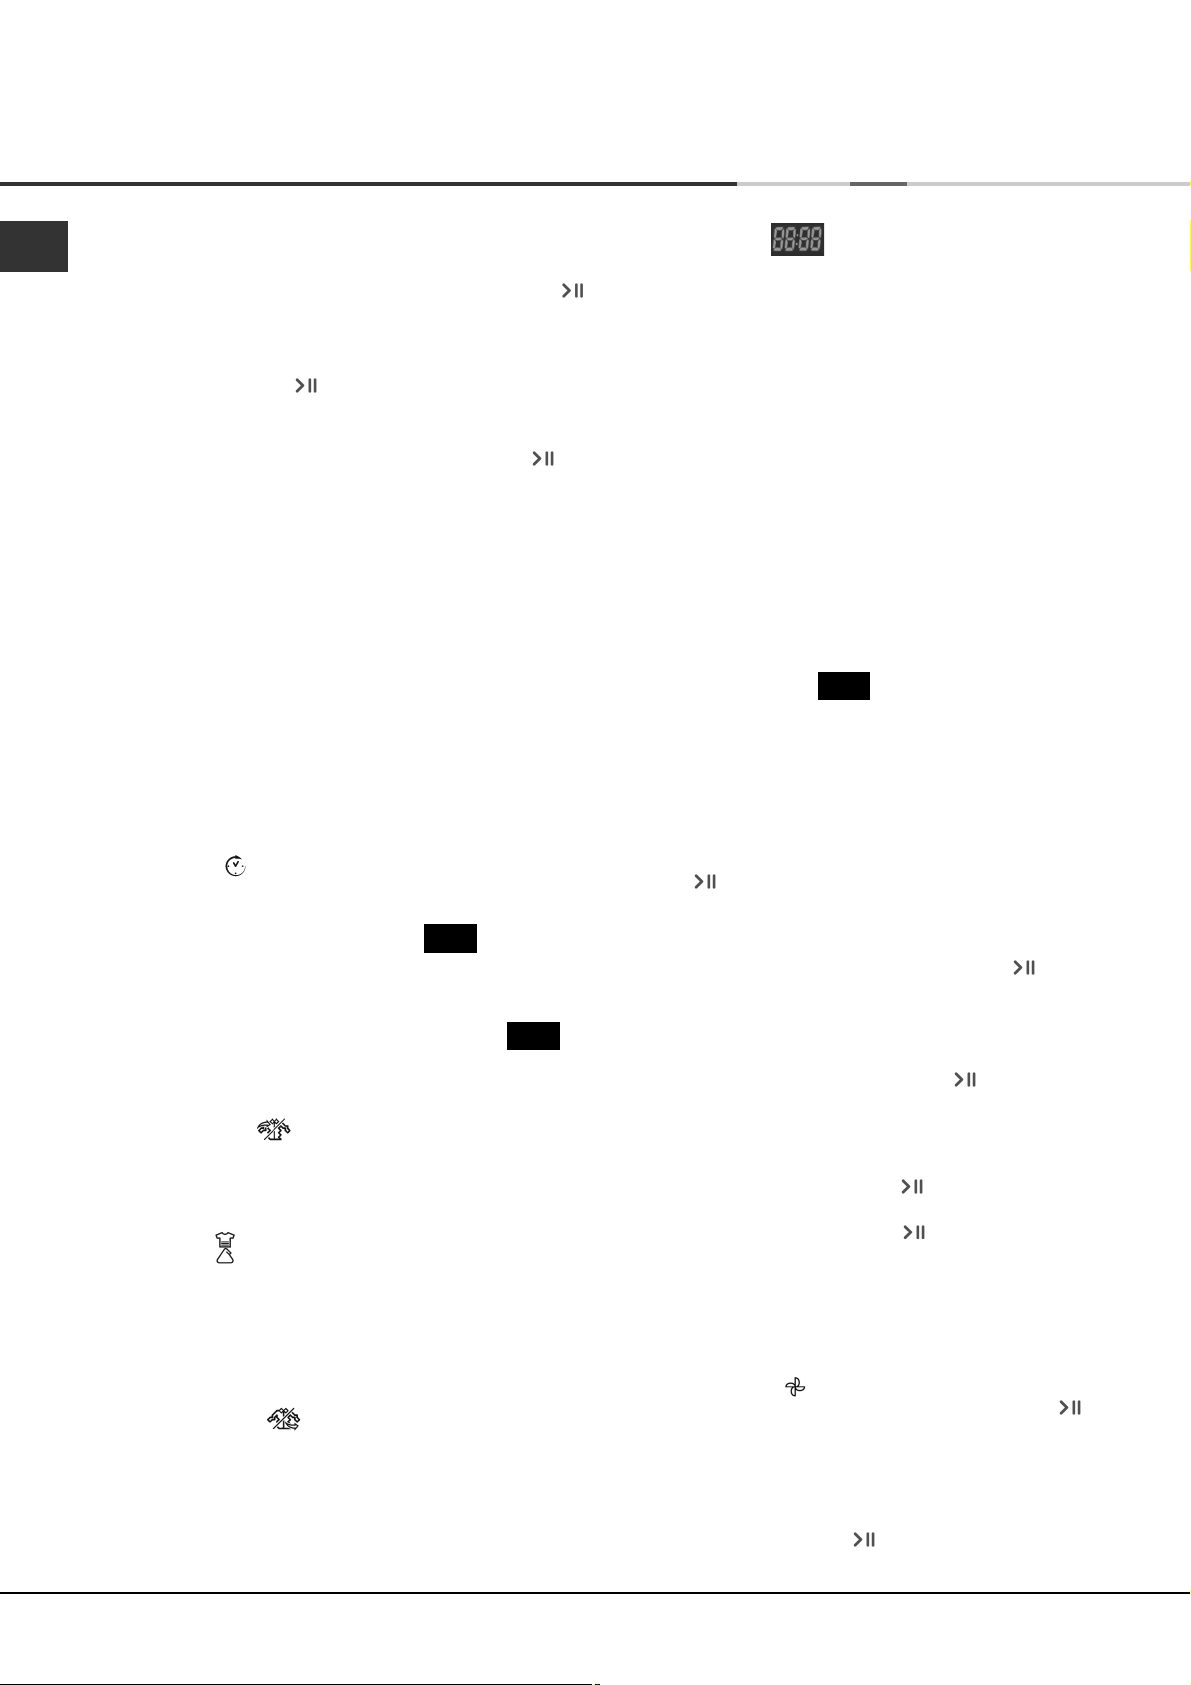
DISPLAY
Air Intake Vent
GB
Vent Tube fitted here
OPTION
Buttons & Lights
Clean Filter
Light
Programme Guide
The ON/OFF button/light : If the dryer is running
and this button is pressed, the dryer is turned off.
Press again, the dryer restarts. The light signals that
your dryer is in use or ready to select a programme.
The Programme Guide allows you to consult a user
friendly table of the available programmes.
The PROGRAMMES knob sets the programme: rotate
it until the indicator is pointing to the programme you want
to select (see Start and Programmes).
The OPTION buttons/lights select available options for
your selected programme. The lights indicate that the
option has been selected. If an option is not available
the buzzer will beep three times (see Start and
Programmes).
The START/PAUSE button/light starts a selected
programme. When you press this button there will be
one beep and the progress lights will flash to confirm
the action. When a programme is running, holding this
ON/OFF
Button & Light
CHILD LOCK
Button & Light
START/PAUSE
Button & Light
button in pauses the programme and stops the dryer.
The light is green when the programme is running,
flashing amber if the programme has been paused or
flashing green if on standby waiting to start a programme
(see Start and Programmes).
The CHILD LOCK button/light : Press and hold this
button after selecting your programme and any options,
this prevents the programme settings from being
changed. When the light is lit the other buttons and
the programme knob are disabled. Hold the button to
cancel and the light will go out.
The Progress lights show you the status of the
programme. As each stage of the programme starts
the corresponding light turns on.
The Clean Filter light gives you a reminder before
every programme that it is essential to clean the filter
every time the dryer is used (see Maintenance and Care).
Progress
Lights
5

Start and Programmes
GB
Choosing a programme
1. Plug the dryer into the electrical socket.
2. Sort your laundry according to fabric type (see
Laundry).
3. Open the door and make sure the filter is clean
and in place (see Maintenance).
4. Load the machine and make sure items are not
in the way of the door seal. Close the door.
5. If the On/Off light is not lit: Press the ON/OFF
button .
6. Choose a programme by checking the Programmes
Guide (see Programmes) as well as the indications
for each type of fabric (see Laundry).
- select a programme by rotating the PROGRAMMES
knob.
7. Set a delay time and other options if necessary.
8. The START/PAUSE light is flashing green:
- press the START/PAUSE button to begin.
The green light stops flashing and the display will
show the estimated time to end.
During the drying programme, you can check on
your laundry and take out items that are dry while
others continue drying. When you close the door
again, press the START/PAUSE button in order
to resume drying.
(When the door is opened the START/PAUSE light
will flash Amber, after the door is closed and the
START/PAUSE button pressed, the START/PAUSE
light will stop flashing and show green.)
9. During the last few minutes of Drying Programmes,
before the programme is completed, the final
COOL TUMBLE phase is entered (fabrics are
cooled), this phase should always be allowed to
complete.
10. The buzzer will warn you when the programme is
complete. Open the door, take the laundry out,
clean the filter and replace it (see Maintenance).
If the Post Creasecare Option has been selected
and you do not remove the laundry immediately,
the dryer will tumble occasionally for 10 hours
or until you open the door.
11. Unplug the dryer.
Easy Iron Programme
‘Easy Iron’ is a short 10 minute programme (8 minutes of heat followed by a 2 minute cool tumble period) which
fluffs the fibres of clothing that have been left in the same position/location for an extended period of time.
The cycle relaxes the fibres and makes them easier to iron and fold.
! ‘Easy Iron’ is not a drying programme and should not be used for wet articles of clothing.
For best results:
1. Do not load more than the maximum capacity.
These numbers refer to the dry weight:
Fabric Maximum load
Cotton and Cotton mixtures 2.5kg
Synthetics 2kg
Denim 2kg
2. Unload the dryer immediately after the end of the programme, hang, fold or iron the articles and put
them away in the closet. Should this not be possible repeat the programme.
The ‘Easy Iron’ effect varies from one fabric to the next. It works well on traditional fabrics like Cotton or Cotton mix,
and less well on acrylic fibres and on materials such as Tencel®.
Wool Programme
●
This is a programme for tumble dryer safe garments marked with the symbol .
●
It can be used for load sizes up to 1kg (approximately 3 sweaters).
●
We recommend that garments are turned inside out before drying.
●
This programme will take about 60 minutes, but may take longer depending on the size and density of the
load and the spin speed used in your washer.
●
Loads dried using this programme are usually ready to wear, but on some heavier garments the edges may be
slightly damp. Allow these to dry naturally as over-drying could damage garments.
! Unlike other materials, the mechanism of wool shrinkage is irreversible; i.e. it will not stretch back to original size
and shape.
! This programme is not suitable for Acrylic garments.
The wool drying cycle of this tumble dryer has been approved by The Woolmark Company for the drying of
Woolmark garments labelled as machine wash and tumble dry, provided that the garments are dried according to
instructions on the garment label and those issued by the manufacturer of this tumble dryer (M0615).
This is the first and only wool drying cycle approved by The Woolmark Company.
6
Start and Programmes
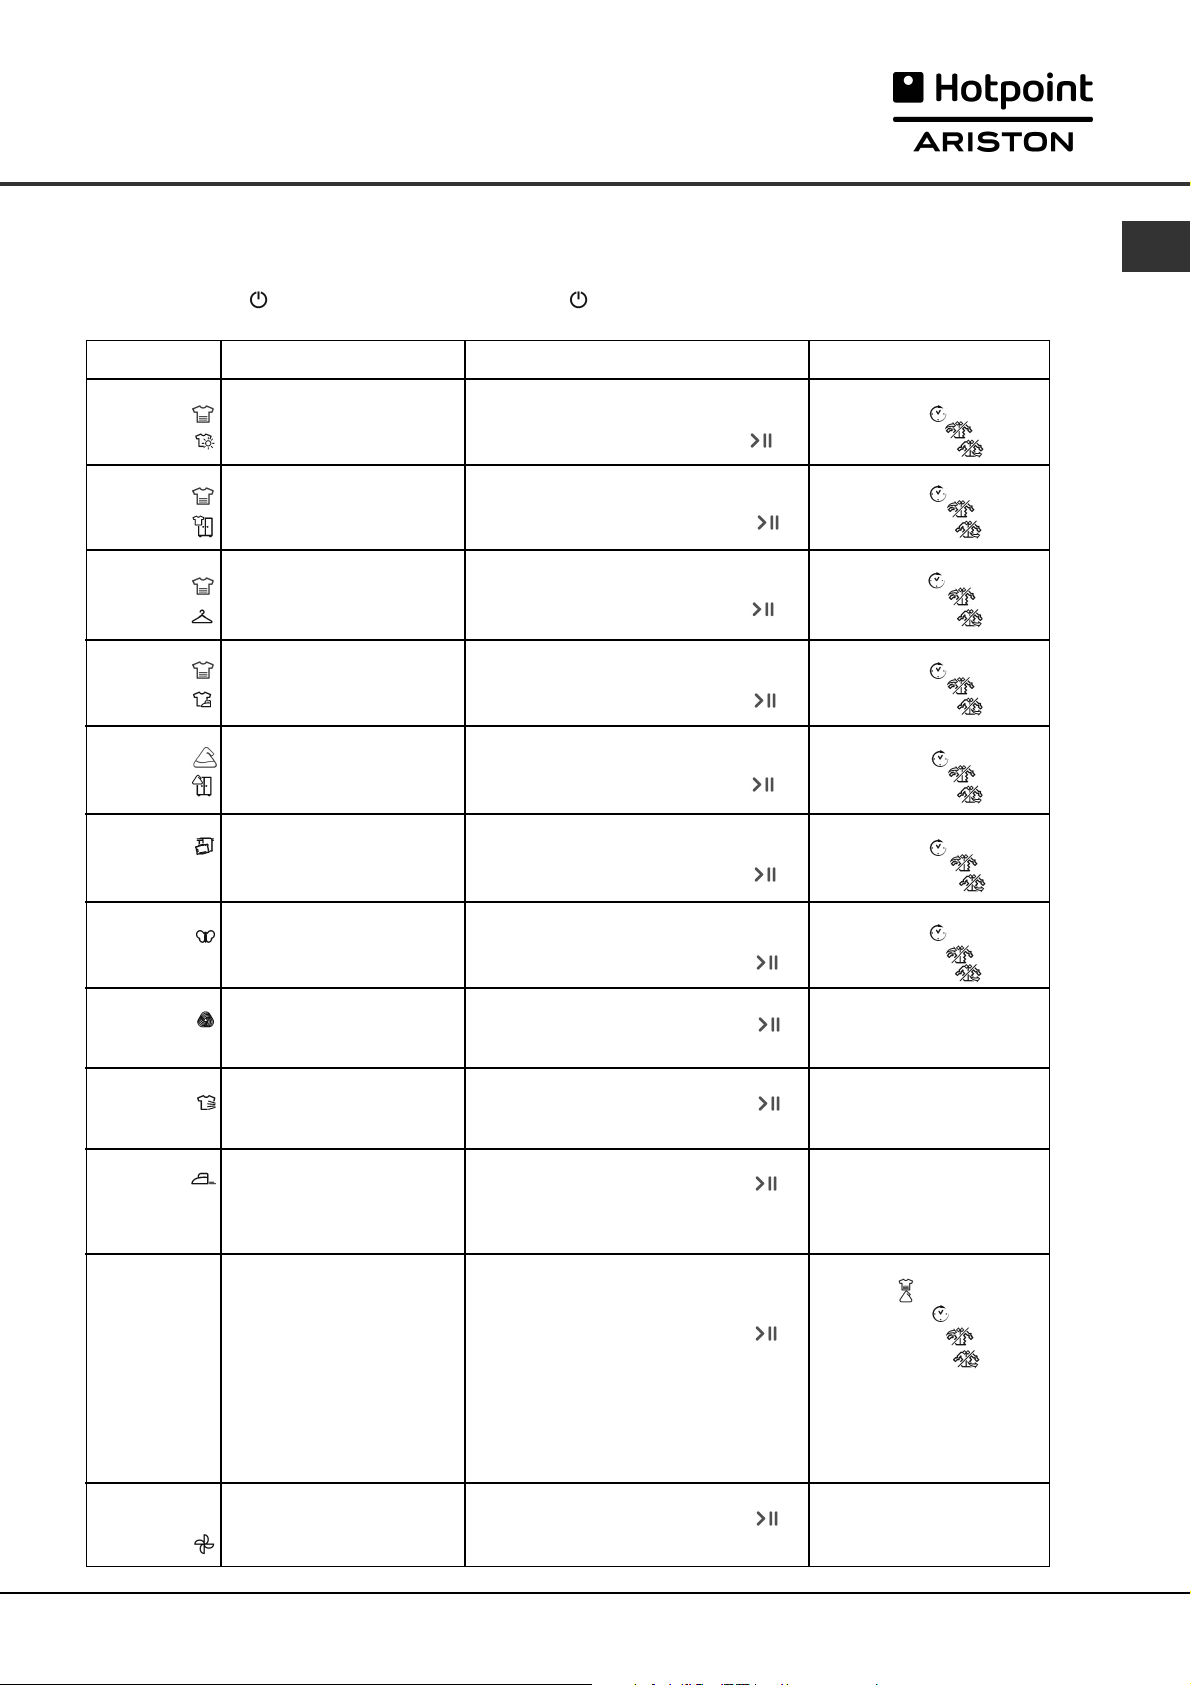
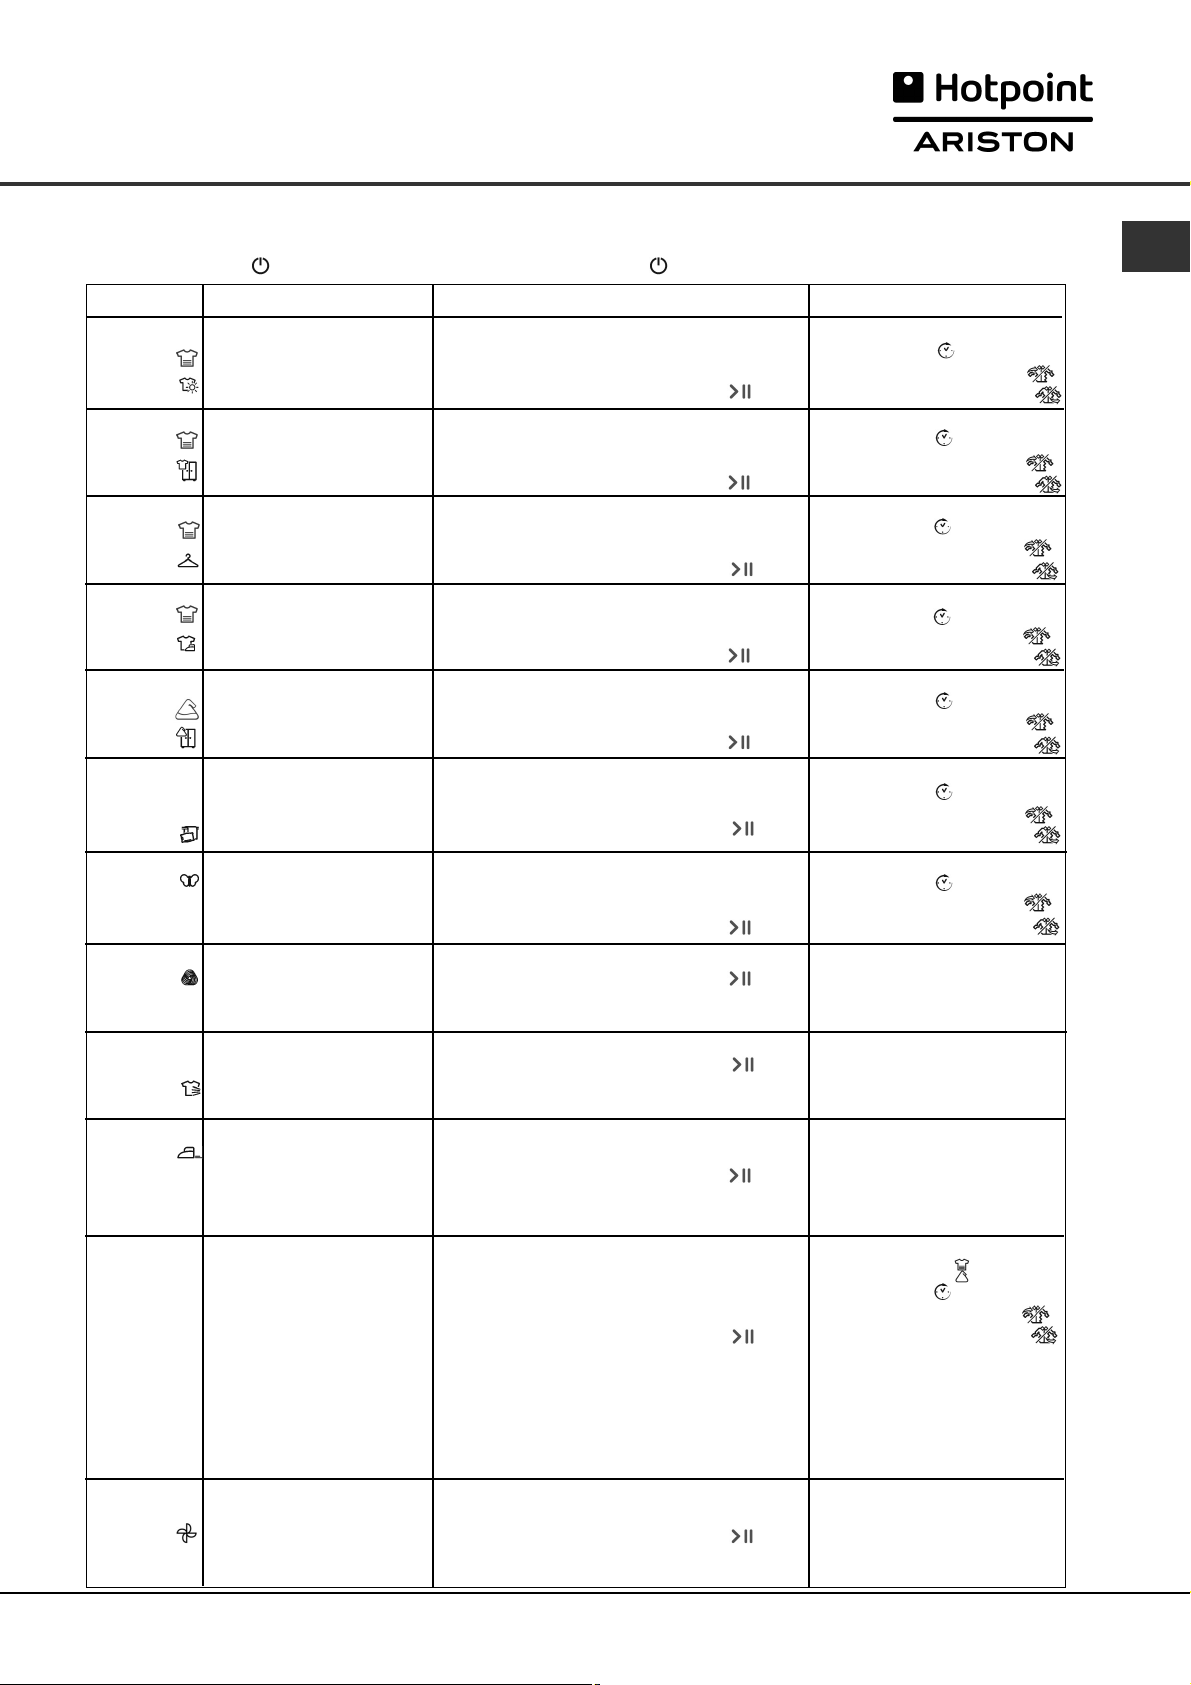
Programmes
! If the On/Off light is not lit; Press the ON/OFF button and then select programme.
Programme
1
Cottons
Extra Dry
2
Cottons
Cupboard Dry
3
Cottons
Hanger Dry
4
Cottons
Iron Dry
5
Synthetics
Cupboard Dry
6
Bed & Bath
7
Delicates
(e.g. Acrylics)
8
Wool
What it does... How to set it... Note:
Dries your clothes on High
heat setting, ready for
wearing.
Dries your clothes on High
heat setting, ready for
putting away.
Dries your clothes on High
heat setting, ready for
hanging.
Dries your clothes on High
heat setting, ready for
ironing.
Dries your clothes on High
heat setting , ready for
putting away.
Dries your bedding and
towels on High heat setting,
ready for putting away.
Dries your clothes on Low
heat setting, ready to be
worn.
Dries your Woollen clothes,
(see previous page).
1. Position the PROGRAMME knob on 1.
2. Select any Options, if required.
3. Press the START/PAUSE button .
1. Position the PROGRAMME knob on 2.
2. Select any Options, if required.
3. Press the START/PAUSE button .
1. Position the PROGRAMME knob on 3.
2. Select any Options, if required.
3. Press the START/PAUSE button .
1. Position the PROGRAMME knob on 4.
2. Select any Options, if required.
3. Press the START/PAUSE button .
1. Position the PROGRAMME knob on 5.
2. Select any Options, if required.
3. Press the START/PAUSE button .
1. Position the PROGRAMME knob on 6.
2. Select any Options, if required.
3. Press the START/PAUSE button .
1. Position the PROGRAMME knob on 7.
2. Select any Options, if required.
3. Press the START/PAUSE button .
1. Position the PROGRAMME knob on 8.
2. Press the START/PAUSE button .
Options available:
Delayed start
Pre Creasecare
Post Creasecare
Options available:
Delayed start
Pre Creasecare
Post Creasecare
Options available:
Delayed start
Pre Creasecare
Post Creasecare
Options available:
Delayed start
Pre Creasecare
Post Creasecare
Options available:
Delayed start
Pre Creasecare
Post Creasecare
Options available:
Delayed start
Pre Creasecare
Post Creasecare
Options available:
Delayed start
Pre Creasecare
Post Creasecare
Options available:
None
GB
9
AIRING
10
Easy Iron
Timed Drying
(120, 90, 60,
30 or 20
minutes)
11
Cool Tumble
Airs your clothes with cool
air, use also to cool warm
clothes.
Brief programme
(approximately 10 minutes)
that softens fibres of clothing
that is ready for ironing.
Dries wet clothing that you
wish to dry on low heat or
small loads (less than 1kg).
Can be used with high heat
option if you prefer to use a
timed programme.
Brief programme
(approximately 10 minutes)
that cools fibres or clothing.
1. Position the PROGRAMME knob on 9.
2. Press the START/PAUSE button .
1. Position the PROGRAMME knob on 10.
2. Press the START/PAUSE button .
1. Position the PROGRAMME knob on
the desired time: 120, 90, 60, 30 or 20.
2. Select any Options, if required.
3. Press the START/PAUSE button .
1. Position the PROGRAMME knob on 11
2. Press the START/PAUSE button .
Options available:
None
! This is not a drying
programme (see previous
page).
Options available:
None
Options available:
High Heat ,
Delayed Start ,
Pre Creasecare ,
Post Creasecare .
Consult suggested drying
times (see Laundry).
The last 10 minutes of these
programmes is the Cool
Tumble.
Options available:
None
7
GB
Start and Programmes
The Controls
●
PROGRAMMES knob
●
DISPLAY
! Warning, if after pressing the START/PAUSE button
the programme knob position has changed, the new
position will NOT change the programme selected.
To change a selected programme, press the
START/PAUSE button , the light flashes Amber to
indicate the programme is paused. Select the new
programme and any options required, the light will
then flash green. Press the START/PAUSE button
again and the new programme will start.
●
OPTION buttons / lights
These buttons are used to customise the selected
programme to your requirements. A programme must
have been selected on the programme knob before
an option can be selected. Not all options are available
for all programmes (see Start and Programmes). If an
option is not available and you press the button, the
buzzer will beep three times. If the option is available
there will be one beep and the option light next to the
button lights to confirm the selection.
After the START/PAUSE button has been pressed only
the Pre Creasecare and Post Creasecare options can
be changed.
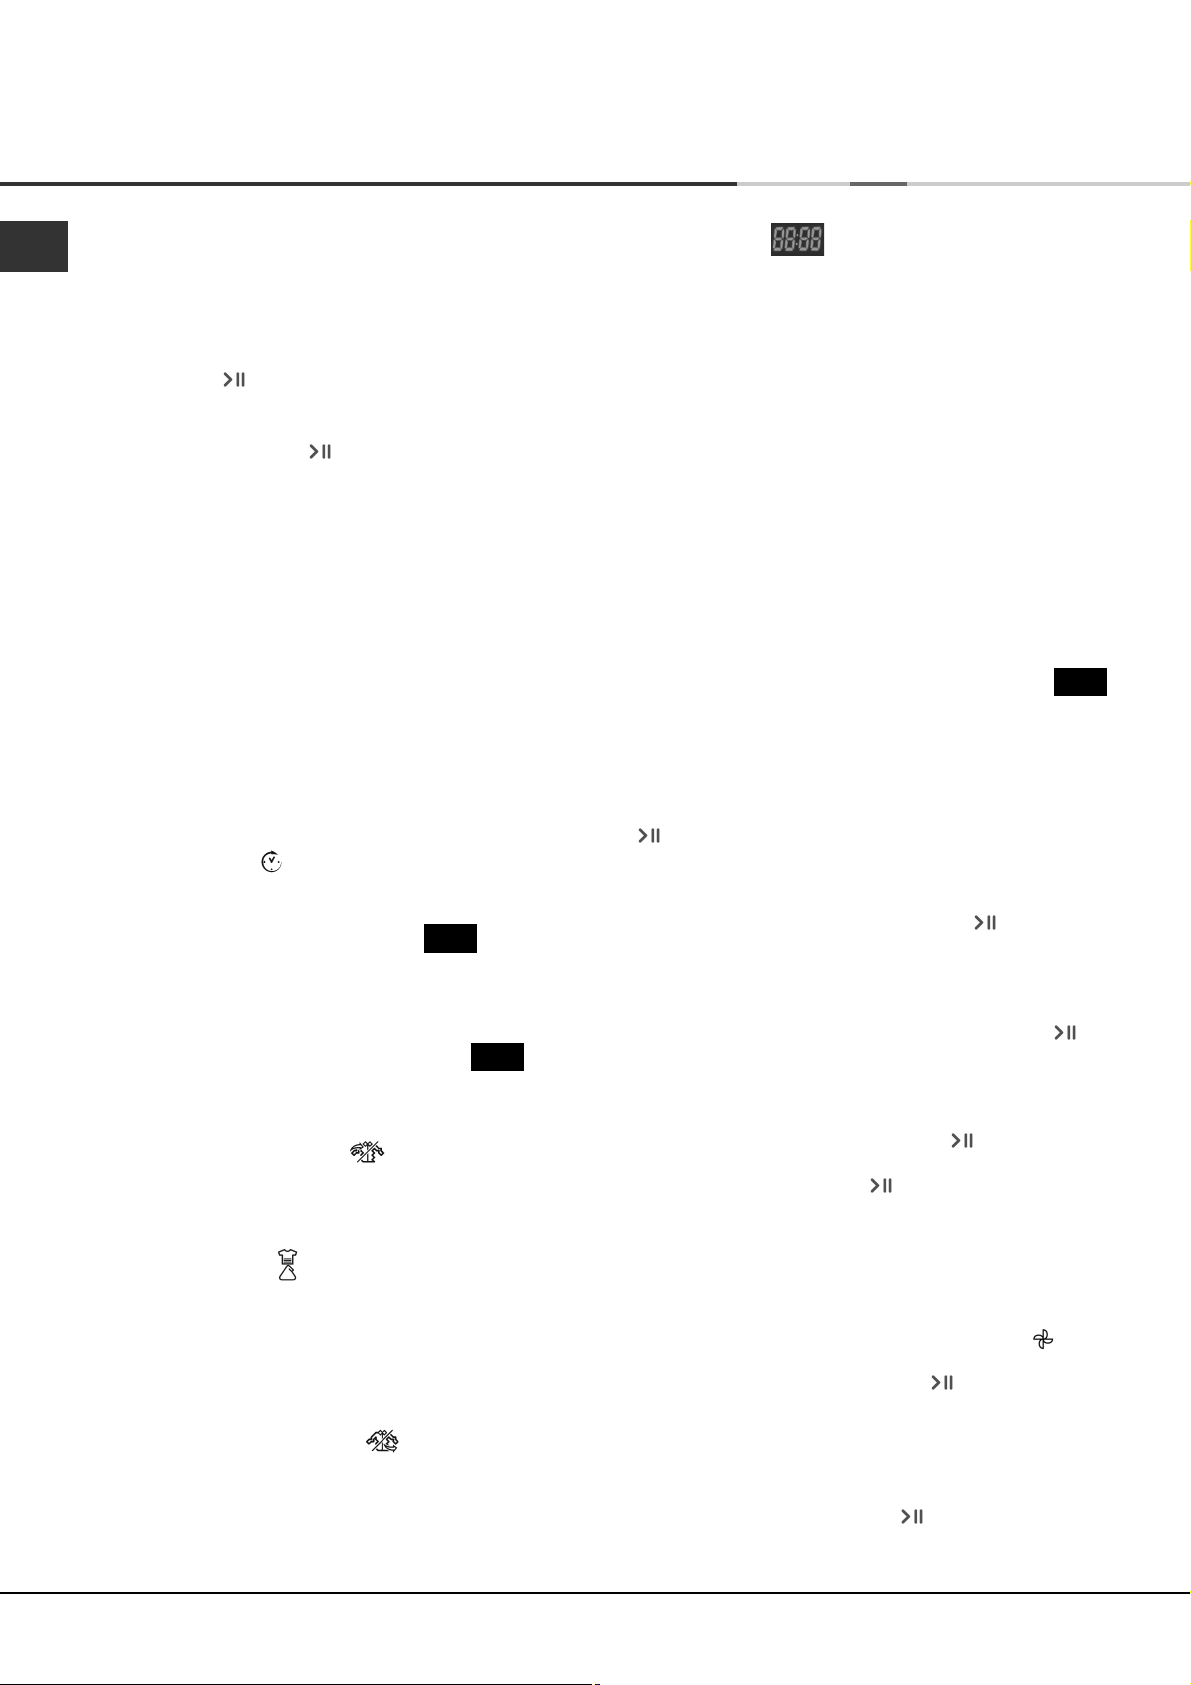
Time Delay
The start of some programmes (see Start and
Programmes) can be delayed for up to 24 hours.
Press this button, the display shows and the
OFF
option light comes on. Press again and a 1 hour delay
is selected and the display indicates 1hr, each further
press of the button adds 1hr to the delay. When 24hr
is displayed a further press the display shows
OFF
and after a couple of seconds cancels the delay. You
can also cancel the delay by pressing the ON/OFF
button.
Pre Creasecare
This option is only available if a delayed start has
been selected. It tumbles the clothes occasionally
during the delayed period to help prevent creases
developing.
High Heat
Available for Timed Drying programmes. Press this
button and a high heat setting is selected and the
light next to the button comes on.
Timed programmes have a default of low heat, if the
light next to the button is on then pressing this button
selects a low heat setting and the light goes out.
Post Creasecare
When available and selected, the clothes are
occasionally tumbled after the end of the drying and
cool tumble cycles, to help prevent creases
developing should you not be available to remove the
load immediately the programme is complete.
The display shows either the amount of time delay
remaining or an indication of the amount of time left for
a drying programme.
The delay time is displayed in hours and counts down
each minute.
The time to end is displayed in hours and minutes and
counts down each minute, this includes the cool
tumble phase. When timed programmes are selected
the time displayed throughout the cycle is the actual
time remaining.
When a sensing programme is selected the time
displayed is an estimate of the time remaining. When
the programme is selected the display shows the time
required to dry a full load, after around 10 minutes the
controller calculates a better estimate of the cycle time.
The colons between the hours and minutes in the
display flash to show that the time is counting down.
When the programme finishes its cool tumble phase
the display will show .
E88
The display also shows if there is a problem with your
dryer, if this occurs the display will show F followed by
a fault code number (see Troubleshooting).
●
Door Opening
Opening the door (or pressing the START/PAUSE
button ) during a programme will stop the dryer and
have the following effects:
●
The START/PAUSE light flashes Amber.
●
During a delay phase the delay will continue to
count down. The START/PAUSE button must
be pressed to resume the delay programme. The
progress lights will change to show current status.
●
During the drying part of the programme, the
time to end count continues but the colons do not
flash. The START/PAUSE button must be
pressed to resume the programme. The progress
lights will change to show the current status.
●
During the post creasecare phase of a drying
programme, the programme will finish. Pressing
the START/PAUSE button will re-start a new
programme at the beginning.
●
The START/PAUSE button must be pressed to
resume the programme. The progress lights will
change to show the current status and the
START/PAUSE light will stop flashing and turn green.
●
Changing the programmes knob will select a new
programme and the START/PAUSE light will flash
green. You can use this to select the Cool Tumble
programme to cool the clothes, if you find them
dry enough. Press the START/PAUSE button to
begin a new programme.
●
Note
If you have a power cut, switch off the power or
remove the plug. When the power is restored, press
the START/PAUSE button and the programme will
resume.
8
Laundry
Sorting your laundry
●
Check symbols on clothing labels to make sure
that the articles can be tumble dried.
●
Sort laundry by fabric type.
●
Empty pockets and check buttons.
●
Close zippers and hooks and tie loose belts and
strings.
●
Wring out each item in order to eliminate as much
excess water as possible.
! Do not load dripping wet clothes into the dryer.
Maximum load size
Do not load more than maximum capacity.
These numbers refer to dry weight:
Natural fibres: 6kg max (13lb)
Synthetic fibres: 3kg max (6.6lb)
! DO NOT overload the dryer as this could result in
reduced drying performance.
Typical load
Note: 1kg = 1000g 1lb = 16oz
Clothes
Blouse Cotton 150g 5oz
Other 100g 3oz
Dress Cotton 500g 1lb 2oz
Other 350g 12oz
Jeans 700g 1lb 6oz
10 nappies 1000g 2lb 3oz
Shirt Cotton 300g 10oz
Other 200g 7oz
T-Shirt 125g 4oz
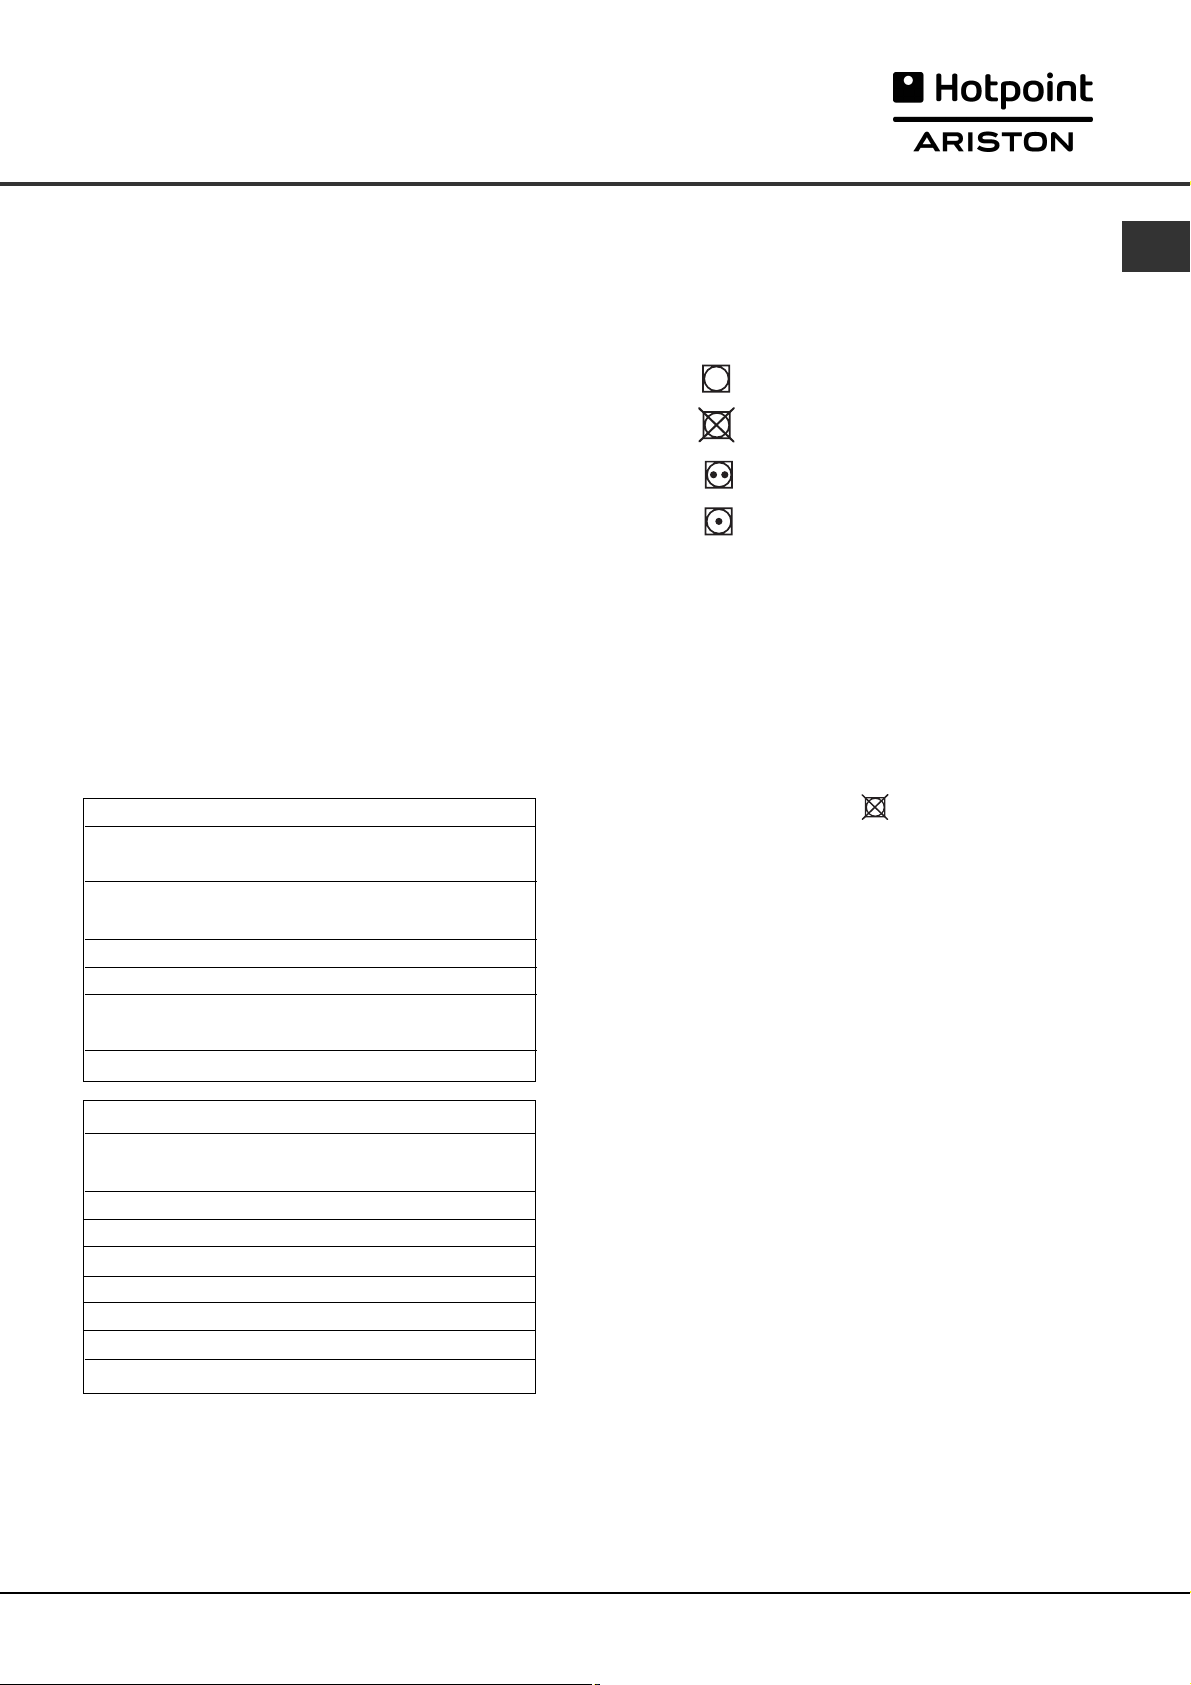
Wash Care Labels
Look at the labels on your garments, especially when
tumble drying for the first time. The following symbols
are the most common:
May be tumble dried
Do not tumble dry
Tumble dry at high heat setting
Tumble dry at low heat setting
Items not suitable for tumble drying
●
Articles that containing rubber or rubber-like
materials or plastic film (pillows, cushions, or PVC
rainwear), any other flammable articles or objects
that contain flammable substances (towels soiled
with hair spray).
●
Glass fibres (certain types of draperies)
●
Items which have been dry cleaned
●
Items with the ITCL Code (see Special
clothing items). These can be cleaned with special
at-home dry cleaning products. Follow instructions
carefully.
●
Large bulky items (quilts, sleeping bags, pillows,
cushions, large bedspreads etc). These expand
when drying and would prevent airflow through
the dryer.
GB
Household Items
Duvet cover Cotton 1500g 3lb 5oz
(Double) Other 1000g 2lb 3oz
Large Tablecloth 700g 1lb 6oz
Small Tablecloth 250g 9oz
Tea Towel 100g 3oz
Bath Towel 700g 1lb 6oz
Hand Towel 350g 12oz
Double Sheet 500g 1lb 2oz
Single Sheet 350g 12oz
At the end of a drying cycle, cottons could still be
damp if you grouped cottons and synthetics together.
If this happens simply give them an additional short
period of drying.
●
Note: The last 10 minutes of any time set is the
Cool Tumble, so allow for this when setting the time,
as this period will not dry your laundry.
9
Laundry
GB
Special clothing items
Blankets and Bedspreads: acrylic items (Acilan,
Courtelle, Orion, Dralon) must be dried with special
care on LOW heat setting. Avoid drying for a long
period of time.
Pleated or creased garments: read the manufacturer’s
drying instructions on the garment.
Starched articles: do not dry these with non-starched
items. Make sure that as much of the starch solution is
removed from the load as possible before placing it in
the dryer. Do not over-dry: the starch will become
powdery and leave your clothing limp, which defeats
the purpose of starch.
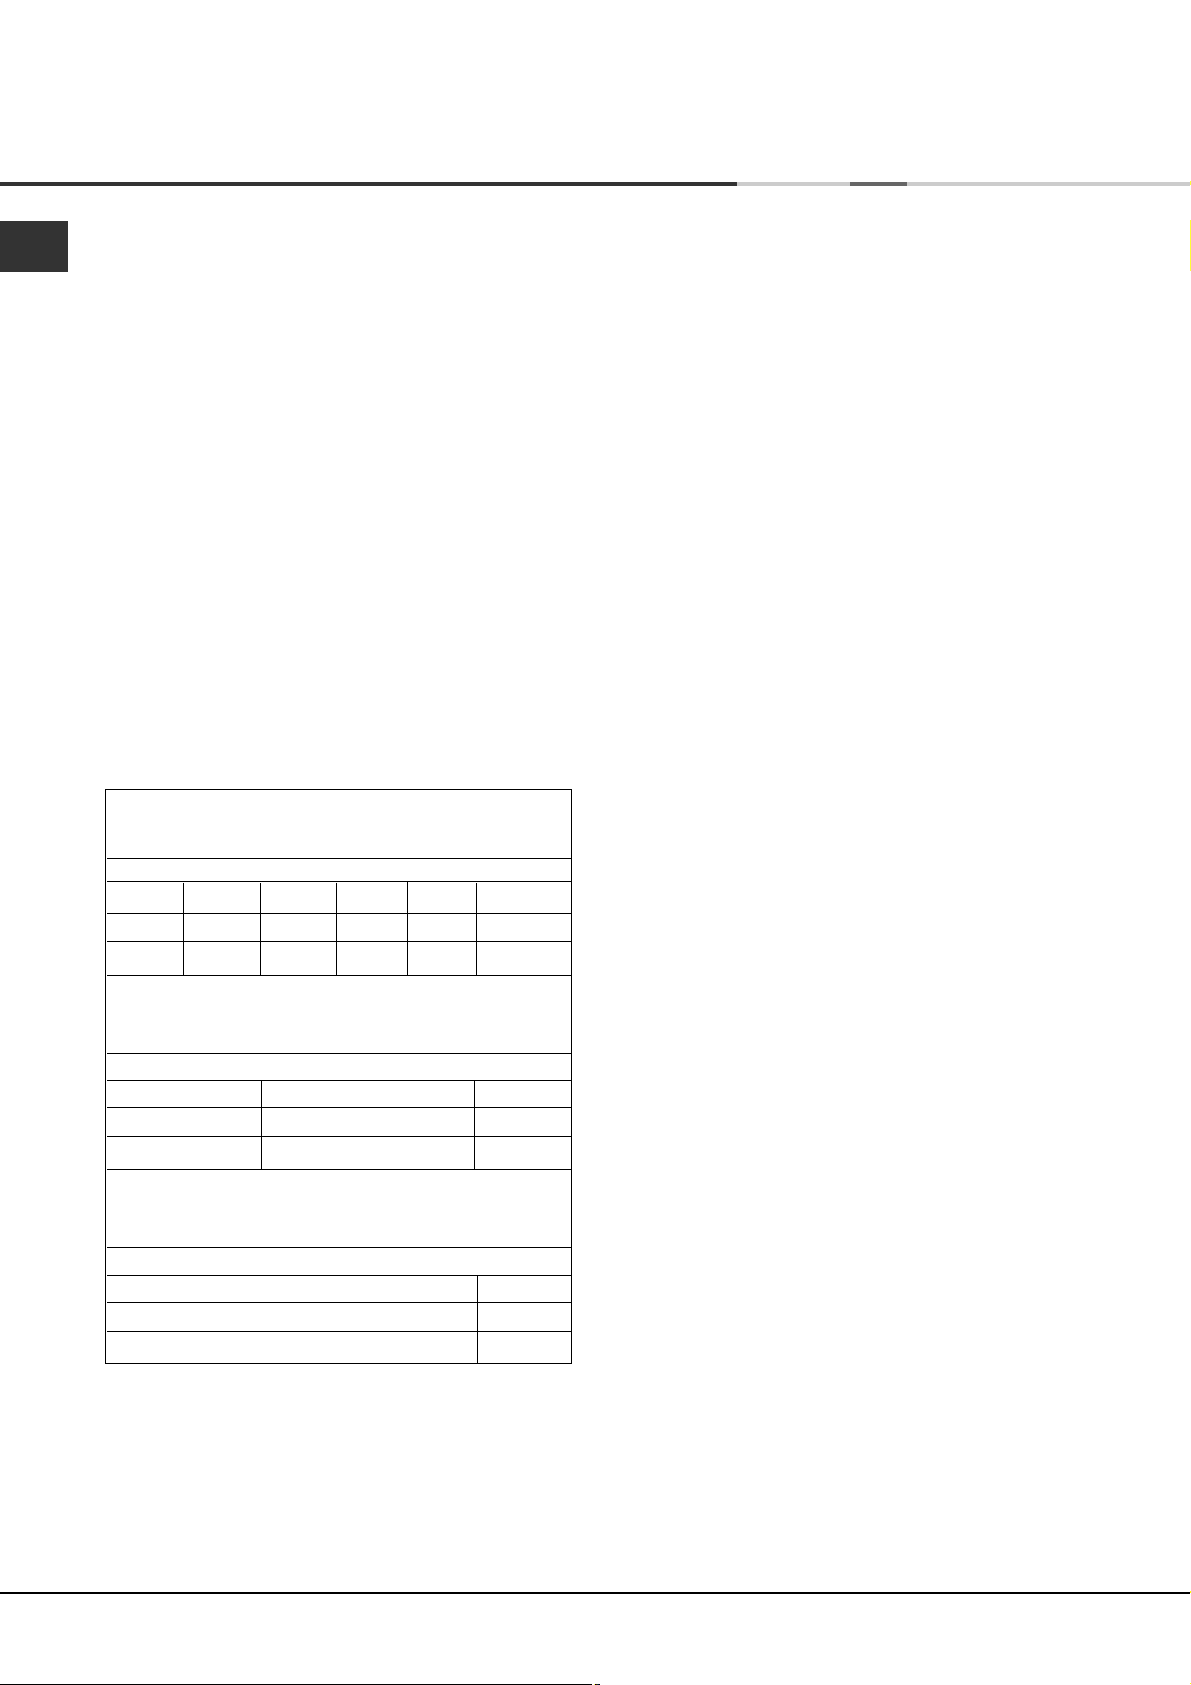
Drying times
The table below presents APPROXIMATE drying times
in minutes. Weights refer to dry garments:
Cottons
High (full) Heat
Drying times 800-1000rpm in washing machine
Half Load Full Load
1kg 2kg 3kg 4kg 5kg 6kg
20-30 35-45 45-60 60-70 70-80 80-100
Synthetics
High (full) Heat
Drying times on reduced spin in washing machine
Half Load Full Load
1kg 2kg 3kg
20-40 30-50 40-70
Times are approximate and can vary depending
upon:
●
Amount of water retained in clothes after spin
cycle: towels and delicates retain a lot of water.
●
Fabrics: items that are the same type of fabric but
different textures and thicknesses may not have
the same drying time.
●
Quantity of laundry: single items or small loads
may take longer to dry.
●
Dryness: If you are going to iron some of your
clothes, they can be taken out while still a bit
damp. Others can be left longer if you need them
to be completely dry.
●
Heat setting.
●
Room temperature: if the room where the dryer is
located is cold, it will take longer for the dryer to
dry your clothes.
●
Bulk: some bulky items can be tumble dried with
care. We suggest that you remove these items
several times, shake them out, and return them to
the dryer until finished.
! Do not over-dry your clothes.
All fabrics contain a little natural moisture, which
keeps them soft and fluffy.
Delicates (e.g.Acrylics)
Low (gentle) Heat
Drying times on reduced spin in washing machine
Half Load Full Load
1kg 2kg
50-70 90-130
10
Warnings and Suggestions
●
! The appliance has been designed and built according
to international safety standards.
These warnings are given for safety reasons and must
be followed carefully.
General safety
●
This tumble dryer is not intended for use by
persons (including children) with reduced physical,
sensory or mental capabilities, or lack of experience
and knowledge, unless they have been given
supervision or instruction concerning use of the
appliance by a person responsible for their safety.
●
This tumble dryer has been designed for home,
and not professional use.
●
Do not touch the appliance while barefoot or with
wet hands or feet.
●
Unplug the machine by pulling on the plug, not
the cord.
●
Children must not be in proximity of the dryer
when in use. After using the dryer, turn it off and
unplug it. Keep the door closed to make sure that
children do not use it as a toy.
●
Children should be supervised to ensure that they
do not play with the dryer.
●
The appliance must be installed correctly and
have proper ventilation. The air intake vents
behind the machine, the outlet vents and the vent
tube should never be obstructed (see Installation).
●
Never direct the vent tube outlet towards the air
intake at the back of the machine.
●
Never allow the tumble dryer to recycle exhaust air.
●
Never use the dryer on carpeting where the pile
height would prevent air from entering the dryer
from the base.
●
Check to see if the dryer is empty before loading it.
●
●
●
●
●
●
●
●
●
●
The back of the dryer could become very
hot. Never touch it while in use.
Do not use the dryer unless the filter is securely
in place (see Maintenance).
Do not use liquid fabric softeners in the dryer, add
it to the final rinse of your wash.
Do not overload the dryer (see Laundry) for
maximum loads.
Do not load items that are dripping wet.
Tumble dry items only if they have been washed
with detergent and water, rinsed and been through
the spin cycle. It is a fire hazard to dry items that
HAVE NOT been washed with water.
Carefully check all instructions on clothing labels
(see Laundry).
Do not dry garments that have been treated with
chemical products.
Never dry articles that are contaminated with
flammable substances (cooking oil, acetone, alcohol,
petrol, kerosene, spot removers, turpentine, waxes,
wax removers and hair sprays), unless washed in
hot water with an extra amount of detergent.
Do not tumble dry rubber, rubber backed articles and
clothes, pillows fitted with foam rubber pads, foam
(latex foam), rubber, plastic, shower caps, waterproof
textiles, nappy pants or liners, polythene or paper.
Do not tumble dry large, very bulky items.
●
Do not tumble dry acrylic fibres at high temperatures.
●
Remove all objects from pockets, especially lighters
(risk of explosion).
●
Complete each programme with its Cool Tumble Phase.
●
Do not turn off the dryer when there are still warm
items inside.
●
Clean the filter after each use (see Maintenance).
●
Do not allow lint to collect around the dryer.
●
Never climb on top of the dryer. It could result in
damage.
●
Always follow electrical standards and requirements
(see Installation).
●
Always buy original spare parts and accessories
(see Service).
! WARNING: Never stop the dryer before the end of the
drying cycle unless all items are quickly removed and
spread out so that the heat is dissipated.
Recycling and disposal information
As part of our continued commitment to helping the
environment, we reserve the right to use quality recycled
components to keep down customer costs and minimise
material wastage.
●
Disposing of the packaging material: follow local
regulations, so the packaging can be recycled.
●
To minimise risk of injury to children, remove the
door and plug - then cut off mains cable, flush
with the appliance. Dispose of these parts separately
to ensure that the appliance can no longer be
plugged into a mains socket.
Disposal of old electrical appliances
The European Directive 2002/96/EC on Waste Electrical
and Electronic Equipment (WEEE), requires that old
household electrical appliances must not be disposed
of in the normal unsorted municipal waste stream. Old
appliances must be collected separately in order to
optimise the recovery and recycling of the materials
they contain and reduce the impact on human health
and the environment.
The crossed out “wheeled bin” symbol on the
product reminds you of your obligation, that
when you dispose of the appliance it must be
separately collected.
Consumers should contact their local authority or
retailer for information concerning the correct disposal
of their old appliance.
Saving energy and respecting the
environment
●
Wring out items to eliminate excess water before
tumble drying (if you use a washing machine first,
select a high spin cycle). Doing this will save time
and energy during drying.
●
Always dry full loads - you save energy: single
items or small loads take longer to dry.
●
Clean the filter after each use to contain energy
consumption costs (see Maintenance).
GB
11
Maintenance and Care
GB
Switching off the electricity
Unplug your dryer when not using it, when cleaning it
and during all maintenance operations.
Clean the filter after each cycle
The filter is an important part of your dryer:
it accumulates lint and fluff that is formed while drying.
Small items could also become trapped in the filter.
When finished drying, therefore, clean the filter by
rinsing it under running water or with your vacuum
cleaner. Should the filter become clogged up, the airflow
inside the dryer will be seriously compromised: drying
times lengthen and you will consume more energy. It
may also damage your dryer.
The filter is found in front
of the dryer trim
(see diagram).
Check the drum after each cycle
Turn the drum manually in order to remove small items
(handkerchiefs) that could have been left behind.
Cleaning the drum
! Do not use abrasives, steel wool or stainless steel
cleaning agents to clean the drum.
A coloured film may start to appear on the stainless
steel drum, this may be caused by a combination of
water and, or cleaning agents such as fabric conditioner
from the wash. This coloured film will not affect the
dryer performance.
Cleaning
●
External parts in metal or plastic and rubber parts
can be cleaned with a damp cloth.
●
Periodically check the vent tube and any
permanent venting fixture to make sure that there
has been no accumulation of fluff or lint, and
remove it.
Removing the filter:
1. Pull the plastic grip of
the filter upwards (see
diagram).
2. Clean the filter and
replace it correctly.
Ensure the filter is fully
located flush into the
tumble dryer trim.
! Do not use the dryer without replacing the filter.
●
Remove lint that collects around the filter and the
outlet vents.
! Do not use solvents or abrasives.
! Your dryer uses special bearing components which
do not need lubrication.
! Have your dryer checked regularly by authorised
technicians to ensure electrical and mechanical safety
(see Service).
12

Troubleshooting
One day your dryer seems not to be working. Before you call your Service Centre (see Service), go through the
following troubleshooting suggestions:
Problem:
The tumble dryer won’t start.
Possible causes / Solution:
●
The plug is not plugged into the socket, or not making contact.
●
There has been a power failure.
●
The fuse has blown. Try to plug another appliance into the socket.
●
You are using an extension cord? Try to plug the dryer’s power cord
directly into the socket.
●
The door is not closed securely?
●
The PROGRAMMES knob has not been set properly (see Start and
Programmes).
●
The START/PAUSE button has not been pressed (see Start and
Programmes).
●
Drying cycle will not begin.
Its taking a long time to dry.
You have set a delayed time (see Start and Programmes).
●
The filter has not been cleaned (see Maintenance).
●
The correct programme has not been selected for the load (see Start
and Programmes).
●
The flexible vent tube is obstructed (see Installation).
●
The air intake vent is obstructed (see Installation).
●
The permanent ventilation flap on the storm cover is obstructed (see
Installation).
●
The items were too wet (see Laundry).
●
The dryer was overloaded (see Laundry).
GB
Programme finishes and
clothes are damper than
expected.
The display shows a fault
code F followed by one or two
numbers.
The display briefly shows
every 6 seconds.
! For safety the dryer has a maximum programme time of 3 hours. If an
automatic programme has not sensed the required final moisture in this time
the dryer will complete the programme and stop. Check the above points
and run the programme again, if the results are still damp, contact the
Service Centre (see Service).
●
If the display shows F10 or F15:
- Turn off and remove the plug. Clean the filter (see Maintenance).
Then replace the plug, turn on and start another programme. If F10
or F15 is still displayed contact the Service Centre (see Service).
●
If any other number is shown: Note down the code and contact the
Service Centre (see Service).
●
The dryer is in ‘Demo’ mode. Press and hold both the On/Off and
Start/Pause buttons for 3 seconds. The display will show for
3 seconds and then the dryer will resume normal operation.
13
Service
GB
Before calling the Service Centre:
●
Use the troubleshooting guide to see if you can
solve the problem yourself (see Troubleshooting).
●
If not, turn off the dryer and call the Service Centre
closest to you.
What to tell the Service Centre:
●
name, address and post code.
●
telephone number.
●
the type of problem.
●
the date of purchase.
●
the appliance model (Mod.).
●
the serial number (S/N).
This information can be found on the data label inside
the door of the machine.
Spare Parts
This dryer is a complex machine. Repairing it yourself
or having a non-authorised person try to repair it could
cause harm to one or more persons, could damage
the machine and could invalidate the spare parts
warranty.
Call an authorised technician if you experience problems
while using the machine.
The spare parts have been designed exclusively for
this appliance and not for other uses.
Comparative Programmes
●
Programmes recommended for comparative test to EN61121
Programme Programme to select Load size
(EN61121)
Dry Cotton 2 Cottons - Cupboard Dry 6 kg
Iron Dry Cotton 4 Cottons - Iron Dry 6 kg
Easy-care textile 5 Synthetics - Cupboard Dry 3 kg
! Note: This is not a full list of programme options (see Start and Programmes).
14
This appliance conforms to the following EC Directives:
- 2006/95/EC (Low Voltage Equipment)
- 89/336/EEC, 92/31/EEC and 93/68/EEC (Electromagnetic Compatibility)

Libretto di istruzioni
ASCIUGATRICE
GB
English, 1
I
Italiano, 15
E
Español, 43PPortuguês, 57
TVF651
F
Français, 29
Indice
Importanti informazioni, 16
Installazione, 17-18
Dove installare l’asciugatrice
Aerazione
Collegamento elettrico
Livellamento
Informazioni preliminari
Descrizione del prodotto, 19
Lato anteriore
Lato posteriore
Pannello di controllo
Avvio e programmi, 20-22
Scelta del programma
Tabella dei programmi
I comandi
Bucato, 23-24
Controllo del bucato
Etichette con le istruzioni per il lavaggio
Tessuti particolari
Tempi di asciugatura
I
Avvertenze e suggerimenti, 25
Sicurezza
Smaltimento
Risparmio energetico e rispetto dell’ambiente
Cura e manutenzione, 26
Scollegamento dell’apparecchio dalla rete elettrica
Pulizia del filtro al termine di ogni ciclo
Controllo del cestello al termine di ogni ciclo
Pulizia del tamburo
Pulizia dell’asciugatrice
Ricerca guasti, 27
Assistenza, 28
Ricambi
! Tenere a portata di mano il presente libretto, così da poterlo consultare facilmente ad ogni evenienza. Tenere il
libretto sempre vicino all’asciugatrice; nel caso in cui l’apparecchio venga venduto o ceduto ad altre persone,
ricordarsi di consegnare loro questo libretto, così da permettere anche ai nuovi possessori di conoscere le avvertenze
e i suggerimenti sull’utilizzo dell’asciugatrice.
! Leggere attentamente queste istruzioni: le pagine che seguono contengono importanti informazioni
sull’installazione e utili suggerimenti sul funzionamento dell’elettrodomestico.
15
Importanti Informazioni
I
Per fare funzionare in modo efficiente la vostra asciugatrice a sfiato, è necessario
osservare
lo schema di manutenzione regolare indicato qui di seguito:
Filtro...
! E’ NECESSARIO pulire la lanugine che si deposita
sul filtro dopo OGNI ciclo di asciugatura.
FASE 1.
Aprire lo sportello
dell’asciugatrice.
FASE 4.
Per installare nuovamente
il filtro. - Assicurarsi che le
frecce siano rivolte verso
di voi.
FASE 2.
Estrarre il filtro (usando
due dita).
FASE 5.
Assicurarsi che il filtro sia
spinto completamente
verso l’interno. - Non
attivare MAI l’asciugatrice
senza il filtro in posizione
FASE 3.
Pulire eventuali depositi
di lanugine dalla rete del
filtro.
! La mancata pulizia del filtro dopo OGNI ciclo di asciugatura potrebbe influire sulla prestazione di asciugatura
della vostra macchina.
- Impiegherà più tempo ad asciugare e di conseguenza verrà utilizzata più elettricità durante l’asciugatura.
! E’ NECESSARIO rimuovere periodiicamente (OGNI due o tre mesi) la lanugine che si accumula intorno all’alloggio
del filtro e al tubo di sfiato.
- Inoltre controllare il tubo di sfiato e ogni altro dispositivo di sfiato permanente per assicurarsi che non ci sia
accumulo di lanugine o sporco, e rimuoverlo.
16
Installazione
Dove installare l’asciugatrice
●
Le fiamme possono danneggiare l’asciugatrice che
deve pertanto essere installata lontano da cucine a
gas, stufe, termosifoni o piani di cottura.
●
spazio minima 10mm
Se l’elettrodomestico verrà
installato sotto un banco da
lavoro, è necessario lasciare
uno spazio vuoto di almeno
10 mm sopra il pannello
superiore dell’elettrodomestico;
spazio minima
15mm
i pannelli laterali dovranno
invece avere uno spazio
libero intorno di almeno
15 mm. In questo modo sarà garantita la circolazione
dell’aria. Controllare che le prese d’aria del pannello
posteriore non siano ostruite.
●
Assicurarsi inoltre che l’ambiente in cui viene installata
l’asciugatrice non sia umido e che vi sia un
adeguato ricambio di aria. L’asciugatrice non
funzionerà correttamente se posizionata in uno
spazio chiuso o all’interno di un mobile.
! Non è consigliabile che l’asciugatrice sia installata in un
armadio, e non deve mai essere installata dietro una porta
richiudibile a chiave, una porta scorrevole o una porta con
cerniera sul lato opposto dello sportello dell’asciugatrice.
Aerazione
Questo elettrodomestico asciuga il bucato
immettendo aria fredda, pulita e relativamente
asciutta, riscaldandola e facendola passare attraverso
i tessuti, che vengono così delicatamente asciugati.
Per agevolare l’asciugatura, l’aria umida viene espulsa
dalla parte posteriore attraverso un tubo di aerazione.
È importante che l’ambiente in cui si utilizza
l’asciugatrice sia sufficientemente aerato, così da
evitare il riciclo dei gas combusti da altri apparecchi.
Sistema di aerazione mobile
! Fare attenzione a non rivolgere il tubo di aerazione
verso la presa d’aria, che si trova nel lato posteriore
dell’asciugatrice.
! Il tubo di aerazione non deve superare la lunghezza
massima di 2,4 metri; deve inoltre essere scosso con
frequenza per rimuovere eventuali depositi di laniccio,
polvere o acqua. Fare attenzione a non calpestare il tubo.
Sistema di aerazione fisso
Si consiglia di collegare il tubo di aerazione ad uno
dei sistemi di aerazione per finestra o porta, disponibili
presso il rivenditore da cui è stata acquistata
l’asciugatrice o presso il più vicino rivenditore di parti
di ricambio.
Foro di aerazione su
parete
1.Lasciare un’apertura
nella parete alla sinistra
del punto in cui verrà
installata l’asciugatrice.
2. Fare in modo che il
tubo sia quanto più
corto e dritto possibile,
così da evitare che
l’umidità, condensandosi, possa rifluire
nell’asciugatrice.
3. Allo stesso modo, anche il foro nella parete deve essere
dritto e in discesa, così do non ostacolare il deflusso dell’aria
verso l’esterno.
Foro di aerazione su
finestra
1. In linea teorica, quando
l’asciugatrice è a pieno
carico, il foro di
aerazione dovrebbe
trovarsi direttamente
dietro la ventola.
2. È importante quindi
che il tubo sia il più
corto possibile.
I
Quando si utilizza l’asciugatrice con il sistema di
aerazione mobile, è necessario collegare un tubo di
aerazione. Il tubo va fissato saldamente al foro di
ventilazione posteriore dell’asciugatrice (vedere la
sezione Descrizione del prodotto). Se possibile, si
consiglia di fissare il tubo ad uno scarico vicino
all’asciugatrice. Quando non può essere installata in
modo fisso, l’asciugatrice assicurerà comunque ottime
prestazioni facendo passare il tubo di aerazione
attraverso una finestra parzialmente aperta.
Le aree A e B devono essere controllate frequentemente,
per prevenire il formarsi di laniccio o detriti, specialmente
nei casi di uso frequente dell’asciugatrice. L’adattatore
per il tubo di aerazione deve essere montato
correttamente, così da evitare che l’aria umida possa
rientrare nella stanza.
! Fare attenzione a non spingere troppo indietro l’asciugatrice,
perché in questo modo si rischia di schiacciare, piegare
o addirittura scollegare il tubo di aerazione.
! Il tubo non deve presentare tagli, strozzature o curve
a “U” che potrebbero ostruire la ventilazione o intrappolare
la condensa.
17
Installazione
I
Aerazione attraverso una finestra aperta
L’estremità del tubo deve
essere rivolto verso il
basso, così da evitare
che l’aria calda umida
possa condensarsi nella
stanza o nell’asciugatrice.
! Assicurarsi che l’asciugatrice sia sufficientemente
ventilata e che l’estremità del tubo di aerazione non
sia rivolto verso il condotto della presa d’aria posteriore.
! Per il corretto funzionamento dell’asciugatrice è
indispensabile montare sempre il tubo di aerazione.
! Controllare che il tubo di aerazione e i condotti delle
prese d’aria non siano ostruiti o intasati.
! Evitare che l’asciugatrice ricicli aria viziata.
! L’uso scorretto dell’asciugatrice può creare il pericolo di
incendio.
! Non scaricare l’aria emessa dall’asciugatrice nello
stesso canale in cui viene scaricato il fumo emesso
da altri apparecchi che bruciano gas o altri
combustibili.
! Non rilasciare l’aria aspirata in un sistema di
aspirazione o in condotti con ventole di aspirazione.
Ciò influirà sul funzionamento dei controlli termici e
potrebbe provocare incendi.
! Non utilizzare prolunghe.
! Il cavo elettrico non deve essere tagliato né
calpestato.
! Controllare regolarmente il cavo elettrico e, se
necessario, farlo sostituire solo da tecnici qualificati
che installeranno un altro cavo specifico per questo
elettrodomestico (vedere la sezione Assistenza).
Presso i rivenditori autorizzati è possibile acquistare
cavi di ricambio e cavi più lunghi di quelli montati in
fabbrica.
! Il produttore declina ogni responsabilità nei casi in
cui le presenti regole non vengano rispettate.
! Se si nutrono dei dubbi a riguardo, consultare un
elettricista.
Livellamento dell’asciugatrice
L’asciugatrice deve essere installata in piano per
funzionare correttamente.
Dopo aver installato
l’asciugatrice nella
posizione definitiva,
controllare il suo livello
prima da lato a lato,
quindi da davanti a dietro.
Collegamento elettrico
Prima di inserire la spina nella presa elettrica,
verificare che:
●
la presa sia dotata di messa a terra
●
la presa sia in grado di supportare la potenza
massima prevista per l’asciugatrice, così come
indicata sull’etichetta che riporta le prestazioni di
esercizio (vedere la sezione Descrizione del
prodotto)
●
la tensione di alimentazione sia compresa nei valori
indicati dall’etichetta che riporta le prestazioni di
esercizio (vedere la sezione Descrizione del
prodotto)
●
la presa sia compatibile con il tipo di spina
dell’asciugatrice. In caso contrario, sostituire la
spina o la presa.
! L’asciugatrice non può essere installata in ambienti
all’aperto, anche se riparati. Può essere molto
pericoloso esporre questo elettrodomestico alla pioggia
o a un temporale.
! Dopo l’installazione dell’elettrodomestico, il cavo e
la spina elettrica devono rimanere a portata di mano.
Se l’asciugatrice non è in
piano, utilizzare un blocco
di legno per sostenerla
mentre si regolano i due
piedini anteriori in alto o
in basso, finché non si
posiziona in piano.
Informazioni preliminari
Una volta installata l’asciugatrice, prima di metterla in
funzione, pulire l’interno del cestello, così da
rimuovere lo sporco che può essersi accumulato
durante il trasporto.
18
Descrizione del prodotto
Lato anteriore Lato posteriore
Pannello di controllo Cestello
Numero di
serie e numero
di modello
Pannello di controllo
Filtro
alta temperaturan
manopola
PROGRAMMI
Prestazioni di
esercizio
Attenzione,
Indicatore
DISPLAY
Presa d’aria
Collegamento per
tubo di aerazione
OPZIONE
pulsanti e spie
I
spia
Pulizia Filtro
Guida dei programmi
Il pulsante/spia ON/OFF : Se l’asciugatrice è in
funzione e viene premuto questo pulsante l’asciugatrice
si arresta. Premendolo nuovamente, l’asciugatrice si
riavvia. La spia segnala che l’asciugatrice è in funzione
o pronta per selezionare un programma.
La Guida dei programmi permette di consultare una
tabella semplice dei programmi disponibili.
La manopola PROGRAMMI consente di impostare il
programma desiderato: ruotarla fina a quando l’indicatore
si troverà sul programma che si desidera selezionare
(vedere la sezione Avvio e programmi).
I pulsanti/spie OPZIONE selezionano le opzioni
disponibili per il programma selezionato. Le spie indicano
che l’opzione è stata selezionata. Se un’opzione non è
disponibile il segnalatore acustico suonerà tre volte
(vedere la sezione Avvio e programmi).
Il pulsante START/PAUSA avvia un programma
selezionato. Quando si preme questo pulsante, verrà
emesso un segnale acustico e le spie di avanzamento
lampeggeranno per confermare l’azione. Quando un
programma è funzione, premendo questo pulsante
pulsante e spia
ON/OFF
pulsante e spia
BLOCCO SICUREZZA
BAMBINI
il programma va in pausa è si arresta l’asciugatrice.
La luce è verde quando il programma è in funzione,
lampeggia di giallo se il programma è in pausa,
lampeggia di verde se è in attesa di avviare un
programma (vedere la sezione Avvio e programmi).
Pulsante/spia
Premere e tenere premuto questo pulsante dopo
aver selezionato il programma desiderato e altre
opzioni
programma vengano cambiate. Quando la spia è
accesa, gli altri pulsanti e la manopola del
programma sono disabilitati. Tenere premuto il
pulsante per cancellare il blocco, e la luce
scomparirà.
Le spie di Progressione indicano lo stato del programma.
All’avvio di ogni fase del programma, si accende la
spia corrispondente.
La spia pulizia filtro rammenta prima dell’avvio
di ogni programma che è essenziale pulire il filtro
ogni volta che si usa l’asciugatrice (vedere la
sezione Cura e manutenzione).
, ciò evita che le impostazioni del
pulsante e spia
START/PAUSA
BLOCCO SICUREZZA BAMBINI
spie di
Progressione
:
19

Avvio e programmi
I
Scelta del programma
1. Inserire la spina dell’asciugatrice nella presa di
alimentazione elettrica.
2. Selezionare il bucato in base al tipo di tessuto
(vedere la sezione Bucato).
3. Aprire lo sportello e controllare la corretta
posizione e la pulizia del filtro (vedere la sezione
Manutenzione).
4. Caricare l’elettrodomestico, facendo attenzione ad
evitare che qualche indumento possa frapporsi tra
lo sportello e la relativa guarnizione. Chiudere lo
sportello.
5. Se la spia On/Off non è accesa: Premere il
pulsante ON/OFF .
6. Scegliere un programma verificando la Guida
Programmi (vedere Programmi) e anche le indicazioni
per ciascun tipo di tessuto (vedere Bucato).
- Selezionare un programma ruotando la
manopola PROGRAMMI.
7. Impostare un tempo di ritardo ed altre opzioni, se
necessario.
8. La spia START/PAUSA lampeggia di verde:
premere il pulsante START/PAUSA per iniziare.
La spia verde smette di lampeggiare e il display
indicherà il tempo previsto per la fine del programma.
Durante il funzionamento, è possibile aprire lo
sportello per estrarre i capi che nel frattempo si
sono asciugati e lasciare asciugare gli altri. Dopo
aver richiuso lo sportello, è necessario premere
nuovamente il pulsante START/PAUSA , in
mode che l’asciugatrice riprendra a funzionare.
(Quando lo sportello è aperto la spia
START/PAUSA lampeggia di giallo, dopo che lo
sportello viene chiuso e viene premuto il pulsante
START/PAUSA, la spia START/PAUSA smette di
lampeggiare e diventa verde.)
9. Durante gli ultimi minuti dei programmi di
asciugatura, prima del termine del programma,
viene inserita la fase ASCIUGATURA A FREDDO
(i tessuti vengono raffreddati), questa fase deve
sempre essere attivata per terminare il ciclo.
10. Il segnalatore acustico avviserà quando il
programma è terminato.
Aprire lo sportello, estrarre il bucato, pulire il filtro
e metterlo nuovamente in posizione (vedere la
sezione Manutenzione).
Se l’opzione Post-trattamento antipiega è stata
selezionata e non si rimuove il bucato immediatamente,
l’asciugatrice funzionerà occasionalmente per 10
ore o finché non viene aperto lo sportello.
11. Scollegare l’asciugatrice dalla rete elettrica.
Programma di stiratura facile
“Stiratura facile” è un breve programma di 10 minuti (8 minuti di riscaldamento seguiti da 2 minuti di asciugatura
a freddo) che gonfia le fibre dei tessuti rimasti immobili per un lungo periodo di tempo. Il ciclo distende le fibre
dei capi in modo da agevolarne la stiratura e la piegatura.
! Questo non è un programma di asciugatura e non va quindi utilizzato con capi ancora bagnati.
Per risultati ottimali:
1. Non caricare il cestello oltre la capacità massima.
I seguenti valori si riferiscono al peso degli indumenti asciutti:
Tessuto Carico massimo
Cotone e Misto cotone 2,5 kg
Sintetico 2 kg
Jeans 2 kg
2. Svuotare l’asciugatrice subito dopo la fine del programma; appendere, piegare o stirare i capi per poi
riporli nell’armadio. Se ciò non fosse possibile, ripetere il programma.
L’effetto prodotto dal programma “Stiratura facile” varia da tessuto a tessuto. I migliori effetti si ottengono su
tessuti tradizionali, quali Cotone o Misto cotone; invece, le caratteristiche di tessuti quali le fibre acriliche o il
Tencel® non consentono di ottenere gli stessi risultati.
Programma Lana
●
Questo è un programma per preservare nell’asciugatrice gli indumenti contrassegnati con il simbolo .
●
Può essere usato per carichi fino ad 1kg (circa 3 maglioni).
●
Consigliamo di rivoltare gli indumenti prima dell’asciugatura.
●
Questo programma impiegherà circa dai 60 minuti, ma potrebbe impiegare più tempo a seconda delle
dimensioni e della densità del carico e della velocità di centrifuga usata nella lavatrice.
●
I carichi che vengono asciugati con questo programma sono di solito pronti da indossare, ma con alcuni
indumenti più pesanti i bordi potrebbero essere leggermente umidi. Fare asciugare questi naturalmente,
poiché un’ulteriore processo di asciugatura potrebbe danneggiare gli indumenti.
! Al contrario di altri materiali, il meccanismo di restringimento della lana è irreversibile; cioè non ritorna alla
dimensione e alla forma originale.
! Questo programma non è indicato per gli indumenti acrilici.
Il programma "ciclo lana" di questa asciugabiancheria è stato approvato da Woolmark per l’asciugatura dei capi in
lana etichettati "lavabili in lavatrice e asciugabili a mezzo di asciugabiancheria a temperatura ridotta" che recano i
marchi di The Woolmark Company. Seguire le istruzioni riportate sull'etichetta cucita al capo e le indicazioni fornite
dal fabbricante della macchina (M0615).
Questo è il primo e l'unico programma di asciugatura "ciclo lana" approvato da The Woolmark Company.
20
Avvio e programmi
Programmi
! Se la spia On/Off non è accesa; Premere il pulsante ON/OFF e selezionare il programma.
Programma
1
Cotone
Extra
Asciutto
2
Cotone
Asciugatura
armadio
3
Cotone
Asciugatura
appendino
4
Cotone
Asciugatura
stiratura
5
Sintetici
Asciugatura
armadio
6
Lenzuola e
asciugamani
7
Delicati
Acrilici
8
Lana
Funzione Impostazione Nota:
Asciuga gli indumenti con
impostazione temperatura
alta, pronti per essere
indossati.
Asciuga gli indumenti con
impostazione temperatura
alta, pronti per essere
riposti nell’armadio.
Asciuga gli indumenti con
impostazione temperatura
alta, pronti per essere
appesi.
Asciuga gli indumenti con
impostazione temperatura
alta, pronti per la stiratura.
Asciuga gli indumenti con
impostazione temperatura
alta, pronti per essere
riposti nell’armadio.
Asciuga biancheria da
letto e asciugamani con
impostazione temperatura
alta, pronti per essere
riposti nell’armadio.
Asciuga i capi delicati con
impostazione temperatura
bassa, pronte per essere
indossate.
Asciuga gli indumenti di
lana (vedere pagina
precedente).
1. Posizionare la manopola PROGRAMMI su 1
2. Selezionare eventuali opzioni, se
necessario.
3. Premere il pulsante START/PAUSA .
1. Posizionare la manopola PROGRAMMI su 2
2. Selezionare eventuali opzioni, se
necessario.
3. Premere il pulsante START/PAUSA .
1. Posizionare la manopola PROGRAMMI su 3
2. Selezionare eventuali opzioni, se
necessario.
3. Premere il pulsante START/PAUSA .
1. Posizionare la manopola PROGRAMMI su 4
2. Selezionare eventuali opzioni, se
necessario.
3. Premere il pulsante START/PAUSA .
1. Posizionare la manopola PROGRAMMI su 5
2. Selezionare eventuali opzioni, se
necessario.
3. Premere il pulsante START/PAUSA .
1. Posizionare la manopola PROGRAMMI su 6
2. Selezionare eventuali opzioni, se
necessario.
3. Premere il pulsante START/PAUSA .
1. Posizionare la manopola PROGRAMMI su 7
2. Selezionare eventuali opzioni, se
necessario.
3. Premere il pulsante START/PAUSA .
1. Posizionare la manopola PROGRAMMI su 8
2. Premere il pulsante START/PAUSA .
Opzioni disponibili:
Avvio ritardato
Pre-trattamento antipiega
Post-trattamento antipiega
Opzioni disponibili:
Avvio ritardato
Pre-trattamento antipiega
Post-trattamento antipiega
Opzioni disponibili:
Avvio ritardato
Pre-trattamento antipiega
Post-trattamento antipiega
Opzioni disponibili:
Avvio ritardato
Pre-trattamento antipiega
Post-trattamento antipiega
Opzioni disponibili:
Avvio ritardato
Pre-trattamento antipiega
Post-trattamento antipiega
Opzioni disponibili:
Avvio ritardato
Pre-trattamento antipiega
Post-trattamento antipiega
Opzioni disponibili:
Avvio ritardato
Pre-trattamento antipiega
Post-trattamento antipiega
Opzioni disponibili:
Nessuna
I
9
Arieggiatura
10
Stiratura
facile
Asciugatura
temporizzata
(120, 90, 60,
30
o 20
minuti)
11
Asciugatura
a freddo
Arieggia gli indumenti con aria
fredda.
Usare questo programma per
raffreddare gli indumenti caldi.
Programma breve (circa
10 minuti) che
ammorbidisce le fibre dei
capi pronti per la stiratura.
Asciuga il bucato umido
che si desidera asciugare
a bassa temperatura o
piccolo carichi (inferiore
ad 1kg).
Può essere usato con
l’opzione temperatura alta
se si preferisce usare un
programma a tempo.
Programma breve (circa
10 minuti) che raffredda
le fibre o i capi.
1. Posizionare la manopola PROGRAMMI su 9
2. Premere il pulsante START/PAUSA .
1. Posizionare la manopola PROGRAMMI
su 10
2. Premere il pulsante START/PAUSA .
1. Posizionare la manopola PROGRAMMI
secondo il periodo desiderato
60, 30 or 20.
2. Selezionare eventuali opzioni, se
necessario.
3. Premere il pulsante START/PAUSA .
1. Posizionare la manopola PROGRAMMI
su 11
2. Premere il pulsante START/PAUSA .
: 120, 90,
Opzioni disponibili:
Nessuna
!
Non è un programma di
asciugatura (vedere pagina
precedente).
Opzioni disponibili:
Nessuna
Opzioni disponibili:
Temperatura alta
Avvio ritardato
Pre-trattamento antipiega
Post-trattamento antipiega
Consultare i tempi di
asciugatura suggeriti
(vedere Bucato).
Gli ultimi 10 minuti di Questi
programmi sono Il
funzionamento a freddo
Opzioni disponibili:
Nessuna
21
Avvio e programmi
I Comandi
●
I
manopola PROGRAMMI
●
DISPLAY
! Avvertenza, Se dopo aver premuto il pulsante START/PAUSA,
la posizione della manopola programmi è cambiata, la
nuova posizione NON cambierà il programma selezionato.
Per cambiare un programma selezionato, premere il pulsante
START/PAUSA , la spia lampeggia di giallo per indicare
che il programma è in pausa. Selezionare il nuovo programma
e le opzioni, la luce lampeggerà di verde. Premere nuovamente
il pulsante START/PAUSA il nuovo programma verrà
.
avviato
●
Pulsanti OPZIONE / spie
Questi pulsanti vengono usati per personalizzare il
programma selezionato secondo le proprie esigenze. Un
programma deve essere selezionato con la manopola
programmi prima di selezionare un’opzione. Non tutte le
opzioni sono disponibili per tutti i programmi (vedere la
sezione Avvio e programmi). Se un’opzione non è disponibile
e si preme il pulsante, il segnalatore acustico suonerà tre
volte. Se l’opzione è disponibile, il segnale acustico suonerà
solo una volta e l’ opzione vicina alle spie dei pulsanti si
illuminerà per confermare la selezione.
Dopo aver premuto il pulsante START/PAUSA, è possibile
cambiare solo l’opziones Pre-trattamento antipiega e Posttrattamento antipiega.
Avvio Ritardato
L’avvio di alcuni programmi (vedere la sezione Avvio
e programmi) può essere ritardato fino a 24 ore.
Premere il pulsante, il display indica e la spia
OFF
dell’opzione si accende. Premere nuovamente e viene
selezionata un’ora di ritardo ed il display indica 1hr,
premendo ulteriormente il pulsante, si aggiunge 1 ora
all’avvio ritardato. Quando viene visualizzato 24hr
un’ulteriore pressione del pulsante indica e
OFF
dopo alcuni secondi viene cancellato l’avvio ritardato.
E’ inoltre possibile cancellare il rilardo premendo il
pulsante ON/OFF.
Pre-trattamento antipiega
Questa opzione è disponibile solo se è stato selezionato un
avvio ritardato. I capi vengono asciugati occasionalmente
durante il periodo di ritardo, per contribuire ad evitare la
formazione di pieghe.
Temperatura alta
Disponibile per i programmi di asciugatura temporizzata.
Premendo questo pulsante si seleziona una temperatura alta
e la spia vicina al pulsante si accende.
I programmi a tempo hanno preimpostata una temperatura
bassa; se la spia vicina al pulsante è accesa, premendo il
pulsante si seleziona un’impostazione con temperatura
bassa e la luce si spegne.
Post-trattamento antipiega
Quando disponibile e selezionato, gli indumenti vengono
asciugati occasionalmente dopo la fine dei cicli di
asciugatura e asciugatura a freddo, per evitare la
formazione di pieghe nel caso la biancheria non venga
rimossa immediatamente dopo la fine del programma.
Il display mostra sia il periodo di tempo di avvio ritardato
rimanente, che il periodo di tempo rimasto per un
programma di asciugatura.
L’avvio ritardato viene visualizzato in ore e fa il conto
alla rovescia di ciascun minuto
Il tempo che rimane per la fine del processo viene
visualizzato in ore e minuti e viene eseguito il conto alla
rovescia di ciascun minuto, ciò comprende la fase di
asciugatura a freddo
programmi temporizzati, il tempo visualizzato durante il
ciclo è il tempo rimanente attuale.
Quando viene selezionato un programma di rilevazione, il
tempo visualizzato è una previsione del tempo rimanente.
Quando il programma è selezionato, il display indica il tempo
necessario per asciugare un carico pieno, dopo circa 10
minuti il controller calcola una migliore previsione del tempo
del ciclo. I punti fra le ore ed i minuti nel display lampeggiano
per indicare il tempo che sta passando. Quando il programma
termina la propria fase di asciugatura, il display indica .
Il display indica inoltre se c’è un problema con l’asciugatrice,
se ciò si verifica, il display indicherà F seguito da un numero
di codice di guasto (vedere la sezione Ricerca guasti).
●
Apertura Sportello
Aprendo lo sportello (o premendo ill pulsante START/PAUSA
) durante il funzionamento di un programma, l’asciugatrice si
arresterà e si avranno le seguenti conseguenze:
●
La spia START/PAUSA lampeggia di giallo.
●
Durante una fase di ritardo, il ritardo continuerà ad essere
conteggiato. Il pulsante START/PAUSA deve essere
premuto per ripristinare un programma di ritardo.
Le spie di progresso andranno ad indicare lo stato attuale.
●
Durante la fase di asciugatura del programm, il conto
alla rovescia del tempo che rimane continua, ma i due
punti non lampeggiano. Il pulsante START/PAUSA
deve essere premuto per riprendere il programma. Le
spie di progresso andranno ad indicare lo stato attuale.
●
Durante la fase post-trattamento antipiega di un
programma di asciugatura, il programma terminerà.
Premendo il pulsante START/PAUSA verrà riavviato
un nuovo programma dall’inizio.
●
Il pulsante START/PAUSA deve essere premuto per
riprendere il programma. Le spie di progresso andranno
ad indicare lo stato attuale. La spia START/PAUSA smette
di lampeggiare e diventa verde.
●
Cambiando la manopola programmi si selezionerà un
nuovo programma, e la spia START/PAUSA lampeggerà
di verde. E’ possibile usare questa funzione per
selezionare il programma asciugatura a freddo per
raffreddare gli indumenti, se sono asciutti a sufficienza.
remere il pulsante START/PAUSA o avviare un nuovo
P
programma
●
Nota
In caso di interruzione di corrente, spegnere l’alimentazione
o rimuovere la presa. Quando la corrente viene ripristinata,
premere il pulsante START/PAUSA ed il programma verrà
ripristinato.
. Quando sono selezionati
.
.
,
E88
22
 Loading...