

HOTPOINT TT 44E AX0 UK, TT 22E AX0 UK, TT 22E AR0 UK, TT 22E AC0 UK, TT 44E AR0 UK User Manual
...
10
9
1
8
Indesit Company UK Ltd
Morley Way,
Peterborough PE2 9JB
www.indesitcompany.com
TT 22E UK - TT 44E UK
02/2013 - ver.1.1
EN Operating Instructions
1
2
220-240V
1800W
2 3 4 5 6 7
6 5 4 3 2
3
TT 44E AX0 UK
10
1
9
8
2 3 7
6 5 4
1
2
3
TT 22E AX0 UK

en
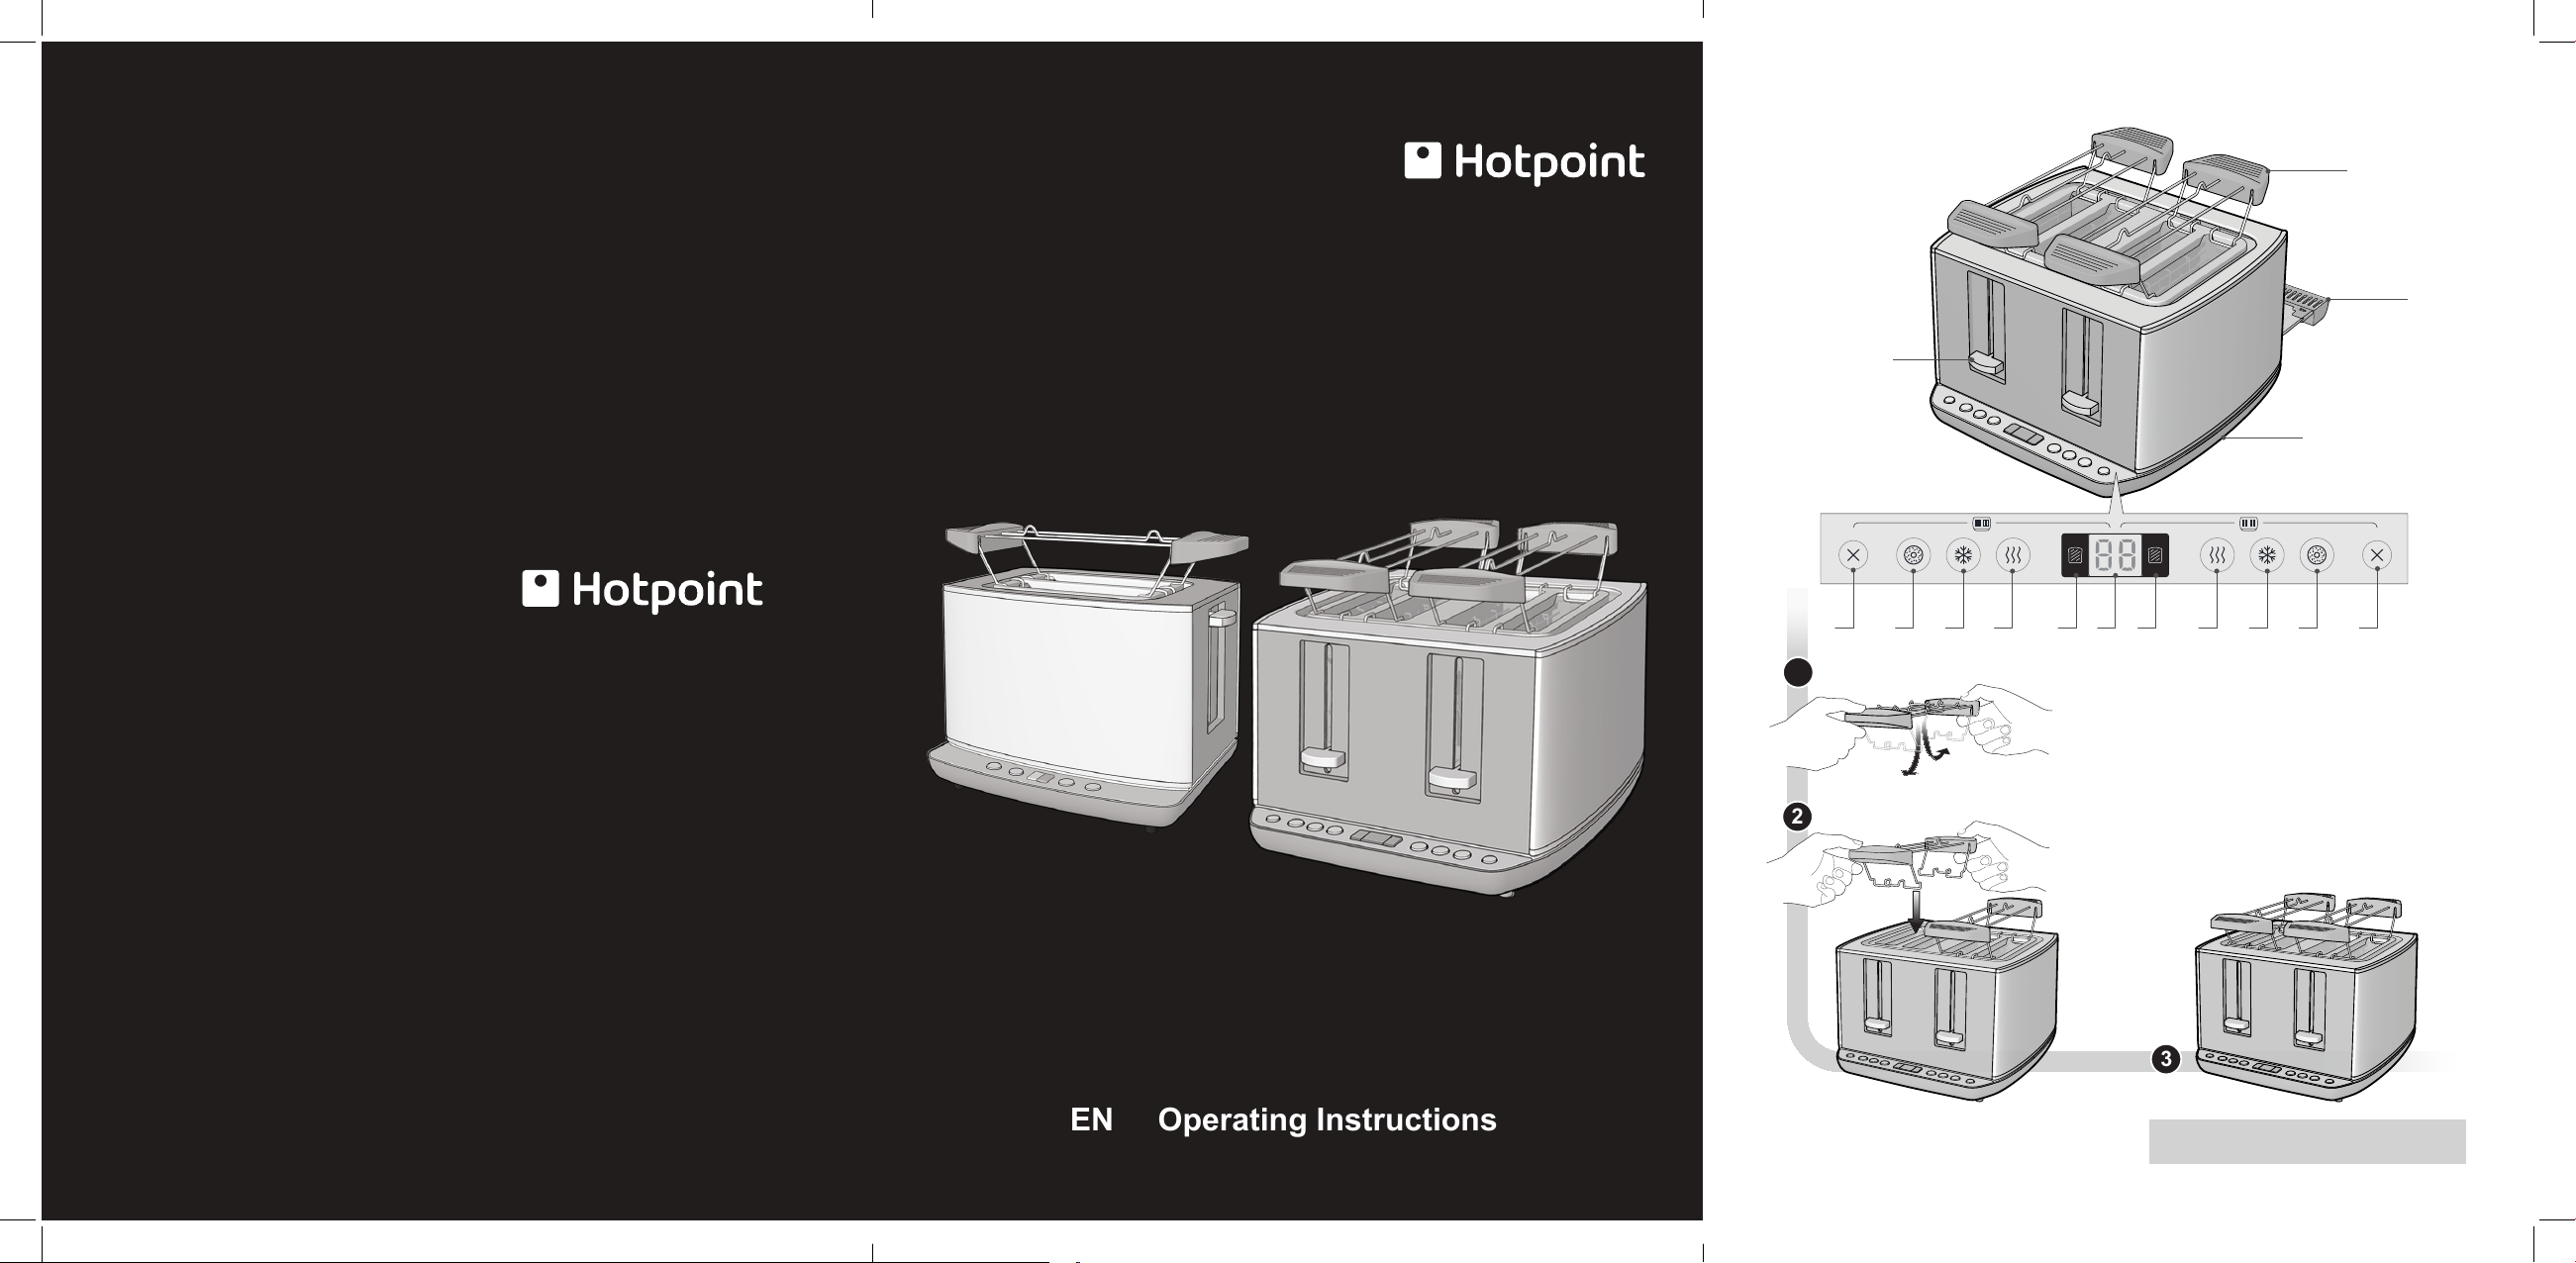
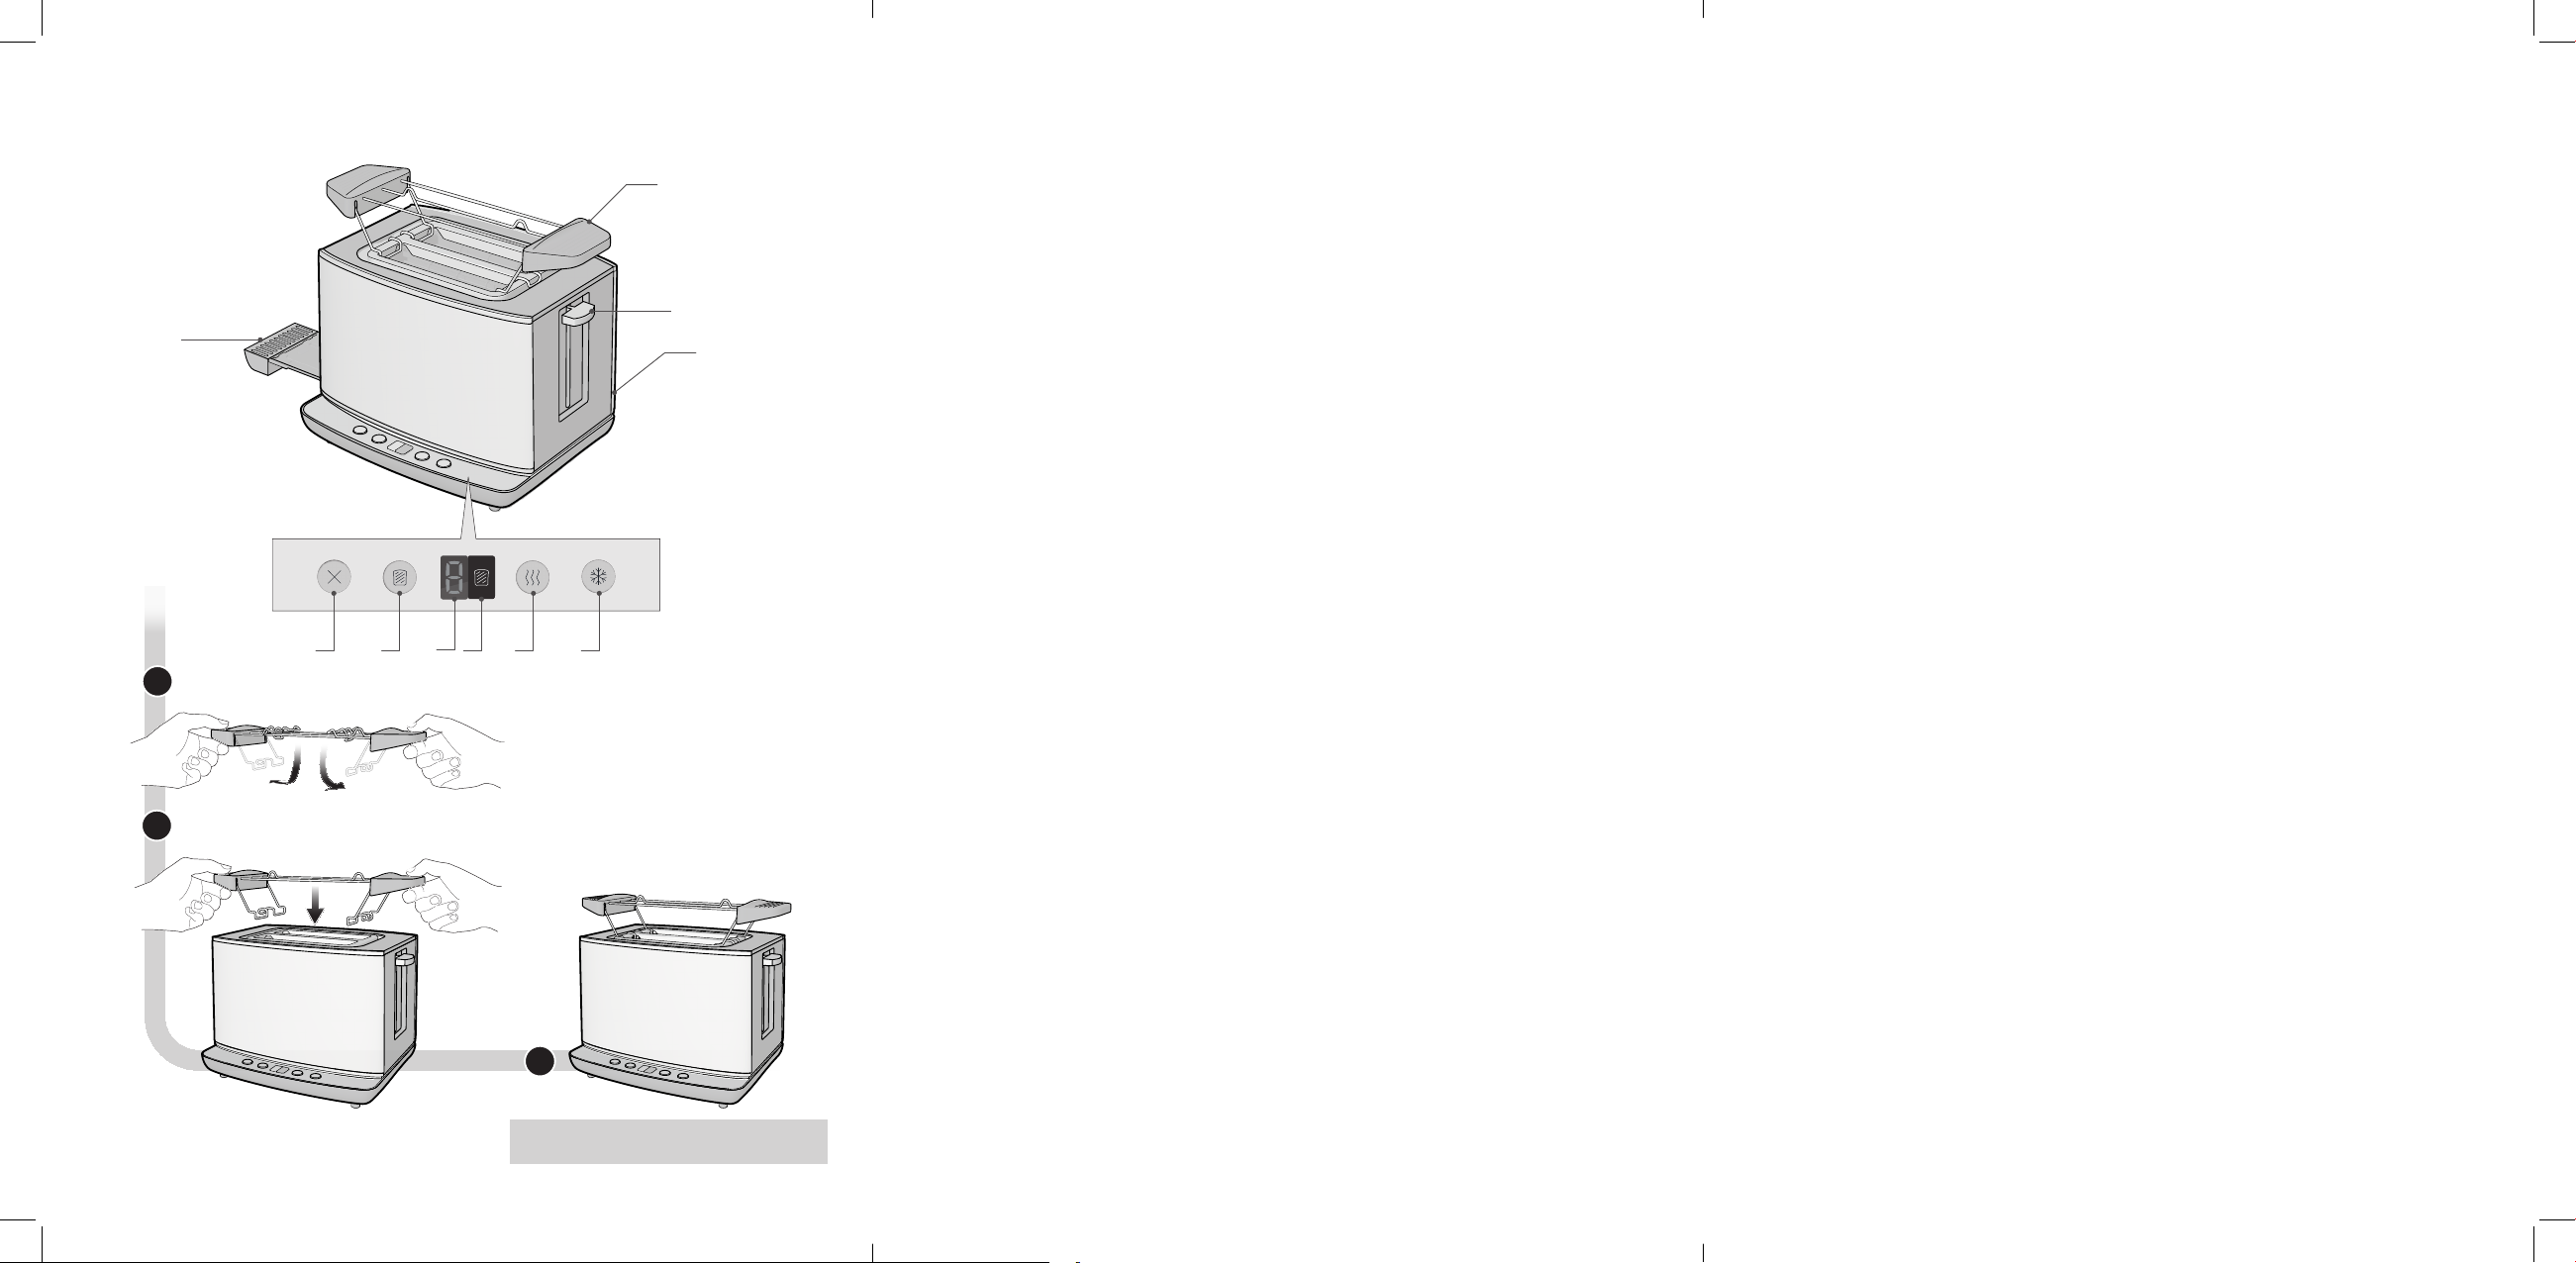
PARTS AND FEATURES
1. Operating lever
2. Cancel button
3. Bagel button
4. Defrost button
5. Reheat button
6. Toasting level button
7. Display
8. Cord wrap
9. Removable crumb tray
10. Warming rack (only on some models)
11. Pliers (only on some models)
INTRODUCTION
Thank you for purchasing our product.
In doing so, you have opted for an effective high-performance appliance.
If the instructions on the correct use of this appliance are not observed, the manufacturer shall assume
no responsibility for any resulting damage.
The operating instructions may refer to different models: any difference is clearly identied.
hotpoint.co.uk
55

en
IMPORTANT INFORMATION
ON SAFETY
When using any electrical appliance, always follow basic safety precautions,
including the following:
1. Read all the instructions.
2. Make sure that your outlet voltage corresponds to the voltage stated on the rating
label of the toaster.
3. Do not touch parts other than the operating
controls, as the toaster can become hot during toasting.
4. As a protection against electrical shocks, do
not immerse the cord, plug or any electrical
part of the toaster in water or other liquids.
5. Unplug the unit from the outlet when it is not
in use, before cleaning it or if it is defective.
Let it cool down before installing or removing
any parts.
6. Allow the unit to cool down completely before cleaning or storing it.
7. Do not operate any appliance with a damaged cord/plug or in abnormal state. If the
mains cord is damaged, have it replaced by
the manufacturer, the nearest service agent
or a qualied person.
8. Do not let the cord hang over the edge of a
table / counter top or touch a hot surface. Do
not use it as a carrying handle.
9. Do not place the appliance on or near a hot
gas / electric burner or in a heated oven.
10. Do not use the appliance for any use other
than its intended use.
11. Do not introduce any objects inside the
toaster, as this may cause damage or risks.
12. As bread may burn, do not use the toaster
near or below curtains and other ammable
materials.
13. The use of accessory attachments not recommended by the appliance manufacturer
may cause injuries or damage.
14. Use the appliance on a level stable work
surface. Only operate the toaster when it is
upright.
15. Do not attempt to remove the food when the
toaster is in operation.
16. The appliance is not intended to be operated
by means of an external timer or separate
remote-control system.
17. Remove the bread carefully after toasting to
avoid any injuries.
18. This appliance has a built-in grounded plug.
Make sure the wall outlet in your house is
properly earthed.
19. This appliance is not intended for use by
persons (including children) with reduced
physical, sensory or mental capabilities, or
lack of experience and knowledge, unless
they have been given supervision or instructions concerning the use of the appliance by
a person responsible for their safety.
20. Children should be supervised to ensure that
they do not play with the appliance.
21. Keep the appliance and its cord out of the
reach of children less than 8 years of age.
22. Warning: When toasting small bread slices
less than 85mm long, be careful of the potential risk of burning when taking out the
slices.
23. Do not use the appliance outdoors.
24. This appliance is intended to be used for
household and similar applications such as:
• staff kitchen areas in shops, ofces and other working environments;
• farm houses;
• by clients in hotels, motels and other resi-
dential-type environments;
• bed&breakfast-type environments.
25. Save these instructions.
26. Never cover the toaster slot.
27. Pull down the operating lever only for toasting: never block it.
28. Never leave the toaster unattended while it
is in use.
29. Do not use it near the water in bathtubs,
sinks or other containers.
BEFORE FIRST USE
Carefully wipe the outside of the appliance to remove any dust that may have accumulated. Dry
with a dry cloth. Remove any labels or stickers.
Do not immerse the supply cord in water or other
liquids. With the window open, operate the toaster
without any bread inside at least three times at
the highest toasting level setting. Then let it cool
down.
66

en
USING THE TOASTER
1. Put the food to be toasted into the bread slot.
No more than two slices can be introduced
every time.
Make sure the crumb tray is perfectly in
place before using.
2. Plug the power cord into the outlet.
3. Set the toasting level to the desired colour
using the toasting level button. The lowest
level is 1 and the highest level is 8. The default level is 4.
If you toast only one slice, set the
toasting level lower than for two slices.
If you toast the food continuously, the
toasting colour of the different slices can be
slightly different or darker, even if the same
level is used.
4. Pull down the operating lever until it en-
gages: toasting will begin at once. Once the
bread has been toasted to the preset level,
the operating lever will automatically spring
up.
The operating lever can rest on the
bottom of the slot only if the plug was
connected.
5. During the toasting process, if the browning
is satisfactory, press the CANCEL button to
stop toasting.
6. If the bread was taken out of the FREEZER,
set the toasting level according to your preference. Press the DEFROST button to toast
it to your desired color, then pull down the
operation lever until it is in place.
7. If you want to reheat any cold toasted bread,
press the REHEAT button. Toasting time is
xed in this mode: when time is over the operating lever will automatically spring up and
stop the reheating process.
8. The Bagel function makes it possible to toast
bread, bagels, mufns etc on one side only
(external side), while the other side (internal side) remains warm. Bagels and muf-
ns should be sliced in half before toasting.
Press the BAGEL button and then pull down
the lever.
USING THE WARMING RACK
(only on some models) (A)
The food that cannot be placed inside the slots
(e.g. rolls, baguettes, croissants) can be warmed
on the warming rack
1. Place the support on the slot.
2. Use the button to set the desired toasting
level.
3. Pull down the operating lever until it engages.
Never place aluminium foil on the warming rack. Never warm and toast at the
same time!
USE OF ACCESSORIES
PLIERS
(only on some models)
Preparation of sandwiches or toasts.
The toaster is equipped with a burning cycle spe-
cic for the preparation of sandwiches or toasts:
1. Insert the sandwich into the rack.
2. Insert the rack into the slot.
3. Hold down the REHEAT button until you see
the browning level number slowly ashing on
the display.
4. Lower the operating lever.
With this feature, your sandwich will be well
browned on the outside and cooked inside.
The function is not available on levels 1
and 2; in these cases, when the Reheat
button is hold down, the display will quickly
ash 3 times and Reheat function will be turned off.
If the toaster starts to smoke, press the
CANCEL button to stop toasting immedi-
ately.
Remove any protective wrapping before
positioning the toaster.
Avoid toasting food with extremely runny ingredients such as butter.
Be careful not to damage the internal
mechanism or heating elements when
hotpoint.co.uk
77

en
removing the bread.
Toast any items only until they are gold-
en brown and not brown or too dark.
Remove any burnt edges. Do not over-toast
food containing starch - especially grain and
potato products - to reduce the production of
acryl amides.
If a slice gets stuck at the end of the toasting process, pull the power plug and carefully
remove the bread after the toaster has cooled
down.
The use of browning levels from 4 to 6 is
recommended for the preparation of
sandwiches.
Depending on the quantity or quality of
stufng, it can happen that the inside of
the sandwich is not warm enough or completely melt: in case, please leave the sandwich
into the slot for about one minute after ending
the toasting.
CLEANING AND MAINTENANCE
1. Disconnect from the AC outlet before clean-
ing.
2. Wipe the outside with a soft dry cloth after
the toaster has cooled down. Never use
metal polish.
3. Pull out the crumb tray from the bottom of
the toaster and empty it. If the toaster is
used frequently, accumulated bread crumbs
should be removed at least once a week.
Make sure the crumb tray is completely
closed before using the toaster again.
4. When the toaster is not used or is stored, the
power cord may be wound under the bottom
of the toaster.
5. Never use steam cleaners or pressure
cleaners on the appliance.
6. If you use specic products for cleaning
steel, be careful with the chrome parts. They
could get stained .
GUARANTEE
12 months Parts and Labour Guarantee
This certicate of guarantee represents the guarantee (“Guarantee” hereinafter) offered by In-
desit Company UK Limited with registered ofce
at Peterborough PE2 9JB in relation to products
purchased in the United Kingdom and Indesit
Ireland Limited with registered ofce in Dublin 9,
Ireland for products purchased in the Republic of
Ireland. This Guarantee does not affect your statutory rights.
Your product has the benet of our manufacturer’s Guarantee, which covers the product for
twelve months from the date of purchase.
This gives you the reassurance that if, within that
time, your product is proven to be defective because of either workmanship or materials, we will,
at our discretion, either repair or replace the product at no cost to you.
This Guarantee is subject to the following conditions:
• Documentary proof of original purchase date
is provided.
• Cosmetic damage must be reported within
14 days from the date of purchase.
• The product has been installed and operated
correctly and in accordance with our operating and maintenance instructions.
• The product is used only on the electricity
supply printed on the rating plate.
• The product has been used for normal domestic purposes only.
• The product has not been altered, serviced,
maintained, dismantled, or otherwise interfered with by any person not authorised by us.
• Any repair work must be undertaken by us or
our appointed agent.
• Any parts removed during repair work or any
product that is replaced become our property.
• The product is used in the United Kingdom
or Republic of Ireland.
The Guarantee does not cover:
• Damage resulting from transportation, improper use, neglect or interference or as a
result of improper installation.
88

en
hotpoint.co.uk
• Accidental damage, this includes but is not
limited to, damage which occurs as a result
of an external action.
• Replacement of any consumable item or accessory. These include but are not limited to:
• plugs, cables, light bulbs, hoses, brushes,
covers and lters.
• Replacement of any removable parts made
of glass or plastic.
After Sales Service
No one is better placed to care for your Hotpoint
product during the course of its working life than
us – the manufacturer.
Essential Contact Information
Advice Line
We have a dedicated team who can provide free
advice and assistance with your product if you
experience any technical difculties. Simply call
our Hotpoint Service Hotline on 08448 240 055
(Republic of Ireland 0818 904 041) for telephone
assistance.
Please note:
Our advisors will require the following information:
Model number:
Serial number:
Consumables and Accessories
We supply a full range of consumables and accessories to keep your product functioning efciently throughout its life.
UK: 08448 225 225
Republic of Ireland: 0818 313 413
www.hotpoint.co.uk
down customer costs and minimise material wastage.
Please dispose of packaging and old products
carefully.
Register your new product and get a second
year FREE!
We want to give you additional benets of ownership of your product and offer you an additional
free 1 year guarantee when you register your
product with Hotpoint within 28 days of purchase.
If you do not register your product with Hotpoint
within 28 days, your product is guaranteed for 1
year only.
To activate your 2 year guarantee register with
us online at www.hotpoint.co.uk. Please note that
the 2 year guarantee is only available in UK and
Ireland and is subject to the same conditions as
the 1 year Guarantee. Please refer to the certicate of guarantee for more information.
DISPOSAL OF OLD
ELECTRICAL APPLIANCES
The European Directive 2002/96/EC on
Waste Electrical and Electronic
Equipment (WEEE), requires that old
household electrical appliances must
not be disposed of in the normal unsor
ted municipal waste stream.
Old appliances must be collected separately in order to optimise the recovery
and recycling of the materials they con-
tain and reduce the impact on human
health and the environment.
The crossed out “wheeled bin” symbol on the
product reminds you of your obligation, that when
you dispose of the appliance it must be separately
collected. Consumers should contact their local
authority or retailer for information concerning the
correct disposal of their old appliance.
Recycling and Disposal Information
As part of Hotpoint’s continued commitment to
helping the environment, Hotpoint reserves the
right to use quality, recycled components to keep
99
 Loading...