

Hotpoint RGA524PW4 Owner’s Manual

GEAppliances
©
0
°y..q
Safety Instructions ... 2,4-_
A_gi-dl_ device ..........4, 43, 5l
Operadng lnstr_getions, Tips
A[uminum joi[ ............... l 7
Clock (rod Hm(.:v, ............. J9
77[_-'U*7__Javm7_I<L_"dvauJ_-m. . . .2_5'-2 9
(J_m_................... l b- 27
t_<U<7_g,". ............... l 7, 20
lh'oili_<g:,lh'oi{H_<g'g_Ude ...... 18
Co_medTo_ cookT_g", ...... 22-23
Door/arch .............. 30, 31
ISb_,'*7_ _g_itio_ ......... 16, 49
Lgi'_t bulb r_.jdoce*_m_t ....... 39
Ov_.q__onO'o[ ............... 12
PrelteoU_<7". ................ 77
Pm be ..................... 27
[7oa,sU_g, RoasUn 2"
<g'_u(l(,............l 7, 20, 24-25
S(,Oc(b(mi_g"7_,stvu_tio_,s ,, 3(/- 31
&ek)(_s ................... 16
77meg bakikt<g, .......... 20, 26
7),pc %imatgY_*ine ........... 27
Be ore You
f . Call For
S_v_ee
7"her_tio.stat adfl_.st_*e}_t-
Uoit yo_o:s('(7, ............... 2 7
7"_>ub[e.d_oogD_gdlzs , ....... 52- _5
Preparation
k 7r ac,!]u.s[men[ ............... 50
F[o_(, siz(:' .................. 4 9
Floorh_g"v_d(_v#_er(m2(.: ....... 43
b_,s_'a[[otTo_7_,O'm Ho_,s .... 4#- 5/
k(,v(,gh_g, ................... 50
LP ........................ 51
Consumer Services
GE Answer Center ®800.626.2000
_umb_:s, i ........... Bg_ckCov(.r
ProUud *vGO'otio_ ...... 3, 57, 5_
l.V<_vm_@ ................... 59
JGI, 910
g
.1G1_920
0
cJ
0
oq
(7o_tvo{sefti_<its .............. 9
waw_U_g"zos_e.............. //
Care and Cleaning
Bvoi[(_r/_an and gv'id ......... 3d
Buv_(.'r o,ss(,mb[3' ..........32, 33
th_*'_ev g'mt(,s ................ 34
Co_trol 2(m('7 ............... L_
Cookt@ ................. 34- _5
G&,ss ..................... _5
Pg_*'ge[(U_ .................. 34
Door r(.mov(H'................ 36
Ov(.q_bottom ................ 36
Sdi-([(_(mi_<g"7_s,'vu(,'7o_,s , ,, 3(7- 3 l
SD(4v(.:s..................... 39
l,V(m_7_g"(Irow(.m, ............37
www.ge@pliaszce,s,corn

IMPORTANTSAFETYINFORMAtiON.
READALLINSTRUCtiONSBEFOREUSING.
WARNING!
ANTI-TIPDEVICE
ALL RANGES CAN TIP
INJURY TO PERSONS
COULD RESULT
INSTALL AN_ TIP
DEVICES PACKED WITH
RANGE
SEE INSTALLAtiON
INSTRUCtiONS
WARNING: If the information in this
manual is not followed exactly, a fire or
explosion may result causing property
damage, personal injury or death.
-- Do not store or use gasoline or other
flammable vapors and liquids in the
vicinity of this or any other appliance.
WHAT TODO IF YOUSMELL GAS
Do not try to light any appliance.
Do not touch any electrical switch;
do not use any phone in your building.
Immediately call your gas supplier
from a neighbor's phone. Follow the
gas supplier's instructions.
If you cannot reach your gas supplier,
call the fire department.
-- Installation and service must be
performed by a qualified installer,
service agency or the gas supplier.

GE& You,A ServicePartnership.
IMPORTANT!
Fill out tile ( onsumer Product Registration Card.
Twoeasy ways to registeryour appliance!
• Through the internet at _v.geappliances.com
• Complete and mail the enclosed Product Registration (ard
FORYOURRECORDS
Write the model andserial numbershere:
#
#
You can find them on a label on the flont of the range behind the warming &awer.
Staple sales slip or cancelled check here.
Proof of the original purchase date is needed to obtain se_ice under the w:uramy.
READTHISMANUAL
Inside you will find many helpfid hints on how to use and maintain your range properly.
Just a little preventive care on your part can save you a great deal of time and money _)verthe lite
of your vdnge.
IFYOUNEEDSERVICE
Y_)u'll find many answers to common problems in the Before You Call For Service section.
If you rexiew our chart of Troubleshooting 77psfirst, you may not need to call tin sevvice at all.
If you do need sevvice, you can relax knowing help is only a phone call away. A list of toll-flee
customer sevvice numbers isincluded in the back section of this mamml. Or, y{)ucan ahvays
call the GE Answer Center Pat 800.626.2000, 24 h{)urs a day, 7 days a week.
3

IMPORTANTSAFETYINFORMATION.
READALLINSTRUCTIONSBEFOREUSING.
WARNING!
For your safety the information in this manual must be followed to minimize the risk of fire or explosion,
electric shock, or to prevent property damage, personal injury, or loss of fife.
WARNINGANTI-TIPDEVICE
All ranges can tip and injury could result.
Toprevent accidental tipping of the range, attach it to the waft by installing the Anti--tip device supplied.
Tocheck if the device is installed and engaged properly, carefully tip the range forward. TheAnti--tip
device should engage and prevent the range from tipping over.
If you pull the rmlge out from tire wall for any reason, make sure tire device isproperly engaged
when you push the rangy back against the wall. Ifit isnot, there isa possible risk of the range
tipping over and causing injuU if you or a child stand, sit or lean on an open door.
Please refbr m the Anti-Tip device information in this manual. Failure m take this precaution
could result in tipping of the range and injuU.
IMPORTANTSAFETYNOtiCE
The California Safe Drinking Water and Toxic Enforcement Act requires the Governor of California to
publish a list of substances known to the state to cause birth defects or other reproductive harm, and
requires businesses to warn customers of potential exposure to such substances.
Gasappliances can cause minor exposure to four of these substances, namely benzene, carbon
monoxide, formaldehyde and soot, caused primarily by the incomplete combustion of natural gas or
LP fuels. Properly adjusted burners, indicated by a bluish rather than a ye#ow flame, will minimize
incomplete combustion. Exposure to these substances can beminimized by venting with an open
window or using a ventilation fan or hood.
Fluorescent light bulbs and safety valves on standing pilot ranges contain mercury. If your model has
these features, they must be recycled according to local, state and federal codes.
SAFETYPRECAUtiONS
Have the installer show you the location of the range gas shut-off valve and how to shut it off if
necessary.
Have _xmr range installed and properly
gTounded by aqualified installer, in
accor, lance with the Installation Instnlctions.
Any adjusmmnt mid se_ice should be
pe_tbrmed only by qualified gas range
installers or service technicians.
Do not attempt to repair or replace any part
of your range unless it is specifically
recommended in this manual. All other
serxice should be referTed m a qualified
technician.
Ph|g your range into a 120-volt gTounded
outlet only. Do not remove fire r_)t|nd
gTounding prong from the plug. If in (Mubt
about the gTounding of the home electrical
system, it isyour personal responsibility and
obligation to have an ung_mnded outlet
replaced with a pr_)perly g_mnded, three-
prong outlet in accordance with the National
Electrical Code. Do not use an extension
co_,l with this appliance.
4

SAFETYPRECAUTIONS
I,ocate the range out of kitchen traffic path
and out of (Daffy locations to prevent pilot
outage (on standing pilot models) and poor
air circulation.
Be sure all packaging materials are removed
fi_ml the range 1)effete operating it to prevent
tire or smoke damage should the packaging
material ignite.
Be sure your range is correctly a(!justed by a
qualified sere'ice tedmician or installer f{_r
the t}_)e of gas (natural or I2) that is u_ be
used. Your range can be converted f{_ruse
with either t}_oe of gas. See the Installation of
the range section.
WARNING: These a(!justments nmst be
made by a qualified sere'ice technician in
accoi,lance with the manufacturer's
instructions and all codes and requirelnents
of the authority having jurisdiction. Failure to
fk_llow these instructions could result in
serious in jur?_or property damage. The
qualified agency pe_tk_rming this work
assumes responsibility fk_rthe conversion.
After prolonged use of a range, high floor
temperatures may result and many floor
coverings will not withstand this kind of use.
Never install the range over vinyl tile or
linoleum that cannot withstand such b_e of
use. Never install it directly over interior
kitchen carpeting.
Do not leave children alone or unattended
where a range is hot or in operation. They
could be seriously burned.
Do not allow anyone to climb, stand or hang
on the oven door, storage drmver, warming
drms_r or cooktop. They could damage the
range and even tip it over, causing severe
personal in jur?_.
CAUTION: Items ofinterest to children
should not be stored in cabinets above a
range or on the backsplash of a range-
children climbing on the range m reach
items could be seriously injured.
For 3_mr safety, never use your appliance
f(_rwarming or heating the room.
Never wear loose fitting or hanging garments
while using the appliance. Be carefid when
reaching f{_ritems stored in cabinets over the
range. Flammable material could be ignited
ifbrought in contact with flame or hot oven
smtaces and may cause severe burns.
Do not store flammable materials in an oven,
a range storage drawer, a warming drawer or
near a cooktop.
Do not store or use combustible materials,
gasoline or other flammable vapors and
liquids in the vicinity of this or any other
appliance.
Do not let cooking g_ease or other
flammable materials accumulate in or near
the range.
Do not use water on gTease tires. Never pick
up a flaming pan. Turn the controls off.
Smother a flaming pan on a su_hce burner
by covering the pan completely with a well-
fitting lid, cookie sheet or flat uay. Use a
multi-purpose dry_chemical or f0am-t}i)e fire
extingafisher.
Flaming g_ease outside a pan can be put out
by covering it with baking soda or, it
available, by using a multi-purpose (h) _
chemical or fkmm-type fire extingadsher.
Flame in the oven or wanning drawer can be
smothered completely by dosing the oven
door or (kawer and turning the conrail to ofl
or by using a multi-purpose dU chemical or
f{mm-type fire extingafisher.
Let the burner gTates and other surfaces cool
bef()re touching them or leaving them where
children can reach them.
Never block the vents (air openings) of the
range. They provide the air inlet and outlet
that are necessa U fi_r the range to operate
pmpeliy with correct combustion. Air
openings are located at the rear of the
cooktop, at the top and bottom ofthe oven
door, and at the bottom of the range under
the wmming drawer, storage drawer or kick
panel.

IMPORTANTSAFETYINFORMATION.
READALLINSTRUCTIONSBEFOREUSING.
A WARNING!
SURFACEBURNERS
Use proper pan size--avoid pans that are unstable or easily tipped. Select cookware having flat bottoms
large enough to cover burner grates. Toavoid spillovers, make sure cookware is large enough to contain
the food properly. This will both save cleaning time and prevent hazardous accumulations of food, since
heavy spattering or spillovers left onrange can ignite. Usepans with handles that can be easily grasped
and remain cooL
Always use tire LITE position (on electric
ignition models) or dre HI position (on
standing pilot models) when igniting the top
burners and rnal<e sure file burners have ignited.
Never leave tile smtace burners unattended
at higil flame settin D. lk)ilove_s cause smoking
and g_,easy spillovers that m W catch on fire.
A(!just tile mp burner flame size so it (bes
not extend be>rod tile edge of the cookwar,e.
Excessive flame is hazardous.
Use only d_Tpot hoMers- moist or damp pot
holders on hot surfaces m W r,esult in burns
fi_)m steam. Do not let pot hoMers come
near open flames when lifting cookwar,e. Do
not use a towel or other bulky dotb in place
of a pot holder.
_qmn using glass cookware, make sure it
is designed for top-ot:range cooking.
To minimize the possibility ofburns, ignition
of flammable materials and spillage, turn
cookwar,e bandies mwa_d tile side or back
of the range without extending over a(!jacent
burners.
Carefully watdl foods being flied at a high
flame setting.
Always heat fat slowly, and watch as it heats.
Do not leave any items on tile cooktop. Tile
hot air fi_)nl tile vent may ignite flammable
items and will increase pr,essur,e in closed
containers, which may cause them to burst.
Ifa combination of oils or fats will be used in
flying, stir uNether befbr,e heating or as fats
melt slowly.
Use a deep fat themlometer whenever
possible u_ prevent overheating fat beyond
tile smoking point.
Use tile least possible amount offat for
efIective shallow or deep4at flying. Filling the
pan mo full offat can cause spillovers when
fbod is added.
Do not use awok on dm cooking smtace if
tile wok has a round metal ring that isplaced
over tile burner grate to support tile wok. This
ring acts as a heat trap, which m Wdamage
tile burner gTate and burner bead. Also, it
m W cause tile burner m wofl<improperly.
This may cause a carl)on monoxkle level
above that allowed by current standards,
resulting in a health hazard.
Foods fbr fiTing should be asd U as possible.
Frost on fi_zen R_ods or moismr,e on fresh
foods can cause hot fat m bubble up and
over tile sides of tile pan.
Never uy m move a pan of hot fat, especially
a deep fat flyer. Wait until tile fat is cool.
Do not leave plastic items on the cooktop-
they mW meh if left too dose to the vent.
Keep all plastics away from tile smtace
burners.
To avoid the possibility of a burn, aMays be
certain fllat tile controls R_rall burners are
at the OFFposition and all grams are cool
befbr,e attempting m remove them.
ifrange islocated near a window, do not
hang long curtains that couM blow over tile
smtace burners mid create a fire hazard.
If>)u smell gas, turn off tile gas to tile rang,e
and call a qualified service teclmician. Never
use an open flame to locate a leak.
Alx_%vsmrn tile surface burner conmfls off
l)efk_r,eremoving cool<ware.
V_qmn flaming fbods are under tile hood,
mrn the fan ottL The fan, ifoperating, may
spr,ead the flames.
WARNING!
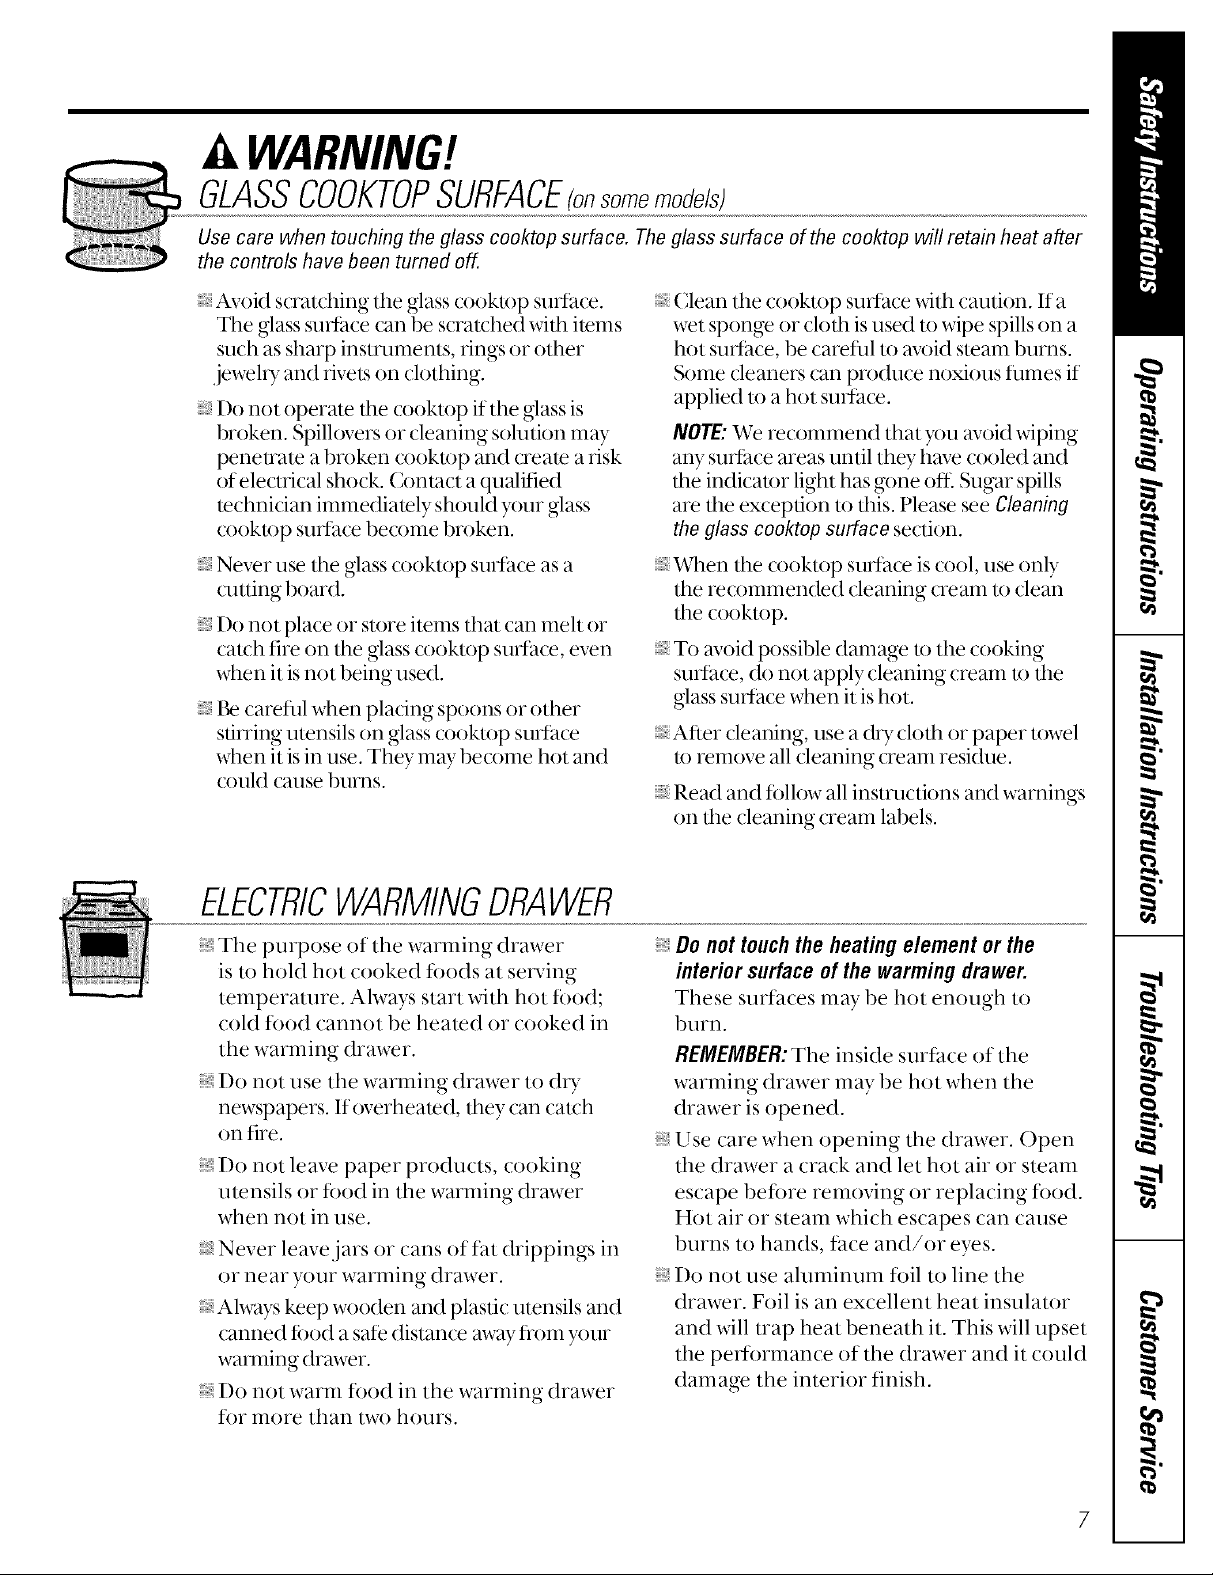
GLASSCOOKTOPSURFACE(onsomemode/s
Use care when touching the glass cooktop surface. The glass surface of the cooktop will retain heat after
the controls have been turned off.
Avoid scratdling tile glass cooktop smiace.
The glass smihce can be scratched with items
such as sharp instruments, rings or other
jewelry and rivets on dothing.
Do not operate dm cooktop if tim glass is
broken. Spillovers or cleaning solution may
penetrate a broken cooktop and create a risk
of electrical shock. Contact a qualified
teclmician immediately should your glass
cooku)p smiace become broken.
Never use file glass cooktop smth(:e as a
oating board.
Do not place or store items that can melt or
catch fire on tim glass cookmp smiace, even
when it is not being used.
Be carefld when placing spoons or other
sdrTing utensils on glass cooku)p smlace
when it is in use. They may become hot and
could cause burns.
(;lean tim cooktop smiace with caution. If a
wet sponge or cloth is used to wipe spills on a
hot smthce, be careful to avoid steam bums.
Some deaners can produce noxious fumes if
applied u) a hot snrlace.
NOTE: We recommend that mu avoid wiping
any smihce areas until they l_ave cooled and
the indicator light has gone ore Sugar spills
are the exception m this. Please see CIoaning
the glass cooktop surface section.
V_qmn tim cooktop smlace is cool, use only
the recommended cleaning cream m dean
the cookmp.
To avoid possible damage to tim cooking
smiace, do not apply cleaning cream to the
glass smlace when it is hot.
After cleaning, use a (h T clofll or paper tox_l
to remove all deaning (:r_am residue.
Read and follow all instructions and warnings
on the cleaning cream labels.
ELECTRICWARMINGDRAWER
The purpose of tim warming drawer
is to hold hot cooked fbods at sers'ing
temperature. Always start with hot food;
cold tood cannot be heated or cooked in
tim warming drawer.
Do not use the warming drm_r to dr T
newspapers. If overheated, they can cau:h
on fire.
Do not leave paper products, cooking
umnsils or food in the warming drawer
when not in use.
Never leave jars or cans of fat drippings in
or near your warming drawer.
Alx_ys keep x_x_oden and plastic utensils and
canned f_od a safe distance away from your
wamfing drinker.
Do not warm food in the warming drawer
for more than two hours.
Do not touch the heating element or the
interior surface of the warming drawer.
These surfaces may be hot enough to
burn.
REMEMBER: The inside surtace of tim
warming drawer may be hot when the
drawer is opened.
Use care when opening tim drawer. ()pen
tim drawer a crack and let hot air or steam
escape before removing or replacing f?)od.
Hot air or steam which escapes can cause
burns to hands, face and/or eyes.
Do not use aluminum f()il to line tim
drawer. Foil is an excellent heat insulator
and will trap heat beneath it. This will upset
the pe_t?)rmance of the drawer and it could
damage the interior finish.
IMPORTANTSAFETYINFORMATIONo
READA£LINSTRUCTIONSBEFOREUSING.
COOKMEATANDPOULTRYTHOROUGHLY...
Cookmeatandpoultry thoroughly--meat to atleast anINTERNALtemperatureof 160°Eandpoultryto at least an
INTERNALtemperatureof 180°ECookingtothese temperaturesusuallyprotectsagainstfoodbomeillness.
OVEN
Stand away from the range when opening the door of a hot oven. The hot air and steam that escape can
cause burns to hands, face and eyes.
Do not use tire oven for a storage area. Items
stored in dre oven can ignite.
Keep tire oven flee tiom g_ease buildup.
Place tire oven shelves in the desired position
while tire oven is cool.
Pulling out tire shelf to the stop-lock is a
convenience in lifting hem T foods. It is also
a precaution against bums tiom touching
hot su_taces of tire door or oven walls. Tire
lowest position "R" is not designed to slide.
Do not heat unopened food containers.
Pressure could build up and the container
could burst, causing an i_!juU.
Never use aluminum foil to line tire oven
N)ttom. Improper use of ff)ilcould start a fire.
Do not use aluminum R)il anDvhere in tire
oven except as described in this manual.
Misuse could result in a fire haza_xl or
damage m the range.
SELF-CLEANINGOVEN
_qren using cooking or roasting bags in dre
oven, follow the manufacturer's directions.
Do not use your oven to dU newspapers.
Ifoverheated, they can catch fire.
Use only glass cookware that is
recommended for use in gas ovens.
_Always remove tire broiler pan fiom range as
soon as xxm finish broiling. Grease lef*in the
pan can catch fire ifoven is used without
removing the g_ease from the broiler pan.
V_qmnbroiling, if meat is too close to tire
flame, the fat mW ignite. Trim excess fat to
prevent excessive flare-ups.
Make sure tire broiler pan is in place cor_ecdy
m redu(:e tire possibility of g_ease fires.
Ifgin should have a gTease fire in tire broiler
pan, press the CLEAR/OFFpad,and keep
the oven door closed to contain fire until
it burns out.
Be sure to wipe up excess spillage befbre
selt:cleaning operation.
lk_fbre selfZcleaning the oven, remove
the shelves, broiler pan, g_id and
other cookware.
Do not clean the door gasket. Tire door
g_asketisessential R_ra good seal. Care
should be taken not m rub, damage or
move fire gasket.
Cleml only pans listed in dlis Oxmer's Manual.
If dm sell:cleaning mode malfunctions, turn
the oven off and disconnect the power supply.
Have it sets'iced by a qualified technician.
Do not use oven cleaners. No commercial
oven cleaner or oven liner of any kind should
be used in or around any part of the oven.
Residue fi_m oven cleaners will damage
the inside of the oven when the sell:clean
Qvle is used.
Readandfollow this SafetyInformationcarefullF
SAVETHESEINSTRUCTIONS
8

Usingthegassurfaceburners.
Throughout this manual, features and appearance may vary from your model
How to Light a Gas Surface Burner
Push the control knob in and turn it
to the LITEposition.
Push [he ( ormo] knob in and turn it to the
UTEposidon.
You will heara little clickflgl noise--die
sound of the electric spark igniting the
burner.
Turf1 tile knob t(1adjust tile flame size.
If die knob sm) s at UTE, h _dl] (:omirme
t(1 (:lick.
Sealed GasBurners
When one burner is turned to LITE all
the bm hers spmk. 1-)onot attempt to
disassemble o1 (lear_ around ar_yburner
while anodler bmner is (m Ar_ele( _ri(
shock may result, which could cm_seyou
to knock over hot cookwme.
The smaller burner (right rear position) will
We the best simmer resuhs, It offers predse
cooking pefibrmance fi/r delicate fitods,
such as statues or fi)ods which need to cook
over low heat fi)r a long time. It can be
turned (ht_/o a vet) htw simmer setting.
How to Select Name Size
Forsafe handling of cookware, never let the flames
extend up the sides of the cookware.
Watch the flame, not the knob, as you
reduce heat. The tlmne size on a gas burner
should match the cookware you are using.
In Case of Power Failure
In case of a power tailure, you can light the
gas suflace burners on your range with a
mauh. Hold a lit match to the burner, then
push in and turn tile conuol knob tl1the
LITEposition. Use extreme caution when
lighting burners this way.
The largest burners are higher powered
than the others and will bring liquids to a
boil quicker.
Anyflame larger than tile bottom of the
( ookwate is wasted and only serves to heat
the handle.
Surface burners in use when an electri(al
power f:,filure occurs _dll continue to
operate normally.
Before Lighting a Gas Burner
:_If drip pans are supplied with yt_urrange,
they should beusedat all dines.
;_Make sure all grates on the range are in
place betore using any burner.
After Lighting a Gas Burner
:_ Do not operate the burner fi)r an
extended period of time without
cookwme on the grate. The finish on
tile grate may chip without cookwme
to absorb the heat.
Be sure the burners and grates are cool
befi)re you place your hand, a pot holder,
cleaning cloths or other materials on
thetn.

Usingthegassurfacebwnem(cont.),
Top-of-Range Cookware
Aluminum:Medium-weight cookwme is
recommended because it heats quickly
and evenly. Most ioods br()wn exvnly in an
aluminum skillet. Use saucepans with figh/-
fitting lids when cooking with minimum
aIIIOllIltSof water.
Cast-Iron: If heated slowly, most skillets xdll
give satisfhcto_y resuhs.
Enamelware: Under some conditions,
the enamel of some (ookware may meh.
Follow cookware illanufacttliei"s
recommendations ti)r cooking methods.
Stove TopGrills
Do not use stove lop grills on y()m sealed
gas burners. If you use the st()ve top grill
on the sealed gas burner, it will cm_se
incomplete combustion and can resuh
in exposure to carbon monoxide levels
above allowable olnent standmds.
Thiscan be hazardousto yourhealth.
Glass:There me two Upes of glass
cookwme-those fi)r oven use only and
those tbr top-of range cooking (sm_cepans,
coffee and teapo/s). (;lass con&_cts heat
veU slowly.
HeatproofGlassCeramic:Can be used fi)r
dther suflilce or oven cooking. It conducts
heat veU slowly and cools xv U slowly. Check
cookwme manufitcmrer's directions to be
sure it can be used on gas ranges.
StainlessSteer This metal alone has poor
heating properties and is usually combined
with copper, ahHninum or other metals fi)r
impr()ved heat disuibufion. ( ombinafion
me/al skillets usually work safislimtorily if
they are used _dth me(fium heat as the
manuthcmrer recommends.
Use a fiat-bottomed wok.
10
Wok This Way
We recommend filat Vouuse a fiat-bottomed wok.
Theyareavailahleatyourlocalretailstore.
()n]y a fla_-bo_omed wok should be used
1-)ono_ use a fla_>bot_omed wok wi_]_ a
wok holdeL
Do no{ 11se a _]a{-boHome(] wok on a
suppov{ _Ting.P]a( ins d_e ring over d_e
b!llTneY017g-_a_emay (ause d_e blll'neF
to work impvope;ly, ;esuidng in carbon
monoxide levels above allowable cu;rem
s_andmds.This (ould be dange;ous _o
yore heahh.
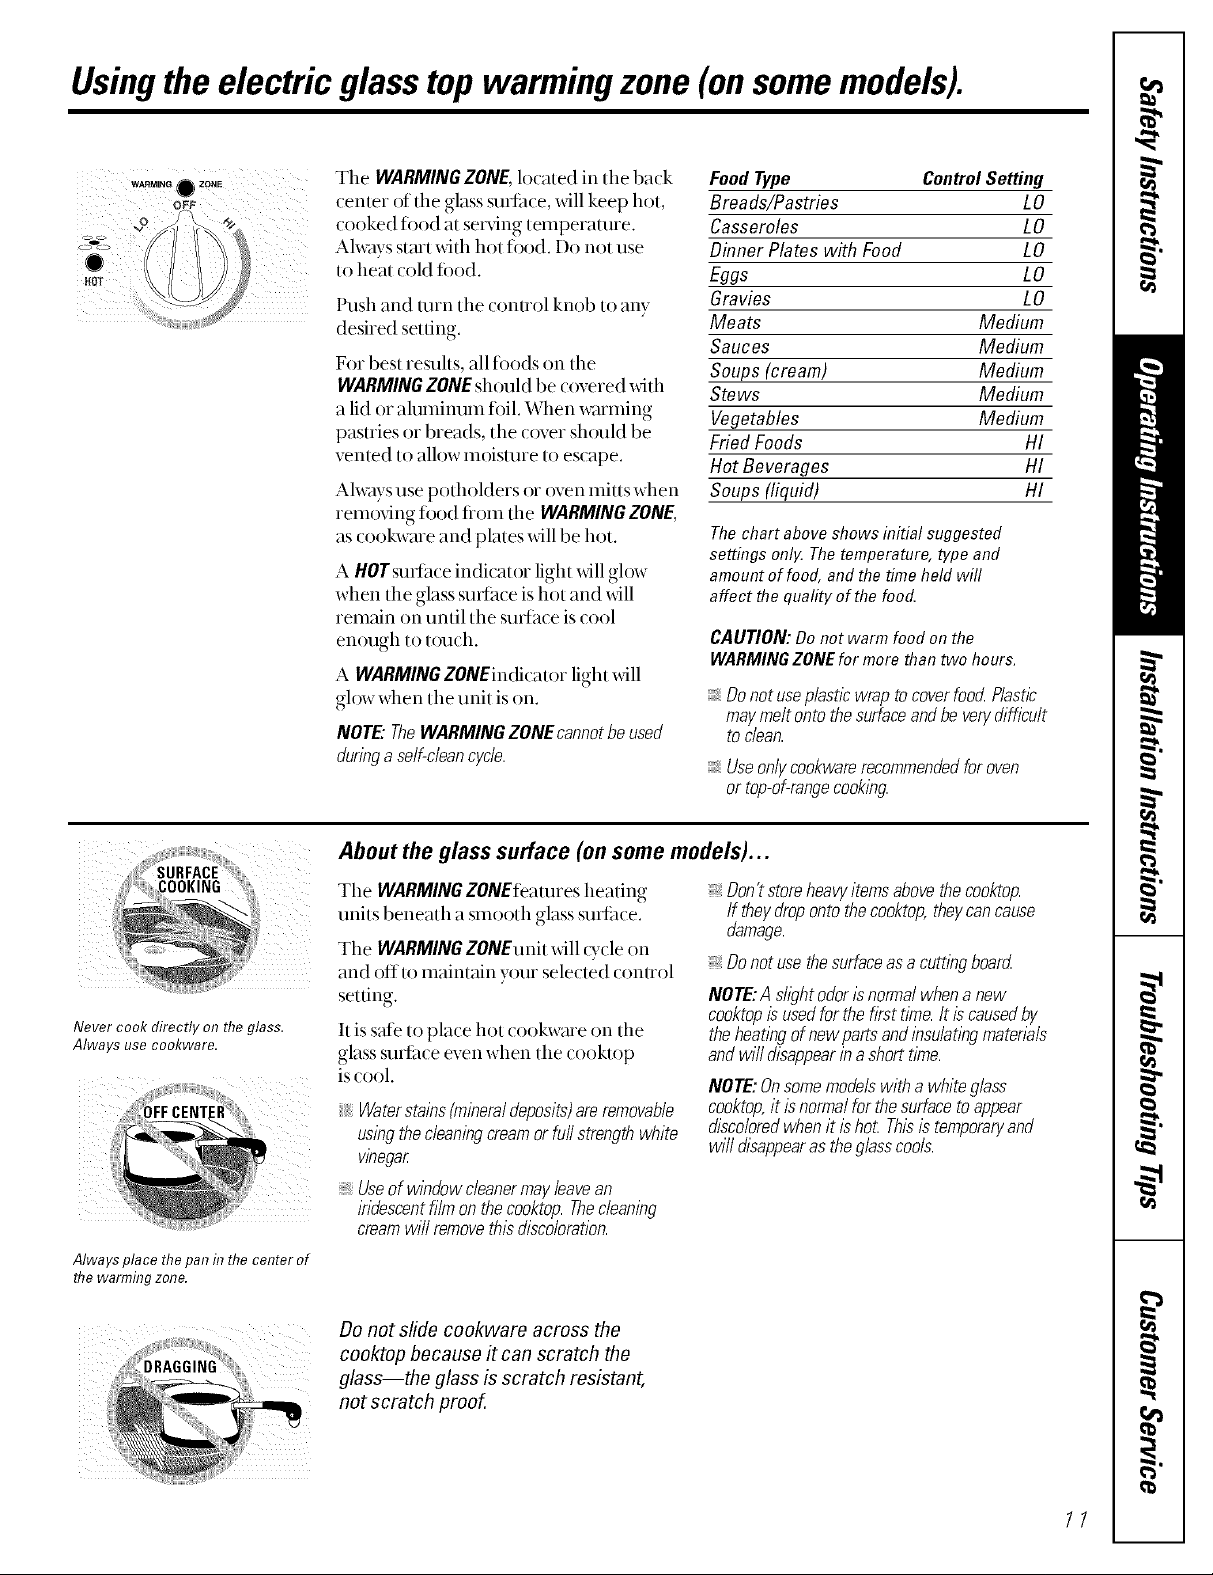
Usingthe electric glass top warmingzone (onsomemodels).
The WARMINGZONE,located in tile back
center of the glass surlitce, xdll keep hot,
cooked fi)od at serving temperature.
Ahvays stmt _itll hot fi)od. Do not use
to heat cold fi)od.
Push and turn tile control knob to any
desired setting.
For best resuhs, all fi)ods on tile
WARMINGZONEshould be covered with
a lid or ahmfinum ti)il. When warming
pastries or breads, the c{)vershould be
vented to allow moisture to escape.
Ahvays use pofllolders or oven mitts when
removing food tiom the WARMINGZONE,
as cookware and plates will be hot.
A HOTsufface indicator light willglow
when the glass sufihce is hot and will
remain on until tile surlhce is cool
enough to touch.
A WARMINGZONEin(ficatorlight will
glow when the unit is on.
NOTE: TheWARMING ZONE cannotbe used
duringa self-cleancycle.
Food Type Control Setting
Breads/Pastries L0
Casseroles LO
Dinner Plates with Food LO
Eggs LO
Gravies LO
Meats Medium
Sauces Medium
Soups (cream) Medium
Stews Medium
Vegetables Medium
Fried Foods HI
Hot Beverages HI
Soups (liquid) HI
The chart above shows initial suggested
settings only The temperature, type and
amount of food, and the time held will
affect the quality of the food.
CAUTION: Do not warm food on the
WARMINGZONE for more than two hours.
Donot useplastlewrap tocover food Plastic
may melt onto thesurface and be verydifficult
to clean.
Useon/}/cookwarerecommendedfor oven
ortop-of-rangecooking.
Never cook directly on the glass.
Always use cookware.
Always place the pan in the center of
flTewarming zone.
1
About the glass surface (on some models)...
Tile WARMINGZONEfeatures heating
units beneath a smooth glass surlilce.
Don'tstoreheavyitemsabovethecooktop.
If theydropontothecooktop,theycancause
damage.
The WARMINGZONEunit will Q,cle on
and off to maintain your selected control
setting.
Donot use thesurfaceas a cutting board
NOTE:AshghtodorIsnormalwhenanew
cooktopisusedforthefirst time.Itiscausedby
It iss_d_'to place hot cookw_ue on the
glass SUltilce even wllen tile cooktop
is cool.
Waterstains(mineraldeposits)areremovable
usingthecleaningcreamor fu//strengthwhite
wnegar
theheatingofnewpartsandinsulatingmaterbls
andwilldisappearinashorttime.
NOTE:Onsomemodelswithawhiteglass
cooktop,itisnormalforthesurfacetoappear
discoloredwhenit ishoLThisistemporaryand
willdisappearastheglasscools.
, Useofwindowcleanermayleavean
Yidescentfilmonthecooktop.Thecleaning
creamwillremovethisdiscoloration.
Do not slide cookwara across the
cooktop because it can scratch the
glass--the glass is scratch resistant,
not scratch proof.
11

Usingthe oven controls.
Throughout this manual, features and appearance may vary from your model
o
OvenControl, Clock and TimerFeatures and Settings
SELFCLEANPad
0
Touch tllis pad to select the self-cleaning
hmction. Seetile Usingthe self-cleaning
ovensection.
PROBEPad (on some models)
Touch this pad when using the probe to
cook food to the desired internal
temperature.
O BAKEPad
Tou(h this pad to sele(t tile bake fim(tion.
O BROILHI/LO Pad
Tou(h tiffs pad to sele(t tile broil fim(tion.
O CONVECTIONROASTPad
Tou(h tiffspad to sele(t roasting with tile
convection fimction.
o isplay
Showsthe lime ofday, oven temperature,
whether the oven is in the bake, broil,
convecdon, or self cleaning mode and
the dines set fin the timer or mnomafic
)yen ope_vnions.
If "f- anda numberorletter"flashinthedisplayandthe
ovencontrolsigna&thisindicatesa functionerrorcode.
If yourovenwassetfora tYnedovenoperationand
apoweroutageoccurred,thedockandaftprogrammed
functionsmustbereseL
ThetYneof daywill flash inthe display whenthere has
beena power outage.
If "Err"appears in the &splay, youhave tried toset a time
or temperatureoutsideof the control's bruits.Press
CLEAR/OFFandentera new setting.
o CLOCKPad
Tou(h this pad before setting tile (lo( k.
O OOKING TIME Pad
Tou(h this pad and then touch the number
pads u) set the alllount of time y_)uw:mt
your tood to cook. The oven willshut off
when the cooking time has mn out.
O ELAYSTARTPad
Use along wifll COOKINGTIMEor SELF
automatically at a time you set.
TOPLIGHT Pad
Touch this pad to turn tile stnfa( e light on
or off.
OVENLIGHT Pad
Touch tiffspad to mrn tile oven light on
or off.
STARTPad
Must be t_nwhed to slm't any cooking or
cleaning fimction.
KITCHEN TIMERON/OFFPad
T{mch this pad 1oselecttile timer feature.
Number Pads
Use to set any flmction requiting numbers
such as the time of day on the clock, the
timer, tile oven temperature, the internal
ti)od temperature, tile start time and
length of operation for timed baking
and self cleaning.
CONVECTIONBAKE Pad
Touch this pad to select baking with the
convection flmction.
O CLEAR/OFFPad
Touch this pad to cancel ALLoven
operations ex(ept tile (lo(k and timer.
CLEANpads u) set tile oven to start and slop
12

Special featuresofyourovencontrol
Yournew touch pad control has additional features that you may choose to use. The following are the features
and how you may activate them.
Thespecial feature modes can only be activated while the display is showing the time of day. Theyremain
in the control's memory until the steps are repeated.
When the display shows your choice, touch the STARTpad. Thespecial features will remain in memory after
a power failure.
12 Hour Shut-OH
i BAKE _ththisfeature, shouldyouforgetandleavethe []
I@
ovenon, thecontrol will automaticallyturn off the
ovenafter 12hours duringbaklbgfunctions or
after 3 hours dunbga broil function.
If you wish to turn OFFthis featuie, follow
the steps below.
[] Touch tile BAKE and BROILH!/LO
pads at the same tilne for 3 seconds
until the display shows SF
Fahrenhe# or Celsius Temperature Selection
Yourovencontrol isset to use the Fahrenheit
temperatureselectionsbut youmay changethis
to use theCelsiusselections.
[] Touch tile BAKE and BROILH!/LO
pads at the same tilne for 3 seconds
until tile display shows SE
Touch the DELAYSTART pad. The
display xdll show 12shdn (12 hour
shut-off). Touch the DELAYSTART
pad again and tile (fisplay xdll show
no shdn (no shut-off).
Touch the START pad to activate tile
[]
no shut-offand leave the control
set in this special i_'atures mode.
[] Touch tile BROILHI/LO pad. Tile
display will show F (Fahrenheit).
[] Touch tile BROIL HI/LO pad again.
The display xdll show C ((eMus).
[] Touch tile START pad.
i!i/ _ i
Tonesat the Endof a Timed Cycle
At the end of a tinnedcycle,3 shortbeeps will
soundfollowed byone beepevery 6 secondsuntil
the CLEAR/OFFpadis touched Thiscontinual 6
secondbeepmay be canceled
To cancel tile 6 second beep:
[] Tou(h the BAKE and BROILH!/LO
pads at tile same time tbr 3 se(onds
until tile display shows SF
Touch tile KITCHENTIMERON/OFF
[]
pad. The display shows CONBEEP
(continual beep). Touch tile
KITCHENTIMERON/OFFpad
again. The display shows BEEP.
(This cancels the one beep
eveI y 6 seconds.)
[] Touch tile START pad.
13

Special featuresofyourovencontrol(cont.).
Control Lockout(on some models)
! i ¸
CONTROL LOCKOUT
Yourcontrolwillallowyoutolockoutthetouch
padssotheycannotbeactivatedwhentouched
orc/eanlbgtheglasspanel.
To lock tile conuols:
[] Touch tile 9 and 0 tou(h pads at the
s_une time f(n 3 seconds until the
( (muol beeps txd(e. The display xdll
show LOCcontinuously and the time
of day if not bla( ked out.
NOTE"A//cooklbgandtYningfunctionsw#/be
cancelledwhenlockingoutthecontrol
[] To unlock the control, touch the
9 and 0 touch pads at the same time
for 3 seconds until the control beeps
twice, and LOCwill be removed tiom
the display.
COOKING
TIME
12Hour,24 Hour or Clock Black-Out
Yourcontrol/ssettousea 12hourdock.
Ifyou would preter to have a 24 hour
milita U time (lo(k or 1)lack-out the (lo(k
display, fi)llow the steps below.
[] Tou(h the BAKEand BROILHI/LO
pads at the same time fi)r 3 se(onds
until the display shows SE
[] Touch tile CLOCKpad once. The
display xdll show 12hr. If this is
the (hoice you want, tou(h tile
STARTpad.
Cook and Hold
Yournewcontrolhasacookandholdfeaturethat
keepscookedfoodswarmforupto3hoursafter
thecooklbgfunctionis flbished
This feature can only be used when timed
(ooking.
To activate this teature, fi)llow tile steps
below.
[] Touch tile BAKEand BROILHI/LO
pads at the same time for 3 seconds
until tile display shows SE
Touch the CLOCKpad again to change
to tile 24 hour militmy time clock. The
display will sh{)w 24 hr. If this isthe choice
y_)uw:mt, u)uch the STARTpad.
Touch the CLOCKpad again to black-out
the clock display. The display will sh{)w
OFF.If this isthe choice you want, touch
the STARTpad.
NOTE"If theclockisintheblack-outmodeyou
wi//notbeabletousetheDelayStartfunction.
[] Touch the COOKINGTIME pad. The
display will show HidOFF.
Touch the COOKINGTIMEpad again
to activate tile feature. The display
will show Hid ON.
Touch tile STARTpad to activate
[]
tile cook and hold l[eature and
leave the contxol set in this special
t_'atures mode.
14

Notes.
15

Usingthe oven.
Toavoid possible burns, place the shelves in the desired position before you turn the oven on.
Before yeu begin...
dl
The oven has 5 shelf positions.
It also has a special low shelf
position (R)for extra large items,
such as a large terke,A
Plastic items on the cooktop may
melt if left too close to the vent.
Vent appearance and location vary.
The she]_es have su)p-]ocks, so dlat _dlen
ply( ed (one(tl)on the supports, they vdll
stop before coming (ompletely out, and will
m)t till.
When placing and remo,Ang (ook_are,
pull the shelf om to tile bmllp on tile shelf
support.
Oven Vent
Y(_m ()yen isvented through (h_cls at tile
rear of the range. Do not block these ducls
when cooking in the oven-it is important
that the flow of hot air flom the oven and
flesh air to the oven burner be
uninten_upted. Av_)id t()uching the vent
openings or nembv surfaces during oven or
broiler operation-they may become hot.
Toremove a shelf, pull it to_ard you tih the
fiom end up and pull it out.
Toreplace, pl _(:edie end of die shelf (su)p-
locks) on die support, tilt up die fiom and
NOTE:Theshelfisnotdesl_,nedtosMe outatthe
speciallowshelf(ill position.
_,Handlesofpotsandpansonthecooktopmay
becomehotif lefttooclosetothevenL
:_Donotleavep/astleitemsonthecooktop--they
maymeltifleft toodoseto theven£
:_Donot/eaveanyitemsonthecooktop.Thehot
ak fromtheventmayigniteflammableitemsand
wi//increasepressureindosedcontainers,which
maycausethemtoburst.
;;;;;;_,Metalitemswi//becomeveryhotif theyareleft
onthecooktop,andcouldcausebums.
Power Outage
CAUTION:Donotmakeanyattempttooperatethe
e/ectrleignitionovendunbgane/ectrlea/power
failure.
Tile oven or broiler cannot be lit during a
power failure. Gas _fill not flow unless tile
glow l)ar is hot.
Oven Light
Touch the OVENLIGHTpad on the upper
(ontrol panel to turn tile light on or off.
If the oven is in use when a power Ltilure
oc(urs, tile oven burner shuts offand
cannot be re-lit until power is restored. This
is becm_se the flow of gas is mm)matically
stopped and will not resume when power is
restored until the glow bin has reached
operating temperature.
16

How to Set the Oven for Baking or Roasting
The oven has a special low shelf (R)
position just above the oven bottom.
Use it when extra cookhTgspace is
needed, for example,when cooking
a large turkey. Theshelf is not
designed to sfide out at this position.
[] Touch the BAKEpad.
[] Touch tile number pads to set tile
desired temperature.
[] Touch the STARTpad.
The word ON and 100°will be displayed.
As the oven heats up, the display will show
the changing tempex>mne. When the oven
reaches the temperature y{)uset, a tone will
SOtlnd.
Tochangethe oven temperaturedunng BAKEcycle,
pressthe BAKEpad and then thenumberpads to
get thenew temperature.
[] (_heck t_od for doneness at minimum
rune on redpe. Cook hmger if
net essal)e
[] Touch the CLEAR/OFFpad when
cooking is con]plete.
Preheating and Pan Placement
Preheat the {)yenif tile recipe calls fi)r it.
To preheat, set the oven at the conect
temperature. Preheating is necessa U
when convection baking and ti)r good
resuhs when baking cakes, cookies, past U
and breads.
Forovenswithoutapreheatindicator/l_?htor tone,
preheat10minutes.
Typeof Food Shelf Position
Frozenpies(oncookiesheet) BorC
Angelfoodcake, A
bundtorpoundcakes
Biscuits,muffins,brownies, C
cookies,cupcakes,
layercakes,pies
Casseroles BorC
Roasting RorA
Baking resuhs will be better if baking pans
me centered in the oven as IIlllch as
possible. Pans shouM not t()uch each other
or the walls of the oven. Ifyou need to use
two shelves, stagger the pans so one isnot
directly ab()ve the other, and leave
approximately 1V/'belween pans, fiom
the fiont, back and sides r)f the wall.
Cut slits in the foil just like the grid.
Aluminum Foil
Never cover the oven bottom with
ahmfinum ti)il.
You can use ahnninum ti)il to line the
broiler pan and broiler grid. However, you
nmst rooM the ti)il tightly to the grid and cut
slits in itjust like the grid.
Oven Moisture
As your oven heats up, the temperature
change of the air in the {)yen may cruise
water droplets to finm on the door glass.
These droplets are hmmless and will
evaporate as the oven continues to heat up,
Aluminumfoilmayalsobeusedtocatchaspillover
Never entirely cover a shelf with ahnninum
fi)il. This willdisturb tile heat circulation
and resuh in poor baking.
A smaller sheet of foil may be used to catch
a spilh)ver by plating it on a h)wer shelf
several in(hes beh)w the fi)od,
17

Usingtheoven(cont.).
How to Set the Oven for Broiling
[] Place tile meat offish on the broiler
grid in the broiler pan.
Always use the broiler pan and grid
that came with your oven. It is
designed to minimize smoking and
spattering by trapping juices f17the
shielded lower part of the pan.
[] Follow suggested shelfposiuons in the
BroilingGuide.
[] The oven door must be closed during
broiling.
[] Touch the BROIL HI/LO pad on(e for
HI Broil.
To change to LO Broil, tou(h the BROIL
HI/LOpad again.
Broiling Guide
The size, weight, thickness,
starting temperature, and Food
y()llI" piet_'ien(e of Bacon
doneness will affect broiling
times. This guide is based GroundBeef
on meats at refiigerator WellDone
temperature.
?The U.S. Department of Agriculture
says "Rare beef is popular, but you
should know that cooking it to only
140°F.means some food poisonhTg
organisms may survive." (Source:
Safe Food Book YourKitchen
Guide USDARoy. June 1985.)
Beef Steaks
Raret
Medium
WellDone
Raret
Medium
WellDone
Chicken
LobsterTails
FishFillets
HamSlices
srec00ked}
Pork Chops
WellDone
LambChops
Medium
WellDone
Medium
WellDone
Quantityand/
orThickness
1/2lb.
(about8tbin slices)
1lb. (4patties)
1/2to 3/4" thick
1" thick
1to 1> Ibs.
1X" thick
2 to 2_ Ibs.
1whole
2 to 2X Ibs.,
split lengtbwise
4 bone-inbreasts
24
6to 8 oz.eacb
1/4to I/2" thick
1" thick
1/2"tbick
2 (1/2" thick)
2 (I" thick) about 1 lb.
2 (1" thick) about 10
to 12oz.
2 (I>" tldck)about1lb.
Shelf
Position
C
C
C
C
C
C
B
D
D
D
D
D
D
D
[] Touch the STARTpad.
[] When broiling is finished, tou(h the
CLEAR/OFFpad.
Serve the food immediately, and leave the
pan outside the oven to (ool during the
meal fi)r easiest (leaning.
Use LOBroiltocook foods suchaspouh U
or thick cuts of meat thoroughly without
over-browning them.
First Side
Time (rain.)
10 11
12
13
10
12 15
25
3045
25 30
13 16
10
15
10
10
17
Second Side
Time (min.)
4
9
6
8
3
7
5-6
89
6W
1012
1618
15_0
1015
Donot
turll
ovelt
6
8
8
4W
10
4-6
12 14
Comments
Arrangeinsinglelayer.
Space evenly. Up to 8
patties take about the
same time.
Steakslessthan1" thickcoo
throughbeforebrowning.
Panfryingis recommended.
Slashfat.
Brusheacbsidewith melte(
butter.Broilskin-side-down
first.
Cutthroughbackof shell.
Spreadopen.Brushwith
meltedbutterbeforebroilim
andafter half of broiling
time.
Handleandturnvery
carefully.Brushwith lemon
butterbeforeand during
cooking,ifdesired. Prebeat
broilerto increasebrowning
Slashfat.
Slashfat.
18
 Loading...