

Hotpoint NVL333EY0WW, NVL333EY0AA, DBR453EA1WW, DBR453EA0WW, DBL333EY0WW Owner’s Manual
...
Owner'sManual
DBL333
DCL333
DVL223
NLL113
NVL333
iiiiiiiiiiiiiiiiiii_
Part No. 175D1807P265 Pub.No.49-9996 5/99JR
131819400
Safety Information
SafetyPrecautions.......... 3-5
Operating Instructions
Controls .................. 6,7
CareandCleaning............. 8
LoadingandUsingTheDryer.... 8
Congratulations/.
YouAre Now Partof OurFamily.
Welcome to our iilmily. We're proud ()four quality produ(ts and we are committed to
providing dependable sevvi(e. You'll see it in this easy-to-use Owner's Manual and you'll
hear it in the tiiendly voi(es of our customer sev_4( e depamnent.
Best of all, you'll experience these values each time you use your (hTer. That's
important, because your new (hyer will be pmt of your family fi)r many years. And we
hope you will be part of ours fi)r a long time to come.
We dlank you for buying our product. We appreciate your purchase, and hope you xdll
(ontinue to rely on us whenever you need quality applian( esfor your home.
A ServicePartnership.
IMPORTANT!
Staple sales slip orcancelled check here.
Proof of the original purchase date is needed to obtain sevvice under
the warranty.
InstallationInstructions
PreparetoInstallYourDryer.... 10
ElectricalRequirements....... 11
ExhaustingtheDryer....... 12,13
GasSupplyRequirements...... 13
Locationof YourDryer......... 14
MobileHomeInstallation...... 15
Electricalinstallationfor
ElectncDryer............. 16,17
GasConnectionforGasDryer... 18
ReversingtheDoorSw/bg ..... 19
TroubleshootingTips
BeforeYouCallForService..20,21
m
m
FORYOURRECORDS
Write the model and serial numbershere:
#
#
They are on the label on the tiont of the left side of the door opening.
READTHISMANUAL
Inside you _dll lind many helpfid hints on how to use and maintain
veto" (h_,er properly, lust a little preventive (_ne on veto"part can save
you a great deal of time and money over the lid of your (hyer.
PROPERVENTING
For the best (hTing perfi)rman(e the (hyer needs to be properly venm(1.
The (hyer willuse more energy and nm longer if it is not vented to the
specifications outlined in the VentingtheDryersection in this manual and
the Exhaustingsection in the Installation Instructions.
Customer Service
Warranty................... 23
ServiceTelephone
Numbers............ BackCover
m
I
w
2
IFYOUNEEDSERVICE
You'll find many answers to common problems in the Before You Call
ForServicese(tion. If you review our (hart of Troubleshootingtips first,
you may not need to call fi)r sev_4ceat all.
Ifyou do need sevvice, you can rebLxknowing help is only a phone call
:4w;ty.A list of toll-tiee customer sevvice mm_bers is included in the
back section. Or you can alwaFs call the GE Answer Center ®at
800.626.2000, 24 hours a day, 7 (laFsa week.
iMPORTANTSAFETYiNFORMAtiON.
READALLiNSTRUCtiONSBEFOREUSING
A WARNING!
For your safety, the information in this manual must be followed to minimize the risk of fire
or explosion, electric shock, or to prevent property damage, personal injury, or death.
• Do notstoreor usegasoline or other
flammable vaporsand liquids in the
vicinityof thisor anyother appliance.
• Installation and service mustbe performed
by a qualified installer,service agency or
the gas supplier.
WHATTODOIFYOUSMELLGAS:
[] Do nottry tolight a match,or cigarette,or
turnon anygas or electrical appliance.
[] Do nottouch anyelectrical switch; do not
useany phone in yourbuilding.
[] Clear theroom,buildingorarea of all
occupants.
California Safe Drinking Water and ToxicEnforcement Act
This act requires the governor of California to publish a list of substances knoxm to the state to cause cancer,
birth detects or other reproductive harm and requires businesses to warn customers of potential exposure
tO Sllch substances.
(;as appliances €till cause illinor exposure 1o fotli of these stllystances, natllely benzene, catbon illonoxide,
formaldehyde and soot, (aused primarily by tile in( oinplete ( oinbustion of natural gas or IJ_filels.
Properly ac!justed chTers xxdllminimize incomplete combustion. Exposure to these substances can lye
minimized flnther by properly venting the &Ter to the outdoors.
[] Immediatelycall yourgassupplierfroma
neighbor'sphone.Followthe gassupplier's
instructionscarefully.
[] ff youcannot reach yourgassupplier,call
the fire department.
PROPERINSTALLATION
This dryer must be properly installed and located in accordance with the Installation Instructions
before it is used.
• Properly ground &Ter to contorm with all
governing codes and ordinances. Follow details
in tile InstallationInstructionssection.
• Install or store where it xdll not lye exposed to
temperatures belowfieezing or exposed to the
weather.
• Connect to a properly rated, protected and sized
power supply circuit to avoid electrical overh)ad.
• Remove all shmp packing items and dispose of all
shipping materials properly,
Exhaust/Ducting:
[]This &Ter MUSTbe exhausted to tile outside.
[] Use onlyrigid inetal or flexible metal 4"
diameter ductwork inside tile (h_,_ercabinet or
lot exhmls/ing to tile outside. USEOFPLASTIC
OROTHERCOMBUSTIBLEDUCTWORKCAN
CAUSEAFIRE.PUNCTUREDDUCTWORKCAN
CAUSEAFIREIFITCOLLAPSESORBECOMES
OTHERWISERESTRICTEDIN USEORDURING
INSTALLATION.
Follow details in tile InstallationInstructionssection.
iMPORTANTSAFETYiNFORMATiON.
READALLiNSTRUCTiONSBEFOREUSING.
WARNING!
YOUflLAUNOflYAflEA
• Keep the area underneath and m(nmd your
appliances fiee of combustible materials, such
as lint, paper, rags, chemicals, gasoline and other
flmnmable vapors and liquids.
• Keep tile floor ar()und your appliances clean and
dU to reduce the possibili/y of slipping.
• Keep area around the exhm_st opening and
surrctunding meas flee fiom the accumulation of
lint, chestand dirt.
• Do not obstruct tile flow ofvemilating air. Do not
stack or place laund U or tlmtw rags against the
front or back of the &yer.
• Close supei_ision is necessa U if this appliance is
used by or near chil&en. Do not allow children to
plW on, _dth, or inside this or any other applian_ e.
• Keep all lmm&y aids (such as detergems,
bleaches, etc.) out of the reach ofchiMren,
preterably in a locked cabinet. Obsei_-e all
warnings oil container labels to avoid in juU.
• Never climb oil or stand oil tile (hyer top.
• Do not install or store this appliance where it will
be exposed u) the weather.
WHENUSINGYOUflOflYEfl
• Never reach into the dr):er while the drum is
mcMng. Betore loacfing, unloading or adding
clothes, wait until the &_um has completely
stopped.
• (lean the lint fiher befi)re each h t:tdto prevent
lint accunmlation inside the &yer or in the room.
DONOTOPERATETHEDRYERWITHOUTTHELINT
FILTERIN PLACE,UNLESSTHEDRYINGRACKIS
IN USE.
• Do not wash or &y articles that have been
cleaned in, washed in, soaked in, or spotted
with combustible or explosive substances (such as
w_L,¢,oil, paint, gasoline, degreasers, &)_cleaning
solvents, kerosene, etc.) which mW ignite or
explode. Do not acid these substances to the
wash water. Do not tlse or place these sllbstances
mound your washer or &yer chning operation.
• Any article oil which yc)u have used a cleaning
solvent or that comains flammable materials
(such as cleaning cloths, mops, towels used in
beaub: salons, resumrants, or barber shops, etc.)
must not be placed in or nero the &yer until
solvents or flammable materials have been
remctved. There are many highly flammable
items used in homes such as acetone, denatured
alcohol, gasoline, kerosene, some househoM
cleaners, soiile spot reiilovers,/tlrpentines,
w_Lxes,wax remc)vers and producls comaining
peuoleum (fistillates.
• Tile laund U process can reduce the flmne
retmdanQ offitbrics. To avoid such a result,
cmeliflly tolh)w the gmment manutimmrer's
cme instructions.
• Do not &y articles containing robber, plastic,
or similar male.rials such as padded bras, tennis
shoes, galoshes, bath mats, rags, bibs, baby paros,
plastic bags, pillows, etc. that may meh or burn.
Some robber materials, when heated, can under
certain circumstances pro&_ce fire by
sponumecn_s combustion.
• Do not store plastic, paper or clothing that may
burn or melt on top ot the chyer during operation.
• Gm'mems labeled On/Away fromHeator Do
Not TumbleOn/(such as life jackels comaining
Kapok) must not be put in your duer.
• Do not chy fiberglass mticles in yctur chyer.
Skin irriultion couM resuh fiom the remaining
particles that may be picked up by clothing
during subsequent diyer uses.
To minimize tile possibili/y ofelecuic shock,
unplug this appliance fiom the pctwer supply
or disconnect the &yer at the household
disu'ibution panel by remcMng the fi_seor
switching off the drcuit breaker betine
attempting any maintenance or cleaning
(except the remc)val and cleaning of the lint
fiher). NOTE:Turning the Cycle Selector knob
to an OFFposition does NOTdisconnect the
appliance fiom the pctwer supply.
• Do not spray any bpe of aerosol into, oil or near
dD:er at any time.
• Do not place items exposed to cooking oils in
your duer. Items conuuninated with cooking oils
mW contribum to a chemical reaction that could
cm_se a load to catch fire.
4
Never attempt to operate this appliance if it is
dmnaged, maltuncfioning, partially
disassembled, or has missing or broken pmls,
including a damaged cord or plug.
The interior of the machine and the exhm_st (hint
connection inside the &yet sh{)uld be cleaned at
least once a yem by a qualified technician. See the
Loadingand Usingthe Dryersection. Do not use any
type of spray cleaner when cleaning (byes
interior. Hazardous fimms or elecllical shock
could occur.
• Ifyoms is a gas dueT, it is equipped with an
automatic electric ignition and does not have a
pilot light. DONOTATTEMPTTOLIGHTWITHA
MATCH.Burns may resuh tiom having your hand
in the vicinib_ of the burner when the m_mmafic
ignition turns on.
• You may wish to soften your laundered titbfics or
re(h_ce the static elecuidty in them by using a
(hyer-applied titbric sotiener or an anfi-slafic
concfitioner. We recommend }_)uuse either a
tabfic sotiener in the wash _ycle, according to the
manuthcturer's instructions fi)r those proch_cts, or
Uya d_yer-added product tbr which the
mamflhcturer gives x_Tittenassurance on the
paclclge that their product can be sat(ly used in
your dueT. Service or pedormance problems
cm_sed by use of these producls me the
responsibility of the manutitcmrers of those
producls and are not c()vered under the warranty
to this appliance.
WHENNOTUSINGYOURDRYER
• Gv4sp the plug timfly when disconnecting this • Befi)re discarding a dueT, or rem_)ving it flom
appliance U)ax_)iddmnage to the cord while service, rem_)ve the &yet door to prevent
pulling. Place the cord away fiom uaffic areas so children fiom hiding inside.
it willnot be stepped on, uipped {)vet or
subjected to damage.
• Do not tamper with conuols.
Do not attempt to repair or replace any part of
this appliance or attempt any se_icing unless
specifically vetommended in this O_mer's Manual
or in published useHepair insuuclions that you
understand and hmv the skills to car U (nit.
Readandfollow thisSafetyInformationcarefully.
SAVETHESEINSTRUCTIONS
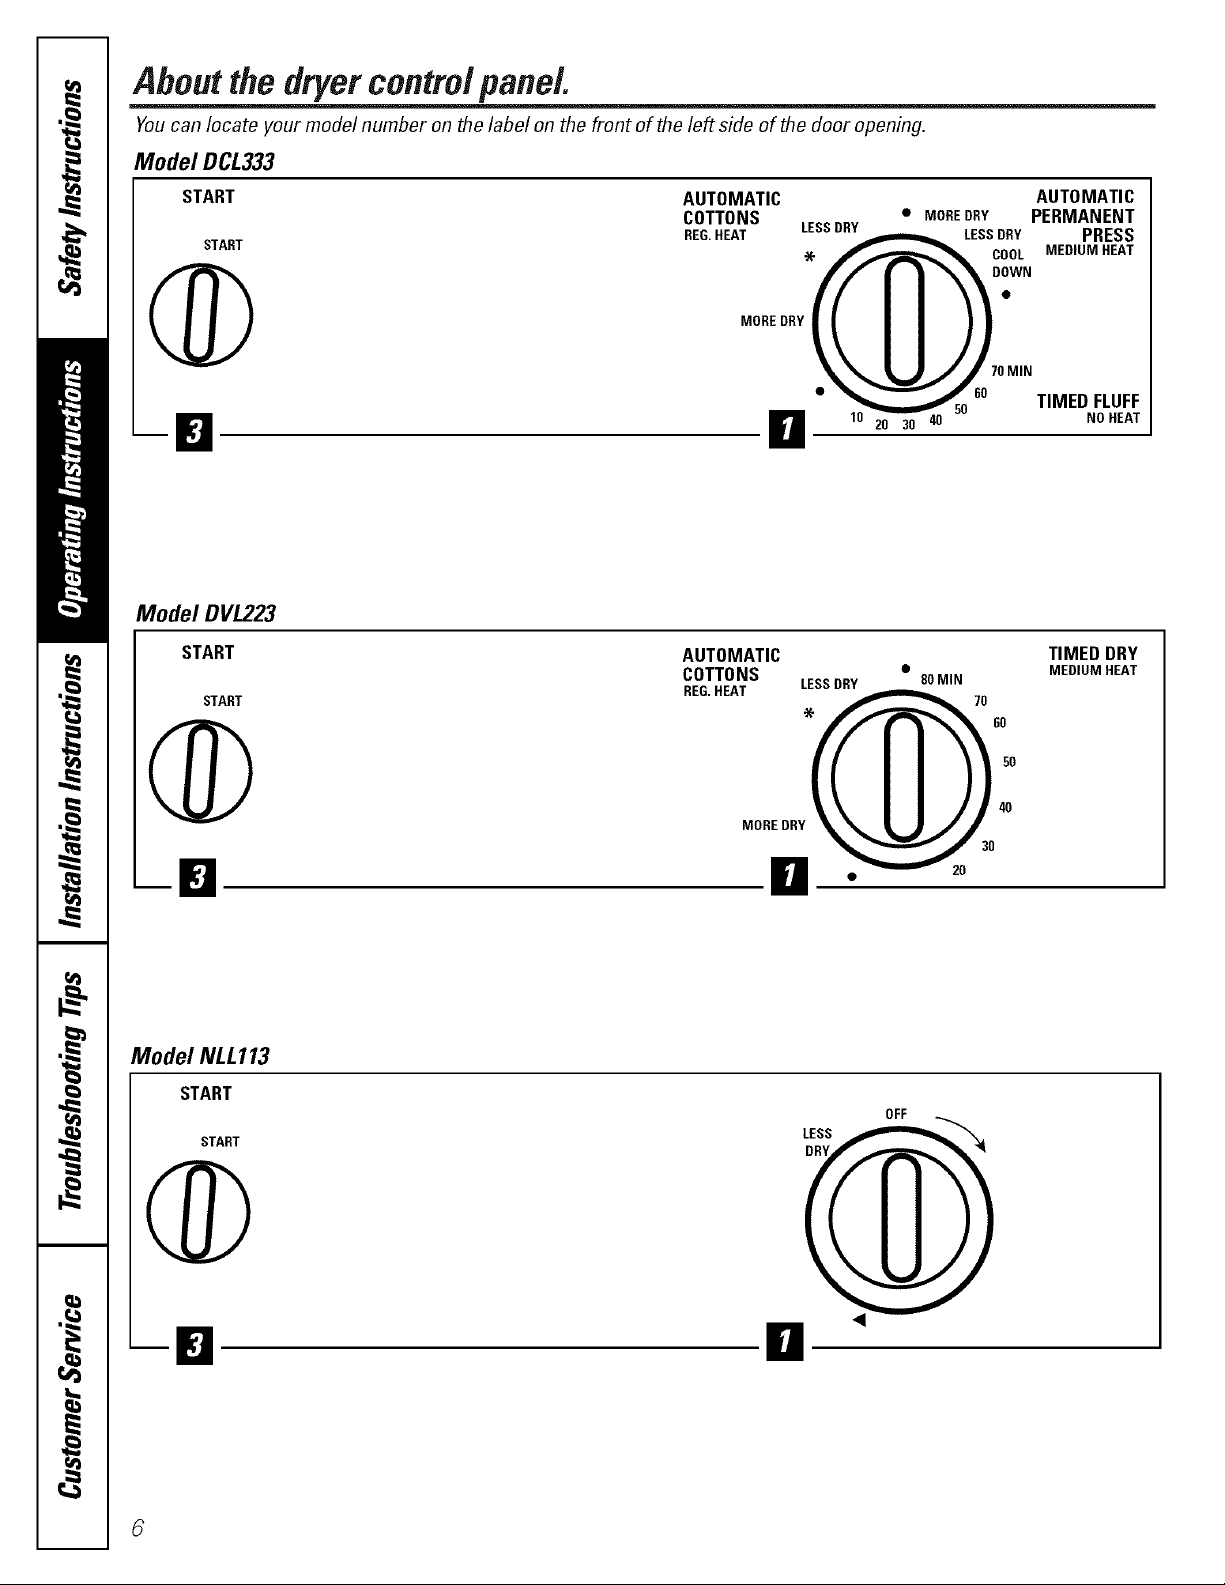
Aboutthe dryercontrolpanel.
Youcan locate your model number on the label on the front of the left side of the door opening.
Model DCL333
START AUTOMATIC AUTOMATIC
COTTONS * MOREDRY PERMANENT
START
REG.HEAT LESS DRY LESS DRY PRESS
-X- COOL MEDIUM HEAT
Q DOWN
--_=J_ n 10203040
Model DVL223
START
START REG. HEAT LESSDRY 80 MIN 70
Q LtUj o °
MOREDRY
'0 MIN
_o TIMED FLUFF
50
AUTOMATIC TIMED DRY
COTTONS •
,.X-_ 60
MORE DRY
NO HEAT
MEDIUM HEAT
LI_ 0 '__° 3°
Model NLL113
START
START
Q
6
OFF
LESS
DRY
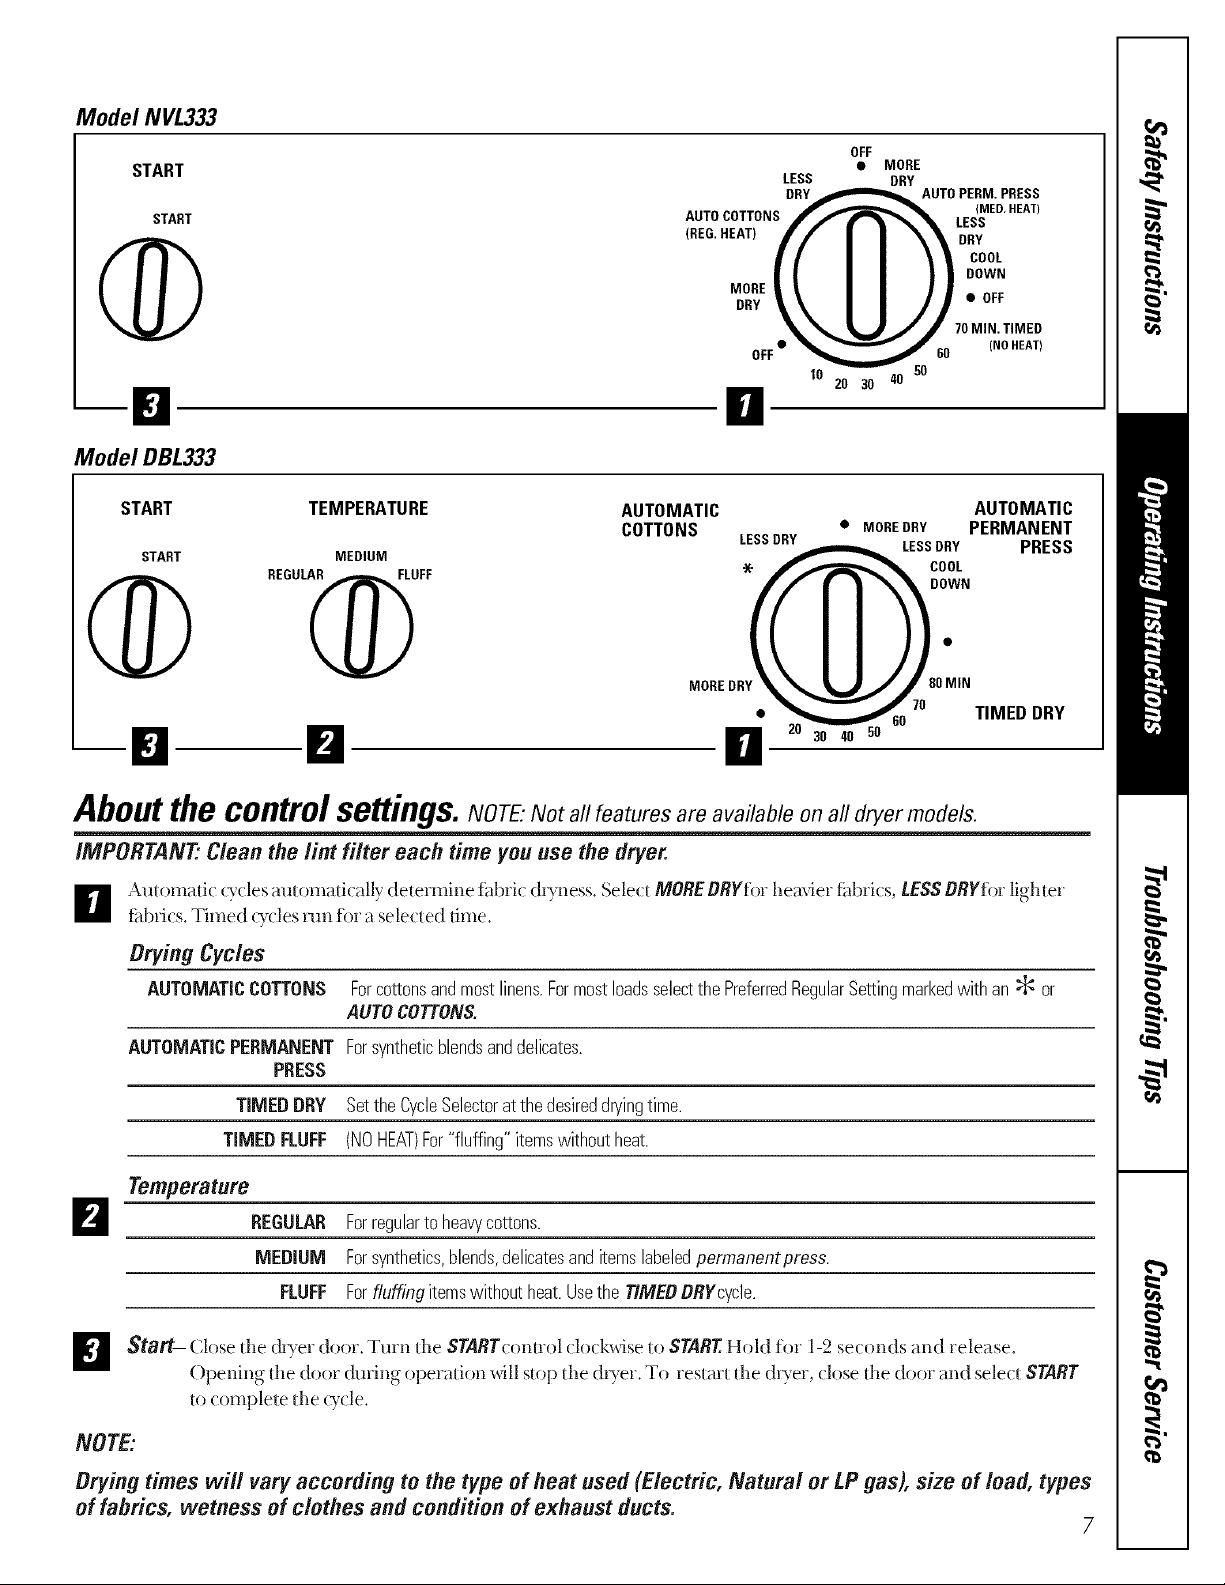
Model NVL333
START
START
Model DBL333
OFF
LESS DRY
DRY_,_m_LAUTO PERM. PRESS
AUTO COTTONS ,_"_"-_ml_'_'_ LES(_ ED HEAT)
• MORE
IREG.REAT_I[ I I \\ OR,
I I I I \ I COOL
I I I I I I DOWN
II )l •OFF
'_ _ _k,_FJ J 70 MIN. TIMED
OFF• _ 60 (NOHEAT)
10 20 30 40 50
!i
START TEMPERATURE
START MEDIUM
REGULA_UFF
AUTOMATIC
COTTONS
MORE DW 30MIN
LESS DRY LESSDRY PRESS
"X- COOL
• MORE DRY PERMANENT
70 TIMEDDRY
60
AUTOMATIC
DOWN
--D El Ell
Aboutthe control
IMPORTANT'.Clean the lint filter each time you use the dryer.
_r_ _1t ()I_E_lti((_( _es_l_1t(_I_`_ti(_:_`_(iete1`I_iI_e_i_)1`i(_:(i_)_I_ess.Se_e(t M_RE_RYfi)l` _e_`lx_e_`fi_)_`i(s_LESS_Y_i_l` _ig_Eter
fabri( s.Timed (_(les _unfin a sele(ted time.
Drying Cycles
AUTOMATICCOTTONS Forcottonsandmostlinens.Formostloadsselectthe PreferredRegularSettingmarkedwithan _ or
AUTOMATICPERMANENT Forsyntheticblendsanddelicates.
PRESS
se[tlngs.NOTE:Not all features are available on all dryer models.
AUTOCOTTONS.
TIMEDDRY SettheCycleSelectoratthedesireddryingtime.
TIMEDFLUFF (NOHEAT)For"fluffing"itemswithoutheat.
Temperature
El
D tart- Close file (h)_er door Turn the START(ont_ol clo(k_4se u) STARTHold for 1-2 se(onds and release.
REGULAR Forregularto heavycottons.
MEDIUM Forsynthetics,blends,delicatesanditemslabeledpermanentpress.
FLUFF Forfluffingitemswithoutheat.UsetheTIMERBRYcycle.
Opening file door during operation _4_llsu_p file dt)_er. To restart fl_e d_,,er (lose file door and sele( _START
U)(:onEplele file Q,cle.
NOTE:
Drying times will vary according to the type of heat used (Electric, Natural or LP gas), size of load, types
of fabrics, wetness of clothes and condition of exhaust ducts.
7
@ff SortingandLoadingHbts
As a general nile, if clothes are sorted properly for tile washer, they are sorted properly for the (hTer.
Do not addfabricsoftener sheetsoncethe load has become warm. Theymaycausefabric softener stains. Bouncd_ Fabric
ConditionerDryerSheetshavebeen approved for uselb all GEDryerswhen usedin accordancewith themanufacturer_
instructions.
Donotoverload.Thiswastesenergyandcauseswrink/ibg.
Donotdrythe followingitems:f/#erg/assitem&woo/ens,rubber-coateditem&plastic&itemswithp/ast/ctrimand
foam-fi//editems.
CareandCleaningof theDryer
| 68
TheExterior:Wipeor dust any spills or washing
compounds with a damp cloth. Duet control
panel and finishes illay be dmnaged by SOltle
laund U pretreatment soil and stain remover
products. Apply these products away flom the
(hyer. The tabric may then be washed and dried
normally. Damage to your &yet cresset1by these
pro(h_cls is not covered byy_nn"w_uranty.
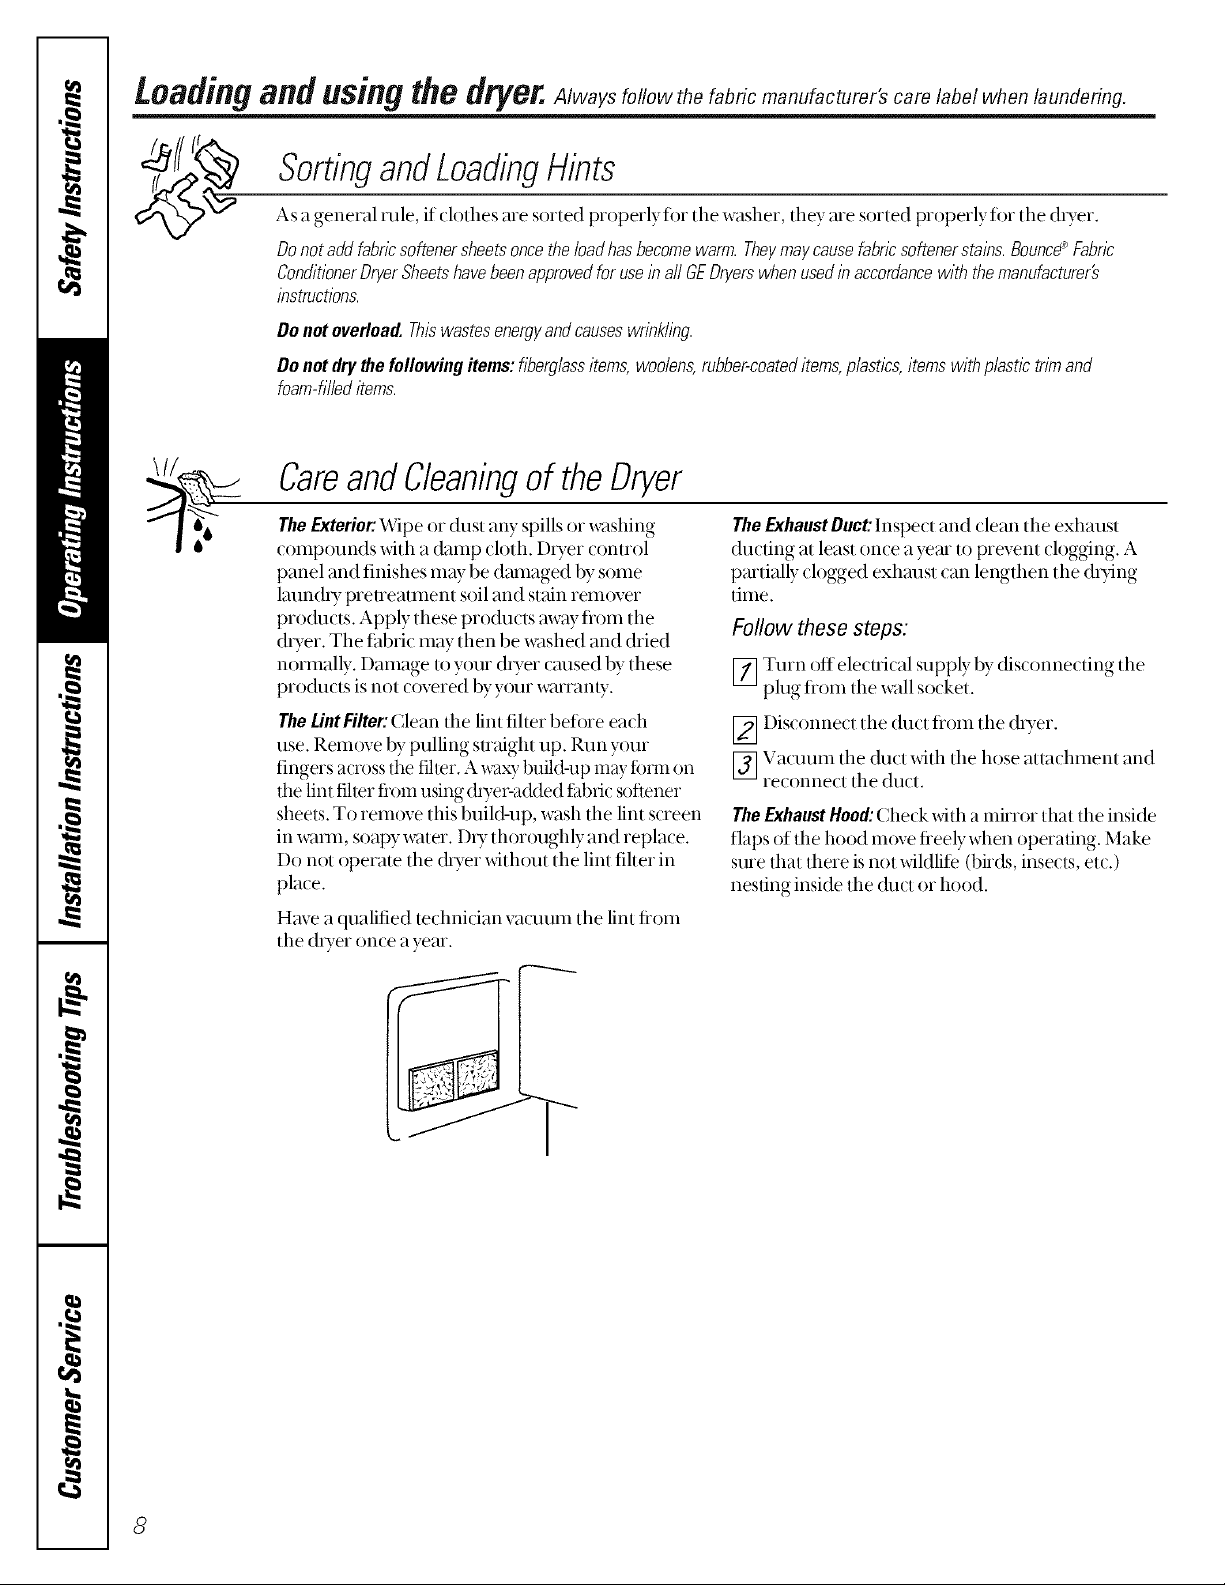
TheLintFilter:Clean tile lint filter betore each
use. Rem{)ve by pulling smdght up. Run your
fingers across the filmr. A x_v_xybuild-up may ti_nn on
the lint filter flom using di)-er-a&led thbric softener
sheets. To rem{)ve this buiM-up, wash the lint screen
in waml, soapy water. DU thoroughly and replace.
Do not operate the dtTer xdthout the lint filter in
place.
Have a qualified technician vacuum tile lint fiom
tile (hTer once a year.
TheExhaustDuct:lnspect and clean tile exhaust
ducdng at least once a year to prevent clogging. A
partially clogged exhaust can lengthen the (h):ing
time.
Follow these steps.
_] Turn off electrical supply by disconnecting tile
plug flom the wall socket.
[_ Disconnect tile duct flom tile (hTer.
[3] Vactluiil tile duct with the hose attachment and
reconnect tile duct.
TheExhaustHood.Check x_th a ranrot that the msl(le
flaps of the hood move tieely when ot)erating. Make
sure that there is not wildlite (birds, insects, etc.)
nesting inside the duct or hood.
8

FabricCareLabels
WASH LABELS
Machine__
wash
cycle Normal Permanent Press/
wrinkle resistant
Gentle/ Do not wash Do not wring
delicate Hand wash
Water
temperature
BLEACHLABELS
Bleach
symbols Any bleach
(when needed)
DRY LABELS
Tumble D
dry
Dry
000 O0 •
Hot Warm Cold/cool
(50°C/120'_F) (40°C/105'_F) (30°C/85'_F)
0nly non-chlorine bleach Do not bleach
(when needed)
DDD
Normal Permanent Press/ Gentle/
wrinkle resistant delicate
Do not tumble dry
Do not dry
(used with
do net wash)
setting
Special
instructions
High Medium Low No heat/air
Fq Fq
Line dry/ Drip dry Dry flat In the shade
hang to dry

Preparingtoinstall yourdryer.
Read these instructions completely and carefully.
WARNING
• This dlyer must be exhm_sted m the ou/doors
using only rigid metal or flexible metal 4"
diameter ductw_nk tin inside tile chyer cabinet
or exhm_sdng.
• Never useplastic or other combustible ductwork.
See Exhausting section.
• This appliance must be properly grounded
and installed as des_ ribed in these Installation
Instructions.
• Do not install or store appliance in an area where
it xdll be exposed to water/weather. See Location
of YourOryerse(tion.
• The National Fuel (;as code resuicts installations
of gas appliances in garages. They must be 18"
(45.7 _m) offthe ground and prote_ted fiom
vehides by a banier. SeeLocationof YourDryer
section.
• Tile electricalserviceto the (hTei iinlst confi)iiil
_dth local codes and ordinances and the latest
edition of the National Electrical Code,
ANSI/NFI'A 70.
• Tile gas serviceto tile (liTer inust COlflbim xdth
local codes and ordinances or tile latest edition of
the National Fuel (3as Code ANSI Z223.1 .The gas
duet is designed under ANSI Z21.5. l fin"home
use only. This dlyer is not recolnlnended fin.
commerdal applications such as restmnants or
beauty salons, etc.
ToolsandMaterialsRequiredforDryerInstallation
• Phillips head screwdriver
• ( hannel-lock a(!juslable pliers
• Carpenter's level
• Flat or suaight blade screwdriver
• Duct tape
• Rigid or flexible metal 4" (10.2cm) duct
• Vent hood
• Pipe thread sealer (GAS DRFER)
• Plastic knife
• 1/2" open-end _Tench
UnpackingtheDryer
_] Using tile fi)m shipping canon corner posts
(two on ead_ side), cmefhlly lay the duet on its
left side and remove foam shipping pad.
Foamshippingpad ._}
A AUEION:To prevem damage, do not use the
conUol panel as a means to pick up or move
the <hTer.
[_ Return tl_e&Ter to an upright position.
_] Adiust d_e leveling legs to match tim washer
height. Tim duet must be level and rest firmly
on all four le_eling legs.
10

Electrical requirements.
Read these instructions completely and carefully.
ElectricalConnectionInformationforElectricDryers
A WARNING--To reduce the risk of fhe,
electric shock, or personal injury:
, DONOTUSEANEXTENSIONCORDWITHTHIS
APPLIANCE.
° THISAPPLIANCEMUST BEPROPERLYGROUNDED.
Thisdryermustbeelectricallygroundedin accordance
withlocal codesandordinances,orin theabsenceof
localcodes,inaccordancewith theNATIONAL
ELECTRICALCODE,ANSI/NFPANO.70.
Electrical Requirements
• This duet must be connected to an indixidual
branch circuit, protected by the required time-
del W fi_ses or circuit breakers. 208V or 24(W
installation 30 mnps.
• Use copper conductors only.
° If the electricsupplydoesnotmeet theabove
spedfications, call a licensed elecuician.
NOTE:Awiring diagram is located inside the
conuol panel.
ElectricalConnectionInformationforGasDryers
WARNING--To reduce the risk of fire,
electric shock, or personal in jusT:
, DONOTUSEANEXTENSIONCORDORANADAPTER
PLUGWITH THISAPPLIANCE.
• DONOT,UNDERANY CIRCUMSTANCES,CUTOR
REMOVETHETHIRDGROUNDINGPRONGFROM
THEPOWERCORD.
Thisdryermustbeelectricallygroundedin accordance
withlocal codesandordinances,orintheabsenceof
localcodes,inaccordancewiththeNATIONAL
ELECTRICALCODE,ANSI/NFPANO.70.
ExternalGround(ifroquirod)
An externalgroundwire, (netprovided), whichmeets
localcodes,maybeaddedbyattachingittothegreen
groundscrew ontherear ofthedryerintheupperleft
handcorner,andtogroundedmetal coldwaterpipe or
otherestablishedground.
L-
Attachgroundwire
(obtainlocally)
Electrical Requirements
• This &Ter nmst be supplied with 12(W, 60 Hz,
and connected to an indivkh_al properly
grounded brand dr(uit, protected by a 15 or
20 mnp circuit breaker or fime-del W fi_se.
• If the electric supply pr(Mded does not meet the
above specifications, it is recolnlnended that a
licensed electrician install an approved outlet.
Ensureproperground
existsbeforeuse
tr.o
NOTE:Axdring diagram is located inside the
(ontrol panel.
11

Exhaustingthe dryer.
ExhaustSystemRequirements
Useonly4"(10.2cm)diameter(minimum)rigidmetal
ductforbestpetformance,orflexiblemetalduct.Use
appr()ved vent 1100(1which has s_dng_(_utdampers
that open when the duer is in operation. When the
&yer stops, the (hmpers m_tomafically close to
prevent &afis and the entrance of insects and
roden/s. To avoid resuicfing the outlet, maintain a
mininmm of 12" (30.5 cm) clemance belween the
vent hood and the ground or any other obsu_uction.
If all rigid metal (h]ct cannot be used, then flexible
all-racial venting can be used, but it will re(h]ce the
maximum re(ommended duct length. See
AdditionalInstallationInstructionsfollo_fing. klk
A
Correct
Incorrect
ThedryerexhaustsystemMUST BEEXHAUSTED
TOTHEOUTSIDEof thedwelling.
DONOTalh)wcombustible materials (for
example: clothing, &aperies/curtains, paper) to
come in contact with exhaust system.
ThedryerMUSTNOTbeexhaustedintoagasvent,
chimney,a wall,a ceiling,a commonductwitha
kitchenexhaustoranyconcealedspaceofa
buildingwhichcanaccumulatelint,resultingina
firehazard.
DONOTexceed the length ofduct pipe or
number of elbows allowed in the Maximum
Length charts. Ik_t can acommlate in the
exhaust system, plugging the sysmm and
creadng a fire hazard, aswell as increasing
(h)4ng dines.
DONOTscreen the exhm_st ends oftim vent
sys[elil, nor use any screws or rivets to assemble
the exhm_st system. IJnt can become caught in
the screen, on the screws or rivets, clogging the
duct work and creating a fire hazmd as well as
increasing (h)ing times. Use an approxvd vent
hood to terminate the (h_ct outdoors, and seal
alljoints xdth duct rope. All male duct pipe
fittings MUSTbe installed (loxxllstream _dth
the fl()w of air.
WARNING: Thefollowing are specific requirements
for proper and safe operation of your dryer Failure
to follow these instructions can create excessive
drying times and fire hazards,
DONOT useplastic flexible duct to exhaust the
dryer.Excessive lint can build up inside exhaust
system and create a fire hazardand restrict air
flow, Restrictedair flow will increase drying
times, ff yourpresent system is made upof plastic
duct ormetal foil duct, replace it with rigid or
flexible metal duct, Ensurethe present duct is free
ofany lint prior to installing dryer duct
Additional Installation Instructions
If all rigid melal (h_ct cannot be used, then flexible
all-racial venting can be used, but it will reduce the
maxinmm recommended (h]ct length. In special
installations when it is impossible m make a
connection with the ab()ve recommendations, then
UL-listedclothesdryertransitionductmay be used as
transition venting between the (hyer and wall
connection only. The use of this ducting will altect
(h)4ng lime.
ff flexibletransitionductisnecessary,onlyUL-listed
ductidentified forusewith clothesdryersisapproved.
EXPLOSIONHAZARD.Do not install the duer
A
where gasoline or other flammables are kept
or stored. If the duer is installed in a gmage,
it must be a minimum of 18" (45.7 cm) above
the floor. Failure to do so can resuh in death,
explosion, fire or burns.
Provide an access for inspection and cleaning of
_tlle exhaust system, especially at turns, lnspe(rt
and clean at least once per year.
1)o not obstruct incoming or exhausted air.
Thefollowingdirectionsmustbe followed,
• Use the shortest length possible.
• Suetch the (h_ct to its maxinmm length,
° Do not crush or collapse.
• Never use Uansition duct inside the wall, flooring,
ceiling or inside the &yer.
• Avoid resting the (h_ct on shmp objecls.
° Venting nmst contorm to local building codes.
12

Installingthe dryer.
Exhaust Ducting Length
The exhaust system should be inspected and clem_ed
at least once a year xfith normal usage. Tile more the
dUeT is used, tile more often you should check the
exhaust s}:stem and xvnt hood tOTproper operation.
Ifroof vents or h nwered plenums are used, they must
be equivalent m a 4" dampered wall cap in regard to
resistance to airflow, prevention of back (hatis and
maintenance required to prevent clogging.
MAXIMUM LENGTH of 4" (10.2cm)Dia. RIGIDMETALDUCT
PREFERRED VENT HOOD TYPE
4" (10.2 cm) Louvered
" DONOTassembletheductwork_dthfastenersthat
extend into the duct. They will serve as collection
points for lint.
" Ductwork which runs through an unheated area or
is nero an _firconditioning duct should be insulated
to reduce condensation and lint build-up.
MAXIMUM LENGTHof4" (10.2cm)Oia.FLEXIBLEMETALDUCT
PREFERREDVENTHOODTYPE
4" (10.2cm) Louvered
Number of _
90°11.... "--l='_ I(10 2';m)l "_-
0 60" 118.28 m}
1 52"115.84m)
2 44' (13.41 m)
3 32" (9.75 m)
4 28" (8.53m)
48" 114.63 m}
40'112.19mt
32" (9,75 m)
24" (7.31 m)
16" (4,87 m)
INSTALLMALE FITTINGSIN
CORRECTDIRECTION
ExhaustDirection
All dxyers shipped fiom tile tilctoxy me set up tOTrein
exhmlsdng. However, on ELECTRICDRYERS,exhmlsdng
can be on the right or leti side of the cabinet or the
bottom of the dxyer. On GASDRYERS,exhausting can
be on the right side of the cabinet or the bottom of the
&yeT. Directional exhausting can be accomplished by
installing Exhmlst Kit, l'ub. No. 14-A018, available
through y_)ur parts disuibutor. Follow the insu_ucfions
supplied with the kit. Use only metal ducting inside the
&yet cabinet.
Number of
0 aft' 19.14 m}
1 22" (6,71 m}
2 14' (4,27 m)
3
./Same as EXHAUST DUCT LOCATING
| _ other side DIMENSIONS
(I._," 5-7/8"
L {15cm} 4-3/8"
3-3/4"(9.5cm}t (9.5cm)
not recommended
18"15.49m)
14" 14.27m}
10' (3,05m)
cm)
Gas SupplyRequirements
_ Repla( e brass connecting pipe that is not plasdt-
coated. Stainless steel or plasti(-( Dated brass
MUSTbe used.
WARNING:Never *euse old flexible connectors. The _ tapping, accessible ti)r test gauge (oniiection,
use of old flexible connectors can cause gas leaks
and personal inju U Always use NEWflexible
connectors when installing a gas appliance.
Installation MUSTcontbrmwidl local codes,or in
[]
[l_eabsence of local codes, widl the National Fuel
( ,as (_ode, ANSI Z223. l (latest edition).
The gas supply line should be of l/2" (1.27 cm)
[]
rigid pipe.
If codes allow, flexible metal robing may be used
[]
u) (onne( tyour &yet u) dm gas supply line. Tile
robing MUSTbe (onsu-ucled of stainless steel or
plastic-coated brass.
[_] The gas supply line MUSThave an indivkhlal
slmt_iff_alve."
[_ A 1/8" ((1.32cm) NPT minimum plugged
MUSTbe installed immediate b,upstream of d_e
gas supply (onne( don u) tl_e &yer
@The &yet and its individual slmu)ffvalve MUST
be disconne(ted fiom d_egassupply piping
systemdming any pressure testing of tlle gas
supply piping system at test pressures in ex( ess
of l/2 psig (3.45 kPa).
[_The duet MUSTbe isolated fiom tlle gas supply
piping system by closing its individual manual
slmtoffx alve during any pressure testing of the
gas supply piping system at test pressures equa}
to or less than l/2 psig (3.45 kPa). 3

Installingthe dryer.
Locationof YourDryer
Do Not Install the Dryer:
_] Do not install the dryerin an area exposed u)
&ipping water or outside weather conditions.
]Do not install the dryerin an area where it _dll
coiile in con[act %_itll(tn[ains, (hapes, or
anything that will obsu_uct tile flow of
combustion and ventilation air.
Installation in Recess or Closet
[]This dryer MUST be exhausted outdoors.
]No other/uel burning applian(e shall be
installed in tile same (It)set as tile GAS DRYER.
[]Your (hyer needs the space around it for proper
ventilation, DONOTINSTALLYOURDRYERIN A
CLOSETWITHA SOLIDDOOR.
A minimum of 120 square inches (774.2 square
[]
(m) of opening, equally dMded at tile top and
bottom of tile (loot, is required. Air openings are
required to be unobstructed when a (loot is
installed. A louvered door with equivalent air
openings fi)r the fifll length of the (loot is
acceptable.
[] Do not instafl the dryer on carpet.
Floor MUSTbe solid xdth a maximum sh)pe of 1"
(2.54 (rn).
AIIowthe following clearances for ease of installation:
FRONT SIDES REAR TOP
Alcove O(Ocm) O(Ocm) O(Ocm) 15"(38.1cm)
Closet 1"(2.54 cm) 0 (0cm) 0 (0cm) 15"(38.1cm)
Closet door ventilation required: 2 louvered
openings each 60 square inches (387.1 square cm)
--3" (7.6 cm) fi'om bottom and top of door.
14
0
I 1
Closet door
0"(0cm)
_" "I cm)
60 sq. in.
(387.1sq. cm)

Mobile Home Installation
Dryer MUSTbe exhausted outside (outdoors,
[]
noi beneath tile mobile home) using metal
ducting that will not support combustion, Metal
ducting must be 4" (l 0. l 6 cm) in diameter with
no obstm(tions. Rind metal du(t is preferred.
If (hyer is exhausted tlnough the floor and area
[]
beneath the mobile home is enclosed, the
exhaust systeln MUSTterlninate outside the
enclosure xxdththe termination securely filstened
to the inobile heine structure.
When installing a gas dxyer into a mobile home,
[]
a prox4sion must be made for outside make-up
air. This prt)xdsitm is to be not less than tx_d(e tile
area of the (hyer exhaust outlet.
This d_a_er MUSTbe fastened to tile floor. Mobile
[]
Home installation Kit Pub, No. 14-D:446-33 is
available fiom your dealer.
_See the ExhaustSystemRequirementssection fi)r
other important venting information.
Installation MUSTconfi)rm to current
Nlantffactured Home (_onstmction & Safety
Standard (which is a Federal Regulation Title
24 ( FR--Part 32-80) or, when such standard is
not applicable, with American National
Standard t_)rMobile Homes.
Correct
Incorrect
Thedryer is designed underANSIZ21.5.1forHOME
USEonl}_
flough-lnDimensions
267/8" --
-- (68.3cm)
47 1/2"
1
Dooropen
E_ Electricalconnection
2 9/16'_,_
(6.5cm}
131/2" ,,_
(34.4cm) i
1 ©
n
3/8"(0.96cm)Dia.
3 3/4" gaspipe
(9.5cm)
REARVIEW
Servicing- Considerationmust be given toprovide adequate clearances for installation and servicing,
435/8"
- I
(110.7cm}
36"
(91.5cm)
!
1"(2.54cm} (68.6cm)
90°
43/8"
(11.1cm)'---'_!
Optional-'---,_ '
ventknockout ".
t,.,,,,.J I.,,,,,.d
27" --_-
SIDEVIEW
J_
t
33/4"
(9.5cm)
A CAUT_N:Labe_a_@`espri_rt_dis_nne_ti_nwhense_x4dng_ntr_s._iringerr_rs_an_ause
improper and dangerous operation (verig_ proper ope_nion after se_xdcing/installation).
15

Installingthe dryer.
ElectricalInstallationfor ElectricDryers
A
WARNING:The fbllo_dng me spedfic
requirements fin proper and saf( electrical
installation ofy_)m (hyer. Failure to fi)llow
these instructions can create elecuical shock
and/or a fire hazard.
A
WARNING:This appliance MUSTbe properly
grounded. Elecnical shock can resuh if the
(hyer is not properly grounded. Follow the
inswuctions in this manual fin proper
grounding.
.4,
WARNING: DO NOTuse an extension cord widl
this duet. Some extension cords are not
designed to withslzmd the mnounts of
elecuical cunent this &yet utilizes and can
meh, creating electrical shock and/or fire
hazard. I_ocate the d_yer within reach of the
wall outlet, taking into account the length
of power cord to be Dnchased and allowing
some slack in the cord. Refer to Electrical
Requirements in this manual fin the proper
power _ord to be purchased.
_WARNING:A UL-approved suain relief must be
installed onto power cord. If the smfin relief is
not attached, the cord can be pulled out of the
(hyer and can be cut by any m_)vement of the
cord, resulting in elecuical shock,
_ WARNING: Usecopper receptacles only.
NOTE:Duets operating on 208-voh power supply xdll
have longer (hying times than those operating
on 240-voh power supply.
A wiring diagram is located inside the
(ontrol panel.
GroundingRequirements
_ DANGER:Improper connection of the
equipment-grounding (ondu(tor can resuh in a risk
of elecuic shock. Check xfith a licensed elecuician if
you are in doubt as to whether the appliance is
properly grounded.
(;rounding must be in accordance xdth local codes
and or(finan(es, or in the absem e of lo(al (odes, in
a(cordam e with die National Eledrk al (ode
ANSI/NFPA No. 70.
Fora grounded, cord-connected electric dryer:
[7] The dxyer MUSTbe grounded. In the event of
a malfimction or breakdown11,grouncfing will
reduce the risk of ele_ trical shock by (rearing
a path of least resistam e for ele_ tri_ al cunent.
[_ Ifyore &yet is equipped xdth a power supply
(ord haxfng an equipment-grounding (ondu(tor
and a gr()unding plug, the plug MUSTbe
plugged into an appropriate, copper-wired
receptacle that is properly instzdled and
grounded in accordance with all local codes and
ordinances, ff in doubt, call a licensed electrician.
)- ),
Fora permanently-connected electric dryer:
• The duet MUSTbe connected to a grounded
metal, permanent _dfing system; or an equipment-
grounding conductor must be run with the drcuit
conductors and connected to the equipment-
grounding temfinal or lead on the appliance.
Fora cord-connectedgasdryer:
• This &yet is equipped with a three-prong
(gr()unding) plug fi)r your protection against
shock hazard and should be plugged directly into
a properly grounded three-prong receptacle. Do
not cut or rem_)ve the grounding prong fiom this
plug.
16

3-Wire System for Electric Dryers-DO NOT use for Mobile Home Installations
F_ Remove tile screws securing tile terminal bh)ck
a((ess (over and the strain relief mounting
bra(ket lo(ated on the ba(k of din dxyer upper
CoI'neI'.
[_ Install a UL-approved suain reliefinto the power
(ord enuy hole of din mounting bra(ket. Use
a smfin relief which attaches to the mounting
bracket with a nut. Finger-tighten the nut only
at this time.
F_ Thread a UI 7approved 30A, 240V, 3 # 10AW(;
minimum copper condu(tor power cord through
the strain relieL
Green (
Greenneutral
groundwire Nut
Usecopper Stra relief
Silverterminal
Po'_wercord
conductorsonly. mounting bracket
[_] Attach tile power cord neutral (center wire)
conductor to the silver-colored center terminal
on the terminal bh)ck. Tighten the screw
sectlrely.
F_ Attach tile remaining two power cord outer
conductors to tlle outer b{ass-colored terminals
on tile terminal bh)ck. Tighten both screws
securely.
A WARNIN&Do not make a sharp bend or crimp
_firing/conductor at connections.
F_ Reauach tile strain relief mounting bracket to
tlle back of din &yer with two screws. Tighten
s(rews se(tliely.
F_ Tighten the screws securing the cord restraint
firmly against the power (ord.
[_ Tighten tile strain relief nm securely so that tile
strain relief does not turn. •
[_ Reinstall tile terminal bh)ck access cover.
4-Wire System for Electric Dryers--MUST be used for Mobile Home Installations
F_ Remove tile screws securing tile terminal bh)ck
access cover and the stiain relief mounting
bracket located on tile back of din &yer upper
CoI'neI',
[_ Install a UITapproved strain relief in the enuy
hole of the mounting bra(ket. Use a strain relief
whkh attaches to the mounting bra(ket with a
nut. Finger-tighten the nut only at this time.
F_ Remove tile green neutral ground wire fiom tile
Y Y
green ground s(rew lo(ated above the terminal
blo(k.
Typical4 t/'l w _ Black240V
conductor| I I ]
receptacle_. '=11 J Typical ._(t.
4 conductorcord J,_=" Whiteneutral
"_Red 240V
--Green ground
F_ Thread a UL-approved 30A, 240V, 4 # 10AW(;
mmml m _ on o_ ox_
• " u coppec duct p _ecordthrough
tlle strain relief.
[_ Attach the green power cord ground wire to the
cabinet _dth the green ground screw.
F_] Auach tile red and black power cord conductors
to tile outer brass-coh)red terlninals on the
terminal bh)ck.
Greenground _ /
screw "_/a_//_ Silverterminal
Green neutral _ _/"_,
Greenpowercordgroundwire
(____J_ _. _-,,_=====Te rmina, block
grou,,dw,re B,ack
I_"'_ °//_Wbite Nut
/1 _// ,, Tighten nut to
Red __k k_/"A tb'ese tbrea ds
/4. W/
_a- /_q relief " 2"-_5::s_
Powercord_ _ mounting?_NN
A WARNING:Donot make a sharp bend or crimp
wiring/conductor at the connections.
[_ Tighten the screws securing tile cord restraint
fi{mly against tile power c(ird.
[_ Tighten the suain relief nut securely so the
strifin relief does not turn. •
bracket
[_ Auach tile white (neutral) power cord
condu(tor fioln tile power cord and tile green
ground wire fiom tile (hyer harness to the silver-
(oh)red (enter terminal on the terminal blo( k.
Tighten the screw securely.
[_ Reinstall the terminal block access cover.
17

Installingthe dryer.
GasConnectionforGasDryers
_] Remove tile shipping cap fiom gas pipe at tlle
rear of the duer.
NOTE:DONOTconnect the &yer to 1,1'gas service
xdthout converting the gas valve. An I,P conversion
kit (Pub. No. 14-A038) MUSTbe installed by a
qualified gas technician.
[] Connect a 1/2" (1.27 cm) I.D. semi-rigid
or approved pipe fiom gas supply line to
the 3/8" (0.96 cm) pipe located on the back
of the duer. Use a 1/2" to 3/8" (1.27 cm to
0.96 cm) re&_cer fitr a connection. Apply an
appr{tved thread sealer that is resistant to the
corrosive action of liquefied gases on all pipe
connections.
BeforeOperatingtheDryer
[_] Open tile shutoffvalve in tlle gas supply line.
[_ Test all conne(tions by brushing on a soapy
water solution.
CAUTION:NEVERTESTFORGASLEAKSWITH
AN OPENFLAME.
NOTE."On gas &yers, befi)re the burner will light,
it is necessa U fi)r the gas line to be bled of air. If
the burner does not light within 45 seconds the first
time the duer is turned on, the s_dely sMtch _dll
shut the burner off. If this happens, turn the timer
to OFFand wait 5 minutes befi)re making another
attempt to light.
[Z]Connect the exhaust duct to outside exhaust
system. Use duct tape to seal all joints.
[] _.,\:itlltlie &yer in its final position, at{just one or
more of the legs until tlle &yer is resting solidly
on all four legs. Place a lintelon top oftim duer.
THEDRYERMUSTBELEVELANDRESTING
SOLIDLYONALLFOURLEGS.Turn tile locknuts
on eadl of tile four legs up toward tile base of
tile &yer and snug xdth a 1/2" open-end
xxTench.
[_] Plug tlle power cord into a grounded outlet.
NOTE"Check to ensure tlle power is offat circuit
breaker/fi_se box before plugging tlle power
cord into the outlet.
[_] TuI'n on the power at the circuit breaker/fi_se
box.
ReplacementParts
Ifreplacement proIs are needed for your duer,
contact the source where you purchased your dt)Ter.
_CAUTlON:I:abelallxdres prior to disconnection
when servidng controls. WMng errors (an
tause ilnproper and dangerous operation.
Veriffi proper operation after servidng,
CAUTION:Befi)re operating the duer, make
A
sure the duer area is clear and flee fiom
combustible materials, gasoline, and other
flammable vapors. Also see that nothing (such
as boxes, clothing, eu.) obstructs the flow of
combustion and ventilation air.
@Run the &ver through a cycle check fi)r proper
operation. _ •
[_] lfvour &ver does not operate, please iexdew the
7_mbk_h[>oli_zg Ti/),s se(tion in this inanual betbre
(ailing fi)r servk e.
[_] Plate these instm(tions in a lo(ation near the
&yer for fimne reteren_ e.
WARNING:Theinsu_uctions in the manual and
all other literature included with this duer are
not ineant to c()ver evely possible condition
and situation that may occur. Good sate
practice and caution MUSYbe applied when
installing, operating and maintaining any
appliance.
78
_WARNIN& Destroy the carton and plastic bags
after the &yer isunpa(ked. ChiMren might
use theln ti)i plW. Cmtons c()vered with rags,
bedspreads or plastic sheets can become
airtight chambers causing s_flfimation. Place all
materials in a garbage container or make
materials inaccessible to chiMren.

ReversingtheDryerDoorSwing
[_ Open the (h),er door. Remove the 4 hinge hole
plugs or s(rews flom tlle left side of door
opening. Place nearby tor flmne installation.
NOTE"Youmayneeda plastic knifeto helppullout
theplugs.Be careful not to scratchthepaint.
[_ Relnove tile fOUl" screws that secure the door
hinges to the (hTer fiont panel. NOTE"Remove 1
screw from eachof the 2hingesfirst Holdthe door
firmlybeforeremovingthe last 2screws.
_] Rotate tlle door 180° and reinstall tlle door
hinges to the (hTer fiont panel with the 4 screws.
[_] Install the 4 hinge hole plugs or screws that were
removed in step 1into the open screw holes on
the right side of the door opening.
1
Remove4 screws elsefromeachhingefirst
19

Beforeyoucall forservice...
Troubleshooting -tips
Save time and money/.Review the charts on the following
pages first and you maynot need to call for service.
Problem Possible Causes What ToDo
Dryer doesn't start Dryer is unplugged o Make sure tile &yer plug is pushed completely into
Fuse is bloval/circuit breaker is * Check the house filse/( ir(:uit breaker box and
tripped repla(e fllse or reset breaker. NOTE:Most ele( tri(
Thermal limiter tripped o Call authorized self'it e person fin repla(ement.
Dryer doesn'theat Fuse is blown/circuit breaker is * Check tile house filse/circuit breaker box and
tripped,the dryer maytumble replace fllse or reset breaker.
but not heat
Gas service is off o Make sure gas shutoffat &yer and main shutoffare
There are 2 house fuses in the - Replace fiase.
dryer circuit. If 1 of the 2fuses
is blown, the drum may turn but
the heater will not operate
Gas supplyvalve is not open * Check to make sure supply valve is open. See
(gas models) InstallationInstructionstbr pro(e&lre.
Dryer does not have enough air * See Installation Instructions
supply to support the bunmr
flame (gas models)
the outlet.
d_yers use two filses/breakers.
flflly open.
LP gas supply tank isempty * Refill or replace tank. Duet should heat when utility
or there has been a utility servi( e is restored.
interruption of natural gas
(gas models)
Dryer shakes or makes Some shaking/noise is normal. * M_we duer to an even floor space, or a({iust
noise Dryer may be sitting unevenly leveling legs as net essaU until even.
Greasy spots on clothes hnproper use of fabric softener * Follow directions on ihbri( softener package.
Drying dlrtyitems with clean ones * Use your d_yer to d_y only (lean items. Dirty items can
stain (lean items and tile &yer.
Clothes were not completely clean * Sometimes stains which cannot be seen when (lie
(lothes are wet appoaratier &)_ng. Use proper
washing pro( e&lres beii_re &}dng.
Lint onclothes Lint filter is full * Clean lint screen betore each load.
Improper sorting * Sort lint pro&lcers (like chenille) from lint collectors
(like corduroy).
Static electricity can attract lh_t * See suggestions in this section under STATIC.
Overloading * Separate large loads into smaller ones.
Paper, tissue, etc. left in pockets * Empty all pockets betore laundering clothes.
20

Problem Possible Causes What ToDo
Static occurs No fabric softener was used • T U a lid)tic softener.
• Bounce _'Fabric Conditioner D_TerSheets have been
approved tier use in all GE D_Terswhen used in
accordance _dth the mam_Ltcmrer's instructions.
Overdrying • T U a tid3ri( softener.
• A_{just conuols fi)r less duiug.
Synthetics, permanent press and • T U a titbfic softener.
blends can cause static
Inconsistent drying times Type of heat • Automatic (hTing times will vaU according to the type
of heat used (electric, natural orLP gas), size of load,
types oftabfics, wetness of clothes and condition of
exhmast duos.
Clothes take too long Improper sorting • Sepmate hemT items fiom lightweight items (generally,
to dry a well-sorted washer load isa well-sorted duet load).
Large loads of heavy fabrics (like • I.arge, heaxT tilbfi(s (ontain more moisture and take
beach towels) longer to &y. Separate large, hemy fabrics into smaller
loads to speed duiug time.
Controls improperly set • Match control settings to the load y¢)ume duiug.
Lint filter is full • (lean lint fiher beti)re eveU load.
Improper or obstructed ducting • Check installation insu_uctions ti)r proper
ducting/venting.
• Make sure ducting is clean, fiee of kinks and
unobswucted.
• (heck to see if outside w_tlldmnper operates easily.
• (heck the Installation Instructions to make sure the &yet
venting is correct.
Blown fuses or tripped circuit *Replace fl_sesor reset circuit breakers. Since most
breaker (hyers use 2 fi_ses/breakers, make sure both me
operating.
Overloading/combining loads • Do not put more than one washer load in the &yet at
a time.
Underloading • If you ;ue (hying only one or two items, add a tew items to
ensure proper rambling.
Clothes are wrinkled Overdrying • Sele(t a shorter (hTiug time.
• Remove items while they still hold a slight amount of
moisture.
Letting items sit in dryer after • Rem{)ve items when _Tcle ends and fi)ld or hang
cycle ends immecfiamly.
Clothes shrink Some fabrics will naturally shrink • To avoid shfinl_lge, follow garment (are labels exa( tly.
whenwashed. Others can be • Solne itelns inay be pressed ba{k into shape after duiug.
safelywashed, but will shrink
in the dryer • Ifyou are concerned about shrinkalge in a particular item,
do not machine w:tsh or ramble d U it.
21

Notes
w
m
m
m
w
m
m
m
q_
m
m
mw_,
w
m
w
m
m_
m
m
_ m
m
m
m
q
22

GEDryer Warranty
_ II warranty service provided by our Factory Service Centers,
For The Period Of." GE Will Replace:
OneYear
Fromthe dateof the
originalpurchase
or an authorized Customer Care¢_technician. For service,
call 800-GE-CARES.
Any part of tile &yet which fi61s(h_e to a detect in materials or w_)rhnanship. During this full
one-yearwarranty,GE _dll alsopr_Mde, freeofcharge,all labor and in-home serviceto replace
tile (letv( tive part.
What GE Will Not Cover:
• Service trips to your home to teach you how to use the
product.
• Improper installation.
• Failure of the product if it is abused, misused, or used for
other than the intended purpose or used commercially.
This warranty is extended to the original purchaser and any succeeding owner for products purchased for home
use within the USA. In Alaska, the warranty excludes the cost of shipping or service calls to your home.
• Replacement of house fuses or resetting of circuit
breakers.
• Damage to the product caused by accident, fire, floods or
acts of God.
• Incidental or consequential damage to personal property
caused bypossible defects with this appliance.
Some states do not aflow the exclusion or limitation of incidental or consequential damages. This warranty gives
you specific legal rights, and you may also have other rights which vary from state to state. Toknow what your
legal rights are, consult your local or state consumer affairs office or your state's Attorney General.
Warrantor: General Electric Company.Louisville, KY 40225
23

Service TelephoneNumbers.
=_ GEAnswerCenteF 800.626.2000
The (;E Answer (_enteff _is open 24 hours a day, 7 days a week.
In-HomeRepairService800-GE-CARES(800-432-2737)
Expert (;E repair servk e is only a phone _all away.
SpecialNeedsService800.626.2000
800-TDD-GEAC(800-833-#322)
GE offers, fiee ofcharge, a brodmre to assist in planning a barrier-tiee kit(hen ti)r persons
with limited mobility.
ServiceContracts800-626-2224
Put( hase a (;E ser_4_ e _onUa_ t while your warranty is still in effect and you'll re( eive a
substantial discount. (iE Consumer Serxdce _dll still be there after your warranty expires.
PartsandAccessories800-626-2002
lncfividuals qualified to set_ice their ox_l_appliances can have p_uts or accessories sent directly
to thor homes (VISA, Master( md and Discover cmds are accepted).
Instructions contained inthis manual cover procedures to be performed by any user. Other servicing
generally should bereferred to qualified service personnel Cautionmustbe exercised, since
improper servicing may cause unsafe operation.
ServiceSatisfaction
Ifyou are not satisfied xdth the service you receive flom GE:
First,contact the people who sex_@ed your applian( e.
Next, if you me still not pleased, x_3iteall the details-including your phone number-to:
Manager, Customer Relations
GE Appliances
Appliance Park
I,ouisville, KY 40225
24 Printed in flTeUnited States
 Loading...