

Hotpoint MTM 1901 F SK User Manual
Operating Instructions
2-DOOR FRIDGE
GB F
Français, 9English, 1
MTM 1901 F SK
Contents
GB
Installation, 2
Positioning and connection
Description of the appliance, 3
Overall view
Start-up and use, 4-5
Starting the appliance
Using the refrigerator to its full potential
Using the freezer to its full potential
Maintenance and care, 6
Switching the appliance off
Cleaning the appliance
Avoiding mould and unpleasant odours
Replacing the light bulb
Precautions and tips, 7
General safety
Disposal
Respecting and conserving the environment
Troubleshooting, 8
Assistance, 8

Installation
GB
! Before placing your new appliance into operation
please read these operating instructions carefully. They
contain important information for safe use, for
installation and for care of the appliance.
! Please keep these operating instructions for future
reference. Pass them on to possible new owners of the
appliance.
Positioning and connection
Positioning
1. Place the appliance in a well-ventilated humidity-free
room.
2. Do not obstruct the rear fan grills. The compressor
and condenser give off heat and require good
ventilation to operate correctly and save energy.
3. Leave a space of at least 10 cm between the top part
of the appliance and any furniture above it, and at least
5 cm between the sides and any furniture/side walls.
4. Ensure the appliance is away from any sources of
heat (direct sunlight, electric stove, etc.).
5. In order to maintain the correct distance between the
appliance and the wall behind it, fit the spacers
supplied in the installation kit, following the
instructions provided.
Electrical connections
After the appliance has been transported, carefully place
it vertically and wait at least 3 hours before connecting it
to the electricity mains. Before inserting the plug into the
electrical socket ensure the following:
• The appliance is earthed and the plug is compliant with
the law.
• The socket can withstand the maximum power of the
appliance, which is indicated on the data plate located
on the bottom left side of the fridge (e.g. 150 W).
• The voltage must be in the range between the values
indicated on the data plate located on the bottom left
side (e.g. 220-240V).
• The socket is compatible with the plug of the appliance.
If the socket is incompatible with the plug, ask an
authorised technician to replace it (
not use extension cords or multiple sockets.
! Once the appliance has been installed, the power supply
cable and the electrical socket must be easily accessible.
! The cable must not be bent or compressed.
! The cable must be checked regularly and replaced by
authorised technicians only (see Assistance).
! The manufacturer declines any liability should these
safety measures not be observed.
see Assistance
). Do
Levelling
1. Install the appliance on a level and rigid floor.
2. If the floor is not perfectly horizontal, adjust the
refrigerator by tightening or loosening the front feet.
2
Description of the
appliance
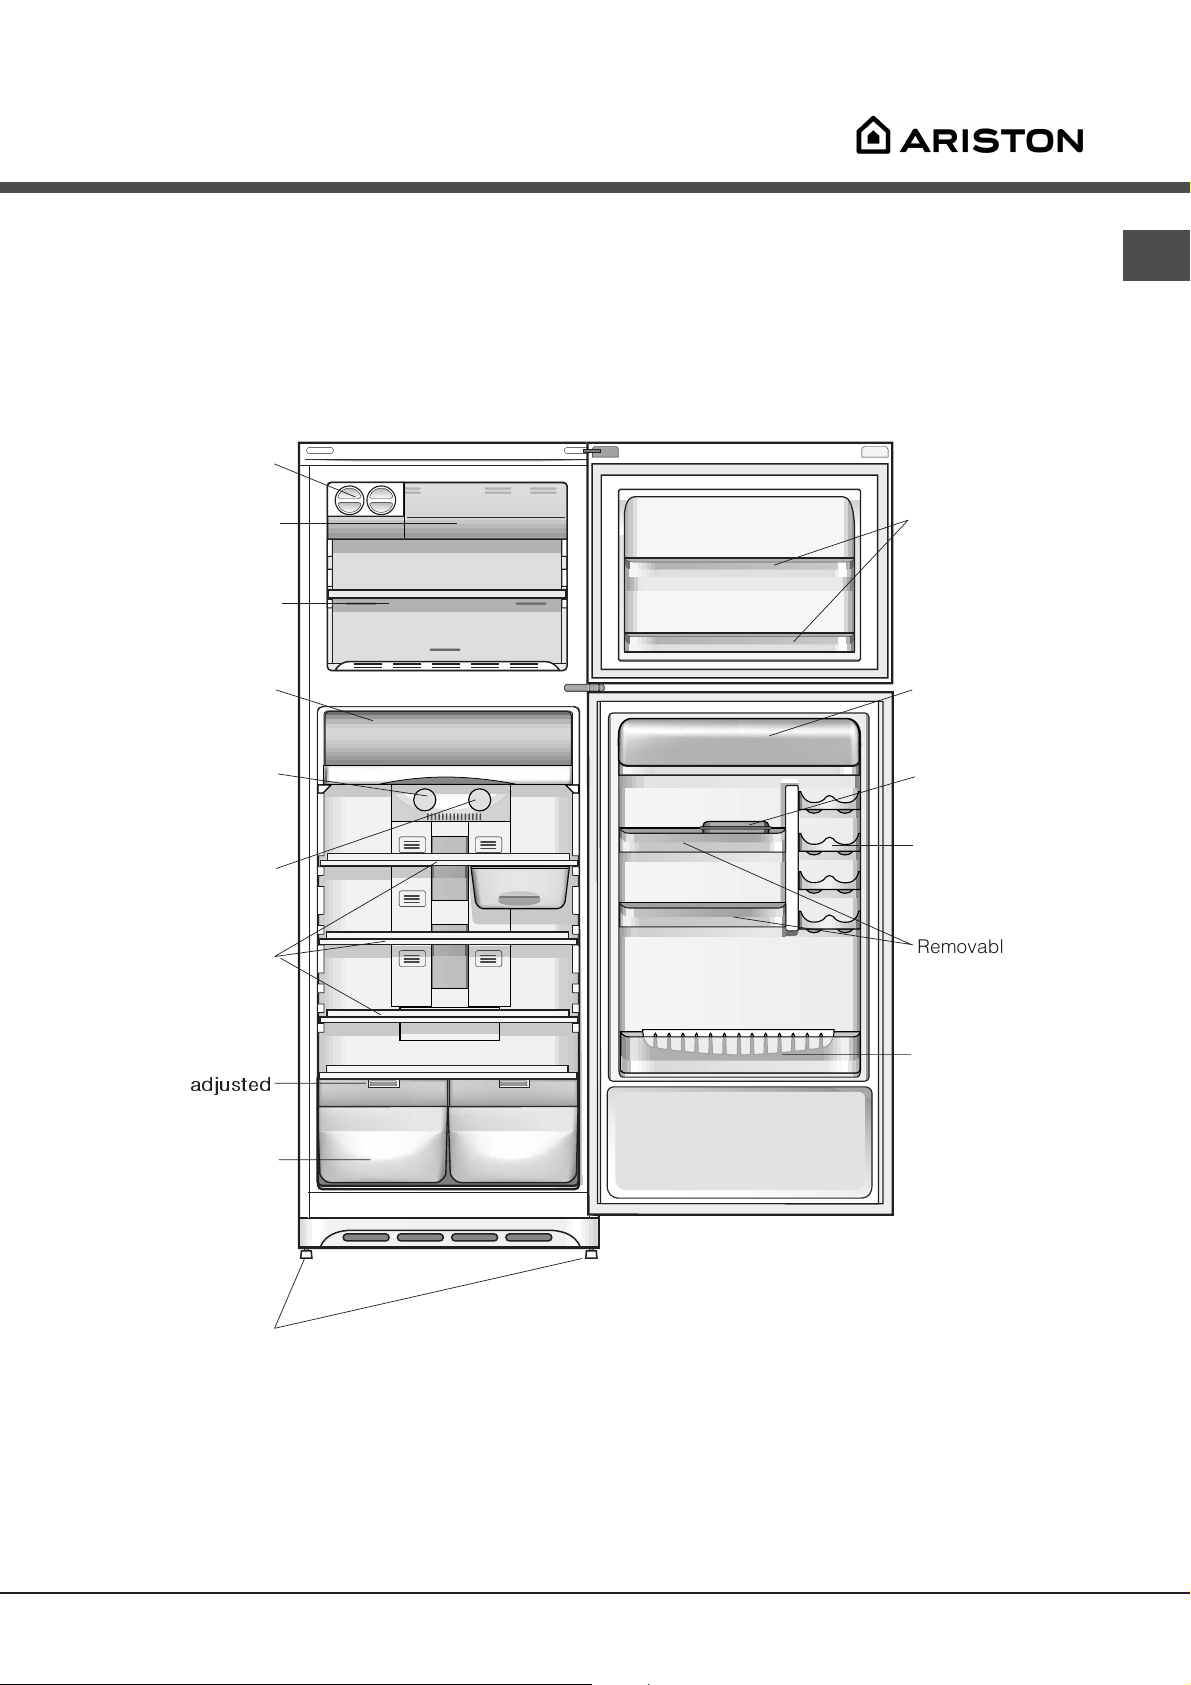
Overall view
The instructions contained in this manual are applicable to different model refrigerators. The diagrams may not
directly represent the appliance purchased. For more complex features, consult the following pages.
ICE DEVICE
FAST FREEZER
compartment
STORAGE
compartment
FRESH BOX
Compartment
REFRIGERATOR
OPERATION
Knob
FREEZER
OPERATION
Knob
SHELVES
Removable
multipurpose
SHELVES
Removable lidded
shelf with EGG TRAY
BUTTER dish
BEVERAGE CAN
shelves
Removable
multipurpose
SHELVES
•
GB
*
MOISTIRE
Levelling FEET
adjusted
FRUIT and
VEGETABLE
bin
Varies by number and/or position.
Available only on certain models.
*
BOTTLE shelf
3

Start-up and use
Starting the appliance
GB
! Before starting the appliance, follow the
installation instructions (
! Before connecting the appliance, clean the
compartments and accessories well with lukewarm
water and bicarbonate.
1. Insert the plug into the socket and ensure that the
internal light illuminates.
2. Turn the TEMPERATURE ADJUSTMENT knob to an
average value. After a few hours you will be able to
put food in the refrigerator.
see Installation
Using the refrigerator to its full potential
The temperature inside the
refrigerator compartment
automatically adjusts itself
according to the position of the
fridge
thermostat knob.
min = warmest
max = coldest
We recommend, however, a
medium position.
FRESH BOX: for fresh meat and
fish. Due to the compartment’s
low temperature (the coldest in
).
FRUIT and VEGETABLE bin
The salad crispers fitted inside the fridge have been
specially designed for the purpose of keeping fruit and
vegetables fresh and crisp. Open the humidity regulator
(position B) if you want to store food in a less humid
environment, or close it (position A) to store food in a more
humid environment.
The easy-to-open lids (all you have to do is pull the crisper
out) make it easy to put food in and take it out.
the refrigerator) and to the clear
door that provides protection
against oxidation and
blackening, food can be stored
for even up to one week. It can
also be used for “cold meals.”
It is recognisable by aeration cells located on the back
walls of the compartments.
The No Frost system circulates cold air continuously to
collect humidity and prevent ice and frost formation. The
system maintains an optimal humidity level in the
compartment, preserving the original quality of the food,
preventing the food from sticking together and making
defrosting a thing of the past. Do not block the aeration
cells by placing food or containers in direct contact with
the refrigerating back panel. Close bottles and wrap
food tightly.
Place only cold or lukewarm foods in the compartment,
not hot foods (
Remember that cooked foods do not last longer than raw
foods.
see Precautions and tips
SHELVES: with or without grill.
1
2
Due to the special guides the
shelves are removable and the
height is adjustable (
diagram
of large containers and food.
Height can be adjusted without
complete removal of the shelf.
).
see
), allowing easy storage
BEVERAGE CAN shelves.
The can rack on the inner
door allows you to store not
only cans, but also yoghurt,
butter and other containers,
according to your
requirements.
4
Using the freezer to its full potential
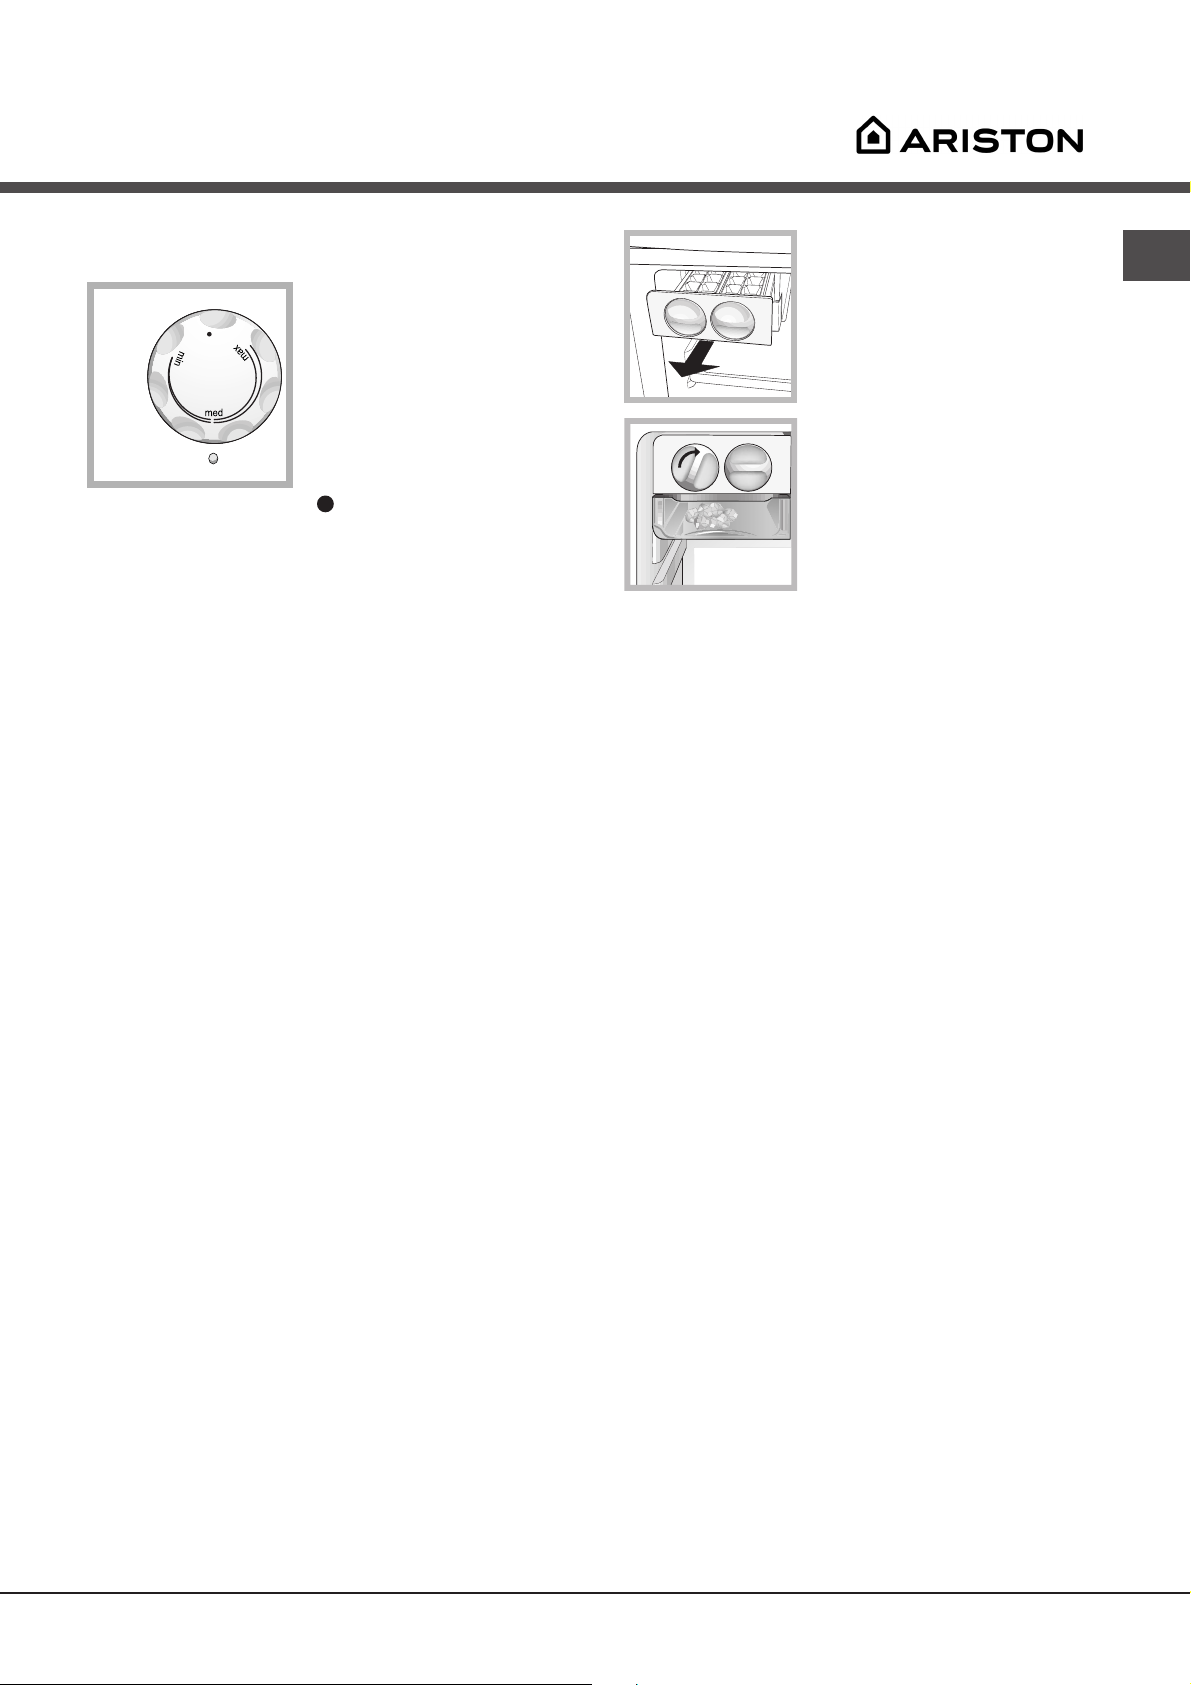
The temperature inside the
freezer compartment
automatically adjusts itself
according to the position of
the thermostat knob.
freezer
off, including the refrigerator.
Set the thermostat to the maximum max in order to freeze
foods quickly.
Set the thermostat to the medium med for normal use and
to store frozen foods for long periods.
Set the thermostat to the minimum min in order to keep ice
cubes frozen.
During hot seasons, when the knob is turned to max position,
your fridge will operate for elongated period. The thermostat
position should be brought to its initial position when the
freezer compartment is cooled sufficiently.
min = warmest
max = coldest
We recommend, however, a
medium position.
switches the appliance
ICE DEVICE
After pouring water in the special
ice cups, place them in their
places in the ice device. After
about 2 hours, the ice cubes will
be ready. In order to get the ice
cubes, it will be sufficient to turn
the two buttons to the right. The ice
cubes will fall in to the tray below,
ready to be used.
GB
• Do not re-freeze food that is defrosting or that has
already been defrosted. These foods must be cooked
and eaten (within 24 hours).
• Fresh food that needs to be frozen must not come
into contact with food that has already been
defrosted. Fresh food must be packed in the top
FAST FREEZER compartment where the temperature
drops below -18°C and guarantees rapid freezing.
• Do not place glass bottles which contain liquids, and
which are corked or hermetically sealed in the freezer
because they could break.
• The maximum quantity of food that may be frozen daily
is indicated on the plate containing the technical
properties located on the bottom left side of the
refrigerator compartment (for example: Kg/24h: 4)
! Do not open the door during freezing.
! If there is a power cut or malfunction, do not open the
freezer door. This will help maintain the temperature
inside the freezer, ensuring that foods are conserved for
at least 9 -14 hours.
! To avoid blocking the air circulation inside the freezer, it
is advisable not to obstruct the ventilation holes with food
or containers.
5
 Loading...