

Page 1

Please phone us on
08448 24 24 24
to activate your
guarantee
MULTIPLO UK
English
Operating Instructions
HOB
Contents
Operating Instructions,1
Warnings,2
Description of the appliance,3
Installation,4
Start-up and use,5
Precautions and tips,9
Maintenance and care,10
After Sales Service,11
Guarantee,12
Page 2

GB
PLEASE PHONE US TO REGISTER YOUR APPLIANCE AND ACTIVATE YOUR PARTS GUARANTEE ON 08448 24 24 24
Warnings
WARNING: The appliance and its
accessible parts become hot during use.
Care should be taken to avoid touching
heating elements. Children less than 8
years of age shall be kept away unless
continuously supervised. This appliance
can be used by children aged from 8 years
and above and persons with reduced
physical, sensory or mental capabilities
or lack of experience and knowledge
if they have been given supervision
or instruction concerning use of the
appliance in a safe way and understand
the hazards involved. Children shall not
play with the appliance. Cleaning and
user maintenance shall not be made by
children without supervision.
The appliance is not intended to be
operated by means of an external timer
or separate remote control system.
WARNING: Unattended cooking on a hob
with fat or oil can be dangerous and may
result in re. NEVER try to extinguish a
re with water, but switch off the appliance
and then cover ame e.g. with a lid or a
re blanket.
WARNING: Danger of re: do not store
items on the cooking surfaces.
WARNING: If the surface in glass-ceramic
is cracked, switch off the appliance to
avoid the possibility of electric shock.
Never use steam cleaners or pressure
cleaners on the appliance.
Do not place metal objects (knives,
spoons, pan lids, etc.) on the hob as they
may become hot.
After use, switch off the hob element by
its control and do not rely on the pan
detector.
2
Page 3

PLEASE PHONE US TO REGISTER YOUR APPLIANCE AND ACTIVATE YOUR PARTS GUARANTEE ON 08448 24 24 24
Description of the appliance
Overall view
1 POWER LEVEL INDICATOR display
2 SELECTED COOKING ZONE indicator light
3 FRONT COOKING ZONE SELECTOR button
4 INCREASE POWER button
5 PROGRAMME TIMER display
6 PROGRAMMED COOKING ZONE indicator light
7 ON/OFF button
8 ON/OFF indicator light
9 CONTROLS LOCKED indicator light
10 CONTROL LOCK button
11 PROGRAMME TIMER button
12 TIMER indicator light
13 DECREASE POWER button
14 REAR COOKING ZONE SELECTOR button
15 SINGLE COOKING ZONE SELECTOR button
The control panel described in this manual is only a
representative example: it may not exactly match the panel
on your appliance.
• PROGRAMME TIMER display shows the programmes
selected (see Start-up and use).
• PROGRAMME TIMER buttons activate the programmes
for each cooking zone (see Start-up and use).
• COOKING ZONE PROGRAMMED indicator light shows
that a particular cooking zone has been programmed
(see Start-up and use).
• ON/OFF button switches the appliance on and off.
• The ON/OFF indicator light signals that the appliance is
turned on.
• CONTROL PANEL LOCK button prevents accidental
changes to the hob settings (see Start-up and use).
• CONTROLS LOCKED indicator light shows the control
panel has been locked (see Start-up and use).
• COOKING ZONE SELECTOR button shows a particular
cooking zone has been selected and therefore various
adjustments are possible.
• COOKING ZONE SELECTOR button is used to select
the desired cooking zone.
• POWER indicator provides a visual display for the set
heat level.
• INCREASE POWER button switches on the hotplate and
controls the power (see Start-up and use).
• REDUCE POWER button controls the power and
switches off the hotplate (see Start-up and use).
GB
15
2
1
43
6
5
7
8
9
1011121314
3
Page 4

PLEASE PHONE US TO REGISTER YOUR APPLIANCE AND ACTIVATE YOUR PARTS GUARANTEE ON 08448 24 24 24
Installation
0
GB
! Before operating your new appliance please read this
instruction booklet carefully. It contains important information
for safe use, installation and care of the appliance.
700 min
! Please keep these operating instructions for future reference.
Pass them on to possible new owners of the appliance.
Positioning
! Keep packaging material out of the reach of children. It can
become a choking or suffocation hazard (see Precautions
and tips).
! The appliance must be installed by a qualied professional
according to the instructions provided. Incorrect installation
may cause harm to people and animals or may damage
property.
Built-in appliance
Use an appropriate cabinet to ensure that the appliance
operates properly.
• The supporting surface must be heat-resistant up to a
temperature of approximately 100°C.
• Avoid installing the hob above a dishwasher: if this
cannot be avoided, place a waterproof separation device
between the two appliances.
• Depending on the hob you want to install (see gure),
the cabinet must have the following dimensions:
46
510
50 min
50 min
Securing the appliance to the cabinet
The appliance must be installed on a perfectly level
supporting surface.
Any deformities caused by improper xing could affect the
features and operation of the hob.
• Before tting the hob to the worktop, position the seal
provided along the perimeter of the hob, as illustrated in
the gure.
• The installation cavity should have the dimensions
indicated in the figure accompanying the previous
paragraph.
445
495
Installing semi-ush hobs
All the necessary precautions must be taken in order to
install the appliance in conformity with current accident-
prevention regulations (CEI-UNI-CIG) relating to gas and
electrical connections. To ensure sit-on hobs installed
in kitchen cabinets operate correctly, the minimum
distances indicated should be observed (see gure). All
adjacent surfaces and the back panel should also be able
to withstand an overheating temperature of 65°C.
Fix the hob as follows:
1. Use the screws supplied to t the 4 alignment springs in
the holes provided at the central point of each side of the
part underneath the hob.
2. Place the hob in the cavity, make sure it is in a central
position and push down on the whole perimeter until the
hob is stuck to the supporting surface.
FRONT SIDE
OF HOB
SUPPORTIN G
SURFACE
UNDERSIDE
OF HOB
30
40
4
Page 5
PLEASE PHONE US TO REGISTER YOUR APPLIANCE AND ACTIVATE YOUR PARTS GUARANTEE ON 08448 24 24 24
! The screws for the alignment springs must remain
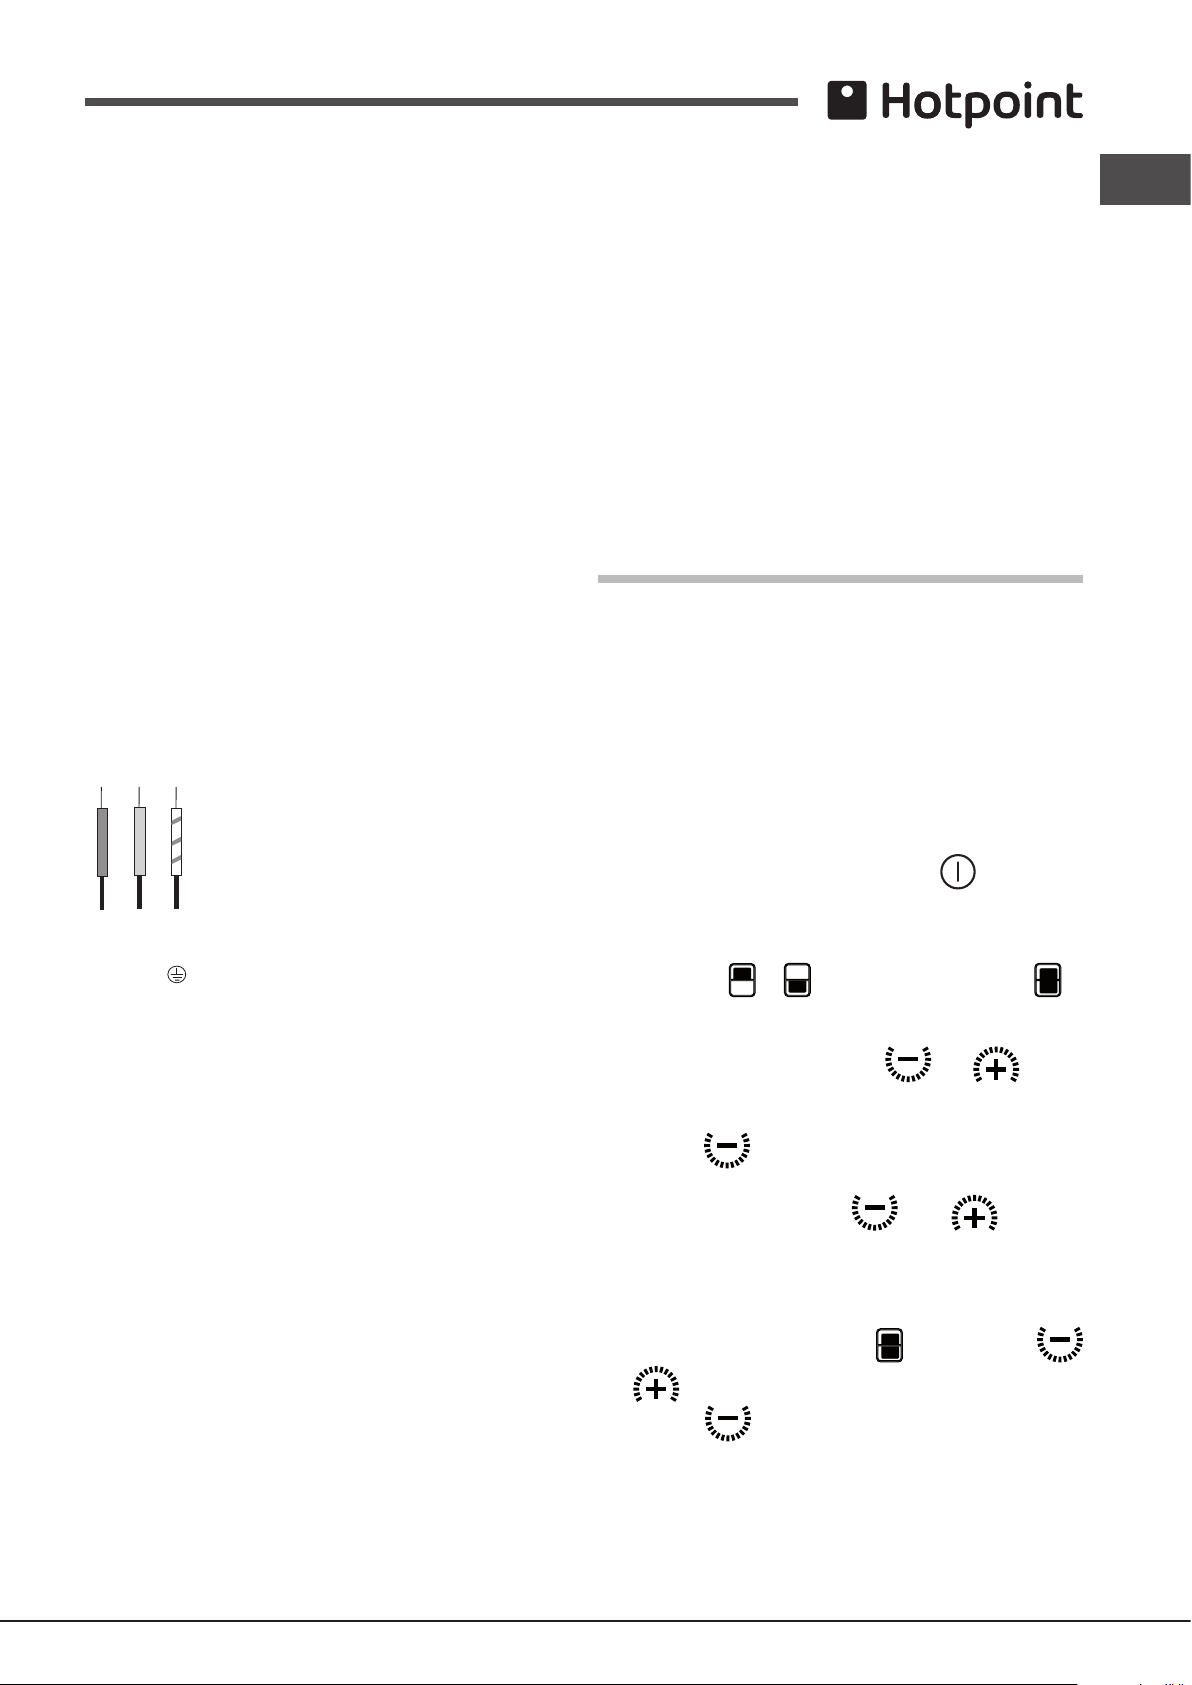
Blue
Brown
N
Neutral
L
Live
Green/Yellow
Earth
accessible.
! In order to adhere to safety standards, the appliance must
not come into contact with electrical parts once it has been
installed.
! All parts that ensure the safe operation of the appliance
must not be removable without the aid of a tool.
• The socket is compatible with the plug of the appliance.
If the socket is incompatible with the plug, ask an
authorised technician to replace it. Do not use extension
cords or multiple sockets.
! Once the appliance has been installed, the power supply
cable and the electrical socket must be easily accessible.
! The cable must not be bent or compressed.
GB
! To maximise the efficiency of all maintenance
procedures, the area around the hob must be easily
accessible after it has been installed (i.e. there are no
completely closed-off elements).
Electrical connection
Hobs equipped with a three-pole power supply cable are
designed to operate with alternating current at the voltage
and frequency indicated on the data plate (this is located
on the lower part of the appliance). The earth wire in the
cable has a green and yellow cover. If the appliance is to
be installed above a built-in electric oven, the electrical
connection of the hob and the oven must be carried out
separately, both for electrical safety purposes and to make
extracting the oven easier.
Single-phase connection
If the hob is tted with a supply cable,
connect it to the mains, observing the
colour coding of the wires (see
diagram). The yellow-green earth wire
must be 5 cm longer than the other
wires.
! The cable must be checked regularly and replaced by
authorised technicians only (see Assistance).
! The manufacturer declines any liability should these
safety measures not be observed.
Start-up and use
! The glue applied on the gaskets leaves traces of grease
on the glass. Before using the appliance, we recommend
you remove these with a special non-abrasive cleaning
product. During the rst few hours of use there may be a
smell of rubber which will disappear very quickly.
The appliance has 2 cooking zones and its various functions
are activated by touching the corresponding controls.
Each selection must be activated within 10 seconds,
otherwise the display will switch off again.
Switching on the hob
The hob is switched on by activating the button.
Selecting the cooking zones
To select the desired cooking zone, press the cooking mode
Connecting the supply cable to the mains
The appliance must be directly connected to the mains
using an omnipolar circuit-breaker with a minimum contact
opening of 3 mm installed between the appliance and the
mains. The circuit-breaker must be suitable for the charge
indicated and must comply with current electrical regulations
(the earthing wire must not be interrupted by the circuitbreaker). The supply cable must not come into contact with
surfaces with temperatures higher than 50°C.
! The installer must ensure that the correct electrical
connection has been made and that it is compliant with
safety regulations.
Before connecting to the power supply, make sure that:
• The appliance is earthed and the plug is compliant with
the law.
• The socket can withstand the maximum power of the
appliance, which is indicated on the data plate.
• The voltage is in the range between the values indicated
on the data plate.
selector button or alternatively press button to
select the single cooking zone.
Once the desired cooking zone has been selected, set the
desired power level using buttons and .
Switching off the cooking zones
Activate the ; button; the power of the cooking zone
will progressively decrease until it is switched off.
Alternatively, activate the and ; buttons
simultaneously; the power level will revert to 0 immediately
and the cooking zone will switch off.
Single cooking zone operation
Switch on the hob. Press button . Press buttons
and to select the desired power level. Once activated,
press button until reaching 0 to switch from the single
cooking zone to separate cooking zones. It will then be
possible to select one of the two separate cooking zones.
5
Page 6
PLEASE PHONE US TO REGISTER YOUR APPLIANCE AND ACTIVATE YOUR PARTS GUARANTEE ON 08448 24 24 24
Programming the cooking duration
GB
! All the cooking zones may be programmed for a length of
time between 1 and 99 minutes.
1. Select the cooking zone using the corresponding control.
2. Adjust the power level of the cooking zone.
3. Press the programming button. The indicator light
corresponding to the selected zone will start ashing.
Control panel lock
When the hob is switched on, the oven controls may be
locked in order to prevent the settings from being changed
accidentally. To activate the function, press and hold button
; for 2 seconds; the controls will be locked and the
indicator light above the button will switch on.
To use any of the controls (e.g. to stop cooking), you must
4. Set the desired cooking duration using the and
buttons.
5. Conrm by pressing the button or automatic selection
occurs after 10 seconds. The indicator light corresponding
to the programmed cooking zone will start ashing.
The timer begins counting down immediately. When the
programmed cooking duration has elapsed, a buzzer
sounds (for 1 minute) and the cooking zone switches off.
Repeat the procedure described above for every hotplate
you wish to programme.
The corresponding COOKING ZONE PROGRAMMED
INDICATOR LIGHT will switch on for every cooking zone.
When both cooking zones have been programmed, the
display visualises the remaining time for the cooking zone
with lower duration and indicates the position of the latter
with the corresponding ashing indicator light. The indicator
light for the other programmed zone emits a steady light.
To visualise the time remaining for the other programmed
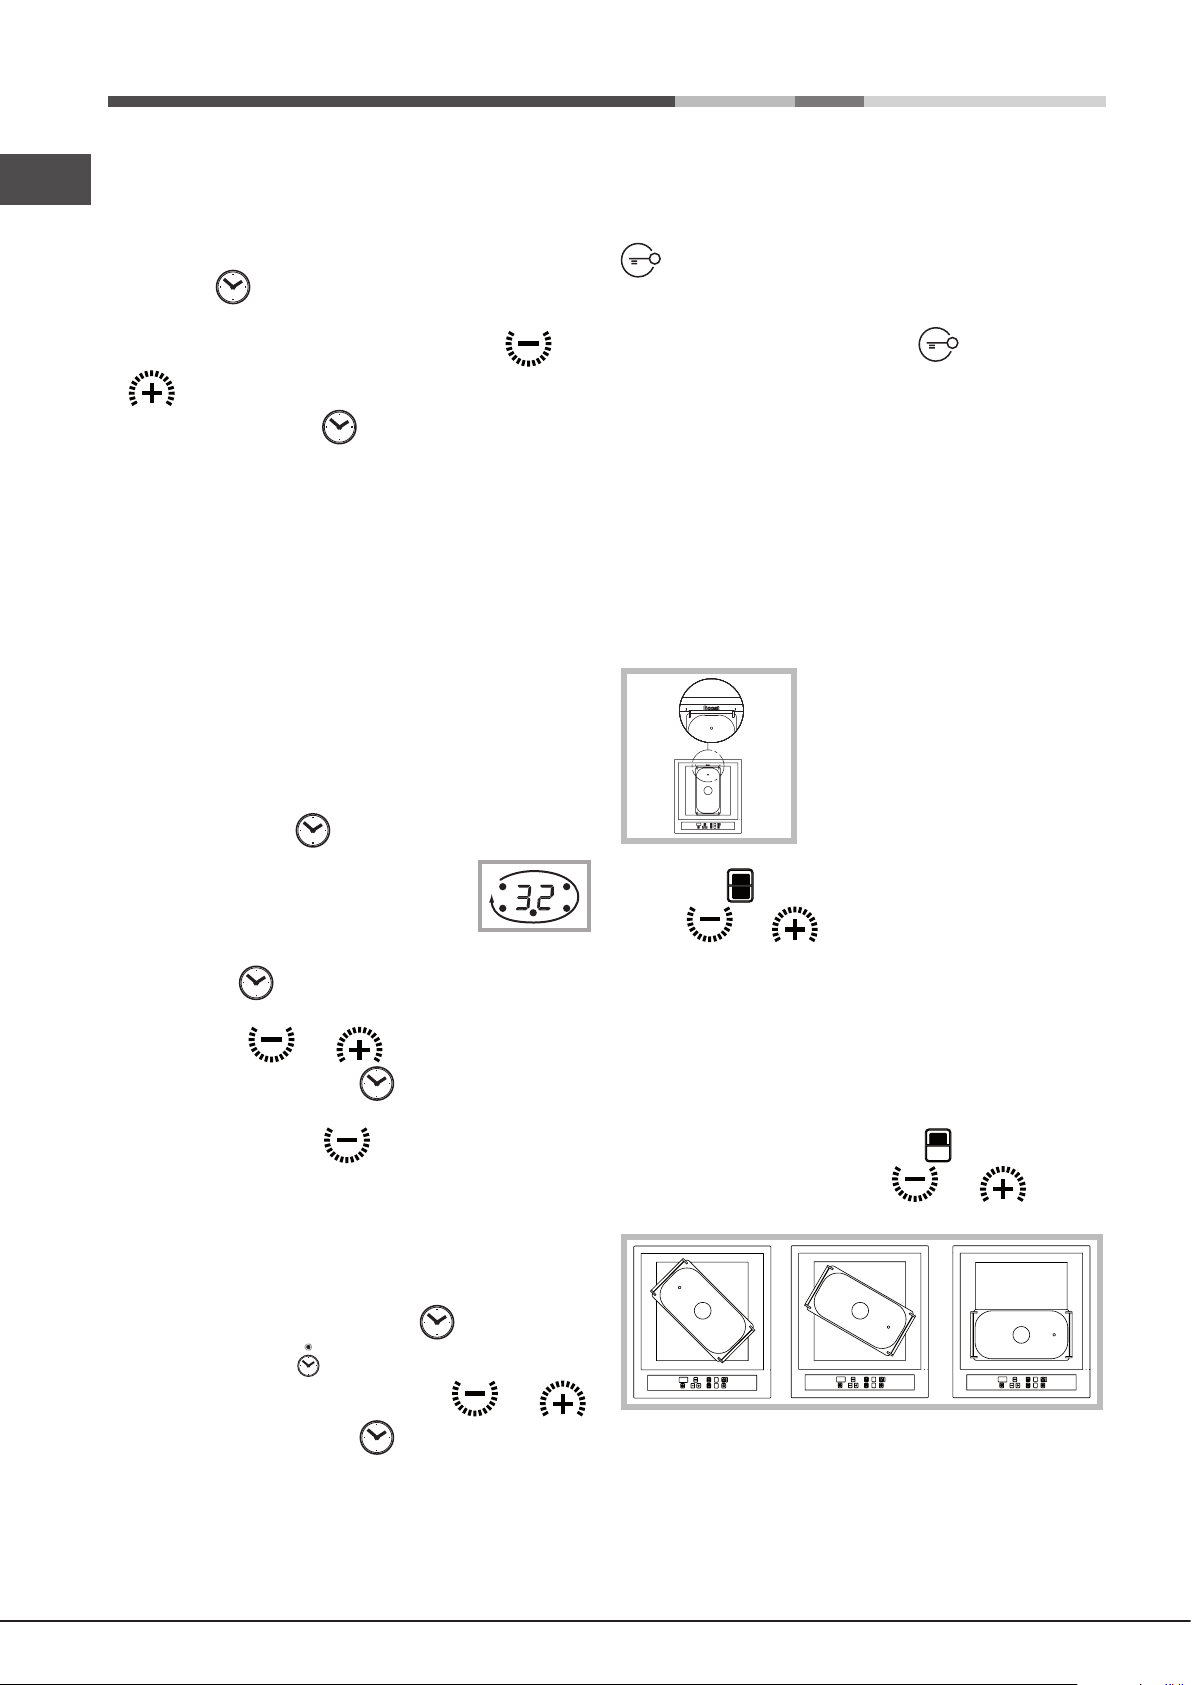
hotplates, press the : button repeatedly: the time
remaining for each hotplate will be shown
sequentially in a clockwise order, starting
from the front left hotplate.
Changing the programme
1. Press button repeatedly until the display visualises
the hotplate time that must be modied.
2. Press buttons and to set the new time.
3. Conrm by pressing button .
To cancel a programme, follow the above instructions.
switch off this function. Press the button for a few
moments, the indicator light will switch off and the lock
function will be removed.
BOOST function
The extreme exibility and versatility of the Multiplo means
it is possible to cook any type of dish quickly, without
compromising its quality.
The “Boost” function in particular speeds up cooking times
for dishes such as pasta or any fried food, reducing the
overall time required by approximately 50% in comparison
with the time required when using a cooking recipient with
a single cooking zone (horizontal position).
To bring the water to the boil or
to fry food quickly, simply switch
on the hob, placing the single
cooking recipient centrally and in a
vertical position with respect to the
text “boost” (see gure).
Press button to select the single cooking zone then press
buttons and to select the maximum power level
“16”. The vertical position of the cooking recipient may be
maintained until the cooking process is complete.
Alternatively, once the correct boiling/frying temperature
has been reached and the hotplate switched off using the
relevant buttons, the cooking recipient may be rotated by
90°, returning it to a horizontal position on the front cooking
zone and keeping the temperature constant (see gure).
The free cooking zone may be used to start another cooking
At step 2, press button : the duration decreases
progressively to 0 then turns off. The programme resets
and the display exits the programming mode.
process by pressing selector button select the desired
power level by pressing buttons and .
The timer
The hob must be switched on.
The timer allows for setting a time of up to 99 minutes.
1. Press the programming button until the timer
indicator light turns on .
2. Set the desired duration using buttons and .
3. Conrm by pressing button .
The timer begins counting down immediately. When the
time has elapsed, a buzzer will sound (for 10 seconds).
6
Page 7
PLEASE PHONE US TO REGISTER YOUR APPLIANCE AND ACTIVATE YOUR PARTS GUARANTEE ON 08448 24 24 24
Switching off the hob
Press the button to switch off the appliance - do not
rely solely on the pan sensor.
If the appliance controls have been locked, they will continue
to be locked even after the hob has been switched back
on. In order to switch the hob on again, you must remove
the lock function.
Safety devices
Pan sensor
Each cooking zone is equipped with a cooking recipient
sensor device. The hotplate only emits heat when a cooking
recipient is placed on it. If, once the appliance has been
switched on and the cooking zone and corresponding
power level selected, the numerical indicator ashes, this
means that the cooking recipient should be placed in the
corresponding position.
Heat indicators
If, after the appliance has been used, the letter “H” remains
lit on the corresponding display, this means that the heating
zone is still hot (temperature over 60°C); do not touch it. This
indication will disappear once the hotplate has cooled down.
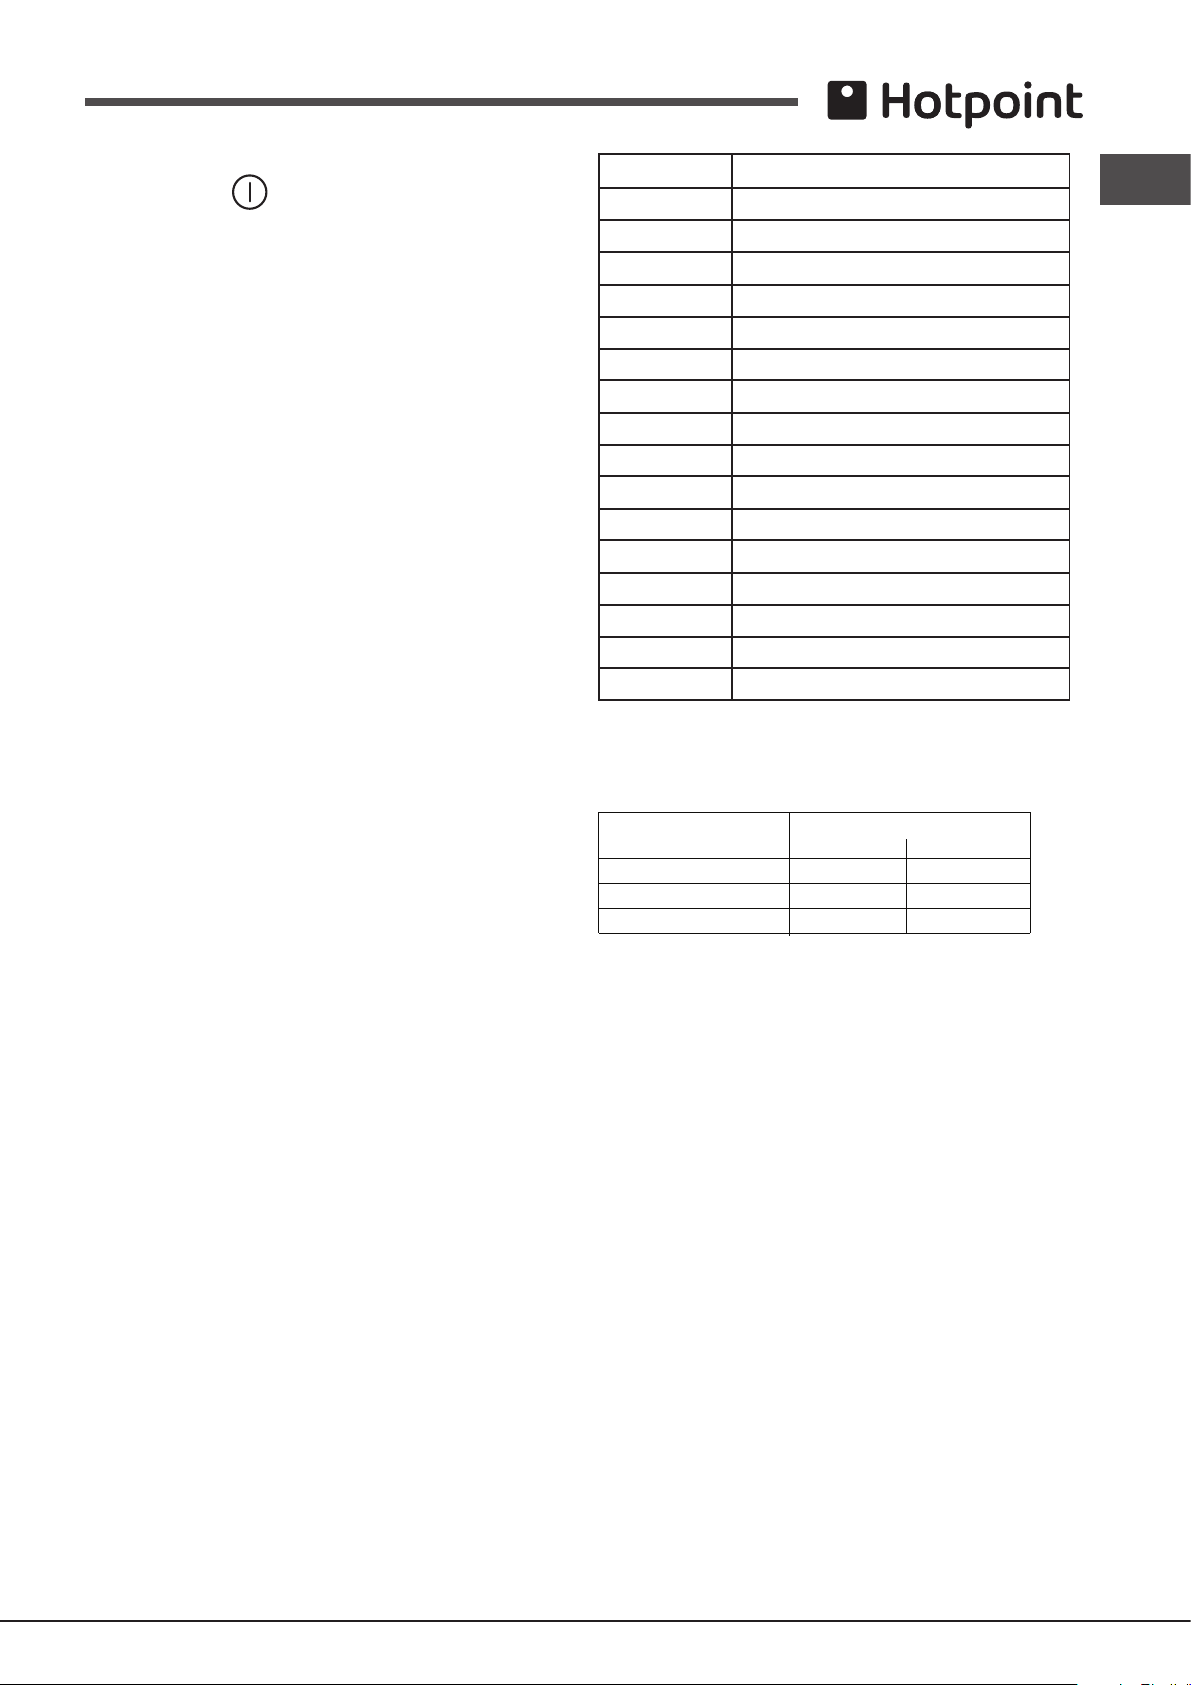
Power level
1
2
3
4
5
6
7
8
9
10
11
12
13
14
15
16
Maximum operating time in hours
10
9,5
9
8,5
7,5
7
6,5
6
5,5
5
4
3,5
3
2,5
2
1
GB
Buzzer
This can also indicate several irregularities:
• Something has been spilt on the control panel.
• A button has been pressed for too long. All of the above
situations may cause the buzzer to sound. Remove the
cause of the malfunction to stop the buzzer. The control
panel locks automatically in the above situations. If the
cause of the problem is not removed, the buzzer will keep
sounding and the hob will switch off.
Overheating protection
The hob is tted with a protection device for electronic
components; in the event of overheating the power of the
hotplates is limited automatically. This could inuence
cooking times slightly.
Safety switch
The appliance has a safety switch which automatically
switches off the cooking zones when they have been in
operation for a certain amount of time at a given power
level. When the safety switch has been triggered, the
display shows “0”.
For example: the rear hotplate is set to 5 and will switch
off after 7,5 hours of continuous operation, while the front
hotplate is set to 2 and will switch off after 9,5 hours.
Technical description of the model
Cooking zone
Rear
Front
Total power
I 1400 W
I 1400 W
2800 W 3000 W
Key:
I = single induction cooking zone
Power
230 V 240 V
I 1500 W
I 1500 W
Practical advice on using the appliance
The appliance comes with a series of accessories
(dishwasher safe) which can be used for various types of
cooking methods. These make it possible to:
• Fry sh, potatoes, meat, etc...
• Steam cook vegetables, sh, etc...
• Boil pasta, vegetables, rice, etc…
• Pan-roast dishes.
• Cook at low temperatures.
Thanks to the separate cooking recipients, it is possible to
prepare two dishes at the same time (for example, pasta in
the front recipient and a pan-roast dish on the rear hotplate).
7
Page 8
GB
PLEASE PHONE US TO REGISTER YOUR APPLIANCE AND ACTIVATE YOUR PARTS GUARANTEE ON 08448 24 24 24
Levels
Cooking methods Notes
1
Melting chocolate
1-2-3
Low temperature
4-5-6-7
Reducing sauces
Stir occasionally
6-7-8
Steam cooking
Stirring
E.g. risotto
8-9-10
Pan frying/Browning
Stir occasionally
13-14-15
Deep frying/Boiling
16
Boiling/Deep frying Quick heating, then
select the most
suitable level
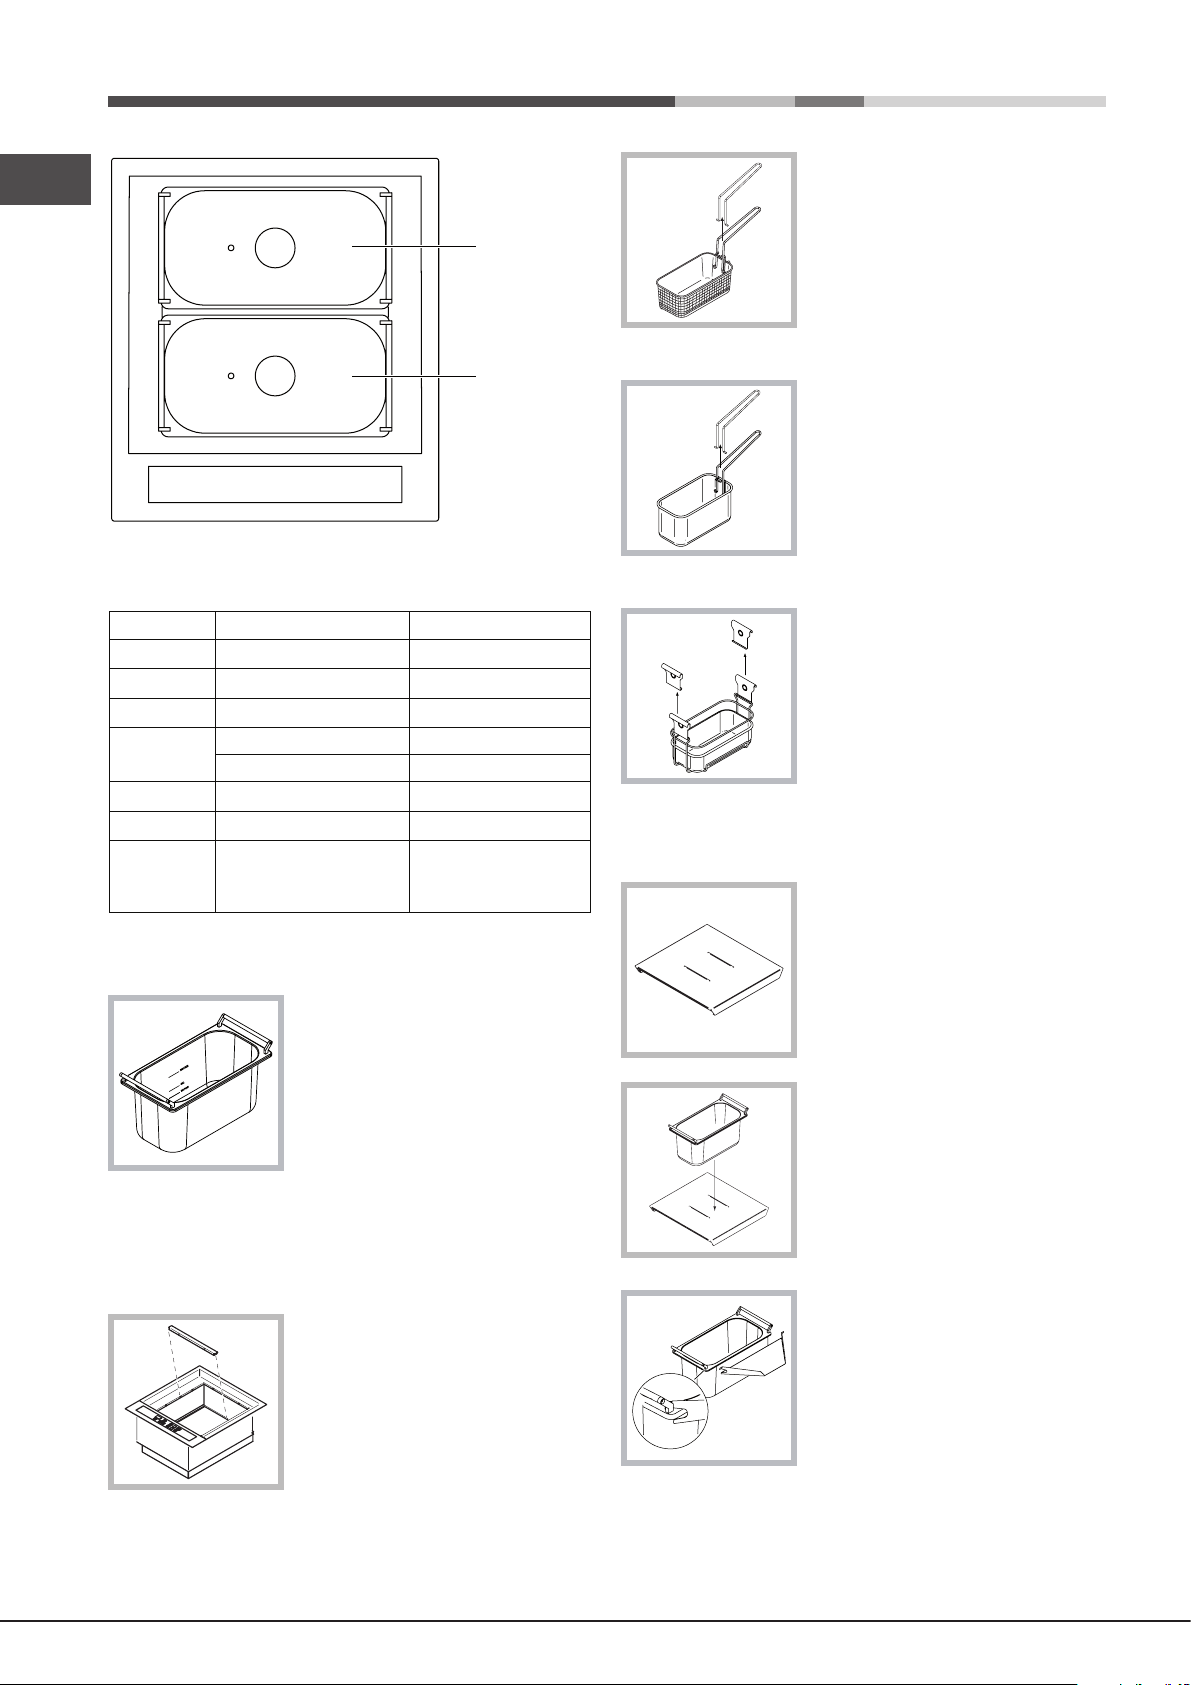
Recommended power levels for various types of cooking:
REAR
RECIPIENT
FRONT
RECIPIENT
Frying basket
Pour the oil into the cooking recipient
and insert the frying basket. The
handle may be removed and the
recipient covered with the glass lid.
Once you have nished cooking,
remove the basket and rest it on
the handle of the cooking recipient
so that the oil drains off.
Pasta basket
Pour the water into the cooking
recipient and insert the pasta
basket. The handle may be
removed and the recipient covered
with the glass lid. Once you have
nished cooking, remove the pasta
basket from the cooking recipient
and drain the pasta.
Steamer basket with special
rest and handles
Pour water into the cooking
recipient and insert the steamer
basket and its special rest, as
shown in the figure. Close the
glass cover supplied. Once you
have nished cooking, remove the
basket using the special handles,
remove the cooking recipient and
pour the water away.
Accessories supplied
Cooking recipient
This may be used as a normal
saucepan, to cook pan-roasted
dishes, sauces, etc… The maximum
ll levels for each cooking method
are marked on the inside of the
recipient:
• WATER and OIL: Maximum water and oil levels help to
prevent spills.
• VAPOR: Water level required for steam cooking.
Recipient divider
Separates the two cooking
recipients supplied while keeping
them stable.
Cover
As well as serving a visual purpose,
this can also be used as a resting
surface for the cooking recipients.
Liquid drainer
Once you have nished cooking,
this can be used to empty the
recipient of water, oil, etc…
8
Page 9
PLEASE PHONE US TO REGISTER YOUR APPLIANCE AND ACTIVATE YOUR PARTS GUARANTEE ON 08448 24 24 24
Optional extras kit
If you wish to cook large quantities of food, you should
consider purchasing this kit (available from Technical
Assistance Centres or authorised retailers), which
consists of the following items:
• Large cooking recipient (uses both cooking zones).
• Large pasta basket.
• Large steamer basket with special rest.
The handles supplied for the standard steamer basket
may also be used with the large steamer basket
included in this kit.
Precautions and tips
! This appliance has been designed and manufactured
in compliance with international safety standards. The
following warnings are provided for safety reasons and
must be read carefully.
This appliance conforms to the following
European Economic Community directives:
- 2006/95/EEC dated 12/12/06 (Low Voltage) and
subsequent amendments;
- 2004/108/EEC dated 15/12/04 (Electromagnetic
Compatibility) and subsequent amendments;
- 93/68/EEC dated 22/07/93 and subsequent amendments.
General safety
! Make sure that the air inlet behind the fan grille is never
obstructed. The built-in hob should, in fact, be provided
with suitable ventilation for the cooling of the electronic
components used in the appliance.
! We advise against the installation of an induction hob above
an under-the-counter refrigerator (heat) or above a washing
machine (vibrations). In fact, there would be insufcient
space for the ventilation of electronic components.
• The appliance was designed for domestic use inside the
home and is not intended for commercial or industrial use.
• The appliance must not be installed outdoors, even in
covered areas. It is extremely dangerous to leave the
appliance exposed to rain and storms.
• Do not touch the appliance when barefoot or with wet or
damp hands and feet.
• The appliance must be used by adults only for the
preparation of food, in accordance with the instructions
provided in this booklet. Do not use the hob as a worktop
or chopping board.
• Ensure that power supply cables of other electrical
appliances do not come into contact with the hot parts of
the hob.
• When unplugging the appliance, always pull the plug from
the mains socket; do not pull on the cable.
• Never perform any cleaning or maintenance work without
having disconnected the appliance from the electricity
mains.
• Warning for people who have been fitted with
pacemakers or other active internal medical devices:
The hob conforms to all current legislation relating to
electromagnetic interference.
This product therefore fully conforms with all legal
requirements (directive 2004/108/EEC). It was designed
not to create interference with other electrical equipment
used nearby, provided that the other equipment also
conforms fully with all the above legislation.
The induction hob generates short range electromagnetic
elds.
To avoid all risks of interference between the hob and the
pacemaker, the pacemaker should be made in accordance
with all current legislation.
We can only guarantee the conformity of our product in
this matter. For further information relating to conformity
or any incompatibility problems, please contact your G.P.
or the pacemaker manufacturer.
• The appliance should not be operated by people (including
children) with reduced physical, sensory or mental
capacities, by inexperienced individuals or by anyone
who is not familiar with the product. These individuals
should, at the very least, be supervised by someone
who assumes responsibility for their safety or receive
preliminary instructions relating to the operation of the
appliance.
• Do not let children play with the appliance.
• If the surface of the hob is cracked, switch off the appliance
to prevent electric shocks from occurring.
• Do not place metal objects (knives, spoons, pan lids, etc.)
on the hob as they may become hot.
• After using the hob, switch it off using the corresponding
control device; do not rely solely on the pan sensor.
• Do not place metal objects (knives, spoons, pan lids, etc.)
on the hob as they may become hot..
• The appliance is not intended to be operated by means
of an external timer or separate remote-control system
Disposal
• When disposing of packaging material: observe local
legislation so that the packaging may be reused.
• The European Directive 2002/96/EC on Waste
Electrical and Electronic Equipment (WEEE), requires
that old household electrical appliances must not
be disposed of in the normal unsorted municipal
waste stream. Old appliances must be collected
separately in order to optimise the recovery and
recycling of the materials they contain and reduce
the impact on human health and the environment.
The crossed out “wheeled bin” symbol on the product
reminds you of your obligation, that when you dispose
of the appliance it must be separately collected.
Consumers should contact their local authority or retailer
for information concerning the correct disposal of their
old appliance.
GB
9
Page 10
PLEASE PHONE US TO REGISTER YOUR APPLIANCE AND ACTIVATE YOUR PARTS GUARANTEE ON 08448 24 24 24
Maintenance and care
GB
Switching the appliance off
Disconnect your appliance from the electricity supply before
carrying out any work on it.
Cleaning the appliance
! Do not use abrasive or corrosive detergents (for example,
products in spray cans for cleaning barbecues and ovens),
stain removers, anti-rust products, powder detergents or
sponges with abrasive surfaces: these may scratch the
surface beyond repair.
! Never use steam cleaners or pressure cleaners on the
appliance.
Stainless steel can be marked by hard water which has been
left on the surface for a long time, or by cleaning products
containing phosphorus.
After cleaning, it is advisable to rinse the surface well and
dry it thoroughly. If water is spilt on the surface, dry it quickly
and thoroughly.
The surface on which the cooking recipients are placed
is made using glass ceramic material. When cleaning this
hob, proceed as follows:
Glass ceramic hob
cleaners
Window scraper
Razor blade scrapers
Replacement blades
COLLO luneta
HOB BRITE
Hob Clean
SWISSCLEANER
Available from
DIY Stores
DIY Stores, supermarkets, chemists
Boots, Co-op stores,
department stores,
Regional Electricity Company
shops, supermarkets
• It is usually sufcient simply to wash the hob using a
damp sponge and dry it with absorbent kitchen towel.
• If the hob is particularly dirty, rub it with a special glass
ceramic cleaning product, then rinse well and dry
thoroughly.
• To remove more stubborn dirt, use a suitable scraper
(this is not supplied with the appliance). Remove spills
as soon as possible, without waiting for the appliance
to cool, to avoid residues forming crusty deposits. You
can achieve excellent results by using a rustproof steel
wire sponge - specically designed for glass ceramic
surfaces - soaked in soapy water.
• Once it is clean, the hob may be treated with a special
protective maintenance product: the invisible lm left
by this product protects the surface from drips during
cooking. This maintenance task should be carried out
while the appliance is warm (not hot) or cold.
• Always remember to rinse the appliance well with clean
water and dry it thoroughly: residues can become
encrusted during subsequent cooking processes.
• To prevent any burnt-on residue from building up on the
frying basket and its special rest, clean both items using
a stainless steel wire sponge which has been soaked in
soapy water.
10
Page 11
PLEASE PHONE US TO REGISTER YOUR APPLIANCE AND ACTIVATE YOUR PARTS GUARANTEE ON 08448 24 24 24
After Sales Service
No one is better placed to care for your Hotpoint appliance during the course of its working life than us – the
Essential Contact Information
GB
manufacturer.
We are the largest service team in the country offering you access to 400 skilled telephone advisors and 1000
fully qualified engineers on call to ensure you receive fast, reliable, local service.
Republic of Ireland: 0818 313 413
Please note: Our advisors will require the following information:
Hotpoint Service
UK: 08448 224 224
www.hotpointservice.co.uk
Model number:
Serial number:
Parts and Accessories
We supply a full range of genuine replacement parts as well as accessory products that protect and hygienically
clean your appliance to keep it looking good and functioning efficiently throughout its life.
UK: 08448 225 225
Republic of Ireland: 0818 313 413
www.hotpointservice.co.uk
Appliance Registration
We want to give you additional benefits of Hotpoint ownership. To activate your free 5 year parts guarantee you
must register your appliance with us.
UK: 08448 24 24 24
Republic of Ireland: 01 230 0800
www.hotpointservice.co.uk
Indesit Company UK Ltd. Morley Way, Peterborough, PE2 9JB
Indesit Company Unit 49 Airways Industrial Estate, Dublin 17
Recycling and Disposal Information
As part of Hotpoint’s continued commitment to helping the environment, Hotpoint reserves the right to use
quality, recycled components to keep down customer costs and minimise material wastage.
Please dispose of packaging and old appliances carefully. To minimise the risk of injury to children, remove the
door, plug, and cut the mains cable off flush with the appliance. Dispose of these parts separately to ensure that
the appliance can no longer be plugged into mains socket, and the door cannot be locked shut.
11
Page 12

PLEASE PHONE US TO REGISTER YOUR APPLIANCE AND ACTIVATE YOUR PARTS GUARANTEE ON 08448 24 24 24
195107453.00
12 months Parts and Labour Guarantee
11/2012 - XEROX FABRIANO
Guarantee
GB
Your appliance has the benefit of our manufacturer’s guarantee, which covers the cost of breakdown repairs for
twelve months from the date of purchase.
This gives you the reassurance that if, within that time, your appliance is proven to be defective because of either
workmanship or materials, we will, at our discretion, either repair or replace the appliance at no cost to you.
This guarantee is subject to the following conditions:
- The appliance has been installed and operated correctly and in accordance with our operating and
maintenance instructions.
- The appliance is used only on the electricity or gas supply printed on the rating plate.
- The appliance has been used for normal domestic purposes only.
- The appliance has not been altered, serviced, maintained, dismantled, or otherwise interfered with by
any person not authorised by us.
- Any repair work must be undertaken by us or our appointed agent.
- Any parts removed during repair work or any appliance that is replaced become our property.
- The appliance is used in the United Kingdom or Republic of Ireland.
The guarantee does not cover:
- Damage resulting from transportation, improper use, neglect or interference or as a result of improper
installation
- Replacement of any consumable item or accessory. These included but not limited to: plugs, cables,
batteries, light bulbs, fluorescent tubes and starters, covers and filters.
- Replacement of any removable parts made of glass or plastic.
THIS GUARANTEE WILL NOT APPLY IF THE APPLIANCE HAS BEEN USED IN COMMERCIAL OR NONDOMESTIC PREMISES.
5 Year Parts Guarantee
Hotpoint also offers you a free 5 year parts guarantee. This additional guarantee is conditional on you registering
your appliance with us and the parts being fitted by one of our authorised engineers. There will be a charge for
our engineer’s time. To activate the extra parts warranty on your appliance, simply call our registration line on
08448 24 24 24 (Republic of Ireland 01 230 0800)
Extended Guarantees
We offer a selection of protection plans that enable you to fully cover yourself against the expense of repair bills
for the life of your policy. To find the ideal plan for you please call our advice line on 08448 226 226 (Republic of
Ireland 01 230 0233).
Free Helpdesk Service
We have a dedicated team who can provide free advice and assistance with your appliance if you experience
any technical difficulties within the first 90 days of ownership. Simply call our Hotpoint Service Hotline on 08448
224 224 (Republic of Ireland 0818 313 413) for telephone assistance, or, where necessary, to arrange for an
engineer to call.
12
 Loading...