

Page 1

LSFF 8M117
EN
English
Operating instructions
DISHWASHER - Contents
Operating instructions,1
Precautions and advice, 2-3
Product Data, 10
Assistance, 13
Installation, 14-15
Description of the appliance, 16
Refined salt and rinse aid, 17
Loading the racks, 18-19
Detergent and dishwasher use, 20
Wash cycles, 21
Special wash cycles and options, 22
Care and maintenance, 23
Troubleshooting, 24
Français
FR
Programy specjalne i opcje, 44
Konserwacja i obsługa, 45
Nieprawidłowe działanie i możliwe środki zaradcze, 46
Česky
CS
Návod k použití
MYČKA NÁDOBÍ -Obsah
Návod k použití, 1
Opatření a rady, 5-6-7
Informační list výrobku, 11
Servisní služba, 13
Instalace, 47-48
Popis zařízení, 49
Regenerační sůl a Leštidlo, 50
Plnění košů, 51-52
Mycí prostředek a použití myčky, 53
Programy, 54
Speciální programy a Volitelné funkce, 55
Údržba a péče, 56
Poruchy a způsob jejich odstranění, 57
Mode d’emploi
LAVE-VAISSELLE - Sommaire
Mode d’emploi, 1
Précautions et conseils, 3-4
Fiche produit, 10
Assistance, 13
Installation, 25-26
Description de l’appareil, 27
Sel régénérant et Produit de rinçage, 28
Charger les paniers, 29-30
Produit de lavage et utilisation du lave-vaisselle, 31
Programmes, 32
Programmes spéciaux et Options, 33
Entretien et soin, 34
Anomalies et remèdes, 35
PL
Polski
Instrukcja obsługi
ZMYWARKA - Spis treści
Instrukcja obsługi,1
Zalecenia i środki ostrożności, 4-5
Karta produktu, 11
Serwis Techniczny, 13
Instalacja, 36-37
Opis urządzenia, 38
Sól regeneracyjna i środek nabłyszczający, 39
Ładowanie koszy, 40-41
Środek myjący i obsługa zmywarki, 42
Programy, 43
SK
Slovensky
Návod na použitie
UMÝVAČKA RIADU - Obsah
Návod na použitie, 1
Opatrenia a rady, 7-8
Opis výrobku, 12
Servisná služba, 13
Inštalácia, 58-59
Popis zariadenia, 60
Regeneračná soľ a Leštidlo, 61
Naplňte koše
Umývací prostriedok a použitie umývačky, 64
Programy, 65
Špeciálne programy a Voliteľné funkcie, 66
Údržba a starostlivosť, 67
Poruchy a spôsob ich odstránenia, 68
BG
, 62-63
Български
Инструкция за експлоатация
СЪДОМИЯЛНА МАШИНА - Съдържание
Инструкция за експлоатация, 1
Предпазни мерки и съвети, 8-9
Информационна листовка на уреда, 12
Сервизно обслужване, 13
Инсталиране, 69-70
Описание на уреда, 71
Регенерираща сол и гланц, 72
Зареждане на кошниците, 73-74
Миещ препарат и експлоатация на съдомиялната
машина, 75
Програми, 76
Специални програми и опции, 77
Поддръжка и грижи за машината, 78
Неизправности и начини за отстраняването им, 79
Page 2

EN
Precautions and advice
This appliance was designed and
manufactured in compliance with international
safety standards. The following information
has been provided for safety reasons and
should be read carefully.
Keep this instruction manual in a safe place
for future reference. If the appliance is sold,
given away or moved, make sure the manual
is kept with the machine.
Read the instructions carefully, as they
include important information on safe
installation, use and maintenance.
This appliance was designed for domestic
use or similar applications, for example:
- farmhouses;
- use by guests in hotels, motels and other
residential settings;
- bed & breakfasts.
Remove the appliance from all packaging
and make sure it was not damaged during
transportation. If it was damaged, contact
the retailer and do not proceed any further
with the installation process.
General safety
• This appliance should not be operated
by children younger than 8 years, people
with reduced physical, sensory or mental
capacities, or inexperienced people
who are not familiar with the product,
unless they are given close supervision
or instructions on how to use it safely and
are made aware by a responsible person
of the dangers its use might entail.
• Children must not play with the appliance.
• It is the user's responsibility to clean and
maintain the appliance. Children should
never clean or maintain it unless they are
given supervision.
• The appliance was designed for domestic
use inside the home and is not intended
for commercial or industrial use.
• The appliance must be used to wash
domestic crockery in accordance with the
instructions in this manual.
• The appliance must not be installed
outdoors, even in covered areas. It is
extremely dangerous to leave the machine
exposed to rain and storms.
• Do not touch the appliance when barefoot.
• When unplugging the appliance always
pull the plug from the mains socket. Do
not pull on the cable.
• The water supply tap must be shut off
and the plug should be removed from
the electrical socket at the end of every
cycle and before cleaning the appliance
or carrying out any maintenance work.
• The maximum number of place settings is
shown in the product sheet.
• If the appliance breaks down, do not under
any circumstances touch the internal parts
in an attempt to perform the repair work
yourself.
• Do not lean or sit on the open door: this
may cause the appliance to overturn.
• The door should not be left open as it may
create a dangerous obstacle.
• Keep detergent and rinse aid out of reach
of children.
• The packaging material should not be
used as a toy.
• Knives and other utensils with sharp
edges must be placed either with the
points/blades facing downwards in the
cutlery basket or horizontally on the tip-up
compartments or in the tray/third basket,
if available.
• Connect the appliance to the water mains
using the new supply hose provided with
the appliance. Do not re-use the old hose.
• Install the back side of a free-standing
dishwasher against a wall.
Disposal
• To dispose of any packaging materials,
follow local legislation so that the
packagings may be reused.
• The European Directive 2012/19/EU
relating to Waste Electrical and Electronic
Equipment (WEEE) states that household
appliances should not be disposed of
using the normal solid urban waste cycle.
Exhausted appliances should be collected
separately in order to optimise the cost of
reusing and recycling the materials inside
the machine, while preventing potential
damage to the atmosphere and public
health. The crossed-out dustbin symbol
shown on all products reminds the owners
of their obligations regarding separated
waste collection.
For further information relating to the
correct disposal of household appliances,
owners may contact the relevant public
authority or the local appliance dealer.
2
Page 3
Saving energy and respecting the
environment
Saving water and energy
• Only begin a wash cycle when the
dishwasher is full. While waiting for the
dishwasher to be filled, prevent unpleasant
odours with the Soak cycle
Wash Cycles).
(if available, see
• Select a wash cycle that is suited to the
type of crockery and to the soil level using
the Table of Wash Cycles:
- For dishes with a normal soil level, use
the Eco wash cycle, which guarantees low
energy and water consumption levels.
- If the load is smaller than usual activate
the Half Load option
and options, if available).
(see Special wash cycles
• If your electricity supply contract gives
details of electricity-saving time bands, run
the wash cycles when electricity prices are
lower. The Delayed Start option can help
you organise the wash cycles accordingly
(see Special wash cycles and options, if available).
FR
Précautions et conseils
CET appareil a été conçu et fabriqué
conformément aux normes internationales
de sécurité. Ces consignes sont fournies
pour des raisons de sécurité, il faut les lire
attentivement.
Conserver ce mode d’emploi pour pouvoir
le consulter à tout moment. En cas de vente,
de cession ou de déménagement, s’assurer
qu’il accompagne bien l’appareil.
Lire attentivement les instructions : elles
fournissent des conseils importants sur
l’installation, l’utilisation et la sécurité de
l’appareil.
Cet appareil est conçu pour un usage
domestique ou autres applications similaires,
telles que :
- fermes ;
- utilisation par les clients d’hôtels, de motels
ou autres locaux de type résidentiel ;
- chambres d’hôtes.
Déballer l’appareil et s’assurer qu’il n’a pas
été endommagé pendant le transport. S’il
est abîmé, ne pas le raccorder et contacter
le revendeur.
Sécurité générale
• Cet appareil électroménager peut être
utilisé par des enfants âgés de plus
de 8 ans et par des personnes dont
les capacités physiques, sensorielles
ou mentales sont réduites, ou encore
sans l'expérience ou la connaissance
nécessaire, mais sous l'étroite surveillance
d'un adulte responsable ou après que
ces personnes aient reçu des instructions
relatives à une utilisation en toute sécurité
de l'appareil et compris les dangers qui lui
sont inhérents.
• Les enfants ne doivent pas jouer avec
l'appareil.
• Le nettoyage et l'entretien de l'appareil
doivent être effectués par l'utilisateur. Ils ne
doivent pas être effectués par des enfants
sans surveillance.
• Cet appareil est conçu pour un usage de
type non professionnel à l'intérieur d'une
habitation.
• Cet appareil est destiné au lavage de
vaisselle à usage domestique et selon les
instructions reportées dans cette notice.
• Ne pas installer l’appareil à l’extérieur,
même dans un endroit protégé, car il est
extrêmement dangereux de l’exposer à la
pluie et aux orages.
• Ne pas toucher au lave-vaisselle pieds
nus.
• Ne jamais tirer sur le câble pour débrancher
la fiche de la prise de courant.
• Fermer le robinet de l’eau et débrancher la
fiche de la prise de courant après chaque
utilisation et avant d’effectuer tous travaux
de nettoyage et d’entretien.
• Le nombre maximal de couverts est
indiqué dans la fiche produit.
• En cas de panne, éviter à tout prix
d’accéder aux mécanismes internes pour
tenter une réparation.
• Ne pas s’appuyer à la porte ouverte ou s’y
asseoir : l’appareil pourrait basculer.
• Ne pas garder la porte ouverte pour éviter
de buter contre elle en risquant de se faire
mal.
• Garder les produits de lavage et de
rinçage hors de la portée des enfants.
• Les emballages ne sont pas des jouets
pour enfants.
• Les couteaux et ustensiles de cuisine à
bords tranchants doivent être disposés,
pointes et lames tournées vers le bas,
dans le panier à couverts ou, à plat, sur les
clayettes rabattables du panier supérieur
ou bien encore, si le modèle en est équipé,
dans le plateau ou troisième panier.
• L’appareil doit être raccordé à l’arrivée
3
Page 4

d’eau en le reliant avec le nouveau tuyau
d’arrivée. L’ancien tuyau d’arrivée ne doit
pas être réutilisé.
• Si le lave-vaisselle est en libre pose, le côté
arrière de ce dernier doit être placé contre
le mur.
Mise au rebut
• Mise au rebut du matériel d’emballage : se
conformer aux réglementations locales de
manière à ce que les emballages puissent
être recyclés.
• La directive européenne 2012/19/EU sur
les déchets d’équipements électriques
et électroniques (DEEE), prévoit que les
électroménagers ne peuvent pas être
traités comme des déchets solides urbains
normaux. Les appareils usagés doivent
être collectés séparément afin d’optimiser
le taux de récupération et le recyclage
des matériaux qui les composent et
réduire l’impact sur la santé humaine et
l’environnement Le symbole de la poubelle
barrée est appliqué sur tous les produits
pour rappeler qu’ils font l’objet d’une
collecte sélective.
Pour tout autre renseignement sur la
collecte des électroménagers usés, prière
de s’adresser au service public préposé
ou au vendeur.
Economies et respect de
l’environnement
Faire des économies d’eau et d’électricité
• Ne faire fonctionner le lave-vaisselle
que quand il est rempli au maximum de
sa capacité. Dans l’attente de remplir
l’appareil, lancer le cycle de Trempage
pour éviter la formation de mauvaises
odeurs
• Sélectionner un programme adapté
au type de vaisselle et à son degré de
salissure, consulter pour cela le Tableau
des programmes :
- pour de la vaisselle normalement sale,
choisir le programme Eco (économique),
il limite la quantité d’eau et d’électricité
utilisée.
- pour une quantité réduite de vaisselle,
choisir l’option Demi-charge
Programmes Spéciaux et Options).
• Si le contrat de fourniture d’électricité
prévoit des tranches horaires à prix réduit,
effectuer les lavages pendant ces heures
creuses. L’option Départ différé peut aider
à organiser les lavages dans ce sens
disponible voir Programmes Spéciaux et Options).
(si disponible - voir Programmes).
(si disponible voir
(
si
PL
Zalecenia i środki ostrożności
Niniejsze urządzenie zostało
zaprojektowane i wyprodukowane zgodnie z
międzynarodowymi normami
bezpieczeństwa. Poniższe ostrzeżenia
podane zostały ze względów bezpieczeństwa
i należy je uważnie przeczytać.
Należy zachować niniejszą książeczkę
instrukcji dla przyszłych konsultacji. W
przypadku sprzedaży, odstąpienia lub
przeprowadzki należy dopilnować, aby
została przekazana wraz z urządzeniem
nowemu właścicielowi.
Uważnie przeczytać instrukcję: zawiera
ona ważne informacje dotyczące instalacji,
użytkowania i bezpieczeństwa.
To urządzenie zostało zaprojektowane
do użytku domowego lub podobnych
zastosowań, na przykład:
- w domach kolonijnych;
- do użytku przez klientów w hotelach, motelach
i innych obiektach typu mieszkaniowego;
- w pensjonatach bed and breakfast.
Rozpakować urządzenie i sprawdzić, czy nie
zostało uszkodzone podczas transportu. Jeśli
okazałoby się uszkodzone, nie podłączać go,
lecz skontaktować się ze sprzedawcą.
Bezpieczeństwo ogólne
• Niniejsze urządzenie może być używane
przez dzieci powyżej 8 roku życia oraz
osoby o ograniczonych zdolnościach
fizycznych, zmysłowych i umysłowych
lub nie posiadające jego odpowiedniej
znajomości lub doświadczenia, pod
warunkiem, że znajdują się one pod
ścisłym nadzorem odpowiedzialnej za
nie osoby bądź też otrzymały instrukcje
dotyczące bezpiecznego użytkowania
urządzenia oraz zrozumiały związane z
nim zagrożenia.
• Dzieci nie powinny bawić się urządzeniem.
• Czyszczenie oraz konserwację urządzenia
musi przeprowadzać użytkownik. Nie mogą
być one przeprowadzane przez dzieci bez
nadzoru.
• Urządzenie jest przeznaczone do użytku
nieprofesjonalnego wewnątrz pomieszczeń
mieszkalnych.
• Urządzenie powinno być używane do
mycia naczyń w warunkach domowych
zgodnie z niniejszymi instrukcjami.
• Urządzenia nie należy instalować na
4
Page 5

świeżym powietrzu, nawet w miejscu
zadaszonym, gdyż wystawienie go na
działanie deszczu i burz jest bardzo
niebezpieczne.
• Nie dotykać zmywarki, stojąc boso na
podłodze.
• Przy wyjmowaniu wtyczki z gniazdka nie
ciągnąć za kabel, lecz trzymać za wtyczkę.
• Po zakończeniu każdego cyklu i przed
przystąpieniem do czyszczenia i
konserwacji urządzenia należy zamknąć
zawór wody i wyjąć wtyczkę z gniazdka.
• Maksymalna ilość nakryć jest podana w
karcie produktu.
• W razie uszkodzenia w żadnym wypadku
nie ingerować w wewnętrzne mechanizmy
urządzenia i nie próbować go samodzielnie
naprawiać.
• Nie opierać się ani nie siadać na otwartych
drzwiach: urządzenie mogłoby się
przewrócić.
• Nie należy pozostawiać otwartych drzwi
zmywarki, gdyż można się o nie potknąć.
• Trzymać detergenty i płyn nabłyszczający
z dala od dzieci.
• Opakowania nie są zabawkami dla dzieci.
• Noże i przyrządy o ostrych krawędziach
należy wkładać do kosza na sztućce, tak
aby czubki/ostrza były skierowane do dołu,
lub układać w położeniu poziomym na
półeczkach lub na tacy/trzecim koszu w
modelach, w których są one zainstalowane.
• Należy podłączyć urządzenie do
sieci wodnej, stosując nowy przewód
doprowadzający wodę; nie należy używać
starego przewodu.
• Podczas ustawiania zmywarek
wolnostojących, tylna część musi być
zwrócona w kierunku ściany.
przekreślonego kosza umieszczany
jest na wszystkich produktach w celu
przypominania o obowiązku segregacji
odpadów.
W celu uzyskania bliższych informacji na
temat prawidłowego złomowania urządzeń
gospodarstwa domowego ich właściciele
mogą się zwrócić do właściwych służb
publicznych lub do sprzedawców tych
urządzeń.
Oszczędność i ochrona środowiska
Oszczędność wody i energii
• Uruchamiać zmywarkę tylko z pełnym
ładunkiem. W oczekiwaniu na napełnienie
maszyny zapobiegać przykrym zapachom
przy pomocy cyklu namaczania
dostępny - zob. Programy).
• Wybierać programy odpowiednie do
rodzaju naczyń i stopnia zabrudzenia,
stosując się do Tabeli programów:
- dla naczyń normalnie zabrudzonych
stosować program Eco, który zapewnia
niskie zużycie energii i wody.
- przy ograniczonym ładunku włączyć opcję
Połowa ładunku
Programy specjalne i opcje).
(
jeśli jest on dostępny - zob.
• Jeśli zawarta umowa na dostawę energii
elektrycznej przewiduje strefy czasowe
oszczędności energetycznej, uruchamiać
zmywarkę w godzinach obowiązywania
niższej taryfy. Opcja Opóźnienia startu
może pomoc w takiej organizacji zmywania
(jeśli jest ona dostępny - zob. Programy specjalne i
opcje).
CZ
Opatření a rady
(jeśli jest on
Utylizacja
• Utylizacja materiałów opakowaniowych:
dostosować się do lokalnych przepisów;
w ten sposób opakowanie będzie mogło
zostać ponownie wykorzystane.
• Dyrektywa wspólnotowa 2012/19/EU w
sprawie zużytego sprzętu elektrycznego
i elektronicznego (WEEE) przewiduje,
że sprzęt gospodarstwa domowego nie
powinien być usuwany jako nieposortowane
odpady komunalne. Zużyte urządzenia
powinny podlegać selektywnej zbiórce w
celu uzyskania maksymalnego wskaźnika
odzysku i recyklingu ich materiałów
składowych oraz uniknięcia ewentualnych
zagrożeń dla zdrowia i środowiska. Symbol
Zařízení bylo navrženo a vyrobeno
v souladu s platnými mezinárodními
bezpečnostními předpisy. Tato upozornění
jsou uváděna z bezpečnostních důvodů a
je třeba si je pozorně přečíst.
Je velmi důležité tento návod uschovat,
aby jej bylo možné kdykoli dle potřeby
konzultovat. V případě prodeje, darování
nebo přestěhování zařízení se ujistěte, že
návod zůstane uložen v jeho blízkosti.
Pozorně si přečtěte uvedené pokyny:
Obsahují důležité informace o instalaci,
použití a bezpečnosti.
Toto zařízení bylo navrženo pro použití v
5
Page 6

domácnosti nebo pro podobné aplikace,
jako například:
- hospodářská stavení;
- použití zákazníky v hotelu, motelu nebo
jiných prostředích rezidenčního typu;
- penziony typu „bed and breakfast“.
Po rozbalení zařízení zkontroluje, zda
během přepravy nedošlo k jeho poškození.
V případě, že je poškozeno, je nezapojujte
a obraťte se na prodejce.
Základní bezpečnostní pokyny
• Tento elektrospotřebič mohou používat
děti ve věku od 8 let a osoby se sníženými
fyzickými, senzorickými nebo duševními
schopnostmi nebo osoby bez zkušeností
nebo potřebné znalosti, když jsou pod
dozorem odpovědné osoby, případně
poté, co jim byly poskytnuty pokyny
týkající se bezpečného použití zařízení
a pochopení souvisejících nebezpečí.
• Děti si nesmí hrát se zařízením.
• Čištění a údržbu zařízení musí provádět
uživatel. Nesmí je provádět děti bez
dozoru.
• Toto zařízení bylo navrženo výhradně pro
neprofesionální použití v domácnosti.
• Zařízení musí být používání na mytí
nádobí v domácnosti podle pokynů
uvedených v tomto návodu.
• Zařízení nesmí být nainstalováno venku,
a to ani v případě, že by se jednalo o
místo chráněné před nepřízní počasí,
protože je velmi nebezpečné vystavit jej
působení deště a bouří.
• Nedotýkejte se myčky nádobí bosýma
nohama.
• Nevytahujte zástrčku ze zásuvky
elektrického rozvodu tahem za kabel,
ale uchopením za zástrčku.
• Na konci každého cyklu a před
provedením operací čištění a údržby
je třeba zavřít kohoutek přívodu vody a
odpojit zástrčku ze zásuvky elektrického
rozvodu.
• Maximální počet jídelních souprav je
uveden v technickém listu výrobku.
• Při výskytu poruchy se v žádném případě
nepokoušejte o opravu vnitřních částí
zařízení.
• Neopírejte se o otevřená dvířka a
nesedejte si na ně: zařízení by se mohlo
převrátit.
• Dvířka nesmí zůstat v otevřené poloze,
protože by mohla představovat nebezpečí
zakopnutí.
• Udržujte mycí prostředek a leštidlo mimo
dosah dětí.
• Obaly nejsou hračky pro děti!
• Nože a nástroje s ostrými hroty musí být
umístěny do košíku na příbory s hroty/
ostřími obrácenými směrem dolů nebo
do vodorovné polohy na sklopné držáky
nebo na tác/do třetího koše u modelů,
jejichž je součástí.
• Zařízení musí být připojeno k rozvodu
vody novou přívodní hadicí a stará
přívodní hadice nesmí být znovu použita.
• Když se jedná o volně instalovatelnou
myčku nádobí, její zadní strana musí být
umístěna ke stěně.
Likvidace
• Likvidace obalových materiálů: Při jejich
odstraňování postupujte v souladu
s místním předpisy a dbejte na možnou
recyklaci.
• Evropská směrnice 2012/19/EU o odpadu
tvořeném elektrickými a elektronickými
zařízeními (RAEE) předpokládá, že
elektrospotřebiče nesmí být likvidovány
v rámci běžného pevného městského
odpadu. Vyřazená zařízení musí být
sesbírána zvlášť za účelem zvýšení
počtu recyklovaných a znovu použitých
materiálů, ze kterých jsou složena, a za
účelem zabránění možným ublížením na
zdraví a škodám na životním prostředí.
Symbolem je přeškrtnutý koš, který je
uveden na všech výrobcích s cílem
připomenout povinnosti spojené se
separovaným sběrem.
Podrobnější informace týkající
se správného způsobu vyřazení
elektrospotřebičů z provozu mohou
jejich držitelé získat tak, že se obrátí na
navrženou veřejnou instituci nebo na
prodejce.
Jak ušetřit a brát ohled na životní
prostředí
Šetření vodou a energií
• Uvádějte myčku nádobí do chodu pouze
tehdy, když je naplněna. Během čekání
na naplnění zařízení zabraňte vzniku
nepříjemného zápachu použitím cyklu
Namáčení
• Zvolte program vhodný pro druh nádobí
a stupeň znečištění; podívejte se do
Tabulky programů:
(je-li součástí - viz Programy)
.
6
Page 7

- pro běžně znečištěné nádobí použijte
program Eko, který zaručuje nízkou
spotřebu energie a vody.
- při menším množství nádobí použijte
volitelnou funkci Poloviční náplň
součástí - viz Speciální programy a Volitelné funkce).
(je-li
• V případě, že vaše smlouva na dodávku
elektrické energie předpokládá používání
časových pásem pro šetření elektrickou
energií, provádějte mytí v časových
pásmech se sníženou sazbou. Volitelná
funkce Odložený start může napomoci
organizaci mycích cyklů uvedeným
způsobem
a Volitelné funkce).
SK
Opatrenia a rady
(
je-li součástí - viz Speciální programy
Zariadenie bolo navrhnuté a vyrobené
v súlade s medzinárodnými bezpečnostnými
normami. Tieto upozornenia sú uvádzané
z bezpečnostných dôvodov a je potrebné
si ich pozorne prečítať.
Je dôležité tento návod uschovať, kvôli
prípadnému neskoršiemu nahliadnutiu.
V prípade predaja, darovania alebo
presťahovania zariadenia zabezpečte, aby
návod zostal vždy jeho súčasťou.
Pozorne si prečítajte uvedené pokyny: Sú
zdrojom dôležitých informácií, týkajúcich
sa inštalácie, použitia a bezpečnosti.
Toto zariadenie bolo navrhnuté pre použitie
v domácnosti alebo pre podobné aplikácie,
ako napríklad:
- hospodárske príbytky;
- použitie zákazníkmi v hoteli, moteli alebo
iných rezidenčných zariadeniach;
- penzióny typu „bed and breakfast“.
Po rozbalení zariadenia skontrolujte, či
počas prepravy nedošlo k jeho poškodeniu.
Ak je poškodené, nezapájajte ho a obráťte
sa na predajcu.
Základné bezpečnostné pokyny
• Tento elektrospotrebič smú používať deti
vo veku do 8 rokov a osoby so zníženými
fyzickými, zmyslovými alebo duševnými
schopnosťami, alebo osoby bez
skúseností alebo potrebných znalostí, len
ak sú pod dozorom zodpovednej osoby,
alebo ak boli poučení o bezpečnom
použití zariadenia a ak pochopili súvisiace
nebezpečenstvá.
• Deti sa so zariadením nesmú hrať.
• Čistenie a údržbu zariadenia musí
vykonávať užívateľ. Túto činnosť nesmú
vykonávať deti bez dozoru.
• Toto zariadenie bolo navrhnuté pre
neprofesionálne použitie vo vnútri bytu/
domu.
• Zariadenie musí byť používané na
umývanie riadu v domácnosti, podľa
pokynov uvedených v tomto návode.
• Zariadenie nesmie byť nainštalované
v exteriéri, a to ani v prípade, keď sa
jedná o chránený priestor, pretože
jeho vystavenie dažďu alebo búrke je
mimoriadne nebezpečné.
• Nedotýkajte sa umývačky riadu bosými
nohami.
• Nevyťahujte zástrčku zo zásuvky
elektrickej siete ťahaním za kábel, ale
uchopením za zástrčku.
• Na konci každého cyklu pred čistením
a údržbou je potrebné zatvoriť kohútik
prívodu vody a odpojiť zástrčku zo
zásuvky elektrického rozvodu.
• Maximálny počet jedálenských súprav je
uvedený v technickom liste výrobku.
• V prípade poruchy sa v žiadnom prípade
nepokúšajte zasahovať do vnútorných
častí, v snahe o opravu.
• Neopierajte sa o otvorené dvierka a
nesadajte si na ne: zariadenie by sa
mohlo prevrátiť.
• Nenechávajte dvierka otvorené, pretože
by ste mohli o ne zakopnúť.
• Udržujte umývací prostriedok a leštidlo
mimo dosahu detí.
• Obaly nie sú hračky pre deti!
• Nože a náradie s ostrými hrotmi musia
byť uložené do košíka na príbory hrotmi/
ostrím obráteným smerom dolu, alebo
musia byť uložené do vodorovnej polohy
na sklopné držiaky alebo na podnos/do
tretieho koša, ak je súčasťou daného
modelu.
• Zariadenie musí byť pripojené k rozvodu
vody novou prívodnou hadicou a stará
prívodná hadica nesmie byť opätovne
7
Page 8

použitá.
• Ak sa jedná o voľne inštalovateľnú
umývačku riadu, jej zadná strana musí
byť umiestnená ku stene.
Likvidácia
• Likvidácia obalových materiálov: Obaly
zlikvidujte v súlade s miestnymi predpismi
kvôli umožneniu ich recyklácie.
• Európska smernica 2012/19/EU o odpade
z elektrických a elektronických zariadení
(OEEZ) predpisuje, že elektrospotrebiče
nesmú byť zlikvidované v rámci bežného
tuhého komunálneho odpadu. Vyradené
zariadenia musia byť zozbierané
separovane kvôli optimalizácii stupňa
opätovného použitia a recyklácie
materiálov, z ktorých sú vyrobené,
a kvôli zamedzeniu možných škôd
na zdraví a na životnom prostredí.
Symbol preškrtnutého koša, uvedený na
všetkých takýchto výrobkoch, upozorňuje
na povinnosti spojené so separovaným
zberom.
Podrobnejšie informácie, týkajúce
sa správneho spôsobu vyradenia
elektrospotrebičov z prevádzky, môžu
ich držitelia získať od poverenej verejnej
inštitúcie alebo od predajcu.
Ako ušetriť a brať ohľad na životné
prostredie
Šetrenie vodou a energiou
• Používajte umývačku riadu len vtedy,
keď je naplnená. Počas čakania na
naplnenie zariadenia zabráňte vzniku
nepríjemného zápachu spustením cyklu
Namáčania
• Zvoľte program vhodný pre druh riadu
a stupeň znečistenia podľa Tabuľky
programov:
- pre bežné znečistenie riadu použite
program Eko, ktorý zaručuje nízku
spotrebu energie a vody.
- pri menšom množstve riadu použite
voliteľnú funkciu Polovičná náplň
je súčasťou - viď Špeciálne programy a Voliteľné
funkcie).
• V prípade dodávky elektrickej energie
v časových pásmach pre šetrenie
elektrickou energiou, používajte
umývačku v časových pásmach so
(ak je súčasťou - viď Programy)
.
(ak
zníženou sadzbou. Voliteľná funkcia
Oneskorený štart vám umožní používať
umývačku práve v tomto čase
súčasťou - viď Špeciálne programy a Voliteľné
funkcie).
BG
Предпазни мерки и съвети
(
ak je
Уредът е проектиран и конструиран в
съответствие с международните норми за
безопасност.
Тези предупреждения се дават от
съображения за безопасност и трябва да
бъдат прочетени внимателно.
Важно е да съхраните тази инструкция,
за да можете да направите справка във
всеки момент. В случай на продажба,
преотстъпване или преместване се
уверете, че инструкцията придружава
уреда.
Прочетете внимателно инструкцията: в нея
има важна информация за свързването на
уреда, използването му и безопасността
при работа.
Този уред е предназначен за домашна
употреба или за подобни приложения,
като:
– вили/селски къщи;
– оборудване за използване от клиентите
на хотели, мотели и други жилищни сгради;
– къщи за гости.
Разопаковайте уреда и проверете дали
не се е повредил по време на транспорта.
Ако е повреден, не го свързвайте, а се
обърнете към продавача.
Обща безопасност
• Този електродомакински уред може
да се ползва от деца на минимум
осемгодишна възраст и от лица с
ограничени физически, сетивни или
умствени способности или без опит или
необходимите познания, ако бъдат под
наблюдение или са получили инструкции
относно безопасното използване на
уреда или запознаването със свързаните
с него опасности.
• Децата не трябва да си играят с уреда.
• Почистването и поддръжката на уреда
трябва да се извършва от ползвателя.
Не трябва да се извършва от деца без
надзор.
• Уредът е предвиден за непрофесионална
8
Page 9

употреба в домашни условия на закрито.
• Уредът трябва да се използва за миене
на съдове в домакинството и съгласно
дадените в това ръководство указания.
• Машината в никакъв случай не трябва
да се инсталира на открито, дори когато
мястото е защитено с навес, тъй като
излагането й на дъжд и бури е много
опасно.
• Не докосвайте миялната машина с боси
крака.
• При изключване на щепсела от контакта
не хващайте кабела, а дръпнете самия
щепсел.
• С приключването на всеки цикъл и
преди почистване или поддръжка трябва
да затворите крана за водата и да
изключите щепсела от контакта.
• Максималният брой съдове е посочен на
информационната листовка на уреда.
• При повреда в никакъв случай не
правете опити да поправите вътрешните
механизми.
• Не се облягайте и не сядайте върху
отворената врата: уредът би могъл да
се преобърне.
• Вратата не трябва да се държи отворена,
тъй като може да създаде опасност от
спъване.
• Съхранявайте миещия препарат и
гланца на място, недостъпно за деца.
• Опаковките не са детски играчки.
• Острите ножове и прибори трябва да
бъдат поставяни в кошницата с върха/
острието надолу,и хоризонтално на
рампите или на таблата/третата кошница
при моделите, в които са налични.
• Уредът трябва да бъде свързан към
водопроводната мрежа посредством
новия маркуч за подаване на водата,
като старият не бива да се използва
отново.
• Ако миялната машина е
свободностояща,задната й страна
трябва да опира в стена.
Изваждане от употреба
• Изхвърляне на амбалажния материал:
придържайте се към местните норми,
така опаковките ще могат да се използват
повторно.
• Европейската директива 2012/19/EС за
отпадъците от електрическо и електронно
оборудване предвижда домакинските
електроуреди да не се изхвърлят заедно
с обичайните твърди градски отпадъци.
Извадените от употреба уреди трябва
да бъдат събирани отделно с цел да
бъде увеличен дялът на подлежащите
на повторна употреба и рециклиране
материали, от които са направени, както
и да бъдат избегнати евентуални вреди
за човешкото здраве и околната среда.
Символът зачеркнато кошче е поставен
върху всички продукти, за да напомня за
задължителното разделно събиране.
За по-нататъшна информация относно
правилното изваждане от употреба
на домакинските електроуреди,
притежателите им могат да се обърнат
към съответния обществен отдел за
услуги или към продавачите на тези
уреди.
Икономии и опазване на околната
среда
Икономия на вода и енергия
• Пускайте миялната машина само при
пълен капацитет. Докато изчаквате
да се напълни машината, може да
предотвратите появата на неприятна
миризма с цикъл „Накисване“
наличен - виж Програми).
• Изберете програма, подходяща за вида
съдове и степента им на замърсеност,
като направите справка с Таблица на
програмите:
- за нормално замърсени съдове
използвайте програмата „Еко“, която
осигурява нисък разход на енергия и
вода.
- ако зареждате с по-малко съдове,
пуснете машината на опцията Половин
зареждане
програми и опции)
(където е налична - виж Специални
• Ако вашият договор за снабдяване
с електрическа енергия предвижда
часови период с пестене на енергия,
използвайте миялната машина в
часовете с намалена тарифа. Опцията
„Отложен старт“ може да подпомогне
задаването на измиванията по тази
система
програми и опции).
(където е налична - виж Специални
(
където е
9
Page 10
EN
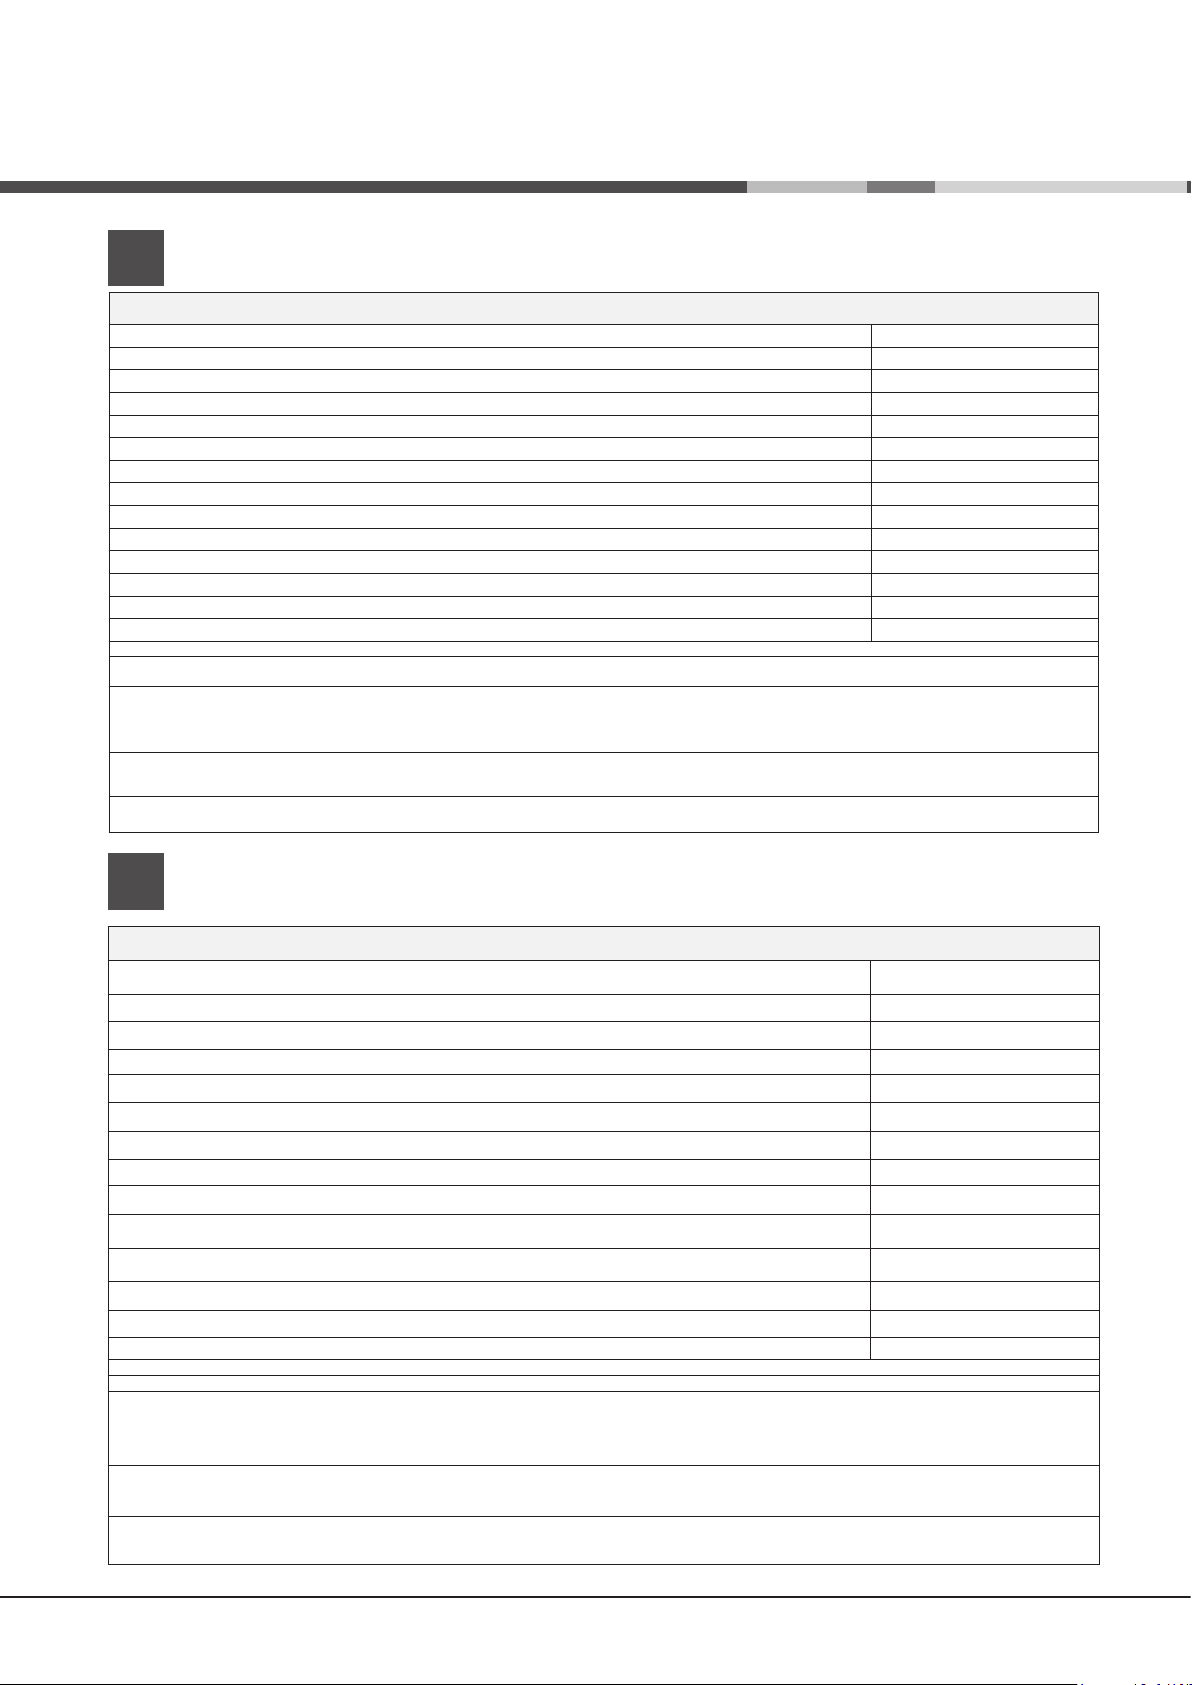
Product Data (product fiche)
Product Fiche
Brand
Model
Rated capacity in standard place settings (1)
Energy efciency class on a scale from A+++ (low consumption) to D (high consumption)
Energy consumption per year in kWh (2)
Energy consumption of the standard cleaning cycle in kWh
Power consumption of the off-mode in W
Power consumption of the left-on mode in W
Water consumption per year in litres (3)
Drying efcacy class on a scale from G (low efcacy) to A (high efcacy)
Programme time for standard cleaning cycle in minutes
The duration of the left-on mode in minutes
Noise in dB(A) Re 1pW
Built-in model
HOTPOINT ARISTON
LSFF 8M117
10
A+
237
0.83
0.5
5.0
2520
A
180
12
47
No
NOTES
1) The information on the label and che relates to the standard cleaning cycle, this programme is suitable to clean normally soiled
tableware and it is the most efcient programme in terms of combined energy and water consumption. The standard cleaning cycle
corresponds to the Eco cycle.
2) Based on 280 standard cleaning cycles using cold water ll and the consumption of the low power modes. Actual energy consumption
depends on how the appliance is used.
3) Based on 280 standard cleaning cycles. Actual water consumption depends on how the appliance is used.
FR
Fiche de produit
Fiche de produit
Marque
Modèle
Capacité nominale dans un environnement standard (1)
Classe énergétique sur une échelle de A+++ (faible consommation) à D (consommation élevée)
Consommation d''énergie par année en kWh (2)
Consommation d''énergie du cycle de lavage standard en kWh
Consommation d''energie en mode "off" en W
Consommation d''energie en mode "on" en W
Consommation d''eau par an en litres (3)
Classe d’efcacité du séchage sur une échelle de G (efcacité minimum) à A (efcacité maximum)
Durée du programme pour un cycle de lavage standard en minutes
Durée du mode "on" en minutes
Émissions acoustiques dans l’air, exprimées en dB(A) re 1 pW
Encastrable
HOTPOINT ARISTON
LSFF 8M117
10
A+
237
0.83
0.5
5.0
2520
A
180
12
47
NO
NOTES
1) Les informations sur l’étiquette et sur la che se rapportent au cycle de lavage standard. Ce programme convient pour laver
une vaisselle normalement sale, et il s’agit des programmes les plus efcaces en termes de consommation combinée d’eau et
d’énergie. Le cycle de lavage standard correspond au cycle éco.
2) Sur la base de 280 cycles de lavage standard avec une alimentation en eau froide et une consommation en modes à faible
puissance. La consommation réelle d’énergie dépend des conditions d’utilisation de l’appareil
3) Sur la base de 280 cycles de lavage standard. La consommation réelle d’énergie dépend des conditions d’utilisation de
l’appareil.
10
Page 11
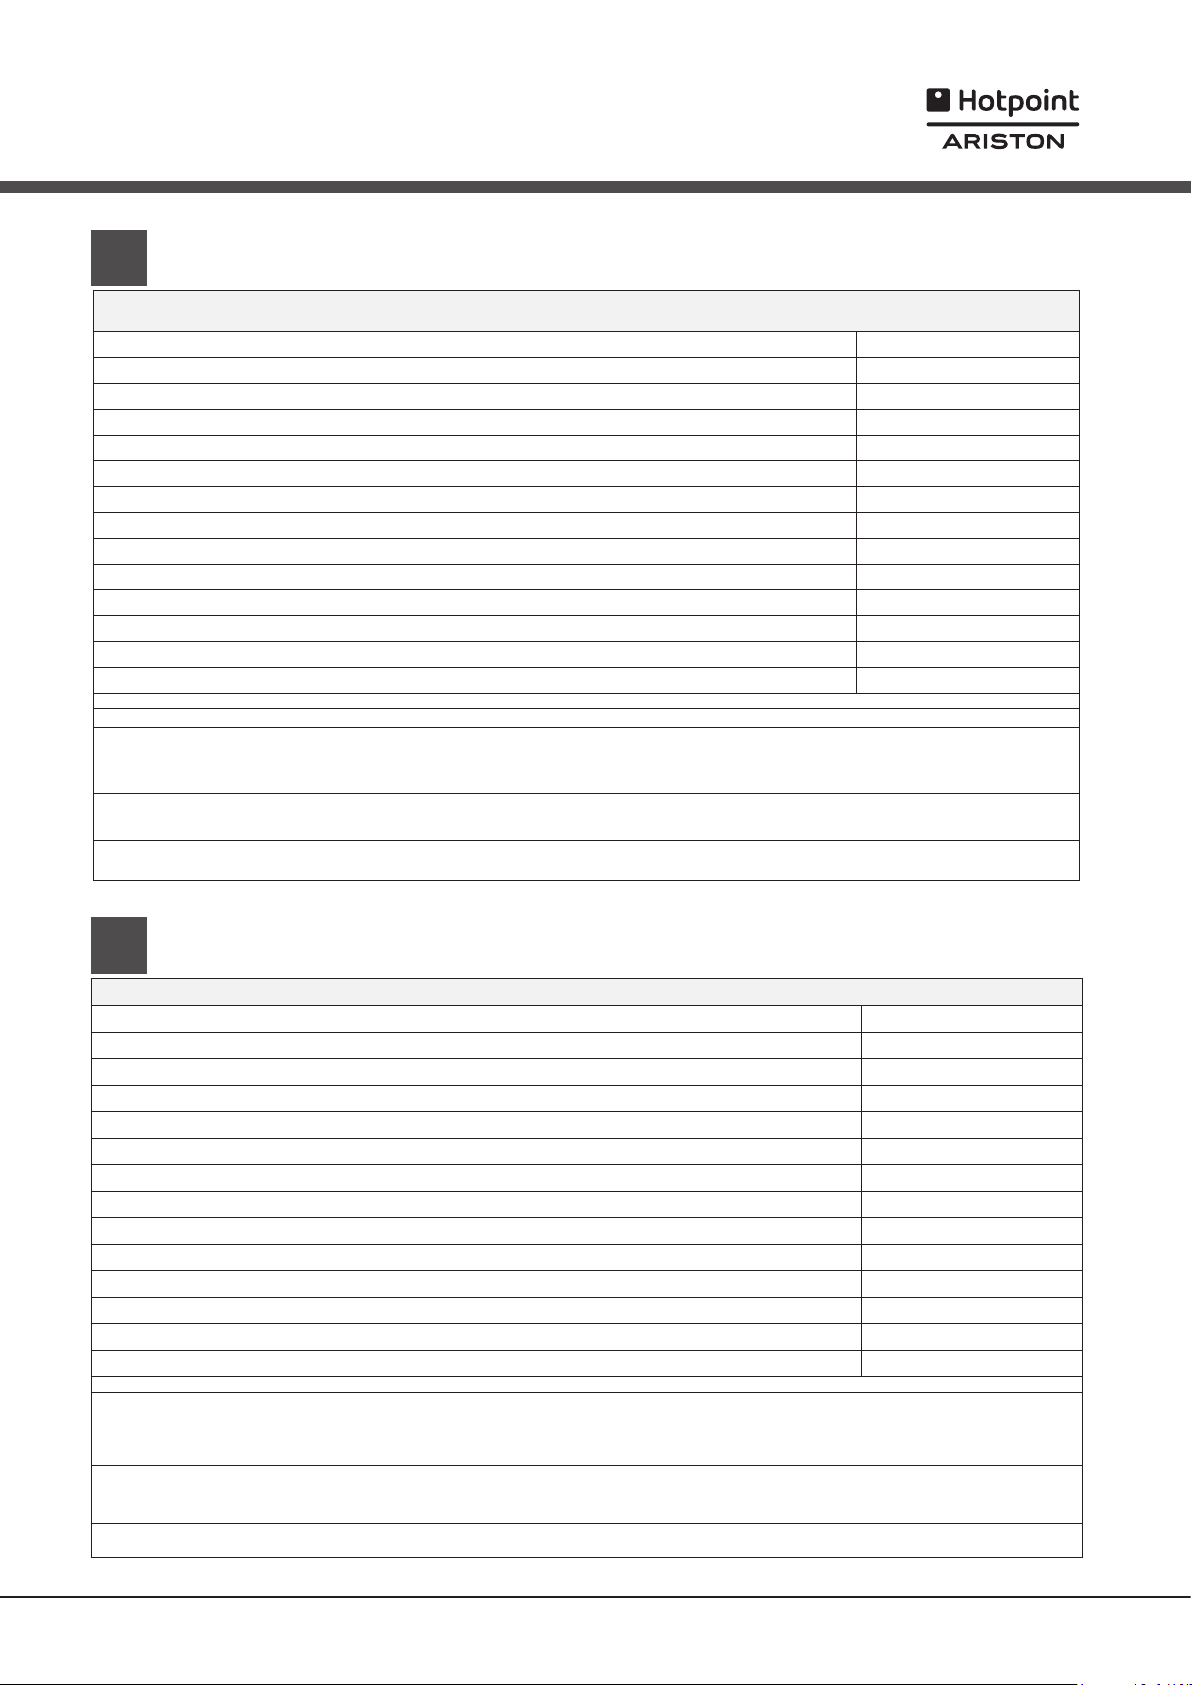
PL
Karta produktu
Karta produktu
Marka
Nazwa modelu
Pojemność znamionowa, wyrażona liczbą standardowych kompletów naczyń (1)
Klasa efektywności energetycznej, skla od A+++ (niskie zużycie) do D (wysokie zużycie)
Zużycie energii w kWh rocznie (2)
Zużycie energii w standardowym cyklu zmywania w kWh
Zużycie energii w trybie wyłączenia i trybie czuwania w W
Zużycie energii w trybie włączenia i trybie czuwania w W
Roczne zużycie wody w litrach rocznie (3)
Klasa efektywności suszenia, skala od G (minimalna efektywność) do A (maksymalna efektywność)
Czas programu dla standardowego cyklu zmywania w minutach
Czas trwania trybu czuwania w minutach
Poziom emitowanego hałasu w dB(A) re1 pW
Model do zabudowy
Uwagi
1) Informacja, że cykl jest odpowiedni do zmywania normalnie zabrudzonych zastaw stołowych oraz że jest najbardziej efektywnym
programem pod względem łącznego zużycia energii i wody dla tego rodzaju zastawy stołowej; Standardowy cykl zmywania odpowiada
cyklowi Eco.
2) Na podstawie 280 standardowych cykli zmywania, przy użyciu zimnej wody, oraz w trybie niskiego zużycia energii. Rzeczywiste
zużycie energii zależy od sposobu użycia urządzenia.
3) Na podstawie 280 standardowych cykli zmywania. Rzeczywiste zużycie energii zależy od sposobu użycia urządzenia.
HOTPOINT ARISTON
LSFF 8M117
10
A+
237
0.83
0.5
5.0
2520
A
180
12
47
Nie
CS
Informační list výrobku
Informační list výrobku
Značka
Model
Kapacita počtu standardních sad nádobí (1)
Třída energetické účinnosti na stupnici A+++ (nejnižší spotřeba) až D (vysoká spotřeba)
Roční spotřeba energie v kWh (2)
Spotřeba energie standardního mycího cyklu v kWh
Spotřeba energie ve vypnutém stavu ve W
Spotřeba energie v režimu ponechání v zapnutém stavu ve W
Roční spotřeba vody v litrech za rok (3)
Třída účinnosti sušení na stupnici od G (minimální účinnost) až po A (maximální účinnost)
Délka programu při standardním mycím cyklu v minutách
Délka režimu ponechání v zapnutém stavu v minutách
Emise hluku v dB(A) re 1 pW
Vestavný spotřebič
1) Informace uvedené na štítku a v informačním listu se vztahují na standardní mycí cyklus. Tento program je vhodný pro mytí
běžně znečištěného nádobí. Jedná se o nejúčinnější program z hlediska kombinované spotřeby energie a vody. Standardní mycí
cyklus koresponduje s cyklem Eco.
2) Na základě 280 standardních mycích cyklů při použití studené vody a spotřeby v režimu nízké spotřeby energie. Skutečná
spotřeba energie závisí na tom, jak je spotřebič používán.
HOTPOINT ARISTON
LSFF 8M117
10
A+
237
0.83
0.5
5.0
2520
A
180
12
47
Ne
3) Na základě 280 standardních mycích cyklů. Skutečná spotřeba vody závisí na tom, jak je spotřebič používán.
11
Page 12
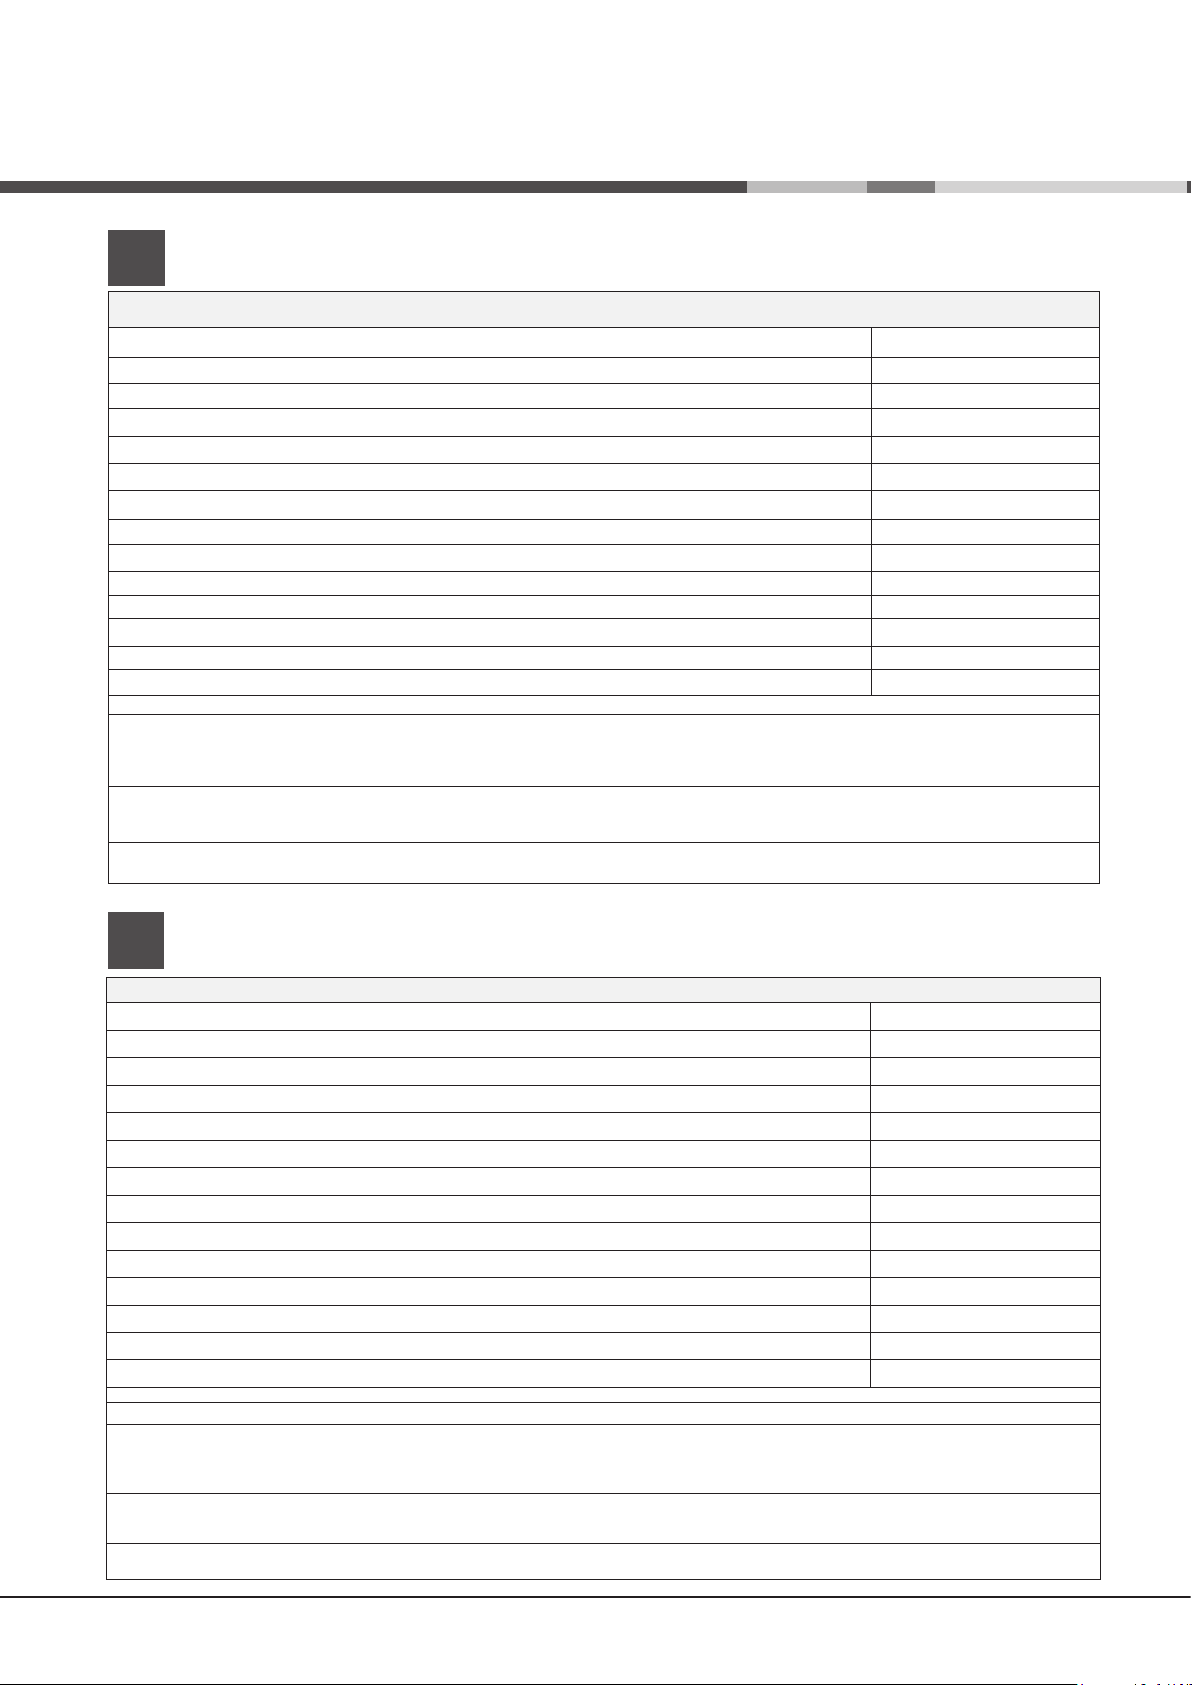
SK
Opis výrobku
Opis výrobku
Značka
Model
Kapacita počtu štandardných súprav riadu (1)
Trieda energetickej účinnosti na stupnici A+++ (najnižšia spotreba) až D (vysoká spotreba)
Ročná spotreba energie v kWh (2)
Spotreba energie štandardného umývacieho cyklu v kWh
Spotreba energie vo vypnutom stave vo W
Spotreba energie v režime ponechania v zapnutom stave vo W
Ročná spotreba vody v litroch za rok (3)
Trieda účinnosti sušenia na stupnici od G (minimálna účinnosť) až po A (maximálna účinnosť)
Dĺžka programu pri štandardnom umývacom cykle v minútach
Dĺžka režimu ponechania v zapnutom stave v minútach
Emisa hluku v dB(A) re 1 pW
Vstavaný spotrebič
1) Informácie uvedené na štítku a v informačnom liste sa vzťahujú na štandardný umývací cyklus. Tento program je vhodný
na umývanie bežne znečisteného riadu. Jedná sa o najúčinnejší program z hľadiska kombinovanej spotreby energie a vody.
Štandardný umývací cyklus korešponduje s cyklom Eco.
2) Na základe 280 štandardných umývacích cyklov pri použití studenej vody a spotreby v režime nízkej spotreby energie.
Skutočná spotreba energie závisí na tom, ako je spotrebič používaný.
HOTPOINT ARISTON
LSFF 8M117
10
A+
237
0.83
0.5
5.0
2520
A
180
12
47
Nie
3) Na základe 280 štandardných umývacích cyklov. Skutočná spotreba vody závisí na tom, ako je spotrebič používaný.
BG
Продуктов фиш
Продуктов фиш
Марка
Модел
Капацитет на стандартни комплекти за миене (1)
Енергиен клас от А+++ (ниска консумация) до D (висока консумация)
Годишна консумация на енергия в kWh (2)
Консумация на енергия при стандартна програма на миене в kWh
Консумация на мощност при изключен режим в W
Консумация на мощност при включен режим в W
Годишна консумация на вода в литри (3)
Клас на изсушаване от G (най-мокро) до A (най-сухо)
Продължителност в минути на стандартна програма за миене
Продължителност на включен режим в минути
Ниво на шум в dB(A) re 1 pW
Модел за вграждане
Забележки
1) Информацията върху енергийния стикер и информационния фиш е на база на 280 страндартни цикъла на измиване.
Програма е подходяща за нормално замърсени съдове и е най-ефективната като комбинация за потребление на електроенергия
и вода. Стандартната прогама на измиване отговаря на Еко програма.
2) На база на 280 страндартни цикъла на измиване със студена вода и инономични програми . Реалната консумация на
електроенергия зависи от начина на експлоатиране на уреда.
3) На база на 280 страндартни цикъла на измиване. Реалната консумация на вода зависи от начина на експлоатиране на уреда.
HOTPOINT ARISTON
LSFF 8M117
10
A+
237
0.83
0.5
5.0
2520
A
180
12
47
He
12
Page 13
EN
Assistance
CS
Servisní služba
Before contacting Assistance:
• Check whether the problem can be resolved using the
Troubleshooting guide
• Restart the programme to check whether the problem
has ceased to exist.
• If the problem persists, contact the Authorised Technical
Assistance Service.
Never use the services of unauthorised technicians.
Please have the following information to hand:
• The type of malfunction.
• The appliance model (Mod.).
• The serial number (S/N).
This information can be found on the appliance data plate
(see Description of the appliance)
FR
Service
Avant d’appeler le service d’assistance technique:
• Vérifier s’il est possible de résoudre l’anomalie soi-même
(voir Anomalies et remèdes).
• Faire repartir le programme pour s’assurer que
l’inconvénient a été résolu.
• Si ce n’est pas le cas, contacter un Service d’Assistance
Technique agréé.
Ne jamais faire appel à des techniciens non agréés.
Communiquer:
• le type d’anomalie;
• le modèle de l’appareil (Mod.);
• le numéro de série (S/N).
Ces informations figurent sur la plaque signalétique
apposée sur l’appareil
(see Troubleshooting).
.
(voir Description de l’appareil).
Před přivoláním servisní služby:
• Zkontrolujte, zda nejste schopni poruchu odstranit sami
(viz Poruchy a způsob jejich odstranění).
• Znovu uveďte do chodu mycí program s cílem ověřit,
zda byla porucha odstraněna.
• V případě negativního výsledku se obraťte na
Autorizovanou servisní službu.
Nikdy se neobracejte s žádostí o pomoc na
neautorizované techniky.
Při hlášení poruchy uveďte:
• druh poruchy;
• model zařízení (Mod.);
• výrobní číslo (S/N).
Tyto informace jsou uvedeny na štítku s jmenovitými údaji,
umístěném na zařízení. (viz Popis zařízení).
Servisná služba
SK
Skôr ako sa obrátite na Servisnú službu:
• Skontrolujte, či nie ste schopní poruchu odstrániť sami
(viď Poruchy a spôsob ich odstránenia).
• Opätovne uveďte do chodu umývací program, s cieľom
overiť, či bola porucha odstránená.
• V prípade negatívneho výsledku sa obráťte na Servisnú
službu alebo na autorizovaného technika;
Nikdy sa neobracajte so žiadosťou o pomoc na
neautorizovaných technikov.
Pri hlásení poruchy uveďte:
• druh poruchy;
• model zariadenia (Mod.);
• výrobné číslo (S/N).
Tieto informácie sú uvedené na štítku s technickými údajmi,
umiestnenom na zariadení. (viď Popis zariadenia).
PL
Serwis Techniczny
Przed zwróceniem się do Serwisu Technicznego:
• Sprawdzić, czy problemu nie można rozwiązać
samodzielnie
sposoby ich usuwania).
• Ponownie uruchomić program, aby przekonać się, czy
usterka nie ustąpiła.
• W przeciwnym wypadku skontaktować się z
autoryzowanym Serwisem Technicznym.
Zwracać się wyłącznie do autoryzowanych
techników.
Podać:
• rodzaj nieprawidłowości;
• model urządzenia (Mod.);
• numer seryjny (S/N).
Informacje te znajdują się na tabliczce znamionowej
umieszczonej na urządzeniu
(patrz Nieprawidłowości w działaniu i
(patrz Opis urządzenia).
BG
Помощ
Преди да се свържете с отдела за помощ:
• Проверете дали проблемът може да се разреши,
като използвате насоките в “Отстраняване на
неизправности”
неизправности”).
• Рестартирайте програмата, за да проверите дали
проблемът все още съществува.
• Ако проблема не е отстранен, свържете се с
оторизиран сервиз за техническа помощ.
Никога не използвайте услугите на
неупълномощени техници.
Подгответе следната информация:
• тип на повредата.
• модел на уреда (Mod.).
• сериен номер (S/N).
Можете да намерите тази информация на табелката с
данни на уреда
(виж “Отстраняване на
(виж “Описание на уреда”)
.
13
Page 14
Installation
EN
If the appliance must be moved at any time, keep it in an
upright position; if absolutely necessary, it may be tilted onto
its back.
Connecting the water supply
Adaptation of the water supply for installation should only
be performed by a qualified technician.
The water inlet and outlet hoses may be positioned towards
the right or the left in order to achieve the best possible
installation.
Make sure the dishwasher does not bend or squash the
hoses.
Connecting the water inlet hose
• To a 3/4” gas cold or hot water connection point (max.
60°C).
• Run the water until it is perfectly clear.
• Screw the inlet hose tightly into position and turn off the
tap.
If the inlet hose is not long enough, contact a specialist
store or an authorised technician
The water pressure must be within the values indicated
in the Technical Data table - otherwise the dishwasher may
be function properly.
Make sure the hose is not bent or compressed.
(see Assistance)
.
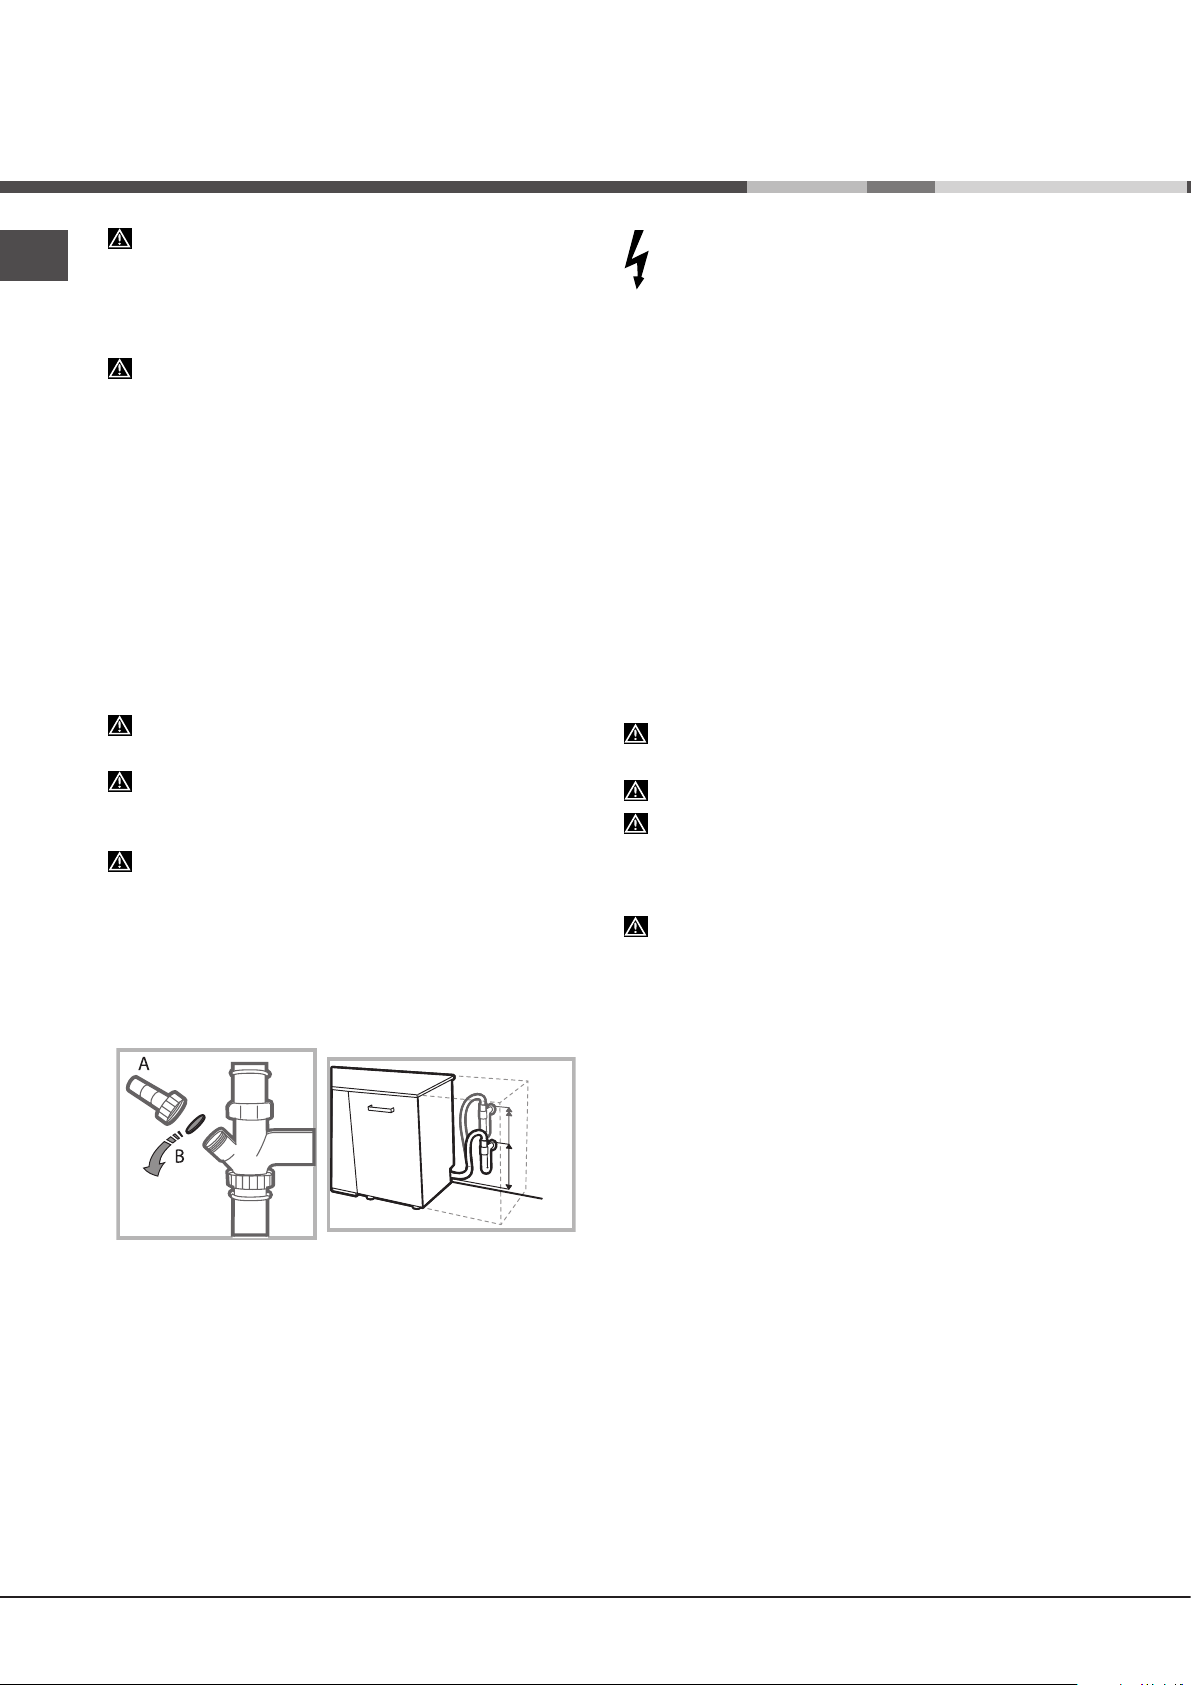
Connecting the water outlet hose
Connect the outlet hose to a drain duct with a minimum
diameter of 2 cm. (A)
The outlet hose connection must be at a height ranging from
40 to 80 cm from the floor or surface where the dishwasher
rests.
MAX 80 cm
MIN 40 cm
Before connecting the water outlet hose to the sink drain,
remove the plastic plug (B).
WARNING: HAZARDOUS VOLTAGE!
Under no circumstances should the water inlet hose be cut
as it contains live electrical parts.
Electrical connection
Before inserting the plug into the electrical socket, make
sure that:
• The socket is earthed and complies with current
regulations;
• the socket can withstand the maximum load of the
appliance as shown on the data plate located on the inside
of the door
(see chapter Description of the appliance);
• The power supply voltage falls within the values indicated
on the data plate on the inside of the door.
• The socket is compatible with the plug of the appliance. If
this is not the case, ask an authorised technician to replace
the plug (
multiple sockets.
Once the appliance has been installed, the power supply
cable and the electrical socket should be easily accessible.
The cable should not be bent or compressed.
If the power supply cable is damaged, have it replaced
by the manufacturer or its authorised Technical Assistance
Service in order to prevent all potential hazards.
see Assistance
). Do not use extension cables or
(See
Assistance)
The Company shall not be held responsible for any
incidents, if these regulations are not observed.
Positioning and levelling
1. Position the dishwasher on a level sturdy floor. If the floor is
uneven, the front feet of the appliance may be adjusted until
it reaches a horizontal position. If the appliance is levelled
correctly, it will be more stable and much less likely to move
or cause vibrations and noise while it is operating.
2. Before recessing the dishwasher, stick the adhesive
transparent strip* under the wooden shelf in order to protect
it from any condensation which may form.
3. Place the dishwasher so that its sides or back panel are in
contact with the adjacent cabinets or the wall. This appliance
can also be recessed under a single worktop*
Assembly instruction sheet)
.
(see the
Anti-flooding protection
To ensure floods do not occur, the dishwasher:
- is provided with a special system which blocks the water
supply in the event of anomalies or leaks from inside the
appliance.
Some models are also equipped with the supplementary
safety device New Acqua Stop*, which guarantees antiflooding protection even in the event of a supply hose rupture.
14
4*. To adjust the height of the rear foot, turn the red hexagonal
bushing on the lower central part at the front of the dishwasher
using a hexagonal spanner with an opening of 8 mm. Turn the
spanner in a clockwise direction to increase the height and
in an anticlockwise direction to decrease it.
(see Building-in
instruction sheet attached to the documentation)
* Only available in selected models.
Page 15
Advice regarding the first wash cycle
After the installation, remove the stoppers from the racks and
the retaining elastic elements from the upper rack
(if any).
Water softener settings
Before starting the first wash cycle, set the hardness level of the water from the mains supply.
(see chapter Rinse
aid and refined salt).
First load the softener tank with water, then introduce about
1 kg of salt. It is perfectly normal for water to flow out.
As soon as this procedure is complete, run a wash cycle.
Only use salt that has been specifically designed for dishwashers.
After the salt has been poured into the machine, the LOW
SALT indicator light* switches off.
If the salt container is not filled, the water softener and
the heating element may be damaged as a result.
Technical data
width 45 cm
Dimensions
Capacity 10 standard place-settings
Water supply pressure
Power supply voltage See appliance data plate
height 85 cm
depth 60 cm
0,05 ÷ 1MPa (0.5 ÷ 10 bar)
7,25 psi – 145 psi
The machine has a buzzer/set of tones
dishwasher model
been implemented: power on, cycle end etc.
The symbols/indicator lights/LEDs on the control panel/
display may vary in colour and may have a flashing or fixed
light
(depending on the dishwasher model)
The display* provides useful information concerning the
type of wash cycle, drying/wash-cycle phase, remaining
time, temperature etc.
) to inform the user that a command has
(depending on the
.
EN
Total absorbed power See appliance data plate
Fuse See appliance data plate
This dishwasher conforms to the
following European Community
Directives:
-2006/95/EC (Low Voltage)
-2004/108/EC (Electromagnetic
Compatibility)
-2009/125/EC (Comm. Reg.
1016/2010) (Ecodesign)
-97/17/EC (Labelling)
-2012/19/ CE Waste Electrical
and Electronic Equipment (WEEE)
* Only available in selected models.
15
Page 16
Description of the
appliance
EN
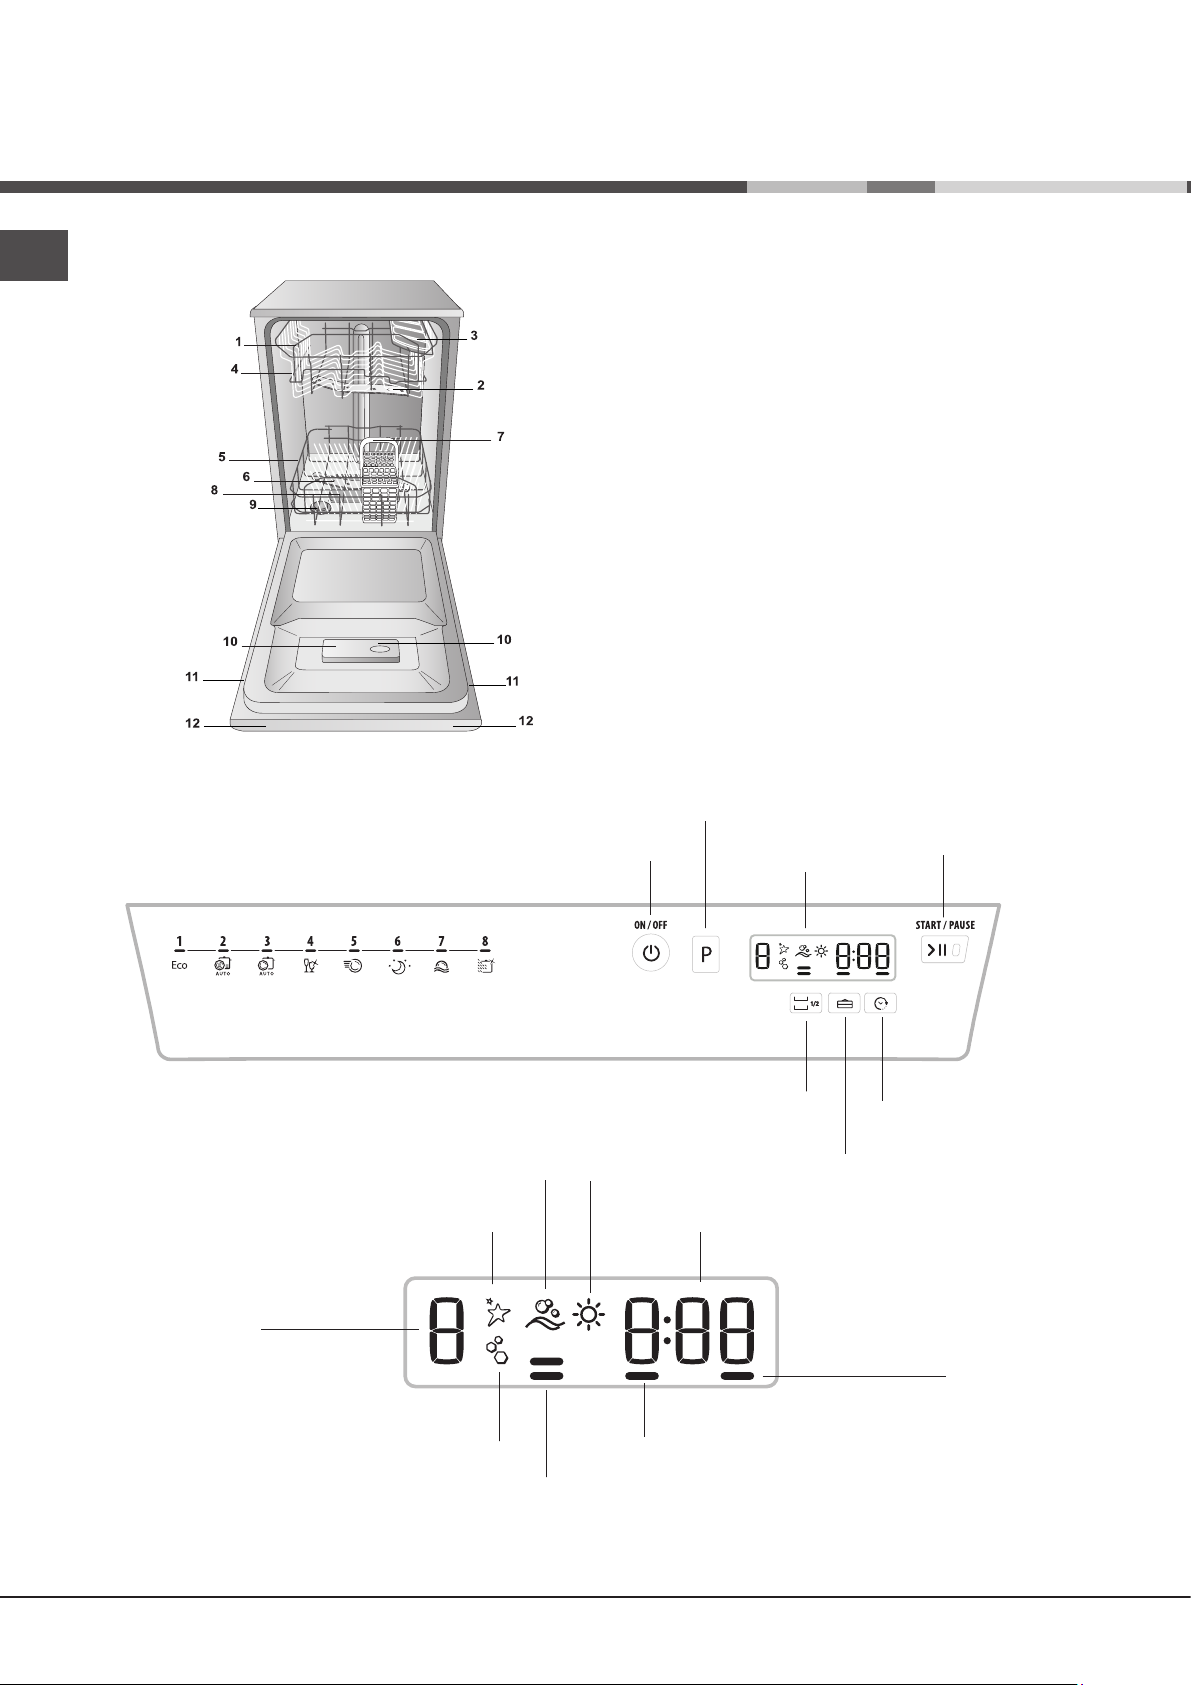
Overall view
Control panel
1. Upper rack
2. Upper spray arm
3. Tip-up compartments
4. Rack height adjuster
5. Lower rack
6. Lower spray arm
7. Cutlery basket
8. Washing filter
9. Salt dispenser
10. Detergent and rinse aid dispensers
11. Data plate
12. Control Panel***
ON/OFF/RESET
button
Select Wash
Cycle button
Display
Start/Pause button
and indicator light
Half Load Option button
Multi-functional Tablets
Option button (Tabs)
Display
Low Rinse Aid
indicator light
Wash cycle
number indicator
indicator light
Washing
indicator light
Low Salt
Drying
indicator light
Wash-Cycle Remaining
Time indicator
Delayed Start Option
indicator light
Multi-functional Tablets
Option indicator light (Tabs)
Half Load Option indicator lights
***Only in completely built-in models.
* Only available in selected models.
The number and type of wash cycles and options may vary depending on the dishwasher model.
16
Delayed Start
Option button
Page 17
Refined Salt and Rinse Aid
Only use products which have been specifically designed
for dishwashers. Do not use table salt or industrial salt.
Follow the instructions given on the packaging.
If you are using a multi-function product, we recommend
that you add salt in any case, especially if the water is hard
or very hard.
If you do not add salt or rinse aid, the LOW SALT* and
LOW RINSE AID* indicator lights will remain lit.
(Follow the instructions given on the packaging.)
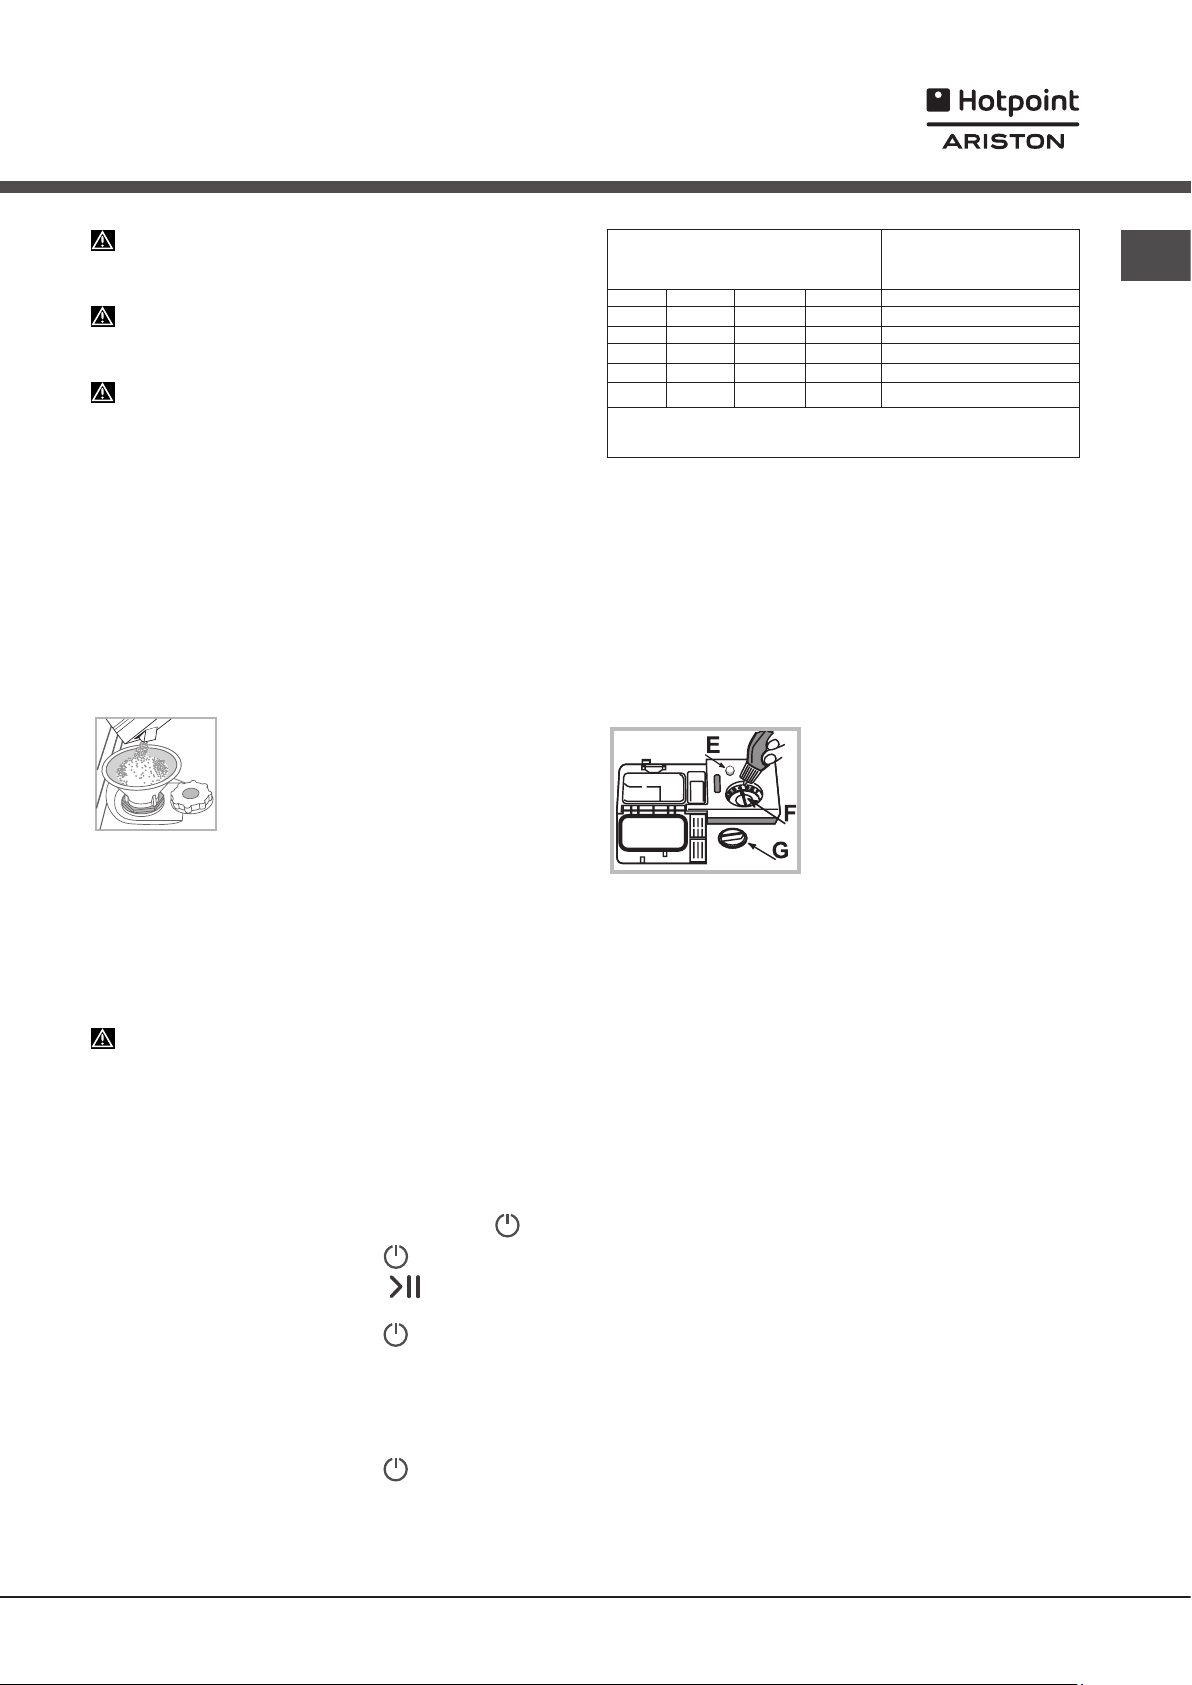
Measuring out the refined salt
The use of salt prevents the formation of LIMESCALE on the
dishes and on the machine's functional components.
• It is important that the salt dispenser be never empty.
• It is important to set the water hardness.
The salt dispenser is located in the lower part of the dishwasher
(see Description)
• When the LOW RINSE AID indicator light in the control panel
is lit *;
• When the green float* on the cap of the salt dispenser is no
longer visible.
• See autonomy in the water hardness table.
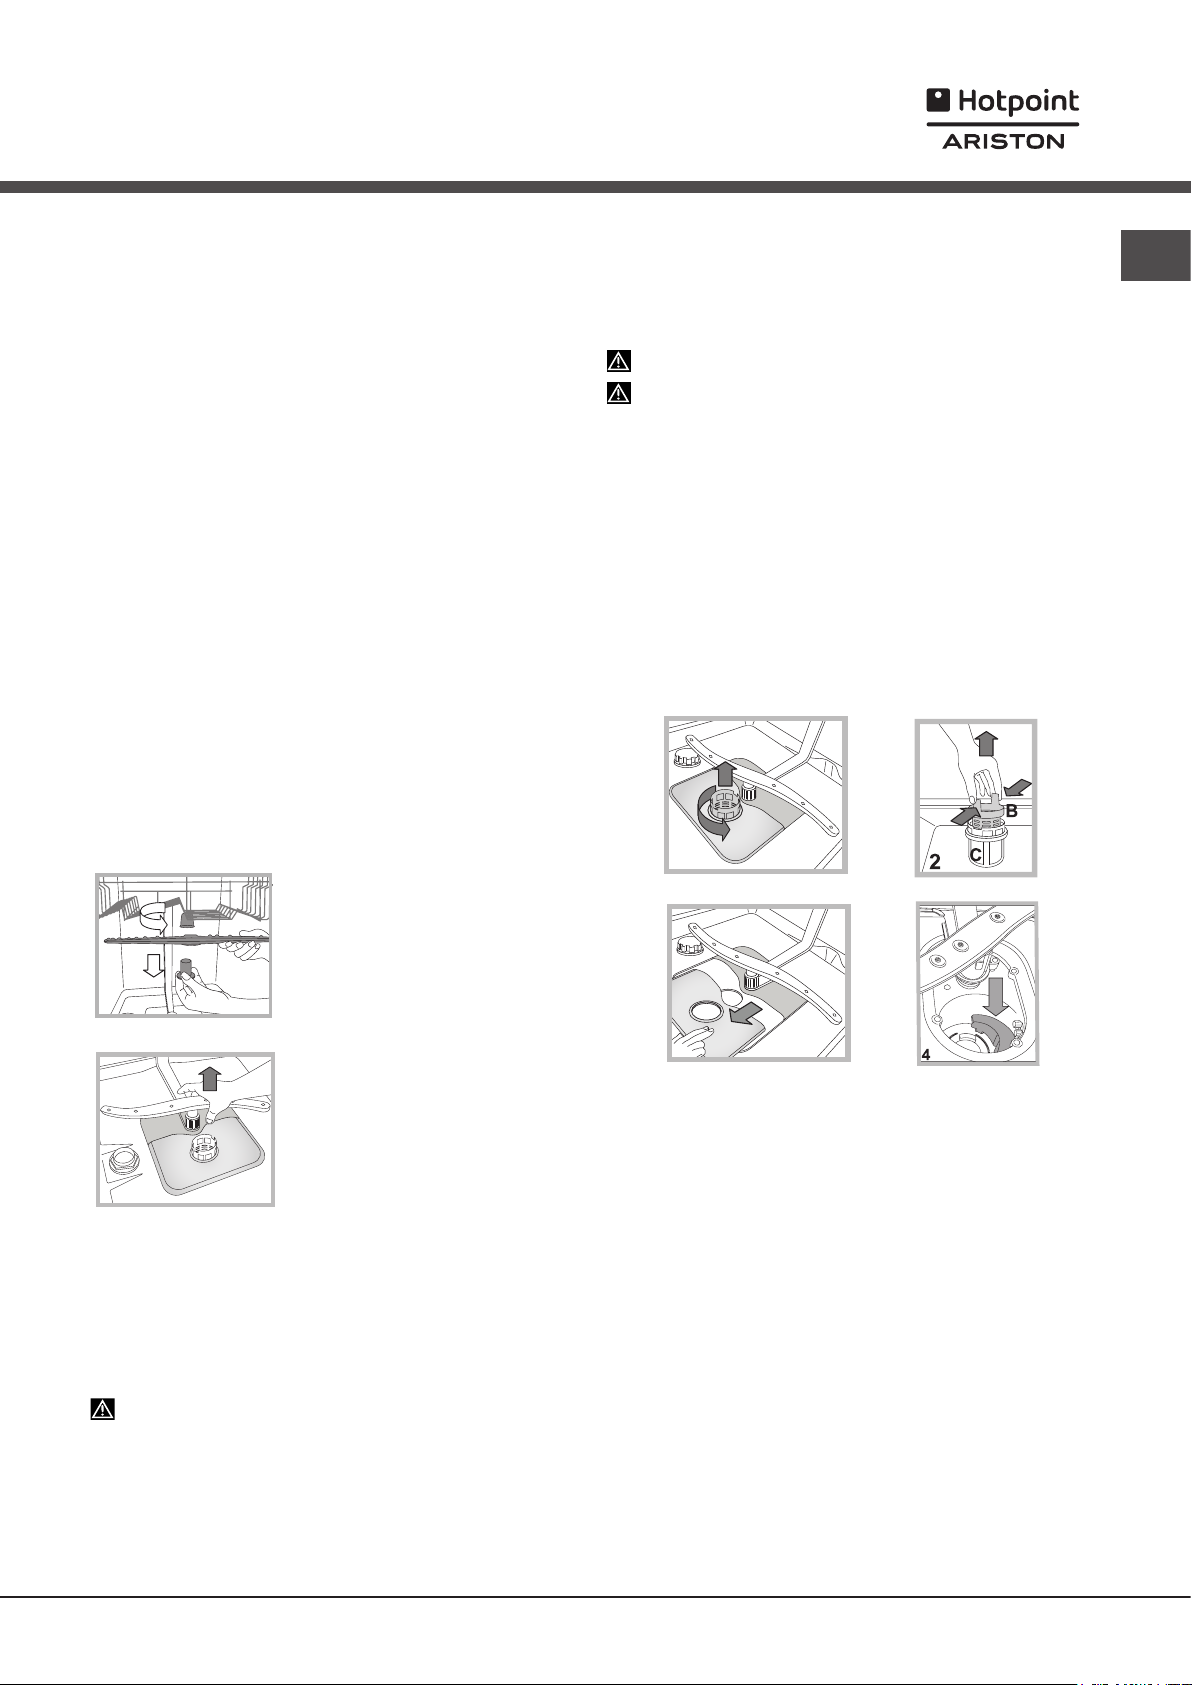
(approximately 1 kg); it is not unusual for a little water to leak out.
4. Remove the funnel and wipe any salt residue away from the
opening; rinse the cap under running water and then screw it on.
It is advisable to perform this procedure every time you add salt
to the container.
Make sure the cap is screwed on tightly, so that no detergent can
get into the container during the wash cycle (this could damage
the water softener beyond repair).
Whenever you need to add salt, we recommend carrying out
the procedure before the washing cycle is started.
Setting the water hardness
For perfect water softener operation, it is essential that the
adjustment be based on the water hardness in your house. Ask
your local water supplier for this information. The factory setting
is for medium water hardness.
• Switch the dishwasher on using the On/Off button.
• Switch it off using the On/Off button
• Hold down the START/PAUSE button for 5 seconds until
you hear a beep.
• Switch it on using the On/Off button
• The display shows the current selection level number and the
salt indicator light.
• Press button P to select the desired hardness level
Hardness Table).
• Switch it off using the On/Off button
• Setting is complete!
and should be filled:
1. Remove the lower rack and unscrew the
container cap (anticlockwise).
2. Only the first time you do this: fill the water
dispenser up to the edge.
3. Position the funnel
fill the salt container right up to its edge
(see figure)
and
(see
Average autonomy
Water Hardness Table
level °dH °fH mmol/l months
1 0 - 6 0 - 10 0 - 1 7 months
2 6 - 11 11 - 20 1.1 - 2 5 months
3 12 - 17 21 - 30 2.1 - 3 3 months
4 17 - 34 31 - 60 3.1 - 6 2 months
34 - 50 61 - 90 6.1 - 9 2/3 weeks
5*
For values between 0°f and 10°f, we do not recommend the use
of salt. A setting of 5 may increase cycle duration.
(°dH = hardness measured in German degrees - °f = hardness
measured in French degrees – mmol/l = millimoles per litre)
salt dispenser with 1
wash cycle per day
Measuring out the rinse aid
Rinse aid makes dish DRYING easier. The rinse aid dispenser
should be filled:
• When the LOW RINSE AID indicator light on the panel/display
is lit *;
• When the dark optical indicator on the dispenser door “E”
becomes transparent.
1. Open the dispenser by turning
the cap "G" in an anticlockwise
direction.
2. Pour in the rinse aid, making
sure it does not overflow from the
dispenser. If this happens, clean
the spill immediately with a dry
cloth.
3. Screw the cap back on.
NEVER pour the rinse aid directly into the tub.
Adjusting the amount of rinse aid
If you are not completely satisfied with the drying results, you
can adjust the quantity of rinse aid used. Turn the adjuster “F”.
A maximum of 4 levels can be set according to the dishwasher
model. The factory setting is for a medium level.
• If you see bluish streaks on the dishes, set a low number (1-2).
• If there are drops of water or limescale marks on the dishes,
set a high number (3-4).
EN
* Only available in selected models.
17
Page 18
Loading the racks
EN
Tips
Before loading the racks, remove all food residues from the
crockery and empty liquids from glasses and containers. No
preventive rinsing is needed under running water.
Arrange the crockery so that it is held in place firmly and does
not tip over; and arrange the containers with the openings facing
downwards and the concave/convex parts placed obliquely,
thus allowing the water to reach every surface and flow freely.
Make sure that the lids, handles, trays and frying pans do not
prevent the spray arms from rotating. Place any small items in
the cutlery basket.
Since plastic dishes and non-stick frying pans usually retain more
water drops, their drying will be not so good as that of ceramic
or stainless-steel dishes.
Lightweight items such as plastic containers should be placed
in the upper rack and arranged so that they cannot move.
After loading the appliance, make sure that the spray arms can
rotate freely.
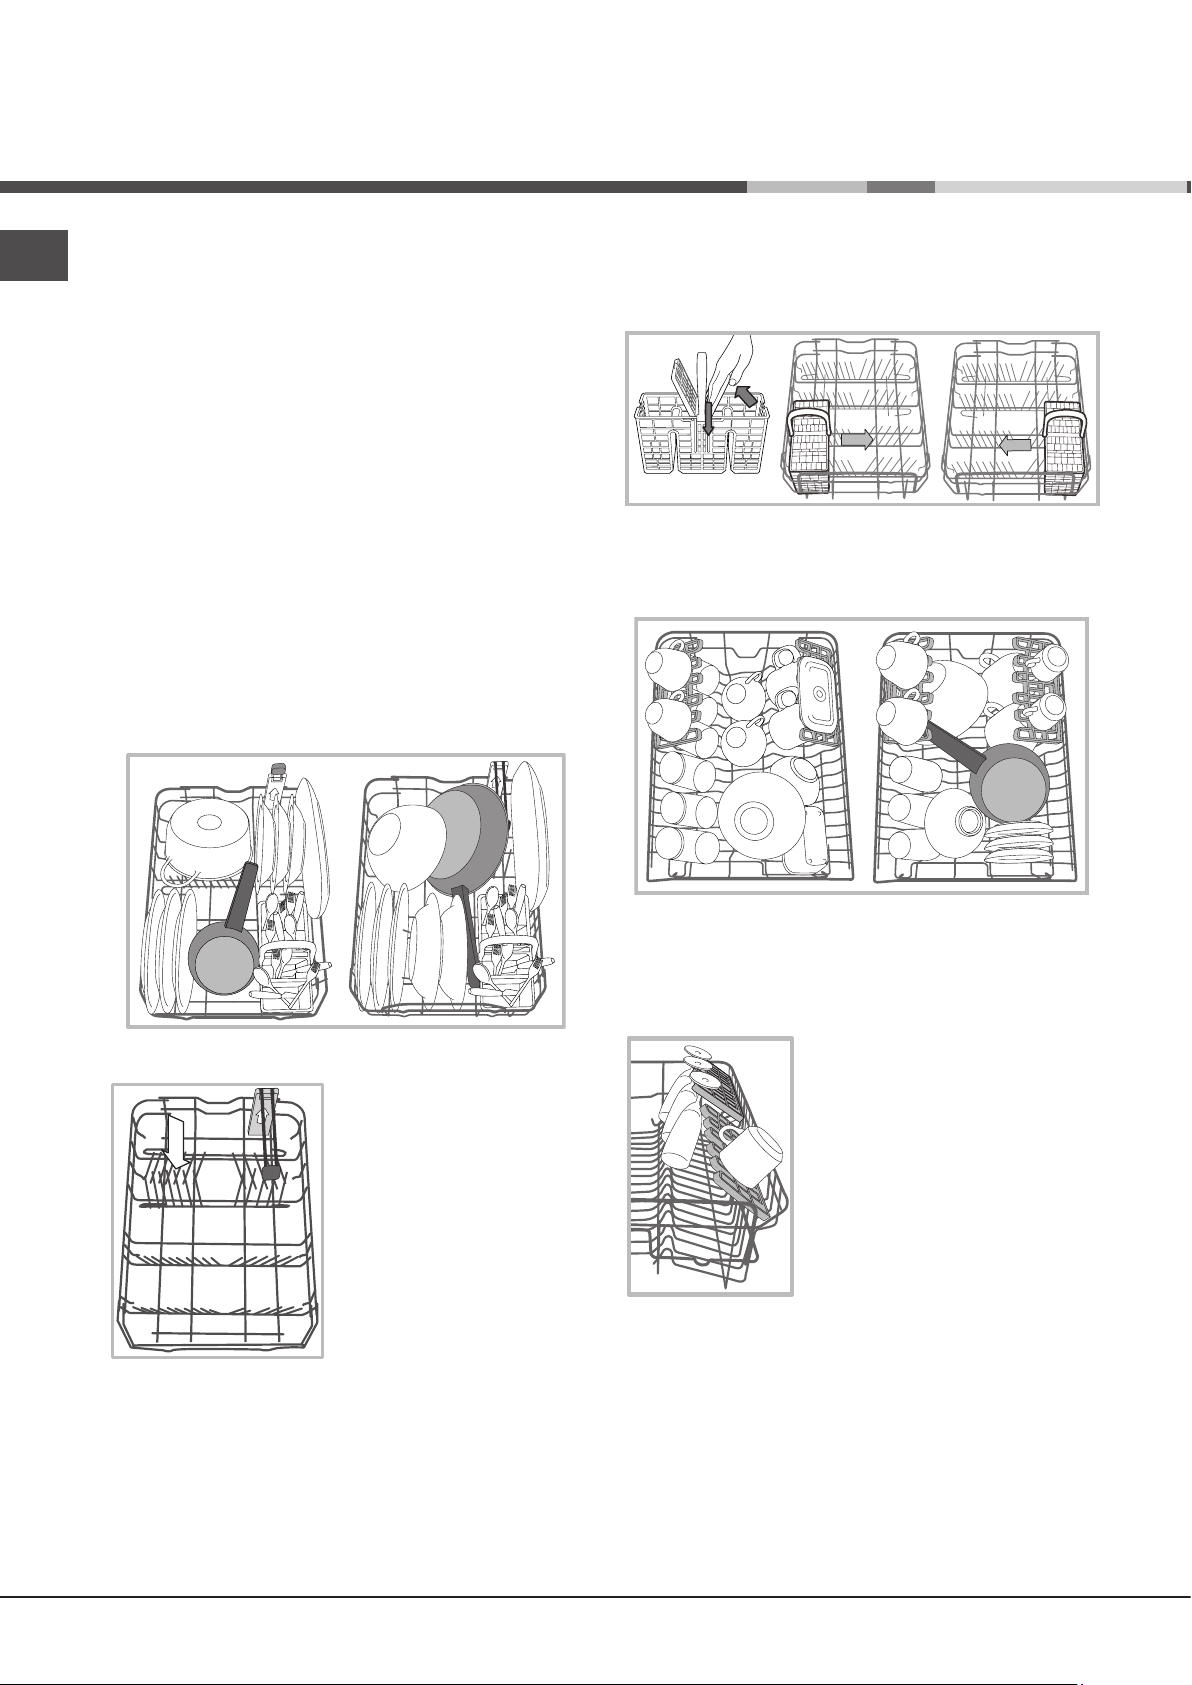
Lower rack
The lower rack can hold pans, lids, dishes, salad bowls, cutlery
etc. Large plates and lids should ideally be placed at the sides.
Cutlery basket
The basket is equipped with top grilles for improved cutlery
arrangement. The cutlery basket should be positioned only at
the front of the lower rack.
Upper rack
Load this rack with delicate and lightweight crockery such as
glasses, cups, saucers and shallow salad bowls.
Some models are equipped with
Vertical Zone, special pull-out
supports*in the rear of the rack
that can be used to support frying
pans and baking pans in a more
vertical position, thus taking up
less space.
In order to use it, just get hold
of the coloured grip and pull it
upwards while rotating it forward.
The supports can slide right and
left to fit the size of the crockery.
Several dishwasher models are fitted with tip-up sectors*.
They can be used in a vertical position when arranging dishes
or in a horizontal position (lower) to load pans and salad bowls
easily.
Very soiled dishes and pans should be placed in the lower rack
because in this sector the water sprays are stronger and allow
a higher washing performance.
Adjustable position tip-up compartments*
The side tip-up compartments can be positioned at three
different heights to optimize the arrangement of the crockery
inside the rack.
Wine glasses can be placed safely in
the tip-up compartments by inserting
the stem of each glass into the
corresponding slot.
For optimum drying results incline
the tip-up compartments more. To
change the inclination, pull up the tipup compartment, slide it slightly and
position it as you wish.
*Only available in selected models with different numbers and
positions.
18
Page 19
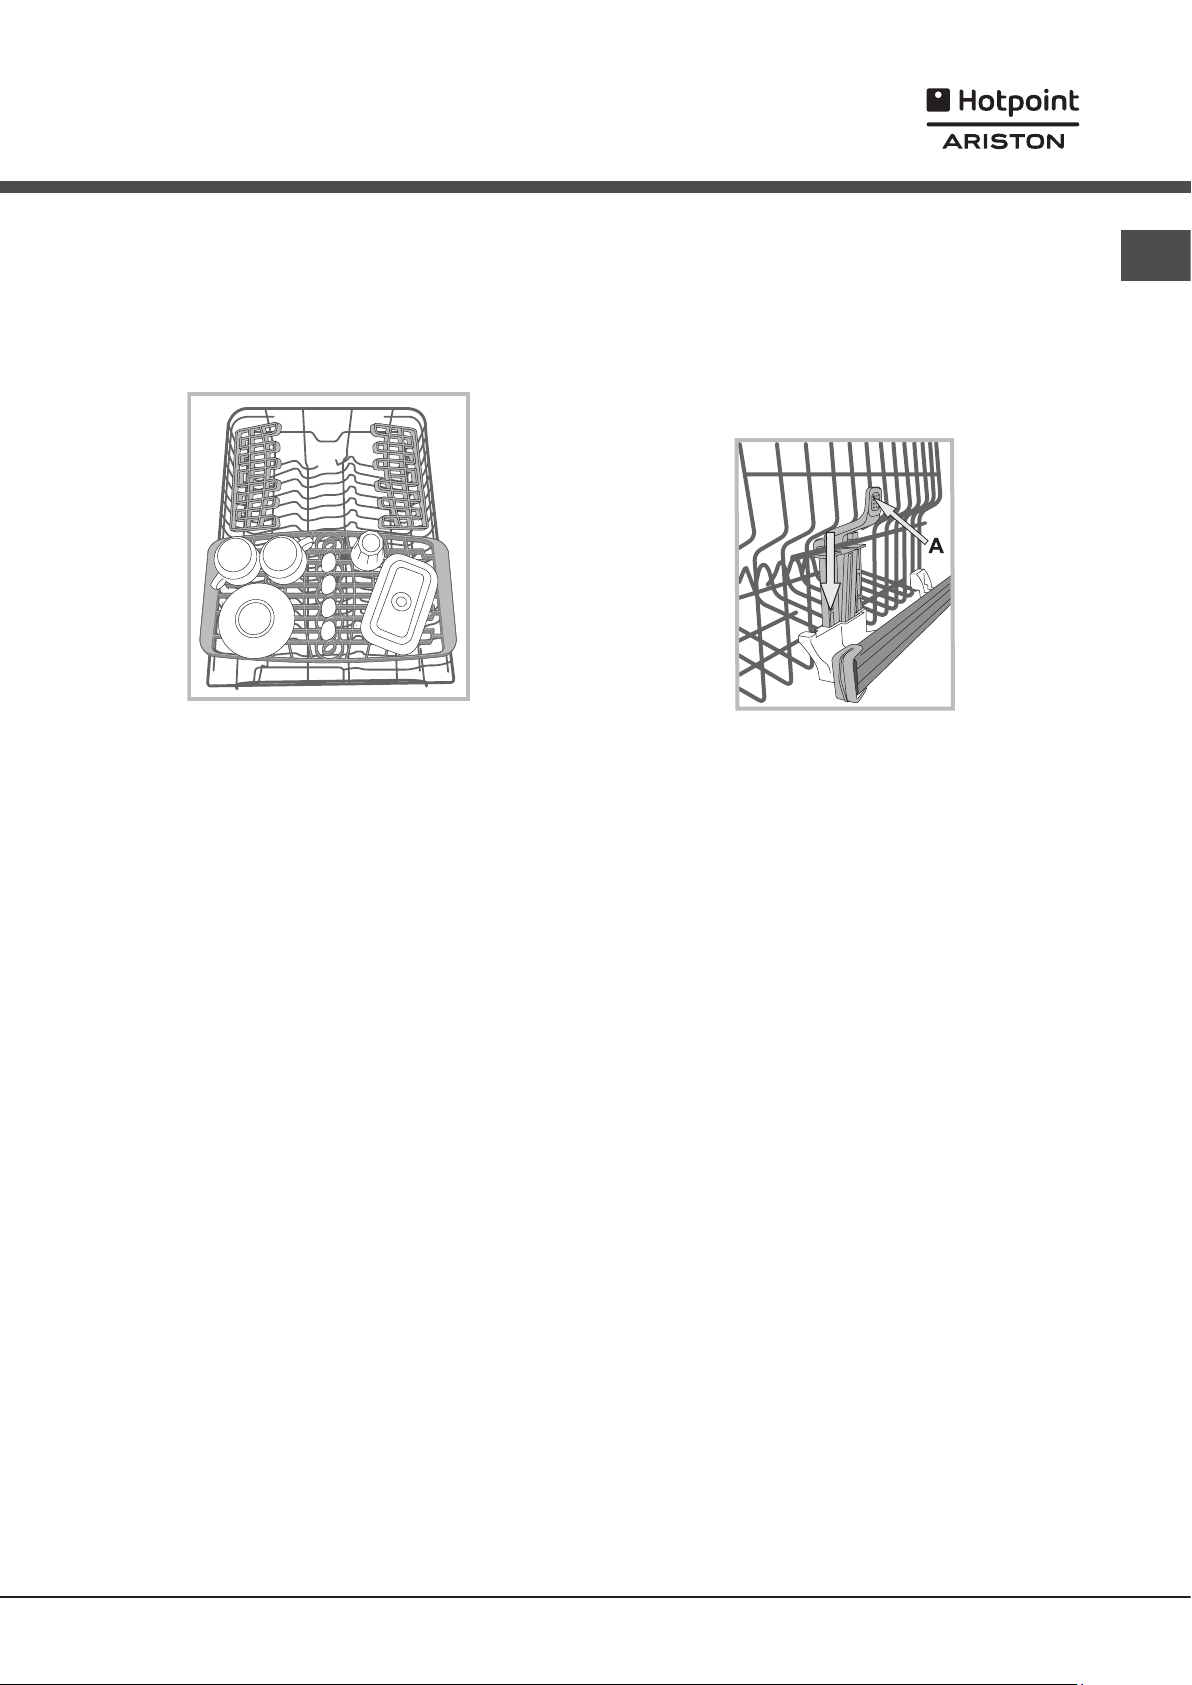
Tray*
Some dishwasher models are fitted with a sliding tray which
can be used to hold small crockery and cutlery.
For optimum washing performance, avoid positioning bulky
crockery directly below the tray. The cutlery tray can be
removed
(see Figure.)
Adjusting the height of the upper rack
The height of the upper rack can be adjusted: high position
to place bulky crockery in the lower rack and low position to
make the most of the tip-up compartments by creating more
space upwards.
The height of the upper rack should be adjusted WHEN THE
RACK IS EMPTY.
NEVER raise or lower the rack on one side only.
EN
If the rack is equipped with a Lift-Up device*
it up by holding its sides. To restore the lower position, press
the levers (A) at the sides of the rack and follow the rack down.
(see figure)
, lift
Unsuitable crockery
• Wooden crockery and cutlery.
• Delicate decorated glasses, artistic handicraft and antique
crockery. Their decorations are not resistant.
• Parts in synthetic material which do not withstand high
temperatures.
• Copper and tin crockery.
• Crockery soiled with ash, wax, lubricating grease or ink.
The colours of glass decorations and aluminium/silver pieces can
change and fade during the washing process. Some types of
glass (e.g. crystal objects) can become opaque after a number
of wash cycles too.
Damage to glass and crockery
Caused by:
• Type of glass and glass production process.
• Chemical composition of detergent.
• Water temperature of rinse cycle.
Tips:
• Only use glasses and porcelain guaranteed by the
manufacturer as dishwasher safe.
• Use a delicate detergent suitable for crockery.
• Collect glasses and cutlery from the dishwasher as soon as
the wash cycle is over.
* Only available in selected models.
19
Page 20
Detergent and
dishwasher use
EN
Measuring out the detergent
Good washing results also depend on the correct amount of
detergent being used. Exceeding the stated amount does not
result in a more effective wash and increases environmental
pollution.
The amount can be adjusted to the soil level.
In the case of normally soiled items, use approximately either
25g (powder detergent) or 25ml (liquid detergent). If tablets
are used, one tablet will be enough.
If the crockery is only lightly soiled or if it has been rinsed
with water before being placed in the dishwasher, reduce
the amount of detergent used accordingly.
For good washing results also follow the instructions shown
on the detergent box.
For further questions please ask the detergent producers.
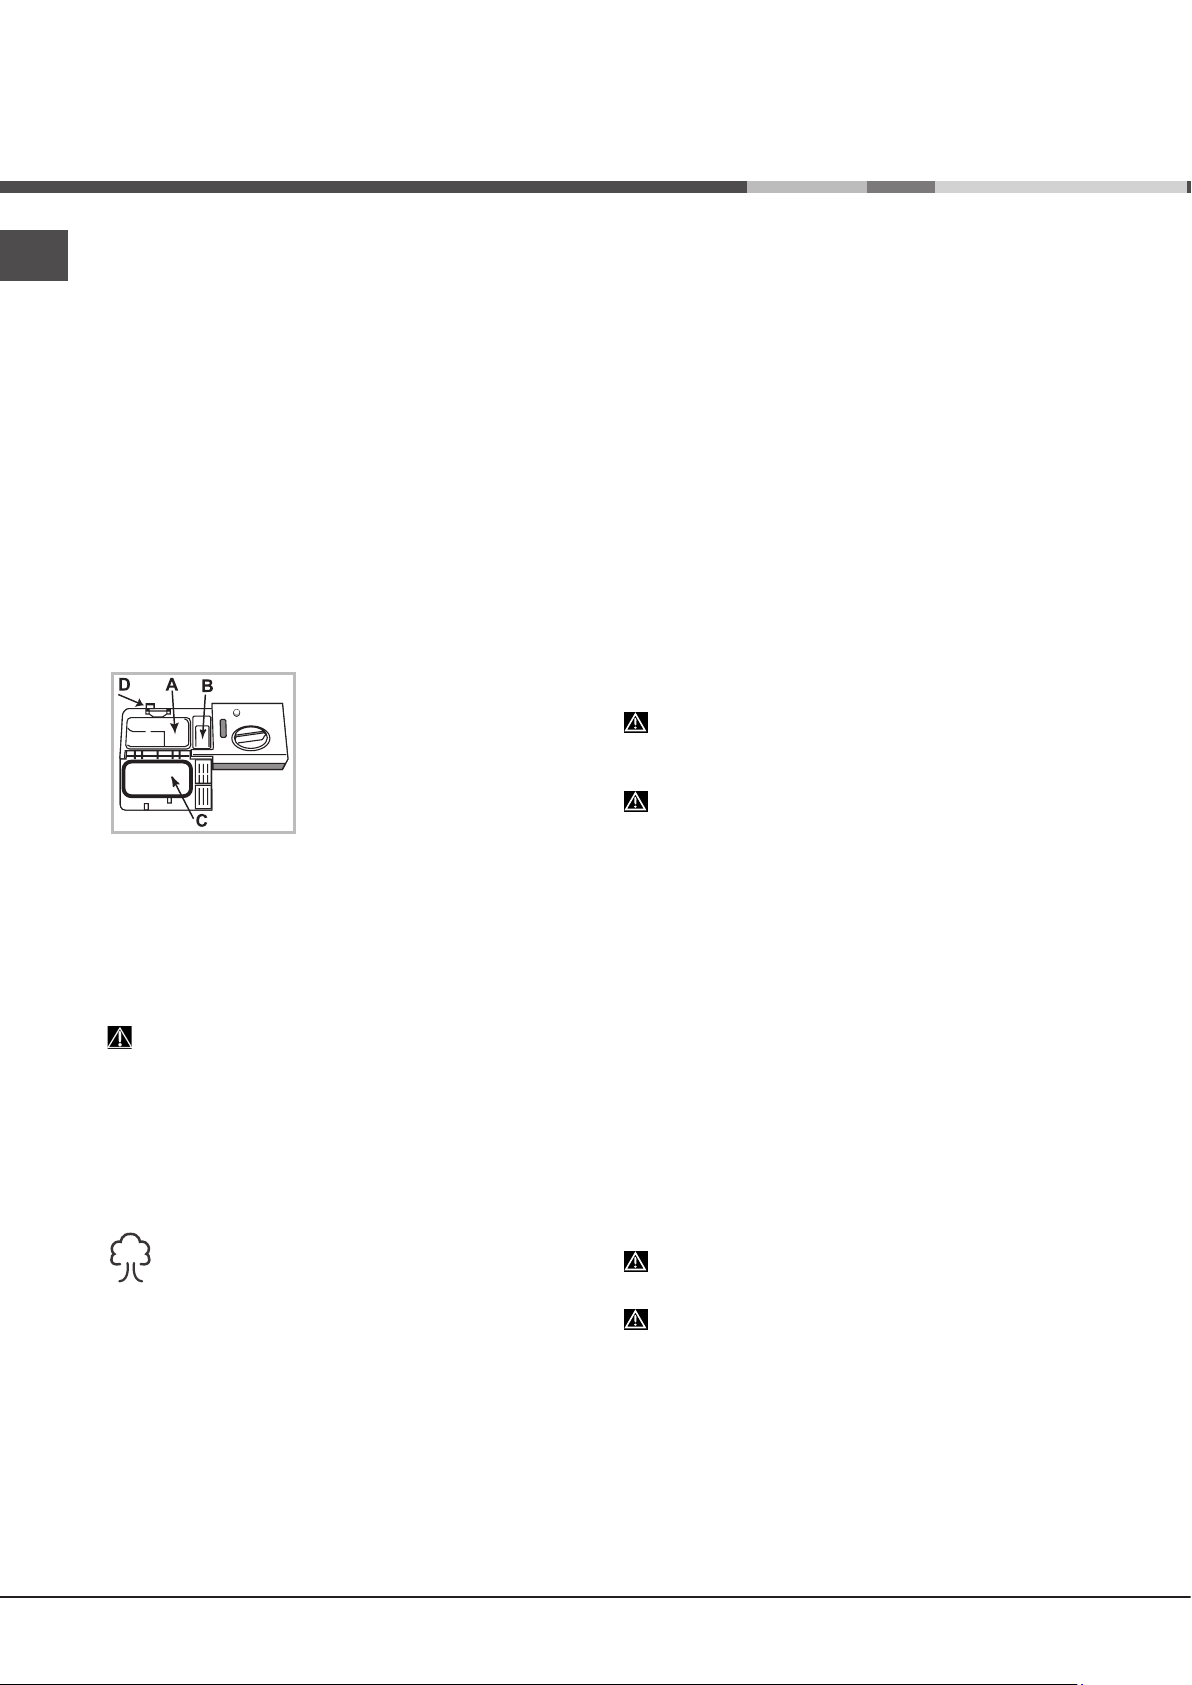
Open the detergent dispenser using button D and measure out
the detergent according to the Table of wash cycles:
• powder or liquid: compartments
A (wash detergent) and B (prewash detergent)
• tablets: when the cycle requires
1 tablet, place it in compartment A
and close cover C; when it requires
2 tablets, place the second tablet
on the bottom of the appliance.
Remove detergent residues from the edges of the compartment
and close cover C until it clicks.
The detergent dispenser automatically opens up at the right time
according to the wash cycle.
If all-in-one detergents are used, we recommend using the TABS
option, because it adjusts the cycle so that the best washing and
drying results are always achieved.
Only use detergent which has been specifically designed
for dishwashers.
DO NOT USE washing up liquid.
Using excessive detergent may result in foam residues
remaining in the machine after the cycle has ended.
To achieve the best washing and drying results, the combined
use of detergent, rinse aid liquid and refined salt is required.
We recommend using detergents that do not contain
phosphates or chlorine, as these products are harmful
to the environment.
Starting the dishwasher
1. Turn the water tap on.
2. Press the ON/OFF button.
3. Open the door and pour in a suitable amount of detergent
(see Measuring out the detergent.)
4. Load the racks
5. Select the wash cycle in accordance with the type of
crockery and its soil level
pressing the P button.
6. Select the wash options*
7. Press the Start/Pause button to start the cycle (fixed light):
a long beep signals the start of the wash cycle, the cycle
indicator lights up and the display shows the cycle number
and the time remaining until the end of the cycle.
8. Two short beeps and one long beep indicate the end of the
wash cycle, the Start/Pause button switches off and the word END
appears on the display. Switch off the appliance by pressing
the ON/OFF button.
9. Wait for a few minutes before removing the crockery - to
avoid burns. Unload the racks, beginning with the lower level.
The machine will switch off automatically during long
periods of inactivity in order to minimise electricity
consumption.
AUTO WASH CYCLES*: some models of dishwasher are
equipped with a special sensor which can be used to assess
the level of soiling and automatically select the most efficient and
economic wash cycle accordingly. The duration of the auto wash
cycles may vary due to the operation of the sensor.
Changing a wash cycle in progress
If a mistake was made in the wash-cycle selection process, it is
possible to change the cycle provided that it has only just begun:
Once the wash cycle has started, in order to change the wash
cycle switch off the machine by pressing and holding the ON/
OFF/Reset button. Switch it back on using the same button and
select the desired wash cycle and options.
Adding extra crockery
Press the Start/Pause button and open the door, taking care to
avoid the escaping steam. Then place the crockery inside the
dishwasher. Press the Start/Pause button: The cycle will start
again after a long beep has been emitted.
If the delayed start has been set, at the end of the countdown
the wash cycle will not start. It will stay in Pause mode.
(see Loading the racks)
(see Table of wash cycles)
(see Options).
and close the door.
by
* Only available in selected models.
20
Press the Start/Pause button to pause the machine; the wash
cycle is stopped.
At this stage the wash cycle cannot be changed.
Accidental interruptions
If the door is opened during the wash cycle or there is a power
cut, the cycle stops. It starts again from the point at which it
was interrupted once the door has been shut or the electricity
supply restored.
Page 21
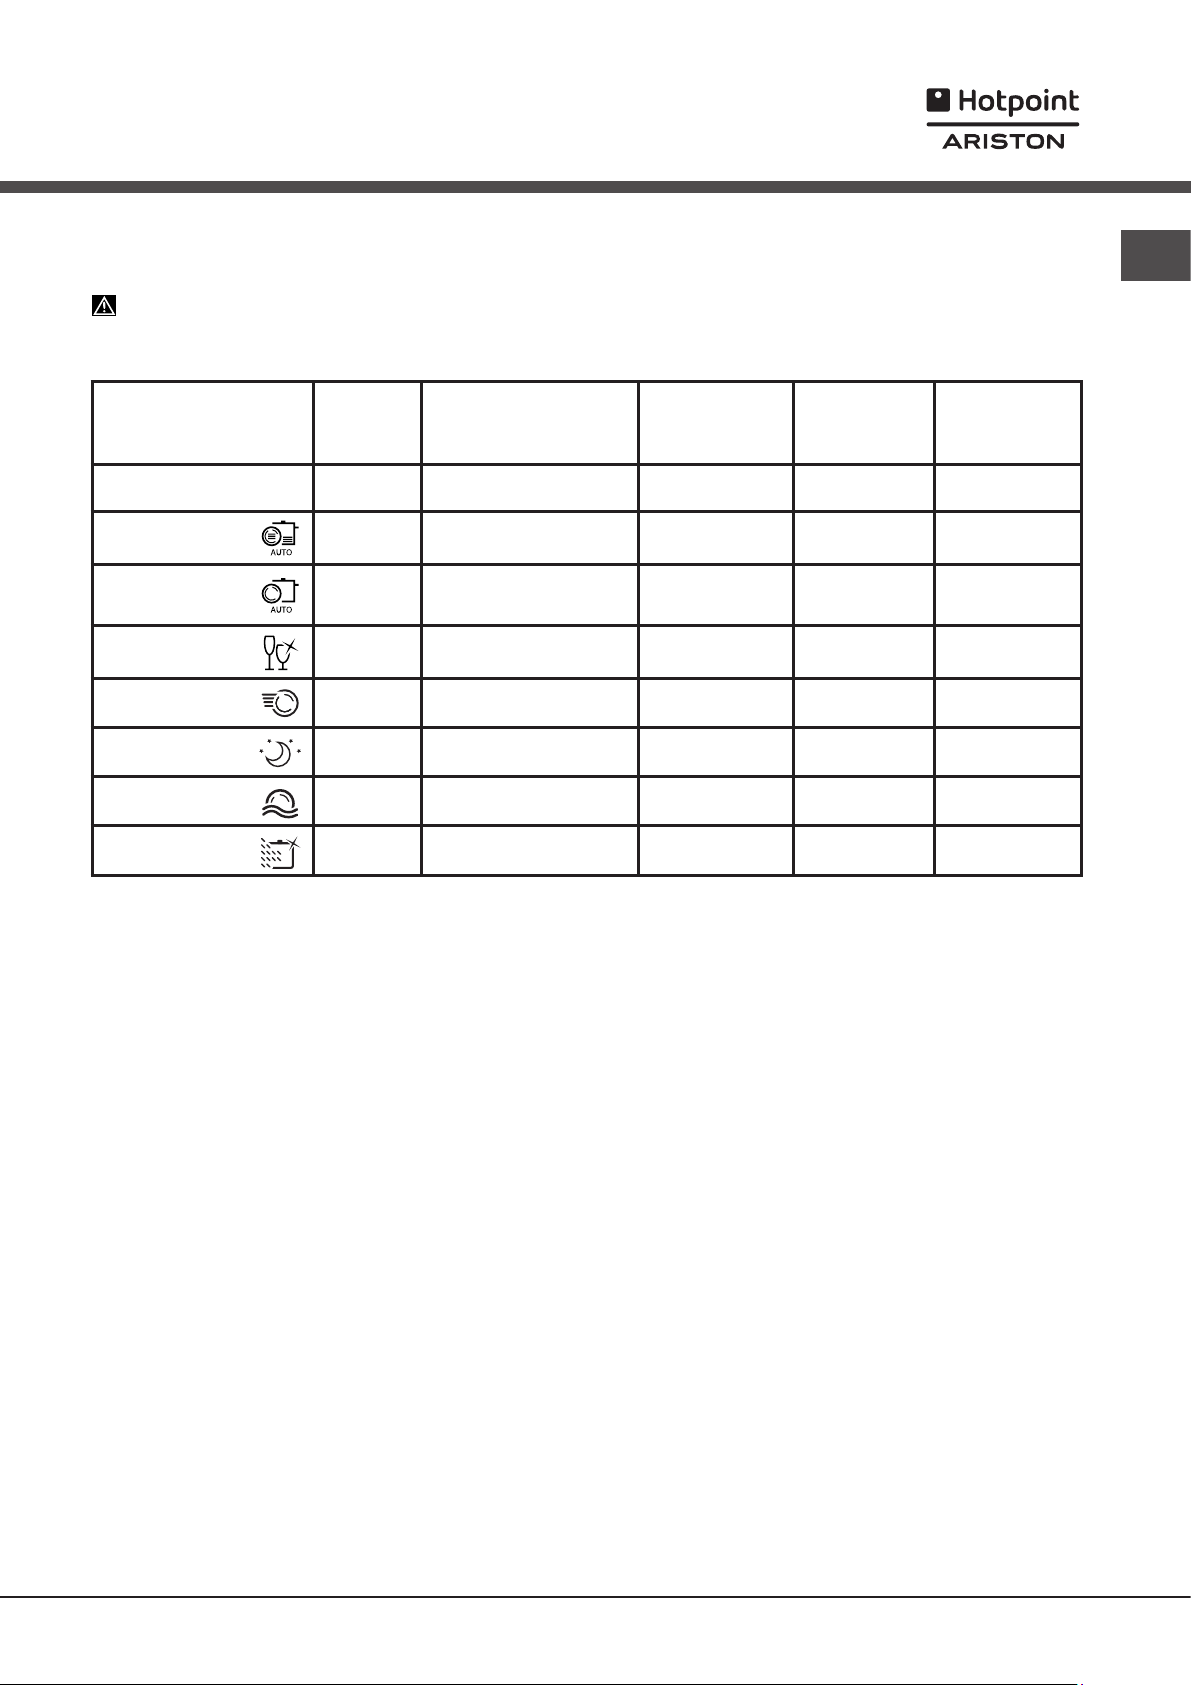
Wash cycles
Wash-cycle data is measured under laboratory conditions according to European Standard EN 50242.
Based on the different conditions of use, the wash-cycle duration and data can change.
The number and type of wash cycles and options may vary depending on the dishwasher model.
Wash cycle
Wash cycle
1. Eco Yes
2. Auto Intensive Yes
3. Auto Normal Yes
4. Delicates Yes
5. Express No Delayed start – Tabs 00:25 8,0 0,45
6. Good Night Yes Delayed start – Tabs 03:30 13,0 0,85
7. Soak No
8. Ultra Intensive Yes
which
include
drying
Options
Delayed start –
Half Load - Tabs
Delayed start –
Half Load - Tabs
Delayed start –
Half Load - Tabs
Delayed start –
Half Load - Tabs
Delayed start –
Half Load
Delayed start –
Half Load - Tabs
Approximate
duration of wash
cycles
h:min.
03:00 9,0 0,83
02:20 - 03:00 13,0 - 14,0 1,20 - 1,45
01:40 - 02:20 13,5 – 14,5 1,00 - 1,20
01:40 9,0 0,90
00:10 4,0 0,01
02:50 17,0 1,50
Water
consumption
(l/cycle)
Energy
consumption
(KWh/cycle)
EN
Instructions on wash-cycle selection and detergent dosage
1. The ECO wash cycle is the standard cycle to which the energy label data refers. It can be used to wash crockery with a normal
soil level and is the most efficient cycle in terms of energy and water consumption for this type of crockery.
4 gr/ml**+ 21 gr/ml – 1 Tab
2. Heavily soiled dishes and pans (not to be used for delicate items). 25 gr/ml – 1 Tab
3. Normally soiled pans and dishes. 4 gr/ml**+ 21 gr/ml – 1 Tab
4. Cycle for delicate items, which are more sensitive to high temperatures 25 gr/ml – 1 Tab
5. Fast cycle to be used for slightly dirty dishes (ideal for 2 place settings) 21 gr/ml – 1 Tab
6. Optimum performance ensured. Ideal for night-time operation. 25 gr/ml – 1 Tab
7. Pre-wash while awaiting completion of the load with the dishes from the next meal. No detergent.
8. Heavily soiled saucepans or pans with residual dried-on food. 4 gr/ml**+ 25 gr/ml – 1+1 Tab
Standby consumption: Left-on mode consumption: 5 W - Off mode consumption: 0.5 W.
(**Quantity of pre-washing detergent)
21
Page 22
Special wash cycles
and Options
EN
Notes:
Optimum performance levels when using the “Express” cycle
can be achieved by respecting the specified number of place
settings.
To reduce consumption even further, only run the dishwasher
when it is full.
Note for Test Laboratories: for information on comparative EN
testing conditions, please send an email to the following address:
assistenza_en_lvs@indesitcompany.com
Wash options*
The OPTIONS may only be set, changed or reset after the
wash cycle has been selected and before the Start/Pause
button has been pressed.
Only the options which are compatible with the type of wash
cycle set may be selected. If an option is not compatible
with the selected wash cycle
corresponding symbol flashes rapidly 3 times.
If an option is selected which is not compatible with another
(previously selected) option, it will flash 3 times and switch off,
while the most recently selected option will remain active.
To deselect an option which has been set by mistake, press the
corresponding button again.
(see Table of wash cycles)
, the
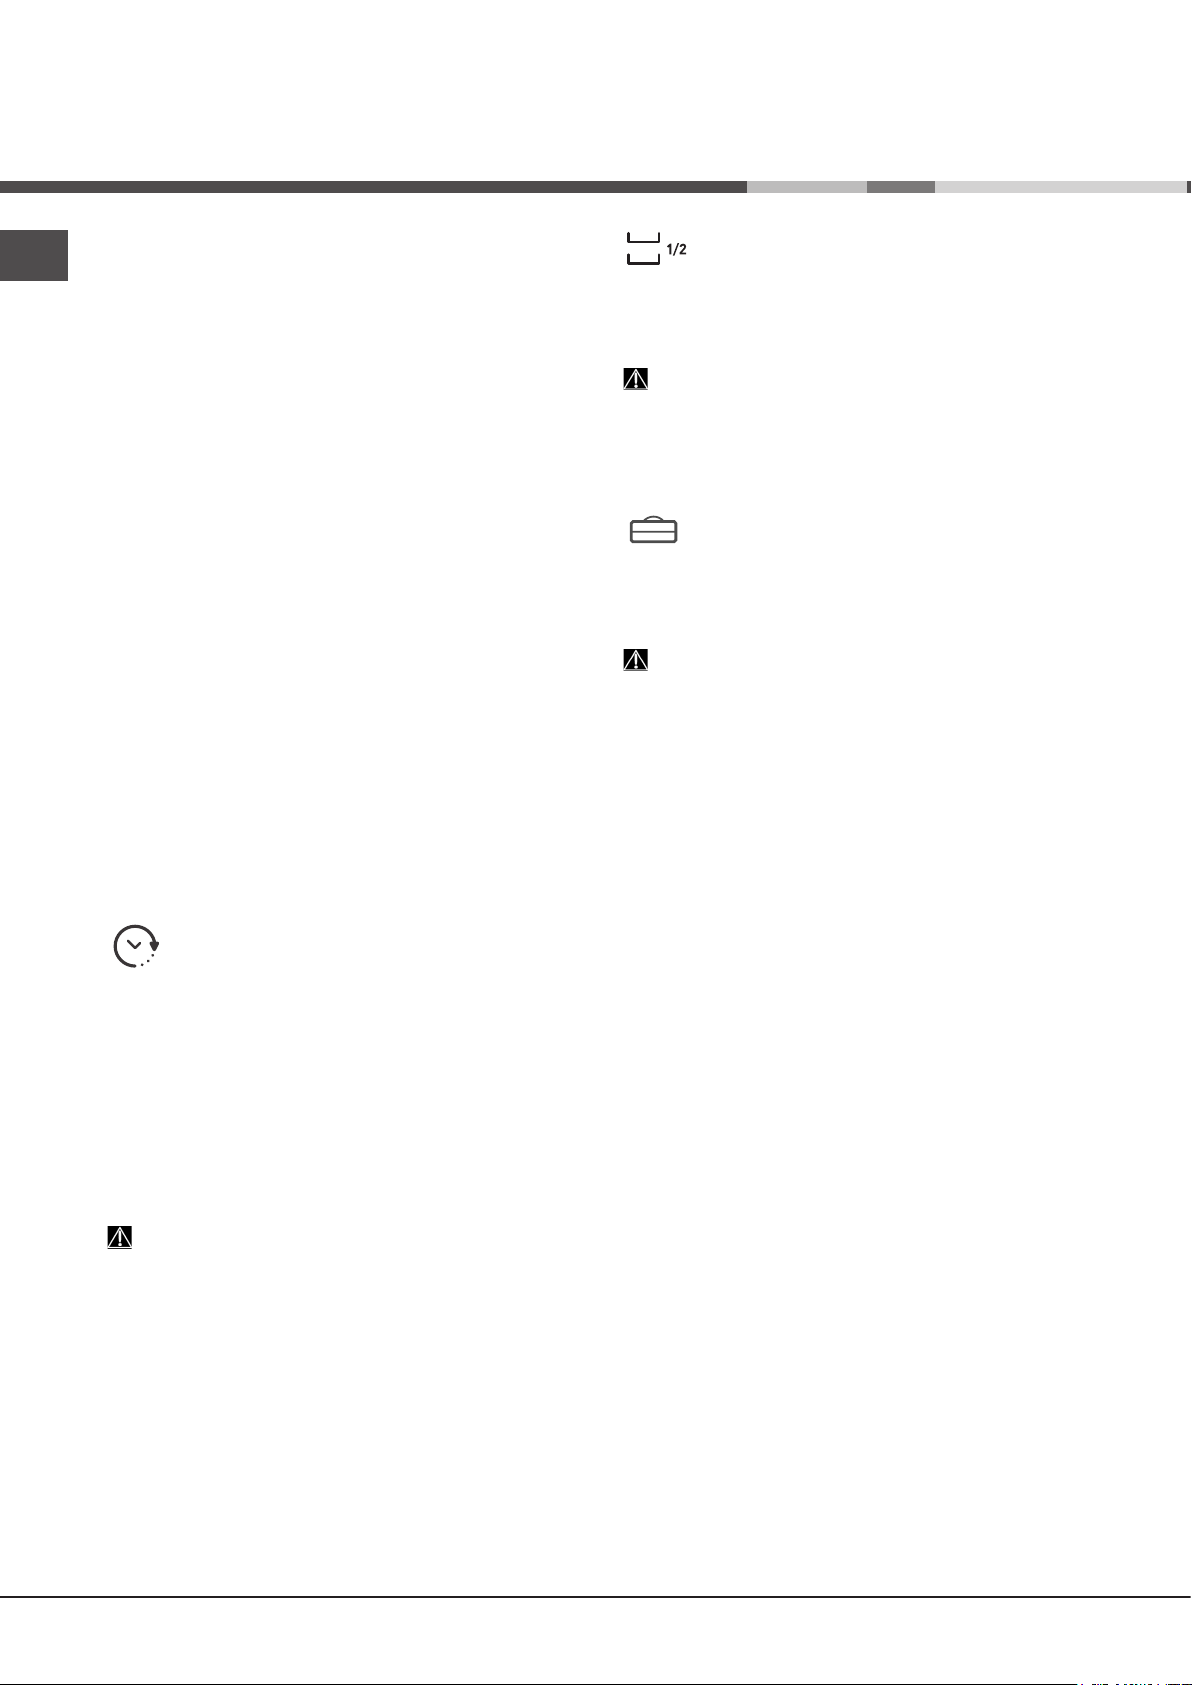
Half load option using the upper or lower rack
If there are not many dishes to be washed, a half load
cycle may be used in order to save water, electricity
and detergent. Select the wash cycle and then press the HALF
LOAD button: the indicator corresponding to the chosen rack
lights up and the wash cycle starts only in the upper or lower rack.
Remember to load the upper or lower rack only, and to
reduce the amount of detergent accordingly.
Multi-functional tablets option (Tabs)
This option optimises washing and drying results.
When using multi-functional tablets, press the MULTIFUNCTIONAL TABLETS button; the corresponding symbol
will light up. If the button is pressed again, the option will be
deselected.
The “Multi-functional tablets” option results in a
longer wash cycle.
Delayed start option
It is possible to delay the start time of the cycle by a
period of time between 1 and 24 hours:
1. Select the desired wash cycle and any other options
required; press the DELAYED START button. The indicator
light will go on. Use the same button to select when the wash
cycle will start (h01, h02 etc.)
2. Confirm the selection using the START/PAUSE button to
start the countdown.
3. Once this time has elapsed, the DELAYED START indicator
light goes off and the wash cycle begins.
To deselect the DELAYED START option, press the DELAYED
START button until the text OFF appears.
The Delayed Start function cannot be set once a wash
cycle has started.
* Only available in selected models.
22
Page 23
Care and maintenance
Shutting off the water and electricity supplies
• Turn off the water tap after every wash cycle to avoid leaks.
• Always unplug the appliance when cleaning it and when
performing maintenance work.
Cleaning the dishwasher
• The external surfaces of the machine and the control panel
can be cleaned using a non-abrasive cloth which has been
dampened with water. Do not use solvents or abrasive
products.
• Any marks on the inside of the appliance may be removed
using a cloth dampened with water and a little vinegar.
Preventing unpleasant odours
• Always keep the door of the appliance ajar in order to avoid
moisture from forming and being trapped inside the machine.
• Clean the seals around the door and detergent dispensers
regularly using a damp sponge. This will avoid food becoming
trapped in the seals, which is the main cause behind the
formation of unpleasant odours.
Cleaning the spray arms
Food residue may become encrusted onto the spray arms
and block the holes used to spray the water. It is therefore
recommended that you check the arms from time to time and
clean them with a small non-metallic brush.
The two spray arms may both be removed.
To remove the upper spray arm,
turn the plastic locking ring in an
anti-clockwise direction. The upper
spray arm should be replaced so
that the side with the greater
number of holes is facing upwards.
Cleaning the filters
The filter assembly consists of three filters which remove food
residues from the washing water and then recirculate the water.
They must be cleaned if you wish to achieve the best results in
every wash.
Clean the filters regularly.
The dishwasher must not be used without filters or if the filter
is loose.
• After several washes, check the filter assembly and if necessary
clean it thoroughly under running water, using a non-metallic
brush and following the instructions below:
1. Turn the cylindrical filter C in an anti-clockwise direction and
pull it out
2. Remove the cup filter B by exerting a slight pressure on the
side flaps
3. Slide out the stainless-steel plate filter A.
4. Inspect the trap and remove any food residues. NEVER
REMOVE the wash-cycle pump protection
(fig. 1).
(fig. 2);
(fig. 3).
(black detail) (fig.4).
C
1
A
EN
The lower spray arm can be
removed by pressing on the side
tabs and pulling it upwards.
Cleaning the water inlet hose*
If the water hoses are new or have not been used for an extended
period of time, let the water run to make sure it is clear and free
of impurities before performing the necessary connections. If this
precaution is not taken, the water inlet could become blocked
and damage the dishwasher.
Clean the water inlet filter at the tap outlet regularly.
- Turn off the water tap.
- Unscrew the end of the water inlet hose, remove the filter and
clean it carefully under running water.
- Re-place the filter and screw the water hose back into position.
3
After cleaning the filters, re-place the filter assembly and fix it in
position correctly; this is essential for maintaining the efficient
operation of the dishwasher.
Leaving the machine unused for extended
periods
• Disconnect the appliance from the electricity supply and shut
off the water tap.
• Leave the door of the appliance ajar.
• When you return, run a wash cycle when the dishwasher is
empty.
* Only available in selected models.
23
Page 24

Troubleshooting
EN
Whenever the appliance fails to work, check for a solution from the following list before calling for Assistance.
Problem: Possible causes / Solutions:
The dishwasher does not start
or cannot be controlled.
The door won’t close.
No water drain out of the
dishwasher.
The dishwasher makes
excessive noise.
The dishes and glasses are
covered in a white lm or
limescale deposits.
The dishes and glasses are
streaked or have a bluish
tinge.
The crockery has not been
dried properly.
The dishes are not clean. • The crockery has not been arranged properly.
The dishwasher won’t load
any water.
It is bocked with ashing lights.
• The water supply tap is not turned on.
• Switch off the appliance by pressing the ON/OFF button, switch it back on after approximately
one minute and reset the wash cycle.
• The appliance has not been plugged in properly or another electricity socket should be used.
• The dishwasher door has not been closed properly.
• Make sure that the racks were inserted all the way.
• The lock was released. Strongly push the door until a “clacking” noise is heard.
• The wash cycle has not nished yet.
• The water drain hose is bent
• The drain duct is clogged up.
• The lter is clogged up with food residues.
• Check the height of the drain hose.
• The dishes are rattling against each other or against the sprayer arms. Place the dishes
properly and make sure the sprayer arms can rotate freely.
• Too much foam: the detergent has not been measured out correctly or it is not suitable for use
in dishwashers.
• No rened salt.
• Water hardness adjustment is not suitable: increase the relevant values.
and Rinse Aid.)
• The salt and rinse-aid dispenser cap has not been closed properly.
• The rinse aid has been used up or the dosage is too low.
• The rinse aid dosage is too high.
• A wash cycle without a drying programme has been selected.
• The rinse aid has been used up.
• The rinse aid dispenser setting is not suitable.
• The crockery is made from non-stick material or plastic; the presence of water drops is
normal.
• The sprayer arms cannot rotate freely, being hindered by the dishes.
• The wash cycle is too gentle
• Too much foam: the detergent has not been measured out correctly or it is not suitable for use
in dishwashers.
• The lid on the rinse aid compartment has not been closed correctly.
• The lter is dirty or clogged up
• The rened salt level is low
• Make sure that the height of the dishes is compatible with the rack adjustment.
• The holes in the sprayer arms are clogged up.
• There is no water in the mains supply or the tap is shut off.
• The water inlet hose is bent
• The lters are clogged up: they need cleaning.
• The drain duct is clogged up: it needs cleaning.
• After checking and cleaning, switch the dishwasher on and off and start a new wash cycle.
• If the problem persists, turn off the water tap, remove the plug and call the Service Centre.
(See Detergent and dishwasher use.)
(See Detergent and dishwasher use.)
(see Installation).
Do not prewash the dishes by hand.
(See Rened Salt
(See Rened Salt and Rinse Aid.)
(see Wash Cycles).
(see Care and maintenance.)
(See Rened Salt and Rinse Aid.)
(See Care and maintenance.)
(see Installation).
(See Care and maintenance.)
* Only available in selected models.
24
Page 25

Installation
En cas de déménagement, transporter l’appareil
verticalement ; si besoin est, l’incliner sur le dos.
Raccordements hydrauliques
L’adaptation des installations de plomberie de
l’installation doit être effectuée par du personnel qualifié
Les tuyaux d’amenée et d’évacuation de l’eau peuvent être
orientés vers la droite ou vers la gauche pour simplifier
l’installation.
Attention à ce que les tuyaux d’arrivée et d’évacuation ne
soient pas pliés ou écrasés par le lave-vaisselle.
Raccord du tuyau d’amenée de l’eau
• Auneprised'eaufiletée3/4”gazfroideouchaude(max.
60°C).
• Fairecoulerl'eaujusqu'àcequ'ellesoitlimpide.
• Bienvisserletuyaud'évacuationetouvrirlerobinet.
Si la longueur du tuyau d’amenée ne suffit pas, s’adresser
à un magasin spécialisé ou à un technicien agréé
Assistance)
La pression de l’eau doit être comprise entre les valeurs
citées dans le tableau des Caractéristiques techniques,
autrement le lave-vaisselle risque de ne pas fonctionner
correctement.
Faireattentionàcequ'iln'yaitnipliuresniétranglements
au niveau du tuyau.
.
(voir
Raccordement du tuyau d’évacuation de
l’eau
Raccorder le tuyau d’évacuation à une conduite d’évacuation
ayantaumoins2cmdediamètre.(A)
Leraccorddutuyaud’évacuationdoitêtreplacéentre40et
80 cm au-dessus du sol ou du plan d’appui du lave-vaisselle.
MAX 80 cm
MIN 40 cm
Avant de raccorder le tuyau d’évacuation de l’eau au siphon
del’évier,retirerlebouchonenplastique(B).
ATTENTION : TENSION DANGEREUSE !
Il ne faut en aucun cas couper le tuyau d’amenée de l’eau
car il contient des parties sous tension.
Raccordement électrique
Avantdebrancherlafichedanslaprisedecourant,s'assurer
que :
• la prise est bien reliée à la terre et est conforme aux
réglementations en vigueur ;
• lapriseestbienapteàsupporterlapuissancemaximale
de la machine reportée sur la plaquette signalétique fixée
à la contre-porte
(voirchapitreDescriptiondulave-vaisselle);
• latension d’alimentation est bien compriseentre les
valeurs figurant sur la plaque signalétique de la contreporte ;
• lapriseestbiencompatibleaveclafichedel’appareil.
Autrement, faire remplacer la fiche par un technicien
agréé
(voirAssistance)
multiples.
Après installation de l’appareil, le cordon d’alimentation
électrique et la prise de courant doivent être facilement
accessibles.
Le câble ne doit être ni plié ni trop écrasé.
Afin d’éviter tout danger, faire changer le cordon
d’alimentation abîmé, par le fabricant ou par son service
après-vente.
Nous déclinons toute responsabilité en cas de nonrespect des normes énumérées ci-dessus.
(VoirAssistance)
; n’utiliser ni rallonges ni prises
Mise en place et mise à niveau
1. Installer le lave-vaisselle sur un sol plat et rigide.
Compenser les irrégularités en vissant ou en dévissant les
piedsavantjusqu'àcequel'horizontalitédel’appareilsoit
parfaite. Une bonne horizontalitégarantit la stabilité de
l’appareil et supprime tout risque de bruits et de vibrations.
2.Avantd'encastrerlelave-vaisselle,collerlerubanadhésif
transparent* sous le plan en bois pour le protéger contre le
risque de formation de condensation.
3.Installerlelave-vaisselledemanièreàcequelescôtéset
laparoiarrièretouchentauxmeublesadjacentsouaumur.
L’appareil peut être encastré sous un plan de travail continu*
(voirfeuilledemontage)
.
FR
Sécurité anti-fuite
Pour éviter tout risque d’inondation, le lave-vaisselle :
- est équipé d’un dispositif qui coupe l’arrivée de l’eau en
cas d’anomalie ou de fuite à l’intérieur de l’appareil.
Quelques modèles sont aussi équipés d’un dispositif de
sécurité supplémentaire New Acqua Stop*, qui garantit
contretoutrisqued'inondationmêmeencasderupturedu
tuyau d’amenée de l’eau.
4*. Pour régler la hauteur du pied arrière, agir sur la douille
rouge à six pans située dans la partie avant du lavevaisselle, en bas et au milieu, à l’aide d’une clé mâle à six
pans, ouverture 8 mm. Tourner dans le sens des aiguilles
d’une montre pour augmenter la hauteur et dans le sens
inverse pour la diminuer.
(voirfeuilled’instructionsjointeà
la documentation)
* Présent uniquement sur certains modèles.
25
Page 26

FR
Conseils pour le premier lavage
Aprèsl'installation,retirerlescalesplacéessouslespaniers
ainsi que les élastiques de fixation du panier supérieur
(si
prévus).
Réglages de l'adoucisseur d'eau
Avant de lancer le premier lavage, sélectionner le niveau
de dureté del'eauduréseau.
(voirchapitreProduitderin-
çage et sel régénérant))
Lors de son premier chargement, il faut d'abord remplir
l'adoucisseurd'eau puisintroduire environ1 kgde sel.Il
estnormalquedel'eaudéborde..
Fairedémarreruncycledelavagetoutdesuiteaprès.
N’utiliser que du sel spécial lave-vaisselle.
Après remplissage du réservoir, le voyant SEL*s'éteint.
L'absencede remplissage duréservoir àsel peut
endommager l’adoucisseur d’eau et l’élément chauffant.
Caractéristiques techniques
largeur 45 cm
Dimensions
Capacité 10 couverts standard
Pression eau
d’alimentation
Tension
d’alimentation
Puissance totale
absorbée
Fusible Voir étiquette des caractéristiques
hauteur 85 cm
profondeur 60 cm
0,05 ÷ 1 MPa (0,5 ÷ 10 bar)
7,25 – 145 psi
Voir étiquette des caractéristiques
Voir étiquette des caractéristiques
Cet électroménager dispose de signaux sonores/bips
le modèle de lave-vaisselle
a été activée: allumage, fin de cycle etc..
Tous les symboles/voyants/led lumineux du bandeau de
commande/afficheur peuvent avoir des couleurs différentes,
flasher ou être en fixe.
Affichage* d'informations utiles concernant le type de cycle
sélectionné, la phase de lavage/séchage, le temps résiduel,
la température etc.... etc...
) qui signalent que la commande
(selonlemodèledelave-vaisselle)
(selon
.
Cet appareil est conforme aux
Directives Communautaires suivantes:
- 2006/95/EC (Basse Tension)
- 2004/108/EC (Compatibilité
Electromagnétique)
-2009/125/EC (Comm. Reg.
1016/2010) (Ecodesign)
-97/17/EC (Etiquetage)
-2012/19/EU (DEEE)
* Présent uniquement sur certains modèles.
26
Page 27
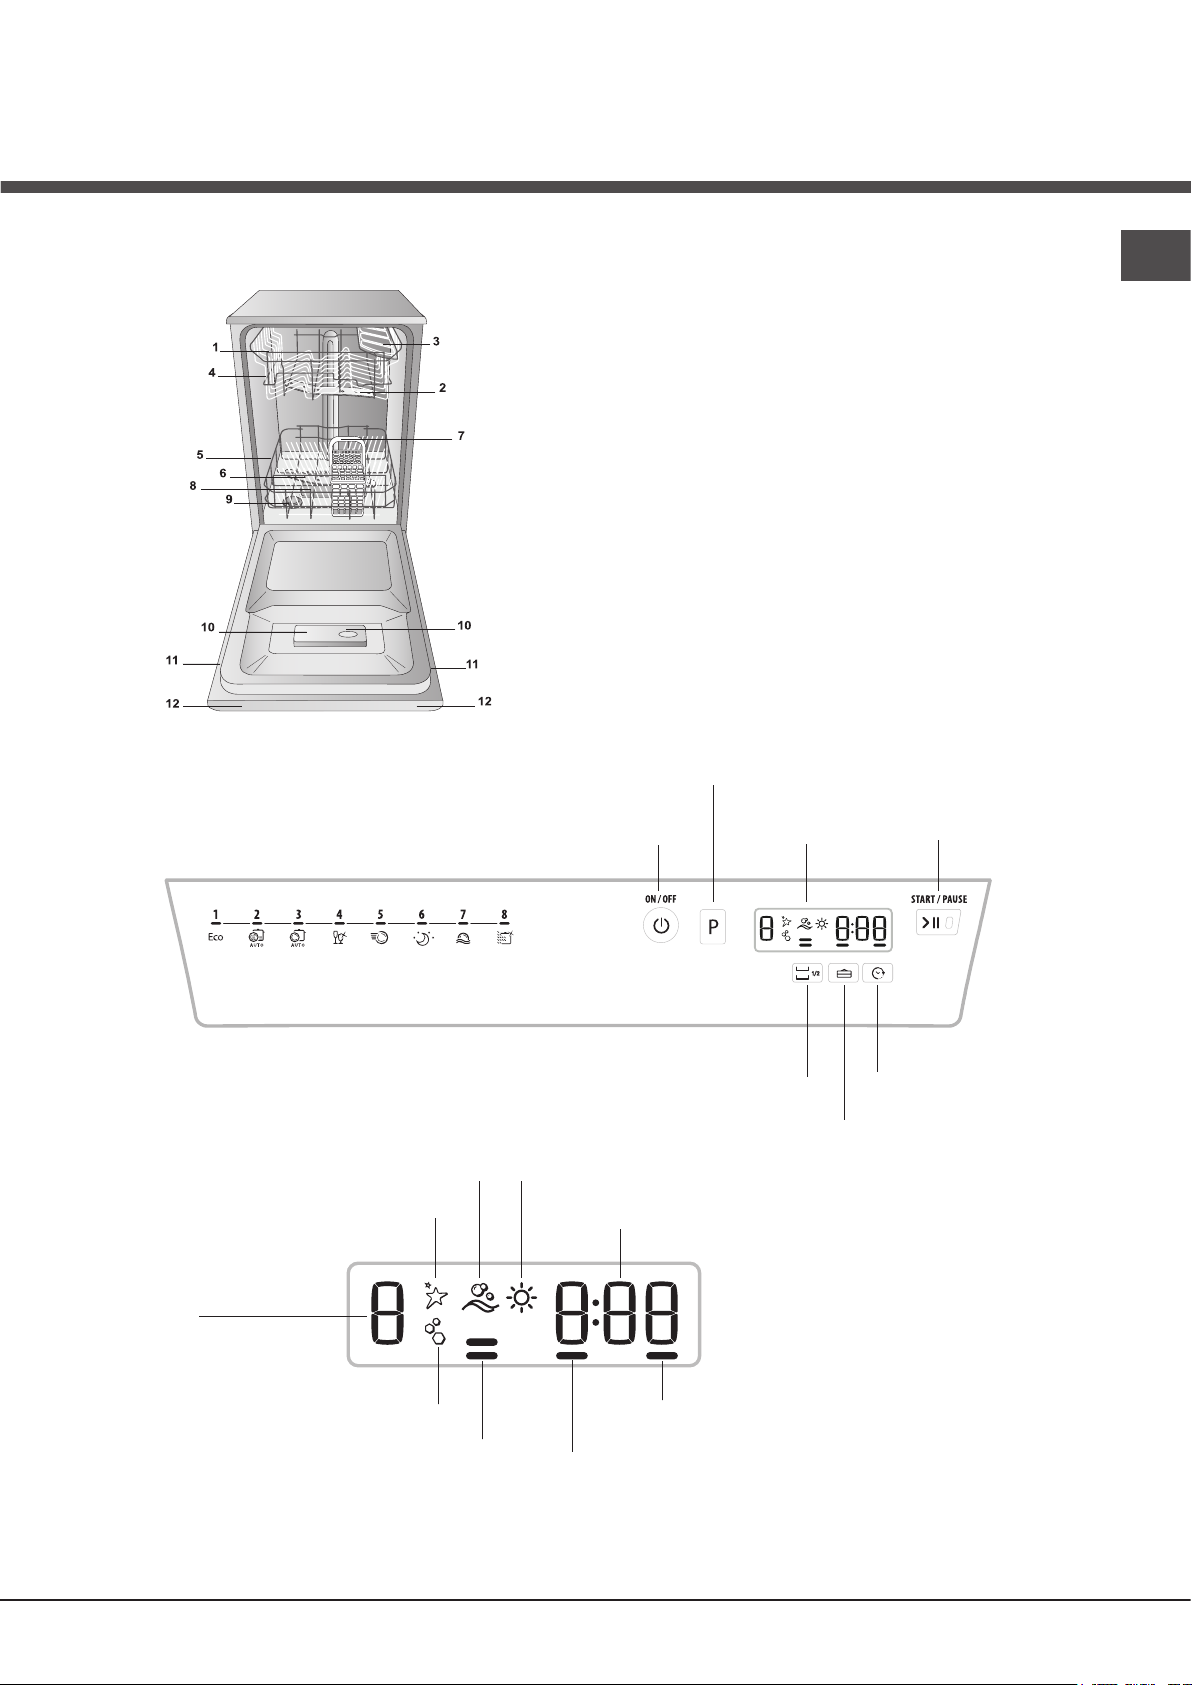
Description de l’appareil
Vue d’ensemble
Tableau de bord
FR
1. Panier supérieur
2. Brasdelavagesupérieur
3. Clayettes rabattables
4. Réglage hauteur du panier
5. Panier inférieur
6. Brasdelavageinférieur
7. Panier à couverts
8. Filtrelavage
9. Réservoir à sel
10. Bacsproduitdelavageetréservoirà
produit de rinçage
11. Plaque signalétique
12. Tableau de bord***
touche
Sélection Programme
Display
voyant Manque de
Produit de Rinçage
indicateur Numéro
du Programme
voyant Manque de Sel
voyants Option Demi-charge
touche ON-OFF/RESET
voyant Lavage voyant Séchage
indicateur du Temps Restant
voyant Option Pastilles
Multifonction (Tabs)
Display
touche Option
Demi-charge
touche Option Pastilles
multifonction (Tabs)
voyant Option Départ Différé
touche et voyant
Départ/Pause
touche Option
Départ Différé
*** Uniquement pour modèles « tout intégrable » * Présent uniquement sur certains modèles.
Le nombre et les types de programmes varient selon le modèle de lave-vaisselle.
27
Page 28
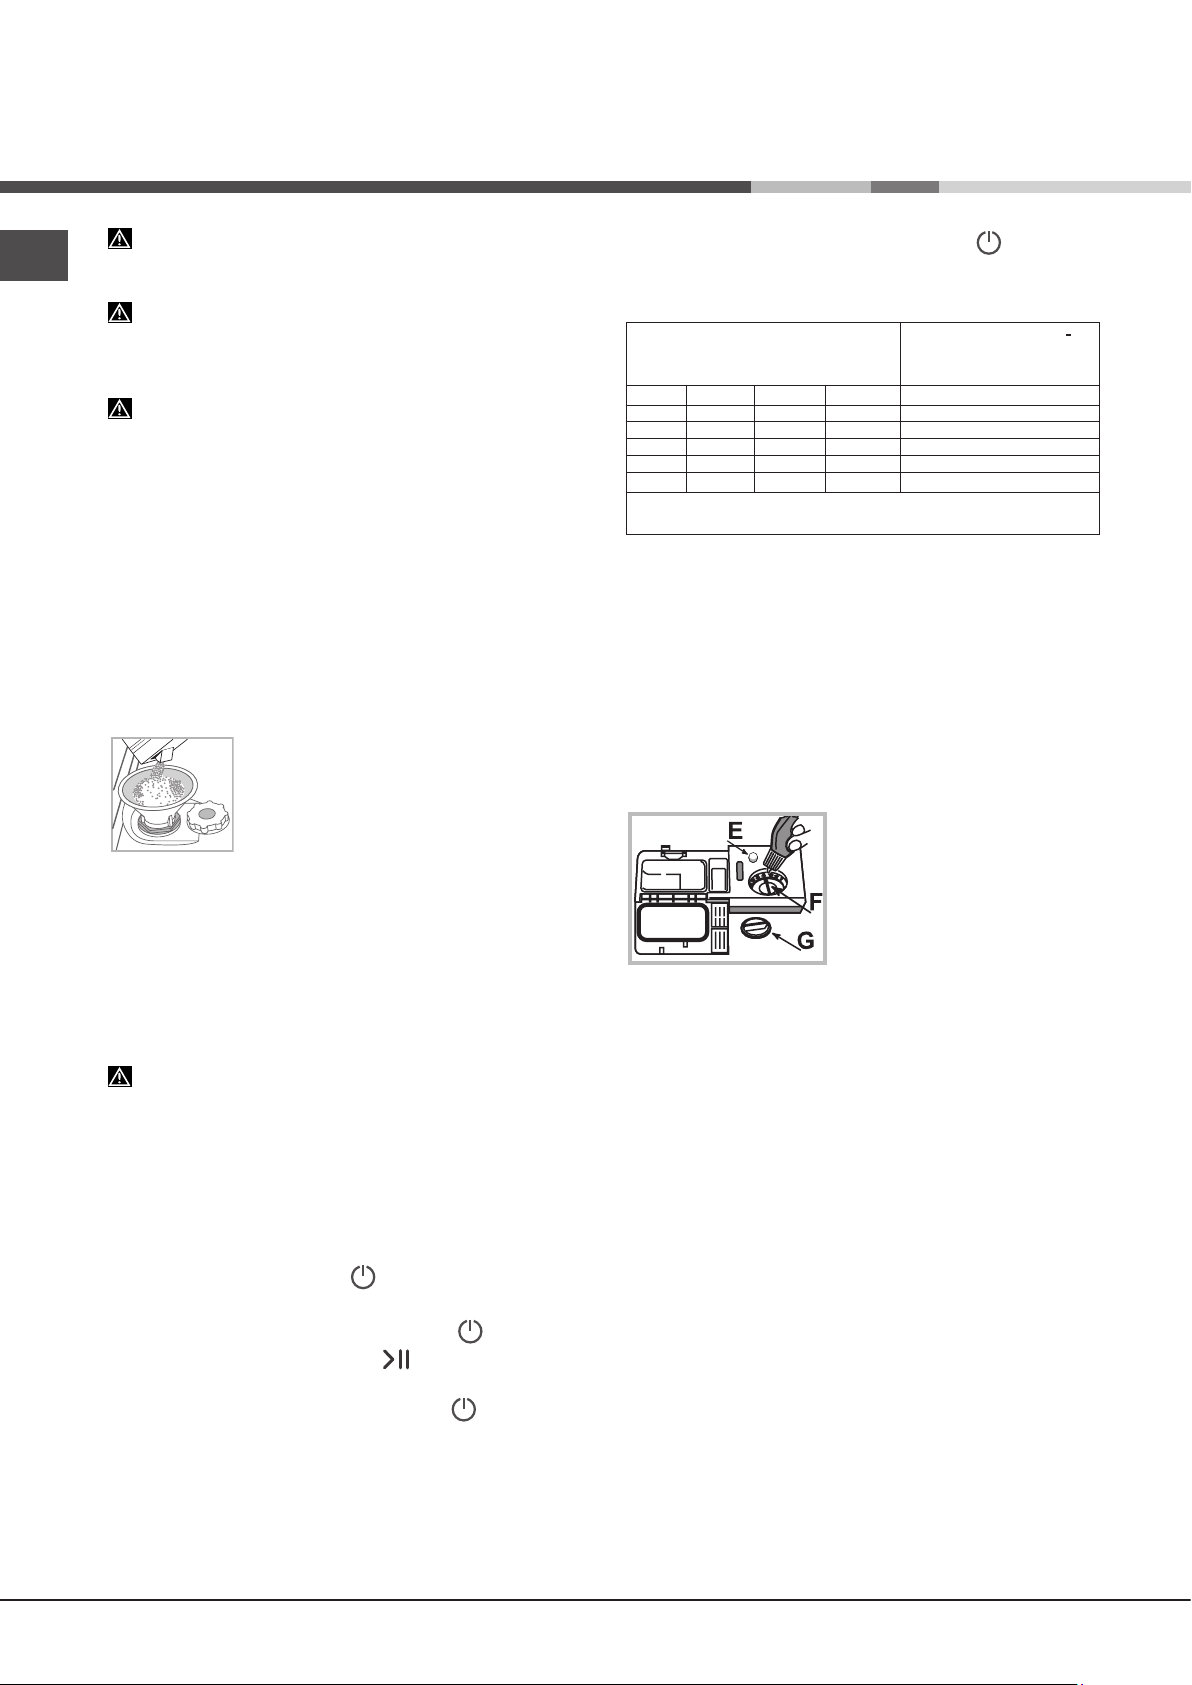
Sel régénérant et
Produit de rinçage
FR
N’utiliser que des produits de lavage spéciaux lave-vaisselle.
N’utilisez pas de sel alimentaire ou industriel.
Se conformer aux instructions reportées sur l’emballage.
En cas d’utilisation d’un produit multifonction, nous
conseillons malgré tout d’ajouter du sel, surtout en cas d’eau
dure ou très dure.
l’emballage).
Faute d’ajouter du sel ou du produit de rinçage, il est normal
que les voyants SEL* et PRODUIT DE RINCAGE* restent
allumés.
(Seconformer auxinstructionsreportées sur
Charger le sel régénérant
L'utilisationdeselévitelaformationdeCALCAIREsurlavaisselleet
sur les composants fonctionnels du lave-vaisselle.
•Ilestimportantqueleréservoiràselnesoitjamaisvide.
•Ilestimportantdeprocéderauréglagedeladuretédel'eau.
Le réservoir à sel qui se trouve dans la partie inférieure du lavevaisselle
•quandlevoyantSEL*dubandeaus’allume;
•quandleflotteurvert*quisetrouvesurlecouvercleduseln'est
•voirautonomiedansletableaudeduretédel'eau.
réservoirdeseljusqu’aubord(1kgenviron);ilesttoutàfaitnormal
quedel'eaudéborde.
4.Enleverl’entonnoir,éliminerlesrésidusdeselsurlefiletage.Avant
de revisser le couvercle, il faut le rincer à l’eau courante.
Nous conseillons d’effectuer cette opération à chaque chargement
de sel.
Fermersoigneusementlecouverclepouréviterqueduproduitde
lavagepénètre àl’intérieur duréservoir pendantle lavage(cela
pourraitendommagerirrémédiablementl'adoucisseur).
opération avant de démarrer le lavage.
Réglage dureté de l’eau
Pour obtenir un fonctionnement parfait de l’adoucisseur anticalcaire, il faut absolument procéder à un réglage selon la dureté
de l’eau de l’appartement. Se renseigner auprès de l’organisme
distributeur de l’eau. La valeur sélectionnée correspond à une
dureté moyenne.
•AppuyersurlatoucheON/OFF pour mettre le lave-vaisselle
sous tension
•AppuyersurlatoucheON/OFFpouréteindre
•Garder la touche Départ/Pause enfoncée pendant 5
secondes,jusqu’aubip.
•AppuyersurlatoucheON/OFFpourallumer
•L’écranaffichelenuméroduniveaudesélectioncourantetle
voyant sel.
•AppuyersurlatoucheP pour sélectionner le niveau de dureté
(voirtableaudureté).
(voirDescription)
plus visible.
Encas de rajout de sel, nous conseillons d'effectuer cette
doit être rempli:
1. Sortir le panier inférieur et dévisser le
couvercle du réservoir dans le sens inverse des
aiguilles d’une montre.
2. Lors de la première mise en service : remplir
le réservoir d’eau à ras bord.
3.Utiliserl’entonnoir
(voirfigure)
pour remplir le
•AppuyersurlatoucheON/OFFpouréteindre
•Réglageeffectué!
Tableau de dureté de l’eau
niveau
De 0°f à 10°f nous vous conseillons de ne pas utiliser de sel.
* La sélection 5 peut prolonger la durée.
(°dH=duretéendegrésallemands-°fH=duretéendegrés
français-mmol/l=millimol/litre)
°dH °fH mmol/l mois
1 0 - 6 0 - 10 0 - 1 7 mois
2 6 - 11 11 - 20 1,1 - 2 5 mois
3 12 - 17 21 - 30 2,1 - 3 3 mois
4 17 - 34 31 - 60 3,1 - 6 2 mois
34 - 50 61 - 90 6,1 - 9 2/3 semaines
5*
Autonomie moyenne
réservoir à sel avec 1
lavage par jour
Charger le produit de rinçage
LeproduitderinçageaideauSÉCHAGEdelavaisselle.Ilfaut
remplir le réservoir à produit de rinçage :
• quand levoyant PRODUITDE RINÇAGE*s'allumesur le
bandeau/écran.
• quandl'indicateuroptiquesituésurlecouvercleduréservoir
« E », passe de foncé à transparent.
1.Ouvrir leréservoir entournant
le couvercle « G » dans le sens
inverse des aiguilles d’une montre.
2.Verser le produit de rinçage
sans le faire déborder. Si cela se
produit,nettoyer aussitôtavec un
chiffon sec.
3.Revisserlecouvercle.
Ne JAMAIS verser le liquide de rinçage directement à
l'intérieur de la cuve.
Régler la dose de produit de rinçage
Si le résultat du séchage n’est pas satisfaisant, le dosage du
produit de rinçage peut être réglé. Tourner le dispositif de
réglage « F ». Possibilité de sélectionner jusqu'à 4 niveaux
maximum selon le modèle de lave-vaisselle. La valeur
sélectionnée correspond à un niveau moyen.
• silavaisselleprésentedestraces bleuâtres, régler sur des
chiffresplusbas(1-2).
• s’ilyadesgouttesd’eau oudestachesdecalcaire surla
vaisselle,réglersurdeschiffresplusélevés(3-4).
28
* Présent uniquement sur certains modèles.
Page 29
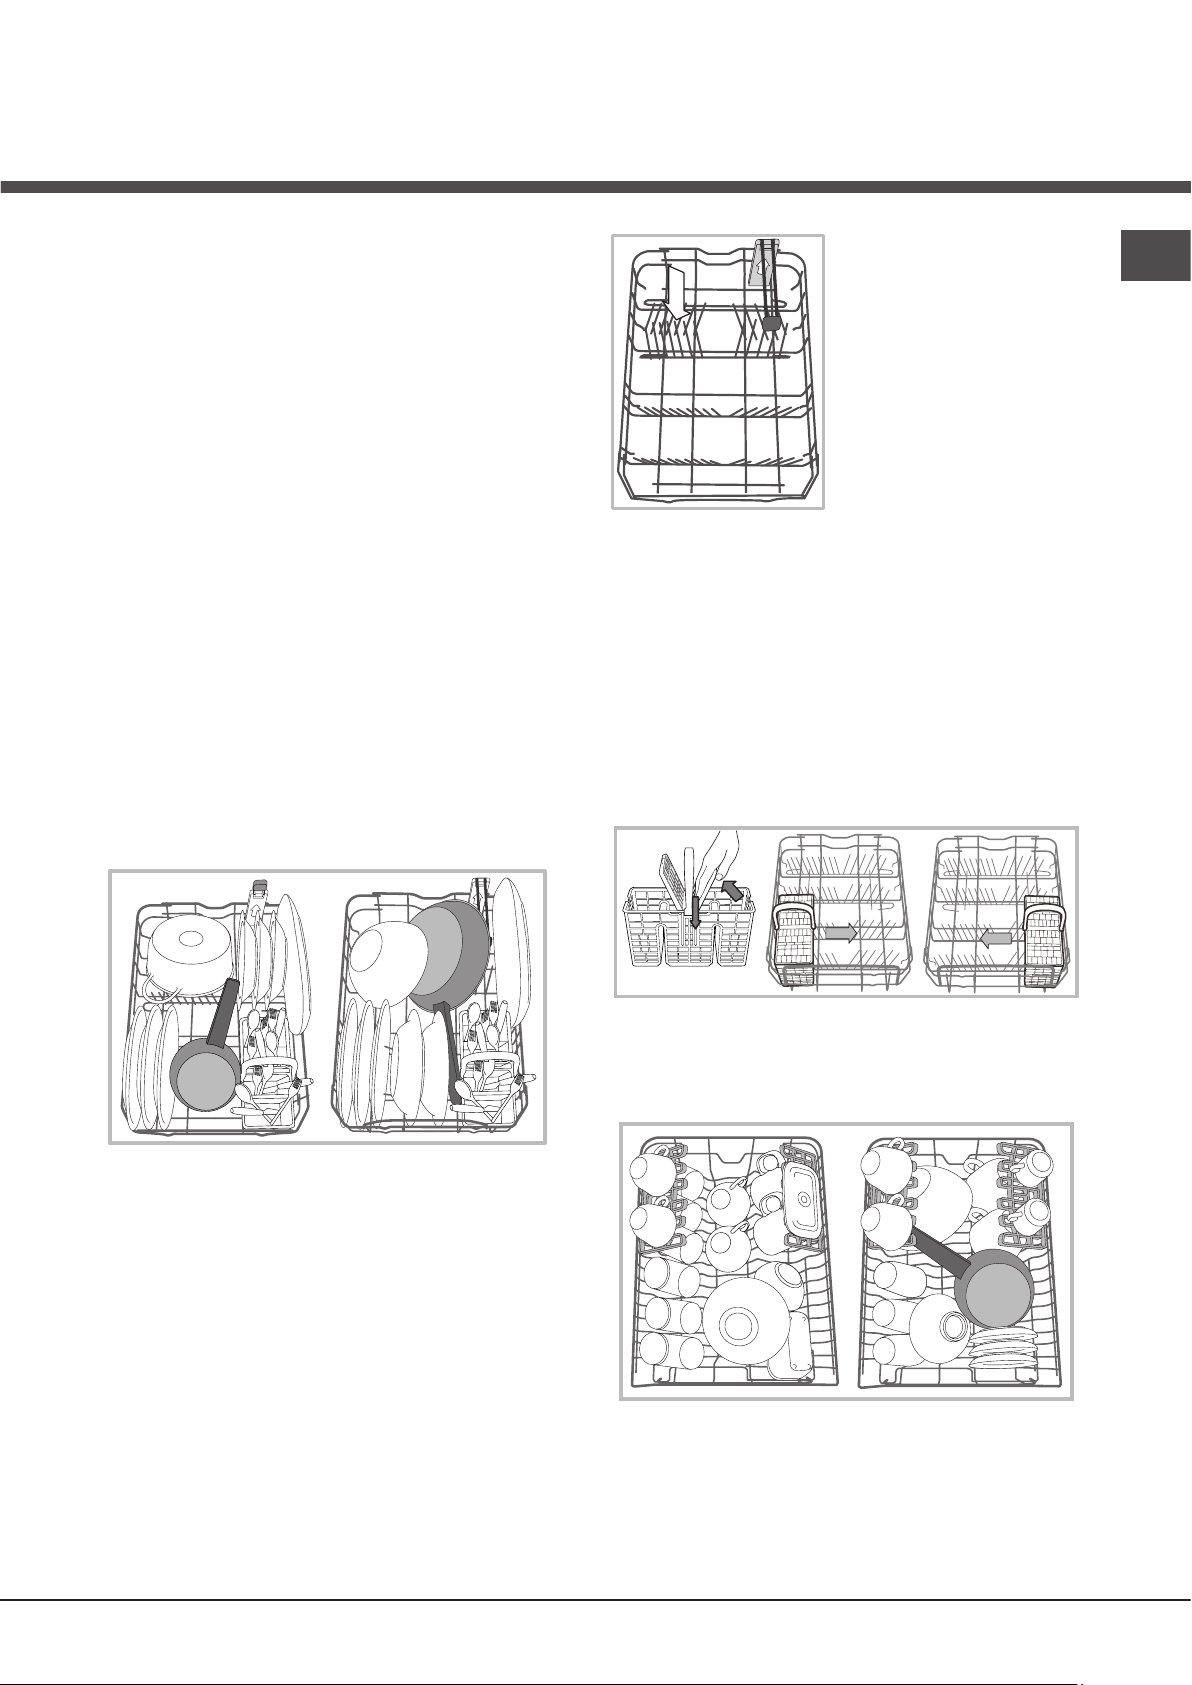
Charger les paniers
Conseils
Avant de charger les paniers, débarrasser la vaisselle des
déchets plus importants et vider les verres et autres récipients.
Pas besoin de rincer préalablement à l'eau courante.
Ranger la vaisselle de manière à ce qu’elle ne bouge pas
pour éviter tout risque de renversement, ranger les saladiers
et les casseroles ouverture tournée vers le bas et les parties
concavesouconvexesenpositionobliquepourpermettreàl'eau
d'atteindretouteslessurfacesetdes'écoulercomplètement.
Veilleràce que les couvercles,manches,poêlesetplateaux
ne gênent pas la rotation des bras de lavage. Placer les petits
objetsdanslepanieràcouverts.
La vaisselle en plastique et les poêles anti-adhésives ont
tendanceàretenirlesgouttesd'eauetleurdegrédeséchage
sera par conséquent inférieur à celui de la vaisselle en
céramique ou en acier.
Lesobjetslégers(telsquelesrécipientsenplastique)doivent
être rangés, de préférence. dans le panier supérieur et placés
demanièreàcequ'ilsnerisquentpasdesedéplacer.
Après avoir chargé le lave-vaisselle, s’assurer que les bras de
lavage tournent librement.
Panier inférieur
Le panier inférieur peut contenir des casseroles, des couvercles,
des assiettes, des saladiers, des couverts etc. Les assiettes et
les couvercles de grandes dimensions doivent être rangés, de
préférence,surlescôtésdupanier.
Certains modèles sont équipés
d’uneVerticalZone,dessupports
spéciaux extractibles*situés
dans la partie arrière du panier
qui peuvent servir à positionner
les poêles ou les casseroles
plus à la verticale, de manière
à ce qu’elles occupent moins
de place.
Pour s’en servir, il suffit de tirer
vers le haut la poignée colorée
en la faisant tourner en avant.
Ces supports peuvent coulisser
à droite ou à gauche pour s’adapter aux dimensions de la
vaisselle.
Il est conseillé de ranger la vaisselle très sale dans le panier
inférieurcardanscettepartiedulave-vaisselle,lesjetsd’eau
sont plus énergiques et permettent d’obtenir de meilleures
performances de lavage.
Panier à couverts
Le panier à couverts est équipé de grilles supérieures
permettant de mieux ranger les couverts. Le panier à couverts
non séparable doit être placé obligatoirement dans la partie
avant du panier inférieur.
FR
Certains modèles de lave-vaisselle sont pourvus de secteurs
rabattables*, qui peuvent être utilisés en position verticale pour
accueillirlesassiettesouenpositionhorizontale(abaissés)pour
pouvoir charger plus facilement les casseroles et les saladiers.
* Présent uniquement sur certains modèles.
Panier supérieur
Réservé au chargement de la vaisselle fragile et légère : verres,
tasses, soucoupes, saladiers bas.
29
Page 30
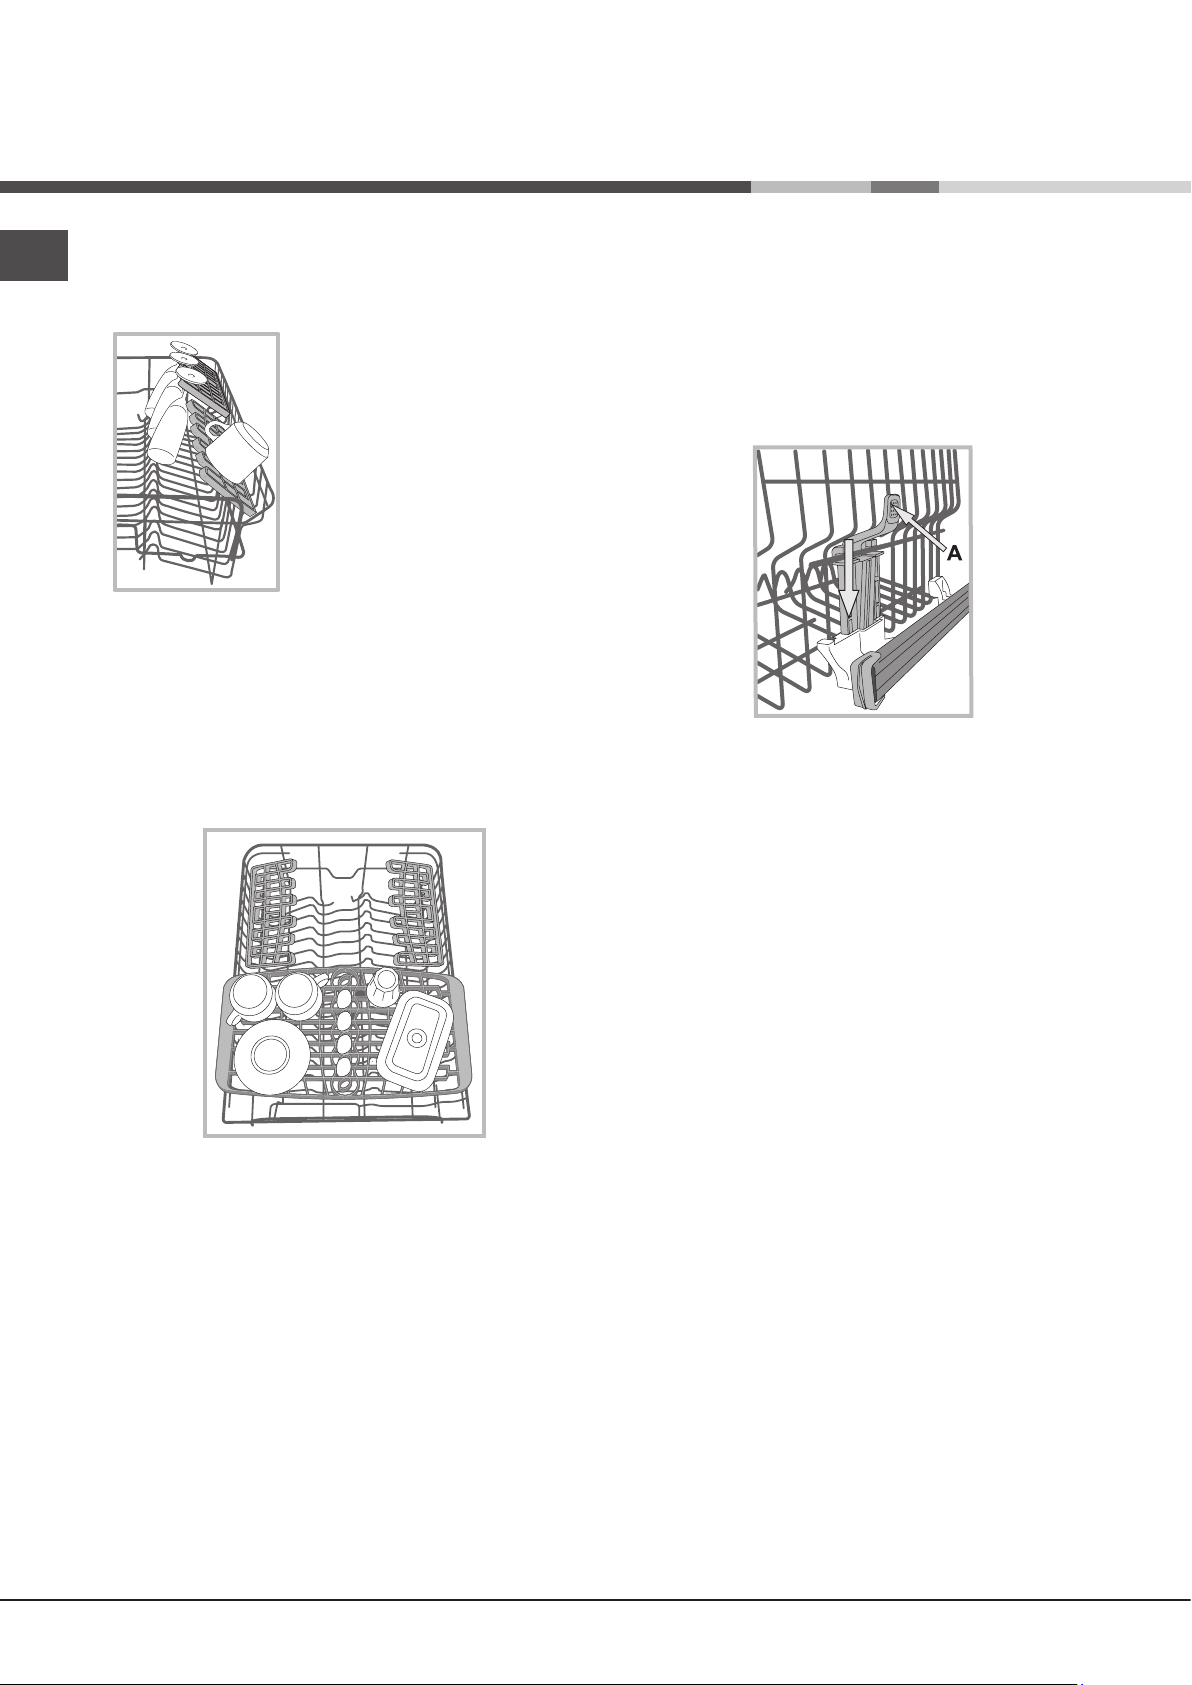
FR
Clayettes rabattables à emplacement variable*
Les clayettes latérales peuvent être placées à trois hauteurs
différentes afin d’optimiser la disposition de la vaisselle dans
le panier.
Les verres à pied peuvent être
placés en position stable sur les
clayettes rabattables en insérant
leurs pieds dans les fentes prévues
à cet effet.
Pour optimiser le séchage,
choisir la plus forte inclinaison
des clayettes rabattables. Pour
modifier l’inclinaison de la clayette
rabattable, la soulever et la faire
glisser légèrement avant de la
placer comme voulu.
Plateau*
Certains modèles de lave-vaisselle sont dotés d’un plateau
coulissant qui peut être utilisé pour contenir des couverts
ou de la vaisselle de petite taille.
Pour de meilleures performances de lavage, éviter de mettre
sous le plateau de la vaisselle encombrante. Le plateau à
couverts est amovible.
(voirfigure)
Régler la hauteur du panier supérieur
Le panier supérieur est réglable en hauteur : en position
haute, il permet de ranger de la vaisselle encombrante dans
le panier inférieur ; en position basse, il permet d’exploiter
au mieux l’espace des clayettes rabattables en créant plus
de place de rangement vers le haut.
Régler de préférence la hauteur du panier quand ce dernier
est VIDE.
Ne JAMAIS soulever ou abaisser le panier d’un seul côté.
Si le panier est équipé de Lift-Up*
enlesaisissantparlescôtésetledéplacerverslehaut.Pour
reveniràlapositionbasse,appuyersurlesleviers(A) sur les
côtésdupanieretl'aideràdescendreverslebas.
(voirfigure)
, soulever le panier
Vaisselle non appropriée
• Couvertsetvaisselleenbois.
• Verresdécorésetfragiles,vaisselleartisanaleartistiqueou
ancienne. Leurs décors ne sont pas résistants.
• Partiesen matière synthétique nerésistant pasà la
température.
• Vaisselleencuivreouenétain.
• Vaissellesaledecendre,cire,graisselubrifianteouencre.
Les décors sur verre, les pièces en aluminium ou argent risquent
de changer de couleur et de blanchir en cours de lavage.
Certainstypes de verre (les objets en cristal par exemple)
deviennent opaques après de nombreux lavages.
Endommagement du verre et de la vaisselle
Causes :
• Typedeverreetprocédédefabricationduverre.
• Compositionchimiqueduproduitdelavage.
• Températuredel'eauduprogrammederinçage.
Conseils :
• N'utiliserquedesverresetdelaporcelainegarantisparle
fabricant comme résistants au lavage en lave-vaisselle.
• Utiliserunproduitdelavagedélicatpourvaisselle.
• Sortir lesverres etles couverts du lave-vaisselle le plus
rapidement possible après la fin du programme.
*Présents uniquement sur certains modèles, ils peuvent varier
au point de vue nombre et emplacement.
30
Page 31

Produit de lavage et
utilisation du lave-vaisselle
Charger le produit de lavage
Un bon résultat de lavage dépend aussi d’un bon dosage
du produit de lavage. Un excès de produit de lavage ne lave
pas mieux et pollue l’environnement.
Le dosage peut être adapté selon le degré de salissure.
En cas de vaisselle normalement sale, utiliser environ 25 g
(produit de lavage en poudre) ou 25ml (produit liquide). En
cas d’utilisation de tablettes, une seule suffit.
En cas de vaisselle peu sale ou précédemment rincée à l’eau,
réduire considérablement la quantité de produit de lavage.
Pour un bon résultat de lavage, suivre également les
instructions reportées sur l’emballage.
Pour toute autre demande de renseignements, s’adresser
aux fabricants de produits de lavage.
Ouvrirledistributeuràproduit
de lavage en actionnant le
bouton D; pour doser le
produit de lavage, consulter
le tableau des programmes :
•enpoudreouliquide:bacs
A (produitde lavage)et B
(produitdeprélavage)
•tablettes: quand le
programme en prévoit 1,
placer cette dernière dans
le bac A et fermer le couvercle C. S’il en prévoit 2, mettre la
deuxième dans le fond de la cuve.
Eliminer les résidus de produit de lavage sur les bords du bac
et fermer le couvercle Cjusqu’audéclic.
Le distributeur à produits de lavage s’ouvre automatiquement
selon le programme, au moment voulu.
Encas d'utilisation deproduits de lavagetout enun,utiliser
l'optionTABLETTES qui adapte le programme de lavage de
manièreàtoujoursobtenirlesmeilleursrésultatsdelavageet
de séchage possibles.
N’utiliser que du produit de lavage spécial lave-vaisselle.
NE PAS UTILISER de produits pour laver la vaisselle à la
main.
Une utilisation excessive de produit de lavage peut laisser
des résidus de mousse en fin de cycle.
Pour obtenir des performances de lavage et de séchage
optimales, il faut opter pour une utilisation combinée de
produit de lavage, produit de rinçage et sel régénérant.
Il est conseillé d’utiliser des produits de lavage sans
phosphates et sans chlore, plus indiqués pour la
protection de l’environnement.
Mettre en marche le lave-vaisselle
1.Ouvrirl’arrivéed’eau.
2.AppuyersurlatoucheON-OFF.
3.Ouvrirlaporteetdoserleproduitdelavage
produit de lavage).
4.Chargerlespaniers
porte.
5. Sélectionner le programme selon le type de vaisselle et son
degré de salissure
la touche P.
6. Sélectionner les options de lavage*
7. Appuyer sur la touche Départ/Pausepourdémarrer(lumière
fixe) : un bip prolongé signale le démarrage du programme, le
voyant du lavage s’allume, le numéro du programme ainsi que
le temps de lavage résiduel s’affichent.
8. A la fin deux bips courts et un bip prolongé annoncent la fin
du programme, la touche Départ/Pause s’éteint et l’écran affiche
END.Pouréteindrel’appareil,appuyersurlatoucheON-OFF.
9. Attendre quelques minutes avant de sortir la vaisselle pour
éviterdesebrûler.Déchargerlespaniersencommençantpar
celui du bas.
Pour réduire sa consommation d'énergie, la machine
s'éteint automatiquement dans certaines conditions de nonutilisation prolongée.
PROGRAMMES AUTO* : certains modèles de lave-vaisselle
sontéquipésd'uncapteurspécialquipeutévaluerledegréde
salissure et sélectionner le lavage le plus efficace et le plus
économique. La durée des programmes Auto peut varier du fait
de l’intervention du capteur.
(voirChargerlespaniers)
(voirtableaudesprogrammes)
(voirOptions).
Modifier un programme en cours
En cas d’erreur de sélection d’un programme, il est possible
lemodifier,àconditionqu’ilviennetoutjustededémarrer:
changer un cycle de lavage en cours, éteindre puis rallumer
l’appareilparunepressionprolongée sur la toucheON/OFF,
sélectionner ensuite le nouveau programme et les options
désirées.
Introduire de la vaisselle en cours de lavage
Appuyer sur la touche Départ/Pause ouvrir la porte en faisant
attention à la vapeur chaude qui s’échappe et introduire
la vaisselle. Appuyer sur la touche Départ/Pause: le cycle
redémarre après un bip prolongé.
Encasdesélectiond'undépartdifféré,unefoislecompte
à rebours terminé, le cycle de lavage ne démarre pas, il reste
en Pause.
Toute pression sur la touche Départ/Pause pour mettre
l’appareil en pause, stoppe le programme.
Pendant cette phase, aucun changement de programme n’est
possible.
Interruptions accidentelles
En cas d’ouverture de la porte en cours de lavage ou de coupure
de courant, le programme s’arrête. Il redémarre du point où il
a été interrompu dès que le courant revient ou que la porte est
refermée.
(voirChargerle
et fermer la
appuyer sur
de
pour
FR
* Présent uniquement sur certains modèles.
31
Page 32
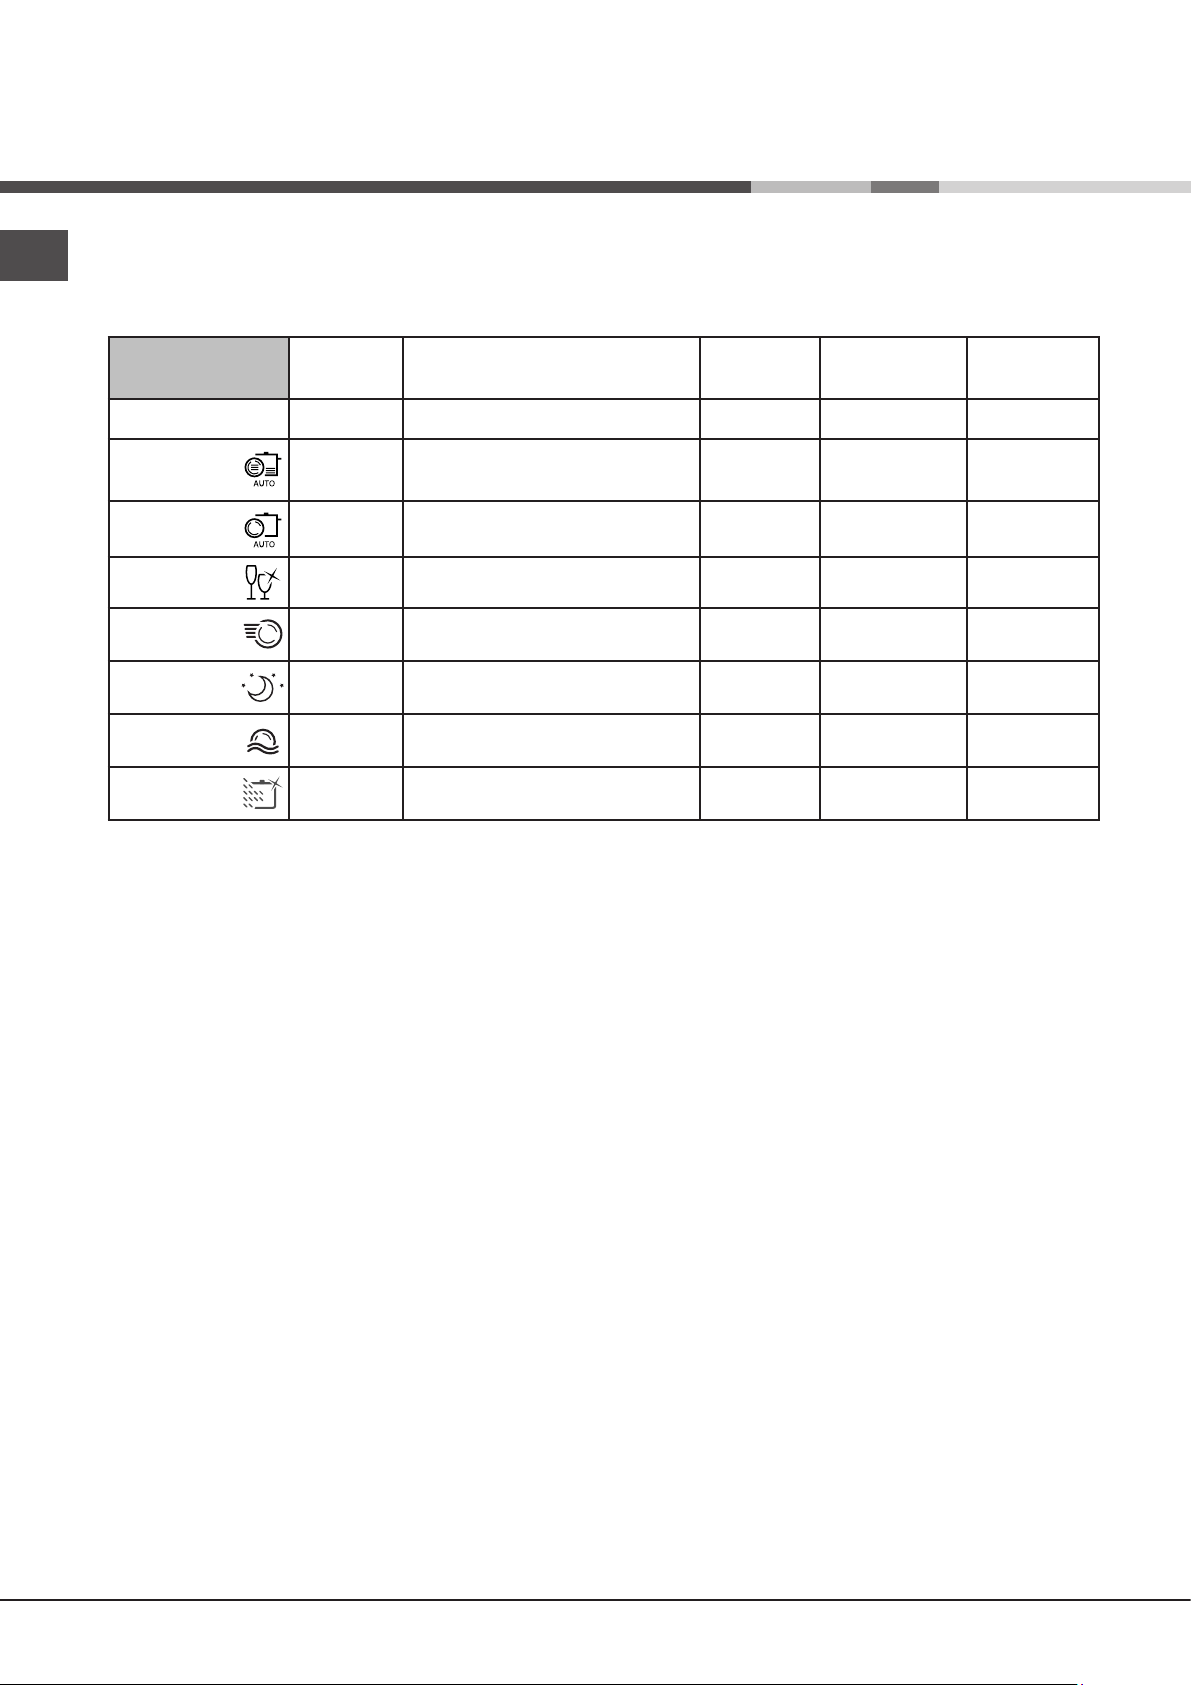
Programmes
FR
LesdonnéesdesprogrammessontmesuréesdansdesconditionsdelaboratoireselonlanormeeuropéenneEN50242.
Selon les différentes conditions d’utilisation, la durée et les données des programmes peuvent être différentes.
Le nombre et les types de programmes et des options, varient selon le modele de lave-vaisselle.
Programme Séchage Options
1. Eco Oui
2. Auto intensif Oui
3. Auto Normal Oui
4. Délicat Oui
5. Express Non Départ différé - Tabs 00:25 8,0 0,45
6. Good Night Oui Départ différé - Tabs
7. Trempage Non Départ différé - Demi-charge 00:10 4,0 0,01
8. Ultra Intensive Oui
Départ différé - Demi-charge - Tabs
Départ différé - Demi-charge - Tabs
Départ différé - Demi-charge - Tabs
Départ différé - Demi-charge - Tabs
Départ différé - Demi-charge - Tabs
Durée du
programme
03:00 9,0 0,83
02:20 - 03:00 13,0 - 14,0 1,20 - 1,45
01:40 - 02:20 13,5 - 14,5 1,00 - 1,20
01:40 9,0 0,90
03:30 13,0 0,85
02:50 17,0 1,5
Consommation
d’eau (litre/cycle)
Consomation
d’énergie
(KWh/cycle)
Indications sur le choix des programmes et dosage du produit de lavage
1. LecycledelavageECOestleprogrammestandardauquelseréférentlesdonnéesdel’étiquette-énergie.Cecycleestprévu
pour le lavage de vaisselle normalement sale, c’est le programme le plus efficace en termes de consommation d’énergie et d’eau
pourcetypedevaisselle.4g/ml**+ 21g/ml–1Tab
2. Vaisselleetcasserolestrèssales(déconseillépourlavaissellefragile).25g/ml–1Tab
3.Vaisselleetcasserolesnormalementsales.4g/ml**+ 21g/ml–1Tab
4.Cyclepourvaissellefragilenesupportantpasleshautestempératures.25g/ml–1Tab
5.Cyclerapideconseilléencasdevaissellepeusale.(idéalpour2couverts)21g/ml–1Tab
6.Assuredesperformancesoptimales.Adaptépourl’utilisationdenuit.25g/ml–1Tab
7. Lavage préalable dans l’attente de compléter le chargement au repas suivant. Pas de produit de lavage
8. Cycle pour casseroles extrêmement sales ou avec incrustations d’aliments. 4g/ml**+25g/ml–1+1Tab
Consommations en stand-by: Consommation en left-on mode: 5,0 W - Consommation en off-mode: 0,5 W.
(**Quantité de produit de lavage pour le prélavage)
32
Page 33

Programmes spéciaux et Options
Remarque :
pour obtenir des performances optimales avec les programmes
«Express» il est conseillé de respecter le nombre de couverts
indiqué.
Pour consommer moins, utiliser le lave-vaisselle à pleine charge.
Note pour les laboratoires d’essai : pour toutes informations
sur les conditions d’essai comparatif EN, s’adresser à:
assistenza_en_lvs@indesitcompany.com
Options de lavage*
La sélection, la modification ou l’annulation des OPTIONS
n’est possible qu’après avoir choisi le programme de lavage
et avant d’appuyer sur la touche Départ/Pause.
Seules les options compatibles avec le programme choisi
peuvent être sélectionnées. Si une option n’est pas compatible
avec le programme sélectionné,
symbolecorrespondantclignoterapidement3fois.
En cas de sélection d’une option incompatible avec une option
précédemmentsélectionnée,celle-ciclignote3foisdesuitepuis
s'éteint,tandisqueladernièresélectioneffectuéeresteallumée.
Pour désactiver une option sélectionnée par erreur, appuyer à
nouveau sur la touche correspondante.
(voirtableauprogrammes)
le
Option Demi-charge dans le panier supérieur
ou inférieur
Le programme demi-charge permet de laver une
petite vaisselle et de faire des économies d’eau, d’électricité et
de produit de lavage. Sélectionner le programme, appuyer sur la
toucheDEMI-CHARGE,ensuccession:levoyantcorrespondant
aupanierchoisis'allumeetlelavagedémarreuniquementdans
le panier supérieur ou uniquement dans le panier inférieur.
Penser à ne ranger la vaisselle que dans le panier
supérieur ou inférieur et à réduire de moitié la quantité de
produit de lavage.
Option Tablettes Multifonctions (Tabs)
Cette option permet d’optimiser le résultat de lavage
et de séchage.
En cas d’utilisation de tablettes multifonction, appuyer
surla touche TABLETTES MULTIFONCTION, le symbole
correspondants'allume.Pourdésactivercetteoptionappuyer
à nouveau sur la touche.
L’option « Tablettes Multifonctions » prolonge la durée
du programme.
FR
Option Départ différé
Possibilité de différer le départ du programme de 1 à
24 heures :
1. Sélectionner le programme de lavage et toute autre option
possible,appuyersurlatoucheDÉPARTDIFFÉRÉ:levoyant
s'allume.Sélectionneràl'aidedelamêmetouche,àquelmoment
fairedémarrerlecycledelavage.(h01,h02,etc.)
2.Confirmer le choix à l'aide de la touche Départ/Pause, le
compte à rebours commence.
3.Al’expirationdudélaid’attente,levoyantdeDÉPARTDIFFÉRÉ
s’éteint et le programme démarre.
PourdésactiverunDÉPARTDIFFÉRÉ,appuyersurlatouche
DÉPARTDIFFÉRÉjusqu’àaffichagedeOFF.
Aucune sélection de Départ différé n'est plus possible
en cours de cycle.
* Présent uniquement sur certains modèles.
33
Page 34

Entretien et soin
FR
Coupure de l’arrivée d’eau et du courant
• Fermerlerobinetdel'eauaprèschaquelavagepouréviter
tout risque de fuites.
• Débrancherlafichedelaprisedecourantlorsdunettoyage
de l’appareil et pendant tous travaux d’entretien.
Nettoyer le lave-vaisselle
• Pour nettoyer l’extérieur etle bandeaude commande,
utiliser un chiffon humide non abrasif. N’utiliser ni solvants
ni détergents abrasifs.
• Pournettoyerlacuveintérieureetenlevertoutetache,utiliser
un chiffon imbibé d’eau additionnée d’un peu de vinaigre.
Eviter les mauvaises odeurs
• Laisser toujours la porte entrouverte pour évitertoute
stagnation d’humidité.
• Nettoyerrégulièrementlesjointsd’étanchéitédelaporteet
desbacsàproduitsdelavageavecuneépongehumide.On
évitera ainsi les incrustations de déchets d’aliment qui sont
les principaux responsables de la formation de mauvaises
odeurs.
Nettoyer les bras de lavage
Il peut arriver que des déchets restent collés aux bras de lavage
etbouchentlestrousdesortiedel’eau:mieuxvautlescontrôler
de temps en temps et les nettoyer avec une petite brosse non
métallique.
Les deux bras de lavage sont tous deux démontables.
Pour démonter le bras supérieur,
il faut dévisser sa bague en
plastique en tournant dans le sens
inverse des aiguilles d’une montre.
Remonter le bras gicleur supérieur
en veillant à ce que la face percée
du plus grand nombre d’orifices
soit bien orientée vers le haut.
Pour démonter le bras de lavage
inférieur, pousser sur les languettes
situéessur lescôtés ettirer vers
le haut.
Nettoyer les filtres
Les trois filtres qui composent le groupe filtrant débarrassent
l’eau de lavage des résidus d’aliments avant de la remettre en
circulation : pour obtenir de bons résultats de lavage, il faut
les nettoyer.
Nettoyer les filtres régulièrement.
Ne pas utiliser le lave-vaisselle sans filtres ou avec filtre mal
fixé.
•Après quelqueslavages, contrôler le groupe filtrant et, si
nécessaire, le laver soigneusement à l’eau courante avec une
petite brosse non métallique en procédant comme suit :
1. tourner le filtre cylindrique C dans le sens inverse des aiguilles
d’une montre pour le sortir de son emplacement
2. Exercer une légère pression sur les ailettes latérales du
gobelet filtre B pour le faire sortir
3.DégagerlefiltreinoxA.
4. Examiner la cavité et éliminer tout résidu de nourriture.
NE JAMAIS RETIRER la protection de la pompe de lavage
(piècenoire)(fig.4).
(Fig.2);
(fig.3).
C
1
A
3
Après avoir nettoyé les filtres, remettre soigneusement le groupe
filtrant à sa place, cette opération est fondamentale pour un bon
fonctionnement du lave-vaisselle.
(fig.1).
Nettoyage du filtre d’entrée d’eau*
Si les tuyaux de l’eau sont neufs ou s’ils sont restés longtemps
inutilisés, avant d’effectuer le raccordement, faire couler l’eau
jusqu’àcequ’elledeviennelimpideetdépourvued’impuretés.
Fautede quoi,unengorgementpourraitseproduireaupoint
d’arrivée de l’eau et endommager le lave-vaisselle .
Nettoyer, périodiquement le filtre d’entrée de l’eau situé à
la sortie du robinet.
-Fermerlerobinetdel’eau.
-Dévisserl’extrémitédutuyaud’arrivéedel'eau,retirerlefiltre
et le laver soigneusement à l’eau courante.
- Remettre le filtre en place et visser le tuyau.
34
En cas d’absence pendant de longues
périodes
• Débrancher lesraccordements électriqueset fermerle
robinet de l’eau.
• Laisserlaporteentrouverte.
•Auretour,effectuerunlavageàvide.
* Présent uniquement sur certains modèles.
Page 35

Anomalies et remèdes
Sil’appareilprésentedesanomaliesdefonctionnement,procéderauxcontrôlessuivantsavantdeprendrecontact
avec le service d’assistance technique.
Anomalies : Causes / Solutions possibles :
Le lave-vaisselle ne démarre
pas ou n’obéit pas aux
commandes
La porte ne ferme pas
Le lave-vaisselle ne vidange
pas.
Le lave-vaisselle est bruyant. • La vaisselle s’entrechoque ou butte contre les bras de lavage. Ranger la vaisselle
La vaisselle et les verres
présentent des dépôts de
calcaire ou une couche
blanchâtre.
La vaisselle et les verres
présentent des traces blanches
ou des reets bleuâtres.
La vaisselle n’est pas sèche. • ll y a eu sélection d’un programme sans séchage.
La vaisselle n’est pas propre. • La vaisselle n’est pas rangée correctement.
Il n’y a pas d’arrivée d’eau
il est bloqué et ses voyants clignotent
• Le robinet de l’eau n’est pas ouvert.
• Eteindre l’appareil à l'aide de la touche ON-OFF, rallumer au bout d’une minute environ et
sélectionner à nouveau le programme.
• La che n’est pas bien branchée dans la prise de courant ou il faut changer la prise de
courant.
• La porte du lave-vaisselle n’est pas bien fermée.
• S'assurer que les paniers sont bien poussés jusqu'au fond.
• La serrure est déclenchée ; pousser énergiquement sur la porte jusqu’au « clic ».
• Le programme de lavage n'est pas encore terminé.
• Le tuyau de vidange de l’eau est plié
• L’évacuation de l’évier est bouchée.
• Le ltre est bouché par des déchets de nourriture.
• Contrôler la hauteur du tuyau d'évacuation.
correctement et s'assurer que les bras de lavage tournent librement.
• Excès de mousse : le produit de lavage n’est pas bien dosé ou n’est pas approprié.
Produit de lavage et utilisation du lave-vaisselle).
• Absence de sel régénérant.
• Le réglage de la dureté de l'eau n'est pas adéquat ; il faut augmenter les valeurs.
régénérant et Produit de rinçage).
• Le couvercle du réservoir à sel et à produit de rinçage n'est pas bien fermé.
• Il n’y a plus de produit de rinçage ou son dosage est insufsant.
• Le dosage du produit de rinçage est excessif.
• Il n'y a plus de produit de rinçage.
• Le réglage du produit de rinçage n’est pas approprié.
• La vaisselle est en matériau anti-adhésif ou en plastique ; la présence de gouttelettes d'eau
est normale.
• Les bras de lavage ne tournent pas librement car ils sont gênés par la vaisselle.
• Le programme de lavage n’est pas assez puissant
• Excès de mousse : le produit de lavage n’est pas bien dosé ou n’est pas approprié.
Produit de lavage et utilisation du lave-vaisselle).
• Le couvercle du réservoir à produit de rinçage n'est pas bien fermé.
• Le ltre est sale ou bouché
• Il manque du sel régénérant
• S'assurer que la hauteur des assiettes est compatible avec le réglage du panier.
• Les orices des bras de lavage sont bouchés.
• Il y a une coupure d'eau du réseau ou le robinet est fermé.
• Le tuyau d’arrivée de l’eau est plié
• Les ltres sont bouchés ; il faut les nettoyer.
• L'évacuation est bouchée ; il faut la nettoyer.
• Après avoir effectué les opérations de contrôle et de nettoyage, éteindre puis rallumer le
lave-vaisselle et faire démarrer un nouveau cycle de lavage.
• Si le problème persiste, fermer le robinet de l'eau, débrancher la che de la prise de courant
et contacter le centre d'assistance technique.
(voir Entretien et soin).
(voir Sel régénérant et produit de rinçage).
(voir Installation).
(voir
Ne pas prélaver la vaisselle à la main.
(voir Sel
(voir Sel régénérant et Produit de rinçage).
(voir Programmes).
(voir
(voir Entretien et soin).
(voir Installation).
(voir Entretien et soin).
FR
* Présent uniquement sur certains modèles.
35
Page 36

Instalacja
PL
W przypadku przenoszenia należy trzymać urządzenie
w pozycji pionowej; w razie konieczności przechylić je do tyłu.
Połączenia hydrauliczne
Przystosowanie instalacji hydraulicznej powinno być
dokonywane wyłącznie przez wykwalikowany personel.
Wąż doprowadzający i odprowadzający wodę można
skierować na prawo lub na lewo, aby umożliwić optymalną
instalację.
Przewody rurowe nie mogą być zagięte ani przygniecione
przez zmywarkę.
Podłączenie węża doprowadzającego wodę
• Do zaworu wody z gwintem 3/4” GAS zimnej lub ciepłej
(max. 60°C).
• Odkręcić wodę i pozwolić płynąć aż stanie się przejrzysta.
• Przykręcić dobrze wąż doprowadzający wodę i odkręcić
kurek.
Jeśli wąż doprowadzający okaże się za krótki, zwrócić
się do specjalistycznego sklepu lub wykwalifikowanego
technika
podanych w tabeli danych technicznych, w przeciwnym
przypadku zmywarka może pracować nieprawidłowo.
się zgięcia ani zwężenia.
(zob. Serwis)
Ciśnienie wody powinno mieścić się w zakresie wartości
Należy zwrócić uwagę, aby na przewodzie nie tworzyły
.
Podłączenie węża odprowadzającego wodę
Podłączyć przewód odprowadzający do przewodu
kanalizacyjnego o średnicy minimum 2 cm. (A)
Złącze przewodu odprowadzającego musi znajdować się na
wysokości od 40 do 80 cm od podłogi lub podłoża, na którym
umieszczono zmywarkę.
MAX 80 cm
MIN 40 cm
Przed podłączeniem przewodu odprowadzającego wodę do
syfonu zlewozmywaka, należy usunąć plastikową zatyczkę
(B).
Zabezpieczenie przed zalaniem
Aby zagwarantować, że nie dojdzie do zalania, zmywarka:
- posiada system przerywający dopływ wody w przypadku
wystąpienia anomalii lub wydostawania się wody ze środka.
Niektóre modele są wyposażone także w dodatkowe
urządzenie zabezpieczające New Acqua Stop*, które
gwarantuje ochronę przed zalaniem również w przypadku
pęknięcia przewodu doprowadzającego wodę.
UWAGA: NIEBEZPIECZNE NAPIĘCIE!
Węża doprowadzającego wodę nie można w żadnym
wypadku przecinać, gdyż zawiera części pod napięciem.
Podłączenie do sieci elektrycznej
Przed włożeniem wtyczki do gniazdka należy się upewnić,
czy:
• gniazdko ma uziemienie i jest zgodne z obowiązującymi
przepisami;
• gniazdko jest w stanie wytrzymać obciążenie maksymalnej
mocy urządzenia wskazane na tabliczce znamionowej
umieszczonej na drzwiach wewnętrznych
(zob. Opis zmywarki);
• napięcie zasilania zawiera się w przedziale wartości
podanych na tabliczce znamionowej umieszczonej na
drzwiach wewnętrznych;
• gniazdko jest kompatybilne z wtyczką urządzenia. W
przeciwnym wypadku zwrócić się do wykwalikowanego
technika o wymianę wtyczki
przedłużaczy ani rozgałęziaczy.
Po zainstalowaniu urządzenia przewód zasilana
elektrycznego oraz gniazdko elektryczne powinny być łatwo
dostępne.
Przewód nie powinien być powyginany ani przygnieciony.
Jeśli przewód zasilający jest uszkodzony, powinien zostać
wymieniony przez producenta lub jego serwis techniczny, aby
uniknąć wszelkiego ryzyka.
Producent nie ponosi żadnej odpowiedzialności w
przypadku nieprzestrzegania tych zasad.
(zob. Serwis)
(zob. Serwis)
; nie używać
Ustawienie i wypoziomowanie
1. Postawić zmywarkę na równym i twardym podłożu.
Skompensować nierówności odkręcając lub dokręcając
przednie nóżki, aż urządzenie znajdzie się w pozycji poziomej.
Dokładne wypoziomowanie zapewnia stabilność i zapobiega
drganiom i hałasom.
2. Po zamontowaniu zmywarki otworzyć drzwiczki i przykleić
przezroczysty pasek samoprzylepny* pod blatem drewnianym
w celu jego ochrony przed ewentualnymi skroplinami.
3. Ustawić zmywarkę, przysuwając jej boki lub tył do
sąsiadujących mebli lub do ściany. Urządzenie można
również wbudować pod blatem kuchennym*
montażu)
4*. Aby wyregulować wysokość tylnej nóżki, należy przekręcić
sześciokątną tuleję w kolorze czerwonym, znajdującą się w
dolnej, przedniej, środkowej części zmywarki za pomocą
klucza sześciokątnego 8 mm, obracając ją w kierunku
zgodnym z ruchem wskazówek zegara, aby zwiększyć
wysokość, a w kierunku przeciwnym do ruchu wskazówek
zegara, aby ją zmniejszyć.
.
(patrz ulotka z instrukcjami
(zob. Karta
dotyczącymi zabudowy załączona do dokumentacji)
* Tylko w niektórych modelach.
36
Page 37

Przed pierwszym użyciem
Po zainstalowaniu, należy zdjąć elementy ochronne z koszy
oraz gumki przytrzymujące kosz górny
(jeśli je zastosowano).
Maszyna jest wyposażona w systemy akustyczne/
tonowe
wykonanym poleceniu: włączeniu, końcu cyklu, itd.
(zależnie od modelu zmywarki
), które informują o
PL
Ustawienia zmiękczacza wody
Przed włączeniem pierwszego mycia, należy ustawić
stopień twardości wody w sieci wodociągowej.
(zob. roz-
dział Płyn nabłyszczający i sól ochronna).
Pierwsze napełnienia zbiornika zmiękczacza należy wykonać przy użyciu wody, a następnie wsypać około 1 kg soli;
przelanie się wody jest normalnym zjawiskiem.
Natychmiast po napełnieniu zbiornika należy włączyć cykl
mycia.
Stosować wyłącznie sól przeznaczoną do zmywarek.
Po wsypaniu soli kontrolka BRAK SOLI* zgaśnie.
Nienapełnienie pojemnika soli może doprowadzić do
uszkodzenia zmiękczacza wody i elementu grzewczego.
Dane tecniczne
szerokość 45 cm.
Wymiary
Pojemność 10 nakryć standardowych
Ciśnienie wody
zasilania
Napięcie zasilania
elektrycznego
Całkowita moc
pochłaniania
Bezpiecznik topikowy
wysokość 82 cm.
głębokość 55 cm.
0,05 ÷ 1 MPa (0,5 ÷ 10 bar)
7,25 – 145 psi
Patrz tabliczka danych
technicznych
Patrz tabliczka danych
technicznych
Patrz tabliczka danych
technicznych
Niniejsze urządzenie zostało
wyprodukowane zgodnie z
natępującymi dyrektywami
unijnymi:
-2006/95/EC (o Niskim Napięciu)
-2004/108/EC (o Zgodności
Elektromagnetycznej)
-2009/125/EC (Comm. Reg.
1016/2010) (Ecodesign)
-97/17/EC (Nakładanie
etykietek)
-2012/19/CE (WEEE)
Symbole/lampki kontrolne/diody świetlne obecne na panelu
sterowniczym/wyświetlaczu mogą posiadać różne kolory,
świecić światłem pulsującym lub stałym.
(zależnie od modelu
zmywarki)
Wyświetlacz* wyświetla użyteczne informacje odnoszące
się do rodzaju ustawionego cyklu, fazy mycia/suszenia,
pozostałego czasu, temperatury, itd.
* Tylko w niektórych modelach.
37
Page 38

Opis urządzenia
PL
Widok ogólny
Panel sterowania
1. Kosz górny
2. Spryskiwacz górny
3. Półeczki
4. Regulacja wysokości kosza
5. Kosz dolny
6. Spryskiwacz dolny
7. Kosz na sztućce
8. Filtr zmywania
9. Pojemnik na sól
10. Pojemniki na środek myjący i nabłyszczający
11. Tabliczka znamionowa
12. Panel sterowania***
przycisk Wyboru Programu
przycisk On-Off/Reset
przycisk i kontrolka
Wyświetlacz
Start/Pauza
przycisk Opcji Połowy Wsadu
Wyświetlacz
kontrolka Pranie
lampka sygnalizująca Brak
środka Nabłyszczającego
numer Programu
lampka sygnalizująca Brak Soli
kontrolka Opcji Połowy Wsadu
kontrolka Suszenie
wskaźnik Czasu Pozostałego
Do Zakończenia Programu
kontrolka Start z Opóźnieniem
kontrolka Opcji Pastylki
wielofunkcyjne (Tabs)
***Tylko dla modeli do całkowitej zabudowy.
* Tylko w niektórych modelach.
Numery i rodzaje programów zmieniają się w zależności od modelu zmywarki.
przycisk Startu
z Opóźnieniem
przycisk Opcji Pastylki
Wielofunkcyjne (Tabs)
38
Page 39

Sól regenerująca i środek
nabłyszczający
Stosować wyłącznie produkty przeznaczone do
zmywarek. Nie stosować soli jadalnej lub przemysłowej.
Stosować zgodnie z zaleceniami podanymi na opakowaniu.
W przypadku stosowania produktu wielofunkcyjnego,
zaleca się mimo to dodanie soli, zwłaszcza gdy woda jest
twarda lub bardzo twarda.
podanymi na opakowaniu).
Gdy nie dodaje się ani soli, ani środka nabłyszczającego,
jest rzeczą normalną, że kontrolki BRAKU SOLI* oraz BRAKU
ŚRODKA NABŁYSZCZAJĄCEGO
włączone.
(Stosować zgodnie z zaleceniami
* pozostają przez cały czas
Wsypywanie soli ochronnej
Stosowanie soli pozwala uniknąć osadzania się KAMIENIA na
naczyniach i elementach funkcjonalnych zmywarki.
• To ważne, aby zbiornik sali nie był nigdy pusty.
• To ważne, aby ustawić stopień twardości wody.
Pojemnik na sól znajduje się w dolnej części zmywarki
Opis)
i należy go napełnić:
• gdy na panelu zaświeci się kontrolka BRAKU SOLI
• gdy zielony pływak
• zob. autonomię w tabeli twardości wody.
zbiornik solą po samą krawędź (około 1 kg); przelanie się
niewielkiej ilości wody jest normalnym zjawiskiem.
4. Wyjąć lejek, usunąć resztki soli z krawędzi pojemnika; opłukać
korek pod bieżącą wodą i zakręcić.
Zaleca się wykonywanie tych czynności przy każdym uzupełnianiu
soli.
Dokładnie zamknąć korek, tak aby podczas zmywania środek
myjący nie dostał się do zbiornika (mogłoby to nieodwracalnie
uszkodzić odwapniacz).
Gdy dodanie soli jest konieczne, zaleca się wykonanie tej
czynności przed włączeniem zmywania.
* na korku soli nie jest już widoczny.
1. Wyjąć kosz dolny i odkręcić korek
pojemnika, obracając go w kierunku
przeciwnym do ruchu wskazówek zegara.
2. Tylko przy pierwszym użyciu: napełnić
pojemnik solą po samą krawędź.
3. Ustawić lejek
(zob. rysunek)
Ustawianie twardości wody
Aby odwapniacz działał prawidłowo, konieczne jest
przeprowadzenie regulacji na podstawie stopnia twardości wody
dostępnej w mieszkaniu. Dane te można uzyskać w administracji
wodociągu. Ustawiona wartość odpowiada średniemu stopniu
twardości.
• Włączyć zmywarkę przyciskiem ON/OFF
• Wyłączyć przyciskiem ON/OFF
• Przytrzymać wciśnięty przycisk START/PAUZA przez 5
sekund, do chwili, gdy rozlegnie się sygnał dźwiękowy.
• Włączyć przyciskiem ON/OFF
• Na wyświetlaczu wyświetlony jest numer aktualnie ustawionego
poziomu oraz kontrolka soli.
• Nacisnąć przycisk P, aby wybrać żądany stopień twardości
(zob. tabela twardości).
• Wyłączyć przyciskiem ON/OFF
• Ustawianie zakończone!
(zob.
*;
i napełnić
Tabela twardości wody
poziom °dH °fH mmol/l miesiące
1 0 - 6 0 - 10 0 - 1 7 miesięcy
2 6 - 11 11 - 20 1,1 - 2 5 miesięcy
3 12 - 17 21 - 30 2,1 - 3 3 miesięcy
4 17 - 34 31 - 60 3,1 - 6 2 miesięcy
34 - 50 61 - 90 6,1 - 9 2-3 tygodnie
5
*
Od 0°f do 10°f zaleca się nie stosować soli.
* Przy ustawieniu 5 czas potrzebny na zużycie soli może się
wydłużyć.
(°dH = twardość w stopniach niemieckich - °fH = twardość w
stopniach francuskich - mmol/l = milimol/litr)
Autonomia średnia
pojemnik soli przy 1
myciu dziennie
Wlewanie płynu nabłyszczającego
Środek nabłyszczający ułatwia suszenie naczyń. Pojemnik na
płyn nabłyszczający należy napełnić:
• gdy na panelu zaświeci się kontrolka BRAKU ŚRODKA
NABŁYSZCZAJĄCEGO*
• gdy wskaźnik optyczny znajdujący
się na drzwiczkach pojemnika„E”,
zmienia kolor z ciemnego na
przezroczysty.
1. Otworzyć pojemnik, przekręcając
korek „G” w kierunku przeciwnym do
ruchu wskazówek zegara.
2. Wlać płyn nabłyszczający, tak aby
nie dopuścić do jego przelania. Jeśli do tego dojdzie, natychmiast
wytrzeć suchą ściereczką.
3. Zakręcić z powrotem korek.
Nie należy NIGDY wlewać środka nabłyszczającego
bezpośrednio do wnętrza komory zmywania.
Regulacja ilości środka nabłyszczającego
Gdy wyniki suszenia nie są zadowalające, można wyregulować
ilość środka nabłyszczającego. Obrócić regulator „F”. W
zależności od modelu zmywarki, możliwe jest ustawienie
maksymalnie 4 poziomów. Ustawiona wartość odpowiada
poziomowi średniemu.
• jeśli na naczyniach widoczne są niebieskawe zacieki, należy
ustawić niższe numery (1-2).
• jeśli na naczyniach widoczne są krople wody lub osadza się
kamień, należy ustawić wyższe numery (3-4).
* Tylko w niektórych modelach.
PL
39
Page 40

Ładowanie koszy
PL
Zalecenia
Przed napełnieniem koszy, usunąć z naczyń resztki żywności i
opróżnić szklanki oraz kieliszki z pozostałych w nich płynów. Nie
jest konieczne płukanie naczyń pod bieżącą wodą.
Umieścić naczynia w sposób taki, by były one unieruchomione
i się nie przewracały; pojemniki powinny być ułożone w sposób
taki, by otwór znalazł się na dole, a części wklęsłe lub wypukłe
w pozycji pochylonej, umożliwiając dopływ wody do wszystkich
powierzchni oraz jej swobodny odpływ.
Upewnić się, że pokrywki, uchwyty, patelnie i tace nie utrudniają
obrotów spryskiwaczy. Umieścić małe przedmioty w koszyku na
sztućce.
Plastikowe naczynia i patelnie z tworzywa zapobiegającego
przywieraniu mają skłonność do większego zatrzymywania kropli
wody i, w związku z tym, stopień ich osuszenia będzie niższy od
stopnia osuszenia naczyń ceramicznych lub stalowych.
Jeżeli jest to możliwe, lekkie przedmioty (jak plastikowe
pojemniki) powinny być ułożone w koszu górnym w sposób
uniemożliwiający ich przemieszczanie.
Po napełnieniu zmywarki należy sprawdzić, czy spryskiwacze
obracają się swobodnie.
Kosz dolny
W koszu dolnym można umieszczać garnki, pokrywki, talerze,
salaterki, sztućce, itp. Duże talerze i pokrywki najlepiej umieścić
w bocznych częściach kosza.
Aby ich użyć wystarczy chwycić za kolory uchwyt pociągając go
do góry i obracając do przodu. Suporty te można przesuwać w
prawo lub w lewo, aby dostosować je do wielkości naczyń.
Koszyk na sztućce
- Wyposażony jest w przesuwne pałeczki, które umożliwiają
optymalne ułożenie sztućców. Kosz nieskładany może być
umieszczony wyłącznie w przedniej części dolnego kosza.
Kosz górny
Załadować delikatne i lekkie naczynia: kieliszki, liżanki, talerzyki,
niskie salaterki.
Zaleca się ułożenie bardzo brudnych naczyń w koszu dolnym,
ponieważ w tej części zmywarki strumień wody jest mocniejszy
i umożliwia osiągnięcie lepszych wyników mycia.
Niektóre modele zmywarek
wyposażone są w pochylne
półki*, które można ustawić
w pozycji pionowej celem
ułożenia talerzy lub w pozycji
poziomej (obniżonej) celem
ułożenia garnków i salaterek.
Niektóre modele są
wyposażone w Vertical
Zone, specjalne, wyjmowane
suporty* umieszczone w
tylnej części kosza, które
mogą być wykorzystywane
do podpierania patelni lub blach w położeniu pionowym, dzięki
czemu zajmują one mniej miejsca.
Półeczki o różnym stopniu nachylenia*
W celu jak najlepszego rozmieszczenia naczyń w koszyku możliwe
jest ustawienie półeczek na trzech różnych wysokościach.
Kieliszki można ustawiać w bezpieczny
sposób dzięki półeczkom, wsuwając
nóżkę kieliszka w odpowiednie otwory.
W celu optymalizacji suszenia, należy
ustawić półeczki z jak największym
nachyleniem. Aby zmienić nachylenie,
należy unieść półeczkę, przesunąć ją
lekko i ustawić w żądanym położeniu.
*Tylko w niektórych modelach; różnią się numerem i miejscem
ułożenia.
40
Page 41
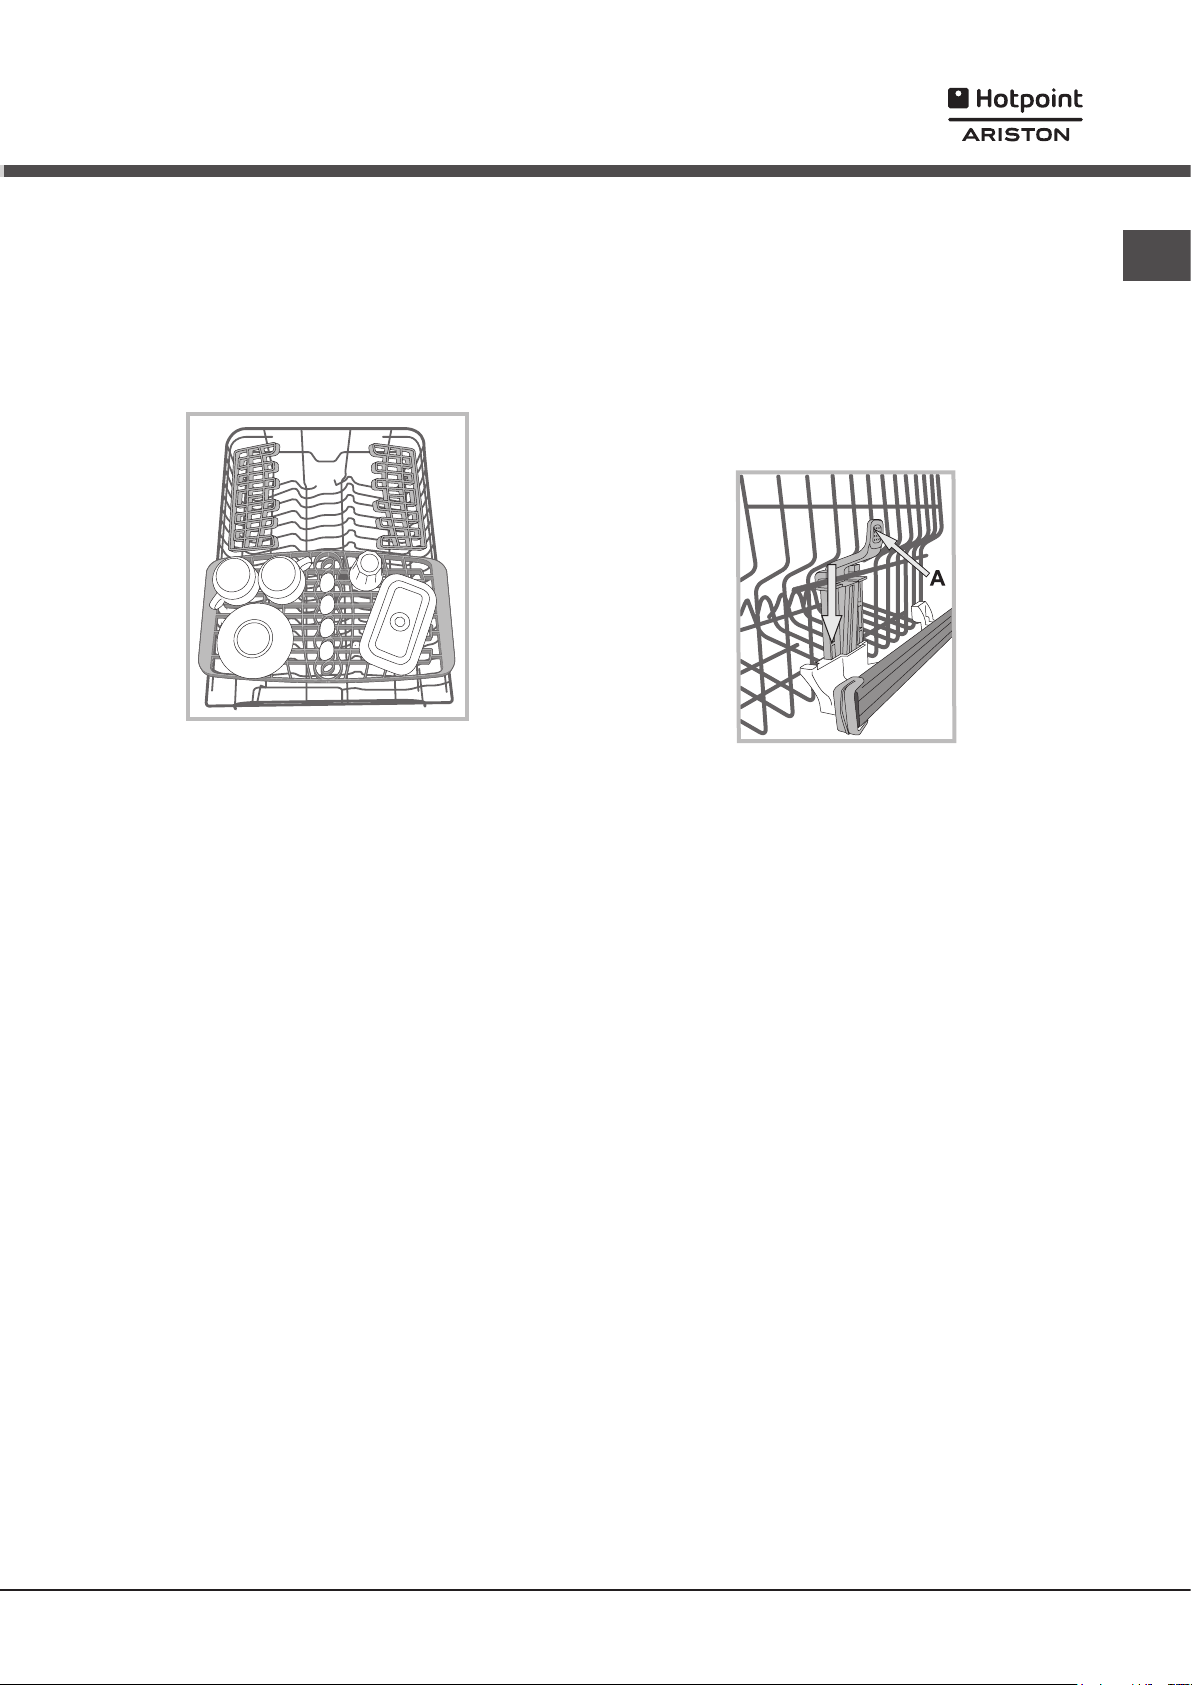
Taca*
Niektóre modele zmywarek są wyposażone w przesuwną
tacę, na której można umieszczać sztućce lub niewielkie
naczynia.
Dla uzyskania najlepszych efektów mycia, nie należy wkładać
pod tacę dużych naczyń. Tacę na sztućce można wyjmować.
(zob. rysunek)
Regulowanie wysokości górnego kosza (45 cm)
Wysokość kosza górnego można regulować: umieszczenie
kosza w pozycji górnej umożliwia ułożenie w koszu dolnym
niewymiarowych naczyń; umieszczenie kosza w pozycji dolnej
umożliwia wykorzystanie pochylnych półeczek i uzyskanie
większej przestrzeni w kierunku górnym.
Najlepiej wyregulować wysokość górnego kosza, gdy KOSZ
JEST PUSTY.
Nie należy NIGDY podnosić ani opuszczać kosza tylko z
jednej strony.
PL
Jeśli kosz posiada Lift-Up*
chwytając jego boczne części i przesunąć go w górę. W celu
powrotu do pozycji dolnej, nacisnąć dźwignie (A) w bocznych
częściach kosza i przesunąć kosz w dół.
(patrz rysunek)
, unieść kosz
Naczynia nieodpowiednie
• Sztućce i naczynia drewniane.
• Delikatne, dekorowane kieliszki, naczynia rzemieślnicze i
antykwaryczne. Ich dekoracje nie są odporne.
• Części z syntetycznych tworzyw nieodporne na działanie
wysokich temperatur.
• Naczynia z miedzi i cyny.
• Naczynia zabrudzone popiołem, woskiem, smarem lub
atramentem.
Dekoracje na szkle, elementy aluminiowe i srebrne podczas
mycia mogą zmienić kolor i się odbarwić. W wyniku wielokrotnego
mycia również niektóre rodzaje szkła (np. przedmioty z kryształu)
mogą stać się matowe.
Uszkodzenia szkła i naczyń
Przyczyny:
• Typ szkła i proces produkcji szkła.
• Skład chemiczny środka myjącego.
• Temperatura wody programu płukania.
Rada:
• Używać wyłącznie kieliszków i porcelany gwarantowanych
przez producenta jako odpowiednie do mycia w zmywarkach.
• Stosować delikatne środki myjące do naczyń.
• Jak najszybciej wyjąć kieliszki i sztućce ze zmywarki po
zakończeniu programu.
* Tylko w niektórych modelach.
41
Page 42
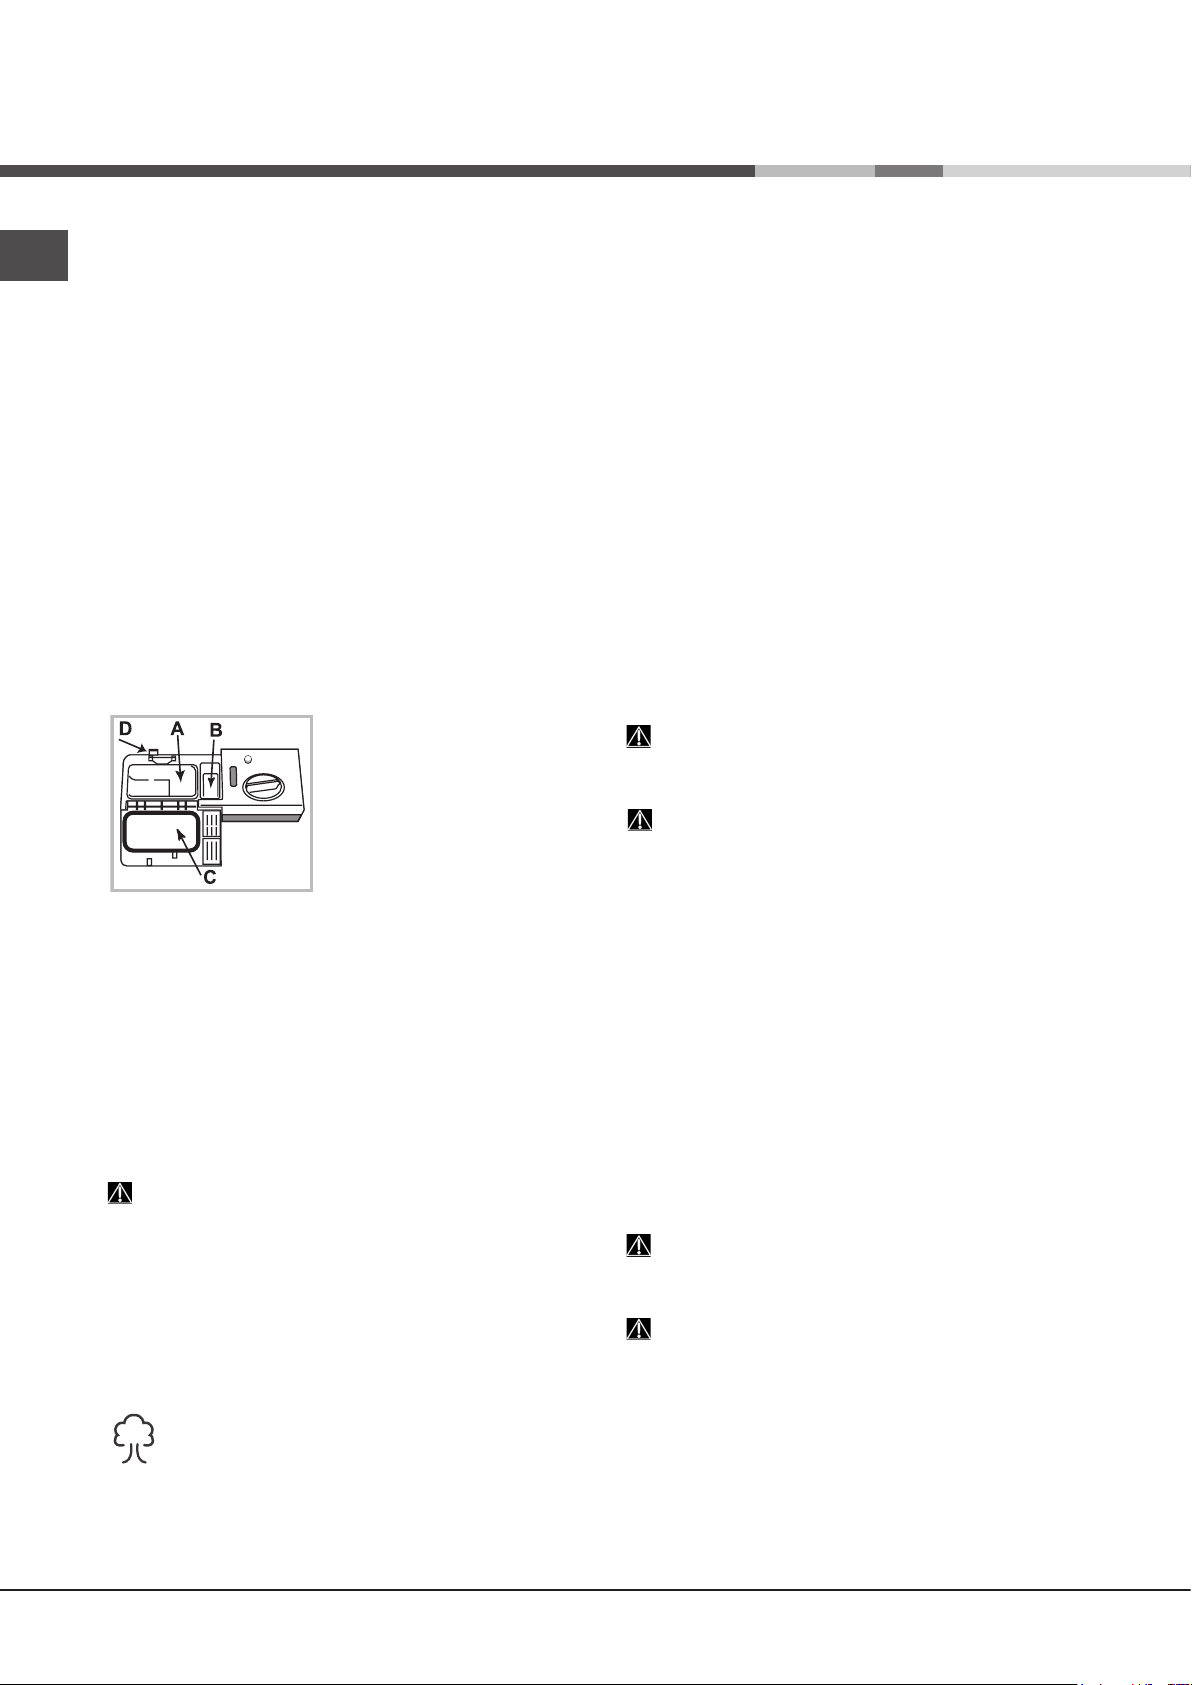
Środek myjący i obsługa
zmywarki
PL
Napełnianie dozownika detergentu
Dobry rezultat mycia zależy również od właściwego
dozowania środka myjącego, jego nadmierna ilość nie
zwiększa skuteczności mycia, powoduje natomiast
zanieczyszczenie środowiska.
Dozowanie można dostosować do stopnia zabrudzenia
naczyń.
Zazwyczaj w przypadku normalnych zabrudzeń stosuje się
około 25 g (detergentu w proszku) lub 25 ml (detergentu w
płynie). W przypadku użycia pastylek, wystarczające jest
użycie jednej sztuki.
Jeśli naczynia są mało zabrudzone lub zostały uprzednio
spłukane wodą, należy znacznie zmniejszyć ilość środka
myjącego.
Dla uzyskania odpowiednich wyników zmywania należy
również przestrzegać wskazówek zamieszczonych na
opakowaniach detergentów.
W razie wątpliwości zalecamy skontaktowanie się z
producentami detergentów.
Otworzyć pojemnik na detergent
przy użyciu przycisku D; przystąpić
do dozowania detergentu zgodnie
z tabelą programów:
• w proszku lub w płynie:
pojemniczek A (detergent do
mycia) i B (detergent do mycia
wstępnego)
• tabletki: gdy program wymaga 1
tabletki, należy włożyć ją do pojemniczka A i zamknąć pokrywę C;
gdy wymaga 2 tabletek, drugą tabletkę umieścić na dnie komory.
Usunąć resztki detergentu z brzegów pojemnika i zamknąć
pokrywę C tak, aby się zatrzasnęła.
Otwarcie pojemnika na środek myjący następuje w sposób
automatyczny w odpowiednim momencie, w zależności od
programu.
W razie stosowania różnych rodzajów środków myjących, zaleca
się użycie opcji TABS, która odpowiednio dostosuje program
myjący w sposób taki, by umożliwić jak najlepsze wyniki mycia
i suszenia.
Stosować wyłącznie detergenty przeznaczone do
zmywarek.
NIE UŻYWAĆ środków do mycia ręcznego.
Nadmiar środka myjącego może być powodem pozostania
piany po zakończeniu cyklu.
Najwyższą skuteczność zmywania i suszenia uzyskuje się
tylko przy równoczesnym zastosowaniu detergentu, środka
nabłyszczającego i soli regenerującej.
Zaleca się stosowanie detergentów niezawierających
fosforanów i chloru, gdyż są one najbardziej
wskazane ze względów ochrony środowiska.
Uruchomienie zmywarki
1. Otworzyć zawór wody.
2. Nacisnąć przycisk ON-OFF.
3. Otworzyć drzwi i napełnić dozownik detergentu
Napełnianie dozownika detergentu).
4. Załadować kosze
5. Wybrać program w zależności od rodzaju naczyń i od
stopnia ich zabrudzenia
przycisk P.
6. Wybrać opcje zmywania*
7. Uruchomić zmywarkę, naciskając przycisk Start/Pauza
(światło ciągłe): długi sygnał dźwiękowy informuje o
rozpoczęciu programu, kontrolka zmywania włącza się, a na
wyświetlaczu wskazywany jest numer programu oraz czas
pozostający do zakończenia cyklu.
8. O zakończeniu programu informują dwa krótkie sygnały
dźwiękowe i jeden długi, kontrolka przycisku Start/Pauza gaśnie,
a na wyświetlaczu pojawia się słowo END. Wyłączyć zmywarkę
wciśnięciem przycisku ON-OFF.
9. Odczekać kilka minut przed wyjęciem naczyń, aby się nie
oparzyć. Wyładować kosze, zaczynając od dolnego.
W celu ograniczenia zużycia energii elektrycznej w
pewnych sytuacjach NIEUŻYWANE urządzenie wyłącza się
automatycznie.
PROGRAMY AUTO*:niektóre modele zmywarek są
wyposażone w specjalny czujnik umożliwiający ocenę stopnia
zabrudzenia i ustawienie najbardziej wydajnego i ekonomicznego
mycia. Czas trwania programów Auto będzie się zmieniać w
zależności od wskazań czujnika.
(zob. Ładowanie koszy)
(zob. tabela programów)
(zob. Opcje).
i zamknąć drzwi.
Zmiana rozpoczętego programu
Jeśli został wybrany niewłaściwy program, można go zmienić,
pod warunkiem, że dopiero co się rozpoczął: aby zmienić cykl
zmywania po jego rozpoczęciu, należy wyłączyć urządzenie,
naciskając i przytrzymując przycisk ON/OFF/Reset, ponownie
włączyć urządzenie tym samym przyciskiem i wybrać nowy
program i odpowiednie opcje.
Wkładanie kolejnych naczyń
Nacisnąć przycisk Start/Pauza, otworzyć drzwi, uważając na
wydostającą się parę i włożyć naczynia. Nacisnąć przycisk
Start/Pauza: cykl rozpocznie się na nowo po dłuższym sygnale
dźwiękowym.
Jeżeli został ustawiony opóźniony start, po zakończeniu
odliczania wstecznego nie nastąpi rozpoczęcie cyklu, ale
pozostanie on w trybie Pauzy.
Naciśnięcie przycisku Start/Pauza w celu wstrzymania pracy
urządzenia powoduje przerwanie programu.
Na tym etapie nie można zmienić programu.
Niezamierzone przerwanie pracy urządzenia
Jeśli podczas zmywania drzwiczki zostaną otwarte lub wystąpi
przerwa w dopływie prądu, program zostanie przerwany. Po
zamknięciu drzwi lub wznowieniu dostawy prądu nastąpi jego
ponowne uruchomienie w miejscu, w którym zostało przerwane.
(zob.
naciskając
42
* Tylko w niektórych modelach.
Page 43

Programy
Dane programów są mierzone w warunkach laboratoryjnych zgodnie z europejską normą EN 50242.
W zależności od poszczególnych warunków użytkowania, czas trwania oraz dane programów mogą się zmieniać.
Liczba i rodzaj programów i opcji zmieniają się w zależności od modelu zmywarki.
Program Suszenie Opcje
1. Eco Tak
2. Auto Intensywny Tak
3. Auto Normalny Tak
4. Delikatne Tak
5. Express Nie Opóźnienie startu – Tabs 00:25 8,0 0,45
6. Good Night Tak Opóźnienie startu – Tabs 03:30 13,0 0,85
7. Namaczanie Nie
8. UltraIntensive Tak
Opóźnienie startu –
Połowa wsadu - Tabs
Opóźnienie startu –
Połowa wsadu - Tabs
Opóźnienie startu –
Połowa wsadu - Tabs
Opóźnienie startu –
Połowa wsadu - Tabs
Opóźnienie startu –
Połowa wsadu
Opóźnienie startu –
Połowa wsadu - Tabs
Czas trwania
programu
03:00 9,0 0,83
02:20 - 03:00 13,0 - 14,0 1,20 - 1,45
01:40 - 02:20 13,5 – 14,5 1,00 - 1,20
01:40 9,0 0,90
00:10 4,0 0,01
02:50 17,0 1,50
Zużycie wody
(l/cykl)
Zużycie energii
(KWh/cykl)
PL
Wskazówki dotyczące wyboru programów i dozowania detergentu
1. Cykl zmywania EKO to program standardowy, do którego odnoszą się dane etykiety energetycznej; cykl ten jest odpowiedni
do mycia średnio zabrudzonych naczyń i jest najbardziej wydajnym programem pod względem zużycia energii elektrycznej i wody
dla tego rodzaju naczyń. 4 g/ml**+ 21 g/ml – 1 Tab (**Ilość środka zmywającego w zmywaniu wstępnym)
2. Mocno zabrudzone naczynia i garnki (nie używać do naczyń delikatnych). 25 g/ml – 1 Tab
3. Normalnie zabrudzone naczynia i garnki. 4 g/ml**+ 21 g/ml – 1 Tab
4. Cykl przeznaczony do delikatnych naczyń, wrażliwych na wysokie temperatury. 25 g/ml – 1 Tab
5. Szybki cykl przeznaczony do mało zabrudzonych naczyń. (idealny do 2 nakryć) 21 g/ml – 1 Tab
6. Gwarantuje znakomitą skuteczność zmywania. Odpowiedni do stosowania w nocy. 25 g/ml – 1 Tab
7. Mycie wstępne w oczekiwaniu na uzupełnienie ładunku po następnym posiłku. Bez detergentu
8. Cykl do garnków mocno zabrudzonych lub z zaschniętymi resztkami jedzenia. 4 g/ml**+ 25 g/ml – 1+1 T
Zużycie w trybie czuwania: Zużycie w trybie włączenia: 5 W - Zużycie w trybie wyłączenia: 0,5 W
ab
43
Page 44

Programy specjalne i opcje
PL
Uwagi:
najlepszą skuteczność działania programów “Express ” uzyskuje
się przestrzegając zaleceń dotyczących ilości wkładanych
naczyń.
Aby zmniejszyć zużycie wody i energii, staraj się uruchamiać
zmywarkę, gdy jest całkowicie wypełniona.
Uwaga dla laboratoriów testowych: szczegółowe informacje
dotyczące warunków testów porównawczych EN można uzyskać
pod adresem: assistenza_en_lvs@indesitcompany.com
Opcje zmywania*
OPCJE można ustawić, zmienić lub wyzerować dopiero po
wybraniu programu zmywania i przed naciśnięciem przycisku
Start/Pauza.
Możliwy jest wybór tylko tych opcji, które są zgodne z rodzajem
wybranego programu. Jeśli jakaś opcja nie jest zgodna z
wybranym programem,
symbol pulsuje szybko 3 razy.
Po wybraniu opcji niekompatybilnej z inną wcześniej ustawioną
opcją ta ostatnia miga 3 razy i gaśnie, natomiast pozostaje
włączone ostatnie wybrane ustawienie.
Aby anulować omyłkowo ustawioną opcję, należy ponownie
nacisnąć odpowiadający jej przycisk.
(patrz tabela programów)
odpowiedni
Opcji Połowa wsadu w koszu górnym lub
dolnym
Jeśli naczyń jest niewiele, można napełnić kosz
częściowo, oszczędzając wodę, energię i środek myjący. Należy
wybrać program i wciskać kolejno przycisk POŁOWA WSADU:
zapala się kontrolka odpowiadająca wybranemu koszowi i włącza
się mycie tylko w koszu górnym lub tylko w dolnym.
Należy pamiętać o układaniu naczyń tylko w górnym lub
tylko w dolnym koszu i o zmniejszeniu o połowę ilości środka
myjącego.
Opcji Tabletki wielofunkcyjne (Tabs)
Opcja ta pozwala uzyskać optymalne wyniki zmywania
i suszenia.
W przypadku stosowania tabletek wielofunkcyjnych nacisnąć
przycisk TABLETKI WIELOFUNKCYJNE, kontrolka zaświeci się;
kolejne naciśnięcie przycisku wyłącza opcję.
Włączenie opcji "Pastylki wielofunkcyjne” powoduje
wydłużenie czasu trwania programu.
Opóźniony start
Uruchomienie programu można opóźnić od 1 do
24godzin:
1. Po wybraniu żądanego programu mycia i ewentualnych opcji,
należy nacisnąć przycisk OPÓŹNIONY START: zaświeci się
kontrolka. Za pomocą tego samego przycisku, należy wybrać
czas rozpoczęcia cyklu zmywania. (h01, h02, itd.)
2. Potwierdzić wybór, naciskając przycisk START/PAUZA:
rozpocznie się odliczanie wsteczne.
3. Po upływie ustawionego czasu, lampka kontrolna
OPÓŹNIONEGO STARTU gaśnie i program jest uruchamiany.
W celu anulowania STARTU Z OPÓŹNIENIEM naciskać przycisk
START Z OPÓŹNIENIEM aż wyświetli się OFF.
Nie można nastawić Opóźnienia startu po rozpoczęciu
cyklu.
44
* Tylko w niektórych modelach.
Page 45

Konserwacja i obsługa
Wyłączanie wody i prądu elektrycznego
• Zakręcać zawór wody po każdym zmywaniu, aby uniknąć
niebezpieczeństwa wycieków.
• Wyjmować wtyczkę z kontaktu przed przystąpieniem
do czyszczenia urządzenia oraz podczas czynności
konserwacyjnych.
Czyszczenie zmywarki
• Obudowa zewnętrzna i panel sterowania mogą być
czyszczone miękką ściereczką zwilżoną wodą. Nie należy
stosować rozpuszczalników ani środków ściernych.
• Ewentualne plamy w komorze wewnętrznej można czyścić
przy pomocy szmatki zmoczonej w roztworze wody i
niewielkiej ilości octu.
Unikanie powstawania brzydkich zapachów
• Pozostawiać drzwi zmywarki zawsze przymknięte, aby
uniknąć osadzania się wilgoci.
• Regularnie czyścić obwodowe uszczelki drzwi oraz pojemniki
na środek myjący przy pomocy wilgotnej gąbki. Pozwoli to
uniknąć osadzania się resztek żywności, które są główną
przyczyną powstawania przykrych zapachów.
Czyszczenie spryskiwaczy
Może się zdarzyć, że resztki żywności pozostaną na
spryskiwaczach, zatykając otwory, przez które wydostaje się
woda: od czasu do czasu dobrze jest je sprawdzać i czyścić przy
pomocy niemetalowej szczoteczki.
Obydwa spryskiwacze są demontowalne.
Aby zdemontować górny
spryskiwacz, należy odkręcić
plastikowy pierścień, obracając go
w kierunku przeciwnym do ruchu
wskazówek zegara. Górny zraszacz
należy zamontować z otworami
skierowanymi do góry.
- Po zamknięciu zaworu należy odkręcić końcówkę przewodu
doprowadzającego wodę do zmywarki, wyjąć ltr i delikatnie
umyć go pod bieżącą wodą.
- Następnie ponownie włożyć ltr i zakręcić przewód.
Czyszczenie ltrów
Zespół ltrujący składa się z trzech ltrów, które oczyszczają
wodę wykorzystywaną do mycia z resztek żywności i ponownie
wprowadzają ją do obiegu: w celu zapewnienia dobrych
rezultatów mycia konieczne jest ich czyszczenie.
Czyścić ltry regularnie.
Nie należy używać zmywarki bez ltrów lub z odłączonym
ltrem.
• Po kilku zmywaniach sprawdzić zespół ltrujący i, w razie
konieczności, dokładnie go wyczyścić pod bieżącą wodą,
wykorzystując w tym celu niemetalową szczoteczkę, zgodnie z
poniższymi instrukcjami:
1. obrócić w kierunku przeciwnym do ruchu wskazówek zegara
ltr cylindryczny C i wyjąć go (rys. 1).
2. Wyjąć obsadę ltra B lekko naciskając na boczne skrzydełka
(Rys. 2);
3. Wysunąć płytę ltra ze stali nierdzewnej A. (rys. 3).
4. Skontrolować studzienkę i usunąć ewentualne resztki potraw.
NIGDY NIE USUWAC ochrony pompy mycia (szczegół w kolorze
czarnym) (rys.4).
C
1
A
PL
Dolny zraszacz wyciąga się
pociągając go w kierunku do góry.
Czyszczenie ltra dopływu wody
„Jeśli rury sieci wodociągowej są nowe lub nie były używane
przez dłuższy czas, przed podłączeniem zmywarki należy
odkręcić wodę i odczekać, aż będzie ona przejrzysta i wolna
od zanieczyszczeń. Ostrożność ta zapobiega zbieraniu się
nieczystości w punkcie, w którym zmywarka pobiera wodę i w
następstwie tego, uszkodzeniu zmywarki.”
Od czasu do czasu czyścić ltr dopływu wody znajdujący się
na wyjściu zaworu.
- Zamknąć zawór wody.
*
3
Po wyczyszczeniu ltrów należy ponownie zamontować zespół
filtrujący i prawidłowo go umiejscowić; ma to zasadnicze
znaczenie dla prawidłowego działania zmywarki.
W przypadku dłuższej nieobecności
• Odłączyć połączenia elektryczne i zamknąć zawór wody.
• Pozostawić drzwi uchylone.
• Po powrocie wykonać jedno zmywanie bez wsadu.
* Tylko w niektórych modelach.
45
Page 46

Nieprawidłowe działanie i
możliwe środki zaradcze
PL
Jeśli w pracy urządzenia pojawiają się anomalie w pracy, należy skontrolować następujące punkty przed zwróceniem się do Obsługi
technicznej (patrz Obsługa techniczna). Niektóre z usterek są sygnalizowane za pomocą lampek zapalających się na panelu sterowania.
Przed wezwaniem pomocy technicznej należy zanotować, które z lampek świecą.
Usterki: Możliwe przyczyny / Rozwiązanie:
Zmywarka nie rozpoczyna pracy
lub nie odpowiada na polecenia
Drzwi się nie zamykają
Zmywarka nie odprowadza wody. • Program zmywania jeszcze się nie skończył.
Zmywarka jest głośna. • Naczynia uderzają o siebie lub o spryskiwacze. Ustawić prawidłowo naczynia i upewnić
Na naczyniach i szklankach
osadza się kamień lub tworzy się
białawy nalot.
Na naczyniach i szklankach
tworzą się zacieki lub
niebieskawe smugi.
Naczynia nie są całkiem suche. • Wybrany został program bez suszenia.
Naczynia nie są czyste. • Naczynia nie są właściwie. ułożone.
Zmywarka nie pobiera wody
jest zablokowana a kontrolki migają
• Kurek dopływu wody nie jest otwarty.
• Wyłączyć urządzenie naciskając przycisk ON/OFF, uruchomić je ponownie po upływie
jednej minuty i ponownie ustawić program.
• Wtyczka nie jest dobrze włożona do gniazdka lub zmienić gniazdko.
• Drzwi zmywarki nie są dobrze zamknięte.
• Upewnić się, że kosze są wsunięte do końca.
• Zaskoczył zamek drzwi; popchnąć energicznie drzwi, aż do usłyszenia dźwięku „clack”.
• Przewód odprowadzający wodę jest zgięty
• Odpływ zlewozmywaka jest zatkany.
• Filtr jest zapchany resztkami jedzenia.
• Sprawdzić wysokość przewodu odprowadzającego.
się, że spryskiwacze swobodnie się obracają.
• Nadmiar piany: niewłaściwa ilość detergentu lub detergent nieodpowiedni do zmywania w
zmywarce.
• Brak soli regenerującej.
• Ustawienie twardości wody nie jest odpowiednie: zwiększyć wartości.
regeneracyjna i środek nabłyszczający).
• Korek zbiornika soli i środka nabłyszczającego nie jest dobrze zamknięty.
• Środek nabłyszczający skończył się lub jego ilość jest niewystarczająca.
• Dozowana ilość środka nabłyszczającego jest zbyt duża.
• Środek nabłyszczający skończył się.
• Regulacja środka nabłyszczającego jest niewłaściwa.
• Naczynia są wykonane z nieprzywierającego tworzywa lub z plastiku; obecność kropli
wody jest normalnym zjawiskiem.
• Spryskiwacze nie mogą się swobodnie obracać, są zablokowane przez naczynia.
• Program zmywania jest zbyt delikatny
• Nadmiar piany: niewłaściwa ilość detergentu lub detergent nieodpowiedni do zmywania w
zmywarce.
• Korek płynu nabłyszczającego nie został odpowiednio zakręcony.
• Filtr jest brudny lub zapchany
• Brak soli regeneracyjnej
• Upewnić się, że wysokość naczyń jest kompatybilna z wysokością kosza.
• Otwory spryskiwaczy są zatkane.
• Brak wody w sieci wodociągowej lub zamknięty zawór wody.
• Przewód doprowadzający wodę jest zgięty
• Filtry są zatkane: należy je wyczyścić.
• Odpływ jest zatkany: należy go wyczyścić.
• Po przeprowadzeniu kontroli i czyszczenia, należy wyłączyć i włączyć zmywarkę i
uruchomić nowy cykl zmywania.
• Jeśli usterka nie znika, należy zamknąć zawór wody, wyjąć wtyczkę z gniazdka i
skontaktować się z serwisem.
(zob. Środek myjący i obsługa zmywarki).
(zob. Środek myjący i obsługa zmywarki).
(zob. Konserwacja i utrzymanie).
(zob. Środek nabłyszczający i sól).
(zob. Konserwacja i utrzymanie).
(zob. Instalacja).
Nie wyjmować ręcznie naczyń.
(zob. Sól
(zob. Sól regeneracyjna i środek nabłyszczający).
(zob. Programy).
(zob. Instalacja).
(zob. Konserwacja i utrzymanie).
* Tylko w niektórych modelach.
46
Page 47
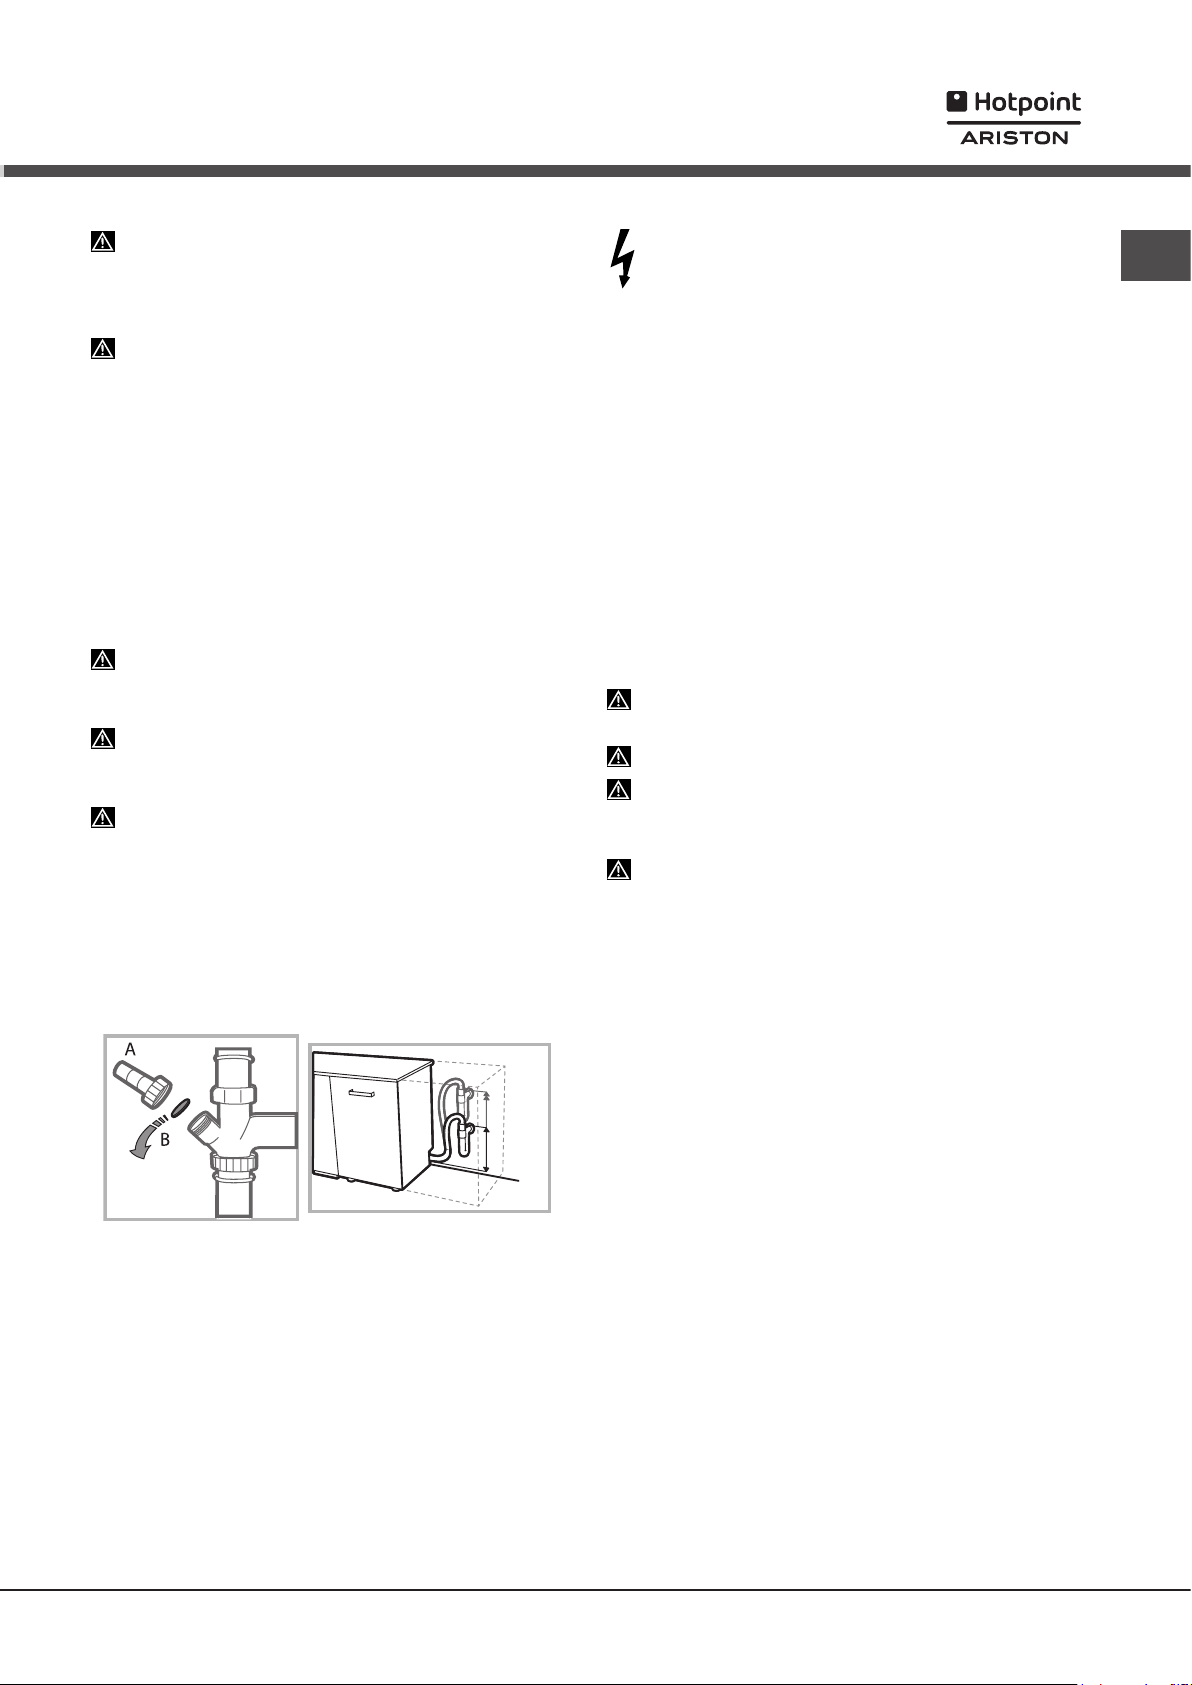
Instalace
Při stěhování udržujte zařízení ve svislé poloze; dle
potřeby je můžete naklonit na zadní stranu.
Připojení k rozvodu vody
Přizpůsobení rozvodu vody pro instalaci musí být
provedeno kvalikovaným personálem.
Přívodní hadice a vypouštěcí hadice vody musí být nasměrovány směrem doprava nebo doleva s cílem umožnit co
nejlepší instalaci.
Hadice nesmí být ohnuté nebo přitlačené myčkou.
Připojení hadice pro přívod vody
• Připojení se provádí k přípojce vody o velikosti 3/4” typu
plyn se studenou nebo teplou vodou (max. 60 °C).
• Nechte vodu odtéct, dokud nebude průzračná.
• Řádně přišroubujte přívodní hadici a otevřete ventil.
V případě, že délka přívodní hadice nebude dostatečná,
se obraťte na specializovanou prodejnu nebo na
autorizovaného technika
Tlak v rozvodu vody se musí pohybovat v rozmezí hodnot
uvedených v tabulce Technických údajů; v opačném případě
by se mohlo stát, že myčka nebude fungovat správně.
Dbejte na to, aby hadice nebyla příliš ohnutá ani
přiškrcená.
(viz Servisní služba)
.
Připojení hadice vypouštění vody
Připojte vypouštěcí hadici do odpadového potrubí s minimálním
průměrem 2 cm. (A)
Přípojka vypouštěcí hadice se musí nacházet ve výšce od
40 do 80 cm od podlahy nebo od plochy, na které je uložena
myčka.
MAX 80 cm
MIN 40 cm
Před připojením vypouštěcí hadice k sifonu umývadla
odstraňte plastový uzávěr (B).
Bezpečnostní opatření proti vytopení
Aby bylo zaručeno, že nedojde k vytopení, je myčka:
- vybavena systémem, který přeruší přívod vody v případě
poruch nebo jejího úniku dovnitř myčky.
Některé modely jsou vybaveny také přídavným bezpečnostním
zařízením New Acqua Stop*, které zaručuje ochranu proti
vytopení i v případě poškození přívodní hadice.
UPOZORNĚNÍ: NEBEZPEČNÉ NAPĚTÍ!
Přívodní hadice vody nesmí být v žádném případě
přeřezána, protože obsahuje součásti pod napětím.
Připojení k elektrickému rozvodu
Před zasunutím zástrčky do zásuvky elektrického rozvodu
se ujistěte, že:
• zásuvka je uzemněnaa že vyhovuje normám;
• je zásuvka schopna snést maximální zátěž odpovídající
jmenovitému příkonu zařízení, uvedenému na štítku
se jmenovitými údaji, umístěném na vnitřní straně dvířek
(viz kapitola Popis myčky);
• napájecí napětí odpovídá hodnotám uvedeným na štítku
se jmenovitými údaji, umístěném na vnitřní straně dvířek;
• zásuvka je kompatibilní se zástrčkou zařízení. V opačném
případě požádejte o výměnu zástrčky autorizovaného
technika
šňůry ani rozvodky.
Po instalaci zařízení musí kabel elektrického napájení a
zásuvka elektrického rozvodu zůstat snadno přístupné.
Kabel nesmí být ohnutý ani stlačený.
V případě poškození musí být napájecí kabel vyměněn
výrobcem nebo jeho střediskem Servisní služby, aby se
předešlo jakémukoli riziku.
Firma neponese žádnou odpovědnost za následky
nerespektování uvedených pokynů.
(viz Servisní služba)
(Viz Servisní služba)
; nepoužívejte prodlužovací
Ustavení a vyrovnání do vodorovné polohy
1. Umístěte myčku na rovnou a pevnou podlahu. Vykompenzujte
nerovnosti odšroubováním nebo zašroubováním předních
nožiček až do dosažení vodorovné polohy zařízení. Dokonalé
vyrovnání do vodorovné polohy zabezpečí stabilitu zařízení
a zamezí vzniku vibrací a hluku.
2. Po vestavění myčky přilepte pod dřevěnou polici průsvitný
samolepicí pás*, který bude polici chránit před případným
kondenzátem.
3. Umístěte myčku tak, aby se bočními stěnami nebo zadní
stěnou dotýkala přilehlého nábytku nebo stěny. Tento model
myčky lze rovněž vestavět pod dlouhou pracovní plochu*
Montážní pokyny)
4*. Seřízení výšky zadní nožičky se provádí prostřednictvím
hexagonálního pouzdra červené barvy, nacházejícího se ve
spodní, čelní, centrální části myčky, klíčem na hexagonální
šrouby o velikosti 8 mm; otáčením ve směru hodinových
ručiček dosáhneme zvětšení výšky a otáčením proti směru
hodinových ručiček jejího snížení.
.
(viz list s montážními
pokyny pro vestavění, přiložený k dokumentaci)
(viz
CS
* Pouze u některých modelů.
47
Page 48

CS
Upozornění pro první mytí
Po instalaci odstraňte tampony umístěné na koších a
přidržovací gumy na horním koši
(jsou-li součástí).
Nastavení dekalcikátoru vody
Před zahájením prvního mytí nastavte úroveň tvrdosti
vody z vodovodní sítě.
(viz kapitola Leštidlo a regenerační
sůl)
Při prvním naplnění nádržky dekalcikátoru je třeba použít
vodu a následně je třeba přidat přibližně 1 kg soli; je zcela
běžné, že vyteče určité množství vody.
Bezprostředně poté zahajte jeden mycí cyklus.
Používejte pouze specickou sůl pro myčky nádobí.
Po doplnění soli zhasne kontrolka CHYBĚJÍCÍ SŮL**.
Nenaplnění zásobníku soli může způsobit poškození
dekalcikátoru vody a topného článku.
Technické údaje
Šíøka 45 cm
Rozmìry
Kapacita
Tlak vody v pøívodním
potrubí
Napájecí napìtí Viz štítek s jmenovitými údaji
Výška 85 cm
Hloubka 60 cm
10 standardních souprav
nádobí
0,05 ÷ 1 MPa (0,5 ÷ 10 bar)
7,25 – 145 psi
Zařízení je vybaveno akustickými signály/tóny
na modelu myčky
), které avizují realizovaný ovládací
(v závislosti
příkaz: zapnutí, konec cyklu apod.
Symboly/kontrolky/LED přítomné na ovládacím panelu/
displeji se mohou měnit z hlediska barvy a mohou buď
blikat, nebo svítit stálým světlem
myčky)
.
(v závislosti na modelu
Na displeji* jsou zobrazovány užitečné informace, které
se týkají druhu nastaveného cyklu, fáze mytí/sušení,
zbývající doby, teploty apod.
Celkový pøíkon Viz štítek s jmenovitými údaji
Pojistka Viz štítek s jmenovitými údaji
Toto zaøízení je ve shodì
s následujícími smìrnicemi
Evropské unie:
-2006/95/EC (Nízké napìtí)
- 2004/108/EC (Elektromagne
tická kompatibilita)
- 2009/125/EC (Comm. Reg.
1016/2010) (Ecodesign)
- 97/17/EC (Energetické
štítkování myèek nádobí)
-2012/19/EC (WEEE)
48
* Pouze u některých modelů.
Page 49

Popis zařízení
Celkový pohled
1. Horní koš
2. Horní ostřikovací rameno
3. Sklopné držáky
4. Mechanismus nastavení výšky koše
5. Spodní koš
6. Spodní ostřikovací rameno
7. Košík na příbory
8. Mycí ltr
9. Nádržka na sůl
10. Přihrádky na mycí prostředek a nádržka na
leštidlo
11
. Štítek s jmenovitými údaji
12. Ovládací panel***
CS
Ovládací panel
Display
tlačítko Zapnutí-Vypnutí/Vynulování
kontrolka
Nedostatek Leštidla
číslo Programu
kontrolka
Nedostatek Soli
kontrolky Volitelná
funkce Poloviční náplň
tlačítko Volba Programu
kontrolka Mytí
tlačítko Volitelná
funkce Poloviční náplň
kontrolka Sušení
indikátor Zbývající
Doba Programu
kontrolka Volitelná funkce
Multifunkční tablety (Tabs)
Display
Volitelná funkce
Odložený Start
tlačítko Volitelná funkce
Multifunkční tablety (Tabs)
kontrolka Volitelná
funkce Odložený Start
tlačítko a kontrolky
Start/Pauza
tlačítko
*** Pouze u modelů určených pro úplné vestavění. * Pouze u některých modelů.
Počet a druh programů a volitelných funkcí se mění v závislosti na modelu myčky.
49
Page 50

Regenerační sůl
a Leštidlo
CS
Používejte pouze specické mycí prostředky pro myčky
nádobí. Nepoužívejte kuchyňskou ani průmyslovou sůl.
Dodržujte pokyny uvedené na obalu.
Pokud používáte multifunkční produkt, stejně se
doporučuje přidat sůl, zejména v případě, že je voda tvrdá
nebo velmi tvrdá.
Když se nepřidá sůl ani leštidlo, je zcela zřejmé, že
kontrolky CHYBĚJÍCÍ SŮL* a CHYBĚJÍCÍ LEŠTIDLO*
zůstanou i nadále rozsvícené.
(dodržujte pokyny uvedené na obalu).
Dávkování regenerační soli
Použití soli zabrání vytvoření VODNÍHO KAMENE na nádobí a
na funkčních komponentech myčky.
* Je důležité, aby nádobka na sůl nebyla nikdy prázdná.
* Je důležité provést nastavení tvrdosti vody.
Zásobník soli se nachází ve spodní části myčky nádobí
a je třeba jej naplnit:
• když na ovládacím panelu bliká kontrolka CHYBĚJÍCÍ SŮL*;
• když zelený plovák*, který je součástí uzávěru nádobky na sůl,
již není vidět.
• viz autonomie uvedená v tabulce tvrdosti vody.
1. Vytáhněte spodní koš a odšroubujte
uzávěr nádržky jeho otáčením proti směru
hodinových ručiček.
2. Pouze při prvním použití: naplňte nádržku
vodou až po okraj.
3. Umístěte trychtýř
nádobku na sůl až po okraj (přibližně 1 kg); vytečení malého
množství vody je zcela běžným jevem.
4. Odložte trychtýř, odstraňte zbytky soli z hrdla; před
zašroubováním uzávěru jej opláchněte pod tekoucí vodou.
Doporučuje se provést tento úkon při každém doplňování soli.
Dobře dotáhněte uzávěr, aby se do nádobky na sůl během mytí
nedostal mycí prostředek (mohlo by tak dojít k trvalému poškození
dekalcikátoru).
Když je třeba doplnit sůl, doporučuje se udělat to před
zahájením mytí.
(viz obrázek)
Nastavení podle tvrdosti vody
Pro dosažení dokonalé činnosti změkčujícího dekalcikátoru je
nezbytné provést nastavení v závislosti na tvrdosti vody dostupné
v obydlí. Potřebný údaj lze zjistit u organizace zabývající se
dodávkou pitné vody. Nastavená hodnota odpovídá průměrné
tvrdosti vody.
• Zapněte myčku tlačítkem ZAPNUTÍ/VYPNUTÍ
• Vypněte myčku tlačítkem ZAPNUTÍ/VYPNUTÍ
• Držte stisknuté tlačítko START/PAUZA po dobu 5 sekund,
dokud neuslyšíte pípnutí.
• Zapněte myčku tlačítkem ZAPNUTÍ/VYPNUTÍ
• Na displeji bude blikat číslo úrovně aktuální volby a kontrolka soli.
• Stiskněte tlačítko P za účelem volby požadované úrovně tvrdosti
(viz tabulka tvrdosti).
• Vypněte myčku tlačítkem ZAPNUTÍ/VYPNUTÍ
• Nastavení bylo dokončeno!
(viz Popis)
a naplňte
Průměrná autonomie
Tabulka tvrdosti vody
úroveň
Od 0 °f do 10 °f se doporučuje nepoužívat sůl.
* Při nastavení 5 může dojít k prodloužení doby.
(°dH = tvrdost vody v německých stupních - °fH = tvrdost vody
ve francouzských stupních - mmol/l = milimol/litr)
°dH °fH mmol/l měsíce
1 0 - 6 0 - 10 0 - 1 7 měsíce
2 6 - 11 11 - 20 1,1 - 2 5 měsíce
3 12 - 17 21 - 30 2,1 - 3 3 měsíce
4 17 - 34 31 - 60 3,1 - 6 2 měsíce
34 - 50 61 - 90 6,1 - 9 2/3 týdny
5*
nádobka na sůl při 1
mycím cyklu denně
Dávkování leštidla
Leštidlo usnadňuje SUŠENÍ nádobí. Nádržka na leštidlo se plní:
• když na ovládacím panelu/displeji bliká kontrolka/symbol
NEDOSTATEK LEŠTIDLA*
• když se optický indikátor, který se nachází na dvířkách nádobky
„E“, změní z tmavého na průsvitný.
1. Otevřete nádobku otáčením
uzávěru „G“ proti směru hodinových
ručiček.
2. Nalijte leštidlo tak, aby nepřeteklo.
Pokud k tomu dojde, očistěte jej
suchým hadrem.
3. Zašroubujte zpět uzávěr.
NIKDY neaplikujte leštidlo přímo
dovnitř mycího prostoru.
Nastavení dávky leštidla
V případě, že nejste spokojeni s výsledkem sušení, je možné
provést nastavení množství leštidla. Otáčejte regulátorem „F“.
Je možné nastavit až do max. 4 základních úrovní v závislosti na
modelu myčky. Nastavená hodnota odpovídá průměrné úrovni.
Je možné nastavit až do max. 4 základních úrovní v závislosti na
modelu myčky. Nastavená hodnota odpovídá průměrné úrovni.
• Pokud je na nádobí modravý povlak, nastavte nízké hodnoty
(1-2).
• Pokud jsou na nádobí kapky vody nebo skvrny vodního
kamene, nastavte vysoké hodnoty (3-4).
50
* Pouze u některých modelů.
Page 51

Plnění košů
Doporučení:
Před plněním košů odstraňte z nádobí zbytky jídla a vylijte
ze sklenic a pohárů tekutiny, které v nich zůstaly. Není třeba
provádět předběžné oplachování pod tekoucí vodou.
Umístěte nádobí tak, aby zůstalo bez pohybu a nepřevrátilo se,
aby nádoby zůstaly obráceny otvorem dolů a aby se vypouklé a
vyduté části nacházely v šikmé poloze, což umožní vodě dostat
se ke všem povrchům i odtékat.
Dávejte pozor, aby víka, rukojeti, pánve a tácy nebránily otáčení
ostřikovacích ramen. Malé předměty umístěte do košíku na
příbory.
Plastový příbor a pánve z antiadhezivního materiálu mají tendenci
více zachytávat kapky vody, a proto jejich schopnost sušení bude
menší než u keramického nebo ocelového nádobí.
Lehké předměty (jako např. plastové nádoby) musí být dle
možností umístěny do horního koše a tak, aby se nemohly
pohybovat.
Po naplnění zkontrolujte, zda se ostřikovací ramena mohou
volně otáčet.
Spodní koš
Do spodního košíku lze ukládat hrnce, víka, talíře, salátové mísy,
příbory apod. Talíře a velká víka je třeba dle možnosti umístit po
krajích koše.
Košík na příbory
Košík na příbory je vybaven horními mřížkami pro lepší
uspořádání příborů. Musí být umístěn výhradně v horní přední
části spodního koše.
Horní koš
Naložte do něj choulostivé a lehké nádobí: sklenice, šálky, talířky,
nízké salátové mísy.
CS
Doporučuje se umístit značně znečištěné nádobí do spodního
koše, protože v této části myčky jsou proudy vody nejsilnější a
umožňují dosáhnout nejlepších výsledků mytí.
Některé modely myček nádobí
disponují naklonitelnými částmi*,
které lze použít ve svislé poloze k
uložení talířů nebo ve vodorovné
poloze (spuštěné dolů) k uložení
hrnců a salátových mís.
Součástí některých modelů je
Vertical Zone, speciální vyjímatelné
držáky*, které jsou umístěny v
zadním prostoru koše a mohou
být použity pro udržení pánví nebo
plechů ve svislejší poloze, aby
zabíraly méně prostoru.
Pro jejich použití stačí uchopit barevnou úchopnou část,
potáhnout ji směrem nahoru a otočit dopředu. Tyto držáky se
mohou posouvat doprava nebo doleva, aby se přizpůsobily
velikosti nádobí.
Sklopné držáky s proměnlivou polohou*
Boční sklopné držáky lze umístit do tří různých výšek z důvodu
optimalizace umístění nádobí v prostoru koše.
Poháry lze umístit stabilně na sklopné
držáky zasunutím stopky poháru do
příslušných podélných otvorů.
Pro optimalizaci sušení umístěte
sklopné držáky s vyšším sklonem. Pro
změnu sklonu nadzvedněte sklopný
držák, mírně jej posuňte a umístěte
požadovaným způsobem.
*Přít. pouze na některých modelech, v různém počtu a v různých
polohách.
51
Page 52
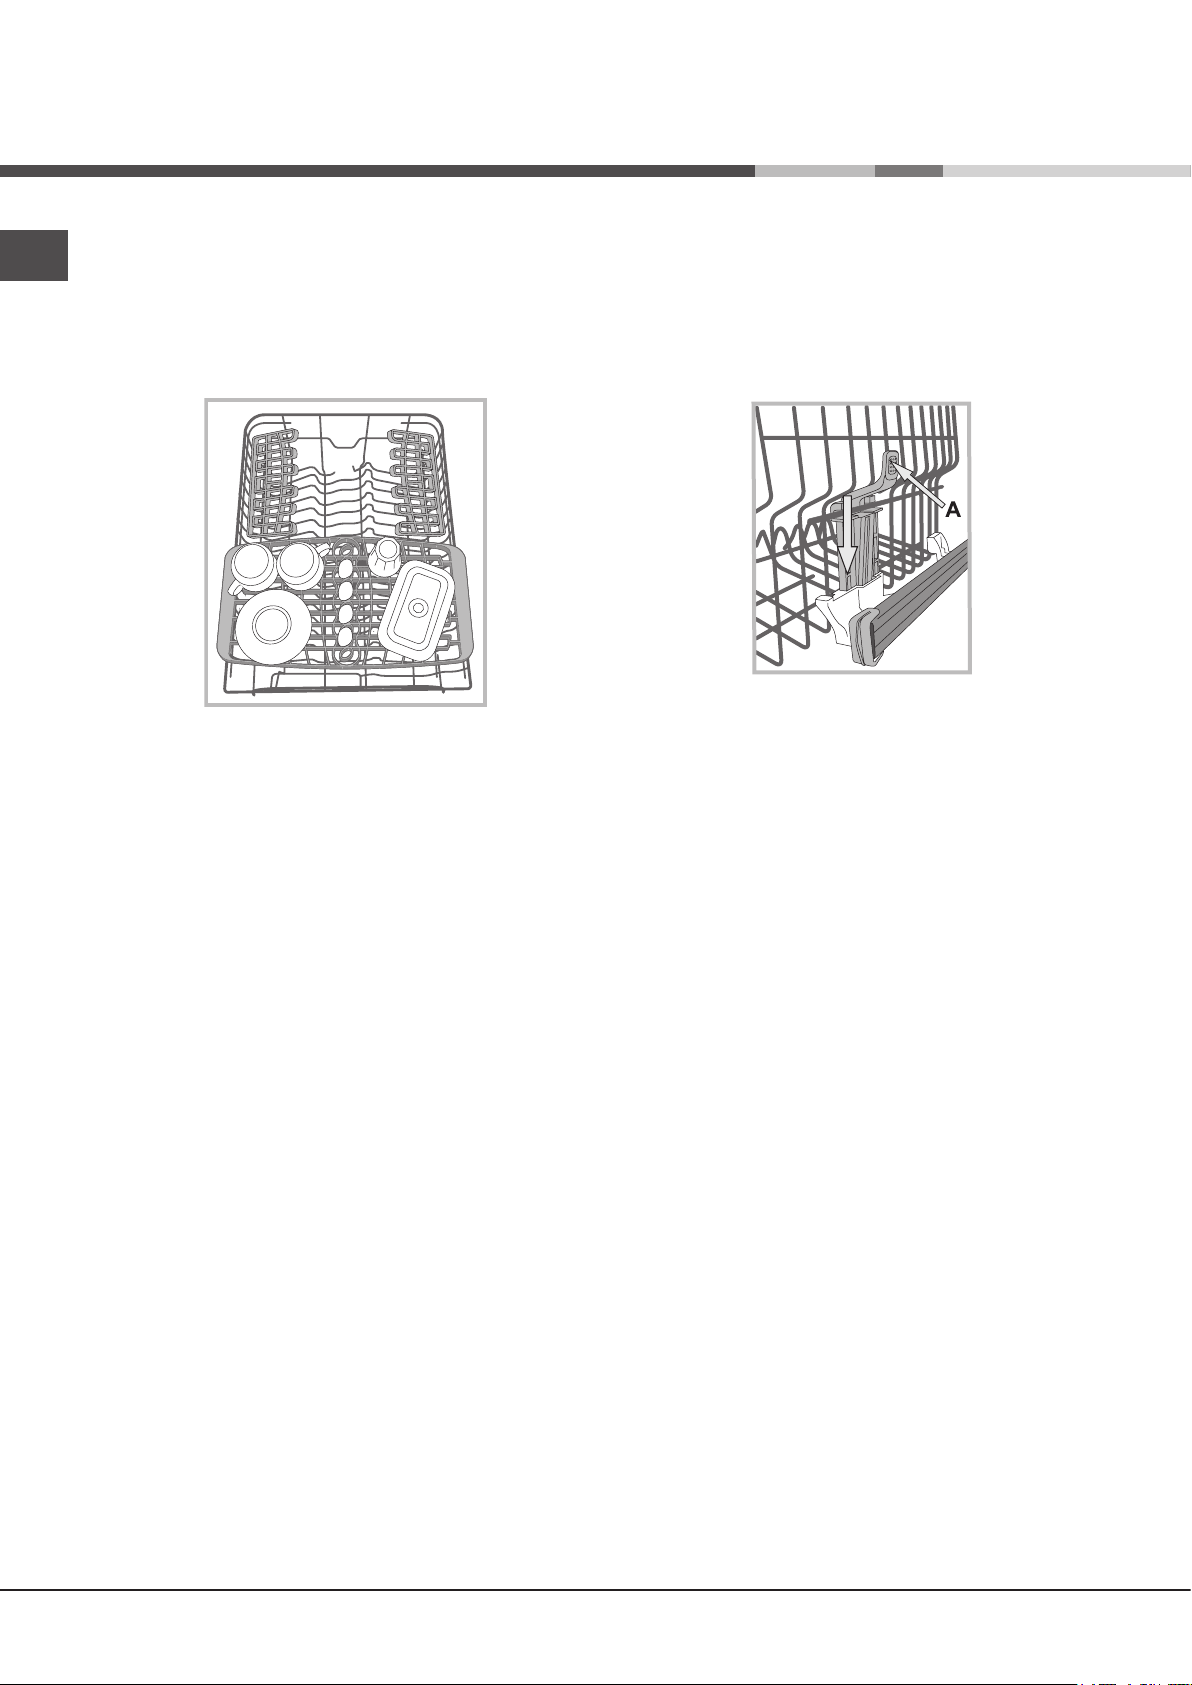
CS
Tác*
Některé modely myček jsou vybaveny posuvným tácem, který lze
použít pro uložení příboru nebo nádobí malých rozměrů.
Za účelem dosažení co nejlepších vlastností mytí nepokládejte
na uvedený tác neskladné nádobí. Tác na příbor je vyjímatelný.
(viz obrázek)
Nastavení výšky horního koše (45 cm)
Horní koš je výškově nastavitelný: do horní polohy kvůli umístění
neskladného nádobí; do spodní polohy kvůli využití prostorů
sklopných držáků a vytvoření většího prostoru směrem nahoru.
Je lépe nastavit výšku horního koše při PRÁZDNÉM KOŠI.
NIKDY nezvedejte nebo nespouštějte koš pouze z jedné
strany.
Když je koš vybaven systémem Lift-Up*
koš po jeho uchopení na bocích a pohněte jím směrem nahoru.
Pro návrat do spodní polohy stiskněte páky (A) na bocích koše
a doprovoďte jej při sestupu směrem dolů.
(viz obrázek)
, zvedněte
Nevhodné nádobí
• Dřevěný příbor a nádobí.
• Choulostivé dekorované sklenice, umělecké řemeslné nádobí
a antikvární prvky. Jejich dekorace nejsou odolné.
• Části syntetického materiálu, které nejsou odolné vůči teplotě.
• Měděné a cínové nádobí.
• Nádobí znečištěné od popela, vosku, maziva nebo inkoustu.
Dekorace na skle, hliníkové a stříbrné kusy mohou mít během
mytí tendenci změnit barvu a vyblednout. Také některé druhy
skla (např. křišťálové předměty) se mohou po mnoha mytích
stát matnými.
Poškození skla a nádobí
Příčiny:
• Druh skla a postup výroby skla.
• Chemické složení mycího prostředku.
• Teplota vody oplachovacího programu.
Rada:
• Používejte pouze sklenice a porcelán, které jsou výrobcem
zaručeny jako vhodné pro mytí v myčce nádobí.
• Používejte jemný mycí prostředek, vhodný pro tento druh
nádobí.
• Po ukončení programu vyjměte sklenice a příbory co nejdříve.
* Pouze u některých modelů.
52
Page 53

Mycí prostředek a
použití myčky
Dávkování mycího prostředku
Dobrý výsledek mytí závisí také na správném dávkování
mycího prostředku, přičemž platí, že při překročení
doporučeného množství nedojde ke zvýšení účinnosti mytí,
ale pouze k vyššímu znečištění životního prostředí.
Dávkování lze přizpůsobit stupni znečištění.
V případě běžného znečištění se obvykle používá přibližně
25 g práškového mycího prostředku nebo 25 ml tekutého
mycího prostředku. V případě použití tablet stačí jedna.
Když je nádobí málo znečištěné nebo když se předem
oplachovalo pod vodou, snižte výrazně množství mycího
prášku.
Pro dosažení dobrých výsledků mytí dodržujte pokyny
uvedené na obalu mycího prostředku.
V případě dalších otázek vám doporučujeme obrátit se na
výrobce mycích prostředků.
Otevřete nádobku na mycí prostředek tlačítkem D; nadávkujte
mycí prostředek podle informací uvedených v tabulce programů:
• práškový nebo tekutý: vaničky
A (mycí prostředek pro mytí) a B
(mycí prostředek pro předmytí)
• tablety: Když program
vyžaduje použití 1 tablety,
vložte ji do nádobky A a zavřete
kryt C; když vyžaduje použití 2
tablet, položte druhou na dno
mycího prostoru.
3. Odstraňte zbytky mycího
prostředku z okrajů nádobky a zavřete víko C až po zacvaknutí.
Nádobka na mycí prostředek se otevře automaticky ve vhodném
okamžiku v závislosti na zvoleném programu.
Při použití kombinovaných mycích prostředků se doporučuje použít
volitelnou funkci TABS, která přizpůsobí mycí program tak, aby bylo
vždy dosaženo nejlepšího výsledku mytí a co nejlepšího možného
sušení.
Používejte výhradně mycí prostředky pro myčky nádobí.
NEPOUŽÍVEJTE mycí prostředky pro mytí v rukou.
Nadměrné použití mycích prostředků může způsobit
přítomnost pěny na konci cyklu.
Nejúčinnějšího mytí a sušení je možné dosáhnout
kombinovaným použitím mycího prostředku, tekutého
leštidla a regenerační soli.
Doporučuje se používat mycí prostředky bez fosfátů
a bez chloru, které jsou vhodnější z hlediska ochrany
životního prostředí.
Uvedení myčky do činnosti
1. Otevřete kohoutek přívodu vody.
2. Stiskněte tlačítko ZAPNUTÍ-VYPNUTÍ.
3. Otevřete dvířka a nadávkujte mycí prostředek
dávkování mycího prostředku).
4. Naplňte koše
5. Zvolte program podle druhu nádobí a stupně jeho znečištění
(viz tabulka programů)
6. Zvolte volitelné funkce mytí*
7. Zahajte program stisknutím tlačítka Start/Pauza (stálé
světlo): dlouhé pípnutí oznámí zahájení programu, dojde
k rozsvícení kontrolky mytí a na displeji se zobrazí číslo
programu a doba zbývající do konce cyklu.
8. Na konci vám dvě krátká a jedno dlouhé pípnutí oznámí
ukončení programu, dojde ke zhasnutí tlačítka Start/Pauza a
k zobrazení slova END. Vypněte zařízení stisknutím tlačítka
ZAPNUTÍ-VYPNUTÍ.
9. Před vyjmutím nádobí vyčkejte několik minut, abyste se
vyhnuli popálení. Vyložte koše počínaje spodním košem.
Pro snížení spotřeby elektrické energie se zařízení
v některých podmínkách dlouhodobějšího NEPOUŽÍVANÍ
automaticky vypne.
AUT. PROGRAMY*:Některé modely myčky jsou vybaveny
speciálním snímačem, který dokáže posoudit stupeň znečištění
a nastavit tak co nejúčinnější a co nejúspornější mytí. Doba trvání
Aut. programů se může měnit v závislosti na zásahu snímače.
(viz Plnění košů)
stisknutím tlačítka P.
(viz Možnosti).
a zavřete dvířka.
Změna probíhajícího programu
V případě volby chybného programu je možné provést jeho změnu
za předpokladu, že byl program právě zahájen: Při zahájeném
mytí je pro změnu mycího cyklu potřebné vypnout zařízení delším
stisknutím tlačítka ZAPNOUT/VYPNOUT/Vynulovat, znovu jej
zapnout stejným tlačítkem a znovu zvolit program a požadované
volitelné funkce.
Přidání nádobí
Stiskněte tlačítko Start/Pauza a otevřete dvířka; dávejte přitom
pozor na vycházející páru. Poté vložte nádobí. Stiskněte tlačítko
Start/Pauza: cyklus bude obnoven po dlouhém pípnutí.
Je-li nastaven odložený start, po skončení odečítání nedojde
k zahájení mycího cyklu, ale zařízení zůstane ve stavu Pauzy.
Stisknutím tlačítka Start/Pauza za účelem přerušení činnosti
zařízení dojde k přerušení programu.
V této fázi není možné provádět změnu programu.
Náhodné přerušení
Když se během mytí otevřou dvířka nebo když dojde k přerušení
dodávky elektrické energie, program bude přerušen. Po zavření
dvířek nebo po obnovení dodávky elektrické energie bude
program pokračovat z bodu, ve kterém byl přerušen.
(viz
CS
* Pouze u některých modelů.
53
Page 54

Programy
CS
Údaje programů jsou naměřeny v laboratorních podmínkách v souladu s evropskou normou EN 50242.
V závislosti na různých podmínkách použití může docházet ke změnám doby trvání a dat programů.
Počet a druh programů a volitelných funkcí se mění v závislosti na modelu myčky.
Program Sušení Volitelné funkce
1. Eko mytí Ano
2. Auto Intenzivní Ano
3. Auto Běžné mytí Ano
Jemné mytí
4.
5.
Ekspress
6. Good Night Ano Odložený start - Tabs 03:30 13,0 0,85
7. Namáčení Ne Odložený start - Poloviční náplň 00:10 4,0 0,01
Ano
Ne Odložený start - Tabs 00:25 8,0 0,45
Odložený start - Poloviční náplň -
Tabs
Odložený start - Poloviční náplň -
Tabs
Odložený start - Poloviční náplň -
Tabs
Odložený start - Poloviční náplň -
Tabs
Doba trvání
programu
03:00 9,0 0,83
02:20 - 03:00 13,0 - 14,0 1,20 - 1,45
01:40 - 02:20 13,5 – 14,5 1,00 - 1,20
01:40 9,0 0,90
Spotřeba vody
(l/cyklus)
Spotřeba
energie
(kWh/cyklus)
8. UltraIntensive Ano
Odložený start - Poloviční náplň -
Tabs
02:50 17,0 1,50
Pokyny pro volbu programů a dávkování mycího prostředku
1. Mycí cyklus EKO je standardní program, na který se vztahují údaje uvedené na energetickém štítku; tento cyklus je vhodný pro mytí
běžně znečištěného nádobí a jedná se o nejúčinnější program z hlediska energetické úspory a úspory vody pro tento druh nádobí. 4
g/ml** + 21 g/ml – 1 tableta
2. Silně znečištěné nádobí a hrnce (nevhodný pro choulostivé nádobí) 25 g/ml – 1 tableta
3. Běžně znečištěné nádobí a hrnce 4 g/ml
4. Cyklus pro choulostivé nádobí, které je citlivější na vysoké teploty 25 g/ml – 1 tableta
5. Rychlý cyklus, který se používá pro mírně znečištěné nádobí (ideální pro 2 soupravy) 21 g/ml – 1 tableta
6. Zaručuje vynikající výkonnost Vhodný pro noční použití. 25 g/ml – 1 tableta
7. Předběžné mytí, kdy se očekává doplnění náplně po dalším jídle. Bez mycího prostředku
8. Cyklus pro mimořádně znečištěné hrnce nebo hrnce se zbytky zaschlého jídla. 4 g/ml** + 25 g/ml – 1+1 tableta
Spotřeba v pohotovostním režimu: Spotřeba v režimu left-on: 5 W - spotřeba v režimu vypnutí: 0,5 W
(**Množství mycího prostředku pro předmytí)
** + 21 g/ml – 1 tableta
54
Page 55
Speciální programy
a Volitelné funkce
Poznámky:
Nejlepších výsledků s programy „Každodenní mytí“ a „Ekspress“
je možné dosáhnout, když bude dle možností dodržen počet
uvedených souprav.
Pro menší spotřebu používejte myčku na nádobí s plnou náplní.
Poznámka pro zkušební laboratoře: Pro informace o
zkušebních podmínkách srovnávací zkoušky EN napište na
adresu: assistenza_en_lvs@indesitcompany.com
Volitelné funkce mytí*
VOLITELNÉ FUNKCE mohou být nastaveny, měněny nebo
vynulovány teprve po provedení volby mycího programu a
před stisknutím tlačítka Start/Pauza.
Mohou být zvoleny pouze volitelné funkce kompatibilní se
zvoleným programem. Když některá volitelná funkce není
kompatibilní se zvoleným programem,
příslušný symbol třikrát rychle zabliká.
Když bude zvolena volitelná funkce, která není kompatibilní s
některou z předem nastavených volitelných funkcí, tato kontrolka
zabliká třikrát a zhasne, zatímco zůstane rozsvícena poslední
nastavená volba.
Za účelem zrušení chybně nastavené volitelné funkce stiskněte
znovu příslušné tlačítko.
(viz tabulka programů)
Poloviční náplň v horním nebo spodním koši
Při mytí malého množství nádobí je možné provést
mytí poloviční náplně a ušetřit tak vodu, energii a
mycí prostředek. Zvolte program a postupně stiskněte tlačítko
POLOVIČNÍ NÁPLŇ: rozsvítí se kontrolka týkající se zvoleného
koše a aktivuje se mytí pouze v horním nebo spodním koši.
Pamatujte na naložení nádobí pouze na horní nebo spodní
koš a na použití zníženého množství mycího prostředku.
Multifunkční tablety (Tabs)
Tato volitelná funkce optimalizuje výsledek mytí a
sušení.
Při použití multifunkčních tablet stiskněte tlačítko MULTIFUNKČNÍ
TABLETY. Dojde k rozsvícení příslušného symbolu; dalším
stisknutím dojde ke zrušení provedené volby.
Použití volitelné funkce „Multifunkční tablety“ bude mít
za následek prodloužení trvání programu.
CS
Odložený start
Zahájení programu může být odloženo o 1 a 24 hodin:
1. Zvolte požadovaný mycí program a případné další
volitelné funkce. Poté stiskněte tlačítko ODLOŽENÝ START; dojde
k rozsvícení kontrolky. Prostřednictvím stejného tlačítka zvolte,
kdy má být zahájen mycí cyklus (h01, h02 apod.)
2. Potvrďte volbu tlačítkem START/PAUZA; dojde k zahájení
odečítání.
3. Po uplynutí uvedené doby zhasne kontrolka ODLOŽENÝ
START a spustí se program.
Zrušení volby ODLOŽENÉHO STARTU se provádí
několikanásobným stisknutím tlačítka ODLOŽENÝ START,
dokud se nezobrazí OFF.
Není možné nastavit Odložený start během již
probíhajícího cyklu.
* Pouze u některých modelů.
55
Page 56
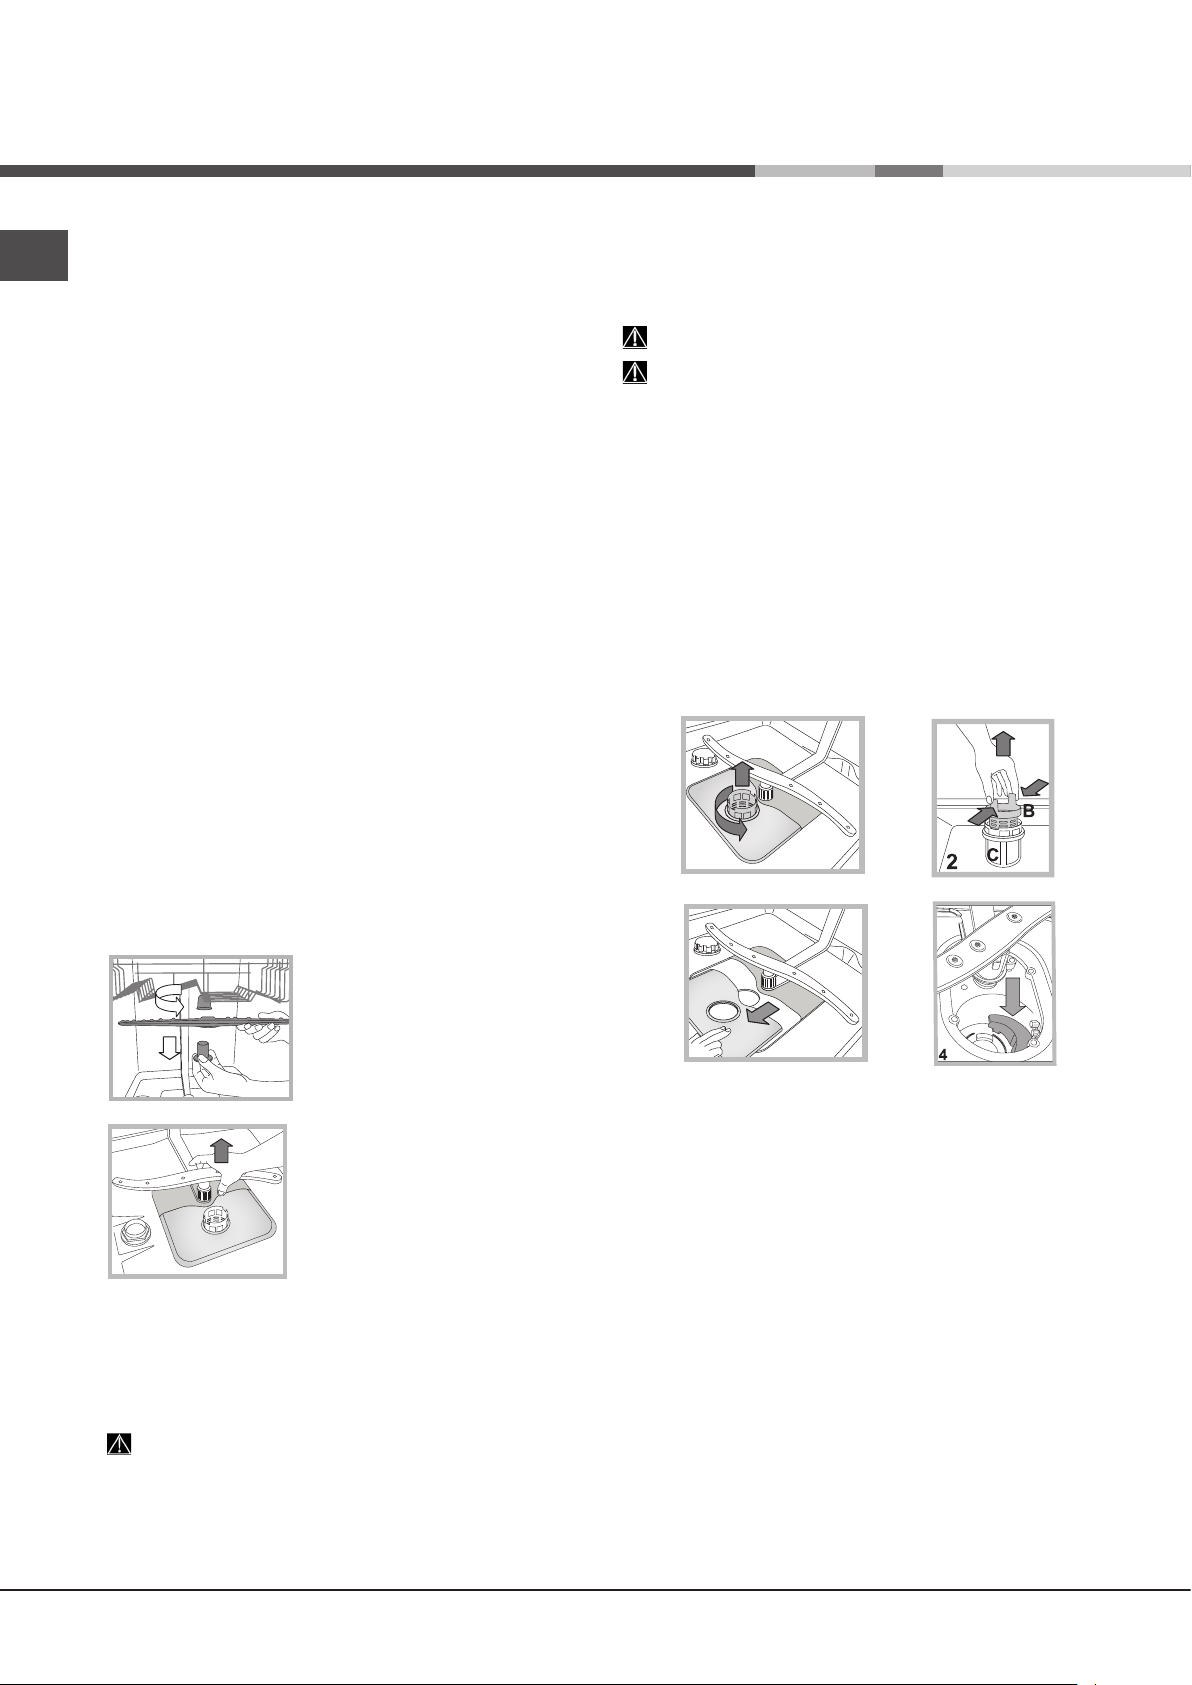
Údržba a péče
CS
Uzavření přívodu vody a vypnutí elektrického
napájení
• Po každém mytí uzavřete kohoutek přívodu vody, abyste se
vyhnuli nebezpečí úniků.
• Při čištění zařízení a během operací údržby odpojte zástrčku
napájecího kabelu ze zásuvky elektrického rozvodu.
Čištění myčky nádobí
• Vnější povrch a ovládací panel se může čistit neabrazivním
hadrem navlhčeným ve vodě. Nepoužívejte rozpouštědla ani
abrazivní prostředky.
• Stěny vnitřního mycího prostoru se dají vyčistit od případných
skvrn hadrem navlhčeným ve vodě s malým množstvím octa.
Zabránění vzniku nepříjemných zápachů
• Dvířka nechte pokaždé pootevřená, aby se zabránilo
hromadění vlhkosti.
• Pravidelně čistěte obvodová těsnění dvířek a nádobek na mycí
prostředek s použitím mokré houby. Zabrání se tak hromadění
zbytků jídla, které jsou hlavními původci nepříjemného
zápachu.
Čištění ostřikovacích ramen
Může se stát, že se na ostřikovacích ramenech zachytí zbytky
jídla a ucpou otvory, kterými vytéká voda: Čas od času je třeba
je zkontrolovat a vyčistit nekovovým kartáčkem.
Obě ostřikovací ramena jsou demontovatelná.
Čištění ltrů
Filtrační jednotka je tvořena dvěma filtry, které čistí vodu
použitou k mytí od zbytků jídla a opětovně ji uvádějí do oběhu:
K zabezpečení trvale dobrých výsledků mytí je třeba ltry čistit.
Pravidelně čistěte ltry.
Myčka nádobí se nesmí používat bez ltrů nebo s odpojeným
ltrem.
• Po několika mytích zkontrolujte ltrační jednotku a dle potřeby
ji důkladně umyjte pod tekoucí vodou. Pomozte si přitom
nekovovým kartáčkem a postupujte dle níže uvedených pokynů:
1. Otáčejte válcovým ltrem C proti směru hodinových ručiček a
vytáhněte jej (obr. 1).
2. Vytáhněte nádobku ltru B mírným zatlačením na boční jazýčky
(obr. 2);
3. Vyvlečte nerezový talíř ltru A (obr. 3).
4. Zkontrolujte výstupní otvor a odstraňte případné zbytky jídla.
NIKDY NEODSTRAŇUJTE ochranný kryt mycího čerpadla
(součást černé barvy) (obr. 4).
C
1
Demontáž horního ostřikovacího
ramena vyžaduje odšroubování
plastové kruhové matice proti
směru hodinových ručiček. Horní
ostřikovací rameno je třeba
namontovat tak, aby bylo obráceno
otvory směrem nahoru.
Demontáž spodního ostřikovacího
ramena se provádí stisknutím
jazýčků, nacházejících se po
stranách, směrem nahoru.
Čištění ltru přívodu vody
Jestliže jsou hadice přívodu vody nové nebo pokud zůstaly delší
dobu v nečinnosti, před připojením je třeba nechat odtéci vodu,
dokud nebude průzračná a zbavená nečistot. Bez uvedeného
opatření může dojít k ucpání přívodu vody a poškození myčky.
Pravidelně čistěte vstupní ltr rozvodu vody, umístěný na
výstupu z vodovodního kohoutu.
- Zavřete kohout přívodu vody.
- Odšroubujte koncovou část přívodní hadice vody, sejměte ltr
a opatrně jej vyčistěte pod proudem tekoucí vody.
- Vložte ltr zpět na původní místo a zašroubujte hadici.
*
A
3
Po vyčištění ltrů proveďte zpětnou montáž ltrační jednotky a
její správné umístění do jejího uložení; představuje nezbytný
předpoklad správné činnosti myčky.
Opatření v případě dlouhodobé nečinnosti
• Odpojte napájecí kabel zařízení ze zásuvky elektrického
rozvodu a zavřete kohoutek přívodu vody.
• Nechte pootevřená dvířka.
• Po vašem návratu proveďte jeden mycí cyklus naprázdno.
* Pouze u některých modelů.
56
Page 57

Poruchy a způsob jejich
odstranění
Může se stát, že zařízení nebude fungovat. Dříve, než se obrátíte na Servisní službu, zkontrolujte prostřednictvím
následujícího seznamu, zda se nejedná o snadno odstranitelný problém.
Poruchy: Možné příčiny / Řešení:
Nedochází k uvedení myčky
do chodu nebo myčka
nereaguje na ovládací povely
Není možné zavřít dvířka
Myčka nevypouští vodu. • Mycí program ještě neskončil.
Myčka je hlučná. • Nádobí naráží vzájemně do sebe nebo do ostřikovacích ramen. Umístěte nádobí správně a
Na nádobí a na sklenicích
jsou viditelné nánosy vodního
kamene nebo bílý povlak.
Na nádobí a na sklenicích jsou
patrné bílé zbytky nebo modrý
povlak.
Nádobí je málo suché.
Nádobí není dostatečně čisté. • Nádobí není rozmístěno správně.
Myčka nenapouští vodu
je zablokovaná s rozsvícenými
kontrolkami
• Je zavřen kohoutek s vodou.
• Vypněte zařízení tlačítkem ZAPNUTÍ/VYPNUTÍ, opět jej zapněte po uplynutí jedné minuty a
znovu nastavte program.
• Zástrčka není řádně zastrčena v zásuvce elektrického rozvodu nebo je třeba použít jinou
zásuvku.
• Dvířka myčky nejsou řádně zavřená.
• Zkontrolujte, zda jsou koše zasunuté až na doraz.
• Došlo k zamknutí zámku; energicky zavřete dvířka, dokud neuslyšíte cvaknutí.
• Vypouštěcí hadice je ohnutá
• Odpadové potrubí umyvadla je ucpáno.
• Filtr je ucpán zbytky jídla.
• Zkontrolujte výšku vypouštěcí hadice.
zkontrolujte, zda se ostřikovací ramena otáčejí volně.
• Nadměrná přítomnost pěny: Mycí prostředek není vhodně dávkován nebo není vhodný pro
mytí v myčkách.
• Chybí regenerační sůl.
• Nastavení tvrdosti vody není vhodné; zvyšte hodnoty.
• Uzávěr nádobky na sůl a na leštidlo není dobře uzavřen.
• Leštidlo bylo spotřebováno nebo jeho dávkování není dostatečné.
• Dávkování leštidla je nadbytečné.
• Byl zvolen program bez sušení.
• Leštidlo bylo spotřebováno.
• Regulace leštidla neodpovídá potřebě.
• Nádobí je z antiadhezivního materiálu nebo z plastu; výskyt kapek vody je zcela běžným
jevem.
• Ostřikovací ramena se nemohou volně otáčet, protože jsou zablokována nádobím.
• Mycí program je příliš mírný
• Nadměrná přítomnost pěny: Mycí prostředek není vhodně dávkován nebo není vhodný pro
mytí v myčkách.
• Uzávěr leštidla nebyl správně uzavřen.
• Filtr je znečištěný nebo ucpaný
• Chybí regenerační sůl
• Ujistěte se, že je výška talířů kompatibilní s nastavením koše.
• Otvory ostřikovacích ramen jsou ucpané.
• Chybí voda v rozvodu vody nebo je zavřený ventil.
• Přívodní hadice na vodu je ohnutá
• Jsou ucpané ltry; je třeba je očistit.
• Jsou ucpaná odpadová potrubí; je třeba je vyčistit.
• Po provedení kontroly a vyčištění vypněte a znovu zapněte myčku a zahajte nový mycí
cyklus.
• Když problém přetrvává, zavřete přívod vody, odpojte zástrčku a obraťte se na servisní
středisko.
(viz Mycí prostředek a Použití myčky).
(viz Mycí prostředek a Použití myčky).
(viz Instalace).
Nepředmývejte nádobí ručně.
(viz Regenerační sůl a Leštidlo),
(viz Regenerační sůl a Leštidlo),
(viz Programy).
(viz Údržba a péče).
(viz Regenerační sůl a Leštidlo).
(viz Údržba a péče).
(viz Instalace).
(viz Údržba a péče).
CS
* Pouze u některých modelů.
57
Page 58

Inštalácia
SK
Pri prenášaní udržujte zariadenie podľa možností vo zvislej
polohe; v prípade potreby ho môžete nakloniť na zadnú stranu.
Pripojenie k rozvodu vody
Prispôsobenie elektrického rozvodu a rozvodu vody pre
inštaláciu musí vykonať kvalikovaný pracovník.
Prívodná hadica a vypúšťacia hadica vody musia byť nasmerované doprava alebo doľava, aby bola umožnená čo najlepšia
inštalácia.
Hadice nesmú byť ohnuté alebo pritlačené umývačkou.
Pripojenie hadice pre prívod vody
• Hadicu je potrebné pripojiť ku prípojke vody s veľkosťou 3/4”
typu plyn, so studenou alebo teplou vodou (max. 60 °C).
• Nechajte vodu odtiecť, až kým nebude priezračná.
• Riadne priskrutkujte prívodnú hadicu a otvorte ventil.
Ak dĺžka prívodnej hadice nebude dostatočná, obráťte sa na
špecializovanú predajňu alebo na autorizovaného technika
Servisná služba)
Tlak v rozvode vody sa musí pohybovať v rozmedzí hodnôt
uvedených v tabuľke Technických údajov; v opačnom prípade by
sa mohlo stať, že umývačka nebude fungovať správne.
Dbajte na to, aby hadica nebola príliš ohnutá alebo stlačená.
.
(viď
Pripojenie vypúšťacej hadice k odpadovému
potrubiu
Pripojte vypúšťaciu hadicu do odpadového potrubia s minimálnym
priemerom 2 cm. (A)
Prípojka vypúšťacej hadice sa musí nachádzať vo výške od 40 do
80 cm od podlahy alebo od plochy, na ktorej je uložená umývačka.
MAX 80 cm
MIN 40 cm
Pred pripojením vypúšťacej hadice k sifónu umývadla odstráňte
plastový uzáver (B).
Bezpečnostné opatrenie proti vytopeniu
S cieľom zaručiť, aby nedochádzalo k vytopeniu, umývačka:
- je vybavená systémom, ktorý preruší prívod vody v prípade
porúch alebo úniku vody dovnútra umývačky.
Niektoré modely sú vybavené tiež prídavným bezpečnostným
zariadením New Acqua Stop*, ktoré zaručuje ochranu proti
vytopeniu aj v prípade pretrhnutia prívodnej hadice.
Prívodná hadica vody nesmie byť v žiadnom prípade prerezaná,
pretože obsahuje súčasti pod napätím.
Pripojenie k elektrickému rozvodu
Pred zasunutím zástrčky do zásuvky elektrického rozvodu sa
uistite, že:
• zásuvka je uzemnená a že vyhovuje normám;
• zásuvka je schopná zniesť maximálnu záťaž odpovedajúcu
menovitému príkonu zariadenia, uvedenému na štítku
s menovitými údajmi, umiestnenom na vnútornej strane dvierok
(viď kapitola Popis umývačky);
• napájacie napätie odpovedá hodnotám uvedeným na štítku
s technickými údajmi, umiestnenom na vnútornej strane
dvierok;
• zásuvka je kompatibilná so zástrčkou zariadenia. V opačnom
prípade požiadajte o výmenu zástrčky autorizovaného technika
(viď Servisná služba)
rozvodky.
Po inštalácii zariadenia musia kábel elektrického napájania
a zásuvka elektrického rozvodu zostať ľahko prístupné.
Kábel nesmie byť ohnutý ani stlačený.
V prípade poškodenia musí byť napájací kábel vymenený
výrobcom alebo strediskom Servisnej služby, aby sa predišlo
akémukoľvek riziku.
Firma neponesie žiadnu zodpovednosť za následky
spôsobené nerešpektovaním uvedených pokynov.
; nepoužívajte predlžovacie šnúry ani
(Viď Servisná služba)
Ustavenie a vyrovnanie do vodorovnej
polohy
1. Umiestnite umývačku na rovnú a pevnú plochu. Vyrovnajte
zariadenie do vodorovnej polohy odskrutkovaním alebo
zaskrutkovaním predných nožičiek. Dokonalé vyrovnanie do
vodorovnej polohy zabezpečí stabilitu zariadenia a zamedzí
vzniku vibrácií a hluku.
2. Po vstavaní umývačky prilepte pod drevenú policu priesvitný
samolepiaci pás*, chrániaci policu pred prípadným kondenzátom.
3. Je možné umiestniť umývačku tak, aby sa bočnými stenami
alebo zadnou stenou dotýkala priľahlého nábytku alebo steny.
Tento model umývačky môže byť tiež zasunutý pod dlhú pracovnú
dosku*
(viď Montážne pokyny)
4*. Výška zadnej nožičky sa nastavuje hexagonálnym puzdrom
červenej farby, nachádzajúceho sa v spodnej čelnej časti, v strede
umývačky, pomocou kľúča s hexagonálnym otvorom s veľkosťou
8 mm. Otáčaním v smere hodinových ručičiek sa výška zvyšuje a
otáčaním proti smeru hodinových ručičiek sa výška znižuje.
návod pre vstavanie, priložený k dokumentácii)
.
(viď
UPOZORNENIE: NEBEZPEČNÉ NAPÄTIE!
58
* Je súčasťou len niektorých modelov.
Page 59

Upozornenia pre prvé umývanie
Po inštalácii odstráňte tampóny umiestnené na košoch a
pridržiavacie gumy na hornom koši
(sk sú súčasťou).
Nastavenie dekalcikátora vody
Pred zahájením prvého umývania nastavte úroveň tvrdosti dodávanej vody.
Pri prvom naplnení nádržky dekalcikátora je potrebné použiť
vodu a následne je potrebné pridať približne 1 kg soli; je úplne
bežné, že určité množstvo vody vytečie.
Bezprostredne potom spustite jeden umývací cyklus.
Používajte len špecickú soľ pre umývačky riadu.
Po doplnení soli zhasne kontrolka CHÝBAJÚCA SOĽ*.
Ak nenaplníte zásobník soli, môžete poškodiť dekalcikátor
vody a ohrevný článok.
(viď kapitola Leštidlo a regeneračná soľ)
Technické údaje
Šírka 45 cm
Rozmery
Kapacita 10 štandardných súprav riadu
Tlak vody
v prívodnom potrubí
Napájacie napätie Viï štítok s menovitými údajmi
Celkový príkon Viï štítok s menovitými údajmi
Poistka Viï štítok s menovitými údajmi
Výška 85 cm
Håbka 60 cm
0,05 ÷ 1 MPa (0,5 ÷ 10 bar)
7,25 – 145 psi
Toto zariadenie je v zhode s
nasledujúcimi smernicami
Európskej únie:
-2006/95/EC (Nízke napätie)
-2004/108/EC (Elektromagnetická kompatibilita)
-2009/125/EC (Comm. Reg.
1016/2010) (Ecodesign)
- 97/17/EC (Energetické
štítkovanie umývaèiek riadu)
-2012/19/EC (WEEE)
Zariadenie vydáva akustické signály/tóny
modeli umývačky
príkazu: zapnutí, ukončení cyklu, atď.
Symboly/kontrolky/LED, ktoré sa nachádzajú na ovládacom
paneli/displeji sa môžu meniť z hľadiska farby a môžu blikať,
alebo byť rozsvietené stálym svetlom.
), ktoré informujú o vykonaní ovládacieho
(v závislosti na
(v závislosti na modeli
umývačky).
Displej* zobrazuje užitočné informácie, ktoré sa týkajú druhu
nastaveného cyklu, fázy umývania/osušovania, zvyšnej doby,
teploty, atď.
SK
* Je súčasťou len niektorých modelov.
59
Page 60
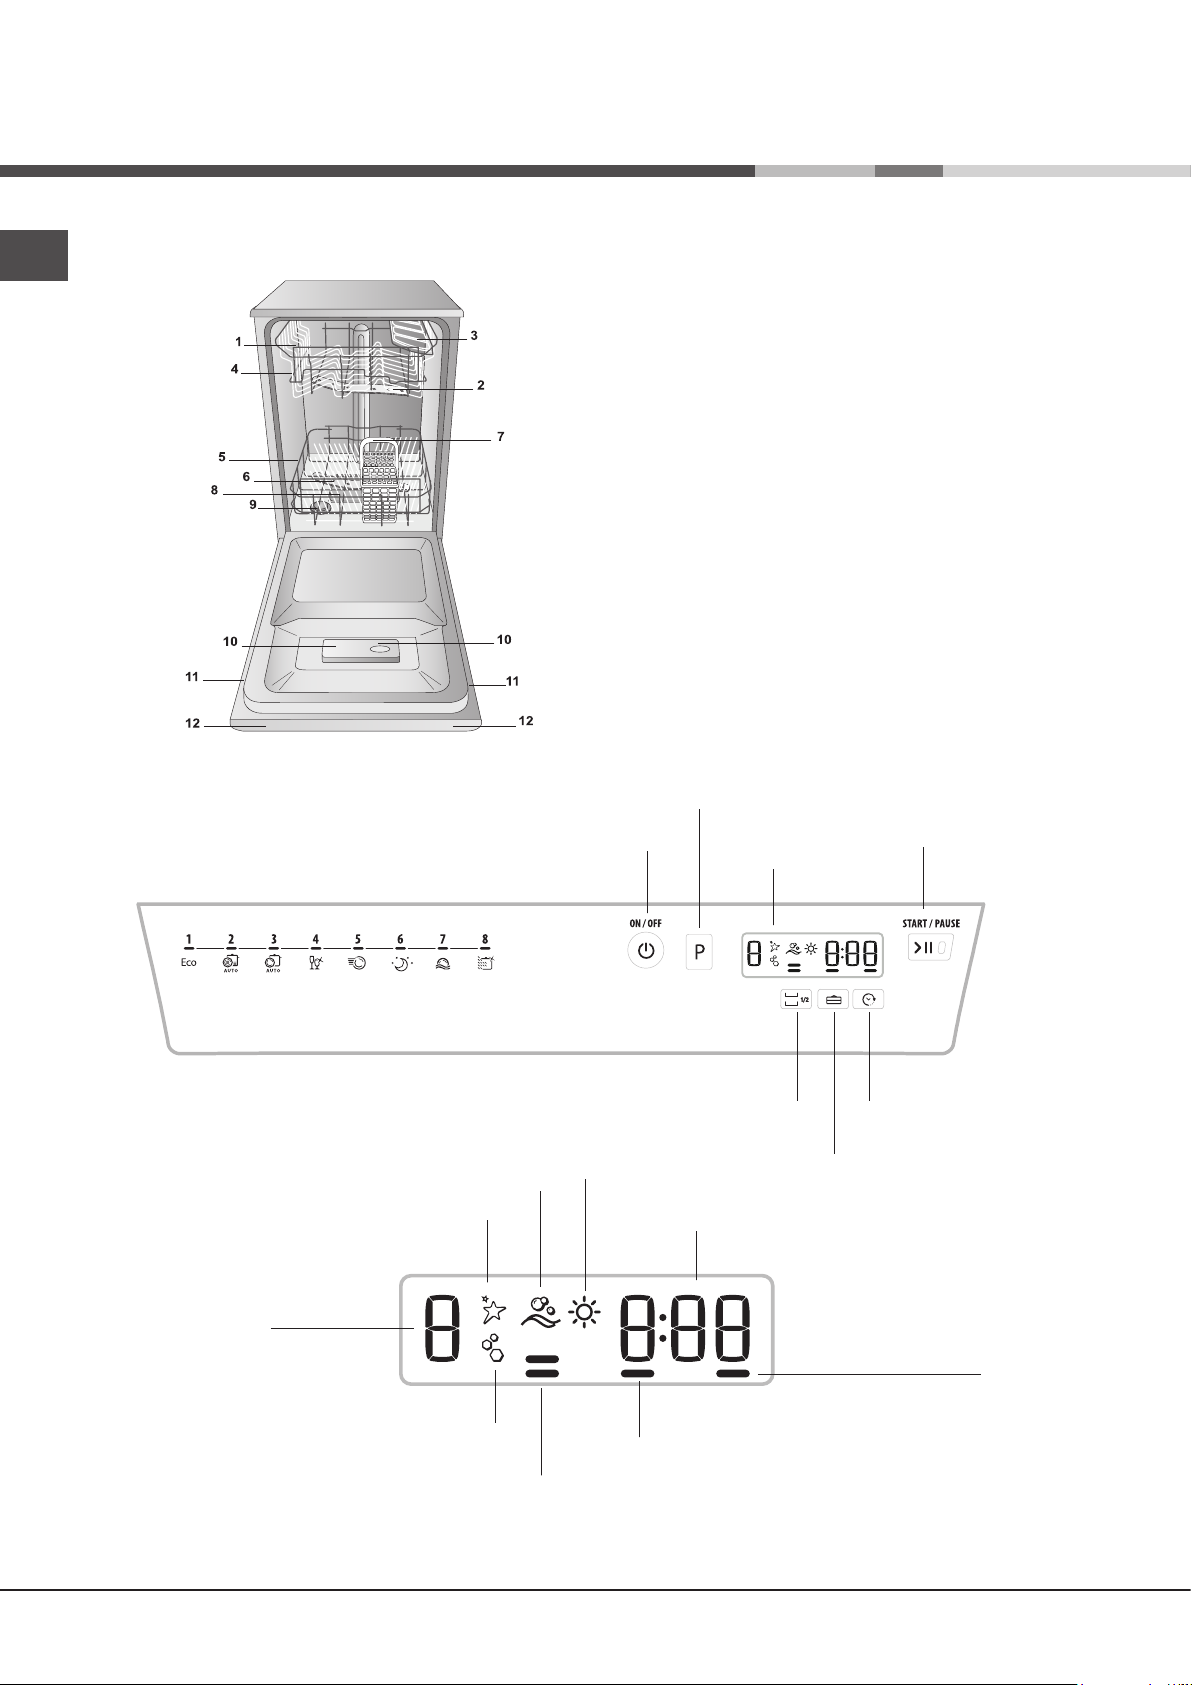
Popis zariadenia
SK
Celkový pohľad
Ovládací panel
1. Horný kôš
2. Horné ostrekovacie rameno
3. Sklopné držiaky
4. Mechanizmus nastavenia výšky koša
5. Dolný kôš
6. Spodné ostrekovacie rameno
7. Košík na príbory
8. Umývací lter
9. Nádobka na soľ
10. Nádobky na umývací prostriedok a nádržka na
leštidlo
11.
Štítok s technickými údajmi
12. Ovládací panel***
tlačidlo Voľba Programu
Displej
kontrola Umývanie
kontrolka
Chýbajúce Leštidlo
číslo Programu
kontrolka Chýbajúca Soľ
kontrolky Voliteľná
funkcia Polovičná náplň
tlačidlo Zapnúť-Vypnúť/
Vynulovať
tlačidlo Voliteľná funkcia
Polovičná Náplň
kontrolka Sušenie
Displej
indikátor Zvyšná Doba Programu
kontrolka Voliteľná
funkcia Oneskorený Štart
kontrolka Voliteľná funkcia
Multifunkčné Tablety (Tabs)
tlačidlo a kontrolka
Štart/Pauza
tlačidlo Voliteľná funkcia
Oneskorený Štart
tlačidlo Voliteľná funkcia
Multifunkčné Tablety (Tabs)
*** Len na modeloch s úplným vstavaním * Prít. len na niektorých modeloch.
Počet a druh programov sa mení v závislosti od modelu umývačky.
60
Page 61

Regeneračná soľ
a Leštidlo
Používajte len špecifické umývacie prostriedky pre
umývačky riadu. Nepoužívajte kuchynskú alebo priemyselnú
soľ. Dodržujte pokyny uvedené na obale.
Ak používate viacúčelový prostriedok, aj tak sa odporúča
pridať soľ, obzvlášť v prípade, keď je voda tvrdá alebo veľmi
tvrdá.
(Dodržujte pokyny uvedené na obale).
Ak nebude pridaná soľ ani leštidlo, je celkom zrejmé, že
kontrolky CHÝBAJÚCA SOĽ* a CHÝBAJÚCE LEŠTIDLO*
zostanú rozsvietené i naďalej.
Dávkovanie regeneračnej soli
Použitie soli zabráni vytvoreniu VODNÉHO KAMEŇA na riade a
na funkčných častiach umývačky.
* Je dôležité, aby nádobka na soľ nebola nikdy prázdna.
* Je dôležité nastaviť tvrdosť vody.
Nádobka na soľ sa nachádza v spodnej časti umývačky
Popis)
a je potrebné ju naplniť:
• keď na ovládacom paneli bliká kontrolka CHÝBAJÚCE
LEŠTIDLO*;
• keď zelený plavák*, ktorý je súčasťou uzáveru nádobky na soľ,
už nevidno.
• viď autonómia uvedená v tabuľke tvrdosti vody.
1. Vytiahnite dolný kôš a odskrutkujte uzáver
nádobky proti smeru hodinových ručičiek.
2. Len pri prvom použití: Naplňte nádobku
vodou až po okraj.
3. Umiestnite lievik
nádobku na soľ až po okraj (približne 1 kg);
vytečenie malého množstva vody je úplne bežným javom.
4. Odložte lievik, odstráňte zvyšky soli z hrdla; pred zaskrutkovaním
uzáveru ho opláchnite pod tečúcou vodou.
Odporúča sa vykonať tento úkon pri každom doplňovaní soli.
Dostatočne dotiahnite uzáver, aby sa do nádobky na soľ počas
umývania nedostal umývací prostriedok (mohlo by tak dôjsť
k trvalému poškodeniu dekalcikátora).
Keď je potrebné doplniť soľ, odporúča sa urobiť to pred
zahájením umývania.
(viď obrázok)
Nastavenie podľa tvrdosti vody
Na dosiahnutie dokonalej činnosti zmäkčujúceho dekalcikátora
je nevyhnutné nastaviť ho v závislosti na tvrdosti dodávanej vody.
Potrebný údaj o tvrdosti vody je možné získať od organizácie,
ktorá sa zaoberá dodávkou pitnej vody. Nastavená hodnota
odpovedá priemernej tvrdosti vody.
• Zapnite umývačku tlačidlom ZAPNUTIE/VYPNUTIE
• Vypnite ju tlačidlom ZAPNUTIE/VYPNUTIE
• Držte stlačené tlačidlo ŠTART/PAUZA 5 sekúnd, až kým
nebudete počuť pípnutie.
• Zapnite umývačku tlačidlom ZAPNUTIE/VYPNUTIE
• Na displeji sa zobrazí číslo úrovne aktuálnej voľby a kontrolka
soli.
• Stlačte tlačidlo P a zvoľte požadovanú úroveň tvrdosti
tabuľka tvrdosti).
• Vypnite ju tlačidlom ZAPNUTIE/VYPNUTIE
• Nastavenie bolo ukončené!
(viď
a naplňte
(viď
Priemerná autonómia
Tabuľka tvrdosti vody
úroveň
Od 0 ° f do 10 ° f sa odporúča nepoužívať soľ.
* Pri nastavení 5 môže dôjsť k predĺženiu doby.
(° dH = tvrdosť v nemeckých stupňoch - ° fH = tvrdosť vo
francúzskych stupňoch - mmol/l = milimol/liter)
° dH ° fH mmol/l mesiace
1 0 - 6 0 - 10 0 - 1 7 mesiacov
2 6 - 11 11 - 20 1,1 - 2 5 mesiacov
3 12 - 17 21 - 30 2,1 - 3 3 mesiacov
4 17 - 34 31 - 60 3,1 - 6 2 mesiacov
34 - 50 61 - 90 6,1 - 9 2/3 týždne
5*
nádobka na soľ pri 1
umývacom cykle denne
Dávkovanie leštidla
Leštidlo uľahčuje SUŠENIE riadu. Nádržka na leštidlo sa plní:
• keď na ovládacom paneli/displeji bliká kontrolka/symbol
CHÝBAJÚCE LEŠTIDLO*
• keď sa optický indikátor, ktorý sa nachádza na dvierkach
nádobky „E“, zmení z tmavého na priesvitný.
1. Otvorte nádržku otáčaním
uzáveru „G“ proti smeru hodinových
ručičiek.
2. Nalejte leštidlo tak, aby
nepretieklo. Ak k tomu dôjde,
očistite ho suchou handrou.
3. Zaskrutkujte naspäť uzáver.
NIKDY nelejte leštidlo priamo
dovnútra umývacieho priestoru.
Nastavenie dávky leštidla
Ak nie ste spokojní s výsledkom sušenia, je možné zmeniť
dávkovanie leštidla. Otáčajte regulátorom „F“. Je možné nastaviť
až do max. 4 základných úrovní, v závislosti na modeli umývačky.
Nastavená hodnota odpovedá priemernej úrovni.
Je možné nastaviť až do max. 4 základných úrovní, v závislosti
na modeli umývačky. Nastavená hodnota odpovedá priemernej
úrovni.
• ak je na riade modrastý povlak, nastavte nízku hodnotu (1-2)
• ak sú na riade kvapky alebo škvrny vodného kameňa, nastavte
vyššiu hodnotu (3-4).
SK
* Je súčasťou len niektorých modelov.
61
Page 62

Naplňte koše
SK
Rady
Pred plnením odstráňte z riadu zvyšky jedla a vylejte z pohárov a z
nádob tekutiny, ktoré v nich zostali. Oplachovanie pod tečúcou
vodou nie je potrebné.
Riad umiestnite tak, aby zostal bez pohybu, a aby sa neprevrátil.
Nádoby musia byť umiestnené otvorom nadol a konkávne alebo
konvexné časti musia byť umiestnené do šikmej polohy, aby sa
voda mohla dostať k všetkým povrchom a potom z nich odtiecť.
Dávajte pozor na to, aby pokrievky, rukoväte, panvice a tácne
nebránili otáčaniu ostrekovacích ramien. Malé predmety
umiestnite do košíka na príbory.
Plastový riad a panvice z nepriľnavého materiálu majú tendenciu
viac zachytávať kvapky vody a preto bude stupeň ich osušenia
nižší ako stupeň osušenia keramického alebo oceľového riadu.
Ľahké predmety (ako napríklad plastové nádoby) musia byť
podľa možností umiestnené do horného koša, a to tak, aby sa
nemohli pohybovať.
Po naplnení koša sa uistite, či sa môžu ostrekovacie ramená
voľne otáčať.
Spodný kôš
Do spodného koša je možné ukladať hrnce, pokrievky, taniere,
šalátové misy, príbory, atď. Taniere a veľké pokrievky je potrebné
umiestniť po krajoch koša.
Košík na príbory
Košík na príbory je vybavený hornými mriežkami pre lepšie
umiestnenie príborov. Musí byť umiestnený výhradne v prednej
časti spodného koša.
Horný kôš
Naložte doň chúlostivý a ľahký riad: poháre, šálky, podšálky,
tanieriky, nízke šalátové misy.
Odporúča sa umiestniť značne znečistený riad do spodného koša,
pretože v tejto časti sú prúdy vody energickejšie a umožňujú
dosiahnuť lepšie výsledky umývania.
Niektoré modely umývačiek riadu
sú vybavené sklopnými časťami*,
ktoré môžu byť použité vo zvislej
polohe na uloženie tanierov alebo
vo vodorovnej polohe (spustené)
na pohodlnejšie naloženie hrncov
a šalátových mís.
Súčasťou niektorých modelov sú
Vertical Zone, špeciálne vyberateľné
držiaky*, ktoré sú umiestnené v
zadnom priestore koša, ktoré sa
používajú na držanie panvíc alebo
plechov vo zvislejšej polohe, aby zaberali menej priestoru.
Pri ich použití je potrebné uchopiť ich za farebnú časť, potiahnuť
ju smerom nahor a otočiť ju dopredu. Tieto držiaky je možné
posúvať doprava alebo doľava, aby sa prispôsobili veľkosti riadu.
Sklopné držiaky s možnosťou zmeny polohy*
Sklopné držiaky je možné umiestniť do troch rôznych výšok kvôli
optimalizácii umiestnenia riadu v priestore koša.
Poháre na stopke je možné umiestniť
stabilne na sklopné držiaky, zasunutím
stopky pohára do príslušných
pozdĺžnych drážok.
Kvôli optimalizácii sušenia nastavte
sklopné držiaky tak, aby mali väčší
sklon. Pre zmenu sklonu nadvihnite
sklopný držiak, mierne ho posuňte a
umiestnite do požadovanej polohy.
*Súčasť len niektorých modelov s rôznym počtom a možnosťou
nastavenia polohy.
62
Page 63

Podnos*
Niektoré modely umývačiek majú posuvný podnos, ktorý je možné
použiť pre uloženie príboru alebo riadu malých rozmerov.
Kvôli dosiahnutiu čo najlepších výsledkov umývania nevkladajte
pod uvedený podnos neskladný riad. Podnos na príbory je
vyberateľný.
(viď obrázok);
Nastavenie výšky horného koša
Horný kôš je výškovo nastaviteľný: jeho horná poloha umožňuje
umiestnenie nespratného riadu do spodného koša; spodná
poloha umožňuje využiť priestor sklopných držiakov a vytvoriť
viac priestoru smerom nahor.
Je vhodné nastaviť výšku horného koša pri PRÁZDNOM
KOŠI.
NIKDY nezdvíhajte alebo nespúšťajte kôš len na jednej
strane.
SK
Ak je kôš vybavený systémom Lift-Up*
kôš tak, že ho uchopíte za boky a pohnete s ním smerom nahor.
Pre návrat do spodnej polohy stlačte páky (A) na bokoch koša a
sprevádzajte ho pri pohybe nadol.
(viď obrázok)
, zdvihnite
Nevhodný riad
• Drevený príbor a riad.
• Chúlostivé dekorované poháre, riad od umeleckých
remeselníkov a riad, ktorý je súčasťou antikvariátu. Ich
dekorácie totiž nie sú odolné.
• Časti zo syntetického materiálu, ktorý nie je teplotne odolný.
• Medený a cínový riad.
• Riad znečistený popolom, voskom, mazacím tukom alebo
atramentom.
Dekorácie na skle, kusy hliníka a striebra by mohli mať počas
umývania tendenciu zmeniť farbu a zosvetliť sa. Aj niektoré
druhy skla (napr. kryštálové predmety) by sa po opakovaných
umývaniach mohli stať matnými.
Škody na skle a riade
Príčiny:
• Druh skla a postup výroby skla.
• Chemické zloženie umývacieho prostriedku.
• Teplota vody odpovedajúca príslušnému oplachovaciemu
programu.
Rada:
• Používajte len poháre a porcelán so zárukou od výrobcu, ktorý
ich vyhlasuje za umývateľné v umývačke riadu.
• Pre uvedený druh riadu používajte jemný umývací prostriedok.
• Poháre a príbory vytiahnite z umývačky riadu bezprostredne po
skončení umývacieho programu.
* Je súčasťou len niektorých modelov.
63
Page 64
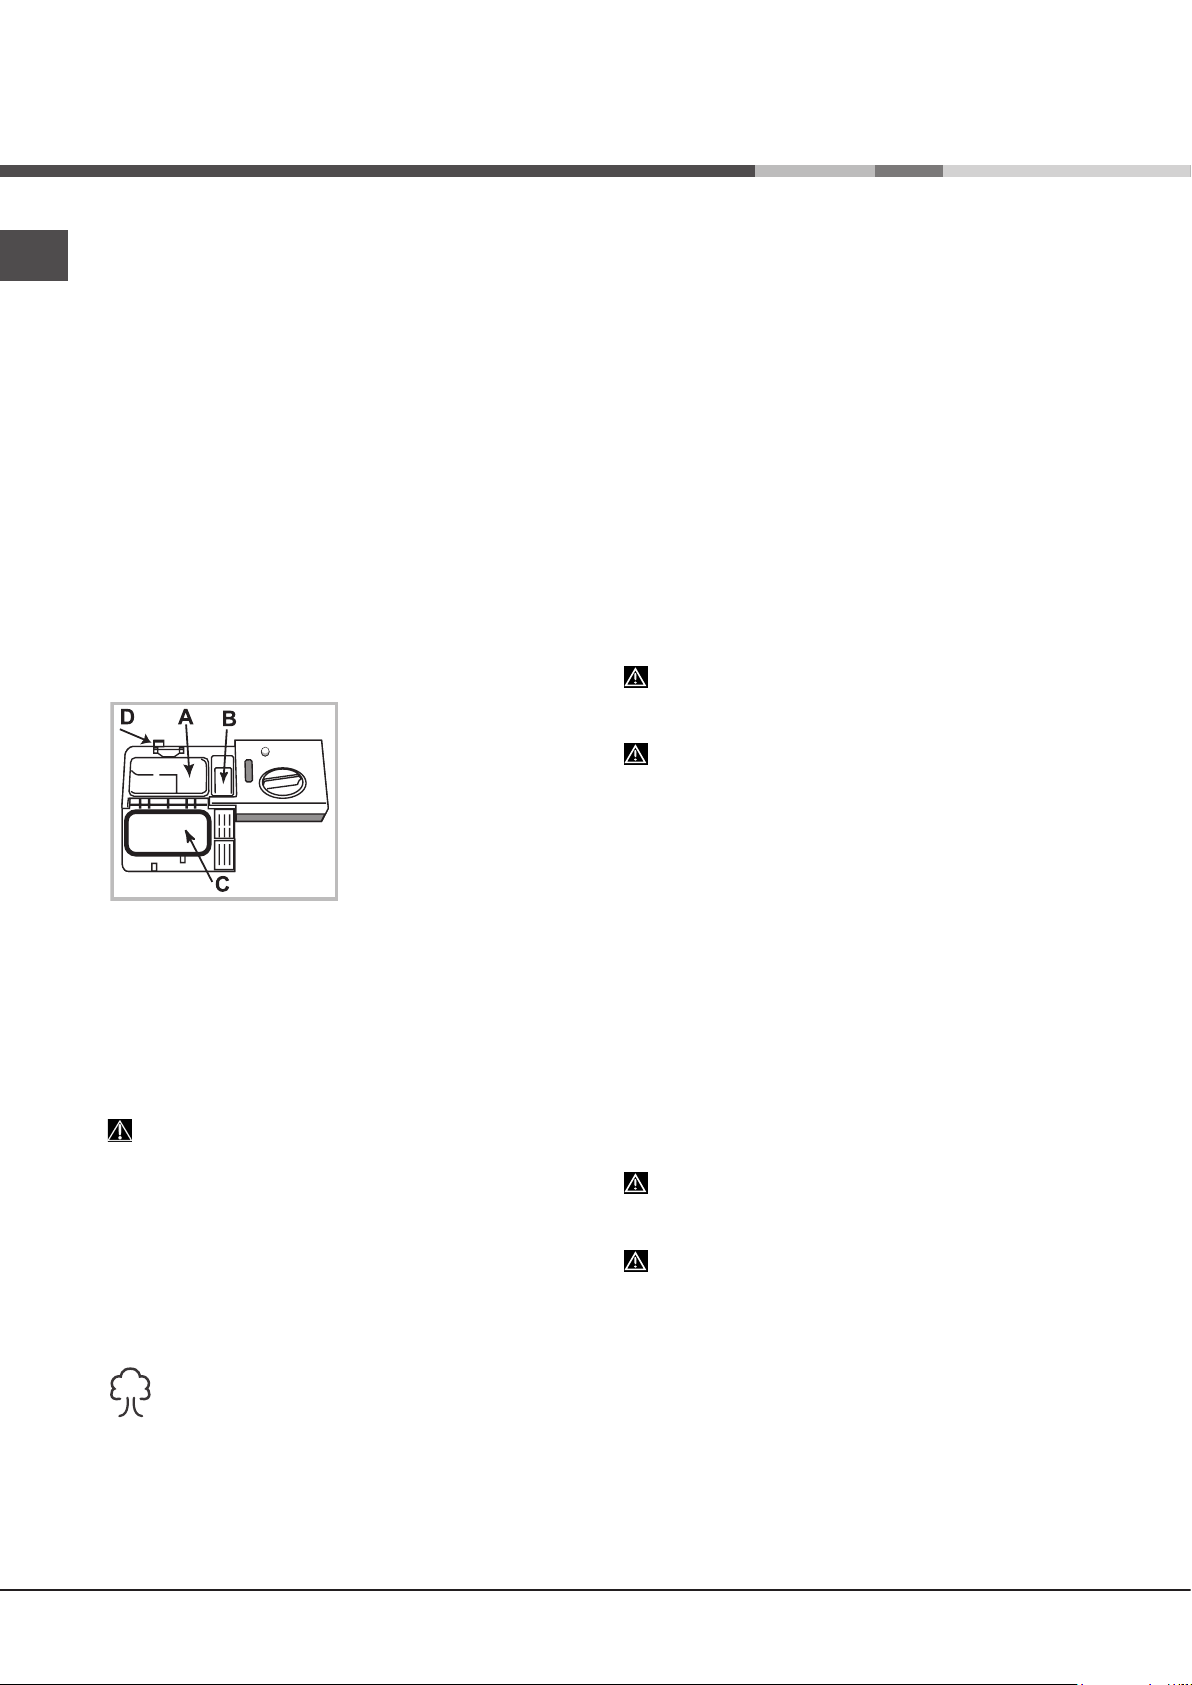
Umývací prostriedok
a použitie umývačky
SK
Dávkovanie umývacieho prostriedku
Dobrý výsledok umývania závisí aj od správneho dávkovania
umývacieho prostriedku. Pri prekročení odporúčaného
množstva sa účinnosť umývania nezvýši, ale dôjde len
k väčšiemu znečisteniu životného prostredia.
Dávkovanie môže byť prispôsobené stupňu znečistenia.
Obvykle je pri bežnom znečistení potrebné použiť približne
25 g (v prípade práškového umývacieho prostriedku), alebo
25 ml (v prípade tekutého umývacieho prostriedku). V prípade
použitia tabliet stačí jedna tableta.
Ak je riad málo znečistený, alebo ak bol predtým opláchnutý
pod vodou, výrazne znížte množstvo umývacieho prášku.
Pre dosiahnutie dobrého výsledku umývania dodržujte aj
pokyny uvedené na obale umývacieho prostriedku.
V prípade ďalších otázok vám odporúčame obrátiť sa na
výrobcov umývacích prostriedkov.
Otvorte nádobku na umývací prostriedok tlačidlom D; nadávkujte
umývací prostriedok podľa informácií uvedených v tabuľke
programov:
• práškový alebo tekutý: vaničky
A (umývací prostriedok pre
umývanie) a B (umývací
prostriedok pre predumytie)
• tablety: keď program vyžaduje
použitie 1, vložte ju do nádobky
A a zatvorte veko C; keď
vyžaduje použitie 2, položte
druhú na dno umývacieho
priestoru.
Odstráňte zvyšky umývacieho prostriedku z okrajov nádobky a
zatvorte veko C tak, aby zacvaklo.
Nádobka na umývací prostriedok sa otvorí automaticky vo
vhodnom okamžiku, v závislosti na zvolenom programe.
Pri použití kombinovaných umývacích prostriedkov sa odporúča
použiť voliteľnú funkciu TABS, ktorá prispôsobí umývací program
kvôli dosiahnutiu najlepšieho možného výsledku umývania aj
osušovania za každých podmienok.
Používajte len umývacie prostriedky vhodné pre
umývačky riadu.
NEPOUŽÍVAJTE umývacie prostriedky pre umývanie
v rukách.
Použitie nadmerného množstva umývacích prostriedkov
môže spôsobiť tvorbu peny na konci cyklu.
Účinnejšie umývanie a sušenie je možné dosiahnuť
kombinovaným použitím umývacieho prášku, tekutého
leštidla regeneračnej soli.
Odporúča sa používať umývacie prostriedky bez
fosfátov a bez chlóru, ktoré menej znečisťujú životné
prostredie.
Uvedenie umývačky do činnosti
1. Otvorte kohútik prívodu vody.
2. Stlačte tlačidlo ZAPNUTIE-VYPNUTIE.
3. Otvorte dvierka a nadávkujte umývací prostriedok
dávkovanie umývacieho prostriedku).
4. Naplňte koše
5. Zvoľte program podľa druhu riadu a stupňa jeho znečistenia
(viď tabuľka programov)
6. Zvoľte voliteľné funkcie umývania*
7. Zahájte umývanie stlačením tlačidla Štart/Pauza (stále svetlo):
Dlhé pípnutie vás upozorní na zahájenie programu, rozsvieti sa
kontrolka umývania a na displeji bude zobrazené číslo programu
a čas zostávajúci do konca cyklu.
8. Na konci vám dve krátke a jedno dlhé pípnutie oznámia
ukončenie programu, tlačidlo Štart/Pauza zhasne a na displeji
sa zobrazí slovo END. Vypnite zariadenie stlačením tlačidla
ZAPNUTIE-VYPNUTIE.
9. Pred vybratím riadu vyčkajte niekoľko minút, aby ste sa
nepopálili. Vyprázdnite koše, pričom začínajte od spodného.
Kvôli zníženiu spotreby elektrickej energie sa zariadenie
v určitých podmienkach dlhodobejšieho NEPOUŽÍVANIA
automaticky vypne.
AUT. PROGRAMY*:Niektoré modely umývačky sú vybavené
špeciálnym snímačom, ktorý dokáže posúdiť stupeň znečistenia
a nastaviť tak čo najúčinnejšie a čo najúspornejšie umývanie.
Doba trvania Aut. programov sa môže meniť v závislosti na
aktivácii snímača.
(viď Plnenie košov)
stlačením tlačidla P.
a zatvorte dvierka.
(viď Voliteľné funkcie).
Zmena prebiehajúceho programu
Ak bol zvolený nesprávny program, je možné ho bezprostredne po
štarte zmeniť: pre zmenu umývacieho cyklu po spustení umývania
je potrebné zariadenie vypnúť dlhším stlačením tlačidla ZAPNÚŤ/
VYPNÚŤ/Vynulovať, znovu ho zapnúť tým istým tlačidlom a znovu
zvoliť požadovaný program a voliteľné funkcie.
Pridanie riadu
Stlačte tlačidlo Štart/Pauza a otvorte dvierka; dávajte pritom pozor
na unikajúcu paru. Následne povkladajte riad. Stlačte tlačidlo
Štart/Pauza: Bude nasledovať dlhšie pípnutie a následne dôjde
k obnoveniu cyklu.
Ak je nastavený oneskorený štart, po skončení odpočítavania
nedôjde k zahájeniu umývacieho cyklu, ale zariadenie zostane
v stave pauzy.
Po tlačení tlačidla Štart/Pauza, kvôli uvedeniu zariadenia do
stavu pauzy, dôjde k dočasnému prerušeniu programu.
V tejto fáze nie je možné zmeniť program.
Náhodné prerušenie
Ak počas umývania dôjde k otvoreniu dvierok, alebo ak dôjde
k prerušeniu dodávky elektrickej energie, program bude
prerušený. Pri zatvorení dvierok alebo obnovení dodávky
elektrickej energie bude pokračovať z bodu, v ktorom došlo
k jeho prerušeniu.
(viď
* Je súčasťou len niektorých modelov.
64
Page 65

Programy
Parametre programov sú namerané v laboratórnych podmienkach, v súlade s európskou normou EN 50242.
V závislosti na rôznych podmienkach použitia môže dochádzať k zmenám doby trvania a parametrov programov.
Počet a druh programov a možností sa mení v závislosti od modelu umývačky.
SK
Spotreba
energie (kWh/
cyklus)
Program Sušenie Voliteľné funkcie
1. Eko
2. Auto Intenzívne
umývanie
3. Auto Bežné
umývanie
4. Chúlostivé
5. Express
6. Good Night
7. Namáčanie
8. UltraIntensive
Áno
Áno
Áno
Áno
Nie
Áno
Nie
Áno
Doba trvania
programu
Oneskorený štart -
Polovičná náplň - Tabs
Oneskorený štart -
Polovičná náplň - Tabs
Oneskorený štart -
Polovičná náplň - Tabs
Oneskorený štart -
Polovičná náplň - Tabs
Oneskorený štart - Tabs 00:25 8,0 0,45
Oneskorený štart - Tabs 03:30 13,0 0,85
Oneskorený štart -
Polovičná náplň
Oneskorený štart -
Polovičná náplň - Tabs
03:00 9,0 0,83
02:20 - 03:00 13,0 - 14,0 1,20 - 1,45
01:40 - 02:20 13,5 – 14,5 1,00 - 1,20
01:40 9,0 0,90
00:10 4,0 0,01
02:50 17,0 1,50
Spotreba vody
(l/cyklus)
Pokyny pre voľbu programov a dávkovanie umývacieho prostriedku
1. Umývací cyklus ECO je štandardný program, na ktorý sa vzťahujú údaje uvedené na energetickom štítku; tento cyklus je vhodný
pre umývanie bežne znečisteného riadu a jedná sa o najúčinnejší program z hľadiska energetickej spotreby a spotreby vody pre tento
druh riadu. 4 g/ml** + 21 g/ml – 1 tableta
2. Veľmi znečistený riad a hrnce (nevhodný pre chúlostivý riad) 25 g/ml – 1 tableta
(**Množstvo umývacieho prostriedku pre predumytie)
3. Bežne znečistený riad a hrnce 4 g/ml
4. Cyklus pre chúlostivý riad, ktorý je citlivejší na vysoké teploty 25 g/ml – 1 tableta
5. Rýchly cyklus, ktorý sa používa pre mierne znečistený riad (ideálny pre 2 súpravy) 21 g/ml – 1 tableta
6. Zaručuje vynikajúci výkon Vhodný pre použitie v noci. 25 g/ml – 1 tableta
7. Predbežné umývanie hrncov a riadu, pred následným umývaním riadu po ďalšom jedle. Bez umývacieho prostriedku
8. Cyklus pre mimoriadne znečistený riad alebo riad so zvyškami zaschnutého jedla. 4 g/ml** + 25 g/ml – 1+1 tableta
Spotreba v pohotovostnom režime: Spotreba v režime left-on: 5 W - spotreba v režime vypnutia: 0,5 W
** + 21 g/ml – 1 tableta
65
Page 66

Špeciálne programy a
Voliteľné funkcie
SK
Poznámky:
Najlepšiu účinnosť programov “ Každodenné umývanie” a
“Express” dosiahnete, ak podľa možností dodržíte množstvo
uvedených súprav.
Kvôli menšej spotrebe používajte umývačku riadu s plnou
náplňou.
Poznámka pre Skúšobné laboratóriá: O informácie
o podmienkach vykonania komparatívnej skúšky EN môžete
požiadať na adrese_
assistenza_en_lvs@indesitcompany.com
Voliteľné funkcie umývania
VOLITEĽNÉ FUNKCIE môžu byť nastavené, menené alebo
vynulované len po zvolení umývacieho programu a pred
stlačením tlačidla Štart/Pauza.
Môžu byť zvolené len voliteľné funkcie kompatibilné s druhom
zvoleného programu. Ak niektorá voliteľná funkcia nie je kompatibilná so zvoleným programom, (viď tabuľka programov) príslušná
kontrolka 3-krát zabliká.
Pri voľbe voliteľnej funkcie, ktorá nie je kompatibilná s inou,
predtým nastavenou voliteľnou funkciou alebo umývacím
programom, nekompatibilná voliteľná funkcia 3-krát zabliká
a zhasne sa, zatiaľ čo zostane zasvietená predtým zvolená
voliteľná funkcia.
Zrušenie voľby voliteľnej funkcie sa vykonáva opätovným
stlačením príslušného tlačidla.
Polovičná náplň v hornom alebo spodnom
koši
Pri umývaní malého množstva riadu je možné zvoliť umývanie
polovičnej náplne a ušetriť tak vodu, energiu a umývací prostriedok.
Zvoľte program a postupne stláčajte tlačidlo POLOVIČNÁ NÁPLŇ:
rozsvieti sa kontrolka týkajúca sa zvoleného koša a aktivuje sa
umývanie len v hornom alebo spodnom koši.
Pamätajte na to, že riad je potrebné uložiť len do horného
alebo spodného koša a že stačí použiť znížené množstvo
umývacieho prostriedku.
Multifunkčné tablety (tabs)
Po zvolení tejto funkcie bude optimalizovaný výsledok
umývania a osušovania.
Pri použití multifunkčných tabliet stlačte tlačidlo MULTIFUNKČNÉ
TABLETY; po jeho stlačení sa rozsvieti príslušná kontrolka.
Voliteľná funkcia “Multifunkčné tablety” má za následok
predĺženie programu.
Funkcia MULTIFUNKČNÉ TABLETY zostane zvolená aj
po následnom zapnutí zariadenia, až kým ju nevypnete.
Oneskorený štart
Zahájenie programu môže byť odložené o 1 až 24 hodín:
1. Zvoľte požadovaný umývací program a prípadné ďalšie
voliteľné funkcie. Potom stlačte tlačidlo ONESKORENÝ ŠTART;
rozsvieti sa príslušná kontrolka. Tým istým tlačidlom zvoľte, kedy
má byť zahájený umývací cyklus. (h01, h02, atď.)
2. Potvrďte voľbu tlačidlom ŠTART/PAUZA; bude zahájené
odpočítavanie doby zostávajúcej do zahájenia zvoleného
programu.
3. Po uplynutí zvolenej doby kontrolka ONESKORENÝ ŠTART
zhasne a bude zahájený program.
Pre zrušenie voľby ONESKORENÉHO ŠTARTU stláčajte tlačidlo
ONESKORENÝ ŠTART, až kým sa nezobrazí OFF.
Po zahájení cyklu už nastavenie ONESKORENÉHO
ŠTARTU nie je možné.
66
* Je súčasťou len niektorých modelov.
Page 67

Údržba a starostlivosť
Uzatvorenie prívodu vody a vypnutie
elektrického napájania
• Po každom umytí uzatvorte kohútik prívodu vody, aby ste
zabránili jej úniku.
• Pri čistení zariadenia a počas údržby odpojte zástrčku
napájacieho kábla zo zásuvky elektrického rozvodu.
Čistenie umývačky
• Vonkajší povrch a ovládací panel môžu byť čistené
neabrazívnou utierkou navlhčenou vo vode. Nepoužívajte
rozpúšťadlá ani abrazívne prostriedky.
• Stany vnútorného umývacieho priestoru môžu byť vyčistené
od prípadných škvŕn utierkou navlhčenou vo vode s malým
množstvom octu.
Zabránenie vzniku nepríjemných zápachov
• Dvierka ponechajte zakaždým pootvorené, aby sa zabránilo
hromadeniu vlhkosti.
• Pravidelne čistite obvodové tesnenia dvierok a nádobiek na
umývací prostriedok s použitím mokrej špongie. Zabráni
sa tak hromadeniu zvyškov jedla, ktoré sú hlavnou príčinou
nepríjemných zápachov.
Čistenie ostrekovacích ramien
Môže sa stať, že na ostrekovacích ramenách sa zachytia zvyšky
jedla a upchajú otvory, z ktorých vyteká voda: z času na čas je
potrebné ich skontrolovať a vyčistiť nekovovou kefkou.
Obidve ostrekovacie ramená je možné odmontovať.
Demontáž horného ostrekovacieho
ramena vyžaduje odskrutkovanie
plastovej kruhovej matice proti
smeru hodinových ručičiek. Horné
ostrekovanie rameno je potrebné
namontovať späť tak, aby bolo
obrátené väčším počtom otvorov
smerom nahor.
Pravidelne čistite vstupný lter rozvodu vody, umiestnený na
výstupe z vodovodného kohúta.
- Zatvorte kohút prívodu vody.
- Odskrutkujte koncovú časť prívodnej hadice vody, odložte lter
a opatrne ho vyčistite pod prúdom tečúcej vody.
- Vložte lter späť na pôvodné miesto a zaskrutkujte hadicu.
Čistenie ltrov
Filtračná jednotka je tvorená dvoma ltrami, ktorí čistia vodu
z umývania od zvyškov jedla a vracajú ju naspäť do obehu:
K zabezpečeniu trvale dobrej funkčnosti je potrebné pravidelne
ich čistiť.
Pravidelne čistite ltre.
Umývačka nesmie byť používaná bez filtrov alebo
s odpojeným ltrom.
Po niekoľkých umývaniach skontrolujte ltračnú jednotku a podľa
potreby ju vyčistite pod tečúcou vodou. Pomôžte si pritom
nekovovou kefkou a postupujte pritom nasledovne:
1. Pootočte valcový lter C proti smeru hodinových ručičiek
a vytiahnite ho (obr. 1).
2. Vytiahnite nádobku ltra B ľahkým zatlačením bočných jazýčkov
(obr. 2);
3. Vyvlečte ltračný tanier z nehrdzavejúcej ocele A. (obr. 3).
4. Skontrolujte jamku uloženia a vyprázdnite ju od prípadných
zvyškov jedla. NIKDY NEODSTRAŇUJTE ochranný kryt umývacieho čerpadla (súčiastka čiernej farby) (obr.4).
C
1
SK
Demontáž spodného ostrekova
cieho ramena sa vykonáva jed
noduchým zatlačením jazýčkov,
nachádzajúcich sa po bokoch a jeho
potiahnutím smerom nahor.
Čistenie ltra prívodu vody*
Keď sú hadice prívodu vody nové, alebo keď neboli dlhšiu dobu
používané, pred pripojením je potrebné nechať odtiecť vodu,
až kým nebude priezračná a zbavená nečistôt. Bez uvedeného
opatrenia môže dôjsť k upchatiu prívodu vody a poškodeniu
umývačky.
-
-
A
3
Po vyčistení filtrov namontujte filtračnú jednotku naspäť a
umiestnite ju správne do jej uloženia; je to nevyhnutné pre správnu
činnosť umývačky.
Opatrenia v prípade dlhodobej nečinnosti
• Odpojte napájací kábel zariadenia zo zásuvky elektrického
rozvodu a zatvorte kohútik prívodu vody.
• Nechajte pootvorené dvierka.
• Po opätovnom spustení vykonajte jeden umývací cyklus
naprázdno.
* Je súčasťou len niektorých modelov.
67
Page 68

Poruchy a spôsob
ich odstránenia
SK
Keď sa na zariadení vyskytnú poruchy v činnosti, skôr, ako sa obrátite na Servisnú službu, skontrolujte nasledujúce body.
Poruchy: Možné príčiny / Riešenia:
Nedochádza k uvedeniu
umývačky do činnosti alebo
umývačka nereaguje na
ovládacie povely
Nie je možné zatvoriť dvierka
Umývačka nevypúšťa vodu. • Umývací program ešte nebol ukončený.
Umývačka riadu je hlučná. • Riad naráža vzájomne do seba alebo do ostrekovacích ramien. Umiestnite riad správne a
Na riade a pohároch sa ukladá
vodný kameň alebo biely
nános.
Na riade a na pohároch sú
biele zvyšky alebo modrý
povlak.
Riad nie je dostatočne suchý. • Bol zvolený program bez sušenia.
Riad nie je dostatočne čistý. • Riad nie je rozmiestnený správne.
Umývačka nenapúšťa vodu
je zablokovaná s rozsvietenými
kontrolkami
• Je zatvorený kohútik s vodou.
• Vypnite zariadenie tlačidlom ZAPNUTIE/VYPNUTIE, zapnite ho znovu po uplynutí približne
jednej minúty a znovu nastavte požadovaný program.
• Zástrčka nie je dostatočne zastrčená v zásuvke elektrickej siete alebo je potrebné použiť inú
zásuvku.
• Dvierka umývačky nie sú dostatočne zatvorené.
• Skontrolujte, či sú koše zasunuté až na doraz.
• Došlo k zamknutiu zámku; ráznejšie zatvorte dvierka, až kým nebudete počuť cvaknutie.
• Vypúšťacia hadica je ohnutá
• Odtokové potrubie umývadla je upchaté.
• Filter je upchatý zvyškami jedla.
• Skontrolujte výšku vypúšťacej hadice.
skontrolujte, či sa ostrekovacie ramená otáčajú voľne.
• Nadmerné tvorenie peny: Umývací prostriedok nie je vhodne dávkovaný, alebo nie je
vhodný pre umývanie v umývačke riadu.
Nepredumývajte riad ručne.
• Chýba regeneračná soľ.
• Nastavená tvrdosť vody nie je vyhovujúca; zvýšte hodnoty.
• Uzáver nádobky na soľ nie je dobre uzatvorený.
• Leštidlo sa minulo, alebo jeho dávkovanie nie je dostatočné.
• Dávkovanie leštidla je prebytočné.
• Leštidlo bolo spotrebované.
• Leštidlo nie je dávkované podľa potreby.
• Riad je z protipriľnavého materiálu alebo z plastu; výskyt kvapiek vody je úplne bežným
javom.
• Ostrekovacie ramená sa nemôžu voľne otáčať, pretože sú zablokované riadom.
• Umývací program je príliš mierny
• Nadmerné tvorenie peny: Umývací prostriedok nie je vhodne dávkovaný, alebo nie je vhodný
pre umývanie v umývačke riadu.
• Uzáver leštidla nebol správne uzatvorený.
• Filter je znečistený alebo upchatý
• Chýba regeneračná soľ
• Uistite sa, že výška tanierov je kompatibilná s nastavením koša.
• Otvory ostrekovacích ramien sú upchaté.
• V rozvode vody nie je voda alebo je zatvorený ventil.
• Napúšťacia hadica je príliš ohnutá
• Sú upchaté ltre; je potrebné ich očistiť.
• Je upchaté vypúšťacie potrubie; je potrebné ho vyčistiť.
• Po skontrolovaní a vyčistení vypnite a znovu zapnite umývačku a spustite nový umývací
cyklus.
• Ak problém pretrváva, zatvorte prívod vody, odpojte zástrčku a obráťte sa na servisné
stredisko.
(viď Inštalácia).
(viď Umývací prostriedok a Použitie umývačky).
(viď Regeneračná soľ a Leštidlo).
(viď Programy).
(viď Umývací prostriedok a Použitie umývačky).
(viď Údržba a starostlivosť).
(viď Regeneračná soľ a Leštidlo).
(viď Údržba a starostlivosť).
(viď Inštalácia).
(viď Údržba a starostlivosť).
(viď Regeneračná soľ a Leštidlo).
* Je súčasťou len niektorých modelov.
68
Page 69

Инсталиране
В случай че се премествате, постарайте се да държите
машината във вертикално положение; ако все пак се
налага, можете да я наклоните на задната страна.
Свързване към водопроводната мрежа
Адаптирането на електрическите и ВиК връзки за
инсталиране на машината трябва да се извършва само
от правоспособен техник.
Маркучите за подаване и оттичане на водата могат да
бъдат ориентирани надясно или наляво за по-добро
инсталиране.
Маркучите не бива да се прегъват или притискат от миялната машина.
Свързване на маркуча за подаване на
вода
• Към кран с размер 3/4” за студена или топла вода (макс.
60°C).
• Пуснете водата да се изтече, докато се избистри.
• Завинтете добре маркуча за подаване на водата и
отворете кранчето.
Ако дължината на маркуча за подаване на водата е
недостатъчна, обърнете се към специализиран магазин
или правоспособен техник
Налягането на водата трябва да е в границите на
стойностите, указани в таблица Технически данни, в
противен случай миялната машина може да не работи
правилно.
Внимавайте маркучът да не се прегъва и притиска.
(вж. Сервизно обслужване)
.
Свързване на маркуча за оттичане
Свържете маркуча за оттичане към отходна тръба с
минимален диаметър 2 см. (A)
Маркучът за оттичане трябва да се намира на височина
между 40 и 80 см от пода или от опората, върху която е
поставена миялната машина.
MAX 80 cm
MIN 40 cm
Преди да свържете маркуча за оттичане към сифона на
мивката, отстранете пластмасовата капачка (В).
* Само за определени модели.
Мерки за защита от наводнение
За да се гарантира, че няма да причини наводнения,
миялната машина е:
- снабдена със система, която прекъсва постъпването
на водата в случай на повреда или изтичане във
вътрешността на машината.
Някои модели са снабдени и с допълнително
обезопасяващо устройство New Acqua Stop*, което
обезопасява машината от наводняване дори и при
счупване на захранващата тръба.
ВНИМАНИЕ: ВИСОКО НАПРЕЖЕНИЕ!
Тръбата за захранване с вода в никакъв случай не трябва
да се срязва, тъй като има участъци под напрежение.
Свързване към електрическата мрежа
Преди да поставите щепсела в контакта за електрически
ток, се уверете, че:
• контактът е заземен и съответства на законовите
изисквания;
• контактът може да понесе максималния товар на
мощност на машината, означен на таблицата с
характеристиките на обратната страна на вратата
(вж. Описание на миялната машина);
• стойностите на захранващото напрежение са в
границите, означени на таблицата с характеристиките
на обратната страна на вратата;
• контактът е съвместим с щепсела на уреда. В
противен случай поискайте подмяна на щепсела от
правоспособен техник
не се използват удължители или разклонители.
След като машината е инсталирана, захранващият
електрически кабел и контактът трябва да са лесно
достъпни.
Кабелът не трябва да се прегъва и притиска.
Ако захранващият кабел е повреден, той трябва да се
замени от производителя или в одобрен от него Център
за сервизно обслужване, за да се предотвратят всякакви
рискове.
отговорност при неспазване на тези изисквания.
(вж. Сервизно обслужване)
Предприятието производител не носи никаква
(вж. Сервизно обслужване)
; да
Позициониране и нивелиране
1. Поставете миялната машина на равен и твърд
под. Компенсирайте неравностите чрез развиване и
завиване на предните крачета, докато уредът не заеме
хоризонтално положение. Точното нивелиране създава
стабилност и се избягват вибрации и шум.
2. Преди да вградите миялната машина, залепете
самозалепващата се прозрачна лента* под дървената
конзола,за да я предпазите от евентуален конденз.
3. Поставете машината така, че да се допира странично
или откъм гърба до съседните мебели или стени. Уредът
BG
69
Page 70

BG
може да бъде вграден под цялостен работен плот*
листа с указания за монтаж)
.
(вж.
4*. За регулиране на височината на задното краче
трябва да се завърти шестоъгълният отвор с червен
цвят, разположен челно в центъра на предната част на
миялната машина, с шестограм 8 мм, като височината се
увеличава при въртене в посока на часовниковата стрелка
и намалява при завъртане в противоположна посока.
(вж.
листа с инструкциите, приложен към документацията)
Технически данни
широчина 45 см
Размери
Капацитет 10 стандартни места за съдове
Налягане на
подаваната вода
височина 85 см
дълбочина 60 см
0,05 ÷ 1MPa (0.5 ÷ 10 бара)
7,25 – 145 psi
Съвети при първото миене
След инсталирането отстранете поставените на кошниците
уплътнения и закрепящите ластици от горната кошница
(където са налични).
Настройка на уреда за омекотяване на вода
Преди да започне първото миене, задайте степента
на твърдост на водата от водопроводната мрежа.
(вж.
раздел Гланц и регенерираща сол)
Първото зареждане на резервоара на уреда за омекотяване трябва да е с вода, след което да се сипе около 1 кг
сол; нормално е водата да прелее.
Активирайте цикъл на миене веднага след това.
Използвайте само сол, предназначена за миялни машини.
След зареждане със сол светлинният индикатор (ЛИПСА
НА СОЛ)* изгасва.
Ако контейнерът не се напълни със сол, може да се
повреди омекотителят на водата и нагревателят.
Напрежение на
електрозахранването
Обща абсорбирана
мощност
Прекъсвач Виж табелката с данни на уреда
Виж табелката с данни на уреда
Виж табелката с данни на уреда
Съдомиялната машина
съответства на следните
директиви на Европейската
общност:
-2006/95/ЕО (Ниско напрежение)
-2004/108/ЕО (Електромагнитна
съвместимост)
-2009/125/ЕО (Регламент
на Общността 1016/2010)
(Екологосъобразно
проектиране)
-97/17/ЕО (Обозначение)
-2012/19/ЕО Отпадъци от
електрическо и електронно
оборудване (ОЕЕО)
Машината издава звукови сигнали/тонове
модела машина
включване, край на цикъла и т.н.
Наличните на управляващия панел или на дисплея
символи/бутони/светлинни индикатори могат да са в
различни цветове, да мигат или да светят продължително.
(според модела миялна машина)
На дисплея се изписва полезна информация за вида зададен
цикъл, за фазата на измиване/подсушаване, за оставащото
време, за температурата и т.н.
), които съобщават за съответната операция:
.
(според
70
* Само за определени модели.
Page 71

Описание на уреда
Общ преглед
Управляващ панел
Бутон „Избор на програма“
Бутон „Вкл.-Изкл./Нулиране“
1. Горна кошница
2. Горен струйник
3. Обръщащи се рафтчета
4. Устройство за регулиране височината на
кошницата
5.
Долна кошница
6. Долен струйник
7. Кошница за прибори
8. Филтър за миене
9. Резервоар за сол
10. Ванички за миещ препарат и резервоар за
гланц
11.
Табелка с характеристики
12. Управляващ панел***
Дисплей
Бутон и индикатор
„Старт/Пауза“
BG
Дисплей
Индикатор за миене
Индикатор за сол
Номер на
програмата
Индикатор за гланц
Индикатор „Половин зареждане“
Бутон „Половин зареждане“
Индикатор за сушене
Индикатор за оставащо време
Индикатор Отложен старт
Индикатор Многофункционални
таблетки - (Tabs)
Бутон Отложен старт
Бутон Многофункционални
таблетки - (Tabs)
***Само в напълно вградените модели. * Само за определени модели.
Броят и типът на циклите на измиване може да варират в зависимост от модела на съдомиялната машина.
71
Page 72

РЕГЕНЕРИРАЩА
СОЛ и ГЛАНЦ
BG
Използвайте само препарати, предназначени
специално за миялни машини. Не използвайте сол за
хранителни и промишлени цели.
Следвайте указанията, посочени на опаковката.
Ако се използва многофункционален препарат, се
препоръчва НЕЗАВИСИМО ОТ ТОВА добавяне на сол,
особено при твърда или много твърда вода.
указанията, посочени на опаковката).
Ако не се добавят нито сол, нито гланц, е нормално
индикаторите ЛИПСА НА СОЛ* и ЛИПСА НА ГЛАНЦ* да
продължат да светят.
(Следвайте
Поставяне на регенерираща сол
Използването на сол предотвратява образуването на КОТЛЕН
КАМЪК върху съдовете и върху функционалните компоненти
на миялната машина.
Важно е резервоарът за сол да не остава никога празен.
Важно е да зададете настройката за твърдост на водата.
Резервоарът за сол е разположен в долната част на миялната
машина
• когато върху панела светне индикаторът (ЛИПСА НА СОЛ)*;
• когато зеленият поплавък* на капачката за солта престане
• вж. автономност на таблицата за твърдост на водата.
(около 1 кг); нормално е при това положение да се препълни
малко с вода.
4. Извадете фунията, отстранете останалата по отвора сол,
изплакнете капачката на течаща вода, преди да я завинтите.
Препоръчително е тази операция да се извършва при всяко
зареждане със сол.
Затворете капачката добре, за да не влиза миещ препарат
в резервоара по време на миене (би могло да доведе до
неотстранимо повреждане на отделението за омекотителя).
това да се направи преди началото на измиването.
Задаване на твърдост на водата
За да постигнете оптимално действие на омекотителя за вода,
е нужно да извършите регулиране в зависимост от твърдостта
на водата в апартамента. Данните могат да се вземат от
дружеството, което осигурява питейна вода. Зададената
стойност съответства на средна степен на твърдост.
• Включете съдомиялната машина с бутон ON/OFF (ВКЛ./
ИЗКЛ)
• Изключете с бутон ON/OFF (ВКЛ./ИЗКЛ)
• Задръжте натиснат бутон Старт/Пауза за 5 секунди,
докато не чуете звуков сигнал.
• Включете с бутон ON/OFF (ВКЛ./ИЗКЛ)
(вж. Описание)
да се вижда.
Когато е необходимо зареждане със сол, се препоръчва
и трябва да се пълни:
1. Извадете долната кошница и
отвийте капачката на резервоара в
посока, обратна на часовниковата
стрелка.
2. Само когато се използва за първи
път: напълнете резервоара с вода
до горе.
3. Поставете фунията
напълнете резервоара със сол до горе
(вж. фигура)
и
• Мига числото на текущо зададената степен и светлинният
индикатор на солта (само мигащ индикатор).
• Натиснете бутон P, за да изберете желаната степен на
твърдост
• Изключете с бутон ON/OFF (ВКЛ./ИЗКЛ)
• Настройването завърши успешно!
Таблица за твърдостта на
водата
степен
От 0°f до 10°f не се препоръчва използването на сол.
* При степен 5 продължителността на цикъла може да се удължи.
(°dH = твърдост в немски градуси – °fH = твърдост във
френски градуси – mmol/l = милимол/литър)
(виж таблица Твърдост на водата).
Средна автономност
контейнер за сол при
°dH °fH mmol/l месеци
1 0 - 6 0 - 10 0 - 1 7 месеца
2 6 - 11 11 - 20 1,1 - 2 5 месеца
3 12 - 17 21 - 30 2,1 - 3 3 месеца
4 17 - 34 31 - 60 3,1 - 6 2 месеца
34 - 50 61 - 90 6,1 - 9 2/3 седмици
5*
1 измиване на ден
Поставяне на гланц
Гланцът улеснява ИЗСУШАВАНЕТО на съдовете. Резервоарът
за гланц трябва да бъде напълнен:
• когато върху панела/дисплея светне индикаторът (ЛИПСА
НА ГЛАНЦ)*
• когато оптичният индикатор на прозорчето на контейнера
„Е“ от тъмен стане прозрачен.
1. Отворете резервоара чрез
завъртане на капачката (G) в
посока, обратна на часовниковата
стрелка.
2. Сипете гланц, като внимавате
да не прелее. Ако това се случи,
почистете веднага със суха кърпа.
3. Завийте отново капачката.
НИКОГА не сипвайте гланца директно във вътрешността
на ваната.
Регулирайте дозата гланц
Ако не сте удовлетворени от резултата след сушенето, можете
да регулирате дозата гланц. Завъртете регулатора (F). Може
да се зададат настройки за максимум 4 степени в зависимост
от модела миялна машина. Зададената стойност съответства
на средна степен.
• ако по съдовете има синкави ивици, задайте на регулатора
по-ниски стойности (1-2).
• ако по съдовете има капки вода или петна от варовик,
задайте по-високи стойности (3-4).
* Само за определени модели.
72
Page 73

Зареждане на кошниците
Съвети
Преди да заредите кошниците, отстранете всички остатъци
от храна от съдовете и излейте течностите от чашите и
контейнерите. Не е необходимо превантивно изплакване
под течаща вода. Подредете съдовете така, че да стоят
стабилно на мястото си и да не се преобърнат; и подредете
контейнерите с отвора надолу и вдлъбнатата/изпъкналата
части под наклон, като по този начин позволявате на водата
да достигне до всяка повърхност и да се отече свободно.
Уверете се, че няма капаци, дръжки, подноси или тигани,
които да пречат на разпръскващите рамена да се въртят.
Поставете малките предмети в кошницата за прибори.
Тъй като пластмасовите чинии и тиганите с незалепващо
покритие задържат повече водни капки, тяхното сушене
няма да е толкова добро, колкото на керамичните съдове
и съдовете от неръждаема стомана. Твърде леки предмети
като пластмасови контейнери трябва да се поставят в горната
кошница и да се подреждат така, че да не се движат.
След като заредите уреда, се уверете, че разпръскващите
рамена могат свободно да се въртят.
Долна кошница
В долната кошница може да се поставят тигани, капаци,
чинии, купи за салата, прибори и т.н. Големите плата и капаци
обикновено се поставят от двете страни.
Силно замърсени чинии и тигани трябва да се поставят в
долната кошница, тъй като в този сектор водните струи са
по-силни и позволяват по-висока ефективност на измиването.
Кошница за прибори
Модулната кошница е оборудвана с горни решетки за по-добро подреждане на приборите. Кошницата за прибори трябва
да се поставя само в предната част на долната кошница.
Горна кошница
Заредете тази кошница с деликатни и леки съдове като
стъклени чаши, чашки за кафе, чинийки и леки купи за салата.
BG
Няколко модела съдомиялни
машини са оборудвани със
странични сектори*.
Те могат да се използват
във вертикална позиция при
нареждане на чинии или в
хоризонтална позиция (пониско) за лесно зареждане на
тигани и купи за салата.
Някои модели разполагат с
Vertical Zone, специални
изтеглящи се опори,*поставени
в задната част на коша, които
дават възможност тиганите или тавите да застават в поизправено положение за да заемат по-малко място.
За да ги използвате, достатъчно е да хванете червената
ръкохватка, да я избутате нагоре и да я завъртите напред.
Тези опори могат да се плъзгат надясно или наляво, за да
паснат на големината на съдовете.
* Само за определени модели.
73
Page 74
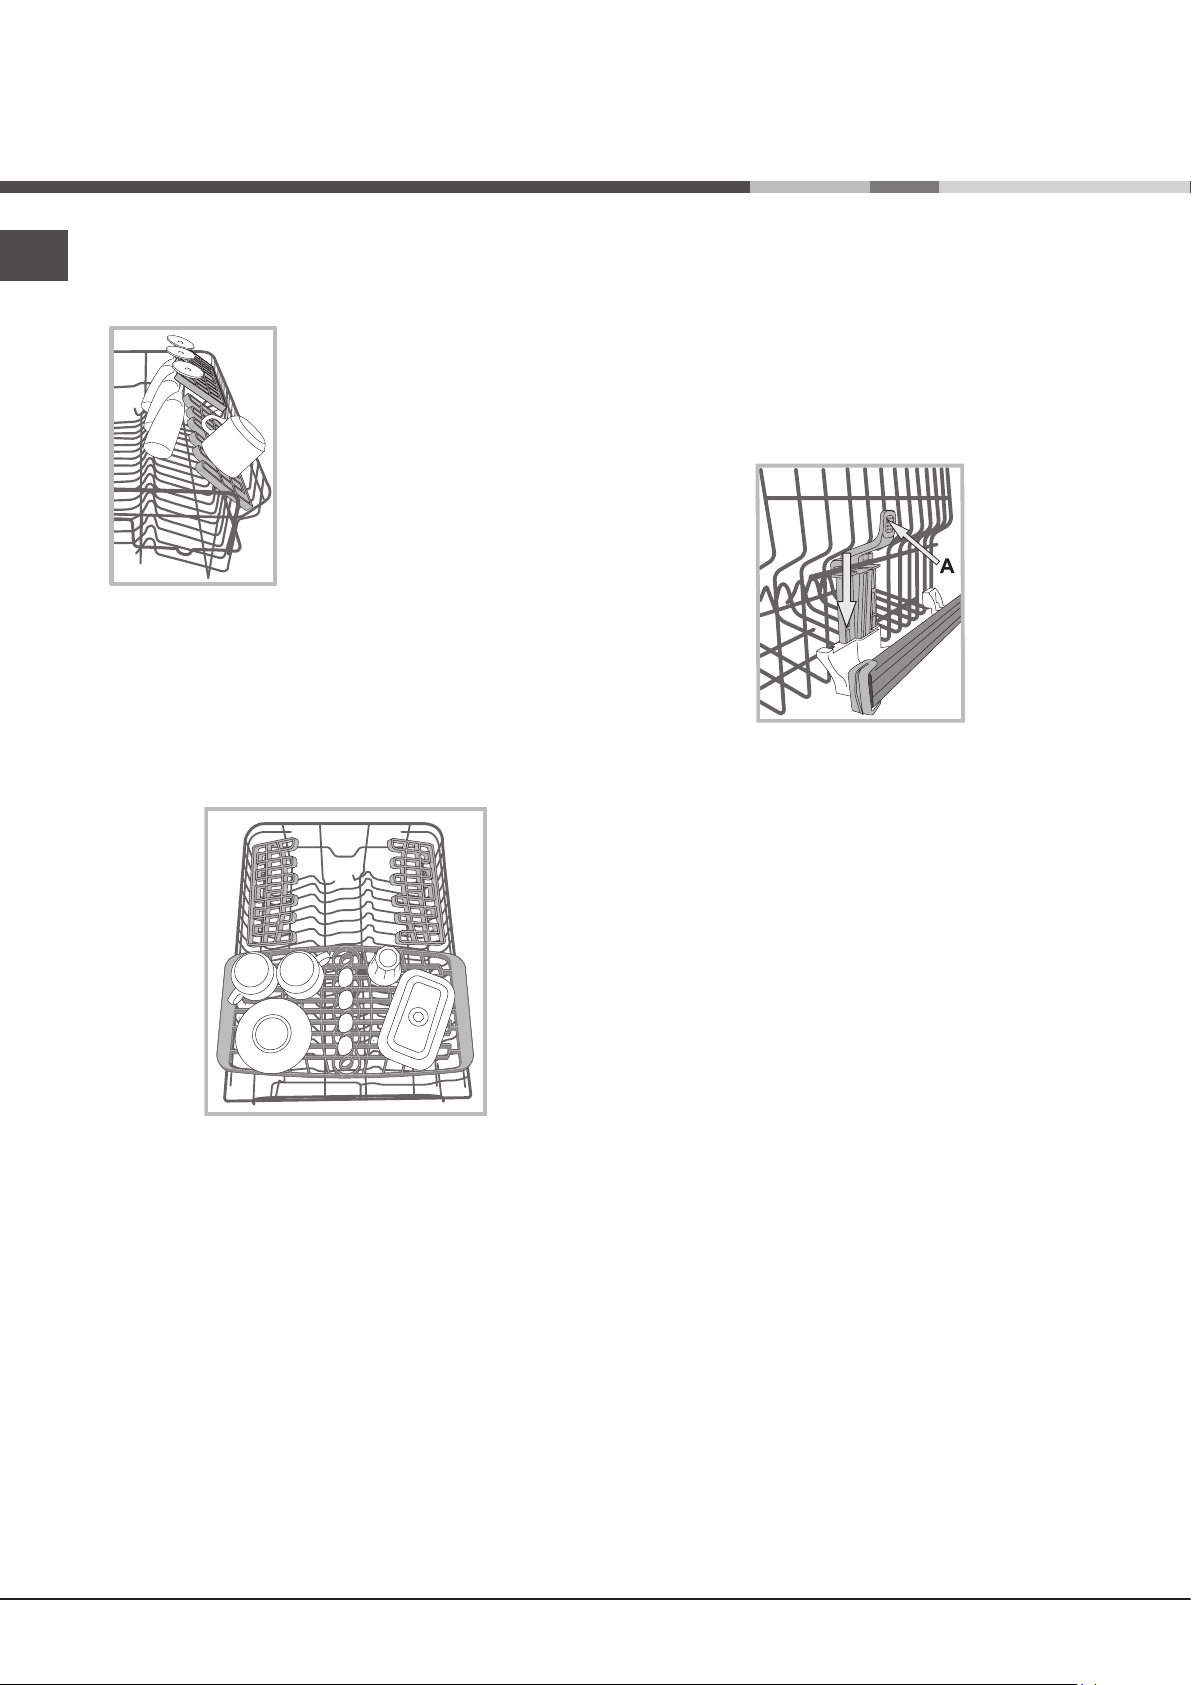
BG
Подвижни рампи*
Страничните рампи могат да бъдат поставяни на три различни
височини, за да се оптимизира разполагането на съдовете
в кошницата.
Високите чаши могат да бъдат
поставени стабилно на рампите,
като дръжките им се вкарат в
специалните слотове.
За оптимизиране на изсушаването
поставете рампите под по-голям
наклон. За да промените наклона,
повдигнете рампата, леко я плъзнете
и я позиционирайте в желаното
положение.
Табла*
Някои модели съдомиялни машини са снабдени с подвижна
табла, която може да бъде използвана като контейнер за
кухненски прибори или съдове с малки размери.
За постигане на по-добро измиване избягвайте да поставяте в
подноса обемисти съдове. Таблата за прибори може да бъде
отстранена.
(виж фигурата)
Регулиране височината на горната кошница
Горната кошница се регулира на височина: във висока
позиция, когато в долната кошница искате да разположите
обемисти съдове; в ниска позиция, за да използвате мястото
на рафтовете или спускащите се части, като освободите
повече пространство горе.
Височината на горната кошница трябва да се регулира,
КОГАТО КОШНИЦАТА Е ПРАЗНА.
НИКОГА не местете кошницата на по-горна или по-долна
позиция само от едната страна.
Ако кошницата е оборудвана с Повдигащо устройство*
фигурата)
За да я върнете в долна позиция, натиснете лостовете (A)
от двете страни на кошницата и свалете кошницата надолу.
, повдигнете я, като я държите от двете страни.
(виж
Неподходящи съдове
• Дървени съдове и прибори.
• Деликатни декорирани чаши, ръчно изработени съдове и
старинни съдове. Декорацията им е неустойчива.
• Части от синтетичен материал, които не са устойчиви на
високи температури.
• Медни и калаени съдове.
• Съдове, които са силно замърсени с пепел, восък,
смазочно масло или мастило.
Цветовете на декорации на стъкло и алуминиеви/сребърни
части може да се променят и избледнеят по време на процеса
на измиване. Също така някои видове стъклени съдове (напр.
кристални) могат да изгубят своята прозрачност след няколко
цикъла на измиване.
Повреди по стъкло и съдове
Причинени от:
• вида на стъклото и процеса на производство на стъклото.
• химическия състав на препарата за измиване.
• температурата на водата в цикъла за изплакване.
Съвети:
• Използвайте само стъкло и порцелан, за които
производителят гарантира, че е безопасно да се почистват
в съдомиялна машина.
• Използвайте деликатен препарат за измиване, подходящ
за съдове.
• Изваждайте стъклените съдове и приборите от
съдомиялната машина веднага щом свърши цикълът на
измиване.
*Предлагат се само в избрани модели с различен брой и
позиция.
74
Page 75

Миещ препарат и експлоатация
на съдомиялната машина
Измерване на препарата за измиване
Добрият резултат от измиването зависи още от правилното
количество използван препарат. Надвишаването на
посоченото количество не води до по-ефикасно измиване
и увеличава замърсяването на околната среда.
Количеството може да се регулира за отделните случаи въз
основа на степента на замърсяване на съдовете, когато се
използва прахообразен или течен препарат. В случай на
нормална замърсеност на съдовете използвайте около 25
г (прахообразен препарат) или 25 мл. (течен препарат). Ако
използвате таблетки, една таблетка е достатъчна.
Ако съдовете са само леко замърсени или са изплакнати с
вода преди да бъдат поставени в съдомиялната машина,
съответно намалете количеството използван препарат.
За добри резултати от измиването следвайте
инструкциите, показани на кутията на препарата.
За допълнителни въпроси се обърнете към отдела за
съвети на съответния производител на препарата.
Отворете резервоара за миещия препарат чрез натискане
на бутон D ; дозирайте
препарата, като направите
справка с Таблицата на
програмите:
• прахообразен или течен:
ванички A (препарат за
миене) и B (препарат за
предварително измиване)
• когато програмата изисква
1 таблетка, тя се поставя
във ваничка А и се затваря
капакът С; когато изисква 2 – втората се поставя върху дъното
на ваната.
Отстранете остатъците от препарат от ръбовете на ваничката
и затворете капака С до щракване.
Резервоарът за миещ препарат се отваря автоматично в
нужния момент в зависимост от програмата.
Ако използвате многофункционален препарат, препоръчваме ви
опцията TABS (таблетки), тъй като тя регулира цикъла така, че
да се постигнат най-добри резултати от измиването и сушенето.
Използвайте само препарат за миялна машина.
НЕ УПОТРЕБЯВАЙТЕ препарати за миене на ръка.
При прекалено голямо количество миещ препарат може
да има остатъци от пяна, когато цикълът приключи.
Най-добри резултати от миенето и сушенето ще получите
само с комбинирано използване на миещ препарат, течен
гланц и регенерираща сол.
Горещо ви препоръчваме да използвате миещи
препарати без фосфати и без хлор, като найподходящи за опазване на околната среда.
Включване на миялната машина
1. Отворете крана на водата.
2. Натиснете бутон ON-OFF (ВКЛ.-ИЗКЛ.).
3. Отворете вратата и сипете необходимата доза препарат
(виж „Зареждане с препарат“).
4. Заредете кошниците (виж „Зареждане на кошниците“) и
затворете вратата.
5. Изберете програма в зависимост от съдовете и степента
на тяхното замърсяване (виж Таблица на програмите) като
натискате бутона P.
6. Изберете опциите за миене* (виж Oпции).
7. Стартирайте с натискане на бутон Старт/Пауза (Avvio/
Pausa) (свети с постоянна светлина): един дълъг звуков
сигнал предупреждава за стартирането на програмата, светва
индикаторът за миене и на дисплея се визуализира номерът
на програмата и времето, оставащо до края на цикъла.
8. Накрая два кратки и един по-дълъг звукови сигнала указват
края на програмата, бутонът Старт/Пауза угасва, на дисплея
се появява надпис END (КРАЙ) Изключете уреда с натискане
на бутон ON/OFF (ВКЛ./ИЗКЛ.)
9. Изчакайте няколко минути, преди да извадите съдовете,
за да не се опарите. Изпразнете кошниците, започвайки от
долната.
- За да се намали разходът на електрическа енергия,
в някои от случаите, в които машината НЕ се използва
дълго време, тя се изключва автоматично.
АВТОМАТИЧНИ ПРОГРАМИ*:някои модели миялни
машини са оборудвани със специален сензор, чрез който
машината преценява степента на замърсяване на съдовете
и задава най-ефикасното и икономично измиване.
Времетраенето на автоматичните програми може да варира
в резултат на функционирането на сензора.
Промяна на текущата програма
Ако е била избрана грешна програма, тя може да бъде
променена, стига да е току-що започнала; за промяна на
цикъла, при вече започнал цикъл на измиване, изключете
машината чрез продължително натискане на бутон ON/OFF/
Reset (ВКЛ./ИЗКЛ./Нулиране), включете я повторно чрез
същия бутон и отново изберете желаната програма и опции.
Добавяне на съдове
Натиснете бутон Avvio/Pausa (Старт/Пауза), отворете
вратата, като внимавате за излизащата пара, и поставете
съдовете. Натиснете бутон Avvio/Pausa (Старт/Пауза);
цикълът продължава след продължителен звуков сигнал.
Ако е зададен режим отложен старт, накрая на обратното
броене цикълът на миене няма да започне, а ще остане в
състояние на пауза.
При натискане на бутон Старт/Пауза, за да се постави
машината в пауза, се прекъсва зададената програма.
На тази фаза програмата не може да се промени.
BG
* Само за определени модели.
Инцидентни прекъсвания
Ако по време на миенето вратата се отвори или има спиране
на електричеството, програмата прекъсва. Щом вратата се
затвори или отново има ток, програмата започва отново от
момента на прекъсването.
75
Page 76

Програми
BG
Данните за програмите са определени след измерване в лабораторни условия съгласно европейски стандарт EN 50242.
В зависимост от различните условия на ползване продължителността и данните на програмите може да са различни.
Броят и типът на циклите на измиване може да варират в зависимост от модела на съдомиялната машина.
Програма Сушене
1. Eco Да
2. Автоматичен
интензивен
3. Автоматичен
нормален
4. Деликатни
съдове
5. Express Не Отложен старт – Таблетки 00:25 8,0 0,45
6. Good Night Да Отложен старт – Таблетки 03:30 13,0 0,85
7. Накисване Не
8. Ultraintensive Да
Да
Да
Да
Отложен старт – Таблетки –
Зареждане наполовина
Отложен старт – Таблетки –
Зареждане наполовина
Отложен старт – Таблетки –
Зареждане наполовина
Отложен старт – Таблетки –
Зареждане наполовина
Отложен старт – Зареждане
Отложен старт – Таблетки –
Зареждане наполовина
Опции
наполовина
Продължител-
ност на програ-
мата
03:00 9,0 0,83
02:20 - 03:00 13,0 - 14,0 1,20 - 1,45
01:40 - 02:20 13,5 – 14,5 1,00 - 1,20
01:40 9,0 0,90
00:10 4,0 0,01
02:50 17,0 1,50
<Разход на
вода (л/цикъл)
Разход на енер-
гия (KWh/цикъл)
Указания за избора на програма и дозиране на миещия препарат
1. Цикъл на измиване ЕКО е стандартната програма, за която се отнасят данните от енергийния етикет; цикълът е подходящ
за измиване на нормално замърсени съдове, като програмата е най-ефективната по отношение на разход на енергия и вода
за този вид съдове. 4 gr/ml**+ 21 gr/ml – 1 таблетка
2. Силно замърсени съдове и тенджери (тази програма не трябва да се използва за фини съдове). 25 gr/ml – 1 тaблетка
3. Нормално замърсени съдове и тенджери. 4 gr/ml**+ 21 gr/ml – 1 таблетка
4. Цикъл за фини съдове, по-чувствителни на високи температури. 25 gr/ml – 1 тaблетка
5. Бърз цикъл за слабо замърсени съдове. (идеален за 2 съда) 21 gr/ml – 1 таблетка
6. Гарантира отлични резултати. Подходящ за работа през нощта. 25 gr/ml – 1 тaблетка
7. Предварително измиване в очакване на дозареждане на миялната машина при следващо хранене. Без миещ препарат
8. Цикъл за силно замърсени тенджери или с остатъци от засъхнала храна по тях. 4 gr/ml**+ 25 gr/ml – 1+1 таблетка
Консумация в режим на готовност: Консумация в режим „оставена включена“: 5 W – консумация в режим „изключена”: 0,5 W
(**Количество миещ препарат за предварителното измиване)
76
Page 77

Специални цикли на
измиване и опции
Забележки:
Оптимални нива на ефективност при използване на циклите
“Fast” и “Express” могат да се постигнат при спазване на
посочения брой гнезда за съдове.
За да се намали още повече консумацията, стартирайте
съдомиялната машина само когато е напълно заредена.
Бележки за тестовите лаборатории: за информация
относно сравнимите с EN тестови условия изпратете имейл на
следния адрес: ASSISTENZA_EN_LVS@indesitcompany.com
Опции за миене*
ОПЦИИТЕ могат да се задават, променят или нулират
само след като е избрана програмата за миене и преди
да е натиснат бутонът Старт/Пауза.
Могат да се изберат само тези опции, които са съвместими
с вида на избраната програма. Ако дадена опция не
е съвместима с избраната програма
програми)
бързо 3 пъти.
Ако бъде избрана опция, която е несъвместима със
зададена преди това друга опция, светлинният индикатор
за нея примигва три пъти и се изключва, докато остава
включена последната зададена опция.
За отказ от погрешно зададена опция трябва отново да
се натисне съответния бутон.
, съответният светлинен индикатор примигва
(виж таблица
Половин зареждане на горната или долната
кошница
Ако съдовете са малко, може да заредите миялната
машина наполовина, като по този начин ще спестите вода,
електроенергия и препарат. Изберете програмата, натиснете
продължително бутон ПОЛОВИН ЗАРЕЖДАНЕ: светва
индикаторът за избраната кошница и се активира измиване
само за горната или само за долната кошница.
Не забравяйте да заредите съдовете само в горната
или в долната кошница и да намалите миещия препарат.
Oпция Многофункционални таблетки
(Таблетки-Tabs)
Тази опция оптимизира резултатите от измиване и
изсушаване.
Когато използвате многофункционални таблетки,
натиснете бутона “МНОГОФУНКЦИОНАЛНИ ТАБЛЕТКИ”;
съответният светлинен индикатор светва. Ако го
натиснете отново, опцията ще се деселектрира.
Опцията “Многофункционални таблетки” води до
по-дълъг цикъл на измиване.
BG
Отложен старт
Възможно е стартът на програмата да бъде
отложен с 1 до 24 часа:
1. Изберете желаната програма за миене и другите
евентуални опции; натиснете бутона ОТЛОЖЕН СТАРТ
– индикаторът се осветява. C натискане на същия бутон
изберете кога желаете да започне цикълът на миене.
(h01, h02, и т.н.)
2. Потвърдете избора с бутон СТАРТ/ПАУЗА – започва
обратното броене.
3. След изтичане на времето светлинният индикатор
ОТЛОЖЕН СТАРТ изгасва и програмата стартира.
За да се откажете от функцията ОТЛОЖЕН СТАРТ,
натискайте бутона ОТЛОЖЕН СТАРТ, докато се появи
OFF.
Не е възможно да се зададе отложен старт при
стартиран цикъл.
* Само за определени модели.
77
Page 78

Поддръжка и грижи
за машината
BG
Изключване на водоснабдителната и
електроразпределителната мрежа
• Затваряйте крана на водата след всеки цикъл, за да
избегнете течове.
• Винаги изключвайте уреда от контакта, когато го почиствате
и когато извършвате дейности по поддръжка.
Почистване на съдомиялната
• Външните повърхности на машината и контролният
панел се почистват с неабразивна кърпа, напоена с вода.
Не използвайте почистващи препарати или абразивни
продукти.
• Всички следи по вътрешните повърхности на уреда могат
да се отстранят с кърпа, напоена с вода и малко оцет.
Предотвратяване на неприятни миризми
• Винаги дръжте вратата на уреда открехната, за да
избегнете влага от пяната, която да остане вътре в
машината.
• Почиствайте пломбите около вратичката и дозаторите
за препарат редовно с влажна гъба. Така ще избегнете
засядането на храна в пломбите, което е основната
причина за образуване неприятни миризми.
Почистване на разпръскващите рамена
Остатъци от храна могат да се натрупат по разпръскващите
рамена и да блокират отворите, които се използват за
разпръскване на вода. Затова е препоръчително да
проверявате разпръскващите рамена периодично и да ги
почиствате с малка неметална четка.
Двете разпръскващи рамена могат да се отстраняват.
За да отстраните горното
разпръскващо рамо, завъртете
пластмасовия заключващ
пръстен в посока, обратна на
часовниковата стрелка. Когато
отново поставите разпръскващото
рамо, то трябва да е поставено
така, че страната с по-големия
брой отвори да е нагоре.
Долното разпръскващо рамо
може да се отстрани, като се
натиснат крачетата от двете
страни и се изтегли нагоре.
Почистване на филтрите
Комплектът на филтрите се състои от три филтъра, които
отстраняват хранителните отпадъци от водата за измиване и
след това рециркулират водата. Те трябва да се почистват, ако
искате да постигнете най-добри резултати от всяко измиване.
Редовно почиствайте филтрите.
Съдомиялната машина на трябва да се използва без
филтри или ако филтърът е разхлабен.
• След няколко измивания проверете комплекта на филтъра
и ако е необходимо, почистете го цялостно под течаща вода,
като използвате неметална четка и следвате инструкциите
по-долу:
1. Завъртете цилиндричния филтър C в посока обратна на
часовниковата стрелка и го издърпайте навън
2. Отстранете капачката на филтъра B, като упражните лек
натиск върху страничните клапи
3. Плъзнете планката от неръждаема стомана на филтъра
A.
(фиг. 3).
4. Огледайте отвора и отстранете евентуални остатъци от
храна. НИКОГА НЕ ОТСТРАНЯВАЙТЕ защитата на помпата
за цикъла на измиване
(черния детайл) (фиг. 4).
(фиг. 2);
C
1
A
3
(фиг. 1).
Почистване на входния филтър за вода*
Ако маркучите за вода са нови или не са използвани
продължителен период от време, оставете водата да се изтече,
за да сте сигурни, че е чиста и не съдържа замърсявания,
преди да извършите необходимите свързвания. Ако тази
предпазна мярка не бъде взета, входът за вода може да бъде
блокиран и да повреди съдомиялната машина.
Почиствайте редовно входния филтър за вода при изхода
от крана.
- Затворете крана за водата.
- Отвийте края на входния маркуч за водата, отстранете
филтъра и го почистете внимателно под течаща вода.
- Сменете филтъра и завийте отново маркуча за вода на
позиция.
78
След почистване на филтрите поставете отново комплекта
на филтъра и го фиксирайте правилно на мястото му; това
е от съществено значение за поддържането на ефективната
работа на съдомиялната машина.
Когато оставяте машината неизползвана
за дълги периоди от време
• Прекъснете връзката на уреда с електрозахранването и
затворете крана за вода.
• Оставете вратата на уреда открехната.
• Когато се върнете, пуснете цикъл на измиване с празна
съдомиялна.
* Само за определени модели.
Page 79

Неизправности и начини
за отстраняването им
Когато уредът не работи, проверете за възможно решение в следващия списък, преди да се обадите за помощ.
Неизправности: Възможни причини / Решение:
Миялната машина не
работи или не отговаря на
командите
Вратата не се затваря
Миялната машина не
изхвърля водата.
Миялната машина издава
шум.
Върху съдовете и чашите
има отлагания от варовик
или белезникава патина.
Върху съдовете и чашите
има синкави ивици или
оттенъци.
Съдовете не са изсъхнали
достатъчно.
Съдовете не са чисти. • Съдовете не са подредени правилно.
В съдомиялната машина не
постъпва вода
блокирана е с мигащи светлинни
индикатори
• Кранът на водата не е отворен.
• Изключете машината чрез бутона ON/OFF (ВКЛ./ИЗКЛ.), включете я отново след около
минута и задайте повторно програмата.
• Щепселът не е добре поставен в електрическия контакт или сменете контакта.
• Вратата на миялната машина не е добре затворена.
• Проверете дали кошовете са вкарани докрай.
• Затварящият механизъм се е задействал; бутнете силно вратата, докато чуете
щракване.
• Програмата за миене още не е приключила.
• Маркучът за оттичане на водата е прегънат
• Сифонът на мивката е запушен.
• Филтърът е запушен с остатъци от храна.
• Проверете височината на маркуча за оттичане на водата.
• Съдовете се удрят един в друг или в струйниците. Поставете съдовете в правилно
положение и проверете дали струйниците се въртят свободно.
• Прекалено образуване на пяна - миещият препарат не е правилно дозиран или не е
подходящ за използване със съдомиялна машина.
на съдомиялната машина),
• Липсва регенерираща сол.
• Зададената настройка за твърдостта на водата не е подходяща; увеличете стойностите.
(виж Регенерираща сол и гланц).
• Капачката на резервоара за сол и гланц не е затворена добре.
• Гланцът е свършил или дозата не е достатъчна.
• Гланцът е предозиран.
• Избрана е програма без сушене.
• Гланцът е изразходван.
• Неподходяща настройка на гланца.
• Съдовете са от незалепващ материал или пластмаса; нормално е присъствието на
водни капки.
• Струйниците не могат свободно да се въртят, защото са блокирани от съдове.
• Програмата за миене не е достатъчно ефикасна
• Прекалено образуване на пяна: миещият препарат не е правилно дозиран или не е
подходящ за използване с миялна машина.
съдомиялната машина),
• Капачката за гланца не е затворена правилно.
• Филтърът е замърсен или запушен
• Липсва регенерираща сол
• Уверете се, че височината на чиниите е съвместима с регулирането на кошницата.
• Отворите на струйниците са запушени.
машината).
• Няма вода във водопроводната мрежа или кранът е затворен.
• Маркучът за подаване на водата е прегънат
• Филтрите са запушени; трябва да се почистят. (виж Поддръжка и грижи за
съдомиялната машината).
• Запушена е отходната тръба; трябва да се почисти.
• След като приключите с проверката и почистването, изключете и включете
съдомиялната машина и стартирайте нов цикъл на миене.
• Ако проблемът продължава, затворете крана на водата и извадете щепсела от контакта
и се свържете с центъра за сервизно обслужване.
Не мийте предварително съдовете на ръка.
(виж Регенерираща сол и гланц).
(виж Поддръжка и грижи за съдомиялната машина).
(виж Регенерираща сол и Гланц).
(виж глава „Инсталиране“).
(виж Миещ препарат и експлоатация
(виж глава „Програми“).
(виж Миещ препарат и експлоатация на
(виж Поддръжка и грижи за съдомиялната
(виж Инсталиране).
BG
* Само за определени модели.
79
Page 80

BG
195123347.01 - NC
09/2014 jk - Xerox Fabriano
Indesit Company Spa
Viale Aristide Merloni 47
60044 Fabriano (AN)
Italy
80
www.hotpoint-ariston.com
 Loading...