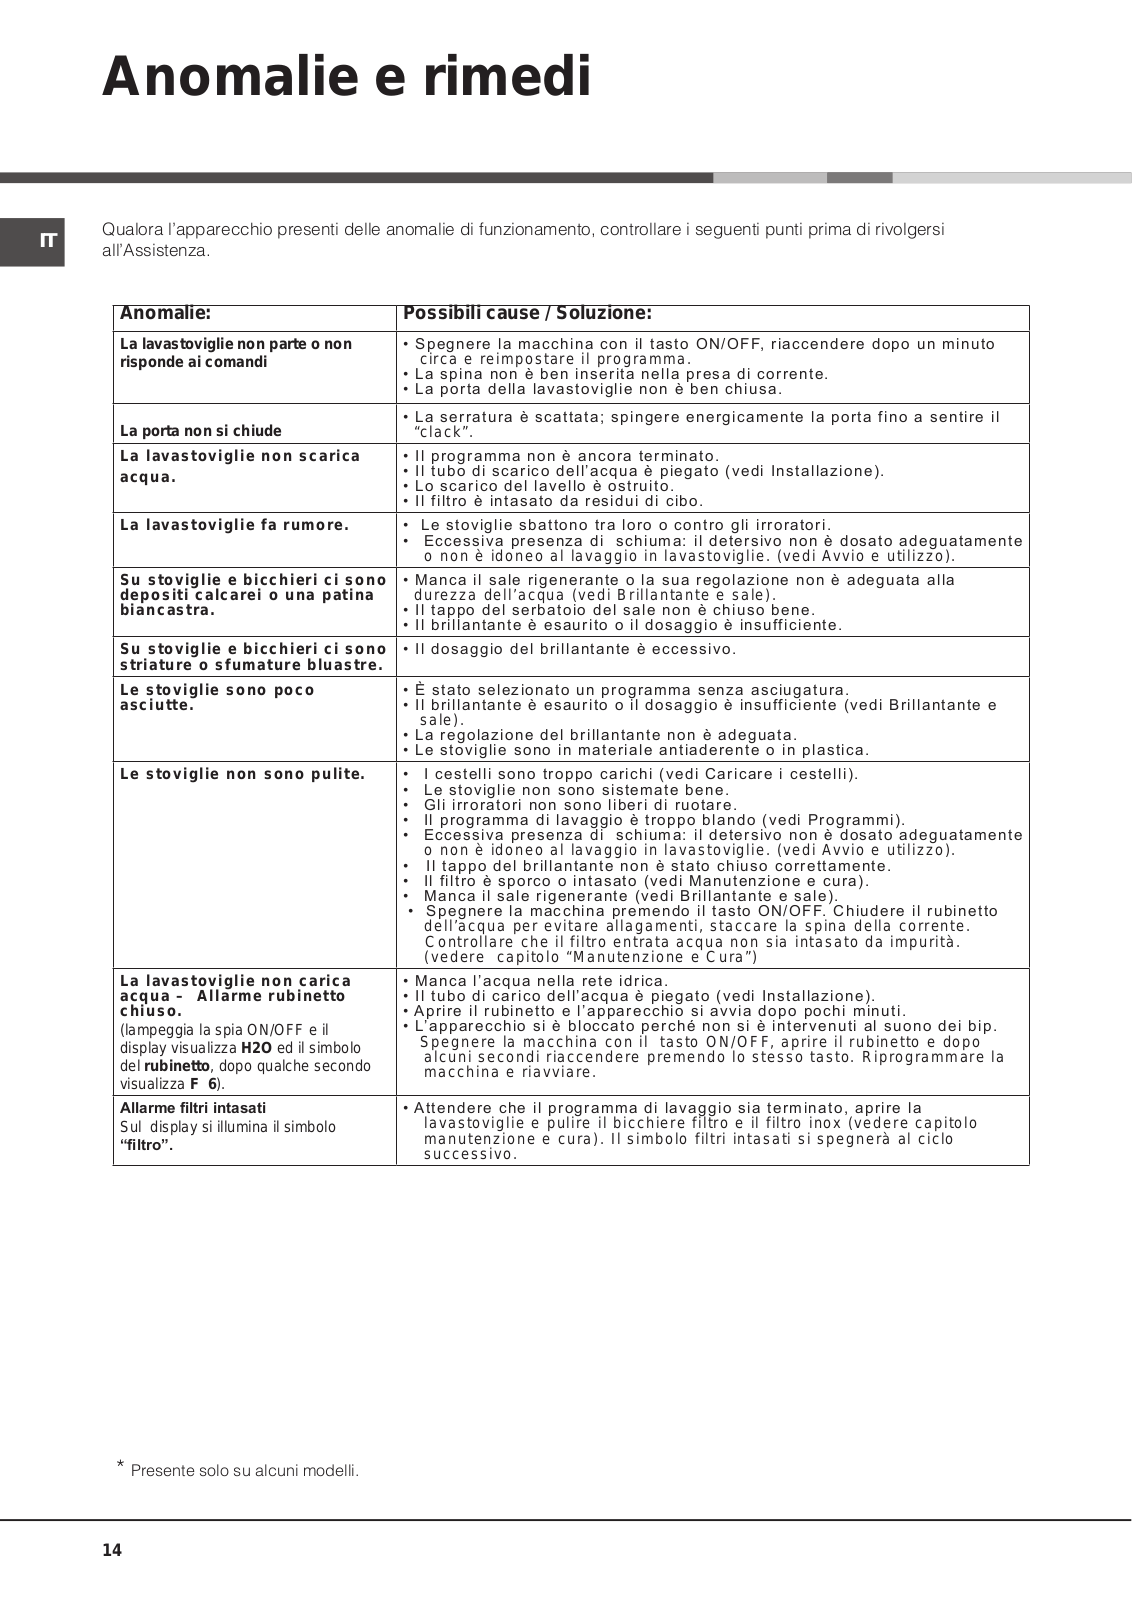
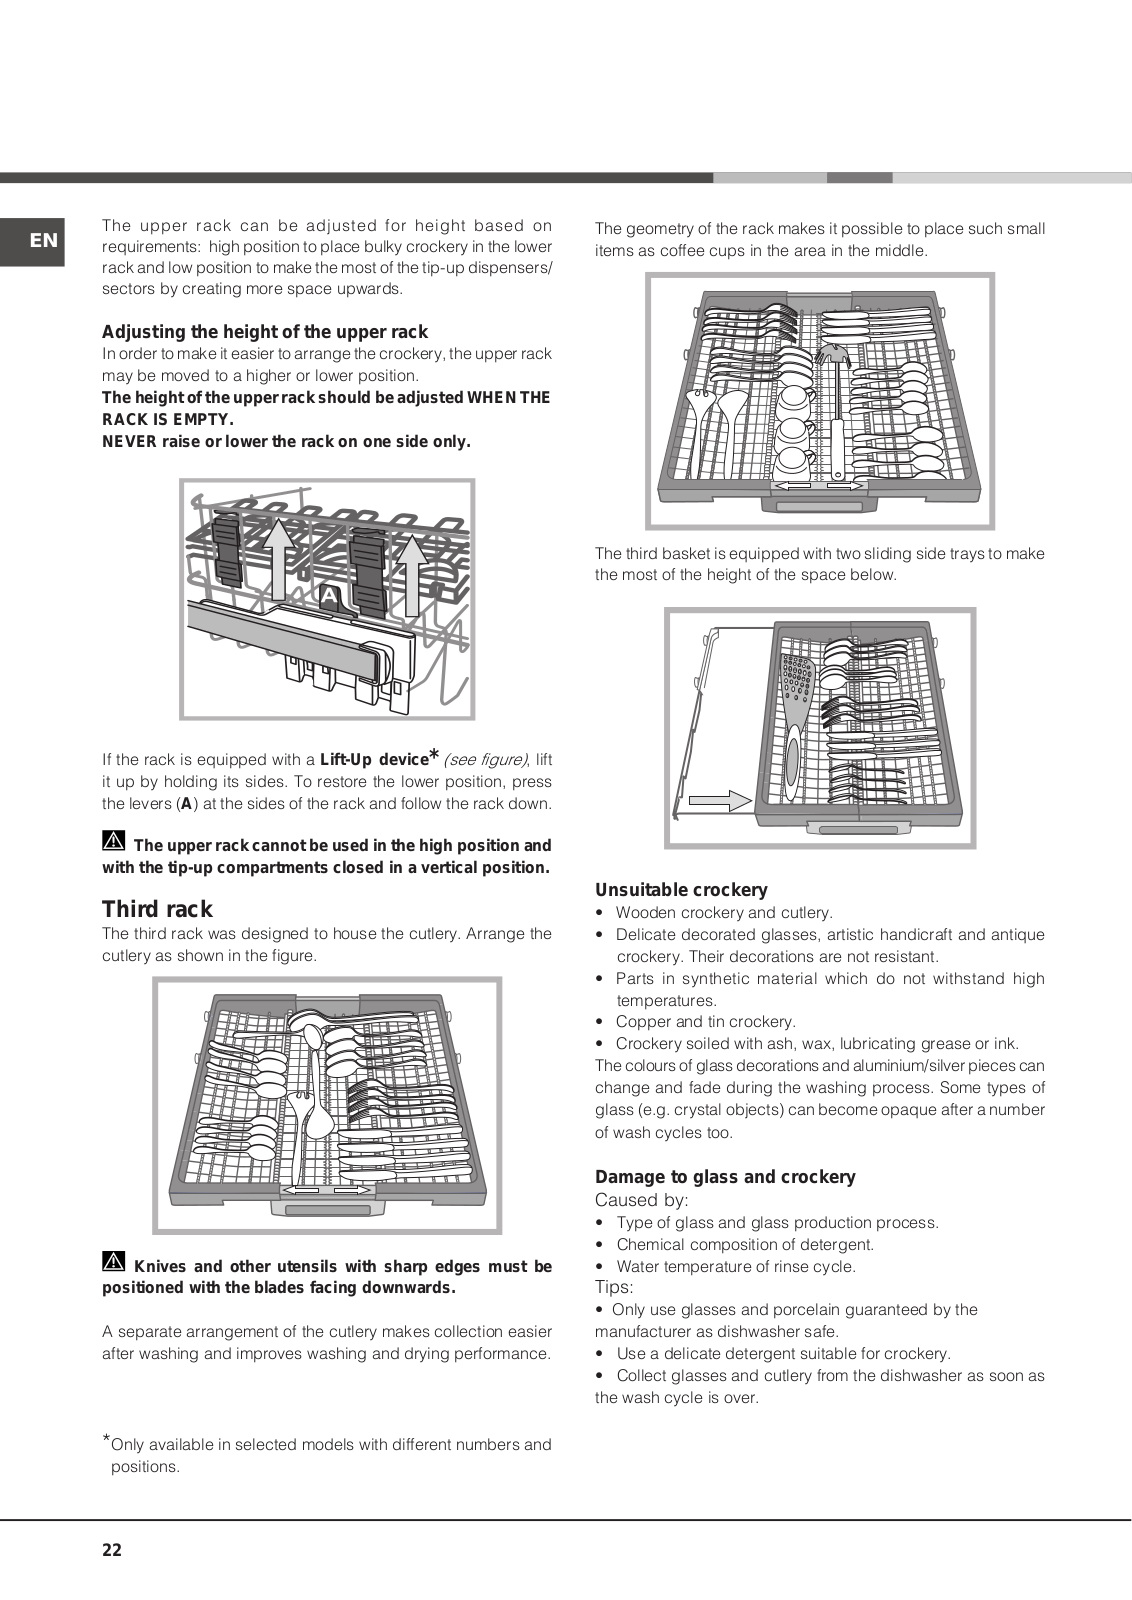
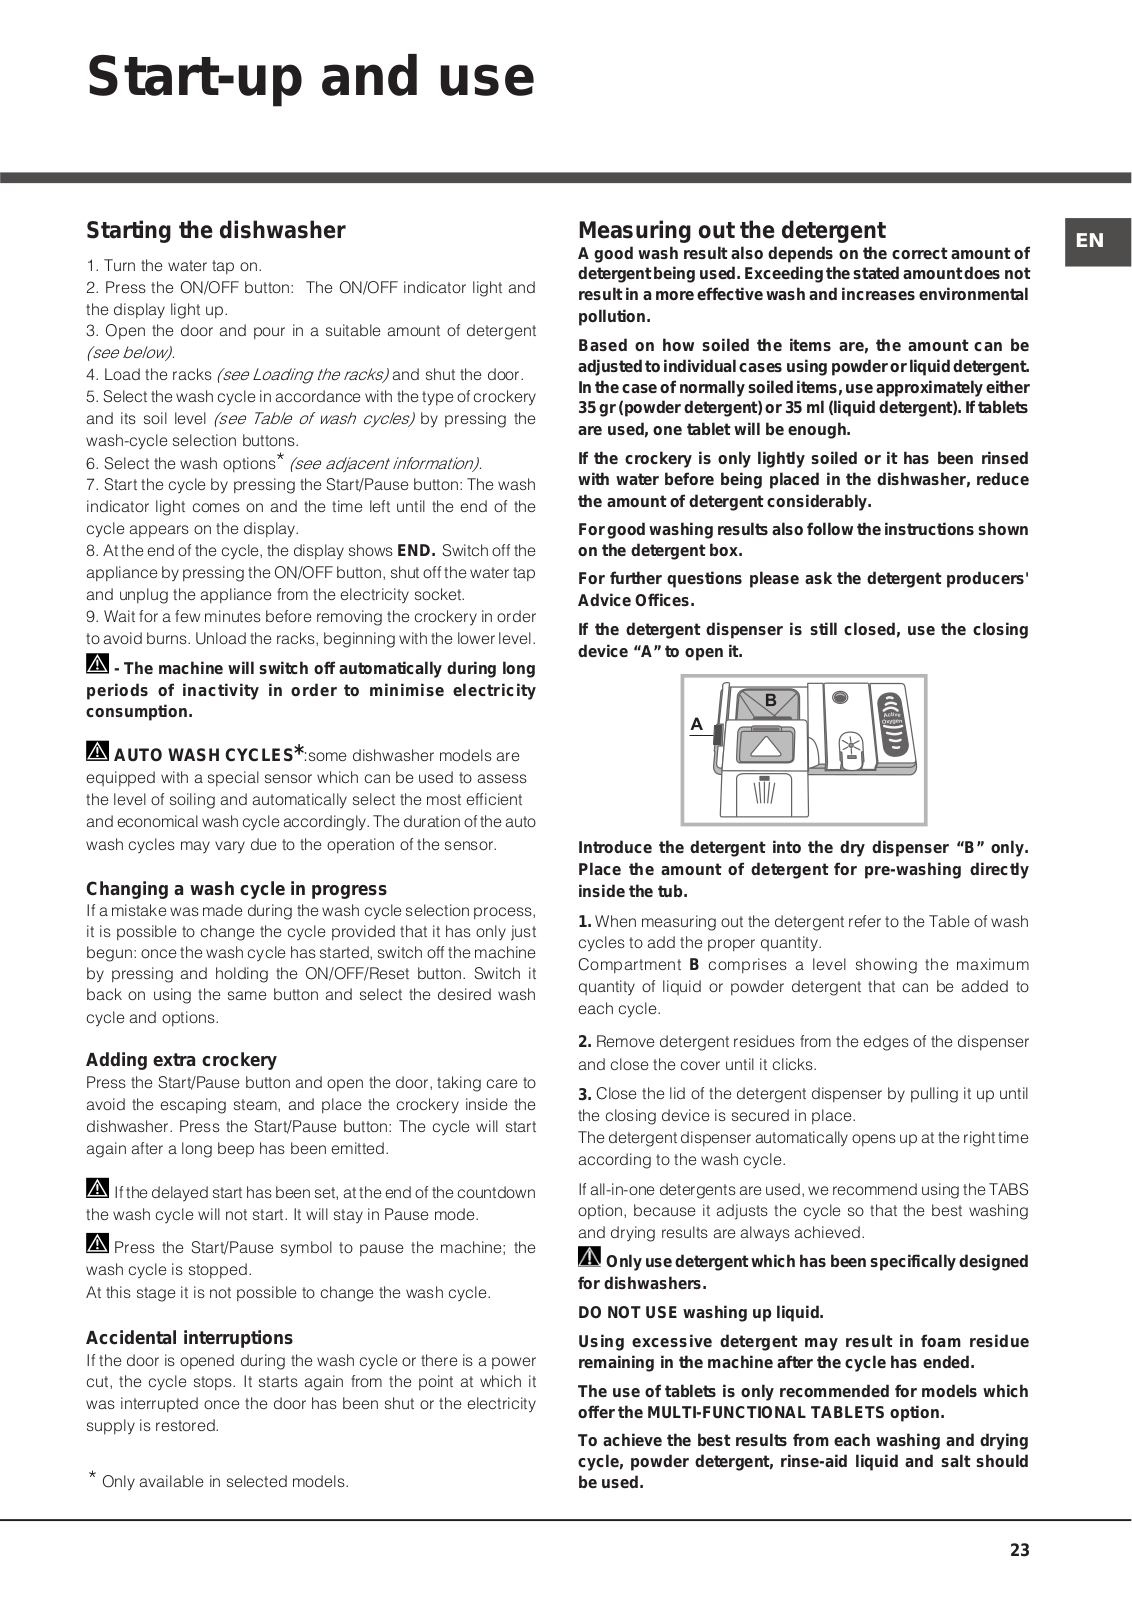
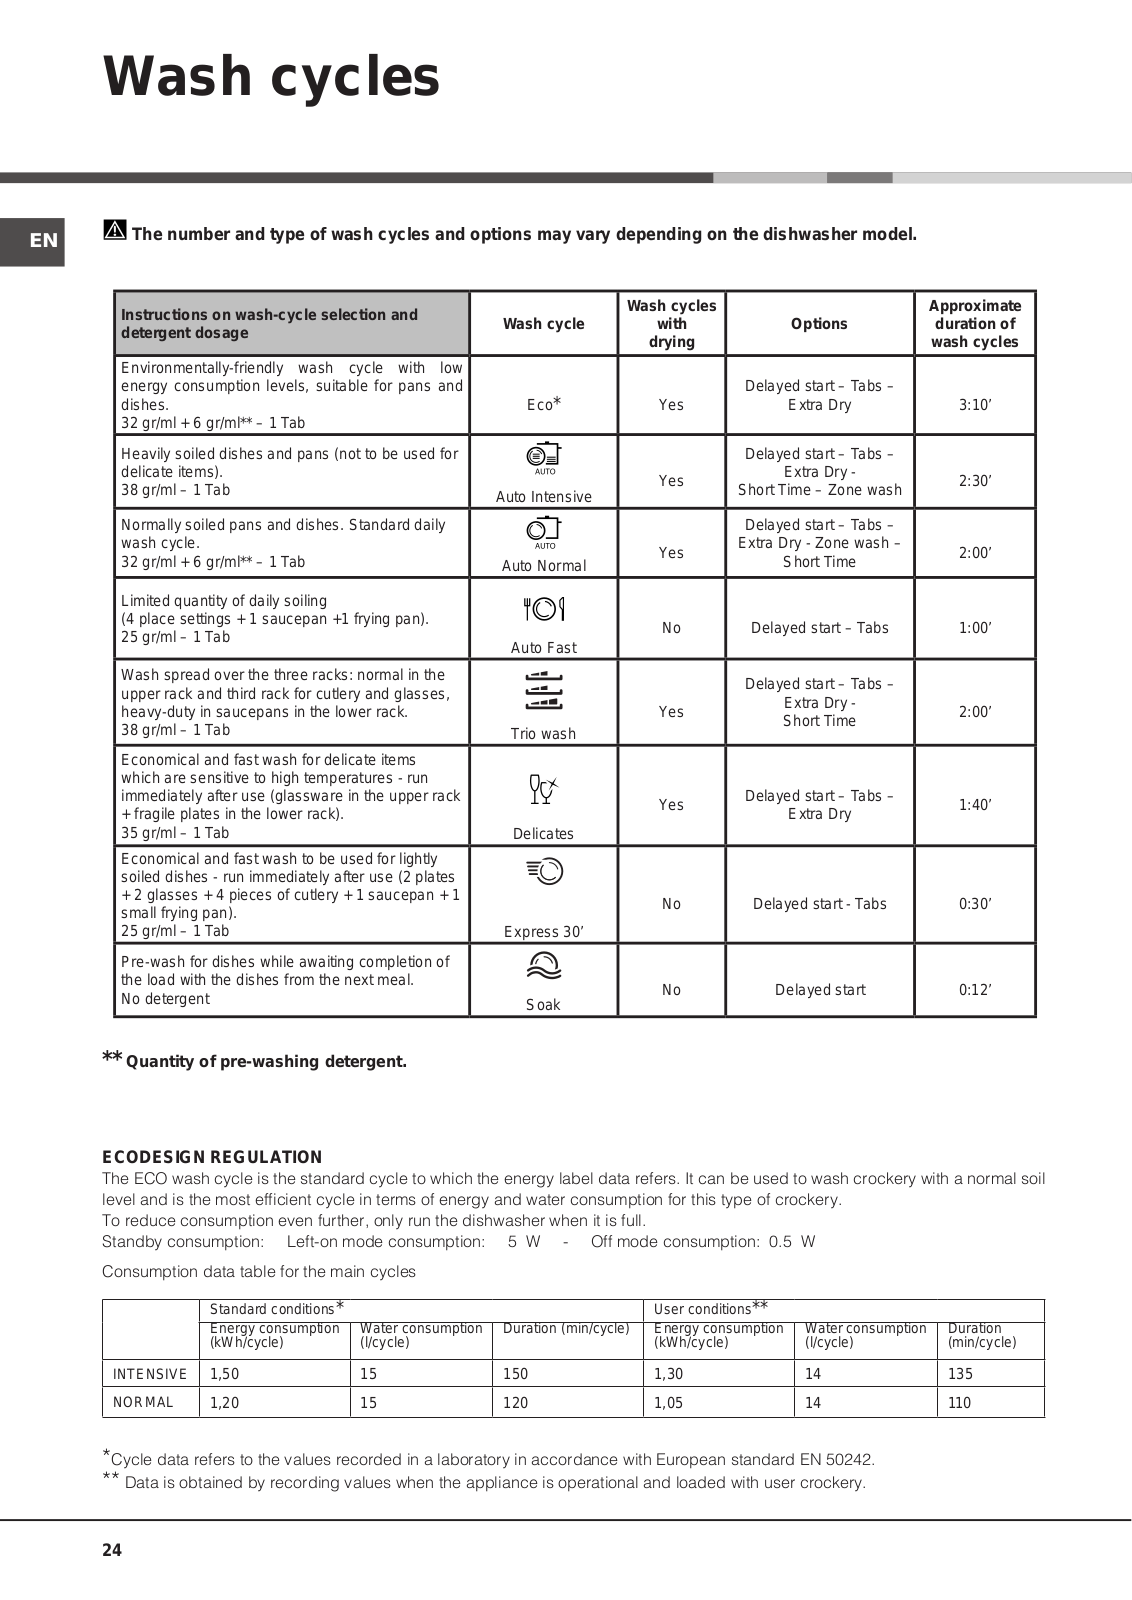
Hotpoint LFF 8S112 X EU, LFF 8S112 EU User Manual

Istruzioni per l’uso

LAVASTOVIGLIE

IT


EN


FR


Italiano, 1

English,15

Français, 29


DE


NL


ES


Deutsch, 43

Nederland, 56

Español, 69

Sommario

Precauzioni, consigli e Assistenza, 2-3

Sicurezza generale Smaltimento

Risparmiare e rispettare l’ambiente Assistenza

Installazione, 4-5

Posizionamento e livellamento

Collegamenti idraulici ed elettrici

Dati tecnici

Avvertenze per il primo lavaggio

LFF 8S112

Descrizione dell’apparecchio, 6

Vista d’insieme Pannello comandi

Caricare i cesti, 7-8

Cesto inferiore

Cesto superiore

Terzo cesto

Regolazione cesto superiore

Stoviglie non idonee

Danni al vetro ed alle stoviglie

Avvio e utilizzo, 9

Avviare la lavastoviglie

Caricare il detersivo

Programmi, 10

Tabella dei programmi

Ecodesign Regulation

Programmi speciali ed Opzioni, 11

Brillantante e sale rigenerante, 12

Caricare il brillantante Caricare il sale rigenerante

Manutenzione e cura, 13

Escludere acqua e corrente elettrica Pulire la lavastoviglie

Evitare i cattivi odori Pulire gli irroratori

Pulizia filtro entrata acqua Pulire i filtri

Se ci si assenta per lunghi periodi

Anomalie e rimedi, 14

Precauzioni, consigli e Assistenza

IT


L’apparecchio è stato progettato e costruito


in conformità alle norme internazionali di sicurezza.


Queste avvertenze sono fornite per ragioni di


sicurezza e devono essere lette attentamente.

È importante conservare questo libretto per poterlo consultare in ogni momento. In caso di vendita, di cessione o di trasloco, assicurarsi che resti insieme all’apparecchio.

Leggere attentamente le istruzioni: ci sono importanti informazioni sull’installazione, sull’uso e sulla sicurezza.

Questo apparecchio è progettato per l’uso domestico o per applicazioni simili, ad esempio:

-aree adibite a cucina per il personale in negozi, uffici ed altri ambienti di lavoro;

-case coloniche;

-utilizzo da parte di clienti in hotel, motel ed altri ambienti di tipo residenziale;

-bed and breakfast.

Sicurezza generale

Questo elettrodomestico non può venire usato da persone (bambini compresi) con ridotte capacità fisiche, sensoriali o mentali, o mancanza di esperienza e conoscenza, a meno che non venga loro fornita supervisione o istruzioni riguardanti l’uso da una persona responsabile della loro sicurezza.

È necessaria la supervisione di un adulto per evitare che i bambini giochino con l’elettrodomestico.

L’apparecchio è stato concepito per un uso di tipo non professionale all’interno dell’abitazione.

L’apparecchio deve essere usato per il lavaggio delle stoviglie a uso domestico, solo da persone adulte e secondo le istruzioni riportate in questo libretto.

L’apparecchio non va installato all’aperto, nemmeno se lo spazio è riparato, perché è molto pericoloso lasciarlo esposto a pioggia e temporali.

Non toccare la lavastoviglie a piedi nudi.

Non staccare la spina dalla presa della corrente tirando il cavo, bensì afferrando la spina.

È necessario chiudere il rubinetto dell’acqua e staccare la spina dalla presa della corrente prima di effettuare operazioni di pulizia e manutenzione.

In caso di guasto, in nessun caso accedere ai meccanismi interni per tentare una riparazione.

Non appoggiarsi o sedersi sulla porta aperta: l’apparecchio potrebbe ribaltarsi.

La porta non deve essere tenuta nella posizione aperta perchè può rappresentare il pericolo di inciampare.

Tenere il detersivo e il brillantante fuori dalla portata dei bambini.

Gli imballaggi non sono giocattoli per bambini.

Smaltimento

Smaltimento del materiale di imballaggio: attenersi alle norme locali, così gli imballaggi potranno essere riutilizzati.

La direttiva Europea 2012/19/EU sui rifiuti di apparecchiature elettriche ed elettroniche (RAEE), prevede che gli elettrodomestici non debbano essere smaltiti nel normale flusso dei rifiuti solidi urbani. Gli apparecchi dismessi devono essere raccolti separatamente per ottimizzare il tasso di recupero e riciclaggio dei materiali che li compongono e impedire potenziali danni per la salute e l’ambiente. Il simbolo del cestino barrato è riportato su tutti i prodotti per ricordare gli obblighi di raccolta separata.

Per ulteriori informazioni, sulla corretta dismissione degli elettrodomestici, i detentori potranno rivolgersi al servizio pubblico preposto o ai rivenditori.

Risparmiare e rispettare l’ambiente

Risparmiare acqua ed energia

Avviare la lavastoviglie solo a pieno carico. In attesa che la macchina sia piena, prevenire i cattivi odori con il ciclo Ammollo (vedi Programmi).

Selezionare un programma adatto al tipo di stoviglie e al grado di sporco consultando la

Tabella dei programmi:

- per stoviglie normalmente sporche utilizzare il programma Eco, che garantisce bassi consumi energetici e di acqua.

- se il carico è ridotto attivare l’opzione Mezzo carico* (vedi Avvio e utilizzo).

Se il proprio contratto di erogazione dell’energia elettrica prevede fasce orarie di risparmio

energetico, effettuare i lavaggi negli orari a tariffa ridotta. L’opzione Partenza Ritardata*

(vedi Avvio e utilizzo) può aiutare a organizzare i lavaggi in tal senso.

2

Detersivi senza fosfati, senza cloro e contenenti enzimi

Si consiglia vivamente di usare i detersivi senza fosfati e senza cloro che sono i più indicati per la tutela dell’ambiente.

Gli enzimi sviluppano un’azione particolarmente efficace con temperature prossime ai 50°C, per cui con i detersivi con enzimi si possono impostare lavaggi a basse temperature e ottenere gli stessi risultati che si avrebbero a

65°C.

Dosare bene il detersivo in base alle indicazioni del produttore, alla durezza dell’acqua, al grado di sporco e alla quantità di stoviglie per evitare sprechi. Pur biodegradabili, i detersivi contengono elementi che alterano l’equilibrio della natura.

Prima di contattare l’Assistenza:


IT

• Verificare se l’anomalia può essere risolta da soli (vedi


Anomalie e Rimedi).


• Riavviareilprogrammapercontrollaresel’inconveniente


è stato ovviato.


• In caso negativo, contattare il Servizio Assistenza


Tecnica Autorizzato.


Non ricorrere mai a tecnici non autorizzati.

Comunicare:

il tipo di anomalia;

il modello della macchina (Mod.);

il numero di serie (S/N).

Queste informazioni si trovano sulla targhetta caratteristiche posta sull’apparecchio

(vedi Descrizione dell’apparecchio).

Assistenza Attiva 7 giorni su 7

Se nasce il bisogno di intervento chiamare il Numero Unico Nazionale 199.199.199*.

Un operatore sarà a completa disposizione per fissare un appuntamento con Centro Assistenza Tecnico autorizzato più vicino al luogo da cui si chiama.

È attivo 7 giorni su 7, sabato e domenica compresi, e non lascia mai inascoltata una richiesta.

*Al costo di 14,25 centesimi di Euro al minuto (iva inclusa) dal Lun. al Ven. dalle 08:00 alle 18:30, il Sab. dalle 08:00 alle 13:00 e di 5,58 centesimi di Euro al minuto (iva inclusa) dal Lun. al Ven. dalle 18:30 alle 08:00, il Sab. dalle 13:00 alle 08:00 e i giorni festivi, per chi chiama dal telefono fisso.

Per chi chiama da radiomobile le tariffe sono legate al piano tariffario dell’operatore telefonico utilizzato.

Le suddette tariffe potrebbero essere soggette a variazione da parte dell’operatore telefonico; per maggiori informazioni consultare il sito www.aristonchannel.com.

*Presente solo su alcuni modelli.

3

Installazione

IT


In caso di trasloco tenere l’apparecchio in posizione


verticale; se fosse necessario, inclinarlo sul lato posteriore.


Posizionamento e livellamento

1.Disimballare l’apparecchio e controllare che non abbia subìto danni durante il trasporto. Se fosse danneggiato non collegarlo e contattare il rivenditore.

2.Sistemare la lavastoviglie facendo aderire i fianchi o lo schienale ai mobili adiacenti o alla parete. L’apparecchio può

anche essere incassato sotto a un piano di lavoro continuo*

(vedi foglio di Montaggio).

3. Posizionare la lavastoviglie su un pavimento piano e rigido.

Compensare le irregolarità svitando o avvitando i piedini anteriori finché l’apparecchio non sia orizzontale. Un accurato livellamento dà stabilità ed evita vibrazioni, rumori e spostamenti.

4*. Per regolare l’altezza del piedino posteriore, agire sulla boccola esagonale di colore rosso presente nella parte inferiore, frontale, centrale della lavastoviglie, con una chiave a bocca esagonale apertura 8 mm., girando in senso orario per aumentare l’altezza e in senso antiorario per diminuirla. (vedere foglio istruzioni incasso allegato alla documentazione)

Collegamenti idraulici ed elettrici

L’adattamento degli impianti elettrici e idraulici per l’installazione deve essere eseguito solo da personale qualificato.

La lavastoviglie non deve appoggiare sui tubi o sul cavo di alimentazione elettrica.

L’apparecchio deve essere collegato alla rete di distribuzione dell’acqua utilizzando tubi nuovi.

Non riutilizzare i vecchi tubi.

I tubi di carico e di scarico dell’acqua e il cavo di alimentazione elettrica possono essere orientati verso destra o sinistra per consentire la migliore installazione.

Collegamento del tubo di carico dell’acqua

A una presa d’acqua fredda: avvitare bene il tubo di carico a un rubinetto con bocca filettata da 3/4 gas; prima di avvitare, far scorrere l’acqua finché non sia limpida affinché le eventuali impurità non intasino l’apparecchio.

A una presa d’acqua calda: nel caso di impianto centralizzato di termosifoni, la lavastoviglie può essere alimentata con acqua calda di rete purché non superi la temperatura di

60°C.

Avvitare il tubo al rubinetto come descritto per la presa d’acqua fredda.

Se la lunghezza del tubo di carico non è sufficiente, rivolgersi a un negozio specializzato o a un tecnico autorizzato (vedi

Assistenza).

La pressione dell’acqua deve essere compresa nei valori riportati dalla tabella Dati tecnici (vedi a lato).

Fare attenzione che nel tubo non ci siano né pieghe né strozzature.

Collegamento del tubo di scarico dell’acqua

Collegare il tubo di scarico, senza piegarlo, a una conduttura di scarico con diametro minimo di 4 cm.

Il tubo di scarico deve essere ad un’altezza compresa tra 40 e 80 cm. dal pavimento o piano d’appoggio della lavastoviglie (A).

Prima di collegare il tubo di scarico dell’acqua al sifone del lavandino, rimuovere il tappo di plastica (B).

Sicurezza antiallagamento

Per garantire che non si generino allagamenti, la lavastoviglie: - è dotata di un sistema che interrompe l’ingresso dell’acqua nel caso di anomalie o di perdite dall’interno.

Alcuni modelli sono dotati di un dispositivo supplementare di sicurezza New Acqua Stop*, che garantisce l’antiallagamento anche in caso di rottura del tubo di alimentazione.

ATTENZIONE: TENSIONE PERICOLOSA!

Il tubo di carico dell’acqua, non deve in nessun caso, essere tagliato in quanto contiene parti sotto tensione.

Collegamento elettrico

Prima di inserire la spina nella presa della corrente, accertarsi che:

la presa abbia la messa a terra e sia a norma di legge;

lapresa sia ingradodisopportare ilcarico massimo dipotenza della macchina, indicato nella targhetta caratteristiche sulla controporta

(vedi capitolo Descrizione della lavastoviglie);

la tensione di alimentazione sia compresa nei valori indicati nella targhetta caratteristiche sulla controporta;

la presa sia compatibile con la spina dell’apparecchio. In caso contrario richiedere la sostituzione della spina a un tecnico autorizzato (vedi Assistenza); non usare prolunghe o prese multiple.

Ad apparecchio installato, il cavo di alimentazione elettrica e la presa della corrente devono essere facilmente raggiungibili.

Il cavo non deve subire piegature o compressioni.

Se il cavo di alimentazione è danneggiato, deve essere sostituito dal costruttore o dal suo Servizio di Assistenza Tecnica, in modo da prevenire ogni rischio. (Vedi Assistenza)

4

L’Azienda declina ogni responsabilità qualora queste norme non vengano rispettate.

Striscia anticondensa*

Dopo aver incassato la lavastoviglie aprire la porta e incollare la striscia adesiva trasparente sotto al ripiano in legno per proteggerlo dalla eventuale condensa.

Dati Tecnici


Dimensioni

Larghezza cm. 60

Altezza cm. 85


Profondità cm. 60

Capacità

15 coperti standard

Pressione acqua

0,05 ÷ 1MPa (0,5 ÷ 10 bar)

alimentazione

7,25 – 145 psi

Tensione di

vedi targhetta caratteristiche

alimentazione


Potenza totale

vedi targhetta caratteristiche

assorbita


Fusibile

vedi targhetta caratteristiche


Questa apparecchiatura è


conforme alle seguenti


Direttive Comunitarie:


-2006/95/EC (Bassa Tensione)


-2004/108/EC (Compatibilità


Elettromagnetica)


-2009/125/EC (Comm. Reg.


1016/2010) (Ecodesign)


-97/17/EC (Etichettatura)


-2012/19/EU (RAEE)

La macchina, è dotata di segnali acustici/toni (secondo il modello d lavastoviglie) che avvisano dell’avvenuto comando: IT accensione, fine ciclo ecc..

I simboli/spie/led luminosi presenti sul pannello comandi/ display, possono variare di colore, pulsare o essere a luce fissa. (secondo il modello di lavastoviglie).

Il display, visualizza informazioni utili relative al tipo di ciclo impostato, alla fase di lavaggio, al tempo residuo, alla temperatura ecc... ecc...

Avvertenze per il primo lavaggio

Dopo l’installazione, immediatamente prima del primo lavaggio, riempire completamente d’acqua il serbatoio del sale e solo dopo aggiungere circa 1 Kg di sale (vedi capitolo Brillantante e sale rigenerante): è normale che l’acqua trabocchi. Selezionare il livello di durezza dell’acqua (vedi tabella capitolo Brillantante e sale rigenerante). Dopo il caricamento del sale la spia

MANCANZA SALE* si spegne.

Il mancato riempimento del contenitore del sale, può provocare il danneggiamento del dolcificatore dell’acqua e dell’elemento riscaldante.

* Presente solo su alcuni modelli.

5

Descrizione dell’apparecchio

IT

Vista d’insieme


1.

Cestello superiore

2.

Irroratore superiore

3.

Ribaltine

4.

Regolatore altezza cestello

5.

Terzo cesto

6.

Cestello inferiore

7.

Irroratore inferiore

8.

Filtro lavaggio

9.

Serbatoio sale

10.

Vaschetta detersivo, serbatoio brillantante e


dispositivo Active Oxigen*

11.

Targhetta caratteristiche

12.

Pannello comandi***


Pannello comandi

Tasto Opzione Pastiglie


multifunzione (Tabs)


Tasti Selezione Programma


Tasto e Spie


Tasto e spia


Display


On-Off/Reset


Avvio/Pausa


Tasto Opzione Extra Asciugatura

Tasti Selezione Programma


Tasti Partenza


Tasto Opzione Zone Wash


Ritardata


Tasto Short Time

Display

Spia mancanza sale

Indicatore tempo residuo

Spie Lavaggio e Asciugatura

Spia filtri intasati

Spia mancanza brillantante

Spia Rubinetto chiuso

Spie programmi


Spie programmi

Spia Partenza Ritardata


Spie Zone Wash


Spia Short Time


Spia Pastiglie multifunzione (Tabs)

Spia Extra Asciugatura


*** Solo sui modelli ad incasso totale * Presente solo su alcuni modelli.

Il numero e il tipo di programmi ed opzioni variano in base al modello di lavastoviglie.

6

Caricare i cesti

Suggerimenti

Prima di caricare i cesti, eliminare dalle stoviglie i residui di cibo e vuotare bicchieri e i contenitori dei liquidi rimasti. Non è necessario un risciacquo preventivo sotto acqua corrente.

Sistemare le stoviglie in modo che siano ben ferme e non si ribaltino, i contenitori siano disposti con l’apertura rivolta in basso e le parti concave o convesse in posizione obliqua, per permettere all’acqua di raggiungere tutte le superfici e di defluire.

Fate attenzione che coperchi, manici, padelle e vassoi non impediscano la rotazione degli irroratori. Disporre gli oggetti piccoli nel cestino delle posate.

Le stoviglie in plastica e le padelle in antiaderente, tendono a trattenere maggiormente le gocce d’ acqua e quindi il loro grado di asciugatura risulterà inferiore a quello delle stoviglie in ceramica o acciaio.

Gli oggetti leggeri (come i recipienti in plastica) devono essere preferibilmente posizionati sul cesto superiore e disposti in modo da non potersi muovere.

Dopo aver caricato, assicurarsi che gli irroratori ruotino liberamente.

Cesto inferiore

Il cesto inferiore può contenere pentole, coperchi, piatti, insalatiere, posate ecc... Piatti e coperchi grandi vanno sistemati di preferenza ai lati del cesto.

IT

E’ consigliabile disporre le stoviglie molto sporche nel cesto inferiore poichè in questo settore i getti d’acqua sono più energici e permettono di ottenere migliori prestazioni di lavaggio.

Alcuni modelli di lavastoviglie, dispongono di settori reclinabili*, gli stessi si possono usare in posizione verticale per la sistemazione dei piatti oppure in posizione orizzontale (abbassati) per poter caricare più agevolmente pentole e insalatiere.

Cesto superiore

Caricare stoviglie delicate e leggere: bicchieri, tazze, piattini, insalatiere basse.

Alcuni modelli di lavastoviglie, dispongono di settori reclinabili*, utilizzabili in posizione verticale per sistemare piattini da thè o dessert o abbassati per caricare ciotole e contenitori per alimenti.

*Presente solo in alcuni modelli e variabili per numero e posizione.

7

Il cesto superiore è regolabile in altezza a seconda della IT necessità: in posizione alta quando nel cesto inferiore si vogliono sistemare stoviglie ingombranti; in posizione bassa, in modo da sfruttare gli spazi delle ribaltine o dei reclinabili creando più

spazio verso l’alto.

Regolare l’altezza del cesto superiore

Per agevolare la sistemazione delle stoviglie, è possibile sistemare il cesto superiore in posizione alta o bassa.

E’ preferibile regolare l’altezza del cesto superiore a CESTO VUOTO.

Non sollevare o abbassare MAI il cesto su un solo lato.

Se il cesto è dotato di Lift-Up* (vedi figura), sollevare il cesto afferrandolo ai lati e muovere verso l’alto. Per tornare nella posizione bassa, premere le leve (A) ai lati del cesto ed accompagnare la discesa verso il basso.

Non è possibile utilizzare il cesto superiore in posizione alta e con le ribaltine chiuse in verticale.

Terzo cesto

Il terzo cesto è adibito alla disposizione delle posate. Sistemare le posate come mostrato in figura.

I coltelli e gli utensili con bordi affilati devono essere sistemati con le lame rivolte verso il basso.

La disposizione separata delle posate, ne facilita il prelievo dopo il lavaggio e ne migliora le prestazioni di lavaggio e asciugatura.

*Presente solo in alcuni modelli e variabili per numero e posizione.

La geometria del cesto, permette di disporre nella zona centrale anche piccole stoviglie come tazzine da caffè.

Il terzo cesto è dotato di due vassoi laterali scorrevoli che permettono un miglior sfruttamento in altezza dello spazio sottostante.

Stoviglie non idonee

Posate e stoviglie di legno.

Bicchieri decorati delicati, stoviglie di artigianato artistico e di antiquariato. Le loro decorazioni non sono resistenti.

Parti in materiale sintetico non resistenti alla temperatura.

Stoviglie di rame e stagno.

Stoviglie sporche di cenere, cera, grasso lubrificante o inchiostro.

Le decorazioni su vetro, i pezzi di alluminio e argento durante il lavaggio possono tendere a cambiare colore ed a sbiancarsi.

Anche alcuni tipi di vetro (per es. oggetti di cristallo) dopo molti lavaggi possono diventare opachi.

Danni al vetro ed alle stoviglie

Cause:

Tipo di vetro e procedimento di produzione del vetro.

Composizione chimica del detersivo.

Temperatura dell’acqua del programma di risciacquo.

Consiglio:

Utilizzare solo bicchieri e porcellana garantiti dal produttore come resistenti al lavaggio in lavastoviglie.

Usare detersivo delicato per stoviglie.

Estrarre bicchieri e posate dalla lavastoviglie al più presto possibile dopo la fine del programma.

8

Avvio e utilizzo

Avviare la lavastoviglie

1.Aprire il rubinetto dell’acqua.

2.Premere il tasto ON-OFF: la spia ON/OFF e il display si illuminano.

3.Aprire la porta e dosare il detersivo (vedi sotto).

4.Caricare i cestelli (vedi Caricare icestelli) e chiudere la porta.

5.Selezionare il programma, in base alle stoviglie e al loro grado di sporco (vedi tabella dei programmi) premendo i tasti di selezione programma.

6.Selezionare le opzioni di lavaggio* (vedi a lato).

7.Avviare premendo il tasto Avvio/Pausa: si illumina la spia del lavaggio e viene visualizzato sul display il tempo residuo alla fine del ciclo.

8.Alla fine del programma, il display visualizza END. Spegnere l’apparecchio premendo il tasto ON-OFF, chiudere il rubinetto dell’acqua e staccare la spina dalla presa di corrente.

9.Aspettare alcuni minuti prima di togliere le stoviglie, per evitare

di scottarsi. Scaricare i cestelli iniziando da quello inferiore.

- Per ridurre il consumo di energia elettrica, in alcune condizioni di NON utilizzo prolungato, la macchina si spegne automaticamente.

PROGRAMMI AUTO*:alcuni modelli di lavastoviglie sono dotati di un particolare sensore che può valutare il grado di sporco e impostare il lavaggio più efficiente ed economico. La durata de programmi Auto potrà variare per l’intervento del sensore.

Modificare un programma in corso

Se si è selezionato un programma sbagliato è possibile modificarlo, purché appena iniziato: a lavaggio avviato, per cambiare ciclo di lavaggio spegnere la macchina con una pressione prolungata del tasto ON/OFF/Reset, riaccenderla con lo stesso tasto e selezionare nuovamente programma e opzioni desiderati.

Aggiungere altre stoviglie

Premere il tasto Avvio/Pausa, aprire la porta facendo attenzione alla fuoriuscita di vapore e inserire le stoviglie. Premere il tasto

Avvio/Pausa: il ciclo riprende dopo un bip prolungato.

Se è impostata la partenza ritardata, alla fine del conto alla rovescia, il ciclo di lavaggio non partirà ma rimarrà in stato di Pausa.

Premendo il tasto Avvio/Pausa per mettere la macchina in pausa, si interrompe il programma.

In questa fase non si può cambiare il programma.

Interruzioni accidentali

Se durante il lavaggio si apre la porta o si verifica un’interruzione di corrente, il programma si interrompe. Riprende dal punto in cui si era interrotto quando si chiude la porta o torna la luce.

* Presente solo su alcuni modelli.

Caricare il detersivo


IT

Il buon risultato del lavaggio dipende anche dal


corretto dosaggio del detersivo, eccedendo non si lava


in modo più efficace e si inquina l’ambiente.


A seconda del grado di sporco, il dosaggio può essere adattato al singolo caso con un detersivo in polvere o liquido. Solitamente per uno sporco normale, utilizzare circa 35 gr. (detersivo in polvere), o 35ml (detersivo liquido). Se si impiegano le pastiglie ne basta una.

Se le stoviglie sono poco sporche o sono state sciacquate precedentemente sotto l’acqua, ridurre sensibilmente la dose del detersivo.

Per un buon risultato di lavaggio osservare anche le istruzioni riportate sulle confezioni del detersivo.

In caso di ulteriori domande consigliamo di rivolgersi agli uffici di consulenza dei produttori di detersivi.

Per aprire il contenitore del detersivo, azionare il dispositivo di apertura “A”

Introdurre il detersivo solo nella vaschetta “B” asciutta. La quantità di detersivo adibita al prelavaggio, deve essere posizionata direttamente in vasca.

1.Dosare il detersivo consultando la Tabella dei programmi per introdurne la quantità corretta.

Nella vaschetta B è presente un livello che indica la quantità massima di detersivo liquido o in polvere inseribile per ogni ciclo.

2.Eliminare i residui di detersivo dai bordi della vaschetta e chiudere il coperchio fino allo scatto.

3.Chiudere il coperchio del contenitore detersivo spingendolo in alto, fino al corretto innesto del dispositivo di chiusura.

Il contenitore detersivo si apre automaticamente in funzione del programma, al momento opportuno.

Se vengono utilizzati detersivi combinati, è consigliato utilizzare l’opzione TABS, che adegua il programma di lavaggio, in modo da raggiungere sempre il migliore risultato di lavaggio e di asciugatura possibile.

Utilizzare solo detersivo per lavastoviglie. NON UTILIZZARE detersivi per lavaggio a mano.

Un utilizzo eccessivo di detersivo può lasciare residui di schiuma a fine ciclo.

L’utilizzo delle pastiglie è consigliato solo nei modelli dove è presente l’opzione PASTIGLIE MULTIFUNZIONE.

Le migliori prestazioni di lavaggio ed asciugatura, si ottengono solo con l’utilizzo di detersivo in polvere, brillantante liquido e sale.

9

Programmi


Il numero e il tipo di programmi ed opzioni variano in base al modello di lavastoviglie.


IT


Programmi


La durata dei


Indicazioni per la scelta dei programmi

Programma

che

Opzioni

programmi


e dosaggio del detersivo

prevedono

è puramente


l’asciugatura


indicativa


Lavaggio ecologico a bassi consumi energetici,

Eco 50°*


Partenza Ritardata – Tabs


adatto a stoviglie e pentole.


Si

– Extra Dry

3:10’


32 gr/ml + 6 gr/ml** – 1 Tab


Stoviglie e pentole molto sporche (da non usare


Partenza Ritardata – Tabs


per pezzi delicati).


Si

– Extra Dry - Zone wash -

2:30’


38 gr/ml – 1 Tab

Auto Intensivo

Short Time


Stoviglie e pentole normalmente sporche.


Partenza Ritardata – Tabs


Programma standard giornaliero.


Si

– Extra Dry - Zone wash -

2:00’


32 gr/ml + 6 gr/ml** – 1 Tab

Auto Normale

Short Time


Sporco quotidiano in quantità limitata.


(4 coperti + 1 pentola + 1 padella).


No

Partenza Ritardata – Tabs

1:00’


25 gr/ml – 1 Tab

Auto Fast


Lavaggio differenziato sui tre cesti: normale


sul cesto superiore e terzo cesto per posate e


Partenza Ritardata – Tabs


bicchieri, energico per pentole sul cesto inferiore.


Si

– Extra Dry - Short Time

2:00’


38 gr/ml – 1 Tab

Trio wash


Ciclo economico e veloce per stoviglie delicate,


più sensibili alle alte temperature, subito dopo


Partenza Ritardata – Tabs


l’uso. (calici nel cesto superiore + piatti delicati,


Si

– Extra Dry

1:40’


nel cesto inferiore).


35 gr/ml – 1 Tab

Delicato


Ciclo economico e veloce da utilizzare per


stoviglie poco sporche, subito dopo l’uso. (2 piatti


Partenza Ritardata - Tabs

0:30’


+2 bicchieri + 4 posate +1 pentola + 1 padellino)


No


25 gr/ml – 1 Tab

Express 30’


Lavaggio preliminare in attesa di completare il


carico al pasto successivo.


No

Partenza Ritardata

0:12’


No detersivo

Ammollo


** Quantità di detersivo del prelavaggio.

ECODESIGN REGULATION

Il ciclo di lavaggio ECO è il programma standard a cui si riferiscono i dati dell’etichetta energetica; questo ciclo è adatto a lavare stoviglie normalmente sporche ed è il programma più efficiente in termini di consumo energetico e di acqua per questo tipo di stoviglie. Per consumare di meno usa la lavastoviglie a pieno carico.

Consumi di stand-by: Consumo di left-on mode: 5 W - consumo di off mode: 0,5 W Tabella con consumi per i cicli principali


Condizioni standard*


Condizioni utente**


Consumo Energia

Consumo di

Durata (min/ciclo)

Consumo Energia

Consumo di

Durata (min/ciclo)


(KWh/ciclo)

acqua (l/ciclo)

(KWh/ciclo)

acqua (l/ciclo)


INTENSIVO

1,50

15

150

1,30

14

135

NORMALE

1,20

15

120

1,05

14

110

*I dati del programma sono valori di misura di laboratorio ricavati secondo la norma europea EN 50242.

** I dati sono ricavati effettuando delle misure in condizioni di utilizzo e di carico stoviglie utente.

10

Programmi speciali ed Opzioni

Note:

le migliori prestazioni dei programmi “Fast ed Express 30’”, si ottengono preferibilmente rispettando il numero di coperti specificati.

* Il programma Eco, rispetta la norma EN-50242, dura più a lungo rispetto ad altri programmi ma presenta un minor consumo di energia ed in più è rispettoso con l’ambiente.

Nota per i laboratori di Prove: per informazioni sulle condizioni della prova comparativa EN, farne richiesta all’indirizzo:

ASSISTENZA_EN_LVS@indesitcompany.com

Opzioni di lavaggio*

Le OPZIONI possono essere impostate, modificate o azzerate solo dopo aver scelto il programma di lavaggio e prima di aver premuto il tasto Avvio/Pausa.

Possono essere selezionate solo le opzioni compatibili al tipo di programma scelto. Se un’opzione non è compatibile con il programma selezionato, (vedi tabella programmi) il simbolo relativo lampeggia velocemente 3 volte.

Se viene selezionata un’opzione incompatibile con un’opzione precedentemente impostata, questa lampeggia 3 volte, e si spegne, mentre rimane accesa l’ultima impostazione scelta. Per deselezionare un’opzione erroneamente impostata, premere di nuovo sul tasto corrispondente.

Partenza ritardata

È possibile posticipare da 1 a 24 ore l’avvio del programma:

1. Selezionare il programma di lavaggio desiderato ed altre eventuali opzioni; premere i tasti della PARTENZA RITARDATA: il relativo simbolo inizierà a lampeggiare. Con i tasti + e - selezionare quando si desidera far iniziare il ciclo di lavaggio. (h01, h02, ecc.)

2.Confermare la scelta con il tasto AVVIO/PAUSA, il simbolo smette di lampeggiare, inizia il conto alla rovescia.

3.A tempo scaduto, il simbolo della PARTENZA RITARDATA si spegne, e il programma si avvia.

Per deselezionare la PARTENZA RITARDATA, premere il tasto PARTENZA RITARDATA fino alla visualizzazione di

OFF.

Non è possibile impostare la Partenza Ritardata a ciclo avviato.

Opzione Short Time

Questa opzione, permette di ridurre la durata dei principali programmi mantenendo le stesse performance di lavaggio ed asciugatura.

Dopo aver selezionato il programma, premere il tasto Short Time.

Per deselezionare l’opzione, ripremere lo stesso tasto.

Extra Asciugatura

IT

Per migliorare l’asciugatura delle stoviglie, premere il tasto EXTRA ASCIUGATURA il simbolo si illumina, un’ ulteriore pressione deseleziona l’opzione.

Una temperatura più alta durante il risciacquo finale e una fase di asciugatura prolungata, permettono di migliorare l’asciugatura.

L’ opzione EXTRA ASCIUGATURA, comporta l’allungamento del programma.

Pastiglie Multifunzione (Tabs)

Questa opzione ottimizza il risultato di lavaggio ed asciugatura.

Quando si usano le pastiglie multifunzione premere il tasto

PASTIGLIE MULTIFUNZIONE, il simbolo si illumina; un’ ulteriore pressione la deseleziona.

L’opzione “Pastiglie Multifunzione”, comporta l’allungamento del programma.

L’utilizzo delle pastiglie è consigliato solo dove è presente tale opzione, ed è sconsigliata con i programmi che non prevedono l’uso delle pastiglie multifunzione.

Zone Wash

Questa opzione permette di effettuare il lavaggio

solo sul cesto selezionato. Selezionare il

programma, premere il tasto ZONE WASH in successione: il cesto selezionato si illumina e il lavaggio si attiva solo sul cesto selezionato; un ulteriore pressione del tasto deseleziona l’opzione.

L’opzione è disponibile con i programmi: Intensivo e

Normale.

Selezionando l’opzione e il programma Intensivo, si attiva il lavaggio POWER ZONE. Questo lavaggio è ideale per il carico misto più sporco come ad es. pentole e tegami, piatti incrostati o stoviglie difficili da lavare (grattugia, passaverdura, posate molto sporche). La pressione di spruzzo viene rafforzata, la temperatura di lavaggio aumentata garantendo un lavaggio ottimale sullo sporco ostinato.

Selezionando l’opzione e il programma Normale, si attiva il lavaggio GREEN ZONE. Con questa funzione si può ridurre il consumo di acqua ed energia. Risultati di lavaggio e di asciugatura ottimali; il tempo ciclo viene prolungato.

Ricordarsi di caricare le stoviglie solo sul cesto selezionato.

11

Brillantante e sale rigenerante

IT


Usare solo prodotti specifici per lavastoviglie.


Non usare sale alimentare o industriale nè detersivi per il


lavaggio a mano.


Seguire le indicazioni riportate sulla confezione.

Se si usa un prodotto multifunzione, non è necessario aggiungere brillantante, si consiglia invece di aggiungere sale, specie se l’acqua è dura o molto dura. (Seguire le indicazioni riportate sulla confezione).

Non aggiungendo né sale né brillantante è normale che le spie MANCANZA SALE* e MANCANZA BRILLANTANTE* rimangano accese.

Caricare il brillantante

Il brillantante facilita l’asciugatura delle stoviglie facendo scivolare l’acqua dalla superficie, così che non rimangano striature o macchie. Il serbatoio del brillantante va riempito:

quando sul pannello si accende la spia MANCANZA BRILLANTANTE* è ancora disponibile una riserva di brillantante per 1-2 cicli;

A

X

M

1.Aprire il contenitore “D” premendo e sollevando la linguetta sul coperchio;

2.Introdurre con precauzione il brillantante fino al riferimento massimo dell’apertura di riempimento evitando che fuoriesca.

Se accade, pulire subito con un panno asciutto.

3.Chiudere il coperchio fino allo scatto.

Non versare MAI il brillantante direttamente all’interno della vasca.

Regolare la dose di brillantante

Se non si è soddisfatti del risultato dell’asciugatura, è possibile regolare la dose di brillantante. Accendere la lavastoviglie con il tasto ON/OFF, attendere alcuni secondi e spegnere con ON/ OFF. .

Premere il tasto Avvio/Pausa per 3 volte; accendere la macchina con ON/OFF, si entra nel menù di regolazione e si accende la spia brillantante. (la regolazione di fabbrica del brillantante è livello 2)

Selezionare il livello di erogazione del brillantante tramite il tasto programma ECO. (da 0 a 4 Max.).

Premere il tasto ON/OFF per salvare la regolazione impostata.

Il livello di brillantante può essere impostato a ZERO, in tal caso il brillantante non verrà erogato e non verrà accesa la spia di mancanza brillantante in caso di esaurimento dello stesso.

se sulle stoviglie ci sono striature, impostare verso i numeri bassi (1-2).

se ci sono gocce d’acqua o macchie di calcare impostare verso i numeri alti (3-4).

Impostazione durezza dell’acqua

Ogni lavastoviglie è corredata di un dolcificatore dell’acqua che, utilizzando del sale rigenerante specifico per lavastoviglie, fornisce acqua priva di calcare per il lavaggio delle stoviglie.

Questa lavastoviglie, consente una regolazione che riduce

l’inquinamento ed ottimizza le prestazioni di lavaggio in funzione della durezza dell’acqua. Il dato è reperibile presso l’Ente erogatore dell’acqua potabile.

- Accendere la lavastoviglie con il tasto ON/OFF, attendere alcuni secondi e spegnere la lavastoviglie con ON/OFF. Tenere premuto il tasto Avvio/Pausa per almeno 3 secondi; accendere la macchina con ON/OFF, si entra nel menù di regolazione e si accende la spia del sale.

-Selezionare con il tasto ECO, il livello desiderato (da 1 a 5* Max. secondo il mod. di lavastoviglie)

(Il decalcificatore è impostato dalla fabbrica sul livello 3).

Premere il tasto ON/OFF per salvare la regolazione impostata.

Se si utilizzano le pastiglie multifunzione, riempire comunque il serbatoio del sale.


Tabella Durezze Acqua


Autonomia media**


contenitore sale


livello

°dH

°fH

mmol/l

mesi

1

0

-

6

0 - 10

0 - 1

7 mesi

2

6 - 11

11 - 20

1,1 - 2

5 mesi

3

12

-

17

21 - 30

2,1 - 3

3 mesi

4

17

-

34

31 - 60

3,1 - 6

2 mesi

5*

34

-

50

61 - 90

6,1 - 9

2/3 settimane

Da 0°f a 10°f

si consiglia di non utilizzare sale. * con imposta-

zione 5 la durata può prolungarsi. ** con 1 lavaggio al giorno

(°dH = durezza in gradi tedeschi - °fH = durezza in gradi francesi - mmol/l = millimol/litro)

Caricare il sale rigenerante

Per avere buoni risultati di lavaggio è indispensabile verificare che il serbatoio del sale non sia mai vuoto.

Il sale rigenerante elimina il calcare dall’acqua, evitando che si depositi sulle stoviglie.

Il serbatoio del sale è posto nella parte inferiore della lavastoviglie (vedi Descrizione) e va riempito:

quando il galleggiante verde* non è visibile osservando il tappo del sale;

quando sul pannello si accende la spia MANCANZA SALE*;

1. Estrarre il cesto inferiore e svitare il tappo

del serbatoio in senso antiorario.

2. Solo per il primo utilizzo: riempire il

serbatoio di acqua fino al bordo.

3. Posizionare l’imbuto* (vedi figura) e

riempire il serbatoio di sale fino al bordo (circa 1 kg); è normale che trabocchi un

po’ d’acqua.

4. Togliere l’imbuto*, eliminare i residui di sale dall’imbocco; sciacquare il tappo sotto l’acqua corrente prima di avvitarlo, disponendolo a testa in giù e facendo defluire l’acqua dalle quattro fessure disposte a stella nella parte inferiore del tappo.

(tappo con galleggiante verde*)

E’ consigliabile effettuare questa operazione ad ogni caricamento del sale.

Chiudere bene il tappo, affinché nel serbatoio non entri detersivo durante il lavaggio (potrebbe danneggiarsi irrimediabilmente il dolcificatore).

Quando si rende necessario, caricare il sale prima di un ciclo di lavaggio in modo da eliminare la soluzione salina traboccata dal contenitore del sale.

* Presente solo su alcuni modelli.

12

Manutenzione e cura

Escludere acqua e corrente elettrica

Chiudere il rubinetto dell’acqua dopo ogni lavaggio per


eliminare il pericolo di perdite.


Staccare la spina dalla presa di corrente quando si pulisce


la macchina e durante i lavori di manutenzione.

Pulire la lavastoviglie


La superficie esterna e il pannello di controllo possono essere


puliti con un panno inumidito con acqua non abrasivo. Non


usare solventi o detersivi


abrasivi.


La vasca interna può essere pulita da eventuali macchie con


un panno imbevuto di acqua e poco aceto.


Evitare i cattivi odori


Lasciare sempre socchiusa la porta per evitare il ristagno di


umidità.


Pulire regolarmente le guarnizioni perimetrali di tenuta della


porta e delle vaschette detersivo con una spugnetta umida.


Si eviteranno così ristagni di cibo, principali responsabili del


cattivo odore.


Pulire gli irroratori


Può succedere che residui di cibo si attacchino agli irroratori e

ostruiscano i fori da cui esce l’acqua: di tanto in tanto è bene

controllarli e pulirli con uno spazzolino non metallico.

I due irroratori, sono entrambi smontabili.


P e r

s m o n t a r e

l ’ i r r o r a t o r e


superiore, occorre svitare girando


in senso antiorario

la ghiera di


plastica.L’irroratore superiore, va


rimontato con la parte con il maggior


numero di fori rivolta verso l’alto.


L’irroratore inferiore si smonta


facendo pressione sulle linguette


poste ai lati e tirandolo verso l’alto.

Pulizia del filtro entrata acqua* Se i tubi dellacqua sono nuovi o sono rimasti per lungo tempo inattivi, prima di fare l’allacciamento, far scorrere l’acqua fino a che diventi limpida e sia priva di impurità. Senza questa precauzione, c’è il rischio che il punto dove entra l’acqua si intasi, danneggiando la lavastoviglie.

Periodicamente, pulire il filtro entrata acqua posizionato all’uscita del rubinetto.

-Chiudere il rubinetto dell’acqua.

-Svitare l’estremità del tubo di carico acqua, togliere il filtro e pulirlo delicatamente sotto un getto di acqua corrente.

-Inserire nuovamente il filtro e avvitare il tubo.

Pulire i filtri


IT

Il gruppo filtrante è formato da tre filtri che puliscono l’acqua di


lavaggio dai residui di cibo e la rimettono in circolo: per avere


buoni risultati di lavaggio è necessario pulirli.


Pulire i filtri con regolarità.


La lavastoviglie non deve essere usata senza filtri o con filtro


sganciato.


• Dopo alcuni lavaggi, controllare il gruppo filtrante e se necessario pulirlo accuratamente sotto acqua corrente, aiutandosi con uno spazzolino non metallico, seguendo le istruzioni sotto riportate:

1.ruotare in senso antiorario il filtro cilindrico C ed estrarlo (fig.1).

2.Estrarre il bicchiere filtro B facendo una leggera pressione sulle alette laterali (Fig. 2);

3.Sfilare il piatto filtro inox A. (fig. 3).

4.Ispezionare il pozzetto ed eliminare eventuali residui di cibo. NON RIMUOVERE MAI la protezione della pompa di lavaggio

(particolare di colore nero) (fig.4).

Dopo la pulizia dei filtri, rimontare il gruppo filtrante e ricollocarlo correttamente nella sua sede; è fondamentale per un buon funzionamento della lavastoviglie.

Se ci si assenta per lunghi periodi

Staccare i collegamenti elettrici e chiudere il rubinetto dell’acqua.

Lasciare socchiusa la porta.

Al rientro, fare un lavaggio a vuoto.

* Presente solo su alcuni modelli.

13

Anomalie e rimedi


Qualora l’apparecchio presenti delle anomalie di funzionamento, controllare i seguenti punti prima di rivolgersi

IT

all’Assistenza.


Anomalie:

Possibili cause / Soluzione:


La lavastoviglie non parte o non

• Spegnere la macchina con il tasto ON/OFF, riaccendere dopo un minuto


risponde ai comandi


circa e reimpostare il programma.


• La spina non è ben inserita nella presa di corrente.


• La porta della lavastoviglie non è ben chiusa.


La porta non si chiude

• La serratura è scattata; spingere energicamente la porta fino a sentire il


“clack”.


La lavastoviglie non scarica

• Il programma non è ancora terminato.


acqua.

• Il tubo di scarico dell’acqua è piegato (vedi Installazione).


• Lo scarico del lavello è ostruito.


• Il filtro è intasato da residui di cibo.


La lavastoviglie fa rumore.

Le stoviglie sbattono tra loro o contro gli irroratori.


Eccessiva presenza di schiuma: il detersivo non è dosato adeguatamente


o non è idoneo al lavaggio in lavastoviglie. (vedi Avvio e utilizzo).


Su stoviglie e bicchieri ci sono

• Manca il sale rigenerante o la sua regolazione non è adeguata alla


depositi calcarei o una patina


durezza dell’acqua (vedi Brillantante e sale).


biancastra.

• Il tappo del serbatoio del sale non è chiuso bene.


• Il brillantante è esaurito o il dosaggio è insufficiente.


Su stoviglie e bicchieri ci sono

• Il dosaggio del brillantante è eccessivo.


striature o sfumature bluastre.


Le stoviglie sono poco

• È stato selezionato un programma senza asciugatura.


asciutte.

• Il brillantante è esaurito o il dosaggio è insufficiente (vedi Brillantante e


sale).


• La regolazione del brillantante non è adeguata.


• Le stoviglie sono in materiale antiaderente o in plastica.


Le stoviglie non sono pulite.

• I cestelli sono troppo carichi (vedi Caricare i cestelli).


• Le stoviglie non sono sistemate bene.


• Gli irroratori non sono liberi di ruotare.


• Il programma di lavaggio è troppo blando (vedi Programmi).


Eccessiva presenza di schiuma: il detersivo non è dosato adeguatamente


o non è idoneo al lavaggio in lavastoviglie. (vedi Avvio e utilizzo).


• Il tappo del brillantante non è stato chiuso correttamente.


• Il filtro è sporco o intasato (vedi Manutenzione e cura).


• Manca il sale rigenerante (vedi Brillantante e sale).


Spegnere la macchina premendo il tasto ON/OFF. Chiudere il rubinetto


dell’acqua per evitare allagamenti, staccare la spina della corrente.


Controllare che il filtro entrata acqua non sia intasato da impurità.


(vedere capitolo “Manutenzione e Cura”)


La lavastoviglie non carica

• Manca l’acqua nella rete idrica.


acqua – Allarme rubinetto

• Il tubo di carico dell’acqua è piegato (vedi Installazione).


chiuso.

• Aprire il rubinetto e l’apparecchio si avvia dopo pochi minuti.


(lampeggia la spia ON/OFF e il

• L’apparecchio si è bloccato perché non si è intervenuti al suono dei bip.


display visualizza H2O ed il simbolo


Spegnere la macchina con il tasto ON/OFF, aprire il rubinetto e dopo


alcuni secondi riaccendere premendo lo stesso tasto. Riprogrammare la


del rubinetto, dopo qualche secondo


macchina e riavviare.


visualizza F 6).


Allarme filtri intasati

• Attendere che il programma di lavaggio sia terminato, aprire la


Sul display si illumina il simbolo


lavastoviglie e pulire il bicchiere filtro e il filtro inox (vedere capitolo


“filtro”.


manutenzione e cura). Il simbolo filtri intasati si spegnerà al ciclo


successivo.


* Presente solo su alcuni modelli.

14

Instructions for use

DISHWASHER

EN

English, 15

Contents

Precautions, advice and Assistance, 16-17

General safety Disposal

Saving energy and respecting the environment Assistance

LFF 8S112

Installation, 18-19

Positioning and levelling

Connecting the electricity and water supplies Advice regarding the first wash cycle Technical data

Description of the appliance, 20

Overall view Control panel

Loading the racks, 21-22

Lower rack Upper rack

Adjusting the upper rack Third rack

Unsuitable crockery

Damage to glass and crockery

Start-up and use, 23

Starting the dishwasher Measuring out the detergent

Wash cycles, 24

Table of wash cycles Ecodesign Regulation

Special wash cycles and options, 25

Rinse aid and refined salt, 26

Measuring out the rinse aid Measuring out the refined salt

Care and maintenance, 27

Cutting off the water and electricity supplies Cleaning the dishwasher

Preventing unpleasant odours Cleaning the sprayer arms Cleaning the water inlet filter Cleaning the filters

Leaving the machine unused for extended periods

Troubleshooting, 28

Precautions, advice and Assistance

EN

T h i s a p p l i a n c e w a s d e s i g n e d a n d

manufactured in compliance with international


safety standards The following information has


been provided for safety reasons and should


therefore be read carefully.


Keep this instruction manual in a safe place for


future reference. If the appliance is sold, given


away or moved, please ensure the manual is kept


with the machine.


Please read these instructions carefully: they


contain important information on installation, use


and safety.

This appliance is designed for domestic use or similar applications, for example:

-staff kitchen areas in shops, offices and other work environments;

-farmhouses;

-use by guests in hotels, motels and other residential settings;

-bed & breakfasts.

General safety

The appliance should not be operated by people (including children) with reduced physical, sensory or mental capacities, or by inexperienced people who are not familiar with the product, unless supervision or instructions on how to use it are provided by someone who assumes responsibility for their safety.

An adult must supervise children at all times to prevent them from playing with the appliance.

The appliance was designed for domestic use inside the home and is not intended for commercial or industrial use.

The appliance must be used by adults only to wash domestic crockery in accordance with the instructions in this manual.

The appliance must not be installed outdoors, even in covered areas. It is extremely dangerous to leave the machine exposed to rain and storms.

Do not touch the appliance when barefoot.

When unplugging the appliance always pull the plug from the mains socket. Do not pull on the cable.

The water supply tap must be shut off and the plug should be removed from the electrical socket before cleaning or maintaining the appliance.

If the appliance breaks down, do not under any circumstances touch the internal parts in an attempt to perform the repair work yourself.

Do not lean or sit on the open door of the appliance: this may cause the appliance to overturn.

The door should not be left open as it may create

a dangerous obstacle.

Keep detergent and rinse aid out of reach of children.

The packaging material should not be used as a toy for children.

Disposal

Disposal of packaging material: observe local legislation so that the packaging may be reused.

The European Directive 2012/19/EU relating to Waste Electrical and Electronic Equipment

(WEEE) states that household appliances should not be disposed of using the normal solid urban waste cycle. Exhausted appliances should be collected separately in order to optimise the re-using and recycling rate of the materials inside the machine, while preventing potential damage to the environment and public health. The crossed-out dustbin symbol is marked on all products to remind the owners of their obligations regarding separated waste collection.

For further information relating to the correct disposal of household appliances, owners may contact the relevant public authority or the local appliance dealer.

Saving energy and respecting the environment

Saving water and energy

Only begin a wash cycle when the dishwasher is full. While waiting for the dishwasher to be filled, prevent unpleasant odours using the Soak cycle (see Wash cycles).

Select a wash cycle that is suited to the type of crockery and to the soil level of the crockery using the Table of wash cycles:

-for dishes with a normal soil level use the Eco wash cycle, which ensures low energy/water consumption levels.

-If the load is smaller than usual activate the Half Load option* (see Start-up and use).

If your electricity supply contract gives details of electricity-saving time bands, run wash cycles when electricity prices are lower. The Delayed

Start button * (see Start-up and use) helps you organise the wash cycles accordingly.

* Only available in selected models.

16

Phosphate-free and chlorine-free detergents containing enzymes

Westronglyrecommendthatyouusedetergents that do not contain phosphates or chlorine, as these products are harmful to the environment.

Enzymes provide a particularly effective action at temperatures around 50°C. As a result detergents containing enzymes can be used in conjunction with low-temperature wash cycles in order to achieve the same results as a normal

65°C wash cycle.

To avoid wasting detergent, use the product in appropriate quantities based on the manufacturer’s recommendations, the hardness of the water, the soil level and the quantity of crockery to be washed. Even if they are biodegradable, detergents contain substances which may alter the balance of nature.

Assistance


EN


Before contacting Assistance:

Check whether the problem can be resolved using the

Troubleshooting guide (see Troubleshooting).

Restart the programme to check whether the problem has ceased to exist.

If the problem persists, contact the Authorised Technical Assistance Service.

Never use the services of unauthorised technicians.

Please have the following information to hand:

The type of malfunction.

The appliance model (Mod.).

The serial number (S/N).

This information can be found on the appliance data plate

(see Description of the appliance).

17

Installation

EN


If the appliance must be moved at any time, keep it in an


upright position; if absolutely necessary, it may be tilted onto its


back.

Positioning and levelling

1.Remove the appliance from all packaging and check that it has not been damaged during transportation. If it has been damaged, contact the retailer and do not proceed any further with the installation process.

2.Arrange the dishwasher so that its sides or back panel are in contact with the adjacent cabinets or the wall. This appliance

can also be recessed under a single worktop* (see the Assembly

Instruction sheet.)

3. Position the dishwasher on a level sturdy floor. If the floor is uneven, the front feet of the appliance should be adjusted until it reaches a horizontal position. If the appliance is levelled correctly, it will be more stable and much less likely to move or cause vibrations and noise while it is operating.

4*. To adjust the height of the rear foot, turn the red hexagonal bushing on the lower central part at the front of the dishwasher using a hexagonal spanner with an opening of 8 mm. Turn the spanner in a clockwise direction to increase the height and in an anticlockwise direction to decrease it (see Building-in Instruction sheet attached to the documentation.)

Connecting the water and electricity supplies

Connection to the water and electricity supplies should only be performed by a qualified technician.

The dishwasher should not stand on the water hoses or electricity supply cable.

The appliance must be connected to the water supply network using new hoses.

Do not use old piping.

The water inlet and outlet hoses and the electricity supply cable may be positioned towards the right or the left in order to achieve the best possible installation.

Connecting the water inlet hose

To a suitable cold water connection point: before attaching the hose, run the water until it is perfectly clear so that any impurities that may be present in the water do not clog the appliance; after performing this operation, screw the inlet hose tightly onto a tap with a ¾ gas threaded connection.

To a suitable hot water connection point: your dishwasher may be supplied with hot water from the mains supply (if you

have a central heating system with radiators) provided that it does not exceed a temperature of 60°C.

Screw the hose to the tap as described for connection to a cold water supply.

If the inlet hose is not long enough, contact a specialist store or an authorised technician (see Assistance.)

The water pressure must be within the values indicated in the Technical Data table (see adjacent information.)

The hose should not be bent or compressed.

Connecting the water outlet hose

Connect the outlet hose (without bending it) to a drain duct with a minimum diameter of 4 cm.

The outlet hose must be at a height ranging from 40 to 80 cm from the floor / surface where the dishwasher rests (A).

Before connecting the water outlet hose to the sink drain, remove the plastic plug (B).

Anti-flooding protection

To ensure floods do not occur, the dishwasher:

- is provided with a special system which blocks the water supply in the event of anomalies or leaks from inside the appliance.

Some models are also equipped with the supplementary safety device New Acqua Stop*, which guarantees anti-flooding protection even in the event of a supply hose rupture.

WARNING: HAZARDOUS VOLTAGE!

Under no circumstances should the water inlet hose be cut, as it contains live electrical parts.

Electrical connection

Before inserting the plug into the electrical socket, make sure that:

The socket is earthed and complies with current regulations.

the socket can withstand the maximum load of the appliance, which is indicated on the data plate located on the inside of the door

(see Description of the appliance);

The power supply voltage falls within the values indicated on the data plate on the inside of the door.

The socket is compatible with the plug of the appliance. If this is not the case, ask an authorised technician to replace the plug (see Assistance); do not use extension cables or multiple sockets.

Once the appliance has been installed, the power supply cable and the electrical socket should be easily accessible.

The cable should not be bent or compressed.

If the power supply cable is damaged, it must be replaced by the manufacturer or its Technical Assistance Service in order to prevent all potential hazards (see Assistance.)

* Only available in selected models.

18

Anti-condensation strip*

After installing the dishwasher, open the door and stick the adhesive transparent strip under the wooden shelf in order to protect it from any condensation which may form.

Advice regarding the first wash cycle

After the appliance has been installed, immediately before running the first wash cycle, completely fill the salt dispenser with water and add only then approximately 1 kg of salt

(see chapter entitled Rinse aid and refined salt). The water may overflow: this is normal and is not a cause for concern. Select the water hardness value (see chapter entitled Rinse aid and refined salt). - After the salt has been poured into the machine, the LOW SALT indicator light* switches off.

If the salt container is not filled, the water softener and the heating element may be damaged as a result.

Technical data

Dimensions

width 60 cm

height 85 cm


depth 60 cm

Capacity

14 standard place-settings

Water supply

0,05 ÷ 1MPa (0.5 ÷ 10 bar)

pressure

7,25 – 145 psi

Power supply

See appliance data plate

voltage


Total absorbed

See appliance data plate

power


Fuse

See appliance data plate


This dishwasher conforms to the


following European Community


Directives:


-2006/95/EC (Low Voltage)


-2004/108/EC (Electromagnetic


Compatibility)


-2009/125/EC (Comm. Reg.


1016/2010) (Ecodesign)


-97/17/EC (Labelling)


-2012/19/EU Waste Electrical


and Electronic Equipment


(WEEE)


The machine has a buzzer/set of tones (depending on the dishwasher model) to inform the user that a command has EN been implemented: power on, cycle end etc.

The symbols/indicator lights/LEDs on the control panel/ display may vary in colour and may have a flashing or fixed light (depending on the dishwasher model).

The display provides useful information concerning the type of wash cycle, drying/wash-cycle phase, remaining time, temperature etc etc.

* Only available in selected models.

19

Description of the appliance

EN

Overall view


1. Upper rack

2. Upper sprayer arm

3. Tip-up dispensers

4. Rack height adjuster

5. Third rack*

6. Lower rack

7. Lower sprayer arm

8. Washing filter

9. Salt dispenser

10. Detergent and rinse-aid dispensers and device Active Oxigen*

11. Data plate

12. Control panel***


Control Panel

Multi-functional Tablets


Delayed Start buttons

option button (Tabs)

Wash-Cycle Selection buttons


On-Off/Reset button

Display

Start/Pause button

and indicator light

and indicator lights


Extra Drying option button


Short Time option button


Zone Wash option button

Display

Low Salt indicator light

Remaining Time indicator

Washing and Drying indicator lights

Blocked Filter indicator light

Low Rinse Aid indicator light

Tap Shut-Off indicator light

Wash cycle


Wash cycle


Delayed Start indicator light


Zone Wash indicator lights


Short Time option indicator light

Extra Drying indicator light


Multi-Functional Tablets indicator light (Tabs)


*** Only in completely built-in models * Only available in selected models.

The number and type of wash cycles and options may vary depending on the dishwasher model.

20

Hotpoint LFF 8S112 X EU, LFF 8S112 EU User Manual

Loading the racks

Tips

Before loading the racks, remove all food residues from the crockery and empty liquids from glasses and containers. No preventive rinsing is needed under running water.

Arrange the crockery so that it is held in place firmly and does not tip over and arrange the containers with the openings facing downwards and the concave/convex parts placed obliquely, thus allowing the water to reach every surface and flow freely.

Make sure that the lids, handles, trays and frying pans do not prevent the sprayer arms from rotating. Place any small items in the cutlery rack.

Since plastic dishes and non-stick frying pans usually retain more water drops, their drying will be not so good as that of ceramic or stainless-steel dishes.

Lightweight items such as plastic containers should be placed in the upper rack and arranged so that they cannot move.

After loading the appliance, make sure that the sprayer arms can rotate freely.

Lower rack

The lower rack can hold pans, lids, dishes, salad bowls, cutlery etc. Large plates and lids should be placed at the sides of the rack.

Very soiled dishes and pans should be placed in the lower rack because in this sector the water sprays are stronger and allow a higher washing performance.

Several dishwasher models are fitted with tip-up sectors*. They can be used in a vertical position when arranging dishes or in a horizontal position (lower) to load pans and salad bowls easily.

EN

Upper rack

Load this rack with delicate and lightweight crockery such as glasses, cups, saucers and shallow salad bowls.

Several dishwasher models are fitted with tip-up sectors*. They can be used in a vertical position when arranging tea/dessert saucers or in a lower position to load bowls and food containers. The side tip-up dispensers can be positioned at three different heights to optimize the arrangement of crockery throughout the rack.

Wine glasses can be placed safely in the tip-up dispensers, by inserting the stem of each glass into the corresponding slots.

*Only available in selected models with different numbers and positions.

21

The upper rack can be adjusted for height based on

EN requirements: high position to place bulky crockery in the lower rack and low position to make the most of the tip-up dispensers/ sectors by creating more space upwards.

Adjusting the height of the upper rack

In order to make it easier to arrange the crockery, the upper rack may be moved to a higher or lower position.

The height of the upper rack should be adjusted WHEN THE RACK IS EMPTY.

NEVER raise or lower the rack on one side only.

If the rack is equipped with a Lift-Up device* (see figure), lift it up by holding its sides. To restore the lower position, press the levers (A) at the sides of the rack and follow the rack down.

The upper rack cannot be used in the high position and with the tip-up compartments closed in a vertical position.

Third rack

The third rack was designed to house the cutlery. Arrange the cutlery as shown in the figure.

Knives and other utensils with sharp edges must be positioned with the blades facing downwards.

A separate arrangement of the cutlery makes collection easier after washing and improves washing and drying performance.

*Only available in selected models with different numbers and positions.

The geometry of the rack makes it possible to place such small items as coffee cups in the area in the middle.

The third basket is equipped with two sliding side trays to make the most of the height of the space below.

Unsuitable crockery

Wooden crockery and cutlery.

Delicate decorated glasses, artistic handicraft and antique crockery. Their decorations are not resistant.

Parts in synthetic material which do not withstand high temperatures.

Copper and tin crockery.

Crockery soiled with ash, wax, lubricating grease or ink. The colours of glass decorations and aluminium/silver pieces can change and fade during the washing process. Some types of glass (e.g. crystal objects) can become opaque after a number

of wash cycles too.

Damage to glass and crockery

Caused by:

Type of glass and glass production process.

Chemical composition of detergent.

Water temperature of rinse cycle.

Tips:

Only use glasses and porcelain guaranteed by the manufacturer as dishwasher safe.

Use a delicate detergent suitable for crockery.

Collect glasses and cutlery from the dishwasher as soon as the wash cycle is over.

22

Start-up and use

Starting the dishwasher

1.Turn the water tap on.

2.Press the ON/OFF button: The ON/OFF indicator light and the display light up.

3.Open the door and pour in a suitable amount of detergent

(see below).

4.Load the racks (see Loading the racks) and shut the door.

5.Select the wash cycle in accordance with the type of crockery and its soil level (see Table of wash cycles) by pressing the wash-cycle selection buttons.

6.Select the wash options* (see adjacent information).

7.Start the cycle by pressing the Start/Pause button: The wash indicator light comes on and the time left until the end of the cycle appears on the display.

8.At the end of the cycle, the display shows END. Switch off the appliance by pressing the ON/OFF button, shut off the water tap and unplug the appliance from the electricity socket.

9.Wait for a few minutes before removing the crockery in order

to avoid burns. Unload the racks, beginning with the lower level.

- The machine will switch off automatically during long periods of inactivity in order to minimise electricity consumption.

AUTO WASH CYCLES*:some dishwasher models are equipped with a special sensor which can be used to assess the level of soiling and automatically select the most efficient and economical wash cycle accordingly. The duration of the auto wash cycles may vary due to the operation of the sensor.

Changing a wash cycle in progress

If a mistake was made during the wash cycle selection process, it is possible to change the cycle provided that it has only just begun: once the wash cycle has started, switch off the machine by pressing and holding the ON/OFF/Reset button. Switch it back on using the same button and select the desired wash cycle and options.

Adding extra crockery

Press the Start/Pause button and open the door, taking care to avoid the escaping steam, and place the crockery inside the dishwasher. Press the Start/Pause button: The cycle will start again after a long beep has been emitted.

If the delayed start has been set, at the end of the countdown the wash cycle will not start. It will stay in Pause mode.

Press the Start/Pause symbol to pause the machine; the wash cycle is stopped.

At this stage it is not possible to change the wash cycle.

Accidental interruptions

If the door is opened during the wash cycle or there is a power cut, the cycle stops. It starts again from the point at which it was interrupted once the door has been shut or the electricity supply is restored.

* Only available in selected models.

Measuring out the detergent


EN

A good wash result also depends on the correct amount of


detergent being used. Exceeding the stated amount does not


result in a more effective wash and increases environmental


pollution.


Based on how soiled the items are, the amount can be


adjusted to individual cases using powder or liquid detergent.


In the case of normally soiled items, use approximately either


35 gr (powder detergent) or 35 ml (liquid detergent). If tablets


are used, one tablet will be enough.


If the crockery is only lightly soiled or it has been rinsed


with water before being placed in the dishwasher, reduce


the amount of detergent considerably.


For good washing results also follow the instructions shown


on the detergent box.


For further questions please ask the detergent producers'


Advice Offices.


If the detergent dispenser is still closed, use the closing


device “A” to open it.


Introduce the detergent into the dry dispenser “B” only. Place the amount of detergent for pre-washing directly inside the tub.

1.When measuring out the detergent refer to the Table of wash cycles to add the proper quantity.

Compartment B comprises a level showing the maximum quantity of liquid or powder detergent that can be added to each cycle.

2.Remove detergent residues from the edges of the dispenser and close the cover until it clicks.

3.Close the lid of the detergent dispenser by pulling it up until the closing device is secured in place.

The detergent dispenser automatically opens up at the right time according to the wash cycle.

If all-in-one detergents are used, we recommend using the TABS option, because it adjusts the cycle so that the best washing and drying results are always achieved.

Only use detergent which has been specifically designed for dishwashers.

DO NOT USE washing up liquid.

Using excessive detergent may result in foam residue remaining in the machine after the cycle has ended.

The use of tablets is only recommended for models which offer the MULTI-FUNCTIONAL TABLETS option.

To achieve the best results from each washing and drying cycle, powder detergent, rinse-aid liquid and salt should be used.

23

Wash cycles


The number and type of wash cycles and options may vary depending on the dishwasher model.


EN


Instructions on wash-cycle selection and


Wash cycles


Approximate


Wash cycle

with

Options


duration of


detergent dosage


drying


wash cycles


Environmentally-friendly wash cycle with low


Delayed start – Tabs –


energy consumption levels, suitable for pans and

Eco*


dishes.

Yes

Extra Dry


3:10’


32 gr/ml + 6 gr/ml** – 1 Tab


Heavily soiled dishes and pans (not to be used for


Delayed start – Tabs –


delicate items).


Yes

Extra Dry -


2:30’


38 gr/ml – 1 Tab

Auto Intensive

Short Time – Zone wash


Normally soiled pans and dishes. Standard daily


Delayed start – Tabs –


wash cycle.


Yes

Extra Dry - Zone wash –


2:00’


32 gr/ml + 6 gr/ml** – 1 Tab

Auto Normal

Short Time


Limited quantity of daily soiling


(4 place settings + 1 saucepan +1 frying pan).


No

Delayed start – Tabs


1:00’


25 gr/ml – 1 Tab

Auto Fast


Wash spread over the three racks: normal in the


Delayed start – Tabs –


upper rack and third rack for cutlery and glasses,


Extra Dry -


heavy-duty in saucepans in the lower rack.


Yes


2:00’


Short Time


38 gr/ml – 1 Tab

Trio wash


Economical and fast wash for delicate items


which are sensitive to high temperatures - run


immediately after use (glassware in the upper rack


Yes

Delayed start – Tabs –


1:40’


+ fragile plates in the lower rack).


Extra Dry


35 gr/ml – 1 Tab

Delicates


Economical and fast wash to be used for lightly


soiled dishes - run immediately after use (2 plates


+ 2 glasses + 4 pieces of cutlery + 1 saucepan + 1


No

Delayed start - Tabs


0:30’


small frying pan).


25 gr/ml – 1 Tab

Express 30’


Pre-wash for dishes while awaiting completion of


the load with the dishes from the next meal.


No

Delayed start


0:12’


No detergent

Soak


** Quantity of pre-washing detergent.

ECODESIGN REGULATION

The ECO wash cycle is the standard cycle to which the energy label data refers. It can be used to wash crockery with a normal soil

level and is the most efficient cycle in terms of energy and water consumption for this type of crockery.


To reduce consumption even further, only run the dishwasher when it is full.


Standby consumption: Left-on mode consumption:

5 W - Off mode consumption: 0.5 W


Consumption data table for the main cycles


Standard conditions*


User conditions**


Energy consumption

Water consumption

Duration (min/cycle)


Energy consumption

Water consumption

Duration


(kWh/cycle)

(l/cycle)


(kWh/cycle)

(l/cycle)

(min/cycle)


INTENSIVE

1,50

15

150


1,30

14

135


NORMAL

1,20

15

120


1,05

14

110


*Cycle data refers to the values recorded in a laboratory in accordance with European standard EN 50242. ** Data is obtained by recording values when the appliance is operational and loaded with user crockery.

24

Special wash cycles and Options

Notes:

Optimum performance levels when using the “Fast wash” and “Express 30’” cycles can be achieved by respecting the specified number of place settings.

*The Eco wash cycle complies with regulation EN-50242. Although it has a longer duration than other wash cycles, it uses less energy and is less harmful to the environment.

Note for Test Laboratories: for information on comparative EN testing conditions, please send an email to the following address:

ASSISTENZA_EN_LVS@indesitcompany.com

Wash options*

The OPTIONS may only be set, changed or reset after the wash cycle has been selected and before the Start/ Pause button has been pressed.

Only the options which are compatible with the type of wash cycle set may be selected. If an option is not compatible with the selected wash cycle (see Table of wash cycles), the corresponding symbol flashes rapidly 3 times.

If an option is selected which is not compatible with another (previously selected) option, it will flash 3 times and switch off, while the most recently selected option will remain active. To deselect an option which has been set by mistake, press the corresponding button again.

Delayed start

It is possible to delay the start time of the cycle by 1 to 24 hours:

1.Select the desired wash cycle and any other options required, press the DELAYED START button. The relevant symbol starts flashing. Use the buttons + and - to select when the wash cycle will start (h01, h02 etc.)

2.Confirm with the START/PAUSE button. The symbol stops flashing and the countdown begins.

3.Once this time has elapsed, the DELAYED START symbol switches off and the wash cycle begins.

To deselect the DELAYED START option, press the DELAYED

START button until the text OFF appears.

The Delayed Start function cannot be set once a wash cycle has been started.

Short Time

This option can be used to reduce the duration of the main wash cycles while, maintaining the same washing and drying performance levels. After selecting the wash cycle, press the SHORT TIME button; the illumination of the corresponding indicator light indicates its selection. Press it again to deselect it.

Extra drying*


EN

To improve the dryness level of the crockery, press


the EXTRA DRYING button and the symbol will light up. If it


is pressed again, the option will be deselected.


A higher temperature during the final rinsing and a longer


drying phase improve the dryness level.


The EXTRA DRYING option increases the duration of the wash cycle.

Multi-functional tablets* (Tabs)

This option optimises washing and drying results.

When using multi-functional tablets, press the MULTIFUNCTIONAL TABLETS button; the corresponding symbol will light up. If the button is pressed again, the option will be deselected.

The “Multi-functional tablets” option results in a longer wash cycle.

The use of tablets is only recommended for models having this option and it is not recommended with wash cycles which do not specify the use of multi-functional tablets.

Zone Wash*

This option makes it possible to carry out the wash

cycle in the selected rack only. Select the wash cycle and then press the ZONE WASH button: the selected rack lights up and the wash cycle starts in the selected rack only. Press the button again to deselect the option.

The option is available with the following wash cycles:

Intensive and Normal.

Select the option and the Intensive cycle to start the POWER ZONE washing. This wash cycle is ideal for very soiled mixed loads, e.g. pans and saucepans, dishes with heavy encrustation or difficult-to-clean crockery (grater, vegetable mill, dirty cutlery). The spraying pressure is stronger and the washing temperature higher, thus ensuring optimum handling of stubborn stains.

Select the option and the Normal cycle to start the GREEN ZONE washing. This function makes it possible to reduce water and energy consumption, thus achieving excellent washing and drying results. Cycle duration is longer.

Remember to load the crockery in the selected rack only.

25

Rinse aid and refined salt


Only use products which have been specifically designed

EN


for dishwashers.


Do not use table salt or industrial salt, or washing up liquid.


Follow the instructions given on the packaging.


If using a multi-functional product it is not necessary to any


add rinse aid; however, we recommend that you add salt,


especially if you live in an area where the water is hard or


very hard. (Follow the instructions given on the packaging).


If you do not add salt or rinse aid, the LOW SALT* and


LOW RINSE AID indicator lights will remain lit.


Measuring out the rinse aid


Rinse aid makes it easier for the crockery to dry, as water runs


off surfaces more readily and therefore does not leave streaks


or marks. The rinse aid dispenser should be filled:


• When the LOW RINSE AID* indicator light on the control panel


is illuminated, a reserve supply of rinse aid is still available


for 1-2 cycles;

A

X

M

1.Open the dispenser “D” by pressing and pulling up the tab on the lid;

2.Carefully introduce the rinse aid as far as the maximum reference notch of the filling space - avoid spilling it. If this happens, clean the spill immediately with a dry cloth.

3.Press the lid down until you hear a click to close it.

NEVER pour the rinse aid directly into the tub.

Rinse-aid dispenser setting

If you are not completely satisfied with the drying results, you may adjust the quantity of rinse aid.

Switch on the dishwasher using the ON/OFF button, wait a few seconds and then switch it off using the ON/OFF button. Press the Start/Pause button 3 times.

Switch on the dishwasher using the ON/OFF button, you enter the menu for setting and rinse aid indicator light shown on the display (default setting is level 2)

Adjust the level of rinse aid supply using the ECO cycle button. (from 0 to 4 max)

Press the ON/OFF button to save the setting.

If the rinse aid level is set to ZERO, no rinse aid will be supplied. The LOW RINSE AID indicator light will not illuminate if you run out of rinse aid.

If there are streaks on the crockery, set the adjustment device to a lower number (1-2).

If there are drops of water or limescale marks, set the adjustment device to a higher number (3-4).

Setting the water hardness

Every dishwasher is equipped with a water softener which, by using refined salt designed especially for this type of appliance, supplies water without limescale which is then used to wash the crockery.

This dishwasher offers a setting which helps to reduce pollution and optimises washing performance in accordance with the

water hardness level in your area. This information can be obtained from your local water supplier.

Switch on the dishwasher using the ON/OFF button, wait a few seconds and then switch it off again (ON/OFF button). Hold down the Start/Pause button for 3 seconds, switch on the dishwasher using the ON/OFF button, you enter the menu for setting and the Salt indicator light shown on the display (the default setting of the softener is No. 3).

Adjust the hardness level using the ECO wash-cycle button; (from 1 to max. 5* levels.)

Press the ON/OFF button to save the setting.

Even if using multi-functional tablets, the salt dispenser should still be filled.


Water Hardness Table


Average salt container


capacity duration**

Level

°dH

°fH

mmol/l

months

1

0

- 6

0 - 10

0 - 1

7 months

2

6 - 11

11 - 20

1,1 - 2

5 months

3

12

- 17

21 - 30

2,1 - 3

3 months

4

17

- 34

31 - 60

3,1 - 6

2 months

5*

34

- 50

61 - 90

6,1 - 9

2/3 weeks

For values between 0°f and 10°f, we do not recommend the use of salt. * this setting may cause a slight increase in the duration of the cycles. ** for 1 wash cycle per day.

(°dH = hardness measured in German degrees - °f = hardness measured in French degrees – mmol/l = millimoles per litre)

Measuring out the refined salt

In order to obtain the best possible results from a wash cycle, make sure that the salt dispenser is never empty.

Refined salt removes limescale from the water, thus avoiding the formation of deposits on crockery.

The salt dispenser is located in the lower part of the dishwasher (see Description) and should be filled:

When the green float* cannot be seen by simply looking at the cap of the salt dispenser;

When the LOW RINSE AID indicator light on the control panel

is illuminated *;

1. Remove the lower rack and unscrew the

cap (anticlockwise).

2. The first time you do this: fill the water

tank right up to its edge.

3. Position the funnel* (see figure) and fill the salt dispenser up to the edge

(approximately 1 kg). It is normal for a little water to leak out. 4. Remove the funnel* and wipe any salt residues away from the opening; rinse the cap under running water and then screw it on, the head facing downwards so as to let the water flow out of the four slots (star-shaped) on the lower part of the cap (cap

with green float*).

It is advisable to perform this procedure every time you add salt to the dispenser.

Make sure the cap is screwed on tightly so that no detergent can get into the container during the wash cycle (this could damage the water softener beyond repair).

When necessary, measure out the salt before a wash cycle so that any saline solution which has leaked out of the salt dispenser is removed.

* Only available in selected models.

26

Loading...
+ 58 hidden pages