

Hotpoint HDA850G User Manual
Dishwasher
Conten@
Jse
Air Gap
Appliance Registration
Care and Cleaning
China,
Cycle Features
Detergent, Detergent Guide 6,7
Crvstal, Sterling
4,5
11
2
11
10
and Care of
built-in model
HDA850G
Dispenser Cups
Energy-Saving Tips
Front Panel Color Change
.-
Loading
Model and Serial Numbers
Operating Instructions
Cycle Selection
Drying Options
Soil Level
Plate Warmer
Problem Solver
Repair Service
Safety Instructions
User Maintenance Instructions 11
Warranty
Water Temperature
Winter Storage
Back Cover
7
2
11
8,9
2
4,5
4,5
4,5
7
5
12-14
15
3
6
11
The GE Answer
Center@
800.626.2000
●
Help us help you...
Ene~y-saving
tips
Before
usi~
your dishwasher,
read this book carefully.
It is intended to help you operate
and maintain your new dishwasher
properly.
Keep it handy for answers to your
questions.
If you don’t understand something
or need more help, write (include
your phone number):
Consumer Affairs
Hotpoint
Appliance Park
Louisville, KY 40225
Write down the model
and serial numbers.
You’ll find them on a label just
inside the dishwasher door.
These numbers are also on the
Consumer Product Ownership
Registration Card that came with
your dishwasher. Before sending
in this card, please write these
numbers here:
If you received
a dam~ed dishwasher...
Immediately contact the dealer
(or builder) that sold you the
dishwasher.
Save time and money.
Before you request
service...
Check the Problem Solver
(pages 12-14). It lists causes of
minor operating problems that
you can correct yourself.
The power consumption of your
dishwasher can be minimized if you
follow these suggestions:
●
Operate dishwasher only when
full.
Let dishes accumulate in
dishwasher. When you put in only a
partial load, use WNSE HOLD
cycle to rinse off heavy soils. Be
sure to latch door when waiting for
full load. This helps keep soils
moist, easier to remove.
. If you don’t need your dishes right
away,
use your Drying Heat OFF
feature
off automatically and saves energy.
Dishes dry naturally over a longer
period such as overnight.
●
amount of water to remove soil
from load. See
that turns the drying heater
Select
cycle that uses
pages 4,5.
least
Mdel
Number
Serial Number
Use these numbers in any
correspondence or service calls
concerning your dishwasher.
2
IMPORTANT SAFETY INSTRUCTIONS
Read all instructions before using this appliance.
WMNG—When
appliance, always
using this
exercise(basic
safety precautions, including the
following:
Q
Use this appliance only for
ib
intended purpose, as you
will find described in this Use
and Care Book.
●
This dishwasher must be
properly instilled and located
in
accordmce
with the
Installation Instructions before
it is used.
If you did not receive
an Installation Instructions sheet
with your dishwasher, you can
obtain one by contacting the
service location nearest you.
—This appliance must be
connected to a grounded metal,
-- permanent wiring system; or an
equipment-grounding conductor
must be run with the circuit
conductors and connected to the
equipment-grounding terminal
or lead of the appliance.
—Connect to a properly rated,
protected and sized power-supply
circuit to avoid electrical overload.
●
Use only powder or liquid
detergents or wetting agents
recommended for use in a
dishwasher.
●
DO
not wash
plastic items
unless
marked “dishwasher safe” or the
equitient. For plastic items not so
marked, check the manufacturer’s
recommendations.
●
Load light plastic items so
they will not become dislodged
and drop to the bottom of the
dishwasher—they might come
into contact with the heating
unit and be damaged.
To minimize the possibility of
injury.
●
When loading items to be
washed:
A. Locate sharp items so that
they are not likely to damage
the door seal, and
B. Load sharp knives with the
handles up to reduce the risk
of cut-type injuries.
●
Do not touch the heating
element during or immediately
after use.
●
Do not operate your dishwasher
unless all enclosure panels are
properly in place.
●
Do not tamper with controls.
●
Do not abuse, sit on, or stand
on the door or dish rack of the
dishwasher.
●
Close supervision is necessary
if this appliance is used by or near
children. Do not allow children
to play inside, on or with this
appliance or any discarded
appliance. Dispose of discarded
appliances and shipping or
packing material properly.
Before discarding a dishwasher,
remove the door of the washing
compartment.
●
Keep all washing detergents
and wetting agents out of the
reach of children, preferably in
a locked cabinet, Observe all
warnings on container labels to
avoid personal injury.
●
~ROGEN
GM is
produced by the chemical action
within your water heater. It can
accumulate in the water heater
and/or water pipes if hot water
has not been used for a period of
two weeks or longer. HYDROGEN
GAS IS
EXPLOSWE.
To prevent
the possibility of damage or
injury, if you have not used hot
water for two weeks or more, or
move into a residence in which
the hot water system may not
have been used for some time,
turn on all hot water faucets and
allow them to run for several
minutes before using any
electrical appliance which is
connected to the hot water
system. This will allow any
hydrogen gas to escape. Also,
since the gas is flammable, do
not smoke or use an open flame
or appliance during this process.
SAVE THESE
INSTRUCTIONS
3
How to operate your dishwasher
Door Latch
(Logked)
Cycle
Indicator Dial
(Turn to Start)
STEP 1.
Load your dishwasher
with dishes, silverware, pots, pans,
bowls, etc. according to instructions
on pages 8 and 9.
STEP 2. Add detergent to the
detergent dispenser. Make sure the
Cycle
Indicator Dial is at OFF
position before adding detergent.
(See pages 6 and 7.)
STEP 3.
Select DRYING HEAT
Option. It must be ON for PLATE
WARMER cycle, OFF for RINSE
HOLD cycle. It can be ON or OFF,
at your option (see below), for any
of the wash cycles.
DRYING HEAT
ON
1
OFF
ON. Turns the drying heater on for
fast drying.
OFF. Turns the drying heater off
to save energy. Dishes will dry
naturally over a longer period such
as overnight.
If you need your dishes sooner,
open the dishwasher door after the
cycle is complete to reduce the
natural drying time.
Use of this option reduces the
electrical energy used by this model
approximately 8% for the NORMAL
WASH cycle.
Estimated yearly savings,
depending on your local electrical
rates, are as follows:
STEP 4.
Select the cycle and start
the dishwasher.
If your dishwasher drains into a
food waste disposer, operate the
disposer until it is empty before
starting the dishwasher. (See Cycle
Selection Hints at right,)
To obtain the benefits of a complete
cycle, be careful that you
turn the dial any further than
necessary
I
to start the dishwasher.
do not
. For POTS & PANS, NORMAL
WNH
and LIGHT WASH cycles:
POTS
& PANS WASH
a. Push selected
NORMAL LIGHT
WASH
cycle
button.
b. Latch the door.
ON
●
OFF
■
:WARMER
I
(WSHM”I.G.F.T..
,“,,0.,
c. Slowly turn Cycle Indicator Dial
to ON position to start the cycle.
● For RINSE HOLD cycle:
a. Be sure door is unlatched.
b. Select DRYING HEAT-OFF
drying option.
c. Slowly turn Cycle Indicator
Dial to RINSE HOLD position.
d. Latch the door to start the cycle,
.—
4
●
For PLATE WARMER cycle:
a.
Load clean plates and dishes to
be warmed.
b.
Select DRYING HEAT–ON
drying option.
c.
bave
the door unlatched.
d. Slowly turn Cycle Indicator Dial
clockwise to PLATE WARMER
position.
e. Latch the door to start the
cycle.
Cycle selection hints
It
is important to follow the loading
instructions on pages 8 and 9.
P~S
& PANS—For items such as
pots, pans, cookware, dishes and
glasses with heavy soil. Everyday
dishes may be included.
NORMAL WASH—For most
loads of everyday dishes, glasses
and cookware with medium soils.
LIGHT WASH—For dishes
that have been
loading. Also, for washing
lightly
soiled dishes with soils
that have not dried on.
pre-rinsed
before
ve~
RINSE HOLD—For rinsing
partial loads which will be washed
later. Select DRYING
OFF drying option. Do
HEAT–
not
use
detergent.
PLATE WARMER—For warming
clean dishes and serving plates for
the serving of hot food.
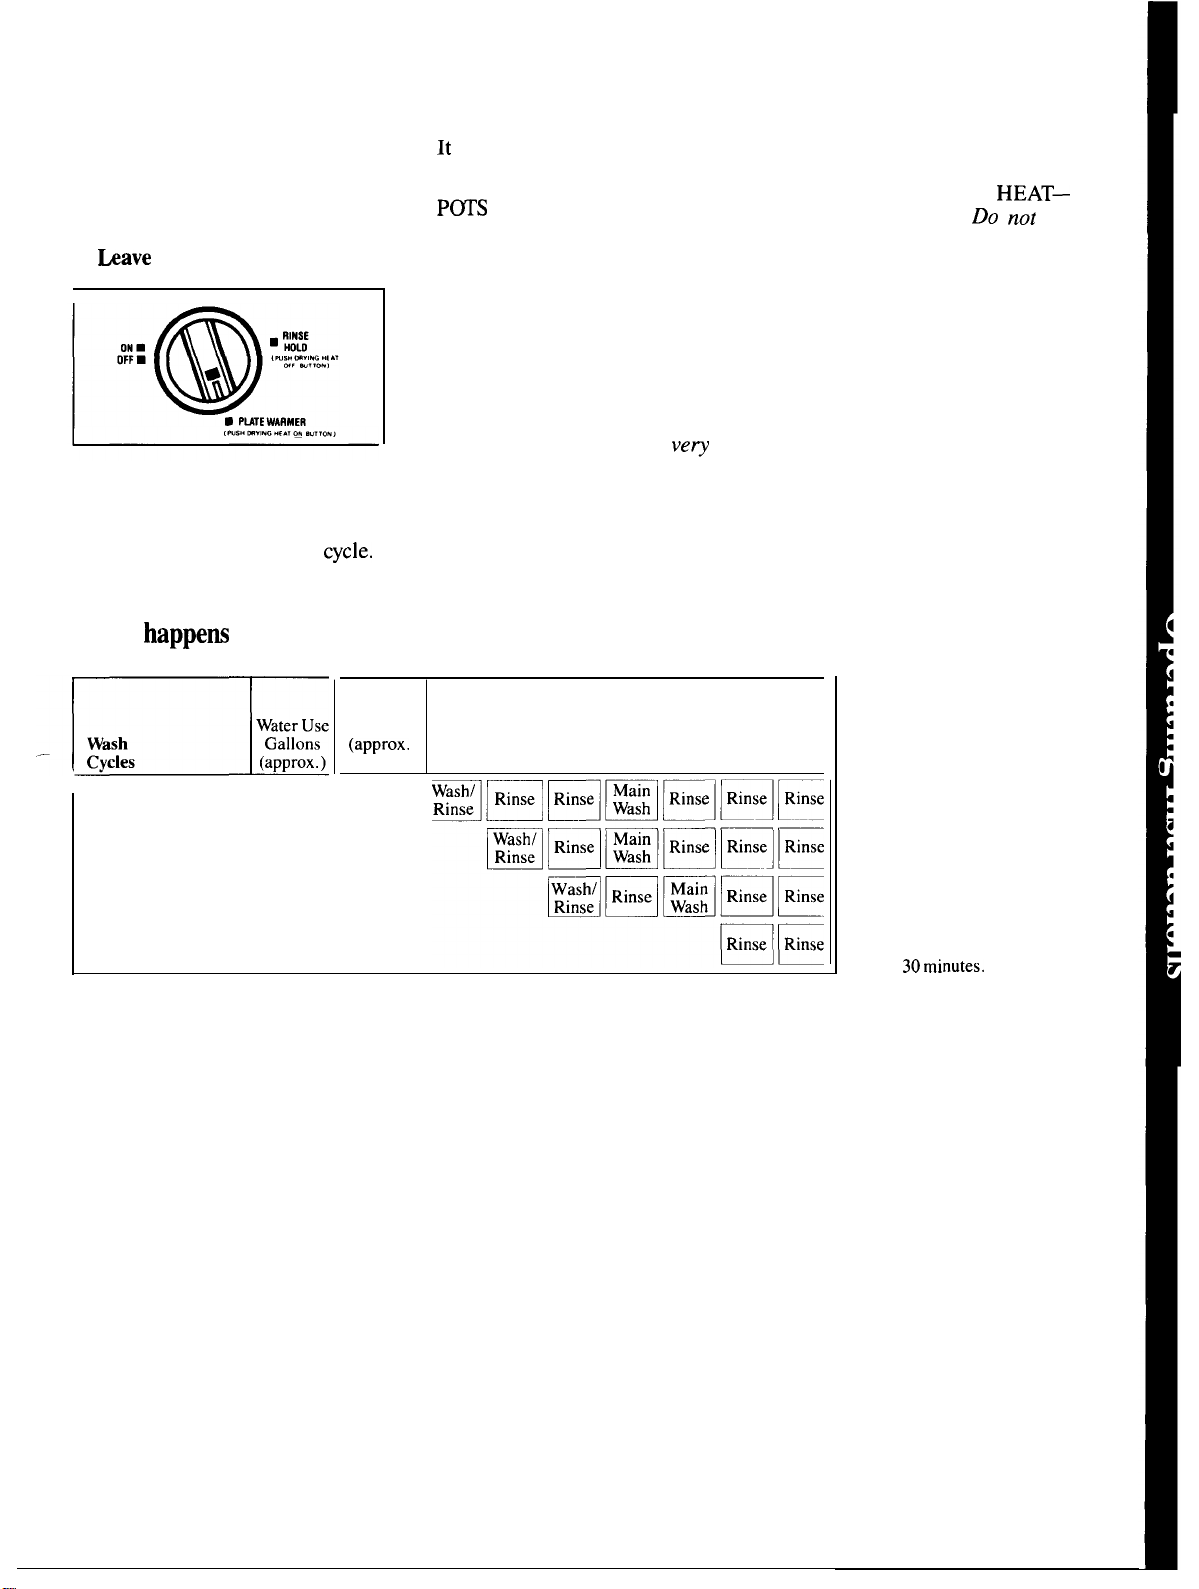
What
●
happem
POTS & PANS
NORMAL WASH
LIGHT WASH
RINSE HOLD
in each cycle
12.6
10.7
9.2
3.6
You’ll hear occasional clicking
sounds:
–Soft food disposer shredding
action.
—Drain valve opening to pump
water out.
—Timer control as cycle
progresses.
—Detergent cup opening.
Minimum
Wash
Time
Cycle
(approx.
minutes)
55*
55*
55*
10
Cycle Sequence
*DRYING HEAT—ON:
Add 30minutes.
● During the drying period:
—The motor stops.
—Water vapor is released through
the vent under the door handle.
It maybe visible.
5
 Loading...