

Page 1
La ringraziamo per aver scelto un prodotto Ariston, sicuro e davvero facile da usare. Per conoscerlo, utilizzarlo al
meglio e a lungo, le consigliamo , prima di utilizzare l’apparecchio, di leggere attentamente le a vvertenze contenute nel
presente libretto, in quanto f orniscono importanti indicazioni riguardanti la sicurezza di installazione, d’uso e di manutenzione. Conservare con cura questo libretto per ogni ulteriore consultazione. Grazie.
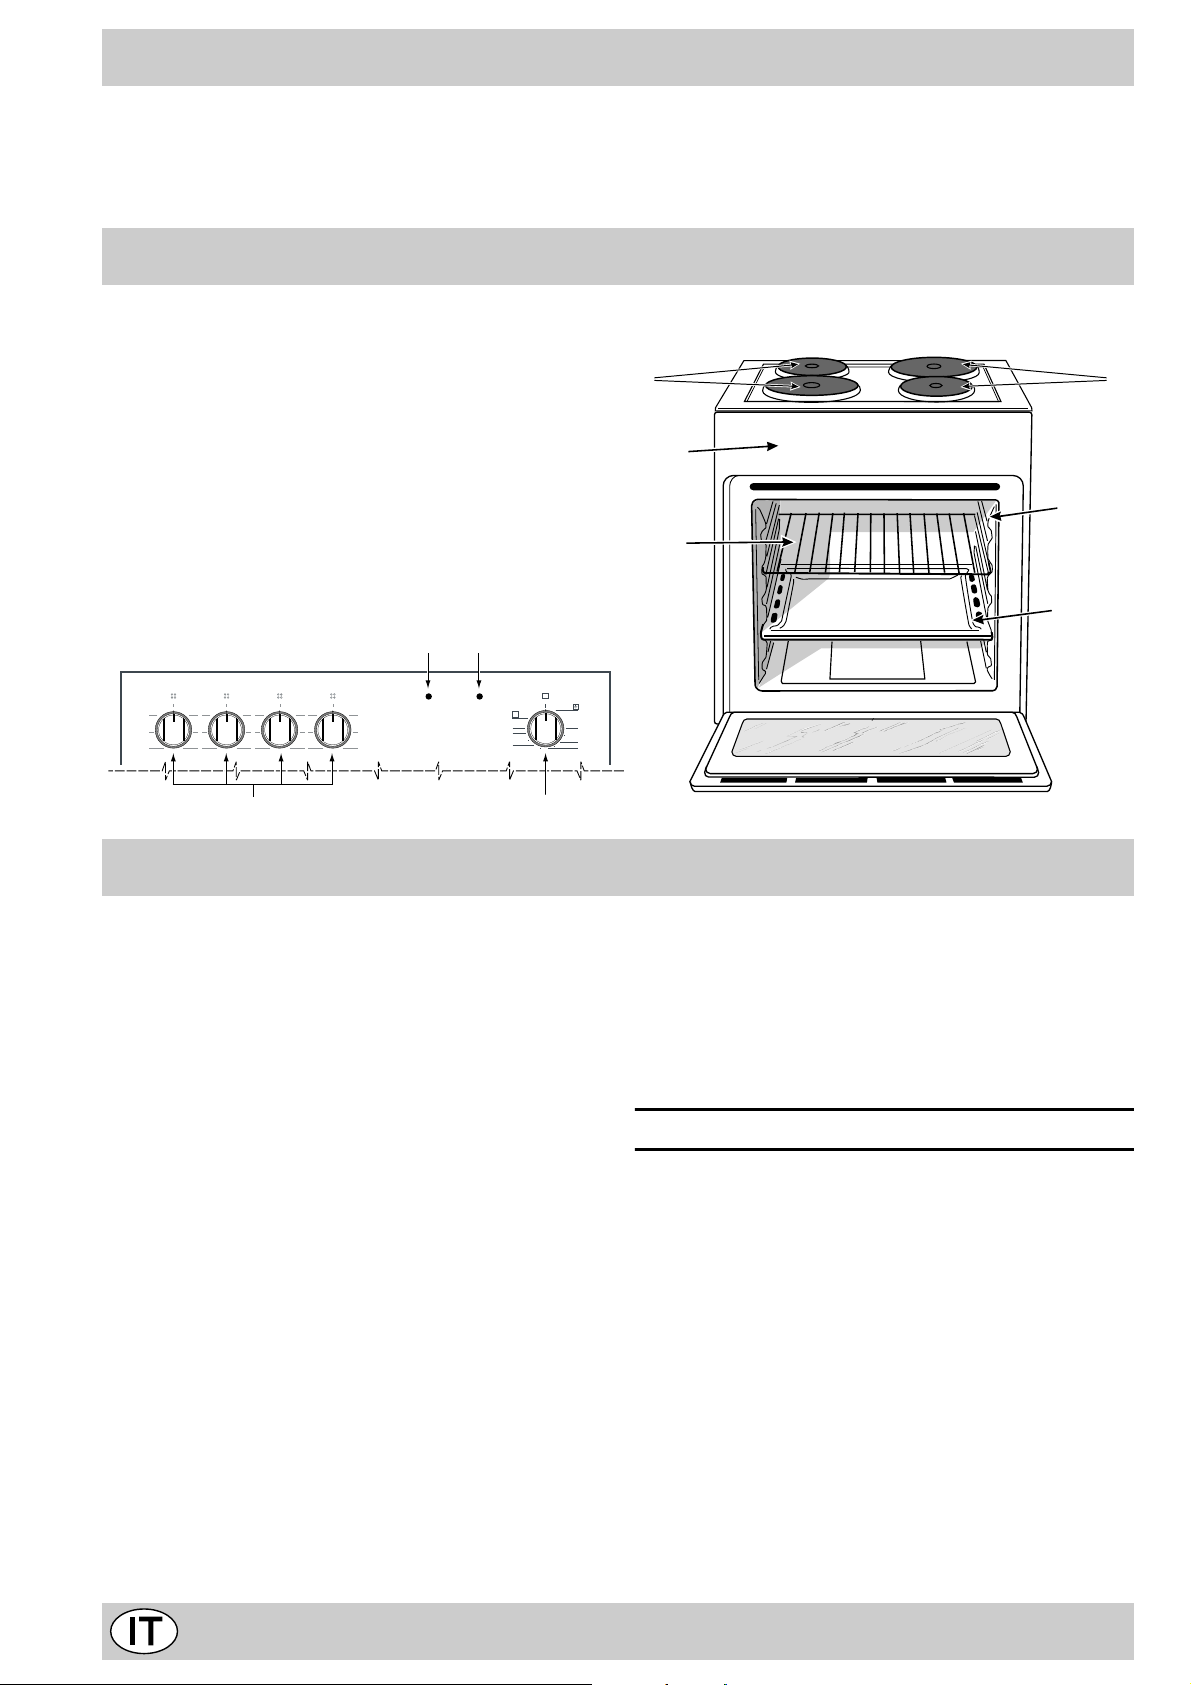
Visto da vicino
A. Cruscotto comandi
B. Leccarda o piano di cottura
C. Griglia ripiano del forno
D. Piastra elettrica
E. Manopola di selezione funzioni di cottura
F. Manopole piastre elettriche
G. Spia funzionamento piastre elettriche
H. Guide di scorrimento di leccarde e griglie
I. Spia di funzionamento del forno (presente solo su
alcuni modelli) - Se accesa indica la fase di riscaldamento fino alla temperatura impostata
G
I
0
0
0
1
2 5
3
6
1
2 5
3
4
6
1
2 5
3
4
6
1
2 5
3
4
0
6
4
0
MAX
220
180
60
100
140
D
A
C
D
H
B
F
E
Come utilizzarlo
La selezione delle varie funzioni presenti nel forno avviene agendo sui dispositivi ed organi di comando posti sul
cruscotto dello stesso.
Attenzione: Alla prima accensione consigliamo di f ar funzionare il forno a vuoto per circa mezz’ora con il termostato al massimo e a porta chiusa. Quindi trascorso tale
tempo spegnerlo, aprite la porta ed areare il locale. L’odore che talvolta si avverte durante questa operazione è
dovuto all’ev aporazione delle sostanze usate per proteggere il forno durante l’intervallo di tempo che intercorre
tra la produzione e l’installazione del prodotto.
Attenzione: Utilizzare il primo ripiano dal basso, posizionandoci la leccarda in dotazione per raccogliere sughi e/
o grassi, solamente nel caso di cotture al grill o con girarrosto (presente solo su alcuni modelli). P er le altre cotture
non utilizzate mai il primo ripiano dal basso e non appoggiate mai oggetti sul fondo del forno mentre state cuocendo perchè potreste causare danni allo smalto. P onete sempre i Vostri recipienti di cottura (pirofile , pellicole di alluminio, ecc. ecc.) sulla griglia in dotazione con l’apparecchio,
appositamente inserita nelle guide del forno.
La manopola del forno (E)
É il dispositivo che permette di selezionare le diverse funzioni del forno e di scegliere la temperatura di cottura più
idonea ai cibi da cuocere fra quelle indicate sulla manopola stessa (comprese fra 60°C e 240°C). Ruotando la
manopola in senso orario si accende la luce del forno 8
ed entrano in funzione gli elementi riscaldanti superiore
ed inferiore (resistenze elettriche) e si può scegliere, tra
la gamma completa di valori qui sotto riportati, la temperatura più idonea ai cibi da cuocere (funzione “Statico”).
Ciò si ottiene facendo coincidere l’indicazione desiderata
con il riferimento fisso posto sul cruscotto.
60 • 100 • 140 • 180 • 220 Max
80 120 160 200 240
La temperatura impostata viene automaticamente raggiunta e mantenuta costante dall’organo di controllo (il termostato) comandato dalla manopola.
Posizione Resistenza Superiore c
Ruotando la manopola fino a questa posizione si accende la luce del forno ed entra in funzione la resistenza superiore.
La luce forno
Si accende ruotando la manopola “E” sul simbolo 8. Illumina il forno e resta accesa quando sia messo in funzione un qualsivoglia elemento elettrico riscaldante del forno.
2
Page 2
Le manopole di comando delle piastre elettriche del
piano di cottura (F)
Le cucine possono essere dotate di piastre elettriche normali, rapide e automatiche in varie combinazioni (le piastre rapide si distinguono dalle altre per la presenza di un
bollo rosso al centro, quelle automatiche per la presenza
di un piattello circolare di alluminio al centro).
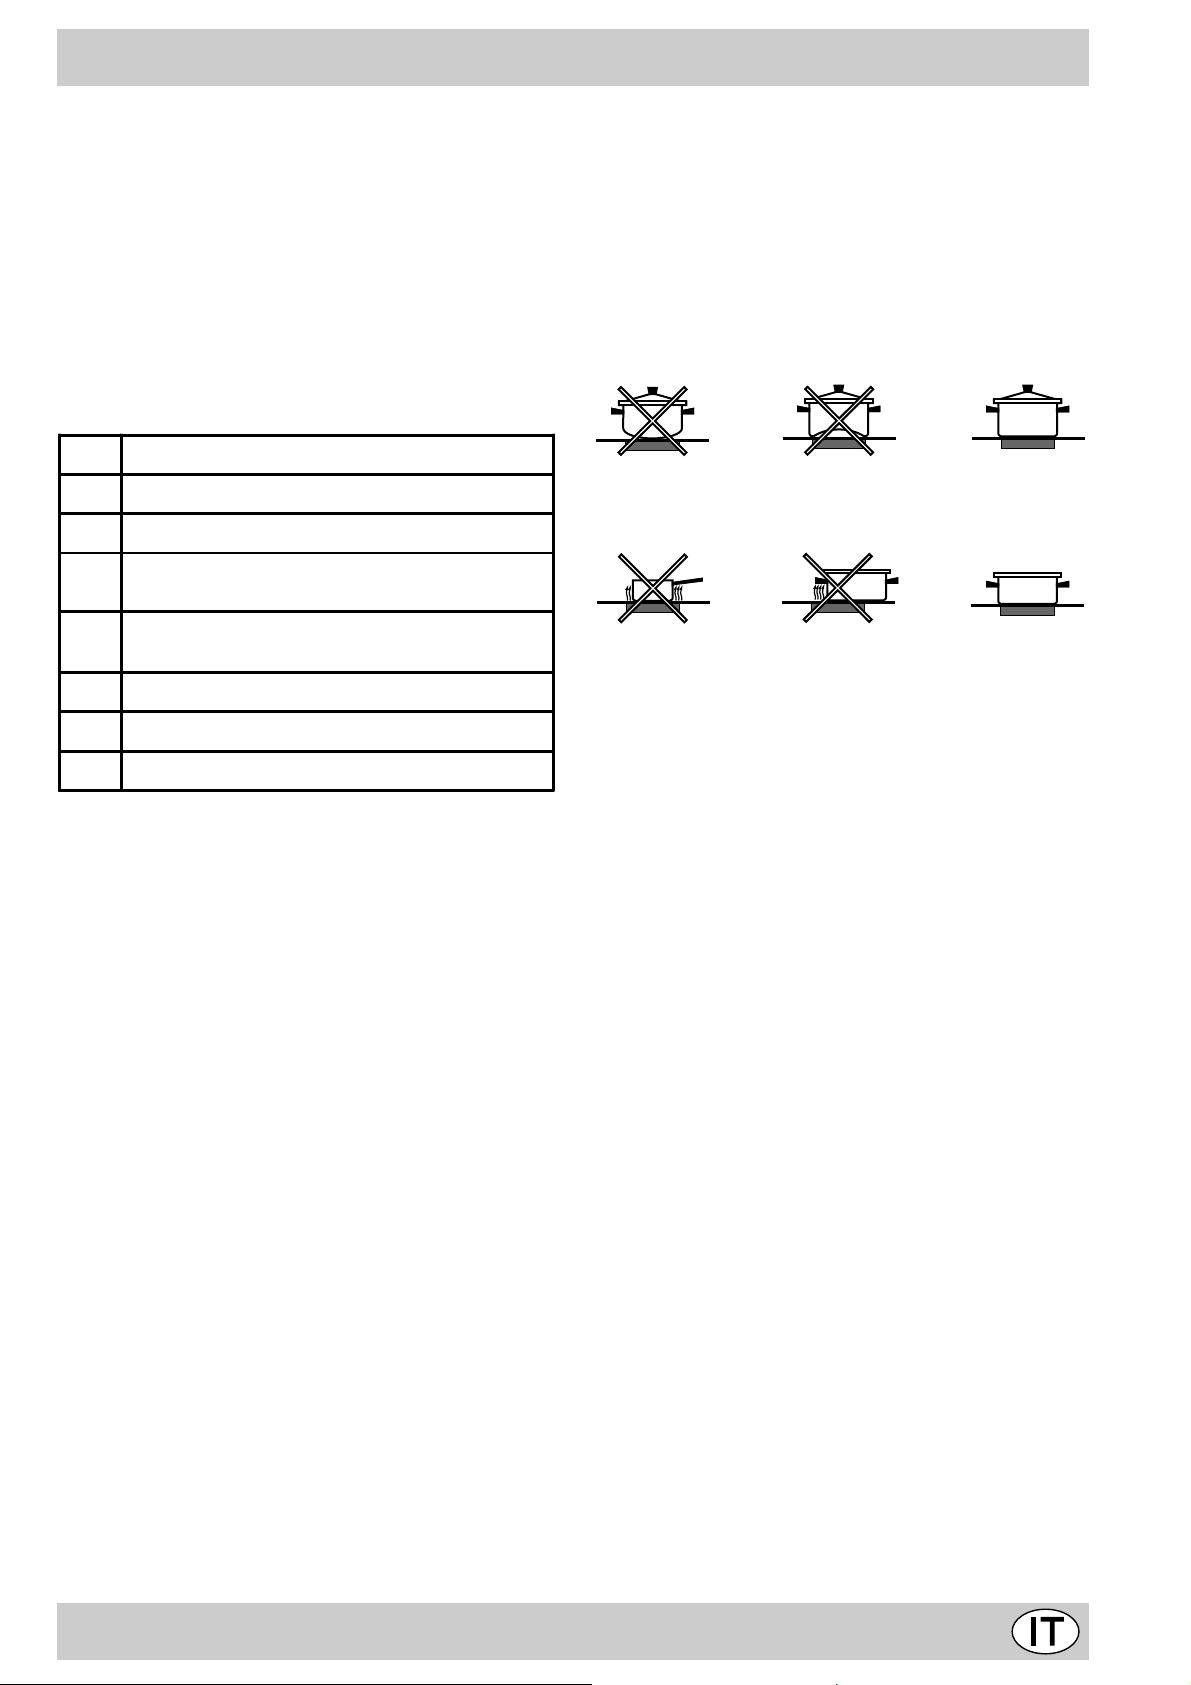
Per e vitare dispersioni di calore e danni alle piastre è bene
usare recipienti con fondo piano e di diametro non inferiore a quello della piastra.
Nella tabella sono riportate le corrispondenze fra la posizioni indicate sulle manopole e l’uso per il quale le piastre
sono consigliate.
Pos. Piastra normale o rapida
0
Spento
1
Cottura di verdure, pesci
Cottura di patate (a vapore) minestre, ceci,
2
fagioli
Proseguimento di cottura di grandi quantità di
3
cibi, minestroni
4
Arrostire (medi o)
Spia funzionamento piastre elettriche (G)
Risulta accesa quando sia messo in funzione un
qualsivoglia elemento elettrico riscaldante del piano di
cottura.
Uso del piano
Per ottenere i migliori risultati dal vostro piano di cottur a,
esistono alcuni accorgimenti fondamentali da seguire durante la cottura o nella preparazione dei cibi.
· Adoperare pentole con fondo piatto per essere certi
dell’aderenza della pentola alla zona di cottura.
· Adoperare pentole di diametro sufficiente a coprire
completamente la piastra di cottura, in modo da garantire l’utilizzazione di tutto il calore disponibile.
· Accertatevi che la base delle pentole sia sempre asciut-
ta e pulita, per garantire un buon contatto ed una lunga durata delle piastre e delle pentole stesse.
5
Arrostire (fort e)
6
Rosolare o raggiungere bollitura in poco tempo
Prima di utilizzarle per la prima volta, è necessario
riscaldare le piastre di cottura alla massima temperatura per circa 4 minuti, senza pentola. Durante questa
fase iniziale, il rivestimento protettivo si indurisce e
raggiunge la massima resistenza.
3
Page 3

Come tenerlo in forma
Prima di ogni operazione disconnettere l’apparecchio dall’ alimentazione elettrica.
Per una lunga durata del forno è indispensabile eseguire
frequentemente una accurata pulizia generale, tenendo
presente che:
• per la pulizia non utilizzare apparecchi a vapore
• le parti esterne smaltate o inox vanno lav ate con acqua tiepida senza usare polveri abrasive e sostanze corrosive che
potrebbero rovinarle. L ’acciaio inox può rimanere macchiato .
Se le macchie sono difficili da asportare usare prodotti specifici normalmente in commercio. Si consiglia di sciacquare
abbondantemente ed asciugare dopo la pulizia.
• l’interno del forno va pulito , pref eribilmente ogni v olta dopo
l’uso, quando è ancora tiepido usando acqua calda e detersivo, risciaquando e asciugando poi accuratamente con un
panno morbido. Evitare l’uso di detersivi abrasivi (ad esempio le polveri, ecc...) e di spugne abrasive per piatti oppure
acidi (ad esempio anticalcare, ecc...), perchè potrebberto
rovinare lo smalto. Se lo sporco è particolarmente duro da
togliere, usare un prodotto specifico per la pulizia del forno ,
secondo le istruzioni riportate sulla confezione.
• se usate il forno per un tempo prolungato ci potrebbe essere
formazione di condensa. Asciugatela usando un panno
morbido.
• attor no all’apertura del forno, una guarnizione in gomma
garantisce il suo corretto funzionamento. Controllate quindi
periodicamente lo stato di questa guarnizione. Se necessario pulitela evitando di usare prodotti o oggetti abrasivi. In
caso risulti danneggiata rivolgetevi al Centro Assistenza più
vicino. E’ consigliabile non usare il f orno fino all’avvenuta riparazione.
• non rivesta mai il fondo forno con fogli di alluminio, poichè
l’accumulo di calore conseguente comprometterebbe la cottura danneggiando anche lo smalto.
• pulire il vetro della porta forno utilizzando prodotti e
spugne non abrasive ed asciugare con un panno morbido.
Come togliere la porta forno
Per una pulizia più accurata è possibile togliere la porta del forno. Procedere nel seguente modo:
• aprite completamente la porta;
• alzate e ruotate le levette poste sulle due cerniere;
• afferrate la porta ai due lati esterni, richiudetela lentamente
ma non completamente;
• tirate la porta verso di voi estraendola dalla sua sede;
Rimontare la porta seguendo il procedimento sopra descritto in
senso contrario.
123
Sostituzione della lampada nel vano forno
• Togliere l’alimentazione al forno tramite l’interruttore
omnipolare utilizzato per il collegamento del forno all’impianto elettrico, o scollegare la spina, se accessibile;
• Svitare il coperchio in vetro del portalampada;
• Svitare la lampada e sostituir la con una resistente ad alta
temperatura (300°C) con queste caratteristiche:
- T ensione 230/240 V
- Potenza 25W
- Attacco E14
• Rimontare il coperchio in vetro e ridate alimentazione al forno.
4
Page 4
Consigli pratici per la cottura
Nella cottura al forno utilizzate una sola leccarda o griglia
alla volta. Questa va posizionata sulle guide inferiori o
superiori a seconda che la cottura necessiti di maggior
calore dal basso o dall’alto.
Preriscaldamento
Nel caso in cui sia necessario preriscaldare il forno, in
linea di massima tutte le volte in cui si cuociono cibi lievitati, è consigliabile utilizzare la funzione “forno statico” che
consente di raggiungere la temperatura in breve tempo.
Alla fine del preriscaldamento, indicata dallo spegnimento della spia rossa “I”, selezionate la funzione di cottura
più indicata.
Cottura del pesce e della carne
Per le carni bianche, i volatili ed il pesce utilizzate temperature da 180 °C a 200 °C.
Per le carni rosse che si vuole siano ben cotte all’esterno
conservando all’interno il sugo, è bene utilizzare una temperatura iniziale alta (200°C-220°C) per brev e tempo, per
poi diminuirla successivamente.
In generale, più grosso è l’arrosto , più bassa dovrà essere la temperatura e più lungo il tempo di cottura. P onete la
carne da cuocere al centro della griglia ed inserite sotto
la griglia la leccarda per raccogliere i grassi.
Inserite la griglia in modo che il cibo si trovi al centro del
forno. Se volete più calore da sotto, utilizzate i ripiani più
bassi. P er ottenere arrosti saporiti (in particolare anatra e
selvaggina) bardate la carne con lardo o pancetta e posizionatela in modo che sia nella parte superiore.
Dolce non si stacca dallo stampo
Ungete bene lo stampo e c ospar getelo a nch e con un
pò di farina oppure utili zzat e cart a forn o.
Utilizzo del grill
Utilizzate la funzione c “grill” posizionando il cibo al centro
della griglia (posta al 3° o 4° ripiano partendo dal basso),
dato che risulta accesa solamente la parte centrale della
resistenza superiore.
Utilizzare il primo ripiano dal basso, posizionandoci la
leccarda in dotazione per raccogliere sughi e/o grassi.
Quando si utilizza tale funzione, si raccomanda di
impostare il termostato al massimo. Questo, però, non
significa che non si possano utilizzare temperature
inferiori, semplicemente regolando la manopola del
termostato sulla temperatura desiderata.
Importante: effettuare la cottura al grill con porta del
forno chiusa, ciò per ottenere migliori risultati ed un sen-
sibile risparmio di energia (10% circa).
Pertanto i migliori risultati nell’utilizzo delle funzioni
grill si ottengono disponendo la griglia sugli ultimi
ripiani partendo dal basso (vedi tabella cottura)
dopodiché, per raccogliere i grassi ed evitare la formazione di fumo, disponete la leccarda in dotazione
nel primo ripiano dal basso.
Cottura dei dolci
Nella cottura dei dolci preriscaldate sempre il forno e, per
evitare un abbassamento del dolce, non aprite la por ta
durante la cottura. In generale:
Dolce troppo secco
La prossima volta impo state u na temp eratu ra di1 0°C
superiore e riducete il t empo di c ottur a.
Dolce si abbassa
Usate meno liquido o ab bassa te la tem pera tura d i
10°C.
Dolce scuro superiormente
Inseritelo ad altezz a infer iore, i mpost ate u na
temperatura più bas sa e prolu ngate la cott ura.
Buona cottura esterna, ma interno colloso
Usate meno liquido, riducete la temperatura,
aumentate il tem po di co ttura.
5
Page 5
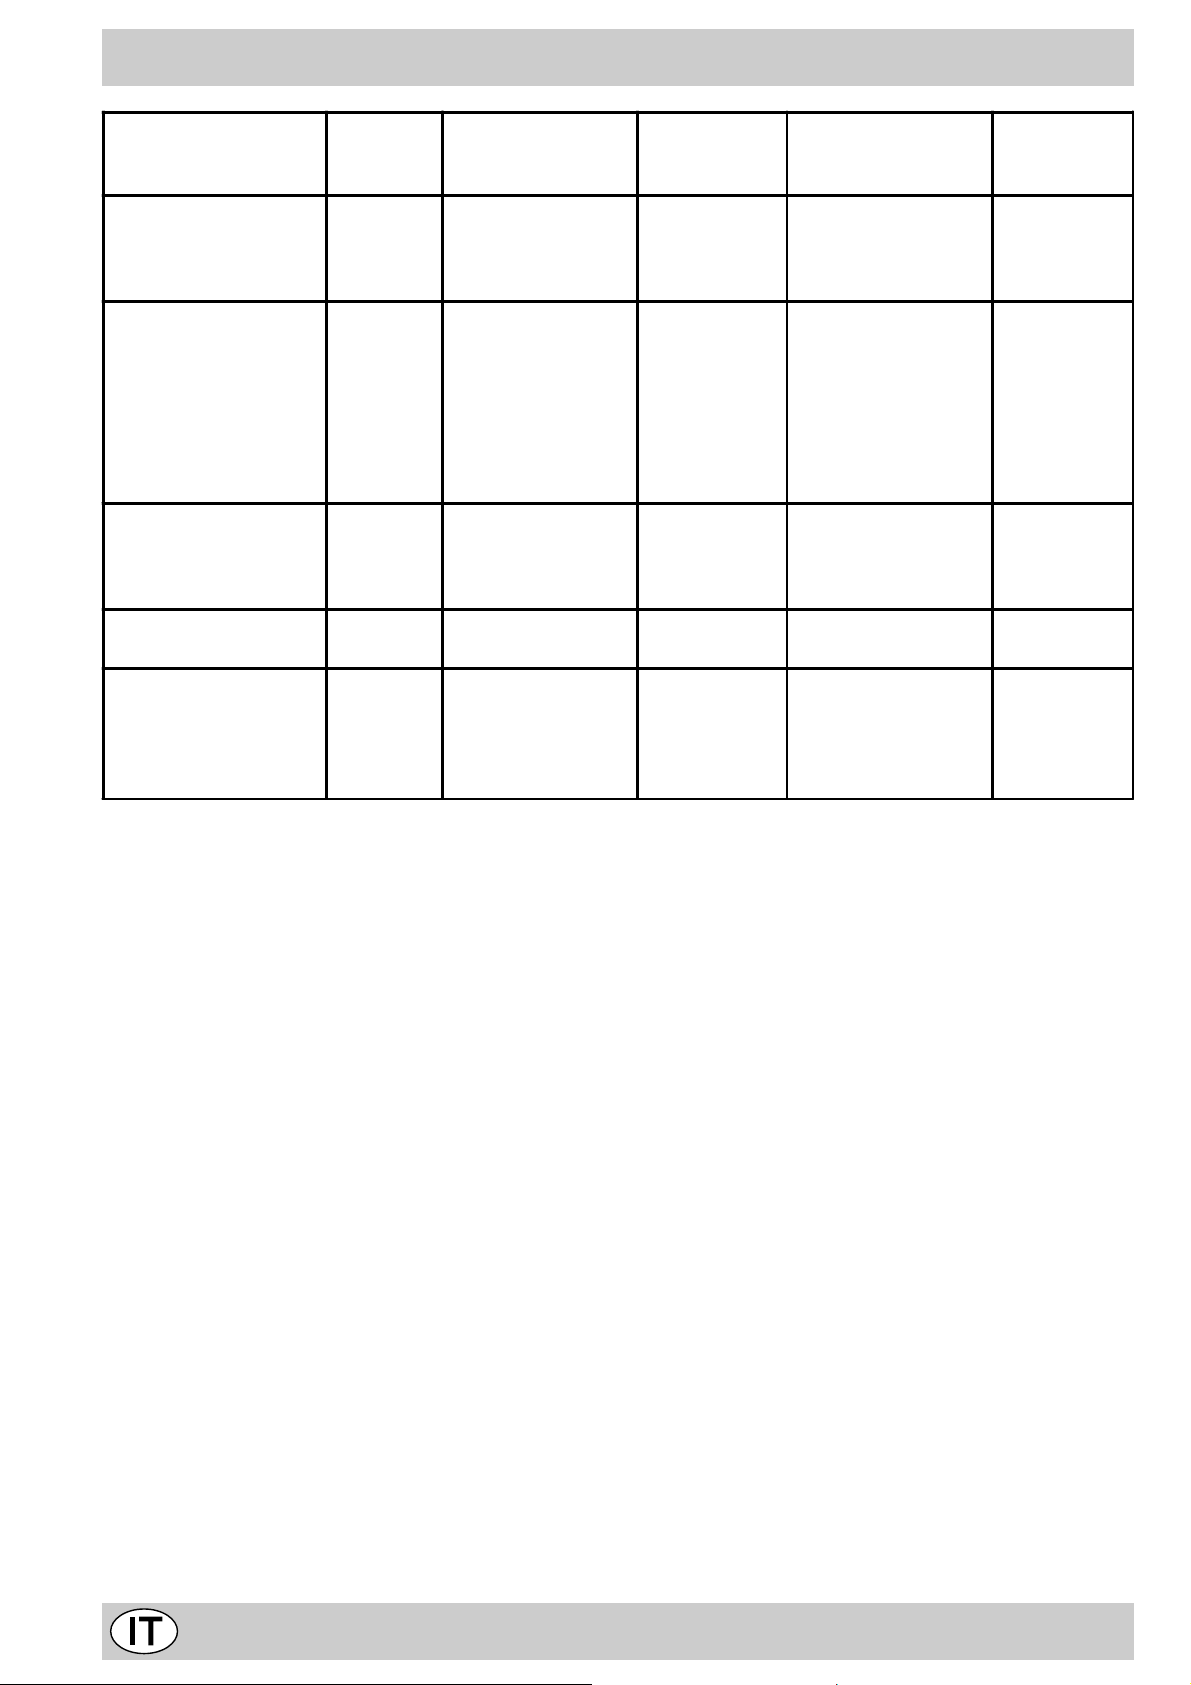
Cibo da cucinare Peso
(Kg)
Pasta
Lasagne
Cannelloni
Tagliatelle
Carni
Vitello
Pollo
Tacchino
Anatra
Coniglio
Maiale
Agnello
Pesci
Sgombri
Dentice
Trota al cartoccio
Pizza
Napoletana
Torte
Biscotti
Crostata
Torta al cioccolato
Torta lievitata
2,5
2,5
2,5
1,7
1,5
3,0
1,8
2,0
2,1
1,8
1,1
1,5
1,0
1,0 3 Max 15 30-35
0,5
1,1
1,0
1,0
Posizione cottura
ripiani dal basso
3
3
3
3
3
3
3
3
3
3
3
3
3
3
3
3
3
Temperatura
(°C)
210
210
210
220
220
220-Max
220
220
220
220
210-230
210-230
210-230
180
180
200
200
Te mpo di
preriscaldamento
(minuti)
-
-
-
-
-
-
-
-
-
-
-
-
-
15
15
15
15
Te mpo di
cottura
(minuti)
75-80
75-80
75-80
85-90
110-115
95-100
120-125
105-110
100-110
90-95
55-60
60-65
40-45
30-35
30-35
45-50
50-55
Nota: i tempi di cottura sono puramente indicativi e possono variare in base ai gusti per sonali.
6
Page 6

La sicurezza una buona abitudine
Per garantire l’efficienza e la sicurezza di questo elettr odomestico:
• rivolgetevi esclusivamente a centri di assistenza tecnica autorizzati
• richiedete sempre l’utilizzo di parti di ricambio originali
• Per movimentare l’apparecchio, onde evitare dan-
ni a persone e al prodotto stesso, servirsi sempre
delle apposite maniglie ricavate sulle fiancate del
forno.
• L ’apparecchio è concepito per uso non professionale nelle
abitazioni e le sue caratteristiche non vanno modificate.
• Le istruzioni sono valide solo per i paesi di destinazione
i cui simboli figurano sul libretto e sulla targa matricola.
• La sicurezza elettrica di questo apparecchio è assicurata soltanto quando lo stesso è correttamente collegato
ad un efficiente impianto di messa a terra come previsto
dalle vigenti norme di sicurezza.
• Durante l’uso dell’apparecchio gli elementi riscal-
danti e alcune parti della porta forno diventano
molto calde. Fare attenzione a non toccarle e tenere i bambini a distanza.
T rattandosi di fonti di pericolo, e vitare che bambini e
incapaci abbiano contatti con:
- i comandi e l’apparecchio in genere;
- gli imballaggi (sacchetti, polistirolo, chiodi ecc.);
- l’apparecchio, durante e subito dopo il funzionamento del
forno e del grill, visto il surriscaldamento;
- l’apparecchio inutilizzato (in questo caso vanno rese innocue le parti che potrebbero essere pericolose).
Vanno e vitate le seguenti operazioni:
- toccare l’apparecchio con parti del corpo umide;
- l’uso quando si è a piedi nudi;
- tirare l’apparecchio o il cavo di alimentazione per staccarlo dalla presa di corrente;
- operazioni improprie e pericolose;
- ostruire le aperture di ventilazione o smaltimento calore;
- che il cavo di alimentazione di piccoli elettrodomestici finisca su parti calde dell’apparecchio;
- l’esposizione ad agenti atmosferici (pioggia, sole);
- l’utilizzo del forno come ripostiglio;
- l’utilizzo di liquidi infiammabili nei pressi;
- l’impiego di adattatori, prese multiple e/o prolunghe;
- tentativi di installazione o riparazione senza l’intervento
di personale qualificato.
Occorre assolutamente rivolgersi a personale
qualificato nei seguenti casi:
- installazione (secondo le istruzioni del costruttore);
- quando si hanno dubbi sul funzionamento;
- sostituzione della presa in caso di incompatibilità con la
spina dell’apparecchio.
Occorre rivolgersi a centri di assistenza autorizzati dal
costruttore nei seguenti casi:
- in caso di dubbio sull’integrità dell’apparecchio dopo aver
tolto l’imballaggio;
- danneggiamento o sostituzione del cavo di alimentazione;
- in caso di guasto o cattivo funzionamento, richiedendo i
ricambi originali.
È opportuno effettuare le seguenti operazioni:
- solo la cottura dei cibi evitando altre operazioni;
- verificare l’integrità dopo aver tolto l’imballaggio;
- disconnettere l’apparecchio dalla rete di alimentazione
elettrica in caso di cattivo funzionamento e prima di qualsiasi operazione di pulizia o manutenzione;
- quando inutilizzato, disinserire l’apparecchio dalla rete
elettrica e chiudere il rubinetto del gas (se previsto);
- utilizzare guanti da forno per inserire o estrarre recipienti;
- impugnare sempre la maniglia della porta al centro dato
che all’estremità potrebbe essere più calda a causa di
eventuali uscite d’aria;
- controllare sempre che le manopole siano nella posizione “•”/”o” quando l’apparecchio non è utilizzato;
- tagliare il cavo di alimentazione dopo averlo disconnesso
dalla rete elettrica quando si decide di non utilizzare più
l’apparecchio.
• Il costruttore non può essere considerato responsabile
per eventuali danni derivanti da: errata installazione, usi
impropri, erronei ed irragionevoli.
7
Page 7
Installazione
L’installazione deve essere effettuata secondo le istruzioni del costruttore da personale professionalmente
qualificato. Una errata installazione può causare danni a
persone, animali o cose, nei confronti dei quali il costruttore
non può essere considerato responsabile.
Importante: qualsiasi intervento di regolazione, manutenzione etc. deve essere eseguito con il forno elettricamente disinserito.
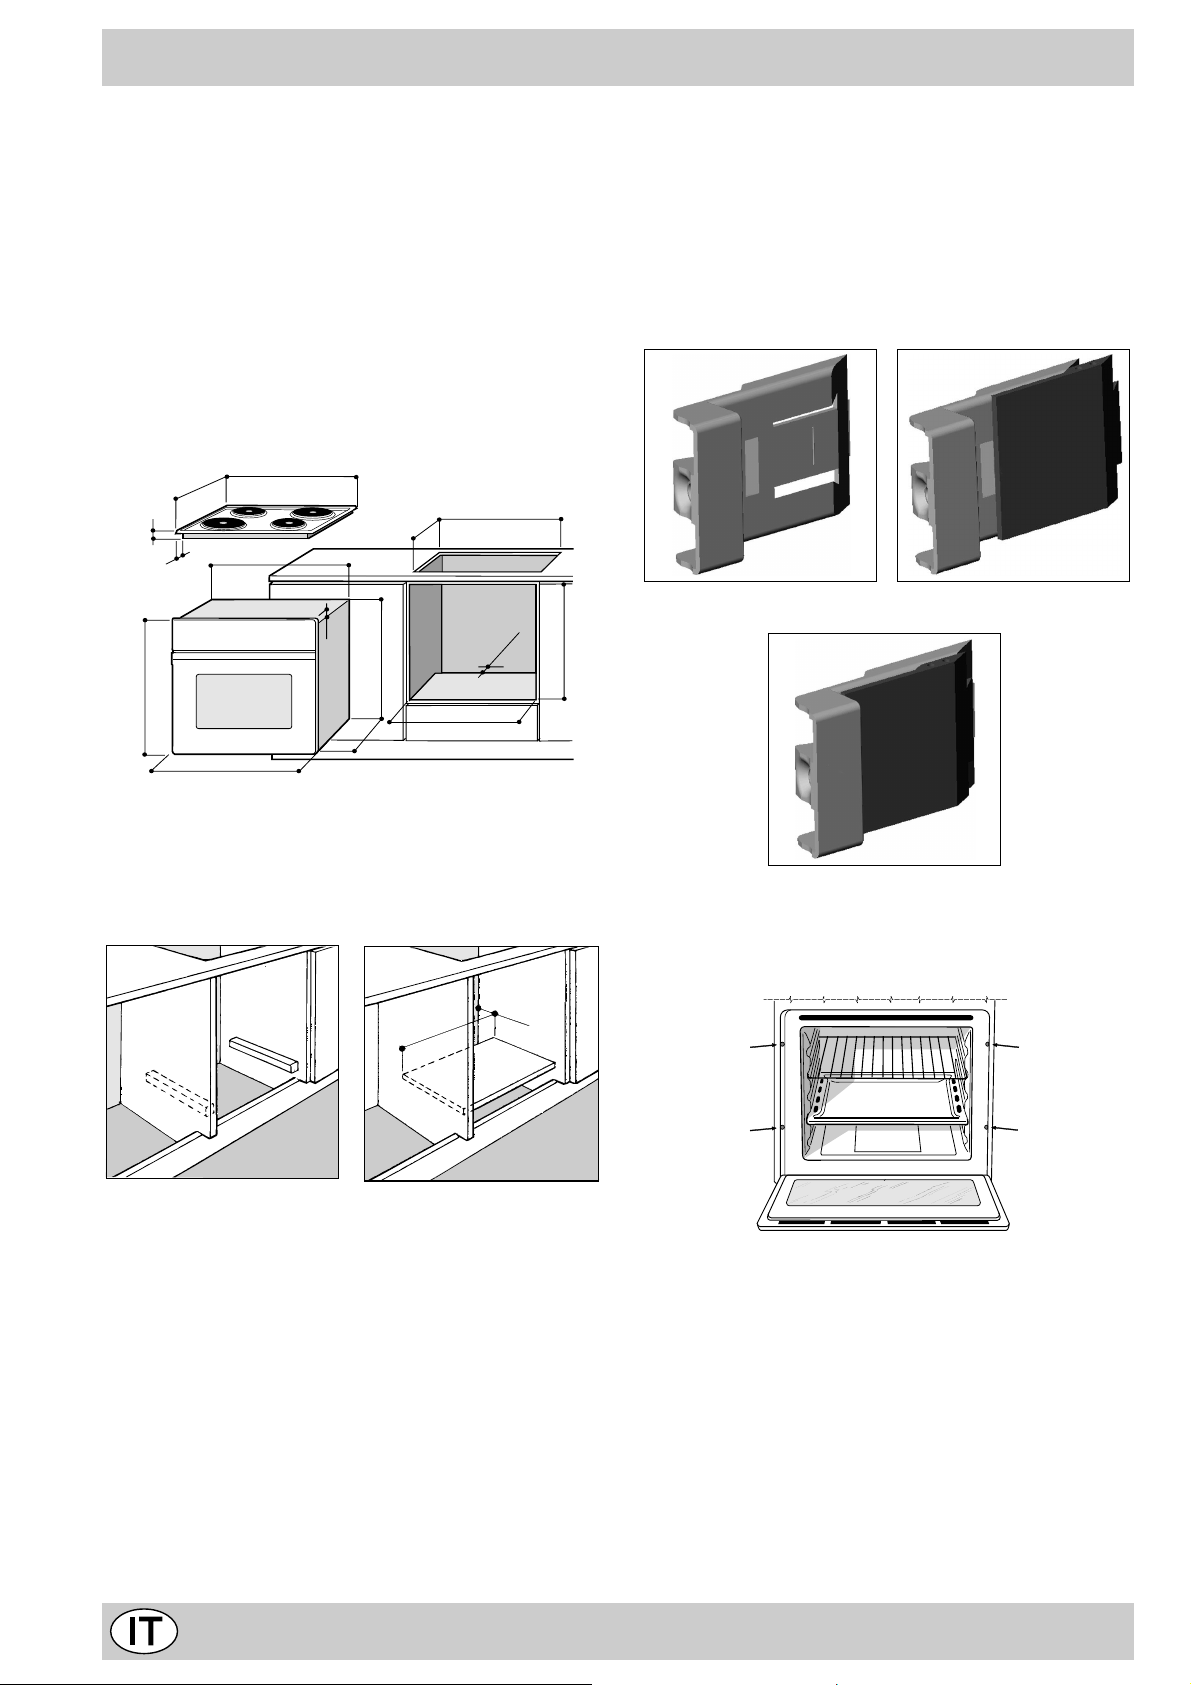
Installazione dei forni da incasso
Per garantire un b uon funzionamento dell’apparecchio da
incasso è necessario che il mobile sia di caratteristiche
adatte. Nella figura sottostante vengono ripor tate le dimensioni del vano del mobile nell’inserimento sottotavolo
ed a colonna.
555
580
560
min
+4 -0
min
min
45
575-585
+4 -0
480
23
572
558
543545
500
39
15
595
595
N.B.: Installazione per dichiarazione consumi
Per un corretto centraggio regolare i 4 tacchetti posti lateralmente al forno in corrispondenza dei 4 fori sulla cornice perimetrale. In particolare se lo spessore della fiancata
del mobile:
• è di 20 mm: la parte mobile del taccheto deve essere
rimossa (Fig. A);
• è di 18 mm: utilizzare la prima scanalatura; già predi-
sposto in fabbrica (Fig. B);
• è di 16 mm: utilizzare la seconda scanalatura (Fig. C).
Fig. A Fig. B
Per garantire una b uona areazione è necessario eliminare la parete posteriore del vano, è preferibile installare il
forno in modo che appoggi su due listelli in legno; nel caso
in cui sia presente un piano continuo di appoggio questo
deve a vere un’apertura di almeno 45 x 560 mm.
45 mm.
560 mm.
I pannelli dei mobili adiacenti il forno dovranno essere in
materiale resistente al calore. In particolare nel caso di
mobili in legno impiallicciato le colle dovranno essere resistenti alla temperatura di 100 °C.
In conformità alle norme di sicurezza, una volta incassato
l’apparecchio, non debbono essere possibili e ventuali contatti con le pareti elettriche.
T utte le parti che assicurano la protezione debbono essere fissate in modo tale da non poter essere tolta senza
l’aiuto di qualche utensile.
Fig. C
Per fissare il forno al mobile aprite la por ta del forno e
fissate il forno tramite 4 viti a legno nei 4 fori posti sulla
cornice perimetrale.
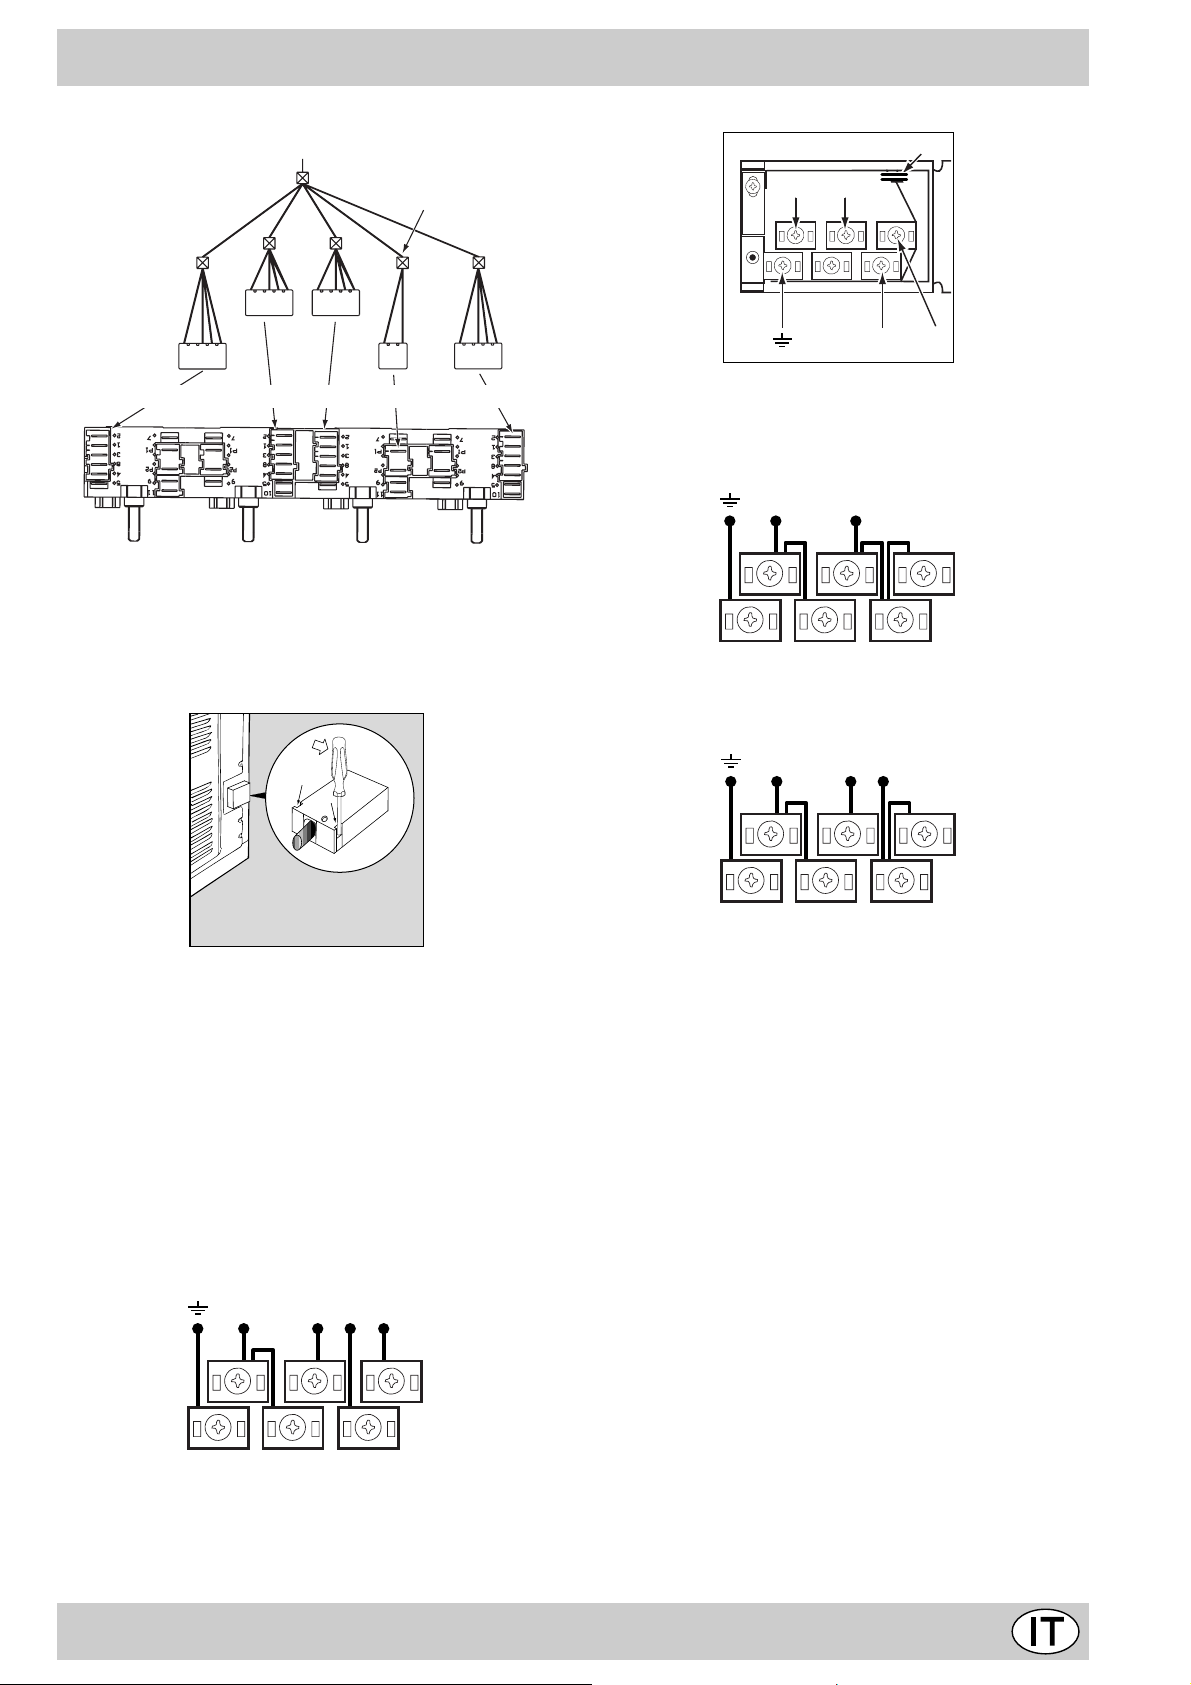
Collegamento elettrico
Il collegamento elettrico alla rete deve essere fatto sulla
cucina. Il piano si collega alla cucina tramite un apposito
connettore. Le cucine sono predisposte per il funzionamento con corrente alternata alla tensione e frequenza di
alimentazione indicata sulla targhetta caratteristiche.
8
Page 8
PIANO INCASSO
NL
230V 1N~
H07RN-F 3x4 CEI-UNEL 35364
1
3
2
4
5
NL2L3
L1
P
Presente solo
su alcuni
modelli
BIANCO ROSSO GIALLO BLU
CUCINA INCASSO
Montaggio cavo di alimentazione
Apertura morsettiera:
• Servendosi di un cacciavite, fare leva sulle linguette
laterali del coperchio della morsettiera;
• Tirare ed aprire il coperchio della morsettiera.
Per la messa in opera del ca v o eseguire le seguenti operazioni:
• svitare la vite del serracavo e le viti dei contatti
Nota: i ponticelli vengono predisposti dalla Fabbrica
per il collegamento a 400V trifase (fig. D).
• per effettuare i collegamenti elettrici delle fig. F e fig.
G, utilizzare i due ponticelli alloggiati dentro la scatola
(fig. E - rif erimento “P”)
• fissare il cavo di alimentazione nell’apposito fermacavo
e chiudere il coperchio.
400V 3N~
H05RR-F 5x2.5 CEI-UNEL 35363
NL3L1L2
5
3
4
1
2
Fig. D
VERDE
Fig. E
Fig. F
400V 2N~
H05RR-F 4x2.5 CEI-UNEL 35363
NL2L1
5
3
4
Fig. G
Allacciamento del cavo di alimentazione alla rete
Montare sul cavo una spina normalizzata per il carico indicato sulla targhetta caratteristiche, nel caso di collegamento diretto alla rete è necessario interporre tra l’apparecchio e la rete un interruttore omnipolare con apertura
minima fra i contatti di 3 mm. dimensionato al carico e
rispondente alle norme in vigore (il filo di terra non deve
essere interrotto dall’interruttore).
Il cavo di alimentazione de ve essere posizionato in modo
che non raggiunga in nessun punto una temperatura superiore di 50°C a quella ambiente.
Prima di effettuare l’allacciamento accertarsi che:
• La sicurezza elettrica di questo apparecchio è assicurata soltanto quando lo stesso è correttamente collegato ad un efficiente impianto di messa a terra come
previsto dalle vigenti norme di sicurezza elettrica. E’
necessario verificare questo fondamentale requisito di
sicurezza e, in caso di dubbio , richiedere un controllo
accurato dell’impianto da parte di personale professionalmente qualificato. Il costruttore non può essere
considerato responsabile per eventuali danni causati
dalla mancanza di messa a terra dell’impianto.
• Prima di collegare l’apparecchio accer tarsi che i dati
di targa (posti sull’apparecchio e/o sull’imballo) siano
rispondenti a quelli della rete di distribuzione elettrica
e gas.
1
2
9
Page 9
• V erificare che la portata elettrica dell’impianto e delle
prese di corrente siano adeguate alla potenza massima dell’apparecchio indicata in targa. In caso di dubbio rivolgersi ad una persona professionalmente qualificata.
Caratteristiche tecniche
• In caso di incompatibilità tra la presa e la spina dell’apparecchio fare sostituire la presa con altra di tipo
adatto da personale professionalmente qualificato.
Quest’ultimo, in particolare, dovrà anche accertare che
la sezione dei cavi della presa sia idonea alla potenza
assorbita dall’apparecchio. In generale è sconsigliabile
l’uso di adattatori, prese multiple e/o prolunghe. Qualora il loro uso si rendesse indispensabile è necessario utilizzare solamente adattatori semplici o multipli e
prolunghe conformi alle vigenti norme di sicurezza,
facendo però attenzione a non superare il limite di portata in valore di corrente, marcato sull’adattatore semplice e sulle prolunghe, e quello di massima potenza
marcato sull’adattatore multiplo. La spina e la presa
devono essere facilmente accessibili.
Dimensioni utili del forno:
larghezza cm. 43,5
profondità cm. 43,5
altezza cm. 32
Volume utile del forno:
litri 60
ENERGY LABEL
Direttiva 2002/40/CE sull’etichetta dei forni elettrici
Norma EN 50304
Consumo energia dichiarazione Classe convezione Naturale
funzione di riscaldamento: Statico
Tensione e frequenza di alimentazione:
230/400V ~ 3N 50/60Hz 8400W
7
Questa apparecchiatura è conforme alle seguenti
Direttive Comunitarie:
- 73/23/CEE del 19/02/73 (Bassa T ensione) e successive modificazioni;
- 89/336/CEE del 03/05/89 (Compatibilità Elettromagnetica) e successive modificazioni;
- 93/68/CEE del 22/07/93 e successive modificazioni.
- 2002/96/CE
La direttiva Europea 2002/96/CE sui rifiuti di
apparecchiature elettriche ed elettroniche (RAEE), prevede che gli elettrodomestici non debbano essere smaltiti
nel normale flusso dei rifiuti solidi urbani. Gli apparecchi
dismessi devono essere raccolti separatamente per
ottimizzare il tasso di recupero e riciclaggio dei materiali
che li compongono ed impedire potenziali danni per la
salute e l’ambiente. Il simbolo del cestino barrato è riportato su tutti i prodotti per ricordare gli obblighi di raccolta
separata.
Per ulteriori informazioni, sulla corretta dismissione degli
elettrodomestici, i detentori potranno rivolgersi al servizio
pubblico preposto o ai rivenditori.
10
Page 10
Congratulations on choosing an Ariston appliance, which you will find is dependable and easy to use. We recommend
that you read the instructions in this owner’ s manual carefully before use for the best perf ormance and to extend the lif e
of your appliance, as it will provide you with all the instructions you require to ensure its safe installation, use and
maintenance. Always k eep this owner’ s manual close to hand since you may need to ref er to it in the future. Thank you.
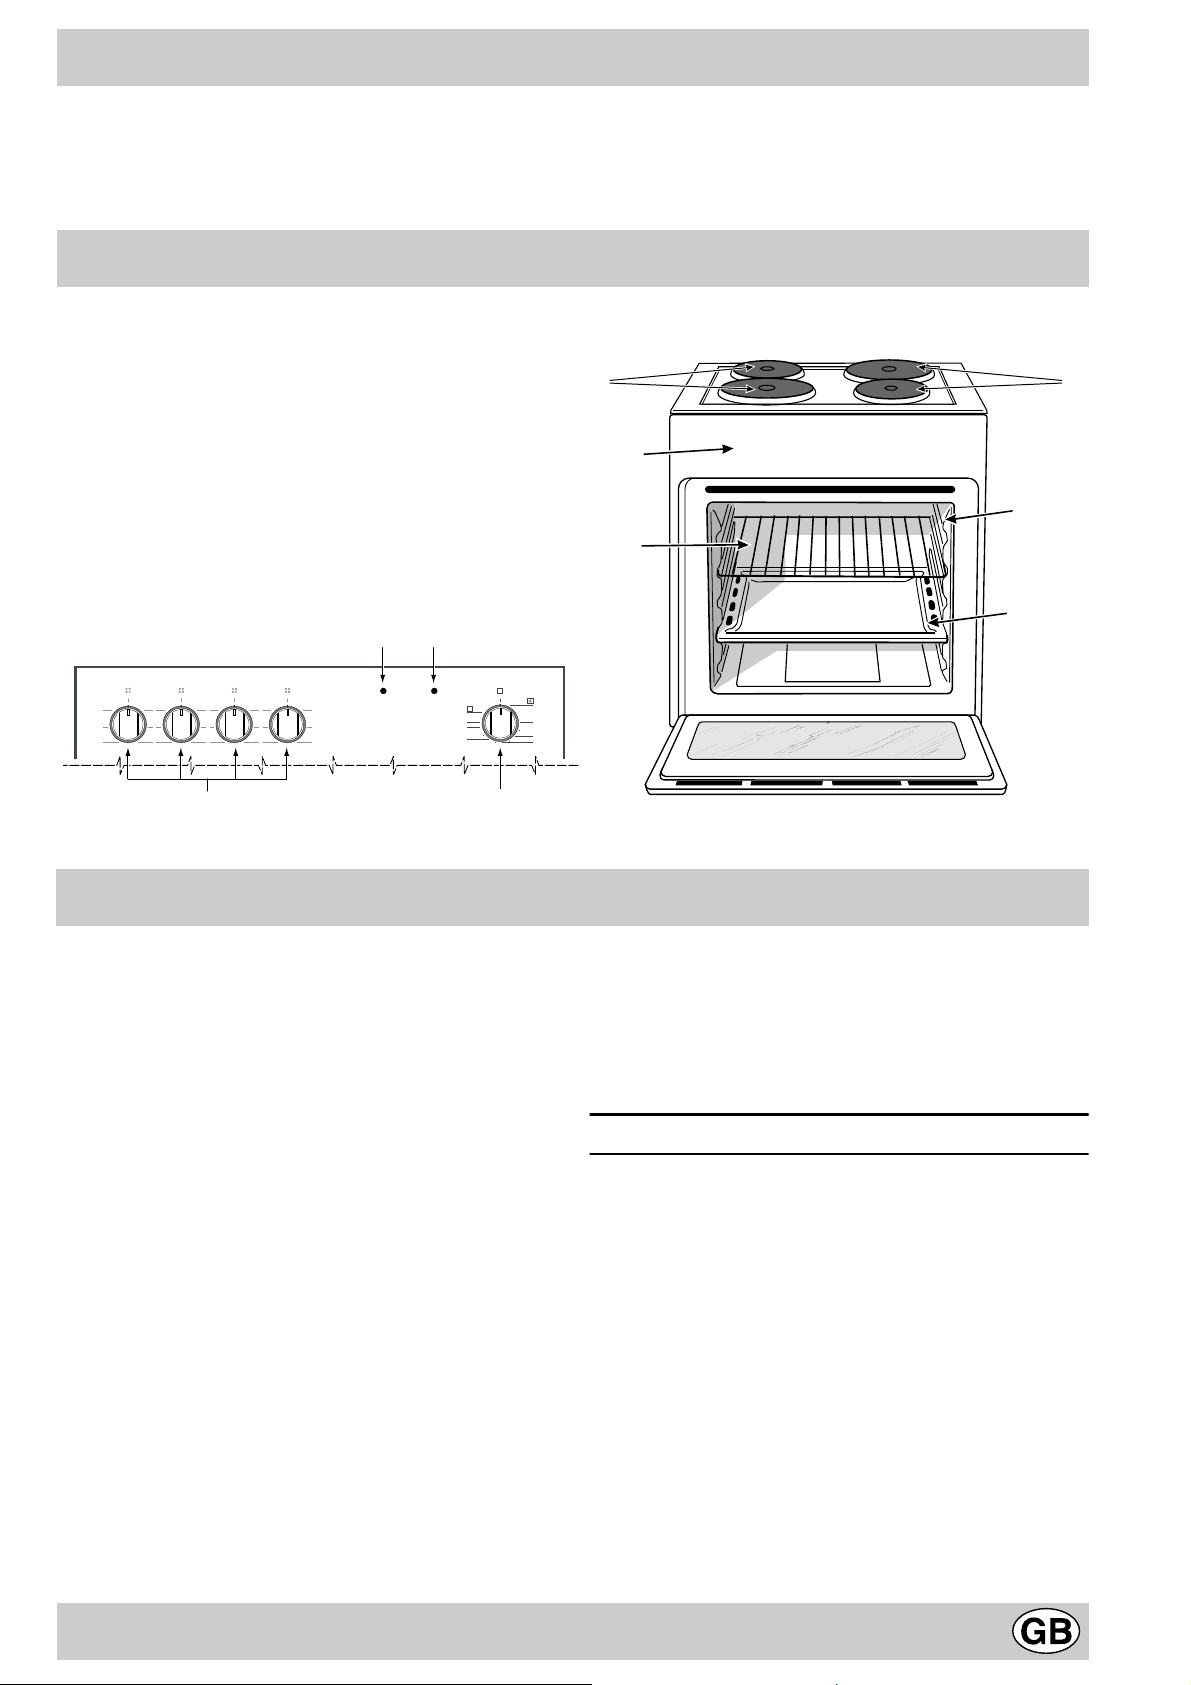
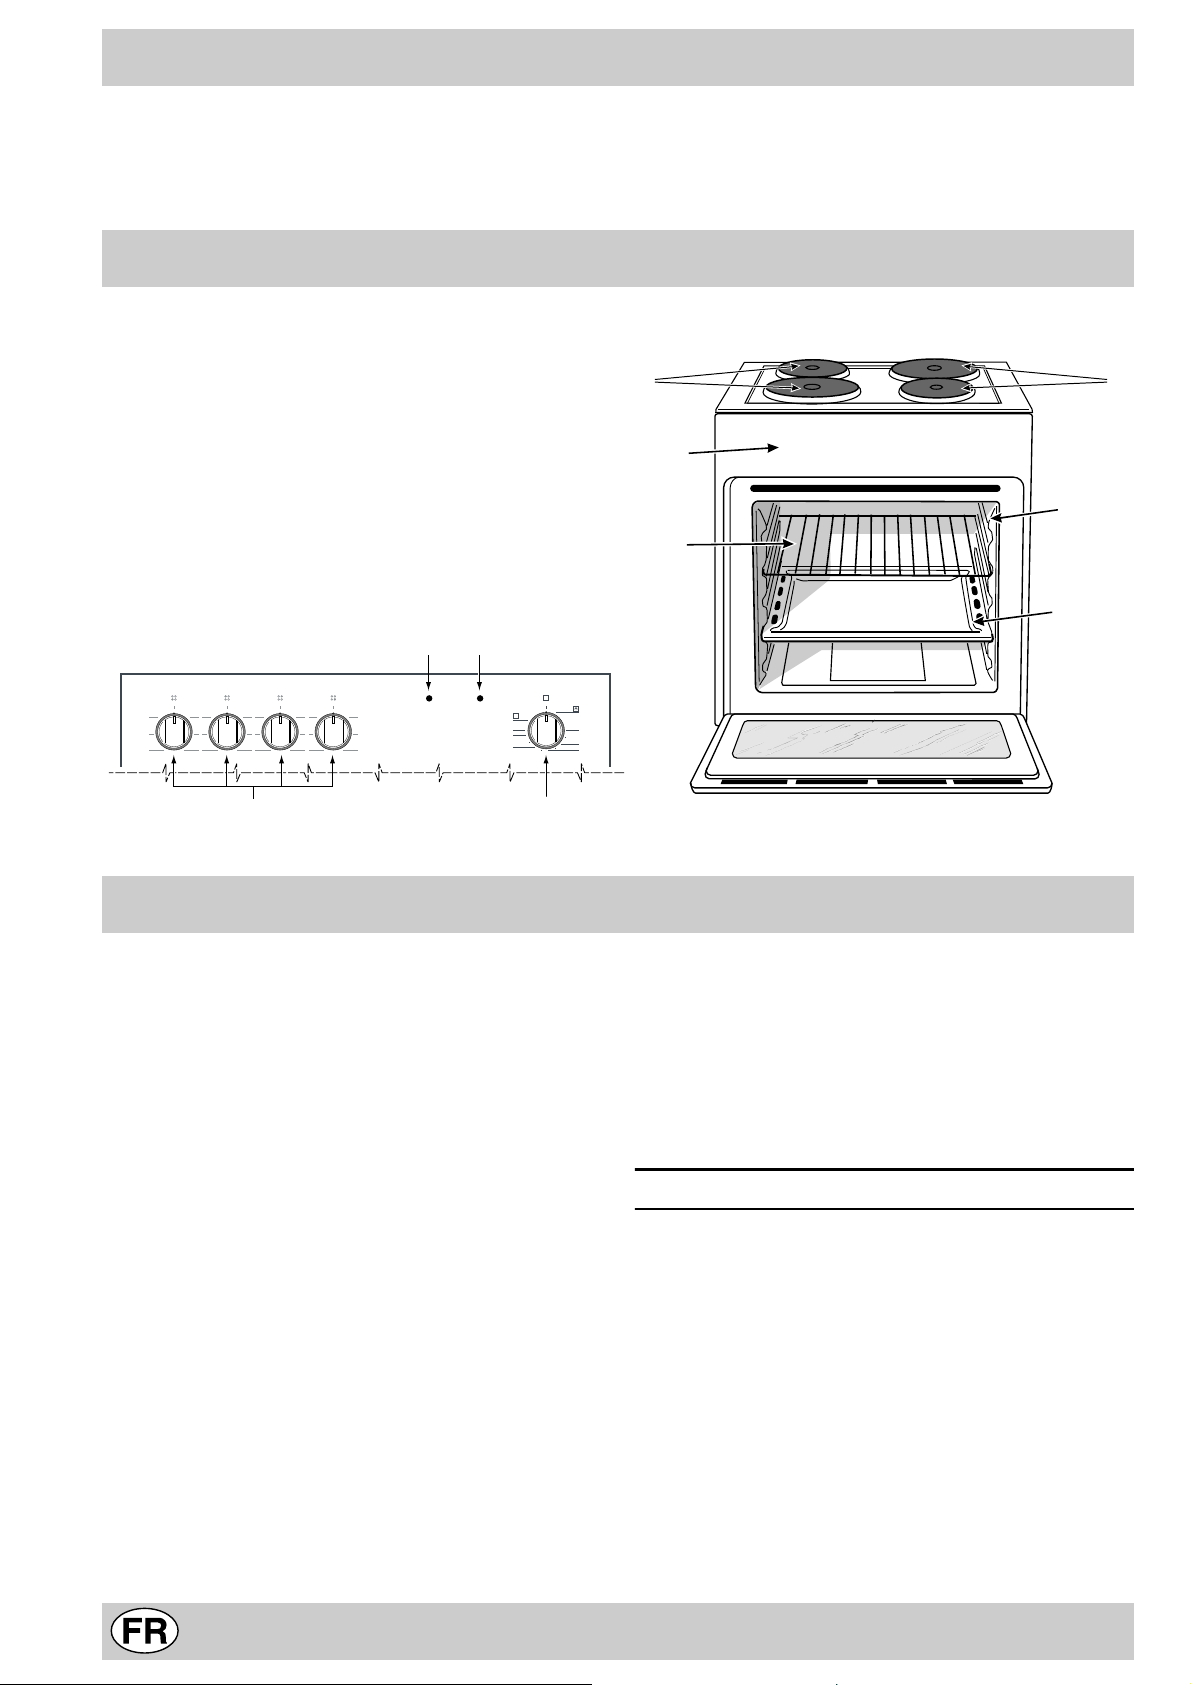
Close-up view
A. Control Panel
B. Dripping Pan or Baking Sheet
C. Oven Rack
D. Electric hotplate
E. Cooking mode selection knob
F. Electric hotplate knobs
G. Electric hotplate indicator light
H. Guides for sliding the racks or dripping pan in and
out
I. Oven indicator light (only on certain models) - When
lit, it indicates the oven is heating up to the temperature set.
G
I
0
0
0
1
2 5
3
6
1
2 5
3
4
6
1
2 5
3
4
6
1
2 5
3
4
0
6
4
0
MAX
220
180
60
100
140
D
A
C
D
H
B
F
E
How to use your oven
The various features of this oven are controlled via the
knobs and buttons located on the control panel.
Notice: The first time y ou use your appliance, we recommend that you set the thermostat to the highest setting
and leave the ov en on f or about half an hour with nothing
in it, with the oven door shut. Then, open the oven door
and let the room air. The odour that is often detected during this initial use is due to the evaporation of substances
used to protect the oven during storage and until it is installed.
Notice: Place the dripping pan provided on the bottom
shelf of the oven to prev ent any sauce and/or grease from
dripping onto the bottom of the oven only when grilling
food or when using the rotisserie (only available on certain models). F or all other types of cooking, ne ver use the
bottom shelf and never place anything on the bottom of
the oven when it is in operation because this could damage the enamel. Alw ays place your cookware (dishes , aluminium foil, etc. etc.) on the grid provided with the appliance inserted especially along the oven guides.
The oven knob (E)
This knob is used not only to select the different oven
modes, but also to choose the right cooking temperature
from among the temperatures shown on the knob itself
(from 60°C to 240°C) for the food to be cooked in the
oven. When the knob is turned clockwise, the oven light
and the top and bottom heating elements will come on 8
you can choose the most suitable temperature f or cooking
your food from the range of values below (Convection
Mode). To select the temperature, match the desired temperature with the fixed ref erence mark on the control panel.
60 • 100 • 140 • 180 • 220 Max
80 120 160 200 240
The oven will automatically reach the temperature set,
and the thermostat, which is controlled by the knob, will
keep it constant.
Top Heating Element Position c
Set the knob to this position and the oven light and top
heating element come on.
The oven light
Set knob “E” to the 8 symbol to turn it on. It lights the
oven and stays on when any of the electrical heating
elements in the oven come on.
The control knobs for the hob electric hotplates (F)
The cookers can be equipped with standard, rapid and
automatic electric hotplates in a variety of combinations
(the rapid hotplates can be distinguished from the rest by
11
Page 11

the red boss in the centre of the same, and the automatic
hotplates by the smaller circular aluminium plate in their
centre).
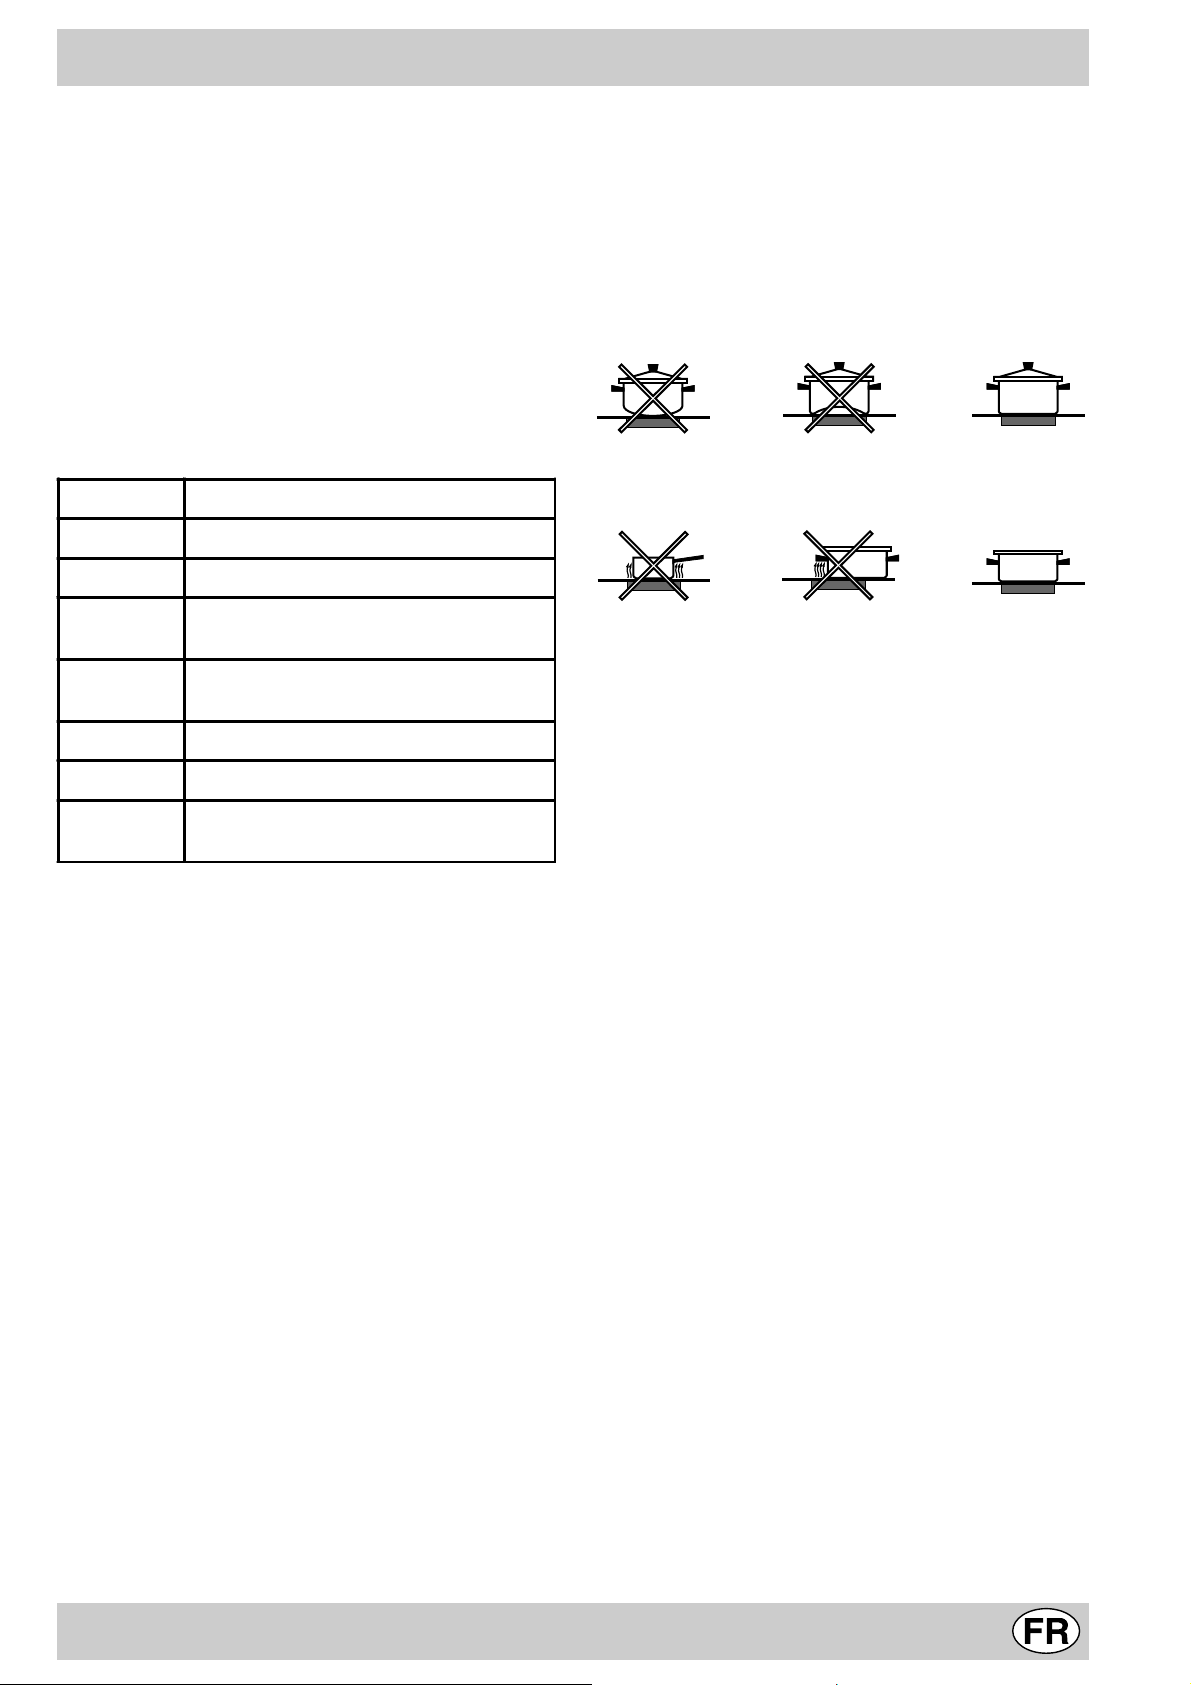
To avoid any heat loss and damage to the hotplates, we
advise you to use pans with a flat bottom, whose diameter
is no less than that of the hotplate itself.
The table contains the different settings indicated on the
knobs and the use for which the hotplates are
recommended.
Using the hob
To get the best from your hob, here are a fe w helpful tips
to keep in mind during cooking or when preparing food.
· Use flat-bottomed pans to ensure the same adhere
fully to the cooking zone.
Setting Normal or Fast Plate
0
1
2
3
4
5
6
Off
Cooking vegetables, f ish
Cooking potatoes (usin g st eam) sou ps,
chickpeas, beans.
Continuing the cooking of larg e quantit ies
of food, minestrone
For roasting (average)
For roasting (above ave rage)
For browning and reaching a bo il in a
short time.
Before using the hot plates for the first time, you
should heat them at maximum temperature for
approximately 4 minutes, without any pans. During
this initial stage, their protective coating hardens and
reaches its maximum resistance.
Electric hotplate indicator light (G)
This light comes on when any of the electrical hotplates
on the hob have been turned on.
· Use pans whose diameter is sufficient to cover the
hotplate fully, so as to guarantee the use of all the
available heat.
· Make sure the bottom of the pan is always clean and
dry, to ensure correct contact and a long life for your
hotplates and pans.
12
Page 12
How to Keep Your Oven in Shape
Before cleaning your oven, or performing maintenance,
disconnect it from the power supply.
To extend the life of your oven, it must be cleaned
frequently, keeping in mind that:
• Do not use steam equipment to clean the appliance.
• the enamelled or stainless steel parts should be
washed with lukewarm water without using any abrasive powders or corrosiv e substances which could ruin
them; Stainless steel could get stained. If these stains
are difficult to remove, use special products available
on the market. After cleaning, it is advisable to rinse
thoroughly and dry .
• the inside of the oven should preferably be cleaned
immediately after use, when it is still warm, with hot
water and soap; the soap should be rinsed away and
the interior dried thoroughly. Avoid using abrasiv e detergents (for example cleaning powders, etc…) and
abrasive sponges for dishes or acids (such as
limescale-remover , etc…) as these could damage the
enamel. If the grease spots and dir t are particularly
tough to remove, use a special product f or ov en cleaning, following the instructions provided on the packet.
• if you use your oven for an extended period of time,
condensation may form. Dry it using a soft cloth.
• there is a rubber seal surrounding the oven opening
which guarantees its perfect functioning. Check the
condition of this seal on a regular basis. If necessary,
clean it and avoid using abrasive products or objects
to do so. Should it become damaged, please contact
your nearest After-sales Service Centre. We recommend you avoid using the oven until it has been repaired.
• never line the oven bottom with aluminium foil, as the
consequent accumulation of heat could compromise
the cooking and even damage the enamel.
• clean the glass door using non-abrasive products or
sponges and dry it with a soft cloth.
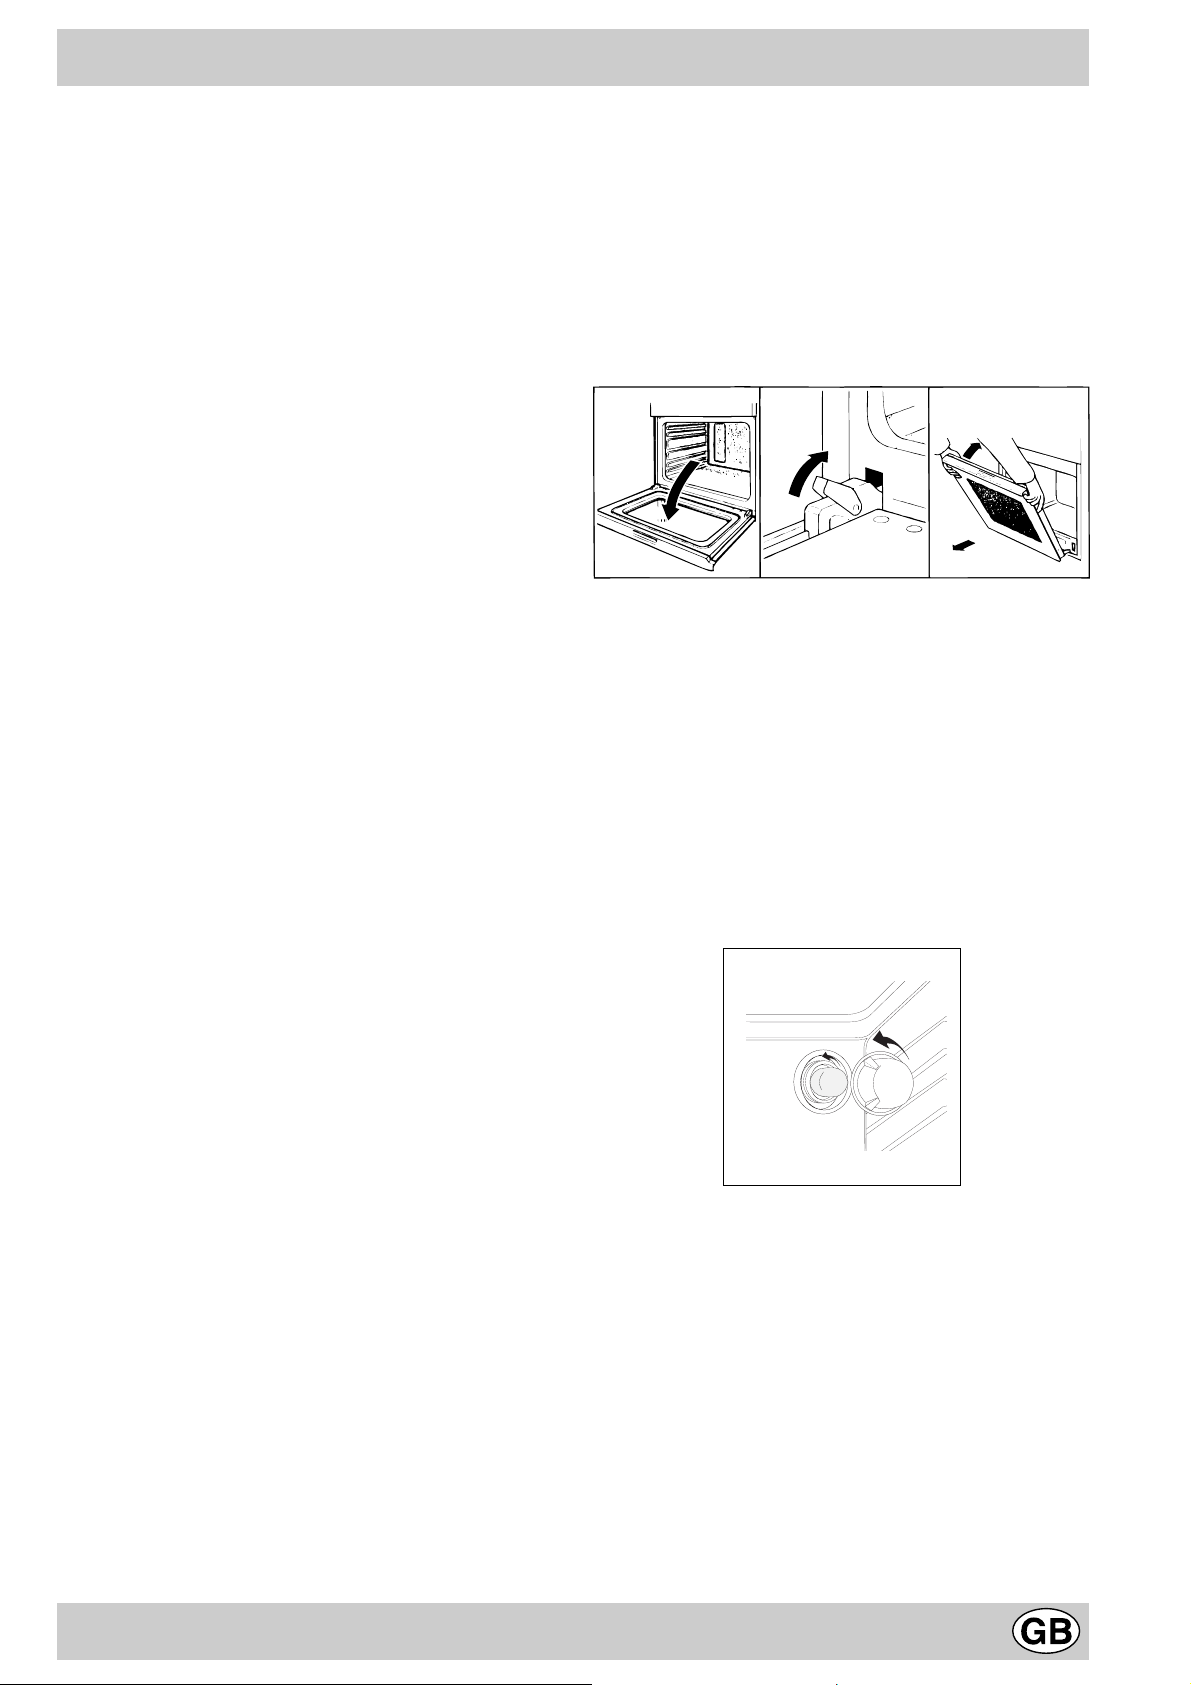
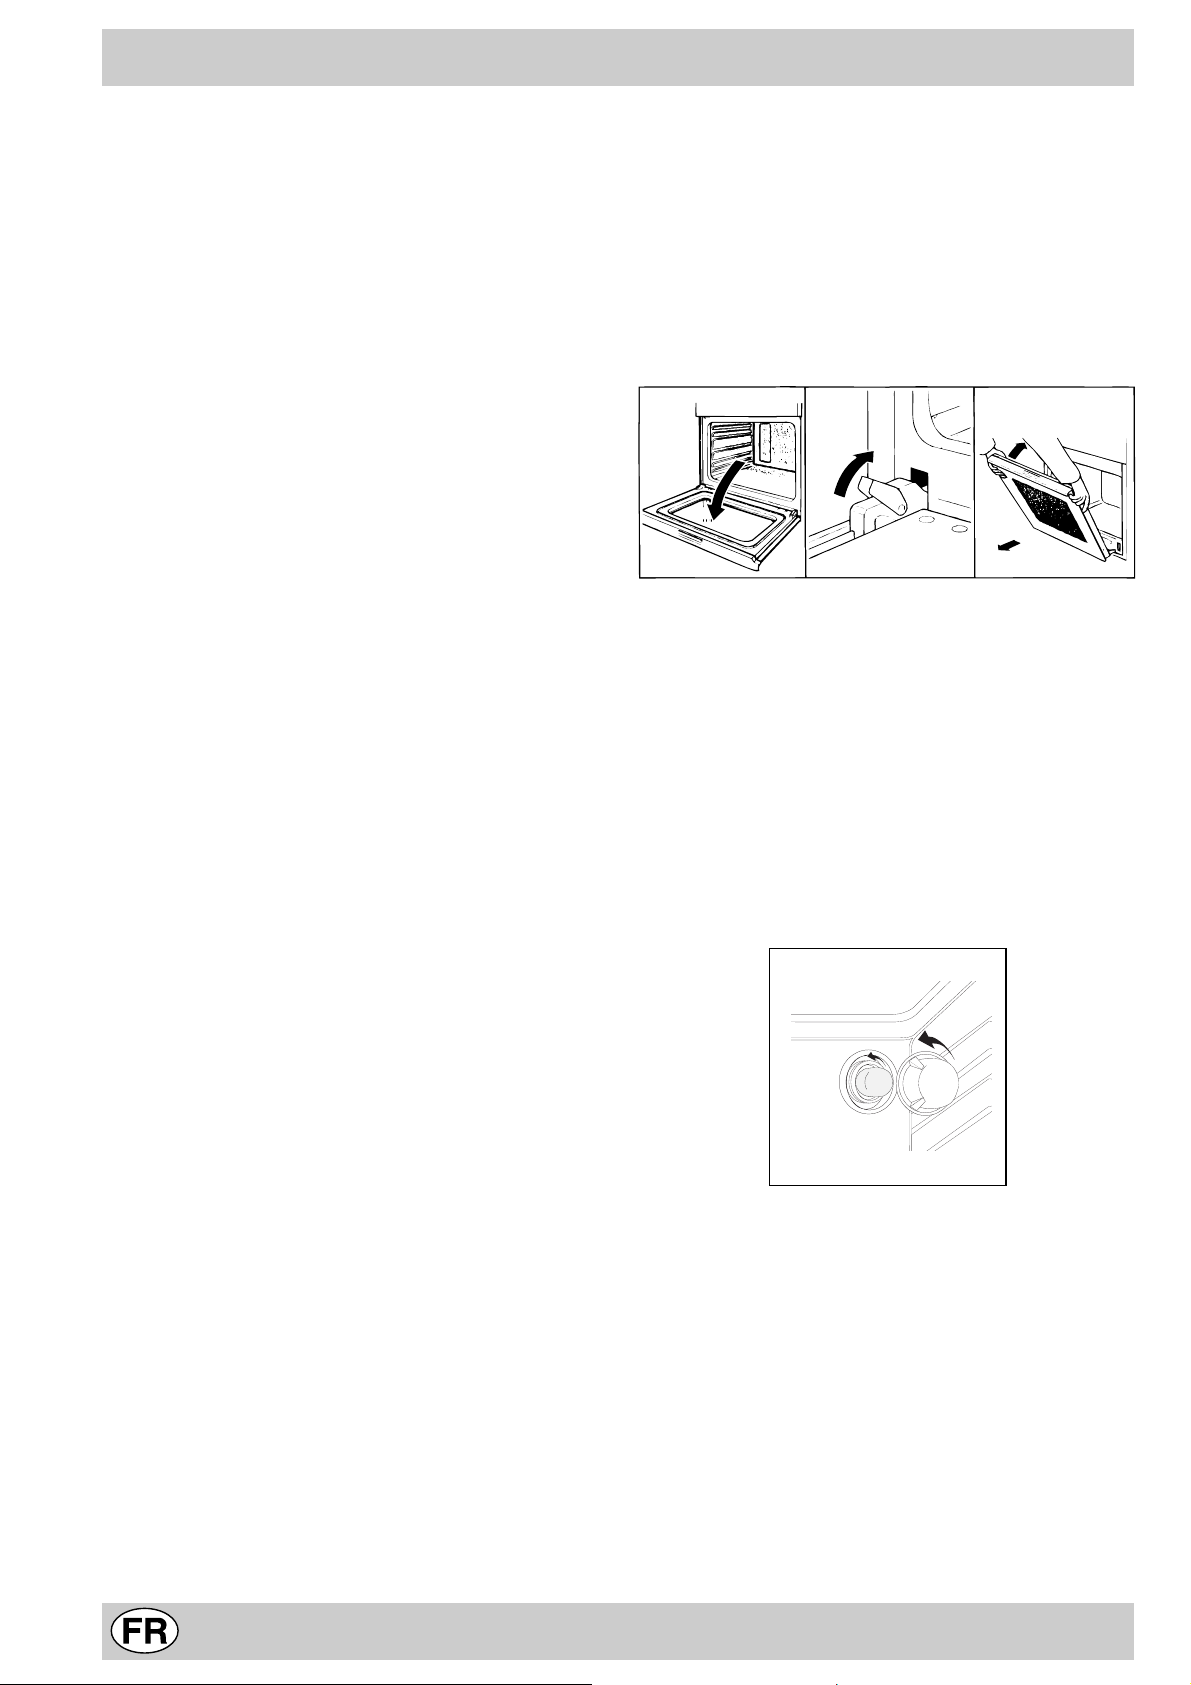
How to remove the oven door
For a more thorough clean, you can remove the oven
door. Proceed as follows:
• open the door fully;
• lift up and turn the small levers situated on the two
hinges;
• grip the door on the two external sides, shut it slowly
but not completely;
• pull the door towards you, pulling it out of its seat;
Reassemble the door by follo wing the abov e procedures
backwards.
123
Replacing the Oven Lamp
• Disconnect the oven from the power supply by means
of the omnipolar switch used to connect the appliance
to the electrical mains; or unplug the appliance if the
plug is accessible;
• Remove the glass cover of the lamp-holder;
• Remove the lamp and replace with a lamp resistant to
high temperatures (300°C) with the following characteristics:
- Voltage: 230/240 V
- Wattage 25W
- T ype E14
• Replace the glass cover and reconnect the oven to
the mains power supply.
13
Page 13

Practical Cooking Advice
When cooking in the oven, use only one dripping pan or
rack at a time. Select from among the top or bottom rack
heights based on whether the dish needs more or less
heat from the top.
Preheating
If the oven must be preheated (this is generally the case
when cooking leavened f oods), w e recommend y ou use
the “conv ection mode” to reach the desired temper ature
as quickly as possible . When preheating is over , which is
indicated by the red light “I” going out, select the required
cooking mode.
Cooking Fish and Meat
When cooking white meat, fowl and fish, use temperature
settings from 180 °C to 200 °C.
For red meat that should be well done on the outside while
tender and juicy in the inside, it is a good idea to start with
a high temperature setting (200°C-220°C) for a short time,
then turn the oven down afterwards .
In general, the larger the roast, the lower the temperature
setting. Place the meat on the centre of the grid and place
the dripping pan beneath it to catch the fat.
Make sure that the grid is inserted so that it is in the centre
of the oven. If you would like to increase the amount of
heat from below, use the low rack heights. For savoury
roasts (especially duck and wild game), dress the meat
with lard or bacon on the top.
Using the Grill
Use the d “grill” mode, placing the food under the centre
of the grill (situated on the 3rd or 4th rack form the bottom) because only the central part of the top heating element is turned on.
Use the bottom rack (1st from the bottom), placing the
dripping pan provided to collect any sauce and/or grease
and prevent the same from dripping onto the oven bottom.
When using this mode, we recommend you set the thermostat to the highest setting. Ho wever , this does not mean
you cannot use lower temperatures, simply by adjusting
the thermostat knob to the desired temperature.
Important: always use the grill with the oven door shut.
This will allow you both to obtain excellent results and to
save on energy (appro ximately 10%).
Therefore the best results when using the grill modes
are obtained by placing the grid on the lower racks
(see cooking table) then, to prevent fat and grease
from dripping onto the bottom of the oven and smoke
from forming, place a dripping-pan on the 1st oven
rack from the bottom.
Baking Cakes
When baking cakes, alwa ys preheat the o v en and do not
open the oven door during baking to prev ent the cak e
from dropping. In gener al:
Pastry is too dr y
Increase the tempe rature b y 10°C and r educe th e
cooking time.
Pastry dropped
Use less liquid or lower th e temperat ure by 10°C.
Pastry is too dark on top
Place it on a lower rack, l ower the tem perat ure, a nd
increase the cooking tim e.
Cooked well on the inside but sticky on the
outside
Use less liquid, lower t he tempe ratur e, and i ncre ase
the cooking time.
The pastry sticks to the pan
Grease the pan well and s prinkle it wit h a dust ing of
flour or use greaseproof paper.
14
Page 14
Foods Wt.
(Kg)
Paste
Lasagne 2.5 3 210 - 75-80
Cannelloni 2.5 3 210 - 75-80
Oven-baked noodles 2.5 3 210 - 75-80
Meat
Veal 1.7 3 220 - 85-90
Chicken 1.5 3 220 - 110-115
Turkey 3.0 3 220-Max - 95-100
Duck 1.8 3 220 - 120-125
Rabbit 2.0 3 220 - 105-110
Pork 2.1 3 220 - 100-110
Lamb 1.8 3 220 - 90-95
Fish
Mackerel 1.1 3 210-230 - 55-60
Dentex 1.5 3 210-230 - 60-65
Trout baked in paper 1.0 3 210- 230 - 40-45
Pizze
Napolitan pizza 1.0 3 Max 15 30-35
Tarts
Biscuits 0.5 3 180 15 30-3 5
Meringues 1. 1 3 180 15 30-35
Chocolate cake 1.0 3 200 15 45-50
Yeast cakes 1.0 3 200 15 50-55
Note: cooking times are approx imate an d may v ary ac cord ing to pe rson al tast e.
Cooking position
from bottom
Temperature
(°C)
Pre-eating time
(minuts)
Cooking time
(minuts)
15
Page 15

Safety Is A Good Habit To Get Into
T o maintain the efficienc y and saf ety of this appliance, we recommend that you do the following:
• only call the Service Centres authorised by the manufacturer
• always use original spare parts
• When handling the appliance, we recommend you
always use the purpose pro vided handles recessed
into the sides of the oven to prevent harming
people or damaging the appliance itself.
• This appliance is designed for non-professional, household use and its functions must not be changed.
• These instructions are only valid for the countries
whose symbols appear on the manual and the serial
number plate.
• The electrical system of this appliance can only be used
safely when it is correctly connected to an efficient
earthing system in compliance with current safety
standards.
• When the appliance is in use, the heating elements
and some parts of the oven door become extremely
hot. Make sure you don’t touc h them and keep children well away.
The following items are potentially danger ous, and
therefore appropriate measures must be taken to
prevent children and the disabled from coming into
contact with them:
- Controls and the appliance in general;
- Packaging (bags, polystyrene, nails, etc.);
- The appliance itself, immediately after use of the oven
or grill due to the heat generated;
- The appliance itself, when no longer in use (potentially
dangerous parts must be made safe).
Av oid the following:
- Touching the appliance with wet parts of the body;
- Using the appliance when barefoot;
- Pulling on the appliance or the supply cable to unplug
it from the electrical outlet;
- Improper or dangerous operations;
- Obstructing the ventilation or heat dissipation slots;
- Allowing power supply cables of small appliances to
come into contact with the hot parts of the appliance;
- Exposing the appliance to atmospheric agents such
as rain, or sunlight;
- Using the oven for storage purposes;
- Using flammable liquids near the appliance;
- Using adapters, multiple sockets and/or extension
leads;
- Attempting to install or repair the appliance without the
assistance of qualified personnel.
Qualified personnel must be contacted in the
following cases:
- Installation (following the manufacturer’ s instructions);
- When in doubt about operating the appliance;
- Replacing the electrical socket when it is not compatible with the appliance plug.
Service Centres authorised by the manufacturer
must be contacted in the follo wing cases:
- If in doubt about the soundness of the appliance after
removing it from its packaging;
- If the power supply cable has been damaged or needs
to be replaced;
- If the appliance breaks down or functions poorly; ask
for original spare parts.
It is a good idea to do the following:
- Only use the appliance to cook food and nothing else;
- Check the soundness of the appliance after it has been
unpacked;
- Disconnect the appliance from the electrical mains if it is
not functioning properly and before cleaning or performing maintenance;
- When left unused, unplug the appliance form the electricity mains and turn off the gas tap (if foreseen);
- Use oven gloves to place cookware in the ov en or when
removing it;
- Always grip the oven door handle in the centre as the
extremities of the same may be hot due to any hot air
leaks;
- Make sure the knobs are in the “•”/”o” position when the
appliance is not in use.
- Cut the power supply cable after disconnecting it from
the mains when you decide not to use the appliance any
longer.
• The manufacturer may not be held responsible for any
damage due to: incorrect installation, improper , incorrect
and irrational use.
16
Page 16
Instalation
The appliance must be installed only by a qualified
person in compliance with the instructions provided.
The manufacturer declines all responsibility f or improper
installation which may harm persons and animals and
damage property.
Important: The power supply to the appliance must be
cut off before any adjustments or maintenance work is
done on it.
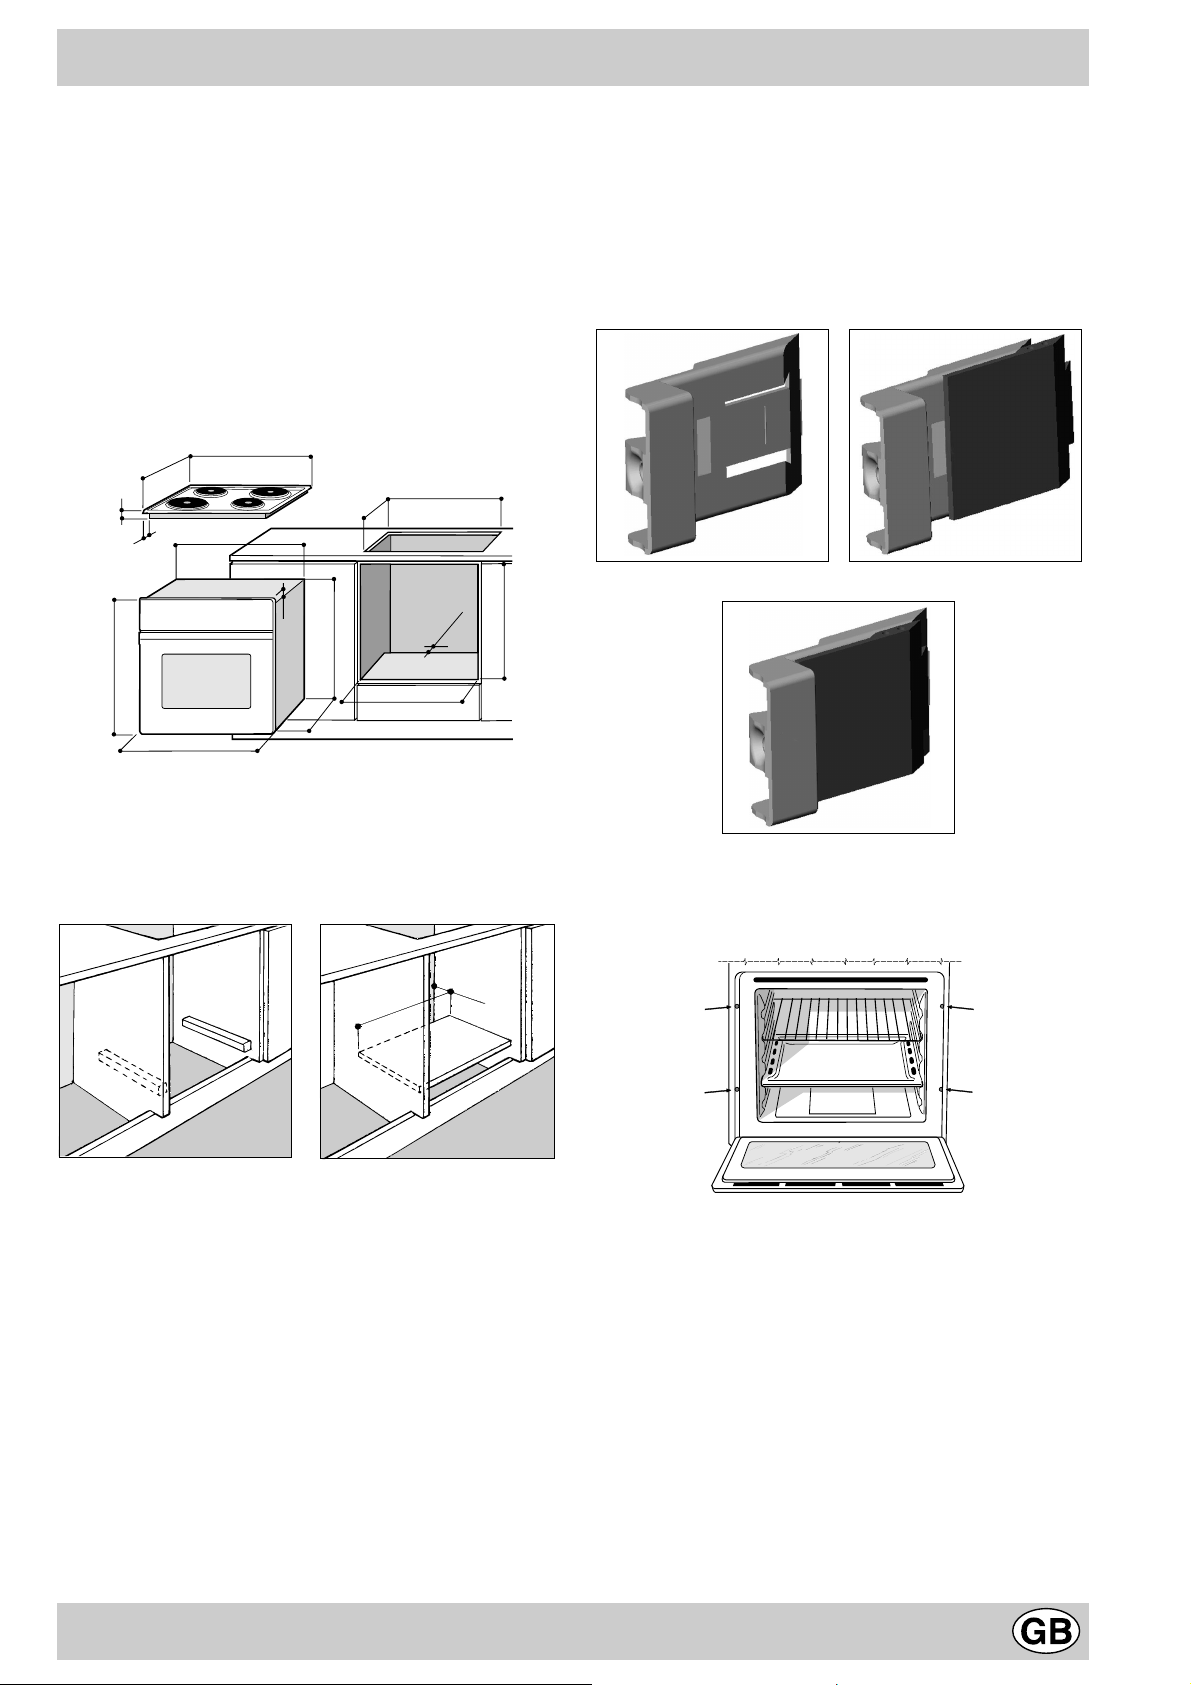
Installation of Built-in Ovens
In order to ensure that the built-in appliance functions properly, the cabinet containing it must be appropr iate. The
figure below gives the dimensions of the cut-out f or installation under the counter or in a wall cabinet unit.
555
580
560
min
+4 -0
min
min
45
575-585
+4 -0
480
23
572
558
543545
500
39
15
595
595
N.B.: Installation in compliance with the consumption declaration
For the correct centring of your appliance, position the 4
tabs on the sides of the oven in correspondence with the
4 holes on the perimeter of the frame. In particular , if the
cabinet side panel:
• is 20 mm thick: the remov able part of the tab must be
removed (Fig. A);
• is 18 mm thick: use the first groove, which is factoryset (Fig. B);
• is 16 mm thick: use the second groo ve (Fig.C)
Fig. A Fig. B
In order to ensure adequate ventilation, the back panel of
the cabinet unit must be removed. Installing the oven so
that it rests on two strips of wood is preferab le. If the oven
rests on a continuous, flat surface, there must be an aperture of at least 45 x 560 mm.
45 mm.
560 mm.
The panels of the adjacent cabinets must be made of heatresistant material. In particular, cabinets with a v eneer exterior must be assembled with glues which can withstand
temperatures of up to 100 °C.
In compliance with current safety standards, contact with
the electrical parts of the oven must not be possible once
it has been installed.
All parts which ensure the safe operation of the appliance
must be removab le only with the aid of a tool.
Fig. C
To fasten the oven to the cabinet, open the door of the
oven and attach it by inserting the 4 wooden screws into
the 4 holes located on the perimeter of the frame.
Electrical Connection
The cooker must be connected to the mains electricity
supply . The hob is connected to the cook er using a special
connector. The cookers are designed to operate on
alternating current featuring the supply voltage and
frequency indicated on the appliance data plate.
17
Page 17
BUILT-IN HOB
WHITERED
YELLOW
Only on
certain models
BLUE GREEN
P
NL2L3
L1
Fig. E
230V 1N~
H07RN-F 3x4 CEI-UNEL 35364
NL
BUILT-IN COOKER
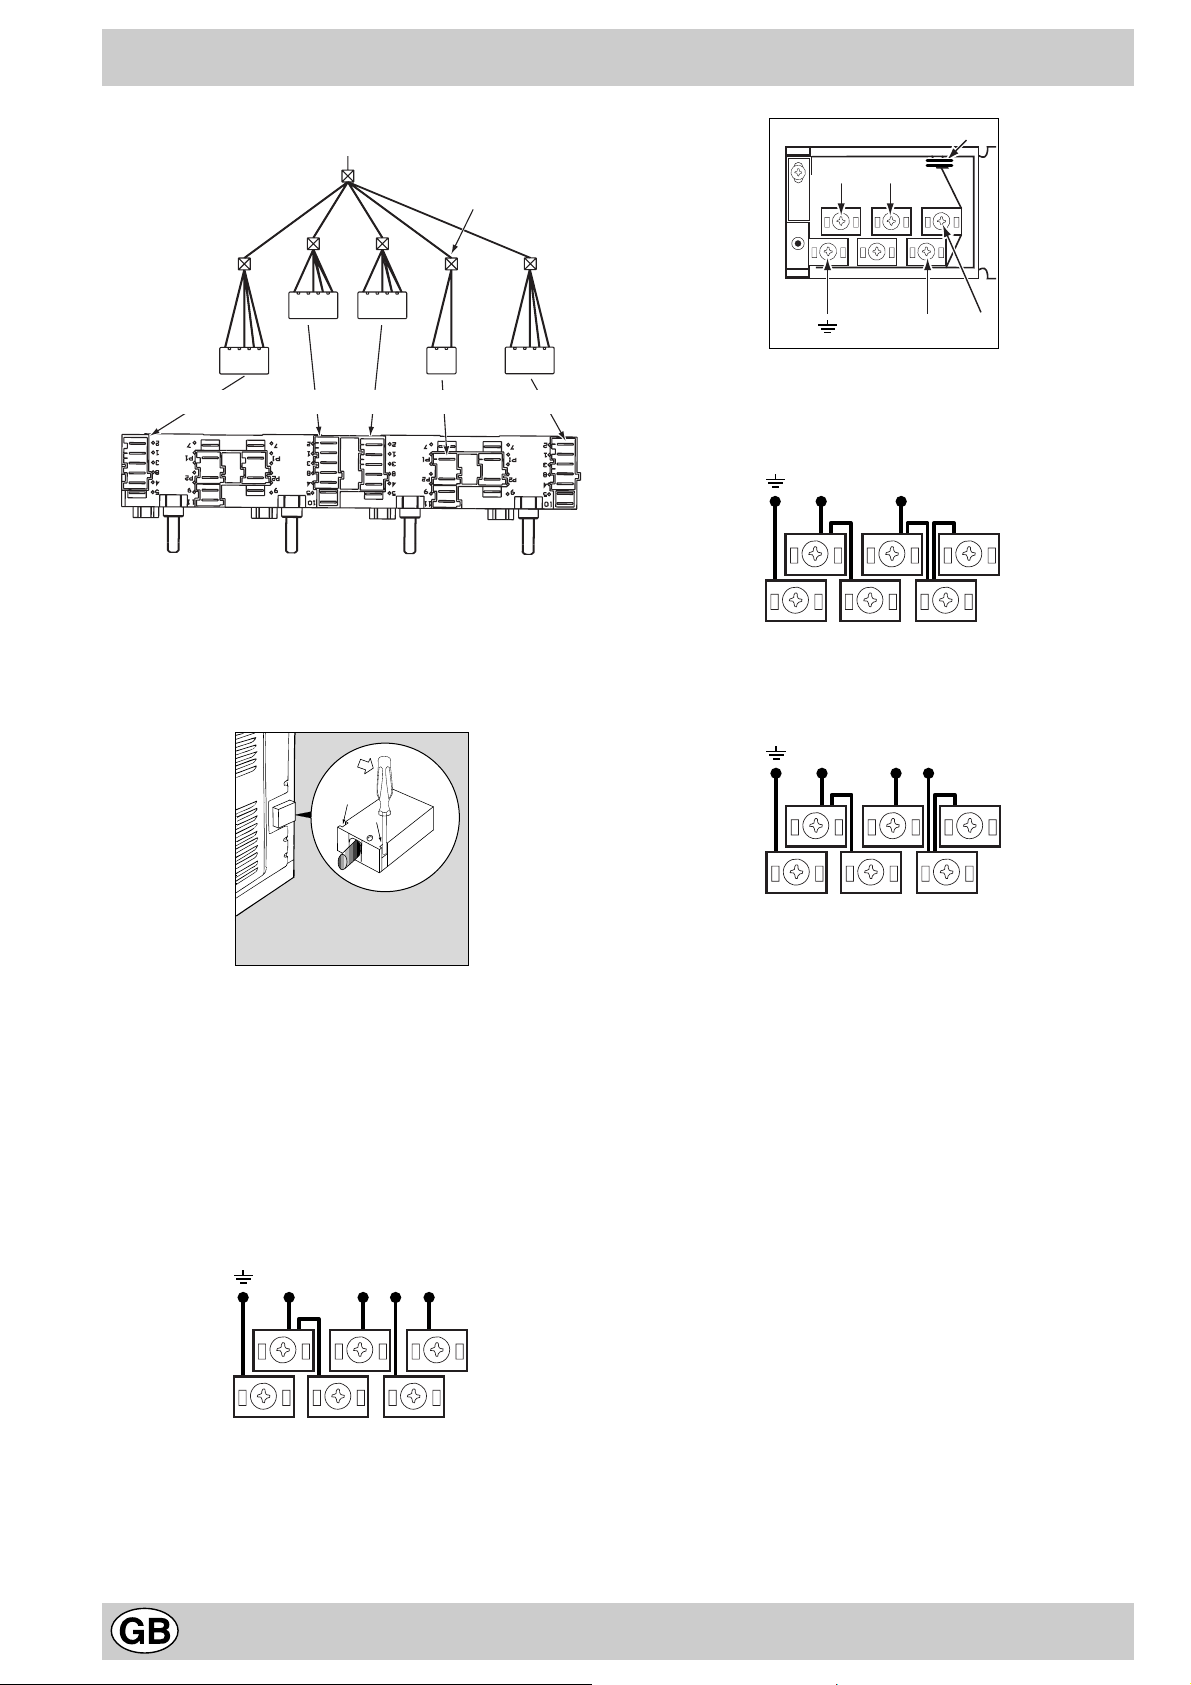
Fitting on a Po wer Suppl y Cable
Opening the terminal board:
• Using a screwdriver, prise on the side tabs of the
terminal board cover;
• Pull open the cover of the terminal board.
To install the cable, proceed as follows:
• unscrew the wire clamp screw and the contact screws
Note: the jumpers are factory-set for a three-phase
400V connection (fig. D).
• to make the electrical connections illustrated in fig. F
and fig. G, use the tw o jumpers housed in the box (fig.
E - reference “P”)
• fasten the supply cable in place with the clamp and
close the cover of the terminal board.
400V 3N~
H05RR-F 5x2.5 CEI-UNEL 35363
NL3L1L2
5
3
4
Fig. D
1
2
5
3
4
1
2
Fig. F
400V 2N~
H05RR-F 4x2.5 CEI-UNEL 35363
NL2L1
5
3
4
Fig. G
Connecting the supply cable to the mains
Install a standardised plug corresponding to the load indicated on the data plate. When connecting the cable directly to the mains, install an omnipolar circuit-breaker with
a minimum contact opening of 3 mm between the appliance and the mains. The omnipolar circuit break er should
be sized according to the load and should comply with
current regulations (the earth wire should not be interrupted by the circuit breaker).
The supply cable should be positioned so that it does not
reach a temperature of more than 50°C with respect to
the room temperature, anywhere along its length.
Before making the connection, check that:
• The electrical safety of this appliance can only be guaranteed if the cooker is correctly and efficiently earthed,
in compliance with regulations on electrical safety. Always ensure that the earthing is efficient; if you have
any doubts call in a qualified technician to check the
system. The manufacturer declines all responsibility
for damage resulting from a system which has not been
earthed.
• Before plugging the appliance into the mains, check
that the specifications indicated on the date plate (on
the appliance and/or packaging) correspond to those
of the electrical mains system of your home.
1
2
18
Page 18
• Check that the electrical capacity of the system and
sockets will support the maximum power of the appliance, as indicated on the data plate. If you have any
doubts, call in a qualified technician.
• If the socket and appliance plug are not compatible,
have the socket replaced with a suitable model by a
qualified technician. The latter, in particular, will also
have to ensure that the cross section of the socket
cables are suitable for the po wer absorbed by the ap-
Technical Specifications
pliance. The use of adapters, multiple sockets and/or
extensions, is not recommended. If their use cannot
be avoided, remember to use only single or multiple
adapters and extensions which comply with current
safety regulations. In these cases, never exceed the
maximum current capacity indicated on the single
adapter or extension and the maximum power indicated
on the multiple adapter. The plug and socket must
be easily accessible.
Inner dimensions of the oven:
Width 43.5 cm
Depth 43.5 cm
Height 32 cm
Inner Volume of the Oven:
60 litres
ENERGY LABEL
Directive 2002/40/EC on the label of electric ovens
Norm EN 50304
Declared energy consumption for Natural conv ection Class
heating mode: Con vection
Voltage and Frequency of Power Supply:
230/400V ~ 3N 50/60Hz 8400W
7
This appliance conforms with the following
European Economic Community directives:
- 73/23/EEC of 19/02/73 (Low V oltage) and subsequent
modifications;
- 89/336/EEC of 03/05/89 (Electromagnetic
Compatibility) and subsequent modifications;
- 93/68/EEC of 22/07/93 and subsequent
modifications.
- 2002/96/EC
The European Directive 2002/96/EC on Waste Electrical
and Electronic Equipment (WEEE), requires that old
household electrical appliances must not be disposed of
in the normal unsorted municipal waste stream. Old
appliances must be collected separately in order to
optimise the recovery and recycling of the materials they
contain and reduce the impact on human health and the
environment. The crossed out “wheeled bin” symbol on
the product reminds you of your obligation, that when y ou
dispose of the appliance it must be separately collected.
Consumers should contact their local authority or retailer
for information concerning the correct disposal of their old
appliance.
19
Page 19
Merci d’avoir choisi un produit Ariston, fiable et facile à utiliser. Pour apprendre à bien connaître votre appareil, à
l’utiliser et à le conserver longtemps, lisez attentivement cette notice av ant toute utilisation car elle contient des instructions
très importantes concernant sa sécurité d’installation, d’usage et d’entretien. Conservez av ec soin cette brochure pour
toute consultation ultérieure. Merci.
Vu de près
A. Tableau de bord
B. Lèchefrite ou plateau de cuisson
C. Grille du four
D. Plaque électrique
E. Sélecteur de fonctions
F. Manettes plaques électriques
G. V o y ant f onctionnement plaques électriques
H. Crémaillères pour lèchefrites et grilles
I. Vo y ant de fonctionnement du f our (n’e xiste que sur
certains modèles) - Quand il est allumé il indique la
montée en température jusqu’à la température
sélectionnée.
G
I
0
0
0
1
2 5
3
6
1
2 5
3
4
6
1
2 5
3
4
6
1
2 5
3
4
0
6
4
0
MAX
220
180
60
100
140
D
A
C
D
H
B
F
E
Mode d’emploi
Pour sélectionner les différentes f onctions du four , servezvous des dispositifs de commande de son tableau de bord.
Attention : Lors de son premier allumage, faites fonctionner le four à vide, porte fermée, pendant au moins
une demi-heure en réglant la température à son maximum. Ouvrez ensuite la porte et ventilez la pièce. L’odeur
qui se dégage parfois pendant cette opération est due à
l’évaporation des produits utilisés pour protéger le four
pendant le laps de temps qui s’écoule entre la fabrication
et l’installation du produit.
Attention : Installez la lèchefrite sur le premier gradin du
bas pour recueillir les graisses et les jus uniquement en
cas de cuissons au gril ou au tournebroche (ce dernier
n’est présent que sur certains modèles). P our les autres
modes de cuisson n’utilisez jamais le gradin du bas et ne
posez jamais d’objets à même la sole du four, vous r isqueriez d’abîmer l’émail. Enf ournez toujours vos plats de
cuisson (plats pyrex, papier alu, etc. etc.) sur la grille f ournie avec l’appareil et montée dans les gradins de la crémaillère à l’intérieur de l’enceinte du four .
La manette du four (E)
Ce dispositif vous permet de sélectionner les différentes
fonctions du four et de choisir, suivant les aliments, la
température de cuisson la plus appropriée parmi celles
qui sont indiquées sur la manette (comprises entre 60°C
et 240°C). T ournez la manette dans le sens des aiguilles
d’une montre, la lampe du four s’allume 8 , et les éléments
chauffants sole et voûte se mettent en marche (résistances
électriques), vous pouvez alors choisir parmi les
températures indiquées ci-dessous, celle qui convient le
mieux à la cuisson des aliments (Four Statique). Il vous
suffit pour cela d’amener la valeur désirée en face du
repère fixe situé sur le tableau de bord.
60 • 100 • 140 • 180 • 220 Max
80 120 160 200 240
La température est automatiquement atteinte et maintenue
par le thermostat commandé par la manette.
Position Résistance Supérieure c
Tournez la manette dans cette position pour allumer la
lumière du four et brancher l’élément chauffant supérieur .
Eclairage du four
Pour l’allumer , amenez le bouton “E” en face du symbole
8. La lampe s’allume et reste allumée chaque f ois qu’une
résistance électrique du four se met en marche.
20
Page 20
Manettes de commande des plaques électriques du
plan de cuisson (F)
Les cuisinières peuvent monter des plaques électriques
normales, rapides et automatiques combinées entre elles
(les plaques rapides se distinguent des autres à leur
pastille rouge, les plaques automatiques à la présence
d’un plateau aluminium circulaire).
Pour éviter toute déperdition de chaleur et ne pas
endommager les plaques, il est conseillé d’utiliser des
casseroles à fond plat dont le diamètre n’est pas plus petit
que celui de la plaque.
Dans le tableau suivant, vous trouverez les
correspondances entre les positions indiquées sur les
manettes et l’utilisation pour laquelle les plaques sont
conseillées.
Position Plaque normale ou rapide
0
Eteint
1 Cuisson de légumes v erts, poiss ons
Voyant fonctionnement plaques électriques (G)
Il s’allume chaque fois qu’une résistance électrique du
plan de cuisson se met en marche.
Utilisation du plan de cuisson
Pour obtenir des résultats optimums de votre plan de
cuisson, suivez certaines règles fondamentales au
moment de préparer ou de cuire les aliments.
· N’utilisez que des casseroles à fond plat pour qu’elles
adhèrent bien à la zone de cuisson.
· Utilisez des casseroles dont le diamètre couvre
entièrement la plaque de cuisson pour utiliser à plein
toute la chaleur disponible.
2
3
4
5
6
Cuisson de pommes de terre (à la
vapeur) soupes, po is ch iches, har ico ts
Pour continuer la c uisso n de gr andes
quantités d'aliments, m inest rone
Rôtir (moyen)
Rôtir (fort)
Rissoler ou rejoindr e l'ébu llition en peu
de temps
Avant d’utiliser vos plaques de cuisson pour la
première fois, faites-les chauffer pendant 4 minutes à
leur température maximum sans casserole. A u cours
de cette phase initiale, le revêtement protecteur dur cit
et atteint sa résistance maximum.
· Veillez à ce que le dessous des casseroles soit bien
sec et propre pour garantir un bon contact avec les
plaques et la longévité de ces dernières et de vos
casseroles.
21
Page 21
Comment le garder en f orme
Av ant toute opération de nettoy age ou d’entretien coupez
l’alimentation électrique de l’appareil.
Pour pr olonger la durée de vie de votre appareil, nettoyez-le fréquemment, en n’oub liant pas que:
• pour le nettoyage, ne pas utiliser d’appareils à
vapeur
• les parties extérieures émaillées ou inox doivent être
lavées à l’eau tiède en évitant toute utilisation de poudres abrasives ou de produits corrosifs qui pourraient
les abîmer. L’acier inox peut se tacher. Si les taches
sont difficiles à enlever, utilisez des produits spéciaux
que vous trouverez dans le commerce. Il est conseillé
de rincer abondamment et d’essuyer après le nettoy age.
• l’intérieur du four doit être nettoyé, de préférence après
chaque usage, quand il est encore tiède av ec de l’eau
chaude et du détergent, en rinçant et en essuyant ensuite soigneusement avec un chiff on doux. Evitez d’utiliser des produits abrasifs (des poudres par ex emple),
des éponges récurantes ou des acides (détartrants par
ex.) qui pourraient abîmer l’émail. En cas d’incrustations particulièrement difficiles à enlever , utilisez un nettoyant spécial f our en suivant à la lettre les instructions
indiquées sur l’emballage.
• si la durée d’utilisation du four se prolonge, de la buée
peut se former. Essuyez-la avec un chiff on doux.
• un joint en caoutchouc placé sur l’ouverture du four
assure son bon fonctionnement. Contrôlez par conséquent périodiquement l’état de ce joint. A u besoin, nettoyez-le en évitant d’utiliser des produits ou des objets
abrasifs. S’il est abîmé, adressez-vous au service
après-vente le plus proche de votre domicile. Mieux
vaut ne pas utiliser le four tant qu’il n’est pas réparé.
• ne tapissez jamais la sole du four de papier aluminium
car l’accumulation de chaleur qui s’en suivrait pourrait
compromettre la cuisson et détériorer l’émail.
• nettoyez la vitre de la porte du four à l’aide de produits
et d’éponges non abrasifs et séchez avec un chiffon
doux.
Dépose de la porte du four
Pour nettoyer plus à fond, vous pouvez déposer la porte
du four . Procédez comme suit :
• ouvrez la porte complètement ;
• soulevez et faites piv oter les leviers situés sur les deux
charnières ;
• saisissez la porte par les côtés extérieurs, refermez-la
lentement mais pas complètement ;
• tirez-la vers vous en la sortant de son logement;
Remontez la porte en refaisant en sens inverse les opérations indiquées ci-dessus.
123
Remplacement de la lampe à l’intérieur de l’enceinte
du four
• Déconnectez l’appareil à l’aide de l’interrupteur
omnipolaire reliant le four à l’installation électrique ou
bien débranchez la fiche, si elle est accessible;
• Dévissez le couvercle en verre de la douille;
• Dévissez l’ampoule, remplacez-la par une ampoule résistant à des températures élevées (300°C) et ayant
les caractéristiques suivantes:
- T ension 230/240 V
- Puissance 25W
- Culot E14
• Remontez le couvercle en verre et connectez l’appa-
reil.
22
Page 22
Conseils utiles pour la cuisson
Pour cuire au four, n’utilisez qu’une seule lèchefrite ou
grille à la fois. Placez-la sur les gradins du bas ou du haut
selon que la cuisson exige plus de chaleur provenant de
la voûte ou de la sole.
Préchauffage
Quand un préchauffage est nécessaire, en gros chaque
fois que vous devez enfourner des pâtes levées, vous
pouvez utiliser la fonction «f our statique» qui permet d’obtenir une montée en température rapide. Attendez que
l’extinction du voyant rouge «I» vous signale que le préchauffage est terminé pour sélectionner la fonction de
cuisson la plus indiquée.
Cuisson du poisson et de la viande
Pour les viandes blanches , les volailles et le poisson utilisez des températures entre 180°C et 200 °C.
Pour rissoler les viandes rouges à l’e xtérieur et les garder
juteuses à l’intérieur, sélectionnez au départ une température élevée (200-220°C) pendant un bref laps de temps
puis diminuez-la par la suite.
En général, plus votre rôti est gros , plus vous de vez choisir une température basse et prolonger la durée de cuisson. Placez la viande au milieu de la gr ille et placez la
lèchefrite en dessous pour recueillir les graisses.
Enfournez la grille de manière à ce que la viande se trouve
au centre du four . Si vous voulez plus de chaleur en dessous, choisissez les gradins les plus bas. Pour obtenir
des rôtis savoureux (canard et gibier notamment), bardez votre viande de lard ou de petit salé en faisant en
sorte qu’ils se trouvent sur le dessus de la viande quand
vous l’enfournez.
Utilisation du gril
Utilisez la fonction d “gril” en plaçant vos aliments au
milieu de la grille (placée au 3ème ou au 4ème niveau en
partant du bas) car seule la par tie centrale de la résistance du haut est allumée.
Placez la lèchefrite fournie avec l’appareil sur le premier
niveau en partant du bas pour recueillir les graisses et les
jus.
Quand vous utilisez cette fonction, n’oubliez pas de régler votre thermostat sur le maximum. Ceci ne vous empêche toutefois pas d’utiliser des températures plus basses que vous sélectionnerez à l’aide du bouton du thermostat.
Important : pour la cuisson au gril, la porte du four
doit être fermée, vous obtiendrez de meilleurs résultats
et ferez des économies d’énergie (10% environ).
En cuisson barbecue, placez la grille sur les derniers
gradins en partant du bas (voir tableau de cuisson) et
placez la lèchefrite fournie sur le premier gradin en
partant du bas pour recueillir les graisses et éviter la
formation de fumée.
Cuisson de la pâtisserie
Préchauffez toujours votre f our av ant d’enfourner vos gâteaux et n’ouvrez pas la porte pendant leur cuisson pour
éviter qu’ils ne s’affaissent. En général :
Pâtisserie trop sèche
La prochaine fois progr amme z une te mpératur e de
10°C supérieure et réduise z le tem ps de c uisson.
Le gâteau s'affaisse
Utilisez moins de liqu ide ou bai ssez la tem pérat ure de
10°C.
Gâteau foncé sur le dessus
Enfournez-le à u n nivea u plu s bas, chois iss ez une
température plus ba sse et prolo ngez la cuis son
Bonne cuisson extérieure, mais intérieur colla nt
Utilisez moins de liqu ide, abai ssez la tem pérat ure,
augmentez le temps de c uisson.
Le gâteau ne se démoule pas
Beurrez bien votr e moul e et far inez-l e un peu ou bien
utilisez du papier s ulfur isé.
23
Page 23
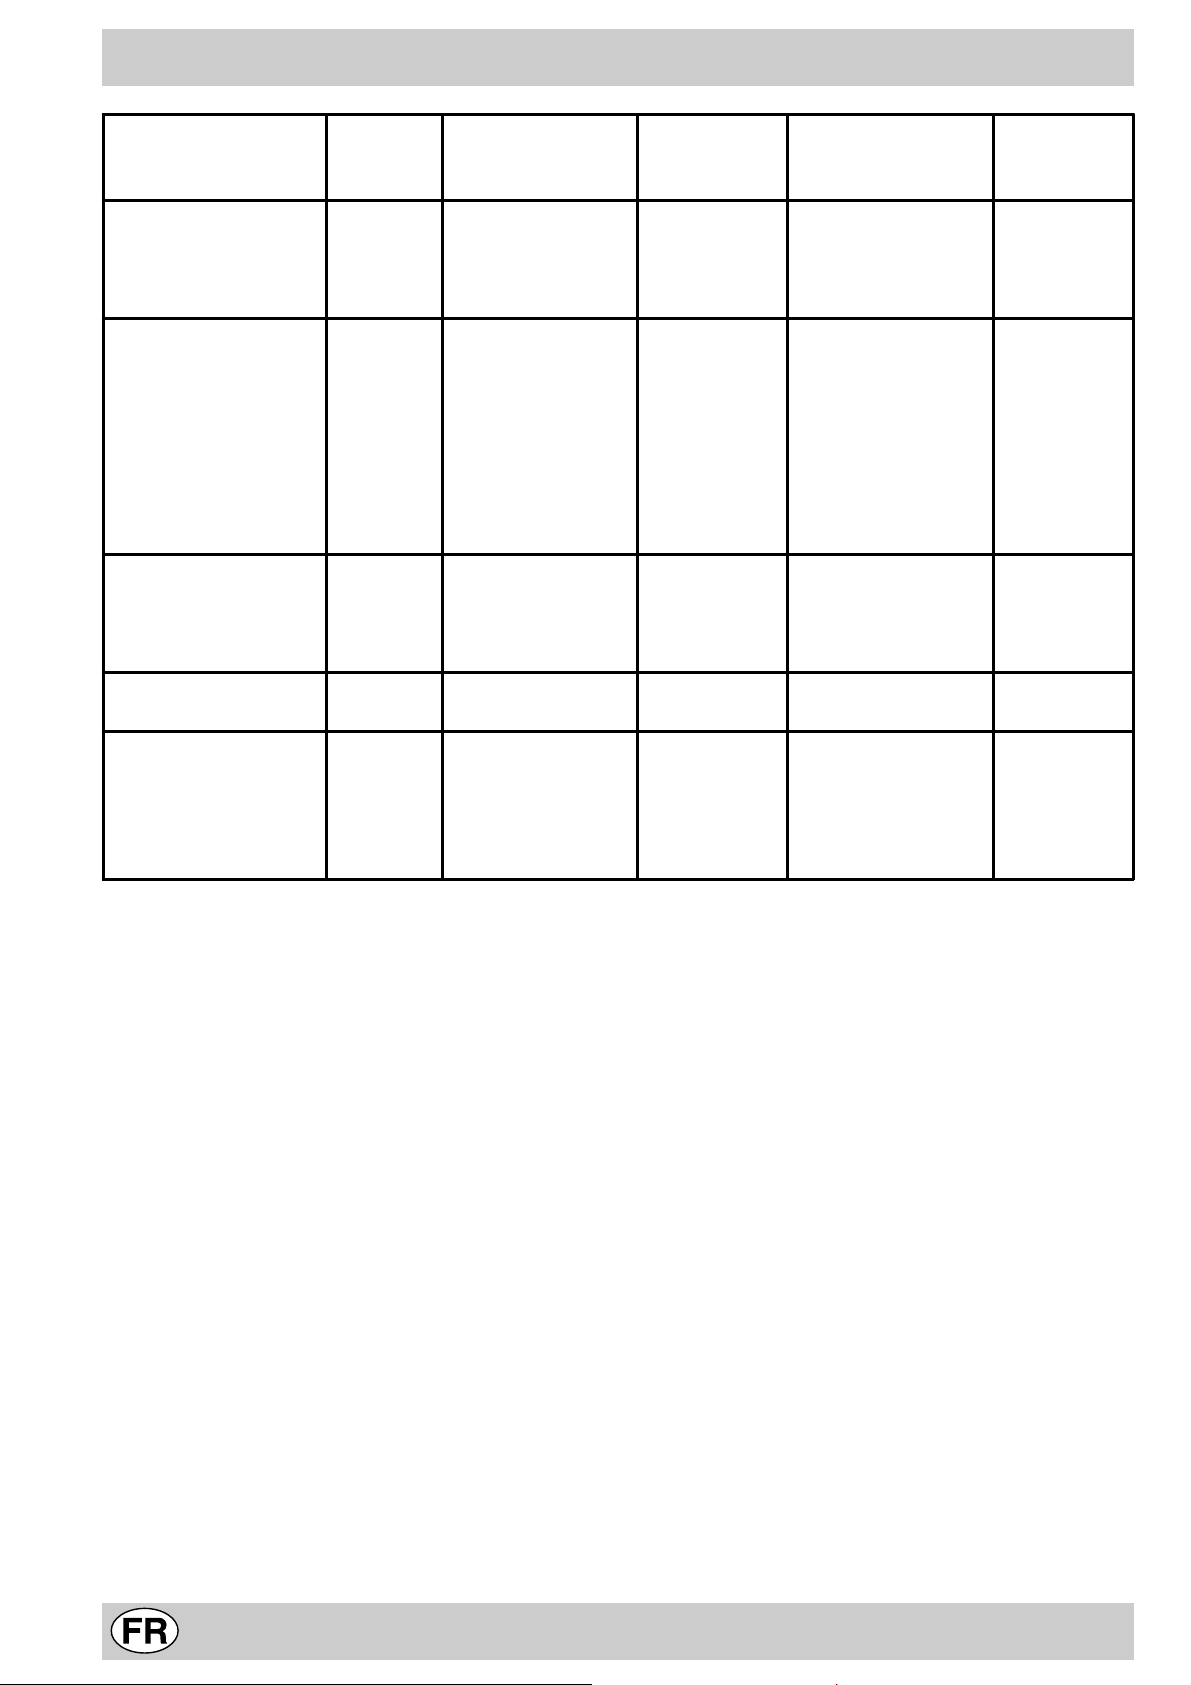
Aliments à cuire Poids
(Kg)
Pâtes
Lasagnes 2,5 3 210 - 75-80
Cannelloni 2,5 3 210 - 75-80
Tagliatelle au four 2,5 3 210 - 75-80
Viandes
Veau 1,7 3 220 - 85-90
Poulet 1,5 3 220 - 110-115
Dinde 3,0 3 220-Max - 95-100
Canard 1,8 3 220 - 120-125
Lapin 2,0 3 220 - 105-110
Porc 2,1 3 220 - 100-110
Agneau 1,8 3 220 - 90-95
Poissons
Maquereaux 1,1 3 210-230 - 55-60
Dentex 1,5 3 210-230 - 60-65
Truite en papillote 1,0 3 210-230 - 40-45
Pizza
Pizza napolitaine 1,0 3 Max 15 30-35
Gâteaux
Biscuits 0,5 3 180 15 30-35
Tarteata 1,1 3 180 15 30-35
Gâteaux au chocolat 1,0 3 200 15 45-50
Gâteaux levés 1,0 3 200 15 50-55
Note: les temps de cuisson sont purement indicatifs et peuvent vari er en fonction des goût s de l'utilis ateur.
Position de
cuisson étages à
partir du bas
Température
(°C)
Temps de préréchauffement
(minutes)
Te mps de
cuisson
(minutes)
24
Page 24

La sécurité, une bonne habitude
Pour garantir l’efficacité et la sécurité de ce produit
• adressez-vous exclusivement à des Centres d’assistance technique agréés
• exigez toujours l’utilisation de pièces détachées originales.
• Pour déplacer l’appareil servez-vous toujours des
poignées prévues sur les côtés du four, vous
éviterez ainsi tout risque de blessure ou
d’endommagement de l’appareil.
• Cet appareil a été conçu pour un usage non professionnel, à domicile, et ses caractéristiques ne peuvent être
modifiées.
• Les instructions fournies ne sont applicables qu’aux pays
dont les symboles sont reportés dans la notice et sur la
plaquette d’immatriculation....
• La sécurité de cet appareil n’est garantie que si ce dernier a été correctement raccordé à une installation de
mise à la terre efficace conforme aux normes de sécurité.
• En cours de fonctionnement, les éléments chauffants
et certaines parties de la porte peuvent devenir très
chauds. Attention à ne pas les toucher et à garder
les enfants à distance.
Ce dernier pouvant représenter un danger , évitez que
des enfants ou des incapables aient accès :
- aux commandes et à l’appareil en général ;
- aux emballages (sachets, polystyrène, clous etc.) ;
- à l’appareil, pendant et tout de suite après l’utilisation du
four et du gril, à cause de la surchauffe;
- à l’appareil inutilisé (dans ce cas il faut rendre inoffensives les parties pouvant s’avérer dangereuses)...
Evitez :
- de toucher l’appareil avec des parties du corps humides
;
- de l’utiliser pieds nus ;
- de tirer sur l’appareil ou sur le cordon d’alimentation pour
le débrancher de la prise de courant ;
- toute opération inappropriée et dangereuse ;
- de boucher les fentes d’aération ou de déperdition de la
chaleur ;
- que le cordon d’alimentation de petits électroménagers
touchent à des parties chaudes de l’appareil ;
- l’exposition aux agents atmosphériques (pluie, soleil) ;
- d’utiliser le four comme rangement ;
- d’utiliser des liquides inflammables à proximité ;
- d’utiliser des adaptateurs, des prises multiples et/ou des
rallonges ;
- toute tentative d’installation ou de réparation sans l’intervention de personnel qualifié.
Faites toujours appel à des techniciens qualifiés dans
les cas suivants :
- installation (conforme aux instructions du fabricant) ;
- quand vous avez des doutes sur son fonctionnement ;
- remplacement de la pr ise en cas d’incompatibilité avec
la fiche de l’appareil.
Faites appel aux centres de service après-vente
agréés par le fabricant dans les cas suivants :
- en cas de doute sur le bon état de l’appareil lors de son
déballage ;
- endommagement ou remplacement du cordon d’alimentation ;
- en cas de panne ou de mauvais fonctionnement, exigez
des pièces détachées d’origine.
Effectuez les opérations suivantes :
- évitez toute opération autre que la cuisson ;
- vérifiez le bon état de l’appareil lors de son déballage ;
- déconnectez l’appareil en cas de mauvais fonctionnement et avant toute opération de nettoyage ou d’entretien ;
- quand il est inutilisé, débranchez l’appareil de la prise de
courant et fermez le robinet du gaz (s’il y en a un de
prévu) ;
- utilisez des gants de protection pour enfourner ou sortir
des plats du four ;
- saisissez toujours la poignée de porte en son milieu car
à ses extrémités les sorties d’air chaud pourraient la rendre plus chaude ;
- contrôlez toujours si les manettes sont bien sur “•”/”o”
quand l’appareil n’est pas utilisé.
- coupez le cordon d’alimentation après l’avoir débranché
de la prise quand vous décidez de ne plus utiliser votre
appareil.
• Le fabricant décline toute responsabilité en cas de dommages provoqués par : une mauvaise installation, un
usage impropre et erroné.
25
Page 25

INSTALLATION
L’installation doit être effectuée conformément aux
instructions du fabricant et par un professionnel du
secteur. Le f abricant décline toute responsabilité pour tous
dommages causés à des personnes, à des animaux ou à
des choses du fait d’une installation incorrecte de
l’appareil.
Important : déconnectez le four a vant de procéder à toute
opération de réglage, d’entretien etc.
Installation des fours à encastrer
Pour garantir un bon fonctionnement d’un appareil à
encastrer, il faut que le meuble possède des
caractéristiques bien précises. Les dimensions de la niche
à l’intérieur du meuble en cas d’installation sous plan ou
en colonne sont indiquées sur la figure qui suit.
555
580
560
min
+4 -0
min
min
45
575-585
+4 -0
480
23
572
558
543545
500
39
15
595
595
Pour bien le centrer, positionnez les 4 taquets situés sur
les côtés du four en face des 4 trous pr atiqués sur le cadre
du four . Attention à l’épaisseur des joues du meuble :
• si elle est de 20 mm : enlevez la partie amovible du
taquet (Fig. A) ;
• si elle est de 18 mm : utilisez la première rainure ; déjà
prévu en usine (Fig. B) ;
• si elle est de 16 mm : utilisez la deuxième rainure
(Fig.C).
Fig. A Fig. B
Pour garantir une bonne aération il faut éliminer la paroi
arrière de la niche, il vaut mieux installer le four de manière
à ce qu’il repose sur deux cales en bois; s’il y a par contre
un plan d’appui continu, ce dernier doit avoir une ouverture d’au moins 45 x 560 mm.
45 mm.
560 mm.
Les panneaux des meubles adjacents doivent être
fabriqués dans un matériau résistant à la chaleur . Dans
le cas notamment de meubles en bois plaqué, il faut que
les colles résistent à une température de 100 °C.
Conformément aux normes de sécurité, après
encastrement de l’appareil, il ne doit plus y avoir possibilité
de contact avec les parties électrifiées.
Toutes les parties qui servent de protection doivent être
fixées de manière à ne pouvoir être enlevées qu’a vec l’aide
d’un outil.
Fig. C
Pour fixer le four au meuble, ouvrez la porte du four et
fixez le four à l’aide des 4 vis à bois dans les 4 trous situés
sur le pourtour.
Raccordement électrique
Le raccordement électrique au réseau doit être effectué
sur la cuisinière. Le plan de cuisson est raccordé à la
cuisinière à l’aide d’un connecteur spécial. Les cuisinières
sont prévues pour fonctionnement au courant alternatif à
la tension et à la fréquence d’alimentation indiquées sur
la plaquette signalétique.
26
Page 26

T able à encastrer
NL
230V 1N~
H07RN-F 3x4 CEI-UNEL 35364
1
3
2
4
5
NL2L3
L1
P
BLANC ROUGE JAUNE BLEU VERT
CUISINIERE A ENCASTRER
N'existe que
sur certains
modèles
Montage du cordon d’alimentation
Ouverture du bornier:
• Faites pression à l’aide d’un tournevis sur les languettes
latérales du couvercle du bornier;
• Tirez et ouvrez le couvercle du bornier.
Fig. E
Fig. F
400V 2N~
H05RR-F 4x2.5 CEI-UNEL 35363
NL2L1
Pour monter le cordon d’alimentation, procédez comme
suit:
• dévissez la vis du serre-câble de même que les vis
des contacts
Rappel : les pontets sont montés en usine pour
raccordement à 400V triphasé (fig. D).
• pour effectuer les raccordements électriques illustrés
fig. F et fig. G, utilisez les deux pontets placés dans le
boîtier (fig. E - référence “P”)
• fixez le câble d’alimentation dans le serre-câble
correspondant et fermez le couvercle.
400V 3N~
H05RR-F 5x2.5 CEI-UNEL 35363
NL3L1L2
5
3
4
1
2
Fig. D
5
3
4
1
2
Fig. G
Branchement du câble d’alimentation au réseau
électrique
Montez sur le câble une fiche normalisée pour la charge
indiquée sur la plaquette des caractéristiques; en cas de
branchement direct au réseau, intercalez entre l’appareil et
l’installation électrique un interrupteur omnipolaire ayant au
moins 3 mm d’ouverture entre les contacts, dimensionné à
la charge et conforme aux normes applicables (l’interrupteur ne doit pas interrompre le fil de la terre).
Le câble d’alimentation ne doit atteindre, en aucun point,
des températures dépassant de 50°C la température ambiante.
Av ant de procéder au branchement, vérifiez que :
• La sécurité électrique de cet appareil n’est assurée que
si ce dernier est correctement raccordé à une installation de mise à la terre conformément aux normes applicables en matière de sécurité électrique. Il est indispensable de vérifier si cette condition fondamentale de sécurité est bien remplie; en cas de doute, f aites appel à un
professionnel du secteur pour un contrôle minutieux de
l’installation électrique. Le f abricant ne peut en aucun cas
être considéré responsable des dommages pouvant survenir si l’installation de mise à la terre fait déf aut.
• Avant de brancher l’appareil, vérifiez si les caractéristiques techniques reportées sur les étiquettes (apposées
sur l’appareil et/ou sur l’emballage) correspondent bien
à celles de votre installation électrique .
27
Page 27

• Vérifiez si la charge électrique de l’installation et des prises de courant est apte à supporter la puissance maximum de l’appareil figurant sur la plaquette. En cas de
doute, faites appel à un prof essionnel du secteur .
• En cas d’incompatibilité entre la prise et la fiche de
l’appareil, faites remplacer cette prise par une autre
appropriée par un professionnel du secteur . Ce dernier
devra aussi vérifier si la section des câbles de la prise est
apte à supporter la puissance absorbée par l’appareil.
Caractéristiques T echniques
En général, il vaut mieux n’utiliser ni adaptateurs, ni prises
multiples ni rallonges. Si leur emploi s’avère indispensable,
n’utilisez que des adaptateurs simples ou multiples et des
rallonges conformes aux normes de sécurité, tout en
veillant à ne pas dépasser la limite de la charge électrique
indiquée sur l’adaptateur simple ou sur les rallonges et
la puissance max. indiquée sur l’adaptateur multiple . La
fiche et la prise doivent être d’un accès facile.
Dimensions utiles du four:
largeur : cm 43,5
profondeur : cm 43,5
hauteur : cm 32
Volume utile du four:
litres 60
ETIQUETTE ENERGIE
Directive 2002/40/CE sur l’étiquette des fours électriques
Norme EN 50304
Consommation énergie déclarée pour Classe convection naturelle
fonction four : Statique
Tension et fréquence d’alimentation :
230/400V ~ 3N 50/60Hz 8400W
7
Cet appareil est conforme aux Directives
Communautaires suivantes :
- 73/23/CEE du 19/02/73 (Basse Tension) et
modifications successives ;
- 89/336/CEE du 03/05/89 (Compatibilité
électromagnétique) et modifications successives ;
- 93/68/CEE du 22/07/93 et modifications
successives.
- 2002/96/EC
La Directive Européenne 2002/96/EC sur les Déchets des
Equipements Electriques et Electroniques (DEEE), exige
que les appareils ménagers usagés ne soient pas jetés
dans le flux normal des déchets municipaux. Les appareils
usagés doivent être collectés séparément afin d’optimiser
le taux de récupération et le recyclage des matériaux qui
les composent et réduire l’impact sur la santé humaine et
l’environnement. Le symbole de la ‘ ‘poubelle barrée’ ’ est
apposée sur tous les produits pour rappeler les obligations
de collecte séparée.
Les consommateurs devront contacter les autorités
locales ou leur revendeur concernant la démarche à suivre
pour l’enlèvement de leur vieil appareil.
28
Page 28

Le agradecemos por haber elegido un producto Ariston, seguro y realmente fácil de usar. Para conocerlo y utilizarlo
bien y por mucho tiempo, le aconsejamos, antes de utilizar el aparato, leer atentamente las advertencias contenidas
en el presente manual, ya que suministran importantes indicaciones referidas a la seguridad, la instalación, el uso y el
mantenimiento. Conservar cuidadosamente este manual para posteriores consultas. Gracias.
Visto de cerca
A. Panel de mando
B. Bandeja o encimera
C. Parrilla del horno
D. Placa eléctrica
E. Perilla para selección de las funciones de cocción
F. Perillas de las placas eléctricas
G. Luz indicadora de funcionamiento de las placas
eléctricas
H. Guías de deslizamiento bandejas y parrillas
I. Luz indicadora de funcionamiento del horno (pre-
sente sólo en algunos modelos) - Si está encendida
indica la fase de calentamiento hasta la temperatura
seleccionada
G
I
D
A
H
C
B
D
0
0
0
1
2 5
3
6
1
2 5
3
4
6
1
2 5
3
4
F
6
1
2 5
3
4
0
6
4
0
MAX
220
180
60
100
140
E
Cómo utilizarlo
La selección de las distintas funciones presentes en el
horno se realiza accionando los dispositivos y órganos
de mando ubicados en el panel del mismo.
Atención: Cuando se enciende por primera vez, aconsejamos hacer funcionar el horno vacío durante aproximadamente media hora a la temperatura máxima, y con la puerta
cerrada. Una v ez transcurrido dicho tiempo, apáguelo , abra
la puerta del horno y airee el ambiente. El olor que a veces
se advierte durante esta operación es causado por la evaporación de substancias empleadas para proteger el horno
durante el lapso de tiempo que transcurre entre la fabricación y la instalación del producto.
Atención: Utilice el primer piso , desde abajo, colocando la
bandeja suministrada con el aparato, para recoger jugos y/o
grasa, solamente en el caso de cocciones en el grill o con
asador automático (presente sólo en algunos modelos). Para
otras cocciones no utilice nunca el primer piso, desde abajo ,
y nunca apoye objetos en el fondo del horno mientras está
cocinando, porque podría causar daños al esmalte. Coloque siempre sus recipientes de cocción (fuentes para horno, películas de aluminio , etc.) sobre la parrilla suministrada
con el aparato, ubicada en las guías del horno.
La perilla del horno (E)
Es el dispositivo que permite seleccionar las diferentes
funciones del horno y escoger entre las temperaturas de
cocción que se indican en la perilla misma, aquella que
resulte más indicada para cocinar los distintos alimentos
(comprendidas entre 60°C y 240°C). Gir ando la perilla en
sentido horario, se enciende la luz del horno 8 y entran
en funcionamiento los elementos calentadores superior
e inferior (resistencias eléctricas) y se puede elegir, dentro de la gama completa de valores indicados a
continuación, la temperatura más adecuada para los
alimentos que debe cocinar (Horno Convencional). Esto
se obtiene haciendo coincidir, la temperatura deseada,
con la referencia fija ubicada en el panel de mandos.
60 • 100 • 140 • 180 • 220 Max
80 120 160 200 240
La temperatura seleccionada se alcanza automáticamente
y se mantiene constante a través del órgano de control
(el termostato) dirigido por la perilla.
29
Page 29

Posición de la Resistencia Superior c
Girando la perilla hasta esta posición, se enciende la luz
del horno y entra en funcionamiento la resistencia superior.
La luz del horno
Se enciende girando la perilla «E» hasta el símbolo 8.
Ilumina el horno y permanece encendida cuando se pone
en funcionamiento un elemento eléctrico calentador
cualquiera del horno.
Las perillas de mando de las placas eléctricas de la
encimera (F)
Las cocinas pueden estar dotadas de placas eléctricas
normales, rápidas y automáticas en varias combinaciones
(las placas rápidas se distinguen de las otras por la
presencia de un sello rojo en el centro, las automáticas
por la presencia de un disco circular de aluminio en el
centro).
Para e vitar dispersiones de calor y daños a las placas, es
importante utilizar recipientes con fondo plano y de
diámetro igual o mayor que el de la placa.
En la tabla se indica la correspondencia entre las
posiciones indicadas en las perillas y el uso aconsejable
para las placas.
Posición Placa normal o rápida
0
Apagado
Luz indicadora de funcionamiento de las placas
eléctricas (G)
Resulta encendida cuando se haya puesto en
funcionamiento uno cualquiera de los elementos eléctricos
calentadores de la encimera.
Uso de la encimera
Para obtener los mejores resultados de su encimera, se
deben tomar algunas precauciones fundamentales durante la cocción o en la preparación de las comidas.
· Utilice ollas con fondo plano que aseguren su
adherencia a la zona de cocción.
· Utilice ollas de un diámetro suficiente para cubrir com-
pletamente la placa de cocción, de modo tal que se
garantice el uso de todo el calor disponible.
· V erifique que la base de las ollas esté siempre seca y
limpia para garantizar un buen contacto y una mayor
duración de las placas y también de las ollas.
1
2
3
4
Cocción de verduras, pesc ados
Cocción de papas (a vapo r) sopa s,
garbanzos, porotos
Para continuar la cocción d e grand es
cantidades de alimentos , minestr ones
Asar (mediano)
5 Asar (fuerte)
6
Dorar o alcanzar el hervo r en poco
tiempo
Antes de utilizarlas por primera vez, es necesario
calentar las placas de cocción a la máxima temperatura
durante 4 minutos, sin olla. Durante esta fase inicial, el
revestimiento protector se endurece y alcanza la máxima
resistencia.
30
Page 30

Cómo mantenerlo en buenas condiciones
Antes de efectuar cualquier operación, desconectar el aparato de la alimentación eléctrica.
Para una duración prolongada del horno es indispensable realizar frecuentemente una cuidadosa limpieza
general, teniendo presente que:
• Para la limpieza no utilice aparatos a vapor .
• las partes externas esmaltadas o de acero inoxidable se
deben lavar con agua tibia sin usar polvos abrasivos ni
sustancias corrosivas que podrían arruinarlas. El acero
inoxidable puede quedar manchado . Si las manchas son
difíciles de eliminar use productos específicos que se
encuentran normalmente en el comercio. Se sugiere un
aclarado abundante y secado inmediato después de la
limpieza.
• El interior del hor no se debe limpiar, preferentemente
cada vez que se usa, cuando todavía está tibio , usando
agua caliente y detergente, enjuagando y secando luego cuidadosamente con un paño suave. Evite el uso de
detergentes abrasivos (por ejemplo los polvos, etc...) y
de esponjas abrasivas para platos o ácidos (por ejemplo, anticaliza, etc...), porque podrían arruinar el esmalte. Si la suciedad es particularmente difícil de eliminar,
use un producto específico para la limpieza del horno,
siguiendo las instrucciones contenidas en el paquete.
• si usa el horno por un tiempo prolongado se podría formar líquido de condensación. Séquelo usando un paño
suave.
• una junta de goma alrededor de la aper tura del horno
garantiza su correcto funcionamiento. P or lo tanto , controle periódicamente el estado de dicha junta. Si es necesario límpiela evitando usar productos o elementos
abrasivos. Si se encontrara dañada llame al Centro de
Asistencia más cercano. Es aconsejable no usar el horno hasta que no haya sido reparado.
• no revista nunca el fondo del horno con hojas de aluminio, porque la consiguiente acumulación de calor perjudicaría la cocción dañando también el esmalte.
• limpie el vidrio de la puerta del horno utilizando productos y esponjas no abrasivos y séquelo con un paño suave.
Cómo extraer la puerta del horno
Para realizar una limpieza más profunda es posib le extr aer
la puerta del horno. Proceda del siguiente modo:
• abra completamente la puerta;
• alce y gire las palancas ubicadas en las dos bisagras;
• agarre la puerta de los dos lados externos, ciérrela lentamente pero no completamente;
• tire la puerta hacia Ud. e xtra yéndola de su alojamiento;
Vuelva a montar la puerta siguiendo el procedimiento
descripto arriba pero en sentido contrario.
123
Reemplazo de la lámpara en la bóveda del horno
• Quitar a la cocina la alimentación mediante el interruptor
omnipolar utilizado para la conexión a la instalación eléctrica, o desenchufarlo.
• Aflojar la tapa de vidrio del portalámpara;
• Desenroscar la lámpara y sustituirla con una resistencia
a alta temperatura (300°C) con las siguientes características:
- T ensión 230/240 V
- Potencia 25W
- Casquillo E14
• Colocar de nuevo la tapa de vidrio. V olver a darle alimentación a la cocina.
31
Page 31

Consejos prácticos para la cocción
En la cocción al horno utilice una sola bandeja o rejilla
por vez. La misma se coloca en las guías inferiores o
superiores según que la cocción necesite mayor calor
desde abajo o desde arriba.
Precalentamiento
Cuando sea necesario precalentar el horno, en general,
todas las veces que se cocinan alimentos con levadura,
es aconsejable utilizar la función «horno convencional»
que permite alcanzar la temperatura en breve tiempo. Al
final del precalentamiento, indicado porque se apaga la
luz testigo roja «I», seleccione la función de cocción
más indicada.
Cocción del pescado y de la carne
Para las carnes blancas, las a ves y el pescado utilice
temperaturas desde 180 °C a 200 °C.
Para las carnes rojas, que deben estar bien cocidas en
la parte externa, conservando en su interior el jugo, es
importante comenzar con una temperatura inicial alta
(200°C-220°C) por un breve tiempo , par a después
disminuirla.
Por lo gener al, cuanto más grande es el troz o de asado,
menor será la temperatura y más largo el tiempo de
cocción. Colocar los troz os de carne en el centro de la
parrilla y colocar la grasera por debajo para recoger el
jugo.
Colocar bien la parrilla de manera que la carne ocupe el
centro del horno. Cuando se necesite calor por debajo ,
usar el primer nivel inferior . Para obtener asados
sabrosos (en particular pato y animales de caza)
condimente la carne con tocino o panceta y colóquela
en la parte superior.
Uso del grill
Utilice la función d “grill” colocando el alimento en el
centro de la parrilla (ubicada en el 3° o 4° nivel comenzando desde abajo), debido a que resulta encendida solamente la parte central de la resistencia superior.
Utilice el primer nivel, desde abajo, para colocar en él la
bandeja suministrada con el aparato, para recoger jugos
y/o grasa.
Cuando se utiliza dicha función, se recomienda colocar
el termostato al máximo. P ero esto no significa que no se
puedan utilizar temperaturas inferiores simplemente llevando la perilla del termostato hasta la temperatura deseada.
Importante: efectuar la cocción al grill con la puerta
del horno cerrada, para obtener, juntamente con los mejores resultados, un sensible ahorro de energía (10%
aproximadamente).
Por lo tanto, al utilizar las funciones grill, los mejores
resultados se obtienen colocando la rejilla en los últimos niveles comenzando desde abajo (ver la tabla
de cocción) luego, para recoger la grasa y evitar la
formación de humo, coloque la bandeja suministrada con el aparato en el primer nivel, desde abajo.
Preparación de postres y repostería en general
En la cocción de tortas, precaliente siempre el horno y,
para evitar que se baje la torta, no abra la puerta
durante la cocción. En general:
Masa de dulce muy seca
En la próxima oportun idad selec cionar te mperatur a
con 10°C superior y redu cir el tiemp o de cocci ón.
Cuando el bizcocho no fermenta
Usar menos líquido o bajar la temperatura de 10°C.
Torta oscura en la superficie
Colocar el molde más aba jo, sel eccio nar un a
temperatura menor y pr olonga r el tiemp o de cocci ón
Buen aspecto por fuera, pegadizo por dentro
Usar menos líquido, reduc ir la temperat ura, a umentar
el tiempo de cocció n
La torta no se desprende del molde
Unte bien el molde y e sparza s obre él un poco de
harina o utilice pape l para hor no.
32
Page 32

Comida a cocinar Peso
(Kg)
Pastelería
Lasañas 2,5 3 210 - 75-80
Canelones 2,5 3 210 - 75-80
Tallarines 2,5 3 210 - 75-80
Carnes
Ternera 1,7 3 220 - 85-90
Pollo 1,5 3 220 - 110-115
Pavo 3,0 3 220-Max - 95-100
Pato 1,8 3 220 - 120- 125
Conejo 2,0 3 220 - 105-110
Cerdo 2,1 3 220 - 100-110
Cordero 1,8 3 220 - 90-95
Pescados
Mariscos 1,1 3 210-230 - 55-60
Dentice 1,5 3 210-230 - 60-65
Trucha asada 1,0 3 210-230 - 40- 45
Pizzas
Napoletana 1,0 3 Max 15 30-35
Tortas
Biscochos 0,5 3 180 15 30-35
Tartas 1,1 3 180 15 30-35
Torta de chocolate 1,0 3 200 15 45-50
Biscochuelo 1,0 3 200 15 50-55
Nota: los tiempos de preparación son puramente indicativ os y pueden varia r según los gustos .
Posición cocción
niveles a partir de
abajo
Temperatura
(°C)
Tiempo de pre -
calentamiento
(minutos)
Tiempo de
cocción
(minutos)
33
Page 33

La seguridad como una buena costumbre
Para garantizar la eficiencia y la seguridad de este electrodoméstico:
• diríjase exclusivamente a centros de asistencia técnica autorizados
• requiera siempre el uso de repuestos originales
• Para mover el aparato y con el fin de evitar daños
a personas y al mismo aparato, utilice siempre las
manijas especiales que se encuentran en los
costados del horno.
• El aparato está destinado a un uso no profesional en
las viviendas y sus características no se deben modificar.
• Las instrucciones son válidas sólo en los países de
destino cuyos símbolos figuran en el manual y en la
placa de características.
• La seguridad eléctrica de este aparato está garantizada solamente cuando el mismo está correctamente
conectado a una eficiente instalación de puesta a tierra de acuerdo a lo previsto por las normas vigentes
sobre seguridad.
• Durante el uso del aparato los elementos calenta-
dores y algunas partes de la puerta del horno se
calientan mucho. Tenga cuidado de no tocarlos y
mantenga alejados a los niños.
Tratándose de fuentes de peligro, evite que los
niños e incapaces se pongan en contacto con:
- los mandos y el aparato en general;
- los embalajes (bolsitas, poliestireno, clav os, etc.);
- el aparato, durante e inmediatamente después del funcionamiento del horno y del grill, debido al
sobrecalentamiento;
- un aparato inutilizado (en este caso, se deben proteger las partes que podrían ser peligrosas).
Evite las siguientes operaciones:
- tocar el aparato con partes del cuerpo húmedas;
- el uso cuando está descalzo;
- tirar del aparato o del cable de alimentación eléctrica
para desconectarlo del tomacorriente;
- operaciones impropias y peligrosas;
- obstruir los orificios de ventilación o para eliminación
del calor;
- que el cable de alimentación de pequeños electrodomésticos quede en contacto con las partes calientes
del aparato;
- la exposición a agentes atmosféricos (lluvia, sol);
- el uso del horno como trastero;
- el uso de líquidos inflamables cerca del aparato;
- el uso de adaptadores, tomas múltiples y/o prolongaciones;
- intentos de instalación o reparación sin la intervención de personal calificado.
Es absolutamente necesario llamar a personal
especializado en los siguientes casos:
- instalación (según las instrucciones del fabricante);
- cuando se tienen dudas sobre el funcionamiento;
- sustitución del toma en caso de incompatibilidad con
el enchufe del aparato .
Es necesario llamar a centros de asistencia
autorizados por el fabricante, en los siguientes
casos:
- dudas sobre la integridad del aparato después de haber quitado el embalaje;
- daño o sustitución del cable de alimentación;
- avería o mal funcionamiento, solicitando repuestos
originales.
Es conveniente efectuar las siguientes operaciones:
- sólo la cocción de alimentos evitando otras operaciones;
- verificar la integridad después de haber quitado el embalaje;
- desconectar el aparato de la red de alimentación eléctrica en caso de mal funcionamiento y antes de efectuar
cualquier operación de limpieza o mantenimiento;
- cuando no se utiliza, desconecte el aparato de la red
eléctrica y cierre la llave de gas (si está previsto);
- utilice guantes para horno para introducir o extraer recipientes;
- tome siempre la manija de la puerta en el centro debido
a que los extremos podrían estar más calientes con motivo de ev entuales salidas de aire;
- controlar siempre que las per illas estén en la posición
«•»/»o» cuando no se utiliza el aparato.
- cortar el cable de alimentación después de haberlo desconectado de la red eléctrica cuando se decide no utilizar más el aparato.
• El fabricante no se puede considerar responsable por
eventuales daños derivados de: errores en la instalación,
usos impropios, erróneos e irracionales.
34
Page 34

Instalación
La instalación debe efectuarse según las instrucciones
del fabricante y por personal profesionalmente calificado. Una incorrecta instalación puede causar daños a perso-
nas, animales o cosas, con relación a los cuales el fabricante no puede ser considerado responsable.
Importante: cualquier intervención de regulación, mantenimiento, etc. se debe realizar con el horno desconectado de
la red de alimentación eléctrica.
Instalación de los hornos empotrables
Para garantizar un b uen funcionamiento del aparato empotrable,
es necesario que el mueble tenga las características adecuadas. En la siguiente figura se indican las dimensiones del espacio en el mueble cuando el horno se instala bajo encimera y en
columna.
555
580
560
min
+4 -0
min
min
45
575-585
+4 -0
480
23
572
558
543545
500
39
15
595
595
En particular, si el espesor del costado del mueble es:
• de 20 mm: la parte móvil del taco se debe extraer (Fig.A);
• de 18 mm: utilice la primera ranura; ya predispuesta de
fábrica (Fig. B);
• de 16 mm: utilice la segunda ranura (Fig. C).
Fig. A Fig. B
Para gar antizar una b uena aireación es necesario eliminar la
pared posterior del espacio para el horno, es preferible instalarlo de modo que apoye sobre dos listeles de mader a; en el caso
de que sea una superficie continua de apoyo, la misma debe
tener una abertura de 45 x 560 mm como mínimo.
45 mm.
560 mm.
Los paneles de los muebles adyacentes al horno deberán
ser de un material resistente al calor. En par ticular, en el
caso de muebles de madera chapeada, las colas deberán
ser resistentes a una temperatura de 100 °C. En conformidad con las normas de seguridad, una vez empotrado el
aparato, no se deben producir contactos con las paredes en
las que hay instalaciones eléctricas. Todas las par tes que
garantizan la protección se deben fijar de modo tal que no
puedan ser quitadas sin la ayuda de una herramienta.
Para un correcto centrado , regule los 4 tacos ubicados en la
parte lateral del horno, a la altura de los 4 orificios del marco.
Fig. C
Para fijar el horno al mueble abra la puerta del horno y fíjelo
mediante 4 tornillos para madera en los 4 orificios ubicados
en el marco.
Conexión eléctrica
La conexión eléctrica a la red se debe realizar a través de la
cocina. La encimera se conecta a la cocina mediante un
conector. Las cocinas están fabricadas para el
funcionamiento con corriente alterna para la tensión y
frecuencia de alimentación indicada en la placa de
características.
35
Page 35

ENCIMERA EMPOTRABLE
Presente s lo
en algunos
modelos
P
NL2L3
L1
BLANCO ROJO
COCINA EMPOTRABLE
AMARILLO
AZUL VERDE
Montaje del cable de alimentación
Apertura del tablero de bornes:
• Con la ayuda de un destornillador, haga palanca en las
lengüetas laterales de la tapa del tablero de bornes;
• Tirar y abrir la tapa del tablero de bornes.
Para la colocación del cable, realizar las siguientes
operaciones:
• aflojar el tornillo de la mordaza de terminal de cable y los
tornillos de los contactos
Nota: los conectores puente están preparados por la
Fábrica para la conexión a 400V trifásica (fig. D).
• para realizar las conexiones eléctricas de las fig. F y
fig. G, utilice los dos conectores puente alojados dentro de la caja (fig. E - referencia “P”)
• fijar el cable de alimentación en el correspondiente
sujetacable y cerrar la tapa.
400V 3N~
H05RR-F 5x2.5 CEI-UNEL 35363
NL3L1L2
5
3
4
Fig. D
1
2
Fig. E
230V 1N~
H07RN-F 3x4 CEI-UNEL 35364
NL
5
3
4
Fig. F
1
2
400V 2N~
H05RR-F 4x2.5 CEI-UNEL 35363
NL2L1
5
3
4
Fig. G
Conexión del cable de alimentación a la red
Instalar, en el cabl e, un enchufe normalizado para la potencia indicada en la placa de características; en caso de conexión directa a la red, es necesario colocar entre el aparato y la red, un interruptor omnipolar con una distancia mínima entre los contactos de 3 mm, adecuado a la potencia y
conforme a las normas en vigencia (el cable a tierra no debe
ser interrumpido por el interruptor).
El cable de alimentación debe colocarse de tal manera que,
en ningún punto alcance una temperatura superior a 50°C
con respecto a la temperatura ambiente.
Antes de efectuar la conexión comprobar que:
• La seguridad eléctrica de este aparato se garantiza sólo
cuando el mismo resulte correctamente conectado a una
eficiente instalación de conexión a tierra conforme a lo
previsto por las normas de seguridad eléctrica. Es necesario verificar este fundamental requisito de seguridad y ,
en caso de duda, solicitar un control cuidadoso de la
instalación por parte de personal profesionalmente especializado. El fabricante no puede ser considerado responsable por los ev entuales daños causados por la falta
de conexión a tierra de la instalación.
• Antes de conectar el aparato, comprobar que los datos
de la placa de características (ubicada en el aparato y/o
en el embalaje) correspondan a los de la red de distribución eléctrica y gas.
1
2
36
Page 36

• Comprobar que la capacidad eléctrica de la instalación y
la de los tomas de corriente resulten adecuadas a la
potencia máxima del aparato indicada en la placa de
características. En caso de duda, dirigirse a personal
profesionalmente especializado .
• En caso de incompatibilidad entre el toma de corriente y
el enchufe del aparato, llamar a personal técnico para
reemplazar el toma con otro adecuado. El técnico, en
particular, deberá también comprobar que la sección de
los cables del toma de corriente resulte adecuada a la
Características técnicas
potencia absorbida por el aparato. En general, no es
aconsejable el uso de adaptadores, tomas múltiples y/o
extensiones. Si su uso fuera indispensable es necesario
utilizar solamente adaptadores simples o múltiples y
prolongaciones conformes a las normas vigentes de
seguridad, teniendo cuidado de no superar el límite de
capacidad de corriente marcado en el adaptador simple
y en las prolongaciones, y el de máxima potencia
marcado en el adaptador múltiple. El enchuf e y el toma
de corriente deben ser fácilmente accesibles.
Dimensiones útiles del horno:
ancho: 43,5 cm.
profundidad: 43,5 cm.
altura: 32 cm.
Volumen útil del horno:
litros 60
ENERGY LABEL
Norma 2002/40/CE en la etiqueta de los hornos eléctricos
Norma EN 50304
Clase Consumo de energía para funcionamiento por convección
Natural
función de calentamiento: Conv encional
Tensión y frecuencia de alimentación:
230/400V ~ 3N 50/60Hz 8400W
7
Este aparato ha sido fabricado conforme con las
siguientes Directivas Comunitarias
- 73/23/CEE del 19/02/73 (Baja Tensión) y sucesivas
modificaciones;
- 89/336/CEE del 03/05/89 (Compatibilidad
Electromagnética) y sucesivas modificaciones;
- 93/68/CEE del 22/07/93 y sucesivas
modificaciones.
- 2002/96/CE
En base a la Norma europea 2002/96/CE de Residuos
de aparatos Eléctricos y Electrónicos (RAEE), los
electrodomésticos viejos no pueden ser arrojados en los
contenedores municipales habituales; tienen que ser
recogidos selectivamente para optimizar la recuperación
y reciclado de los componentes y materiales que los
constituyen, y reducir el impacto en la salud humana y el
medioambiente. El símbolo del cubo de basura tachado
se marca sobre todos los productos para recordar al
consumidor la obligación de separarlos para la recogida
selectiva.
El consumidor debe contactar con la autoridad local o
con el vendedor para informarse en relación a la correcta
eleminación de su electrodoméstico viejo.
37
Page 37

Agradecemos a sua escolha de um produto Ariston, seguro e realmente fácil de utilizar. P ara conhecê-lo , utilizá-lo da
melhor maneira e durante longo tempo, é aconselháv el, antes de utilizar o aparelho , ler atentamente as advertências
contidas no presente folheto , que f ornecem importantes indicações relativas a segurança na instalação, na utilização
e na manutenção. Guarde cuidadosamente este folheto para consultas futuras. Obrigado
Visto de perto
A. Painel de comandos
B. Bandeja pingadeira ou plano de cozedura
C. Grelha da prateleira do forno
D. Chapa eléctrica
E. Botão selector das funções de cozedura
F. Botões das chapas eléctricas
G. Indicador luminoso das chapas eléctricas
H. Carris de deslizamento para bandejas pingadeiras
e grelhas
I. Indicador luminoso do forno (presente somente em
alguns modelos) - Se estiver aceso indica a fase de
aquecimento até a temperatura programada
G
I
0
0
0
1
2 5
3
6
1
2 5
3
4
6
1
2 5
3
4
6
1
2 5
3
4
0
6
4
0
MAX
220
180
60
100
140
D
A
C
D
H
B
F
E
Como utilizar
A selecção das várias funções que há no forno é realizada
mediante os dispositivos e componentes de comando
situados no próprio painel.
Atenção: A primeira vez que o acendem, aconselhamos
deixar funcionar a vácuo o forno aproximadamente durante meia hora com o termostato posto à temperatura
máxima e a porta fechada. Logo depois, passado esse
tempo, desligá-lo , abrir a porta do forno e ventilar o local.
O cheiro que às vezes se sente durante esta operação
deve-se à e vapor ação das substâncias usadas para proteger o forno durante o período entre a produção e a instalação do produto.
Atenção: Utilize a primeira prateleira a partir de baixo, e
coloque a bandeja pingadeira fornecida, para a colecta
do suco e/ou gordura derretida, somente se cozer no grill
ou com espeto giratório (presente somente em alguns
modelos). P ara as demais cosedur as, nunca utilize a primeira prateleira de baixo e nunca apoie objectos no fundo do forno enquanto estiver a coser , porque poderá causar danos ao esmalte do forno. Coloque sempre os recipientes de cosedura (formas, películas de alumínio etc.
etc.) na grelha fornecida com o aparelho apropriadamente colocada nos carris do forno.
O selector do forno (E)
É o dispositivo que consente seleccionar as várias funções
do forno e escolher a temperatura adequada para os
alimentos entre as indicadas no próprio botão
(compreendida entre 60°C e 240°C). Se rodar o selector
na direcção horária, acende-se a luz do forno 8 e entram
em funcionamento os elementos aquecedores superior e
inferior (resistências eléctricas) e será possível escolher ,
dentre a gama completa de valores aqui abaixo
apresentados, a temperatura mais idónea aos pratos a
serem cozidos (Forno Estático). P ara tanto f aça coincidir
a indicação desejada com a referência fixa situada no
60 • 100 • 140 • 180 • 220 Max
80 120 160 200 240
painel.
A temperatura seleccionada é atingida automaticamente
e mantém-se constante mediante o elemento de controlo
(o termostato) controlado pelo botão.
Posição da Resistência Superior c
Se rodar o selector até esta posição acende-se a luz do
forno e entra em funcionamento a resistência superior.
38
Page 38

A luz do forno
Acende-se se rodar o selector “E” até o símbolo 8. Ilumina o forno e permanece acesa enquanto estiver a funcionar qualquer dos elementos eléctricos de aquecimento
do forno.
Os botões de comando das chapas eléctricas do
plano de cozedura (F)
Os fogões podem ser equipados com chapas eléctricas
normais, rápidas ou automáticas em várias combinações
(as chapas rápidas distinguem-se das demais pela marca vermelha no centro, as automáticas pela presença de
um prato circular de alumínio no centro).
Para e vitar dispersão de calor e danos às chapas é bom
utilizar recipientes com fundo chato e de diâmetro não
inferior ao da chapa.
Na tabela estão indicadas as correspondências entre as
posições indicadas nos botões e a utilização para a qual
as chapas são aconselhadas.
Posição Placa normal ou rápida
Indicador luminoso das chapas eléctricas (G)
Acende-se quando se puser a funcionar qualquer elemento eléctrico aquecedor do plano de cozedura.
Utilização do plano
Para obter os melhores resultados do plano de cozedura,
há alguns recursos durante a cozedura ou na preparação
dos pratos.
· Empregue panelas com fundo prato, para assegur ar a
aderência das panelas na zona de cozedura.
· Empregue panelas de diâmetro suficiente para cobrir
inteiramente a chapa de cozedura, para garantir a
utilização de todo o calor disponível.
0 Apagado
1 Cozedura de l egumes , verdes ou de pe ixe
2
3
4
Cozedura de batatas (em v apor ), sopas ,
grão de bico, feijão
Para continuar a coz edur a de gr andes
quantid. de alimentos , m inest roni
Estufar (médio)
5 Estufar (forte)
6 Tostar ou ferver em pou co tem po
Antes da primeira utilização, é necessário aquecer as
chapas de cosedura na temperatura máxima durante
aproximadamente 4 minutos, sem panela. Durante
esta fase inicial, o forro de protecção endurece-se e
obtém a máxima resistência.
· Certifique-se que a base das panelas esteja sempre
enxuta e limpa, para garantir bom contacto e longa
duração das chapas e das próprias panelas.
39
Page 39

Como mantê-lo em forma
Antes de cada operação de limpeza, desligue o aparelho
da alimentação eléctrica.
Para uma longa duração do forno é indispensável realizar frequentemente uma cuidadosa limpeza geral,
lembre-se que:
• Para a limpeza não utilizar aparelhos a vapor.
• las peças exteriores esmaltadas ou inoxidáveis de vem
ser lavadas com água morna sem usar pós abrasivas
nem substâncias corrosivas que poderão estragá-las.
O aço inoxidável poderá manchar-se. Se f or difícil tirar
as manchas, empregue produtos específicos a venda
normalmente no comércio. Aconselha-se enxaguar
com muita água e enxugar após a limpeza.
• o interior do forno deve ser limpado, preferivelmente
todas as vezes que terminar de utilizá-lo, enquanto
ainda estiver quente, empregue água quente e detergente, enxagúe e, em seguida, enxugue com cuidado
usando um pano macio. Evite utilizar detersivos
abrasivos (por exemplo produtos em pó etc. ...), es-
ponjas abrasivas de limpeza de loiça e ácidos (por
exemplo contra calcário etc. ...), porque poderão es-
tragar o esmalte. Se a sujidade for muito difícil de tirar ,
use um produto específico para limpeza de forno, segundo as instruções apresentadas na embalagem do
produto.
• se usar o forno durante muito tempo, pode ser que se
forme condensação. Enxugue-a com um pano macio .
• ao redor da abertura do forno, uma guarnição em borracha garante um funcionamento correcto do mesmo.
Portanto periodicamente verifique o estado desta guarnição. Se for necessário, limpe-a mas evite usar produtos ou objectos abrasivos. Se houver danos,
contacte o Centro de Assistência Técnica mais perto.
É aconselhável não usar o f orno antes do mesmo ter
sido reparado.
• nunca forre o fundo do forno com folhas de alumínio,
porque a acumulação de calor consequente perturbará a cozedura e também danificará o esmalte.
• limpe o vidro da porta do forno utilizando produtos e
esponjas não abrasivas e enxugue com um pano macio.
Como tirar a porta do forno
Para uma limpeza mais cuidadosa, é possível tir ar a porta do forno. Proceda da seguinte maneira:
• abra inteiramente a porta;
• levante e rode as alav ancas situadas nas duas dobradiças;
• segure a porta dos dois lados exteriores e feche-a de
novo de v agar mas não inteiramente;
• puxe a porta na direcção de si a tirá-la do lugar;
Monte a porta realizando na ordem contrária as operações
aci ma descritas.
123
T roca da lâmpada no vão do forno
• Desligue o forno da rede de alimentação através do
interruptor omnipolar utilizado para a ligação do forno
ao sistema eléctrico, ou desligue a ficha, se for acessível;
• Desatarraxe a tampa de vidro do porta lâmpada;
• Desatarraxe a lâmpada e substitui-a com uma resistente à alta temperatura (300°C) que tenha as seguintes características:
- T ensão 230/240 V .
- Potência 25 W.
- Bocal E14
• Atarraxe a tampa de vidro e ligue novamente o f orno à
rede.
40
Page 40

Conselhos práticos para a cozedura
Ao cozer no forno, utiliz e apenas uma bandeja pingadeira
ou grelha de cada vez. Coloque-a nos carris de baixo ou
de cima, em função da necessidade de cozer com mais
calor de baixo ou de cima.
Pré-aquecimento
Se for necessário aquecer previamente o forno, ou seja,
praticamente todas as vezes que f or assar produtos com
levedo, é aconselhável utilizar a função “forno estático”
que possibilita chegar à temperatura em pouco tempo.
No fim do pré-aquecimento, que é indicado pelo indicador
vermelho “I” que se apaga, seleccione a função de
cozedura mais indicada.
Cozedura de peixe ou carne
Para carnes brancas, aves e peixe utilize temperaturas
entre 180 °C e 200 °C.
Para a carne ficar bem cozida por for a e conservar o suco
por dentro, é melhor começar com uma temperatura alta
(200°C ~ 220°C) por pouco tempo, para depois diminuíla sucessivamente.
Em geral, quanto maior for o pedaço de carne a ser
assado, menor deverá ser a temperatura e mais longo o
tempo de cozedura. Coloque a carne a ser cozida no meio
da grelha e o tabuleiro que recolhe a gordura debaixo da
grelha.
Instale a grelha na parte central do forno. Se desejar mais
calor de baixo use a 1a prateleira a partir de baixo. Para
obter assados saborosos (especialmente patos e caça),
coloque uma camada de banha ou toucinho na carne, de
modo que esteja na parte superior.
Cozedura de sobremesas
Para cozer sobremesas, sempre aqueça previamente o
forno e, para evitar que a sobremesa abaix e-se, não abra
a porta durante a cozedura. Em geral:
O doce não se solta da forma
Unte bem a forma e deite também na mesma u m
pouco de farinha ou uti lize papel d e forno .
Utilização do grill
Utilize a função d “grill” e coloque a comida no centro
da grelha (colocada na 3a ou na 4a prateleira a partir de
baixo), porque fica acesa somente a parte central da
resistência superior.
Utilize a primeira prateleira a partir de baixo, colocando
a bandeja pingadeira fornecida para a colecta do suco e/
ou gordura derretida.
Quando utilizar-se esta função, é recomendáv el colocar
o termostato no máximo. Entretanto isto não quer diz er
que não é possível utilizar temperaturas mais baixas, é
suficiente colocar o selector do termostato na
temperatura desejada.
Importante: efectue a cozedura no grill com a porta
do forno fechada; desta maneira obterá, além de
melhores resultados, uma sensível economia de energia
(aproximadamente 10 %).
Portanto os melhores resultados na utilização das
funções de grill são obtidas se colocar a grelha nas
últimas prateleiras a partir de baixo (veja a tabela de
cozedura) posteriormente, para a colecta da gordura
derretida e para evitar formar fumo, coloque a
bandeja pingadeira fornecida na primeira prateleira
a partir de baixo.
Bolo muito seco
A próxima vez au mentar a tem perat ura de 10°C e
reduzir o tempo de coz edura
O bolo abaixou-se
Utilizar menos líqui do ou abai xar a temper atura d e
10°C.
Bolo escuro por cima
Colocá-lo a uma altur a inf erior, se lecc ionar uma
temperatura mais b aixa e d eixá- lo coz er mais temp o.
Boa cozedura por fora mas mole por dentro
Utilizar menos líquido, r eduz ir a temp eratu ra,
aumentar o tempo de coz edura.
41
Page 41

Alimenstos cozinhados Peso
(Kg)
Posições para
assar ranhuras a
partir de baixo
Temperatura
(°C)
Tempo de pre-
aquecimento
(minutos)
Tempo de
cozedura
(minutos)
Massas
Lasanhas 2, 5 3 210 - 75-80
Cannelloni 2,5 3 21 0 - 75-80
Tagliatelle no forno 2,5 3 210 - 75-80
Carnes
Vitela 1,7 3 220 - 85-90
Frango 1,5 3 220 - 110-115
Perù 3,0 3 220-Max - 95-100
Pato 1,8 3 220 - 120-125
Coelho 2,0 3 220 - 105-110
Porco 2,1 3 220 - 100-110
Carneiro 1,8 3 220 - 90-95
Peixes
Cavala 1,1 3 210-230 - 55-60
Dentão 1,5 3 210-230 - 60-65
Truta embrulha da 1,0 3 210-230 - 40-45
Pizzas
Napolitana 1,0 3 Max 15 30-35
Tortas
Biscoitos 0,5 3 180 15 30-35
Tartes 1,1 3 180 15 30-35
Bolo de chocolat e 1,0 3 200 15 45-50
Bolos c/ fermento 1,0 3 200 15 50-55
Nota: os tempos de cozedura são indicativos e podem variar conforme o gôsto de cada um.
42
Page 42

A segurança um bom costume
Para garantir a eficiência e a segurança deste electrodoméstico:
• dirija-se exclusivamente aos centros de assistência técnica autorizados
• solicite sempre a utilização de peças de reposição originais
• Para deslocar o aparelho, ao fim de evitar prejuízos
a pessoas e ao próprio produto, utilizar sempre
apropriadas empunhaduras criadas aos lados do
forno.
• Este aparelho foi concebido para utilização não profissional nas moradas e as suas características não podem
ser modificadas.
• As instruções são válidas somente para os países de
destino para os quais os símbolos constam no livrete e
na placa de identificação do aparelho.
• A segurança eléctrica deste aparelho é garantida somente quando o mesmo tiver sido correctamente ligado a
um eficiente sistema de ligação à terra da maneira prevista pelas normas de segurança em vigor.
• Durante o uso do aparelho os elementos de aqueci-
mento e algumas partes da porta do forno ficam
muito quentes. Tome cuidado para não tocar nos
mesmos e mantenha as crianças afastadas.
Por serem fontes de perigo, evite que crianças e
incapazes entrem em contacto com:
- os comandos e o aparelho em geral;
- as embalagens (saquinhos, poliestirol, pregos etc.);
- o aparelho, durante e logo após o funcionamento do forno e do grill, por causa do superaquecimento;
- o aparelho inutilizado (neste é preciso tornar inócuos os
componentes que poderão ser perigosos).
É preciso evitar as seguintes operações:
- tocar o aparelho com partes do corpo húmidas;
- utilizá-lo com os pés descalços;
- puxar o aparelho ou o cabo de alimentação eléctrica para
tirar a ficha da tomada de corrente;
- operações impróprias e perigosas;
- tapar as aberturas de ventilação ou de escoamento do
calor;
- que o cabo de alimentação de pequenos electrodomésticos entrem em contacto com partes quentes do aparelho;
- a exposição aos elementos atmosféricos (chuva, sol);
- a utilização do forno para guardar utensílios;
- a utilização de líquidos inflamáveis nas proximidades;
- o emprego de adaptadores, fichas múltiplas e/ou extensões;
- tentativas de instalação ou reparação sem a intervenção de pessoal qualificado.
É absolutamente necessário dirigir-se a pessoal
qualificado nos seguintes casos:
- instalação (segundo as instruções do fabricador);
- quando houver dúvidas sobre o funcionamento;
- troca de tomada eléctrica no caso de incompatibilidade
com a ficha do aparelho.
É preciso dirigir-se aos centros de assistência técnica
autorizados pelo fabricador nos seguintes casos:
- no caso de dúvida sobre o bom estado do aparelho, ao
tirá-lo da embalagem;
- danos ou troca do cabo de alimentação eléctrica;
- anomalia ou mau funcionamento, solicite sempre peças
de reposição originais.
É oportuno efectuar as seguintes operações:
- somente a cozedura de alimentos, evite outras operações;
- verifique o bom estado, logo após tirar da embalagem;
- desligue o aparelho da rede de alimentação eléctrica no
caso de mau funcionamento e antes de quaisquer operações de limpeza ou manutenção;
- quando não for utilizá-lo, desligue o aparelho da rede
eléctrica e feche a torneira do gás (se houver);
- utilize luvas de forno para colocar e tirar recipientes do
forno;
- segure sempre a maçaneta da porta pelo meio, porque
a ponta pode estar mais quente por causa de eventual
saídas de ar;
- controle sempre que os botões estejam na posição “•”/
”o” quando o aparelho não for utilizado.
- cor te o cabo de alimentação eléctrica depois de tê-lo
desligado da rede eléctrica, quando for decidido não mais
utilizar o aparelho.
• O fabricador não poderá ser considerado responsável
por eventuais danos deriv antes de: errada instalação , ou
utilizações impróprias, erradas e não racionais.
43
Page 43

INSTALAÇÃO
A instalação deve ser efectuada conforme as instruções
do fabricador, por pessoal profissionalmente qualificado. Uma instalação errada pode causar danos às pessoas,
animais ou objectos, em relação aos quais o fabricador não
pode ser responsabilizado.
Importante: quaisquer inter venções de regulação, manutenção etc. precisam ser efectuadas com o f orno desligado
da electricidade.
Instalação dos fornos de encaixar
Para garantir um bom funcionamento do aparelho de encaixar é necessário que o móvel seja de características adequadas. Na figura a seguir, são apresentadas as dimensões
do vão do móvel na introdução embaixo de uma mesa ou
numa coluna.
555
580
560
min
+4 -0
min
min
45
575-585
+4 -0
480
23
572
558
543545
500
39
15
595
595
Para centralizar correctamente , regule os 4 taquinhos laterais do forno em correspondência aos 4 furos na moldura
do perímetro. Especialmente se a espessura do painel lateral do móvel:
• for de 20 mm.: a parte móvel do taquinho deve ser tirada
(Fig. A);
• for de 18 mm.: utilize a primeira canaleta; já realizada na
fábrica (Fig. B);
• for de 16 mm.: utilize a segunda canaleta (Fig. C).
Fig. A Fig. B
Para garantir uma boa ventilação é necessário eliminar o
painel traseiro do vão, é pref erível instalar o f orno de modo
que apoie sobre ripas de madeira; se houver um plano contínuo de apoio, o mesmo precisa possuir uma abertura de
pelo menos 45 x 560 mm.
45 mm.
560 mm.
Os painéis dos móveis adjacentes ao forno precisam ser de
material resistente ao calor. Especialmente no caso de móveis de madeira contraplacada, as colas da mesma precisam ser resistentes a temperatura de 100 °C.
Em conformidade com as normas de segurança, depois de
instalar o aparelho encaixado, não de ve ser possível o contacto com componentes eléctricos.
Todos os componentes de garantia da protecção precisam
estar presos de modo que não possam ser tirados sem o
emprego de uma ferramenta.
Fig. C
Para prender o f orno no móvel, abra a porta do forno e
prenda o forno usando 4 parafusos para madeira nos 4
furos situados na moldura do perímetro.
Ligação eléctrica
Os fornos equipados com cabo eléctrico tripolar, são preparados para o funcionamento com corrente alternada na tensão e frequência eléctricas indicadas na placa de identificação (situada no aparelho) e no folheto de instruções. O fio
de ligação à terra do cabo distingue-se pelas cores amarelo-verde.
44
Page 44

BRANCO
NL
230V 1N~
H07RN-F 3x4 CEI-UNEL 35364
1
3
2
4
5
NL2L3
L1
P
PLANO DE ENCAIXAR
VERMELHO
FOGÃO DE ENCAIXAR
AMARELO
AZUL VERDE
Presente
somente em
alguns
modelos
Montagem do cabo de alimentação
Abertura da caixa de bornes:
• Utilize uma chave de fenda para fazer alavanca nas
linguetas laterais da tampa da caixa de bornes;
• Puxe e abra a tampa da caixa de bornes.
Fig. E
Fig. F
400V 2N~
H05RR-F 4x2.5 CEI-UNEL 35363
NL2L1
Para a instalação do cabo ef ectue as seguintes operações:
• desatarraxe o parafuso da braçadeira e os parafusos
dos contactos
Observação: as pontes são aprontadas pela Fábrica
para a conexão a 400V trifásica (fig. D).
• para efectuar as conexões eléctricas das fig. F e fig.
G, utilizar as duas pontes colocadas dentro da caixa
(fig. E - referência “P”)
• fixe o cabo de alimentação na apropriada braçadeira
e feche a tampa.
400V 3N~
H05RR-F 5x2.5 CEI-UNEL 35363
NL3L1L2
5
3
4
1
2
Fig. D
5
3
4
1
2
Fig. G
Ligação do cabo de alimentação à rede
Monte uma ficha normalizada no cabo, apropriada à carga
indicada na placa de características. Em caso de ligação
directa à rede, é preciso interpor entre o aparelho e a rede
um interruptor omnipolar com abertura mínima entre os contactos de 3 mm., dimensionado à carga e de acordo com as
normas em vigor (o fio de terra não deve ser interrompido
pelo interruptor).
O cabo de alimentação deve estar colocado de modo a não
atingir em ponto algum uma temperatura que ultrapasse temperatura ambiente de mais de 50°C.
Antes de efectuar a ligação verificar se:
• A segurança eléctrica deste aparelho está assegurada
somente quando o mesmo estiver ligado a uma instalação com contacto de terra eficiente, conforme as normas de segurança eléctrica em vigor. É necessário verificar este requisito fundamental de segurança e, em caso
de dúvida, mandar efectuar um controle meticuloso da
instalação por pessoal profissionalmente qualificado. O
fabricador não se responsabiliza por danos eventuais
provocados pela f alta de ligação à terra da instalação .
• Antes de ligar o aparelho assegure-se de que os dados
da plaqueta (colocada sobre o aparelho e/ou na embalagem) coincidam com os da rede de distribuição eléctrica e de gás.
45
Page 45

• Verifique se a capacidade eléctrica da instalação e das
tomadas de corrente são apropriadas para a potência
máxima do aparelho que está indicada na plaqueta. Em
caso de dúvida dirija-se a pessoal profissionalmente qualificado.
• No caso de incompatibilidade entre a ficha do aparelho,
mande um técnico profissionalmente qualificado trocar
a ficha por outra de tipo adequado. Este técnico deverá
também especificamente certificar-se que o diâmetro dos
cabos da ficha seja idóneo para a potência absorvida
Características técnicas
pelo aparelho. Em geral é desaconselhável o uso de
adaptadores, fichas múltiplas e/ou extensões. Se o uso
de adaptadores for indispensável, use somente
adaptadores simples ou múltiplos, e extensões conformes às normas de segurança em vigor, porém tome cuidado para não ultrapassar o limite de capacidade da
corrente, indicado no adaptador simples e nas extensões, nem o limite de potência máxima indicado no
adaptador múltiplo. A ficha e a tomada devem ser fa-
cilmente acessíveis.
Medidas úteis do forno:
largura: 43,5 cm.
profundidade: 43,5 cm.
altura: 32 cm.
Volume útil do forno:
60 litros
ETIQUETA DE ENERGIA
Directiva 2002/40/CE acerca dos fornos eléctricos
Norma EN 50304
Consumo de energia da declaração de Classe com convecção
Natural
função de aquecimento: Estático
Tensão e frequência da alimentação eléctrica:
230/400V ~ 3N 50/60Hz 8400W
7
Este equipamento é em conformidade com as
seguintes Directivas Comunitárias:
- 773/23/CEE de 19/02/73 (Baixa Tensão) e
sucessivas modificações;
- 89/336/CEE de 03/05/89 (Compatibilidade
Electromagnética) e sucessivas modificações;
- 93/68/CEE de 22/07/93 e sucessivas modificações.
- 2002/96/CE
A directiva Europeia 2002/96/CE referente à gestão de
resíduos de aparelhos eléctricos e electrónicos (RAEE),
prevê que os electrodomésticos não dev em ser escoados
no fluxo normal dos resíduos sólidos urbanos. Os
aparelhos desactualizados devem ser recolhidos
separadamente para optimizar a taxa de recuperação e
reciclagem dos materiais que os compõem e impedir
potenciais danos para a saúde humana e para o ambiente. O símbolo constituído por um contentor de lixo barrado
com uma cruz deve ser colocado em todos os produtos
por forma a recordar a obrigatoriedade de recolha
separada.
Os consumidores devem contactar as autoridades locais
ou os pontos de venda para solicitar inf ormação referente
ao local apropriado onde devem depositar os
electrodomésticos velhos.
46
Page 46

Wij danken u dat u een Ariston product heeft gekozen, veilig en gemakk elijk in het gebruik. T eneinde de ov en beter te
leren kennen, beter te gebruiken en er langer plezier van te hebben raden wij u aan de gebruiksaanwijzing aandachtig
te lezen voordat u hem voor de eerste k eer gaat gebruiken, er staan belangerijke aanwijzingen in met betrekking op de
veiligheid van installeren, het gebruik en onderhoud. Bew aar dit boekje zorgvuldig voor e ventuele verdere r aadpleging.
Dank u.
Van dichtbij gezien
A. Bedieningspaneel
B. Lekplaat of bakplaat
C. Ovenrek
D. Elektrische kookplaat
E. Keuzeknop kookfuncties
F. Knoppen elektrische kookplaten
G. Controlelampje elektrische kookplaten
H. Geleider lekplaat en ovenrek
I. Controlelampje oven (slechts op enkele modellen
aanwezig) - als dit aan is geeft het de verwarmingsfase
aan tot aan de ingestelde temperatuur .
G
I
D
A
C
D
H
B
0
0
0
1
2 5
3
6
1
2 5
3
4
6
1
2 5
3
4
F
6
1
2 5
3
4
0
6
4
0
MAX
220
180
60
100
140
E
Het Gebruik
De verschillende functies van de oven worden gekozen
met de knoppen op het bedieningspaneel.
Belangrijk: Wij raden aan bij het eerste gebruik de oven
ongeveer een half uur leeg te laten functioneren op maximum temperatuur en met de deur dicht. Als deze tijd v erlopen is opent u de ovendeur en lucht u het vertrek. De
geur die men soms gedurende deze handeling waarneemt
is te wijten aan het verdampen van de middelen die gebruikt worden om de oven te beschermen gedurende het
tijdsverloop tussen de productie en het installeren van het
product.
Belangrijk: Plaats de bijgeleverde lekplaat voor het opvangen van v et en vleessappen op de laagste stand in de
oven, alleen als u onder de grill bakt of het braadspit
(slechts op enkele modellen aanwezig) gebruikt. Bij alle
andere soorten van koken nooit de laagste stand gebruiken of voorwerpen op de bodem van de oven plaatsen
terwijl de oven aan is, aangezien dit het email kan beschadigen. Plaats altijd uw ovenschotels, aluminiumfolie
en dergelijken op het bijgeleverde rek, dat u in de gleuv en
van de oven steekt.
Ovenknop (E)
Hiermee kiest u de verschillende functies van de ov en en
de beste temperatuur voor het gerecht dat u gaat koken
(tussen 60°C en 240°C). Door de knop met de klok mee
te draaien gaat het ovenlicht aan 8, gaan de bovenste
en onderste verwarmingselementen werken (elektrische
weerstanden) en kunt u de gewenste temperatuur kiezen.
Hiervoor zet u de gewenste indicatie gelijk met het wijzertje
op het bedieningspaneel (Statische oven).
60 • 100 • 140 • 180 • 220 Max
80 120 160 200 240
De ingestelde temperatuur wordt automatisch bereikt en
constant gehouden door de thermostaat.
Positie Bovenste Weerstand c
Door de knop tot aan deze positie te draaien gaat het
ovenlicht aan en gaat de bovenste weerstand werken.
Het ovenlicht
Dit gaat aan met de knop “E” op symbool 8. De oven
wordt verlicht en blijft verlicht zolang er een elektrisch element in de oven aan is.
47
Page 47

Bedieningsknoppen van de elektrische kookplaten
(F)
De fornuizen kunnen voorzien zijn v an normale, snelle en
automatische elektrische platen in verschillende
combinaties (de snelle platen onderscheiden zich van de
anderen door een rode stip) .
Gebruik pannen met een platte bodem niet kleiner dan de
diameter van de kookplaat, zo ver mijdt u warmteverlies
en eventuele schade aan de k ookplaten.
De juiste verhouding tussen de positie aangegev en op de
knoppen en het optimale gebruik van de kookplaten is
aangegeven in de tabel.
Positie Normale of snell e plaat
0
Uit
1 Groenten en vis
Controlelampje elektrische kookplaten (G)
Dit blijft aan zolang er een elektrisch verwarmingselement
aan is.
Gebruik van de kookplaat
Voor de beste resultaten van uw kookplaat volgen hier
enkele fundamentele regels waaraan u zich moet houden
bij het koken en bij het v oorbereiden v an de gerechten.
· Gebruik pannen met een platte bodem die zich goed
aansluiten aan de kookzone.
· Gebruik pannen die groot genoeg zijn om de kookplaat
geheel te bedekken teneinde alle beschikbare hitte te
benutten.
2
3
4
5
6
Aardappelen (gestoomd), soep,
capucijners, bonen
Doorkoken van grote hoevelheeden,
minestroni enz.
Braden (medium)
Braden (hard)
Bruin bakken of snel aan de kook brengen
Vóór het eerste gebruik moeten de kookplaten voor
ongeveer 4 minuten op maximum wor den verwarmd,
zonder pannen. Gedurende deze beginfase wordt de
beschermlaag hard en maximaal resistent.
· Zorg ervoor dat de bodem van de pan altijd schoon en
droog is, zo garandeert u een goed contact en een
lange duurzaamheid van de kookplaten en van de
pannen zelf.
48
Page 48

Onderhoud
Sluit altijd eerst de stroom af voordat u tot enige handeling ov ergaat.
Het is belangrijk voor de lange duurzaamheid van het apparaat dat u het regelmatig nauwkeurig schoonmaakt, als
volgt:
• Gebruik voor het reinigen geen stoomapparaat.
• de buitenkant, geëmailleerd en roestvrij staal, wordt met
een lauw sopje gewassen, gebruik nooit schuurmiddelen
of oplosmiddelen, die beschadigingen kunnen veroorzaken; roestvrij staal kan permanent gevlekt blijven. Gebruik voor hardnekkige vlekken speciale producten die
normaal in de handel te krijgen zijn. Spoel ze dus na het
reinigen goed af en droog ze af.
• de binnekant van de oven wordt gereinigd als de oven
nog lauw is, liefst na ieder gebruik, met een warm sopje,
dan gespoeld en zorgvuldig gedroogd met een zachte
doek. Gebruik nooit schuurmiddelen (b.v. vim enz…) of
de harde kant van de afwasspons of zuren (b .v . ontkalker
enz…) aangezien die het email kunnen beschadigen. Als
het vuil moeilijk te verwijderen is, gebruik dan een speciaal product voor het schoonmaken v an de oven en volg
de aanwijzingen op de verpakking hiervan.
• als de oven lange tijd gebruikt wordt kan zich
condenswater v ormen. Droog af met een zachte doek.
• de rubber afwerking om de oven heen zorgt voor het goed
functioneren. Controleer dus af en toe de staat waarin
deze afdichting zich bevindt. Maak hem schoon indien
nodig maar vermijd producten of voorwerpen die schuren of scherp zijn. Indien de afdichting beschadigd is moet
u zich wenden tot de installateur. Gebruik de oven pas
weer als dit gerepareerd is.
• bekleed de bodem van de oven nooit met aluminium folie, aangezien het ophopen van hitte zowel uw gerecht
als het email kan beschadigen.
• reinig de ruit van de ovendeur met niet-schurende
producten en sponzen, en droog hem met een zachte
doek.
Het verwijderen van de ovendeur
V oor een grondige reiniging kunt u de ovendeur verwijderen. Ga
als volgt te werk:
• open de deur helemaal;
• trek omhoog en draai de hendeltjes op de twee scharnieren;
• pak de deur aan beide kanten vast, doe hem langzaam maar
niet helemaal dicht;
• trek de deur naar u toe en uit zijn behuizing.
Monteer de deur weer op tegenovergestelde wijze .
123
Het vervangen van de ovenlamp
• Sluit de stroom van de oven af door middel van de schakelaar die de installatie aan het net verbindt, of door de stekker
uit het stopcontact te trekken, indien deze bereikbaar is.
• Schroef het glazen lampekapje los;
• Schroef het lampje los en ve rvang het met een nieuw lampje
dat hittebestendig is (300°C) met de volgende kenmerken:
- Spanning 230/240 V
- V ermogen 25W
- Fitting E14
• Monteer het lampekapje en sluit de stroom weer aan.
49
Page 49

Kooktips
Gebruik in de oven slechts één bakplaat of ovenrek tegelijkertijd. Deze w ordt hoger of lager geplaatst naar gelang
het gerecht meer bovenwarmte of meer onderwarmte nodig heeft.
V oorverwarmen
Gebruik de “statische ov en” v oor het voorverwarmen,
vrijwel altijd voor gerechten die moeten rijzen, aangezien
hiermee de temperatuur in korte tijd wordt bereikt. Aan
het einde van de voorverwarming, aangegev en doordat
het rode controlelampje “I” uitgaat, kiest u de gew enste
functie.
Vis en vlees
Gebruik voor wit vlees, gev ogelte en vis temper aturen
van 180 °C tot 200 °C .
Bij rood vlees is het goed te beginnen met een hogere
temperatuur (200°C - 220°C) en vervolgens de
temperatuur te verlagen.
Over het algemeen geldt de regel: hoe g roter het stuk
vlees, hoe lager de temperatuur en hoe langer de tijd
van braden. Zet het vlees in het midden van het ovenrek
en zet er de lekplaat onder .
Plaats het rek zodanig dat het vlees zich midden in de
oven be vindt. Voor meer onderwarmte zet u het rek wat
lager. Voor een heerlijk braadstuk kunt u het met spek of
spekvet bedekken (v ooral ook eend en wild) en zo
plaatsen dat het zich boven in de ov en bevindt.
Desserts
Gebruik voor gebak altijd een voorverwarmde oven en
open de ovendeur niet gedurende de kooktijd aangezien
het gebak in kan zakken. In het algemeen:
Buitenkant goed, maar van binnen niet gaar
Maak deeg minder vloeiba ar, v erlaag de t emper atuur,
verleng de baktijd.
De taart komt niet uit de vorm
Boter de vorm goed in en sprink el er wat b loem
overheen, of gebruik ov enpapie r.
De grill
Gebruik de functie d “grill” met het gerecht in het midden onder de grill (op de 3° of 4° stand van beneden),
aangezien alleen het middelste gedeelte van het bovenste verwarmingselement aan gaat.
Zet de lekplaat op het onderste ovenrek voor het opvangen van sappen en/of vet.
Bij deze functie hoort u de thermostaat op maximum te
zetten. Dit wil niet zeggen dat u niet een lagere temperatuur kunt gebruiken door de thermostaat op de gewenste
temperattuur te zetten.
Belangrijk: gebruik de grill met de ovendeur dicht, dit
biedt de beste resultaten en een energiebesparing van
ongeveer 10%.
De beste resultaten van de grill verkrijgt u door het
ovenrek op de bovenste stand te zetten (zie kooktabel)
en de bijgeleverde lekplaat voor het opvangen van vet
en het vermijden van rook op de onderste stand.
Taart te droog
Stel de volgende keer een tem perat uur in d ie 10°C
hoger is en maak de bakt ijd korter .
Taart zakt in
Maak deeg minder vloeibaar of verlaag de
temperatuur met 10°C.
Taart te donker bovenop
Plaats hem op een lagere s tand in d e oven, stel een
lagere temperatuur in en v erleng de baktij d.
50
Page 50

Te koken voedsel Gewicht
(Kg.)
Paste
Positie van koken
verdiepingen van
beneden
Te mperatuur
(°C)
Tijd van
voorverwarming
(min.)
Tijd van
koken
(min.)
Lasagne
Cannelloni
Tagliatelle
Vlees
Kalfsvlees
Kip
Kalkoen
Eend
Konijn
Varkensvlees
Schaapsvlees
Vis
Makreel
Brasem
Forel
Pizze
Napoletana 1,0 3 Max 15 30-35
Taarten
Biscuitjes
Vlaai
Chocoladetaart
Rijstaart
2,5
2,5
2,5
1,7
1,5
3,0
1,8
2,0
2,1
1,8
1,1
1,5
1,0
0,5
1,1
1,0
1,0
3
3
3
3
3
3
3
3
3
3
3
3
3
3
3
3
3
210
210
210
220
220
220-Max
220
220
220
220
210-220
210-220
210-220
180
180
200
200
15
15
15
15
-
-
-
-
-
-
-
-
-
-
-
-
75-80
75-80
75-80
85-90
110-115
95-100
120-125
105-110
100-110
90-95
55-60
60-65
40-45
30-35
30-35
45-50
50-55
N.B.: de kooktijden zijn slechts aanduidinge n en kunnen v ariëren naar g elang uw eigen s maak.
51
Page 51

Veiligheid is een goede gewoonte
Voor het garanderen van de efficiëntie en veiligheid van het apparaat:
• Wendt u zich alleen tot een erkend technisch service center
• Vereis altijd originele onderdelen
• Maak gebruik van de handgrepen aan de zijkanten
van de oven als u het apparaat moet verplaatsen,
zo vermijd u schade aan personen en aan de oven
zelf.
• Dit apparaat is geschikt voor niet-professioneel gebruik
thuis en zijn kenmerken mogen niet ver anderd worden.
• De instructies gelden alleen voor de landen van
destinatie waarvan de symbolen in de gebruiksaanwijzing voorkomen en op het registratieplaatje.
• De veiligheid van dit apparaat is slechts dan gegarandeerd als het van een volgens de geldende v eiligheidsnormen aangelegde aarding is voorzien.
• Gedurende het gebruik van de oven worden de
verwarmingselementen en enkele delen van de
ovendeur heet. Raak er niet aan en houd de kinderen op een afstand.
Zorg ervoor dat kinderen en onbekwame personen
niet in contact komen met:
- het bedieningspaneel en het apparaat in het algemeen;
- de verpakking (plastic zakken, piepschuim, spijkers
enz.);
- het apparaat gedurende en direct n gebruik van de
oven of grill, vanwege de hitte;
- het apparaat ongebruikt (in dit geval moeten onderdelen onschadelijk gemaakt worden).
De volgende handelingen moeten vermeden
worden:
- het apparaat met natte handen aanraken;
- het apparaat gebruiken als u blootsvoets bent;
- aan het apparaat trekken of aan de voedingskabel om
de stekker uit te trekken;
- verkeerde en/of gevaarlijke manipulaties uitv oeren;
- ventilatie-openingen verstoppen;
- de elektrische draden van kleine keukenapparaten op
warme delen van het apparaat laten liggen;
- blootstellen aan weersomstandigheden (regen, zon);
- de oven gebruiken als opbergplaats;
- het gebruik van ontvlambare vloeistoffen nabij de oven;
- het gebruik van adapters, verlengsnoeren en/of dubbelstekkers;
- zelf installeren of repareren zonder de hulp van een
erkende installateur.
Het is noodzakelijk zich tot een erkende installateur
te wenden in de volgende gevallen:
- het installeren (volgens de aanwijzingen van de fabrikant);
- als u niet zeker bent of het apparaat wel goed functioneert;
- voor het vervangen van het stopcontact, als de stekker niet past.
Het is noodzakelijk zich tot de technische service
van de fabrikant te wenden in de volgende gevallen:
- als het apparaat na het uitpakken beschadigd lijkt;
- als de voedingskabel beschadigd is en vervangen moet
worden;
- eis bij het vervangen altijd een origineel onderdeel.
Houdt u zich aan het volgende:
- alleen koken, en geen ander gebruik van het apparaat;
- na uitpakken controleren op schade;
- de stroom van het apparaat afsluiten bij storingen en
voordat u tot onderhoud ov ergaat;
- als de oven niet gebruikt wordt moet u de stroom uitschakelen en de gaskraan dicht doen (indien aanwezig);
- gebruik ovenwanten voor het in- en uitladen van gerechten;
- pak het handvat van de deur altijd in het midden aan,
aangezien de uiteinden warm kunnen worden door een
eventuele luchtstroom;
- controleer altijd dat de knoppen in de positie “•”/”o” staan
als het fornuis niet gebruikt wordt.
- als u het apparaat niet meer gaat gebruiken, sluit dan
de stroom af en snijd de voedingskabel door .
• de fabrikant stelt zich niet aansprakelijk voor e ventuele
schade veroorzaakt door: foutief installeren, onjuist,
verkeerd of onredelijk gebruik.
52
Page 52

INSTALLATIE
Het installeren moet uitgevoerd w orden door een bevoegde installateur en volgens de instrukties van de
fabrikant. Een verkeerde aansluiting kan schade veroor-
zaken aan personen, dieren of dingen en voor deze gevallen kan de fabrikant niet verantwoordelijk worden gesteld.
Belangrijk: sluit altijd eerst de stroom af voordat u overgaat tot regelen, onderhoud enz.
Installeren inbouwovens
V oor een goede werking van het apparaat moet het meubel de juiste kenmerken hebben. In de afbeelding vindt u
de afmetingen van de uitspaarruimte voor het plaatsen
onder de aanrecht of stapelbouw.
555
580
560
min
+4 -0
min
min
45
575-585
+4 -0
480
23
572
558
543545
500
39
15
595
595
N.B.: Installatie voor aangifte energieverbruik
V oor het centreren laat u de 4 poten aan de zijkant van de
oven samenv allen met de 4 gaten in de lijst. Vooral als de
dikte van de wand van het kastje:
• 20 mm is: moet het bewegelijke deel van de poot ver-
wijderd worden (afb. A);
• 18 mm is: gebruik de eerste groef die reeds in de fa-
briek is voorbereid (afb. B);
• 16 mm is: gebruik de tweede groef (afb . C).
Afb. A Afb. B
De achterwand van de uitspaarruimte moet verwijderd
worden voor het luchten Het is het beste als de oven op
twee houten randen steunt. Indien er een doorlopende
steunplaat aanwezig is moet deze van een opening worden voorzien van minstens 45 x 560 mm.
45 mm.
560 mm.
De wanden van aangrenz ende kastjes moeten van hittebestendig materiaal zijn. Vooral in het geval van kastjes
met fineer moet de lijm bestand zijn tegen een temperatuur van 100 °C.
Volgens de veiligheidsnormen mogen de elektrische panelen na het installeren niet aanraakbaar zijn.
Alle beschermende onderdelen moeten zodanig zijn bevestigd dat ze niet kunnen worden v erwijderd zonder gereedschap te gebruiken.
Afb. C
V oor het bev estigen van de o ven aan het meubel opent u
de ovendeur en schroeft u hem v ast met 4 houtschroeven
in de 4 gaten in de zijrand.
Elektrische aansluiting
De elektrische aansluiting aan het net moet worden
uitgevoerd op het fo rnuis . De kookplaat wordt aan het
fornuis aangesloten door middel van een speciale
aansluiting. De fornuizen zijn ingesteld op wisselstroom
met voltage en frequentie zoals aangegeven op het
typeplaatje.
53
Page 53

INBOUWPLAAT
Slechts op
enkele
modellen
aanwezig
P
NL2L3
L1
WIT ROOD GEEL BLAUW GROEN
INBOUWFORNUIS
Monteren voedingskabel
Opening klemmenbord:
• Licht de lipjes aan de zijkanten van de deksel van het
klemmenbord op met behulp van een
schroevendraaier;
• trek de deksel van het klemmenbord open
Het aansluiten van de kabel:
• schroef de schroef van de kabelklem en de schroev en
van de contacten los
N.B: de overbruggingsklemmen zijn door de fabriek
voorbestemd voor aansluiting aan 400V trif ase (afb.D).
• voor het uitvoeren van de elektrische aansluitingen v an
de afbeeldingen F en G worden de twee
overbruggingsklemmen die zich in de doos bevinden
gebruikt (afb. E - kenteken “P”)
• zet de kabel vast in de kabelklem en sluit de deksel.
400V 3N~
H05RR-F 5x2.5 CEI-UNEL 35363
NL3L1L2
5
3
4
Afb. D
1
2
Afb. E
230V 1N~
H07RN-F 3x4 CEI-UNEL 35364
NL
5
3
4
Afb. F
1
2
400V 2N~
H05RR-F 4x2.5 CEI-UNEL 35363
NL2L1
5
3
4
Afb. G
Het aansluiten van de voedingskabel aan het net
Bevestig een stekker op de voedingskabel, die geschikt
is voor de lading die aangegev en wordt op het typeplaatje.
In het geval er een directe aansluiting aan het net plaatsvindt, moet men tussen het apparaat en het net een
veelpolige schakelaar aanbrengen met een minimum afstand tussen de kontaktpunten van 3 mm. Deze moet aan
de lading aangepast zijn en aan de geldende normen voldoen (de geaarde kabel mag niet door de schakelaar onderbroken worden).
De voedingskabel moet zodanig geplaatst zijn, dat hij nergens een temperatuur bereikt die 50°C hoger is dan de
kamertemperatuur.
V oor het aansluiten moet men k ontroleren dat:
• De electrische veiligheid van dit apparaat is slechts
dan verzekerd als het op de juiste wijz e is geaard zoals voorgeschreven door de geldende normen voor
electrische veiligheid. Het is belang rijk zich hiervan te
verzekeren en, in geval van twijfel, een controle te laten uitvoeren door een bev oegde electricien. De fabrikant kan niet aansprakelijk worden gesteld voor schade
die veroorzaakt is door nalatigheid betreffende het aarden van de installatie.
1
2
54
Page 54

• Voordat het apparaat wordt aangesloten moet men zich
ervan verzekeren dat de gege vens v an het typeplaatje
(op het apparaat en/of de verpakking) overeenkomen
met de kenmerken van het electrische net en de gasleiding.
• Controleer dat het electrische vermogen van het net
en van de stopcontacten voldoende is voor het maximum vermogen van het apparaat zoals aangegeven
op het typeplaatje. In geval van twijfel moet u zich tot
een bevoegde electricien wenden.
• Als de stekker en het stopcontact niet passen, dan moet
de stekker vervangen worden met een passende
stekker door een bevoegde electr icien. Deze moet
Technische gegevens
vooral ook controleren dat de doorsnede v an de kabels
van het stopcontact voldoende is voor het vermogen
van het apparaat. Het is in het algemeen af te raden
adapters, dubbel.stekkers en/of verlengsnoeren te
gebruiken. Als het gebruik hiervan onv ermijdelijk is dan
moet men enkelvoudige of meervoudige adapters en
verlengsnoeren gebruiken die voldoen aan de geldende
veiligheidsnormen. Let echter op de vermogensgrens
van de stroom niet te overschrijden zoals deze is
aangegeven op de enkele adapter en op de
verlengsnoeren, en het maximum vermogen
aangegeven op de meervoudige adapter. Stekker en
stopcontact moeten gemakkelijk te bereiken zijn.
Afmetingen van de oven:
breedte : 43,5 cm
diepte: 43,5 cm
hoogte: 32 cm
Inhoud van de oven:
60 liters
ENERGY LABEL
Richtlijn 2002/40/CE op etiket van de elektrische ov ens
Norm EN 50304
Energieverbruik verklaring Klasse convectie Natuurlijk
verwarmingsfunctie: Statische
Voltage en frekwentie van de stroomverzorging:
230/400V ~ 3N 50/60Hz 8400W
7
Dit apparaat voldoet aan de volgende EEG
Richtlijnen:
- 73/23/EEG van 19/02/73 (laagspanning) en
successieve lijke modificaties;
- 89/336/
compatibiliteit) en successievelijk e modificaties;
- 93/68/EEG van 22/07/93 en successievelijk e
modificaties;
- 2002/96/EC
De Europese Richtlijn 2002/96/EC over Vernietiging van
Electrische en Electronische Apparatuur (WEEE), vereist
dat oude huishoudelijke electrische apparaten niet mogen
vernietigd via de normale ongesorteerde afvalstroom.
Oude apparaten moeten apart worden ingezameld om zo
het hergebruik van de gebruikte materialen te
optimaliseren en de negatieve in vloed op de gez ondheid
en het milieu te reduceren. Het symbool op het product
van de “afvalcontainer met een kruis erdoor” herinnert u
aan uw verplichting, dat wanneer u het apparaat vernietigt,
het apparaat apart moet worden ingezameld.
Consumenten moeten contact opnemen met de locale
autoriteiten voor informatie over de juiste wijze van
vernietiging van hun oude apparaat.
EEG
van 03/05/89 (elektromagnetische
55
Page 55

Wir danken Ihnen, dass Sie dieses sichere und äußerst leicht zu bedienende Ariston-Gerät gewählt haben. Um sich
mit diesem vertraut zu machen und es auf optimale Art zu gebrauchen lernen, empfehlen wir Ihnen, dieses Handbuch
vor Inbetriebnahme des Gerätes aufmerksam zu lesen, da es wichtige Hinweise hinsichtlich der Sicherheit bei der
Installation, dem Gebrauch und der W artung liefert. Bewahren Sie dieses Handbuch sorgfältig auf , damit Sie es jederzeit
zu Rate ziehen können. Dank e .
Aus der Nähe betrachtet
A. Schalterblende
B. Fettpfanne bzw. Bac kblech
C. Backofenrost
D. Elektroplatte
E. Drehknopf Garfunktionen
F. Elektroplatten-Reglerknöpfe
G. Elektroplatten-Betriebsanzeigeleuchte
H. Gleitführungen für Backblech und Bac kof enroste
I. Backofen-Betriebsanzeigeleuchte (nur an einigen
Modellen) - Diese bleibt während der Aufheizphase bis
zum Erreichen der Temperatur eingeschaltet.
G
I
D
A
H
C
B
D
0
0
0
1
2 5
3
6
1
2 5
3
4
6
1
2 5
3
4
F
6
1
2 5
3
4
0
6
4
0
MAX
220
180
60
100
140
E
Inbetriebnahme des Gerätes
Die Wahl der einzelnen Herd-Funktionen erfolgt mittels
der auf der Schalterblende angeordneten Reglerknöpfe.
Zur Beachtung: Bei erstmaliger Inbetriebnahme sollte der leere Backof en für etwa 30 Minuten bei eingestellter Höchsttemperatur und geschlossener Backofentür in Betrieb gesetzt werden. Nach Ablauf dieser Zeit schalten Sie den Backofen aus,
öffnen die Backofentür und lüften die Küche. Der hierbei evtl.
entstehende Geruch wird durch das V erdunsten der zum Schutz
des Backofens während des Zeitraums zwischen Produktion
und erster Inbetriebnahme aufgetragenen Stoffe verursacht.
Zur Beachtung: Verwenden Sie bitte die erste (die unterste)
Führungsschiene nur für die Fettpfanne, d.h. zum Auffangen
des abtropfenden Fleischsaftes und/oder Fettes beim Grillen
oder bei Einsatz des Bratspießes (nur an einigen Modellen). Für
alle anderen Gararten ist diese Führungsschiene nicht zu verwenden. Stellen Sie bei in Betrieb befindlichem Backofen auch
niemals Kochgeschirr auf den Boden des eingeschalteten Backofens, Sie könnten hierdurch das Email beschädigen. Stellen
Sie Ihr Kochgeschirr (Auflauffor men, Alufolien, usw.) stets auf
die ordnungsgemäß in die Führungsschienen eingesetzten, mit
dem Gerät gelieferten Backofenroste .
Backofen-Reglerknopf (E)
Mit diesem können die einzelnen Backof enfunktionen und
die für die Speisen geeignetste Gartemperatur (zwischen
60°C e 240°C) eingestellt werden. Durch Drehen des
Reglerknopfes im Uhrzeigersinn wird die
Backofenbeleuchtung eingeschaltet 8 und das obere und
das untere Heizelement (Elektrowiderstände) aktiviert. Sie
können nun aus der nachfolgenden Temperaturskala die
zum Garen geeignetste Temperatur einstellen, indem Sie
die auf dem Knopf angegebenen Heizwerte mit den auf
der Schalterblende aufgedruckten Werten in
Übereinstimmung bringen (Statischer Backofen).
60 • 100 • 140 • 180 • 220 Max
80 120 160 200 240
Die gewählte Temperatur wird automatisch erreicht und
durch den mittels des Temperaturwählers geregelten
Thermostaten konstant gehalten.
Oberer Heizwiderstand c
Drehen Sie den Knopf auf diese Position, schaltet sich
die Backofenbeleuchtung ein und das obere Heiz element
wird aktiviert.
56
Page 56

Backofenbeleuchtung
Diese wird durch Drehen des Knopfes „E“ auf das Symbol 8
eingeschaltet. Sie beleuchtet das Of eninnere und bleibt eingeschaltet, solange sich irgendein elektrisches
Backof enheizelement in Betrieb befindet.
Schalterknöpfe für die Elektroplatten des
Kochf eldes (F)
Die Herde können mit Normal-, Schnellaufheiz- und
Automatik-Elektroplatten in unterschiedlichen
Kombinationen bestückt sein (die Schnellaufheizplatten
sind durch einen roten Punkt in Plattenmitte, die AutomatikPlatten durch eine Alu-Diskette in Plattenmitte
gekennzeichnet).
Um zu große Wärmev erluste und Schäden an den Platten
zu verhindern, sollten Sie Töpf e und Pfannen mit glattem
Boden verwenden, deren Durchmesser nicht kleiner ist,
als der der Elektroplatte.
Der Tabelle können Sie entnehmen, welche Platte und
welche Einstellung für welche Garart am besten geeignet
ist.
Elektroplatten-Betriebsanzeigeleuchte (G)
Diese schaltet sich ein, sobald irgendein KochfeldHeizelement in Betrieb gesetzt wird.
Einsatz des Kochfeldes
Ihr Kochfeld gibt Ihnen sein Bestes, w enn Sie beim Kochen
bzw. bei der Zubereitung von Speisen einige grundlegende
Regeln beachten.
· Benutzen Sie Kochgeschirr mit flachem Boden, um
sicher zu sein, dass er ganz auf der Heizfläche aufliegt.
· Benutzen Sie Kochgeschirr , dessen Durchmesser mit
dem der Elektroplatte übereinstimmt, d.h. dessen
Boden die Elektroplatte ganz bedeckt, und somit die
gesamte Wärme genutzt wird.
Einstellung Normal- oder Schnellkochplatte
0
1
2
3
4
5
6
Ausgeschalte t
Garen von Gemüse, Fisch
Kartoffeln (däm pfen) Gemüse sup pen,
Kichererbsen, Boh nen
Weitergaren von Ei ntopfge rich ten und
Gemüsesuppen
Braten (mäßige Hitze)
Braten (starke Hitze)
Anbraten von Fleisch u nd rasc hes
Aufkochen von Speise n
Vor erstmaliger Inbetriebnahme müssen die
Elektroplatten, ohne T opf, für ungefähr 4 Minuten auf
höchster Temperaturstufe erhitzt werden. Während
dieser ersten Heizphase härtet der Schutzüberzug und
erreicht so seine höchste Beständigkeit.
· Stellen Sie sicher, dass die Geschirrböden stets sauber
und trocken sind, damit ein optimaler K ontakt und eine
lange Lebensdauer der Kochplatten und des
Kochgeschirrs gewährleistet wird.
57
Page 57

So halte ich das Gerät in Topform
V or jeder Reinigung und Pflege muß das Gerät vom Stromnetz getrennt werden.
Um eine lange Lebensdauer des Backofens zu gewähr leisten, m uß er regelmäßig gründlich gereinigt werden.
Berücksichtigen Sie hierbei, dass:
• Verwenden Sie zur Reinigung bitte keine
Dampfgeräte.
• die Oberflächen aus Email oder Edelstahl mit lauwarmem W asser zu reinigen sind; v erwenden Sie bitte keine
Scheuermittel oder scharfe Reiniger, die diese hochw ertigen Oberflächen beschädigen könnten. Auf Edelstahl
könnten sich Flecken bilden. Sollten diese nur schwer
zu entfernen sein, empfehlen wir den Einsatz der im Handel erhältlichen Spezialreinigungs- und Pflegemittel. Es
ist ratsam, diese Teile nach der Reinigung gut nachzuspülen und trockenzureiben;
• der noch lauwarme Backofen möglichst nach jedem Gebrauch mit warmem W asser und Spülmittel gereinigt, mit
klarem W asser nachgespült und mit einem weichen Tuch
sorgfältig abgetrocknet werden sollte. V ermeiden Sie den
Einsatz von Scheuermitteln (zum Beispiel Pulver-Reinigern usw .) und Scheuerschwämmen, oder Säuren (z.B.
Antikalklösungen usw .), diese könnten das Email beschädigen. Verwenden Sie bei besonders hartnäckigen Verschmutzungen die üblicherweise zur Reinigung des Bac kofens bestimmten Spezialreiniger . Halten Sie sich jedoch
genau an die auf der Packung angegebenen Gebr auchsanleitungen;
• sich bei längerer Betriebszeit des Backofens Kondenswasser bilden könnte. Reiben Sie dieses mit einem weichen T uch trocken;
• die rund um die Backofenöffnung befindliche Dichtung
die korrekte Funktionsweise des Backofens garantiert.
Der Zustand dieser Dichtung sollte demnach regelmäßig überprüft werden. Gegebenenf alls ist diese zu reinigen, wobei jedoch keine Scheuermittel oder -produkte
zu verwenden sind. Wenden Sie sich im F alle einer Beschädigung dieser Dichtung an Ihre nächstgelegene
Kundendienststelle. Es empfiehlt sich, den Bac kofen bis
zur erfolgten Reparatur nicht in Gebrauch zu nehmen;
• der Backofenboden niemals mit Aluf olie ausgelegt w erden darf, da der hierdurch verursachte Wärmestau den
Garvorgang gefährden und auch das Email beschädigen würde.
• das Glas des Backofenfensters mit einem milden Reiniger und einem weichen Schwammtuch gereinigt und anschließend mit einem weichen T uch trockengerieben werden muss.
Abnehmen der Backofentür
Um den Backofen mühelos gründlich reinigen zu können,
kann die Backofentür abgenommen w erden. Verfahren Sie
hierzu wie folgt:
• die Tür ganz öffnen;
• klappen Sie die seitlich an den beiden Scharnieren befindlichen Hebel hoch und drehen Sie diese nach links;
• fassen Sie die Tür an den beiden äußeren Seiten und
schließen Sie sie langsam, jedoch nicht ganz;
• ziehen Sie die Tür zu sich hin aus ihrer Lagerung heraus.
In umgekehrter Reihenfolge wird die Tür wieder angebracht.
123
Lampenwechsel im Backofenraum
• Die Stromversorgung des Backofens abschalten, und
zwar entweder mit dem für den Anschluß an die Stromleitung verwendeten allpoligen Schalter , oder durch Herausziehen des Steckers, sof ern dieser zugänglich ist.
• Die Glasabdeckung der Lampenhalterung herausdrehen.
• Die Lampe herausschrauben und durch eine hitzebeständige Lampe (300°C) nachstehender Eigenschaften ersetzen:
- Spannung 230/240 V
- Leistung 25W
- Sock el E14
• Die Glasabdeckung einsetzen und die Stromversorgung
zum Backof en wieder herstellen.
58
Page 58

Praktische Back-/Brathinweise
V erwenden Sie bei Garen im Backof en immer nur ein Backblech bzw. Rost. Schieben Sie dieses entweder auf die
unteren oder auf die oberen Führungsschienen, je nach
dem, ob mehr Ober- oder mehr Unterhitze verlangt wird.
V orheize n
Sollte sich ein Vorheizen des Backofens als erforder lich
erweisen, wie bei Hefeteigen usw., dann empfiehlt sich
der Einsatz der Funktion „Statischer Backofen“, da auf
dieser Einstellung die gewünschte Temperatur in kürzester Zeit erreicht wird. Nach Ab lauf der V orheizzeit, angezeigt durch Erlöschen der roten Kontrollleuchte „I“, wählen Sie die jeweils geeignetste Garfunktion.
Fisch und Fleisch
Für Geflügel und Fisch stellen Sie eine Temperatur von
180 °C - 200 °C ein.
Für Rinderbraten, der außen gut angebraten, innen jedoch saftig bleiben soll, empfiehlt es sich, das Fleisch bei
hoher Temperatur (200°C-220°C) rasch anzubraten, um
dann auf eine niedrigere Temperatur überzugehen.
Als Richtlinie gilt: je größer der Braten, desto niedriger die
Temperatur und um so länger die Bratzeit. Legen Sie den
Braten in die Mitte auf den Rost und schieben Sie die
Fettpfanne unter den Rost, um das abtropfende Fett aufzufangen.
Den Rost so einschieben, daß sich der Braten auf der
mittleren Einschubhöhe befindet. Wird mehr Unterhitze
gewünscht, muß der Braten auf eine niedrigere Ebene
eingeschoben werden. Belegen Sie das Fleisch (insbesondere bei Entenbraten und Wild) mit Speckscheiben,
das garantiert besonders schmackhafte Braten, und schieben Sie den Braten so ein, dass er möglichst viel Oberhitze bekommt.
Backen
Bevor Sie Kuchen in den Backofen geben, ist der Backofen stets vorzuheizen. Um zu vermeiden, dass der Kuchen zusammenfällt, sollte die Backof entür während des
Backens nicht geöffnet werden. Was tun wenn:
Der Kuchen zu trocken ist ?
Das nächste Mal stellen Sie eine um 10°C höh ere
Temperatur ein und ver kürzen Sie die B ackz eit.
Der Kuchen zusammenfällt ?
Verwenden Sie wenige r Flüssi gkeit od er st ellen Si e
eine um 10°C niedrigere Temper atur ein .
Der Kuchen an der Oberseite zu dunkel ist ?
Wählen Sie eine niedr igere Ein schubh öhe, eine
niedrigere Temperatur u nd verlän gern Sie di e
Backzeit.
Der Kuchen außen gut gebacken aber innen noch
klebrig ist ?
Verwenden Sie wenige r Flüssi gkeit, reduz ieren Sie
die Temperatur, verlänge rn Sie die Backz eit.
Der Kuchen sich nicht aus der Form löst ?
Fetten Sie die Kuchenform gut ein un d bestäuben S ie
sie mit etwas Mehl oder lege n Sie Bac kpapi er in die
Form.
Gebrauch des Grills
Bei Einsatz der Funktion d “grill” sollte das Grillgut auf
die Mitte des Rostes (3. oder 4. Einschubhöhe v on unten)
gelegt werden, da auf dieser Einstellung nur der mittlere
Teil des oberen Heizwiderstandes eingeschaltet ist.
V erwenden Sie die 1. Einschubhöhe nur für die Fettpf anne,
die Sie zum Auffangen des abtropfenden Fettes bzw.
Fleischsaftes unter das Grillgut schieben.
Bei Einsatz dieser Funktion sollte der Thermostat auf die
höchste Stufe eingestellt werden. Dies bedeutet jedoch
nicht, dass, falls erforderlich, nicht auch niedrigere Temperaturen eingestellt werden können. Drehen Sie den
Thermostaten ganz einfach auf die gewünschte Temperatur.
Wichtig: Grillen Sie bei geschlossener Backofentür,
dadurch erzielen Sie nicht nur optimale Ergebnisse, sondern sparen auch Energie (ca. 10%).
Die besten Resultate erzielen Sie durch Einschieben
des Grillrostes auf die unteren Führungen (siehe Tabelle) und schieben Sie die Fettpfanne unter das Grillgut (unterste Führung), um abtropfendes Fett aufzufangen und Rauchbildung zu vermeiden.
59
Page 59

Zu kochende Gerichte Gewicht
(Kg)
Teigwaren
Lasagne 2,5 3 210 - 75-80
Cannelloni 2,5 3 210 - 75-80
Bandnudeln 2,5 3 210 - 75-80
Fleisch
Kalb 1, 7 3 220 - 85-90
Huhn 1,5 3 220 - 110-115
Trufhahn 3,0 3 220-Max - 95-100
Ente 1,8 3 220 - 120 -125
Kaninchen 2,0 3 220 - 105-110
Schwein 2,1 3 220 - 100-110
Lamm 1,8 3 220 - 90-95
Fisch
Makrelen 1,1 3 210-230 - 55-60
Zahnbrassen 1,5 3 210-230 - 60-65
Forelle in Folie 1,0 3 210 -230 - 40- 45
Pizza
Pizza "Napoli" 1,0 3 Max 15 30-35
Gebäck
Kekse 0,5 3 180 15 30-35
Mürbeteigkuchen 1,1 3 180 15 30-35
Schokoladenkuche n 1,0 3 200 15 45-50
Hefekuchen 1,0 3 200 15 50-55
Anmerkung:
werden können.
Bei den angegebenen Garz eiten h andelt es s ich um Ric htwert e, die je nach Ges chmack geändert
Kochstellung
Etagen von unten
Thermo-stats-
tellung
(°C)
Ankochzeit (min) Kochzeiten
(min)
60
Page 60

Die Sicherheit - Eine gute Gewohnheit
Um die Leistungsfähigkeit und Sicherheit dieses Gerätes zu gewährleisten, bitte f olgendes beachten:
• wenden Sie sich ausschließlich an unsere anerkannten Kundendienst-Zentren
• verlangen Sie, dass nur Original-Ersatzteile verwendet werden.
• Bedienen Sie sich zur Positionsveränderung des
Geräts stets der an den Seiten des Ofens
eingekerbten Griffe. Sie vermeiden auf diese W eise
Schäden an Personen oder am Gerät selbst.
• Das Gerät ist für den Einsatz im privaten Haushalt bestimmt; seine Eigenschaften dürfen nicht verändert
werden.
• Die Anweisungen gelten nur für die Bestimmungsländer, deren Symbole im Handb uch und auf dem Typenschild angegeben sind.
• Die elektrische Sicherheit dieses Gerätes wird nur dann
gewährleistet, wenn es sachgemäß und gemäß den
einschlägigen Sicherheitsvorschriften an eine leistungsfähige Erdungsanlage angeschlossen wird.
• Bei in Betrieb befindlichem Gerät werden die
Heizelemente und einige Ofentürteile sehr heiß.
Vermeiden Sie demnach, diese zu berühren und
halten Sie Kinder vom Ofen fern.
Folgende Gefahrenquellen sollten für Kinder und
unfähige Personen nicht zugänglich sein:
- die Bedienungselemente und das Gerät im allgemeinen;
- die V erpackung (Plastikbeutel, Nägel us w.)
- das Gerät während des Gebrauchs und auch sofort
nach dem Gebrauch, da es sehr heiß werden kann;
- das Altgerät (bei einem solchen muss auch dafür gesorgt werden, dass keines seiner Bestandteile mehr
eine Gefahrenquelle darstellen kann).
Vermeiden Sie bitte:
- das Gerät mit feuchten Körperteilen zu berühren;
- das Gerät barfuß zu benutzen;
- den Stecker am Kabel oder am Gerät selbst aus der
Steckdose zu ziehen;
- unsachgemäße und demnach gefährliche Eingriffe;
- die Be- und Entlüftungsschlitze zu verstopfen;
- dass das Kabel kleiner Elektrogeräte mit heißen Teilen des Backof ens in Berührung kommt;
- das Gerät der Witterung (Regen, Sonne usw .) auszusetzen;
- den Backofen als Lagerungsstätte zu verwenden;
- den Gebrauch brennbarer Flüssigkeiten in seiner Nähe;
- den Einsatz von Adaptern, Vielfachsteckdosen und/
oder V erlängerungen;
- Installations- und Reparationsversuche, ohne Fachpersonal anzufordern.
Fordern Sie absolut Fachper sonal an:
- für die Installation (gemäß den Anweisungen des Herstellers);
- bei Zweifeln hinsichtlich der Funktionsweise;
- wenn die Steckdose ausgetauscht werden muss, falls
diese mit dem Gerätestecker nicht übereinstimmen
sollte.
Fordern Sie den Einsatz von Technikern der vom
Hersteller anerkannten Kundendienststellen an bei:
- Zweifeln hinsichtlich der Unversehrtheit des Gerätes
nach Abnahme des Verpackungsmaterials;
- Beschädigung oder Austausch des Zufuhrkabels;
- Störungen oder schlechter Betriebsweise , und verlangen Sie den Einsatz von Original-Ersatzteilen.
Folgendes sollte befolgt werden:
- Verw enden Sie das Gerät für keine anderen Zwecke,
als zum Garen von Speisen.
- Überzeugen Sie sich nach Abnahme der V erpackung,
dass das Gerät auch nicht beschädigt wurde.
- T rennen Sie das Gerät bei Betriebsstörungen, vor der
Wartung und Reinigung vom Stromnetz.
- Schalten Sie das Gerät vom Stromnetz ab, und drehen Sie den Gashahn (wenn vorgesehen) ab, wenn
das Gerät nicht in Betrieb ist.
- Verwenden Sie Bac kof enhandschuhe.
- Fassen Sie den Griff stets in der Mitte an, da die Seitenteile durch eventuellen Heißluftaustritt äußerst heiß
sein könnten.
- Vergewissern Sie sich stets, daß sich die Reglerknöpfe
auf Position “• ”/”o” befinden, wenn sich das Gerät nicht
in Gebrauch befindet.
- Schneiden Sie bitte vor der Entsorgung Ihres Altgerätes
das (vom Stromnetz getrennte!) Elektrokabel ab .
• Der Hersteller kann für eventuelle, durch fehlerhafte
Installation, oder unsachgemäßen, falschen oder unangemessenen Gebrauch nicht haftbar gemacht werden.
61
Page 61

INSTALLIERUNG
Die Installation ist von Fachper sonal und gemäß den Anweisungen des Herstellers durchzuführen. Eine unsach-
gemäße Installation kann zu Schäden an Personen, Tieren
oder Gegenständen führen, für die der Hersteller nicht zur
Verantwortung gezogen werden kann.
Wichtig: Vor jeder Einstellung, Wartung usw . m uss der Backofen vom Stromnetz getrennt werden.
Installation der Einbaubacköfen
PUm eine einwandfreie Betriebsweise des Gerätes zu gewährleisten, muss der Umbauschrank geeignete Merkmale
aufweisen. Auf nachstehender Abbildung sind die jeweils für
den Einbau in einen Unterbau oder in einen Hochschrank
erforderlichen Abmessungen ersichtlich.
555
580
560
min
+4 -0
min
min
45
575-585
+4 -0
480
23
572
558
543545
500
39
15
595
595
NB: Installation zwecks Energiedeklaration
Um eine korrekte Zentrierung zu gewährleisten, müssen die
4 seitlich am Backofen befindlichen Klampen mit den 4 Löchern des Rahmens in Übereinstimmung gebracht werden.
Im Besonderen muss, bei einer Stärke der Umbauschrankwand von:
•
20 mm: der bewegliche Teil der Klampe abgenommen
werden (Abb. A);
•
18 mm: die erste, werkseitig bereits angebrachte Rille
genutzt werden (Abb . B);
•
16 mm: die zweite Rille genutzt w erden (Fig. C).
Abb. A Abb. B
Um eine einwandfreie Belüftung zu gewährleisten, muss die
Rückwand des Schrankumbaus abgenommen werden. Der
Backofen sollte möglichst so installiert werden, dass er auf
zwei Holzleisten aufliegt; sollte eine durchgehende Fläche
als Auflage vorhanden sein, m uss diese mit einem Ausschnitt
von mindestens 45 x 560 mm versehen werden.
45 mm.
560 mm.
Die an den Backofen angrenzenden Schrankwände müssen aus hitzebeständigem Material beschaffen sein. Dies
gilt besonders für Möbel aus Furnierholz, deren Leim einer
Temperatur von 100 °C standhalten muss.
Gemäß den Sicherheitsvorschriften muss nach erfolgtem
Einbau die Möglichkeit einer Berührung mit den Elektroteilen
ausgeschlossen sein.
Alle zum Schutz dienenden Teile müssen so befestigt werden, dass ein Entfernen derselben ohne ein Werkzeug zu
Hilfe nehmen zu müssen, nicht möglich ist.
Abb. C
Zur Befestigung des Backofens am Möbel öffnen Sie die
Backofentür und befestigen Sie ihn dann mittels 4 Holzschrauben, die in die 4 im Backofenr ahmen befindlichen Löcher einzuschrauben sind.
Elektroanschluss
Der Anschluss an das Stromnetz ist am Herd vorzunehmen.
Das Kochfeld wird mittels eines geeigneten Verbinders an
den Herd angeschlossen. Die Herde sind für den Betrieb mit
Wechselstrom mit der auf dem Typenschild angegebenen
V ersorgungsspannung und -frequenz ausgelegt.
62
Page 62

EINBAU-KOCHFELD
NL
230V 1N~
H07RN-F 3x4 CEI-UNEL 35364
1
3
2
4
5
NL2L3
L1
P
Nur bei
einigen
Modellen
WEISS ROT GELB BLAU GRÜN
EINBAUHERD
Verlegen des Netzkabels
Öffnen des Klemmengehäuses:
• Heben Sie unter Zuhilfenahme eines Schraubenziehers
die seitlichen Zungen des Klemmengehäusedeckels an.
• Ziehen Sie den Deckel des Klemmengehäuses ab.
V erlegen Sie nun das Versorgungskabel wie folgt:
• schrauben Sie die Schraube der Kabelklemme sowie die
der Kontakte aus;
Anmerkung: Die Brücken werden vom Hersteller für
einen 400V Dreiphasenanschluss (Abb. D)
vorgesehen.
• Zur Durchführung der elektrischen Anschlüsse der Abb .
F und G sind die beiden Brücken aus dem Gehäuse
zu verwenden (Abb. E - Bezugspunkt “P”).
• das Versorgungskabel in der entsprechenden
Kabelklemme befestigen und den Deck el schließen.
400V 3N~
H05RR-F 5x2.5 CEI-UNEL 35363
NL3L1L2
5
3
4
1
2
Abb. D
Abb. E
Abb. F
400V 2N~
H05RR-F 4x2.5 CEI-UNEL 35363
NL2L1
5
3
4
Abb. G
Anschluß des V ersorgungskabels an das Stromnetz
Versehen Sie das Kabel mit einem Normstecker für die auf
dem Typenschild angegebene Belastung; wird das Gerät direkt an das Stromnetz angeschlossen, ist ein allpoliger Schalter mit einer Mindestöffnung von 3 mm, der der Strombelastung und den geltenden Richtlinien entspricht,
zwischenzuschalten (der Erdleiter darf nicht durch den Schalter unterbrochen werden).
Das Versorgungskabel muß so verlaufen, daß es an keiner
Stelle eine Temperatur erreicht, die 50°C über der Raumtemperatur liegt.
Bev or der Anschluß vorgenommen wird, beachten Sie, daß:
• Die elektrische Sicherheit dieses Gerätes nur dann
gewährleistet ist, wenn es sachgemäß und gemäß den
geltenden Sicherheitsvorschriften an eine leistungsfähige
Erdungsanlage angeschlossen wird. Die Gegebenheit
dieser grundlegenden Sicherheitsanforderung muß
überprüft werden, im Zweifelsf alle ist eine Kontrolle durch
Fachpersonal anzufordern. Der Hersteller kann für
eventuelle durch F ehlen einer Erdungsanlage verursachte
Schäden nicht zur Verantwortung gezogen werden.
• Vor Anschluß des Gerätes kontrollieren Sie bitte , daß die
auf dem Typenschild (befindlich auf dem Gerät und/oder
auf der V erpackung) angegebenen Daten mit denen des
Stromversorgungsnetzes übereinstimmen.
1
2
63
Page 63

• Vergewissern Sie sich dav on, daß die elektrische Leistung
der Anlage und der Steckdosen der maximalen, auf dem
Typenschild angegebenen Höchstleistung des Gerätes
entspricht. Im Zweifelsfalle ziehen Sie bitte einen
Fachmann zu Rate .
• Falls Steckdose und Stecker des Gerätes nicht
übereinstimmen sollten, ist die Steckdose von einem
Fachmann durch eine andere geeigneten Typs zu
ersetzen. Derselbe muß bei der Gelegenheit auch
überprüfen, daß der Steckdosen-Kabelquerschnitt der
Leistungsaufnahme des Gerätes entspricht. Allgemein
Technische Eigenschaften
ist die V erwendung von Adpatern, Vielfachsteckdosen und/
oder V erlängerungen nicht ratsam. Falls deren Gebrauch
jedoch unvermeidlich sein sollte, dürfen n ur Einfach- oder
Vielfachadapter und V erlängerungen verwendet werden,
die den geltenden Sicherheitsvorschriften entsprechen;
achten Sie darauf, daß die auf dem Einf achadapter und
den V erlängerungen angegebene Stromleistungsgrenze
und die auf dem Vielfachadapter angegebene
Höchstleistungsgrenze nicht überschritten wird. Stecker
und Steckdose müssen leicht zugänglich sein.
Nutzabmessungen des Backofens:
Breite: cm 43,5
Tiefe: cm 43,5
Höhe: cm 32
Nutzvolumen des Backofens:
Liter 60
ENERGIE-ETIKETT
Richtlinie 2002/40/CE über die Etikettierung von
Elektrobacköfen
Norm EN 50304
Deklarierte Energieverbrauchsklasse Natürliche Konv ektion
Heizfunktion: Statischer
Versor gungsspannung und -frequenz:
230/400V ~ 3N 50/60Hz 8400W
7
Dieses Gerät entspricht den folgenden EGRichtlinien:
- 73/23/EWG vom19.02.73 (Niederspannung) und
nachfolgenden Änderungen;
- 89/336/EWG vom 03.05.89 (elektromagnetische
V erträglichkeit) und nachfolgenden Änderungen;
- 93/68/EWG vom 22.07.93 und nachfolgenden
Änderungen.
- 2002/96/EC
Gemäß der Europäischen Richtlinie 2002/96/EC über
Elektro- und Elektronik-Altgeräte (WEEE) dürfen
Elektrohaushalts-Altgeräte nicht über den herkömmlichen
Haushaltsmüllkreislauf entsorgt werden. Altgeräte müssen
separat gesammelt werden, um die Wiederverwertung und
das Recycling der beinhalteten Materialien zu optimieren
und die Einflüsse auf die Umwelt und die Gesundheit zu
reduzieren. Das Symbol „durchgestrichene Mülltonne“ auf
jedem Produkt erinnert Sie an Ihre Verpflichtung, dass
Elektrohaushaltsgeräte gesondert entsorgt werden
müssen.
Endverbraucher können sich an Abfallämter der
Gemeinden wenden, um mehr Informationen über die
korrekte Entsorgung ihrer Elektrohaushaltsgeräte zu
erhalten.
64
Page 64

Убт ехчбсйуфпэме рпх ерйлЭобфе Энб рспъьн Ariston, буцблЭт кбй рсбгмбфйкЬ еэкплп уфз чсЮуз. Гйб нб фп гнщсЯуефе,
кбй нб фп чсзуймпрпйеЯфе кблэфесб кбй ерЯ мбксьн, убт ухмвпхлеэпхме, рсйн чсзуймпрпйЮуефе фз ухукехЮ, нб дйбвЬуефе
рспуекфйкЬ фйт рспейдпрпйЮуейт рпх ресйЭчпнфбй уфп рбсьн егчейсЯдйп, бцпэ убт рбсЭчпхн узмбнфйкЭт хрпдеЯоейт
учефйкЬ ме фзн буцЬлейб егкбфЬуфбузт, чсЮузт кбй ухнфЮсзузт. ДйбфзсеЯуфе ме цспнфЯдб фп егчейсЯдйп бхфь гйб кЬие
меллпнфйкЮ ресйбфЭсщ бнбцпсЬ. Ехчбсйуфпэме.
Кпйфюнфбт фп брь кпнфЬ
A. Фбмрль енфплюн
B. ЛйрпухллЭкфзт Ю ерЯредп шзуЯмбфпт
C. РлЭгмб ерйрЭдпх цпэснпх
D. ЗлекфсйкЮ еуфЯб
E. ЕрйлпгЭбт лейфпхсгйюн шзуЯмбфпт
F. ЕрйлпгеЯт злекфсйкюн еуфйюн
G. ЕндейкфйкЮ лхчнЯб лейфпхсгЯбт злекфсйкюн еуфйюн
H. ПдзгпЯ плЯуизузт лйрпухллекфюн кбй рлегмЬфщн
I. ЕндейкфйкЮ лхчнЯб лейфпхсгЯбт фпх цпэснпх
(рбспэуб мьнп уе псйумЭнб мпнфЭлб) - Бн еЯнбй
бнбммЭнз деЯчней фз цЬуз иЭсмбнузт мЭчсй фзн феиеЯуб
иесмпксбуЯб
G
I
D
A
C
D
H
B
0
0
0
1
2 5
3
6
1
2 5
3
4
6
1
2 5
3
4
F
6
1
2 5
3
4
0
6
4
0
MAX
220
180
60
100
140
E
Рщт чсзуймпрпйеЯфбй
З ерйлпгЮ фщн дйбцьсщн лейфпхсгйюн рпх хрЬсчпхн уфп
цпэснп рсбгмбфпрпйеЯфбй енесгюнфбт уфб ухуфЮмбфб кбй
ьсгбнб енфплюн рпх всЯукпнфбй уфз мефюрз фзт.
РспупчЮ: Уфп рсюфп Ьнбммб, убт ухнйуфпэме нб
лейфпхсгЮуефе фп цпэснп Ьдейп гйб ресЯрпх мйуЮ юсб ме
фпн иесмпуфЬ фз уфп мЭгйуфп, кбфьрйн бнпЯофе фзн рьсфб
кбй бесЯуфе фп чюсп. З пумЮ рпх месйкЭт цпсЭт
бнбрфэууефбй кбфЬ фзн есгбуЯб бхфЮ пцеЯлефбй уфзн
еоЬфмйуз фщн пхуйюн рпх чсзуймпрпйпэнфбй гйб нб
рспуфбфеэупхн фп цпэснп уфп дйЬуфзмб рпх меуплбвеЯ
брь фзн рбсбгщгЮ фпх рспъьнфпт мЭчсй фзн егкбфЬуфбуз.
РспупчЮ: ЧсзуймпрпйеЯуфе фп рсюфп ерЯредп брь кЬфщ,
фпрпиефюнфбт фпн лйрпухллЭкфз рпх убт рбсЭчефбй гйб фз
ухллпгЮ жщмюн Ю/кбй лйрюн, мьнп уфз ресЯрфщуз шзуЯмбфпт
уфп гксйл Ю уфз упэвлб (мьнп уе псйумЭнб мпнфЭлб). Гйб фб
Ьллб шзуЯмбфб мз чсзуймпрпйеЯфе рпфЭ фп рсюфп ерЯредп
брь кЬфщ кбй мзн бкпхмрЬфе рпфЭ бнфйкеЯменб уфз вЬуз фпх
цпэснпх еню мбгейсеэефе гйбфЯ иб мрпспэубфе нб
рспкблЭуефе жзмйЭт уфп умЬлфп. Нб фпрпиефеЯфе рЬнфб фб
укеэз убт (рхсЭо, цэллб блпхмйнЯпх, клр.) уфп рлЭгмб рпх
убт рбсЭчефбй ме фз ухукехЮ кбй рпх еЯнбй фпрпиефзмЭнп
уфпхт пдзгпэт фпх цпэснпх.
П ерйлпгЭбт фпх цпэснпх (E)
ЕЯнбй з дйЬфбоз рпх ерйфсЭрей фзн ерйлпгЮ фщн дйбцьсщн
лейфпхсгйюн фпх цпэснпх кбй фзн ерйлпгЮ фзт иесмпксбуЯбт
шзуЯмбфпт фзт рлЭпн кбфЬллзлзт гйб фп шЮуймп цбгзфюн
мефбоэ екеЯнщн рпх бнбцЭспнфбй уфпн Ядйп фпн ерйлпгЭб
(мефбоэ 60°C êáé 240°C). УфсЭцпнфбт фпн ерйлпгЭб
деойьуфспцб бнЬвей фп цщт фпх цпэснпх 8 кбй фЯиенфбй уе
лейфпхсгЯб фб иесмбнфйкЬ уфпйчеЯб, ерЬнщ кбй кЬфщ
(злекфсйкЭт бнфйуфЬуейт) кбй мрпсеЯфе нб ерйлЭоефе, брь
фзн рлЮсз гкЬмб фймюн рпх бнбцЭспнфбй рбсбкЬфщ, фзн
рлЭпн кбфЬллзлз иесмпксбуЯб гйб фб рспт шЮуймп
цбгзфЬ. Бхфь ерйфхгчЬнефбй кЬнпнфбт нб ухмрЭуей з
ерйихмзфЮ Эндейоз ме фз уфбиесЮ Эндейоз ерЯ фпх фбмрль
(Уфбфйкьт цпэснпт).
60 • 100 • 140 • 180 • 220 Max
80 120 160 200 240
З феиеЯуб иесмпксбуЯб ерйфхгчЬнефбй бхфьмбфб кбй
дйбфзсеЯфбй уфбиесЮ брь фп ьсгбнп елЭгчпх (фп
иесмпуфЬфз) рпх дйехиэнефбй брь фпн ерйлпгЭб.
ИЭуз ЕрЬнщ БнфЯуфбузт c
УфсЭцпнфбт фпн ерйлпгЭб мЭчсй фз иЭуз бхфЮ бнЬвей фп цщт
фпх цпэснпх кбй фЯиефбй уе лейфпхсгЯб з ерЬнщ бнфЯуфбуз.
65
Page 65

Фп цщт фпх цпэснпх
БнЬвей уфсЭцпнфбт фпн ерйлпгЭб E уфп уэмвплп 8.
ЦщфЯжефбй п цпэснпт кбй рбсбмЭней бнбммЭнп еньущ еЯнбй
уе лейфпхсгЯб Энб прпйпдЮрпфе злекфсйкь иесмбнфйкь
уфпйчеЯп фпх цпэснпх.
Пй ерйлпгеЯт енфплюн фщн злекфсйкюн еуфйюн фзт
ерйцЬнейбт мбгейсЭмбфпт (F)
Oй кпхжЯнет мрпсеЯ нб еЯнбй ецпдйбумЭнет ме злекфсйкЭт
еуфЯет кбнпнйкЭт, фбчеЯет кбй бхфьмбфет уе дйЬцпспхт
ухндхбумпэт (пй фбчеЯет еуфЯет дйбксЯнпнфбй брь фйт Ьллет
брь фзн рбспхуЯб мйЬт кьккйнзт уцсбгЯдбт уфп кЭнфсп).
Гйб нб брпцехчиеЯ з дйбурпсЬ иесмьфзфбт кбй жзмйЭт уфйт
еуфЯет еЯнбй кбль нб чсзуймпрпйеЯфе укеэз ме вЬуз ерЯредз
кбй дйЬмефсп ьчй мйксьфесз брь екеЯнз фзт еуфЯбт
Уфпн рЯнбкб бнбцЭспнфбй пй бнфйуфпйчЯет мефбоэ фщн иЭуещн
фщн ерйлпгЭщн кбй фзт чсЮузт гйб фзн прпЯб пй еуфЯет
рспфеЯнпнфбй.
Qsh Esta kanonik¾ ¾ tacea
0
1
SbhstÒ
Y»simo cortarikèn, yarikèn
Ендейкфйкь цщфЬкй лейфпхсгЯбт злекфсйкюн еуфйюн
(G)
ЕЯнбй бнбммЭнп ьфбн Эчей феиеЯ уе лейфпхсгЯб Энб
прпйпдЮрпфе злекфсйкь иесмбнфйкь уфпйчеЯп фзт ерйцЬнейбт
мбгейсЭмбфпт.
ЧсЮуз фзт ерйцЬнейбт
Гйб нб Эчефе кблэфесб брпфелЭумбфб брь фз ерйцЬнейб
мбгейсЭмбфпт хрЬсчпхн псйумЭнб вбуйкЬ фечнЬумбфб рпх
рсЭрей нб ецбсмьуефе кбфЬ фп шЮуймп Ю фзн рспефпймбуЯб
фщн цбгзфюн.
· Нб чсзуймпрпйеЯфе кбфубсьлет ме ерЯредз вЬуз гйб
нб еЯнбй уЯгпхсз з ербцЮ фзт кбфубсьлбт уфз жюнз
шзуЯмбфпт.
· Нб чсзуймпрпйеЯфе кбфубсьлет фЭфпйбт дйбмЭфспх рпх
нб кблэрфеефбй фелеЯщт з еуфЯб мбгейсЭмбфпт, Эфуй юуфе
нб еобуцблЯжефбй з чсЮуз ьлзт фзт дйбиЭуймзт
иесмьфзфбт.
2
3
Pat£tej ston atmÒ, minstrej, fasÒlia,
rebÚqia
Suncish yhsmatoj meg£lwn trofmwn,
minstrej
4 Y»simo (mtrio)
5 Y»simo (dunatÒ)
6
Rodokokknisma h epteuxh brasmoÚ se
sÚntomo crÒno
Рсйн фз чсзуймпрпйЮуефе гйб рсюфз цпсЬ, рсЭрей
нб иесмЬнефе фйт еуфЯет уфз мЭгйуфз иесмпксбуЯб
гйб ресЯрпх 4 лерфЬ, чщсЯт кбфубсьлб. КбфЬ фзн
бсчйкЮ бхфЮ цЬуз, з рспуфбфехфйкЮ ерЭндхуз
уклзсбЯней кбй брпкфЬ фзн мЭгйуфз бнфЯуфбуз.
· ВевбйщиеЯфе ьфй з вЬуз фщн кбфубсплюн еЯнбй рЬнфб
уфегнЮ кбй кбибсЮ, гйб мйб кблэфесз ербцЮ кбй
мегблэфесз дйЬскейб жщЮт фщн еуфйюн кбй фщн Ядйщн фщн
кбфубсплюн.
66
Page 66

Рщт нб фп дйбфзсеЯфе уе цьсмб
Рсйн брь кЬие енЭсгейб нб брпухндЭефе фз ухукехЮ брь фз
злекфсйкЮ фспцпдпуЯб.
Гйб мйб мегЬлз дйЬскейб жщЮт фпх цпэснпх еЯнбй
брбсбЯфзфп нб екфелеЯфе ухчнЬ мйб учплбуфйкЮ генйкЮ
кбибсйьфзфб, лбмвЬнпнфбт хрьшз ьфй:
Гйб фпн кбибсйумь мз чсзуймпрпйеЯфе ухукехЭт
бфмпэ.
б еощфесйкЬ ерйумблфщмЭнб Ю бнпоеЯдщфб мЭсз рлЭпнфбй ме
члйбсь несь чщсЯт фз чсЮуз брпохуфйкюн кбй дйбвсщфйкюн
пхуйюн рпх иб мрпспэубн нб фб кбфбуфсЭшпхн. Фп бнпоеЯдщфп
бфуЬлй мрпсеЯ нб рбсбмеЯней лекйбумЭнп. Бн пй лекЭдет еЯнбй
дэукплпй гйб нб цэгпхн чсзуймпрпйЮуфе ейдйкЬ рспъьнфб фпх
емрпсЯпхУбт ухнйуфпэме нб оерлЭнефе ме Ьципнп несь кбй нб
уфегнюнефе мефЬ фпн кбибсйумь.
фп еущфесйкь фпх цпэснпх кбибсЯжефбй, кбфЬ рспфЯмзуз кЬие
цпсЬ мефЬ фз чсЮуз, ьфбн еЯнбй бкьмз члйбсьт,
чсзуймпрпйюнфбт жеуфь несь кбй брпссхрбнфйкь, оерлЭнпнфбт
кбй уфегнюнпнфбт кбфьрйн рспуекфйкЬ ме Энб брбль рбнЯ.
Брпцеэгефе фз чсЮуз брпохуфйкюн брпссхрбнфйкюн (гйб
рбсЬдейгмб фйт укьнет, клр.) кбй фб брпохуфйкЬ
уцпхггбсЬкйб гйб рйЬфб Ю поЭб (гйб рбсЬдейгмб бцблбфйкЬ,
клр...), дйьфй иб мрпспэубн нб кбфбуфсЭшпхн фп умЬлфп. Бн
з всщмйЬ еЯнбй йдйбЯфесб бниекфйкЮ, чсзуймпрпйЮуфе Энб ейдйкь
рспъьн гйб кбибсйумь цпэснпх, уэмцщнб ме фйт пдзгЯет рпх
бнбгсЬцпнфбй уфзн ухукехбуЯб.
бн чсзуймпрпйеЯфе ерЯ мбксьн фпн цпэснп иб мрпспэуе нб
учзмбфйуфеЯ ухмрэкнщмб. УкпхрЯуфе фп ме Энб мблбкь рбнЯ.
гэсщ брь фп Ьнпйгмб фпх цпэснпх, Энб лЬуфйчп дйбуцблЯжей
фз ущуфЮ фпх лейфпхсгЯб. Нб елЭгчефе, лпйрьн, ресйпдйкЬ
фзн кбфЬуфбуз фзт фуймпэчбт бхфЮт. Бн чсейбуфеЯ кбибсЯуфе
фп брпцеэгпнфбт фз чсЮуз рспъьнфщн Ю бнфйкеймЭнщн
брпохуфйкюн. Бн убт рспкэшей цибсмЭнп брехихниеЯфе уфп
рлзуйЭуфесп КЭнфсп ФечнйкЮт ХрпуфЮсйозт. УхнйуфЬфбй нб мз
чсзуймпрпйеЯфе фпн цпэснп мЭчсй фзн ерйукехЮ фпх.
мзн нфэнефе рпфЭ фп цьнфп фпх цпэснпх ме блпхмйньчбсфп,
дйьфй з ухнербгьменз ухууюсехуз фзт иесмьфзфбт иб
дйбкэвехе фп шЮуймп кбфбуфсЭцпнфбт ерЯузт кбй фп умЬлфп.
пй злекфсйкЭт еуфЯет кбибсЯжпнфбй ме Энб рбнЯ хгсь кбй
блеЯцпнфбй ме лЯгп лЬдй ьуп еЯнбй бкьмз члйбсЭт.
кбибсЯуфе фп фжЬмй фзт рьсфбт фпх цпэснпх
чсзуймпрпйюнфбт рспъьнфб кбй уцпхггбсЬкйб мз
брпохуфйкЬ кбй уфегнюуфе ме Энб мблбкь рбнЯ.
Рщт бцбйсеЯфбй з рьсфб фпх цпэснпх
Гйб Энб учплбуфйкь кбибсйумь мрпсеЯфе нб бцбйсЭуефе фзн рьсфб
фпх цпэснпх. РспчщсЮуфе ме фпн бкьлпхип фсьрп:
бнпЯофе фелеЯщт фзн рьсфб
бнбузкюуфе кбй уфсЭшфе фпхт мпчлпэт рпх всЯукпнфбй уфпхт
дэп менфеуЭдет
рйЬуфе фзн рьсфб брь фб дэп еощфесйкЬ рлехсЬ, обнбклеЯуфе
фз бсгЬ бллЬ ьчй фелеЯщт
фсбвЮофе фзн рьсфб рспт фп мЭспт убт вгЬжпнфЬт фзн брь
ôçí Ýäñá ôçò.
ОбнбмпнфЬсефе фзн рьсфб бкплпхиюнфбт фзн рбсбрЬнщ
дйбдйкбуЯб бллЬ бнфЯуфспцб.
123
БнфйкбфЬуфбуз фзт лхчнЯбт уфп дйбмЭсйумб цпэснпх
Дйбкьшфе фзн фспцпдпуЯб фпх цпэснпх мЭущ фпх рплхрплйкпэ
дйбкьрфз рпх чсзуймпрпйеЯфбй гйб фз уэндеуз фпх цпэснпх
уфзн злекфсйкЮ егкбфЬуфбуз, Ю вгЬлфе фп вэумб, бн еЯнбйм
рспувЬуймп.
Оевйдюуфе фп гхЬлйнп кЬлхммб фзт лхчнЯбт.
Оевйдюуфе фзн лхчнЯб кбй бнфйкбфбуфЮуфе фз ме мЯб рпх еЯнбй
бниекфйкЮ уе хшзлЭт иесмпксбуЯет (300°C) ме фб рбсбкЬфщ
чбсбкфзсйуфйкЬ:
- ÔÜóç 230/240 V
- Йучэт 25W
- Уэндеуз E14
ОбнбмпнфЬсефе фп гхЬлйнп кЬлхммб кбй ербнбфспцпдпфЮуфе
фпн цпэснп ме сеэмб.
67
Page 67

РсбкфйкЭт ухмвпхлЭт гйб фп шЮуймп
Уфп шЮуймп уфп цпэснп чсзуймпрпйеЯфе Энб мьнп
лйрпухллЭкфз Ю рлЭгмб фз цпсЬ. Бхфь фпрпиефеЯфбй уфпхт
кЬфщ Ю ерЬнщ пдзгпэт бнЬлпгб бн фп шЮуймп брбйфеЯ
ресйууьфесз иесмьфзфб брь кЬфщ Ю брь рЬнщ.
РспиЭсмбнуз
Уе ресЯрфщуз рпх еЯнбй бнбгкбЯп нб рспиесмЬнефе фпн
цпэснп, уе генйкЭт гсбммЭт ьлет фйт цпсЭт рпх
мбгейсеэпнфбй цбгзфЬ ме мбгйЬ, еЯнбй иемйфь нб
чсзуймпрпйеЯфе фз лейфпхсгЯб фпх уфбфйкпэ цпэснпх рпх
ерйфсЭрей фзн ерЯфехоз фзт иесмпксбуЯбт уе уэнфпмп чсьнп.
Уфп фЭлпт фзт рспиЭсмбнузт, рпх хрпдейкнэефбй брь фп
увЮуймп фпх кьккйнпх ендейкфйкпэ цщфьт I, ерйлЭофе фзн
рлЭпн ендедейгмЭнз лейфпхсгЯб шзуЯмбфпт.
ШЮуймп кесбфйкюн кбй шбсйкюн
Гйб фб лехкЬ ксЭбфб, фб рпхлесйкЬ кбй фб шбсйкЬ
чсзуймпрпйеЯуфе иесмпксбуЯет da 180 °C a 200 °C.
Гйб фб кьккйнб ксЭбфб рпх иЭлефе нб еЯнбй кблпшзмЭнб
еощфесйкЬ дйбфзсюнфбт уфп еущфесйкь фщн фп жпхмЯ фпхт
еЯнбй кбль нб оекйнЬфе ме мЯб бсчйкЮ иесмпксбуЯб хшзлЮ
(200°C-220°C) гйб мйксь чспнйкь дйЬуфзмб, кбй кбфьрйн
чбмзлюуфе фзн.
ГенйкЬ ьуп рйп пгкюдет еЯнбй фп шзфь фьуп чбмзльфесз
рсЭрей нб еЯнбй з иесмпксбуЯб кбй рйп рбсбфефбмЭнпт п
чсьнпт шзуЯмбфпт. ФпрпиефеЯуфе фп рспт шЮуймп ксЭбт
уфп кЭнфсп фпх гксйл кбй вЬлфе кЬфщ брь фп гксйл фп
фбшЯ ресйухллпгЮт лЯрпхт (лйрпухллЭкфзт).
ФпрпиефеЯуфе фп рлЭгмб Эфуй юуфе з фспцЮ нб всЯукефбй
уфп кЭнфсп фпх цпэснпх. Бн ерйихмеЯфе ресйууьфесз
иесмьфзфб брь кЬфщ, чсзуймпрпйеЯуфе фб чбмзльфесб
ерЯредб. Гйб нб рефэчефе шзфЬ еэгехуфб (ейдйкЬ рЬрйб
кбй кхнЮгй) ресйфхлЯофе фп ксЭбт ме лбсдЯ Ю чпйсйнь лЯрпт
кбй фпрпиефеЯуфе фп Эфуй юуфе нб всЯукефбй уфп рЬнщ
мЭспт.
ШЮуймп фщн глхкюн
Уфп шЮуймп фщн глхкюн
кбй, гйб нб брпцэгефе фп кЬийумб фпх глхкпэ, мзн бнпЯгефе
фзн рьсфб кбфЬ фп шЮуймп. ГенйкЬ:
GlukÒ polÚ xerÒ
Thn epÒmenh for£ qste mi£ qermokrasa kat£ 10°C
uyhlÒterh kai meièste to crÒno yhsmatoj.
нб рспиесмбЯнефе рЬнфб фпн цпэснп
GlukÒ pou "kaqzei"
Crhsimopoiete ligÒtero ugrÒ kai camhlèste th
qermokrasa kat£
GlukÒ skoÚro epifaneiak£
Topoqeteste to camhlètera, qste mia qermokrasa
camhlÒterh kai paratenete to y»simo..
KalÒ exwterikÒ y»simo, ma eswterik£ koll£ei
Crhsimopoieste ligÒtero ugrÒ, meièste th
qermokrasa, auxeste to crÒno yhsmatoj
Фп глхкь ден оекпллЬей брь фз цьсмб
БлеЯшфе кблЬ фз цьсмб кбй блехсюуфе фз Ю
чсзуймпрпйЮуфе чбсфЯ цпэснпх
ЧсЮуз фпх гксйл
ЧсзуймпрпйеЯфе фз лейфпхсгЯб grill фпрпиефюнфбт фп
фсьцймп уфп кЭнфсп фпх рлЭгмбфпт (уфп 3° Ю 4° ерЯредп
оекйнюнфбт брь кЬфщ), дедпмЭнпх ьфй рбсбмЭней бнбммЭнп
мьнп фп кенфсйкь мЭспт фзт ерЬнщ бнфЯуфбузт.
ЧсзуймпрпйеЯфе фп рсюфп ерЯредп брь кЬфщ, фпрпиефюнфбт
фпн лйрпухллЭкфз рпх убт рбсЭчефбй гйб фб жпхмйЬ Ю/кбй
ôá ëßðç.
¼фбн чсзуймпрпйеЯфе фз лейфпхсгЯб бхфЮ, ухнйуфпэме нб
иЭфефе фпн иесмпуфЬфз уфп мЭгйуфп. Бхфь, ьмщт, ден узмбЯней
ьфй ден мрпспэн нб чсзуймпрпйзипэн чбмзльфесет
иесмпксбуЯет, брлЬ схимЯжпнфбт фпн ерйлпгЭб фпх
иесмпуфЬфз уфзн ерйихмзфЮ иесмпксбуЯб.
Узмбнфйкь: нб рсбгмбфпрпйеЯфе фп шЮуймп уфп гксйл
ме фзн рьсфб фпх цпэснпх клейуфЮ, êé áõôü ãéá íá
ерйфхгчЬнефе мбжЯ ме фб кблэфесб брпфелЭумбфб мйб
бйуизфЮ еопйкпньмзуз енЭсгейбт (10% ресЯрпх).
Щуфьуп фб кблэфесб брпфелЭумбфб, ме фз чсЮуз фщн
лейфпхсгйюн фпх гксйл, ерйфхгчЬнпнфбй
фпрпиефюнфбт фп рлЭгмб уфб фелехфбЯб ерЯредб
оекйнюнфбт брь кЬфщ (влЭре рЯнбкб шзуЯмбфпт) кбй
кбфьрйн, гйб нб ухллЭоефе фб лЯрз кбй фзн брпцхгЮ
рбсбгщгЮт кЬрнбт, вЬлфе фпн лйрпухллЭкфз рпх
убт рбсЭчефбй уфп рсюфп ерЯредп брь кЬфщ.
10°C.
68
Page 68

Trof¾ gi£ magerema B£roj Qsh yhsmatoj
eppeda apÕ
k£tw
(Kg.) (°C) (min.) (min.)
Zumarik£
Qermokrasa CrÕnoj
proqrmanshj
CrÕnojyhs
matoj
Laz£nia
KanelÕnia
Taliatlej
Kreatik£
BwdinÕ
KotÕpoulo
GalopoÝla
P£pia
Kounli
CoirinÕ
Arn£ki
Yarik£
Skoumpri£
Sunagrdej
P strofa se ladÕcarto
Ptsej kai Kik
Napolet£na
MpiskÕtta
Krost£ta
Kik sokol£taj
Kik zÝmhj
Shme wsh: oi crÕnoi yhs matoj enai kaqar£ endeiktiko kai mporoÝn na all£zoun an£loga me tij proswpik j
protim¾seij.
2,5
2,5
2,5
1,7
1,5
3,0
1,8
2,0
2,1
1,8
1,1
1,5
1,0
1,0
0,5
1,1
1,0
1,0
3
3
3
3
3
3
3
3
3
3
3
3
3
3
3
3
3
3
210
210
210
220
220
220-Max
220
220
220
220
210-220
210-220
210-220
Max
180
180
200
200
15
15
15
15
15
-
-
-
-
-
-
-
-
-
-
-
-
75-80
75-80
75-80
85-90
110-115
95-100
120-125
105-110
100-110
90-95
55-60
60-65
40-45
30-35
30-35
30-35
45-50
50-55
69
Page 69

З буцЬлейб мйб кблЮ ухнЮиейб
Гйб нб еобуцблЯуефе фзн брпфелеумбфйкьфзфб кбй фзн буцЬлейб фзт ухукехЮт бхфЮт:
брехиэнеуфе брпклейуфйкЬ уе еопхуйпдпфзмЭнб кЭнфсб фечнйкЮт хрпуфЮсйозт
нб жзфЬфе рЬнфб фз чсЮуз бхиенфйкюн бнфбллбкфйкюн
Гйб фз мефбкЯнзуз фзт ухукехЮт, кбй гйб нб
брпупвзипэн жзмйЭт уе Ьфпмб кбй уфп Ядйп фп
рспъьн, нб чсзуймпрпйеЯфе рЬнфб фйт бнфЯуфпйчет
лбвЭт рпх хрЬсчпхн уфб рлбънЬ фпх цпэснпх.
H ухукехЮ бхфЮ учедйЬуфзке гйб мз ербггелмбфйкЮ
чсЮуз, уфп еущфесйкь кбфпйкЯбт кбй фб чбсбкфзсйуфйкЬ
фзт ден рсЭрей нб фспрпрпйпэнфбй.
Пй пдзгЯет бхфЭт йучэпхн мьнп гйб фйт чюсет рсппсйумпэ
фб уэмвплб фщн прпЯщн брейкпнЯжпнфбй уфп егчейсЯдйп
кбй уфзн фбмрелЯфуб мзфсюпх.
З злекфсйкЮ буцЬлейб фзт ухукехЮт бхфЮт
дйбуцблЯжефбй мьнп ьфбн з Ядйб еЯнбй ущуфЬ ухндедемЭнз
ме мйЬ брпфелеумбфйкЮ егкбфЬуфбуз геЯщузт ьрщт
рспвлЭрефбй брь фпхт йучэпнфет кбнпнйумпэт
буцЬлейбт .
КбфЬ фз чсЮуз фзт ухукехЮт фб иесмбнфйкЬ
уфпйчеЯб кбй псйумЭнб мЭсз фзт рьсфбт фпх
цпэснпх иесмбЯнпнфбй рплэ. РспуЭофе рплэ нб
мз фб бггЯоефе кбй ксбфЬфе фб рбйдйЬ уе брьуфбуз.
ЕрейдЮ рськейфбй гйб рзгЭт иесмьфзфбт, мзн
ерйфсЭрефе уе рбйдйЬ Ю бнЯкбнб Ьфпмб нб Эсипхн уе
ербцЮ ме:
- фпхт енфплеЯт кбй фз ухукехЮ генйкЬ
- фйт ухукехбуЯет (убкпэлет, рплхуфхсьл, кбсцйЬ, клр.)
- фз ухукехЮ, кбфЬ кбй мефЬ фз лейфпхсгЯб фпх цпэснпх кбй
фпх гксйл, дедпмЭнзт фзт хресиЭсмбнуЮт фпхт
- фзн уе бчсзуЯб ухукехЮ (уфзн ресЯрфщуз бхфЮ кбиЯуфбнфбй
бвлбвЮ фб мЭсз рпх иб мрпспэубн нб еЯнбй ерйкЯндхнб).
Брпцеэгпнфбй пй бкьлпхиет енЭсгейет:
- нб бггЯжефе фз ухукехЮ ме всегмЭнб мЭсз фпх уюмбфпт
- нб фз чсзуймпрпйеЯфе ме гхмнЬ рьдйб
- нб фсбвЬфе фз ухукехЮ Ю фп кблюдйп фспцпдпуЯбт гйб
нб фзн брпухндЭуефе брь фзн рсЯжб сеэмбфпт
- Ьукпрет кбй ерйкЯндхнет енЭсгейет
- нб впхлюнпхн фб бнпЯгмбфб бесйумпэ Ю брпвплЮт фзт
иесмьфзфбт
- нб кбфблЮгей фп кблюдйп фспцпдпуЯбт мйксюн злекфсйкюн
ухукехюн уе иесмЬ мЭсз фзт ухукехЮт
- мзн фзн бцЮнефе екфеиеймЭнз уе бфмпуцбйсйкпэт
рбсЬгпнфет (вспчЮ, Юлйп, клр.)
- з чсЮуз фпх цпэснпх щт брпизкехфйкпэ чюспх
- з чсЮуз еэцлекфщн хгсюн рлзуЯпн фзт ухукехЮт
- з чсЮуз рспубсмпуфйкюн, рплэрсйжщн Ю/кбй
рспекфЬуещн
- рспурЬиейет егкбфЬуфбузт Ю ерйукехЮт чщсЯт фзн
ерЭмвбуз ейдйкехмЭнпх рспущрйкпэ.
РсЭрей прщудЮрпфе нб брехиэнеуфе уе ейдйкехмЭнп
рспущрйкь уфйт бкьлпхиет ресйрфюуейт:
- егкбфЬуфбуз (уэмцщнб ме фйт пдзгЯет фпх кбфбукехбуфЮ)
- ьфбн бмцйвЬллефе гйб фз лейфпхсгЯб
- бнфйкбфЬуфбуз фзт рсЯжбт уе ресЯрфщуз бухмвбфьфзфбт
ме фп вэумб фзт ухукехЮт.
РсЭрей нб брехиэнеуфе уфб еопхуйпдпфзмЭнб кЭнфсб
фечнйкЮт хрпуфЮсйозт уфйт бкьлпхиет ресйрфюуейт:
- бн бмцйвЬллефе гйб фзн бкесбйьфзфб фзт ухукехЮт бцпэ
Эчефе бцбйсЭуей фз ухукехбуЯб
- жзмйЬ Ю бнфйкбфЬуфбуз фпх кблщдЯпх фспцпдпуЯбт
- уе ресЯрфщуз влЬвзт Ю кбкЮт лейфпхсгЯбт, жзфюнфбт
бхиенфйкЬ бнфбллбкфйкЬ.
ЕЯнбй укьрймп нб екфелеЯфе фйт бкьлпхиет дйесгбуЯет:
- мьнп фп шЮуймп фщн цбгзфюн, брпцеэгпнфбт Ьллет
енЭсгейет
- нб елЭгчефе фзн бкесбйьфзфб бцпэ бцбйсЭуефе фз
ухукехбуЯб
- нб брпухндЭефе фз ухукехЮ брь фп злекфсйкь дЯкфхп уе
ресЯрфщуз кбкЮт лейфпхсгЯбт кбй рсйн брь прпйбдЮрпфе
енЭсгейб кбибсйумпэ Ю ухнфЮсзузт
- ьфбн ден чсзуймпрпйеЯфбй, нб брпухндЭефе фз ухукехЮ брь
фп злекфсйь дЯкфхп кбй нб клеЯнефе фпн кспхнь фпх бесЯпх
(бн рспвлЭрефбй)
- нб чсзуймпрпйеЯфе гЬнфйб гйб фп цпэснп гйб нб ейуЬгефе Ю
нб вгЬжефе укеэз
- нб рйЬнефе рЬнфб фз лбвЮ фпх цпэснпх уфп кЭнфсп,
дедпмЭнпх ьфй уфп Ьксп иб мрпспэуе нб еЯнбй рйп иесмЮ
ео бйфЯбт фзт еоьдпх иесмпэ бЭсб
- нб елЭгчефе рЬнфб бн пй ерйлпгеЯт еЯнбй уфз иЭуз /o
ьфбн з ухукехЮ ден чсзуймпрпйеЯфбй
- нб кьвефе фп кблюдйп фспцпдпуЯбт бцпэ фп Эчефе
брпухндЭуей брь фп злекфсйкь дЯкфхп ьфбн брпцбуЯжефе
нб мз чсзуймпрпйЮуефе рйб фз ухукехЮ.
П кбфбукехбуфЮт ден мрпсеЯ нб иещсзиеЯ хреэихнпт гйб
ендечьменет жзмйЭт рспесчьменет брь: лбнибумЭнз
егкбфЬуфбуз, чсЮуейт бльгйуфет, лбнибумЭнет кбй
Ьукпрет.
70
Page 70

ЕгкбфЬуфбуз
З егкбфЬуфбуз рсЭрей нб рсбгмбфпрпйзиеЯ уэмцщнб
ме фйт пдзгЯет фпх кбфбукехбуфЮ брь рспущрйкь
ербггелмбфйкЬ ейдйкехмЭнп. Мйб лбнибумЭнз егкбфЬуфбуз
мрпсеЯ нб рспоенЮуей жзмйЭт уе рсьущрб, жюб Ю рсЬгмбфб,
Энбнфй фщн прпЯщн п кбфбукехбуфЮт ден мрпсеЯ нб иещсзиеЯ
хреэихнпт.
Ó
змбнфйкь: прпйбдЮрпфе ерЭмвбуз сэимйузт, ухнфЮсзузт клр.
рсЭрей нб екфелеЯфбй ме фпн цпэснп брпухндедемЭнп злекфсйкЬ.
ЕгкбфЬуфбуз фщн енфпйчйжьменщн цпэснщн
Гйб нб дйбуцблЯуефе мйб кблЮ лейфпхсгЯб фзт енфпйчйжьмензт
ухукехЮт рсЭрей фп Эрйрлп нб Эчей кбфЬллзлб чбсбкфзсйуфйкЬ.
Уфзн рбсбкЬфщ ейкьнб рбсбиЭфпнфбй пй дйбуфЬуейт фпх чюспх
фпх ерЯрлпх.
Гйб нб дйбуцблйуфеЯ Энбт кбльт бесйумьт рсЭрей нб бцбйсеиеЯ
555
580
560
min
+4 -0
min
min
45
575-585
+4 -0
480
23
572
558
543545
500
39
15
595
595
• еЯнбй 20 mm: фп кйнзфь мЭспт фпх фЬкпх рсЭрей нб бцбйсеиеЯ
(Åéê. A)
• еЯнбй 18 mm: чсзуймпрпйЮуфе фп рсюфп бхлЬкй рпх еЯнбй
Юдз рспефпймбумЭнп брь фп есгпуфЬуйп (Åéê. B)
• еЯнбй 16 mm: чсзуймпрпйЮуфе фп деэфесп бхлЬкй (Åéê..C).
Åéê. A Åéê. B
фп рЯущ фпЯчщмб фпх чюспх, еЯнбй рспфймьфесп нб егкбфбуфЮуефе
фпн цпэснп Эфуй юуфе нб бкпхмрЬей уе дэп оэлйнпхт рЮчейт. Уе
ресЯрфщуз рпх хрЬсчей Энб ухнечЭт ерЯредп уфЮсйозт, бхфь
рсЭрей нб Эчей Энб Ьнпйгмб фпхлЬчйуфпн 45 x 560 mm.
Фб рЬнел фщн гейфпнйкюн фпх цпэснпх ерЯрлщн рсЭрей нб еЯнбй
цфйбгмЭнб брь хлйкь бниекфйкь уфз иесмьфзфб. Ейдйкьфесб,
45 mm.
560 mm.
уфзн ресЯрфщуз оэлйнщн ерЯрлщн кбрлбмЬ пй кьллет рсЭрей
нб бнфЭчпхн уе иесмпксбуЯб фщн 100°C.
Уэмцщнб ме фпхт кбнпнйумпэт буцблеЯбт, бцпэ енфпйчйуфеЯ з
ухукехЮ, ден рсЭрей нб хцЯуфбнфбй ендечьменет ербцЭт ме
фб злекфсйкЬ фпйчюмбфб.
¼лб фб мЭсз рпх дйбуцблЯжпхн фзн рспуфбуЯб рсЭрей нб
уфесеюнпнфбй ме фЭфпйп фсьрп рпх нб мзн мрпсеЯ нб бцбйсеиеЯ
чщсЯт фз впЮиейб кЬрпйпх есгблеЯпх.
Гйб Энб ущуфь кенфсЬсйумб схимЯуфе фпхт 4 фЬкпхт рпх
всЯукпнфбй рлехсйкЬ фпх цпэснпх брЭнбнфй брь фйт 4 прЭт
уфп ресймефсйкь рлбЯуйп. Ейдйкьфесб, бн фп рЬчпт фпх рлбънпэ
фпх ерЯрлпх:
Åéê. C
Гйб нб уфесеюуефе фп цпэснп уфп Эрйрлп бнпЯофе фзн рьсфб
фпх цпэснпх кбй уфесеюуфе фпн цпэснп дйбмЭупх фщн 4 оэлйнщн
вйдюн уфйт 4 прЭт рпх всЯукпнфбй уфп ресймефсйкь рлбЯуйп.
ЗлекфсйкЮ уэндеуз
З злекфсйкЮ уэндеуз уфп дЯкфхп рсЭрей нб гЯней уфзн
кпхжЯнб. З ерйцЬнейб ухндЭефбй уфзн кпхжЯнб дйбмЭупх еньт
кбфЬллзлпх ухндЭумпх. Пй кпхжЯнет еЯнбй дйбмпсцщмЭнет
гйб лейфпхсгЯб ме енбллбууьменп сеэмб уе фЬуз кбй
ухчньфзфб фспцпдпуЯбт рпх бнбцЭсефбй уфзн рйкбкЯдб
чбсбкфзсйуфйкюн.
71
Page 71

ЕрЯредп енфпЯчйузт
Ìüíï óå
псйумЭнб
мпнфЭлб
P
NL2L3
L1
ЛЕХКП
КПККЙНП
КПХЖЙНБ ЕНФПЙЧЙЖПМЕНЗ
КЙФСЙНП
ÌÐËÅ
РСБУЙНП
Уэндеуз кблщдЯпх фспцпдпуЯбт
¢нпйгмб фзт рйнбкЯдбт бкспдекфюн:
Чсзуймпрпйюнфбт Энб кбфубвЯдй, ксбфЮуфе кьнфсб уфйт
рлехсйкЭт глщууЯфует фпх кбрбкйпэ фзт рйнбкЯдбт
бкспдекфюн
ФсбвЮофе кбй бнпЯофе фп кбрЬкй фзт рйнбкЯдбт бкспдекфюн.
Гйб фз иЭуз уе лейфпхсгЯб фпх кблщдЯпх екфелЭуфе фйт бкьлпхиет
енЭсгейет:
оевйдюуфе фз вЯдб кбй фйт вЯдет фщн ербцюн
УзмеЯщуз: пй гЭцхсет еЯнбй дйехиефзмЭнет брь фп
ЕсгпуфЬуйп гйб фз уэндеуз уе 400V фсйцбуйкь (ейк.
D).
гйб фзн екфЭлеуз фщн злекфсйкюн ухндЭуещн фщн ейк. F
êáé åéê. G, чсзуймпрпйЮуфе фйт дэп гЭцхсет рпх
всЯукпнфбй енфьт фпх кйвщфЯпх (ейк. E - учефйкь P”)
уфесеюуфе фп кблюдйп фспцпдпуЯбт уфп бнфЯуфпйчп клйр
кблщдЯпх кбй клеЯуфе фп кбрЬкй
400V 3N~
H05RR-F 5x2.5 CEI-UNEL 35363
NL3L1L2
5
3
4
Eik. D
1
2
Eik. E
230V 1N~
H07RN-F 3x4 CEI-UNEL 35364
NL
5
3
4
Eik. F
1
2
400V 2N~
H05RR-F 4x2.5 CEI-UNEL 35363
NL2L1
5
3
4
Eik. G
Уэндеуз фпх кблщдЯпх фспцпдпуЯбт уфп дЯкфхп
МпнфЬсефе уфп кблюдйп Энб вэумб кбнпнйкпрпйзмЭнп гйб фп
цпсфЯп рпх бнбцЭсефбй уфзн рйнбкЯдб фщн уфпйчеЯщн, уфзн
ресЯрфщуз бр ехиеЯбт уэндеузт уфп дЯкфхп егкбфбуфЮуфе
мефбоэ фзт ухукехЮт кбй фпх дйкфэпх Энб пмпйпгенЮ дйбкьрфз
ме елЬчйуфп Ьнпйгмб мефбоэ фщн ербцюн 3 mm. рпх нб ербскеЯ
гйб фп цпсфЯп кбй нб фзсеЯ фйт йучэпхует рспдйбгсбцЭт (п бгщгьт
геЯщузт ден рсЭрей нб дйбкьрфефбй брь фпн дйбкьрфз).
Фп кблюдйп фспцпдпуЯбт рсЭрей нб еЯнбй фпрпиефзмЭнп ме фЭфпйп
фсьрп юуфе уе кбнЭнб узмеЯп фпх з иесмпксбуЯб нб мзн
хресвбЯней екеЯнз фпх ресйвЬллпнфпт кбфЬ 50°C.
Рсйн рсбгмбфпрпйЮуефе фз уэндеуз вевбйщиеЯфе ьфй:
З злекфсйкЮ буцЬлейб фзт ухукехЮт бхфЮт дйбуцблЯжефбй
мьнп ьфбн з Ядйб еЯнбй ущуфЬ ухндедемЭнз уе мйб егкбфЬуфбуз
геЯщузт рпх лейфпхсгеЯ кбй фзсеЯ фйт рспдйбгсбцЭт фщн
йучхьнфщн кбнпнйумюн злекфсйкЮт буцЬлейбт. ЕлЭгофе бн
бхфЮ з вбуйкЮ рспырьиеуз буцЬлейбт фзсеЯфбй рЬнфб. Уе
ресЯрфщуз бмцйвплйюн, жзфЮуфе еопнхчйуфйкь Элегчп брь
Энбн бнбгнщсйумЭнп фечнйкь. П кбфбукехбуфЮт ден мрпсеЯ
нб иещсзиеЯ хреэихнпт гйб ендечьменет жзмйЭт рспклзиеЯует
брь фзн брпхуЯб геЯщузт уфзн егкбфЬуфбуз.
Рсйн ухндЭуефе фз ухукехЮ, вевбйщиеЯфе ьфй фб уфпйчеЯб ерЯ
фзт рйнбкЯдбт (ерЯ фзт ухукехЮт Ю/кбй ерЯ фзт ухукехбуЯбт)
бнфбрпксЯнпнфбй уе екеЯнб фпх дйкфэпх дйбнпмЮт злекфсйкпэ
кбй бесЯпх.
1
2
72
Page 72

ЕлЭгофе бн з злекфсйкЮ рбспчЮ фзт егкбфЬуфбузт кбй фщ
рсйжюн бскпэн гйб фз мЭгйуфз йучэ фзт ухукехЮт, ьрщт
псЯжефбй уфзн рйнбкЯдб. Уе ресЯрфщуз бмцйвплЯбт
брехихниеЯфе уе бнбгнщсйумЭнп ербггелмбфЯб.
Уе ресЯрфщуз бухмвбфьфзфбт мефбоэ рсЯжбт кбй
сехмбфплЮрфз фзт ухукехЮт жзфеЯуфе фзн бнфйкбфЬуфбуз фзт
рсЯжбт ме мйб Ьллз кбфЬллзлз брь еоейдйкехмЭнп
ербггелмбфЯб. Бхфьт, ухгкексймЭнб, иб рсЭрей нб
дйбрйуфюуей бн з дйбфпмЮ фщн кблщдЯщн фзт рсЯжбт еЯнбй
кбфЬллзлз гйб фзн брпсспцпэменз йучэ брь фз ухукехЮ.
ФечнйкЬ чбсбкфзсйуфйкЬ
ГенйкЬ ден ухнйуфЬфбй з чсЮуз фщн рспубсмпуфйкюн,
рплэрсйжщн Ю/кбй рспекфЬуещн. ¼фбн ьмщт з чсЮуз фпхт
ксйиеЯ брбсбЯфзфз иб рсЭрей рЬнфб нб чсзуймпрпйпэнфбй
мьнп брлЬ Ю рпллбрлЬ рспубсмпуфйкЬ кбй рспекфЬуейт
рпх фзспэн фйт рспдйбгсбцЭт фщн йучхьнфщн кбнпнйумюн
буцблеЯбт, рспуЭчпнфбт ьмщт нб мзн оересбуфеЯ фп ьсйп
рбспчЮт уе фймЭт сеэмбфпт рпх бнбцЭсефбй уфзн рспЭкфбуз
Ю уфп брль рспубсмпуфйкь кбй екеЯнз з мЭгйуфз йучэт рпх
бнбгсЬцефбй уфп рпллбрль рспубсмпуфйкь. Фп вэумб кбй
з рсЯжб рсЭрей нб еЯнбй еэкплб рспувЬуймб.
ЩцЭлймет дйбуфЬуейт фпх цпэснпх:
рлЬфпт: cm. 43,5
вЬипт: cm. 43,5
ýøïò: cm. 32
ЩцЭлймпт ьгкпт фпх злекфсйкпэ цпэснпх:
лЯфсб 60
ENERGY LABEL
ПдзгЯб 2002/40/CE гйб фзн ефйкЭфб злекфсйкюн цпэснщн
Кбнпнйумьт EN 50304
КбфбнЬлщуз енЭсгейбт ЦхуйкЮ бгщгймьфзфб
лейфпхсгЯб иЭсмбнузт: Уфбфйкьт
ФЬуейт кбй ухчньфзфб фспцпдпуЯбт:
230/400V ~ 3N 50/60Hz 8400W
7
З ухукехЮ бхфЮ фзсеЯ фйт рспдйбгсбцЭт фщн
бкьлпхищн Кпйнпфйкюн Пдзгйюн:
- 73/23/CEE фзт 19/02/73 (ЧбмзлЮ ФЬуз) кбй
мефбгенЭуфесет фспрпрпйЮуейт.
- 89/336/CEE фзт 03/05/89 (ЗлекфспмбгнзфйкЮ
Ухмвбфьфзфб) кбй мефбгенЭуфесет фспрпрпйЮуейт.
- 93/68/CEE фзт 22/07/93 кбй мефбгенЭуфесет
фспрпрпйЮуейт.
- 2002/96/EK
З ехсщрбъкЮ пдзгЯб 2002/96/EK гйб фб Брьвлзфб
Злекфсйкпэ кбй Злекфспнйкпэ Еопрлйумпэ (БЗЗЕ),
брбйфеЯ ьфй пй рблбйЭт пйкйбкЭт злекфсйкЭт ухукехЭт ден
рсЭрей нб брпвЬлпнфбй мбжЯ ме фб хрьлпйрб брьвлзфб
фпх дзмпфйкпэ дйкфэпх. Пй рблбйЭт ухукехЭт рсЭрей нб
ухллечипэн чщсйуфЬ рспкеймЭнпх нб велфйуфпрпйзипэн
з брпкбфЬуфбуз кбй з бнбкэклщуз фщн хлйкюн рпх
ресйЭчпхн кбй ме укпрь фз меЯщуз фщн влбвесюн
ерйрфюуещн уфзн бнисюрйнз хгеЯб кбй фп ресйвЬллпн.
Фп уэмвплп ме фп дйегсбммЭнп дпчеЯп брпвлЮфщн уфп
рспъьн хренихмЯжей уе убт фзн хрпчсЭщуЮ убт, рщт
ьфбн ерйихмеЯфе нб рефЬоефе фз ухукехЮ ,рсЭрей нб
ухллечиеЯ чщсйуфЬ.
Пй кбфбнблщфЭт иб рсЭрей нб брехиэнпнфбй уфйт
фпрйкЭт бсчЭт Ю уфб кбфбуфЮмбфб лйбнйкЮт гйб
рлзспцпсЯет рпх бцпспэн фз ущуфЮ дйЬиеуз фщн
рблбйюн злекфсйкюн ухукехюн.
73
Page 73

74
Page 74

75
 Loading...