

Page 1

H5TMH6AF C UA
GB
English
Operating Instructions
COOKER AND OVEN
Contents
Operating Instructions,1
Warning, 2
Description of the appliance-Overall view,4
Description of the appliance-Control Panel,5
Installation,6
Start-up and use,10
Using the hob,10
Cooking modes,11
Precautions and tips,14
Care and maintenance,15
Assistance,15
UA
ɍɤɪɚɿɧɫɶɤɚ
ȱɧɫɬɪɭɤɰɿɿ ɡ ɟɤɫɩɥɭɚɬɚɰɿɿ
Ʉɍɏɇə
Ɂɦɿɫɬ
ȱɧɫɬɪɭɤɰɿɿ ɡ ɟɤɫɩɥɭɚɬɚɰɿɿ,1
ȼɇɂɆȺɇɂȿ
Ɉɩɢɫ ɭɫɬɚɧɨɜɤɢ-Ɂɚɝɚɥɶɧɢɢ ɜɢɝɥɹɞ,4
Ɉɩɢɫ ɭɫɬɚɧɨɜɤɢ-ɉɚɧɟɥɶ ɭɩɪɚɜɥɿɧɧɹ,5
ȼɫɬɚɧɨɜɥɟɧɧɹ,17
ȼɤɥɸɱɟɧɧɹ ɿ ɜɢɤɨɪɢɫɬɚɧɧɹ,21
Ʉɨɪɢɫɬɭɜɚɧɧɹ ɪɨɛɨɱɨɸ ɩɨɜɟɪɯɧɟɸ,21
ɉɪɨɝɪɚɦɢ ɩɪɢɝɨɬɭɜɚɧɧɹ ɿɠɿ,22
Ɂɚɩɨɛɿɠɧɿ ɡɚɫɨɛɢ ɿ ɩɨɪɚɞɢ,26
Ⱦɨɝɥɹɞ i ɬɟɯɧɿɱɧɟ ɨɛɫɥɭɝɨɜɭɜɚɧɧɹ,27
Ⱦɨɩɨɦɨɝɚ,26
,2
1
Page 2

GB
WARNINGWARNINGWARNING
WARNING: The appliance and its
accessible parts become hot during
use.
Care should be taken to avoid
touching heating elements.
Children less than 8 years of age shall
be kept away unless continuously
supervised.
This appliance can be used by
children aged from 8 years and
above and persons with reduced
physical, sensory or mental
capabilities or lack of experience
and knowledge if they have been
given supervision or instruction
concerning use of the appliance in a
safe way and understand the hazards
involved. Children shall not play with
the appliance. Cleaning and user
maintenance shall not be made by
children without supervision.
WARNING: Unattended cooking on a
hob with fat or oil can be dangerous
and may result in fire.
NEVER try to extinguish a fire with
water, but switch off the appliance
and then cover flame e.g. with a lid or
a fire blanket.
Do not use harsh abrasive cleaners
or sharp metal scrapers to clean
the oven door glass since they can
scratch the surface, which may result
in shattering of the glass.
The internal surfaces of the
compartment (where present) may
become hot.
Never use steam cleaners or pressure
cleaners on the appliance.
Remove any liquid from
the lid before opening it.
Do not close the glass cover (if present)
when the gas burners or electric
hotplates are still hot.
WARNING: Ensure that the appliance is
switched off before replacing the lamp
to avoid the possibility of electric shock.
CAUTION: the use of inappropriate
hob guards can cause accidents.
! When you place the rack inside,
make sure that the stop is directed
upwards and in the back of the cavity.
2
Page 3

UA
УВАГАУВАГАУВАГА
УВАГА! Під час роботи цей прилад, а також
його доступні частини нагріваються до
високих температур.
Слід бути особливо обережними, щоб не
торкатися нагрівальних елементів.
Діти віком до 8 років мають знаходитися
на небезпечній відстані від приладу,
якщо неможливо забезпечити постійний
контроль над ними.
Дозволяється користування цим приладом
дітьми віком від 8 років, а також особами
з обмеженими фізичними, сенсорними
або розумовими можливостями або
особами без належного досвіду і знань,
якщо вони перебувають під постійним
контролем або проінструктовані щодо
правил з небезпечного користування
приладу і усвідомлюють ступені ризику.
Не дозволяйте дітям гратися з приладом.
Операції з очищення і догляду не повинні
виконуватися дітьми без належного
контролю.
Внутрішні поверхні відділення (де вони
наявні) можуть нагріватися до високих
температур.
Забороняється використання апаратів для
очищення парою або високим тиском.
Витріть насухо всі наявні на кришці
рідини, перш ніж відкрити її. Не
закривайте скляну кришку (якщо вона
наявна), якщо газові пальники або
електричні конфорки залишаються
нагрітими.
УВАГА! Щоб запобігти враженню
електричним струмом переконайтеся в
тому, що прилад вимкнений, перш ніж
заміняти лампочку.
Витріть насухо всі наявні на кришці
рідини, перш ніж відкрити її. Не
закривайте скляну кришку (якщо вона
наявна), якщо газові пальники або
електричні конфорки залишаються
нагрітими.
УВАГА! Небезпечно залишати без нагляду
плити з жиром або олією, тому що це може
призвести до пожежі.
НІ В ЯКОМУ РАЗІ не слід намагатися
погасити полум’я/пожежу водою.
Необхідно вимкнути прилад і накрити
полум’я, наприклад, кришкою або
вогнетривким покривалом.
Не використовувати абразивні засоби ані
металеві загострені шпателі для очищення
скляних дверцях духовки, тому що вони
можуть пошкрябати поверхню, призводячи
до розтріскування скла.
УВАГА! Щоб запобігти враженню
електричним струмом переконайтеся в
тому, що прилад вимкнений, перш ніж
заміняти лампочку.
УВАГА! використання невідповідних
захисних пристроїв варильної поверхні
може призвести до нещасних випадків.
! ɉɿɞ ɱɚɫɬ ɜɫɬɚɜɥɹɧɧɹ ɪɟɲɿɬɤɢ
ɫɥɿɞ ɩɟɪɟɤɨɧɚɬɢɫɹ, ɳɨ ɫɬɨɩɨɪ
ɩɨɜɟɪɧɭɬɢɣ ɜɝɨɪɭ ɿ ɜɫɟɪɟɞɢɧɭ ɧɿɲɿ .
3
Page 4
14
1
2
3
4
5
6
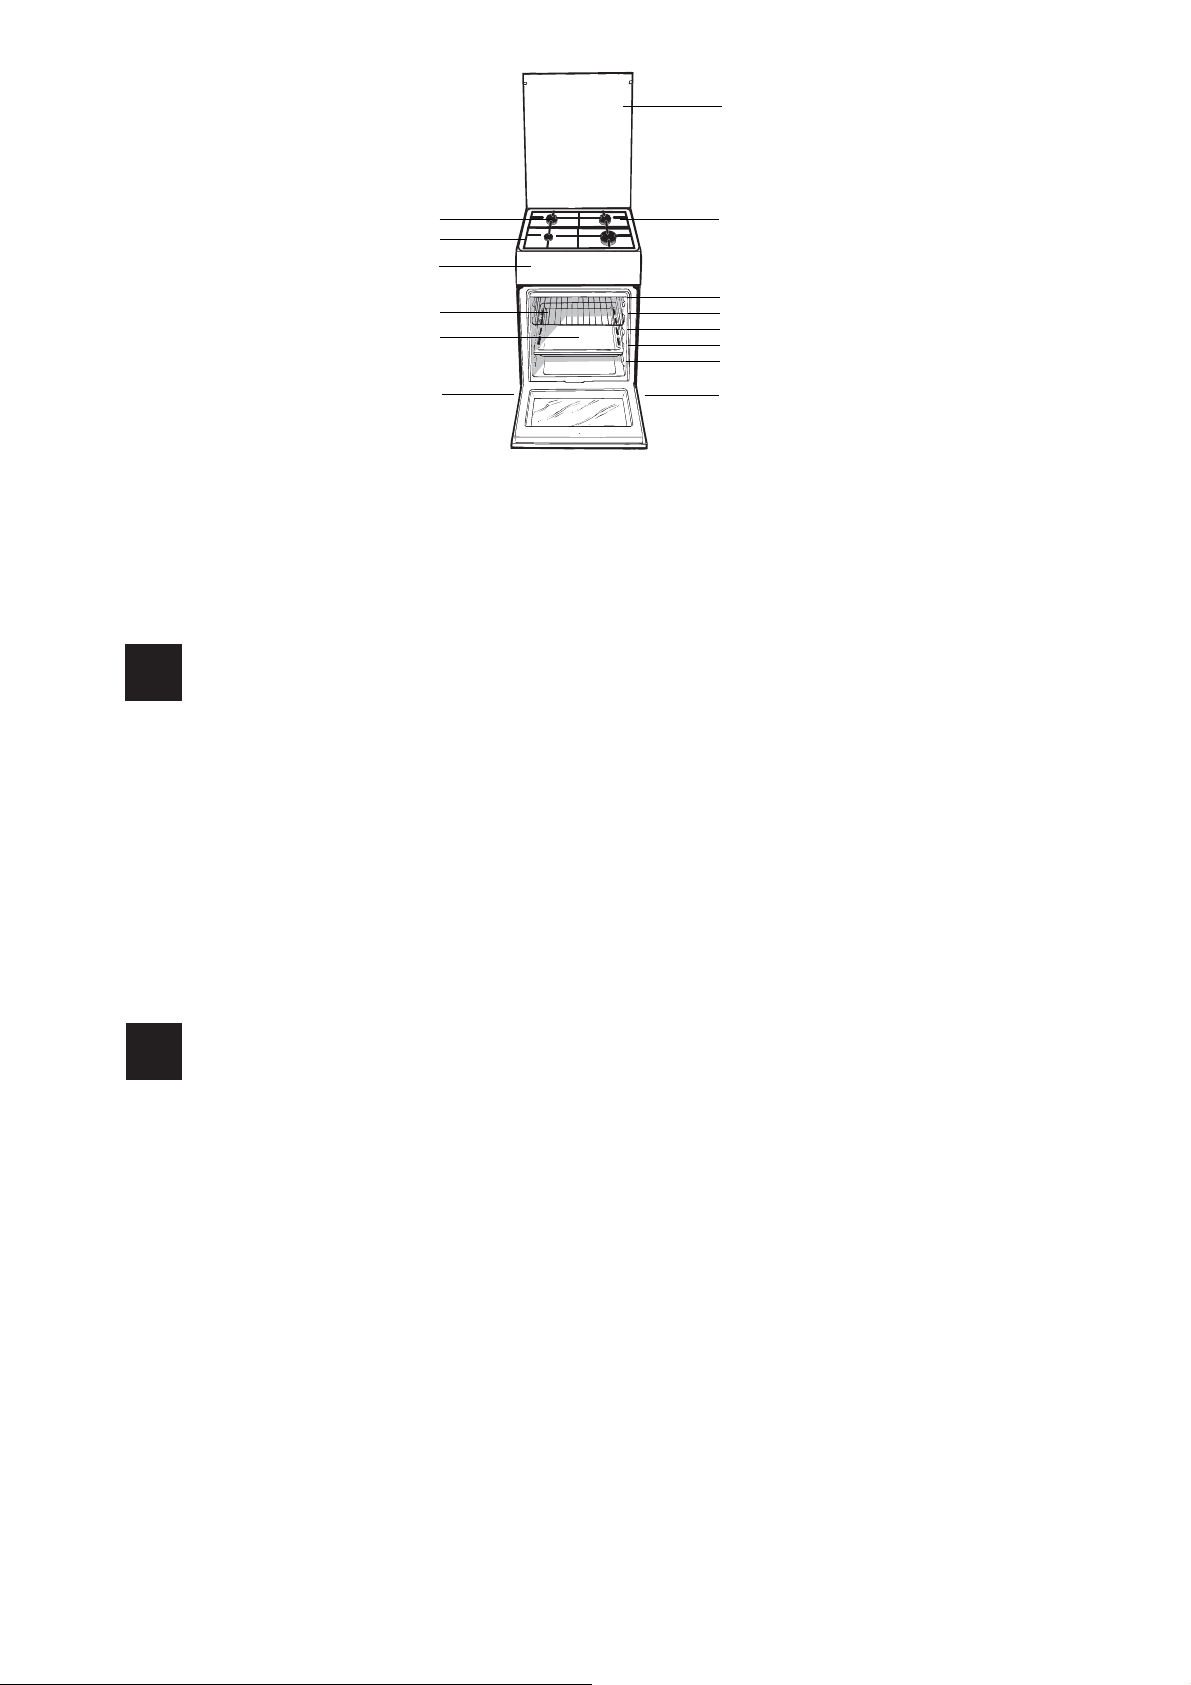
Ɉɩɢɫ ɩɥɢɬɢ
UA
1.Ƚɚɡɨɜɢɣ ɩɚɥɶɧɢɤ
2.ɉɿɞɞɨɧ ɧɚ ɜɢɩɚɞɨɤ ɩɟɪɟɥɢɜɚɧɶ
3.ɉɚɧɟɥɶ ɭɩɪɚɜɥɿɧɧɹ
4.ɉɨɥɤɚ ɊȿɒȱɌKɂ
5.ɉɨɥɤɚ ȾEɄɈ
6.Ʌɚɩɤɚ ɞɥɹ ɧɚɥɚɲɬɭɜɚɧɧɹ
7.ɉoɜɟɪɯɧɹ ɞɥɹ ɡɛɢɪɚɧɧɹ ɡɛiɝɥoʀ piɞɢɧɢ
8.HAɉPABɅəɘɑȱ ɞɥɹ ɩɨɥɢɰɶ
9.ɩɨɥɨɠɟɧɧɹ 5
10.ɩɨɥɨɠɟɧɧɹ 4
11.ɩɨɥɨɠɟɧɧɹ 3
12.ɩɨɥɨɠɟɧɧɹ 2
13.ɩɨɥɨɠɟɧɧɹ 1
14.ɋɤɥɹɧɚ ɤɪɢɲɤɚ (ȯ ɥɢɲɟ ɜ ɞɟɹɤɢɯ ɦɨɞɟɥɹɯ.)
Ɂɚɝɚɥɶɧɢɢ ɜɢɝɥɹɞ
10
11
12
13
6
7
8
9
GB
1.Hob burner
2.Hob Grid
3.Control panel
4.Sliding grill rack
5.DRIPPING pan
6.Adjustable foot
7.Containment surface for spills
8.GUIDE RAILS for the sliding racks
9.position 5
10.position 4
11.position 3
12.position 2
13.position 1
14.Glass Cover (Only on certain models)
Description of the appliance
Overall view
4
Page 5
123 4
5
678
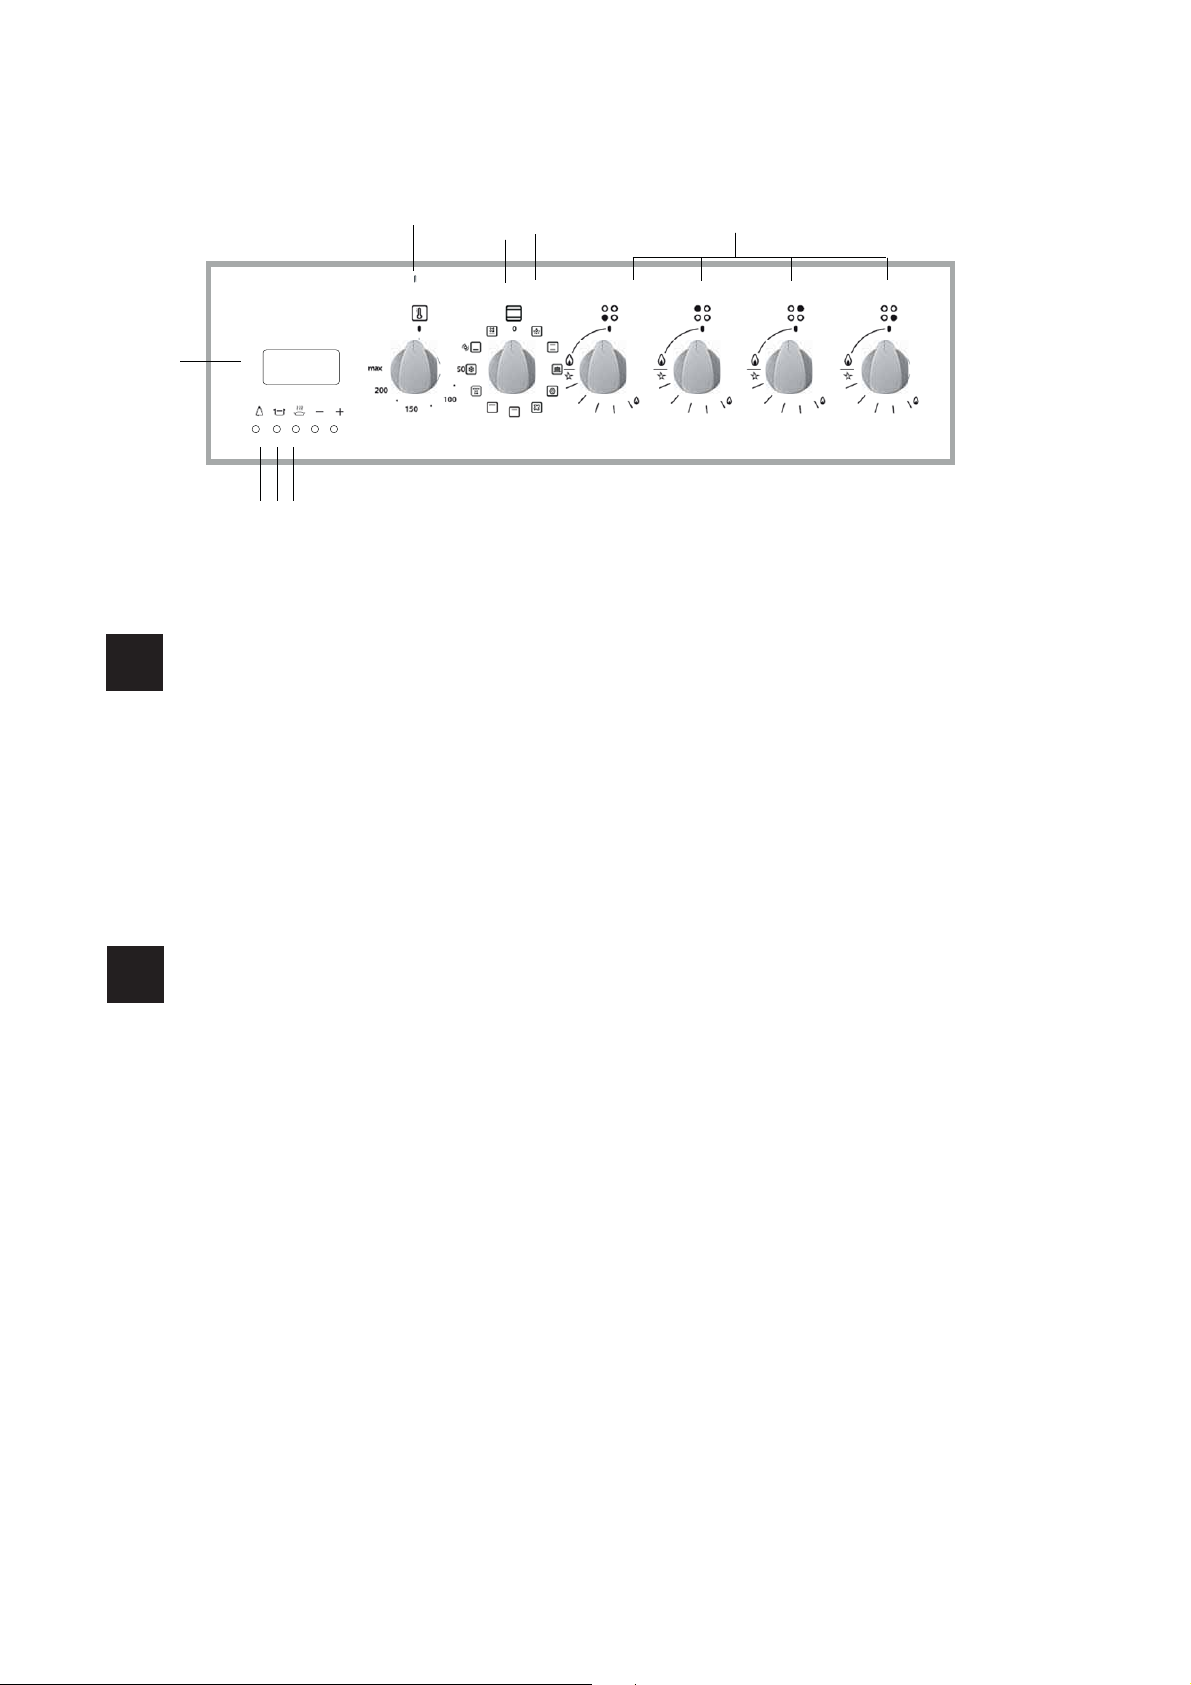
Ɉɩɢɫ ɩɥɢɬɢ
UA
1.Peʉyɥɹɬɨɪ TEPMOCT ATɍ
2.Peʉyɥɹɬɨɪ ɊɋɉȽɋȻɆ
3.ȱɧɞɢɤɚɬɨɪ TEPMOCT ATɍ
4.Ɋɭɱɤɢ ɞɥɹ ɤɟɪɭɜɚɧɧɹ ɝɚɡɨɜɢɦɢ
ɩɚɥɶɧɢɤɚɦɢ ɧɚ ɜɚɪɢɥɶɧɿɣ ɩɨɜɟɪɯɧɿ
5.ȿɥɟɤɬɪɨɧɧɢɣ ɩɪɨɝɪɚɦɚɬɨɪ ɩɪɢɝɨɬɭɜɚɧɧɹ ʀɠɿ
6.Ʉɧɨɩɤɚ ɌȺɃɆȿɊ
7.Ʉɧɨɩɤɚ ɌɊɂȼȺɅȱɋɌɖ ɉɊɂȽɈɌɍȼȺɇɇə
8.Ʉɧɨɩɤɚ ɁȺɄIɇɑȿɇɇə ɉɊɂȽɈɌɍȼȺɇɇə
ɉɚɧɟɥɶ ɭɩɪɚɜɥɿɧɧɹ
GB
GB
1.THERMOSTAT knob
2.SELECTOR knob
3.THERMOSTAT indicator light
4.Hob BURNER control knob
5.Electronic cooking programmer
6.TIMER button
7.COOKING TIME button
8.COOKING END TIME button
Description of the appliance
Control panel
5
Page 6
GB
Installation
! Before operating your new appliance please read
this instruction booklet carefully. It contains important
information concerning the safe installation and
operation of the appliance.
! Please keep these operating instructions for future
reference. Make sure that the instructions are kept with
the appliance if it is sold, given away or moved.
! The appliance must be installed by a qualified
professional according to the instructions provided.
! Any necessary adjustment or maintenance must be
performed after the cooker has been disconnected
from the electricity supply.
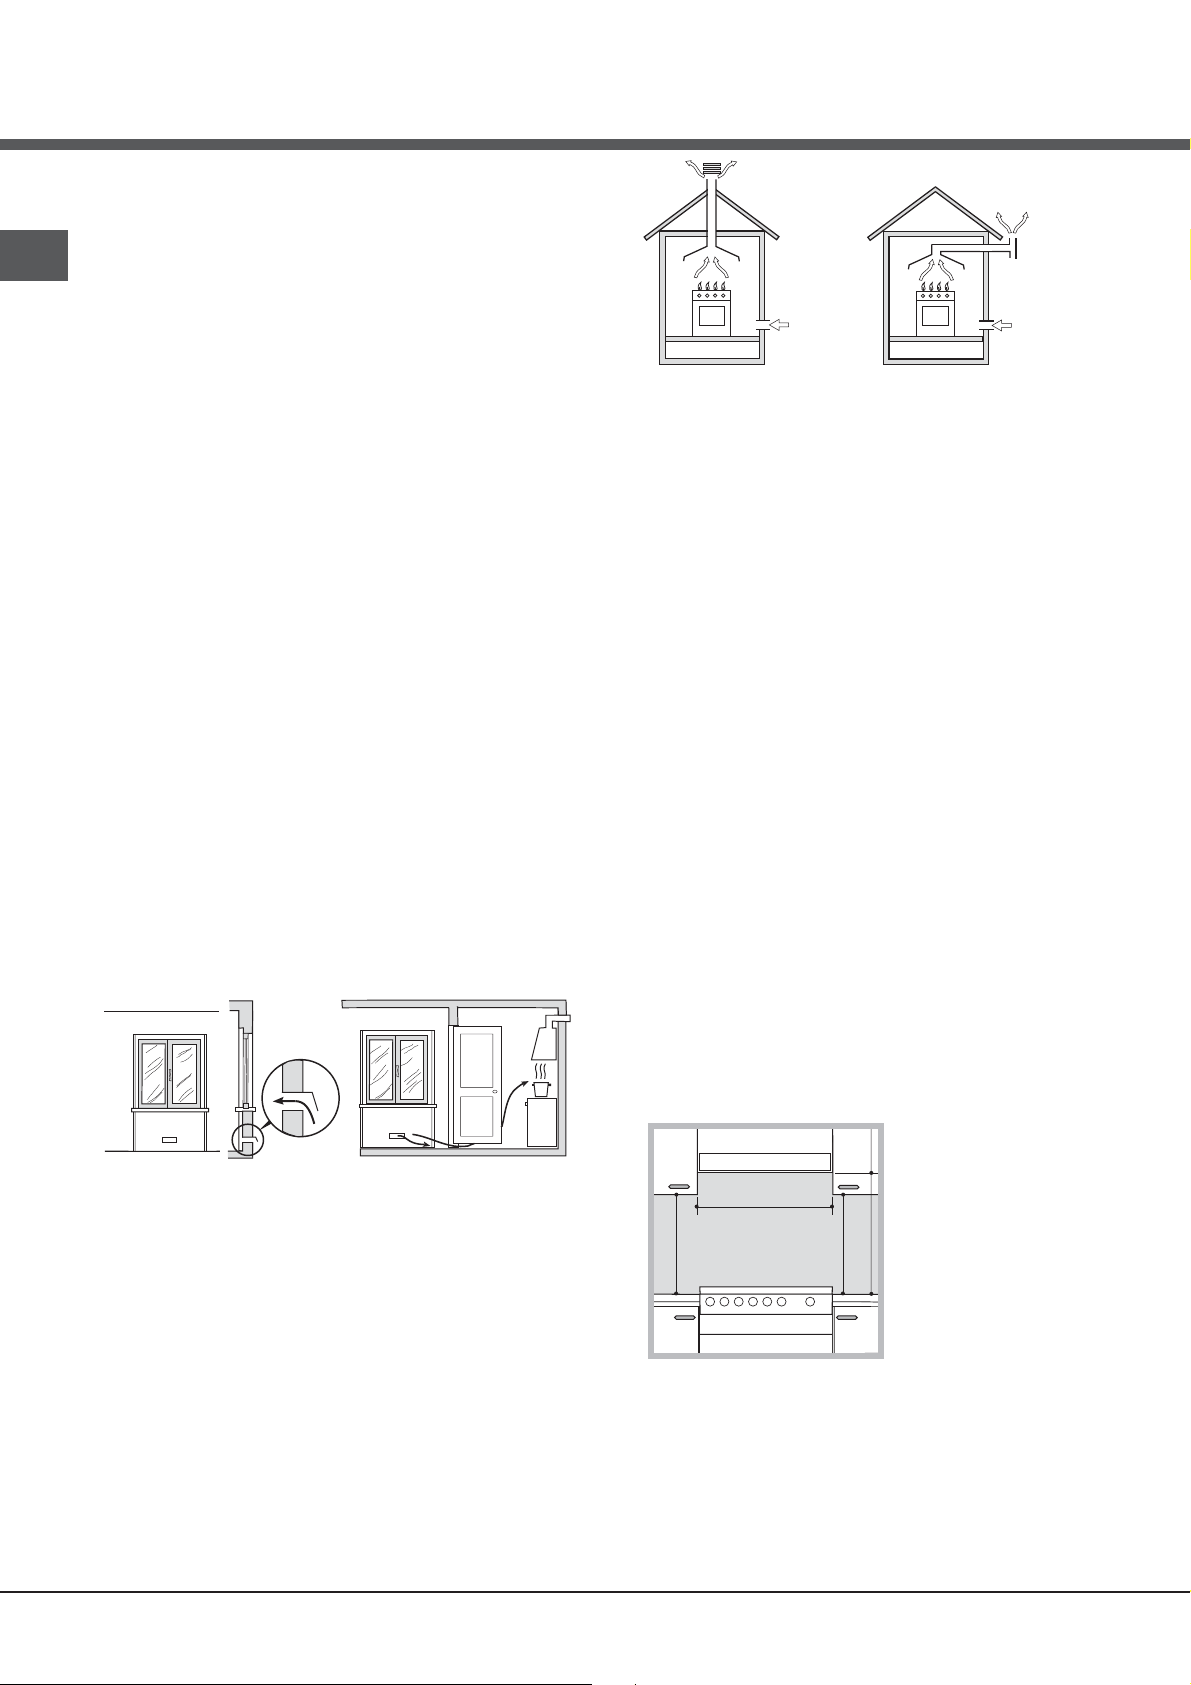
Room ventilation
The appliance may only be installed in permanentlyventilated rooms, according to current national
legislation. The room in which the appliance is installed
must be ventilated adequately so as to provide as
much air as is needed by the normal gas combustion
process (the flow of air must not be lower than 2 m
per kW of installed power).
The air inlets, protected by grilles, should have a duct
with an inner cross section of at least 100 cm
should be positioned so that they are not liable to even
partial obstruction (see gure A).
These inlets should be enlarged by 100% - with a
2
minimum of 200 cm
- whenever the surface of the
hob is not equipped with a flame failure safety device.
When the flow of air is provided in an indirect manner
from adjacent rooms (see gure B), provided that these
are not communal parts of a building, areas with
increased fire hazards or bedrooms, the inlets should
be fitted with a ventilation duct leading outside as
described above.
A
A
Ventilation opening for
comburent air
!
After prolonged use of the appliance, it is advisable to
Adjacent room Room requiring
B
ventilation
Increase in the gap
between the door and
the flooring
open a window or increase the speed of any fans used.
Disposing of combustion fumes
Disposing of combustion fumes should be guaranteed
using a hood connected to a safe and efficient natural
suction chimney, or using an electric fan that begins
to operate automatically every time the appliance is
switched on (see gure).
2
and
3
/h
Fumes channelled
straight outside
!
Fumes channelled through
a chimney or a branched
flue system (reserved for
cooking appliances)
The liquefied petroleum gases are heavier than air
and collect by the floor, therefore all rooms containing
LPG cylinders must have openings leading outside so
that any leaked gas can escape easily.
LPG cylinders, therefore, whether partially or
completely full, must not be installed or stored in rooms
or storage areas that are below ground level (cellars,
etc.). Only the cylinder being used should be stored
in the room; this should also be kept well away from
sources of heat (ovens, chimneys, stoves) that may
cause the temperature of the cylinder to rise above
50°C.
Positioning and levelling
!
It is possible to install the appliance alongside
cupboards whose height does not exceed that of the
hob surface.
Make sure that the wall in contact with the beck of
the appliance is made from a non-flammable, heatresistant material (T 90°C).
To install the appliance correctly:
• Place it in the kitchen, dining room or the bed-sit (not
in the bathroom).
• If the top of the hob is higher than the cupboards,
the appliance must be installed at least 200 mm away
from them.
• If the cooker is
HOOD
Min. mm.
600
mm.
420
Min.
420
Min. mm.
• Do not position blinds behind the cooker or less than
200 mm away from its sides.
• Any hoods must be installed according to the
instructions listed in the relevant operating manual.
installed underneath a
wall cabinet, there must
be a minimum distance
of 420 mm between this
cabinet and the top of
mm. with hood
mm. without hood
650
the hob.
700
min.
min.
This distance should be
increased to 700 mm
if the wall cabinets are
flammable (see gure).
6
Page 7
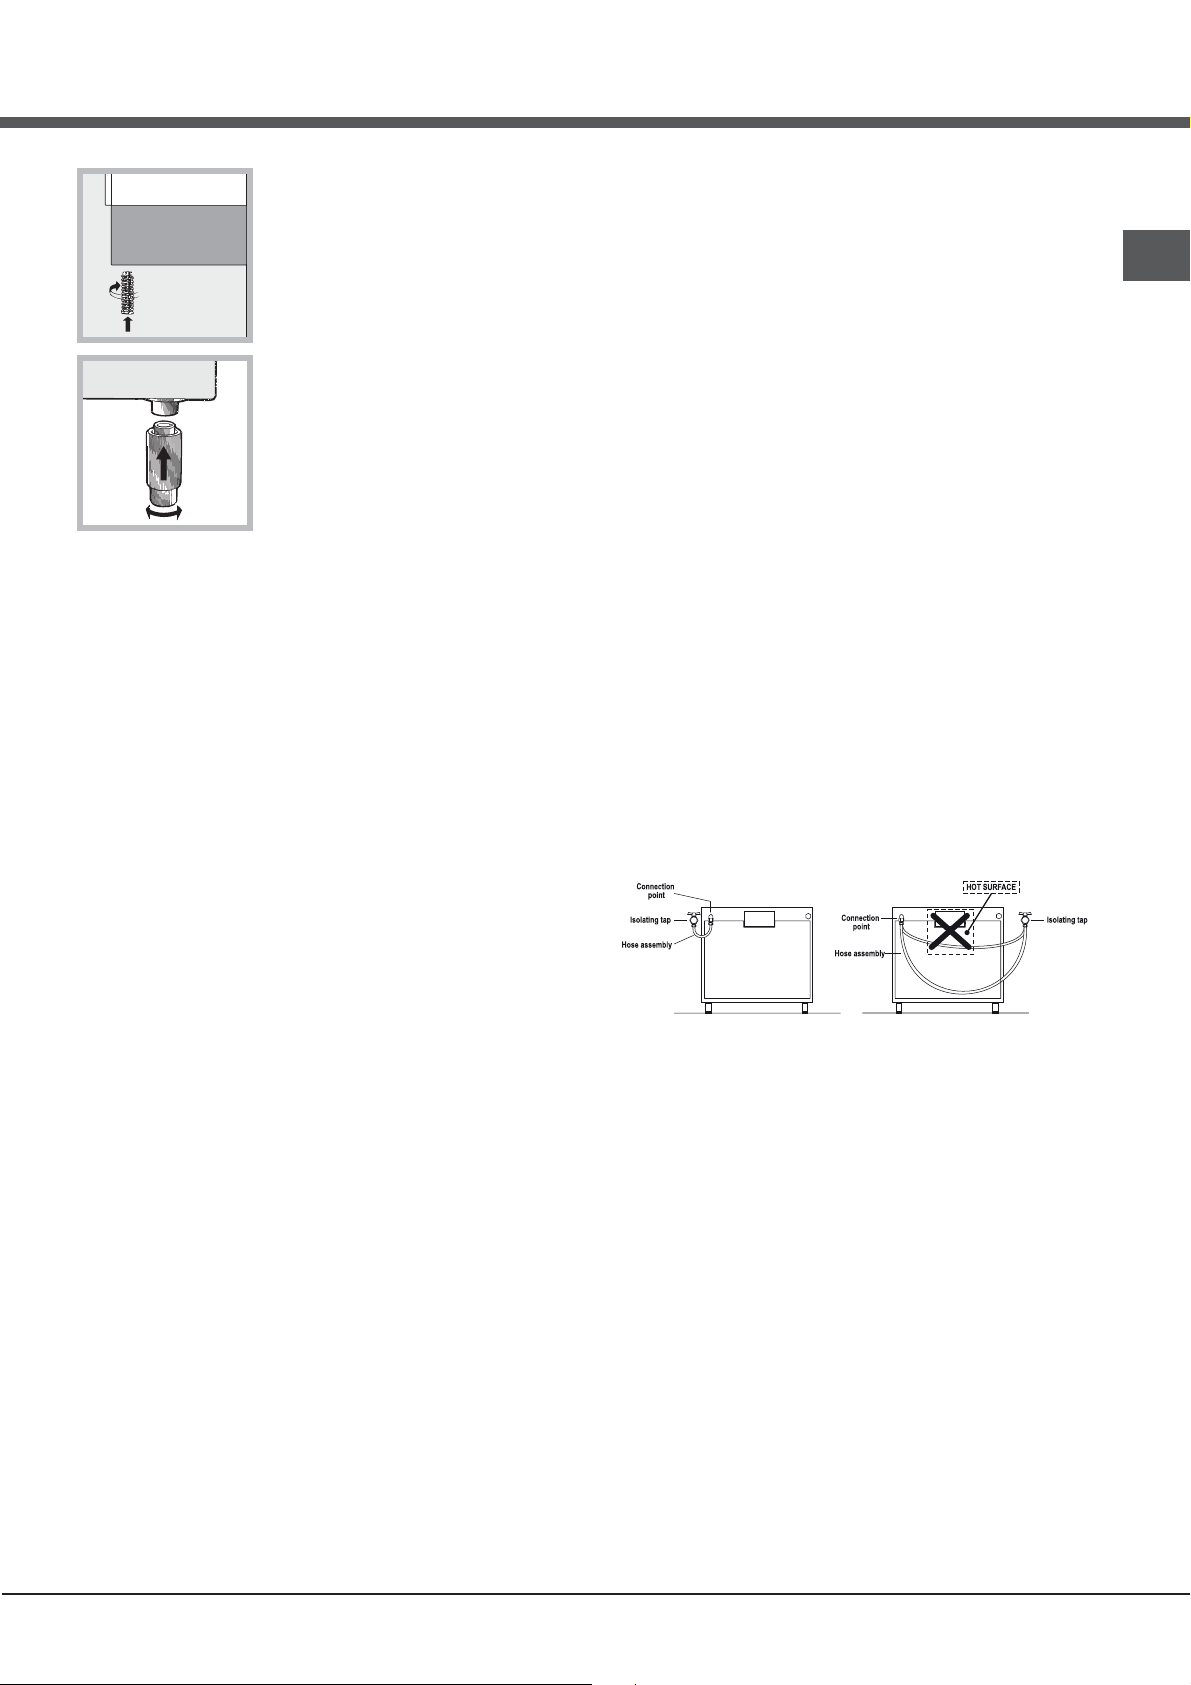
Levelling
If it is necessary to level the
appliance, screw the adjustable
feet into the places provided on
each corner of the base of the
cooker (see gure).
The legs* fit into the slots on the
underside of the base of the
cooker.
Electrical connection
Install a standardised plug corresponding to the load
indicated on the appliance data plate (see Technical
data table).
The appliance must be directly connected to the mains
using an omnipolar circuit-breaker with a minimum contact
opening of 3 mm installed between the appliance and the
mains. The circuit-breaker must be suitable for the charge
indicated and must comply with NFC 15-100 regulations
(the earthing wire must not be interrupted by the circuitbreaker). The supply cable must be positioned so that it
does not come into contact with temperatures higher than
50°C at any point.
Before connecting the appliance to the power supply,
make sure that:
• The appliance is earthed and the plug is compliant with
the law.
• The socket can withstand the maximum power of the
appliance, which is indicated by the data plate.
• The voltage is in the range between the values
indicated on the data plate.
• The socket is compatible with the plug of the
appliance. If the socket is incompatible with the
plug, ask an authorised technician to replace it. Do
not use extension cords or multiple sockets.
! Once the appliance has been installed, the power
supply cable and the electrical socket must be easily
!
The cable must not be bent or compressed.
! The cable must be checked regularly and replaced
by authorised technicians only.
! The manufacturer declines any liability should
these safety measures not be observed.
Gas connection
Connection to the gas network or to the gas cylinder
may be carried out using a flexible rubber or steel hose,
in accordance with current national legislation and after
making sure that the appliance is suited to the type of gas
with which it will be supplied (see the rating sticker on
the cover: if this is not the case see below). When using
liquid gas from a cylinder, install a pressure regulator
which complies with current national regulations. To
accessible.
make connection easier, the gas supply may be turned
sideways*: reverse the position of the hose holder with
that of the cap and replace the gasket that is supplied
with the appliance.
! Check that the pressure of the gas supply is
consistent with the values indicated in the Table
of burner and nozzle specifications (see below).
This will ensure the safe operation and durability of
your appliance while maintaining efficient energy
consumption.
Gas connection using a flexible rubber hose
Make sure that the hose complies with current national
legislation. The internal diameter of the hose must
measure: 8 mm for liquid gas supply; 13 mm for
methane gas supply.
Once the connection has been performed, make sure
that the hose:
• Does not come into contact with any parts that reach
temperatures of over 50°C.
• Is not subject to any pulling or twisting forces and
that it is not kinked or bent.
• Does not come into contact with blades, sharp
corners or moving parts and that it is not
compressed.
• Its whole length is easy to inspect so that the
condition of the hose may be checked.
• Is shorter than 1500 mm.
• Fits firmly into place at both ends, where it will
be fixed using clamps that comply with current
regulations.
! If one or more of these conditions is not fulfilled
or if the cooker must be installed according to the
conditions listed for class 2 - subclass 1 appliances
(installed between two cupboards), the flexible steel
hose must be used instead (see below).
Connecting a flexible jointless stainless steel pipe
to a threaded attachment
Make sure that the hose and gaskets comply with
current national legislation.
To begin using the hose, remove the hose holder on
the appliance (the gas supply inlet on the appliance is
a cylindrical threaded 1/2 gas male attachment).
! Perform the connection in such a way that the hose
length does not exceed a maximum of 2 metres,
making sure that the hose is not compressed and does
not come into contact with moving parts.
Checking the tightness of the connection
When the installation process is complete, check the
hose fittings for leaks using a soapy solution. Never
use a flame.
GB
7
Page 8
GB
Adapting to different types of gas
It is possible to adapt the appliance to a type of gas
other than the default type (this is indicated on the
rating label on the cover).
Adapting the hob
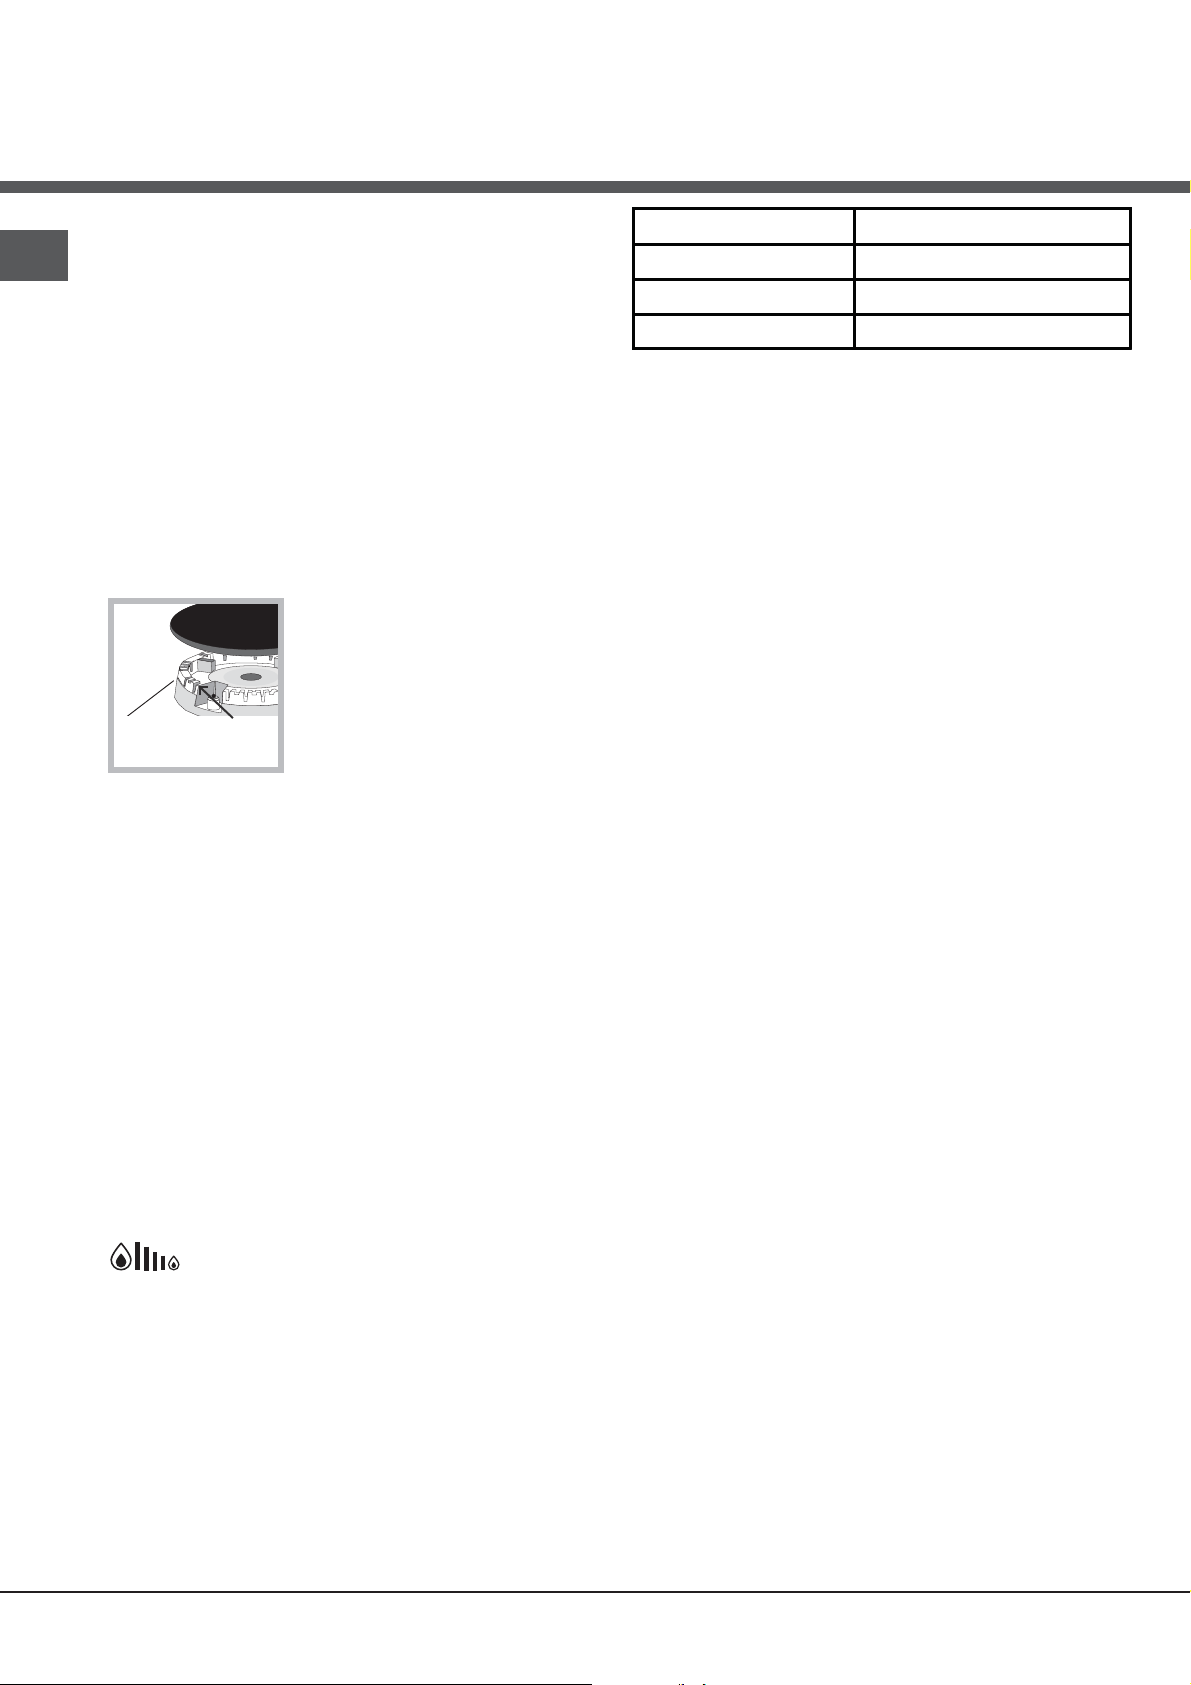
Replacing the nozzles for the hob burners:
1. Remove the hob grids and slide the burners off their
seats.
2. Unscrew the nozzles using
a 7 mm socket spanner (see
gure), and replace them with
nozzles suited to the new type
of gas (see Burner and nozzle
speci cations table).
3. Replace all the components
by following the above instructions in reverse.
Adjusting the hob burners’ minimum setting:
1. Turn the tap to the minimum position.
2. Remove the knob and adjust the regulatory screw,
which is positioned inside or next to the tap pin, until
the flame is small but steady.
! If the appliance is connected to a liquid gas supply,
the regulatory screw must be fastened as tightly as
possible.
3. While
the burner is alight, quickly change the position of the knob
from minimum to maximum and vice versa several times,
checking that the flame is not extinguished.
! The hob burners do not require primary air adjustment.
! After adjusting the appliance so it may be used with a
different type of gas, replace the old rating label with a
new one that corresponds to the new type of gas (these
labels are available from Authorised Technical Assistance
Centres).
! Should the gas pressure used be different (or vary slightly)
from the recommended pressure, a suitable pressure
regulator must be fitted to the inlet hose in accordance
with current national regulations relating to “regulators for
channelled gas”.
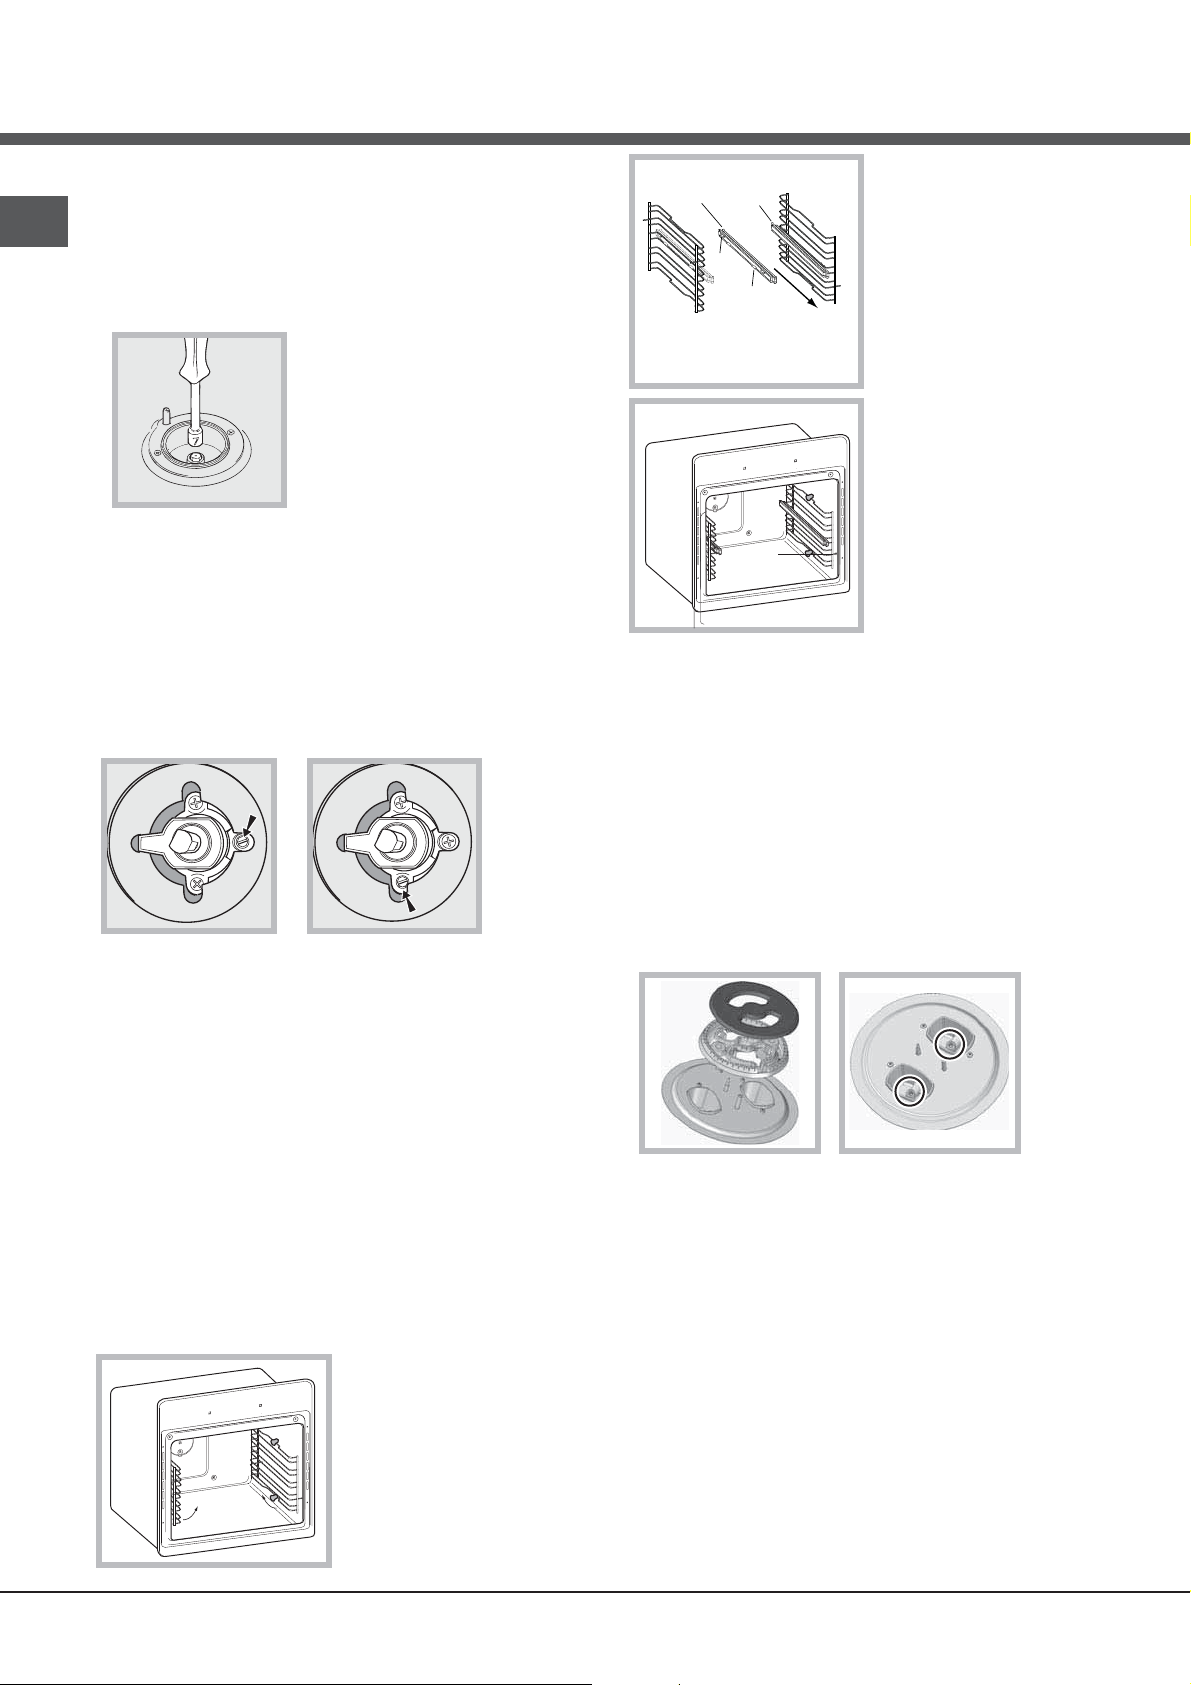
Assembling the sliding rack kit
To assemble the sliding racks:
1. Remove the two frames,
A
lifting them away from the
spacers A (see gure).
Left
guide rail
Right guide
rail
2. Choose which shelf to use
with the sliding rack. Paying
attention to the direction in
which the sliding rack is to be
B
Direction
C
of extraction
extracted, position joint B and
then joint C on the frame.
3. Secure the two frames with
the guide rails using the holes
provided on the oven walls (see
diagram). The holes for the left
frame are situated at the top,
while the holes for the right
D
frame are at the bottom.
4. Finally, fit the frames on the
spacers A.
!
Do not place the sliding racks in position 5.
Replacing the Triple ring burner nozzles
1. Remove the pan supports and lift the burners out
of their housing. The burner consists of two
separate parts (see pictures).
2. Unscrew the nozzles using a 7 mm socket
spanner. Replace the nozzles with models that are
configured for use with the new type of gas (see
Table 1). The two nozzles have the same hole
diameter.
3. Replace all the components by completing the
above operations in reverse order.
• Adjusting the burners’ primary air :
Does not require adjusting.
• Setting the burners to minimum:
1. Turn the tap to the low flame position.
2. Remove the knob and adjust the adjustment
screw, which is positioned in or next to the tap pin,
until the flame is small but steady.
3. Having adjusted the flame to the required low
setting, while the burner is alight, quickly change
the position of the knob from minimum to
maximum and vice versa several times, checking
that the flame does not go out.
4. Some appliances have a safety device
(thermocouple) fitted. If the device fails to work
when the burners are set to the low flame setting,
increase this low flame setting using the adjusting
screw.
8
Page 9
p
5. Once the adjustment has been made, replace the
seals on the by-passes using sealing wax
! If the appliance is connected to liquid gas, the
regulation screw must be fastened as tightly as
possible.
! Once this procedure is finished, replace the old
rating sticker with one indicating the new type of gas
used. Stickers are available from any of our Service
Centres.
! Should the gas pressure used be different (or vary
slightly) from the recommended pressure, a suitable
pressure regulator must be fitted to the inlet pipe (in
order to comply with current national regulations).
Safety Chain
! In order
to prevent
accidental
tipping of the
appliance, for
example by
a child climbing onto the
oven door, the
supplied safety
chain MUST be
installed!
The cooker is fitted with a safety chain to be fixed by
means of a screw (not supplied with the cooker) to
the wall behind the appliance, at the same height as
the chain is attached to the appliance.
Choose the screw and the screw anchor according
to the type of material of the wall behind the appliance. If the head of the screw has a diameter smaller
than 9mm, a washer should be used. Concrete wall
requires the screw of at least 8mm of diameter, and
60mm of length.
Ensure that the chain is fixed to the rear wall of the
cooker and to the wall, as shown in figure, so that
after installation it is tensioned and parallel to the
ground level.
TABLE OF CHARACTERISTSICS
Dimensions
Oven HxWxD
Volume
Useful
measurements
relating to the oven
compartment
Burners
Voltage and
frequency
ENERGY LABEL
This appliance conforms to the following
Data plate, is located inside the flap or, after the oven
compartment has been opened, on the left-hand wall
inside the oven.
340x410x424 mm
60 l
width 42 cm
depth 44 cm
height 17 cm
may be adapted for use with any type of
gas shown on the data plate, which is
located inside the flap or, after the oven
compartment has been opened, on the
left-hand wall inside the oven.
see data plate
Directive 2002/40/EC on the label of
electric ovens.
Standard EN 50304
Energy consumption for Natural
convection – heating mode:D
Traditional mode;
Declared energy consumption for
Forced convection Class – heating
mode: X Baking mode.
European Economic Community
directives: 2006/95/EC dated 12/12/06
(Low Voltage) and subsequent
amendments - 2004/108/EC dated
15/12/04 (Electromagnetic
Compatibility) and subsequent
amendments - 93/68/EC dated 22/07/93
and subsequent amendments.
2002/96/EC
2009/142/EC of 30/11/09 (Gas)
1275/2008 (Stand-by/ Off mode)
S
S
A
TC
H5TMH6AF C UA
GB
Table of burner and nozzle specifications
Table 1 Liquid Gas Natural Gas
Burner
Triple
Crown (TC)
Semi Fast
(Medium)(S)
Auxiliary
(Small)(A)
Supply
Pressures
* At 15°C 1013 mbar-dry gas *** Butane P.C.S. = 49,47 MJ/Kg
** Pro
Diameter
(mm)
Nominal Reduced (mm) (mm) *** ** (mm) (mm)
130 3.25 1.50 63
75 1.90 0.4 30 69 138 136 104 181 115 181
51 1.00 0.4 30 50 73 71 78 95 85 95
ane P.C.S. = 50,37 MJ/Kg Natural P.C.S. = 37,78 MJ/m³
Thermal Power
kW (p.c.s.*)
Nominal (mbar)
Minimum (mbar)
Maximum (mbar)
By Pass
1/100
Nozzle
1/100
2x65
Flow*
g/h
236 232 2x99
28-30
20
35
37
25
45
Nozzle
1/100
20
17
25
Flow*
l/h
309 2x10⁷ 309
Nozzle
1/100
Flow*
l/h
13
6,5
18
9
Page 10
Start-up and use
GB
Using the hob
Lighting the burners
For each BURNER knob there is a full ring showing the
strength of the flame for the relevant burner.
To light one of the burners on the hob:
1. Bring a flame or gas lighter close to the burner.
2. Press the BURNER knob and turn it in an
anticlockwise direction so that it is pointing to the
maximum flame setting (.
3. Adjust the intensity of the flame to the desired level
by turning the BURNER knob in an anticlockwise
direction. This may be the minimum setting &, the
maximum setting ( or any position in between the two.
If the appliance is fitted with an
electronic lighting device* (see
gure), press the BURNER knob
and turn it in an anticlockwise
direction, towards the minimum
flame setting, until the burner
is lit. The burner may be
extinguished when the knob is
released. If this occurs, repeat the operation, holding
the knob down for a longer period of time.
! If the flame is accidentally extinguished, switch off the
burner and wait for at least 1 minute before attempting
to relight it.
If the appliance is equipped with a flame failure
safety device*, press and hold the BURNER knob for
approximately 2-3 seconds to keep the flame alight
and to activate the device.
To switch the burner off, turn the knob until it reaches
the stop position •.
Flame adjustment according to levels
the burner flame intensity can be adjusted with the
knob according to 6 power levels, from maximum
to minimum with 4 intermediate positions:
a click will indicate the change from one level to
another when turning the knob . The system
guarantees a more precise adjustment, allows
to replicate the flame intensity and to identify
easily the preferred level for different cooking
operations.
Burner Ĝ Cookware diameter (cm)
Triple Crown (TC) 24 - 26
Semi Fast (S) 16 - 20
Auxiliary (A) 10 - 14
Using the oven
! The first time you use your appliance, heat the empty
oven with its door closed at its maximum temperature
for at least half an hour. Ensure that the room is well
ventilated before switching the oven off and opening
the oven door. The appliance may emit a slightly
unpleasant odour caused by protective substances
used during the manufacturing process burning away.
! Never put objects directly on the bottom of the oven;
this will avoid the enamel coating being damaged.
! Before operating the product, remove all plastic film
from the sides of the appliance.
1. Select the desired cooking mode by turning the
SELECTOR knob.
2. Select the recommended temperature for the
cooking mode or the desired temperature by turning
the THERMOSTAT knob.
A list detailing cooking modes and suggested cooking
temperatures can be found in the relevant table (see
Oven cooking advice table).
During cooking it is always possible to:
• Change the cooking mode by turning the
SELECTOR knob.
• Change the temperature by turning the
THERMOSTAT knob.
• Stop cooking by turning the SELECTOR knob to the
“0” position.
! Always place cookware on the rack(s) provided.
THERMOSTAT indicator light
When this is illuminated, the oven is generating heat.
It switches off when the inside of the oven reaches
the selected temperature. At this point the light
illuminates and switches off alternately, indicating
that the thermostat is working and is maintaining the
temperature at a constant level.
Oven light
Practical advice on using the burners
For the burners to work in the most efficient way
possible and to save on the amount of gas consumed, it
is recommended that only pans that have a lid and a flat
base are used. They should also be suited to the size of
the burner:
10
This is switched on by turning the SELECTOR knob to
any position other than “0”. It remains lit as long as the
oven is operating. By selecting
light is switched on without any of the heating elements
being activated.
with the knob, the
Page 11

Cooking modes
! A temperature value can be set for all cooking modes
between 60°C and Max, except for the following modes
• GRILL (recommended: set only to MAX power level)
• GRATIN (recommended: do not exceed 200°C).
Both the top and bottom heating elements will come on.
When using this traditional cooking mode, it is best to use
one cooking rack only. If more than one rack is used, the
heat will be distributed in an uneven manner.
The rear heating element and the fan are switched on,
thus guaranteeing the distribution of heat in a delicate and
uniform manner throughout the entire oven. This mode is
ideal for baking and cooking temperature sensitive foods
(such as cakes that need to rise) and for the preparation
of pastries on 3 shelves simultaneously.
The circular heating elements and the elements at
the bottom of the oven are switched on and the fan is
activated. This combination heats the oven rapidly by
producing a considerable amount of heat, particularly
from the element at the bottom. If you use more than one
rack at a time, switch the position of the dishes halfway
through the cooking process.
All the heating elements (top, bottom and circular) switch
on and the fan begins to operate. Since the heat remains
constant throughout the oven, the air cooks and browns
food in a uniform manner. A maximum of two racks may
be used at the same time.
The central part of the top heating element is switched
on. The high and direct temperature of the grill is
recommended for food that requires a high surface
temperature (veal and beef steaks, fillet steak and
entrecôte). This cooking mode uses a limited amount of
energy and is ideal for grilling small dishes. Place the food
in the centre of the rack, as it will not be cooked properly
if it is placed in the corners.
TRADITIONAL OVEN mode
BAKING mode
PIZZA mode
MULTI-COOKING mode
OVEN TOP mode
GRILL mode
GRATIN
The top heating element and the rotisserie (where
present) are activated and the fan begins to operate.
This combination of features increases the effectiveness
of the unidirectional thermal radiation provided by the
heating elements through forced circulation of the air
throughout the oven. This helps prevent food from burning
on the surface and allows the heat to penetrate right into
the food.
! The GRILL and GRATIN cooking modes must be
performed with the oven door shut.
DEFROSTING mode
The fan located on the bottom of the oven makes the air
circulate at room temperature around the food. This is
recommended for the defrosting of all types of food, but in
particular for delicate types of food which do not require
heat, such as for example: ice cream cakes, cream or
custard desserts, fruit cakes. By using the fan, the
defrosting time is approximately halved. In the case of
meat, fish and bread, it is possible to accelerate the
process using the “multi-cooking” mode and setting the
temperature to 80° - 100°C.
BOTTOM VENTILATED mode
The bottom heating element and the fan is activated,
which allows for the heat distribution within the whole
cavity of the oven. This combination is useful for light
cooking of vegetables and fish.
BOTTOM mode
The lower heating element is activated. This position
is recommended for perfecting the cooking of dishes
(in baking trays) which are already cooked on the
surface but require further cooking in the centre, or
for desserts with a covering of fruit or jam, which only
require moderate colouring on the surface. It should
be noted that this function does not allow the maximum
temperature to be reached inside the oven (250°C)
and it is therefore not recommended that foods are
cooked using only this setting, unless you are baking
cakes (which should be baked at a temperature of
180°C or lower).
mode
GB
11
Page 12

GB
Practical cooking advice
! In the GRILL cooking mode, place the dripping pan in
position 1 to collect cooking residues (fat and/or grease).
GRILL
• Insert the rack in position 3 or 4. Place the food in the
centre of the rack.
• We recommend that the power level is set to maximum.
The top heating element is regulated by a thermostat
and may not always operate constantly.
PIZZA
• Use a light aluminium pizza pan. Place it on the rack
provided.
For a crispy crust, do not use the dripping pan as it
prevents the crust from forming by extending the total
cooking time.
• If the pizza has a lot of toppings, we recommend
adding the mozzarella cheese on top of the pizza
halfway through the cooking process.
Planning cooking with the electronic
programmer
Setting the clock
After the appliance has been connected to the
power supply, or after a blackout, the display will
automatically reset to 0:00 and begin to blink. To set
the time:
1. Press the COOKING TIME button
COOKING END TIME
2. Within 4 seconds of having pressed these buttons,
set the exact time by pressing the
button advances the hours and the button
The
decreases the hours.
Once the time has been set, the programmer
automatically switches to manual mode.
Setting the timer
The timer enables a countdown to be set, when the
time has elapsed a buzzer sounds.
To set the timer proceed as follows:
1. press the TIMER button
simultaneously.
. The display shows:
+
and the
and buttons.
1.
2. Press the and buttons to set the desired time.
3. When the buttons are released the timer begins
counting down and the current time appears on the
display.
5
4. After the time has elapsed a buzzer will sound, and
this can be switched off by pressing any button (except
and buttons). The symbol +will switch off.
the
Adjusting the volume of the buzzer
After selecting and confirming the clock settings, use
button to adjust the volume of the alarm buzzer.
the
Setting the cooking time with a delayed start
First decide which cooking mode you wish to use and
set a suitable temperature using the SELECTOR and
! The timer does not switch the oven on or off.
THERMOSTAT knobs on the oven.
At this point it is possible to set the cooking time:
1. Press the COOKING TIME button
2. Within 4 seconds of having pressed this button, set
the desired amount of time by pressing the
buttons. If, for example, you wish to set a cooking time
of 30 minutes, the display will show:
.
and
1
3. 4 seconds after the buttons are released, the current
time (for example 10.00) reappears on the display with
the symbol
Next the desired cooking end time must be set:
4. Press the END COOKING TIME button
5. Within 4 seconds of having pressed this button,
adjust the cooking end time by pressing the
buttons. If, for example, you want cooking to end at
13.00, the display shows:
and the letter A (AUTO).
P
.
and
2
6. 4 seconds after the buttons are released, the current
time (for example 10.00) reappears on the display with
the letter A (AUTO).
3
At this point, the oven is programmed to switch on
automatically at 12:30 and switch off after 30 minutes,
at 13.00.
Setting the cooking time with an immediate start
Follow the above procedure for setting the cooking
time (points 1-3).
! When the letter A appears, this indicates that both
the cooking time and the end cooking time have been
programmed in AUTO mode. To restore the oven to
manual operation, after each AUTO cooking mode
and END COOKING
press the COOKING TIME
TIME
! The symbol
the entire duration of the cooking programme.
The set cooking duration can be displayed at any time
by pressing the COOKING TIME button
the cooking end time may be displayed by pressing
the END COOKING TIME button
time has elapsed a buzzer sounds. To stop it, press
any button apart from the
Cancelling a previously set cooking programme
Press the COOKING TIME button
COOKING END TIME
buttons simultaneously.
will remain lit, along with the oven, for
P
Correcting or cancelling previously set data
The data entered can be changed at any time by
pressing the corresponding button (TIMER, COOKING
and buttons.
simultaneously.
, and
!
. When the cooking
and the
TIME or COOKING END TIME) and the
When the cooking time data is cancelled, the cooking
or button.
12
Page 13

end time data is also cancelled automatically, and vice
versa.
If the oven has already been programmed, it will not
accept cooking end times which are before the start of
the programmed cooking process.
Oven cooking advice table
WARNING! The glass lid canWARNING! The glass lid can
WARNING! The glass lid can
WARNING! The glass lid canWARNING! The glass lid can
break in if it is heated up. Turnbreak in if it is heated up. Turn
break in if it is heated up. Turn
break in if it is heated up. Turnbreak in if it is heated up. Turn
off all the burners and theoff all the burners and the
off all the burners and the
off all the burners and theoff all the burners and the
electric plates before closingelectric plates before closing
electric plates before closing
electric plates before closingelectric plates before closing
the lid. *Applies to the modelsthe lid. *Applies to the models
the lid. *Applies to the models
the lid. *Applies to the modelsthe lid. *Applies to the models
with glass cover only.with glass cover only.
with glass cover only.
with glass cover only.with glass cover only.
GB
Cooking
modes
Convection
Oven
Baking mode
Pizza Mode
Multi-cooking
Grill
Double Grill
Foods Weight
Duck
Roast veal or beef
Roast pork
Biscuits (shortcrust pastry)
Tarts
Tarts
Fruit cakes
Sponge cake made with
yoghurt
Sponge cake
Stuffed pancakes (on 2 racks)
Small cakes (on 2 racks)
Cheese puffs (on 2 racks)
Cream puffs (on 3 racks)
Biscuits (on 3 racks)
Meringues (on 3 racks)
Pizza
Roast veal or beef
Chicken
Pizza (on 2 racks)
Lasagne
Lamb
Roast chicken + potatoes
Mackerel
Sponge cake made with
yoghurt
Cream puffs (on 2 racks)
Biscuits (on 2 racks)
Sponge cake (on 1 rack)
Sponge cake (on 2 racks)
Savoury pies
Sole and cuttlefish
Squid and prawn kebabs
Cuttlefish
Cod fillet
Grilled vegetables
Veal steak
Sausages
Hamburgers
Mackerel
Toasted sandwiches (or toast)
Veal steak
Cutlets
Hamburgers
Mackerel
Toast
With the rotisserie
Spit-roast veal
Spit-roast chicke n
(in kg)
1
1
1
-
1
0.5
1
0.7
0.5
1.2
0.6
0.4
0.7
0.7
0.5
0.5
1
1
1
1
1
1+1
1
1
0.5
0.5
0.5
1
1.5
0.7
0.6
0.6
0.8
0.4
0.8
0.6
0.6
1
n.° 4 and 6
1
1
1
1
n.° 4
1.0
2.0
Rack position Preheating
3
3
3
3
3
3
2 or 3
3
3
2 and 4
2 and 4
2 and 4
1 and 3 and 5
1 and 3 and 5
1 and 3 and 5
3
2
2 or 3
2 and 4
3
2
2 and 4
2
2
2 and 4
2 and 4
2
2 and 4
3
4
4
4
4
3 or 4
4
4
4
4
4
4
4
4
4
4
time
(min)
15
15
15
15
15
15
15
15
15
15
15
15
15
15
15
15
10
10
15
10
10
15
10
10
10
10
10
10
15
5
5
5
5
5
5
5
Recommended
temperature
200
200
200
180
180
180
180
180
160
200
190
210
180
180
90
220
220
180
230
180
180
200
180
170
190
180
170
170
200
100%
100%
100%
100%
100%
100%
100%
100%
100%
100%
Max
Max
Max
Max
Max
Max
Max
Cooking
time
(minutes)
65-75
70-75
70-80
15-20
30-35
20-30
40-45
40-50
25-30
30-35
20-25
15-20
20-25
20-25
180
15-20
25-30
60-70
15-20
30-35
40-45
60-70
30-35
40-50
20-25
10-15
15-20
20-25
25-30
10-12
8-10
10-15
10-15
15-20
15-20
15-20
10-12
15-20
3-5
15-20
15-20
7-10
15-20
2-3
70-80
70-80
Gratin
Bottom
Ventilated
Ventilated
Bottom
Grilled chicken
Cuttlefish
For perfecting cooking
1.5
1.5
2
2
10
10
200
200
55-60
30-35
13
Page 14

Precautions and tips
GB
! This appliance has been designed and manufactured
in compliance with international safety standards.
The following warnings are provided for safety reasons
and must be read carefully.
General safety
• The appliance was designed for domestic use inside
the home and is not intended for commercial or
industrial use.
• The appliance must not be installed outdoors, even in
covered areas. It is extremely dangerous to leave the
appliance exposed to rain and storms.
• Do not touch the appliance with bare feet or with wet
or damp hands and feet.
• The appliance must be used by adults only for
the preparation of food, in accordance with the
instructions outlined in this booklet. Any other
use of the appliance (e.g. for heating the room)
constitutes improper use and is dangerous.
The manufacturer may not be held liable for any
damage resulting from improper, incorrect and
unreasonable use of the appliance.
• The instruction booklet accompanies a class 1
(insulated) or class 2 - subclass 1 (recessed
between 2 cupboards) appliance.
• Keep children away from the oven.
• Make sure that the power supply cables of other
electrical appliances do not come into contact with
the hot parts of the oven.
• The openings used for the ventilation and dispersion
of heat must never be covered.
• Always use oven gloves when placing cookware in
the oven or when removing it.
• Do not use flammable liquids (alcohol, petrol, etc...)
near the appliance while it is in use.
• Do not place flammable material in the lower storage
comaprtment or in the oven itself. If the appliance is
switched on accidentally, it could catch fire.
” position
• Always make sure the knobs are in the “
when the appliance is not in use.
• When unplugging the appliance, always pull the plug
from the mains socket; do not pull on the cable.
• Never perform any cleaning or maintenance work
without having disconnected the appliance from the
electricity mains.
• If the appliance breaks down, under no
circumstances should you attempt to repair
the appliance yourself. Repairs carried out by
inexperienced persons may cause injury or further
malfunctioning of the appliance. Contact Assistance.
• Do not rest heavy objects on the open oven door.
• The appliance should not be operated by people
(including children) with reduced physical, sensory
or mental capacities, by inexperienced individuals
or by anyone who is not familiar with the product.
•
These individuals should, at the very least, be
supervised by someone who assumes responsibility
for their safety or receive preliminary instructions
relating to the operation of the appliance.
• Do not let children play with the appliance.
•
If the cooker is placed on a pedestal, take the necessary precautions to prevent the cooker from sliding
off the pedestal itself.
Disposal
• When disposing of packaging material: observe
local legislation so that the packaging may be
reused.
• The European Directive 2002/96/EC relating
to Waste Electrical and Electronic Equipment
(WEEE) states that household appliances should
not be disposed of using the normal solid urban
waste cycle. Exhausted appliances should be
collected separately in order to optimise the cost
of re-using and recycling the materials inside the
machine, while preventing potential damage to the
atmosphere and to public health. The crossed-out
dustbin is marked on all products to remind the
owner of their obligations regarding separated
waste collection. For more information relating to the
correct disposal of household appliances, owners
should contact their local authorities or appliance
dealer.
Respecting and conserving the
environment
• You can help to reduce the peak load of the
electricity supply network companies by using the
oven in the hours between late afternoon and the
early hours of the morning.
• Always keep the oven door closed when using
the GRILL, DOUBLE GRILL and GRATIN modes:
this will achieve better results while saving energy
(approximately 10%).
• Check the door seals regularly and wipe them clean
to ensure they are free of debris so that they adhere
properly to the door, thus avoiding heat dispersion.
WARNING! The oven is
provided with a stop system to extract the racks
and prevent them from
coming out of the oven.(1)
As shown in the drawing,
to extract them completely, simply lift the racks,
holding them on the front
part, and pull (2).
14
Page 15

Care and maintenance
! Do not close the cover when the burners are alight or
Switching the appliance off
Disconnect your appliance from the electricity supply
before carrying out any work on it.
Cleaning the appliance
! Never use steam cleaners or pressure cleaners on
the appliance.
when they are still hot.
Inspecting the oven seals
Check the door seals around the oven regularly. If
the seals are damaged, please contact your nearest
Authorised After-sales Service Centre. We recommend
that the oven is not used until the seals have been
replaced.
GB
• The stainless steel or enamel-coated external parts
and the rubber seals may be cleaned using a
sponge that has been soaked in lukewarm water
and neutral soap. Use specialised products for the
removal of stubborn stains. After cleaning, rinse well
and dry thoroughly. Do not use abrasive powders or
corrosive substances.
• The hob grids, burner caps, flame spreader rings
and burners may be removed to make cleaning
easier; wash them in hot water and non-abrasive
detergent, making sure all burnt-on residue is
removed before drying them thoroughly.
• Clean the terminal part of the flame failure safety
devices* frequently.
• The inside of the oven should ideally be cleaned
after each use, while it is still lukewarm. Use hot
water and detergent, then rinse well and dry with a
soft cloth. Do not use abrasive products.
Clean the glass part of the oven door using a
•
sponge and a non-abrasive cleaning product, then
dry thoroughly with a soft cloth. Do not use rough
abrasive material or sharp metal scrapers as these
could scratch the surface and cause the glass to
crack.
• The accessories can be washed like everyday
crockery, and are even dishwasher safe.
The cover
If the cooker is fitted with
a glass cover, this cover
should be cleaned using
lukewarm water. Do not
use abrasive products.
It is possible to remove
the cover in order to make
cleaning the area behind
the hob easier. Open the
cover fully and pull it upwards (see gure).
Replacing the oven light bulb
1. After disconnecting the oven from
the electricity mains, remove the
glass lid covering the lamp socket
(see gure).
2. Remove the light bulb and replace
it with a similar one: voltage 230 V,
wattage 25 W, cap E 14.
3. Replace the lid and reconnect the oven to the
electricity supply.
'RQRWXVHWKHRYHQODPSDVIRUDPELHQWOLJKWLQJ
Lower compartment*
There is a compartment
underneath the oven
that may be used to
store oven accessories
or deep dishes. To
open the door pull it
downwards (
figure
).
! The internal surfaces of the compartment (where
present) may become hot.
! Do not place flammable materials in the lower oven
compartment.
see
Gas tap maintenance
Over time, the taps may become jammed or difficult to
turn. If this occurs, the tap must be replaced.
! This procedure must be performed by a qualified
technician who has been authorised by the
manufacturer.
Assistance
Please have the following information to hand:
• The appliance model (Mod.).
• The serial number (S/N).
This information can be found on the data plate located
on the appliance and/or on the packaging.
15
Page 16

GB
Removing and fitting the oven door:
1.Open the door
2.Make the hinge clamps of the oven door rotate
backwards completely (see photo)
3.Close the door until the clamps stop (the door will
remain open for 40° approx.) (see photo)
40°
WARNING! When reassembling the inner door
glass insert the glass panel correctly so that the
text written on the panel is not reversed and
can be easily legible.
7.Replace the profile, a click will indicate that the
part is positioned correctly.
8.Open the door completely.
9.Close the supports (see photo).
10.Now the door can be completely closed and the
oven can be started for normal use.
4.Press the two buttons on the upper profile and
extract the profile (see photo)
5.Remove the glass sheet and do the cleaning as
indicated in chapter: "Care and maintenance".
Steam-Assisted Oven Cleaning
This method of cleaning is recommended especially after
cooking very fatty (roasted)meats.
This cleaning process allows to facilitate the removal of
dirt of the walls of the oven by the generation of steam
that is created inside the oven cavity for easier cleaning.
! Important! Before you start steam -cleaning:
-Remove any food residue and grease from the bottom
of the oven.
- Remove any oven accessories (grids and drip pans).
Perform the above operations according to the following
procedure:
1. pour 300ml of water into the baking tray in the oven,
placing it in the bottom shelf. In the models where the
drip pan is not present, use a baking sheet and place it
on the grill at the bottom shelf;
2. select the function of the oven
and set the temperature to 100 ° C;
3. keep it in the oven for 15min;
4. turn off the oven;
5. Once cooled the oven, you can open the door to
complete the cleaning with water and a damp cloth;
6. eliminate any residual water from the cavity after
finishing cleaning
BOTTOM
6.Replace the glass.
WARNING! Oven must not be operated with inner
door glass removed!
16
When the steam –cleaning is done, after cooking
especially fatty foods, or when grease is difficult to
remove, you may need to complete the cleaning with the
traditional method, described in the previous paragraph.
! Perform cleaning only in the cold oven!
Page 17

ȼɫɬɚɧɨɜɥɟɧɧɹ
! ȼɚɠɥɢɜɨ ɡɛɟɪɟɝɬɢ ɰɸ ɛɪɨɲɭɪɭ, ɳɨɛ ɦɨɠɧɚ ɛɭɥɨ
ɞɨ ɧɟɿ ɡɜɟɪɧɭɬɢɫɹ ɩɪɢ ɧɟɨɛɯɿɞɧɨɫɬɿ ɭ ɛɭɞɶ-ɹɤɨɦɭ
ɜɢɩɚɞɤɭ. ɍ ɪɚɡɿ ɩɪɨɞɚɠɭ, ɩɟɪɟɞɚɱi iɧɲiɢ ɨɫɨɛi
ɚɛɨ ɩɟɪɟɿɡɞɭ, ɩɟɪɟɤɨɧɚɢɬɟɫɹ ɜ ɬɨɦɭ, ɳɨ ɜɨɧɚ
ɡɚɥɢɲɚɽɬɶɫɹ ɪɚɡɨɦ ɡ ɜɢɪɨɛɨɦ.
! ɍɜɚɠɧɨ ɩɪɨɱɢɬɚɢɬɟ ɿɧɫɬɪɭɤɰɿɿ: ɜ ɧɢɯ ɧɚɜɨɞɢɬɶɫɹ
ɜɚɠɥɢɜɚ ɿɧɮɨɪɦɚɰɿɹ ɩɪɨ ɨɛɥɚɞɧɚɧɧɹ, ɜɢɤɨɪɢɫɬɚɧɧɹ
ɢ ɛɟɡɩɟɤɭ.
! ɍɫɬɚɧɨɜɤɚ
ɩɪɢɥɚɞɚ ɦɚɽ ɜɢɤɨɧɭɜɚɬɢɫɹ ɡɝɿɞɧɨ ɞɚɧɨɿ
ɿɧɫɬɪɭɤɰɿɿ ɤɜɚɥɿɮɿɤɨɜɚɧɢɦ ɩɟɪɫɨɧɚɥɨɦ.
! Ȼɭɞɶ-ɹɤɟ ɜɬɪɭɱɚɧɧɹ ɜ ɪɟɝɭɥɸɜɚɧɧɹ ɚɛɨ ɬɟɯɧɿɱɧɟ
ɨɛɫɥɭɝɨɜɭɜɚɧɧɹ ɦɚɽ ɜɢɤɨɧɭɜɚɬɢɫɹ ɧɚ ɩɥɢɬɿ,
ɜɿɞɤɥɸɱɟɧɿɢ ɜɿɞ ɟɥɟɤɬɪɨɠɢɜɥɟɧɧɹ.
ȼɟɧɬɢɥɹɰɿɹ ɩɪɢɦɿɳɟɧɶ
Ɉɛɥɚɞɧɚɧɧɹ ɦɨɠɟ ɛɭɬɢ ɜɫɬɚɧɨɜɥɟɧɟ ɬɿɥɶɤɢ ɭ ɩɨɫɬɿɢɧɨ
ɜɟɧɬɢɥɶɨɜɚɧɢɯ ɩɪɢɦɿɳɟɧɧɹɯ, ɡɝɿɞɧɨ ɞɿɸɱɢɦ ɧɨɪɦɚɦ ɜ
ɤɪɚɿɧi, ɞɟ ɛɭɞɟ ɜɢɤɨɪɢɫɬɚɧɨ ɜɢɪɨɛ. ɍ ɩɪɢɦɿɳɟɧɧɿ, ɜ ɹɤɨɦɭ
ɜɫɬɚɧɨɜɥɟɧɨ ɨɛɥɚɞɧɚɧɧɹ, ɦɚɽ
ɭ ɫɬɭɩɟɧɿ, ɧɟɨɛɯɿɞɧɨɦɭ ɞɥɹ ɧɨɪɦɚɥɶɧɨɝɨ ɝɨɪɿɧɧɹ ɝɚɡɭ
(ɲɜɢɞɤɿɫɬɶ ɡɦɿɧɢ ɩɨɜɿɬɪɹ ɧɟ ɦɚɽ ɛɭɬɢ ɦɟɧɲɨɸ 2ɦ
ɜɿɞɛɭɜɚɬɢɫɹ ɡɦɿɧɚ ɩɨɜɿɬɪɹ,
3
/ɝɨɞ ɧɚ
ɤɨɠɧɢɢ ɤȼɬ ɜɫɬɚɧɨɜɥɟɧɨɿ ɩɨɬɭɠɧɨɫɬɿ).
ȼɯɿɞ ɩɪɢɬɨɱɧɨɿ ɜɟɧɬɢɥɹɰɿɿ, ɡɚɯɢɳɟɧɢɢ ʉɪɚɬɤɨɸ,
ɩɨɜɢɧɟɧ ɦɚɬɢ ɤɨɪɢɫɧɭ ɩɥɨɳɭ ɧɟ ɦɟɧɲɟ 100
ȱ
ɫɦ
ɤɨɪɢɫɧɨɝɨ ɩɟɪɟɬɢɧɭ ɿ ɦɚɽ ɛɭɬɢ ɪɨɡɦɿɳɟɧɢɢ ɬɚɤ,
ɳɨɛ ɜɿɧ ɧɟ ɦɿɝ ɡɚɛɢɬɢɫɹ, ɧɚɜɿɬɶ ɱɚɫɬɤɨɜɨ (ɞɢɜ.
ɦɚɥɸɧɨɤ A).
Ɍɚɤɢɢ ɜɯɿɞ ɩɨɜɢɧɟɧ ɛɭɬɢ ɡɛɿɥɶɲɟɧɢɢ ɧɚ 100%, ɬɨɛɬɨ
ɦɿɧɿɦɭɦ 200 ɫɦ
2
– ɹɤɳɨ ɪɨɛɨɱɚ ɩɨɜɟɪɯɧɹ ɩɥɢɬɢ ɧɟ
ɦɚɽ ɩɪɢɫɬɪɨɸ ɛɟɡɩɟɤɢ ɭ ɪɚɡɿ ɡɧɢɤɧɟɧɧɹ ɩɨɥɭɦ’ɹ, ɿ
ɤɨɥɢ ɦɨɠɥɢɜɢɢ ɧɟɩɪɹɦɢɢ ɩɨɬɿɤ ɩɨɜɿɬɪɹ ɿɡ ɩɪɢɥɟɝɥɢɯ
ɩɪɢɦɿɳɟɧɶ (ɞɢɜ.ɦɚɥɸɧɨɤ B) – ɹɤɳɨ ɰɟ ɧɟ ɫɩɿɥɶɧɿ
ɱɚɫɬɢɧɢ ɛɭɞɿɜɥɿ, ɩɨɠɟɠɨɧɟɛɟɡɩɟɱɧɟ ɩɪɢɦɿɳɟɧɧɹ
ɚɛɨ ɫɩɚɥɶɧɿ ɤɿɦɧɚɬɢ, ɨɛɥɚɞɧɚɧɿ ɜɟɧɬɢɥɹɰɿɢɧɢɦ
ɬɪɭɛɨɩɪɨɜɨɞɨɦ ɧɚɡɨɜɧɿ, ɹɤ ɨɩɢɫɚɧɨ ɜɢɳɟ.
A
A
B
ȼɟɧɬɢɥɹɰɿɢɧɢɢ ɨɬɜɿɪ ɞɥɹ
ɜɿɞɩɪɚɰɶɨɜɚɧɨɝɨ ɩɨɜɿɬɪɹ
ɉɪɢɥɟɝɥɿ
ɩɪɢɦɿɳɟɧɧɹ
Ɂɛɿɥɶɲɟɧɧɹ ɳɿɥɢɧɢ ɦɿɠ
ɞɜɟɪɢɦɚ ɿ ɩɿɞɥɨɝɨɸ
ȼɟɧɬɢɥɶɨɜɚɧɿ
ɩɪɢɦɿɳɟɧɧɹ
! ɉɿɫɥɹ ɬɪɢɜɚɥɨɝɨ ɜɢɤɨɪɢɫɬɚɧɧɹ ɩɥɢɬɢ, ɞɨɰɿɥɶɧɨ
ɜɿɞɤɪɢɬɢ ɜɿɤɧɨ
ɚɛɨ ɡɛɿɥɶɲɢɬɢ ɲɜɢɞɤɿɫɬɶ
ɜɟɧɬɢɥɹɬɨɪɿɜ.
ȼɿɞɜɟɞɟɧɧɹ ɩɪɨɞɭɤɬɿɜ ɡɝɨɪɚɧɧɹ
ȼɿɞɜɟɞɟɧɧɹ ɩɪɨɞɭɤɬɿɜ ɡɝɨɪɚɧɧɹ ɦɚɽ ɛɭɬɢ
ɡɚɛɟɡɩɟɱɟɧɟ ɱɟɪɟɡ ɜɢɬɹɠɤɭ, ɩɿɞɤɥɸɱɟɧɭ ɞɨ ɤɚɧɚɥɭ ɡ
ɩɪɢɪɨɞɧɨɸ ɬɹɝɨɸ ɡ ɧɚɥɟɠɧɨɸ ɟɮɟɤɬɢɜɧɿɫɬɸ, ɚɛɨ ɡɚ
ɞɨɩɨɦɨɝɨɸ ɟɥɟɤɬɪɨɜɟɧɬɢɥɹɬɨɪɚ, ɹɤɢɢ ɛɢ ɜɤɥɸɱɚɜɫɹ
ɚɜɬɨɦɚɬɢɱɧɨ ɤɨɠɧɨɝɨ ɪɚɡɭ ɩɪɢ ɜɤɥɸɱɟɧɧɿ ɩɥɢɬɢ (ɞɢɜ.
ɦɚɥɸɧɤɢ).
ȼɿɞɜɟɞɟɧɧɹ
ɛɟɡɩɨɫɟɪɟɞɧɶɨ
ɧɚɡɨɜɧɿ
ȼɿɞɜɟɞɟɧɧɹ ɱɟɪɟɡ ɤɚɧɚɥɢ
ɚɛɨ ɪɨɡɝɚɥɭɠɟɧɢɢ ɞɢɦɚɪ
(ɡɚɪɟɡɟɪɜɨɜɚɧɢɢ ɞɥɹ ɤɭɯɨɧɧɨɝɨ
ɭɫɬɚɬɤɭɜɚɧɧɹ)
! Ɂɪɿɞɠɟɧɿ ɧɚɮɬɨɜɿ ɝɚɡɢ, ɜɚɠɱɿ ɡɚ ɩɨɜɿɬɪɹ, ɡɛɢɪɚɸɬɶɫɹ
ɜɧɢɡɭ, ɬɨɦɭ ɩɪɢɦɿɳɟɧɧɹ, ɞɟ
ɡɧɚɯɨɞɹɬɶɫɹ ɛɚɥɨɧɢ ɡ
ɝɚɡɨɦ, ɩɨɜɢɧɧɿ ɛɭɬɢ ɨɛɥɚɞɧɚɧɿ ɜɢɬɹɠɧɢɦɢ ɨɬɜɨɪɚɦɢ,
ɳɨ ɜɢɯɨɞɹɬɶ ɧɚɡɨɜɧɿ ɞɥɹ ɟɜɚɤɭɚɰɿɿ ɡɧɢɡɭ ɩɪɢ
ɦɨɠɥɢɜɨɦɭ ɜɢɬɨɤɭ ɝɚɡɭ.
Ȼɚɥɨɧɢ ɿɡ ɡɪɿɞɠɟɧɢɦ ɧɚɮɬɨɜɢɦ ɝɚɡɨɦ, ɩɨɪɨɠɧɿ ɚɛɨ
ɱɚɫɬɤɨɜɨ ɩɨɜɧɿ, ɧɟ ɩɨɜɢɧɧɿ ɛɭɬɢ ɜɫɬɚɧɨɜɥɟɧɿ ɚɛɨ
ɡɛɟɪɿɝɚɬɢɫɹ ɜ ɩɪɢɦɿɳɟɧɧɹɯ ɧɢɠɱɟ ɡɚ ɪɿɜɟɧɶ ɝɪɭɧɬɭ
(ɥɶɨɯɢ ɿ ɬ.ɩ.). ɍ ɩɪɢɦɿɳɟɧɧɿ ɦɨɠɧɚ ɬɪɢɦɚɬɢ ɬɿɥɶɤɢ
ɜɢɤɨɪɢɫɬɨɜɭɜɚɧɢɢ
ɛɚɥɨɧ, ɞɚɥɟɤɨ ɜɿɞ ɞɠɟɪɟɥ ɬɟɩɥɚ
(ɩɟɱɿ, ɤɚɦɿɧɢ, ɨɛɨɝɪiɜɚɱi), ɹɤɿ ɧɚɝɪɿɜɚɸɬɶɫɹ ɜɢɳɟ ɜɿɞ
50°C.
Ɋɨɡɦɿɳɟɧɧɹ ɿ ɜɢɪɿɜɧɸɜɚɧɧɹ
! Ɇɨɠɧɚ ɜɫɬɚɧɨɜɥɸɜɚɬɢ ɩɥɢɬɭ ɡɛɨɤɭ ɜɿɞ ɦɟɛɥɿɜ, ɹɤɿ
ɧɟ ɜɢɳɿ ɡɚ ɪɨɛɨɱɭ ɩɨɜɟɪɯɧɸ.
! ɉɟɪɟɤɨɧɚɢɬɟɫɹ ɜ ɬɨɦɭ, ɳɨ ɩɨɜɟɪɯɧɹ ɫɬɿɧɢ, ɹɤɚ
ɤɨɧɬɚɤɬɭɽ ɿɡ ɡɚɞɧɶɨɸ ɱɚɫɬɢɧɨɸ ɩɥɢɬɢ, ɜɢɝɨɬɨɜɥɟɧɚ
ɡ ɧɟɝɨɪɸɱɨɝɨ ɬɚ ɬɟɩɥɨɫɬɿɢɤɨɝɨ ɦɚɬɟɪɿɚɥɭ ɿ ɜɢɬɪɢɦɭɽ
ɧɚɝɪɿɜɚɧɧɹ (90°C).
Ⱦɥɹ ɩɪɚɜɢɥɶɧɨɝɨ ɜɫɬɚɧɨɜɥɟɧɧɹ:
• ɪɨɡɦɿɳɭɢɬɟ ɩɥɢɬɭ ɜ ɤɭɯɧɿ, ɨɛɿɞɧɿɢ ɡɚɥɿ ɚɛɨ ɜ
ɨɞɧɨɤɿɦɧɚɬɧɿɢ ɤɜɚɪɬɢɪɿ-ɫɬɭɞɿɿ (ɧɟ
• ɹɤɳɨ ɩɨɜɟɪɯɧɹ ɩɥɢɬɢ ɽ ɬɪɨɯɢ ɜɢɳɨɸ, ɧɿɠ
ɩɨɜɟɪɯɧɹ ɦɟɛɥɿɜ, ɦɟɛɥɿ ɩɨɜɢɧɧɿ ɡɧɚɯɨɞɢɬɢɫɹ ɧɟ
ɛɥɢɠɱɟ ɧɿɠ 200 ɦɦ ɜɿɞ ɩɥɢɬɢ;
HOOD
Min. mm.
600
mm.
420
Min.
mm. with hood
420
650
Min. mm.
min.
mm. without hood
700
min.
ɡɚɧɚɜɿɫɨɤ ɩɨɡɚɞɭ ɩɥɢɬɢ ɚɛɨ ɛɥɢɠɱɟ ɧɿɠ 200 ɦɦ ɜɿɞ
ɿɿ ɫɬɨɪɿɧ;
• ɜɢɬɹɠɤɢ ɩɨɜɢɧɧɿ ɜɫɬɚɧɨɜɥɸɜɚɬɢɫɹ ɡɝɿɞɧɨ
ɜɿɞɩɨɜɿɞɧɨɿ ɿɧɫɬɪɭɤɰɿɿ.
ɭ ɜɚɧɧɿ);
• ɹɤɳɨ ɩɥɢɬɚ ɛɭɞɟ
ɜɫɬɚɧɨɜɥɟɧɚ ɩɿɞ
ɫɟɤɰɿɽɸ
ɧɚɜɿɫɧɢɯ ɦɟɛɥɿɜ, ɜɿɞɫɬɚɧɶ
ɞɨ ɿɿ ɩɨɜɟɪɯɧɿ ɧɟ ɩɨɜɢɧɧɚ
ɛɭɬɢ ɦɟɧɲɨɸ ɡɚ 420ɦɦ.
Ɍɚɤɚ ɜɿɞɫɬɚɧɶ ɩɨɜɢɧɧɚ
ɫɤɥɚɞɚɬɢ 700 ɦɦ, ɹɤɳɨ
ɫɟɤɰɿɹ ɧɚɜɿɫɧɢɯ ɦɟɛɥɿɜ
ɡɪɨɛɥɟɧɚ ɡ ɝɨɪɸɱɨɝɨ
ɦɚɬɟɪɿɚɥɭ (ɞɢɜ.
ɦɚɥɸɧɨɤ);
• ɧɟ ɪɨɡɦɿɳɭɢɬɟ
ɜɤɚɡɿɜɤɚɦ
UA
17
Page 18

UA
ȼɢɪɿɜɧɸɜɚɧɧɹ
əɤɳɨ ɧɟɨɛɯɿɞɧɨ ɜɢɪɿɜɧɹɬɢ
ɩɥɢɬɭ, ɜɤɪɭɬɿɬɶ ɪɟɝɭɥɸɸɱɿ
ɧɿɠɤɢ, ɳɨ ɜɯɨɞɹɬɶ ɞɨ
ɤɨɦɩɥɟɤɬɭ ɩɨɫɬɚɱɚɧɧɹ,
ɭ ɫɩɟɰɿɚɥɶɧɿ ɦɿɫɰɹ, ɳɨ
ɡɧɚɯɨɞɹɬɶɫɹ ɭ ɤɭɬɤɚɯ ɨɫɧɨɜɢ
(ɞɢɜ. ɦɚɥɸɧɨɤ).
ɇɿɠɤɢ* ɜɦɨɧɬɨɜɭɸɬɶɫɹ ɭ ɝɧɿɡɞɚ
ɩɿɞ ɨɫɧɨɜɨɸ ɩɥɢɬɢ.
ɉɿɞɤɥɸɱɟɧɧɹ ɟɥɟɤɬɪɨɟɧɟɪɝɿɿ
ȼɫɬɚɧɨɜɿɬɶ ɧɚ ɤɚɛɟɥɿ ɜɢɥɤɭ, ɪɨɡɪɚɯɨɜɚɧɭ ɧɚ
ɧɚɜɚɧɬɚɠɟɧɧɹ, ɜɤɚɡɚɧɟ ɜ ɬɚɛɥɢɱɰɿ ɡ ɬɟɯɧɿɱɧɢɦɢ
ɯɚɪɚɤɬɟɪɢɫɬɢɤɚɦɢ, ɪɨɡɦɿɳɟɧɿɢ ɧɚ ɩɥɢɬɿ (ɞɢɜ.
ɬɚɛɥɢɰɸ Ɍɟɯɧɿɱɧɢɯ Ⱦɚɧɢɯ).
ɍ ɪɚɡɿ ɩɪɹɦɨɝɨ ɩɿɞɤɥɸɱɟɧɧɹ ɞɨ ɦɟɪɟɠɿ ɧɟɨɛɯɿɞɧɨ
ɩɨɦɿɫɬɢɬɢ ɦɿɠ ɩɥɢɬɨɸ ɿ ɦɟɪɟɠɟɸ ɜɫɟɩɨɥɹɪɧɢɢ
ɜɢɦɢɤɚɱ ɡ ɦɿɧɿɦɚɥɶɧɨɸ ɜɿɞɫɬɚɧɧɸ ɦɿɠ ɤɨɧɬɚɤɬɚɦɢ 3
ɦɦ, ɪɨɡɪɚɯɨɜɚɧɢɢ ɧɚ ɜɤɚɡɚɧɟ ɧɚɜɚɧɬɚɠɟɧɧɹ ɿ ɬɚɤɢɢ,
ɳɨ ɜɿɞɩɨɜɿɞɚɽ ɧɨɪɦɿ NFC 15-100 (ɞɪɿɬ ɡɚɡɟɦɥɟɧɧɹ
ɧɟ ɩɨɜɢɧɟɧ ɩɟɪɟɪɢɜɚɬɢɫɹ ɜɢɦɢɤɚɱɟɦ). Ʉɚɛɟɥɶ
ɠɢɜɥɟɧɧɹ ɩɨɜɢɧɟɧ ɛɭɬɢ ɪɨɡɬɚɲɨɜɚɧɢɢ ɬɚɤ, ɳɨɛ
ɠɨɞɧɚ ɡ ɢɨɝɨ ɱɚɫɬɢɧ ɧɟ ɩɿɞɞɚɜɚɥɚɫɹ ɧɚɝɪɿɜɚɧɧɸ
ɜɢɳɟ, ɧɿɠ ɧɚ 50°C ɜɿɞ ɬɟɦɩɟɪɚɬɭɪɢ ɞɨɜɤɿɥɥɹ.
Ⱦɨ ɜɢɤɨɧɚɧɧɹ ɩɿɞɤɥɸɱɟɧɧɹ ɩɟɪɟɤɨɧɚɢɬɟɫɹ, ɳɨ:
• ɪɨɡɟɬɤɚ ɦɚɽ ɡɚɡɟɦɥɟɧɧɹ, ɜɿɞɩɨɜɿɞɧɨ ɞɨ ɜɫɬɚɧɨɜɥɟɧɢɯ
ɧɨɪɦ;
• ɪɨɡɟɬɤɚ ɜɢɬɪɢɦɭɽ ɦɚɤɫɢɦɚɥɶɧɟ ɧɚɜɚɧɬɚɠɟɧɧɹ
ɩɨɬɭɠɧɨɫɬɿ ɨɛɥɚɞɧɚɧɧɹ, ɜɤɚɡɚɧɟ ɧɚ ɬɚɛɥɢɱɰɿ ɡ
ɯɚɪɚɤɬɟɪɢɫɬɢɤɚɦɢ;
• ɧɚɩɪɭɝɚ ɠɢɜɥɟɧɧɹ
ɡɧɚɯɨɞɢɬɶɫɹ ɜ ɦɟɠɚɯ ɡɧɚɱɟɧɶ,
ɜɤɚɡɚɧɢɯ ɧɚ ɬɚɛɥɢɱɰɿ;
• ɪɨɡɟɬɤɚ ɫɭɦɿɫɧɚ ɡ ɜɢɥɤɨɸ ɩɥɢɬɢ. ȼ ɿɧɲɨɦɭ ɜɢɩɚɞɤɭ
ɡɚɦɿɧɿɬɶ ɪɨɡɟɬɤɭ ɚɛɨ ɜɢɥɤɭ; ɧɟ ɜɢɤɨɪɢɫɬɨɜɭɢɬɟ
ɩɨɞɨɜɠɭɜɚɱɿ ɢ ɬɪɿɢɧɢɤɢ.
! ɍ ɜɫɬɚɧɨɜɥɟɧɿɢ ɩɥɢɬɿ, ɦɚɽ ɛɭɬɢ ɡɚɛɟɡɩɟɱɟɧɢɢ
ɥɟɝɤɢɢ ɞɨɫɬɭɩ ɞɨ ɟɥɟɤɬɪɢɱɧɨɝɨ ɤɚɛɟɥɸ ɿ ɪɨɡɟɬɤɢ.
! Ʉɚɛɟɥɶ ɧɟ ɩɨɜɢɧɟɧ ɦɚɬɢ ɩɟɪɟɝɢɧɿɜ ɚɛɨ ɛɭɬɢ
ɫɬɢɫɧɭɬɢɦ.
! Ʉɚɛɟɥɶ ɦɚɽ
ɩɟɪɿɨɞɢɱɧɨ ɩɟɪɟɜɿɪɹɬɢɫɹ ɿ ɦɿɧɹɬɢɫɹ
ɬɿɥɶɤɢ ɮɚɯɿɜɰɹɦɢ.
! ɉɿɞɩɪɢɽɦɫɬɜɨ ɧɟ ɧɟɫɟ ɛɭɞɶ-ɹɤɨɿ
ɜɿɞɩɨɜɿɞɚɥɶɧɨɫɬɿ, ɹɤɳɨ ɰɿ ɧɨɪɦɢ ɧɟ
ɞɨɬɪɢɦɭɜɚɬɢɦɭɬɶɫɹ.
ɉɿɞɤɥɸɱɟɧɧɹ ɝɚɡɭ
ɉɿɞɤɥɸɱɟɧɧɹ ɞɨ ɝɚɡɨɜɨɿ ɦɟɪɟɠɿ ɚɛɨ ɛɚɥɨɧɚ ɦɨɠɟ
ɜɢɤɨɧɭɜɚɬɢɫɹ ɡɚ ɞɨɩɨɦɨɝɨɸ ɝɧɭɱɤɨɝɨ ɝɭɦɨɜɨɝɨ
ɲɥɚɧɝɚ ɚɛɨ ɲɥɚɧɝɚ ɜ ɫɬɚɥɟɜɨɦɭ ɨɛɩɥɟɬɟɧɧɿ,
ɡɝɿɞɧɨ ɞɿɸɱɢɦ ɧɚɰɿɨɧɚɥɶɧɢɦ ɧɨɪɦɚɦ
ɿ ɩɿɫɥɹ ɬɨɝɨ
ɹɤ ɜɫɬɚɧɨɜɥɟɧɨ, ɳɨ ɩɥɢɬɚ ɛɭɥɚ ɧɚɥɚɲɬɨɜɚɧɚ
,
ɧɚ ɬɢɩ ɝɚɡɭ, ɧɚ ɹɤɨɦɭ ɜɨɧɚ ɩɪɚɰɸɜɚɬɢɦɟ (ɞɢɜ.
Ʉɚɥɿɛɪɭɜɚɥɶɧɚ ɛɢɪɤɚ ɧɚ ɤɪɢɲɰɿ: ɜ ɿɧɲɨɦɭ ɜɢɩɚɞɤɭ
ɞɢɜ. ɧɢɠɱɟ). ɍ ɪɚɡɿ ɪɨɛɨɬɢ
ɩɥɢɬɢ ɜɿɞ ɛɚɥɨɧɚ ɿɡ
ɡɪɿɞɠɟɧɢɦ ɝɚɡɨɦ, ɜɢɤɨɪɢɫɬɨɜɭɢɬɟ ɪɟɞɭɤɬɨɪɢ
ɜɿɞɩɨɜɿɞɧɨ ɞɨ ɞɿɸɱɢɯ ɧɨɪɦ ɭ ɫɬɪɚɧi, ɞɟ ɛɭɞɟ
ɜɢɤɨɪɢɫɬɚɧɨ ɜɢɪɨɛ. ɓɨɛ ɩɨɥɟɝɲɢɬɢ ɩɿɞɤɥɸɱɟɧɧɹ,
ɠɢɜɥɟɧɧɹ ɝɚɡɭ ɦɨɠɟ ɩɨɞɚɜɚɬɢɫɹ ɡɛɨɤɭ *:
ɩɟɪɟɫɬɚɜɬɟ ɜ ɨɛɪɚɬɧɨɦɭ ɧɚɩɪɹɦi ɭɬɪɢɦɭɜɚɱ ɝɭɦɤɢ
ɞɥɹ ɩɿɞɤɥɸɱɟɧɧɹ ɡɚɦɢɤɚɸɱɨɿ ɩɪɨɛɤɢ ɿ ɡɚɦɿɧɿɬɶ
ɭɳɿɥɶɧɸɜɚɱ, ɳɨ ɜɯɨɞɢɬɶ ɭ ɤɨɦɩɥɟɤɬ ɩɨɫɬɚɱɚɧɧɹ.
! Ⱦɥɹ ɛɟɡɩɟɪɟɛɿɢɧɨɿ ɪɨɛɨɬɢ, ɞɥɹ ɚɞɟɤɜɚɬɧɨɝɨ
ɜɢɤɨɪɢɫɬɚɧɧɹ ɟɧɟɪɝɿɿ ɿ ɛɿɥɶɲ ɬɪɢɜɚɥɨɝɨ ɬɟɪɦɿɧɭ
ɫɥɭɠɛɢ ɩɥɢɬɢ, ɡɚɛɟɡɩɟɱɬɟ ɬɢɫɤ ɩɨɞɚɱɿ ɝɚɡɭ ɜ
ɦɟɠɚɯ ɡɧɚɱɟɧɶ, ɜɤɚɡɚɧɢɯ ɜ ɬɚɛɥɢɰɿ ɏɚɪɚɤɬɟɪɢɫɬɢɤ
ɩɚɥɶɧɢɤɿɜ ɿ ɮɨɪɫɭɧɨɤ (ɞɢɜ. ɧɢɠɱɟ).
ɉɿɞɤɥɸɱɟɧɧɹ ɝɚɡɭ ɡɚ ɞɨɩɨɦɨɝɨɸ ɝɧɭɱɤɨɝɨ
ɝɭɦɨɜɨɝɨ ɲɥɚɧɝɚ
ɉɟɪɟɜɿɪɬɟ, ɳɨɛ ɲɥɚɧɝ ɜɿɞɩɨɜɿɞɚɜ ɞɿɸɱɢɦ ɞɟɪɠɚɜɧɢɦ
ɧɨɪɦɚɦ. ȼɧɭɬɪɿɲɧɿɢ ɞɿɚɦɟɬɪ ɲɥɚɧɝɚ ɩɨɜɢɧɟɧ ɛɭɬɢ: 8
ɦɦ ɞɥɹ ɡɪɿɞɠɟɧɨɝɨ ɝɚɡɭ; 13 ɦɦ ɞɥɹ ɦɟɬɚɧɭ.
ȼɢɤɨɧɚɜɲɢ
ɡ’ɽɞɧɚɧɧɹ, ɩɟɪɟɤɨɧɚɢɬɟɫɹ ɜ ɬɨɦɭ, ɳɨ
ɲɥɚɧɝ:
• ɧɟ ɬɨɪɤɚɽɬɶɫɹ ɱɚɫɬɢɧ, ɹɤɿ ɧɚɝɪɿɜɚɸɬɶɫɹ ɜɢɳɟ
ɬɟɦɩɟɪɚɬɭɪɢ ɜ 50ɨC;
• ɧɟ ɦɚɽ ɛɭɞɶ-ɹɤɨɝɨ ɧɚɬɹɝɧɟɧɧɹ ɚɛɨ ɫɤɪɭɱɭɜɚɧɧɹ, ɧɟ
ɦɚɽ ɡɝɢɧɿɜ ɚɛɨ ɫɬɢɫɤɚɧɶ;
• ɧɟ ɬɨɪɤɚɽɬɶɫɹ ɝɨɫɬɪɢɯ ɩɪɟɞɦɟɬɿɜ, ɤɪɚɿɜ, ɪɭɯɨɦɢɯ
ɱɚɫɬɢɧ ɿ ɧɟ ɡɞɚɜɥɟɧɢɢ;
• ɦɨɠɟ ɛɭɬɢ ɥɟɝɤɨ ɨɝɥɹɧɭɬɢɢ ɩɨ ɜɫɿɢ ɞɨɜɠɢɧɿ ɞɥɹ
ɤɨɧɬɪɨɥɸ ɢɨɝɨ ɫɬɚɧɭ
;
• ɦɚɽ ɞɨɜɠɢɧɭ ɦɟɧɲɭ ɧɿɠ 1500 ɦɦ;
• ɞɨɛɪɟ ɡɚɤɪɿɩɥɟɧɢɢ ɧɚ ɨɛɨɯ ɤɿɧɰɹɯ ɡɚ ɞɨɩɨɦɨɝɨɸ
ɯɨɦɭɬɿɜ, ɜɿɞɩɨɜɿɞɧɨ ɞɨ ɞɿɸɱɢɯ ɞɟɪɠɚɜɧɢɯ ɧɨɪɦ.
Точк а
кріплення
Відсічний
кран
Блок гнучки
труб
Точк а
кріплення
Блок гнучки
труб
ГАРЯЧА ПОВЕРХНЯ
Відсічний
кран
! əɤɳɨ ɨɞɧɚ ɚɛɨ ɛɿɥɶɲɟ ɡ ɰɢɯ ɭɦɨɜ ɧɟ ɛɭɞɭɬɶ
ɞɨɬɪɢɦɚɧɿ, ɚɛɨ ɹɤɳɨ ɩɥɢɬɚ ɜɫɬɚɧɨɜɥɟɧɚ ɡɝɿɞɧɨ
ɭɦɨɜɚɦ ɤɥɚɫɭ 2 - ɩɿɞɤɥɚɫ 1 (ɩɥɢɬɚ, ɜɫɬɚɧɨɜɥɟɧɚ
ɦɿɠ ɞɜɨɦɚ ɩɪɟɞɟɦɟɬɚɦɢ ɦɟɛɥi), ɧɟɨɛɯɿɞɧɨ
ɜɢɤɨɪɢɫɬɨɜɭɜɚɬɢ ɝɧɭɱɤɢɢ ɲɥɚɧɝ ɜ ɫɬɚɥɟɜɨɦɭ
ɨɛɩɥɟɬɟɧɧɿ (ɞɢɜ. ɧɢɠɱɟ).
ɉɿɞɤɥɸɱɟɧɧɹ ɝɚɡɭ ɡɚ ɞɨɩɨɦɨɝɨɸ ɝɧɭɱɤɨɝɨ
ɲɥɚɧɝɚ ɜ ɨɛɩɥɟɬɟɧɧɿ ɡ ɧɟɿɪɠɚɜɿɸɱɨɿ ɫɬɚɥɿ ɞɨ
ɛɟɡɩɟɪɟɪɜɧɨɿ ɫɬɿɧɢ ɡɚ ɞɨɩɨɦɨɝɨɸ ɩɚɬɪɨɧɿɜ ɿɡ
ɪɿɡɶɛɨɸ
ɉɟɪɟɜɿɪɬɟ, ɳɨɛ ɲɥɚɧɝ ɿ ɭɳiɥɟɧɧɹ ɜɿɞɩɨɜɿɞɚɥɢ ɞɿɸɱɢɦ
ɞɟɪɠɚɜɧɢɦ ɧɨɪɦɚɦ.
ɓɨɛ ɩɿɞɤɥɸɱɢɬɢ ɲɥɚɧɝ, ɜɢɞɚɥɿɬɶ ɭɬɪɢɦɭɜɚɱ ɝɭɦɤɢ,
ɳɨ ɦɿɫɬɢɬɶɫɹ ɜ ɩɥɢɬɿ (ɦɿɫɰɟ ɩɿɞɤɥɸɱɟɧɧɹ ɝɚɡɭ ɞɨ
ɩɥɢɬɢ ɦɚɽ ɜɢɝɥɹɞ ɰɢɥiɧɞɪɢɱɧɨɿ ɬɪɭɛɤɢ ɡ ɪɿɡɶɛɨɸ
ɩɚɩɚ 1/2 ɞɸɢɦɚ).
18
Page 19

! ȼɢɤɨɧɚɢɬɟ ɡ’ɽɞɧɚɧɧɹ ɬɚɤ, ɳɨɛ ɞɨɜɠɢɧɚ
ɬɪɭɛɨɩɪɨɜɨɞɭ ɧɟ ɩɟɪɟɜɢɳɭɜɚɥɚ 2 ɦɟɬɪɿɜ, ɩɪɢ
ɰɶɨɦɭ ɧɟ ɞɨɩɭɫɤɚɢɬɟ ɤɨɧɬɚɤɬɭ ɲɥɚɧɝɚ ɡ ɪɭɯɨɦɢɦɢ
ɱɚɫɬɢɧɚɦɢ ɬɚ ɢɨɝɨ ɫɬɢɫɧɟɧɧɹ.
! əɤɳɨ ɬɢɫɤ ɝɚɡɭ ɜɿɞɪɿɡɧɹɬɢɦɟɬɶɫɹ (ɚɛɨ ɦɿɧɹɬɢɦɟɬɶɫɹ)
ɜɿɞ ɪɚɧɿɲɟ ɜɫɬɚɧɨɜɥɟɧɨɝɨ, ɧɟɨɛɯɿɞɧɨ ɜɫɬɚɧɨɜɢɬɢ ɧɚ
ɜɯɨɞɿ ɪɟɞɭɤɬɨɪ ɬɢɫɤɭ, ɡɝɿɞɧɨ ɞɿɸɱɢɦ ɧɚɰɿɨɧɚɥɶɧɢɦ
ɧɨɪɦɚɦ ɞɥɹ “ɪɟɞɭɤɬɨɪɿɜ ɞɥɹ ɤɚɧɚɥɿɡɨɜɚɧɢɯ ɝɚɡɿɜ”.
UA
Ʉɨɧɬɪɨɥɶ ɝɟɪɦɟɬɢɱɧɨɫɬɿ
ɉɿɫɥɹ ɩɨɜɧɨɝɨ ɜɫɬɚɧɨɜɥɟɧɧɹ ɩɟɪɟɜɿɪɬɟ
ɝɟɪɦɟɬɢɱɧɿɫɬɶ ɜɫɿɯ ɡ’ɽɞɧɚɧɶ, ɜɢɤɨɪɢɫɬɨɜɭɸɱɢ ɬɿɥɶɤɢ
ɦɢɥɶɧɢɢ ɪɨɡɱɢɧ ɿ ɭ ɠɨɞɧɨɦɭ ɜɢɩɚɞɤɭ
ɫɿɪɧɢɤ.
ɇɚɥɚɲɬɭɜɚɧɧɹ ɧɚ ɪɿɡɧi ɬɢɩɢ ɝɚɡɭ
ȯ ɦɨɠɥɢɜɿɫɬɶ ɧɚɥɚɲɬɭɜɚɧɧɹ ɩɥɢɬɢ ɩɿɞ ɬɢɩ ɝɚɡɭ,
ɜɿɞɦɿɧɧɢɢ ɜɿɞ ɬɢɩɭ, ɧɚ ɹɤɢɢ ɜɨɧɚ ɛɭɥɚ ɧɚɥɚɲɬɨɜɚɧɚ
ɩɿɞɩɪɢɽɦɫɬɜɨɦ-ɜɢɪɨɛɧɢɤɨɦ (ɜɤɚɡɚɧɢɢ ɧɚ
ɤɚɥɿɛɪɭɜɚɥɶɧɿɢ ɛɢɪɰɿ ɧɚ ɤɪɢɲɰɿ).
ɇɚɥɚɲɬɭɜɚɧɧɹ ɪɨɛɨɱɨɿ ɩɨɜɟɪɯɧɿ
Ɂɚɦɿɧɚ ɮɨɪɫɭɧɨɤ ɩɚɥɶɧɢɤɿɜ ɩɨɜɟɪɯɧɿ:
1. Ɂɧɿɦɿɬɶ ʉɪɚɬɤɢ ɢ ɩɚɥɶɧɢɤɢ ɡ ɿɯ ɩɨɫɚɞɨɱɧɢɯ ɦɿɫɰɶ;
2. ɜɿɞɝɜɢɧɬɿɬɶ ɮɨɪɫɭɧɤɢ, ɤɨɪɢɫɬɭɸɱɢɫɶ ɬɪɭɛɧɢɦ
ɤɥɸɱɟɦ 7 ɦɦ (ɞɢɜ. ɦɚɥɸɧɨɤ), ɿ ɡɚɦɿɧɿɬɶ ɿɯ
ɮɨɪɫɭɧɤɚɦɢ
( ɞɢɜ. ɬɚɛɥɢɰɸ ɏɚɪɚɤɬɟɪɢɫɬɢɤɢ ɩɚɥɶɧɢɤɿɜ ɿ
ɮɨɪɫɭɧɨɤ);
3. ɜɫɬɚɧɨɜɿɬɶ ɧɚ ɦɿɫɰɟ ɜɫɿ ɤɨɦɩɨɧɟɧɬɢ, ɜɢɤɨɧɚɜɲɢ
ɜɤɚɡɚɧɿ ɜɢɳɟ ɨɩɟɪɚɰɿɿ ɭ ɡɜɨɪɨɬɧɿɢ ɩɨɫɥɿɞɨɜɧɨɫɬɿ.
ɇɚɥɚɲɬɭɜɚɧɧɹ ɦɿɧɿɦɚɥɶɧɨɝɨ ɪɿɜɧɹ ɩɚɥɶɧɢɤɿɜ
ɩɨɜɟɪɯɧɿ:
1. ɜɫɬɚɧɨɜɿɬɶ ɤɪɚɧ ɭ ɦɿɧɿɦɚɥɶɧɟ ɩɨɥɨɠɟɧɧɹ;
2. ɡɧɿɦɿɬɶ ɪɭɤɨɹɬɤɭ ɿ ɤɨɪɢɫɬɭɸɱɢɫɶ ɪɟɝɭɥɸɜɚɥɶɧɢɦ
ɝɜɢɧɬɨɦ, ɳɨ ɡɧɚɯɨɞɢɬɶɫɹ ɧɚ ɜɧɭɬɪɿɲɧɿɢ ɱɚɫɬɢɧɿ
ɚɛɨ ɡɛɨɤɭ ɧɚ ɫɬɪɢɠɧɿ
ɫɬɚɛɿɥɶɧɨɝɨ ɩɨɥɭɦ’ɹ.
! ɍ ɪɚɡɿ ɡɪɿɞɠɟɧɢɯ ɝɚɡɿɜ , ɪɟɝɭɥɸɜɚɥɶɧɢɢ ɝɜɢɧɬ
ɩɨɜɢɧɟɧ ɛɭɬɢ ɜɤɪɭɱɟɧɢɢ ɞɨ ɭɩɨɪɭ;
3. ɩɟɪɟɜɿɪɬɟ, ɳɨɛ ɩɪɢ ɲɜɢɞɤɨɦɭ ɨɛɟɪɬɚɧɧɿ ɤɪɚɧɚ ɡ
ɦɚɤɫɢɦɚɥɶɧɨɝɨ ɜ ɦɿɧɿɦɚɥɶɧɟ ɩɨɥɨɠɟɧɧɹ, ɩɚɥɶɧɢɤ ɧɟ
ɝɚɫɧɭɜ.
! ɉɚɥɶɧɢɤɢ ɪɨɛɨɱɨɿ ɩɨɜɟɪɯɧɿ ɧɟ ɩɨɬɪɟɛɭɸɬɶ
ɪɟɝɭɥɸɜɚɧɧɹ ɩɟɪɜɢɧɧɨɝɨ ɩɨɜɿɬɪɹ.
! ɉɿɫɥɹ ɧɚɥɚɲɬɭɜɚɧɧɹ ɧɚ ɝɚɡ, ɳɨ ɜɿɞɪɿɡɧɹɽɬɶɫɹ ɜɿɞ
ɩɪɢ ɜɢɩɪɨɛɭɜɚɧɧɹɯ ɧɚ ɩɿɞɩɪɢɽɦɫɬɜɿ-ɜɢɪɨɛɧɢɤɭ,
ɝɚɡɭ
ɡɚɦɿɧɿɬɶ ɫɬɚɪɭ ɤɚɥɿɛɪɭɜɚɥɶɧɭ ɛɢɪɤɭ ɧɨɜɨɸ, ɡ
ɡɚɡɧɚɱɟɧɧɹɦ ɧɨɜɨɝɨ ɝɚɡɭ, ɨɞɟɪɠɚɧɭ ɜ Ⱥɜɬɨɪɢɡɨɜɚɧɢɯ
ɫɟɪɜiɫɧɢɯ ɰɟɧɬɪɚɯ.
, ɳɨ ɜɿɞɩɨɜɿɞɚɸɬɶ ɧɨɜɨɦɭ ɬɢɩɭ ɝɚɡɭ
ɤɪɚɧɚ, ɞɨɛɢɢɬɟɫɹ ɦɚɥɟɧɶɤɨɝɨ
ÁÀų¹½Á¿Â¾¸½ÅƽÁµºÀ»ÈÀ³ÂÃÒ¿À»È
¡ÂÀÈ·¶Å² ¾À¿Ä²¸Å ¼À´¹¿ºÇ¿²ÁÂѾ¿ºÇ
º»¾×Äζ´×²¾º ¹
ÂÀ¹Á×ÂÀ¼ $
A
Ліва
напрямна
Права напрямна
B
Напрямок
C
висування
D
²Áº¼×¿È× ´ÃIJ´Ä·Â²¾¼º¿² ÂÀ¹Á×¼º$
!·´ÃIJ´½Ñ»Ä·¼À´¹¿× ¿²ÁÂѾ¿×ÅÁÀ¹ºÈ×Ð
Ɂɚɦɿɧɚ ɮɨɪɫɭɧɨɤ ɧɚ ɩɚɥɶɧɢɤɭ «ɬɪɿɣɧɚ
ɤɨɪɨɧɚ»
1. Ɂɧɹɬɢ ɪɟɲɿɬɤɢ ɿ ɜɢɣɧɹɬɢ ɩɚɥɶɧɢɤɢ ɡɿ ɫɜɨʀɯ
ɦɿɫɰɶ. ɉɚɥɶɧɢɤ ɫɤɥɚɞɚɽɬɶɫɹ ɡ ɞɜɨɯ
ɧɟɡɚɥɟɠɧɢɯ ɱɚɫɬɢɧ (ɞɢɜ.ɦɚɥɸɧɨɤ).
2. Ɋɨɡɤɪɭɬɢɬɢ ɮɨɪɫɭɧɤɢ ɡɚ ɞɨɩɨɦɨɝɨɸ ɬɨɪɰɟɜɨɝɨ
.
ɤɥɸɱɚ ɧɚ 7 ɦɦ. Ɂɚɦɿɧɢɬɢ ɮɨɪɫɭɧɤɢ ɧɚ ɛɿɥɶɲ
ɩɪɢɞɚɬɧɿ ɞɥɹ ɧɨɜɨɝɨ ɬɢɩɭ ɝɚɡɭ (ɞɢɜ.ɬɚɛɥɢɰɸ
1). Ɉɛɢɞɜɚ ɩɚɥɶɧɢɤɚ ɦɚɸɬɶ ɨɞɧɚɤɨɜɿ
3. ȼɫɬɚɧɨɜɢɬɢ ɧɚ ɦɿɫɰɟ ɜɫɿ ɤɨɦɩɨɧɟɧɬɢ,
.
.
ɜɢɤɨɧɭɸɱɢ ɜɢɳɟɧɚɜɟɞɟɧɿ ɞɿʀ ɜ ɡɜɨɪɨɬɧɨɦɭ
.
·»µ¿³¾ÑÀÁ½
º³·Â×ÄÎÂ×´·¿Î ¶½Ñ
¼À´¹¿ºÇ ¿²ÁÂѾ¿ºÇ
Àĺ¾ÅÐɺÃÎ
¿²ÁÂѾ¼Å ´ºÃÅ´²¿¿Ñ
¿²ÁÂѾ¿ÀØÂÀ¹Ä²ÊŻķ
¿² ²¾× ÃÁ·ÂÊŵ¿×¹¶À
%×ÁÀÄ×¾µ¿×¹¶À&
²¼ВЧБЧДО ¶´Ч В²¾¼º
¹Ч´ГД²¿А´½·¿º¾º¿²
¿ºЗ¿²БВС¾¿º¾ºЕ
´Ч¶БА´Ч¶¿ЧАД´АВº¿²
ГДЧ¿¼²З ¶ЕЗА´¼º ·»µ
¿³¾ÑÀÁ½Д´АВº¶½С
½Ч´АШВ²¾¼º
¹¿²ЗА¶СДОГС ЕµАВЧ ¶½С
БВ²´АШЕ¿º¹Е
ɩɨɪɹɞɤɭ
19
Page 20

UA
• Ɋɟɝɭɥɸɜɚɧɧɹ ɨɫɧɨɜɧɨɝɨ ɩɨɜɿɬɪɹ ɧɚ ɩɚɥɶɧɢɤɢ
ɉɚɥɶɧɢɤɢ ɧɟ ɜɢɦɚɝɚɸɬɶ ɧɿɹɤɨɝɨ ɪɟɝɭɥɸɜɚɧɧɹ
ɨɫɧɨɜɧɨɝɨ ɩɨɜɿɬɪɹ.
• Ɋɟɝɭɥɸɜɚɧɧɹ ɦɿɧɿɦɚɥɶɧɨɝɨ ɩɨɥɭɦ’ɹ
1. ɉɟɪɟɜɟɫɬɢ ɤɪɚɧ ɜ ɩɨɥɨɠɟɧɧɹ ɦɿɧɿɦɭɦɭ.
2. Ɂɧɹɬɢ ɪɭɱɤɭ ɿ ɡɚ ɞɨɩɨɦɨɝɨɸ ɪɟɝɭɥɸɜɚɥɶɧɨɝɨ
ɝɜɢɧɬɚ, ɪɨɡɬɚɲɨɜɚɧɨɝɨ ɜɫɟɪɟɞɢɧɿ ɚɛɨ ɡɛɨɤɭ
ɫɬɪɢɠɧɹ ɤɪɚɧɭ, ɧɚɥɚɲɬɭɜɚɬɢ ɧɟɜɟɥɢɱɤɟ
ɫɬɚɛɿɥɶɧɟ ɩɨɥɭɦ’ɹ.
3. ɉɿɫɥɹ ɰɶɨɝɨ ɫɥɿɞ ɩɟɪɟɜɿɪɢɬɢ, ɳɨ ɩɪɢ ɲɜɢɞɤɨɦɭ
ɨɛɟɪɬɚɧɧɿ ɤɪɚɧɭ ɡ ɦɚɤɫɢɦɚɥɶɧɨɝɨ ɭ ɦɿɧɿɦɚɥɶɧɟ
ɩɨɥɨɠɟɧɧɹ ɩɚɥɶɧɢɤ ɧɟ ɝɚɫɧɟ.
4. əɤɳɨ ɭ ɩɪɢɥɚɞɚɯ, ɨɫɧɚɳɟɧɢɯ ɡɚɩɨɛɿɠɧɢɦ
ɩɪɢɫɬɪɨɽɦ (ɬɟɪɦɨɩɚɪɨɸ), ɰɟɣ ɨɫɬɚɧɧɿɣ ɧɟ
ɩɪɚɰɸɜɚɬɢɦɟ ɡ ɭɫɬɚɧɨɜɥɟɧɢɦɢ ɧɚ ɦɿɧɿɦɭɦ
ɩɚɥɶɧɢɤɚɦɢ, ɧɟɨɛɯɿɞɧɨ ɡɛɿɥɶɲɢɬɢ ɦɿɧɿɦɚɥɶɧɿ
ɜɢɬɪɚɬɢ ɡɚ ɞɨɩɨɦɨɝɨɸ ɪɟɝɭɥɸɜɚɥɶɧɨɝɨ ɝɜɢɧɬɚ.
5. ɉɿɫɥɹ ɪɟɝɭɥɸɜɚɧɧɹ ɫɥɿɞ ɜɿɞɧɨɜɢɬɢ ɩɥɨɦɛɭ ɧɚ
ɩɟɪɟɩɭɫɤɧɨɦɭ ɤɥɚɩɚɧɿ ɡɚ ɞɨɩɨɦɨɝɨɸ ɫɭɪɝɭɱɭ
ɚɛɨ ɩɨɞɿɛɧɢɯ ɦɚɬɟɪɿɚɥɿɜ.
! ɉɪɢ ɜɢɤɨɪɢɫɬɚɧɧɿ ɫɤɪɚɩɥɟɧɨɝɨ ɧɚɮɬɨɜɨɝɨ
ɝɚɡɭ
ɪɟɝɭɥɸɜɚɥɶɧɢɣ ɝɜɢɧɬ ɦɚɽ ɡɚɝɜɢɧɱɭɜɚɬɢɫɹ ɞɨ
ɭɩɨɪɭ
.
! ɇɚɩɪɢɤɿɧɰɿ ɨɩɟɪɚɰɿʀ ɡɚɦɿɧɢɬɢ ɫɬɚɪɭ ɟɬɢɤɟɬɤɭ ɩɪɨ
ɬɢɩ ɝɚɡɭ ɧɚ ɧɨɜɭ, ɹɤɚ ɜɿɞɩɨɜɿɞɚɽ ɧɨɜɨɦɭ
ɜɢɤɨɪɢɫɬɨɜɭɜɚɧɨɦɭ ɝɚɡɭ, ʀʀ ɦɨɠɧɚ ɨɬɪɢɦɚɬɢ ɭ
ɧɚɲɢɯ ɰɟɧɬɪɚɯ ɡ ɬɟɯɧɿɱɧɨʀ ɞɨɩɨɦɨɝɢ.
! əɤɳɨ ɬɢɫɤ ɜɢɤɨɪɢɫɬɨɜɭɜɚɧɨɝɨ ɝɚɡɭ
ɜɿɞɪɿɡɧɹɽɬɶɫɹ ɜɿɞ ɩɟɪɟɞɛɚɱɟɧɨɝɨ ɚɛɨ ɧɚɥɟɠɢɬɶ
ɞɨ ɡɦɿɧɧɨɝɨ ɬɢɩɭ, ɧɟɨɛɯɿɞɧɨ ɜɫɬɚɧɨɜɢɬɢ ɧɚ
ɬɪɭɛɨɩɪɨɜɨɞɿ ɩɨɞɚɱɿ ɜɿɞɩɨɜɿɞɧɢɣ ɪɟɝɭɥɹɬɨɪ ɬɢɫɤɭ
(ɡɝɿɞɧɨ ɞɨ
ɫɬɚɧɞɚɪɬɭ EN 88-1 ɿ EN 88-2 «ɩɪɨɯɿɞɧɿ
ɝɚɡɨɜɿ ɪɟɝɭɥɹɬɨɪɢ»).
Ȼɟɡɩɟɤɚ ɥɚɧɰɸɝɚ
! ɓɨɛ
ɡɚɩɨɛɿɝɬɢ
ɜɢɩɚɞɤɨɜɨɦɭ
ɩɟɪɟɤɢɞɚɧɧɸ
ɩɪɢɥɚɞɭ,
ɧɚɩɪɢɤɥɚɞ,
ɤɨɥɢ ɞɢɬɢɧɚ
ɡɚɥɚɡɢɬɶ
ɧɚ ɞɜɟɪɰɹɬɚ
ɞɭɯɨɜɨʀ ɲɚɮɢ,
ɇȿɈȻɏȱȾɇɈ
ɜɫɬɚɧɨɜɢɬɢ
ɡɚɯɢɫɧɢɣ ɥɚɧɰɸɠɨɤ ɡ ɤɨɦɩɥɟɤɬɭ ɩɨɫɬɚɱɚɧɧɹ!
ɉɥɢɬɚ ɨɫɧɚɳɭɽɬɶɫɹ ɡɚɯɢɫɧɢɦ ɥɚɧɰɸɠɤɨɦ, ɹɤɢɣ
ɤɪɿɩɢɬɶɫɹ ɡɚ ɞɨɩɨɦɨɝɨɸ ɝɜɢɧɬɚ (ɧɟ ɜɯɨɞɢɬɶ ɜ
ɤɨɦɩɥɟɤɬ ɩɨɫɬɚɱɚɧɧɹ) ɞɨ ɫɬɿɧɢ ɡɚ ɩɪɢɥɚɞɨɦ ɧɚ ɬɿɣ
ɫɚɦɿɣ ɜɢɫɨɬɿ, ɧɚ ɹɤɿɣ ɥɚɧɰɸɠɨɤ ɤɪɿɩɢɬɶɫɹ ɞɨ
ɩɥɢɬɢ. Ƚɜɢɧɬ ɿ ɞɸɛɟɥɶ
ɞɥɹ ɤɪɿɩɥɟɧɧɹ ɥɚɧɰɸɠɤɚ
ɫɥɿɞ ɨɛɢɪɚɬɢ ɜɿɞɩɨɜɿɞɧɨ ɞɨ ɦɚɬɟɪɿɚɥɭ ɫɬɿɧɢ ɡɚ
ɩɪɢɥɚɞɨɦ.
əɤɳɨ ɞɿɚɦɟɬɪ ɝɨɥɨɜɤɢ ɝɜɢɧɬɚ ɫɬɚɧɨɜɢɬɶ ɦɟɧɲɟ 9
ɦɦ, ɧɟɨɛɯɿɞɧɨ ɜɢɤɨɪɢɫɬɨɜɭɜɚɬɢ ɲɚɣɛɭ. Ⱦɥɹ
ɤɪɿɩɥɟɧɧɹ ɜ ɛɟɬɨɧɧɿɣ ɫɬɿɧɿ ɩɨɬɪɿɛɟɧ ɝɜɢɧɬ
ɞɿɚɦɟɬɪɨɦ ɧɟ ɦɟɧɲɟ 8 ɦɦ ɞɨɜɠɢɧɨɸ 60 ɦɦ.
Ɂɚɤɪɿɩɿɬɶ ɥɚɧɰɸɠɨɤ ɧɚ ɡɚɞɧɿɣ ɫɬɿɧɰɿ ɩɥɢɬɢ ɣ ɧɚ
ɫɬɿɧɿ, ɹɤ ɩɨɤɚɡɚɧɨ ɧɚ ɦɚɥɸɧɤɭ, ɬɚɤ ɳɨɛ ɩɿɫɥɹ
ɜɫɬɚɧɨɜɥɟɧɧɹ ɜɿɧ ɛɭɜ ɧɚɬɹɝɧɭɬɢɣ ɩɚɪɚɥɟɥɶɧɨ ɞɨ
ɩɨɥɭ.
H5TMH6AF C UA
Ɍɚɛɥɢɰɹ ɯɚɪɚɤɬɟɪɢɫɬɢɤ ɩɚɥɶɧɢɤɿɜ
Ɍɚɛɥɢɰɹ 1 Ɂɪɿɞɠɟɧɢɣ ɝɚɡ ɉɪɢɪɨɞɧɢɣ ɝɚɡ
ɉɚɥɶɧɢɤ Ⱦɿɚɦɟɬɪ
ɉɨɬɪiɣɧɚ
ɤɨɪɨɧɚ (Ɍɋ)
ɇɚɩiɜɲɜɢɞɤɢɣ
(ɫɟɪɟɞɧiɣ) (S)
Ⱦɨɩɨɦɿɠɧɢɣ
(Ɇɚɥɟɧɶɤɢɣ)
(A)
Ɍɢɫɤ, ɳɨ
ɩɨɞɚɽɬɶɫɹ
* ɉɪɢ 15°C 1013 ɦɛɚɪ-ɫɭɯɢɣ ɝɚɡ *** Ȼɭɬɚɧ P.C.S. = 49,47 ɆȾɠ/ɤɝ
** ɉɪɨɩɚɧ P.C.S. = 50,37 ɆȾɠ/ɤɝ ɉɪɢɪɨɞɧɢɣ ɝɚɡ = 37,78 MȾɠ/ɦ³
(ɦɦ)
130 3.25 1.50 63
75 1.90 0.4 30 69 138 136 104 181 115 181
51 1.00 0.4 30 50 73 71 78 95 85 95
ɇɨɦɿɧɚɥɶɧɢɣ (ɦɛɚɪ)
Ɇɿɧɿɦɚɥɶɧɢɣ (ɦɛɚɪ)
Ɇɚɤɫɢɦɚɥɶɧɢɣ (ɦɛɚɪ)
Ɍɟɩɥɨɜɚ
ɟɮɟɤɬɢɜɧɿɫɬɶ
ɤȼɬ (p.c.s.*)
ɇɨɦiɧ. Ɂɦɟɧɲ.
Ʉɚɧɚɥ
1/100
(ɦɦ)
ɮɨɪɫɭɧɨɤ
Ɏɨɪɫɭɧ-ɤɚ
1/100
(ɦɦ)
2x65
20
ɿ
ɉɪɨɩɭɫɤɧɚ
ɡɞɚɬ-ɧɿɫɬɶ*
ɝ/ɝɨɞ
*** **
236 232
28-30
20
35
37
25
45
Ɏɨɪɫɭɧ-ɤɚ
1/100
(ɦɦ)
2x99
ɉɪɨɩɭɫɤɧɚ
ɡɞɚɬ-ɧɿɫɬɶ*
ɥ/ɝɨɞ
309
20
17
25
S
A
Ɏɨɪɫɭɧ-ɤɚ
1/100
(ɦɦ)
2x10⁷
S
TC
ɉɪɨɩɭɫɤɧɚ
ɡɞɚɬ-ɧɿɫɬɶ*
ɥ/ɝɨɞ
309
13
6,5
18
Page 21

ȼɤɥɸɱɟɧɧɹ ɿ ɜɢɤɨɪɢɫɬɚɧɧɹ
Ʉɨɪɢɫɬɭɜɚɧɧɹ ɪɨɛɨɱɨɸ ɩɨɜɟɪɯɧɟɸ
ȼɤɥɸɱɟɧɧɹ ɩɚɥɶɧɢɤɿɜ
ɍ ɤɨɠɧɨɿ ɪɭɤɨɹɬɤɢ ɉȺɅɖɇɂɄ, ɳɨ ɜɿɞɧɨɫɢɬɶɫɹ ɞɨ ɧɟɿ,
ɩɨɤɚɡɚɧɢɢ ɭ ɜɢɝɥɹɞɿ ɤɪɭɝɚ.
ɓɨɛ ɡɚɩɚɥɢɬɢ ɩɚɥɶɧɢɤ ɪɨɛɨɱɨɿ ɩɨɜɟɪɯɧɿ:
1. ɩɿɞɧɟɫɿɬɶ ɞɨ ɩɚɥɶɧɢɤɚ ɫɿɪɧɢɤ ɚɛɨ
ɟɥɟɤɬɪɨɡɚɩɚɥɶɧɢɱɤɭ;
2. ɧɚɬɢɫɧɿɬɶ ɿ ɨɞɧɨɱɚɫɧɨ ɨɛɟɪɬɚɢɬɟ ɩɪɨɬɢ
ɝɨɞɢɧɧɢɤɨɜɨɿ ɫɬɪɿɥɤɢ ɪɭɤɨɹɬɤɭ ɉȺɅɖɇɂɄȺ ɞɨ
ɩɨɡɧɚɱɤɢ ɦɚɤɫɢɦɚɥɶɧɨɝɨ ɩɨɥɭɦ’ɹ (.
3. ɜɿɞɪɟɝɭɥɸɢɬɟ ɫɢɥɭ ɛɚɠɚɧɨɝɨ ɩɨɥɭɦ’ɹ, ɨɛɟɪɬɚɸɱɢ
ɩɪɨɬɢ ɝɨɞɢɧɧɢɤɨɜɨɿ ɫɬɪɿɥɤɢ ɪɭɤɨɹɬɤɭ
ɦɿɧɿɦɭɦ &, ɧɚ ɦɚɤɫɢɦɭɦ ( ɚɛɨ ɜ ɩɪɨɦɿɠɧɟ ɩɨɥɨɠɟɧɧɹ.
əɤɳɨ ɩɥɢɬɚ ɨɛɥɚɞɧɚɧɚ ɟɥɟɤɬɪɨɪɨɡɩɚɥɸɜɚɧɧɹɦ
* (ɞɢɜ.ɦɚɥɸɧɨɤ<), ɞɨɫɢɬɶ
ɧɚɬɢɫɧɭɬɢ ɢ ɨɞɧɨɱɚɫɧɨ
ɩɨɜɟɪɧɭɬɢ ɩɪɨɬɢ ɝɨɞɢɧɧɢɤɨɜɨɿ
ɫɬɪɿɥɤɢ ɪɭɤɨɹɬɤɭ ɉȺɅɖɇɂɄȺ
ɞɨ ɩɨɡɧɚɱɤɢ ɦiɧiɦɚɥɶɧɨɝɨ
ɩɨɥɭɦ’ɹ, ɳɨɛ ɡɚɩɚɥɢɬɢ ɝɚɡ
Ɇɨɠɟ ɬɪɚɩɢɬɢɫɹ ɬɚɤ, ɳɨ
ɩɚɥɶɧɢɤ ɡɝɚɫɧɟ ɭ ɦɨɦɟɧɬ
ɜɿɞɩɭɫɤɚɧɧɹ ɪɭɤɨɹɬɤɢ. ɍ ɰɶɨɦɭ
ɜɢɩɚɞɤɭ ɩɨɜɬɨɪɿɬɶ ɨɩɟɪɚɰɿɸ, ɭɬɪɢɦɭɸɱɢ ɪɭɤɨɹɬɤɭ
ɧɚɬɢɫɧɭɬɨɸ ɧɚ ɩɪɨɬɹɡɿ ɞɨɜɲɨɝɨ ɱɚɫɭ.
! ɍ ɪɚɡɿ ɜɢɩɚɞɤɨɜɨɝɨ ɡɝɚɫɚɧɧɹ ɩɨɥɭɦ’ɹ, ɜɢɦɤɧɿɬɶ
ɩɚɥɶɧɢɤ ɿ ɩɨɱɟɤɚɢɬɟ ɩɪɢɧɚɢɦɧɿ 1 ɯɜɢɥɢɧɭ, ɩɟɪɲ ɧɿɠ
ɩɨɜɬɨɪɧɨ ɫɩɪɨɛɭɜɚɬɢ ɜɤɥɸɱɟɧɧɹ.
əɤɳɨ ɩɥɢɬɚ ɨɛɥɚɞɧɚɧɚ ɩɪɢɫɬɪɨɽɦ ɛɟɡɩɟɤɢ* ɡɚ
ɜɿɞɫɭɬɧɨɫɬɿ ɩɨɥɭɦ’ɹ, ɭɬɪɢɦɭɢɬɟ ɧɚɬɢɫɧɭɬɨɸ ɪɭɤɨɹɬɤɭ
ɉȺɅɖɇɂɄȺ ɛɥɢɡɶɤɨ 2-3 ɫɟɤɭɧɞ, ɳɨɛ ɩɿɞɬɪɢɦɚɬɢ
ɝɨɪɿɧɧɹ ɿ ɚɤɬɢɜɿɡɭɜɚɬɢ ɩɪɢɫɬɪiɢ ɛɟɡɩɟɤɢ
ɓɨɛ ɩɨɝɚɫɢɬɢ ɩɚɥɶɧɢɤ, ɨɛɟɪɬɚɢɬɟ ɪɭɤɨɹɬɤɭ ɞɨ ɭɩɨɪɭ
•.
Регулювання сили полум'я
Інтенсивність полум'я пальника можна регулювати
ручкою за 6 рівнями потужності, від максимального
до мінімального з 4 проміжними положеннями:
перехід від одного рівня до іншого супроводжується
клацанням при повороті ручки. Система має можливість
більш точного регулювання для відтворення інтенсивності
полум'я та легкого встановлення бажаного рівня для
різних режимів приготування їжі.
ɉɪɚɤɬɢɱɧɿ ɩɨɪɚɞɢ ɡ ɜɢɤɨɪɢɫɬɚɧɧɹ ɩɚɥɶɧɢɤɿɜ
Ⱦɥɹ ɤɪɚɳɨɿ ɩɪɨɞɭɤɬɢɜɧɨɫɬɿ ɩɚɥɶɧɢɤɿɜ ɿ ɦɿɧɿɦɚɥɶɧɨɝɨ
ɫɩɨɠɢɜɚɧɧɹ ɝɚɡɭ ɧɟɨɛɯɿɞɧɨ ɜɢɤɨɪɢɫɬɨɜɭɜɚɬɢ ɩɨɫɭɞ ɡ
ɩɥɨɫɤɢɦ ɞɧɨɦ, ɧɚɤɪɢɬɢɢ ɤɪɢɲɤɨɸ, ɿ ɹɤɢɢ ɜɿɞɩɨɜɿɞɚɽ
ɡɚ ɪɨɡɦɿɪɨɦ
ɩɚɥɶɧɢɤɭ:
ɉȺɅɖɇɂɄȺ: ɧɚ
.
ɉɚɥɶɧɢɤ ø Ⱦiɚɦɟɬɪ ɦiɫɬɤɨɫɬɟɣ (ɫɦ)
ɉɨɬɪiɣɧɚ ɤɨɪɨɧɚ (Ɍɋ) 24 – 26
ɇɚɩɿɜɲɜɢɞɤɢɣ
(ɋɟɪɟɞɧɿɣ) (S)
Ⱦɨɩɨɦɿɠɧɢɣ
(Ɇɚɥɟɧɶɤɢɣ) (A)
16 – 20
10 – 14
Ʉɨɪɢɫɬɭɜɚɧɧɹ ɞɭɯɨɜɤɨɸ
! ɉɪɢ ɩɟɪɲɨɦɭ ɜɤɥɸɱɟɧɧɿ ɡɚɩɭɫɬɿɬɶ ɞɭɯɨɜɤɭ ɭ
ɯɨɥɨɫɬɨɦɭ ɪɟɠɢɦɿ ɧɟ ɦɟɧɲɟ, ɧɿɠ ɧɚ ɨɞɧɭ ɝɨɞɢɧɭ
ɡ ɦɚɤɫɢɦɚɥɶɧɢɦ ɩɨɥɨɠɟɧɧɹɦ ɬɟɪɦɨɫɬɚɬɚ ɬɚ ɡ
ɡɚɤɪɢɬɢɦɢ ɞɜɟɪɰɹɬɚɦɢ. ɉɨɬɿɦ ɜɢɦɤɧɿɬɶ, ɜɿɞɤɪɢɢɬɟ
ɞɜɟɪɰɹɬɚ ɞɭɯɨɜɤɢ ɢ ɩɪɨɜɿɬɪɿɬɶ ɩɪɢɦɿɳɟɧɧɹ. Ɂɚɩɚɯ,
ɳɨ ɡ’ɹɜɢɜɫɹ, ɽ ɪɟɡɭɥɶɬɚɬɨɦ ɜɢɩɚɪɨɜɭɜɚɧɧɹ ɪɟɱɨɜɢɧ
ɧɟɨɛɯɿɞɧɢɯ ɞɥɹ ɡɚɯɢɫɬɭ ɞɭɯɨɜɤɢ.
! ɉɟɪɟɞ ɤɨɪɢɫɬɭɜɚɧɧɹɦ ɨɛɨɜ’ɹɡɤɨɜɨ ɜɢɞɚɥiɬɶ
ɩɥɚɫɬɢɤɨɜɭ
! ɇɿɤɨɥɢ ɧɿɱɨɝɨ ɧɟ ɤɥɚɞɿɬɶ ɧɚ ɞɧɨ ɞɭɯɨɜɤɢ, ɨɫɤɿɥɶɤɢ ɜɢ
ɪɢɡɢɤɭɽɬɟ ɩɨɲɤɨɞɢɬɢ ɟɦɚɥɶ.
1. ȼɢɛɟɪɿɬɶ ɛɚɠɚɧɭ ɩɪɨɝɪɚɦɭ ɩɪɢɝɨɬɭɜɚɧɧɹ,
ɨɛɟɪɬɚɸɱɢ ɪɭɤɨɹɬɤɭ ɉɊɈȽɊȺɆɂ.
2. ȼɢɛɟɪɿɬɶ ɬɟɦɩɟɪɚɬɭɪɭ, ɪɟɤɨɦɟɧɞɨɜɚɧɭ ɞɥɹ
ɩɪɨɝɪɚɦɢ, ɚɛɨ ɡɚ ɛɚɠɚɧɧɹɦ, ɨɛɟɪɬɚɸɱɢ ɪɭɤɨɹɬɤɭ
ɌȿɊɆɈɋɌȺɌ.
ɋɩɢɫɨɤ ɡ ɪɟɠɢɦɚɦɢ ɩɪɢɝɨɬɭɜɚɧɧɹ ɿ ɜɿɞɩɨɜɿɞɧɢɦɢ
ɪɟɤɨɦɟɧɞɨɜɚɧɢɦɢ ɬɟɦɩɟɪɚɬɭɪɚɦɢ ɩɪɢɜɟɞɟɧɢɢ ɭ
ɫɩɟɰɿɚɥɶɧɿɢ ɬɚɛɥɢɰɿ (ɞɢɜ
ɞɭɯɨɜɰi).
ɉɿɞ ɱɚɫ ɩɪɢɝɨɬɭɜɚɧɧɹ ɡɚɜɠɞɢ ɦɨɠɧɚ:
• ɡɦɿɧɢɬɢ ɩɪɨɝɪɚɦɭ ɩɪɢɝɨɬɭɜɚɧɧɹ, ɫɤɨɪɢɫɬɚɜɲɢɫɶ
ɪɭɤɨɹɬɤɨɸ ɉɊɈȽɊȺɆɂ;
• ɡɦɿɧɢɬɢ ɬɟɦɩɟɪɚɬɭɪɭ ɡɚ ɞɨɩɨɦɨɝɨɸ ɪɭɤɨɹɬɤɢ
ɌȿɊɆɈɋɌȺɌ;
• ɩɟɪɟɪɜɚɬɢ ɩɪɢɝɨɬɭɜɚɧɧɹ, ɩɨɜɟɪɧɭɜɲɢ ɪɭɤɨɹɬɤɭ
ɉɊɈȽɊȺɆɂ ɜ ɩɨɥɨɠɟɧɧɹ “0”.
! Ɂɚɜɠɞɢ ɩɨɦɿɳɚɢɬɟ ɦɿɫɬɤɨɫɬɿ ɞɥɹ ɩɪɢɝɨɬɭɜɚɧɧɹ ɧɚ
ʉɪɚɬɤɭ, ɳɨ ɞɨɞɚɽɬɶɫɹ.
ȱɧɞɢɤɚɬɨɪɧɚ ɥɚɦɩɚ ɌȿɊɆɈɋɌȺɌ
ȱɿ ɜɤɥɸɱɟɧɧɹ ɩɨɩɟɪɟɞɠɚɽ ɩɪɨ ɬɟ, ɳɨ ɞɭɯɨɜɤɚ
ɜɢɪɨɛɥɹɽ
ɞɨɫɹɝɧɭɬɨ ɜɢɛɪɚɧɭ ɬɟɦɩɟɪɚɬɭɪɭ. ɉɪɢ ɰɶɨɦɭ
ɿɧɞɢɤɚɬɨɪɧɚ ɥɚɦɩɚ ɫɩɚɥɚɯɭɽ ɿ ɝɚɫɧɟ ɭ ɩɨɩɟɪɟɦɿɧɧɨɦɭ
ɪɟɠɢɦɿ, ɩɨɤɚɡɭɸɱɢ, ɳɨ ɬɟɪɦɨɫɬɚɬ ɩɪɚɰɸɽ ɿ ɩɿɞɬɪɢɦɭɽ
ɩɨɫɬɿɢɧɭ ɬɟɦɩɟɪɚɬɭɪɭ.
Ɉɫɜɿɬɥɟɧɧɹ ɞɭɯɨɜɤɢ
ɋɩɚɥɚɯɭɽ ɩɪɢ ɨɛɟɪɬɚɧɧɿ ɪɭɤɨɹɬɤɢ ɉɊɈȽɊȺɆɂ ɞɨ
ɛɭɞɶ-ɹɤɨɝɨ ɩɨɥɨɠɟɧɧɹ, ɨɤɪɿɦ “0” ɿ ɡɚɥɢɲɚɽɬɶɫɹ
ɜɤɥɸɱɟɧɢɦ, ɩɨɤɢ ɜɤɥɸɱɟɧɚ ɞɭɯɨɜɤɚ. ɉɪɢ ɜɢɛɨɪɿ
ɡɚ ɞɨɩɨɦɨɝɨɸ ɪɭɤɨɹɬɤɢ, ɨɫɜɿɬɥɟɧɧɹ ɜɤɥɸɱɚɽɬɶɫɹ ɛɟɡ
ɜɤɥɸɱɟɧɧɹ ɛɭɞɶ-ɹɤɨɝɨ ɧɚɝɪɿɜɚɥɶɧɨɝɨ ɟɥɟɦɟɧɬɭ.
ɩɥiɜɤɭ ɡ ɛɨɤiɜ ɜɢɪɨɛɭ.
. Ɍɚɛɥɢɰɹ ɩɪɢɝɨɬɭɜɚɧɧɹ ɜ
ɬɟɩɥɨ. Ƚɚɫɧɟ, ɤɨɥɢ ɭ ɜɧɭɬɪɿɲɧɿɢ ɱɚɫɬɢɧɿ
UA
21
Page 22

Користування духовкою
UA
UA
! При першому включенні запустіть духовку у
холостому режимі не менше, ніж на одну годину з
максимальним положенням термостата та з
закритими дверцятами. Потім вимкніть, відкриите
дверцята духовки и провітріть приміщення. Запах,
що з’явився, є результатом випаровування
речовин, необхідних для захисту духовки.
ɉɪɨɝɪɚɦɢ ɩɪɢɝɨɬɭɜɚɧɧɹ ʀɠɿ
! Ⱦɥɹ ɜɫɿɯ ɩɪɨɝɪɚɦ ɦɨɠɧɚ ɡɚɞɚɬɢ ɬɟɦɩɟɪɚɬɭɪɭ
ɦɿɠ 60°C ɿ MAX, ɜɢɧɹɬɨɤ ɫɤɥɚɞɚɽ:
• ȽɊɂɅɖ (ɪɟɤɨɦɟɧɞɭɽɬɶɫɹ ɜɢɫɬɚɜɥɹɬɢ ɬɿɥɶɤɢ ɧɚ MAX);
• ɄɈɇȼȿɄɐIɃɇɂɃ ȽɊɂɅɖ (ɪɟɤɨɦɟɧɞɭɽɬɶɫɹ ɧɟ
ɩɟɪɟɜɢɳɭɜɚɬɢ ɬɟɦɩɟɪɚɬɭɪɭ ɜ 200°C).
! Перед користуванням обов’язково видалiть
пластикову плiвку з
! Ніколи нічого не кладіть на дно духовки, оскільки
ви ризикуєте пошкодити емаль.
1. Виберіть бажану програму приготування,
обертаючи рукоятку ПРОГРАМИ.
2. Виберіть температуру, рекомендовану для
програми, або за бажанням, обертаючи рукоятку
ТЕРМОСТАТ.
Список з режимами приготування і відповідними
рекомендованими температурами приведении у
спеціальніи таблиці (див. Таблиця приготування в
духовцi).
Під час приготування завжди можна:
• змінити програму приготування, скориставшись
рукояткою ПРОГРАМИ;
• змінити
ТЕРМОСТАТ;
• перервати приготування, повернувши рукоятку
ПРОГРАМИ в положення “0”.
! Завжди поміщаите місткості для приготування на
ґратку, що додається.
Індикаторна лампа ТЕРМОСТАТ
Іі включення попереджає про те, що духовка
виробляє тепло. Гасне, коли у внутрішніи частині
досягнуто вибрану температуру. При цьому
індикаторна лампа спалахує і гасне у
поперемінному режимі, показуючи, що
працює і підтримує постіину температуру.
Освітлення духовки
Спалахує при обертанні рукоятки ПРОГРАМИ до
будь-якого положення, окрім “0” і залишається
включеним, поки включена духовка. При виборі
за допомогою рукоятки
включається без включення будь-якого
нагрівального елементу.
температуру за допомогою рукоятки
бокiв виробу.
88
8
, освітлення
88
термостат
ɉɪɚɰɸɸɬɶ ɞɜɚ ɧɚɝɪɿɜɚɥɶɧɿ ɟɥɟɦɟɧɬɿ – ɧɢɠɧɿɣ ɿ ɜɟɪɯɧɿɣ. Ⱦɥɹ
ɬɚɤɨɝɨ ɬɪɚɞɢɰɿɣɧɨɝɨ ɝɨɬɭɜɚɧɧɹ ɤɪɚɳɟ ɜɢɤɨɪɢɫɬɨɜɭɜɚɬɢ ɬɿɥɶɤɢ
ɨɞɢɧ ɪɿɜɟɧɶ: ɹɤɳɨ ɨɛɪɚɬɢ ɞɟɤɿɥɶɤɚ ɪɿɜɧɿɜ, ɪɨɡɩɨɜɫɸɞɠɟɧɧɹ
ɬɟɩɥɚ ɧɟ ɛɭɞɟ ɪɿɜɧɨɦɿɪɧɢɦ.
ɉɪɚɰɸɽ ɡɚɞɧɿɣ ɧɚɝɪɿɜɚɥɶɧɢɣ ɟɥɟɦɟɧɬ ɿ ɜɟɧɬɢɥɹɬɨɪ,
ɡɚɛɟɡɩɟɱɭɸɱɢ ɞɟɥɿɤɚɬɧɟ ɪɿɜɧɨɦɿɪɧɟ ɪɨɡɩɨɜɫɸɞɠɟɧɧɹ
ɬɟɩɥɚ ɜɫɟɪɟɞɢɧɿ ɞɭɯɨɜɤɢ. ɐɹ ɩɪɨɝɪɚɦɚ
ɪɟɤɨɦɟɧɞɭɽɬɶɫɹ ɞɥɹ ɩɪɢɝɨɬɭɜɚɧɧɹ ɞɟɥɿɤɚɬɧɢɯ ɛɥɸɞ
(ɧɚɩɪ. ɜɢɩɿɱɤɢ, ɹɤɚ ɜɢɦɚɝɚɽ ɩɿɞɣɨɦɭ) ɿ ɩɪɢɝɨɬɭɜɚɧɧɹ
ɦɿɧɿ-ɬɿɫɬɟɱɨɤ ɧɚ ɬɪɶɨɯ ɩɨɥɢɰɹɯ ɨɞɧɨɱɚɫɧɨ.
ɉɪɚɰɸɸɬɶ ɜɫɿ ɧɚɝɪɿɜɚɥɶɧɿ ɟɥɟɦɟɧɬɢ (ɜɟɪɯɧɿɣ, ɧɢɠɧɿɣ
ɿ ɰɢɪɤɭɥɹɰɿɣɧɢɣ) ɿ ɜɟɧɬɢɥɹɬɨɪ. Ɉɫɤɿɥɶɤɢ ɬɟɩɥɨ
ɪɨɡɩɨɞɿɥɟɧɨ ɪɿɜɧɨɦɿɪɧɨ ɩɨ ɜɫɿɣ ɞɭɯɨɜɰɿ, ɩɪɢɝɨɬɭɜɚɧɧɹ
ʀɠɿ ɜɿɞɛɭɜɚɽɬɶɫɹ ɡɚɜɞɹɤɢ ɪɿɜɧɨɦɿɪɧɨɦɭ ɧɚɝɪɿɜɭ
ɩɨɜɿɬɪɹ. Ɇɨɠɧɚ ɜɢɤɨɪɢɫɬɨɜɭɜɚɬɢ ɟ ɛɿɥɶɲɟ ɞɜɨɯ ɪɿɜɧɿɜ
ɨɞɧɨɱɚɫɧɨ.
ɉɪɚɰɸɸɬɶ ɧɢɠɧɿɣ ɿ ɰɢɪɤɭɥɹɰɿɣɧɢɣ ɧɚɝɪɿɜɚɥɶɧɿ
ɟɥɟɦɟɧɬɢ ɿ ɜɟɧɬɢɥɹɬɨɪ. ɍ ɰɿɣ ɩɪɨɝɪɚɦɿ
ɡɚɛɟɡɩɟɱɭɽɬɶɫɹ ɲɜɢɞɤɟ ɧɚɝɪɿɜɚɧɧɹ ɞɭɯɨɜɤɢ, ɩɪɢ
ɰɶɨɦɭ ɡɧɚɱɧɚ ɤɿɥɶɤɿɫɬɶ ɬɟɩɥɚ ɩɨɞɚɽɬɶɫɹ ɡɧɢɡɭ. ɉɪɢ
ɨɞɧɨɱɚɫɧɨɦɭ ɜɢɤɨɪɢɫɬɚɧɧɿ ɞɟɤɿɥɶɤɨɯ ɞɟɤ, ɧɟɨɛɯɿɞɧɨ
ɩɨɦɿɧɹɬɢ ʀɯ
Положення ручки термостату : Між 50°C і Max.
Працює верхній нагрівальний елемент.
Ця функція може використовуватися для
завершальних дій з готування.
ȼɤɥɸɱɚɽɬɶɫɹ ɰɟɧɬɪɚɥɶɧɚ ɱɚɫɬɢɧɚ ɜɟɪɯɧɶɨɝɨ
ɧɚɝɪɿɜɚɥɶɧɨɝɨ ɟɥɟɦɟɧɬɭ. ɉɿɞɜɢɳɟɧɚ ɬɟɦɩɟɪɚɬɭɪɚ,
ɳɨ ɣɞɟ ɜɿɞ ɝɪɢɥɹ, ɪɟɤɨɦɟɧɞɭɽɬɶɫɹ ɞɥɹ ɩɪɨɞɭɤɬɿɜ, ɹɤɿ
ɉɪɨɝɪɚɦɚ ɌɊȺȾɂɐȱɃɇȺ ȾɍɏɈȼɄȺ
ɉɪɨɝɪɚɦɚ ȾɍɏɈȼɄȺ ȾɅə ȼɂɉȱɑɄɂ
ɉɪɨɝɪɚɦɚ ɈȾɇɈɑȺɋɇȿ ȽɈɌɍȼȺɇɇə
ɉɪɨɝɪɚɦɚ
ɦɿɫɰɹɦɢ ɜɫɟɪɟɞɢɧɿ ɝɨɬɭɜɚɧɧɹ.
Духовка «верхнє відділення»
ɉɪɨɝɪɚɦɚ ȽɊɂɅɖ
ȾɍɏɈȼɄȺ ɉȱɐɐȺ
22
Page 23

ɩɨɬɪɟɛɭɸɬɶ ɫɢɥɶɧɨɝɨ ɧɚɝɪɿɜɭ ɩɨɜɟɪɯɧɿ (ɛɿɮɲɬɟɤɫɢ
ɡ ɬɟɥɹɬɢɧɢ ɿ ɹɥɨɜɢɱɢɧɢ, ɮɿɥɟ, ɚɧɬɪɟɤɨɬɢ). ɐɟ ɩɪɨɝɪɚɦɚ ɿɡ ɡɧɢɠɟɧɢɦ ɫɩɨɠɢɜɚɧɧɹɦ ɟɧɟɪɝɿʀ, ɿɞɟɚɥɶɧɚ
ɞɥɹ ɫɦɚɠɟɧɧɹ ɫɬɪɚɜ ɡɦɟɧɲɟɧɢɯ ɪɨɡɦɿɪɿɜ. ɉɨɦɿɫɬɿɬɶ
ɫɬɪɚɜɭ ɭ ɰɟɧɬɪ ɪɟɲɿɬɤɢ, ɬɨɦɭ ɳɨ ɜ ɤɭɬɤɚɯ ɜɨɧɚ
ɧɟ
ɩɪɢɝɨɬɭɽɬɶɫɹ.
ɉɪɨɝɪɚɦɚ
Увімкнений нижній нагрівальний елемент та
вентилятор, що гарантує циркуляцію тепла по всій
духовці. Цей режим зручний для легкого
приготування овочів та риби.
ВЕНТИЛЯЦІЇ ЗНИЗУ
UA
ɉɪɨɝɪɚɦɚ
ɄɈɇȼȿɄɐȱɃɇɂɃ ȽɊɂɅɖ
ɉɪɚɰɸɽ ɜɟɪɯɧɿɣ ɧɚɝɪɿɜɚɥɶɧɢɣ ɟɥɟɦɟɧɬ, ɜɟɧɬɢɥɹɬɨɪ
ɿ ɪɨɠɟɧ (ɞɟ ɜɿɧ ɧɚɹɜɧɢɣ). Ɍɚɤɢɣ ɪɟɠɢɦ ɨɛ’ɽɞɧɭɽ
ɨɞɧɨɫɬɨɪɨɧɧɽ ɬɟɩɥɨɜɟ ɜɢɩɪɨɦɿɧɸɜɚɧɧɹ ɡ
ɩɪɢɦɭɫɨɜɨɸ ɰɢɪɤɭɥɹɰɿɽɸ ɩɨɜɿɬɪɹ ɭɫɟɪɟɞɢɧɿ ɞɭɯɨɜɤɢ.
ɐɟ ɩɟɪɟɲɤɨɞɠɚɽ ɩɨɜɟɪɯɧɟɜɨɦɭ ɩɿɞɝɨɪɹɧɧɸ ɫɬɪɚɜɢ,
ɡɛɿɥɶɲɭɸɱɢ ɩɪɨɧɢɤɧɟɧɧɹ ɬɟɩɥɚ.
! Ƚɨɬɭɜɚɧɧɹ ɧɚ ȽɊɂɅȱ ɚɛɨ ɄɈɇȼȿɄɐȱɃɇɈɆɍ ȽɊɂɅȱ
ɦɚɽ ɜɢɤɨɪɢɫɬɨɜɭɜɚɬɢɫɹ ɡ ɡɚɱɢɧɟɧɢɦɢ ɞɜɟɪɰɹɬɚɦɢ.
Обережна духовка
ɉɪɨɝɪɚɦɚ
Положення реґулятора термостату: Між 50°C і Max.
Працює нижній нагрівальний елемент.
Ця функція призначена для приготування делікатних
страв, зокрема, дріжджової випічки, яка краще підійде
завдяки теплу знизу.
Оскільки досягнення високої температури потребує
багато часу, в таких випадках рекомендується
використання «Традиційної духовки».
ɉɪɨɝɪɚɦɚ
РОЗМОРОЖУВАННЯ
Нижніи відсік
Під духовкою є відсік, якии може
використовуватися для зберігання
аксесуарiв або посуду. Щоб відкрити
дверцята, поверніть іх донизу (див.
малюнок).
! Не кладіть горючі матеріали в нижніи відсік.
!
Практичні поради з приготування іжі
! При режимах приготування з вентиляцією, не
використовуите положення полиць 1 і 5: вони
розташовані безпосередньо біля потоків гарячого
.
повітря, яке може викликати пригорання делікатних
блюд.
МУЛЬТИПРИГОТУВАННЯ
• Використовуите положення полиць 2 і 4, поміщаючи
на полку 2 страви, які вимагають більшого тепла.
• Помістіть деко вниз і ґратку уверх.
Вентилятор в нижній частині духовки заставляє
циркулювати навколо їжі повітря кімнатної
температури. Цей режим рекомендується
використовувати для розморожування всіх видів
їжі, особливо для делікатних продуктів, які не
потребують нагріву, наприклад: торти з морозивом
або кремом, десерти із заварним кремом, фруктові
торти. Завдяки роботі вентилятора час
розморожування скорочується приблизно
рази. У разі розморожування м'яса, риби або хліба
процес можна прискорити вмиканням режиму
«мульти-приготування» та встановленням
температури у межах 80-100 °С.
в два
У режимах приготування ГРИЛЬ і ПОДВІИНИИ
ГРИЛЬ, помістіть ґратку в положення 5 і деко в
положення 1, щоб збирати соки і / або жири, що
утворюються в результаті приготування. У режимі
приготуванні GRATIN, помістіть ґратку в положення 2
або 3 і деко в положення 1, для збору соків і жирів.
Рекомендується виставити рівень енергіі на верхнє
положення. Не турбуитеся
, якщо верхня межа не
залишається постіино включеною: іі робота
контролюється термостатом.
ПРИГОТУВАННЯ ПІЦЦИ
Використовуите сковороду без ручки з легкого
алюмінію, встановивши іі на ґратці, що
додається.
З деком збільшується час приготування і погано
виходить хрустка піцца.
У разі сильно наповнених піц доцільно додати
моццареллу в середині часу приготування.
23
Page 24

ɉɥɚɧɭɜɚɧɧɹ ɩɪɢɝɨɬɭɜɚɧɧɹ ɿɠɿ
ɡɚ ɞɨɩɨɦɨɝɨɸ ɟɥɟɤɬɪɨɧɧɨɝɨ
ɩɪɨɝɪɚɦɚɬɨɪɚ
ɇɚɥɚɲɬɭɜɚɧɧɹ ɝɨɞɢɧɧɢɤɚ
ɉɿɫɥɹ ɩɿɞɤɥɸɱɟɧɧɹ ɞɨ ɟɥɟɤɬɪɢɱɧɨɿ ɦɟɪɟɠɿ ɚɛɨ ɩɿɫɥɹ
ɪɚɩɬɨɜɨɝɨ ɜɿɞɤɥɸɱɟɧɧɹ ɟɥɟɤɬɪɨɟɧɟɪɝɿɿ, ɞɢɫɩɥɟɢ
ɜɿɞɨɛɪɚɠɚɬɢɦɟ 0.00.
ɓɨɛ ɧɚɥɚɲɬɭɜɚɬɢ ɱɚɫ:
1. ɧɚɬɢɫɧɿɬɶ ɨɞɧɨɱɚɫɧɨ ɧɚ ɤɧɨɩɤɢ ɌɊɂȼȺɅȱɋɌɖ
i ɄIɇȿɐɖ ɉɊɂȽɈɌɍȼȺɇɇə ;
ɉɊɂȽɈɌɍȼȺɇɇə
2. ɱɟɪɟɡ 4 ɫɟɤɭɧɞɢ ɜɢɫɬɚɜɬɟ ɩɨɬɨɱɧɢɢ ɱɚɫ,
ɧɚɬɢɫɤɚɸɱɢ ɧɚ ɤɧɨɩɤɢ
, ɱɚɫ ɡɛiɥɶɲɭɽɬɶɫɹ; ɧɚɬɢɫɤɚɸɱɢ ɧɚ ɤɧɨɩɤɭ , ɱɚɫ
ɡɦɟɧɲɭɽɬɶɫɹ.
ɉɿɫɥɹ ɜɢɫɬɚɜɥɹɧɧɹ ɱɚɫɭ, ɩɪɨɝɪɚɦɚɬɨɪ ɩɟɪɟɯɨɞɢɬɶ
ɚɜɬɨɦɚɬɢɱɧɨ ɜ ɪɭɱɧɟ ɩɨɥɨɠɟɧɧɹ.
ɇɚɥɚɲɬɭɜɚɧɧɹ ɬɚɢɦɟɪɚ
Ɂɚ ɞɨɩɨɦɨɝɨɸ ɬɚɢɦɟɪɚ ɦɨɠɧɚ ɡɚɞɚɜɚɬɢ ɜɿɞɥɿɤ ɭ
ɡɜɨɪɨɬɧɨɦɭ ɧɚɩɪɹɦɿ , ɩɿɫɥɹ ɡɚɤɿɧɱɟɧɧɹ ɡɚɞɚɧɨɝɨ ɱɚɫɭ
ɩɨɞɚɽɬɶɫɹ ɡɜɭɤɨɜɢɢ ɫɢɝɧɚɥ.
ɓɨɛ ɧɚɥɚɲɬɭɜɚɬɢ ɬɚɢɦɟɪ:
1. ɧɚɬɢɫɧɿɬɶ ɤɧɨɩɤɭ ɌȺɂɆȿɊ
ɡ’ɹɜɢɬɶɫɹ:
e . ɇɚɬɢɫɤɚɸɱɢ ɧɚ ɤɧɨɩɤɭ
. ɇɚ ɞɢɫɩɥɟɿ
+
1
2. ɧɚɬɢɫɤɚɢɬɟ ɧɚ ɤɧɨɩɤɢ e , ɳɨɛ ɜɢɫɬɚɜɢɬɢ
ɛɚɠɚɧɢɢ ɱɚɫ;
3. ɩɪɢ ɜɿɞɩɭɫɤɚɧɧɿ ɤɧɨɩɨɤ ɩɨɱɢɧɚɽɬɶɫɹ ɜɿɞɥɿɤ
ɭ ɡɜɨɪɨɬɧɨɦɭ ɧɚɩɪɹɦɿ ɿ ɧɚ ɞɢɫɩɥɟɿ ɡ’ɹɜɥɹɽɬɶɫɹ
ɩɨɬɨɱɧɢɢ ɱɚɫ:
5
4. ɩɿɫɥɹ ɡɚɤɿɧɱɟɧɧɹ ɡɚɞɚɧɨɝɨ ɱɚɫɭ ɩɨɞɚɽɬɶɫɹ
ɡɜɭɤɨɜɢɢ ɫɢɝɧɚɥ, ɹɤɢɢ ɦɨɠɧɚ ɜɢɦɤɧɭɬɢ, ɧɚɬɢɫɧɭɜɲɢ
ɧɚ ɛɭɞɶ-ɹɤɭ ɤɧɨɩɤɭ (ɨɤɪɿɦ ɤɧɨɩɨɤ e ): ɩɨɡɧɚɱɤɚ
ɝɚɫɧɟ.
+
! Ɍɚɢɦɟɪ ɧɟ ɤɨɧɬɪɨɥɸɽ ɜɤɥɸɱɟɧɧɹ ɿ ɜɢɤɥɸɱɟɧɧɹ
ɞɭɯɨɜɤɢ.
ɇɚɫɬɪɨɢɤɚ ɝɭɱɧɨɫɬɿ ɡɜɭɤɨɜɨɝɨ ɫɢɝɧɚɥɭ
ɉɿɫɥɹ ɜɢɛɨɪɭ ɿ ɩɿɞɬɜɟɪɞɠɟɧɧɹ ɭɫɬɚɧɨɜɤɢ ɝɨɞɢɧɧɢɤɚ,
ɡɚ ɞɨɩɨɦɨɝɨɸ ɤɧɨɩɤɢ
ɡɜɭɤɨɜɨɝɨ ɫɢɝɧɚɥɭ.
ɉɥɚɧɭɜɚɧɧɹ ɬɪɢɜɚɥɨɫɬɿ ɩɪɢɝɨɬɭɜɚɧɧɹ ɿɡ
ɡɚɬɪɢɦɤɨɸ ɜɤɥɸɱɟɧɧɹ
ɉɟɪɲ ɡɚ ɜɫɟ ɩɨɬɪɿɛɧɨ ɜɢɛɪɚɬɢ ɛɚɠɚɧɭ ɩɪɨɝɪɚɦɭ
ɩɪɢɝɨɬɭɜɚɧɧɹ ɿ ɬɟɦɩɟɪɚɬɭɪɭ ɡɚ ɞɨɩɨɦɨɝɨɸ ɪɭɤɨɹɬɨɤ
ɉɊɈȽɊȺɆɂ ɿ ɌȿɊɆɈɋɌȺɌ ɞɭɯɨɜɤɢ.
ɇɚ ɰɶɨɦɭ ɟɬɚɩɿ ɦɨɠɧɚ ɩɥɚɧɭɜɚɬɢ ɬɪɢɜɚɥɿɫɬɶ
ɩɪɢɝɨɬɭɜɚɧɧɹ:
1. ɧɚɬɢɫɧɿɬɶ ɧɚ ɤɧɨɩɤɭ ɌɊɂȼȺɅȱɋɌɖ ɉɊɂȽɈɌɍȼȺɇɇə
;
2. ɱɟɪɟɡ 4 ɫɟɤɭɧɞɢ ɜɢɫɬɚɜɬɟ ɛɚɠɚɧɭ ɬɪɢɜɚɥɿɫɬɶ
ɩɪɢɝɨɬɭɜɚɧɧɹ, ɧɚɬɢɫɤɚɸɱɢ ɧɚ ɤɧɨɩɤɢ
ɧɚɩɪɢɤɥɚɞ , ɩɥɚɧɭɽɬɶɫɹ ɬɪɢɜɚɥɿɫɬɶ ɜ 30 ɯɜɢɥɢɧ, ɧɚ
ɞɢɫɩɥɟɿ ɡ’ɹɜɥɹɽɬɶɫɹ:
1
3. ɩɪɢ ɜɿɞɩɭɫɤɚɧɧɿ ɤɧɨɩɨɤ, ɱɟɪɟɡ 4 ɫɟɤɭɧɞɢ, ɧɚ
ɞɢɫɩɥɟɿ ɡ’ɹɜɥɹɽɬɶɫɹ ɩɨɬɨɱɧɢɢ ɱɚɫ (ɧɚɩɪɢɤɥɚɞ, 10.00)
iɡ ɩɨɡɧɚɱɤɨɸ
P
ɦɨɠɧɚ ɧɚɥɚɲɬɭɜɚɬɢ ɝɭɱɧɿɫɬɶ
ɿ ɥɿɬɟɪɚ A (ȺȼɌɈ):
e . əɤɳɨ,
Ⱦɚɥɿ ɩɨɬɪɿɛɧɨ ɡɚɞɚɬɢ ɱɚɫ ɡɚɤɿɧɱɟɧɧɹ ɩɪɢɝɨɬɭɜɚɧɧɹ;
4. ɧɚɬɢɫɧɿɬɶ ɧɚ ɤɧɨɩɤɭ ɁȺɄȱɇɑȿɇɇə
ɉɊɂȽɈɌɍȼȺɇɇə
5. ɜɫɬɚɧɨɜɿɬɶ ɛɚɠɚɧɢɢ ɱɚɫ ɡɚɤɿɧɱɟɧɧɹ ɩɪɢɝɨɬɭɜɚɧɧɹ,
ɧɚɬɢɫɤɚɸɱɢ ɧɚ ɤɧɨɩɤɢ
ɧɟɨɛɯɿɞɧɨ ɡɚɤɿɧɱɢɬɢ ɩɪɢɝɨɬɭɜɚɧɧɹ ɜ 13.00 ɝɨɞɢɧ, ɧɚ
ɞɢɫɩɥɟɿ ɡ’ɹɜɥɹɽɬɶɫɹ:
;
e . əɤɳɨ, ɧɚɩɪɢɤɥɚɞ,
2
6. ɩɪɢ ɜɿɞɩɭɫɤɚɧɧɿ ɤɧɨɩɨɤ, ɱɟɪɟɡ 4 ɫɟɤɭɧɞɢ, ɧɚ
ɞɢɫɩɥɟɿ ɡ’ɹɜɥɹɽɬɶɫɹ ɩɨɬɨɱɧɢɢ ɱɚɫ (ɧɚɩɪɢɤɥɚɞ, 10.00)
iɡ ɥɿɬɟɪɨɸ A (ȺȼɌɈ):
3
ɍ ɡɚɩɪɨɩɨɧɨɜɚɧɨɦɭ ɩɪɢɤɥɚɞɿ, ɞɭɯɨɜɤɚ ɜɤɥɸɱɢɬɶɫɹ
ɚɜɬɨɦɚɬɢɱɧɨ ɨ 12.30 ɜ ɪɟɠɢɦɿ, ɹɤɢɢ ɩɨɬɪɿɛɧɨ
ɡɚɜɟɪɲɢɬɢ ɱɟɪɟɡ 30 ɯɜɢɥɢɧ, ɨ 13.00.
ɉɥɚɧɭɜɚɧɧɹ ɬɪɢɜɚɥɨɫɬɿ ɩɪɢɝɨɬɭɜɚɧɧɹ ɿɡ
ɧɟɝɚɢɧɢɦ ɡɚɩɭɫɤɨɦ
ȼɢɤɨɧɚɢɬɟ ɩɪɨɰɟɞɭɪɭ ɡɚɞɚɧɧɹ ɬɪɢɜɚɥɨɫɬɿ
ɩɪɢɝɨɬɭɜɚɧɧɹ, ɨɩɢɫɚɧɭ ɜɢɳɟ (ɩɭɧɤɬɢ 1-3).
! ȼɤɥɸɱɟɧɚ ɥɿɬɟɪɚ A ɧɚɝɚɞɭɽ ɩɪɨ ɡɚɞɚɧɟ ɩɥɚɧɭɜɚɧɧɹ
ɬɪɢɜɚɥɨɫɬɿ ɿ ɩɪɨ ɡɚɤɿɧɱɟɧɧɹ ɩɪɢɝɨɬɭɜɚɧɧɹ ɭ
ɮɭɧɤɰɿɿ ȺȼɌɈ. ɓɨɛ ɜɿɞɧɨɜɢɬɢ ɪɭɱɧɢɢ ɪɟɠɢɦ
ɪɨɛɨɬɢ ɞɭɯɨɜɤɢ, ɩɿɫɥɹ ɤɨɠɧɨɝɨ ɩɪɢɝɨɬɭɜɚɧɧɹ ɜ
ɪɟɠɢɦɿ ȺȼɌɈ, ɧɚɬɢɫɧɿɬɶ ɨɞɧɨɱɚɫɧɨ ɧɚ ɤɧɨɩɤɢ
ɌɊɂȼȺɅȱɋɌɖ ɉɊɂȽɈɌɍȼȺɇɇə
ɉɊɂȽɈɌɍȼȺɇɇə
! ɉɨɡɧɚɱɤɚ
ɞɭɯɨɜɤɨɸ ɩɪɨɬɹɝɨɦ ɜɫɶɨɝɨ ɱɚɫɭ ɩɪɢɝɨɬɭɜɚɧɧɹ.
ɍ ɛɭɞɶ-ɹɤɢɢ ɦɨɦɟɧɬ ɦɨɠɧɚ ɜɢɜɟɫɬɢ ɧɚ ɞɢɫɩɥɟɢ
ɜɢɫɬɚɜɥɟɧɭ ɬɪɢɜɚɥɿɫɬɶ, ɧɚɬɢɫɧɭɜɲɢ ɧɚ ɤɧɨɩɤɭ
ɌɊɂȼȺɅȱɋɌɖ ɉɊɂȽɈɌɍȼȺɇɇə
ɡɚɤɿɧɱɟɧɧɹ ɩɪɢɝɨɬɭɜɚɧɧɹ, ɩɪɢ ɧɚɬɢɫɤɚɧɧɿ ɧɚ ɤɧɨɩɤɭ
ɁȺɄȱɇɑȿɇɇə ɉɊɂȽɈɌɍȼȺɇɇə . ɉɿɫɥɹ ɡɚɤɿɧɱɟɧɧɹ
ɩɪɢɝɨɬɭɜɚɧɧɹ ɥɭɧɚɽ ɚɤɭɫɬɢɱɧɢɢ ɫɢɝɧɚɥ. ɓɨɛ
ɩɟɪɟɪɜɚɬɢ ɢɨɝɨ, ɧɚɬɢɫɧɿɬɶ ɧɚ ɛɭɞɶ-ɹɤɭ ɤɧɨɩɤɭ, ɨɤɪɿɦ
ɤɧɨɩɨɤ e .
əɤ ɚɧɭɥɸɜɚɬɢ ɡɚɩɪɨɝɪɚɦɨɜɚɧɢɢ ɪɟɠɢɦ
ɩɪɢɝɨɬɭɜɚɧɧɹ ɿɠɿ
ɇɚɬɢɫɧɿɬɶ ɨɞɧɨɱɚɫɧɨ ɧɚ ɤɧɨɩɤɢ ɌɊɂȼȺɅȱɋɌɖ
ɉɊɂȽɈɌɍȼȺɇɇə
;
ȼɢɩɪɚɜɿɬɶ ɚɛɨ ɜɿɞɦɿɧɿɬɶ ɡɚɞɚɧɿ ɩɚɪɚɦɟɬɪɢ
Ɂɚɞɚɧɿ ɩɚɪɚɦɟɬɪɢ ɦɨɠɭɬɶ ɛɭɬɢ ɡɦɿɧɟɧɿ ɭ ɛɭɞɶ-ɹɤɢɢ
ɦɨɦɟɧɬ ɲɥɹɯɨɦ ɧɚɬɢɫɤɚɧɧɹ ɧɚ ɜɿɞɩɨɜɿɞɧɭ ɤɧɨɩɤɭ
(ɌȺɂɆȿɊ, ɌɊɂȼȺɅȱɋɌɖ ɉɊɂȽɈɌɍȼȺɇɇə ɚɛɨ
ɁȺɄȱɇɑȿɇɇə ɉɊɂȽɈɌɍȼȺɇɇə) ɬɚ ɧɚɬɢɫɧɭɜɲɢ ɧɚ
ɤɧɨɩɤɢ
ɉɪɢ ɜɿɞɦɿɧɿ ɬɪɢɜɚɥɨɫɬɿ ɩɪɢɝɨɬɭɜɚɧɧɹ ɬɚɤɨɠ
ɜɿɞɛɭɜɚɽɬɶɫɹ ɚɜɬɨɦɚɬɢɱɧɚ ɜɿɞɦɿɧɚ ɡɚɤɿɧɱɟɧɧɹ
ɩɪɢɝɨɬɭɜɚɧɧɹ ɿ ɧɚɜɩɚɤɢ.
ɍ ɪɚɡɿ ɡɚɩɪɨɝɪɚɦɨɜɚɧɨɿ ɪɨɛɨɬɢ, ɩɪɢɥɚɞ ɧɟ ɩɪɢɢɦɚɽ
ɱɚɫ ɡɚɤɿɧɱɟɧɧɹ ɩɪɢɝɨɬɭɜɚɧɧɹ, ɹɤɳɨ ɜɿɧ ɩɟɪɟɞɭɽ
ɩɨɱɚɬɤɭ ɩɪɢɝɨɬɭɜɚɧɧɹ, ɡɚɞɚɧɨɝɨ ɭ ɰɶɨɦɭ ɠ ɩɪɢɥɚɞi.
ɚɛɨ .
P
.
ɡɚɥɢɲɚɽɬɶɫɹ ɜɤɥɸɱɟɧɢɦ ɪɚɡɨɦ ɡ
i ɁȺɄȱɇɑȿɇɇə ɉɊɂȽɈɌɍȼȺɇɇə
ɿ ɁȺɄȱɇɑȿɇɇə
, ɿ ɩɨɛɚɱɢɬɢ ɱɚɫ
ɱɚɫɭ
24
Page 25

Таблиця приготування в духовці
UA
Програми Страви Вага (кг) Положен-
Качка
Жарке з телятини або з яловичини
Звичайна духовка
Духовка Кондитерська
Духовка Пiцца
Мультиприготування
Гриль
Подвiйний гриль
Конвекцiй-ний
гриль (Gratin)
ВЕНТИЛЯЦІЇ
ЗНИЗУ
ɞɭɯɨɜɤɢ
ɇɢɡ
Жарке з свинини
Пiскове печиво
Солодкi пироги
Солодкi пироги
Фруктовi торти
Кекси
Бiсквiти
Млинцi фаршированi ( на двох полицях)
Млинцi фаршированi ( на двох полицях)
Солонi вироби з листкового тiста (на двох
полицях)
Заварнi (на трьох полицях)
Печиво (на трьох полицях)
Безе (на трьох полицях)
Пiцца
Жарке з телятини або з яловичини
Курка
Пiцца (на двох полицях)
Лазан’я
Баранина
Смажена курка + картопля
Скумбрiя
Кекси
Заварнi (на двох полицях)
Печиво (на двох полицях)
Бiсквiти (на однiй полицi)
Бiсквiти (на двох полицi)
Солонi торти
Камбала та каркатицi
Шампури з кальмарiв та креветок
Каракатицi
Фiле мерлузи
Овочи гриль
Бiфштекс з телятини
Сосиски
Гамбургери
Скумбрiя
Тости (або пiдсмажений хлiб)
Бiфштекс з телятини
Вiдбивнi
Гамбургери
Скумбрiя
Тости
На рожнi
Телятина на рожнi
Курка на рожні
Курка гриль
Каракатицi
ɥɟɳ
Ɏɢɥɟ ɬɪɟɫɤɢ
Ɇɨɪɫɤɨɣ ɨɤɭɧɶ ɜ ɮɨɥɶɝɟ
Ɉɜɨɳɧɵɟ ɫɦɟɫɢ
(ɬɢɩɚ ɪɚɬɚɬɭɣ)
ɏɨɪɨɲɨ ɩɪɢɝɨɬɨɜɥɟɧɧɵɟ ɨɜɨɳɢ
Ⱦɨɜɟɞɟɧɢɟ ɞɨɝɨɬɨɜɧɨɫɬɢ
1+1
№ 4 i 6
№ 4
0,8 - 1,0
1,5 - 2,0
ня деко
1
1
1
-
1
0.5
1
0.7
0.5
1.2
0.6
0.4
0.7
0.7
0.5
0.5
1
1
1
1
1
1
1
0.5
0.5
0.5
1
1.5
0.7
0.6
0.6
0.8
0.4
0.8
0.6
0.6
1
1
1
1
1
1.0
2.0
1.5
1.5
0.8 5 Макс 25-30
0,5
0,5
0,5
3
3
3
3
3
3
2 або 3
3
3
2 i 4
2 i 4
2 i 4
1 i 3 i 5
1 i 3 i 5
1 i 3 i 5
3
2
2 або 3
2 i 4
3
2
2 i 4
2
2
2 i 4
2 i 4
2
2 i 4
3
4
4
4
4
3 або 4
4
4
4
4
4
4
4
4
4
4
-
2
2
3
3
3
3
3
Попереднє
розігрівання
(хвилини)
15
15
15
15
15
15
15
15
15
15
15
15
15
15
15
15
10
10
15
10
10
15
10
10
10
10
10
10
15
-
-
-
-
-
-
-
-
-
5
5
5
5
5
5
5
10
10
18’
16’
24’
21’
20’
Рекомендо-вана
темпера-тура
200
200
200
180
180
180
180
180
160
200
190
210
180
180
90
220
220
180
230
180
180
200
180
170
190
180
170
170
200
100%
100%
100%
100%
100%
100%
100%
100%
100%
100%
Макс
Макс
Макс
Макс
Макс
Макс
Макс
200
200
170-180
160-170
200-210
190-200
180-190
Трива-лість
приготу-вання
(хвили-ни)
65-75
70-75
70-80
15-20
30-35
20-30
40-45
40-50
25-30
30-35
20-25
15-20
20-25
20-25
180
15-20
25-30
60-70
15-20
30-35
40-45
60-70
30-35
40-50
20-25
10-15
15-20
20-25
25-30
10-12
8-10
10-15
10-15
15-20
15-20
15-20
10-12
15-20
3-5
15-20
15-20
7-10
15-20
2-3
70-80
70-80
55-60
30-35
25-35
15-20
35-45
50-60
55-60
УВАГА! ! ДуховкаДуховка оснащена
системоюсистемою зупинення решіток,
завдякизавдяки якійякій можна вийняти їх
так, щоб вони не випадали з
духовки(1).
Щоб повністю вийняти
решітки, достатньо, як показано
на малюнку, підняти їх, взятися
спереду і витягнути (2).
25
Page 26

Ɂɚɩɨɛɿɠɧɿ ɡɚɫɨɛɢ ɢ ɩɨɪɚɞɢ
UA
! Ƚɚɡɨɜɚ ɩɥɢɬɚ ɛɭɥɚ ɪɨɡɪɨɛɥɟɧɚ ɿ ɫɤɨɧɫɬɪɭɢɨɜɚɧɚ
ɜɿɞɩɨɜɿɞɧɨ ɞɨ ɦɿɠɧɚɪɨɞɧɢɯ ɧɨɪɦ ɛɟɡɩɟɤɢ.
Ⱦɚɧɿ ɜɤɚɡɿɜɤɢ ɨɛɭɦɨɜɥɟɧɿ ɜɢɦɨɝɚɦɢ ɛɟɡɩɟɤɢ ɿ ɩɨɜɢɧɧɿ
ɛɭɬɢ ɭɜɚɠɧɨ ɜɢɜɱɟɧɿ.
Ɂɚɝɚɥɶɧɚ ɛɟɡɩɟɤɚ
• Ƚɚɡɨɜɚ ɩɥɢɬɚ ɩɪɢɡɧɚɱɟɧɚ ɞɥɹ ɧɟɩɪɨɮɟɫɿɢɧɨɝɨ
ɜɢɤɨɪɢɫɬɚɧɧɹ ɜɫɟɪɟɞɢɧɿ ɠɢɬɥɨɜɢɯ ɩɪɢɦɿɳɟɧɶ.
• Ƚɚɡɨɜɭ ɩɥɢɬɭ ɧɟ ɦɨɠɧɚ ɜɫɬɚɧɨɜɥɸɜɚɬɢ ɩɨɡɚ
ɩɪɢɦɿɳɟɧɧɹɦɢ, ɧɚɜɿɬɶ ɭ ɪɚɡɿ ɡɚɯɢɳɟɧɨɝɨ ɩɪɨɫɬɨɪɭ,
ɬɨɦɭ ɳɨ ɞɭɠɟ ɧɟɛɟɡɩɟɱɧɨ ɩɿɞɞɚɜɚɬɢ ɿɿ ɞɿɿ ɞɨɳɭ ɿ
ɝɪɨɡɢ.
• ɇɟ ɬɨɪɤɚɬɢɫɹ ɩɥɢɬɢ ɦɨɤɪɢɦɢ ɚɛɨ ɜɨɥɨɝɢɦɢ ɧɨɝɚɦɢ
ɚɛɨ ɪɭɤɚɦɢ.
• ɉɪɢɥɚɞ ɦɚɽ ɜɢɤɨɪɢɫɬɨɜɭɜɚɬɢɫɹ ɞɥɹ
ɩɪɢɝɨɬɭɜɚɧɧɹ ʀɠɿ, ɬɿɥɶɤɢ ɞɨɪɨɫɥɢɦɢ ɨɫɨɛɚɦɢ
ɿ ɡɝɿɞɧɨ ɿɧɫɬɪɭɤɰɿɹɦ, ɜɤɚɡɚɧɢɦ ɭ ɰɿɣ ɛɪɨɲɭɪɿ.
Ȼɭɞɶ-ɹɤɟ ɿɧɲɟ ɜɢɤɨɪɢɫɬɚɧɧɹ (ɧɚɩɪɢɤɥɚɞ: ɞɥɹ
ɨɛɿɝɪɿɜɭ ɩɪɢɦɿɳɟɧɶ) ɜɜɚɠɚɬɢɦɟɬɶɫɹ ɧɟ ɡɚ
ɩɪɢɡɧɚɱɟɧɧɹɦ ɿ, ɬɨɛɬɨ, ɧɟɤɨɪɟɤɬɧɢɦ. ȼɢɪɨɛɧɢɤ
ɜɿɞɯɢɥɹɽ ɛɭɞɶ-ɹɤɭ ɜɿɞɩɨɜɿɞɚɥɶɧɿɫɬɶ ɡɚ
ɦɨɠɥɢɜɿ ɡɛɢɬɤɢ ɜɧɚɫɥɿɞɨɤ ɜɢɤɨɪɢɫɬɚɧɧɹ ɧɟ ɡɚ
ɩɪɢɡɧɚɱɟɧɧɹɦ, ɩɨɦɢɥɤɨɜɨɝɨ ɚɛɨ ɧɟɪɨɡɭɦɧɨɝɨ
ɡɚɫɬɨɫɭɜɚɧɧɹ.
• Ȼɪɨɲɭɪɚ ɜɿɞɧɨɫɢɬɶɫɹ ɞɨ ɭɫɬɚɬɤɭɜɚɧɧɹ ɤɥɚɫɭ 1
(ɿɡɨɥɶɨɜɚɧɟ) ɚɛɨ ɤɥɚɫɭ 2 - ɩɿɞɤɥɚɫ 1 (ɜɫɬɚɧɨɜɥɟɧɟ
ɦɿɠ ɞɜɨɦɚ ɟɥɟɦɟɧɬɚɦɢ ɦɟɛɥɿɜ).
• Ȼɟɪɟɝɬɢ ɜɿɞ ɞɿɬɟɢ.
• ɍɧɢɤɚɢɬɟ ɤɨɧɬɚɤɬɭ ɤɚɛɟɥɿɜ ɠɢɜɥɟɧɧɹ ɿɧɲɢɯ
ɩɨɛɭɬɨɜɢɯ ɟɥɟɤɬɪɨɩɪɢɥɚɞɿɜ ɡ ɝɚɪɹɱɢɦɢ ɱɚɫɬɢɧɚɦɢ
ɩɥɢɬɢ.
• ɇɟ ɡɚɤɪɢɜɚɢɬɟ ɜɟɧɬɢɥɹɰɿɢɧɿ ɨɬɜɨɪɢ ɢ ɨɬɜɨɪɢ ɞɥɹ
ɜɿɞɜɟɞɟɧɧɹ ɬɟɩɥɚ.
• Ɂɚɜɠɞɢ ɜɢɤɨɪɢɫɬɨɜɭɢɬɟ ɪɭɤɚɜɢɰɿ ɞɥɹ
ɡɚɜɚɧɬɚɠɟɧɧɹ ɚɛɨ ɜɢɬɹɝɚɧɧɹ ɦɿɫɬɤɨɫɬɟɢ ɞɥɹ ɿɠɿ.
• ɇɟ ɤɨɪɢɫɬɭɢɬɟɫɹ ɪɿɞɤɢɦɢ ɝɨɪɸɱɢɦɢ ɡɚɫɨɛɚɦɢ
(ɫɩɢɪɬ, ɛɟɧɡɢɧ ɿ ɬ.ɩ.) ɩɨɛɥɢɡɭ
ɜɤɥɸɱɟɧɚ.
• ɇɟ ɤɥɚɞɿɬɶ ɝɨɪɸɱɿ ɦɚɬɟɪɿɚɥɢ ɜ ɧɢɠɧɿɢ ɜɿɞɫɿɤ ɚɛɨ ɜ
ɫɚɦɭ ɞɭɯɨɜɤɭ: ɩɪɢ ɜɤɥɸɱɟɧɧɿ ɩɥɢɬɢ ɜɨɧɢ ɦɨɠɭɬɶ
ɡɚɝɨɪɿɬɢɫɹ.
• əɤɳɨ ɩɥɢɬɨɸ ɧɟ ɤɨɪɢɫɬɭɸɬɶɫɹ, ɫɬɟɠɬɟ ɡɚ ɬɢɦ,
ɳɨɛ ɪɭɤɨɹɬɤɢ ɛɭɥɢ ɜ ɩɨɥɨɠɟɧɧɿ
• ɇɟ ɜɢɢɦɚɢɬɟ ɜɢɥɤɭ ɡ ɪɨɡɟɬɤɢ, ɩɨɬɹɝɧɭɜɲɢ ɡɚ
ɤɚɛɟɥɶ, ɬɹɝɧɿɬɶ ɬɿɥɶɤɢ ɡɚ ɫɚɦɭ ɜɢɥɤɭ.
• ɇɟ ɜɢɤɨɧɭɢɬɟ ɱɢɳɟɧɧɹ ɚɛɨ ɬɟɯɧɿɱɧɟ
ɨɛɫɥɭɝɨɜɭɜɚɧɧɹ, ɩɟɪɲ ɧɿɠ ɜɢɬɹɝɬɢ ɜɢɥɤɭ ɡ
ɟɥɟɤɬɪɢɱɧɨɿ ɪɨɡɟɬɤɢ.
• ɍ ɪɚɡɿ ɩɨɲɤɨɞɠɟɧɧɹ, ɜ ɠɨɞɧɨɦɭ ɜɢɩɚɞɤɭ ɧɟ
ɧɚɦɚɝɚɢɬɟɫɹ ɫɚɦɨɫɬɿɢɧɨ ɩɨɥɚɝɨɞɢɬɢ ɜɧɭɬɪɿɲɧɿ
ɦɟɯɚɧɿɡɦɢ. Ɂɜ’ɹɠɿɬɶɫɹ ɿɡ ɋɟɪɜiɫɧɨɸ ɫɥɭɠɛɨɸ.
• ɇɟ ɫɬɚɜɬɟ ɜɚɠɤɿ ɩɪɟɞɦɟɬɢ ɧɚ
ɞɭɯɨɜɤɢ.
ȼɇɂɆȺɇɂȿ! ɉɪɢ ɧɚɝɪɟɜɟ ɫɬɟɤɥɹɧɧɚɹ
ɤɪɵɲɤɚ ɦɨɠɟɬ ɥɨɩɧɭɬɶ. ɉɪɟɠɞɟ ɱɟɦ
ɡɚɤɪɵɬɶ ɟɟ, ɜɵɤɥɸɱɢɬɶ ɜɫɟ ɤɨɧɮɨɪɤɢ
ɢɥɢ ɷɥɟɤɬɪɢɱɟɫɤɢɟ ɝɨɪɟɥɤɢ.*Ɍɨɥɶɤɨ ɞɥɹ
ɦɨɞɟɥɟɣ ɫɨ ɫɬɟɤɥɹɧɧɨɣ ɤɪɵɲɤɨɣ
ɜɿɞ ɩɥɢɬɢ, ɤɨɥɢ ɜɨɧɚ
•.
ɜɿɞɤɪɢɬɿ ɞɜɟɪɰɹɬɚ
• ɇɟ ɩɟɪɟɞɛɚɱɚɽɬɶɫɹ ɜɢɤɨɪɢɫɬɚɧɧɹ ɩɪɢɫɬɪɨɸ
ɨɫɨɛɚɦɢ (ɜɤɥɸɱɚɸɱɢ ɞɿɬɟɣ) ɡ ɨɛɦɟɠɟɧɢɦɢ
ɮɿɡɢɱɧɢɦɢ, ɫɟɧɫɨɪɧɢɦɢ ɚɛɨ ɪɨɡɭɦɨɜɢɦɢ
ɡɞɿɛɧɨɫɬɹɦɢ, ɧɟɞɨɫɜɿɞɱɟɧɢɦɢ ɨɫɨɛɚɦɢ ɚɛɨ
ɬɚɤɢɦɢ, ɳɨ ɧɟ ɨɡɧɚɣɨɦɢɥɢɫɹ ɡ ɜɢɪɨɛɨɦ,
ɡɚ ɜɢɤɥɸɱɟɧɧɹɦ ɜɢɩɚɞɤɿɜ ɧɚɝɥɹɞɭ ɡ ɛɨɤɭ
ɨɫɨɛɢ, ɜɿɞɩɨɜɿɞɚɥɶɧɨʀ ɡɚ ʀɯɧɸ ɛɟɡɩɟɤɭ; ɧɟ
ɩɟɪɟɞɛɚɱɚɽɬɶɫɹ ɜɢɤɨɪɢɫɬɚɧɧɹ ɩɪɢɫɬɪɨɸ ɨɫɨɛɚɦɢ,
ɹɤi ɧɟ ɨɬɪɢɦɚɥɢ ɩɨɩɟɪɟɞɧɿɯ ɜɤɚɡɿɜɨɤ ɳɨɞɨ
ɜɢɤɨɪɢɫɬɚɧɧɹ
•
əɤɳɨ ɩɥɢɬɚ ɪɨɡɬɚɲɨɜɚɧɚ ɧɚ ɩ’ɽɞɟɫɬɚɥ, ɜɠɢɬɢ
ɩɪɢɫɬɪɨɸ.
ɧɟɨɛɯɿɞɧɢɯ ɡɚɯɨɞɿɜ ɨɛɟɪɟɠɧɨɫɬɿ ɞɥɹ ɡɚɩɨɛɿɝɚɧɧɹ
ɡɿɫɤɨɜɡɭɜɚɧɧɸ ɩɥɢɬɢ ɡ ɩ’ɽɞɟɫɬɚɥɭ ɫɚɦɨɝɨ.
ɍɬɢɥɿɡɚɰɿɹ
• ɍɬɢɥɿɡɚɰɿɹ ɦɚɬɟɪɿɚɥɭ ɩɚɤɭɜɚɧɧɹ: ɞɨɬɪɢɦɭɢɬɟɫɶ
ɦɿɫɰɟɜɢɯ ɧɨɪɦ, ɬɚɤ ɹɤ ɩɚɤɭɜɚɧɧɹ ɦɨɠɟ ɛɭɬɢ
ɩɨɜɬɨɪɧɨ ɜɢɤɨɪɢɫɬɚɧɟ.
• Ɂɧɹɬɬɹ ɡ ɟɤɫɩɥɭɚɬɚɰɿɿ ɩɨɛɭɬɨɜɢɯ ɟɥɟɤɬɪɨɩɪɢɥɚɞiɜ
ȯɜɪɨɩɟɢɫɶɤɚ ɞɢɪɟɤɬɢɜɚ 2002/96/CE ɡ ɜɿɞɯɨɞɿɜ
ɜɿɞ ɟɥɟɤɬɪɢɱɧɨɿ ɢ ɟɥɟɤɬɪɨɧɧɨɿ ɚɩɚɪɚɬɭɪɢ (RAEE),
ɩɟɪɟɞɛɚɱɚɽ, ɳɨ ɩɨɛɭɬɨɜɿ ɟɥɟɤɬɪɨɩɪɢɥɚɞɢ
ɧɟ ɦɨɠɭɬɶ ɩɟɪɟɪɨɛɥɹɬɢɫɹ ɭ ɡɜɢɱɚɢɧɨɦɭ
ɩɨɪɹɞɤɭ ɞɥɹ ɬɜɟɪɞɢɯ ɦɿɫɶɤɢɯ ɜɿɞɯɨɞɿɜ. Ɂɧɹɬɿ ɡ
ɟɤɫɩɥɭɚɬɚɰɿɿ ɩɨɛɭɬɨɜɿ ɩɪɢɥɚɞɢ ɦɚɸɬɶ ɛɭɬɢ ɡɿɛɪɚɧɿ
ɨɤɪɟɦɨ ɞɥɹ ɨɩɬɢɦɿɡɚɰɿɿ ɫɬɭɩɟɧɸ ɜɿɞɧɨɜɥɟɧɧɹ ɢ
ɪɟɰɢɤɥɸɜɚɧɧɹ ɦɚɬɟɪɿɚɥɿɜ, ɳɨ ɜɯɨɞɹɬɶ ɞɨ ɿɯɧɶɨɝɨ
ɫɤɥɚɞɭ ɿ ɡ ɦɟɬɨɸ ɭɫɭɧɟɧɧɹ ɩɨɬɟɧɰɿɢɧɨɿ ɲɤɨɞɢ
ɞɥɹ ɡɞɨɪɨɜ’ɹ ɬɚ ɞɨɜɤiɥɥɹ. ɋɢɦɜɨɥ ɡɚɤɪɟɫɥɟɧɨɿ
ɤɨɪɡɢɧɢ, ɡɨɛɪɚɠɟɧɿɢ ɧɚ ɜɫɿɯ ɜɢɪɨɛɚɯ, ɧɚɝɚɞɭɽ ɩɪɨ
ɧɟɨɛɯɿɞɧɿɫɬɶ ɨɤɪɟɦɨɿ ɭɬɢɥɿɡɚɰɿɿ.
Ⱦɥɹ ɩɨɞɚɥɶɲɨɿ ɿɧɮɨɪɦɚɰɿɿ ɩɪɨ ɩɪɚɜɢɥɶɧɟ ɡɧɹɬɬɹ
ɡ ɟɤɫɩɥɭɚɬɚɰɿɿ ɩɨɛɭɬɨɜɢɯ ɟɥɟɤɬɪɨɩɪɢɥɚɞɿɜ, ɿɯɧɿ
ɜɥɚɫɧɢɤɢ ɦɨɠɭɬɶ
ɚɛɨ ɨɪɝɚɧɿɡɚɰɿɸ, ɳɨ ɩɪɨɞɚɽ ɜɢɪɨɛɢ.
ɡɜɟɪɧɭɬɢɫɹ ɭ ɜɿɞɩɨɜɿɞɧɭ ɫɥɭɠɛɭ
Ɉɯɨɪɨɧɚ ɿ ɞɛɚɢɥɢɜɟ ɜɿɞɧɨɲɟɧɧɹ ɞɨ
ɞɨɜɤɿɥɥɹ
• ȼɤɥɸɱɟɧɧɹ ɞɭɯɨɜɤɢ ɜ ɩɪɨɦɿɠɤɭ ɡ ɩɿɡɧɶɨɝɨ
ɩiɫɥɹɨɛiɞɟɧɧɨɝɨ ɱɚɫɭ ɞɨ ɪɚɧɧɶɨɝɨ ɪɚɧɤɭ ɞɨɡɜɨɥɢɬɶ
ɡɦɟɧɲɢɬɢ ɧɚɜɚɧɬɚɠɟɧɧɹ ɧɚ ɩɿɞɩɪɢɽɦɫɬɜɚ
ɜɢɪɨɛɧɢɤɢ ɟɥɟɤɬɪɨɟɧɟɪɝɿɿ.
• ɉɪɢɝɨɬɭɜɚɧɧɹ ɿɠɿ ɜ ɪɟɠɢɦɚɯ ȽɊɂɅɖ, ɉɈȾȼȱɂɇɂɂ
ȽɊɂɅɖ ɿ ɄɈɇȼȿɄɐIɂɇɂɂ ȽɊɂɅɖ ɩɨɜɢɧɧɨ
ɜɢɤɨɧɭɜɚɬɢɫɹ ɩɪɢ ɡɚɤɪɢɬɢɯ ɞɜɟɪɰɹɬɚɯ: ɞɥɹ ɬɨɝɨ,
ɳɨɛ ɨɞɟɪɠɚɬɢ ɧɚɢɤɪɚɳi ɪɟɡɭɥɶɬɚɬɢ ɬɚ ɡ ɦɟɬɨɸ
ɡɚɨɳɚɞɠɟɧɧɹ ɟɥɟɤɬɪɨɟɧɟɪɝiɿ ( ɛɥɢɡɶɤɨ 10%).
ɉɿɞɬɪɢɦɭɢɬɟ ɜ ɪɨɛɨɱɨɦɭ ɫɬɚɧɿ ɿ ɦɢɢɬɟ ɭɳɿɥɶɧɸɜɚɱɿ
•
ɬɚɤ, ɳɨɛ ɜɨɧɢ ɞɨɛɪɟ ɩɪɢɥɹɝɚɥɢ ɞɨ ɞɜɟɪɰɹɬ ɿ ɧɟ
ɞɨɡɜɨɥɹɥɢ ɛ ɜɢɧɢɤɚɬɢ ɜɬɪɚɬɚɦ ɬɟɩɥɚ
.
Ⱦɨɩɨɦɨɝɚ
ɉɨɜiɞɨɦɬɟ:
• ɦɨɞɟɥɶ ɩɥɢɬɢ (ɦɨɞɟɥɶ)
• ɫɟɪɿɢɧɢɢ ɧɨɦɟɪ (S/N)
Ⱦɚɧɚ ɿɧɮɨɪɦɚɰɿɹ ɦɿɫɬɢɬɶɫɹ ɧɚ ɬɚɛɥɢɱɰɿ ɡ
ɯɚɪɚɤɬɟɪɢɫɬɢɤɚɦɢ, ɩɪɢɤɪɿɩɥɟɧɿɢ ɞɨ ɩɥɢɬɢ ɿ / ɚɛɨ ɧɚ
ɭɩɚɤɨɜɰɿ
.
26
Page 27

Ⱦɨɝɥɹɞ i ɬɟɯɧɿɱɧɟ
ɨɛɫɥɭɝɨɜɭɜɚɧɧɹ
ȼɿɞɤɥɸɱɟɧɧɹ ɟɥɟɤɬɪɢɱɧɨɝɨ ɠɢɜɥɟɧɧɹ
Ⱦɨ ɩɨɱɚɬɤɭ ɜɫɿɯ ɪɨɛɿɬ ɿɡɨɥɸɢɬɟ ɩɪɢɥɚɞ ɜɿɞ ɦɟɪɟɠɿ
ɟɥɟɤɬɪɢɱɧɨɝɨ ɠɢɜɥɟɧɧɹ
.
ɑɢɳɟɧɧɹ ɩɪɢɥɚɞɚ
! ɇɿɤɨɥɢ ɧɟ ɜɢɤɨɪɢɫɬɨɜɭɢɬɟ ɩɪɢɥɚɞɢ ɞɥɹ ɦɢɬɬɹ
ɩɚɪɨɸ ɚɛɨ ɜɢɫɨɤɢɦ ɬɢɫɤɨɦ.
• Ɂɨɜɧɿɲɧɿ ɟɦɚɥɶɨɜɚɧɿ ɚɛɨ ɧɟɿɪɠɚɜɿɸɱɿ ɞɟɬɚɥɿ ɢ
ɝɭɦɨɜɿ ɭɳɿɥɶɧɸɜɚɱɿ ɦɨɠɭɬɶ ɛɭɬɢ ɨɱɢɳɟɧɿ ɝɭɛɤɨɸ,
ɩɪɨɫɨɱɟɧɨɸ ɬɟɩɥɨɸ ɜɨɞɨɸ ɿ ɧɟɢɬɪɚɥɶɧɢɦ ɦɢɥɨɦ.
əɤɳɨ ɩɥɹɦɢ ɽ ɬɚɤɢɦɢ, ɳɨ ɜɚɠɤɨ ɜɢɜɨɞɹɬɶɫɹ,
ɜɢɤɨɪɢɫɬɨɜɭɢɬɟ ɫɩɟɰɿɚɥɶɧɿ ɡɚɫɨɛɢ. Ⱦɨɛɪɟ
ɩɪɨɦɢɢɬɟ ɜɨɞɨɸ ɿ ɜɢɫɭɲɿɬɶ ɩɿɫɥɹ ɦɢɬɬɹ. ɇɟ
ɜɢɤɨɪɢɫɬɨɜɭɢɬɟ ɚɛɪɚɡɢɜɧɿ ɩɨɪɨɲɤɢ
ɪɟɱɨɜɢɧɢ
• ʈɪɚɬɤɢ, ɤɨɜɩɚɱɤɢ, ɪɨɡɫɿɤɚɱɿ ɩɨɥɭɦ’ɹ ɿ ɩɚɥɶɧɢɤɢ
ɪɨɛɨɱɨɿ ɩɨɜɟɪɯɧɿ ɥɟɝɤɨ ɡɧɿɦɚɸɬɶɫɹ, ɳɨɛ
ɩɨɥɟɝɲɢɬɢ ɦɢɬɬɹ ɩɥɢɬɢ; ɦɢɢɬɟ ɿɯ ɜ ɝɚɪɹɱɿɢ ɜɨɞɿ
ɡ ɧɟɚɛɪɚɡɢɜɧɢɦ ɦɢɸɱɢɦ ɡɚɫɨɛɨɦ, ɪɟɬɟɥɶɧɨ
ɜɢɞɚɥɹɸɱɢ ɧɚɤɢɩ ɿ ɩɨɜɧɿɫɬɸ ɜɢɫɭɲɢɜɲɢ ɩɟɪɟɞ
ɜɫɬɚɧɨɜɥɟɧɧɹɦ ɧɚ ɦɿɫɰɟ
• Ɋɟɝɭɥɹɪɧɨ ɦɢɢɬɟ ɤɨɧɬɚɤɬɧɿ ɱɚɫɬɢɧɢ ɩɪɢɫɬɪɨɸ ɞɥɹ
ɛɟɡɩɟɤɢ* ɭ ɪɚɡɿ ɜɿɞɫɭɬɧɨɫɬɿ ɩɨɥɭɦ’ɹ.
ȼɧɭɬɪɿɲɧɸ ɱɚɫɬɢɧɭ ɞɭɯɨɜɤɢ ɛɚɠɚɧɨ ɦɢɬɢ ɤɨɠɧɨɝɨ
•
ɪɚɡɭ ɩɿɫɥɹ ɿɿ ɜɢɤɨɪɢɫɬɚɧɧɹ, ɤɨɥɢ ɜɨɧɚ ɳɟ ɬɟɩɥɚ.
ȼɢɤɨɪɢɫɬɨɜɭɢɬɟ ɝɚɪɹɱɭ ɜɨɞɭ ɿ ɦɢɸɱɢɢ ɡɚɫɿɛ, ɞɨɛɪɟ
ɩɪɨɦɢɢɬɟ ɿ ɜɢɬɪɿɬɶ ɦ’ɹɤɨɸ ɬɤɚɧɢɧɨɸ. ɍɧɢɤɚɢɬɟ
ɚɛɪɚɡɢɜɿ.
• Ɉɱɢɳɚɣɬɟ ɫɤɥɨ ɞɜɟɪɰɹɬ ɡɚ ɞɨɩɨɦɨɝɨɸ ɦ’ɹɤɨʀ
ɝɭɛɤɢ ɿ ɧɟɚɛɪɚɡɢɜɧɢɯ ɡɚɫɨɛɿɜ , ɩɿɫɥɹ ɱɨɝɨ
ɜɢɫɭɲɿɬɶ ɣɨɝɨ ɦ’ɹɤɨɸ ɬɤɚɧɢɧɨɸ; ɡɚɛɨɪɨɧɹɽɬɶɫɹ
ɜɢɤɨɪɢɫɬɨɜɭɜɚɬɢ ɲɨɪɫɬɤɭɜɚɬɿ
ɱɢ ɡɚɝɨɫɬɪɟɧɿ ɦɟɬɚɥɟɜɿ ɲɤɪɟɛɤɢ: ɜɨɧɢ ɦɨɠɭɬɶ
ɩɨɞɪɹɩɚɬɢ ɩɨɜɟɪɯɧɸ ɿ ɜɢɤɥɢɤɚɬɢ ɪɨɡɤɨɥ ɫɤɥɚ.
• Ⱥɤɫɟɫɭɚɪɢ ɦɨɠɭɬɶ ɦɢɬɢɫɹ ɹɤ ɡɜɢɱɚɢɧɢɢ ɩɨɫɭɞ,
ɡɨɤɪɟɦɚ ɜ ɩɨɫɭɞɨɦɢɢɧɿɢ ɦɚɲɢɧɿ.
Ʉɪɢɲɤɚ
ɍ ɦɨɞɟɥɹɯ ɡɿ ɫɤɥɹɧɨɸ ɤɪɢɲɤɨɸ ɨɱɢɳɟɧɧɹ
! ɍɧɢɤɚɬɢ ɡɚɤɪɢɜɚɧɧɹ ɤɪɢɲɤɢ, ɤɨɥɢ ɩɚɥɶɧɢɤɢ
ɜɤɥɸɱɟɧɿ ɚɛɨ ɳɟ ɝɚɪɹɱɿ.
Ʉɨɧɬɪɨɥɶ ɭɳɿɥɶɧɟɧɶ ɞɭɯɨɜɤɢ
Ɋɟɝɭɥɹɪɧɨ ɩɟɪɟɜɿɪɹɢɬɟ ɫɬɚɧ ɭɳɿɥɶɧɟɧɧɹ ɧɚɜɤɨɥɨ
ɞɜɟɪɰɹɬ ɞɭɯɨɜɤɢ. ɍ ɪɚɡɿ ɢɨɝɨ ɩɨɲɤɨɞɠɟɧɧɹ,
ɡɜɟɪɧɿɬɶɫɹ ɜ ɧɚɢɛɥɢɠɱɢɢ ɚɜɬɨɪɢɡɨɜɚɧɢɢ ɋɟɪɜiɫɧɢɢ
ɰɟɧɬɪ. ɇɟ ɪɟɤɨɦɟɧɞɭɽɬɶɫɹ ɜɢɤɨɪɢɫɬɨɜɭɜɚɬɢ ɞɭɯɨɜɤɭ
ɞɨ ɡɚɜɟɪɲɟɧɧɹ ɪɟɦɨɧɬɭ.
.
.
ɡɞɿɢɫɧɸɽɬɶɫɹ ɡɚ
ɞɨɩɨɦɨɝɨɸ ɬɟɩɥɨɿ ɜɨɞɢ.
ɍɧɢɤɚɢɬɟ ɚɛɪɚɡɢɜɿ.
Ɇɨɠɧɚ ɡɧɹɬɢ ɤɪɢɲɤɭ
ɞɥɹ ɩɨɥɟɝɲɟɧɧɹ
ɨɱɢɳɟɧɧɹ ɩɨɡɚɞɭ
ɪɨɛɨɱɨɿ ɩɨɜɟɪɯɧɿ:
ɩɨɜɧɿɫɬɸ ɜɿɞɤɪɢɬɢ ɿɿ
ɩɨɬɹɝɧɭɬɢ ɧɚɜɟɪɯ (ɞɢɜ.
ɦɚɥɸɧɨɤ).
ɚɛɨ ɿɞɤɿ
ɚɛɪɚɡɢɜɧɿ ɦɚɬɟɪɿɚɥɢ
ɢ
Ɂɚɦɿɧɚ ɥɚɦɩɨɱɤɢ ɨɫɜɿɬɥɟɧɧɹ ɞɭɯɨɜɤɢ
1. ɉɿɫɥɹ ɜɿɞɤɥɸɱɟɧɧɹ ɞɭɯɨɜɤɢ ɜɿɞ ɟɥɟɤɬɪɢɱɧɨɿ
ɦɟɪɟɠɿ, ɡɧɿɦɿɬɶ ɫɤɥɹɧɭ ɤɪɢɲɤɭ
ɩɚɬɪɨɧɚ (ɞɢɜ. ɦɚɥɸɧɨɤ).
2. ȼɿɞɝɜɢɧɬɿɬɶ ɥɚɦɩɨɱɤɭ ɿ ɡɚɦɿɧɿɬɶ
ɿɿ ɚɧɚɥɨɝɿɱɧɨɸ: ɧɚɩɪɭɝɚ 230ȼ,
ɩɨɬɭɠɧɿɫɬɶ 25 ȼɬ, ɰɨɤɨɥɶ E 14.
3. Ɂɧɨɜ ɜɫɬɚɧɨɜɿɬɶ ɤɪɢɲɤɭ ɢ
ɩɨɜɬɨɪɧɨ ɩɿɞɤɥɸɱɿɬɶ ɞɭɯɨɜɤɭ ɞɨ
ɟɥɟɤɬɪɢɱɧɨɿ ɦɟɪɟɠɿ.
ɇɟɜɢɤɨɪɢɫɬɨɜɭɣɬɟɥɚɦɩɨɱɤɭɞɭɯɨɜɤɢɞɥɹ
ɨɫɜɿɬɥɟɧɧɹɩɪɢɦɿɳɟɧɶ
UA
Ɍɟɯɧɿɱɧɟ ɨɛɫɥɭɝɨɜɭɜɚɧɧɹ ɝɚɡɨɜɢɯ
ɤɪɚɧɿɜ
Ɂ ɱɚɫɨɦ ɦɨɠɟ ɬɪɚɩɢɬɢɫɹ ɬɚɤ, ɳɨ ɤɪɚɧ ɛɭɞɟ
ɡɚɛɥɨɤɨɜɚɧɢɢ ɚɛɨ ɢɨɝɨ ɛɭɞɟ ɜɚɠɤɨ ɨɛɟɪɬɚɬɢ, ɬɨɦɭ
ɛɭɞɟ ɧɟɨɛɯɿɞɧɨ ɩɨɞɭɦɚɬɢ ɩɪɨ ɡɚɦɿɧɭ ɫɚɦɨɝɨ ɤɪɚɧɚ.
! ɐɹ ɨɩɟɪɚɰɿɹ ɦɚɽ ɜɢɤɨɧɭɜɚɬɢɫɹ ɮɚɯɿɜɰɟɦ,
ɭɩɨɜɧɨɜɚɠɟɧɢɦ ɜɢɪɨɛɧɢɤɨɦ.
ɌȺȻɅɂɑɄȺ Ɂ ɌȿɏɇIɑɇɂɆɂ ȾȺɇɂɆɂ
Ɋɨɡɦɿɪɢ ɞɭɯɨɜɤɢ
ȼxɒxȽ
Ɉɛ'ɽɦ
Ʉɨɪɢɫɧɿ ɪɨɡɦɿɪɢ
ɤɨɪɨɛɤɢ ɞɭɯɨɜɤɢ
ɉɚɥɶɧɢɤɢ
ɇɚɩɪɭɝɚ ɬɚ ɱɚɫɬɨɬɚ
ɠɢɜɥɟɧɧɹ
ENERGY LABEL
ɐɟɣ ɩɪɢɥɚɞ ɜiɞɩɨɜɞɚɽ ɬɚɤɢɦ
ɩɥɚɫɬɢɧɢ ɧɨɦɿɧɚɥɶɧɢɣ ɽ ɪɨɡɬɚɲɨɜɚɧɿɣ
ɜɢɫɬɭɩɭ, ɚɛɨ, ɤɨɥɢ ɜɿɞɤɪɢɜɚɽɬɶɫɹ ɞɭɯɨɜɤɚ, ɧɚ ɜɧɭɬɪɿɲɧɿɣ
ɥɿɜɿɣ ɫɬɿɧɰɿ
340x410x424 mm
ɥɿɬɪiɜ60
ɲɢɪɢɧɚ 42 ɫɦ
ɝɥɢɛɢɧɚ 44 ɫɦ
ɜɢɫɨɬɚ 17 ɫɦ
ɧɚɥɚɲɬɨɜɭɸɬɶɫɹ ɧɚ ɜɫɿ ɬɢɩɢ
ɝɚɡɭ, ɜɤɚɡɚɧɿ ɧɚ ɬɚɛɥɢɱɰɿ ɡ
ɞɚɧɢɦɢ, ɪɨɡɬɚɲɨɜɚɧɿɣ ɜ
ɫɟɪɟɞɢɧɿ ɜɢɫɬɭɩɭ, ɚɛɨ, ɤɨɥɢ
ɜɿɞɤɪɢɜɚɽɬɶɫɹ ɞɭɯɨɜɤɚ, ɧɚ
ɜɧɭɬɪɿɲɧɿɣ ɥɿɜɿɣ ɫɬɿɧɰɿ.
Ⱦɢɜ. ɧɚ ɬɚɛɥɢɱɰɿ ɡ ɞɚɧɢɦɢ
Ⱦɢɪɟɤɬɢɜɚ ȯɋ 2002/40/CE ɡ
ɩɪɢɜɨɞɭ ɟɬɢɤɟɬɨɤ ɟɥɟɤɬɪɢɱɧɢɯ
ɞɭɯɨɜɨɤ. ɇɨɪɦɚ EN 50304
ɋɩɨɠɢɜɚɧɧɹ ɟɧɟɪɝɿʀ ɫɜɨɛɨɞɧɚ
ɤɨɧɜɟɤɰiɹ – ɞɥɹ ɨɛɨɝɪiɜɭ:
Ɍɪɚɞɢɰiɣɧɚ;
ɋɩɨɠɢɜɚɧɧɹ ɟɧɟɪɝɿʀ
ɞɟɤɥɚɪɚɰiɹ Ʉɥɚɫ ɤɨɧɜɟɤɰiʀ
ɩɪɢɦɭɲɟɧɚ ɞɥɹ ɨɛɨɝɪiɜɭ: X
Ʉɨɧɞɢɬɟɪɫɶɤɢ ɜɢɪɨɛɢ.
Ⱦɢɪɟɤɬɢɜɚɦ ȯɋ: 2006/95/EC
ɜɿɞ 12/12/06 (ɇɢɡɶɤɚ ɇɚɩɪɭɝɚ)
ɬɚ ɩɨɞɚɥɶɲɿ ɡɦɿɧɢ -
2004/108/EC ɜɿɞ 15/12/0 4
(ȿɥɟɤɬɪɨɦɚɝɧɿɬɧɚ ɫɭɦɿɫɧɿɫɬɶ)
ɬɚ ɩɨɞɚɥɶɲɿ ɡɦɿɧɢ - 93/68/EEC
ɜɿɞ 22/07/93 ɬɚ ɩɨɞɚɥɶɲɿ ɡɦɿɧɢ.
2002/96/EC
2009/142/EC ɜɿɞ 30/11/09(Gas)
1275/2008 (Stand-by/ Off mode)
ɜ ɫɟɪɟɞɢɧɿ
D
27
Page 28

UA
UA
Знімання та встановлення дверцят духовки
1. Відкрийте дверцята
2. Поверніть затискачі на петлях
дверцят повністю назад (див. фото)
3. Закрийте дверцята до зупинки затискачів
(дверцята залишаться відчиненими на близько 40°)
(див. фото)
40°
4. Натисніть на дві кнопки на верхній частині каркаса
та витягніть його (див. фото)
5. Зніміть скло та почистіть його, як зазначено в розділі
«Догляд та обслуговування»
6. Поставте скло назад.
ПОПЕРЕДЖЕННЯ! Духовкою не
можна користуватися, коли скло дверцят зняте!
ПОПЕРЕДЖЕННЯ! При встановленні внутрішнього
скла у дверцята слідкуйте за тим, щоб попереджувальний
надпис на панелі був повернутий назовні та легко читався.
7. Встановіть каркас; клацання вкаже, що він встав на місце.
8. Повністю відкрийте дверцята
9. Закрийте затискачі (див. фото).
10. Тепер дверцята можна повністю закрити, і духовка готова
Цей режим чищення рекомендується
використовувати після приготування жирної їжі
Парове очищення духовки:
Ця процедура очищення може спростити видалення з
абруднень зі стінок духовки завдяки створенню пари
усередині духовки. Таким чином ч
Важливо! Перед очищенням парою:
до нормального використання.
- видаліть всі залишки їжі / жиру з дна духовки;
- витягніть всі аксесуари (решітки та каструлі).
Після цих кроків ми рекомендуємо таку
послідовність дій:
1 - Налийте 300 мл води у глибоке деко
т а поставте його на першу ланку знизу.
У моделях без глибокого деко скористайтеся
стандартним деко для випічки та покладіть
його на решітку на першій ланці знизу.
2
виберіть режим
та встановіть
3 – залиште духовку ввімкненою на 15 хвилин;
4 – вимкніть духовку;
5 – коли духовка захолоне, відкрийте дверцята та
закінчіть чищення водою і вологою тканиною.
6 – після чищення приберіть з духовки всі залишки води.
Якщо парове чищення здійснюється після приготування
во жирних продуктів або коли піч дуже брудна,
завершіть чищення традиційним методом, що описаний
у попередньому пункті.
температуру 100 °C ;
истити духовку
Ɉɛɟɪɟɠɧɚɞɭɯɨɜɤɚ
–
(смаження, м'яса).
буде простіше.
особли
28
Page 29

Page 30

Page 31

Page 32

01/2014 -
195120554.00
XEROX FABRIANO
 Loading...