

Hotpoint FK 1041LX S User Manual
FK 1041 L X S
FK 1041 L S
 English
Operating Instructions
OVEN Contents
Operating Instructions,1 Warnings,2 Assistance,4
Description of the appliance,6 Description of the appliance,7 Installation,9
Start-up and use,11 Modes,13
Precautions and tips,19 Maintenance and care,19 Troubleshooting,21
 Français
Mode d’emploi
FOUR Sommaire
Mode d’emploi,1 Avertissements,2 Assistance,4
Description de l’appareil,6 Description de l’appareil,7 Installation,22
Mise en marche et utilisation,24 Programmes,26
Précautions et conseils,32 Nettoyage et entretien,32 Anomalies et remèdes,34
 Español
Manual de instrucciones
HORNO Sumario
Manual de instrucciones,1 Advertencias,3 Asistencia,4
Descripción del aparato,6 Descripción del aparato,8 Instalación,35
Puesta en funcionamiento y uso,37 Programas,39
Precauciones y consejos,45 Mantenimiento y cuidados,45 Anomalías y soluciones,47
 Portuges
Instruções para a utilização
FORNO Índice
Instruções para a utilização,1 Advertências,3 Assistência,5
Descrição do aparelho,6 Descrição do aparelho,8 Instalação,48
Início e utilização,50 Programas,52
Precauções e conselhos,58 Manutenção e cuidados,58 Anomalias e soluções,60

Warnings
WARNING: The appliance and its accessible parts become hot during use. Care should be taken to avoid touching heating elements. Children less than 8 years of age shall be kept away unless continuously supervised. This appliance can be used by children aged from 8 years and above and persons with reduced physical, sensory or mental capabilities or lack of experience and knowledge if they have been given supervision or instruction concerning use of the appliance in a safe way and understand the hazards involved. Children shall not play with the appliance. Cleaning and user maintenance shall not be made by children without supervision.
Do not use harsh abrasive cleaners or sharp metal scrapers to clean the oven door glass since they can scratch the surface, which may result in shattering of the glass.
Never use steam cleaners or pressure cleaners on the appliance.
WARNING: Ensure that the appliance is switched off before replacing the lamp to avoid the possibility of electric shock.
! When you place the rack inside, make sure that the stop is directed upwards and in the back of the cavity.
Avertissements
ATTENTION : Cet appareil ainsi que ses parties accessibles deviennent très chauds pendant leur fonctionnement. Il faut faire attention à ne pas toucher les éléments chauffants. Ne pas faire approcher les enfants de moins de 8 ans à moins qu’ils ne soient sous surveillance constante. Le présent appareil peut être utilisé par des enfants de plus de 8 ans et par des personnes présentant des capacités physiques, sensorielles ou mentales réduites ou n’ayant pas l’expérience ou les connaissances indispensables, à condition qu’ils soient sous bonne surveillance ou qu’ils aient reçu les instructions nécessaires pour une utilisation de l’appareil en toute sécurité et à condition qu’ils se rendent compte des dangers encourus. Les enfants ne doivent pas jouer avec l’appareil. Les opérations de nettoyage et d’entretien ne doivent pas être effectuées par des enfants non surveillés.
Ne pas utiliser de produits abrasifs ni de spatules métalliques coupantes pour nettoyer la porte du four en verre, sous peine d’érafler la surface et de briser le verre.
Ne jamais nettoyer l’appareil avec des nettoyeurs vapeur ou haute pression.
ATTENTION : s’assurer que l’appareil est éteint avant de procéder au remplacement de l’ampoule, afin d’éviter tout risque d’électrocution.
! Lors de l’introduction de la grille, s’assurer que l’arrêt est bien tourné vers le haut et se trouve dans la partie arrière de l’enceinte.
2

Advertencias
ATENCIÓN: Este aparato y sus partes accesibles se vuelven muy calientes durante el uso. Por lo tanto, es importante evitar tocar los elementos calentadores. Mantenga alejados a los niños menores de 8 años si no son continuamente vigilados. El presente aparato puede ser utilizado por niños mayores de 8 años y por personas con capacidades físicas, sensoriales o mentales disminuidas o sin experiencia ni conocimientos, si se encuentran bajo una adecuada vigilancia o si han sido instruidos sobre el uso del aparato de modo seguro y comprenden los peligros relacionados con el mismo. Los niños no deben jugar con el aparato. Las operaciones de limpieza y de mantenimiento no deben ser realizadas por niños sin vigilancia.
No utilice productos abrasivos ni espátulas de metal cortantes para limpiar la puerta de cristal del horno ya que podrían rayar la superficie y quebrar el cristal.
No utilice nunca limpiadores a vapor o de alta presión para la limpieza del aparato.
ATENCIÓN: Antes de sustituir la lámpara controle que el aparato esté apagado para evitar la posibilidad de choques eléctricos.
! Cuando introduzca la parrilla, controle que el tope esté dirigido hacia arriba y en la parte posterior de la cavidad.
Advertências
ATENÇÃO: Este aparelho e as suas partes acessíveis aquecem muito durante a utilização. É preciso ter atenção e evitar tocar os elementos que aquecem. Manter afastadas as crianças com menos de 8 anos, caso não estejam a ser vigiadas. O presente aparelho pode ser utilizado por crianças com mais de 8 anos e por pessoas com capacidades físicas, sensoriais ou mentais reduzidas ou com pouca experiência e conhecimentos, caso sejam adequadamente vigiadas ou caso tenham recebido instruções em relação ao uso do aparelho de forma segura e tenham conhecimento dos perigos associados. As crianças não devem brincar com o aparelho. As operações de limpeza e manutenção não devem ser efectuadas por crianças sem vigilância.
Não utilizar produtos abrasivos nem espátulas de metal cortantes para limpar a porta em vidro do forno, uma vez que pode riscar a superfície, provocando a ruptura do vidro.
Nunca utilize equipamento de limpeza a vapor ou de alta pressão para limpar o aparelho.
ATENÇÃO: Assegure-se de que o aparelho esteja desligado antes de substituir a lâmpada, para evitar a possibilidade de choques eléctricos.
! Quando inserir a grelha, assegure-se de que o bloqueio esteja voltado para cima e na parte posterior da cavidade.
3

Assistance
Warning:
The appliance is fitted with an automatic diagnostic system which detects any malfunctions. Malfunctions are signalled through messages of the following type: “F—” followed by numbers.
Call for technical assistance in the event of a malfunction.
Before calling for Assistance:
•Check whether you can fix the problem yourself.
•Restart the programme to check whether the malfunction has disappeared.
•If it has not, contact theAuthorised TechnicalAssistance
Service.
! Never use the services of an unauthorised technician.
Please have the following information to hand:
•The type of problem encountered.
•The message shown on the TEMPERATURE display.
•The appliance model (Mod.).
•The serial number (S/N).
The latter two pieces of information can be found on the data plate located on the appliance.
Assistance
Attention :
L’appareil dispose d’un système d’autotest qui permet de détecter toute anomalie de fonctionnement. Ces anomalies sont affichées sous la forme: «F—» suivi de chiffres.
Contacter alors un service d’assistance technique.
Avant d’appeler le service de dépannage :
•Vérifier s’il est possible de résoudre le problème soimême ;
•Redémarrer le programme pour contrôler si le problème a été résolu;
•Si ce n’est pas le cas, contacter le service d’Assistance technique agréé.
! Ne jamais faire appel à des techniciens non agréés.
Indiquer :
•le type d’anomalie;
•le code erreur affiché sur l’écran TEMPERATURE
•le modèle de l’appareil (Mod.);
•son numéro de série (S/N).
Ces informations figurent sur la plaque signalétique apposée sur l’appareil
Asistencia
Atención:
El aparato está dotado de un sistema de diagnóstico que permite detectar problemas de funcionamiento. Los mismos son comunicados en la pantalla mediante mensajes como: “F—” seguido por números.
En esos casos es necesaria la intervención del servicio de asistencia técnica.
Antes de llamar al Servicio de Asistencia Técnica:
•Verifique que la anomalía no pueda ser resuelta por Ud. mismo;
•Vuelva a poner en marcha el programa para controlar si el inconveniente ha sido resuelto;
•Si no es así, llame al Servicio de Asistencia Técnica
Autorizado.
! Nunca solicite la asistencia de técnicos no autorizados.
Comunique:
•El tipo de anomalía;
•elmensaje que se observa en el displayTEMPERATURA
•El modelo del aparato (Mod.)
•El número de serie (S/N)
Esta información se encuentra en la placa de características colocada en el aparato.
La siguiente información es válida solo para España. Para otros países de habla hispana consulte a su vendedor.
Ampliación de garantía
Llame al 902.363.539 y le informaremos sobre el fantástico plan de ampliación de garantía hasta 5 años.
Consiga una cobertura total adicional de
•Piezas y componentes
•Mano de obra de los técnicos
•Desplazamiento a su domicilio de los técnicos
Y NO PAGUE AVERIAS NUNCA MAS
Servicio de asistencia técnica (SAT)
Llame al 902.133.133 y nuestros técnicos intervendrán con rapidez y eficacia, devolviendo el electrodoméstico a sus condiciones óptimas de funcionamiento.
En el SAT encontrará recambios, accesorios y productos específicos para la limpieza y mantenimiento de su electrodoméstico a precios competitivos.
ESTAMOS A SU SERVICIO
4

Assistência
Atenção:
Este aparelho é equipado com um sistema de diagnóstico que possibilita detectar eventuais mau funcionamentos. Estes são comunicados no visor mediante mensagens do seguinte tipo: “F—” seguido por números.
Nestes casos será necessária uma intervenção da Assistência técnica.
Antes de contactar a Assistência:
•Verifique se a anomalia pode ser resolvida autonomamente;
•Reiniciar o programa para controlar se o inconveniente foi resolvido;
•Em caso negativo, contacte o Serviço de Assistência
Técnica Autorizado.
! Nunca recorra a técnicos não autorizados.
Comunique:
•o tipo de avaria;
•a mensagem visível no display da TEMPERATURA
•o modelo da máquina (Mod.)
•o número de série (S/N).
Estas últimas informações encontram-se na placa de identificação situada no aparelho.
5

|
|
|
|
|
|
|
|
|
|
|
|
|
|
|
|
|
|
|
|
|
|
|
|
Description of the appliance |
Descrição do aparelho |
||||||
Overall view |
Vista de conjunto |
||||||
1 |
POSITION 1 |
1 |
POSIÇÃO 1 |
||||
2 |
POSITION 2 |
2 |
POSIÇÃO 2 |
||||
3 |
POSITION 3 |
3 |
POSIÇÃO 3 |
||||
4 |
POSITION 4 |
4 |
POSIÇÃO 4 |
||||
5 |
POSITION 5 |
5 |
POSIÇÃO 5 |
||||
6 |
GUIDES for the sliding racks |
6 |
GUIAS de escorrimento das prateleiras |
||||
7 |
DRIPPING PAN |
7 |
Prateleira BANDEJA PINGADEIRA |
||||
8 |
GRILL |
8 |
Prateleira GRADE |
||||
9 |
Control panel |
9 |
Painel de comandos |
||||
|
|
|
|
|
|
|
|
|
|
|
|
|
|
|
|
Description de l’appareil
Vue d’ensemble
1NIVEAU 1
2NIVEAU 2
3NIVEAU 3
4NIVEAU 4
5NIVEAU 5
6GLISSIERES de coulissement
7Support LECHEFRITE
8Support GRILLE
9Tableau de bord
Descripción del aparato
Vista en conjunto
1POSICIÓN 1
2POSICIÓN 2
3POSICIÓN 3
4POSICIÓN 4
5POSICIÓN 5
6GUÍAS de deslizamiento de las bandejas
7Bandeja GRASERA
8Bandeja PARRILLA
9Panel de control
9 |
6 |
8 |
5 |
|
4 |
7 |
3 |
|
2 |
|
1 |
6

Description of the appliance
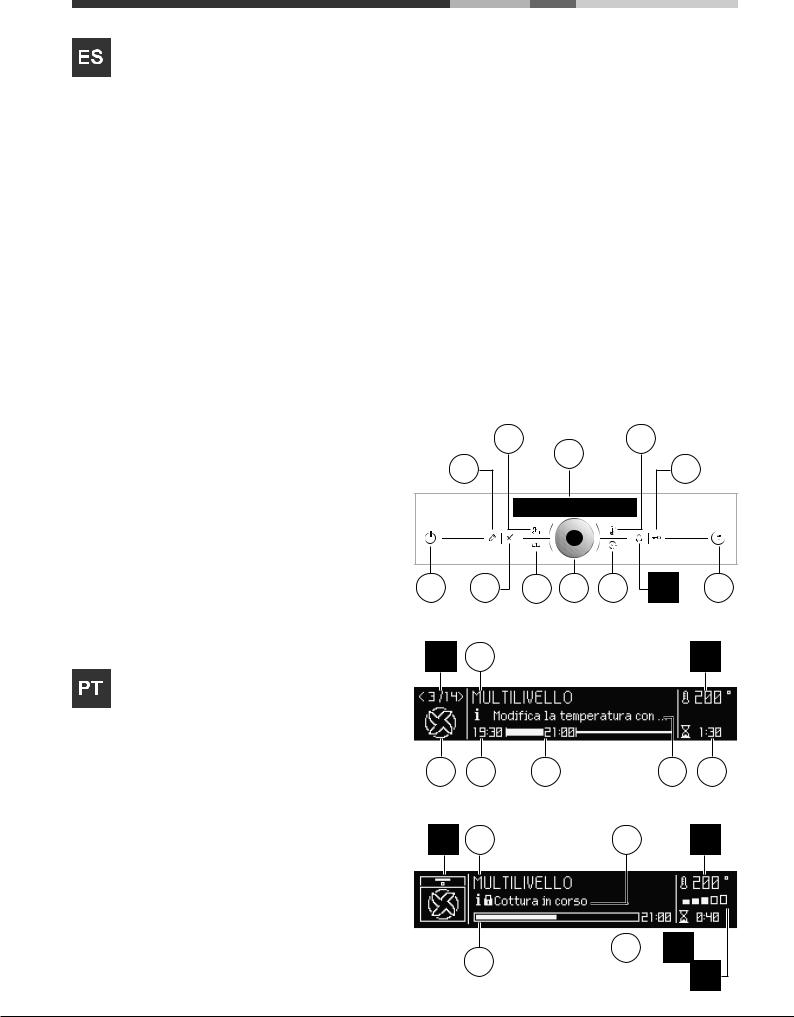
Control panel
1SETTINGS icon
2MANUAL COOKING MODES icon
3Display
4TEMPERATURE icon
5CONTROL PANEL LOCK icon
6START / STOP
7MINUTE MINDER icon
8TIME icon
9SELECTOR control dial
10AUTOMATIC COOKING MODES icon
11CONFIRM SETTINGS icon
12CONTROL PANEL POWER BUTTON
Display in programming mode
13Cooking mode number indicator
14Selected menu indicator
15Temperature indicator
16COOKING DURATION indicator
17Suggests a course of action or displays the activity currently being performed by the oven
18END OF COOKNG TIME indicator
19TIME indicator
20Selected cooking mode icon / recommended rack position icon
Display in cooking mode
21Animated cooking icon
22Selected menu indicator
23Suggests a course of action or displays the activity currently being performed by the oven
24Temperature indicator
25Preheating / Residual heat indicators
26COOKING DURATION indicator
27END OF COOKNG TIME indicator
28Cooking progress indicator
Description de l’appareil
Tableau de bord
1Icône SÉLECTIONS
2Icône PROGRAMMES MANUELS
3Afficheur
4Icône TEMPÉRATURE
5Icône VERROUILLAGE COMMANDES
6DÉPART/ARRÊT
7Icône MINUTEUR
8Icône TEMPS
9Manette SÉLECTION
10Icône PROGRAMMES AUTOMATIQUES
11Icône CONFIRMATION SÉLECTIONS
12ALLUMAGE PANNEAU
Afficheur en mode programmation
13Indication numéro cuisson
14Indication du Menu sélectionné
15Indication Température
16Indication DURÉE DE CUISSON
17Indique que faire ou ce que le four est en train de faire
18Indication HEURE FIN DE CUISSON
19Indication HEURE
20Icône de la cuisson sélectionnée/icône du niveau d’enfournement préconisé
Afficheur en mode cuisson
21Indication Température
22Indication du Menu sélectionné
23Indique que faire ou ce que le four est en train de faire
24Indication Température
25Indicateurs de Préchauffage / Chaleur résiduelle
26Indication DURÉE DE CUISSON
27Indication HEURE FIN DE CUISSON
28Indication état avancement cuisson
2 |
3 |
4 |
|
1 |
5 |
||
|
12 |
11 |
10 |
9 |
8 |
7 |
6 |
13 |
14 |
|
|
|
|
15 |
20 |
19 |
18 |
17 |
16 |
21 |
22 |
|
23 |
24 |
28
27  26
26 
25
7
Descripción del aparato
Panel de control
1Icono PROGRAMACIONES
2Icono de PROGRAMAS MANUALES
3Pantalla
4Icono TEMPERATURA
5Icono BLOQUEO DE MANDOS
6PUESTA EN MARCHA / PARADA
7Icono CONTADOR DE MINUTOS
8Icono TIEMPOS
9Mando SELECCIÓN
10Icono de PROGRAMAS AUTOMÁTICOS
11Icono CONFIRMA PROGRAMACIONES
12ENCENDIDO DEL PANEL
Pantalla en programación
13Indicación número de cocción
14Indicación Menú seleccionado
15Indicación de Temperatura
16Indicación DURACIÓN DE COCCIÓN 17Sugiere qué hacer o qué está haciendo el horno
18Indicación FINAL DE COCCIÓN
19Indicación HORA
20Icono de la cocción seleccionada / icono del nivel de cocción aconsejado
Pantalla en cocción
21Icono animado de cocción
22Indicación Menú seleccionado
23Sugiere qué hacer o qué está haciendo el horno
24Indicación de Temperatura
25Indicadores de Precalentamiento / Calor residual
26Indicación DURACIÓN DE COCCIÓN
27Indicación FINAL DE COCCIÓN
28Indicación Avance de cocción
Descrição do aparelho
Painel de comandos
1Ícone CONFIGURAÇÕES
2Ícone PROGRAMAS MANUAIS
3Visor
4Ícone TEMPERATURA
5Ícone BLOQUEIO COMANDOS
6INÍCIO / PARAGEMTO
7Ícone CONTA-MINUTOS
8Ícone TEMPOS
9Selector SELECÇÃO
10Ícone de PROGRAMAS AUTOMÁTICOS
11Ícone CONFIRMAR CONFIGURAÇÕES
12ACENDER O PAINEL
Display em programação
13Indicação número cozedura
14Indicação Menu seleccionado
15Indicação da temperatura
16Indicação DURAÇÃO DA COZEDURA 17Sugere o que fazer ou o que o forno está fazendo
18Indicação HORA FIM DA COZEDURA
19Indicação HORA
20Ícone da cozedura seleccionada/ícone da prateleira de cozedura recomendada
Display em cozedura
21Ícone animado cozedura
22Indicação Menu seleccionado
23Sugere o que fazer ou o que o forno está fazendo
24Indicação da temperatura
25Indicador do Preaquecimento / Calor resíduo
26Indicação DURAÇÃO DA COZEDURA
27Indicação HORA FIM DA COZEDURA
28Indicação Andamento cozedura
2 |
3 |
4 |
|
1 |
5 |
||
|
12 |
11 |
10 |
9 |
8 |
7 |
6 |
13 |
14 |
|
|
|
|
15 |
20 |
19 |
18 |
17 |
16 |
21 |
22 |
|
23 |
24 |
28
27  26
26 
25
8
Installation
!Please keep this instruction booklet in a safe place for future reference. If the appliance is sold, given away or moved, please make sure the booklet is also passed on to the new owners so that they may benefit from the advice contained within it.
!Please read this instruction manual carefully: it contains important information concerning the safe operation, installation and maintenance of the appliance.
Positioning
!Do not let children play with the packaging material; it should be disposed of in accordance with local separated waste collection standards (see Precautions and tips).
!The appliance must be installed by a qualified professional in accordance with the instructions provided. Incorrect installation may damage property or cause harm to people or animals.
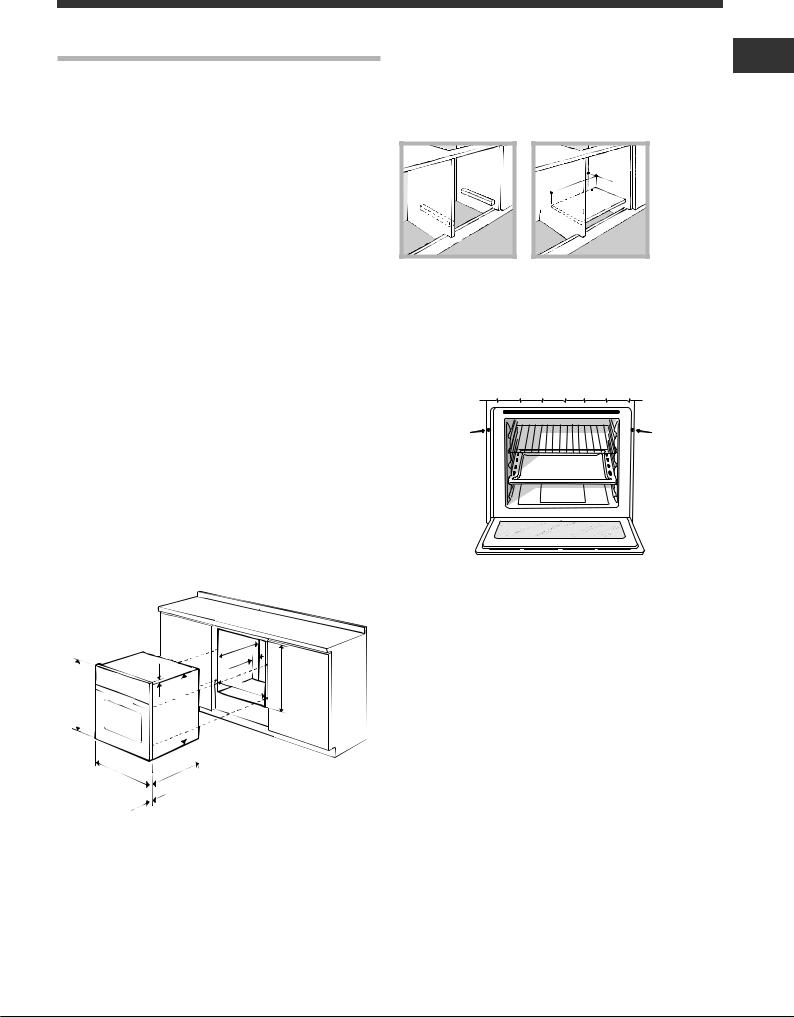
Built-in appliances
Use an appropriate cabinet to ensure that the appliance operates properly:
•The panels adjacent to the oven must be made of heatresistant material.
•Cabinets with a veneer exterior must be assembled with glues which can withstand temperatures of up to 100°C.
•To install the oven under the counter (see diagram) or in a kitchen unit, the cabinet must have the following dimensions:
590 mm.
595 |
mm. |
|
20 mm. |
|
570 mm. |
|
|
. |
mm |
|
550 |
. |
mm |
|
|
.* |
20,5 mm |
|
22,5 |
|
. |
|
mm |
|
550 . |
|
min |
|
mm |
|
45 |
|
560 |
mm. |
|
|
575-585 mm.
* Stainless steel models only
! The appliance must not come into contact with electrical parts once it has been installed.
The indications for consumption given on the data plate have been calculated for this type of installation.
Ventilation
To ensure adequate ventilation, the back panel of the GB cabinet must be removed. It is advisable to install the oven
so that it rests on two strips of wood, or on a completely flat surface with an opening of at least 45 x 560 mm (see diagrams).
. |
45 |
mm. |
mm |
|
|
560 |
|
|
Centring and fixing
Secure the appliance to the cabinet:
•Open the oven door.
•Remove the 2 rubber plugs covering the fixing holes on the perimeter frame.
•Fix the oven to the cabinet using the 2 wood screws.
•Replace the rubber plugs.
! All parts which ensure the safe operation of the appliance must not be removable without the aid of a tool.
9

Electrical connection
GB Ovens equipped with a three-pole power supply cable are designed to operate with alternating current at the voltage and frequency indicated on the data plate located on the appliance (see below).
Fitting the power supply cable
L |
N
1.Open the terminal board by inserting a screwdriver into the side tabs of the cover. Use the screwdriver as a lever by pushing it down to open the cover (see diagram).
2.Install the power supply cable by loosening the cable clamp screw and the three wire contact screws
L-N- .
.
Connect the wires to the corresponding terminals: the Blue wire to the terminal marked (N), the Brown wire to the terminal marked (L) and the Yellow/Green wire
to the terminal marked 
(see diagram).
3.Secure the cable by fastening the clamp screw.
4.Close the cover of the terminal board.
Connecting the supply cable to the mains
Install a standardised plug corresponding to the load indicated on the data plate (see table).
The appliance must be directly connected to the mains using an omnipolar switch with a minimum contact opening of 3 mm installed between the appliance and the mains. The switch must be suitable for the charge indicated and must comply with current electrical regulations (the earthing wire must not be interrupted by the switch). The supply cable must be positioned so that it does not come into contact with temperatures higher than 50°C at any point (the back panel of the oven, for example).
! The installer must ensure that the correct electrical connection has been performed and that it is fully compliant with safety regulations.
Before connecting the appliance to the power supply, make sure that
•The appliance is earthed and the plug is compliant with the law.
•The socket can withstand the maximum power of the appliance, which is indicated on the data plate.
•The voltage is in the range between the values indicated on the data plate.
•The socket is compatible with the plug of the appliance.
If the socket is incompatible with the plug, ask an authorised technician to replace it. Do not use extension cords or multiple sockets.
!Once the appliance has been installed, the power supply cable and the electrical socket must be easily accessible.
!The cable must not be bent or compressed.
!The cable must be checked regularly and replaced by authorised technicians only (see Assistance).
!The manufacturer declines any liability should these safety measures not be observed.
APPLIANCE SPECIFICATIONS
Dimensions* |
width 43.5 cm |
|
height 32,4 cm |
||
|
depth 41.5 cm |
|
Volume* |
59 l |
|
|
|
|
Dimensions** |
width 45.5 cm |
|
height 32,4 cm |
||
|
depth 41.5 cm |
|
|
|
|
Volume** |
62 l |
|
|
|
|
Electrical |
voltage: 220 - 240 V~ 50/60 Hz or |
|
50 Hz (see data plate) maximum power |
||
connections |
||
absorbed 2800 W |
||
|
||
|
|
|
ENERGY |
Directive 2002/40/EC on the label |
|
LABEL |
of electric ovens. Standard EN 50304 |
|
Without |
Declared energy consumption |
|
for Forced convection Class – |
||
removable |
heating mode: |
|
guide rails |
ECO. |
This appliance conforms to the following European Economic Community directives:
- 2006/95/EEC dated 12/12/06 (Low Voltage) and subsequent amendments
- 2004/108/EEC dated 03/05/89 (Electromagnetic Compatibility) and subsequent amendments
- 93/68/EEC dated 22/07/93 and subsequent amendments.
- 2012/19/EEC and subsequent amendments.
1275/2008 standby/off mode.
*Only for models with drawn rails.
**Only for models with wire rails.
10
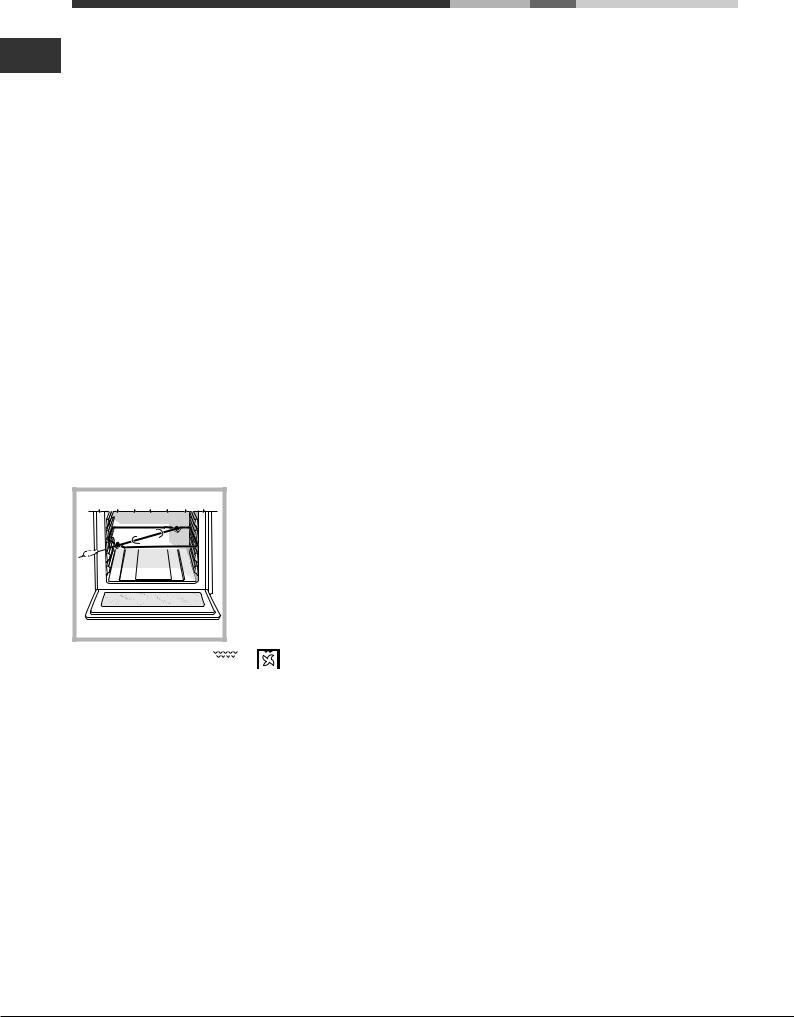
Start-up and use
WARNING! The oven is provided with a stop system to extract the racks and prevent them from coming
out of the oven (1).
As shown in the drawing,
to extract them completely,
simply lift the racks, holding them on the front part, and
pull (2).
!The first time you use your appliance, heat the empty oven with its door closed at its maximum temperature for at least half an hour. Make sure that the room is well ventilated before switching the oven off and opening the oven door. The appliance may emit a slightly unpleasant odour caused by protective substances used during the manufacturing process burning away.
!Turn the control dial to adjust the parameter shown on the display between the “<” and “>” symbols.
!To make the setting process easier, keep the knob in position: this will increase the scrolling speed of the numbers on the display.
!Each setting will automatically be stored in the appliance memory after 10 seconds.
!The touch controls cannot be activated if the user is wearing gloves.
!In order to optimise the cooking performance, when starting the selected function, product settings will be applied that could cause a delayed start of the fan and heating elements.
Some models are equipped with a system of hinges which allows the door to close slowly, without the user having to follow the movement through with his/her hand. To use the system correctly, before closing the door:
•Open the door fully.
•Do not force the closing movement manually.
Switching the oven on for the first time
After connecting the oven to the electricity supply, the first time it is switched on the user should also switch on the control
panel by pressing the  button. The list of languages will appear in the menu. To choose the desired language, select
it using the control dial. Confirm by pressing the icon. Once the selection has been made, the display will show the
settings menu. Press the  icon or scroll through using the control dial until you reach the EXIT command and press
the  icon to begin using the oven.
! After choosing the language in the menu, if the display is not used for another 30 seconds it will automatically revert to programming mode.
Setings menu commands |
|
||
GB |
|||
To enter the settings menu, switch on the control panel and |
|||
press the |
icon. |
|
|
Use the control dial to highlight the individual menu |
|
||
commands. |
|
|
|
To modify the setting, press the icon. |
|
||
The following parameters are listed in the menu:
LANGUAGE: select the language shown on the display.
PYROLYTIC: select the cleaning type. CLOCK: set the exact time.
TONE: activate/deactivate keypad tone.
LIGHT: activate/deactivate the internal oven light during cooking.
LOGO: activate/deactivate logo on start-up. GUIDE: activate/deactivate operating tips.
EXIT: exit the menu.
! It is possible to exit the settings menu by pressing the  icon.
icon.
Control panel/door lock
! The door and control panel can be locked while the oven is off, once cooking has started or finished and during programming.
The door/control panel lock can be used to lock the oven door and/or controls.
To activate it, press the  icon and select the desired command by pressing the control dial:
•NO LOCK: deactivate an active lock;
•BUTTONS: lock the controls. Confirm by pressing the  icon.
icon.
Aconfirmation buzzer will sound and the  icon will appear on the display.
The lock may be activated while the oven is in use, or while it is switched off. It can also be deactivated in all the above situations and after the oven has finished cooking.
Setting the clock
To set the clock, switch on the oven by pressing the  icon,
icon,
then press  and follow the steps described.
1. Scroll through the menu commands using the control dial, select CLOCK and press  .
.
2.Adjust the time using the control dial.
3.Once you have reached the correct hour value, press
the  icon.
icon.
4.Repeat steps 2 and 3 to set the minutes.
5.To exit adjustment mode, press the  icon or use the control dial to scroll through the menu until you reach EXIT,
then press  .
.
! The clock can also be set while the oven is off, by pressing the  icon and carrying out steps 2 to 4 as described above.
After the appliance has been connected to the mains, or after a blackout, the clock will need to be reset.
11

|
Setting the minute minder |
|
|
GB |
|
||
! The minute minder may be set regardless of whether the |
|||
|
oven is switched on or off. It does not switch the oven on or off. |
||
|
|||
|
When the set time has elapsed, the minute minder emits a |
||
|
buzzer that will automatically stop after 30 seconds or when |
||
|
any active button on the control panel is pressed. |
||
|
To adjust the minute minder, proceed as follows: |
||
|
1. Press the |
icon. |
|
|
2. Set the desired time using the control dial. |
||
|
3. Once you have reached the desired value, press the |
||
|
icon again. |
|
|
|
When the oven is switched off, the countdown appears on the |
||
|
display. When the oven is on, the lit |
symbol will remind |
|
|
you that the minute minder is active. |
|
|
To cancel the minute minder, press the  icon and use the control dial to set the time to 00:00. Press
  again.
The  icon will switch off to indicate that the minute minder has been disabled.
Starting the oven
1.Press  to switch on the control panel. The appliance buzzer sounds three times (ascending).
2.Press the  icon to select the desired manual cooking mode. The cooking temperature and duration may be set.
Press the  icon to select the desired automatic cooking mode. The cooking temperature and duration are both set to default values. Only the duration may be adjusted in accordance with the selected mode. The text “AUTO” appears on the display to indicate that the temperature is following a precise cooking profile.Adelayed cooking cycle may be programmed.
3.Press  to start the cooking mode.
4.The oven will begin its preheating phase, the preheating indicators will light up as the temperature rises.
5.When the preheating process has finished, a buzzer sounds and all the preheating indicator lights show that this stage has been completed: the food can then be placed in the oven.
6.During cooking it is always possible to:
- adjust the temperature by pressing the  icon, turning the
control dial and confirming by pressing  again (manual modes only );
-set the duration of a cooking mode (see Cooking Modes);
-stop cooking by pressing the  icon. In this case the appliance stores the temperature modified previously in its memory (manual modes only);
-switch off the oven by pressing the  icon for 3 seconds. 7. If a blackout occurs while the oven is already in operation, an automatic system within the appliance will reactivate the cooking mode from the point at which it was interrupted, provided that the temperature has not dropped below a certain level. Programmed cooking modes which have not yet started will not be restored and must be reprogrammed
(for example: a cooking mode has been programmed to start at 20:30. At 19:30 a blackout occurs. When the power supply is restored, the mode will have to be reprogrammed).
!There is no preheating stage for the GRILL mode.
!Never put objects directly on the bottom of the oven; this will prevent the enamel coating from being damaged.
!Always place cookware on the rack(s) provided.
Cooling ventilation
In order to cool down the external temperature of the oven, a cooling fan blows a stream of air between the control panel and the oven door, as well as towards the bottom of the oven door. At the beginning of the cleaning cycle, the cooling fan operates at low speed.
! Once cooking has been completed, the cooling fan continues to operate until the oven has cooled down sufficiently.
Oven light
The light comes on when the oven door is opened or when a cooking mode starts (if enabled in the settings menu).
When models featuring LED INSIDE technology begin cooking, the LEDs on the door light up for improved illumination of all cooking levels.
Residual heat indicators
The appliance is fitted with a residual heat indicator. When the oven is off, the “residual heat” bar on the display lights up to indicate high temperatures inside the oven cavity. The individual segments of the bar switch off one by one as the temperature inside the oven falls.
Demo mode
! The appliance will not enter DEMO mode if the language has not been selected beforehand.
The oven can operate in DEMO mode: all heating elements are deactivated, and the controls remain operative.
To activate DEMO mode, switch off the oven and keep
the control dial turned clockwise while pressing  for 10 seconds. A buzzer sounds and the display shows “DEMO”. To deactivate DEMO mode, keep the control dial turned
anticlockwise while pressing  for 3 seconds. A buzzer sounds to confirm deactivation.
Restoring the factory settings
The oven factory settings can be restored to reset all selections made by the user (language, tone, customised durations, etc…). To carry out a reset, switch off the oven,
then press and hold 6  ,
,  and
and  simultaneously for 6 seconds. Once the restore procedure is complete, a
buzzer will sound. The first time the  icon is pressed, the oven will behave as if it is being switched on for the first time.
Standby
This product complies with the requirements of the latest European Directive on the limitation of power consumption in standby mode. If no buttons are pressed for 30 minutes and the control panel/door lock has not been activated, the appliance automatically reverts to standby mode. The ECO Mode symbol appears on the display to indicate standby mode. As soon as interaction with the machine resumes, system operation is restored.
12

Modes
!In order to guarantee wonderfully soft and crunchy foodstuffs, the oven releases – in the form of water vapour - the humidity naturally withheld in the food itself. In this way, optimal cooking results can be achieved for all types of food.
!Every time the oven is switched on, it suggests the first manual cooking mode.
Manual cooking modes
!All cooking modes have a default cooking temperature which may be adjusted manually to a value between 40°C and
250°C as desired (270°C for GRILLmode).Any temperature adjustments will be stored in the appliance memory and suggested again the next time this mode is used. If the selected temperature is lower than the temperature inside the oven, the text “OVEN TOO HOT” appears on the display.
However, it will still be possible to start cooking.
If cooking is started without a duration being set, the display will show the elapsed time.

 MULTILEVEL mode
All heating elements and the fan are activated. Since the heat remains constant throughout the oven, the air cooks and browns food in a uniform manner. A maximum of 3 racks may be used at the same time.
GRILL mode
The top heating element and the rotisserie spit (where present) are activated. The high and direct temperature of the grill is recommended for food which requires a high surface temperature. Always cook in this mode with the oven door closed (see “Practical cooking advice”).
FAN GRILLING mode
The top heating element and the rotisserie spit (where present) are activated and the fan begins to operate. During part of the cycle the circular heating element is also activated. This combination of features increases the effectiveness of the unidirectional thermal radiation provided by the heating elements through the forced circulation of the air throughout the oven.
This helps prevent food from burning on the surface and allows the heat to penetrate right into the food. Always cook in this modewiththeovendoorclosed(see “Practical cooking advice”).
ROAST mode
The top and circular heating elements switch on and the fan begins to operate. This combination of features increases the effectiveness of the unidirectional thermal radiation provided by the heating elements through the forced circulation of the air throughout the oven. This helps prevent food from burning on the surface and allows the heat to penetrate right into the food. Always cook in this mode with the oven door closed.
GB
FISH mode
The top and circular heating elements switch on and the fan begins to operate. This combination is ideal for cooking fish dishes gently.
 PIZZA mode
The top and circular heating elements switch on and the fan begins to operate. This combination heats the oven rapidly. If you use more than one rack at a time, switch the position of the dishes halfway through the cooking process.
 PROVING mode
The circular heating element will come on and the fan will operate during the preheating stage only. The oven temperature is ideal for activating the rising process. Always cook in this mode with the oven door closed.
 PASTRY mode
The rear heating element and the fan are switched on, thus guaranteeing the distribution of heat in a delicate and uniform manner throughout the entire oven. This mode is ideal for baking temperature sensitive foods (such as cakes, which need to rise).
 PASTEURISATION mode
This cooking mode is suitable for fruit, vegetables, etc...
Small containers may be positioned on 2 levels (dripping pan on the 1st shelf and rack on the 3rd shelf). Let the containers cool inside the oven. Place the food inside the oven while it is still cold.
 SLOW COOK MEAT/FISH/VEGETABLES modes
This type of cooking mode, used for years by industry professionals, enables food (meat, fish, fruit and vegetables) to be cooked at very low temperatures (75, 85 and 110°C), thereby guaranteeing a perfect level of cooking and enhancing the taste as much as possible.
The value of these advantages should not be underestimated:
•as the cooking temperatures are very low (in general they are lower than the temperature required for evaporation), the dispersion of cooking sauces due to evaporation is substantially reduced and the food becomes softer;
•when cooking meat, the muscle fibres contract less than they would during a classic cooking cycle. The result is a more tender meat which does not need to be rested after it is cooked. Meat should be browned before it is
placed in the oven.
Cooking foods which have been vacuum-packed at low temperatures, a technique used for over 30 years by the most prestigious chefs, brings many advantages:
•culinary: flavours are concentrated and the taste, softness and tenderness of the food are maintained;
•hygienic: provided that hygiene regulations are respected, this type of cooking protects the food from the harmful effects of oxygen, thus ensuring that the dishes may be stored for longer in the refrigerator;
•organisational: thanks to the longer storage period, dishes may be prepared well in advance;
13
• diet-related: this type of cooking limits the amount of fatty
GB substances used and therefore means that the food is lighter and easier to digest;
•financial: the food shrinks less so there is more of the product left after it has been cooked.
To use this technique, you must use a vacuum-packing machine and the appropriate bags. Follow the instructions supplied relating to vacuum-packing food carefully.
The vacuum-packing technique may also be used for raw products (fruit, vegetables, etc.) as well as pre-cooked products (traditional cooking).
 DEFROSTNG mode
The fan at the bottom of the oven circulates roomtemperature air around the food. This mode is suitable for defrosting any type of food, especially delicate items that should not be heated, for example: ice-cream cakes or cakes made with custard, cream or fruit.
ECO mode
The rear heating element and the fan are switched on, thus guaranteeing the distribution of heat in a delicate and uniform manner throughout the entire oven.This energy saving mode is recommended for small dishes, ideal for heating foods and finishing off cooking.
Rotisserie spit*
To operate the rotisserie function ( see diagram) proceed as follows:
1. Place the dripping pan in position 1.
2. Place the rotisserie support in position 3 and insert the spit in the hole provided on the back panel of the oven.
3. Start the rotisserie
function by selecting the |
or |
modes. |
Automatic cooking modes
! The temperature and cooking duration are pre-set, guaranteeing a perfect result every time - automatically. These values are set using the C.O.P.® (Programmed Optimal Cooking) system. The cooking cycle stops automatically and the oven indicates when the dish is cooked. You may start cooking whether the oven has been preheated or not. The cooking duration can be customised according to personal taste by modifying the relevant value - before cooking begins
- by ±5/20 minutes depending on the selected programme. The duration can however be modified even once cooking has begun. If the value is modified before the programme begins, it is stored in the memory and suggested again by the appliance when the programme is next used. If the temperature inside the oven is higher than the suggested value for the selected mode, the text “OVEN TOO HOT” appears on the display and it will not be possible to begin cooking; wait for the oven to cool.
* Only available in certain models.
The icon representing the selected mode and the icon representing the recommended shelf position appear on the display alternately.
!When the cooking stage has been reached, the oven buzzer sounds.
!Do not open the oven door as this will disrupt the cooking time and temperature.
 BREAD mode
Use this function to bake bread.To obtain the best results, we recommend that you carefully observe the instructions below:
•Follow the recipe.
•Do not exceed the maximum weight of the dripping pan.
•Remember to pour 50g (0,5 dl) of cold water into the baking tray in position 5.
•The dough must be left to rise at room temperature for 1 – 1 ½ hours (depending on the room temperature) or until the dough has doubled in size.
Recipe for BREAD:
1 dripping pan holding 1000 g max, lower level
2 dripping pans each holding 1000 g max, medium and lower levels
Recipe for 1000 g of dough: 600 g flour, 360 g water, 11g salt, 25 g fresh yeast (or 2 sachets of powder yeast)
Method:
•Mix the flour and salt in a large bowl.
•Dilute the yeast in lukewarm water (approximately 35 degrees).
•Make a small well in the mound of flour.
•Pour in the water and yeast mixture.
•Knead the dough by stretching and folding it over itself with the palm of your hand for 10 minutes until it has a uniform consistency and is not too sticky.
•Formthe dough into a ball shape, place it in a large bowl and cover it with transparent plastic wrap to prevent the surface of the dough from drying out. Select the manual PROVING function on the oven. Place the bowl inside and leave the dough to rise for approximately 1 hour (the dough should double in volume).
•Cut the dough into equal sized loaves.
•Place them in the dripping pan, on a sheet of baking paper.
•Dust the loaves with flour.
•Make incisions on the loaves.
•Place the food inside the oven while it is still cold.
•Start the  BREAD cooking mode.
•Once baked, leave the loaves on one of the grill racks until they have cooled completely.
 BEEF/VEAL/LAMB mode
Use this function to cook beef, veal and lamb. Place the food inside the oven while it is still cold. The dish may also be placed in a preheated oven. Some of the ROAST modes offer the option of selecting the desired cooking level:
14

1.Press the  icon.
icon.
2.Use the control dial to select “WELL DONE”, “MEDIUM” or “RARE”.
3.Press  again.
 PORK mode
Use this function to cook pork. Place the food inside the oven while it is still cold. The dish may also be placed in a preheated oven.
 CHICKEN mode
This function is ideal for cooking chicken (whole or in pieces). Place the food inside the oven while it is still cold.
The dish may also be placed in a preheated oven.
 FISH FILLET mode
This function is ideal for cooking small-medium fillets. Place the food inside the oven while it is still cold.
 FISH EN PAPILLOTE mode
Use this function to cook whole fish with a maximum weight of 1 kg. The paper/foil package can be placed directly on the dripping pan. Place the food inside the oven while it is still cold.
 TARTS mode
This function is ideal for all tart recipes (which normally need to be heated well from underneath). Place the food inside the oven while it is still cold. The dish may also be placed in a preheated oven.
 SHORTCRUST TARTS mode
This function is ideal for all recipes which require shortcrust pastry (usually made without eggs) or have a liquid or very soft filling. Place the food inside the oven while it is still cold.
The dish may also be placed in a preheated oven.
 BRIOCHE mode
This function is ideal for baked desserts (made using natural yeast). Place the food inside the oven while it is still cold; the dish may also be placed in a preheated oven if desired.
 CAKE mode
This function is ideal for all recipes made using baking powder. Place the food inside the oven while it is still cold. The dish may also be placed in a preheated oven.
 DESSERTS mode
This function is ideal for cooking desserts which are made using natural yeast, baking powder and desserts which contain no yeast. Place the dish in the oven while it is still cold. The dish may also be placed in a preheated oven.
 PAELLA mode
This function was designed for quick and easy paella preparation; all ingredients are placed inside the oven while it is still cold. To obtain the best results, we recommend that you carefully observe the instructions below:
• The rice used must not be sticky: salad rice or American |
GB |
long-grain rice are particularly suitable. |
•The oven must not be preheated.
•Position:
-the deep dripping pan on shelf level 1 (if supplied as an accessory), or place the rack on shelf level 1 and stand a dish measuring approximately 35x30cm (height 5 cm) on it;
-the dripping pan on shelf level 3;
-the rack on shelf level 5;.
Recipe (serves 8):
In the deep dripping pan
•1 onion, chopped
•500 g rice
•500 g frozen mixed seafood (shelled prawns, mussels and clams, squid rings, etc.)
•2 handfuls frozen peas
•¼ chilli, diced
•Chorizo (spiced paprika sausage), sliced
•One tbsp fish stock powder
•1 measure powdered saffron
•700 g water
Cover the dripping pan with aluminium foil.
In the dripping pan
•8 cod fillet portions
•8 (or 16) king prawns (or scampi)
•8 whole mussels, to garnish
Cover the dripping pan with aluminium foil.
On a tray standing on the rack
•6-8 chicken thighs, marinated using paella spices and a drizzle of olive oil
Once the cooking process is complete, finish with more olive oil.
 PILAU RICE mode
Use this function to cook rice. To obtain the best results, we recommend that you observe the instructions below:
•The rice used must not be sticky: salad rice or American long-grain rice are particularly suitable.
•The oven must not be preheated.
•The deep dripping pan should be on shelf level 2 (if supplied as an accessory), or the rack placed on shelf level 2 and a dish measuring approximately 35x30cm
(height 5 cm) stood on it.
Recipe (serves 4 - 6):
•500 g rice
•700 ml water or stock
Place the rice in the deep dripping pan without soaking and cover with liquid. Cover the dripping pan with the aluminium foil.
 YOGHURT mode
The circular heating element will come on and the fan will operate during the preheating stage only. The temperature of 50°C is ideal for preparing yoghurt.
Basic recipe for one litre of yoghurt: one litre of whole UHT milk, one pot of natural yoghurt
Method:
•Heat the milk in a steel pan until it reaches boiling point.
•Removethe layer of cream on the surface and leave to cool.
15

GB |
• |
Stir 3 or 4 tablespoons of milk into the yoghurt and |
|
combine well. |
• Add the mixture to the remaining milk and mix thoroughly.
• Pour into airtight jars.
• Stand the jars on the dripping pan and place in the oven, on level 2.
• At the end of this process, place the jars in the refrigerator to chill for at least 12 hours. Store the yoghurt in the refrigerator for up to one week.
• The recipe can be adjusted to taste.
5.The text “POSTPONED COOKING START” and the time remaining will appear on the display, moving the delayed start bar backwards.
6.Once cooking has begun, the display will indicate the remaining time by filling the duration bar.
7.When the time has elapsed, “COOKING FINISHED” appears on the display and a buzzer sounds.
• For example: it is 9:00 a.m. and a time of 1 hour and 15 minutes is programmed, while the end time is set to 12:30. The programme will start automatically at 11:15 a.m.
Programming cooking
! A cooking mode must be selected before programming can take place.
Programming the duration
1.Press the  icon.
icon.
2.Turn the control dial to set the duration; hold the dial in this position to scroll through the numbers more quickly and make the setting process easier. The display will show a graphic indicating the duration in bar format.
3.Once you have reached the desired duration, press the
 icon again. The duration bar will show the current time, the duration and the end of cooking time as a graphic.
4.Press  to begin cooking.
5.The display will indicate the remaining time by filling the duration bar.
6.When cooking has finished, “COOKING FINISHED” appears on the display and a buzzer sounds.
• For example: it is 9:00 a.m. and a duration of 1 hour and
15 minutes is programmed. The programme will stop automatically at 10:15 a.m.
Current time |
|
|
End |
Cooking |
indicator |
|
|
of cooking time |
duration |
|
|
Duration |
|
|
|
|
bar |
|
|
|
|
|
||
Programming delayed cooking
!A cooking duration must be set before the end of cooking time can be scheduled.
!For the delayed programming to work properly, the clock should be set to the correct time.
1. Follow steps 1 to 3 to set the duration as detailed above.
2.Press the  icon twice; the end of cooking time will begin to flash.
3.Turn the control dial to adjust the end of cooking time; hold the dial in this position to scroll through the numbers more quickly and make the setting process easier. The display will show a graphic indicating the delayed start in bar format.
4.Once you have reached the desired end time, press the
 icon again. The delayed start bar will show the current time, the time remaining until the start of cooking, the duration and the end of cooking time as a graphic.
4. Press  to begin the pyrolysis schedule.
Current time |
|
End of cooking |
Cooking |
indicator |
|
time |
duration |
|
|
Delayed |
|
|
|
start bar |
|
|
|
|
To cancel a schedule, press the  icon.
icon.
Practical cooking advice
!Do not place racks in position 1 and 5 during fan-assisted cooking. This is because excessive direct heat can burn temperature sensitive foods.
!In the GRILL and FAN GRILLING cooking modes, particularly when using the rotisserie spit, place the dripping pan in position 1 to collect cooking residues (fat and/or grease).
MULTILEVEL
•Use positions 2 and 4, placing the food which requires more heat on 2.
•Place the dripping pan on the bottom and the rack on top.
BARBECUE
•Place the rack in position 3 or 4. Position the food in the centre of the rack.
•We recommend that the temperature is set to its maximum level. The top heating element is regulated by a thermostat and may not always operate constantly.
PIZZA
•Use a lightweight aluminium pizza pan. Place it on the rack provided.
For a crispy crust, do not use the dripping pan as this extends the total cooking duration and prevents the crust from forming.
•If the pizza has a lot of toppings, we recommend adding the mozzarella cheese to the top of the pizza halfway through the cooking process.
16

|
|
|
|
|
|
|
|
|
|
|
Cooking advice table |
|
|
|
|
|
|
|
|
|
|
|
|
|
|
|
|
|
|
GB |
||
Modes |
Foods |
Weight |
Rack position |
Preheating |
Recommended |
Cooking |
|
|
||
|
|
|||||||||
|
|
(in kg) |
|
|
|
Temperature |
duration |
|
|
|
|
|
|
|
|
|
(°C) |
(minutes) |
|
||
|
Manual |
|
Standard |
Sliding |
|
|
|
|
|
|
|
|
guide rails |
guide rails |
|
|
|
|
|
|
|
|
|
|
|
|
|
|
|
|
||
Multilevel* |
Pizza on 2 racks |
|
2 and 4 |
1 and 3 |
yes |
210-220 |
20-25 |
|
|
|
|
Pies on two racks/cakes on 2 racks |
|
2 and 4 |
1 and 3 |
yes |
180 |
30-35 |
|
|
|
|
Sponge cake on 2 racks (on the dripping pan) |
|
2 and 4 |
1 and 3 |
yes |
160-170 |
20-25 |
|
|
|
|
Roast chicken + potatoes |
1+1 |
1 and 2/3 |
1 and 3 |
yes |
200-210 |
65-75 |
|
|
|
|
Lamb |
1 |
2 |
1 |
yes |
190-200 |
45-50 |
|
|
|
|
Mackerel |
1 |
1 or 2 |
1 |
yes |
180 |
30-35 |
|
|
|
|
Lasagne |
1 |
2 |
1 |
yes |
180-190 |
35-40 |
|
|
|
|
Cream puffs on 3 racks |
|
1 and 3 and 5 |
1 and 2 and 4 |
yes |
190 |
20-25 |
|
|
|
|
Biscuits on 3 racks |
|
1 and 3 and 5 |
1 and 2 and 4 |
yes |
180 |
10-20 |
|
|
|
|
Cheese puffs on 2 racks |
|
2 and 4 |
1 and 3 |
yes |
210 |
20-25 |
|
|
|
|
Savoury pies |
|
1 and 3 |
1 and 3 |
yes |
190-200 |
20-30 |
|
|
|
Grill* |
Mackerel |
1 |
4 |
3 |
no |
300 |
10-20 |
|
|
|
|
Sole and cuttlefish |
0,7 |
4 |
3 |
no |
300 |
10-15 |
|
|
|
|
Squid and prawn kebabs |
0,7 |
4 |
3 |
no |
300 |
10-15 |
|
|
|
|
Cod fillet |
0,7 |
4 |
3 |
no |
300 |
10-15 |
|
|
|
|
Grilled vegetables |
0,5 |
3 or 4 |
2 or 3 |
no |
300 |
15-20 |
|
|
|
|
Veal steak |
0,8 |
4 |
3 |
no |
300 |
10-20 |
|
|
|
|
Sausages |
0,7 |
4 |
3 |
no |
300 |
10-20 |
|
|
|
|
Hamburgers |
n° 4 or 5 |
4 |
3 |
no |
300 |
10-12 |
|
|
|
|
Toasted sandwiches (or toast) |
n° 4 or 6 |
4 |
3 |
no |
300 |
3-5 |
|
|
|
|
Spit-roast chicken using rotisserie spit (where present) |
1 |
- |
- |
no |
300 |
70-80 |
|
|
|
|
Spit-roast lamb using rotisserie spit (where present) |
1 |
- |
- |
no |
300 |
70-80 |
|
|
|
Fan grilling* |
Grilled chicken |
1,5 |
2 |
2 |
no |
210 |
55-60 |
|
|
|
|
Cuttlefish |
1 |
2 |
2 |
no |
200 |
30-35 |
|
|
|
|
Spit-roast chicken using rotisserie spit (where present) |
1,5 |
- |
- |
no |
210 |
70-80 |
|
|
|
|
Spit-roast duck using rotisserie spit (where present) |
1,5 |
- |
- |
no |
210 |
60-70 |
|
|
|
|
Roast veal or beef |
1 |
2 |
2 |
no |
210 |
60-75 |
|
|
|
|
Roast pork |
1 |
2 |
2 |
no |
210 |
70-80 |
|
|
|
|
Lamb |
1 |
2 |
2 |
no |
210 |
40-45 |
|
|
|
Roast* |
Roasts (white or red meat) |
1 |
2 |
2 |
no |
200 |
50-75 |
|
|
|
|
|
|
|
|
|
|
|
|
|
|
Fish* |
Bream |
0,7 |
2 |
2 |
yes |
180 |
20-25 |
|
|
|
|
Fish fillets |
1 |
2 |
2 |
yes |
170 |
12-15 |
|
|
|
|
Sea bass with potatoes |
0,5 + 0,5 |
2 |
2 |
yes |
190 |
60 |
|
|
|
Pizza* |
Pizza |
0,5 |
2 |
1 |
yes |
210-220 |
15-20 |
|
|
|
|
Focaccia bread |
0,5 |
2 |
1 |
yes |
190-200 |
20-25 |
|
|
|
Proving* |
Rising process for dough made with yeast |
|
2 |
2 |
no |
40 |
|
|
|
|
|
(brioches, bread, sugar pie, croissants, etc.). |
|
|
|
|
|
|
|
|
|
|
|
|
|
|
|
|
|
|
|
|
Pasteurisation* |
Fruit, vegetables, etc. |
|
2 |
2 |
yes |
110 |
|
|
|
|
|
|
|
|
|
|
|
|
|
|
|
Slow cook* |
Meat |
|
2 |
1 |
no |
75 |
90-180 |
|
|
|
|
Fish |
|
2 |
1 |
no |
85 |
90-180 |
|
|
|
|
Vegetables |
|
2 |
1 |
no |
110 |
90-180 |
|
|
|
Defrosting* |
All frozen foods |
|
|
|
|
|
|
|
|
|
|
|
|
|
|
|
|
|
|
|
|
* The cooking times listed above are intended as guidelines only and may be modified according to personal tastes. Oven preheating times are set as standard and may not be modified manually.
! ECO programme: This programme – which has longer cooking times but guarantees sensible energy saving – is recommended for dishes such as fish fillets, small pastries and vegetables. It is also suitable for warming foodstuffs and for completing cooking.
17

|
|
|
|
|
|
|
|
|
|
|
|
|
|
Cooking advice table |
|
|
|
|
|
|
|
|
|
GB |
|
|
|
|
|
|
|
|
|
||
|
|
Modes |
Foods |
Weight |
Rack position |
Preheating |
|
||||
|
|||||||||||
|
|
|
|
(in kg) |
|
|
|
|
|
|
|
|
|
|
|
|
|
Standard |
|
Sliding |
|
|
|
|
|
|
Automatic** |
|
|
|
|
|
|||
|
|
|
|
|
guide rails |
|
guide rails |
|
|
||
|
|
|
|
|
|
|
|
|
|||
|
|
Bread*** |
Bread (see recipe) |
1 |
|
2 or 3 |
|
2 |
|
no |
|
|
|
|
|
|
|
|
|
|
|
|
|
|
|
Beef |
Roast beef |
1-1,5 |
2 or 3 |
|
2 |
|
no |
|
|
|
|
|
|
|
|
|
|
|
|
|
|
|
|
Veal |
Roast veal |
1-1,5 |
2 or 3 |
|
2 |
|
no |
|
|
|
|
|
|
|
|
|
|
|
|
|
|
|
|
Lamb |
Leg of lamb |
1-1,5 |
2 or 3 |
|
2 |
|
no |
|
|
|
|
|
|
|
|
|
|
|
|
|
|
|
|
Pork |
Roast pork |
1,2-1,5 |
2 or 3 |
|
2 |
|
no |
|
|
|
|
|
|
|
|
|
|
|
|
|
|
|
|
Chicken |
Roast chicken |
1-1,5 |
|
2 or 3 |
|
2 |
|
no |
|
|
|
|
|
|
|
|
|
|
|
|
|
|
|
Fish fillet |
Cod |
0,4-0,5 |
2 or 3 |
|
2 |
|
no |
|
|
|
|
|
Perch |
0,4-0,5 |
2 or 3 |
|
2 |
|
no |
|
|
|
|
|
Trout |
0,4-0,5 |
2 or 3 |
|
2 |
|
no |
|
|
|
|
|
|
|
|
|
|
|
|
|
|
|
|
Fish en |
Bream |
0,4-0,5 |
2 or 3 |
|
2 |
|
no |
|
|
|
|
papillote |
Sea bass |
0,4-0,5 |
2 or 3 |
|
2 |
|
no |
|
|
|
|
Tarts |
Tarts |
0,5 |
|
2 or 3 |
|
2 |
|
no |
|
|
|
|
|
|
|
|
|
|
|
|
|
|
|
Shortcrust tarts |
Apple flan |
0,5 |
|
2 or 3 |
|
2 |
|
no |
|
|
|
|
|
|
|
|
|
|
|
|
|
|
|
Brioche |
Desserts made with natural yeast (brioches, almond |
0,7 |
|
2 or 3 |
|
2 |
|
no |
|
|
|
|
cake, etc.) |
|
|
|
|
||||
|
|
|
|
|
|
|
|
|
|
|
|
|
|
Cake |
Desserts made with baking powder |
0,7 |
|
2 or 3 |
|
2 |
|
no |
|
|
|
|
(marbled biscuits, pound cake, etc.) |
|
|
|
|
||||
|
|
|
|
|
|
|
|
|
|
|
|
|
|
Desserts |
Desserts |
1 |
|
2 or 3 |
|
2 |
|
no |
|
|
|
|
|
|
|
|
|
|
|
|
|
|
|
Paella |
Paella (see recipe) |
|
|
1-3-5 |
|
1-2-4 |
no |
|
|
|
|
|
|
|
|
|
|
|
|
|
|
|
|
Pilau rice |
Pilau rice (see recipe) |
0,5 |
|
2 |
|
1 |
|
no |
|
|
|
|
|
|
|
|
|
|
|
|
|
|
|
Pizza |
Very thin pizza (bread dough) |
|
|
4 (place |
|
|
|
|
|
|
|
with stone* |
|
|
|
pizza stone |
|
|
|
|
|
|
|
|
|
|
|
on shelf) |
|
|
|
|
|
|
|
Yoghurt |
Yoghurt |
|
|
2 |
|
2 |
|
yes |
|
*(models with pizza stone only)
**The duration of the automatic cooking functions are set by default. The values can be modified by the user, starting with the default duration.
***As stated in the recipe, pour 50 g (0,5 dl) water into the dripping pan in position 5.
18
 Loading...