

Hotpoint FHS 210 IX/HA S, FH 21 IX/HA S, FHS 21 IX/HA S User Manual
FH 21/HA S FH 21 IX/HA S
FHS 21 IX /HA S FHS 210 IX/HA S FH 23 C /HA S FH 23 C IX/HA S FH 21/HA
FH 21 IX/HA
KZ.O.02.0361
 Français
|
|
|
|
|
|
Mode d’emploi |
||
|
|
|
|
|
|
FOUR |
Sommaire |
|
|
|
|
|
|
|
|
|
|
|
|
|
|
|
|
Mode d’emploi,1 |
|
|
|
|
|
|
|
|
Avertissements,3 |
|
|
|
|
|
|
|
|
Assistance,8 |
|
|
|
|
|
|
|
|
Description de l’appareil,10 |
||
|
|
|
|
|
|
Description de l’appareil,12 |
||
|
|
|
|
|
|
Installation,28 |
|
|
|
|
|
|
|
|
Mise en marche et utilisation,30 |
||
|
|
|
|
|
|
Le programmateur électronique*,30 |
||
|
|
|
|
|
|
Programmes,31 |
|
|
|
|
|
|
|
|
Précautions et conseils,33 |
||
|
|
|
|
|
|
Nettoyage et entretien,33 |
||
|
|
|
|
Italiano |
|
|
Español |
|
|
|
|
|
|
|
|
||
|
|
|
|
|
|
|
||
|
|
|
|
|
|
|
||
|
|
|
|
|
|
|
||
Istruzioni per l’uso |
Manual de instrucciones |
|||||||
FORNO |
Sommario |
HORNO |
Sumario |
|||||
|
|
|
|
|
|
|
||
Istruzioni per l’uso,1 |
|
Manual de instrucciones,1 |
||||||
Avvertenze,3 |
|
Advertencias,4 |
|
|||||
Assistenza,8 |
|
Asistencia,8 |
|
|||||
Descrizione dell’apparecchio,10 |
Descripción del aparato,10 |
|||||||
Descrizione dell’apparecchio,12 |
Descripción del aparato,12 |
|||||||
Installazione,14 |
|
Instalación,35 |
|
|||||
Avvio e utilizzo,16 |
|
Puesta en funcionamiento y uso,37 |
||||||
Il programmmatore di cottura elettronico *,16 |
El programador electrónico*,37 |
|||||||
Programmi,17 |
|
Programas,38 |
|
|||||
Precauzioni e consigli,19 |
Precauciones y consejos,40 |
|||||||
Manutenzione e cura,19 |
Mantenimiento y cuidados,40 |
|||||||
|
|
|
|
English |
|
|
Portuges |
|
|
|
|
|
|
|
|
||
|
|
|
|
|
|
|||
Operating Instructions |
Instruções para a utilização |
|||||||
OVEN |
Contents |
FORNO |
Índice |
|||||
|
|
|
|
|
|
|
||
Operating Instructions,1 |
Instruções para a utilização,1 |
|||||||
Warnings,3 |
|
Advertências,4 |
|
|||||
Assistance,8 |
|
Assistência,9 |
|
|||||
Description of the appliance,10 |
Descrição do aparelho,10 |
|||||||
Description of the appliance,12 |
Descrição do aparelho,12 |
|||||||
Installation,21 |
|
Instalação,42 |
|
|||||
Start-up and use,23 |
|
Início e utilização,44 |
|
|||||
The electronic programmer*,23 |
O programador electrónico*,44 |
|||||||
Cooking modes,24 |
|
Programas,45 |
|
|||||
Precautions and tips,26 |
Precauções e conselhos,47 |
|||||||
Maintenance and care,26 |
Manutenção e cuidados,47 |
|||||||

 Deutsch
  Қазақша
Bedienungsanleitung |
Пайдалану нұсқаулығы |
||||
BACKOFEN Inhaltsverzeichnis |
ПЕШ |
Мазмұны |
|||
Bedienungsanleitung,2 |
|
Пайдалану нұсқаулығы,2 |
|||
Hinweise,5 |
|
Ескертулер,6 |
|
||
Kundendienst,9 |
|
Көмек,9 |
|
||
Beschreibung Ihres Gerätes,11 |
Құрылғы сипаттамасы,11 |
||||
Beschreibung Ihres Gerätes,12 |
Құрылғы сипаттамасы,13 |
||||
Installation,49 |
|
Орнату,70 |
|
||
Inbetriebsetzung und Gebrauch,51 |
Қосу және пайдалану,72 |
||||
Der elektronische Garzeitprogrammierer *,51 |
Электрондық бағдарламалауыш*,72 |
||||
Programme,52 |
|
Тағам дайындау режимдері,73 |
|||
Vorsichtsmaßregeln und Hinweise,54 |
Сақтандырулар мен кеңестер,75 |
||||
Reinigung und Pflege,54 |
Күтім және пайдалану,75 |
||||
|
Nederlands |
|
|
Română |
|
|
|
|
|
||
|
|
|
|
||
Gebruiksaanwijzing |
Instrucţiuni de folosire |
||||
OVEN |
Inhoud |
CUPTOR |
Sumar |
||
|
|
|
|
||
Gebruiksaanwijzing,2 |
|
Instrucţiuni de folosire,2 |
|||
Belangrijk,5 |
|
Avertizări,7 |
|
||
Service,9 |
|
Asistenţă,9 |
|
||
Beschrijving van het apparaat,11 |
Descrierea aparatului,11 |
||||
Beschrijving van het apparaat,13 |
Descrierea aparatului,13 |
||||
Het installeren,56 |
|
Instalare,77 |
|
||
Starten en gebruik,58 |
|
Pornire şi utilizare,79 |
|
||
Elektronische programmering*,58 |
Programator de coacere electronic,79 |
||||
Programma’s,59 |
|
Programe,80 |
|
||
Voorzorgsmaatregelen en advies,61 |
Măsuri de precauţie şi recomandări,82 |
||||
Onderhoud en verzorging,61 |
Întreţinerea şi îngrijirea aparatului,82 |
||||
 Русскии
Руководство по эксплуатации
ДУХОВОЙ ШКАФСодержание
Руководство по эксплуатации,2 Запобіжні заходи,6 Сервисное обслуживание,9 Описание изделия,11 Описание изделия,13 Установка,63 Включение и эксплуатация,65
Электронный таймер программирования выпечки*,65 Программы,66 Предосторожности и рекомендации,68
Техническое обслуживание и уход,69
Avvertenze
ATTENZIONE: Questo apparecchio e le sue parti accessibili diventano molto caldi durante l’uso. Bisogna fare attenzione ed evitare di toccare gli elementi riscaldanti. Tenere lontani i bambini inferiori agli 8 anni se non continuamente sorvegliati. Il presente apparecchio può essere utilizzato dai bambini a partire dagli 8 anni e da persone con ridotte capacità fisiche, sensoriali o mentali oppure con mancanza di esperienza e di conoscenza se si trovano sotto adeguata sorveglianza oppure se sono stati istruiti circa l’uso dell’apparecchio in modo sicuro e se si rendono conto dei pericoli correlati. I bambini non devono giocare con l’apparecchio. Le operazioni di pulizia e di manutenzione non devono essere effettuate dai bambini senza sorveglianza.
Non utilizzare prodotti abrasivi né spatole di metallo taglienti per pulire lo sportello in vetro del forno in quanto potrebbero graffiare la superficie, provocando, così, la frantumazione del vetro.
Nonutilizzaremaipulitoriavaporeoadalta pressione per la pulizia dell’apparecchio.
ATTENZIONE: Assicurarsi che l’apparecchio sia spento prima di sostituire la lampada per evitare la possibilità di scosse elettriche.
Warnings
WARNING: The appliance and its accessible parts become hot during use. Care should be taken to avoid touching heating elements. Children less than 8
years of age shall be kept away unless continuously supervised. This appliance can be used by children aged from 8 years and above and persons with reduced physical, sensory or mental capabilities or lack of experience and knowledge if they have been given supervision or instruction concerning use of the appliance in a safe way and understand the hazards involved. Children shall not play with the appliance. Cleaning and user maintenance shall not be made by children without supervision.
Do not use harsh abrasive cleaners or sharp metal scrapers to clean the oven door glass since they can scratch the surface, which may result in shattering of the glass.
Never use steam cleaners or pressure cleaners on the appliance.
WARNING: Ensure that the appliance is switched off before replacing the lamp to avoid the possibility of electric shock.
Avertissements
ATTENTION : Cet appareil ainsi que ses parties accessibles deviennent très chauds pendant leur fonctionnement. Il faut faire attention à ne pas toucher les éléments chauffants. Ne pas faire approcher les enfants de moins de 8 ans à moins qu’ils ne soient sous surveillance constante. Le présent appareil peut être utilisé par des enfants de plus de 8 ans et par des personnes présentant des capacités physiques, sensorielles ou mentales réduites ou n’ayant pas l’expérience ou les connaissances indispensables, à condition qu’ils soient sous bonne surveillance ou qu’ils aient reçu les instructions nécessaires pour une utilisation de l’appareil en toute sécurité
3
et à condition qu’ils se rendent compte des dangers encourus. Les enfants ne doivent pas jouer avec l’appareil. Les opérations de nettoyage et d’entretien ne doivent pas être effectuées par des enfants non surveillés.
Ne pas utiliser de produits abrasifs ni de spatules métalliques coupantes pour nettoyerlaportedufourenverre,souspeine d’érafler la surface et de briser le verre.
Ne jamais nettoyer l’appareil avec des nettoyeurs vapeur ou haute pression.
ATTENTION : s’assurer que l’appareil est éteint avant de procéder au remplacement de l’ampoule, afin d’éviter tout risque d’électrocution.
Advertencias
ATENCIÓN: Este aparato y sus partes accesibles se vuelven muy calientes durante el uso. Por lo tanto, es importante evitar tocar los elementos calentadores. Mantenga alejados a los niños menores de 8 años si no son continuamente vigilados. El presente aparato puede ser utilizado por niños mayores de 8 años y por personas con capacidades físicas, sensoriales o mentales disminuidas o sin experiencia ni conocimientos, si se encuentran bajo una adecuada vigilancia o si han sido instruidos sobre el uso del aparato de modo seguro y comprenden los peligros relacionados con el mismo. Los niños no deben jugar con el aparato. Las operaciones de limpieza y de mantenimiento no deben ser realizadas por niños sin vigilancia.
No utilice productos abrasivos ni espátulas de metal cortantes para limpiar la puerta de cristal del horno ya que podrían rayar la superficie y quebrar el cristal.
No utilice nunca limpiadores a vapor o de alta presión para la limpieza del aparato.
ATENCIÓN: Antes de sustituir la lámpara controle que el aparato esté apagado para evitar la posibilidad de choques eléctricos.
Advertências
ATENÇÃO: Este aparelho e as suas partes acessíveis aquecem muito durante a utilização. É preciso ter atenção e evitar tocar os elementos que aquecem. Manter afastadas as crianças com menos de 8 anos, caso não estejam a ser vigiadas. O presente aparelho pode ser utilizado por crianças com mais de 8 anos e por pessoas com capacidades físicas, sensoriais ou mentais reduzidas ou com pouca experiência e conhecimentos, caso sejam adequadamente vigiadas ou caso tenham recebido instruções em relação ao uso do aparelho de forma segura e tenham conhecimento dos perigos associados. As crianças não devem brincar com o aparelho. As operações de limpeza e manutenção não devem ser efectuadas por crianças sem vigilância.
Não utilizar produtos abrasivos nem espátulas de metal cortantes para limpar a porta em vidro do forno, uma vez que pode riscar a superfície, provocando a ruptura do vidro.
Nunca utilize equipamento de limpeza a vapor ou de alta pressão para limpar o aparelho.
ATENÇÃO: Assegure-se de que o aparelho esteja desligado antes de substituir a lâmpada, para evitar a possibilidade de choques eléctricos.
4
Hinweise
ZUR BEACHTUNG: Bei Gebrauch wird dieses Gerät und alle zugänglichen Teile sehr heiß. Es ist darauf zu achten, dass die Heizelemente nicht berührt werden. Kinder unter 8 Jahren, die nicht ständig beaufsichtigt sind, von dem Gerät fernhalten. Das Gerät darf von Kindern ab 8 Jahren und Personen mit eingeschränkten körperlichen, geistigen oder Wahrnehmungsfähigkeiten oder aber ohne ausreichende Erfahrung und Kenntnis verwendet werden, vorausgesetzt sie werden ausreichend überwacht oder sie wurden in den sicheren Gebrauch des Geräts eingewiesen und haben eine ausreichende Wahrnehmung der mit dem Gebrauch des Geräts verbundenen Gefahren. Erlauben Sie Kindern nicht, mit dem Gerät zu spielen. Reinigungsund Wartungsarbeiten dürfen nicht von unbewachten Kindern ausgeführt werden.
Verwenden Sie zur Reinigung der Glastür des Backofens keine Scheuermittel oder scharfkantige Metallspachtel, um die Oberfläche nicht zu zerkratzen und so das Zerspringen des Glases zu verursachen.
Verwenden Sie zur Reinigung des Kochfeldes keine Dampfoder Hochdruckreinigungsgeräte.
ZUR BEACHTUNG: Versichern Sie sich, dass das Gerät ausgeschaltet ist, bevor Sie die Lampe austauschen. Stromschlaggefahr.
Belangrijk
PAS OP: Dit apparaat en zijn bereikbare onderdelen worden tijdens gebruik zeer heet. Zorg ervoor de verwarmende elementen niet aan te raken. Zorg ervoor dat kinderen die kleiner dan 8 jaar oud zijn niet dichtbij het apparaat kunnen komen, tenzij onder constant toezicht. Het huidige apparaat mag alleen door kinderen van 8 jaar en ouder en door personen met een beperkt lichamelijk, sensorieel of geestelijk vermogen, of zonder ervaring en kennis worden gebruikt, mits ze onder adequaat toezicht zijn, of mits ze zijn onderricht m.b.t. het veilige gebruik van het apparaat en zich bewust zijn van de betreffende gevaren. Voorkom dat kinderen met het apparaat spelen. De reinigingsen onderhoudshandelingen mogen niet door kinderen worden uitgevoerd, tenzij onder toezicht.
Gebruik geen schurende producten, noch snijdende metalen spatels om de glazen deur van de oven te reinigen, aangezien deze het oppervlak zouden kunnen krassen, en als gevolg het glas doen verbrijzelen.
Gebruik nooit huishoudapparaten met stoom of hoge druk voor het reinigen van de kookplaat.
PAS OP: Controleer of het apparaat uit staat voor u de lamp vervangt, om te voorkomen dat u een elektrische schok krijgt.
5
Запобіжні заходи
ВНИМАНИЕ: Данное изделие и его доступные комплектующие сильно нагреваютсявпроцессеэксплуатации. Будьте осторожны и не касайтесь нагревательных элементов.
Не разрешайте детям младше 8 лет приближатьсякизделиюбезконтроля. Данное изделие может быть использовано детьми старше 8 лет и лицамисограниченнымифизическими, сенсорными или умственными способностямиилибезопытаизнания оправилахиспользованияизделияпри условии надлежащего контроля или обучениябезопасномуиспользованию изделия с учетом соответствующих рисков. Не разрешайте детям играть с изделием. Не разрешайте детям осуществлять чистку и уход за изделием без контроля взрослых.
Неиспользуйтеабразивныевещества или режущие металлические скребки длячисткистекляннойдверцыдухового шкафа, так как они могут поцарапать поверхность, что может привести к разбиванию стекла.
Никогда не используйте паровые чистящие агрегаты или агрегаты под высокимдавлениемдлячисткиизделия.
ВНИМАНИЕ:Проверьте,чтобыизделие было выключено, перед заменой лампочки во избежание возможных ударов током.
Ескертулер
ЕСКЕРТУ: Құрылғы мен оның қол жететінбөліктеріжұмыскезіндеқызуы мүмкін.
Қыздыруэлементтерінетимеугеназар аударыңыз.
8-ге толмаған балаларға үздіксіз бақылау болмаса, құрылғыдан аулақ ұстау керек. Бұл құрылғыны қауіпсіз түрде қолдану бойынша кеңес не нұсқау берілген және ықтимал қауіп- қатерлердітүсінетінжағдайда,оны8-ге толғанбалалармендене,сезінунемесе ой қабілеті төмен немесе тәжірибесі менбіліміжеткіліксізадамдарқолдана алады.Балаларғақұрылғыменойнауға болмайды. Балаларға бақылаусыз құрылғынытазалауғажәнеоғанқызмет көрсетуге болмайды.
Пешесігініңшынысынтазалауүшінқатты ысқыш тазалағыштарды немесе өткір метал ысқыщтарды пайдаланбаңыз, себебі олар шыныны сызып, оның шағылуына әкелуі мүмкін.
Құрылғыда ешқашан бу тазартқышты немесешаңсорғыштыпайдаланбаңыз.
ЕСКЕРТУ:Тоқсоғумүмкіндігініңалдын алу үшін шамды ауыстырмас бұрын құрылғы өшірілгеніне көз жеткізіңіз
6

Avertizări
ATENŢIE: Acest aparat şi părţile sale accesibile devin foarte calde în timpul folosirii.
Trebuie să fiţi atenţi şi să nu atingeţi elementele de încălzire.
Îndepărtaţi copiii sub 8 ani dacă nu sunt supravegheaţi continuu.
Acest aparat poate fi utilizat de copiii de peste 8 ani şi de persoane cu capacităţi fizice,senzorialesaumentaleredusesau fărăexperienţăşicunoştinţedacăseaflă sub o supraveghere corespunzătoare sau dacă au fost instruiţi cu privire la folosirea aparatului în mod sigur şi dacă îşi dau seama de pericolele corelate. Copiii nu trebuie să se joace cu aparatul. Operaţiunile de curăţare şi de întreţinere nu trebuie să fie efectuate de copii fără supraveghere.
Nu folosiţi produse abrazive, nici perii de metaltăioasepentruacurăţauşadesticlă a cuptorului, deoarece ar putea zgâria suprafaţa, provocând astfel spargerea geamului.
Nu folosiţi niciodată aparate cu aburi sau sub presiune pentru a curăţa aparatul.
ATENŢIE: Asiguraţi-vă că aparatul este stins înainte de a înlocui lampa pentru a evita posibilitatea electrocutărilor.
7
|
|
|
|
|
|
|
|
|
|
|
|
|
|
|
|
|
|
|
|
|
|
|
|
|
|
|
|
|
|
|
|
|
|
|
|
|
|
|
|
Assistenza |
Assistance |
||||||
! Non ricorrere mai a tecnici non autorizzati. |
! Never use the services of an unauthorised technician. |
||||||
Comunicare: |
Please have the following information to hand: |
||||||
• Il tipo di anomalia; |
• The type of problem encountered. |
||||||
• Il modello della macchina (Mod.) |
• The appliance model (Mod.). |
||||||
• Il numero di serie (S/N) |
• The serial number (S/N). |
||||||
Queste ultime informazioni si trovano sulla targhetta |
The latter two pieces of information can be found on the |
||||||
caratteristiche posta sull’apparecchio |
data plate located on the appliance. |
||||||
Assistenza Attiva 7 giorni su 7 |
|
|
|
|
|||
|
|
|
|
||||
|
|
|
|
|
|
|
|
Se nasce il bisogno di assistenza o manutenzione basta chiamare il Numero Unico Nazionale 199.199.199* per essere messi subito in contatto con il Centro Assistenza Tecnica più vicino al luogo da cui si chiama.
È attivo 7 giorni su 7, sabato e domenica compresi, e non lascia mai inascoltata una richiesta.
Estensione di garanzia Airbag 
Airbag è il servizio esclusivo creato da Ariston che integra e prolunga nel tempo i contenuti della garanzia standard: con una modica cifra protegge il cliente da ogni imprevisto riguardante l’assistenza e la manutenzione dell’elettrodomestico. Per i 5 anni successivi alla data di acquisto il cliente che aderisce al programma Airbag avrà diritto gratuitamente a:
•l’intervento entro 48 ore dalla chiamata;
•il contributo per spese di trasferta del Tecnico (diritto di chiamata);
•la manodopera;
•le parti di ricambio originali;
•il trasporto dell’elettrodomestico non riparabile in loco.
Inoltre, qualora l’elettrodomestico non sia riparabile la garanzia prevede la sostituzione a prezzo agevolato in funzione dell’anzianità del prodotto.
*Al costo di 14,25 centesimi di Euro al minuto (iva inclusa) dal Lun. al Ven. dalle 08:00 alle 18:30, il Sab. dalle 08:00 alle13:00edi5,58centesimidiEuroalminuto(ivainclusa) dal Lun. al Ven. dalle 18:30 alle 08:00, il Sab. dalle 13:00 alle08:00eigiornifestivi,perchichiamadaltelefonofisso.
Per chi chiama da radiomobile le tariffe sono legate al piano tariffario dell’operatore telefonico utilizzato.
Le suddette tariffe potrebbero essere soggette a variazione dapartedell’operatoretelefonico;permaggioriinformazioni consultare il sito www.indesit.com.
Assistance
! Ne jamais faire appel à des techniciens non agréés.
Lui indiquer :
•le type d’anomalie;
•le modèle de l’appareil (Mod.)
•son numéro de série (S/N)
Ces informations figurent sur la plaque signalétique apposée sur l’appareil
Asistencia
! No llame nunca a técnicos no autorizados.
Comunique:
•El tipo de anomalía;
•El modelo de la máquina (Mod.)
•El número de serie (S/N)
Esta información se encuentra en la placa de características colocada en el aparato.
La siguiente información es válida solo para España.
Para otros países de habla hispana consulte a su vendedor.
Ampliación de garantía
Llame al 902.363.539 y le informaremos sobre el fantástico plan de ampliación de garantía hasta 5 años.
Consiga una cobertura total adicional de
•Piezas y componentes
•Mano de obra de los técnicos
•Desplazamiento a su domicilio de los técnicos
Y NO PAGUE AVERIAS NUNCA MAS
Servicio de asistencia técnica (SAT)
8
Llame al 902.133.133 y nuestros técnicos intervendrán con rapidez y eficacia, devolviendo el electrodoméstico a sus condiciones óptimas de funcionamiento.
En el SAT encontrará recambios, accesorios y productos específicos para la limpieza y mantenimiento de su electrodoméstico a precios competitivos.
ESTAMOS A SU SERVICIO
Assistência
! Nunca recorra a técnicos não autorizados.
Comunique:
•o tipo de avaria;
•o modelo da máquina (Mod.);
•o número de série (S/N);
Estas últimas informações encontram-se na placa de identificação situada no aparelho.
Kundendienst
! Wenden Sie sich auf keinen Fall an nicht autorisierte Techniker.
Geben Sie bitte Folgendes an:
•die genaue Beschreibung des Fehlers;
•das Gerätemodell (Mod.)
•die Modellnummer (S/N).
Letztere Informationen können dem Typenschild, das sich auf dem Gerät befindet, entnommen werden.
Service
! Wendt u nooit tot niet erkende monteurs.
Dit dient u door te geven:
•Het soort storing;
•Het model apparaat (Mod.)
•Het serienummer (S/N)
Deze laatste informatie bevindt zich op het typeplaatje op het apparaat
Сервисное обслуживание
! Никогда не обращайтесь к неуполномоченным техникам.
При обращении в Центр Технического обслуживания сообщите:
•Тип неисправности;
•Модель изделия (Мод.)
•Номер тех. паспорта (серийный №)
Эти данные вы найдете на паспортной табличке, расположенной на изделии.
Көмек
! Рұқсатыжоқадамныңқызметінешқашанқабылдамаңыз.
Келесі мәліметтерді оңай жерде ұстаңыз:
•Туындаған проблема түрі.
•Құрылғының моделі (Мод.).
•Сериялық нөмірі (С/н).
Кейінірекмәліметтердіңекібөлігінқұрылғыныңдеректер тақтасынан көре аласыз.
Asistenţă
! Nu apelaţi niciodată la personal tehnic neautorizat.
Comunicaţi:
•tipul de anomalie;
•modelul aparatului (Mod.)
•numărul de serie (S/N)
Aceste informaţii se găsesc pe tăbliţa cu caracteristici lipită de aparat.
9
|
|
|
|
|
|
|
|
|
|
|
|
|
|
|
|
|
|
|
|
|
|
|
|
|
|
|
|
|
|
|
|
|
|
|
|
|
|
|
|
|
|
|
|
|
Descrizione dell’apparecchio |
Descripción del aparato |
|||||||
Vista d’insieme |
Vista en conjunto |
|||||||
1 |
|
POSIZIONE 1 |
1 |
POSICIÓN 1 |
||||
2 |
|
POSIZIONE 2 |
2 |
POSICIÓN 2 |
||||
3 |
|
POSIZIONE 3 |
3 |
POSICIÓN 3 |
||||
4 |
|
POSIZIONE 4 |
4 |
POSICIÓN 4 |
||||
5 |
|
POSIZIONE 5 |
5 |
POSICIÓN 5 |
||||
6 |
|
GUIDE di scorrimento dei ripiani |
6 |
GUÍAS de deslizamiento de las bandejas |
||||
7 |
|
Ripiano LECCARDA |
7 |
Bandeja GRASERA |
||||
8 |
|
Ripiano GRIGLIA |
8 |
Bandeja PARRILLA |
||||
9 |
|
Pannello di controllo |
9 |
Panel de control |
||||
|
|
|
|
|
|
|
|
|
|
|
|
|
|
|
|
|
|
Description of the appliance |
Descrição do aparelho |
|||
Overall view |
Vista de conjunto |
|||
1 |
POSITION 1 |
1 |
POSIÇÃO 1 |
|
2 |
POSITION 2 |
2 |
POSIÇÃO 2 |
|
3 |
POSITION 3 |
3 |
POSIÇÃO 3 |
|
4 |
POSITION 4 |
4 |
POSIÇÃO 4 |
|
5 |
POSITION 5 |
5 |
POSIÇÃO 5 |
|
6 |
GUIDES for the sliding racks |
6 |
GUIAS de escorrimento das prateleiras |
|
7 |
DRIPPING PAN |
7 |
Prateleira BANDEJA PINGADEIRA |
|
8 |
GRILL |
8 |
Prateleira GRADE |
|
9 |
Control panel |
9 |
Painel de comandos |
|
|
|
|
|
|
|
|
|
|
|
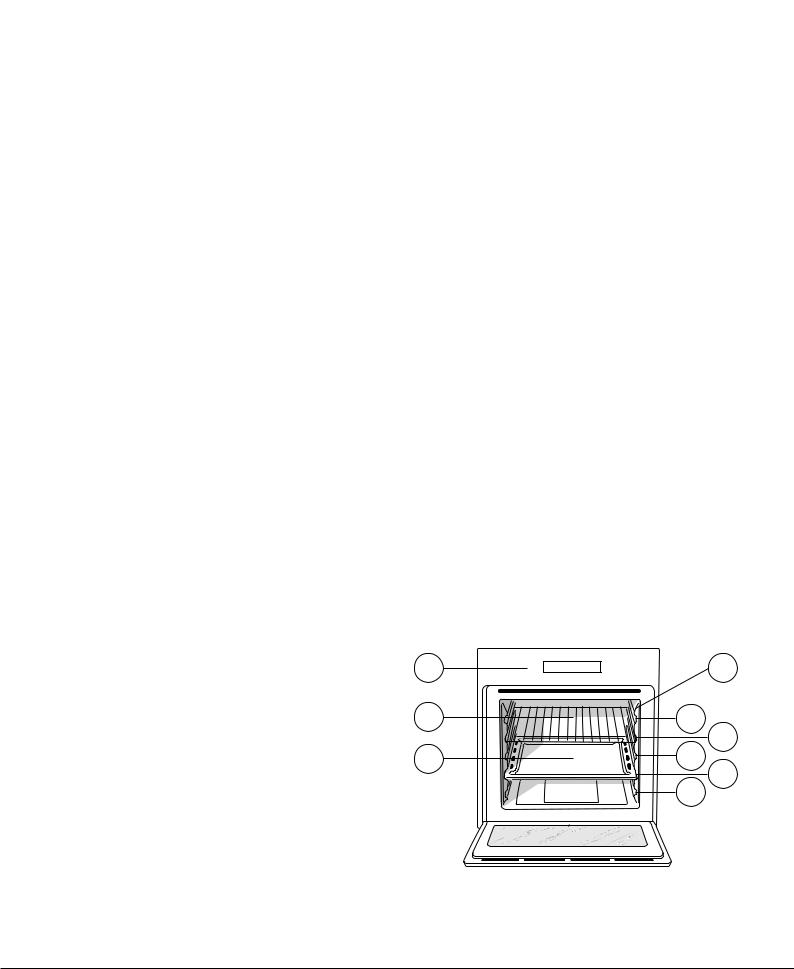
Description de l’appareil
Vue d’ensemble |
9 |
6 |
||
|
|
|||
1 |
NIVEAU 1 |
8 |
5 |
|
2 |
NIVEAU 2 |
|
4 |
|
3 |
NIVEAU 3 |
|
||
7 |
3 |
|||
4 |
NIVEAU 4 |
|||
5 |
NIVEAU 5 |
|
2 |
|
6 |
GLISSIERES de coulissement |
|
1 |
|
7 |
Support LECHEFRITE |
|
|
|
8 |
Support GRILLE |
|
|
|
9 |
Tableau de bord |
|
|
|
10
|
|
|
|
|
|
|
|
|
|
|
|
|
|
|
|
|
|
Beschreibung Ihres Gerätes |
Құрылғы сипаттамасы |
||||
Geräteansicht |
Жалпы шолу |
||||
1 |
EINSCHUBHÖHE 1 |
1 |
ПОЗИЦИЯ 1 |
||
2 |
EINSCHUBHÖHE 2 |
2 |
ПОЗИЦИЯ 2 |
||
3 |
EINSCHUBHÖHE 3 |
3 |
ПОЗИЦИЯ 3 |
||
4 |
EINSCHUBHÖHE 4 |
4 |
ПОЗИЦИЯ 4 |
||
5 |
EINSCHUBHÖHE 5 |
5 |
ПОЗИЦИЯ 5 |
||
6 |
GLEITFÜHRUNGEN für die Einschübe |
6 |
Сырғымалы серелерге арналған СЫРRЫТПАЛАР |
||
7 |
Einschub FETTPFANNE |
7 |
ТАБА |
||
8 |
Einschub BACKOFENROST |
8 |
ГРИЛЬ |
||
9 |
Bedienfeld |
9 |
Басқару тaқтaы |
||
|
|
|
|
|
|
|
|
|
|
|
|
|
|
|
|
|
|
Beschrijving van het apparaat |
Descrierea aparatului |
|||
Algemeen aanzicht |
Vedere de ansamblu |
|||
1 |
POSITIE 1 |
1 |
POZITIA 1 |
|
2 |
POSITIE 2 |
2 |
POZITIA 2 |
|
3 |
POSITIE 3 |
3 |
POZITIA 3 |
|
4 |
POSITIE 4 |
4 |
POZITIA 4 |
|
5 |
POSITIE 5 |
5 |
POZITIA 5 |
|
6 |
GLEUVEN om roosters in te schuiven |
6 |
GHIDAJE culisare rafturi |
|
7 |
Rooster LEKPLAAT |
7 |
Raft TAVĂ |
|
8 |
Rooster GRILL |
8 |
Raft GRĂTAR |
|
9 |
Bedieningspaneel |
9 |
Panou de control |
|
|
|
|
|
|
|
|
|
|
|
Описание изделия
Общии вид |
9 |
6 |
||
|
|
|||
1 |
ПОЛОЖЕНИЕ 1 |
8 |
5 |
|
2 |
ПОЛОЖЕНИЕ 2 |
|
4 |
|
3 |
ПОЛОЖЕНИЕ 3 |
|
||
7 |
3 |
|||
4 |
ПОЛОЖЕНИЕ 4 |
|||
5 |
ПОЛОЖЕНИЕ 5 |
|
2 |
|
6 |
ВЫДВИЖНЫЕ НАПРАВЛЯЮЩИЕ уровней |
|
1 |
|
7 |
ПРОТИВЕНЬ |
|
|
|
8 |
РЕШЕТКА |
|
|
|
9 |
Панель управления |
|
|
|
11
|
|
|
|
|
|
|
|
|
|
|
|
|
|
|
|
|
|
|
|
|
|
|
|
|
|
|
|
|
|
|
|
|
|
|
|
|
|
|
|
Descrizione dell’apparecchio |
Descripción del aparato |
||||||
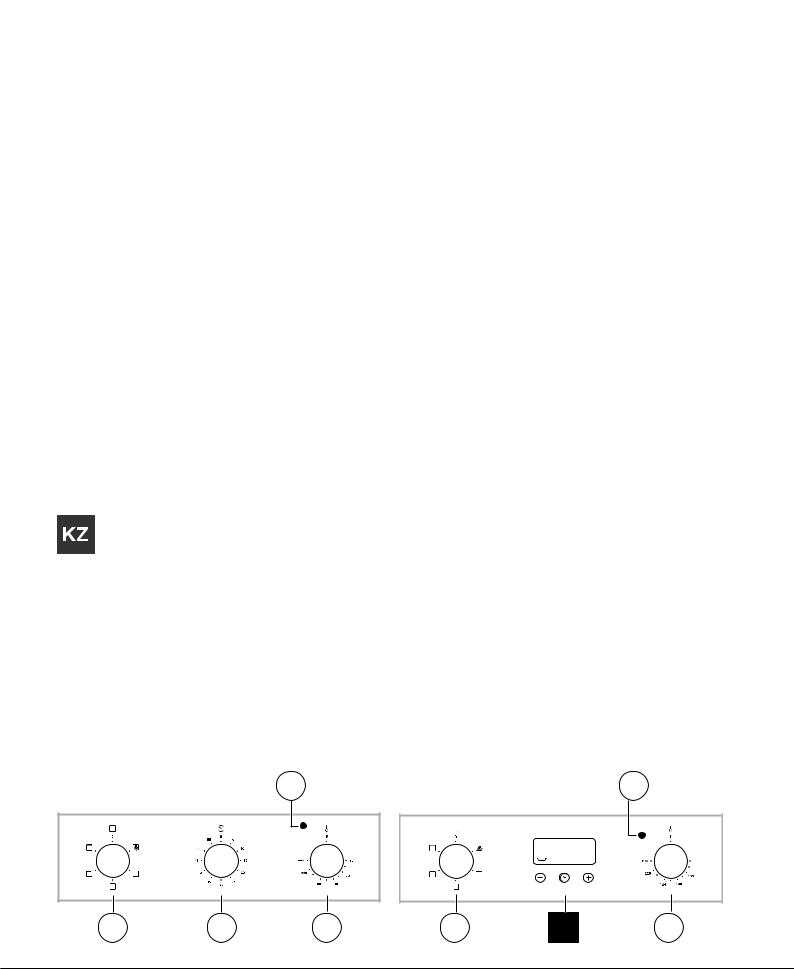
Pannello di controllo |
Panel de control |
||||||
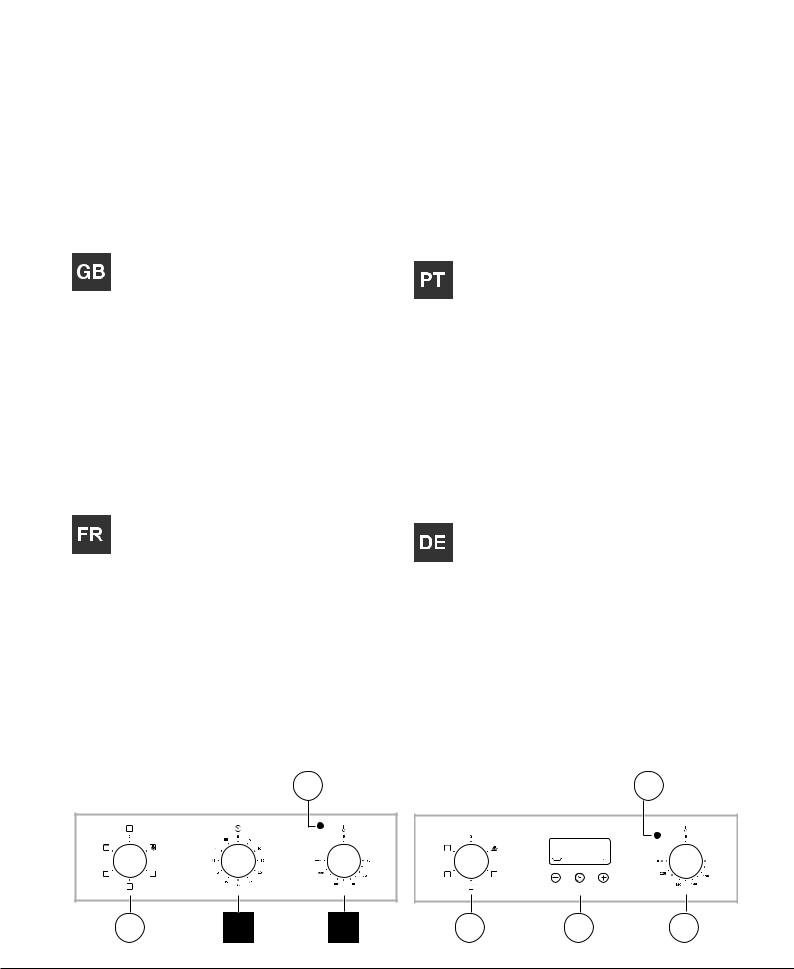
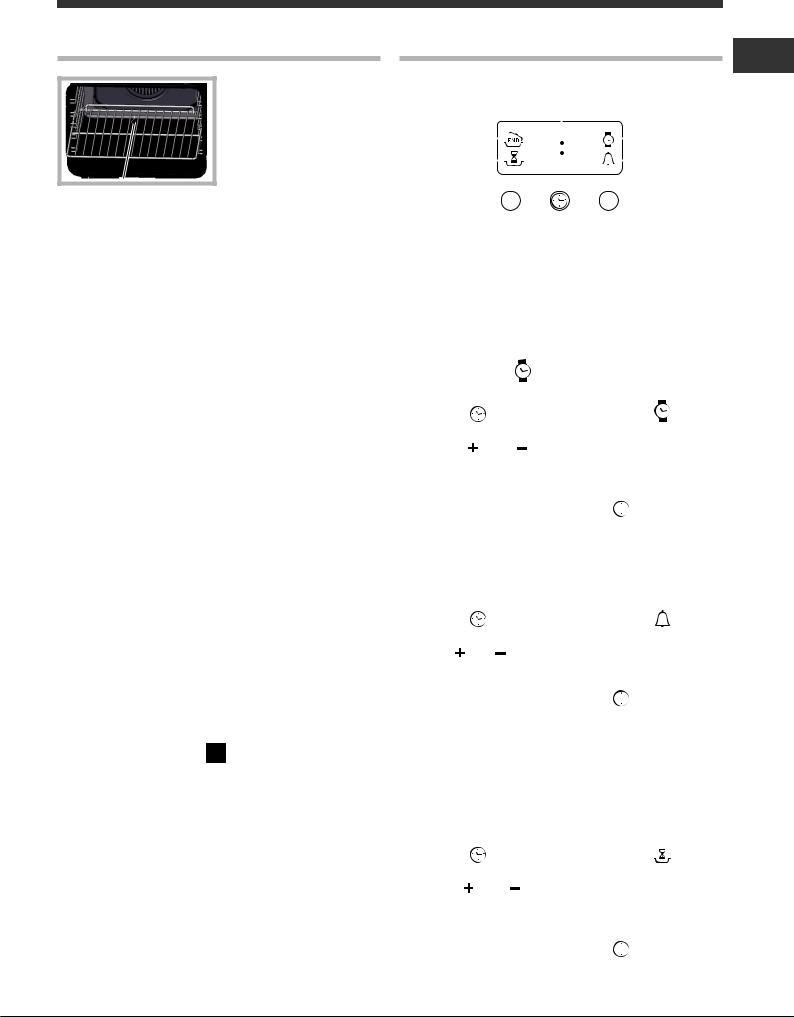
1Spia TERMOSTATO
2Manopola TERMOSTATO
3Manopola TIMER *
4Manopola PROGRAMMI
5Programmatore ELETTRONICO *
* Presente solo in alcuni modelli.
1Spia TERMOSTATO
2Piloto TERMOSTATO
3Mando TEMPORIZADOR *
4Mando PROGRAMAS
5Programador ELECTRÓNICO *
* Presente sólo en algunos modelos.
Description of the appliance Descrição do aparelho
Control panel
1THERMOSTAT indicator light
2THERMOSTAT knob
3TIMER knob *
4SELECTOR knob
5ELECTRONIC programmer *
* Only available in certain models.
Painel de comandos
1Indicador luminoso TERMOSTATO
2Selector do TERMÓSTATO
3Selector do TIMER *
4Selector PROGRAMAS
5Programador ELECTRÓNICO *
* Há somente em alguns modelos.
Description de l’appareil
Tableau de bord
1Voyant THERMOSTAT
2Bouton THERMOSTAT
3Bouton MINUTEUR *
4Bouton PROGRAMMES
5Programmateur ELECTRONIQUE *
* N’existe que sur certains modèles
1
4 |
3 |
2 |
Beschreibung Ihres Gerätes
Bedienfeld
1Kontrollleuchte THERMOSTAT
2Drehknopf THERMOSTAT
3Drehknopf KURZZEITWECKER *
4Drehknopf PROGRAMME
5ELEKTRONISCHER * Pogrammierer
* Nur bei einigen Modellen.
1
 ••
•• ••
••
4 |
5 |
2 |
12
|
|
|
|
|
|
|
|
|
|
|
|
|
|
|
|
|
|
Beschrijving van het apparaat |
Descrierea aparatului |
||||
Bedieningspaneel |
Panoul de control |
||||
1 |
Controlelampje THERMOSTAAT |
1 |
Indicator TERMOSTAT |
||
2 |
THERMOSTAATKNOP |
2 |
Buton TERMOSTAT |
||
3 |
Knop TIMER * |
3 |
Selector TIMER* |
||
4 |
Knop PROGRAMMA’S |
4 |
Buton PROGRAME |
||
5 |
ELEKTRONISCHE * programmering |
5 |
Programator ELECTRONIC * |
||
* Slechts op enkele modellen aanwezig. |
* Prezent doar la anumite modele. |
||||
|
|
|
|
|
|
|
|
|
|
|
|
Описание изделия
Панель управления
1Индикатор ТЕРМОСТАТА
2Регулятор ТЕРМОСТАТА
3Рукоятка ТАЙМЕРА *
4Рукоятка ПРОГРАММЫ
5 ЭЛЕКТРОННЫЙ программер *
* Имеется только в некоторых моделях.
Құрылғы сипаттамасы
Басқару тaқтaы
1 ТЕРМОСТАТ индикатор шамы
2 ТЕРМОСТАТ тұтқacы
3 ТАЙМЕР тұтқacы *
4 РЕТТЕУ тұтқacы
5 ЭЛЕКТРОНДЫҚ бағдарламалаушы *
* Тек белгілі бір модельдерде бар.
1 |
1 |
 ••
•• ••
••
4 |
3 |
2 |
4 |
5 |
2 |
13
IT Installazione
!È importante conservare questo libretto per poterlo consultare in ogni momento. In caso di vendita, di cessione o di trasloco, assicurarsi che resti insieme all’apparecchio per informare il nuovo proprietario sul funzionamento e sui relativi avvertimenti.
!Leggere attentamente le istruzioni: ci sono importanti informazioni sull’installazione, sull’uso e sulla sicurezza.
Posizionamento
!Gli imballaggi non sono giocattoli per bambini e vanno eliminatisecondolenormeperlaraccoltadifferenziata(vedi Precauzioni e consigli).
!L’installazione va effettuata secondo queste istruzioni e da personale professionalmente qualificato. Una errata installazione può causare danni a persone, animali o cose.
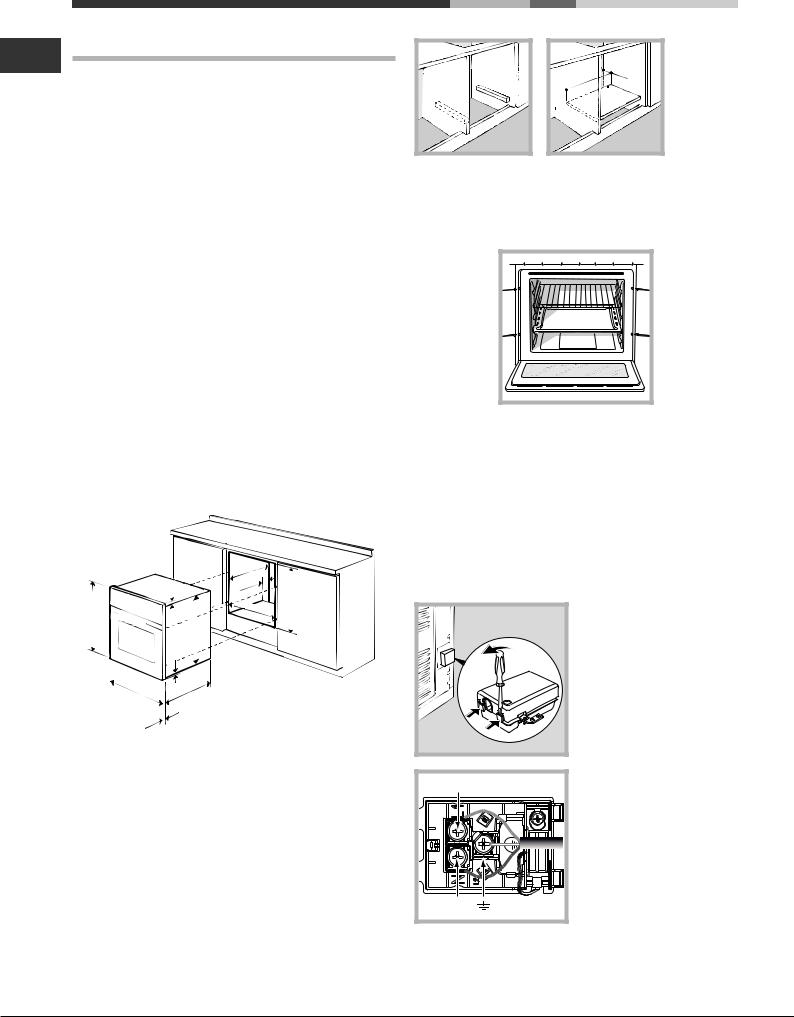
Incasso
Per garantire un buon funzionamento dell’apparecchio è necessario che il mobile abbia le caratteristiche adatte:
•i pannelli adiacenti il forno devono essere di materiale resistente al calore;
•nel caso di mobili in legno impiallacciato, le colle devono essere resistenti alla temperatura di 100°C;
•per l’incasso del forno, sia nel caso di inserimento sottotavolo (vedi figura) che a colonna, il mobile deve avere le seguenti dimensioni:
|
|
|
. |
|
23 mm. |
|
.min |
mm.595 |
mm.567 |
mm |
|
585-575mm. |
|||
|
|
|
547 |
|
|
558 |
mm. |
|
|
|
|
595 |
|
5 mm. |
|
mm. |
. |
|
|
|
mm |
|
|
|
|
545 |
|
|
. |
|
|
|
mm |
|
|
25 |
|
|
|
! Una volta incassato l’apparecchio non debbono essere possibili contatti con le parti elettriche.
Le dichiarazioni di consumo indicate in targhetta caratteristiche sono state misurate con questo tipo di installazione.
Aerazione
Per garantire una buona aerazione è necessario eliminare la parete posteriore del vano. È preferibile installare il forno in modo che appoggi su due listelli in legno oppure su un piano continuo che abbia un’apertura di almeno 45 x 560 mm (vedi figure).
14
. |
45 |
mm. |
mm |
|
|
560 |
|
|
Centraggio e fissaggio
Per fissare l’apparecchio al mobile: aprire la porta del forno e avvitare 4 viti a legno nei 4 fori posti sulla cornice perimetrale.
! Tutte le parti che assicurano la protezione debbono essere fissate in modo tale da non poter essere tolte senza l’aiuto di qualche utensile.
Collegamento elettrico
I forni dotati di cavo di alimentazione tripolare, sono predisposti per il funzionamento con corrente alternata alla tensione e frequenza di alimentazione indicate nella targhetta caratteristiche posta sull’apparecchio (vedi sotto).
Montaggio del cavo di alimentazione
L |
N
1.Aprire la morsettiera facendo leva con un cacciavite sulle linguette laterali del coperchio: tirare e aprire il coperchio (vedi figura).
2.Mettere in opera il cavo di alimentazione: svitare la vite del serracavo e le tre viti dei
contatti L-N- epoifissare i cavetti sotto le teste delle viti rispettando i colori Blu
(N)Marrone(L)Giallo-Verde
 (vedi figura).
3 . F i s s a r e i l c a v o nell’apposito fermacavo. 4. Chiudere il coperchio della morsettiera.
Allacciamento del cavo di alimentazione alla rete
Montare sul cavo una spina normalizzata per il carico indicato nella targhetta caratteristiche (vedi a fianco).
In caso di collegamento diretto alla rete è necessario interporre tra l’apparecchio e la rete un interruttore onnipolare con apertura minima fra i contatti di 3 mm dimensionato al carico e rispondenteallenormeinvigore(ilfiloditerranondeveessere interrottodall’interruttore).Ilcavodialimentazionedeveessere posizionato in modo tale che in nessun punto superi di 50°C latemperaturaambiente(peresempioloschienaledelforno).
! L’installatore è responsabile del corretto collegamento elettrico e dell’osservanza delle norme di sicurezza.
Prima di effettuare l’allacciamento accertarsi che:
•la presa abbia la messa a terra e sia a norma di legge;
•la presa sia in grado di sopportare il carico massimo di potenza della macchina, indicato nella targhetta caratteristiche (vedi sotto);
•latensionedialimentazionesiacompresaneivalorinella targhetta caratteristiche (vedi sotto);
•lapresasiacompatibileconlaspinadell’apparecchio.In caso contrario sostituire la presa o la spina; non usare prolunghe e multiple.
!Ad apparecchio installato, il cavo elettrico e la presa della corrente devono essere facilmente raggiungibili.
!Il cavo non deve subire piegature o compressioni.
!Il cavo deve essere controllato periodicamente e sostituito solo da tecnici autorizzati (vedi Assistenza).
!L’azienda declina ogni responsabilità qualora queste norme non vengano rispettate.
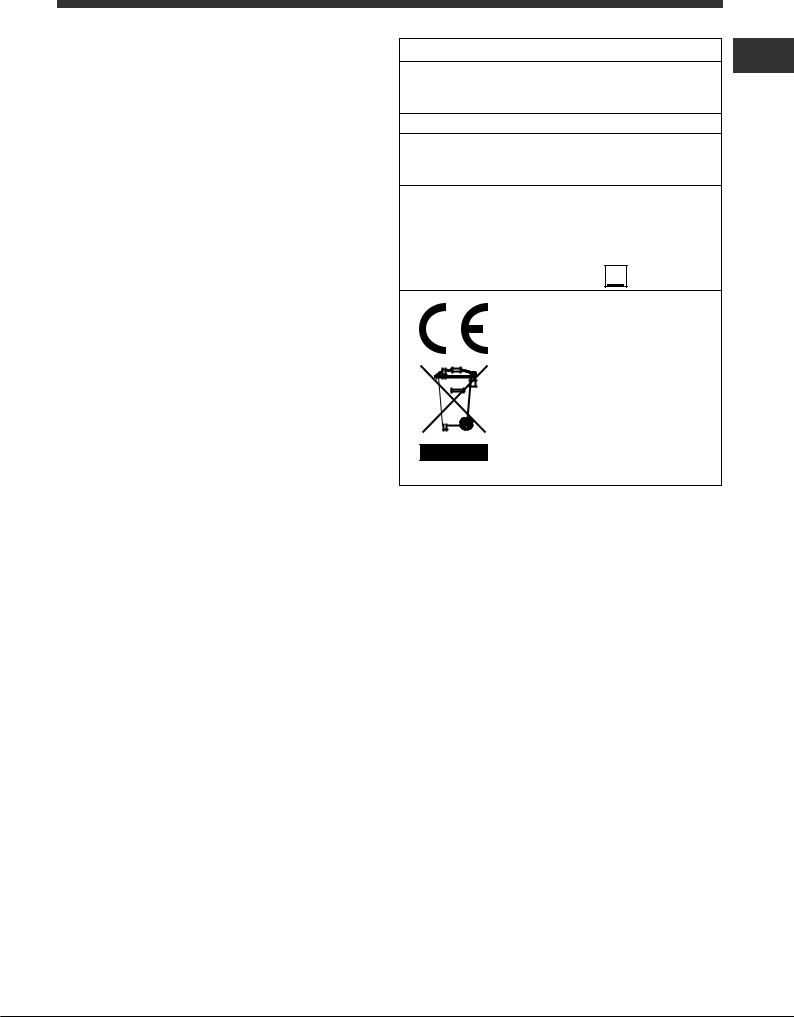
TARGHETTA CARATTERISTICHE |
IT |
|
Dimensioni* |
larghezza cm 43,5 |
|
altezza cm 32,4 |
|
|
|
profondità cm 45,0 |
|
Volume* |
lt. 65 |
|
Collegamenti |
tensione a 220-240V~ 50/60Hz o |
|
50Hz (vedi targhetta caratteristiche) |
||
elettrici |
potenza massima assorbita 2250W |
|
|
Direttiva 2002/40/CE sull’etichetta |
|
|
dei forni elettrici. Norma EN 50304 |
|
|
Consumo energia convezione |
|
ENERGY |
Naturale – funzione di |
|
LABEL |
riscaldamento: |
Tradizionale; |
|
Questa apparecchiatura è |
|
|
conforme alle seguenti Direttive |
|
|
Comunitarie: |
|
|
- 2006/95/CEE del 12/12/06 (Bassa |
|
|
Tensione) e successive modificazioni |
|
|
- 2004/108/CEE del15/12/04 |
|
|
(Compatibilità Elettromagnetica) e |
|
|
successive modificazioni |
|
|
- 93/68/CEE del 22/07/93 e |
|
|
successive modificazioni. |
|
-2002/96/CE e successive modificazioni.
-1275/2008 standby/off mode
15
IT Avvio e utilizzo
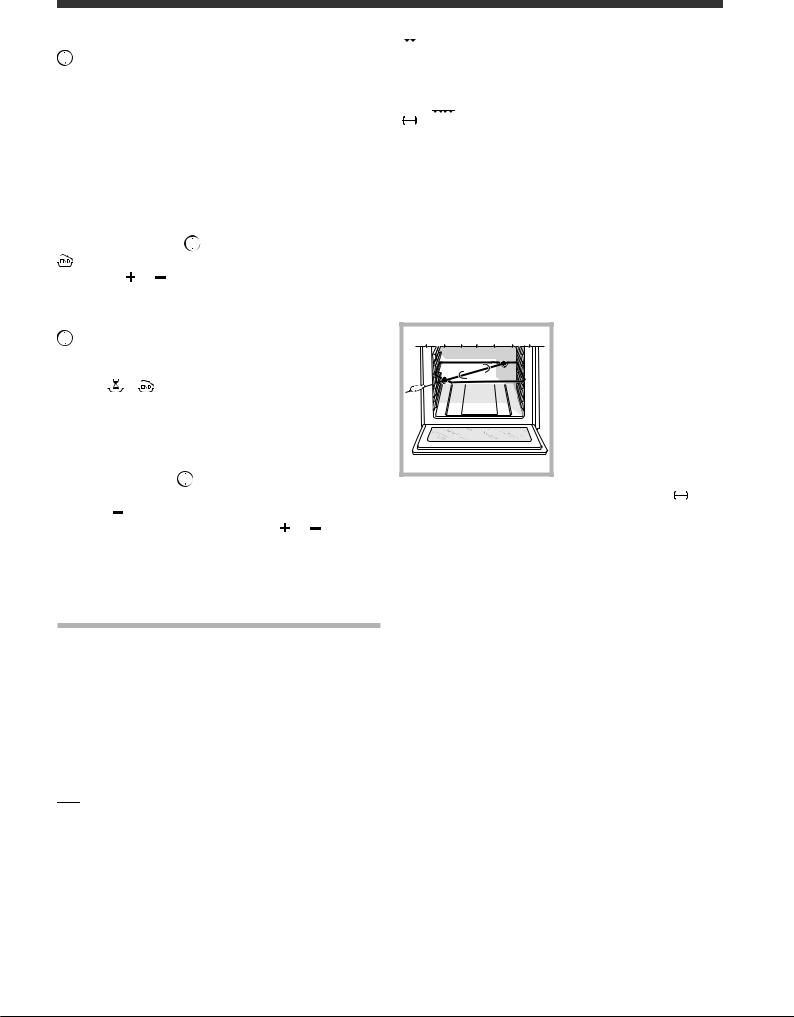
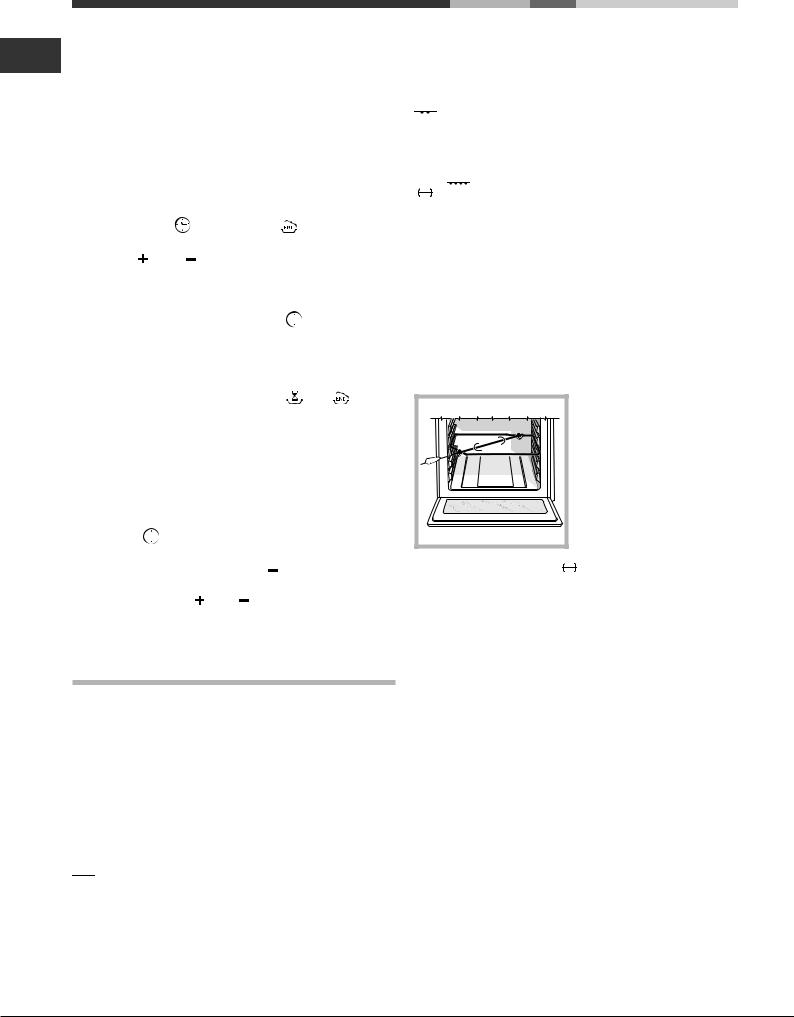
! Quando si inserisce la griglia assicurarsi che il fermo sia nella parte posterioredellacavità(vedi immagine).
! Alla prima accensione fare funzionare il forno a vuoto per almeno un’ora con il termostato al massimo e a porta chiusa. Poi spegnere, aprire la porta del forno e aerare il locale. L’odore che si avverte è dovuto all’evaporazione delle sostanze usate per proteggere il forno.
Avviare il forno
1.Selezionare il programma di cottura desiderato ruotando la manopola PROGRAMMI.
2.Scegliere la temperatura ruotando la manopola TERMOSTATO. Una lista con le cotture e le relative temperature consigliateèconsultabilenellaTabellacottura(vediProgrammi).
3.La spia TERMOSTATO accesa indica la fase di riscaldamento fino alla temperatura impostata.
4.Durante la cottura è sempre possibile:
-modificareilprogrammadicotturaagendosullamanopola PROGRAMMI;
-modificare la temperatura agendo sulla manopola
TERMOSTATO;
-interrompere la cottura riportando la manopola PROGRAMMI in posizione “0”.
!Non appoggiare mai oggetti sul fondo del forno perché si rischiano danni allo smalto.
!Porre sempre i recipienti di cottura sulla griglia in dotazione.
Ventilazione di raffreddamento
Per ottenere una riduzione delle temperature esterne, alcuni modelli sono dotati di una ventola di raffreddamento. Questa genera un getto d’aria che esce tra il pannello di controllo e la porta del forno.
! A fine cottura la ventola rimane attiva finché il forno non è sufficientemente freddo.
Luce del forno |
|
Si accende selezionando |
con la manopola |
PROGRAMMI. Rimane accesa quando si seleziona un programma di cottura.
Utilizzare il timer*
1.Occorre anzitutto caricare la suoneria, ruotando la manopola TIMER di un giro quasi completo in senso orario.
2.Tornando indietro in senso antiorario, impostare il tempo desiderato facendo coincidere l’indice della manopola TIMER con il tempo indicato sul pannello di controllo.
3.Il timer è un contaminuti: a tempo scaduto emette un segnale acustico.
! Il timer non controlla l’accensione e lo spegnimento del forno.
* Presente solo in alcuni modelli.
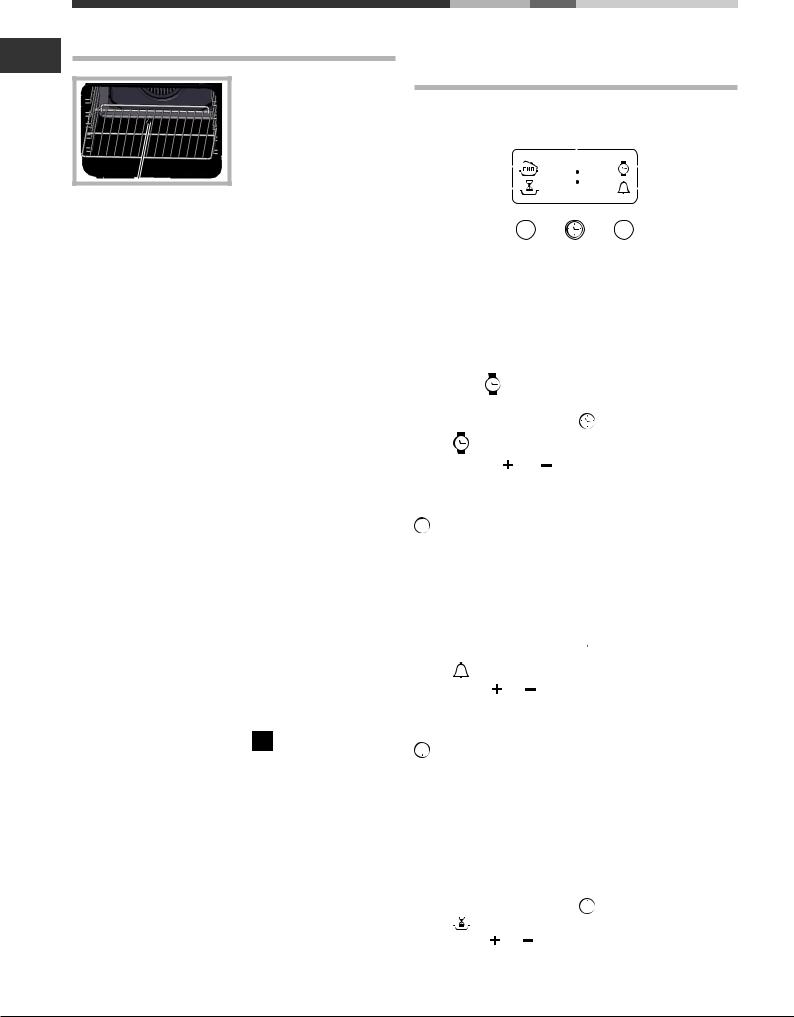
Il programmmatore di cottura elettronico *
|
|
|
|
|
|
DISPLAY |
Icona |
|||||
|
|
|
|
|
|
|||||||
|
|
|
|
|
|
|
|
|
|
|||
Icona |
|
|
|
•• •• |
|
|
||||||
|
|
|
|
|||||||||
FINE COTTURA |
|
|
|
OROLOGIO |
||||||||
Icona |
|
|
|
|
Icona |
|||||||
|
|
|
||||||||||
DURATA |
|
|
|
|
|
|
|
|
CONTAMINUTI |
|||
Tasto |
|
|
|
|
|
|
|
|
|
|
|
Tasto |
|
|
|
|
|
|
|
|
|||||
DIMINUZIONE |
|
|
|
|
|
|
|
|
AUMENTO |
|||
TEMPI |
|
|
Tasto |
TEMPI |
||||||||
|
|
|
|
|
|
IMPOSTAZIONE |
|
|||||
|
|
|
|
|
|
TEMPI |
|
|||||
|
|
|
|
|
|
|
||||||
|
|
|
|
|
|
|
|
|
|
|
|
|
Impostare l’orologio
! Si può impostare sia quando il forno è spento che quando
è acceso, ma non si è programmata la fine di una cottura.
Dopo l’allacciamento alla rete elettrica o dopo un black-
out, l’icona |
e i quattro digit numerici sul DISPLAY |
|
lampeggiano. |
|
|
1. Premere più volte il tasto |
finchè non lampeggiano |
|
l’icona e i quattro digit numerici sul DISPLAY;
2.con i tasti “ ” e “ ” regolare l’ora; se si tengono premuti, i numeri scorrono più velocemente per facilitare l’impostazione.
3.attendere 10 sec oppure premere nuovamente il tasto
 per fissare l’impostazione.
Impostare il contaminuti
! Questa funzione non interrompe la cottura e prescinde dall’utilizzo del forno; permette solo di azionare il segnale acustico allo scadere dei minuti impostati.
1. Premere più volte il tasto finchè non lampeggiano l’icona e i tre digit numerici sul DISPLAY;
2.con i tasti “ ” e “ ” regolare il tempo desiderato; se si tengono premuti, i numeri scorrono più velocemente per facilitare l’impostazione.
3.attendere 10 sec oppure premere nuovamente il tasto
 per fissare l’impostazione.
Seguirà la visualizzazione del conto alla rovescia al termine del quale si azionerà il segnale acustico.
Programmare la cottura
! La programmazione è possibile solo dopo aver selezionato un programma di cottura.
Programmare la durata di cottura
1.Premere più volte il tasto finchè non lampeggiano l’icona e i tre digit numerici sul DISPLAY;
2.con i tasti “ ” e “ ” regolare la durata desiderata; se si tengono premuti, i numeri scorrono più velocemente per facilitare l’impostazione.
16
3. attendere 10 sec oppure premere nuovamente il tasto
 per fissare l’impostazione.
4. a tempo scaduto, sul DISPLAY compare la scritta END, il forno termina la cottura e viene emesso un segnale acustico.
•Esempio: sono le 9:00 e viene programmata una durata di 1 ora e 15 minuti. Il programma si arresta automaticamente alle 10:15.
Programmare la fine di una cottura
! La programmazione della fine di una cottura è possibile solo dopo aver impostato una durata di cottura.
1.Seguire la procedura da 1 a 3 descritta per la durata;
2.poi premere il tasto finchè non lampeggiano l’icona e i quattro digit numerici sul DISPLAY;
3.con i tasti “ ” e “ ”regolarel’oradifinecotturadesiderata; se si tengono premuti i numeri, scorrono più velocemente per facilitare l’impostazione.
4.attendere 10 sec oppure premere nuovamente il tasto
 per fissare l’impostazione.
5. a tempo scaduto, sul DISPLAY compare la scritta END, il forno termina la cottura e viene emesso un segnale acustico. Le icone e accese segnalano che è stata effettuata una programmazione. Sul DISPLAY vengono visualizzate alternativamente l’ora di fine cottura e la durata.
Annulare una programmazione
Per annullare una programmazione:
•premere il tasto  finchè non lampeggia l’icona dell’impostazione da annullare e i digit sul display. Premere il tasto “ ”finchèsuldisplaynoncompaionolecifre00:00.
•premerecontemporaneamenteitasti“ ” e ” ”;inquesto modo si annullano tutte le programmazioni effettuate contaminuti compreso.
Programmi
! Per tutti i programmi è impostabile una temperatura tra 60°C e MAX, tranne:
• GRILL (si consiglia di impostare solo su MAX);
 Programma FORNO TRADIZIONALE
Si attivano i due elementi riscaldanti inferiore e superiore. Con questa cottura tradizionale è meglio utilizzare un solo ripiano: con più ripiani si ha una cattiva distribuzione della temperatura.


 Programma FORNO DOLCE
Si accende l’elemento riscaldante inferiore.
Questa funzione è indicata per la cottura di cibi delicati, in particolare i dolci che necessitano di lievitazione, in quanto viene facilitata dal calore proveniente dal basso.
Viene fatto notare che le temperature più elevate vengono raggiunte in tempi piuttosto lunghi, pertanto in questi casi è consigliabile utilizzare la funzione “Forno Tradizionale”.
|
Programma FORNO SOPRA |
IT |
|
||
Si accende l’elemento riscaldante superiore. Questa |
|
|
|
||
funzione può essere utilizzata per ritocchi di cottura. |
|
|
 /
/  Programma GRILL
Si accende l’elemento riscaldante superiore. La temperatura assai elevata e diretta del grill consente la immediata rosolatura superficiale dei cibi che, ostacolando la fuoriuscita dei liquidi, li mantiene più teneri internamente. La cottura al grill è particolarmente consigliata per quei piatti che necessitano di elevatatemperaturasuperficiale:bistecchedivitelloemanzo, entrecôte, filetto, hamburger etc... Alcuni esempi di utilizzo sono riportati al paragrafo “Consigli pratici per la cottura”. Effettuare le cotture con la porta del forno chiusa.
Girarrosto*
Per azionare il girarrosto
(vedi figura) procedere
come segue:
1. mettere la leccarda in
posizione 1;
2. mettere il sostegno del girarrosto in posizione 3 e inserire lo spiedo
nell’apposito foro posto sulla parete posteriore del forno;
3. azionare il girarrosto selezionando con la manopola il PROGRAMMA  ;
;
Consigli pratici di cottura
!Nelle cotture ventilate non utilizzare le posizioni dei ripiani 1 e 5: sono investite direttamente dall’aria calda, che potrebbe provocare bruciature sui cibi delicati.
!Nelle cotture GRILL, disporre la leccarda in posizione 1 per raccogliere i residui di cottura (sughi e/o grassi).
GRILL
•Inserire la griglia in posizione 3 o 4, disponendo gli alimenti al centro della griglia.
•Si consiglia di impostare il livello di energia al massimo.
Non allarmarsi se la resistenza superiore non resta costantemente accesa: il suo funzionamento è controllato da un termostato.
17
IT |
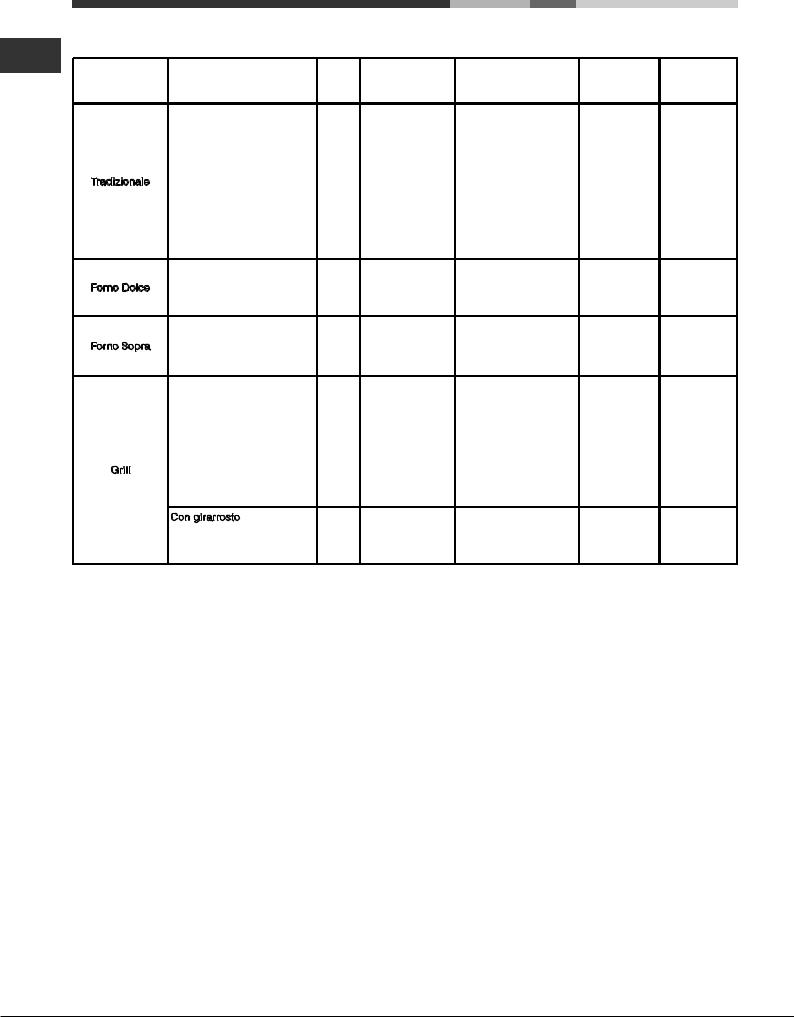
Tabella cottura |
|
|
|
|
|
||
Programmi |
Alimenti |
Peso |
Posizione |
Preriscaldamento |
Temperatura |
Durata |
||
|
||||||||
|
|
|
(Kg) |
dei ripiani |
(minuti) |
consigliata |
cottura |
|
|
|
|
|
|
|
|
(minuti) |
|
|
|
Anatra |
1 |
3 |
15 |
200 |
65-75 |
|
|
|
Arrosto di vitello o manzo |
1 |
3 |
15 |
200 |
70-75 |
|
|
|
Arrosto di maiale |
1 |
3 |
15 |
200 |
70-80 |
|
|
|
Biscotti (di frolla) |
- |
3 |
15 |
180 |
15-20 |
|
|
|
Crostate |
1 |
3 |
15 |
180 |
30-35 |
|
|
Tradizionale |
Lasagne |
1 |
3 |
10 |
190 |
35-40 |
|
|
Agnello |
1 |
2 |
10 |
180 |
50-60 |
||
|
|
|||||||
|
|
Sgombro |
1 |
2 |
10 |
180 |
30-35 |
|
|
|
Plum-cake |
1 |
2 |
10 |
170 |
40-50 |
|
|
|
Bignè |
0.3 |
3 |
10 |
180 |
30-35 |
|
|
|
Pan di spagna |
0.5 |
3 |
10 |
170 |
20-25 |
|
|
|
Torte salate |
1.5 |
3 |
15 |
200 |
30-35 |
|
|
|
Torte lievitate |
0,5 |
3 |
15 |
160 |
30-40 |
|
|
Forno Dolce |
Crostate |
1 |
3 |
15 |
180 |
35-40 |
|
|
Torte di frutta |
1 |
3 |
15 |
180 |
50-60 |
||
|
|
|||||||
|
|
Brioches |
0,5 |
3 |
15 |
160 |
25-30 |
|
|
Forno Sopra |
Ritocchi di cottura |
- |
3/4 |
15 |
220 |
- |
|
|
|
Sogliole e seppie |
1 |
4 |
5 |
Max |
8-10 |
|
|
|
Spiedini di calamari e |
1 |
4 |
5 |
Max |
6-8 |
|
|
|
gamberi |
||||||
|
|
Filetto di merluzzo |
1 |
4 |
5 |
Max |
10 |
|
|
|
Verdure alla griglia |
1 |
3/4 |
5 |
Max |
10-15 |
|
|
|
Bistecca di vitello |
1 |
4 |
5 |
Max |
15-20 |
|
|
Grill |
Cotolette |
1 |
4 |
5 |
Max |
15-20 |
|
|
Hamburger |
1 |
4 |
5 |
Max |
7-10 |
||
|
|
Sgombri |
1 |
4 |
5 |
Max |
15-20 |
|
|
|
Toast |
n.° 4 |
4 |
5 |
Max |
2-3 |
|
|
|
Con girarrosto (ove presente) |
|
|
|
|
|
|
|
|
Vitello allo spiedo |
1.0 |
- |
5 |
Max |
80-90 |
|
|
|
Pollo allo spiedo |
1.5 |
- |
5 |
Max |
70-80 |
|
|
|
Agnello allo spiedo |
1.0 |
- |
5 |
Max |
70-80 |
|
18

Precauzioni e consigli
! L’apparecchio è stato progettato e costruito in conformità alle norme internazionali di sicurezza.
Queste avvertenze sono fornite per ragioni di sicurezza e devono essere lette attentamente.
Sicurezza generale
•L’apparecchio è stato concepito per un uso di tipo non professionale all’interno dell’abitazione.
•L’apparecchio non va installato all’aperto, nemmeno se lo spazio è riparato, perché è molto pericoloso lasciarlo esposto a pioggia e temporali.
•Per movimentare l’apparecchio servirsi sempre delle apposite maniglie poste sui fianchi del forno.
•Non toccare l’apparecchio a piedi nudi o le mani o i piedi bagnati o umidi.
•L’apparecchio deve essere usato per cuocere alimenti, solo da persone adulte e secondo le istruzioni riportate in questo libretto. Ogni altro uso (ad esempio: riscaldamento di ambienti) è da considerarsi improprio e quindi pericoloso. Il costruttore non può essere considerato responsabile per eventuali danni derivanti da usi impropri, erronei ed irragionevoli.
•Durante l’uso dell’apparecchio gli elementi riscaldanti e alcune parti della porta forno diventano molto calde. Fare attenzione a non toccarle e tenere i bambimi a distanza.
•Evitarecheilcavodialimentazionedialtrielettrodomestici entri in contatto con parti calde del forno.
•Non ostruire le aperture di ventilazione e di smaltimento di calore.
•Impugnare la maniglia di apertura della porta al centro: ai lati potrebbe essere calda.
•Utilizzare sempre guanti da forno per inserire o estrarre recipienti.
•Non rivestire il fondo del forno con fogli di alluminio.
•Non riporre materiale infiammabile nel forno: se l’apparecchio viene messo inavvertitamente in funzione potrebbe incendiarsi.
•Assicurarsi sempre che le manopole siano nella posizione “●”/“○” quando l’apparecchio non è utilizzato.
•Non staccare la spina dalla presa della corrente tirando il cavo, bensì afferrando la spina.
•Non fare pulizia o manutenzione senza aver prima staccato la spina dalla rete elettrica.
•In caso di guasto, in nessun caso accedere ai meccanismi interni per tentare una riparazione.
Contattare l’Assistenza (vedi Assistenza).
•Non appoggiare oggetti sulla porta del forno aperta.
•Evitare che i bambini giochino con l’apparecchio.
•Non è previsto che l’apparecchio venga utilizzato da persone (bambini compresi) con ridotte capacità fisiche, sensoriali o mentali, da persone inesperte o che non abbiano familiarità con il prodotto, a meno che non vengano sorvegliate da una persona responsabile della loro sicurezza o non abbiano ricevuto istruzioni preliminari sull’uso dell’apparecchio.
•L’apparecchio non è destinato a essere messo in funzione per mezzo di un temporizzatore esterno oppurediunsistemadicomandoadistanzaseparato.
Smaltimento |
|
|
IT |
||
• Smaltimento del materiale di imballaggio: attenersi |
||
alle norme locali, così gli imballaggi potranno essere |
|
|
|
||
riutilizzati. |
|
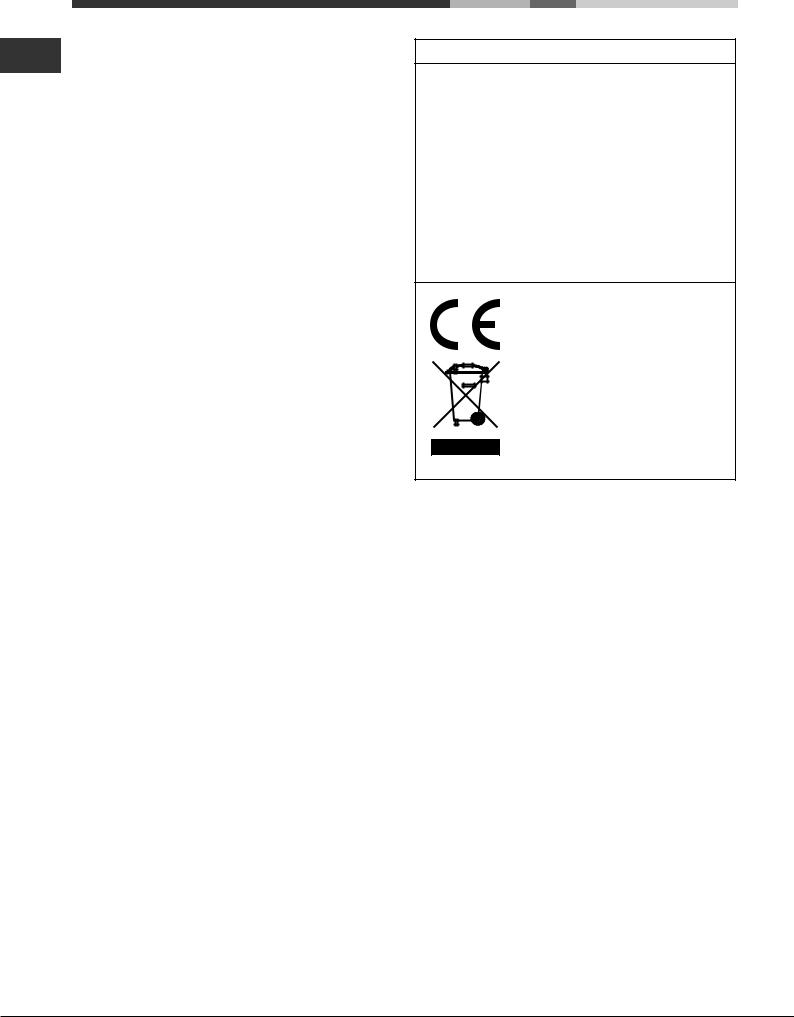
•La direttiva Europea 2002/96/CE sui rifiuti di apparecchiature elettriche ed elettroniche (RAEE), prevede che gli elettrodomestici non debbano essere smaltiti nel normale flusso dei rifiuti solidi urbani. Gli apparecchi dismessi devono essere raccolti separatamente per ottimizzare il tasso di recupero e riciclaggio dei materiali che li compongono ed impedire potenziali danni per la salute e l’ambiente. Il simbolo del cestino barrato è riportato su tutti i prodotti per ricordare gli obblighi di raccolta separata. Per ulteriori informazioni, sulla corretta dismissione degli elettrodomestici, i detentori potranno rivolgersi al servizio pubblico preposto o ai rivenditori.
Risparmiare e rispettare l’ambiente
•Azionando il forno negli orari che vanno dal tardo pomeriggio fino alle prime ore del mattino si collabora a ridurre il carico di assorbimento delle aziende elettriche. Le opzioni di programmazione dei programmi, in particolar modo la “cottura ritardata” (vedi Programmi), permettono di organizzarsi in tal senso.
•Si raccomanda di effettuare sempre le cotture al GRILL a porta chiusa: sia per ottenere migliori risultati che per un sensibile risparmio di energia (10% circa).
•Mantenere efficienti e pulite le guarnizioni, in modo che aderiscano bene alla porta e non procurino dispersioni di calore.
Manutenzione e cura
Escludere la corrente elettrica
Prima di ogni operazione isolare l’apparecchio dalla rete di alimentazione elettrica.
Pulire l’apparecchio
•Lepartiesternesmaltateoinoxeleguarnizioniingomma possono essere pulite con una spugnetta imbevuta di acqua tiepida, e sapone neutro. Se le macchie sono difficili da asportare usare prodotti specifici. Si consiglia di sciacquare abbondantemente e di asciugare dopo la pulizia. Non usare polveri abrasive o sostanze corrosive.
•L’interno del forno va pulito preferibilmente ogni volta dopo l’uso, quando è ancora tiepido. Usare acqua calda e detersivo, risciaquare e asciugare con un panno morbido. Evitare gli abrasivi.
•Gli accessori possono essere lavati come normali stoviglie, anche in lavastoviglie ad eccezione delle guide scorrevoli.
! Non utilizzare mai pulitori a vapore o ad alta pressione per la pulizia dell’apparecchio.
19
|
|
|
|
|
|
|
Pulire la porta |
||||
IT |
|||||
|
Pulire il vetro della porta con spugne e prodotti non abrasivi |
||||
|
e asciugare con un panno morbido; non usare materiali |
||||
|
|||||
|
ruvidi abrasivi o raschietti metallici affilati che possono |
||||
|
graffiare la superficie e causare la frantumazione del vetro. |
||||
|
Per una pulizia più accurata è possibile smontare la porta |
||||
|
del forno: |
||||
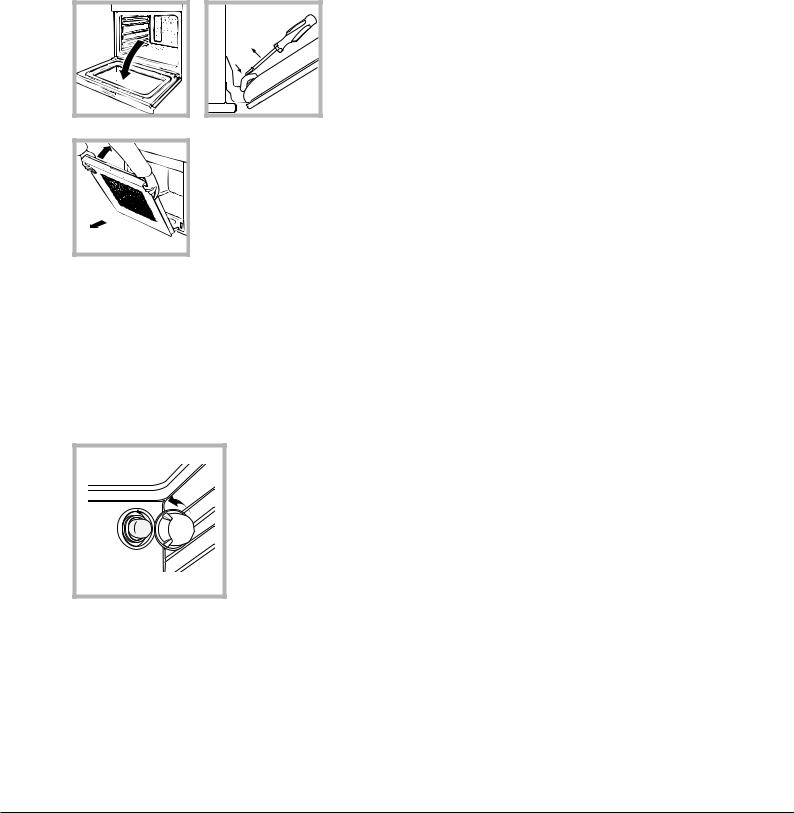
1.aprire completamente la porta (vedi figura);
2.servendosi di un cacciavite, alzare e ruotare le levette F poste sulle due cerniere (vedi figura);
F |
3. afferrare la porta ai due lati esterni, richiudendola lentamente ma non del tutto. Poi tirare la porta verso di sé estraendola dalla sua sede (vedi figura).
Rimontare la porta seguendo il procedimento in senso contrario.
Controllare le guarnizioni
Controllare periodicamente lo stato della guarnizione attorno alla porta del forno. In caso risulti danneggiata rivolgersi al Centro Assistenza più vicino (vedi Assistenza). È consigliabilenonusareilfornofinoall’avvenutariparazione.
Sostituire la lampadina
Per sostituire la lampadina di illuminazione del forno 1. Svitare il coperchio in vetro del portalampada.
2. Svitare la lampadina e sostituirla con una analoga: potenza 25 W, attacco E 14. 3. Rimontare il coperchio
(vedi figura)
! Non utilizzare la lampada forno per e come illuminazione di ambienti.
20

Installation
!Please keep this instruction booklet in a safe place for future reference. If the appliance is sold, given away or moved, please make sure the booklet is also passed on to the new owners so that they may benefit from the advice contained within it.
!Please read this instruction manual carefully: it contains important information concerning the safe operation, installation and maintenance of the appliance.
Positioning
!Do not let children play with the packaging material; it should be disposed of in accordance with local separated waste collection standards (see Precautions and tips).
!Theappliancemustbeinstalledbyaqualifiedprofessionalin accordance with the instructions provided. Incorrect installation may damage property or cause harm to people or animals.
Built-in appliances
Use an appropriate cabinet to ensure that the appliance operates properly:
•The panels adjacent to the oven must be made of heatresistant material.
•Cabinets with a veneer exterior must be assembled with glues which can withstand temperatures of up to 100°C.
•To install the oven under the counter (see diagram) or in a kitchen unit, the cabinet must have the following dimensions:
|
|
|
|
|
|
. |
|
|
|
|
23 mm. |
|
.min |
|
|
|
|
|
|
mm |
|
|
|
mm.595 |
|
|
mm.567 |
547 |
|
575-585 mm. |
|
|
|
558 |
mm. |
||||
|
|
|
|
|
|
||
|
|
|
|
|
|
|
|
|
595 |
|
5 mm. |
|
|
|
|
|
mm. |
|
. |
|
|
|
|
|
|
|
mm |
|
|
|
|
|
|
|
545 |
|
|
|
|
|
|
. |
|
|
|
|
|
|
|
mm |
|
|
|
|
|
|
25 |
|
|
|
|
|
|
* Stainless steel models only
! The appliance must not come into contact with electrical parts once it has been installed.
The indications for consumption given on the data plate have been calculated for this type of installation.
Ventilation
To ensure adequate ventilation, the back panel of the cabinet must be removed. It is advisable to install the oven so that it rests on two strips of wood, or on a completely flat surface with an opening of at least 45 x 560 mm (see diagrams).
|
|
GB |
mm |
45 |
mm. |
. |
|
|
560 |
|
|
Centring and fixing
Secure the appliance to the cabinet by opening the oven door and inserting 4 screws into the 4 holes on the outer frame.
! All parts which ensure the safe operation of the appliance must not be removable without the aid of a tool.
Electrical connection
Ovens equipped with a three-pole power supply cable are designed to operate with alternating current at the voltage and frequency indicated on the data plate located on the appliance (see below).
Fitting the power supply cable
L |
N
1.Open the terminal board by inserting a screwdriver into the side tabs of the cover. Use the screwdriver as a lever by pushing it downtoopenthecover(see diagram).
2.Install the power supply cable by loosening the cable clamp screw and the three wire contact screws
L-N- .
.
Connect the wires to the corresponding terminals: the Blue wire to the terminal marked (N), the Brown wire to the terminal marked (L) and the Yellow/Green wire
to the terminal marked 
(see diagram).
3.Secure the cable by fastening the clamp screw.
4.Close the cover of the terminal board.
21
Connecting the supply cable to the mains
GB Install a standardised plug corresponding to the load indicated on the data plate (see table).
The appliance must be directly connected to the mains using an omnipolar switch with a minimum contact opening of 3 mm installed between the appliance and the mains. The switch must be suitable for the charge indicated and must complywithcurrentelectricalregulations(theearthingwire must not be interrupted by the switch). The supply cable must be positioned so that it does not come into contact with temperatures higher than 50°C at any point (the back panel of the oven, for example).
! The installer must ensure that the correct electrical connection has been performed and that it is fully compliant with safety regulations.
Before connecting the appliance to the power supply, make sure that
•The appliance is earthed and the plug is compliant with the law.
•The socket can withstand the maximum power of the appliance, which is indicated on the data plate.
•The voltage is in the range between the values indicated on the data plate.
•The socket is compatible with the plug of the appliance.
If the socket is incompatible with the plug, ask an authorised technician to replace it. Do not use extension cords or multiple sockets.
!Once the appliance has been installed, the power supply cable and the electrical socket must be easily accessible.
!The cable must not be bent or compressed.
!The cable must be checked regularly and replaced by authorised technicians only (see Assistance).
!The manufacturer declines any liability should these safety measures not be observed.
APPLIANCE SPECIFICATIONS
Dimensions* |
width 43.5 cm |
|||||
height 32,4 cm |
||||||
|
depth 45.0 cm |
|||||
Volume* |
65 l |
|||||
|
|
|
|
|
|
|
Electrical |
voltage: 220-240V~ 50/60 Hz or 50Hz |
|||||
(see data plate) maximum power |
||||||
connections |
||||||
absorbed 2250 W |
||||||
|
||||||
|
|
|
|
|
|
|
|
Directive 2002/40/EC on the label |
|||||
|
of electric ovens. Standard EN 50304 |
|||||
ENERGY |
Energy consumption for Natural |
|||||
LABEL |
||||||
convection – heating mode: |
|
|
|
|
||
|
|
|
|
|
||
|
Traditional mode |
|
|
|
|
|
This appliance conforms to the following European Economic Community directives:
- 2006/95/EEC dated 12/12/06 (Low Voltage) and subsequent amendments. - 2004/108/EEC dated 03/05/89 (Electromagnetic Compatibility) and subsequent amendments.
- 93/68/EEC dated 22/07/93 and subsequent amendments.
-2002/96/EC and subsequent amendments.
-1275/2008 standby/off mode.
22
Start-up and use
! When inserting the shelf make sure the backstop is attherearofthecavity(see image).
! The first time you use your appliance, heat the empty oven with its door closed at its maximum temperature for at least half an hour. Ensure that the room is well ventilated before switching the oven off and opening the oven door. The appliance may emit a slightly unpleasant odour caused by protective substances used during the manufacturing process burning away.
Starting the oven
1.Select the desired cooking mode by turning the SELECTOR knob.
2.Select the desired temperature with the THERMOSTAT knob. See the Cooking advice table for cooking modes and thesuggestedcookingtemperatures(seeCookingModes).
3.When lit, the THERMOSTAT indicator light indicates that the oven is heating up to the temperature set.
4.You may do the following during cooking:
-change the cooking mode by turning the SELECTOR knob.
-change the temperature by turning the THERMOSTAT knob.
-stop cooking by turning the SELECTOR knob to the “0” position.
!Never put objects directly on the bottom of the oven; this will avoid the enamel coating being damaged.
!Always place cookware on the rack(s) provided.
Cooling ventilation
In order to cool down the external temperature of the oven, some models are fitted with a cooling fan that blows out air between the control panel and the oven door.
! Once cooking has been completed, the cooling fan continues to operate until the oven has cooled down sufficiently.
Oven light |
|
It goes on when selecting |
with the SELECTOR knob. |
It stays on when a cooking mode is selected.
How to use the timer*
1.To set the buzzer, turn the TIMER knob clockwise almost one complete revolution.
2.Turn the knob anticlockwise to set the desired time: align the minutes shown on the TIMER knob with the indicator on the control panel.
3.The timer operates in minutes: when the selected time has elapsed, a buzzer will sound.
! The timer does not turn the oven on or off.
* Only available in certain models.
The electronic programmer* GB
|
|
|
|
|
|
DISPLAY |
|
|
|
|
|
|
|
|
|
|
|
|
|
|
|
|
|
||
|
|
|
|
|
|
|
|
|
|
|
||
END OF |
|
|
|
•• •• |
|
|
|
|
CLOCK icon |
|||
|
|
|
|
|
|
|||||||
COOKING icon |
|
|
|
|
|
|
||||||
DURATION |
|
|
|
|
|
|
|
TIMER icon |
||||
|
|
|
|
|
|
|||||||
icon |
|
|
|
|
|
|
|
|
|
|||
DECREASE TIME |
|
|
|
|
|
|
|
|
|
|
|
INCREASE TIME |
|
|
|
|
|||||||||
|
|
|
|
|
|
|
|
|
||||
button |
|
|
SET TIME |
|
|
|
|
button |
||||
|
|
|
|
|
|
|
|
|
|
|
||
|
|
|
|
|
|
button |
|
|
|
|
|
|
|
|
|
|
|
|
|
|
|
|
|
||
|
|
|
|
|
|
|
|
|
|
|
|
|
Setting the clock
! The clock may be set when the oven is switched off or when it is switched on, provided that a the end time of a cooking cycle has not been programmed previously.
After the appliance has been connected to the mains, or
after a blackout, the |
icon and the four numerical digits |
||
on the DISPLAY will begin to flash. |
|
||
1. Press the |
button several times until the |
icon and |
|
the four digits on the display begin to flash. |
|
||
2.Use the “ ” and “ ” buttons to adjust the time; if you press and hold either button, the display will scroll through the values more quickly, making it quicker and easier to set the desired value.
3.Wait for 10 seconds or press the button again to finalise the setting.
Setting the timer
! This function does not interrupt cooking and does not affect the oven; it is simply used to activate the buzzer when the set amount of time has elapsed.
1. Press the |
button several times until the |
icon and |
the three digits on the display begin to flash. |
|
|
2.Use the “ ” and “ ”buttonstosetthedesiredtime;ifyoupress and hold either button, the display will scroll through the values more quickly, making it quicker and easier to set the value.
3.Wait for 10 seconds or press the button again to finalise the setting.
The display will then show the time as it counts down. When this period of time has elapsed the buzzer will be activated.
Programming cooking
! A cooking mode must be selected before programming can take place.
Programming the cooking duration |
|
|
1. Press the |
button several times until the |
icon and |
the three digits on the DISPLAY begin to flash. |
|
|
2.Use the “ ” and “ ” buttons to set the desired duration; if you press and hold either button, the display will scroll through the values more quickly, making it quicker and easier to set the value.
3.Wait for 10 seconds or press the button again to finalise the setting.
23
4. When the set time has elapsed, the text END appears GB on the DISPLAY, the oven will stop cooking and a buzzer
sounds. Press any button to stop it.
•For example: it is 9:00 a.m. and a time of 1 hour and
15 minutes is programmed. The programme will stop automatically at 10:15 a.m.
Setting the end time for a cooking mode
! A cooking duration must be set before the cooking end time can be scheduled.
1. Follow steps 1 to 3 to set the duration as detailed above.
2. Next, press the |
button until the |
icon and the four |
digits on the DISPLAY begin to flash. |
|
|
3.use the “ ” and “ ” buttons to adjust the cooking end time; if you press and hold either button, the display will scroll through the values more quickly, making it quicker and easier to set the desired value.
4.Wait for 10 seconds or press the button again to finalise the setting.
5.When the set time has elapsed, the text END appears on the DISPLAY, the oven will stop cooking and a buzzer sounds.Press any button to stop it.
Programming has been set when the and buttons are illuminated. The DISPLAY shows the cooking end time and the cooking duration alternately.
•For example: It is 9:00 a.m. and a duration of 1 hour has been programmed. 12:30 is scheduled as the end time. The programme will start automatically at 11:30 a.m.
Cancelling a programme
To cancel a programme:
•press the button until the icon corresponding to the setting you wish to cancel and the digits on the display arenolongerflashing.Pressthe“ ” button until the digits 00:00 appear on the display.
•Pressandholdthe“ ” and “ ”buttons;thiswillcancelall the settings selected previously, including timer settings.
Cooking modes
! A temperature value can be set for all cooking modes between 60°C and Max, except for
• GRILL (recommended: set only to MAX power level);
 TRADITIONAL OVEN mode
Both the top and bottom heating elements will come on. With this traditional cooking mode, it is best to use one cooking rack only; if more than one rack is used, the heat will be distributed unevenly.


 PASTRY mode
The bottom heating element comes on.
This mode is ideal for baking and cooking delicate foods - especially cakes that need to rise because the heat coming from the bottom helps the leavening process.
Please note that it takes a considerable amount of time for the higher temperatures to be reached, therefore we recommend you use the “TRADITIONAL OVEN” in these cases.

 TOP OVEN mode
The top heating element comes on. This mode can be used to brown food at the end of cooking.
 /
/  GRILL mode
The top heating element comes on. The extremely high and direct temperature of the grill makes it possible to brown the surface of meats and roasts while locking in the juices to keep them tender. The grill is also highly recommended for dishes that require a high temperature on the surface: such as beef steaks, veal, rib steak, filets, hamburgers etc... Some grilling examples are included in the “Practical Cooking Advice” paragraph. Always cook in this mode with the oven door closed.
Rotisserie spit*
To operate the rotisserie function (see diagram)
proceed as follows:
1. Place the dripping pan in
position 1.
2. Place the rotisserie support in position 3 and insert the spit in the hole
provided on the back panel of the oven.
3. Start the rotisserie using the knob to select MODE  ;
;
Practical cooking advice
!Do not place racks in position 1 and 5 during fan-assisted cooking. Excessive direct heat can burn temperature sensitive foods.
!In the GRILL cooking modes, place the dripping pan in position 1 to collect cooking residues (fat and/or grease).
GRILL
•Insert the rack in position 3 or 4. Place the food in the centre of the rack.
•We recommend that you set the maximum power level.
The top heating element is regulated by a thermostat and may not always be on.
* Only available in certain models.
24
|
|
|
|
|
|
|
|
|
Cooking advice table |
|
|
|
|
|
|
|
|
|
|
|
|
|
|
GB |
||
Cooking |
|
Weight |
Rack |
Pre-heating |
Recommended |
Cooking |
|
|
Foods |
time |
|
|
|||||
modes |
(in kg) |
position |
time (min) |
temperature |
|
|||
|
(minutes) |
|
|
|||||
|
|
|
|
|
|
|
||
|
Duck |
1 |
3 |
15 |
200 |
65-75 |
|
|
|
Roast veal or beef |
1 |
3 |
15 |
200 |
70-75 |
|
|
|
Pork roast |
1 |
3 |
15 |
200 |
70-80 |
|
|
|
Biscuits (short pastry) |
- |
3 |
15 |
180 |
15-20 |
|
|
Convection |
Tarts |
1 |
3 |
15 |
180 |
30-35 |
|
|
Lasagne |
1 |
3 |
10 |
190 |
35-40 |
|
|
|
Oven |
Lamb |
1 |
2 |
10 |
180 |
50-60 |
|
|
|
Mackerel |
1 |
2 |
10 |
180 |
30-35 |
|
|
|
Plum-cake |
1 |
2 |
10 |
170 |
40-50 |
|
|
|
Cream puffs |
0.3 |
3 |
10 |
180 |
30-35 |
|
|
|
Sponge-cake |
0.5 |
3 |
10 |
170 |
20-25 |
|
|
|
Savoury pies |
1.5 |
3 |
15 |
200 |
30-35 |
|
|
|
Raised Cakes |
0,5 |
3 |
15 |
160 |
30-40 |
|
|
Pastry Mode |
Tarts |
1 |
3 |
15 |
180 |
35-40 |
|
|
Fruit cakes |
1 |
3 |
15 |
180 |
50-60 |
|
|
|
|
|
|
||||||
|
Brioches |
0,5 |
3 |
15 |
160 |
25-30 |
|
|
Top oven |
Browning food to perfect cooking |
- |
3/4 |
15 |
220 |
- |
|
|
|
|
|
|
|
|
|
|
|
|
Soles and cuttlefish |
1 |
4 |
5 |
Max |
8-10 |
|
|
|
Squid and prawn kebabs |
1 |
4 |
5 |
Max |
6-8 |
|
|
|
Cod filet |
1 |
4 |
5 |
Max |
10 |
|
|
|
Grilled vegetables |
1 |
¾ |
5 |
Max |
10-15 |
|
|
|
Veal steak |
1 |
4 |
5 |
Max |
15-20 |
|
|
|
Cutlets |
1 |
4 |
5 |
Max |
15-20 |
|
|
Grill |
Hamburgers |
1 |
4 |
5 |
Max |
7-10 |
|
|
|
Mackerels |
1 |
4 |
5 |
Max |
15-20 |
|
|
|
Toasted sandwiches |
n.° 4 |
4 |
5 |
Max |
2-3 |
|
|
|
With rotisserie (where present) |
1.0 |
- |
5 |
Max |
80-90 |
|
|
|
Veal on the spit |
|
|
|||||
|
Chicken on the spit |
1.5 |
- |
5 |
Max |
70-80 |
|
|
|
Lamb on the spit |
1.0 |
- |
5 |
Max |
70-80 |
|
|
25

GB Precautions and tips
! This appliance has been designed and manufactured in compliance with international safety standards. The following warnings are provided for safety reasons and must be read carefully.
General safety
•The appliance was designed for domestic use inside the home and is not intended for commercial or industrial use.
•The appliance must not be installed outdoors, even in covered areas. It is extremely dangerous to leave the appliance exposed to rain and storms.
•When moving or positioning the appliance, always use the handles provided on the sides of the oven.
•Do not touch the appliance while barefoot or with wet or damp hands and feet.
•The appliance must be used by adults only for the preparation of food, in accordance with the instructions provided in this booklet. Any other use of the appliance (e.g. for heating the room) constitutes improper use and is dangerous. The manufacturer may not be held responsible for any damage caused as a result of improper, incorrect and unreasonable use of the appliance.
•Do not touch the heating elements or certain parts of the oven door when the appliance is in use; these partsbecomeextremelyhot.Keepchildrenwellaway from the appliance.
•Makesurethatthepowersupplycablesofotherelectrical appliances do not come into contact with the hot parts of the oven.
•The ventilation and heat dispersal openings must never be obstructed.
•Always grip the oven door handle in the centre: the ends may be hot.
•Always use oven gloves when placing cookware in the oven or when removing it.
•Do not use aluminium foil to line the bottom of the oven.
•Donotplaceflammablematerialsintheoven:iftheappliance is switched on accidentally, the materials could catch fire.
•Always make sure the knobs are in the “●”/“○” position when the appliance is not in use.
•When unplugging the appliance, always pull the plug from the mains socket; do not pull on the cable.
•Do not perform any cleaning or maintenance work without having disconnected the appliance from the electricity mains.
•If the event of malfunctions, under no circumstances should you attempt to perform the repairs yourself.
Contact an authorised Service Centre (seeAssistance).
•Do not rest objects on the open oven door.
•Do not let children play with the appliance.
•Theapplianceshouldnotbeoperatedbypeople(including children) with reduced physical, sensory or mental capacities, by inexperienced individuals or by anyone who is not familiar with the product. These individuals should, at the very least, be supervised by someone who assumes responsibility for their safety or receive preliminary instructions relating to the operation of the appliance.
•Theapplianceisnotintendedtobeoperatedbymeans ofanexternaltimerorseparateremote-controlsystem.
Disposal
•When disposing of packaging material: observe local legislation so that the packaging may be reused.
•The European Directive 2002/96/EC on Waste Electrical and Electronic Equipment (WEEE), requires that old household electrical appliances must not be disposed of in the normal unsorted municipal waste stream. Old appliances must be collected separately in order to optimise the recovery and recycling of the materials they contain and reduce the impact on human health and the environment. The crossed out “wheeled bin” symbol on the product reminds you of your obligation, that when you dispose of the appliance it must be separately collected.
Consumers should contact their local authority or retailer for information concerning the correct disposal of their old appliance.
Respecting and conserving the environment
•You can help to reduce the peak load of the electricity supply network companies by using the oven in the hours between late afternoon and the early hours of the morning. The cooking mode programming options, the “delayed cooking” mode (see Cooking modes) and “delayed automatic cleaning” mode (see Care and Maintenance) in particular, enable the user to organise their time efficiently.
•AlwayskeeptheovendoorclosedwhenusingtheGRILL modes: This will achieve improved results while saving energy (approximately 10%).
•Regularlycheckthedoorsealsandwipecleantoensure they are free of debris so that they stick properly to the door and do not allow heat to disperse.
Maintenance and care
Switching the appliance off
Disconnect your appliance from the electricity supply before carrying out any work on it.
Cleaning the appliance
•The stainless steel or enamel-coated external parts and the rubber seals may be cleaned using a sponge that has been soaked in lukewarm water and neutral soap. Use specialised products for the removal of stubborn stains. After cleaning, rinse and dry thoroughly. Do not use abrasive powders or corrosive substances.
•The inside of the oven should ideally be cleaned after each use, while it is still lukewarm. Use hot water and detergent, then rinse well and dry with a soft cloth. Do not use abrasive products.
•All accessories - with the exception of the sliding racks
- can be washed like everyday crockery, and are even dishwasher safe.
! Never use steam cleaners or pressure cleaners on the appliance.
26
 Loading...