

HOTPOINT FFU4D X 1 User Manual
LARDER FRIDGE - MODELS RLA34,RLA36,RLM34,RLM36
INSTRUCTIONS FOR INSTALLATION & USE
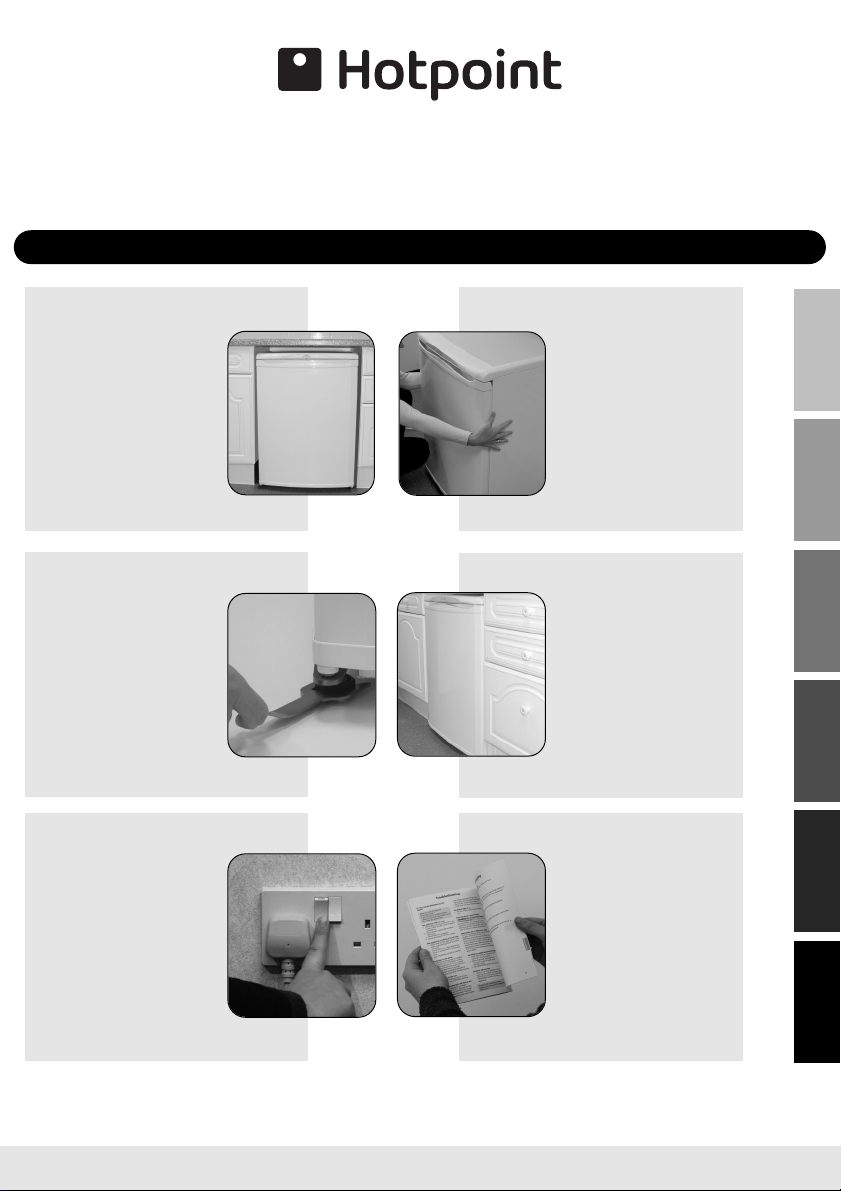
GETTING STARTED:
To ensure that your fridge runs reliably and efficiently follow these steps.
STEP 1 STEP 2
Choose a location for your
fridge, away from any
heat sources and
allow adequate
ventilation - 30mm
1
/4 inch) gap above.
(1
STEP 3 STEP 4
Level the fridge by
adjusting the front feet.
This will stop rocking or
vibration and keep the
door aligned.
STEP 5 STEP 6
Move the fridge into
position, using the sides
of the cabinet. Take care
to avoid damaging the
refrigerant circuit pipe
work on the rear.
Before plugging in and
switching on, leave the
fridge in its final
location for at least 15
minutes to allow it to
settle.
INSTALLATION CONTROLS
SAFETY &
USEFUL ADVICE
MAINTENANCE
CLEANING &
TROUBLESHOOTING
Plug in and switch on.
Allow the fridge to cool
before placing food
inside.
All food in the fridge
should be covered.
Your fridge is now
working.
If after 24 hours your
fridge is not operating as
you want, refer to the
Troubleshooting section.
Read the rest of these instructions to get the best from your appliance
and remember to fill in your guarantee registration.
Keep this Book in a safe place for quick reference.
GUARANTEE
SERVICE &

For Your Safety
For your safety, read the following advice:
The fridge cooling system contains a small amount of gas which is environmentally
friendly but flammable. To avoid any risk :-
● Install the fridge following the installation instructions and ensure
that ventilation openings are kept clear of obstruction.
● Take care when installing or moving the fridge to avoid damaging
the pipes on the rear.
● If you suspect a leak, do not switch on the fridge,but open the
windows and doors to ventilate the room.
● Do not use any mechanical or electrical devices inside the fridge, for
SAFETY &
INSTALLATION
● Only use this fridge for storing domestic foodstuffs.
When installing your fridge :-
● Ensure that the mains cable is not trapped underneath or behind the fridge
● Do not stack any other appliance on top of this fridge as they may
When using your fridge :-
● Do not sit or stand on top of your fridge.
● Do not store poisonous, flammable or dangerous substances in your fridge.
● Do not use aerosol sprays for defrosting or cleaning your fridge.
If you sell the fridge, pass on this booklet to the new owner.
If the supply cord is damaged, it must be replaced by the manufacturer, its service agent
or similarly qualied persons in order to avoid a hazard.
This appliance can be used by children aged from 8 years and above and persons with reduced physical,
sensory or mental capabilities or lack of experience and knowledge if they have been given supervision or
instruction concerning use of the appliance in a safe way and understand the hazards involved.
Children shall not play with the appliance.
Cleaning and user maintenance shall not be made by children without supervision.
– WARNING: Do not use electrical appliances inside the food storage compartments of theappliance, un-
less they are of the type recommended by the manufacturer.
This appliance is intended to be used in household and similar applications such as
– staff kitchen areas in shops, ofces and other working environments;
– farm houses and by clients in hotels, motels and other residential type environments;
– bed and breakfast type environments;
– catering and similar non-retail applications.
Disposal of old electrical appliances
The European Directive 2002/96/EC on Waste Electrical and Electronic Equipment (WEEE),
requires that old household electrical appliances must not be disposed of in the normal
unsorted municipal waste stream. Old appliances must be collected separately in order to
optimise the recovery and recycling of the materials they contain and reduce the impact on
human health and the environment.
2
instance for manual defrosting.
when you install or move it.
damage the fridge or become unstable.
The crossed out “wheeled bin”symbol on the product reminds you of your obligation,
that when you dispose of the appliance it must be separately collected.
Consumers should contact their local authority or retailer for information concerning the
correct disposal of their old appliance.
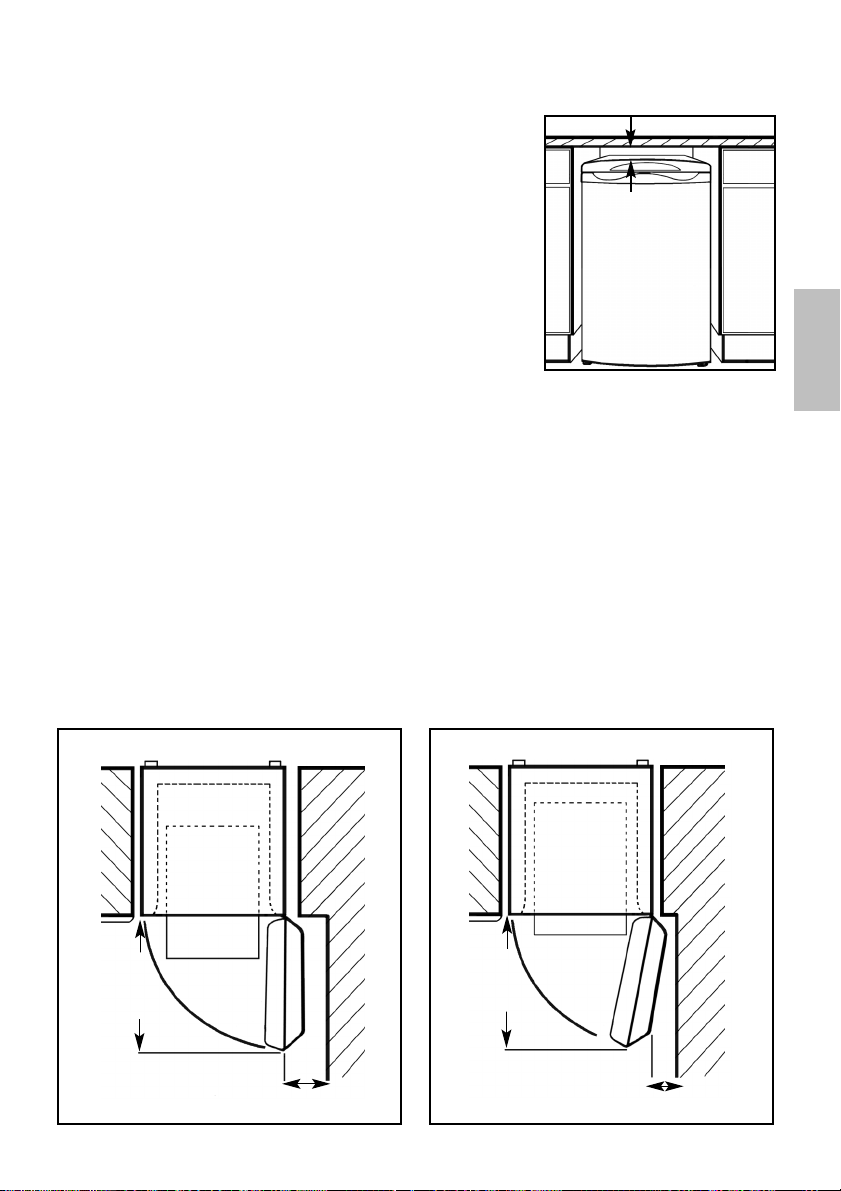
Installation
Location & Air Circulation
30mm (11/4 inch)
Locate your fridge away from sources of heat e.g.
cookers, radiators, direct sunlight as extreme temperature
will affect its performance.
Allow a minimum 30mm (11/4 inch) between the top of
the fridge and the underside of the worktop.
Providing you follow the recommended ventilation requirements you will :-
● Prolong the life of the fridge.
● Minimise the risk of condensation on the outside of the fridge.
● Minimise the running costs.
● Minimise operating sounds caused by vibration.
Minimum space required to open door
The fridge needs a space of 600mm (24 inches) in front to allow the door to open.
When positioning the fridge next to a unit, a gap of 30mm (1
1
/4inch) can be left
at the hinge side of the door to allow the easy removal of furniture.If preferred
the fridge can be positioned so that a gap is not left.This will restrict how far the
door can be opened but the furniture can still be removed (see diagram below).
The door hinge side can be changed to make it easier to open (see ‘Door Reversal’
in the CLEANING & MAINTENANCE section).
INSTALLATION
SAFETY &
600mm
TOP VIEW
30mm or more
TOP VIEW
600mm
less than 30mm
3
Installation
Levelling:
Level the fridge when it is in its final location by adjusting the front feet,until firm
contact is made with the floor. This will stop rocking or vibration and keep the door
aligned which helps the fridge run reliably and efficiently.
Before plugging in and switching on, leave the fridge standing in its final location for
at least 15 minutes to allow it to settle.
Fitting a Fridge under a Work Top
To minimise running costs Hotpoint recommend fitting a vent to the rear of your
SAFETY &
worktop,which is available from Hotpoint Genuine Parts & Accessories Mail Order
INSTALLATION
Hotline (see KEY CONTACTS,back page).
WARNING:If there is less than 30mm clearance above the fridge,a vent must be
fitted to provide adequate ventilation above your fridge.
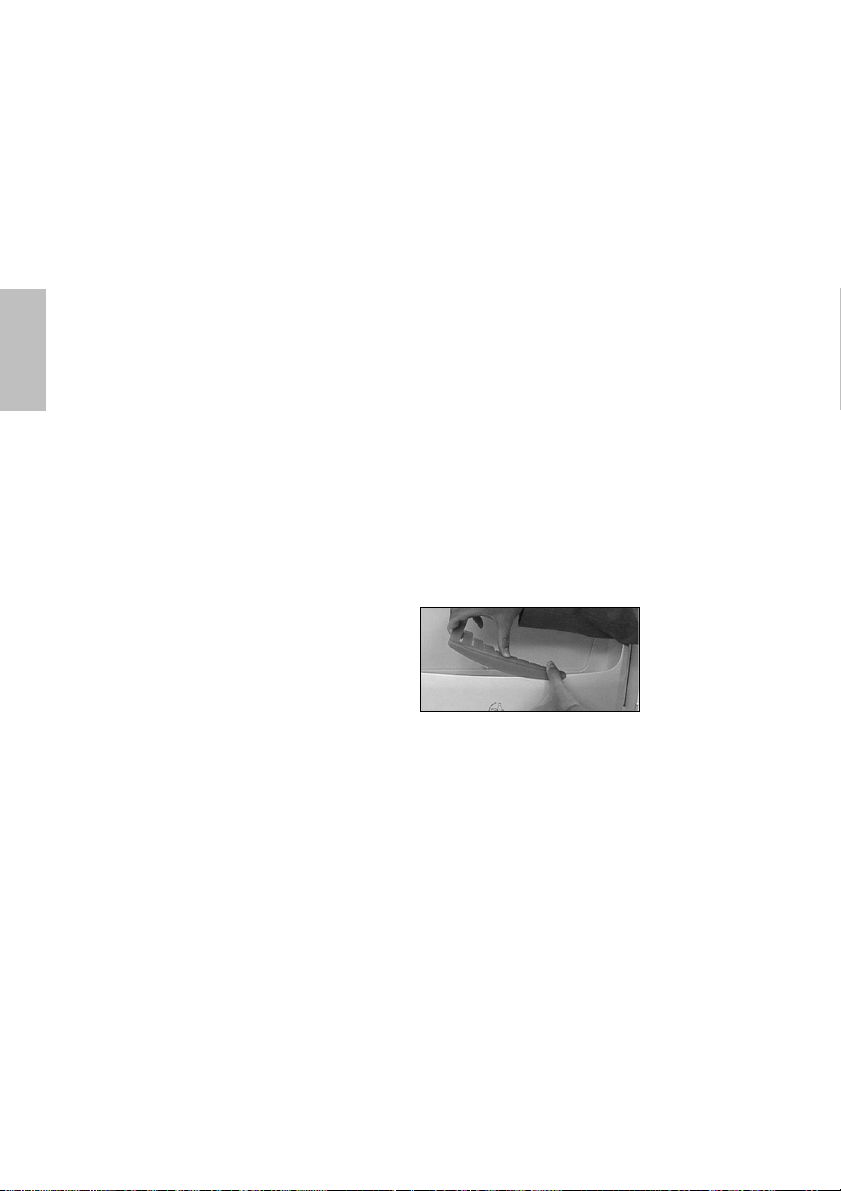
Bottle Retainer:
To fit the bottle rack retainer:
Locate the retainer groove at one end of
the bottle rack and then gradually press
down along the top edge until the
retainer is fully in the home position.
4
Installation
Electrical Supply
WARNING:This appliance must be earthed.
The fridge must be positioned so that the plug is accessible after
installation.
Fuses
Your appliance comes fitted with a plug and a 13A fuse. If you need to replace the
fuse, only use those rated at 13A and ASTA approved to BS1362.
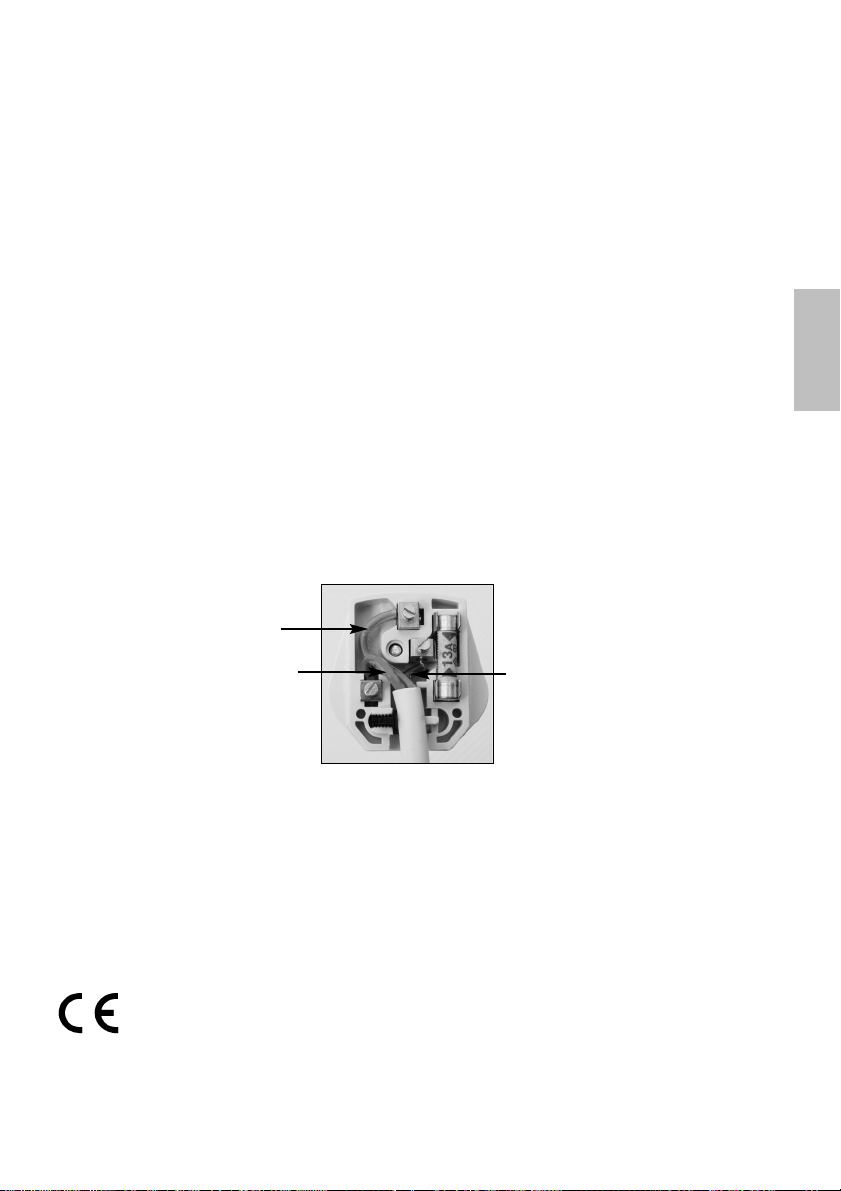
Changing the Plug
Cut off and dispose of the supplied plug if it does not fit your socket.
WARNING:To avoid a shock hazard do not insert the discarded plug into a socket
anywhere else.
IMPORTANT WIRES IN THE MAINS LEAD ARE COLOURED IN ACCORDANCE WITH THE
FOLLOWING CODE :
Green/Yellow - Earth
INSTALLATION
SAFETY &
Blue - Neutral Brown - Live
If you change the plug, the colour of wires in the mains lead may not correspond with
the colour of the markings identifying terminals in the plug. You should therefore
wire it as shown above.
Changing the Mains Lead
This fridge is fitted with a special mains lead. If you need to replace the mains lead
due to damage, one can be bought from Hotpoint Service (see KEY CONTACTS, back
page). It is strongly advised that this work is carried out by a qualified electrician.
CE Marking certifies that this appliance conforms to the following EEC
directives : Low Voltage Equipment - 72/23/EEC & 93/68 EEC
Electromagnetic Compatibility 89/336/EEC, 92/31/EEC & 93/68/EEC
5
 Loading...