

Page 1
Instructions for Installation and Use
Fridge / Freezer
Model FFQ48
Page 2

Retention of this Instruction Book
This Instruction Book must be kept handy for reference as it contains important details on the safe and proper use of the
appliance.
If you sell or pass the appliance to someone else, or move house and leave it behind, make sure this Book is also provided
so the new owner can become familiar with the appliance and safety warnings.
If the Book is lost or damaged a copy may be obtained from:
Indesit Company UK Ltd. Morley Way, Peterborough, PE2 9JB
Page 3

Operating Instructions
REFRIGERATOR/FREEZER COMBINATION
GB
English,1
FFQ48
Contents
Installation, 4
Positioning and connection
Description of the appliance, 6-7
Control panel
Overall view
Accessories, 8
Refrigerator compartment
Freezer compartment
Display, 9-10
Display description
Using the display
Start-up and use, 11
Starting the appliance
Chiller system
Using the refrigerator to its full potential
Using the freezer to its full potential
Maintenance and care, 12
Switching the appliance off
Cleaning the appliance
Avoiding mould and unpleasant odours
Replacing the light bulb
GBGB
GB
GBGB
Precautions and tips, 13
General safety
Disposal
Respecting and conserving the environment
Troubleshooting, 14
Assistance, 15
After Sales Service, 18
Hotpoint Guarantee, 19
Key Contacts, 20
Page 4

Installation
! Before operating your new appliance, please read
GB
these operating instructions carefully. They contain
important information for safe use, installation and care
of the appliance.
! Please keep these operating instructions for future
reference. Pass them on to possible new owners of the
appliance.
Positioning and connection
Positioning
1. Place the appliance in a well-ventilated humidity-free
room.
2. Do not obstruct the rear fan grills. The compressor
and condenser give off heat and require good ventilation
to operate correctly and save energy.
3. Leave a space of at least 10 cm between the top part
of the appliance and any furniture above it, and at least
5 cm between the sides and any furniture/side walls.
4. Ensure the appliance is far away from any sources of
heat (direct sunlight, electric stove, etc.).
Levelling
1. Install the appliance on a level and rigid floor.
2. If the floor is not perfectly horizontal, adjust the
refrigerator by tightening or loosening the rear feet.
Electrical connections
After transportation of the appliance, carefully place it
vertically and wait at least 3 hours before connecting it
to the electricity mains. Before inserting the plug into the
electrical socket ensure the following:
! The manufacturer declines any liability should
these safety measures not be observed.
Connection of the water supply
To carry this out, use the kit provided which contains all
the necessary elements for connection to the water
supply.
To improve the performance of the Aqua Care, we
recommend that you fit a tap with a filter on the pipe for
the connection to the water system: in this way it will be
possible to manually interrupt the water supply during
long periods in which Aqua Care is not used.
! The water pressure inside the water system must be
between 0.8 bar and 8 bar.
! The appliance must only be connected to a water
supply suitable for drinking.
Your appliance is supplied with a 13amp fused plug that
can be plugged into a 13amp socket for immediate use.
Before using the appliance please read the instructions
below.
WARNING:
THIS APPLIANCE MUST BE EARTHED.
Replacing fuse covers:
When replacing a faulty fuse, a 13amp ASTA approved
fuse to BS 1362 should always be used and the fuse
cover re-fitted.
If the fuse cover is lost, the plug must not be used until
a replacement is obtained.
• The appliance is earthed and the plug is compliant
with the law.
• The socket can withstand the maximum power of the
appliance, which is indicated on the data plate
located on the bottom left side of the fridge (e.g. 150
W).
• The voltage must be in the range between the values
indicated on the data plate located on the bottom left
side (e.g. 220-240V).
• The socket is compatible with the plug of the
appliance.
If the socket is incompatible with the plug, ask an
authorised technician to replace it (
Do not use extension cords or multiple sockets.
! Once the appliance has been installed, the power
supply cable and the electrical socket must be easily
accessible.
! The cable must not be bent or compressed.
! The cable must be checked regularly and replaced by
authorised technicians only (
see Assistance
see Assistance
).
).
Replacement fuse covers:
If a replacement fuse cover is fitted, it must be of the
correct colour as indicated by the coloured marking or the
colour that is embossed in words on the base of the plug.
Changing the plug:
Removing the plug
If your appliance has a non-rewireable moulded plug
and you should wish to remove it to add a longer cable
or to re-route the mains cable through partitions, units
etc. please ensure that either:
- The plug is replaced by a fused 13amp rewireable plug bearing the BSI mark of
approval.
or
- The mains cable is wired directly into a
13amp cable outlet, controlled by a
switch (in compliance with BS 5733)
which is accessible without moving the
appliance.
4
Page 5
Disposing of the plug
Cut off and dispose of the supplied plug if it does not fit
your socket. The cable should be cut as close as
possible to the moulded plug.
Remove the fuse.
WARNING:
To avoid a shock hazard do not insert the discarded
plug into a socket anywhere else.
Aqua Care function
GB
The refrigerator you have purchased is fitted with the
Aqua Care system which, thanks to an advanced filter
system with active carbons, provides your household
with fresh, filtered water.
! To improve the system’s performance, we recommend
that you follow the instructions contained in this manual
and in the assembly diagram provided with the kit.
Fitting a new plug
IMPORTANT
WIRES IN THE MAINS LEAD ARE COLOURED IN
ACCORDANCE WITH THE FOLLOWING CODE...
Green and Yellow - Earth
Blue - Neutral
Brown - Live
As the colours of the wires in the mains lead may not
correspond with the coloured markings identifying the
terminals in your plug, proceed as follows:
- Connect Green and Yellow wire to terminal marked
'E' or
- Connect Brown wire to terminal marked 'L' or
coloured red or brown.
- Connect Blue wire to terminal marked 'N' or
coloured Black or Blue.
If a 13amp plug (BS 1363) is used it must be
fitted with a 13amp fuse. A 15amp plug must be
protected by a 15amp fuse, either in the plug or adaptor
or at the distribution board.
:
or coloured Green and Yellow.
Starting Aqua Care
After connecting it to the water system, installing the
filter (see Replacing Aqua Care filter) and switching on
the refrigerator (See Starting the appliance), it is
necessary to remove any air from the Aqua Care system:
1. Activate the AQUA CARE
function by pressing the correct
button (see Display)
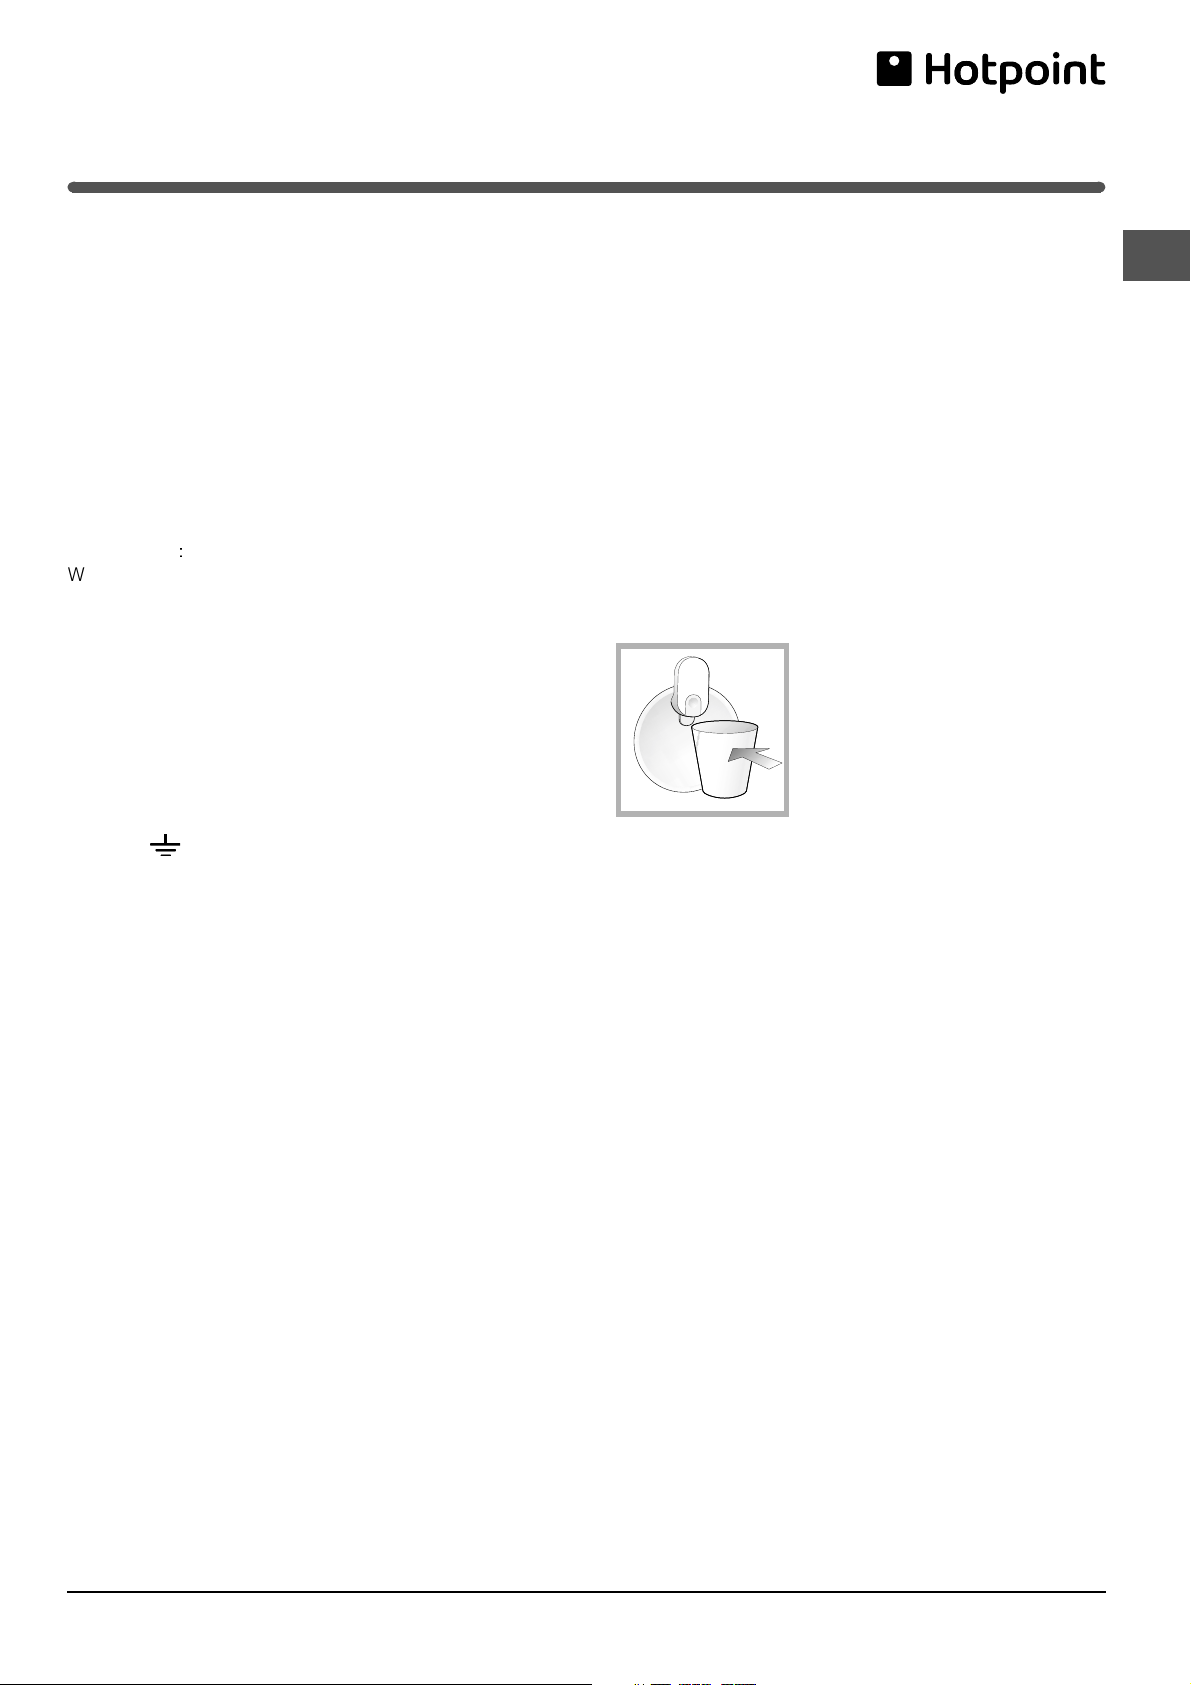
2. Place a container under the
dispenser.
3. Hold the button down until the
water is dispensed.
4. Drain and discard three litres
of water.
! When using for the first time and each time the Aqua
Care system is not used for more than 1 week, it will be
necessary to drain and discard three litres of water.
If you are in any doubt about the electrical
supply to your machine, consult a qualified
electrician before use.
CE Marking certifies that this appliance conforms to
the following EEC directives :
Low Voltage Equipment - 73/23/EEC & 93/68 EEC
Electromagnetic Compatibility 89/336/EEC, 92/31/EEC
& 93/68/EEC
5
Page 6
Description of the
appliance
Control panel
GB
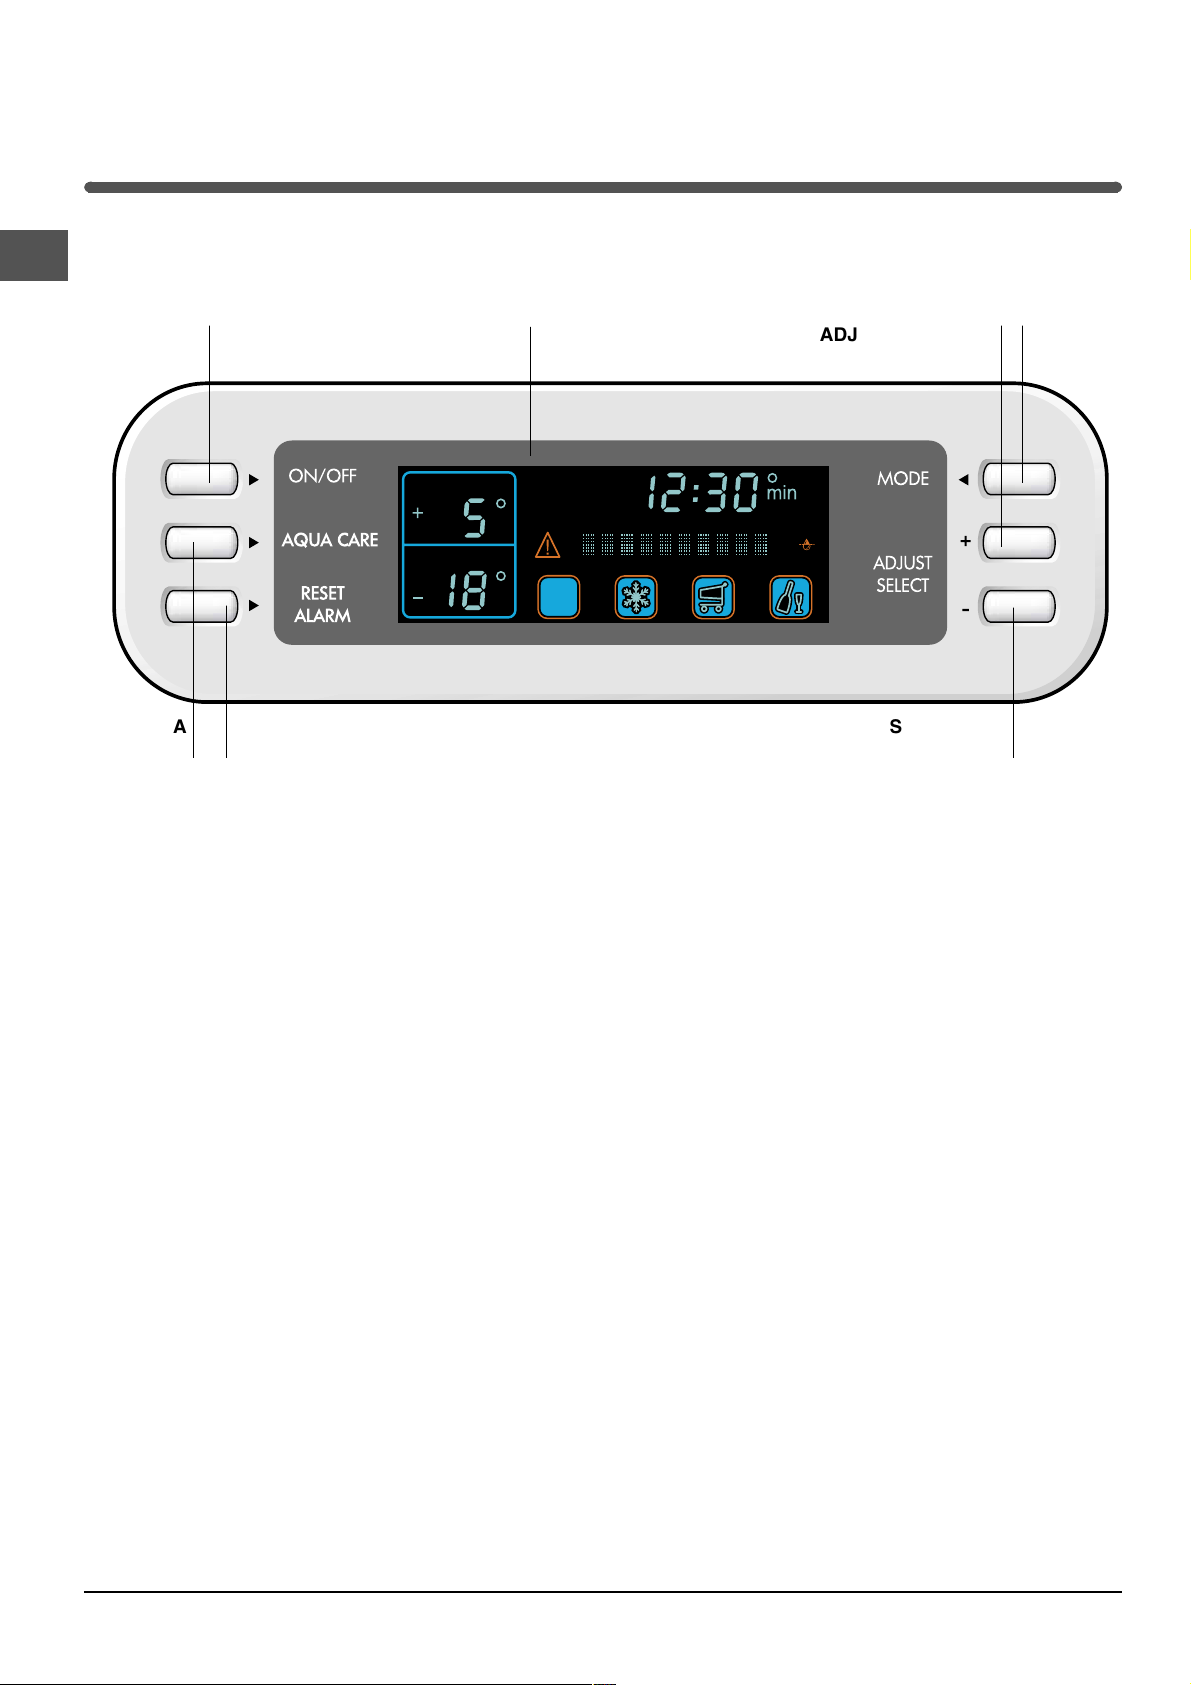
ON/OFF
button
AQUA
CARE
button
• ON/OFF button switches the whole appliance on and
off (refrigerator compartment and freezer
compartment). It must be held down for at least 2
seconds.
.
care
• AQUA CARE button activates and deactivates the
Aqua Care function.
• RESET ALARM button switches off the sound alarm
(press once) and deletes the alarm messages from
the scrolling text on the display (press a second time).
See Troubleshooting
RESET ALARM
button
See Start-up and use
.
and
Maintenance and
Display
ECOECO
ADJUST/SELECT +
button
MODE
button
+
-
ADJUST/SELECT -
button
• MODE selects the various display settings and
functions.
• ADJUST/SELECT + button activates the functions
and modifies the temperature, time, date and
language settings.
• ADJUST/SELECT + button deactivates the functions
and modifies the temperature, time, date and
language settings.
• Display programmes the appliance and controls its
operation.
See Display
See Display
and
Start-up and use
See Display
See Display
and
Start-up and use
and
Start-up and use
.
.
.
6
Page 7
Description of the
appliance
Overall view
(see Maintenance)
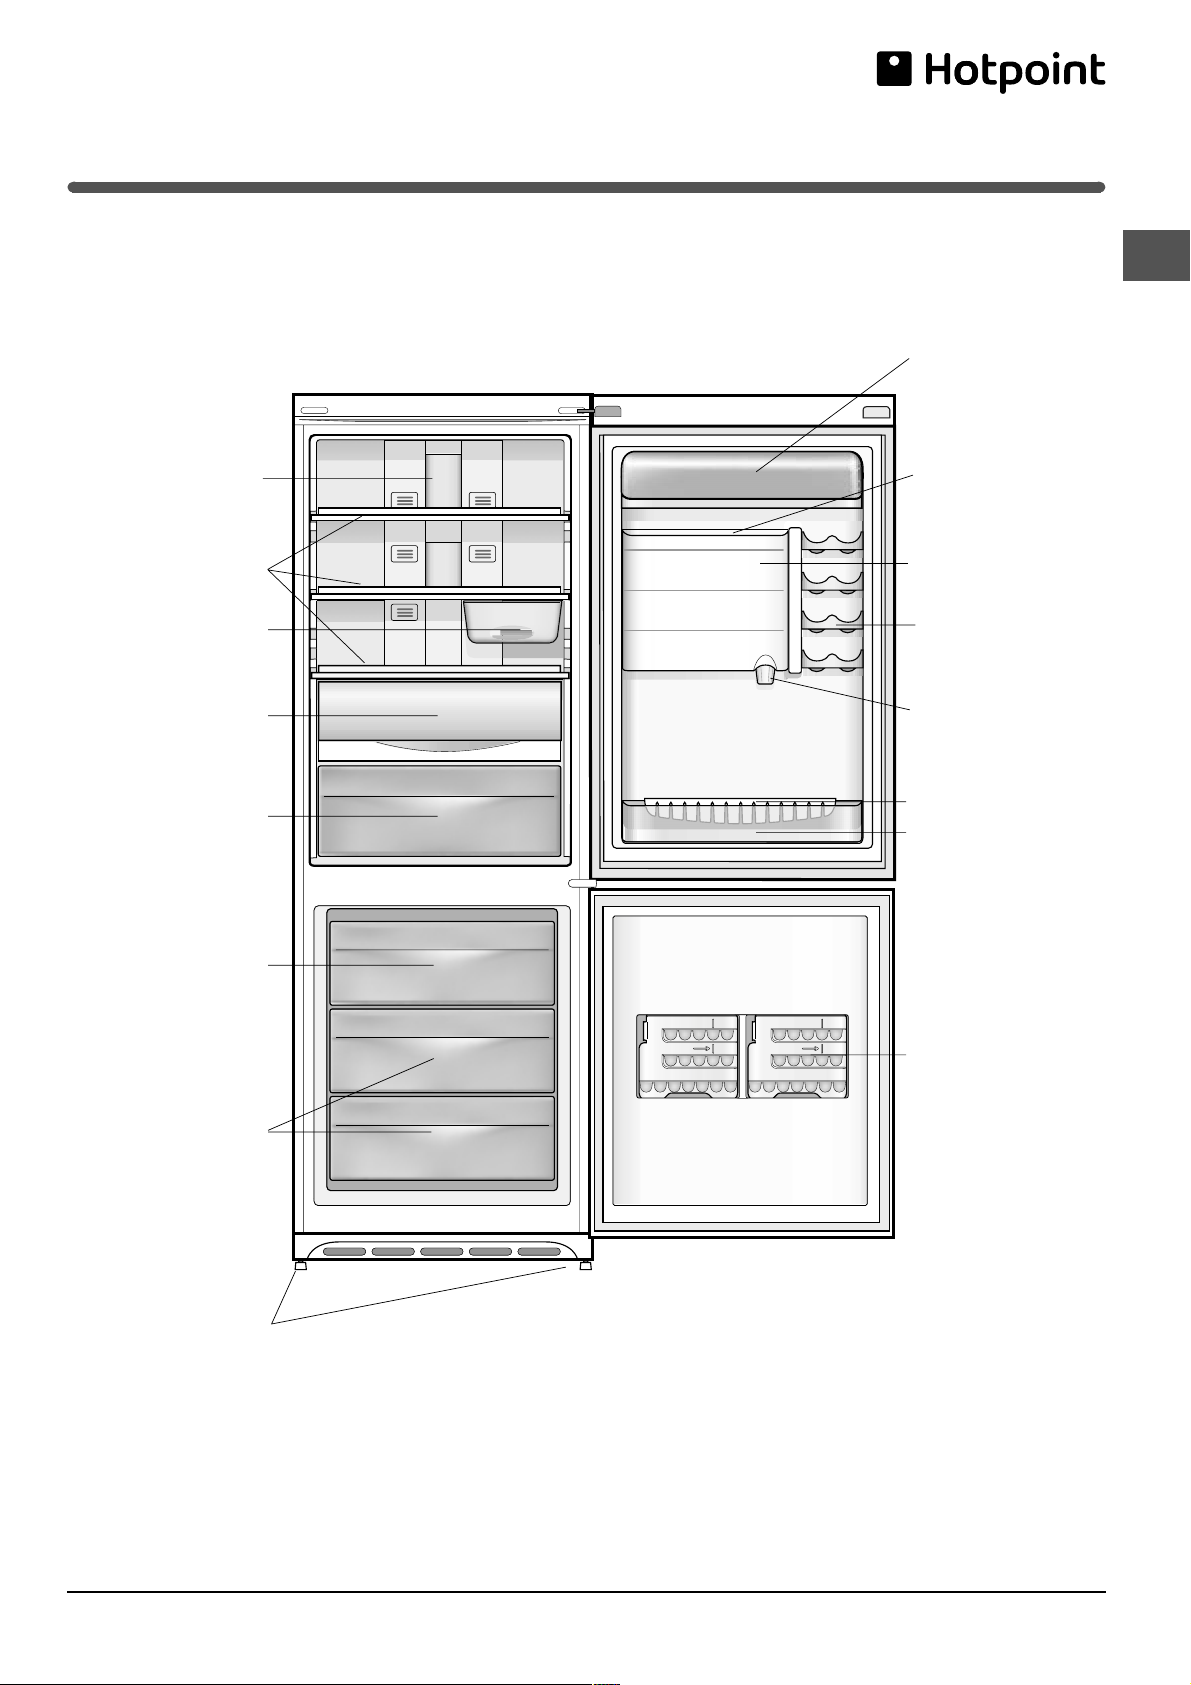
SHELVES
MULTI-USE
FRESH BOX
Compartment
FRUIT and
VEGETABLE bin
LAMP
bin
GB
Removable shelf with
lid and EGG TRAY
Storage SHELF
AQUA CARE tank
*
*
CAN RACK shelves
AQUA CARE filter
BOTTLE FASTENER
BOTTLE shelf
FREEZER and
STORAGE
compartment
STORAGE
compartments
Levelling FEET
Varies by number and/or position.
* Available only on certain models.
WATER LEVEL
MAX
WATER LEVEL
MAX
ICE TRAYS
7
Page 8
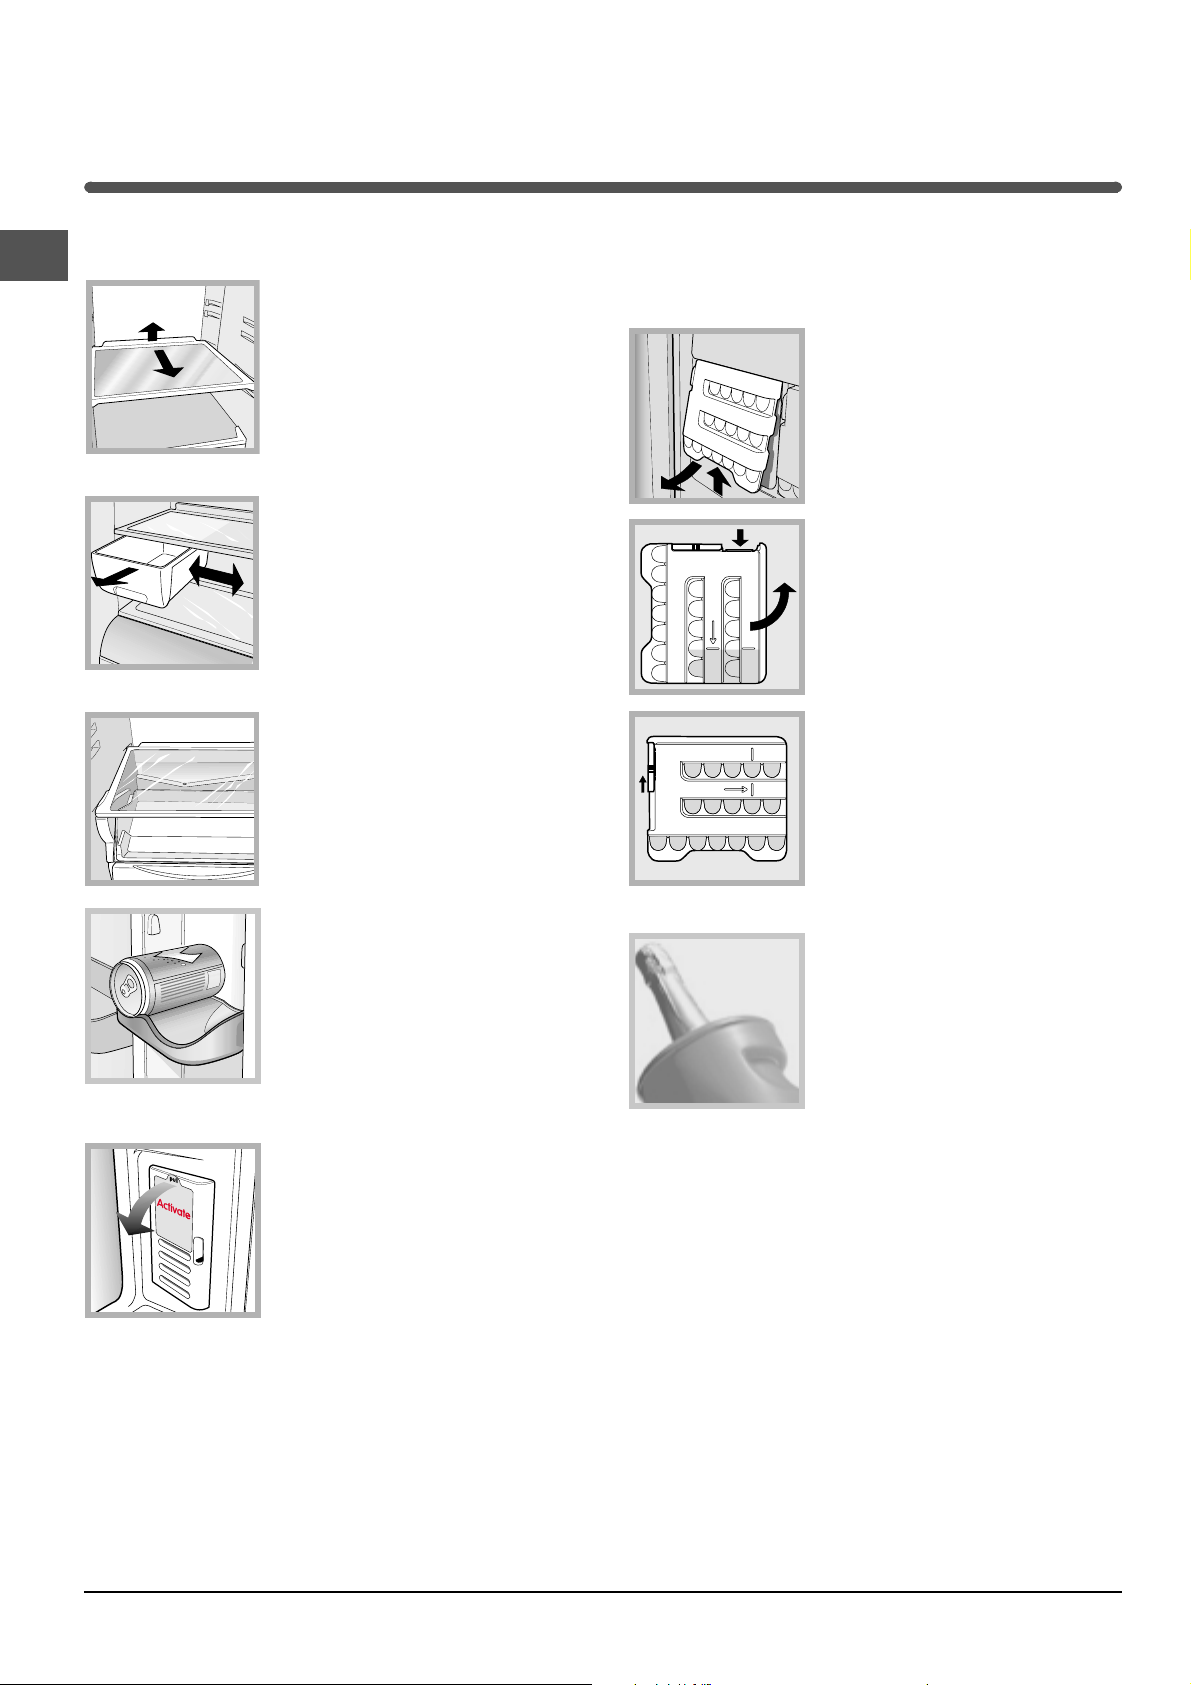
Accessories
Refrigerator compartment
GB
1
2
SHELVES: thanks to the special
rails the shelves are removable
and the height is adjustable (
diagram
of large containers and food.
Height can be adjusted without
complete removal of the shelf.
MULTI-USE
(such as cold meats) for a long
time and also prevent odours
from lingering in the refrigerator.
It can be removed for use and it
may be shifted sideways to
optimise space (
FRESH BOX
fish. Due to the compartment’s
low temperature (the coldest in
the refrigerator), food can be
stored for up to one week. It can
also be used for “cold meals.”
), allowing easy storage
bin
: to store food
*
see diagram
: for fresh meat and
*
see
).
Freezer compartment
ICE ICE
ICE TRAYS: to make ice.
ICE ICE
1. Pull out the tray by pushing it
up and then outwards (
diagram
Check that the tray is completely
empty and fill it with water through
the opening provided.
2. Take care not to exceed the
level indicated (MAX WATER
LEVEL). Excess water prevents
WATER LEVEL
MAX
WATER LEVEL
MAX
the ice cubes from dispensing (if
this happens, wait for the ice to
melt and empty the tray).
3. Turn the tray 90°: the water fills
up the moulds (
Close the opening with the lid
and replace. When the ice has
formed (minimum time
approximately 8 hours), knock the
tray against a hard surface.
see
).
see diagram
).
CAN RACK shelf: to store cans
horizontally (
may also store yoghurt, butter or
general containers.
ODOUR FILTER
are fitted with a new odour filter
with active carbons, which
ensures better air quality inside
the refrigerator.
The filter is located on the bottom
right-hand side, inside the
ventilation opening. To activate it, remove the sticker
from the opening (
see diagram
see diagram
*: Some models
).
). You
ICE PARTY: to bring a bottle of
sparkling wine or champagne to
the right temperature. Place it in
the bucket provided inside the
FREEZER and STORAGE
compartment. The bucket may be
used to serve the bottle, keeping
it cool.
Varies by number and/or position.
* Available only on certain models.
8
Page 9
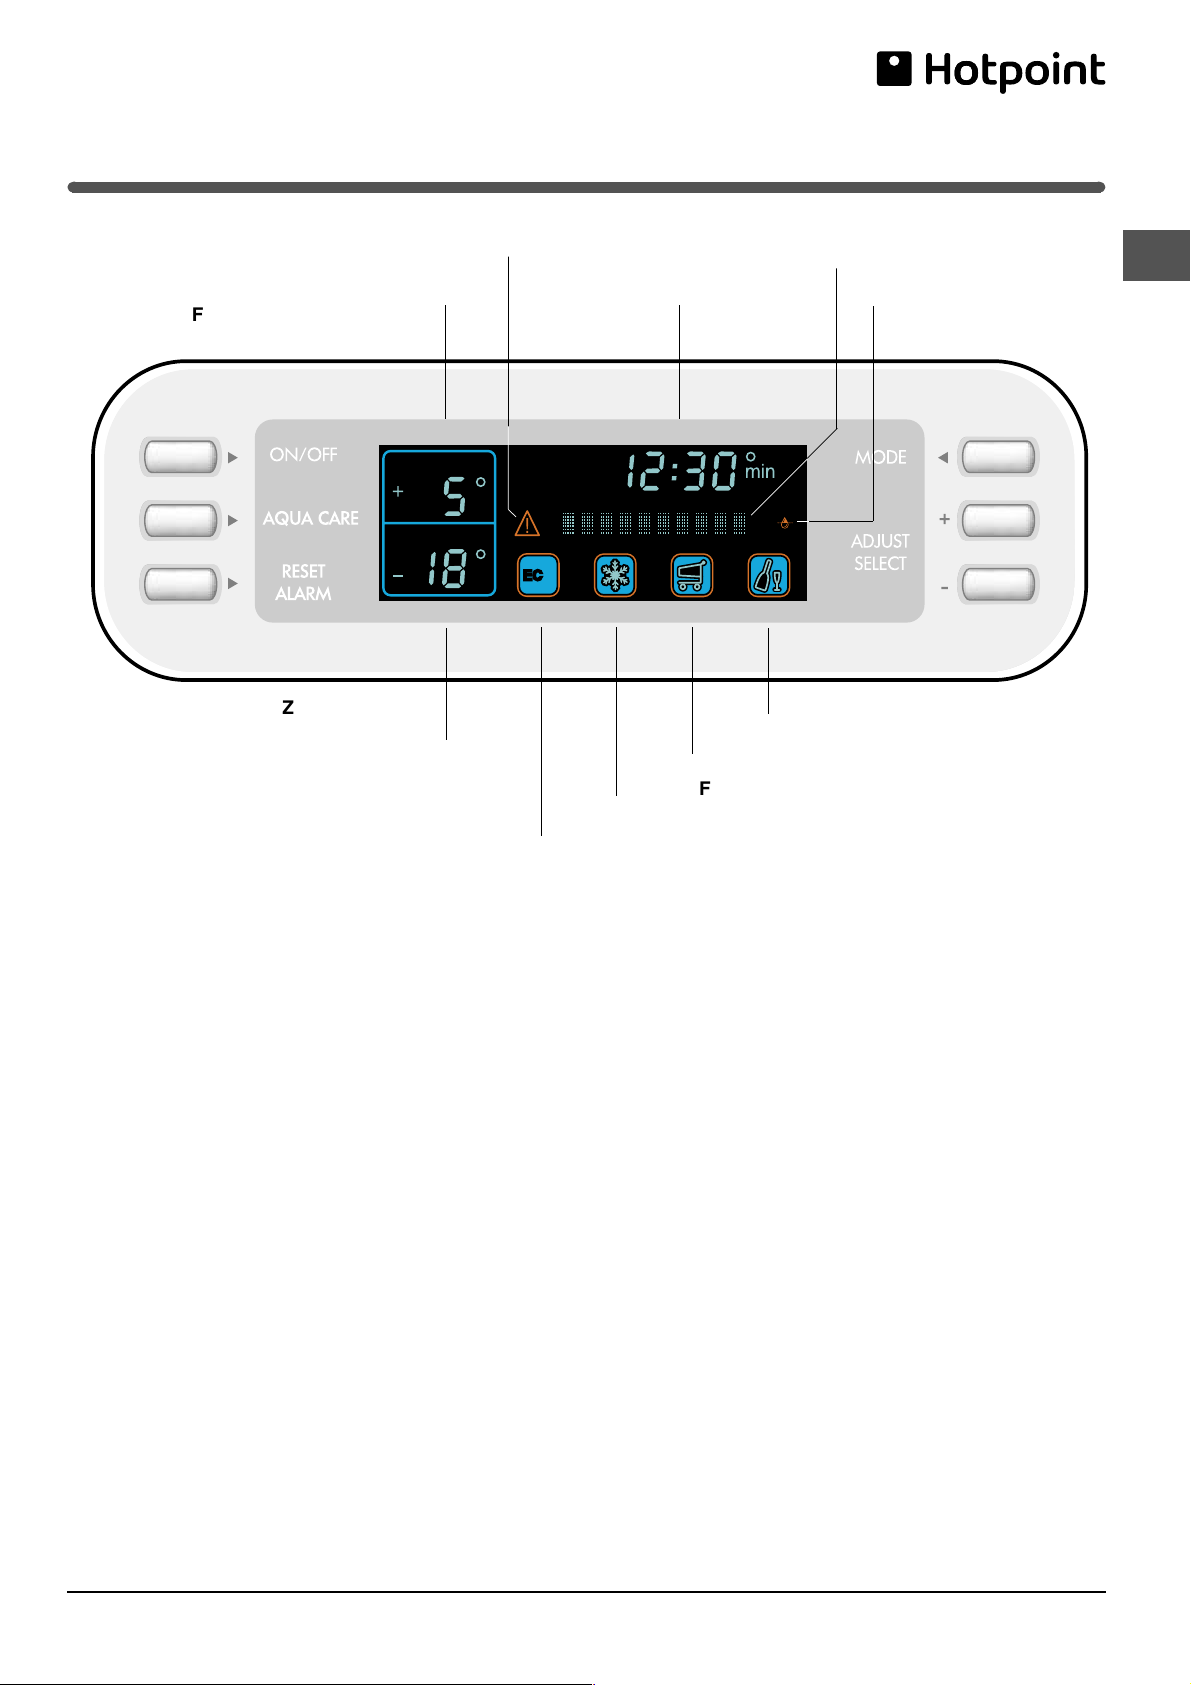
Display
Display description
REFRIGERATOR OPERATION
FREEZER OPERATION
indicator light
indicator light
ALARM indicator light
TIME
indicator light
ECOECO
SUPER FREEZE function
Scrolling text
ICE PARTY functions
SUPER COOL function
GB
AQUA CARE
indicator light
+
-
• REFRIGERATOR OPERATION indicator light: displays
the set temperature (static digit) or the temperature that
is being set (flashing digit) for the refrigerator
compartment. OFF indicates that the compartment is off.
• ALARM indicator light: when this goes on it indicates a
critical situation (door open, high temperature)
Troubleshooting
• ECO function: displays function status Automatically
sets the optimal temperature to store food while
minimizing energy consumption.
• TIME indicator light: displays the time. This is also used
to set the date and time.
• Scrolling text: displays information on the status of the
appliance and on how to use the display.
It is also used to set the language.
• FREEZER OPERATION indicator light: displays the set
temperature (static digit) or the temperature that is being
set (flashing digit) for the freezer compartment. OFF
indicates that the compartment is off.
.
See
ECO function
• SUPER COOL function: displays function status. This is
the rapid cooling function of the refrigerator
compartment. It deactivates automatically.
and use
• SUPER FREEZE function: displays function status. This
is the rapid cooling function of the freezer compartment.
It deactivates automatically.
• AQUA CARE function: displays function status. It
supplies fresh, filtered water by means of the dispenser.
• ICE PARTY function: displays function status. It
reduces the temperature of the freezer for the period of
time required to cool a bottle.
A buzzer sounds when the correct temperature has
been reached.
! The function symbols light up in various ways to indicate
their status (deactivated, selected or activated).
.
See Accessories
See Start-up
See Start-up and use
.
.
9
Page 10
Using the display
GB
setting the temperature
When the appliance is switched on, the standard storage
temperatures are automatically set:
• +5°C for the refrigerator compartment
• -18°C for the freezer compartment.
The temperatures that may be set are the following:
• between +2°C and +8°C for the refrigerator
compartment
• between -18°C and -26°C for the freezer compartment
To set the temperature:
1. Press the MODE button until the value flashes on the
refrigerator compartment or freezer compartment display.
2. To increase the temperature, press the ADJUST/
SELECT+ button.
To decrease the temperature, press the ADJUST/SELECTbutton.
Each time the button is pressed, the value increases by 1°C.
3. Confirm the choice by pressing the MODE button within
ten seconds: the value will stop flashing: If the choice is not
confirmed, the temperature that had been set before the
operation will appear on the display.
! The ECO function reduces the possible adjustments: from
+4°C to +6°C for the refrigerator and from -18°C to -20°C
for the freezer.
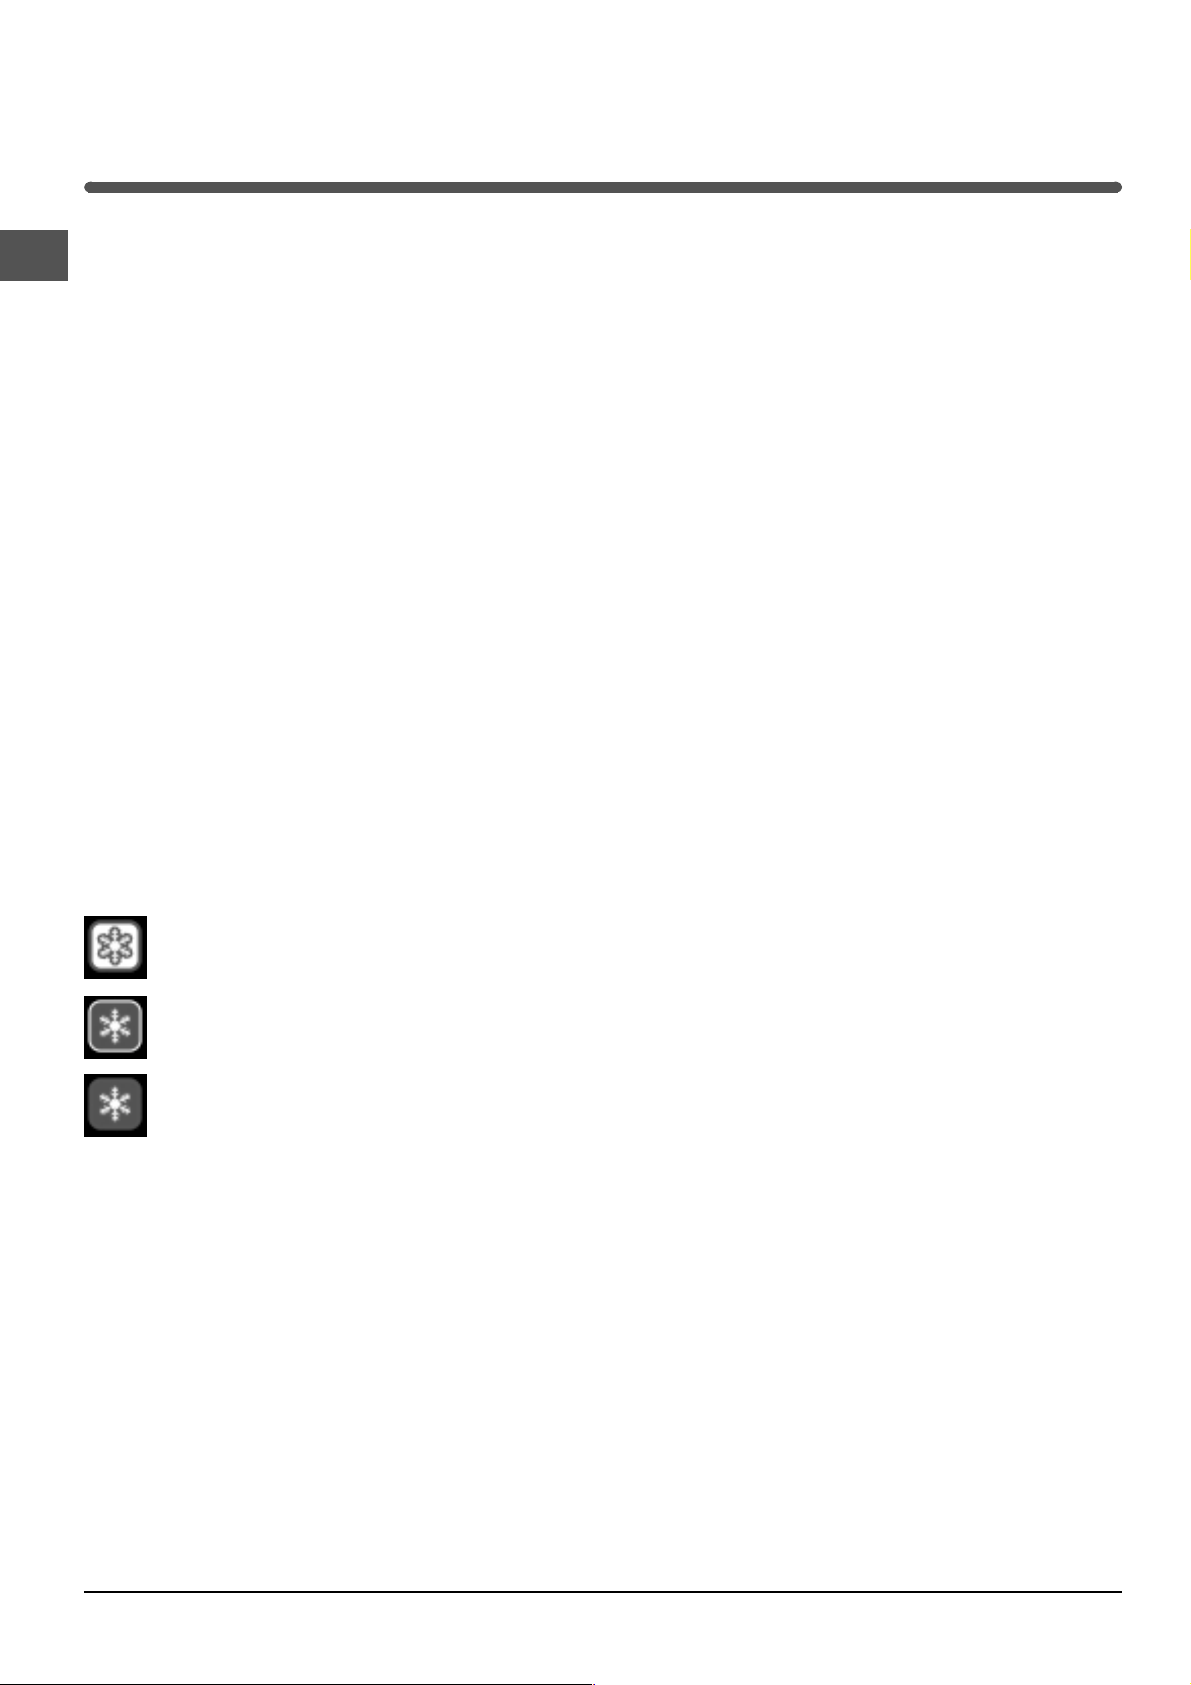
Function status
function activated (green symbol with blue inside on)
function selected (green symbol with red border
on)
function deactivated (green symbol only on)
Activating and deactivating the SUPER COOL,
ECO, SUPER FREEZE, ICE PARTY functions.
1. Press the MODE button until the desired function is
selected.
2. To activate, press the ADJUST/SELECT + button.
To deactivate, press the ADJUST/SELECT - button.
3. Confirm the choice by pressing the MODE button within
ten seconds. If the choice is not confirmed, the function
that had been set before the operation will appear on the
display.
Once the operation is over, the red border goes off.
If the function was activated: green symbol with blue inside
on. If the function was deactivated: green symbol only on.
Water dispensing
1. Activate the Aqua Care function
2. Place the container that needs to be filled under the
outer dispenser.
3. Press the dispenser
4. Interrupt the flow by moving the container away from the
dispenser
! The Aqua Care function comes with a safety timer that
interrupts the supply if operation is continuos for more than
5 minutes. To restore operation it is necessary to press the
RESET ALARM button twice.
Setting the date and time
The settings are in series and it is not possible to adjust the
date if the time has not been set before:
1. Press the MODE button repeatedly until the SET TIME
[+/-] appears on the scrolling text display.
2. To scroll forward one hour press the ADJUST/SELECT+
button. To scroll back one hour press the ADJUST/SELECTbutton.
3. Confirm the choice by pressing the MODE button within
ten seconds. If the choice is not confirmed, the time that
had been set before the operation will appear on the
display.
Once the hours have been set, the minutes, days, months
and years can be set by following steps 1-3.
Σεττινγ τηε λανγυαγε
1. Press the MODE button repeatedly until the language
setting screen appears on the scrolling text display.
2. To scroll forward, press the ADJUST/SELECT + button.
To scroll back, press the ADJUST/SELECT - button.
3. Confirm the choice by pressing the MODE button within
ten seconds. If the choice is not confirmed, the language
that had been set before the operation will appear on the
display.
! The first time that the appliance is switched on, the
language setting request screen appears automatically on
the display: follow the described procedure.
Σωιτχη οφφ τηε σουνδ ανδ ϖισυαλ αλαρµσ
Press the RESET ALARM button: by pressing it once, the
sound alarms are switched off; by pressing it a second
time, the alarm messages are deleted from the scrolling
text on the display.
! The open door alarm is stopped by closing it (
Troubleshooting
! If DEMO MODE appears on the display, the appliance is
in exhibition mode, that is, it does not cool despite the fact
that the display and the internal lamp are on. To exit this
mode, press the MODE, ADJUST/SELECT+ and ADJUST/
SELECT- buttons simultaneously for at least three seconds.
).
see
Activating and deactivating the AQUA CARE function
1. Press the Aqua Care button. A message on the display
shows the current status of the function.
2. Press the Aqua Care button again to activate or
deactivate the function.
10
Page 11
Start-up and use
Starting the appliance
! Before starting the appliance, follow the installation
instructions (
! Before connecting the appliance, clean the
compartments and accessories well with lukewarm
water and bicarbonate of soda.
! The appliance comes with a motor protection control
system which makes the compressor start approximately
8 minutes after being switched on. The compressor also
starts each time the power supply is cut off whether
voluntarily or involuntarily (blackout).
Insert the plug into the electrical socket and, if OFF
appears on both indicator displays (refrigerator and
freezer), switch on the appliance by holding down the
ON/OFF button for at least two seconds:
- the refrigerator is set at a temperature of +5°C.
- the freezer is set at a temperature of -18°C.
To cool the two compartments more rapidly, activate the
SUPER COOL and SUPER FREEZE functions (
Display
see Installation
).
).
see
Using the refrigerator to its full potential
• Adjust the temperature using the display.
• Activate the SUPER COOL function to lower the
temperature quickly. For example, when you place a
large number of new food items inside a fridge, the
internal temperature will rise slightly. The function
quickly cools the groceries by temporarily reducing the
temperature until it reaches the ideal level.
• Place only cold or lukewarm foods in the compartment,
not hot foods (
• Remember that cooked foods do not last longer than
raw foods.
• Do not store liquids in open containers. They will
increase humidity in the refrigerator and cause
condensation to form.
see Precautions and tips
).
Using the freezer to its full potential
• Adjust the temperature using the display.
GB
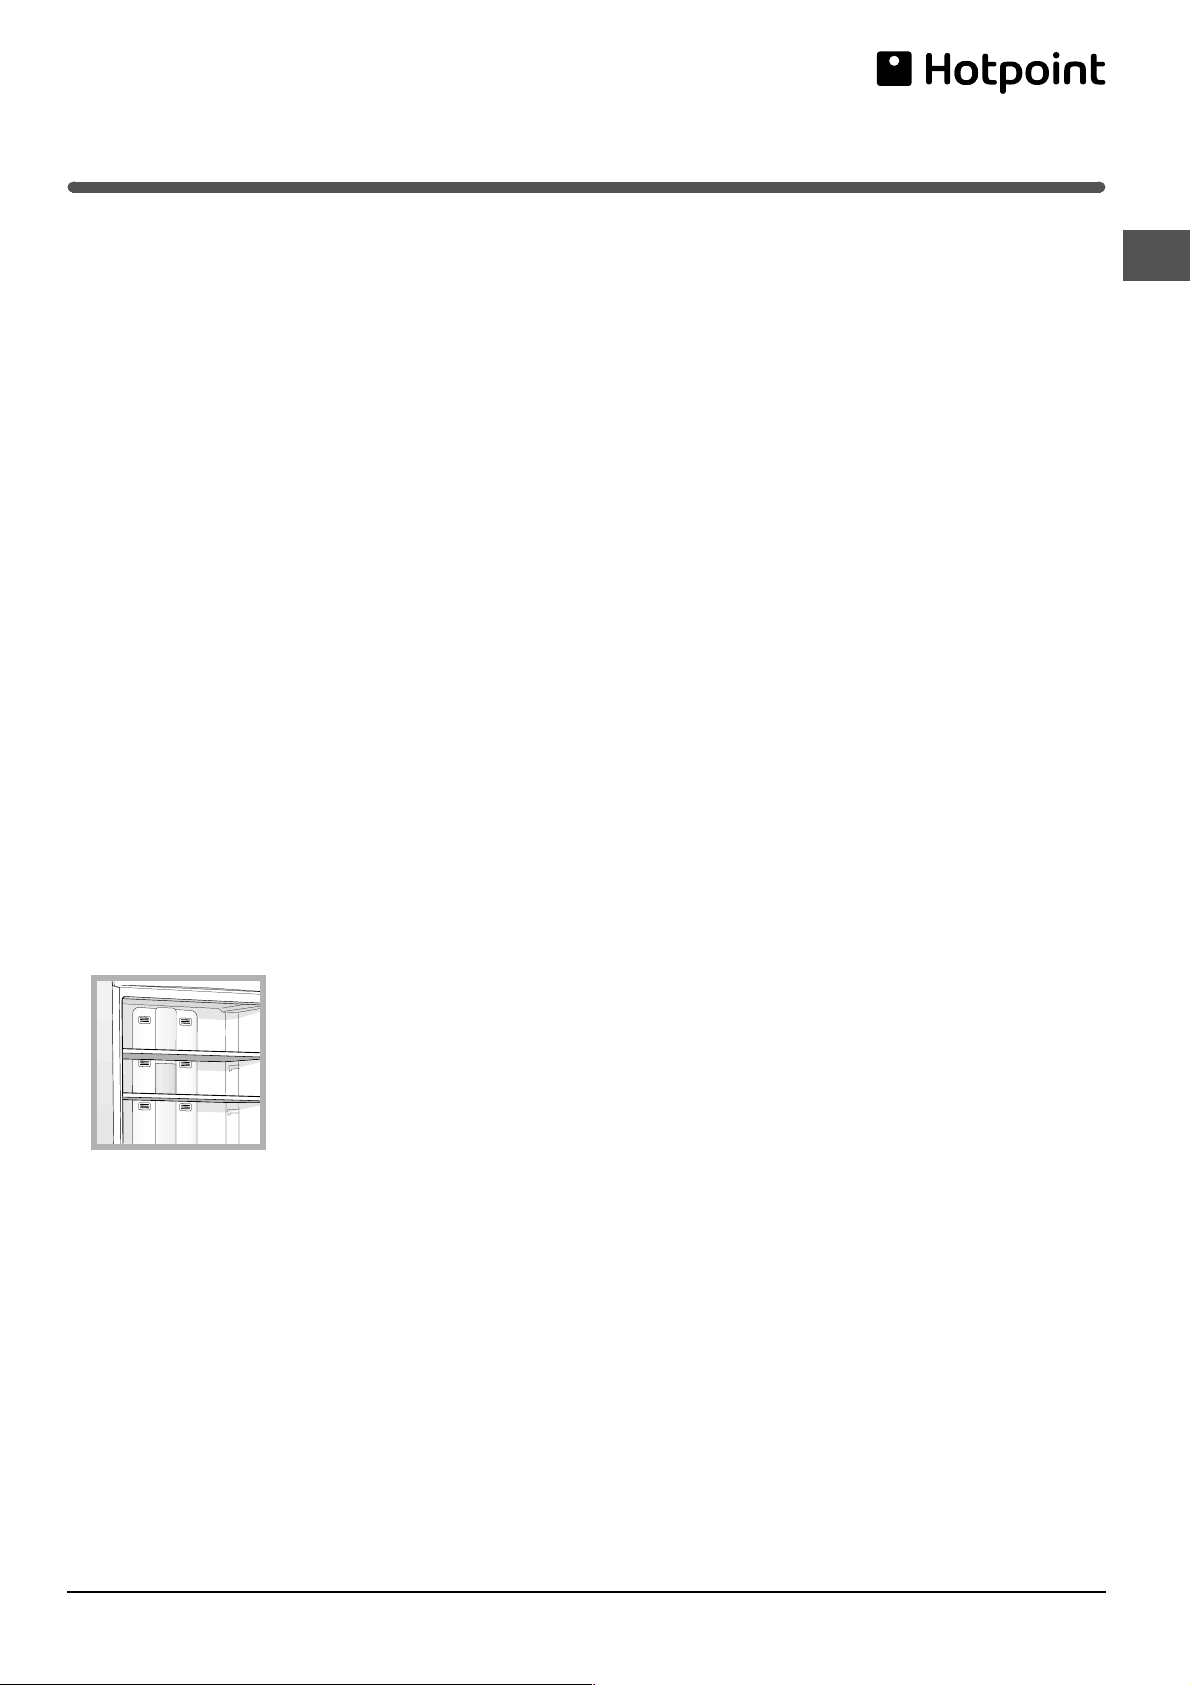
Chiller system
The appliance is fitted with the following cooling system:
No Frost
It is recognisable by aeration
cells located on the back walls
of the compartments.
The No Frost system circulates
cold air continuously to collect
humidity and prevent ice and
frost formation. The system
maintains an optimal humidity level in the compartment,
preserving the original quality of the food, preventing the
food from sticking together and making defrosting a
thing of the past.
! Do not block the aeration cells by placing food or
containers in direct contact with the refrigerating back
panel.
! Close bottles and wrap food tightly.
• To freeze a lot of food, activate the SUPER FREEZE
function. The function is automatically disabled after
24 hours or once the optimal temperature has been
reached.
• Do not refreeze food that has been defrosted or that is
defrosting; this food must be eaten within 24 hours or
may be frozen again after it has been cooked.
• Fresh food that needs to be frozen must not come
into contact with food that has already been
defrosted. Fresh food must be packed in the top
FREEZER compartment where the temperature drops
below -18°C and guarantees rapid freezing.
• Do not place glass bottles which contain liquids, and
which are corked or hermetically sealed in the freezer
because they could break.
• The maximum quantity of food that may be frozen daily
is indicated on the plate containing the technical
properties located on the bottom left side of the
refrigerator compartment (for example: Kg/24h 4).
! Do not open the door during freezing.
! If there is a power cut or malfunction, do not open the
freezer door. This will help maintain the temperature
inside the freezer, ensuring that foods are conserved for
at least 9 -14 hours.
11
Page 12
Maintenance and care
Switching the appliance off
GB
During cleaning and maintenance it is necessary to
disconnect the appliance from the electricity supply:
1. hold the ON/OFF button down for more than two
seconds until OFF appears on both indicator displays
(refrigerator and freezer).
2. pull the plug out of the socket
!
If this procedure is not followed, the alarm may sound.
This alarm does not indicate a malfunction. To restore
normal operation, it is sufficient to hold the ON/OFF
button down for more than two seconds. To disconnect
the appliance, follow points 1 and 2.
Cleaning the appliance
• The external and internal parts, as well as the rubber
seals may be cleaned using a sponge that has been
soaked in lukewarm water and bicarbonate of soda or
neutral soap. Do not use solvents, abrasive products,
bleach or ammonia.
• The removable accessories may be soaked in warm
water and soap or dishwashing liquid. Rinse and dry
them carefully.
• The back of the appliance may collect dust which can
be removed by delicately using the hose of a vacuum
cleaner set on medium power. The appliance must be
switched off and the plug must be pulled out before
cleaning the appliance.
Avoiding mould and unpleasant odours
• The appliance is manufactured with hygienic
materials which are odour free. In order to maintain an
odour free refrigerator and to prevent the formation of
stains, food must always be covered or sealed
properly.
• If you want to switch the appliance off for an extended
period of time, clean the inside and leave the doors
open.
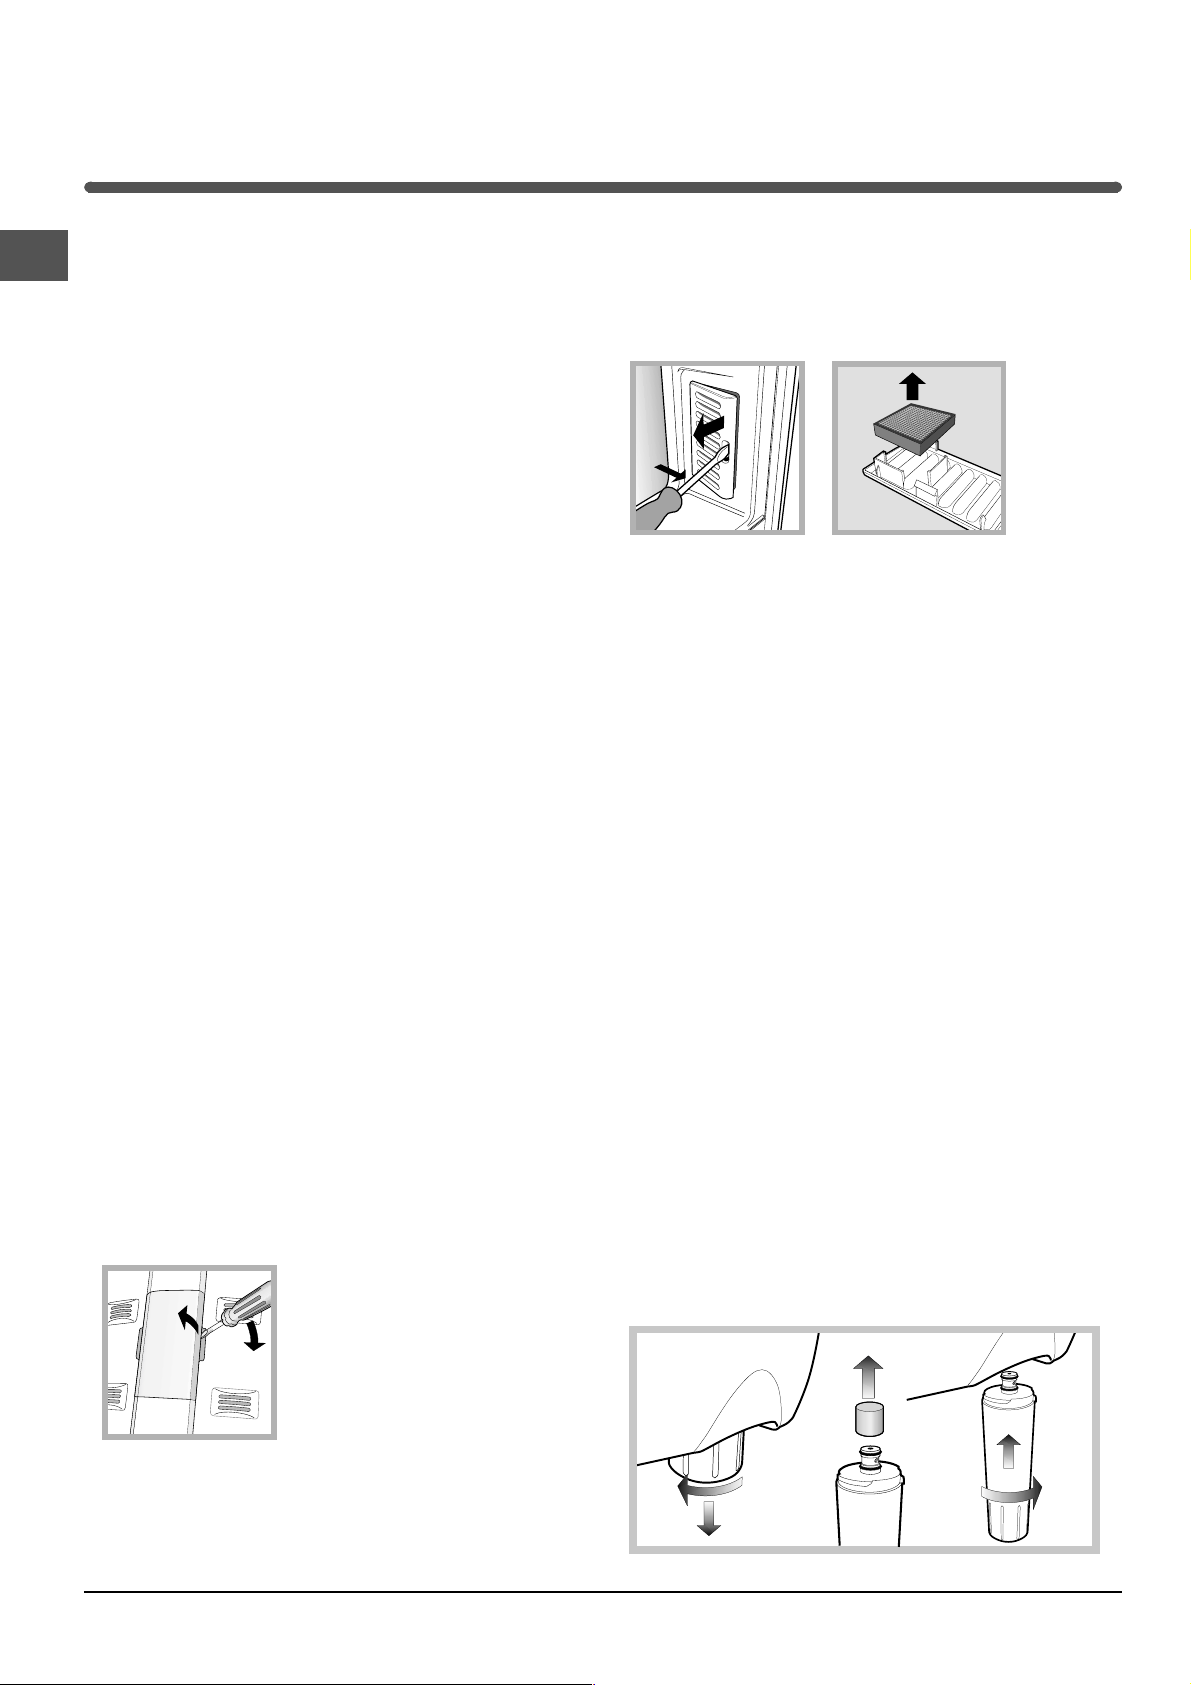
Replacing the light bulb
To replace the light bulb in the refrigerator compartment,
pull out the plug from the
electrical socket.
Access the light bulb as shown
see diagram
(
with a similar light bulb, the
power of which should not
exceed 10 W.
) and replace it
depending on the type of food that is stored. For
information on where a replacement filter may be
purchased, contact Assistance (
replace the filter, follow the instructions (
A and B
).
A
see Assistance
B
see diagrams
). To
Replacing the Aqua Care filter
The Aqua Care system is fitted with an internal meter
which guarantees filtering safety. The filter is guaranteed
for a maximum volume of 1500 l of water, although this
may vary according to the condition and pressure of the
water supply. Once this limit has been reached, the
water supply will stop, the corresponding alarms are
activated (see Troubleshooting) and the filter must be
replaced.
! The filter must always be replaced 6 months after it has
been installed.
! If the filter is replaced without an alarm going off
indicating that the filter is worn out, before replacing it
press the ADJUST/SELECT+ and ADJUST/SELECTbuttons for ten seconds until a message appears on the
display.
Replacing the filter:
1. Deactivate the Aqua Care function (see Display)
2. Unscrew the filter, turning it in an anticlockwise
direction (1/4 turn)
3. After removing the red cap, screw on the new filter by
turning it in a clockwise direction (1/4 turn)
4. Press the RESET ALARM button for approximately
three seconds if the filter alarm has activated (see
Troubleshooting)
5. Activate the Aqua Care function (see Display)
! IOnce the filter has been changed, the message
“Warning - change filter” may appear on the display. This
is a normal system function.
Replacing the l Odour filter
The filter should be replaced after approximately 6-8
months from when it is activated. This period may vary
12
90˚
90˚
Page 13
Precautions and tips
! The appliance was designed and manufactured in
compliance with international safety standards. The
following warnings are provided for safety reasons and
must be read carefully.
This appliance complies with the following
Community Directives:
- 73/23/EEC of 19/02/73 (Low Voltage) and subsequent
amendments;
-89/336/EEC of 03.05.89 (Electromagnetic Compatibility)
and subsequent amendments.
General safety
• The appliance was designed for domestic use inside
the home and is not intended for commercial or
industrial use.
• The appliance must be used by adults only to store
and freeze food products according to the
instructions in this manual.
• The appliance must not be installed outdoors, even in
covered areas. It is extremely dangerous to leave the
appliance exposed to rain and storms.
• Do not touch the appliance with bare feet or with wet
or damp hands and feet.
• Do not touch the internal cooling elements: this could
cause skin abrasions or frost/freezer burns.
• When unplugging the appliance always pull the plug
from the mains socket, do not pull on the cable.
• Do not allow children to tamper with the controls or
play with the appliance. Under no circumstance
should they be allowed to sit on the bins or to hang
from the door.
• Keep packaging material out of the reach of children.
Disposal
• Observe local environmental standards when
disposing of packaging material for recycling
purposes.
• Observe existing legislation and make use of services
provided by local authorities, ensuring that the pipes
are not damaged.
Refrigerants such as isobutane and cyclopentane are
located in the cooling zones and the isolation system
of the refrigerator and freezer.
• Make the appliance unusable by cutting off the cable
and remove any door catches before disposal.
Respecting and conserving the
environment
• Install the appliance in a fresh and well-ventilated
room. Ensure that it is protected from direct sunlight
and do not place it near heat sources.
• Try to avoid keeping the door open for long periods
or opening the door too frequently in order to
conserve energy.
GB
• Before cleaning and maintenance, always switch off
the appliance and disconnect it from the electrical
supply.
It is not sufficient to hold the ON/OFF button down for
more than two seconds to eliminate all electrical
contact.
• In the case of a malfunction, under no circumstances
should you attempt to repair the appliance yourself.
Repairs carried out by inexperienced persons may
cause injury or further malfunctioning of the
appliance.
• Do not use devices or tools other than the special
scraper provided inside the compartments.
• Do not put ice cubes taken directly from the freezer
into your mouth.
• Do not fill the appliance with too much food: cold air
must circulate freely for food to be preserved
properly. If circulation is impeded, the compressor will
work continuously.
• Do not place hot food directly into the refrigerator. The
internal temperature will increase and force the
compressor to work harder and will consume more
energy.
• Regularly check the door seals and wipe clean to
ensure they are free of debris and to prevent cold air
from escaping (
see Maintenance
).
13
Page 14

Troubleshooting
If the appliance does not work, before calling for Assistance (
GB
Malfunctions:
The display is completely switched
off.
The motor does not start.
The display is on but it is dim.
a) The alarms goes off and the lamp
in the refrigerator compartment
flashes.
b) The alarm goes off and a message
appears on the scrolling text of the
display.
c) The alarm goes off and a message
appears on the scrolling text of the
display.
The Aqua Care icon flashes and a
message appears on the display
Possible causes / Solutions:
• The plug has not been inserted into the electrical socket, or not far
• The appliance comes with a motor protection control (
• Pull out and reverse the plug before putting it back in the socket.
a) The refrigerator door has remained open for more than two minutes
b) The temperature of the freezer is too high.
c) The temperature of the freezer has reached a dangerous level. the food
• The Aqua Care filter is about to wear out
see Assistance
enough to make contact, or there is no power in the house.
The buzzer stops when the door is closed or by pressing the RESET
ALARM button. or the correct switching-off procedure was not followed
(
see Maintenance
The freezer will maintain a temperature of around 0°C so that the food
will not refreeze, allowing you to eat it within 24 hours or to freeze it
again after cooking them.
must not be eaten. The freezer will reach a temperature of -18°C.
To switch off the buzzer, press the RESET ALARM button. Press again to
delete the message on the display and to restore normal operation.
).
), check for a solution from the following list.
see Start-up and use
).
Water supply interrupted with repeated
buzzer sounding every two hours and
message appearing on the display
Water supply blocked and message
appearing on the display
The refrigerator and the freezer do
not cool well.
The food inside the refrigerator is
beginning to freeze.
The motor runs continuously.
The appliance makes a lot of noise.
• The Aqua Care filter is worn out and needs to be replaced (see
Maintenance and care)
• The Aqua Care safety blocking system has been activated due to
prolonged supply (5 consecutive minutes). Press the Reset Alarm button
twice (see Display).
• The doors do not close properly or the seals are damaged.
• The doors are opened too frequently.
• The temperature that has been set is too high (
• The refrigerator or the freezer have been over-filled.
• The temperature that has been set is too low (
• The SUPER COOL and/or SUPER FREEZE and/or ICE PARTY functions
are active.
• The door is not closed properly or is continuously opened.
• The outside ambient temperature is very high.
• The appliance has not been installed on a level surface (
)
Installation
• The appliance has been installed between cabinets that vibrate and
make noise.
• The internal refrigerant makes a slight noise even when the compressor
is off. This is not a defect, it is normal.
.
see Start-up and use
see Start-up and use
see
).
).
Early ending of functions
After the filter has been changed, the
message Warning - change filter
appears on the display.
14
• Electrical disturbance on the network or brief interruptions of the power supply
Normal system function
•
Page 15
Assistance
195000000.00
10/2004
Before calling for Assistance:
•
Check if the malfunction can be solved on your own (
see Troubleshooting
).
• If the appliance is still not working and the problem persists despite having carried out all the checks, call
your nearest Service Centre.
model
serial number
Communicating:
93139180000 S/N 704211801
Gross
Bruto
Brut
75
Test
P.S-I.
TI
Net
Util
Utile
Pressure
HIGH-235
LOW 140
Cod.
Gross
Bruto
Brut
W
Fuse
A
Freez. Capac
Poder de Cong
4,0
kg/24 h
Max 15 w
Class
Clase
Classe
N
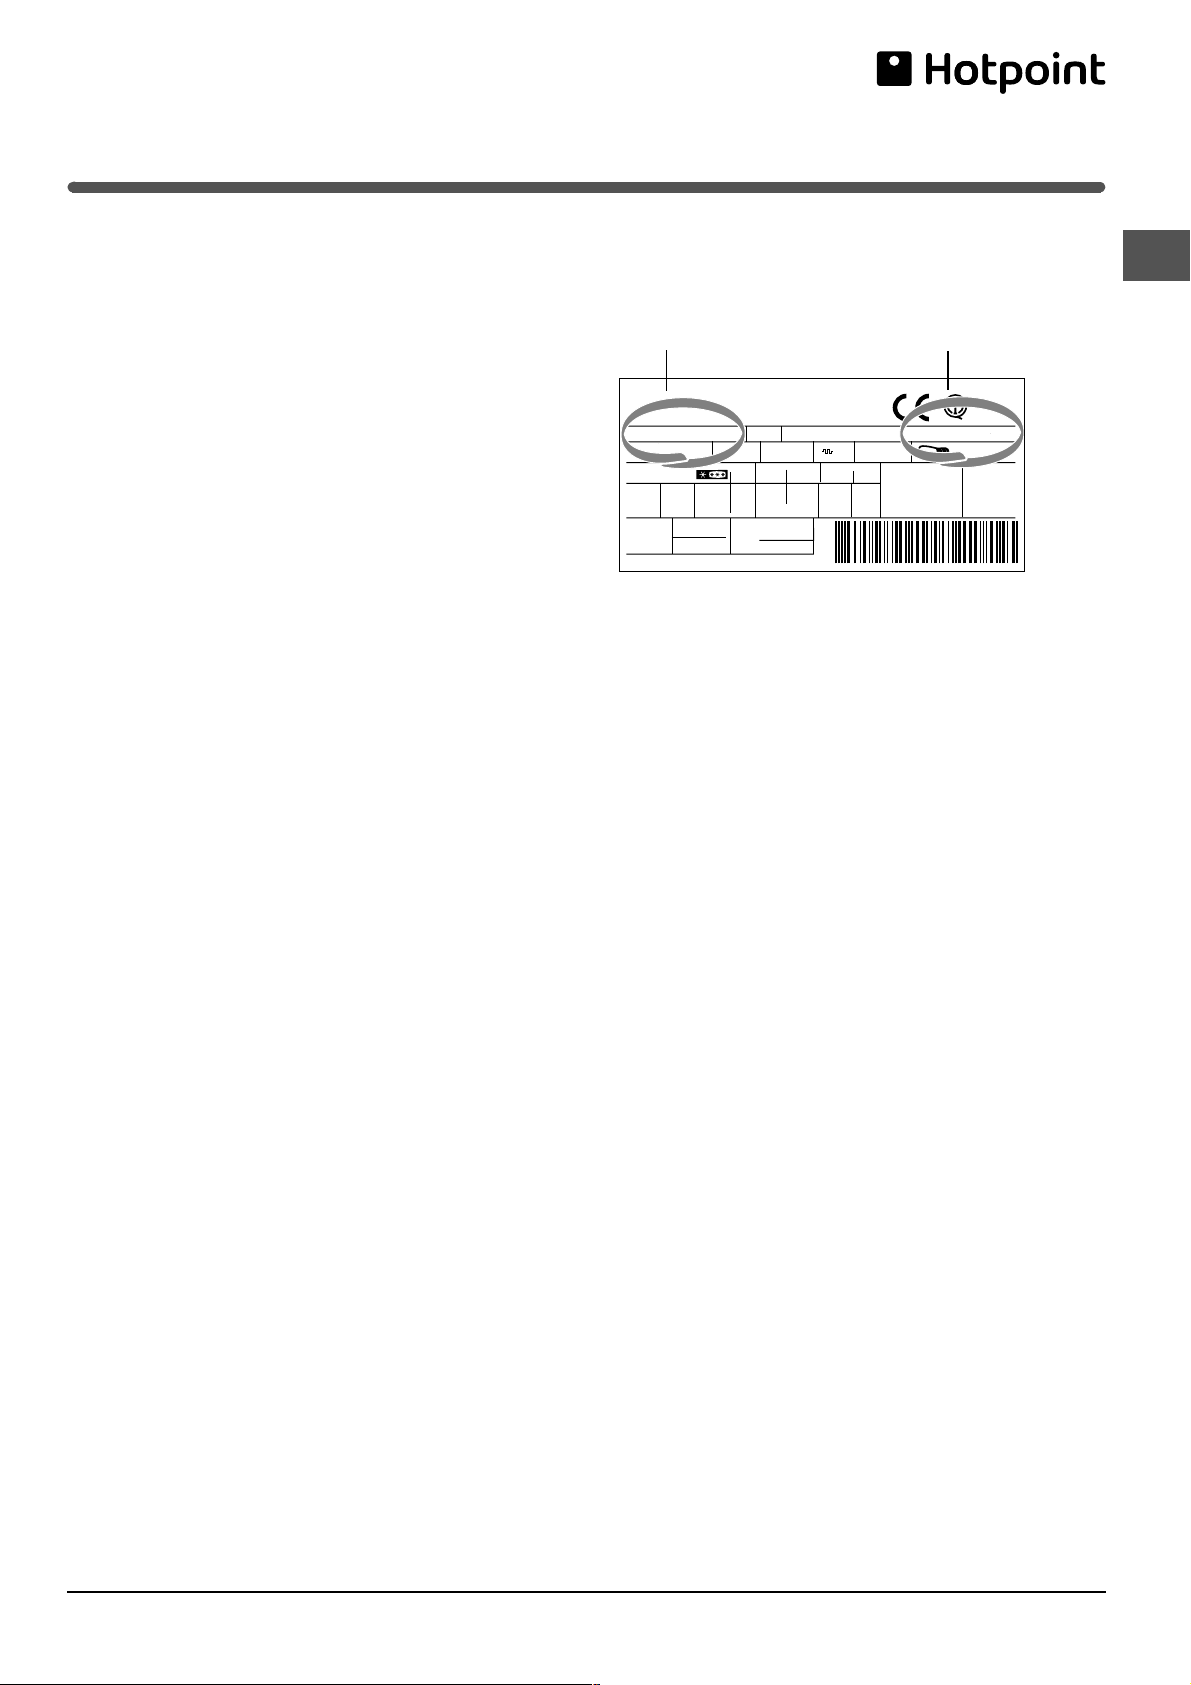
• type of malfunction
• appliance model (Mod.)
• serial number (S/N)
This information can be found on the data plate
located on the bottom left side of the refrigerator
compartment.
RG 2330
Mod.
220 - 240 V- 50 Hz 150 W
340
Total
Gross
Bruto
Brut
Compr.
R 134 a
Syst.
kg 0,090
Kompr.
Made in Italy 13918
Never use unauthorized technicians and never accept replacement parts that are not original
GB
15
Page 16

GB
Notes
16
Page 17

Notes
GB
17
Page 18
GB
After Sales Service
"No company is better positioned to offer an after sales service on a
Hotpoint appliance than us - the manufacturer"
As part of our commitment to you, all Hotpoint appliances have the added benefit of a fully inclusive parts
and labour guarantee for the first 12 months. In addition to this you also have the advantage of free
replacement parts for the first 5 years when fitted by a Hotpoint
engineer. When the 12 months parts and labour guarantee expires we offer the following after sales
service options:
Repair Service and Information Help Desk
UK: 08709 066066
www.theservicecentre.co.uk
Republic of Ireland: 1850 302 200
Note: Our operators will require the Model number and the Serial number of your appliance
Available 364 days a year with a fast, effective and value for money service. We have the largest white
goods repair service in the UK with over 1200 of our own fully trained engineers. All repairs include a
parts and labour guarantee for 12 months from the date of the repair.
If you require any information or have any questions about your appliance, our operators are on hand with
help and advice.
All this ensures that you will receive the best available after sales service possible.
Extended Warranties
UK: 08709 088 088
www.theservicecentre.co.uk
Republic of Ireland: 1850 502 200
Whether you have just one or a number of Hotpoint appliances in your kitchen, we offer two service cover
plans to give you total peace of mind.
- Repair Protection Plan - FREE service repairs for a single Hotpoint appliance during the
period of cover.
- Kitchen Cover - FREE service repairs for all your Hotpoint appliances less than 8
years old.
Genuine Parts and AccessoriesUK: 08709 077 077
www.theservicecentre.co.uk
Republic of Ireland: (01) 842 6836
A wide range of genuine parts and accessories are available from our hotline or through our web site.
Genuine parts and accessories, extended warranties and service repairs are all
available on our web-site at:
18
www.theservicecentre.co.uk
Page 19
Guarantee
"Satisfaction guaranteed or your money back"
We give you a unique 'satisfaction guaranteed' promise - valid for 90 days - after you have
purchased your Hotpoint appliance. If there is a technical problem simply call Hotpoint Repair service
or visit our web-site at www.theservicecentre.co.uk and where necessary, we will arrange for an
engineer to call. If the technical problem is not resolved under this guarantee, we will replace your
machine or, if you prefer, give you your money back.
All Hotpoint appliances carry a fully inclusive 12 month parts and labour guarantee as well as free
replacement parts for the first 5 years (except microwaves, selected integrated appliances and cooker
hoods, which have a one year guarantee) provided that they are fitted by a Hotpoint engineer.
Guarantee terms and conditions
Your guarantee is only applicable in the United Kingdom or Republic of Ireland and is subject to the
following provisions that your appliance:
- Has been installed and used correctly in accordance with this instruction booklet.
- Has been used solely for domestic purposes and is located on domestic premises (ie. not for
commercial or trade use).
- Has been properly connected to a suitable electrical supply voltage as stated on the appliance
rating plate.
- Has not been subject to misuse, accident, modified or repaired by anyone other than one of our
own service engineers.
GB
For pre purchase information on any other Hotpoint product call: 08701 50 60 70
or visit: www.hotpoint.co.uk
Recycling & Disposal Information
As part of Hotpoint's continued commitment to helping the environment, Hotpoint reserves the right to
use quality recycled components to keep down customer costs and minimise material wastage.
Please dispose of packaging and old appliances carefully.
To minimise risk of injury to children, remove the door, plug and cut mains cable off flush with the
appliance. Dispose of these parts separately to ensure that the appliance can no longer be plugged
into a mains socket, and the door cannot be locked shut.
19
Page 20
Key Contacts
After Sales Service
Over 1200 trained specialists, directly employed by us, ensure that you can have complete confidence in
both the appliances and services we offer.
Repair Service and Information Desk
UK: 08709 066 066
(Open 8 to 8 Mon - Fri, 8 to 6 Sat, 10 to 4 Sun & Bank Holidays)
www.theservicecentre.co.uk
Republic of Ireland: 1850 302 200
Note: Our operators will require the following information:
Model number:
Serial number:
Extended Warranties
UK: 08709 088 088
(Open 8 to 8 Mon - Sun)
www.theservicecentre.co.uk
Republic of Ireland: 1850 502 200
Genuine Parts and Accessories
UK: 08709 077 077
(Open 8-30 to 5-30 Mon - Fri & 9 to 12 Sat)
www.theservicecentre.co.uk
Republic of Ireland: (01) 842 6836
195.0481.03.00
Indesit Company UK Ltd. Morley Way, Peterborough, PE2 9JB.
November 2004
 Loading...