

Page 1

User Instructions
for Model
FFU00
Page 2
Electrical Supply
WARNING:This appliance must be earthed.
Fuses
Your appliance comes fitted with a plug and a 13A fuse.
If you need to replace the fuse,only those rated at 13A and ASTA
approved to BS1362 should be used.
WARNING:Do not use the plug unless the fuse cover is fitted.
Changing the plug
Cut off and dispose of the supplied plug if it does not fit your socket.
WARNING:To avoid a shock hazard do not insert the discarded plug into a socket anywhere
else.
IMPORTANT:WIRES IN THE MAINS LEAD ARE COLOURED IN ACCORDANCE WITH THE
FOLLOWING CODE:
Green / Yellow - Earth
Blue - Neutral
Brown - Live
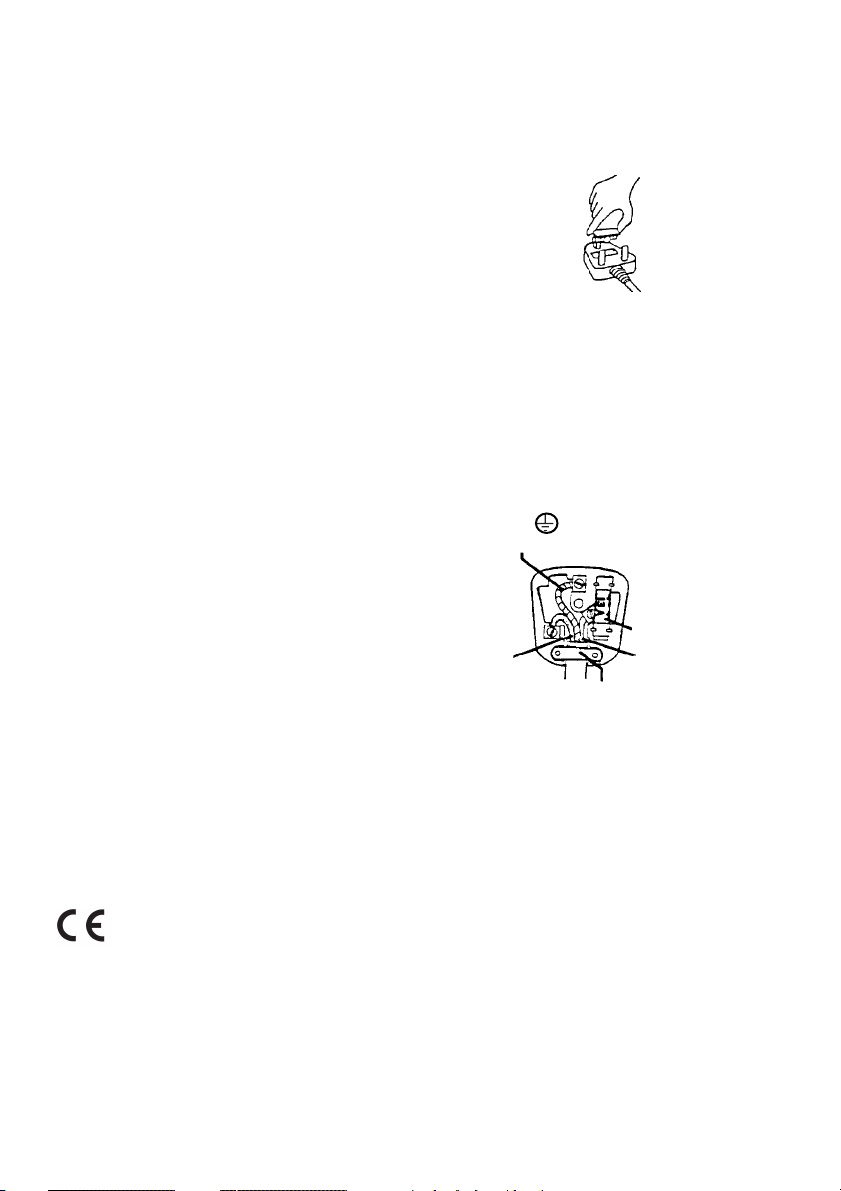
If you change the plug, the colour of
the wires in the mains lead may not
correspond with the colour of the
markings identifying terminals in the
plug. You should therefore wire it as
shown.
Green and yellow (Earth) wire to
terminal marked ‘E’, symbol ,
or coloured green and yellow.
Blue (Neutral) wire to terminal
marked ‘N’or coloured black.
Cord
clamp
13A ASTA approved fuse
to BS1362.
Brown (Live) wire to
terminal marked ‘L’or
coloured red.
Changing the Mains Lead
A special lead can be ordered from your Service Department:
UK: 08709 066 066 or
Republic of Ireland: 1850 302 200
If you have damaged the existing lead or require a longer one a charge will be made.It is
strongly advised that this work is carried out by a qualified electrician.
CE marking certifies that this appliance conforms to the following EEC directives:Low Voltage Equipment - 72/23/EEC & 93/68 EEC
Electromagnetic Compatibility - 89/336/EEC, 92/31/EEC & 93/68/EEC
Retention of the instruction Book
This instruction Book must be kept handy for reference as it contains important details on
the safe and proper use of the appliance.
If you sell or pass the appliance to someone else,or move house and leave it behind,make
sure this Book is also provided so the new owner can become familiar with the appliance
and safety warnings.
2
Page 3

Contents
Page
Electrical requirement 2
Safety advice 4
Installation 5-10
Get to know your Appliance 11-13
The controls 14-16
Storing food 17-18
Care & Cleaning 19
Troubleshooting 20-24
Guarantee 26
Recycling & Disposal information 26
After sales service 27
Key contacts back cover
3
Page 4

Safety advice
* Please take time to read this booklet
before installing and switching on this
appliance.The manufacturer assumes
no responsibility for incorrect
installation and usage.
* If this appliance is to replace an old
refrigerator with a lock, break or remove
the lock as a safety measure to avoid the
danger of children playing with the
refrigerator and locking them inside.
* Do not twist and bend the mains lead and
keep it away from hot surfaces.
* Do not let children play with the appliance.
* Do not sit or stand on the appliance.
* Do not use sharp metal objects for
removing any ice build up in the freezer
compartment, as this could cause damage
to the refrigeration system.
* Old refrigerators and freezers contain
insulation gases and refrigerant that must
be disposed of properly.Please ensure that
none of the tubing at the back of the
appliance gets damaged.
* Do not put the plug into the power supply
with wet hands.
* Do not store poisonous, flammable or
dangerous substances in your freezer.
* Do not store carbonated (fizzy) drinks or
medicines in the freezer compartment.
* Do not eat iced lollipops or other such
things direct from the freezer
compartment as this could cause low
temperature skin burns, always leave
for a few minutes before eating.
* Do not touch the surfaces inside the
freezer compartment with wet hands as
this could cause low temperature skin
burns.
* Do not use aerosol sprays for defrosting or
cleaning your appliance.
4
Page 5

Installation
WARNING:THE APPLIANCE SHOULD
ONLY BE INSTALLED BY A QUALIFIED
PERSONNEL IN COMPLIANCE WITH THESE
INSTRUCTIONS, CURRENT STANDARDS
AND REGULATIONS.
Before Fitting:
Please read through this section before
starting any work.
Choosing a Location:
Do not install your appliance in a room where
the temperature goes below 5˚C, this will
affect the appliances performance.
The power socket should be in a readily
accessible position, adjacent to the appliance.
DO NOT connect to the electricity supply until
all installation is complete.
Place the appliance in a dry and regularly
ventilated room.
Never place the appliance near heat emitting
devices (eg.cooker, radiator,water heater or
similar devices) and do not expose it to direct
sunlight. In such a position your appliance
will have to work harder and will cost more to
run and could be damaged by the heat.
Door Removal:
If your access door is too narrow for the
appliance to pass through, you will need to
remove both doors - pass the appliance
through the access door,in its upright
position - then refit the doors on the other
side (see Door Removal instructions - pages 6
& 7).
Water Supply:
Your appliance has an ice maker and cool
water dispenser function and therefore needs
to be connected to a cold water supply before
use (see Feed Water Tube / Plumbing
Installation instructions - page 8 and 9).
Levelling
Level both doors by adjusting the left and
right hand height adjusting screws.
With the doors aligned they will close
correctly and this helps the appliance to run
efficiently (see Height Adjustment instructions
- page 10)
Ensure that you provide adequate air
circulation around the appliance,to prevent
condensation.
Leave at least 300mm free space above and
50mm or more from the wall.
Also,the appliance should be elevated 25mm
from the floor,especially if it is carpeted.
Providing you follow the recommended
ventilation requirements you will:
* Prolong the life of your appliance.
* Minimise the risk of condensation on the
outside of the appliance.
* Minimise the running costs.
* Minimise operating sounds caused by
vibration.
5
Page 6
Installation
WARNING:ENSURE THE APPLIANCE IS NOT
CONNECTED TO THE ELECTRICITY SUPPLY
BEFORE INSTALLING.
You may need to remove both doors for the
appliance to fit through access doors follow the instructions below:
WARNING:YOU MAY NEED ASSISTANCE TO
DO THIS - THE DOORS ARE HEAVY AND
SHOULD BE SUPPORTED AT ALL TIMES TO
AVOID DAMAGE AND INJURY.
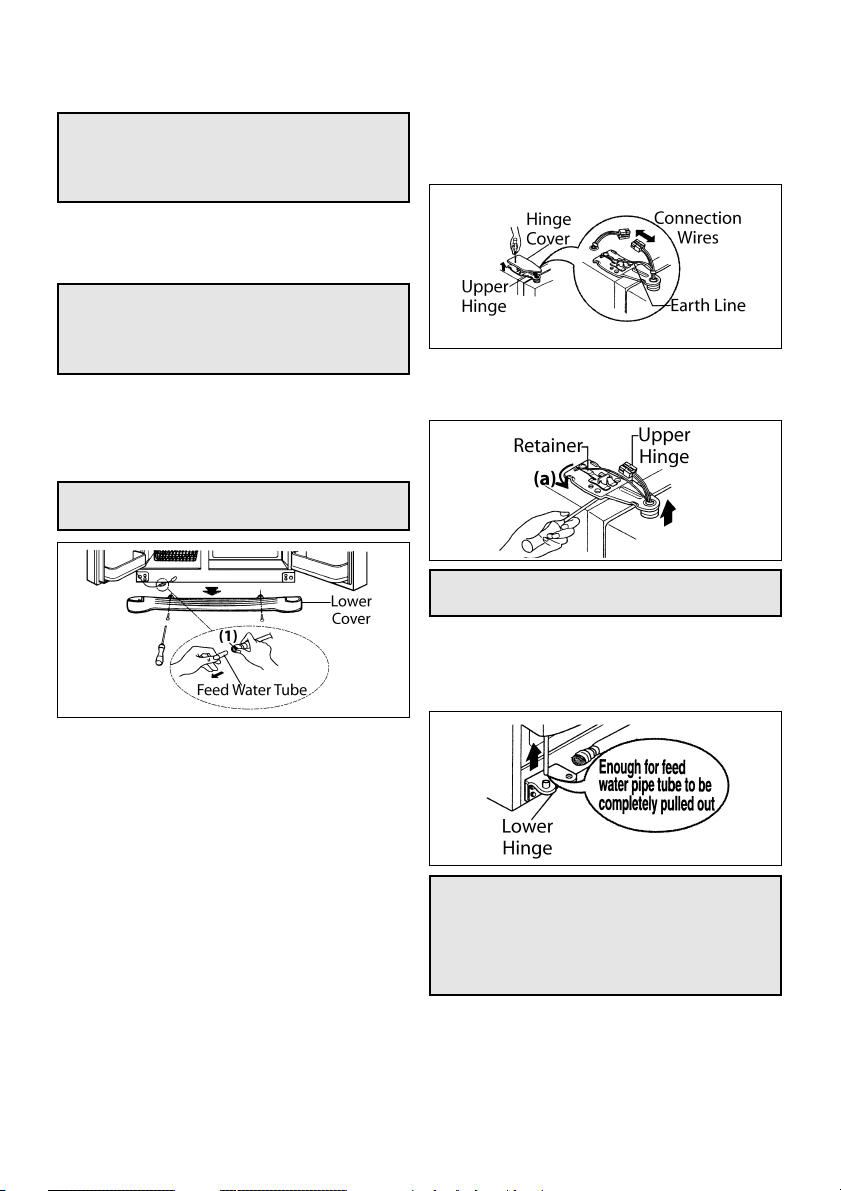
Feed Water Tube:
* Remove the lower cover by lifting upwards.
* Pull out the feed water tube, while pressing
area (1) indicated in Fig.1
NOTE: Cut away any tube end which is
misshapen or worn
Remove the Freezer Compartment Door:
* Loosen the screws in the upper hinge
cover and remove. Separate all connection
wires, except for the earth line (Fig.2).
Fig.2
* Remove the retainer by rotating it anti-
clockwise (a - Fig.3), then remove the
upper hinge by lifting up.
Fig.3
Fig.1
6
NOTE: Support the door when removing
the upper hinge.
* Remove the freezer compartment door by
lifting it up off the lower hinge.
Lift enough so that the feed water tube is
completely pulled out (Fig.4)
Fig.4
NOTE: Carry the freezer compartment
door through the access door and lay it
down on suitable material eg.the original
packaging.
Take care not to bend or damage the feed
water tube.
Page 7

Installation
Remove the Fridge Compartment Door:
* Loosen the upper hinge cover screws and
remove the cover (Fig.5).
Fig.5
* Remove the retainer by rotating it
clockwise (b - Fig.6), then remove the
upper hinge by lifting up.
Fig.6
Door Replacement:
* Replace both doors by following the
removal instruction in reverse order.
NOTE: Support the door when removing
the upper hinge.
* Remove the fridge compartment door by
lifting it up, off the lower hinge (Fig.7).
Fig.7
NOTE: Carry the fridge compartment door
through the access door and lay it down
on suitable material eg.the original
packaging.
Pass the appliance through the access door,
in its upright position (Fig.8)
Fig.8
7
Page 8
Installation
●
FIRST CHECK YOU HAVE THE CORRECT
ITEMS:
- Pipe / Filter Kit comprises:
* 1 x Water Filter
* 2 x Self-Adhesive Fixing Plates
* 2 x Cable Ties
* 1 x 10m Water Pipe
- Adaptor Kit comprises:
* Plastic Pipe Connector
* Rubber Washer
* Threaded Tap Connector
●
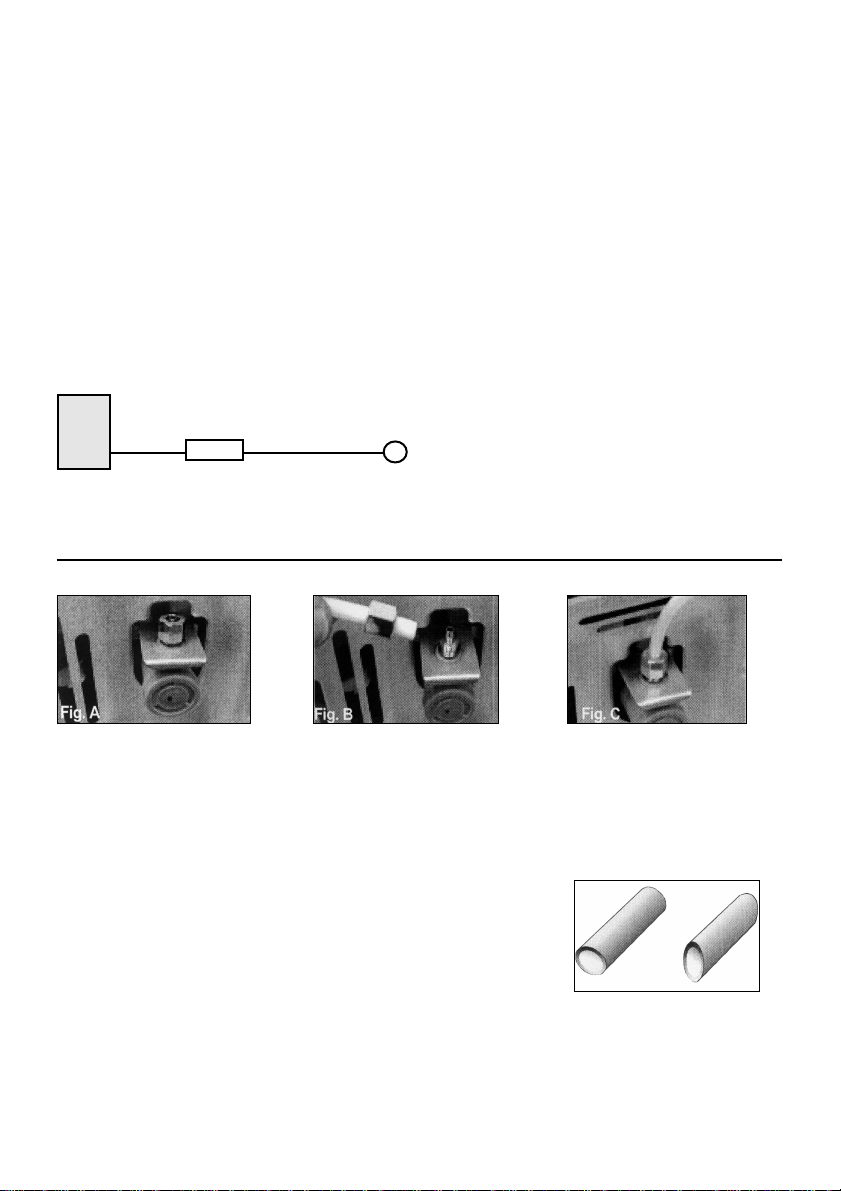
NEXT,HAVE A LOOK AT THE DIAGRAM
BELOW TO VISUALISE HOW THE
APPLIANCE SHOULD BE CONNECTED:
Fridge
Water Pipe
●
Connection to the Appliance:
* At the back of the
appliance you will see
the water inlet valve
(Fig.A)
Filter
Water Pipe
Tap
* Unscrew the metal
threaded collar and
place it over one end of
the water pipe (Fig.B)
* You now need to cut the water pipe to the right length for the
connection of the water filter.
It is suggested that approximately 1.5m of pipe is used - this
should allow the filter to be located in an easily accessible
position (as the water filter should be replaced approximately
every 6 months, according to use and conditions) and also allow
some slack in the pipe behind the appliance, so that it can be
pulled out for cleaning or servicing purposes.
You must also ensure that the cut is square and not at any
sort of angle as this could cause a leak.
* Push the water pipe
onto the water inlet
valve firmly, tighten up
the metal collar (Fig.C)
✓
✗
8
Page 9
Installation
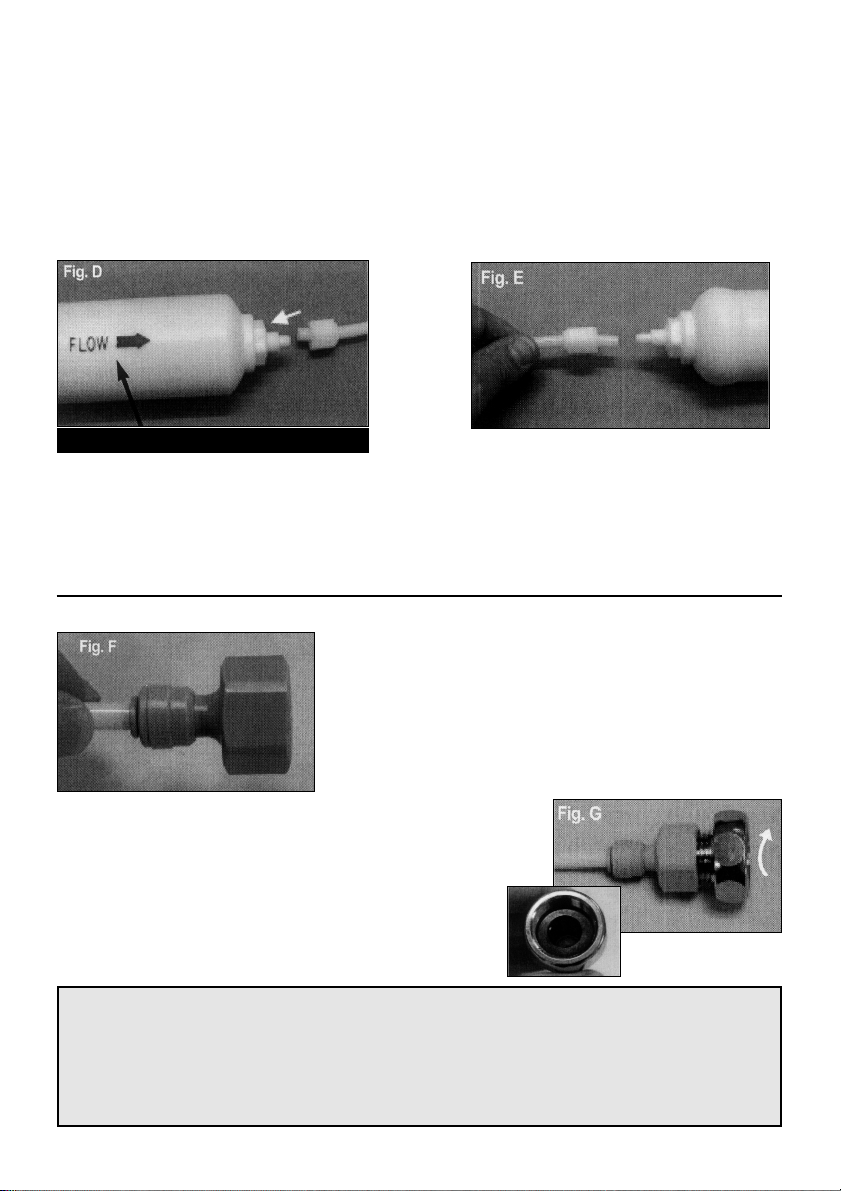
●
Connection of Water Filter:
* Now you have to cut the pipe to the length it needs to be to run from the back of the
appliance and attach to the water filter.
NOTE: The water filter is marked with an arrow to show the direction of water flow (ie.from
supply tap to appliance).
Remember however,that the connection process is being done FROM the appliance TO the
tap (ie. in reverse of the water flow when in use).
Note the direction markings on the filter
* Unscrew the threaded connector and
place it over the end of the cut
section of pipe coming away from
the appliance. Push the pipe over the
end of the water filter that the arrow
points to and tighten the threaded
connector (Fig.D)
●
Connection to the Water Tap:
* Cut the pipe that is connected to the water filter to the
correct length. Again, make sure that the cut is nice and
square to avoid leaks.
* Push the pipe into the smaller hole of the connector
supplied in the adaptor kit. The pipe should be held
firm (Fig.F)
* Place the threaded tap connector over the long part of
the brass flange. Firmly push the flange into the other
end of the water connector (Fig.G)
* Place the rubber washer inside the threaded tap
connector and screw onto the water tap.
●
FINALLY: Plug in and switch on the electricity supply. Turn on the water supply tap.
Check for any leaks. Ensure selection is set to ‘water’(see page 15) push a cup under
the dispenser to verify that water is flowing. When all working OK, move the appliance
into its final location - your appliance is heavy and care should be taken when moving
it, also do not trap or kink hoses at the back of the appliance. Replace the lower cover.
Mount the water filter in an accessible position using the self-adhesive fixing plates
and cable ties supplied.
* Repeat on the other end of the water
filter,using the remainder of water
pipe (Fig.E)
* Run this section of water pipe from
the water filter to the water supply
tap, making sure it is not trapped or
kinked at all.
9
Page 10

Installation
Height Adjustment:
Levelling both doors using the height
adjustment screws. With the doors level they
will close smoothly.
If the doors do not close correctly it will affect
the performance of your appliance.
* If the freezer compartment door is lower
than the fridge compartment door,adjust
the left hand adjustment screw (Fig.10).
Level the door by inserting a flat (- type)
driver into the groove of the left hand
adjustment screw and rotate it clockwise.
Fig.10
* If the freezer compartment door is higher
than the fridge compartment door,adjust
the right hand adjustment screw (Fig.11).
Level the door by inserting a flat (- type)
driver into the groove of the right hand
adjustment screw and rotate it clockwise.
Fig.11
10
Page 11

Get to know your Appliance.
Before using you appliance for the first time,
wipe off any dust and clean thoroughly (see
Cleaning instructions - Page 17).
Unpack and install accessories in their proper
Fig.12
19
18
17
16
places - they are packed together to prevent
possible damage during transit.
See features picture below (Fig.12) to
familiarise yourself with your appliance:
1
2
3
4
5
6
7
8
15
14
1. Covered Dairy Rack
2. Lamps
3. Refrigerator Commodity Rack
4. Wine Bottle Holder
5. Snack Drawer
6. Egg Holder
7. Refrigerator Shelf
8. Vegetable compartment cover
9. Vegetable compartment / Salad Bin
10. Vegetable compartment / Meat Drawer
13
12
11. Humidity Switch
12. Vegetable / Meat Conversion Switch
13. Lower Cover
14. Freezer Commodity Rack
15. Freezer Drawer
16. Freezer shelf
17. Water / Ice Dispenser Unit
18. Automatic Ice Maker
19. Ice Maker On / Off Switch
11
9
10
11
Page 12

Get to know your Appliance.
●
Make the most of interior storage space by
repositioning shelves to suit the various
items you wish to store.
Refrigerator Shelf:
To separate a shelf:
●
Lift shelf up in direction shown 1 in Fig.13.
●
Separate by lifting,direction 2 in Fig.13.
Fig.13
Fig.14
To install a shelf:
●
Hold shelf at an angle,
place at required
position and push into
the grooves, 1 in
Fig.14.
●
Then lower the front
end and again push
into the grooves,2 in
Fig.14.
NOTE:
●
Ensure both sides are fitted at the same
height.
Freezer Shelf:
To remove:
Hold at both ends, push the shelf in to the
left, at the same time lift up at the right
and take out.
To install:
Hold both ends, at an angle so that the left
hand side is in position. Push in to the left
and pull down until the right hand side
locates into position.
Wine Holder:
Fig.15
Commodity Rack:
●
Commodity racks provide storage in the
doors. The covered commodity rack is
recommended for the storage of dairy
items such as butter,margarine and
cheese.
To remove:
Lift the commodity rack, holding both
sides and pull out.
Egg Box:
●
Store eggs in the egg box in the
refrigerator compartment - DO NOT store
in the freezer compartment.
NOTE:
●
Wipe,don’t wash eggs.
●
Bottles are
stored laterally
in the wine
holder.
●
The wine
holder can be
attached to
any shelf in the
refrigerator
compartment.
●
Place the wine
holder at the
side of the
shelf and push
it in along the
shelf edge.
●
Remove it by
pulling it
gently forward
and out.
Vegetable compartment / cover:
The vegetable drawer can be removed by
sliding it out from position.
To remove the cover:
Pull out the vegetable drawer a bit,lift the
cover at the front and pull out.
12
Page 13

Get to know your Appliance.
Humidity Control Switch (Fig.16):
The humidity in the salad / vegetable
compartments can be controlled by adjusting
the switches on the top left of the drawers.
Fig.16
Convert into a Vegetable or Meat
Compartment (Fig.17):
●
The bottom drawer in the refrigerator can
be converted into a vegetable OR meat
compartment.
●
The meat compartment maintains a lower
temperature than the rest of the
refrigerator, so that meat and fish can be
stored fresh for longer.
NOTE:
●
Remember to check setting of
conversion switch before loading food
items - vegetables and fruit will freeze if
placed in drawer set to ‘Meats’!
Fig.17
13
Page 14

The controls
Starting:
●
When your appliance is first installed
leave it to stand in its final location for
2-3 hours, to allow the refrigerant to
settle, before loading it with fresh or
frozen foods.
●
If operation is interrupted,wait 5
minutes before restarting.
Function Display Board
Water/Ice
output
Dispenser
push
switch
Humidity
Switch
How to Adjust the Temperature of the
Freezer Compartment:
●
When the appliance is first switched on
and also after a power cut, the temperature
control will be lit at setting 3 (Normal Mid setting).
●
Pressing the button will change the
temperature setting:
Higher number - Colder
Lower number - Warmer
●
Setting 3 (Normal) is usually suitable - but
the appropriate setting will depend on the
appliance location, room temperature, how
often the door is opened and amount of
stored food.
How to Adjust the Temperature of the
Refrigerator Compartment:
Function Display Board:
Temperature Temperature Dispenser
adjustment adjustment selection
button for button for button.
freezer refrigerator
compartment. compartment.
14
●
When the appliance is first switched on
and also after a power cut, the temperature
control will be lit at setting 3 (Normal Mid setting).
●
Pressing the button will change the
temperature setting:
Higher number - Colder
Lower number - Warmer
●
Setting 3 (Normal) is usually suitable - but
the appropriate setting will depend on the
appliance location, room temperature, how
often the door is opened and amount of
stored food.
Page 15

The controls
Dispenser Selection Button:
●
When the appliance is first switched on
and also after a power cut, the crushed ice
function will be lit .
●
Pressing the button will allow you to
choose the different dispenser functions:
Crushed Ice,Water or Cubed Ice.
Automatic Ice Maker and Dispenser:
Water is cooled while stored in the water tank
in the refrigerator compartment and then
sent to the dispenser.
NOTE: It is normal that the water is not
very cold at first.
The Ice Maker On/Off Switch controls water
going into the ice maker. Make sure when ice
is required that this switch is in the ‘ON’
position.
Ice is made in the automatic ice maker and
sent to the dispenser divided into crushed or
cubed ice.
●
It takes about 12 hours for a newly
installed appliance to make ice!
How to Use the Dispenser:
Select your required dispenser function.
Then gently press in the dispenser push
switch with a glass or similar container.
Crushed Ice:
Press the selection button
until crushed ice function
light illuminates.
●
Crushed ice will be
dispensed by pressing
the dispenser push
switch with a glass.
●
Hold your glass under
the dispenser outlet
after releasing the
dispenser push switch to
allow any left over ice to
be dispensed.
Wat er:
Press the selection button
until water function light
illuminates.
●
Water will be dispensed
by pressing the
dispenser push switch
with a glass.
●
Hold your glass under
the dispenser outlet
after releasing the
dispenser push switch to
allow any left over water
to be dispensed.
Cubed Ice:
Press the selection button
until cubed ice function
light illuminates.
●
Crushed ice will be
dispensed by pressing
the dispenser push
switch with a glass.
●
Hold your glass under
the dispenser outlet
after releasing the
dispenser push switch to
allow any left over ice to
be dispensed.
Humidity Switch:
In low room temperatures,turning ‘ON’the
Humidity Switch reduces condensation on the
dispenser panel.
NOTE:
●
Remove the water collector cover and
wipe away any spilt water.
●
If cubed ice is selected after crushed ice,
there may still be some crushed ice left
to dispense.
●
A ‘click’sound will be heard a few
seconds after the ice is fully dispensed This sound is made when the ice outlet
is closed.
●
Ensure the glass is a suitable size and
held clear of the ice outlet - a glass
placed too close could block the release
of the ice.
WARNING:
●
Children should not be allowed to play
with the appliance or tamper with the
controls.
15
Page 16

The controls
Automatic Ice Maker:
●
8 pieces of ice can be made at a time,80
pieces a day. But these quantities may vary
according to various conditions,such as
the location of the appliance and how
many times the door is opened and closed.
●
Ice making stops when the ice storage bin
is full.
WARNING:
●
The initial amount of ice and water
dispensed may contain particles from
the feed water tube.
Therefore we recommend you discard
approximately, the first 20 pieces of ice
and the first 7 glasses of water
dispensed straight after installation and
again if the appliance has not been
used for a long time.
NOTE:
●
It is normal to hear a noise when ice
is dropped into the ice storage bin.
●
Never store drink cans or other foods in
the ice storage bin for the purpose of
rapid cooling - this could damage the
appliance.
●
Never use thin crystal glass or crockery
to collect ice.
●
Never touch the ice outlet by hand or
using a tool of any kind - this could
cause damage or injury.
●
Never remove the ice maker cover.
●
Level the surface of the ice in the ice
storage bin to ensure ice production
continues to its full capacity.
●
Ensure food packages do not block the
ice passage,from the Automatic Ice
Maker to the Dispenser Unit
●
If ice is not used regularly,it may lump
together. When this happens, remove the
lumps of ice from the ice storage bin -
break them into small pieces and return
the smaller pieces to the ice storage bin.
●
If the ice maker frequently has lumped
together ice or it produces too small cubes
- the amount of water supplied to the ice
maker may need to be adjusted.Contact
Hotpoint service, see back cover.
WARNING:
●
If discoloured ice is dispensed,stop
using and contact Hotpoint service, see
back cover.
16
Ice Storage Bin Removal:
NOTE:
●
It is recommended NOT to dismantle
the ice storage bin unless it is necessary.
●
Hold the ice
storage bin as
shown, pull it
out (2) while
slightly lifting at
the front (1).
●
Be sure to use
both hands when
removing
the ice storage
bin, so as not to
drop it!
●
If the ice storage
bin does not fit
well, rotate the
‘rotating device’
slightly.
Door Open Alarm:
●
An alarm will sound 3 times when either
the freezer or the refrigerator door is left
open for more than 1 minute.
●
This alarm will be rung at intervals of 30
seconds until the door/s are closed.
●
If the door alarm does not stop when the
door/s are closed contact Hotpoint service,
see back cover.
Self-diagnosis (fault detection) function:
●
The self-diagnosis function operated when
a problem occurs.
●
When an error does occur DO NOT turn the
power off and contact Hotpoint service
immediately,see back cover.
(If the power is turned OFF, it will take the
engineer longer to trace the fault).
NOTE:
●
When a fault occurs, pressing any
function buttons will not alter the
temperature settings.
Page 17

Storing food
Making the best use of your
Appliance
To ensure that your appliance operates as
efficiently as possible:
* Follow packaging “best by/use by”
instructions or your suppliers advice on
a suitable maximum storage time.
* Keep foods covered to retain moisture
and prevent flavour/odour
transference.Plastic bags, aluminium
foil, plastic stretch wrap and containers
with lids are ideal.
* Select chilled and frozen food last
when shopping, transport in a ‘coolbag’
and place in appliance as soon as
possible after arriving home.
* Avoid opening the doors unnecessarily
or for longer than needed.
* Allow hot or warm food to cool down
in covered containers before placing in
appliance, as placing hot food in the
appliance reduces efficiency.
* Prepare fresh foods for freezing in
small quantities to ensure that the food
freezes quickly,therefore retaining its
quality.
* Ensure all packets / containers of food
are dry before freezing, otherwise they
may freeze together.
Warning: Do not use to store poisonous,
flammable or dangerous substances,
your appliance has been designed for the
storage of edible foodstuffs only.
Storing food in a freezer
* Freeze and store either fresh food or
long term commercially frozen foods.
* Generally speaking long term storage
means up to 3 months but this can
vary,so always follow your supplier’s
recommendations.
* Place frozen food in the freezer
compartment as soon as possible after
buying it.
* When storing frozen food such as ice
cream for a long period,store it on the
shelves, not in the commodity rack
* Liquid-filled bottles or sealed fizzy
drinks must not be stored in freezer, as
they may burst.
* Lollipops and water ices should not be
given to children directly from the
freezer.The low temperature may
cause ‘freezer burns’.
* Store ice cream towards the top front
of the freezer and remove from freezer
15-30 minutes before serving.
* Ensure food is labelled and dated
before placing in freezer.
* Once thawed, food should be cooked
and eaten within 24 hours or cooked
and refrozen.
Storing Food in a Fridge
* Pack and store cooked and fresh food
separately.
* Wrap raw or defrosting meat and
poultry in polythene or foil and store
below cooked foods and dairy
products to avoid contamination of
dripping food juices.
* Wrap cheese in greaseproof paper and
place in an airtight polythene bag.
Bring to room temperature before
consuming.
* Empty left over canned food into a
covered storage containers before
placing in fridge.
* Position food to allow cold air to
circulate freely, ensuring nothing
comes into contact with the cooling
plate at the back of the appliance.
* Avoid placing moist food on the top
refrigerator shelves,it could freeze
from direct contact with chilled air.
17
Page 18

Storing food
Location of Foods:
Wine bottle holder
Store wine
Snack drawer
Freezer compartment
shelf
Freezer commodity rack
Freezer drawer
Covered dairy rack
Egg Holder
Refrigerator commodity
rack
Store items such as bread,snacks etc.
Store various frozen foods such as meat,fish, ice
cream, frozen snacks etc.,
Store small packed frozen food.
Temperature is likely to increase as the door is
opened, so do not store long term frozen food,such
as ice cream etc.
Store meat, fish, chicken etc.(after wrapping them).
Store products such as butter,cheese etc.
Store eggs only - place this box in its proper location.
Store small packed food or beverages such as milk,
juice, beer etc.
Refrigerator shelf
Vegetable drawer
Vegetable / Meat
conversion drawer
18
Position food to allow cold air to circulate freely.
Store vegetables or fruit.
Store vegetables,fruit
meat to thaw,raw fish etc.
Setting the conversion switch as necessary.
Be sure to check the conversion switch setting before
storing foods.
Page 19

Care & Cleaning
WARNING:
●
Switch off the electricity supply and pull
out mains plug before cleaning.
Interior
* Remove salad bins, racks, shelves and
baskets - wash in warm water and washing
up liquid using a soft cloth, dry thoroughly.
Do not put in a dishwasher.
* Wipe the interior and fittings with a clean
cloth wrung out in a solution of either one
teaspoon of bicarbonate of soda to one
pint of water or Milton™ sterilising fluid,
diluted according to the manufacturer’s
instructions.
* Dry the interior thoroughly with a clean
cloth before replacing fittings and food.
After the dispenser is used:
The water collector has no self drainage function. So it should be cleaned regularly.
* Remove the cover by pressing the top left
where marked.
* Wipe with a damp soft cloth, dry
thoroughly
Note : It is important to ensure that cleaned
shelves, racks, bins and baskets are
thoroughly dried before refitting to the
compartments.
Exterior
* Use a clean soft cloth wrung out in warm
water and washing up liquid to wipe the
exterior surface, dry thoroughly.
* Use a soft brush or vacuum cleaner to
remove dust from underneath the
appliance and from the compressor and
condenser situated at the back of the
appliance. DO NOT damage the pipework.
Do not use abrasive powder,household
cleaner,bleach or wax polish to clean your
appliance, they leave a smell in the
compartments and can damage the exterior.
Door Seals
* Use warm water and a clean soft cloth to
wipe along and in between the creases of
the door seals, dry thoroughly. Take care
not to damage the seals and avoid using
sharp objects.
Do not use detergent, it will damage the
seals.
When the cleaning operations have finished,
reconnect the plug with dry hands.
Replacing the light bulb
1. Unplug the appliance from the power
supply.
2. Gently lift the lamp cover and pull the
lamp out. Turn it anti-clockwise to
remove.
3. Replace the bulb with Max. 240V 40W bulb
for refrigerators and can purchased from
Hotpoint Genuine Parts & Accessories (see
back cover).
Replacing the dispenser lamp:
1. Unplug the appliance from the power
supply.
2. Separate the lamp by pulling it out and
then remove.
3. Replace the bulb with Max. 240V 15W bulb
for refrigerators and can purchased from
Hotpoint Genuine Parts & Accessories (see
back cover).
If the appliance is not going to be used for
a long time:
During average length holidays,you will
probably find it best to leave the appliance
operating as usual.
If the appliance is not going to be used for
some time:
Remove all food,switch off at electricity
supply and unplug and then clean the
appliance interior.
Leave the doors open to prevent the
formation of mildew and build up of odours.
19
Page 20

Troubleshooting.
If your appliance is not working properly,it may be a minor problem, therefore check the
following:
PROBLEM Possible Cause
Running of
Refrigerator
Refrigerator
compressor does
not run.
Refrigerator runs
too much or too
long.
Refrigerator control is off.
Refrigerator is in defrost cycle.
Is it plugged in and switched on.
There been a power cut.
Refrigerator is larger than the
previous one you owned.
Room or outside weather is hot.
Refrigerator has recently been
disconnected for a period of time.
Large amounts of warm or hot
food may have been stored
recently.
Doors are opened too frequently
or for too long.
Doors left slightly open.
Door seals are dirty, worn, cracked
or poorly fitted.
Solution
Set refrigerator control. See ‘Controls’.
This is normal for a fully automatic
defrosting appliance.
The defrost cycle occurs periodically.
Make sure the plug is pushed in fully and
is switched on.
Try to minimise the number of times you
open the doors, if at all.
If the power cut lasts longer than the
maximum conservation time, food should
be cooked and eaten within 24 hours or
cooked and refrozen.
This is normal - larger,more efficient units
run longer in these conditions.
It is normal for the refrigerator to work
longer under these conditions.
It takes some hours for the refrigerator to
cool down completely.
Warm food will cause the refrigerator to
run longer until the desired temperature is
reached.
Warm air entering the refrigerator causes it
to run longer.
Try to minimise the number of times you
open the doors.
Make sure that the appliance is level.
Ensure stored items do not stop the doors
closing properly.
See Problem section: ’Opening/Closing of
Doors’.
Clean the door seal, see ‘Care & Cleaning’
section.
You need to replace damaged seals to
ensure door closes properly.
20
Thermostat is keeping the
refrigerator at a constant
temperature.
This is normal to keep the temperature
constant
Page 21

Troubleshooting.
PROBLEM Possible Cause
Temperatures are
too cold:
Temperature in the
freezer is too cold
BUT
the refrigerator
temperature is
satisfactory.
Temperature in the
refrigerator is too
cold
BUT
the freezer
temperature is
satisfactory.
Food stored in
drawers freezes
Meat stored in fresh
meat drawer freezes
Temperatures are
too warm:
Temperatures in the
refrigerator or
freezer are too
warm
Freezer control is set too cold.
Refrigerator control is set too cold.
Refrigerator control is set too cold.
Meat should be stored at a
temperature just below the
freezing point of water (32˚F, 0˚C)
for maximum fresh storage time.
Freezer control is set too warm.
Refrigerator control is set too
warm.
Refrigerator control has some
effect on freezer temperature.
Doors are opened too frequently
or for too long.
Door is slightly open.
Solution
Set Freezer control to a lower number
(warmer setting) See ‘Controls’.
Set Refrigerator control to a lower number
(warmer setting) See ‘Controls’.
Set Refrigerator control to a lower number
(warmer setting) See ‘Controls’.
It is normal for ice crystals to sometimes
form due to the moisture content of meat.
Set Freezer control to a higher number
(colder setting) See ‘Controls’.
Set Refrigerator control to a higher
number (colder setting) See ‘Controls’.
Warm air enters the compartments
whenever the door/s is/are opened.
Open door/s less often.
Ensure doors are shut properly.
Temperatures in the
refrigerator is too
warm
BUT
the freezer
temperature is
satisfactory.
Large amounts of warm or hot
food may have been loaded
recently.
Appliance has recently been
disconnected for a period of time.
Refrigerator control is set too
warm.
Wait until the refrigerator or freezer has
reached its selected temperature.
The appliance will need some time to
reach its selected settings.
Set Refrigerator control to a higher
number (colder setting) See ‘Controls’.
21
Page 22

Troubleshooting.
PROBLEM Possible Cause
Sound and noise:
Louder sound levels
when refrigerator is
on.
Louder sound levels
when the
compressor comes
on.
Vibrating or rattling
noise.
Sound of ice
dropping.
Water/moisture/ice
inside refrigerator:
Moisture collects on
the inside walls of
the refrigerator.
Moisture forms on
the outside of the
refrigerator or
between the doors.
Today’s refrigeration appliances
have larger storage capacity and
work to maintain more even
temperatures.
The appliance will work harder to
reach selected temperatures
when first switched ‘ON’.
Floor is uneven.
Appliance rocks when touched.
Items placed on top off
refrigerator are vibrating.
Dishes are vibrating on the
shelves in the refrigerator.
Appliance is touching wall or
cabinets.
Appliance is touching wall or
cabinets.
The weather is hot and humid
which increases the rate of frost
build up and internal moisture.
Door is slightly open.
Door is opened too often and for
too long.
Weather is humid.
Door slightly open.
Solution
It is normal for some sound to be heard.
This is normal, the sound will level off
when selected temperature have been
reached.
Ensure the floor is level and solid.
Check ‘Installation’ section for Height
Adjustment information.
Remove items.
Ensure appliance is level.
Move dishes slightly and ensure nothing
touches the interior back wall.
Appliance needs to be relocated so that it
stands clear.
This is normally made when ice is made
and dropped into the ice storage bin.
This is normal.
See problem section:‘Opening/Closing of
Doors’.
Open the door less often
This is normal in humid weather.
Ensure door/s are closed properly.
Odours in
refrigerator:
22
Interior needs to be cleaned. Clean the interior,see ‘Care & Cleaning’
Food with strong odour is stored
in the refrigerator.
Some containers and wrapping
materials contain odours.
section.
Ensure stored items are covered
completely.
Use a different container or brand of
wrapping material.
Page 23

Troubleshooting.
PROBLEM Possible Cause
Opening/Closing of
doors:
Door/s will not
close.
Drawers are difficult
to move.
Dispenser:
Dispenser will not
dispense ice.
Food package keeping the door
open.
Door seal/s dirty or damaged.
Door closed too hard, causing the
other door to open slightly.
Appliance is not level.
It rocks slightly when touched.
Floor is uneven.
Appliance rocks when touched.
Appliance is touching wall or
cabinets.
Food is touching shelf on top of
the drawer.
The drawer runner is dirty.
Ice storage bin is empty. When the first supply of ice is released into
Freezer temperature is set too
warm.
Household water supply tap is not
open.
Refrigerator or freezer door is not
closed.
Ice has melted and frozen,due to
infrequent use, irregular
temperatures and/or power cuts,
causing a blockage.
Solution
Ensure stored items are kept clear of the
door so it can close properly.
Clean the seal/s, see ‘Care & Cleaning’
section.
Replace damaged seal/s.
Close doors gently.
Adjust the height, see ‘Installation’ section.
Ensure floor is level and can adequately
support the appliance.
Appliance needs to be relocated so that it
stands clear.
Do Not load too much food.
Clean the drawer and the runner.
the ice storage bin, the dispenser should
operate.
Turn the Freezer control to a higher
number (colder setting), so that ice cubes
will be made.
When the first supply of ice is made the
dispenser should work.
Open the water supply tap and allow
sufficient time for ice to be made (a newly
installed appliance takes up to 12 hours to
make the first supply of ice).
When ice is made the dispenser should
work.
Ensure both doors are closed properly.
Remove the ice storage bin,as shown on
page 14, and thaw the contents. Wash bin
in warm water and washing up liquid and
dry thoroughly before relocating in correct
position.
When new ice is made the dispenser will
work.
23
Page 24

Troubleshooting.
PROBLEM Possible Cause
Solution
Dispenser:
Ice dispenser is
jammed.
Dispenser will not
dispense water.
Water has an odd
taste and/or odour.
Ice cubes are jammed between ice
maker arm and back of the bin.
ice cubes that have been
purchased or made in another
way have been used in the
dispenser.
Ice cubes are frozen together in
the ice storage bin.
Household water supply tap is not
open.
Refrigerator or freezer door is not
closed.
Water has been in the tank too
long.
Unit not properly connected to
the cold water supply.
Remove the ice cubes.
Only the ice cubes made by the appliance
ice maker should be used with the
dispenser.
Irregular use sometimes causes the ice
cubes to lump together. Take ice out,
break up and put back into the ice storage
bin.
Ensure the household water supply tap is
open. The dispenser should then work.
Ensure both doors are closed properly.
You will need to dispense and discard 7
glasses of water to freshen the supply.
and
Dispense and discard an additional 7
glasses of water to completely rinse out
the tank.
Check connection - reconnect if necessary.
If there is still a problem, contact Hotpoint Service (see KEY CONTACTS back cover for details).
24
Page 25

Notes:
25
Page 26

Hotpoint guarantee
“Satisfaction guaranteed or your money back”
We give you a unique ‘satisfaction guaranteed’ promise - valid for 90 days - after you have
purchased your Hotpoint appliance. If there is a technical problem simply call Hotpoint
Repair service or visit our web-site at www
will arrange for an engineer to call. If the technical problem is not resolved under this
guarantee, we will replace your machine or,if you prefer, give you your money back.
All Hotpoint appliances carry a fully inclusive 12 month parts and labour guarantee as well
as free replacement parts for the first 5 years (except microwaves, selected integrated
appliances and cooker hoods, which have a one year guarantee) provided that they are
fitted by a Hotpoint engineer.
Guarantee terms and conditions
Your guarantee is only applicable in the United Kingdom or Republic of Ireland
and is subject to the following provisions that your appliance:
●
●
●
●
Has been installed and used correctly in accordance with this instruction booklet.
Has been used solely for domestic purposes and is located on domestic
premises (ie. not for commercial or trade use).
Has been properly connected to a suitable electrical supply voltage as stated on
the appliance rating plate.
Has not been subject to misuse, accident, modified or repaired by anyone other
than a Hotpoint service engineer.
.theservicecentre.co.uk and where necessary,we
For pre purchase information on any other Hotpoint product call: 08701 50 60 70
or visit: www
.hotpoint.co.uk
Recycling & Disposal Information
As part of Hotpoint’s continued commitment to helping the environment,Hotpoint reserves
the right to use quality recycled components to keep down customer costs and minimise
material wastage.
Please dispose of packaging and old appliances carefully. Old refrigerant and oil must be
disposed of in a safe and environmentally friendly manner, using suitably qualified
personnel.
To minimise risk of injury to children, remove the door, plug and cut mains cable off flush
with the appliance. Dispose of these parts separately to ensure that the appliance can no
longer be plugged into a mains socket, and the door cannot be locked shut.
26
Page 27

After Sales Service
“No company is better positioned to offer an after sales service on a
As part of our commitment to you, all Hotpoint appliances have the added benefit of a fully
inclusive parts and labour guarantee for the first 12 months. In addition to this you also have
the advantage of free replacement parts for the first 5 years when fitted by a Hotpoint
engineer. When the 12 months parts and labour guarantee expires we offer the following after
Note: Our operators will require the Model number and Serial number of your appliance.
Available 364 days a year with a fast, effective and value for money service. We have the largest
white goods repair service in the UK with over 1200 of our own fully trained engineers. All
repairs include a parts and labour guarantee for 12 months from the date of repair.
If you require any information or have any questions about your appliance,our operators are on
All this ensures that you will receive the best available after sales service possible.
Whether you have just one or a number of Hotpoint appliances in your kitchen,we offer two
●
Repair Protection Plan - FREE service repairs for a single Hotpoint appliance during the
●
Kitchen Cover - FREE service repairs for all your Hotpoint appliances less than 8
Hotpoint appliance than us - the manufacturer.”
sales service options:
Repair Service and Information Help Desk
UK: 08709 066 066
www.theservicecentre.co.uk
Republic of Ireland: 1850 302 200
hand with help and advice.
Extended Warranties
UK: 08709 088 088
www.theservicecentre.co.uk
Republic of Ireland: 1850 502 200
service cover plans to give you total peace of mind.
period of cover.
years old.
Genuine Parts and Accessories
UK: 08709 077 077
www.theservicecentre.co.uk
Republic of Ireland: (01) 842 6836
A wide range of genuine parts and accessories are available from our hotline or through
our web site.
Genuine parts and accessories, extended warranties and service repairs are all available
on our web site at:
www.theservicecentre.co.uk
27
Page 28

Key Contacts
After Sales Service
Over 1200 trained specialists, directly employed by us, ensure that you can have
complete confidence in both the appliances and services we offer.
Repair Service and Information Desk
(Open 8 to 8 Mon - Fri, 8 to 6 Sat, 10 to 4 Sun & Bank Holidays)
Note: Our operators will require the following information:
UK: 08709 066 066
www.theservicecentre.co.uk
Republic of Ireland: 1850 302 200
Model number:
Serial number:
Extended Warranties
UK: 08709 088 088
(Open 8 to 8 Mon - Sun)
www.theservicecentre.co.uk
Republic of Ireland: 1850 502 200
Genuine Parts and Accessories
(Open 8.30 to 5.30 Mon - Fri & 9 to 12 Sat)
UK: 08709 077 077
www.theservicecentre.co.uk
Republic of Ireland: (01) 842 6836
Part No.FP110-01
General Domestic Appliances Limited,Morley Way, Peterborough, PE2 9JB
 Loading...