

Page 1
MODEL CTFfi4E
U!3JWE $31TUATKWJS WHEF?IE AfWJAFdW$
Adiusting screw
POWERCORD WitJ. DE DISCONNECTED
1NFREQUENTL%
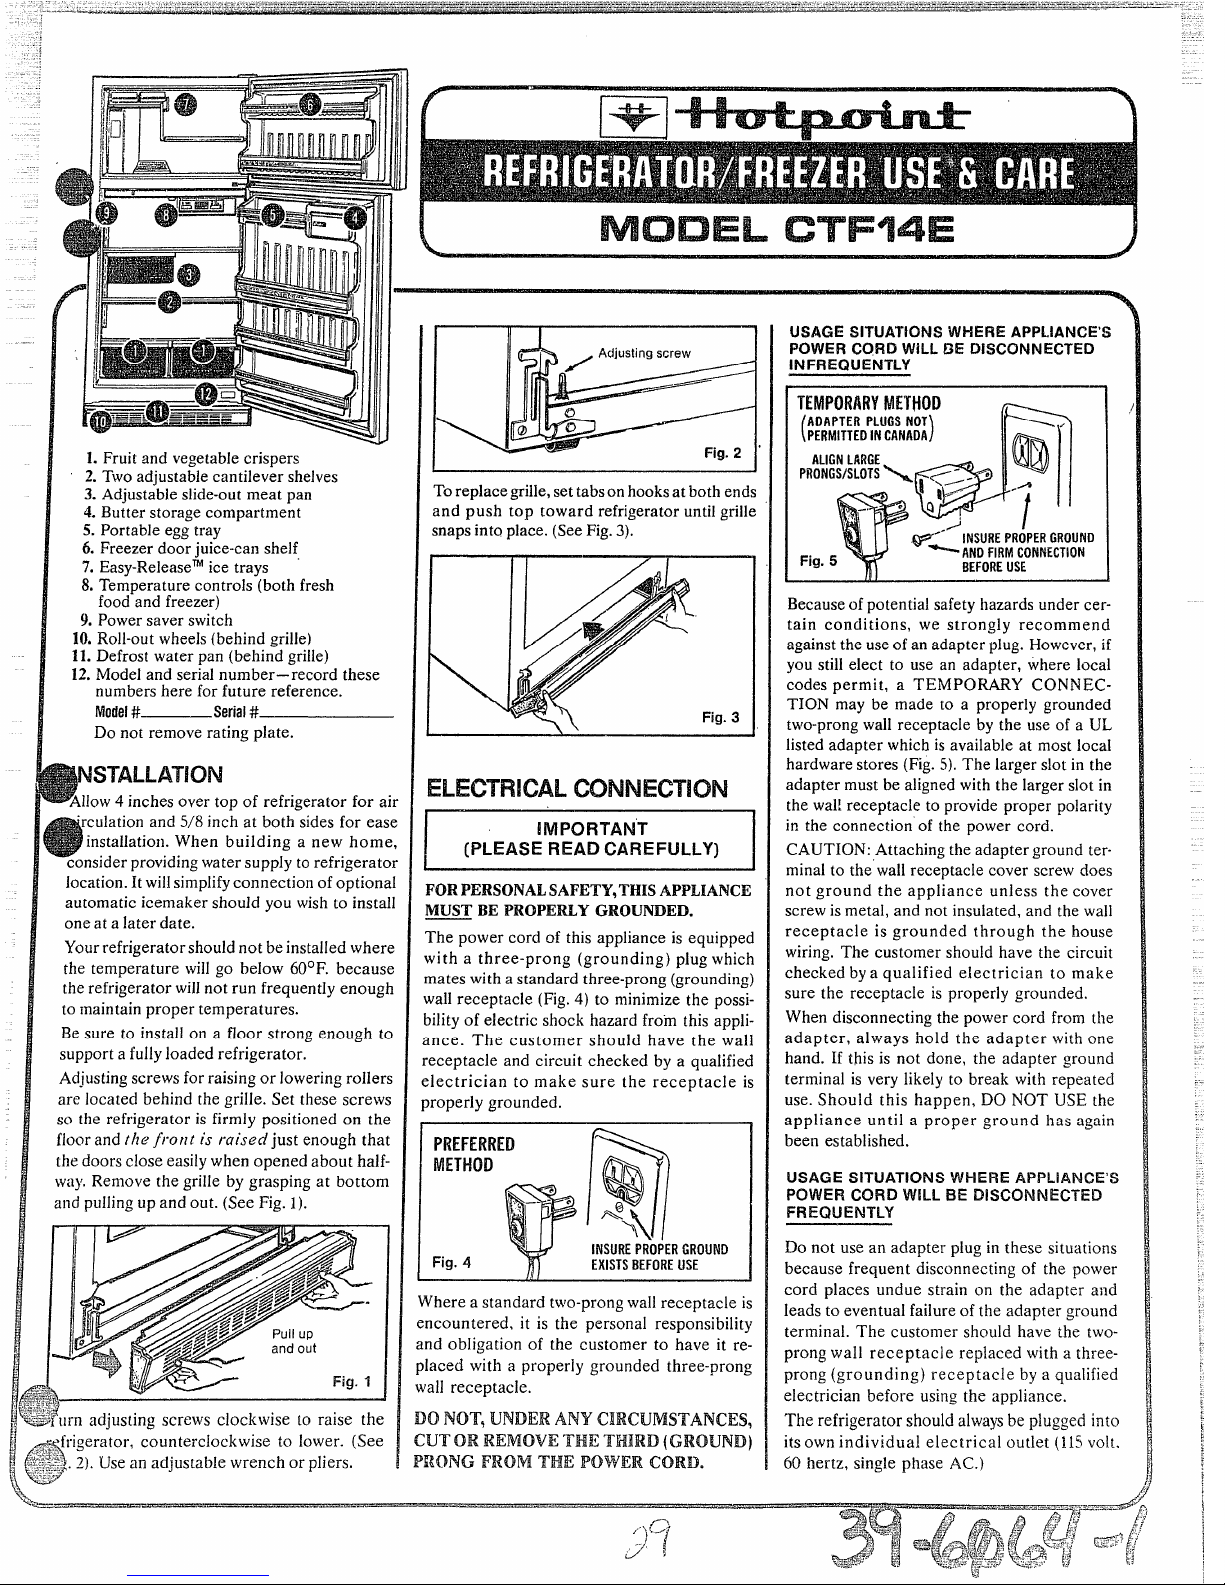
L Fruit and vegetablecrispers
2. Two adjustable cantilever shelves
3. Adjustable slide-outmeat pan
4. Butter storage compartment
5. Portable egg tray
6. Freezer door juice-can shelf
7. Easy-Releasemice trays “
8. Temperature controls (both fresh
food and freezer)
9. Powersaver switch
10.Roll-outwheels (behind grille)
11.Defrost water pan (behind grille)
12.Model and serial number– record these
numbers here for future reference.
Model#——
Do not remove rating plate.
Serial#
WSTALLATION
WAI1OW4 inches over top of refrigerator for air
“rculationand 5/8 inch at both sides for ease
installation. When building a new home,
D
consider providingwater supply torefrigerator
location. It willsimplifyconnection of optional
automatic icemaker should you wish to install ‘
one at a later date.
Yourrefrigerator shouldnot be installed where
the temperature willgo below 60°F. because
the refrigerator willnot run frequently enough
to maintain proper temperatures.
Be sure to instal~on a floor strong enough to
support a fully loaded refrigerator.
Adjustingscrews for raising or loweringrollers
are located behind the grille. Set these screws
so the refrigerator is firmly positioned on the
floor and the
[he doorsclose easily when opened about half-
way,Remove the grille by grasping at bottom
and pullingup and out. (See Fig. 1).
?
I]rn adjus[ing screws clockwise to raise the
~frigerator, counterclockwise to lower. (See
]. 2). Use an adjustable wrench or pliers.
front is raisedjust enough that
1 I
To replace grille,set tabsonhooksat both ends
and push top toward refrigerator untilgrille
snapsinto place. (SeeFig.3).
ELECTRICAL CONNECTION
IMPORTANT
(PLEASE READ CAREFULLY)
I
FORPERSONALSAFETY,’I’HISAPPLIANCE
MUSTBE PROPERLYGROUNDED.
The power cord of this appliance is equipped
with a three-prong (grounding) plug which
mates with a standard three-prong (grounding)
wall receptacle (Fig.4) to minimize the possibility of electric shock hazard fro”mthis appli-
ance. The customer should have the wall
receptacle and circuit checked by a qualified
electrician to make sure the receptacle is
properly grounded.
PFMFEW?ED
METHOD
Fig. 4
Where a standard two-prongwall receptacle is
encountered, it is the personal responsibility
and obligation of the customer to have it replaced with a properly grounded three-prong
wall receptacle.
D() NOT, ILHWIIERANY CKXJMSTAJWES,
Q
%
Q
63
-ii
n
\
INSUREPROPERGROUND
EXISTSBEFOREUSE
cur OR REMOVE ‘n-m THIRD (GROUND)
PRONG FROM TIMEPOWER ICORD.
1
Fig. 3
TEMPORARYMETHOD
ADAPTER PLUGS NOT
PERMITTEDINCANADA
(
ALIGNLARGE
Pt’tONGS/SLOTS> ~Q$---_ ~>
)
~ --0
~
1>
Q
&l
..)
w’
Fig. 5
Becauseof potential safety hazards under certain conditions, we strongly recommend
against the use ofan adapter plug. However, if
you still elect to use an adapter, where local
codes permit, a TEMPORARY C(?NNECTION may be made to a properly grounded
two-prongwall receptacle by the use of a UL
listed adapter whichis available at most local
hardware stores (Fig. 5).The larger slot in the
adapter must be aligned withthe larger slot in
the wallreceptacle to provide proper polarity
in the connection of the power cord.
CAUTION: Attaching the adapter ground ter-
I
minal to the”wallreceptacle cover screw does
not ground the appliance unless the cover
screw is metal, and not insulated, and the wall
receptacle is grounded through the house
wiring. The customer shouid have the circuit
checked bya qualified electrician to make
sure the receptacle is properly grounded.
When disconnecting the power cord from the
adapter, always hold the adapter with one
hand. If this is not done, the adapter ground
terminal is very likely to break with repeated
use. Should this happen, DO NOT USE the
appliance until a proper ground has again
been established.
USAGE SITLJATIONSWHERE APPLIANCE’S
PC?WERCORD WILL BE DISCONNECTED
FREQUENTLY
Do not use an adapter plugin these situations
because frequent disconnecting of the power
cord places undue strain on the adapter and
leads to eventual failure of the adapter ground
terminal. The customer should have the twoprong wall receptacle replaced with a threeprong (grounding) receptacle by a qualified
electrician before using the appliance.
The refrigerator should alwaysbe plugged into
its own individual electrical outlet (115volt.
60 hertz, single phase
- ANDFIRMCONNECTION
AC.)
/
INSUREPROPERGROUND
BEFOREUSE
J
/f2
/’
}
Page 2

TEMPERATURECONTROLS
Your refrigerator has dual temperature
controls for the freezer and the fresh food
compartments (Fig.
N0Ll14ALSETTINGS
COLDER FRESH FOOD C At4D 6.7
COLC?ESTFRESH FOOO : ;:: ;;
COLOEFI FREEZER
WARB.4ERFRESH FOOO c AN22 +1
OFF IFRESM FO 6 FRZ 1
6).
C AND 5
1 SET EOIM CONT170LS
2 ALLOW 24 HOURS
TO STABILIZE
After adjusting the temperature controls,
allow 24 hours for temperatures to stabiize.
Note: Turning the Fresh Food control to
“0” also turns off refrigeration inthe Freezer compartment.
ChideTo Proper Temperatures:
If a container of milk is too warm or too
cold to your taste after being on the top
[Im5iij’m, ,“~m]
FREEZER FRESH FOOD
lnitiaIiy set the Freezer corItrolat “C”and
the Fresh Foodcontrol at ‘S’
Forcolder FreshFood compartment, leave
the Freezer control tit “C” and set the Fresh
Foocicontrol at “6” or “7:’
For coldest Fresh Food compartment, set
the Freezer control
at “B” and the Fresh
Food control at “8” or “9~’
Forcolder Freezer, set the Freezer control
at “D” and the Fresh Food control at “7”
or “8?
ForwarmerFreshFood compartment, leave
the Freezer control at “C” and set the Fresh
Food control at “4;’“3;’“2;’or “I ~’
POWER CONSUMPTION
The kilowatt hours per month (Kwh/Mo.)
shown on the fact tag attached to the
inner door is the measure of the power
consumed when tested in accordance with
AHAM Standard HRF-2ECFT with power
saver switch at the normal setting and at
shelf in the Fresh Food compartment for
a day, adjust the Cold Control Dials
accordingly.
If a gallon of ice cream remains firm to the
touch after being in the Freezer for a day,
the Cold Control Dials are at the proper
setting. If the ice cream’s firmness is not
to your liking, adjust the dials accordingly,
Check a day after resetting either dial to
make sure new setting is providing the temperature you desire.
If you advance the Freezer compartment
Cold Control Dial to “E’ to freeze a quick
supply of ice cubes or a large amount of
food, be sure to reset the dial to its previous setting within
This moisture can be expected only when
the weather is humid and if your kitchen is
not air conditioned. The switch should be
left on the “normal” position to save power
except when moisture does form. Remember to switch it back to normal when the
weather is no longer humid.
the setting recommended when moisture
forms on refrigerator exterior.
The approximate monthly cost of opera-
tion can be calculated by multiplying the
Kwh/Mo. by the cost per kilowatt hour
from your local power company. Cost of
operation varies
under actual usage
conditions.
POWER SAVER SWITCH
Your refrigerator is equipped with a power
POWER-SAVING‘TIPS
~ Don’t open doors more often than necessary and close them as soon as possible,
particularly in hot, humid weather.
~ Store only foods requiring refrigeration
in your refrigerator.
~ Wipe all moisture from bottles and cartons before putting them into the refrigerator; and keep all foods covered to reduce
moisture build-up inside,
;aver switch located on the left side of the
“refrigerator near the top of the fresh food
compartment (Fig. 7). This switch allows
rou to turn heaters on to eliminate moisure on the exterior, if and when. it forms.
~ Don’t waste ice cubes by letting many
melt while using
~ If you turn control to coldest position for
quick chilling or freezing, don’t forget to
turn it back to normal setting.
---—— ~~----
POWERSAVER “
o Don’t overcrowd your refrigerator— overcrowding can require extra electrical energy to keep everything cool.
~Before leaving the house or retiring for
he night, check to be sure doors haven’t
Fig. 7,
]een left ajar inadvertnetly.
a day.
a few.
o Don’t locate your refrigerator adjacent
to your range, a heating vent or where sunshine will strike it if any other kitchen arrangement is possible.
SUGGESTED STORAGE
T!MES–MEAT & IPOLLT’FW
STORAGEPERIOD
maintainits quality)
(To
llEFillGERilTOllFIIEEZEII
35° to 40° F. 0° F.
PRODUCT
FRESHMEATS
Roasts(Beef and Lamb). . . 3 to 5
Roasts (Pork and Veal). . . . 3 to 5
Steaks(Beef) . .. . . . . . . . . 3t05
Chops (Lamb and Pork). . ~ 3 to 5
Ground and Stew Meats. . 1 to 2
Variety Meats.... . . . . . . . lto2
Sausage(Pork) . . . . . . . . . lto2
PROCESSEOMEATS
Bacon . . . . . . . . . . . . . . . 7
Frankfurters . ... . . . . . . . . 7
Ham (Whole) . . . . . . . . . . . 7
Ham (Half) . . . . . . . . . . . . . 3t05
Ham (Slices) . . . . . . . . . . . 3
Luncheon Meats . . . . . . . . . 3t05
Sausage(Smoked). . . . . . . 7
Sausage(Dry and Semi-Dry) 14 to 21
COOKEDMEATS
Cooked Meats and Meat
Dishes . . . . . . . . . . . . . . lt02
Gravy and Meat Broth . . . 1 to 2
FRESH POULTRY
Chicken and Turkey. . . . . . 1 to 2
Duck and Goose .. .... . . . l,to2
Giblets . . .. .. . . . . . . . . . . lto2
COOKEDPOULTRY
Pieces (Covered with Broth) 1 io 2 6
Pieces (Not Covered). . . . . 1 to 2
Cooked Poultry Dishes. 1 to 2
Fried Chicken . . . . . . . . . . . lto2
U.S. Department of Agriculture–January 1973
AUTOMATIC BCEMAKER
(Qpticmd)
If your refrigerator did not come alread!
equipped with an automatic icemaker, yol
may add one at any time. Contact your 10
cal Hotpoint dealer; request Cat. No. I-WI
KIT-1.
(Be sure to shut off water supply to ice
maker when going on vacation or away fo
extended period of time.)
TIPS ON FREEZINGFOODS
There are three essential requirements fo
efficient home freezing. First, of course, i
initial quality. Only top-quality food
DAYS MONTHS
8 to 12
4t08
8 to
3t04
2t03
3t04
lto2
1
%
lto2
lto2
lto2
Freezing
not recoin
mended.
}
2t03
2t03 (
12
6
3
k
4
12
(
t
(
4
Page 3

H your refrigerator appears to have stopped operating (except during the defrost
cycie when the motor and fan are normally
shut off completely for the length of the
ycle), make these simple tests before call-
1. Check temperature control dial. It may
be turned to the OFF position.
2. If interior light is not on, check to see if
refrigerator isplugged inat wall receptacle,
3. If plug is secure and the refrigerator still
fails to operate, plug another appliance into the same outlet to determine if there is
a burned-out fuse.
4. Follow check list below for other possible trouble spots.
h
Moistureiorm.son outside of refrigerator
El Moisture not unusual during periods
of high humidity
•l
Cl Move power saver
switch to right
,Moisturecoilects
Too-frequent and too-long door
El
inside
openings
El Hot-humid weather increases rate of
frost build-up and internal sweating
❑ During automatic defrosting water
runs down rear wall —this is normal
Cabinet has odor
/3 Certain foods produce odor–should
be covered
D Interior needs cleaning
El Defrost-water pan needs cleaning
Refrigerator runs too long
El Modern refrigerators are larger
and run colder— require more
running time
Doors kept open too long
Temperature controls set too cold
El Normal at time of installation or after
refrigerator has been turned off
Refrigerator runs too frequently
Required to provide even
temperature
Too-frequent and too-long door
openings
Cabinetvibrates
❑ Roller screws need adjusting
Check for weak floor
Mow
icecubefreezing
❑ Freezer door may have been left ajar
Fresh food #temperaturetoo warm
❑ Temperature control not set in cold
enough position
❑ Too-frequent and too-long door
openings
Package holding door open
Fresh
foodsdry out
❑ Foods should be covered
Fresh food temperature too cold
Temperature control dial set in too
cold positiort
Noisy
Noise level is slightly higher on
modern, larger refrigerators
Cl Fan air flow– this is normal
Defrost-water pan not in correct
position
•l Freezer door may
Roller screws need adjusting
Check for weak floor
Refrigeratordoes not run
Temperature control in OFF position
❑ Not plugged in
No power at outlet
❑ House fuse blown
Water
on floor
Defrost-water pan full, missing, or
not in position
Interior light does not light
❑ No power at outlet
❑ Light bulb needs replacing
Freezer too warm
Freezer door may have been left ajar
El Package may be holding door open
Frost on frozen food
Too-frequent and
door openings
Frozen foods dry out
Packages not wrapped or sealed
properly
too-long freezer
have been left ajar
If you need to call a Hotpoint Serviceman, be sure to give the model number
of your refrigerator. It maybe found at the front of your refrigerator at the bottom of the fresh food section near the hinge (see model sketch, front cover).
When service is required, be sure to specify genuine Hotpoint renewal parts.
>lflttl llli:llll:l litl108@:l 111881@1S111188tl:lltl 181181118181111#1#:8nn111@81811SSl118nl#t11:18:*1011111i88111BI11:118118118Bll111i8818n1811188111#lllltlltlS illtlll l%llltl 1:1118t111118t11t18111tt111Q1lE1811tt188fi118B11t81118801lt~llll*C1i iUt18~le@3*810Uit*Bk1i8111IIQ1lZ808tll U1l;
:
:
:
:
.*
We main[ain a s[aff of Customer Relations Managers at major market maintain a workingrelationshipwithMACAP,the Major ApplianceCon-
:-~<;7~-j.:~L-..
~.,.. ..>v~=.
.,_.;;.._:=_r,..7
P
locationsto whomyou mayappeal forservice help ifyou are not satisfied
%*
[viththe assistance received throughthe nornial channels specified in the2so that you may contact
2
j~;:,
warraniv on the back cover under “f70~iJTo Obiuin .%ruice.” A listingof
--.,~..y..
~)
:-~~~-:;locations and telephone numbers is provicledwith the product. We also
~_;.-’
:tlt181t ll~tglll llltlla tlu*:t8811l:lltsl *:1St8ul:1118Mltll8*111:1*1tntt811all11:8f81El1811t81tt3t2at18819818aEttt@ll 8168f#8d88a8$lt1i11881b811811t18118181B8118101881:81s1881198t111t1:8ttllllOl 11t8011i801B11:0M818311$18t11B8~880tl$8$00$@@@8$88~6$8881tal$Q8b68i9G:@ablt88$aa8Sata88#:
.
Complaint Handling
sumer Action Panel, 20 North Wacker Drive, Chicago, Illinois 60606, E
them for help in resolvinga complaint but only ~
after you have tried to resolve the problem throughour Customer .
Relations Offices.
:
:
:
:
:
:
:
:
:
:
Page 4

I
[fyou shut off the house power for extend
I
ed vacations, remove food and clean inter
ior with soda solution using one tablespoon
of soda per each quart of water. Wipe dry
To prevent formation of odor, place oper
box of soda in refrigerator and leave door:
open.
Ifyou have an icemaker, flip manuai switch
to OFF position and be sure to shut off
water suppIy to icemaker. (Ask installer to
point out location of shut-off valve at time
~ of installation. )
If you leave for shorter absences, remove
perishable foods and leave control dials at
normal setting. If, however, room temperature is expected to go below 60°F., turn
control dials to OFF, remove food, clean
interior, leave doors open and remove plug
from wall receptacle.
Disconnect power cord from wall receptacle. Remove all foods and clean interior.
Such loose items as grille, shelves, storage
pans, ice trays, covers and removable Parts
should be protected or secured with tape.
This prevents their coming loose arid causingdamage. Your refrigerator ison wheels;
be sure it is properly secured in moving van
to prevent rolling and damage. Handle with
care; exterior should be protected with
blanket covering.
rhe suggestions noted below appiy to the
operation of your household electric re-
frigerator. Hotpoint recommends these
safety precautions:
L If your old refrigerator isstill around the
house but not in use, be sure to remove the
doors. This will reduce the possibility of
danger to children.
2. Some refrigerators are equipped with
automatic icemakers. Do not place fingers
or hands on the automatic icemaking
mechanism while the refrigerator is
plugged in. This will prevent contact with
the movingparts of the ejector mechanism,
or with the heating element that releases
the cubes.
3: The refrigerator should always be
plugged into its own individual electrical
outlet (115volt, 60 cycle, single phase AC),
This isrecommended for best performance
and to prevent overloading house wiring
~ircuits, which could cause a possible fire
hazard from overheating wires.
JSE OF EXTENS1ON CORDS –Because
~fpotential safety hazards under certain
;onditions, we strongly recommend against
he use of an extension cord. However, if
~oustill elect to use an extension cord, it
sabsolutely necessary that it be a UL listed
~-wiregrounding type appliance extension
:ord and that the current carrying rating
~fthe cord in amperes be equal to or great-
r than the branch circuit size shown on
he rating nameplate of this appliance.
luch extension cords are obtainable
through your local service organization.
4. Repair or replace immediately all electric service cords that have become frayed
or otherwise damaged. Do not use a cord
hat shows cracks or abrasion damage
,long its length or at either the plug or conIector end.
1
5. Never unpiug your refrigerator by pullingon the wire. Always grip the plug firmly
and pull straight out from the receptacle.
6. Your refrigerator is equipped with rollers so that it can be easily moved out from
the wall. When rolling out the refrigerator
be careful not to roll over the service cord,
7. Do not operate your refrigerator in the
presence of explosive fumes.
8. A burned-out light bulb might break
when being replaced, In order to avoid
contact with a live wire filament, it is recommended that the refrigerator first be unplugged when replacing a light bulb.
Note: Turning control to OF?? position
does not remove power to the light circuit.
9. Always remove the power cord from
wall outlet before removing the base grille.
10. Don’t refreeiie frozen foods which have
thawed completely unless you cook them
after they have thawed. The ?.-h-titedStates
Department of Agriculture in Home and
Garden Bulletin No. 69 says, “... if foods
have thawed only partially and there are
still ice crystals in the package, they may
safely be refrozen .. .
be used as soon as possible.
“If foods have slowly thawed and have
warmed gradually over a period of several
days to a temperature of 40°F., they are
not likely to be fit for refreezing. Under
these conditions, meats, poultry, most vegetables and some prepared foods may become unsafe to eat; most fruits and fruit
products soon develop an undesirable
flavor.”
41sonote and follow other precautions
Refrozen food should
:ontainedin this Useand CareBook.
(
(
I
Page 5

should be frozen, Freezing retains quality
and flavor; it cannot improve quality. Sec-
ond is speed. The quicker fruits and veg-
etables are frozen after picking, the better
b
the frozen product willbe. You’llsave time,
too, because less culling and sorting will be
necessary. The third requirementt is proper
packaging. Use food wraps designed espe-
cially for freezing; they’re readily available
in a wide selection at your favorite store.
Limitfreezing of fresh (unfrozen) meats or
seafoods to M pounds at a time.
‘1-oFREEZE MEAT,
Flsl+lNw3 POULTRY
Wrap well in freezer-weight foil (or other
heavy-duty wrapping material), forming it
:arefully to the shape of the contents. This
~xpelsair. Fold and crimp ends of the pack~geto provide a good, lasting seal. Don’t
.efreeze meat that has completely thawed;
I
neat, whether raw or cooked, can be frozen
successfully only once.
;UGGESTEDFREEZER
ITORAGETIMES
2ther than for meat and poultry)
lost fruits and vegetables . . . . . . . ...8-12 months
:an fish . . .. . . . . . . . . . . . . . . . . . ..6-8 months
itty fish, rolls and breads,
jups, stew, casseroles . . . . . . . . . . .2-3 months
lkes, pies, sandwiches, Ieft-overs (cooked)
; cream (original carton). . . . . . ...1 month max.
w techniques are constantly being developed. Consult
! State College or County Extension Service or your
:al Utility Company for the latest information on
ezing and storing foods.
X CREAMSTORAGE
ne-quality ice cream, with high cream
ntent, will normally require slightly low-
temperatures than more “airy” ah_eacfycked brands with low cream content. It
11be necessary to experiment to deterne the exact setting to keep your favor-
ite cream at the right serving temperae. Also, the rear of the freezer is slightly
der than the front.
isY-RELEAsEmICETRAYS I
ert and twist trays at both ends to re-
w cubes (Fig. 8).
Fig. 8
or only 1or 2 cubes, leave the tray right
de up, twist ends slightly and pluck out
ubes with ease.
Jash trays in lukewarm water only.
Don’t
lace in automatic dishwasher.
10 DEFROSTING
ou never have to defrost the freezer. 1t
M been pre-set at the factory to defrost
self, automatically,
,DJUSTAEILESHELVES
his model has adjustable shkdves.To ad-
st, remove shelf by tilting up at front, then
~tingup and out of slots at rear (Fig. 9).
I
J replace, select desired shelf height.
ith shelf front raised slightly, engage top
~on rear shelf with proper notches. Then
ver front until shelf locks into position
g. lo).
33JTPAN
.ach cover and relocate on any shelf to
meet storage needs. Slide-out pan can be
removed and taken to sink or food preparation area.
FOOD STORAGE
unfRXZen Meats,
Fish and Poultry
Meats, fish and poultry purchased from the
store vary in quality and age; consequently,
safe storage time in your refrigerator will
vary. Always remove store wrapping from
meats, fish and poultry, Rewrap in foil, film
or wax paper and refrigerate immediately.
CXMMi?se
Cheese should be well wrapped with wax
paper, aluminum foil or placed in a plastic
bag. Carefully wrap to expel air and prevent mold. Packaged cheese can be stored
in its own wrapping.
vegetables
Fruit and vegetable crispers have been specially designed to preserve natural mois-
ture and freshness. Crispness can be maintained by covering vegetables with a moist
towel. As a further aid to freshness, it is
suggested that pre-packaged vegetables be
stored in their original wrapping.
CLEANING
inside
Clean both refrigerator and freezer sec-
tions at least once a year. It is recommend-
ed that the refrigerator be unplugged
before cleaning. If this is not practical,
wring excess moisture out of sponge or
cloth when cleaning in the vicinity of
switches, lights, or controls.
Use warm water and baking soda solution
—about a tablespoon of baking soda to a
quart of water, Rinse thoroughly with water
and wipe dry. Follow this same procedure
for cleaning door gaskets, vegetable and
meat pans and all plastic parts.
When moving refrigerator, always pull cab
inet straight out and return to position b~
pushing straight in. Moving refrigerator ir
a side direction can cause damage to floo]
covering by rollers.
outside
To clean and protect the finish, use liqui[
polish or wax suitable for use on appliance:
Never use oily furniture polish, cleaninj
powders, or alkaline soaps.
Defrost
waterPan
Pan located behind grille should be cleanel
at least once a year or if food is spilled i;
refrigerator section.
No DEFROSTING
It is not necessary to defrost the fresh fool
section of your refrigerator; it will defro:
itself automatically.
Page 6

w
00
$ti..
2!2$$
:,,
This guide will help youto get the best use from your new refrigerator, offerirtg ~,
@
money, time and energy saving tips, H you have any further questions, contact .,
the Consumer Coordinator near you whose number is available from your dealer &
or call or write me. Wewould like to hear from you.
B>:%=.
$iiiJ2ce2z
v
Jane Butel, Manager
Consumers Institute, Hotpoint
$!8
\?-
Appliance Park AP 4-119, Louisville, Ky. 40225 ~~fi
.
FLU ONE”YMR wARRANTY-
HOTPO!NT
REFRIGERATOR
FromIiotpobt toYou–
This warranty
is extended by Hotpoint to the original purchaser and to
anysucceeding owner and applies to productspurchased in the United
States, retained within the 48 contiguousstates, the State of Hawaii, or
the District of Columbiaand employedin ordinaryhome use.
WhatWe WiUDo–
If your Hotpoint Refrigerator fails because of a manufacturing defect
within one year from the date of original purchase, we will repair the
product without charge to you. Parts and service labor are included.
Service willbe provided in the homein the 48 contiguousstates, in the
State of Hawaii,or in the Districtof Columbia.
IIowToObtain
Service–
Service will be provided by our local Customer Care
o factory service
organizationor byone of our franchised CustomerCare servicersduring
normalbusinesshoursafter you notifyusof the need for service. Service
canbe arrangedbytelephone.Lookup“Hotpoint CustomerCare Service”
inthe yellowpagesor write to the addressgivenbelow.
What 1sNot Covered –
This warranty does not cover the failureof your refrigerator if it is dam-
aged while in your possession, used for commercial purposes, or if the
failure is caused by unreasonable use includinguse on house wiringnot
in conformance with electrical codes, low power voltage, and failure to
providereasonable and necessarymaintenance.Inno
event shdl.Hotpoint
be liable
for comequetu’id damages. This warrantydoes not applyto the
State of Alaska, nor to the Virgin Islands, Guam, American Samoa or
the Canal Zone or the Commonwealthof Puerto Rico,
ON-n-ESEALED
REFRIGERATINGSYSTEM
The sealed refrigeratingsystem (compressor,condenser, evaporator and
connecting tubing—see diagram) is
coveredin the above full warranty. In
additiontothat warrantywewillrepair
thissealed systemif it fails because of
a manufacturingdefectwithinthe sec-
ADD!TIONALFLU FOUR-YEARWARRANTY
ondthrough fifth year after original
purchase.Wewillbear the costof both
&cOMpREs’OR
parts and labor.
All other provisionsare the same as
w
thosestated in the abovefullwarranty.
REHWHMIIWSWUM!
LIMITEDWARRANTY
Applicable
tothe ‘stated Alaska
IntheStateofAlaska,freeserviceincludingpartswillbeprovidedtocorrect
manufacturingdefects at our nearest service shop location or in your
home,but we do not cover the cost of transportation of the product to
the shop or for the travel cost of a technician to your home. You are
responsiblefor those costs. All other provisionsof this limited warranty
are the same as thosestated in the fullwarranties above.
n
‘sl
‘+
+*~*
A QUALITY PROOUCT OF
GENERAL ELECTRIC COMPANY
Appliance Park, Louisville, Kentucky 40225
Pub, ~jO. 39-6064-1
Dwg. htO. 465055P04 ~
p
 Loading...