

Page 1
Appliance Registration
Base Grille
Care and Cleaning
Condenser
13
13
2
4
Repair Service
Safety Instructions
Shelves
Storage Drawers
19
3
11, 12
Use and Care of
models
Energy Saver
Energy-Saving Tips
Food Storage Suggestions
Storage Times
Ice Dispenser
Installation
Adapter Plug
Adjustable Rollers
Clearances
Electrical Requirements 3,4
Extension Cord
Grounding
Location
Water Supply to
Light Bulb Replacement
Model and Serial Numbers
Problem Solver
5
2
9
9
6-8
6-8
3,4
4
4
4
4
3
4
14
2
15-17
Drawer & Cover Removal 12
Temperature Controls
Vacation & Moving Tips
Warranty Back Cover
Water Filter Accessory
GE Answer Center
800.626.2000
14
5
with Ice &
8
Chilled Water
Service
Page 2
Help us
help you...
Read this book carefully.
It is intended to help you operate
and maintain your new refrigerator
properly.
Keep it handy for answers to your
questions.
If you don’t understand something
or need more help, write (include
your phone number):
Consumer Affairs
Appliance Park
Louisville. KY 40225
Write down the model and
serial numbers.
You’ll see them on a label at the
bottom, just inside the fresh food
compartment door.
These numbers are also on the
Consumer Product Ownership
Registration Card that came with
your refrigerator.
Before sending in the registration
card, please write these numbers
here:
Model Number
Use these model and serial
numbers in any correspondence or
service calls concerning your
refrigerator.
If you received a damaged
refrigerator,
the dealer (or builder) that sold you
the refrigerator.
immediately contact
Save time and money.
Before you request service,
the Problem Solver on pages
It lists causes of minor operating
problems that you can correct
yourself.
check
tips
●
Location of your refrigerator is
important. Avoid locating it next to
your range, a heating vent or where
the sun will shine directly on it.
●
Don’t open the doors more often
than necessary.
●
Close the doors as soon as possible,
particularly in hot, humid weather.
. Be sure the doors are closed
tightly. Before leaving the house
or retiring for the night, check to
be sure the doors haven’t been left
open accidentally.
●
Store only those foods requiring
refrigeration in your refrigerator.
●
Wipe moisture from bottles and
cartons before putting them in the
refrigerator.
●
Keep foods covered to reduce
moisture buildup inside the
refrigerator.
●
If you turn the controls to the
coldest position for quick chilling
or freezing, be sure to turn them
back to regular settings.
●
Don’t overcrowd your refrigerator.
Overcrowding can require extra
electrical energy to keep everything
cool.
Serial Number
2
Page 3
Read
appliance, always exercise
safety precautions, including the
following:
●
Use this appliance
intended purpose
this Use and Care Book.
.
This refrigerator must be
before
using this
for its
as described in
properly installed in accordance
with the Installation Instructions
before it is used. See
instructions below and on page 4.
●
Never unplug your refrigerator
grounding
by pulling on the power cord.
Always grip plug firmly and pull
straight out from the outlet.
.
Repair or replace immediately
all electric service cords that
have become frayed or otherwise
damaged.
shows cracks or abrasion damage
along its length or at either the plug
or connector end.
●
When moving your refrigerator
away from the
Do not use a cord that
be careful
not to roll over or damage the
power cord.
. After your refrigerator is in
operation, do not touch the cold
surfaces,
are damp or wet.
to these extremely cold surfaces.
when hands
Skin may adhere
this
.
DO
not place fingers or hands
on the automatic
mechanism
is plugged in.
contact with the moving parts of the
ejector mechanism, or with the
heating element that releases the
cubes.
.
Don’t refreeze frozen
which have thawed completely.
The United States Department of
Agriculture in Home and Garden
Bulletin No. 69 says:
“. .
foods that have thawed if they
contain ice
still cold—below
“. .
or fish that have
off-color should not be refrozen
and should not be eaten. Thawed
ice cream should be discarded. If
the odor or color of any food is
poor or questionable, get rid of it.
The food may be dangerous to eat.
“Even
reduce the eating quality of
prepared foods. The eating quality
of red meats is affected less than
may safely refreeze frozen
the refrigerator
This will prevent
or if they are
ground meats, poultry
off-odor or
thawing and_
fruits, vegetables and
that of many other foods. Use
refrozen foods as soon as possible
to save as much of their eating
quality as you
●
old refrigerator is
around the house but not in use,
sure to remove the doors.
will reduce the possibility of
danger to children.
This
. Unplug your refrigerator:
A.
Before making any repairs.
Note: We strongly recommend
that any servicing be performed
by a
B.
Before cleaning.
C Before replacing a burned-out
light bulb, the refrigerator should
be
contact with a live wire filament.
(A burned-out light bulb may
break when being replaced.)
Note:
position does not remove power
to the light circuit.
●
D
O
not operate your
in the
in order to avoid
control to OFF
of explosive fumes.
●
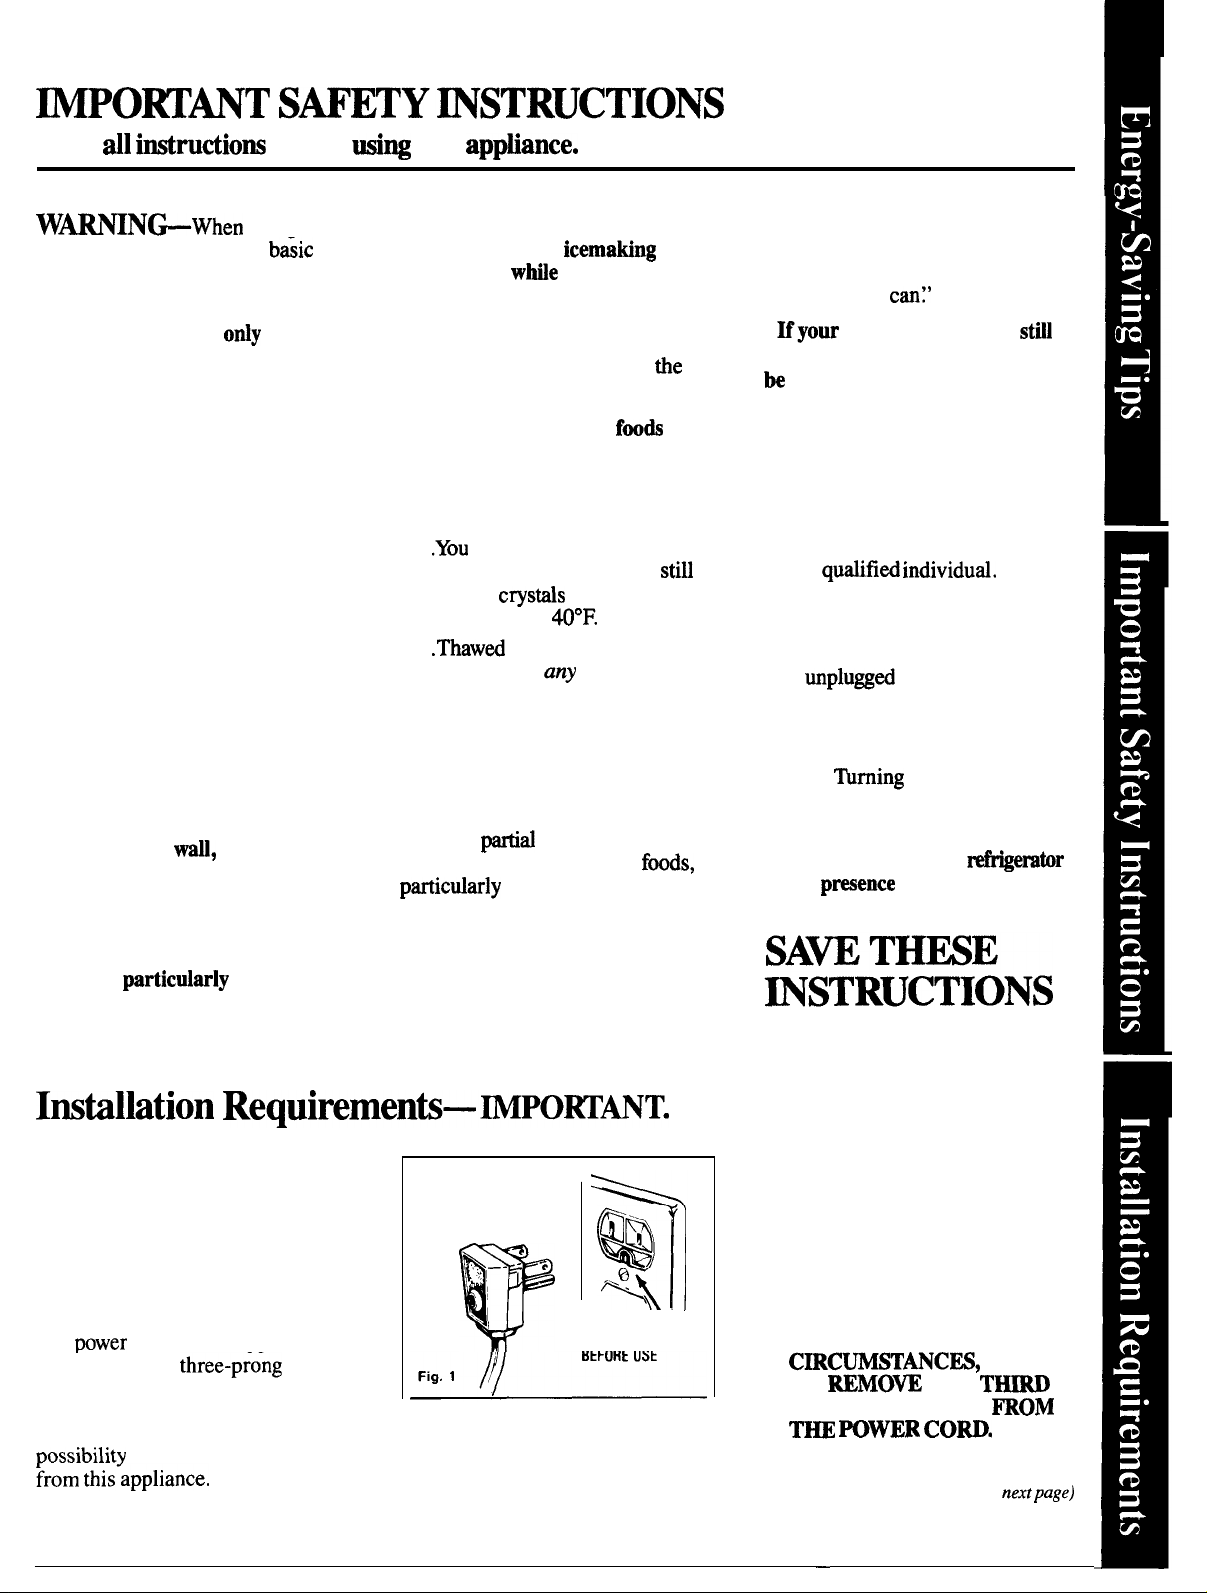
How to connect
electricity
For personal safety,
this appliance must be
properly grounded.
The
equipped with a
(grounding) plug which mates with
a standard three-prong (grounding)
wall outlet (Fig. 1) to minimize the
cord of this appliance is
.. Please read carefully.
PREFERRED
METHOD
Have wall outlet and circuit checked
by a qualified electrician to make
sure outlet is properly grounded.
3
. .
+\
INSURE PROPER
GROUND EXISTS
------ ----
Where a standard two-prong wall
outlet is encountered, it is your
personal responsibility and
obligation to have it replaced with
a properly grounded three-prong
wall outlet.
DO NOT, UNDER ANY
OR
THE
(GROUND) PRONG
(continued
Page 4
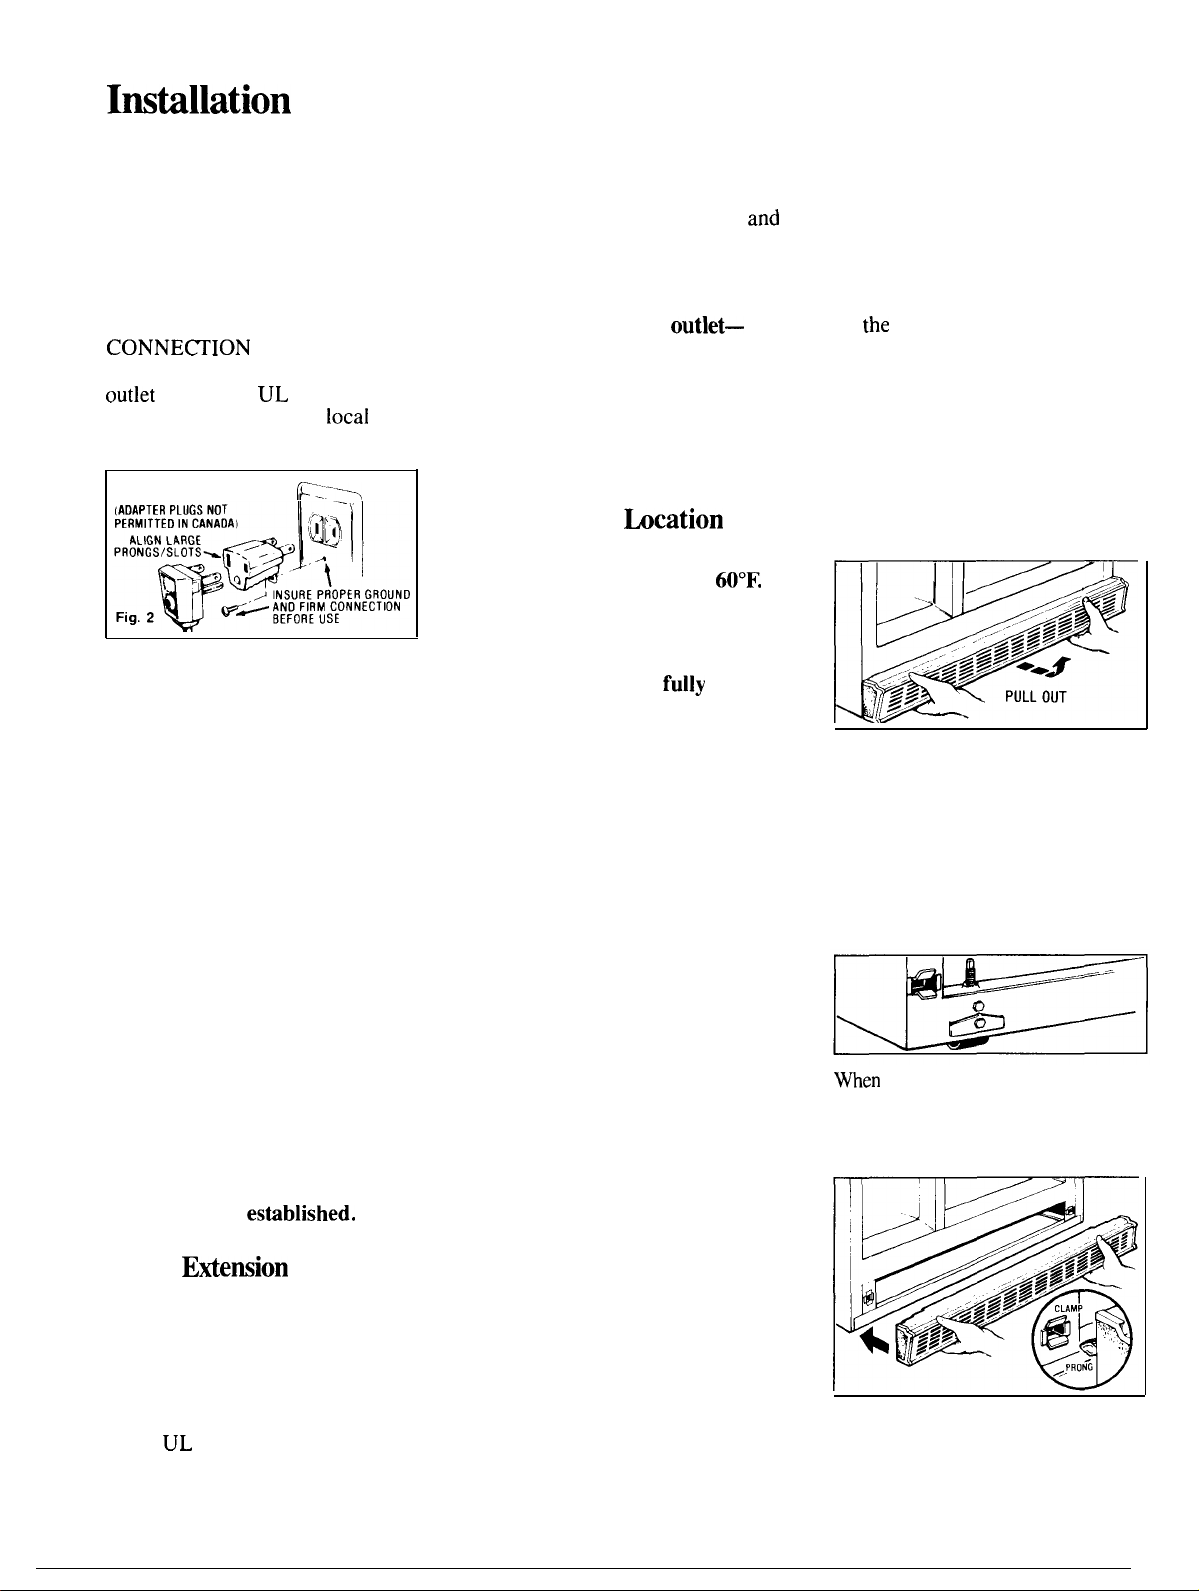
Use of Adapter Plug
Because of potential safety
hazards under certain conditions,
we strongly recommend against use
of an adapter plug. However, if you
still elect to use an adapter, where
local codes permit, a TEMPORARY
maybe made to a
properly grounded two-prong wall
by use of a
(Fig. 2) available at most
hardware stores.
TEMPORARY METHOD
listed adapter
a grounding type plug and outlet
and that the electrical rating of the
cord be 15 amperes (minimum)
120 volts.
The refrigerator should always
be plugged into its own
individual electrical
(115 volt, 60 Hertz, or 100 volt, 50
Hertz, single phase AC). This is
recommended for best performance
and to prevent overloading house
wiring circuits, which could cause a
fire hazard from overheating wires.
Refrigerator
Do
not install refrigerator where
temperature will go below
because it will not run often enough
to maintain proper temperatures.
Rollers
Adjustable rollers behind the base
grille enable you to move your
refrigerator away from the wall for
cleaning. These rollers should be
set so the refrigerator rests firmly
on
floor. To assure that the
doors will close automatically from
a halfway-open position, there is a
built-in tilt from the front to the
back of the cabinet. Side-by-side
refrigerators also have specially
designed door hinges that lift both
doors slightly when opened,
allowing the force of gravity to help
close them securely.
The larger slot in the adapter must
be aligned with the larger slot in the
wall outlet to provide proper polarity
in the connection of the power cord.
CAUTION: Attaching an adapter
ground terminal to wall outlet cover
screw does not ground an appliance
unless cover screw is metal, and
not insulated, and wall outlet is
grounded through house wiring.
You should have circuit checked by
a qualified electrician to make sure
the outlet is properly grounded.
When disconnecting
cord from the adapter,
the adapter with one hand. If this
is not done, the adapter ground
terminal is very likely to break
with repeated use.
Should the adapter ground
terminal break, DO NOT
appliance until a proper ground
has again been
Use of
Because of potential safety
hazards under certain conditions,
we strongly recommend against the
use of an extension cord. However,
if you still elect to use an extension
cord, it is absolutely necessary that
it be a
type appliance extension cord having
the
power
always hold
USE
Cords
the
Do install it on a floor strong
enough to support it
Also see Energy-Saving Tips
regarding location.
Clearances
Allow the following clearances for
ease of installation, proper air
circulation, and plumbing and
electrical connections:
Sides . . . . . . . . . . . . . . . 5/8”
Top . . . . . . . . . . . . . . . . . . 1“
Back . . . . . . . . . . . . . . . . . 1“
Allow the following door clearance:
Sides . . . . . . . . . . . . . . . . 3/4”
Water Supply to Icemaker
You will need to connect your
icemaker to a cold water line. A
water supply kit containing copper
tubing, shutoff valve, fittings and
instructions is available at extra
cost from your dealer. There
should be sufficient tubing for the
icemaker from the cold water supply
to allow moving the refrigerator out
from the wall several feet
(approximately 8 feet of 1/4”
copper tubing in three 10-inch
diameter coils).
To adjust rollers,
grille by grasping it at the bottom
and pulling it out.
Turn the roller adjusting screws
clockwise to raise the refrigerator,
counterclockwise to lower it. Use
an adjustable wrench (3/8” hex
head bolt) or pliers.
adjusting front rollers for proper
door closure, we recommend the
bottom front edge of the cabinet be
approximately 5/8” from the floor.
To replace base grille,
on back of grille with clamps in
cabinet and push forward until
grille snaps into place.
remove the base
align prongs
4
Page 5
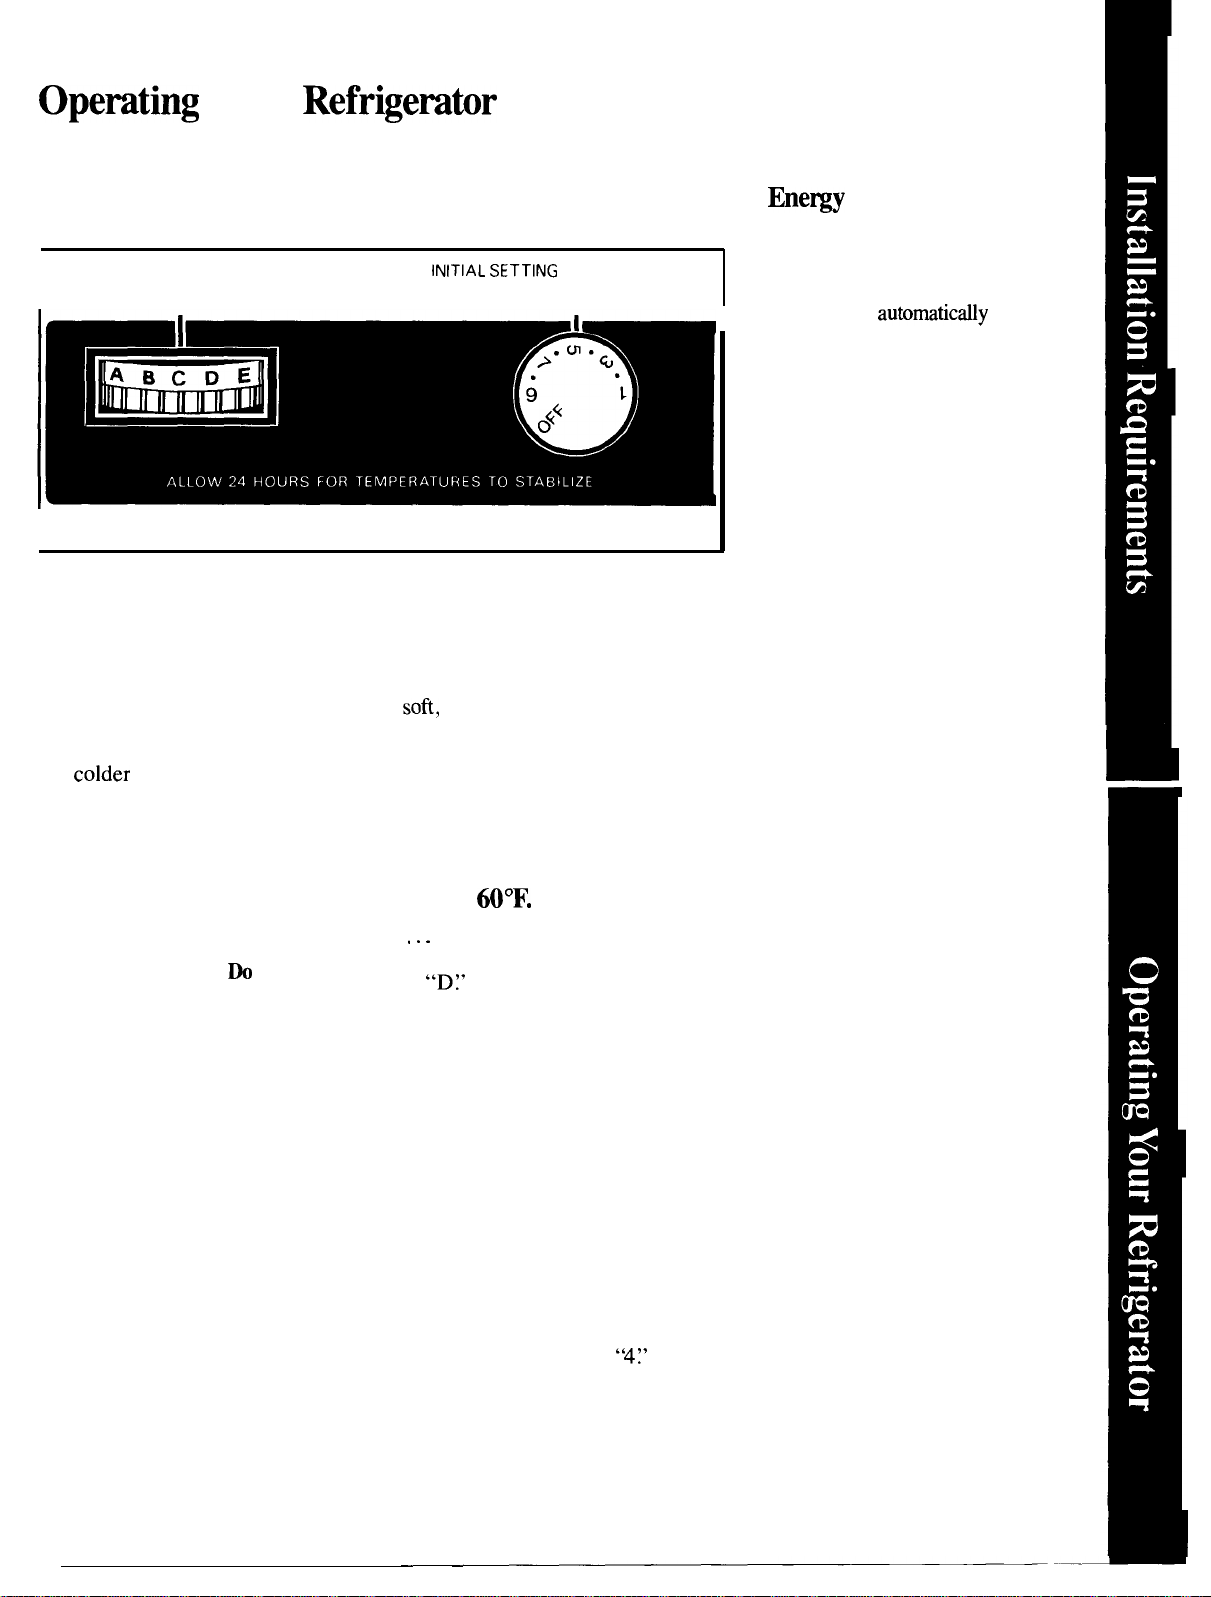
Your
Set the
Temperature Controls
FREEZER
I
I
Your refrigerator has two controls
that let you regulate the temperature
in the fresh food and freezer
compartments.
INITIALLY, set the FRESH
FOOD control at 5 and the
FREEZER control at C.
For colder or warmer temperatures,
adjust the desired compartment
control one letter or number at
a time.
IMPORTANT
When initially setting the controls,
or when adjusting them, allow 24
hours for the temperatures to
stabilize, or even out.
filling the refrigerator with large
amounts of fresh or frozen foods.
Note: Turning the fresh food
control to “OFF” turns off cooling
in BOTH compartments—fresh
food AND freezer, but does not
shut off power to the refrigerator.
C INITIAL SETTING
E COLDEST
TEMPERATURE CONTROLS
this before
How to Test Temperatures
Use the milk test for the fresh
food compartment. Place a
container of milk on the top shelf in
the fresh food compartment. Check
it a day later. If the milk is too
warm or too cold, adjust the
temperature controls.
COLDEST 9
Use the ice cream test for the
freezer compartment. Place a
container of ice cream in the center
of the freezer compartment. Check
it after a day. If it’s too hard or too
adjust the temperature controls.
Always allow
refrigerator to reach the
temperature you set.
5
FRESH FOOD
24
hours for the
If you turn your
household thermostat
below
you may want to turn the lettered
control one step colder, as from “C”
to
house may cause the compressor to
operate less frequently, thus
allowing the freezer compartment
to warm somewhat. To protect your
frozen food supply, leave your
lettered
for the entire winter or for whatever
period of time you are turning down
your thermostat. This is especially
turned down for an extended period.
This change should have no effect
However, if freezing occurs, turn
the numbered control one step
When you stop turning the
thermostat down, turn temperature
controls back to their regular
Cooler temperatures in the
important when the thermostat is
on your fresh food compartment.
warmer, as from “5” to
settings.
at night
setting at this colder setting
Automatic
Saver System
You won’t find an “energy saver”
switch on this refrigerator.
Warm liquid from the refrigerator’s
condenser is
around the front edge of the freezer
compartment to help keep moisture
from forming on the outside of the
refrigerator during humid weather.
Many refrigerators use special
electric heaters. This refrigerator
needs none. That’s why there is no
“energy saver” switch. . there’s no
need for it.
circulated
No Defrosting
It is not necessary to defrost the
freezer or fresh food compartments.
Your refrigerator is designed and
equipped to defrost itself
automatically.
5
Page 6
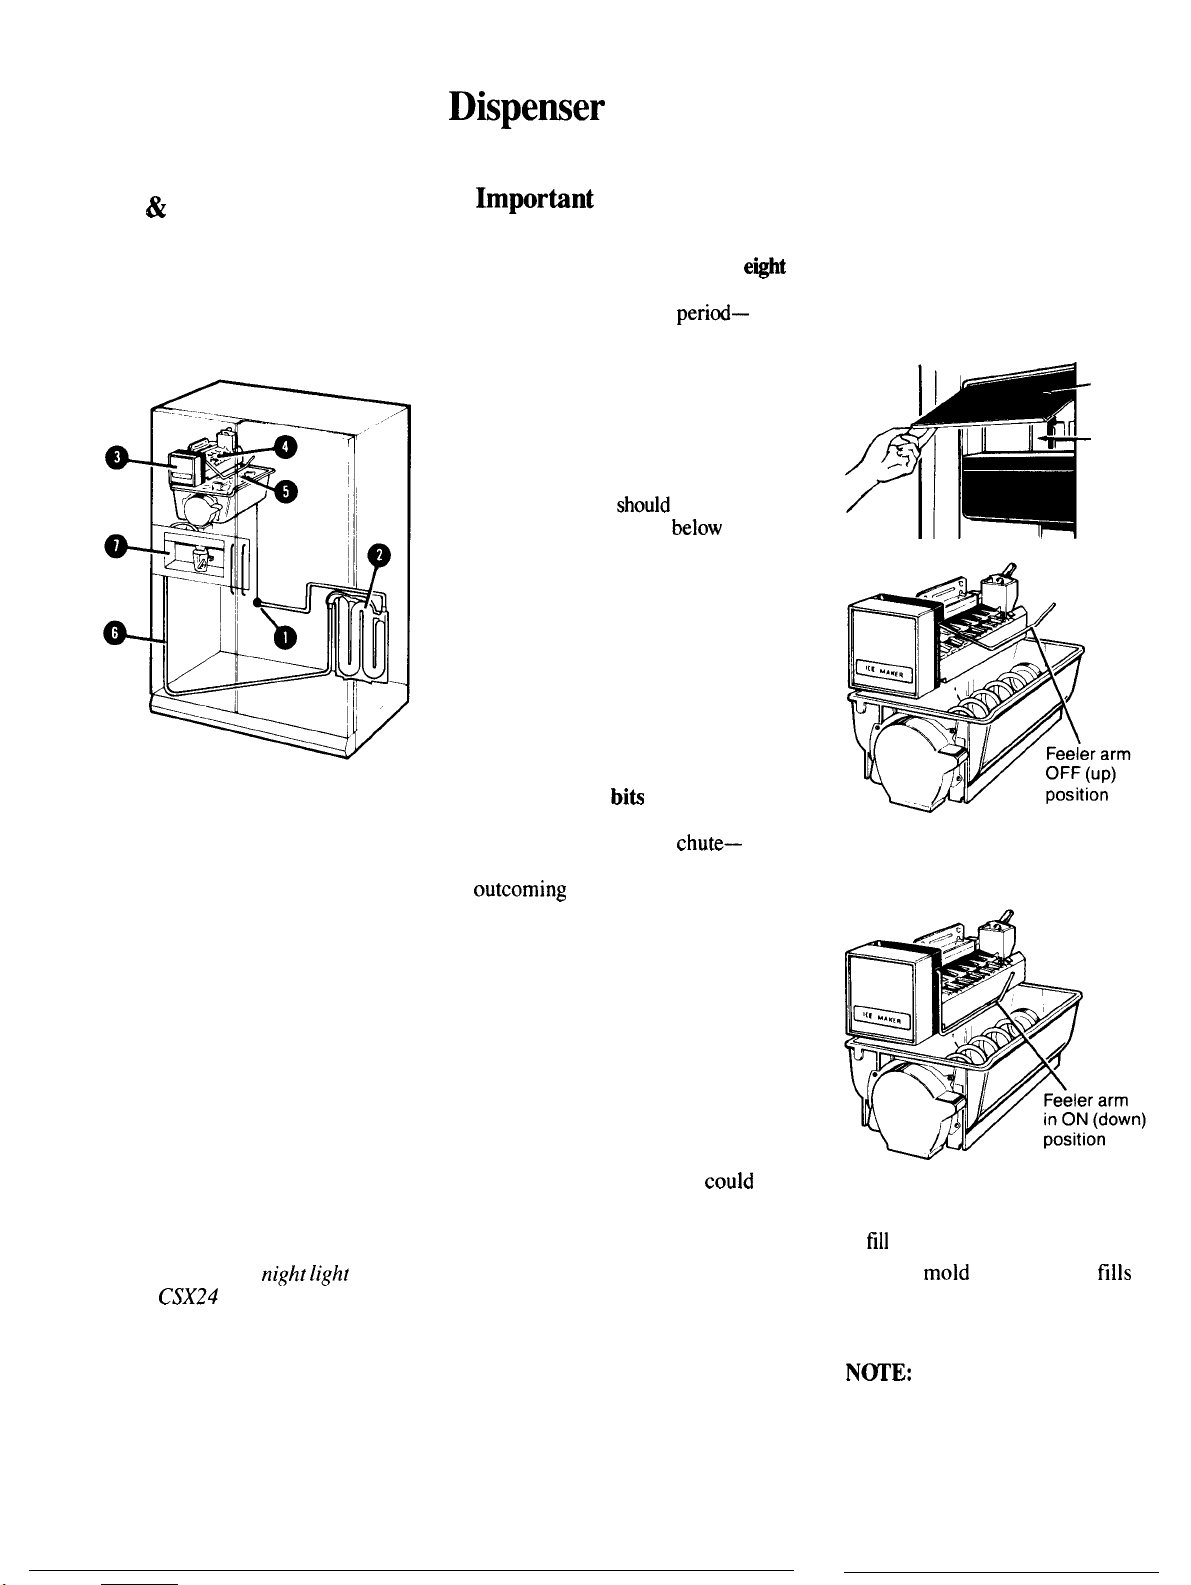
Ice & Chilled Water
Automatic Icemaker and
Ice
Your refrigerator has an automatic
icemaker and a dispenser that
dispenses chilled water and ice
cubes through the freezer
compartment door. Here’s how
they work.
Water flows from household supply
through dual solenoid valve (1) to
water reservoir (2) and to automatic
icemaker (3) as needed.
Water is frozen in cube mold (4)
and ejected into storage bin (5)
where a motor-powered auger moves
cubes forward to dispensing unit.
When you set the selector switch on
front of freezer compartment door
to ICE CUBES, cubes will dispense
through chute in door when cradle
is pressed.
When the switch is moved to
CHILLED WATER, water from
reservoir flows through tubing in
door (6) and is dispensed when
cradle is pressed.
Light switch (7) turns night light*
in the dispenser on or off.
*Light switch and
model
Water Dispenser
on
Facts about
Your Ice & Water Dispenser
●
Your icemaker will produce
cubes per
120 cubes in a 24-hour
depending on freezer compartment
temperature, room temperature,
number of door openings and other
use conditions.
●
Intermittent dispensing of ice is
normal.
more than brief, ice clump(s) may
be the cause and
following instructions
on page 8.
●
Avoid overfilling glasses with
ice and using narrow or extra-tall
glasses.
cause the door in the chute to freeze
shut. Periodically open the freezer
compartment door and look down
into the chute. If ice is blocking
the chute, poke it through with
a wooden spoon.
●
To help keep
being sprayed beyond the glass,
place glass close to ice
but not so close that it blocks
. Ice should not be dispensed into
thin glasses, fine china or delicate
crystal-they can crack or chip
from the combined pressure of your
hand pressing them against the cradle
and ice dropping into the container.
● Ice should be dispensed before
filling glass with soda or other
beverage mixes.
splashing which is annoying and
which, if the splash reaches the ice
and water selector switch,
cause it to stick or bind.
●
Beverages and foods
be quick-chilled in the ice storage
bin.
in the storage bin may cause the
icemaker to malfunction.
●
Ice
by your icemaker should not be
added to the ice storage bin—it
may not dispense well.
cycle—approximately
If ice flow interruption is
be removed
and
This can jam the chute or
of ice from
ice.
This will prevent
should not
Cans, bottles or food packages
other than that produced
Before Using Your
Icemaker and Dispenser
If you use your refrigerator before
the water connection is made, raise
the ice access door and make sure
the icemaker feeler arm is in the
OFF (up) position as shown below.
Ice access
I
When water supply has been
connected to icemaker, move feeler
arm to ON (down) position.
Depress water dispenser cradle
for about two minutes to remove
trapped air from the water line and
to
water reservoir automatically.
Ice cube
with water after cooling to freezing
temperatures. First cubes normally
freeze after several hours.
refrigerator, allow about 24 hours
for the freezer compartment to cool
down to the proper ice-making
temperature.
automatically
With a newly-installed
door
Icemaker
in
6
Page 7

Once Your Icemaker and
Are in Operation
To Dispense Ice and Water
To Dispense Ice and Water
Throw away the first few batches
of ice cubes (16 or 24 cubes). This
will flush away any impurities in
the water line. Do the same thing
after vacations or extended periods
when ice isn’t used.
Discard the first six
water in the kitchen sink. This will
eliminate the slight “plastic” taste
temporarily imparted to the water
by the water reservoir.
Keep ice level to keep icemaker
productive.
an empty storage bin
close to the icemaker and push the
feeler arm up to the OFF position
prematurely when the bin is only
partially full. Open the ice access
door, reach in,
hand and icemaking will resume.
Keeping cubes distributed evenly
will
enough ice to
maximum capacity.
Cubes ejected into
pile up
the cubes by
the icemaker to produce
the bin to its
● Set selector to ICE CUBES or
CHILLED WATER.
1’
II
● For ice, simply position glass
beneath words ICE CUBES. For
water, position glass beneath
words CHILLED WATER.
Caution:
Under certain rare circumstances,
ice cubes may be discolored,
usually appearing with a
bluish hue. The cause of this
discoloration is
due to a combination of
such as certain characteristics of
local waters, household plumbing
and the accumulation of copper
salts in an inactive water supply
line which feeds the icemaker.
Continual consumption of
discolored ice cubes may be
injurious to health. If such
discoloration is
the ice cubes and contact your
Factory Service Center
or an
Servicer.
Customer
such
discafi
● Grip glass or other container
near the rim and press rim gently
but firmly against the
cushioned cradle.
I
The water system provides The
approximately six successive may be warmer than the
6-ounce
several hours must be allowed for
replenished water reservoir supply
to
all the chilled water from the
reservoir on a single occasion.
I
You probably
When Dispensing Water...
not drain
● Grip
gently
firmly against ice or water
dispenser cradle.
following ones.
Dispensed water is chilled, not
iced.
For colder water, simply add
ice before dispensing water.
or other container
the rim and press rim
glass of water dispensed
This is normal.
next
7
Page 8

Ice & Chilled Water
(continued)
To Stop
Release pressure from cradle and
withdraw slowly to catch last ice
cubes or drops of water.
Some slight dripping may occur
following dispensing of chilled
water. If excessive, the spill should
be wiped dry immediately.
Do not pour water in spill shelf
because it is not
pour it in kitchen sink. The shelf
and its grille should be cleaned
regularly according to instructions
on page 13.
If Ice Clumps Form in
Bin...
The
groups of eight, and it is normal for
several cubes to be joined together.
However, if you don’t use the ice
very often, ice clumps may form in
the storage bin and can clog the
dispenser.
If this happens:
●
Remove storage bin from freezer
compartment.
●
Break up ice clumps with
fingertip pressure and discard
remaining clumps.
●
Replace bin before remaining
cubes melt and fuse together.
ejects cubes in
To Remove Ice Cube
Bin
Lift the left corner to free the bin
from the shelf and pull the bin
straight out, supporting
and back.
at front
To Replace Ice Cube
Bin...
Slide the bin back until the
the bin locks into the slot in the
shelf.
If bin does not go all the way
back, remove it and rotate the drive
mechanism 1/4 turn. Then push bin
back again until the tab on the bin
into the slot in the
on
If Ice Is Not Used Often . . .
Old ice cubes will become cloudy
and taste stale. Empty ice storage
bin periodically and wash it in
lukewarm water. Be sure to allow
storage bin to cool before replacing
it—otherwise ice cubes will stick
to the metal auger.
Move
Feeler Arm
to OFF (up)
●
Home water supply is to be
turned off for several hours.
●
Ice storage bin is to be removed
for a period of time.
●
Going away on vacation, at which
time you should also turn off the
valve in the water supply line to
your refrigerator.
If This is Your First
You’ll hear occasional sounds that
may be unfamiliar. These are normal
cause for concern.
Water Filter
Accessory
Your ice cubes can only
be as fresh-tasting as the
water that produces them.
That’s why it’s a good
idea
purify your water
with a water filter.
Its activated charcoal
removes musty, stale
odors and unpleasant
medicinal, metallic
tastes. A porous fiber
cartridge-catches dirt,
rust particles, sand and
silt, while special
reduce deposits of hard scale.
The
cost, available from your
dealer. Specify
complete installation instructions
and installs in minutes on 1/4”
copper water line.
It has
Page 9

Food
Suggestion
Suggested storage times*
Eating quality drops
after time shown
Fresh Meats
Roasts (Beef & Lamb). 3 to 5
Roasts (Pork & Veal). 3 to 5
Steaks (Beef)
Chops (Lamb). 3 to 5
Chops (Pork). 3 to 5
Ground & Stew Meats. 1 to 2
Variety Meats. 1 to 2
Sausage (Pork). 1 to 2
Processed Meats
Bacon. 7
Frankfurters. 7
Ham (Whole). 7
Ham (Half). 3 to 5
Ham (Slices). 3
Luncheon Meats. 3 to 5
Sausage (Smoked). 7
Sausage
Cooked Meats
Cooked Meats and
Meat Dishes. 3 to 4
Gravy & Meat Broth. 1 to 2
Fresh Poultry
Chicken
Chicken (Pieces). 1 to 2
Turkey (Pieces). 1 to 2
Duck & Goose (Whole). 1 to 2
Giblets. 1 to 2
Turkey (Whole). 1 to 2
Cooked Poultry
pieces (Covered with Broth) 1 to 2
(Not Covered). 3 to 4
Cooked Poultry Dishes. 3 to 4
Fried Chicken. 3 to 4
Most fruits and vegetables .. ...8-12 months
Lean fish. .. ..6-8 months
Fatty fish, rolls and breads,
soups, stew, casseroles. .. .2-3 months
Cakes, pies, sandwiches,
Ice cream (original carton). ...1 month max.
techniques are constantly being dweloped.
Consult the College or County Extension
Service or your local Utility Company for the
latest information on freezing and storing foods.
*U.S.
of Agriculture
Meats, fish and poultry purchased
from the store vary in quality and
age; consequently, safe storage
time in your refrigerator will vary.
To
store unfrozen
poultry:
●
Always remove store wrappings.
● Rewrap in foil, film or wax paper
and refrigerate immediately.
35°
DAYS
3 to 5
MONTHS
Freezing
not recom-
mended.
2 to 3
12
9
6
6
1
4 to 6
4
poultry) FREEZER
fish and
6 to 12
4 to 8
6 to 12
6 to 9
3 to 4
3 to 4
3 to 4
1 to 2
1
1 to 2
1 to 2
1 to 2
2 to 3
To store cheese,
wrap well with wax
paper or aluminum foil, or put in
a plastic bag.
●
Carefully wrap to expel air and
help prevent mold.
●
Store pre-packaged cheese in its
own wrapping if you wish.
To store vegetables, use the
vegetable drawers—they’ve been
designed to preserve the natural
moisture and freshness of produce.
●
Covering vegetables with a moist
towel helps maintain crispness.
● As a further aid to freshness,
pre-packaged vegetables can be
stored in their original wrapping.
Note:
Sealed& Fresh
unnecessaq to wrap certain
foods which it has been designed to
drawer is described
on page 11.
To
ice
cream, with high cream content,
normally require slightly lower
temperatures than more “airy”
already-packaged brands with
low cream content.
●
It will be necessary to experiment to
determine the freezer compartment
location and temperature control
setting to keep your ice cream at
the right serving temperature.
●
The rear of the
compartment
is slightly colder than the front.
Tips on freezing foods
There are three essential
requirements for efficient home
freezing:
1.
Initial quality.
top-quality foods. Freezing retains
quality and flavor; it cannot
improve quality.
2. Speed. The quicker fruits and
vegetables are frozen after picking,
the better the frozen product will
be. You’ll save time, too, with less
culling and sorting to do.
3.
wraps designed especially for
freezing.
Freeze only
Use food
To freeze meat, fish and poultry,
wrap well in freezer-weight foil (or
other heavy-duty wrapping material)
forming it carefully to the shape of
the contents. This expels air. Fold
and crimp ends of the package to
provide a good, lasting seal.
Don’t refreeze meat that has
completely thawed; meat, whether
raw or cooked, can be frozen
successfully only once.
Limit freezing of fresh (unfrozen)
meats or seafoods to number of
pounds at a time as follows:
..21
. . . . . . . . . . . .
. . . . . . . . . . . .
pounds
..26 pounds
For convenience...
●
Store all like things together. This
not only saves time, but
because you can find foods faster.
. Place the oldest items up front so
they can be used up promptly.
● Use shelves on the door for most
often used sauces and condiments.
● Use the meat drawer for meats
you do not freeze.
To save money in energy
and food
● Place most perishable items, such
as milk, cream or cottage cheese,
toward the rear of the top shelf;
they will stay coldest in this part of
the fresh food compartment.
●
Cover moist foods with tight lids,
plastic film or foil.
● Leaf vegetables and fruits
placed in storage drawers will last
longer when stored in closed plastic
containers or wrapped in plastic
Do not overload your fresh food
or freezer compartment with a lot
of warm food at once.
●
Open the door the fewest times
possible to save electrical energy.
When going out of town for
several days, leave as few perishables
as possible in the refrigerator. Set the
shut off water to the refrigerator.
9
Page 10

Shelves
Shelves in the fresh food and freezer
compartments are adjustable,
enabling you to make efficient shelf
arrangements to fit your family’s
food storage needs.
Fresh Food Compartment
To remove shelves:
front, then lift it up and out of
tracks on rear wall of refrigerator.
Tilt shelf up at
Removable Bins on Fresh
Food Compartment Door
To remove:
until mounting hooks disengage.
To relocate: Select desired shelf
height, engage the bin’s hook
slots on the tracks of the door, and
push in. The bin will lock in place.
Lift the bin straight up
in
Removable Shelves in
Freezer Compartment
Shelves in the freezer compartment
are easily removed and replaced.
To remove shelves:
1.
While pressing tabs on shelf
supports on right wall, lift shelf out
of grooves in supports.
❑ Engage
top
Lower to
lock
To replace shelves:
shelf height. With shelf front raised
slightly, engage top lugs in tracks at
rear of cabinet. Then lower front of
shelf until it locks into position.
place
Select desired
2. Pull shelf sideways until rods
come out of holes on left wall.
To replace shelves:
holes. Then, while pressing tabs,
lower shelf into grooves in supports.
Be sure shelf wire is fully inserted
into grooves.
Insert rods into
Page 11

Convertible Meat Keeper
The Convertible Meat Pan drawer
has its own cold air duct to allow a
stream of cold air from the freezer
compartment to flow around the
drawer.
The variable temperature control
regulates the air flow from the
freezer compartment.
Set control lever to MEATS—the
coldest setting-to store fresh meats.
If lever is left in MEATS position for
a long period of time, some frost may
form on the inside of the drawer.
Set control lever to VEGETABLES
to convert the drawer to normal
refrigerator temperature and
provide extra vegetable storage
space. Cold air duct is turned off.
Variable settings between these
extremes can be selected.
Sealed & fresh Drawer
This refrigerated drawer is designed
to keep
content of foods
●
●
● Beets, topped ● Currants
●
●
●
As in any refrigerated storage area,
it is recommended that odorous
foods be stored wrapped–foods
such as:
.
●
Storage time will depend upon the
type of food and its condition when
placed in the drawer.
Excess water which may accumulate
in the bottom of the Sealed& Fresh
Drawer should be poured out and
the drawer wiped dry.
The Sealed & Fresh Drawer is
partially sealed by gaskets attached
to the cover at the front and back
edges. Always replace the drawer
in this cover and
all the way in.
unwrapped foods fresh by
the natural moisture
such as:
Artichokes
Asparagus
Blueberries
Carrots
Celery
Broccoli
Brussels
Sprouts
●
Cherries
●
Corn
● Greens, leafy ● Spinach
●
Lettuce . Tomatoes,
. Parsley
●
Peas, green
●
Cabbage
●
Cauliflower● Turnips
●
Green Onions
push the drawer
●
Plums
●
Radishes
●
Rhubarb
ripe
●
Parsnips
11
(continued on
Page 12

(continued)
To Remove
1.
Remove food from shelf above
Sealed & Fresh Drawer and take out
shelf. Take food off the glass cover
and out of the drawer.
2.
Put your fingers behind the
gasket at the rear of the drawer and
pull forward. Remove the gasket.
5. Pull the drawer forward, lift the
front to clear stops, and remove the
drawer. If the refrigerator door
doesn’t open completely, pull the
drawer out until it hits the door.
Then lift the drawer up until it is
higher than the drawer supports, tilt
it and take it out.
8.
Tilt and remove the drawer.
After cleaning, replace in reverse
order.
3.
Pull the drawer
Reach in, push
up; at the same time, push it back
until it clears front-comer retainers.
4. Tilt and remove the cover.
out.
o~the glass
6. If tape holds Convertible
Pan cover to drawer supports,
remove the tape. Pull drawer partway out. Reach in, push the rear of
the glass up and, at the same time,
back, until it clears front-corner
retainers.
7. Tilt and remove the cover.
Meat
When drawers and covers are back
in place, reinstall gasket at rear of
Sealed & Fresh Drawer. Fit the end
of the plastic drawer support into
the slot on the gasket, with the
rubber gasket flap facing you. Make
sure the gasket snaps into place.
12
Page 13

Care and Cleaning
Cleaning—Outside
The water and ice dispenser
spill
immediately to prevent spotting.
you
undiluted vinegar. You can also use
paste of non-precipitating water
softener (such as
acid powder per pint of hot tap
water. Soak until deposit disappears
or becomes loose enough to rinse
away. Usually 30 minutes soaking
time is adequate. Avoid using wax
on spill shelf and trim.
The door handles and trim
cleaned with a cloth dampened with
a solution of mild liquid dishwashing
detergent and water. Dry with a soft
cloth. Don’t use wax on the door
handles or trim.
Keep the finish clean.
a clean cloth lightly dampened with
kitchen appliance wax or mild liquid
dishwashing detergent. Dry and
polish with a
not wipe the refrigerator with a
soiled dishwashing cloth or wet
towel. These may leave a residue
that
not use scouring pads, powdered
cleaners, bleach or cleaners
containing bleach because these
products can scratch and weaken
the paint finish.
Protect the paint finish.
on the outside of the refrigerator is
a high quality, baked-on paint finish.
With proper care, it will stay
looking and rust-free for years.
Apply
wax when the refrigerator is new
and then at least twice a year.
Appliance Polish Wax & Cleaner
(Cat. No.
from
Marts.
should be wiped dry
on shelf
remove by soaking with
water, or one teaspoon of citric
damage the paint. Do
coat of kitchen/appliance
leave deposits
brand)
can be
Wipe with
soft cloth. Do
The finish
is available
Cleaning—Inside
Inside the fresh food and freezer
compartments
at least once a year. Unplug the
refrigerator before cleaning. If this
is not practical, wring excess
moisture out of sponge or cloth
when cleaning around switches,
lights or controls.
Use warm water and baking soda
solution—about a tablespoon of
baking soda to a quart of water.
This both cleans and neutralizes
odors. Rinse thoroughly with water
and wipe dry.
Other parts of the
including door gaskets, meat and
vegetable drawers, ice storage
bin and all plastic parts—can be
cleaned the same way. Do not use
cleansing powders or other abrasive
cleaners.
To help prevent odors,
an open box of baking soda in the
rear of the refrigerator, on the top
months. An open box of baking
soda in the freezer will absorb
stale freezer odors.
not wash any
from your refrigerator
your automatic dishwasher.
Drain opening in freezer
compartment. During yearly
cleaning, remove bottom freezer
basket and flush a solution of baking
soda (one teaspoon) and two cups of
hot (not boiling) water through the
drain line with the help of a meat
baster. This will help eliminate
odor and reduce the likelihood
of a clogged drain line.
If drain becomes
clogged, use a
meat baster and
baking-soda-and- ~
water solution to
force the clog
through the
drain line.
Continue flushing until line is
clear, then empty and replace the
defrost water pan immediately.
should be cleaned
plastic parts
in
!
--
‘
_-J
—..
Behind Refrigerator
Care should be taken in moving
your refrigerator away from the
wall. All types of floor coverings
can be damaged, particularly
cushioned coverings and those
with embossed surfaces. Pull the
refrigerator straight out and return
to position by pushing it straight in.
Moving your refrigerator in a side
direction may result in damage to
your floor covering or refrigerator.
Condenser
The condenser is located behind
the base grille. For most efficient
operation, you will need to keep
the condenser clean. Remove the
base grille (see page 4) and either
sweep away or vacuum up dust that
is readily accessible. For best
results, use a brush specially
designed for this purpose. It is
available at most appliance parts
stores. This easy cleaning operation
should be done at least once a year.
Condenser
\
Defrost Water Wn
Pan be
cleaned a east
reinstalling
ALL THE WA ‘ N until it stops.
base grille should be
a year. When
push it
13
Page 14

and
(continued)
Light bulb replacement
In Fresh Food Compartment
Unplug refrigerator.
1.
2. To align the control knob
properly, note position of
numbered control for proper
reassembly and pull off knob.
3. Pull bottom of light panel down
about
lip at rear from grooves in retainers
on rear wall.
4. Lift panel to disengage top from
pins on side walls; remove panel.
bulb, reinstall panel (hang top on
pins; pull bottom down, push it
back and release it to let lip engage
grooves in retainers). Replace
temperature control knob in OFF
position, turn it to previous setting,
and plug refrigerator back in.
enough to disengage
In
MODEL CSX24
1.
Unplug refrigerator.
2. Remove shelf that’s just below
light shield. (Shelf will be easier to
remove if it is emptied first.)
3. Pull plastic light shield toward
you. (It will bend to free tabs from
grooves.)
4. Replace bulb with same size
bulb.
5. Reinstall shield and shelf.
6. Plug in refrigerator.
MODEL
1. Unplug refrigerator.
Compartment
When you goon vacation
For extended vacations or
absences, shut off power to
refrigerator, turn the numbered
control to OFF, clean interior
with baking soda solution of one
tablespoon of soda to one quart of
water. Wipe dry. To prevent odors,
leave open box of soda in refrigerator.
Leave
doors open.
For shorter vacations, remove
perishable
at regular settings. However, if
room temperature is expected to
drop below
instructions as for extended
vacations.
Move
(up) position and be sure to shut off
water supply to the refrigerator.
foods and leave controls
follow same
When you move
Disconnect power cord from wall
outlet, remove all food and clean
and dry the interior.
Secure
grille, shelves and storage pans
by taping them securely in place
to prevent damage.
Be sure refrigerator stays in
in van. Refrigerator must be secured
in van to prevent movement. Protect
outside of refrigerator with blanket.
loose items
during actual moving and
such as
2. Remove shelf that’s just below
light shield. (Shelf will be easier to
remove if it is emptied first.)
3. Pull plastic light shield toward
you. (It will bend to free tabs from
grooves.)
4. Replace bulb with same size
bulb.
5. Reinstall shield and
6. Plug in refrigerator.
14
Page 15

Use This Problem Solver
PROBLEM
DOES
OPERATE
OPERATES
FOR LONG PERIODS
STARTS&
STOPS FREQUENTLY
POSSIBLE CAUSE AND REMEDY
May be in defrost cycle when motor does not operate for about 30 minutes.
● Temperature control in OFF position.
●
If interior light is not on, refrigerator may not be plugged in at wall outlet.
●
If plug is secure and the refrigerator still fails to operate, plug a lamp or a small
appliance into the same outlet to determine if there is a tripped circuit breaker or
burned out fuse.
● Modern refrigerators with more storage space and a larger freezer compartment
require more operating time.
●
Normal when refrigerator is first delivered to your home—usually requires 24 hours
to completely cool down.
●
Large amounts of food placed in refrigerator to be cooled or frozen.
●
Hot weather—frequent door openings.
● Door left open.
●
Temperature controls are set too cold. Refer to page 5.
●
Grille and condenser need cleaning. Refer to page 13.
●
Check ENERGY-SAVING TIPS on page 2.
●
Temperature control starts and stops motor to maintain even temperatures.
VIBRATION OR
RATTLING
OPERATING
SOUNDS
DOOR
CLOSING
PROPERLY
●
If refrigerator vibrates, more than likely it is not resting solidly on the floor and front
roller screws need adjusting, or floor is weak or uneven. Refer to ROLLERS on page 4.
●
If dishes vibrate on shelves, try moving them. Slight vibration is normal.
●
Defrost water pan rattling, needs to be positioned properly.
● The high speed compressor motor required to maintain near zero temperatures in
the large freezer compartment may produce higher sound levels than your old refrigerator.
● Normal fan air flow-one fan blows cold air through the refrigerator and freezer
compartments-another fan
● These NORMAL sounds will also be heard from time to time:
● Defrost timer switch clicks at defrost.
the compressor motor.
Defrost water dripping into drain pan.
● Temperature control clicks ON or OFF.
Ice cubes dropping into bin and water running in pipes as icemaker refills.
●
Refrigerant boiling or gurgling.
. Cracking or popping of cooling coils caused by expansion and contraction during
defrost and refrigeration following defrost.
●
Door gasket on hinge side sticking or folding over. To correct, put a small amount of
petroleum jelly on face of gasket.
next page)
15
Page 16

The Problem
(continued)
PROBLEM
HOT AIR FROM
BOTTOM OF
FRESH FOOD
OR FREEZER
COMPARTMENT
TEMPERATURE
TOO WARM
FOODS DRY OUT
FROST OR ICE
CRYSTALS ON
FROZEN FOOD
SLOW ICE CUBE
FREEZING
ICE CUBES HAVE
ODOR/TASTE
POSSIBLE CAUSE AND REMEDY
Normal air flow cooling motor. In the refrigeration process, it is normal that heat be
expelled in the area under the refrigerator, Some floor coverings will discolor at these
normal and safe operating temperatures.
Your floor covering supplier should be
consulted if you object to this discoloration.
●
Temperature control not set cold enough. Refer to page 5.
●
Warm weather—frequent door openings.
. Door
●
Package may be holding door open.
open for too long a time.
Foods not covered, wrapped or sealed properly.
●
Door may have been left ajar or package holding door open.
. Too frequent and too long door openings.
. Frost within package is normal.
. Door may have been left ajar.
● Turn temperature of freezer compartment colder.
● Old cubes need to be discarded.
●
Ice storage bin needs to be emptied and washed.
●
Unsealed packages in refrigerator and/or freezer compartments may be transmitting
odor/taste to ice cubes.
. Interior of refrigerator needs cleaning. Refer to page 13.
. Poor-tasting incoming water. Instill water filter-see page 8.
AUTOMATIC
ICEMAKER
DOES NOT WORK
DIVIDER BETWEEN
COMPARTMENTS
FEELS WARM
MOISTURE FORMS
ON OUTSIDE
OF
. Icemaker feeler arm is in OFF (up) position.
. Water supply turned off or not connected.
. Freezer compartment too warm.
●
Cubes too small—water shut-off valve connecting refrigerator to home water line may
be clogged.
. Sometimes cubes fuse to the side of the ice mold and hold the feeler arm in the
OFF (up) position. Remove this ice to restart the icemaker.
. When reaching for cubes by hand, you may have pushed the feeler arm into the
OFF (up) position by mistake.
. Piled up cubes in storage bin may cause icemaker to shut off prematurely. With
icemaker feeler arm in the OFF (up) position, level cubes in bin.
●
Normal warmth is created by Automatic Energy Saver System circulating warm
liquid around front edge of freezer compartment to help prevent condensation on
outside of refrigerator in hot, humid weather.
. Not unusual for moisture to form on outside of refrigerator during periods of high
humidity.
16
Page 17

PROBLEM
POSSIBLE CAUSE AND REMEDY
CUBE DISPENSER
DOES NOT WORK
(MODEL
● No ice cubes. Remove storage bin. If cubes are frozen to wire arm, remove them.
● No ice cubes. Icemaker turned off or water supply turned off.
. Irregular ice clumps in storage container. Breakup as many as you can with fingertip
pressure and discard the remaining clumps.
WATER HAS POOR
TASTE/ODOR
. If water dispenser has not been used for an extended period, dispense water in
regular manner until all water in reservoir is replenished with fresh water.
. Poor-tasting incoming water. Install water filter-see page 8.
WATER IN FIRST . Allow about 24 hours for water to cool to proper temperature after refrigerator is first
GLASS IS WARM
installed.
If water dispenser has not been used for extended period, water in first glass will not
be as cool as in succeeding glasses.
● If water reservoir has been drained,
several hours for replenished supply
to chill.
WATER DISPENSER
DOES
WORK
HAS ODOR
Water supply line turned off or not connected.
Supply line may be clogged with sediment.
●
Foods with strong odors should be tightly covered.
. Check for spoiled food.
. Interior needs cleaning. Refer to page
● Defrost water pan needs cleaning.
. Keep open box of baking soda in refrigerator; replace every three months.
●
MOISTURE
COLLECTS INSIDE
WATER ON
FLOOR OR ON
OF FREEZER
Too frequent or too long door openings.
In humid weather, air carries moisture into refrigerator when doors are opened.
●
The drain in botiom of freezer may be clogged. Remove any ice on the freezer bottom
and clean the drain. Refer to page 13.
●
If you use a glass over 6 inches tall, you may be jamming cubes in the funnel chute.
They can fuse inside the chute and drop out later, leaving water or ice on the floor.
● Defrost water pan full, missing or not in position.
If you need more help.. call, toll free:
GE Answer
800.626.2000
consumer information service
17
Page 18

18
Page 19

If You Need Service
To obtain service, see your warranty
on the back page of this book.
We’re proud of our service and
want you to be pleased. If for some
reason you are not happy with the
service you receive, here are three
steps to follow for further help.
FIRST, contact the people who
serviced your appliance. Explain
why you are not pleased. In most
cases, this will solve the problem.
NEXT, if you are still not pleased,
write
your phone number—to:
FINALLY, if your problem is still
not resolved, write:
the details—including
Manager, Consumer Relations
Appliance Park
Louisville, Kentucky 40225
Major Appliance
Consumer Action
20 North
Chicago, Illinois 60606
Drive
19
Page 20

YOUR HOTPOINT REFRIGERATOR
WARRANTY
Save proof of original purchase date such as your sales slip or
check to establish warranty period.
WHAT IS COVERED
FULL ONEWEAR WARRANTY
For one year from
purchase, we
charge,
in your home to repair or replace
will
parts and service labor
refrigerator
because of a manufacturing
defect.
FULL FIVE-YEAR WARRANTY
For five years from date
purchase, we will provide, free of
charge, parts and service labor in
your
home to repair or replace any
part of the
system (the compressor, condenser,
evaporator and all connecting
tubing) that fails because of a
manufacturing defect.
sealed refrigerating
WHAT IS
of original
provide, free of
that
of original
COVERED
LIMITED LIFETIME WARRANTY
For the life of the refrigerator, we
will replace, free of charge,
see-through storage drawer
made from
resin and furnished with the
refrigerator if the drawer breaks
during normal household use,
Drawer covers are not included.
To avoid any trip charges, you must
take the drawer to a Hotpoint
Appliance Parts Mart and pick up
a replacement.
● Service trips to your home to
teach you how to use the product.
Read your Use and Care material.
If you then have any questions
about operating the product,
please contact your dealer
Consumer Affairs
address below, or call, toll free:
GE Answer Center”
800.626.2000
consumer information service
● Improper installation.
If you have an installation problem,
contact your dealer or installer.
You are responsible for providing
adequate electrical, plumbing and
other connecting facilities.
or
office at the
our
This warranty is extended to
the original purchaser and any
succeeding owner for products
purchased for ordinary home use
in the 48 mainland states, Hawaii
and Washington,
warranty is the same except that it is
LIMITED because you must pay to
ship the product to the service shop
or for the service technician’s travel
costs to your home.
All warranty service will be provided
by our Factory Service Centers or
by our authorized Customer Care”
servicers during normal working
hours.
Look in the White or Yellow Pages
of your telephone directory for
HOTPOINT FACTORY SERVICE,
GENERAL
FACTORY SERVICE or HOTPOINT
CUSTOMER CARE” SERVICE.
. Replacement of house fuses or
resetting of circuit breakers.
● Failure of the product if it is used
for other than its intended purpose
or used commercially.
. Damage to product caused
by accident, fire, floods or acts
of God.
WARRANTOR IS
FOR CONSEQUENTIAL DAMAGES.
In Alaska the
RESPONSIBLE
2-90
Some states do not allow the exclusion or limitation of incidental or consequential damages, so the above limitation or exclusion
may not apply to you. This warranty gives you specific legal rights, and you may also have other rights which vary from state to state.
To know what your legal rights are in your state, consult your local or state consumer affairs office or your state’s Attorney General.
Warrantor: General Electric Company
If further help is needed concerning this warranty, write:
Manager—Consumer Affairs, GE Appliances, Louisville, KY 40225
 Loading...