

Hotpoint CSX27H Use And Care Manual
Contents
Appliance Registration
2
Model and
Serial Numbers
2
Base Grille
4
Problem Solver
16-18
Care and Cleaning
14,
15
Safety
Instruction
3
Condenser
14
Shelves
13
Consumer Services
19
Temperature Controls
5
Countermaker Compartment
6
Vacation & Moving Tips
15
Drawer and Cover Removal 12
Warranty
Back Cover
Energy Saver System
5
Water Filter Accessory
9
Energy-Saving Tips
2
Food Storage Suggestions
1()
Storage Drawers
11,
12
Storage Times
I ()
Ice Dispenser
7-9
Icemaker
7-9
Installation
3,4
Adapter Plug
4
Adjustable Rollers
4
Clearances
4
Electrical Requirements 3, 4
Extension Cord
4
Grounding
3
Location
4
Water Supply to lcemaker 4
GE Answer Center’
Light Bulb Replacement
15
800.626.2000
use
and
care
of
model
CSX27H
Ice &Water Dispenser
Countermaker
Compartment
Help us help you...
Read this book carefully.
It is intended to help you operate
and maintain your new refrigerator
properly.
Keep it handy for answers to your
questions.
If
you don’t understand something
or need more help, write (include
your phone number):
Consumer Affairs
Hotpoint
Appliance Park
Louisville. KY 40225
Write down the model and
serial numbers.
You’ll see them on a label at the
bottom, just inside the fresh food
compartment door.
These numbers are also on the
Consumer Product Ownership
Registration Card that came with
your refrigerator.
Before sending in the registration
card, please
write these numbers
here:
Model Number
Serial Number
Use these numbers in any
correspondence or service calls
concerning your refrigerator.
If you received a damaged
refrigerator, immediately contact
the dealer (or builder) that sold you
the refrigerator.
Save time and money.
Before you request service, check
the Problem Solver on pages
16
through
18. It lists
causes of minor
operating problems that you can
correct yourself.
Energy-sating tips
● Location of your refrigerator is
important. Avoid locating it next to
your range, a heating vent or
where the sun will shine directly
on it.
● Don’t open the doors more often
than necessary.
● Close the doors as soon as
possible, particularly in hot,
humid weather.
● Be sure the doors are closed
tightly. Before leaving the house or
retiring for the night, check to be
sure the doors haven’t been left
open accidentally.
“
Store only those foods requiring
refrigeration in your refrigerator.
● Wipe moisture from bottles and
cartons before putting them in the
refrigerator.
● Keep foods covered to reduce
moisture buildup inside the
refrigerator.
● If you turn the controls to the
coldest position for quick chilling
or freezing, be sure to turn them
back to regular settings.
●
Don’t overcrowd your refrigerator.
Overcrowding can require extra
electrical energy to keep everything
cool.
Myou
need
setice
To obtain service, see the
Consumer Services page in the
back of this book.
We’re proud of our service and
want you to be pleased. If for some
reason you are not happy with the
service you receive, here are three
steps to follow for further help.
FIRST, contact the people who
serviced your appliance. Explain
why you are not pleased. In most
cases, this will solve the problem.
NEXT, if you are still not pleased,
write all the details—including
your phone number—to:
Manager, Consumer Relations
Hotpoint
Appliance Park
Louisville, Kentucky 40225
Finally, if your problem is still not
resolved, write:
Major Appliance Consumer
Action Panel
20 North
Wacker
Drive
Chicago, Illinois 60606
2
~PORTANT
SAFETY INSTRUCTIONS
Read all instructions before using this appliance.
WARNING—
When using this
appliance, always exercise basic
safety precautions, including the
following:
● Use this appliance only for its
intended purpose as described in
this Use
and
Care Book.
● This refrigerator must be
properly installed in accordance
with the Installation Instructions
before it is used. See grounding
instructions below
and on page
4.
● Never unplug your refrigerator
by pulling on the power cord.
Always
&rip
plug
firmly
and
pull
straight out from the outlet.
● Repair or replace immediately
all electric service cords that
have become frayed or
otherwise damaged. Do not use
a
cord
that shows cracks or abrasion
damage along
its length or
at
either the
plug or
connector end.
● When moving your
refrigerator away from the wall,
be careful not to roll over or
damage the power cord.
●
After your refrigerator is in
operation, do not touch the cold
surfaces, particularly when hands
are damp or wet.
Skin may adhere
to these extremely cold surfaces.
. Do not place fingers or hands
on the automatic
icemaking
mechanism while the refrigerator
is plugged in.
This will prevent
contact with the moving
ptis
of
the ejector mechanism, or with the
heating element that releases the
cubes.
● Don’t refreeze frozen foods
which have thawed completely.
The United States Department
of
Agriculture in Home and Garden
Bulletin No.
69
says:
“..
.YoL1
may
safely
refreeze
frozen
foods
that have thawed if they still
contain ice crystals or if they
are
still
cold-below
40”F.
“.. .Thawed ground
meats,
poultry
or
fish that have
UI?}I
off-odor or
off-color
should
not be refrozen
und
should not be eaten. Thawed
ice cream should be discarded.
If
the odor or color of any food is
poor or
questiontible, get
rid of it.
The food
may be
dangerous to eat.
“Even partial thawing and
refreezing reduce the eating quality
of foods, particularly fruits,
vegetables and prepared foods. The
eating
quality of red meat is affected
less than that of many other
foods.
Use refrozen
foods as
soon as
possible to save as much of their
eating quality as you
can:’
● If your
old
refrigerator is still
around the house but not in use,
be sure to remove the doors. This
will reduce the possibility
of
danger to children.
● Unplug your refrigerator:
A. Before making
any
repairs.
Note: We strongly recommend
that any servicing be performed
by a qualified individual.
B. Before cleaning.
C. Before replacing a burned-out
light bulb, the refrigerator should
be unplugged in order to avoid
contact with a live wire filament.
(A burned-out light bulb may
break when being replaced.)
Note: Turning control to OFF
position does not
remove
power
to the light circuit.
●
Do not store or use combustible
materials, gasoline or other
flammable vapors or liquids in
the vicinity of this or any other
appliance.
SAVE THESE
INSTRUCTIONS
Installation
Requirements—
IMPORTANT. .. Please read carefully.
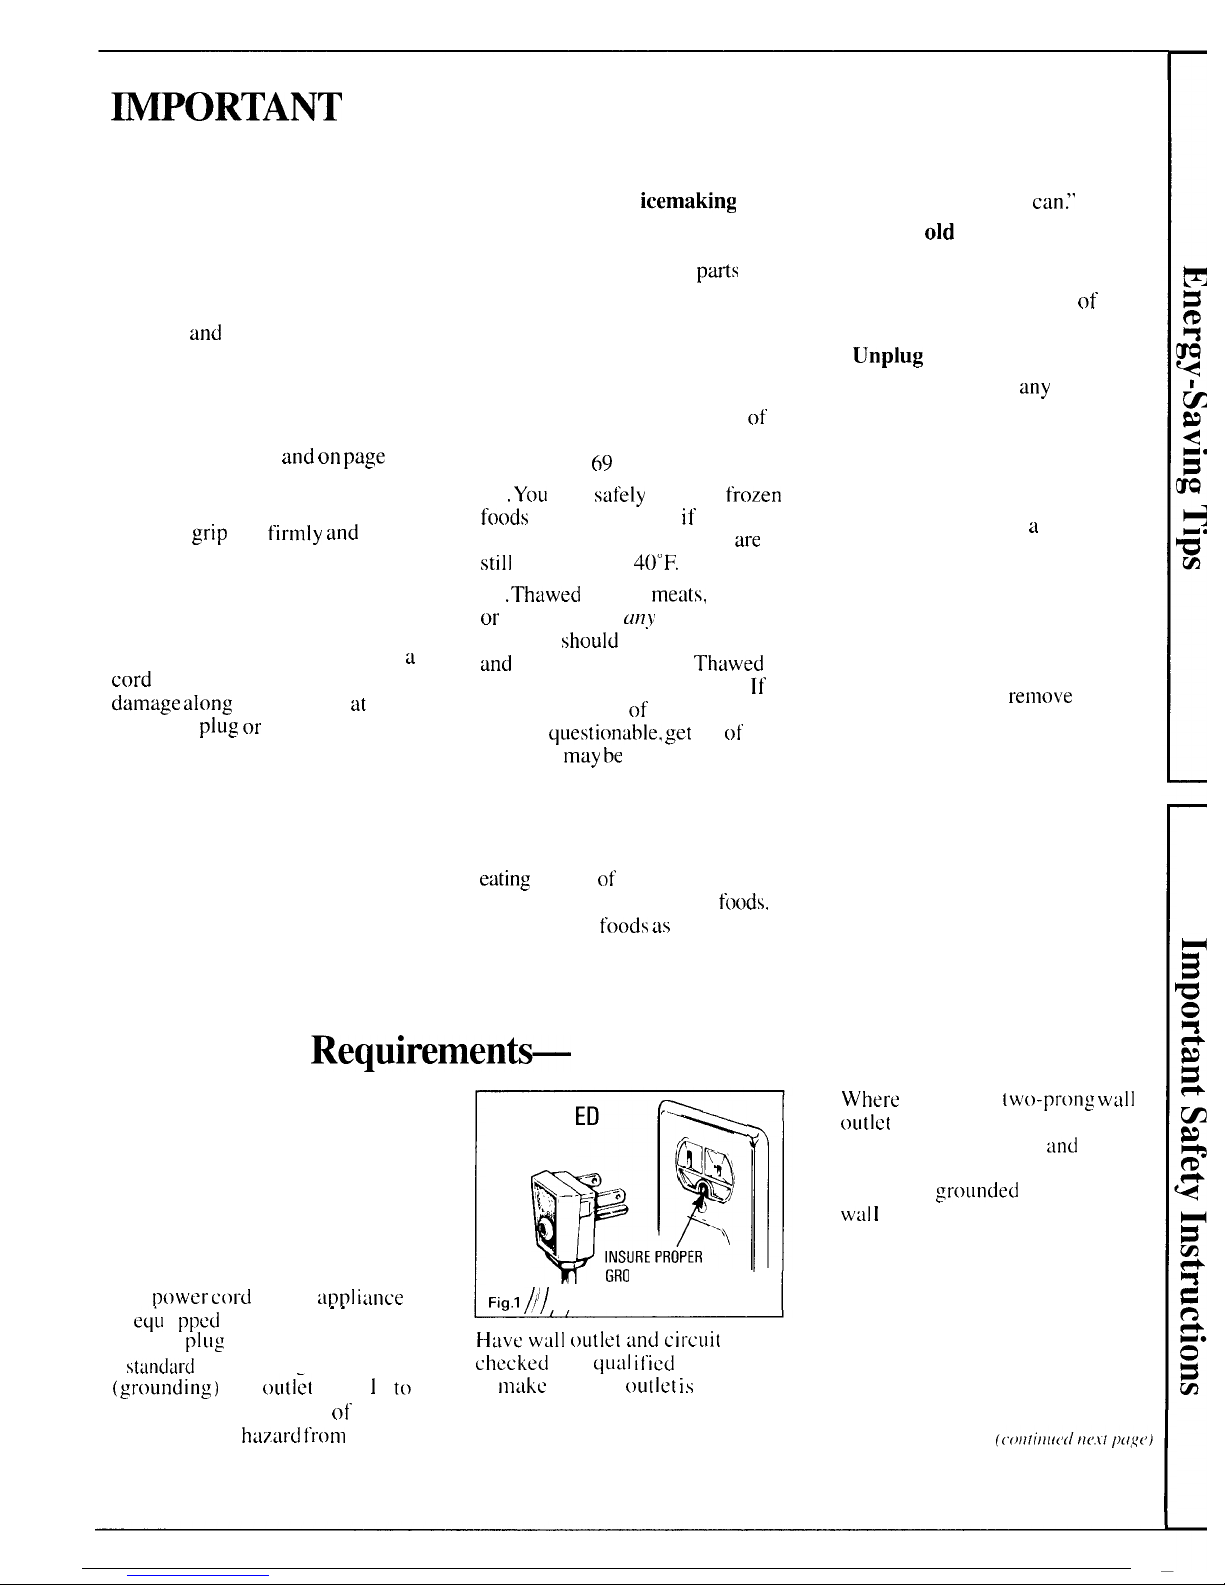
How to connect
electricity
For personal safety,
this appliance must be
properly grounded.
The
t>ower cord
of this
a~?pl iance
PREFERRED
METHOD
h’-”
“
r
;F
‘1
QQ
\h
‘,
%
>)
INSURE PROPER
GROUND EXISTS
Fi~l )/
BEFOREUSE
. .
is
eq;l
i
ppcd
with a three-prong
(
grounded)
plug
which mates with
Have WUI] outlet and cit”cuit
a
stundard
three –t?ron,g
checked
by a
qual ificd
electrician
(grounding)
wall-
outl:t
(Fig. 1 )
t(}
to
make
sure the
outlet is
properly
minimize the possibility
of
grounded.
electric shock
hazard from
this
appliance.
Where
a standard
two-prong wall
outlet
is encountered, it is your
personal responsibility
and
obligation to have it replaced with
a properly
:rounded three-prong
Wal I
outlet.
DO NOT, UNDER ANY
CIRCUMSTANCES, CUT
OR REMOVE THE THIRD
(C; ROUND) PRONG FROM
THE POWER CORD.
3
Instillation Requirement
(cc).ti...dIMPORTANTNpleaseease
Read Carefully.
Use of Adapter Plug
Because of potential
safety huzards
under
certain conditions, wc strongly
recommend against use
of tin
adapter
plug.
However, if you still
elect to
use an adapter, where
local codes
permit, a TEMPORARY
CONNECTION may be made to
a
properly grounded two-prong wall
outlet by use of a UL
listed
adapter
(Fig. 2)
tivailablc at nlost ]octi]
hardware stores.
TEMPORARY METHOD
~~ti;!;;;:~fl~;A) . : .0
{~~”
ALIGN LARGE
PRONGS/SLOT
n
(
l“
~)
-
~;~ Q ,; ‘“ “
I
~’”
pf
‘
INSURE PROPER GROUND
AND FIRM CONNECTION
I Fig,2
BEFORE USE
The
larger
slot in the
adapter
must be
aligned with the
larger
slot in the
wall outlet to provide
proper
polarity
in
the
connection of the power
cord,
CAUTION:
Attaching
tin
adapter
ground
terminal to wall outlet cover
screw does not ground
an
appliance
unless cover screw is metal, and not
insulated,
and
wall outlet is
grounded
throllgh
house wiring.
You should
have circuit checked by
u
qualified electrician to
make
sure
the outlet is properly grounded.
When disconnecting the power
cord from the adapter, always
hold
the adtipter
with
one hand,
If this is not
done,
the
adapter
ground
terminal is very likely
to
break with
repetited
use.
Should the adapter ground
terminal break, DO NOT USE the
appliance until a proper ground
has
again
been established.
Use of Extension Cords
Because of
potentiui
safety hazards
under
cert~in
conditions, we
strongly recommend against the
use
of an extension
cord,
However,
if you still elect to use an extension
cord, it is absolutely necessary that
it be a UL 1
isted 3-w
ire grounding
type appliance extension
cord
having a grounding type
plug
and
outlet and that the electrical
rating
of the cord be 15 amperes
(minimum) and 120 volts.
The refrigerator should
always
be plugged into its own
individual electrical
outlet—
( 115
volt, 60 Hertz, or
100 volt, 50
Hertz,
single
phase AC). This is
recommended
for
best performance
and
to
prevent overloading house
wiring circuits, which
could
cause
a
fire haztird
from overheating wires.
Refrigerator Location
Do not install refrigerator where
temperature will go below
60°F.
because it
will not
run
often enough
to maintain proper temperatures.
Do install it on a floor strong
enough to support it fully loaded.
Also
see Energy-Saving Tips
regarding location,
Clearances
Allow the following clearances
for
ease of installation, proper
air
circulation, and plumbing and
electrical connections:
Sides
. . . . . . . . . . . . . . . . . . . . . . . . . . . . . . . . . . . . . . . . .
%“
Top . . . . . . . . . . . . . . . . . . . . . . . . . . . . . . . . . . . . . . . . . . . .
0“
Back . . . . . . . . . . . . . . . . . . . . . . . . . . . . . . . . . . . . . . . . . .
1“
Allow
the
following
door clearance:
Refrigerator Side . . . . . . . . . . . . . . . . . . . . . 1
M“
Freezer Side . . . . . . . . . . . . . . . . . . . . . . . . . . . . .
I X“
Water Supply to
Icemaker
You will need to connect your
icemaker to a cold water line. A
water supply kit containing copper
tubing,
shu-off
valve, fittings
and
instructions is available at extra cost
from your dealer. There should be
sufficient tubing
for
the icemaker
from
the cold water supply to allow
moving
the
refrigerator out from the
wall several
feet
(approximately
8
feet of
1/4” copper tubing in three
1 ()-inch diameter coils).
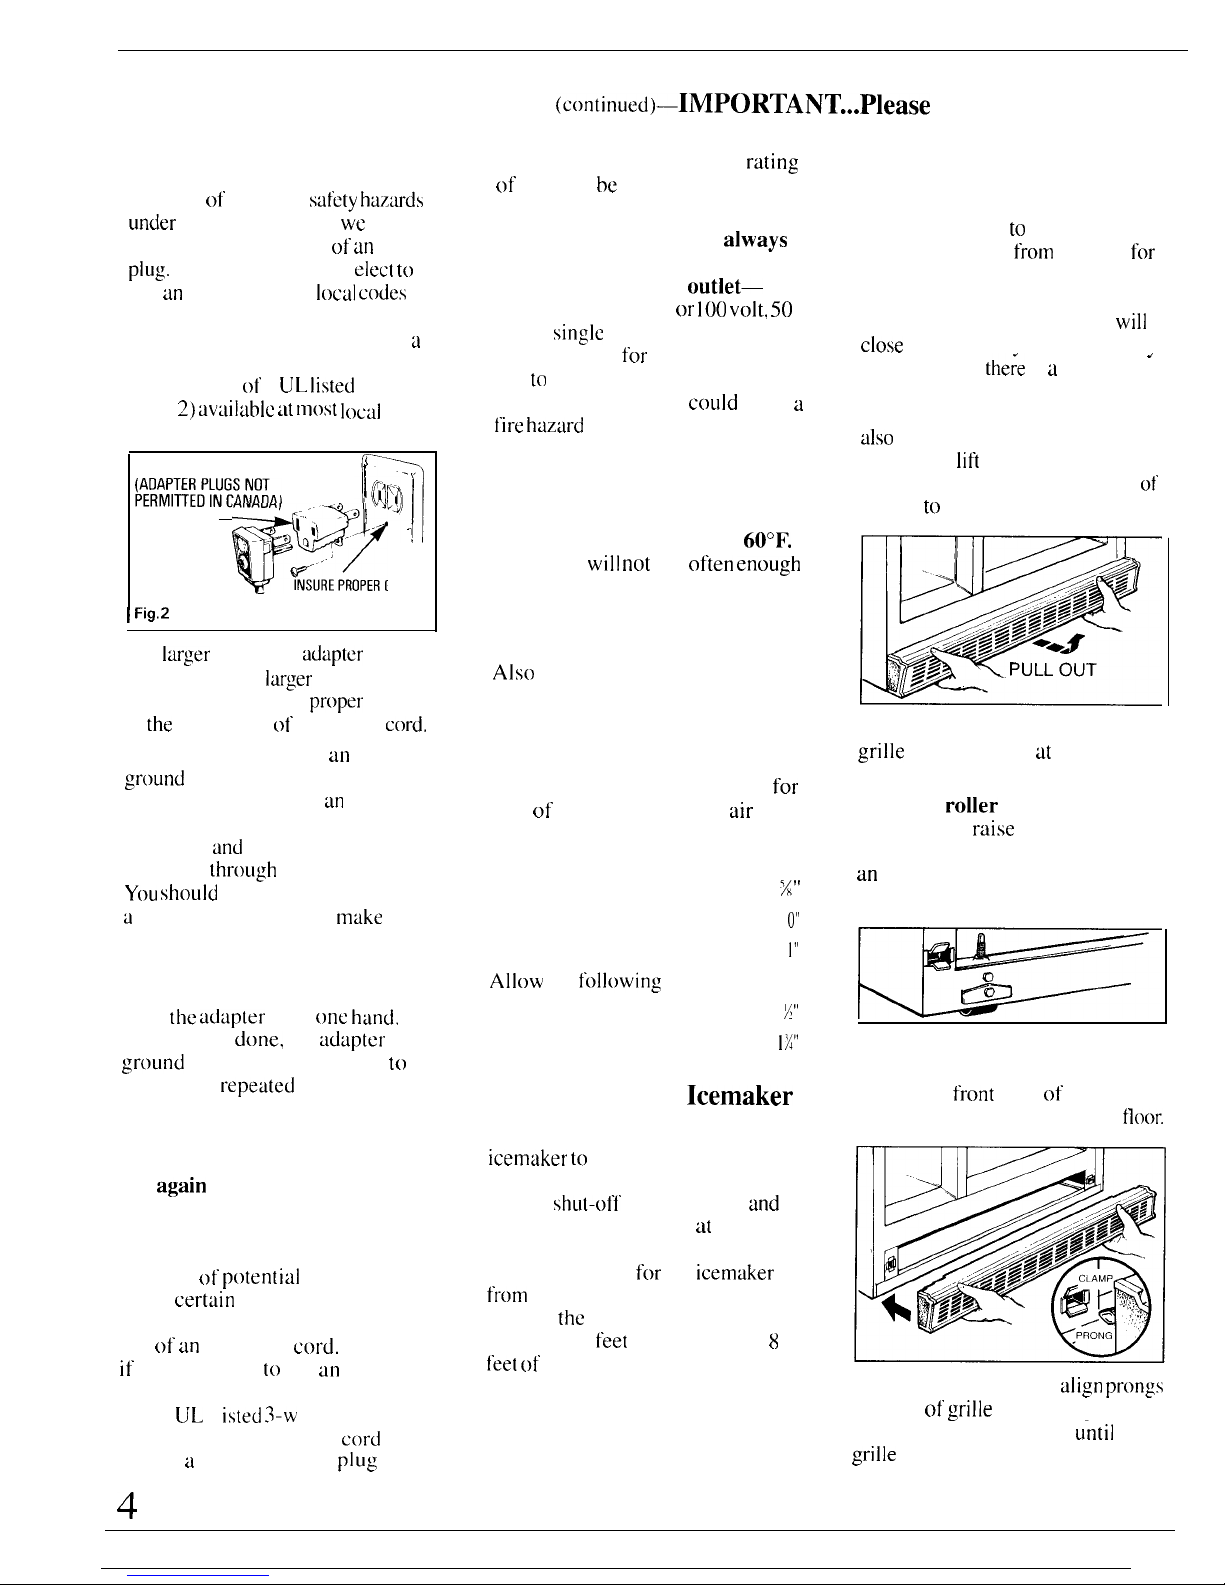
Rollers
Adjustable rollers behind the base
grille enable you to move your
refrigerator away
from
the wall
for
cleaning. These rollers should be set
so the refrigerator rests firmly on the
floor. To assure that the doors
will
close
automatically from a halfwav-
.
open position,
the;e
is a built-in tilt
from the front to the back of the
cabinet. Side-by-side refrigerators
also
have specially designed door
hinges that
lift
both doors slightly
when opened, allowing the force
of
gravity
to
help close them securely.
To adjust rollers,
remove the base
grille
by grasping it at the bottom
and pulling it out.
Turn the
roller
adjusting screws
clockwise to
raise
the refrigerator,
counterclockwise to lower it. Use
an
adjustable wrench (3/8” hex
head bolt) or pliers.
When adjusting front rollers for
proper door closure, we recommend
the bottom
front
edge of the cabinet
be approximately 5/8” from the
floor.
To replace base grille,
align prongs
on back of
grille
with clamps in
cabinet and push forward
until
grille
snaps into place.
Operating Your Refrigerator
Set the
Temperature Controls
FREEZER
C INITIAL SETTING
E COLDEST
INITIAL SETTING 5
FRE~HFooD
COLDEST 9
I
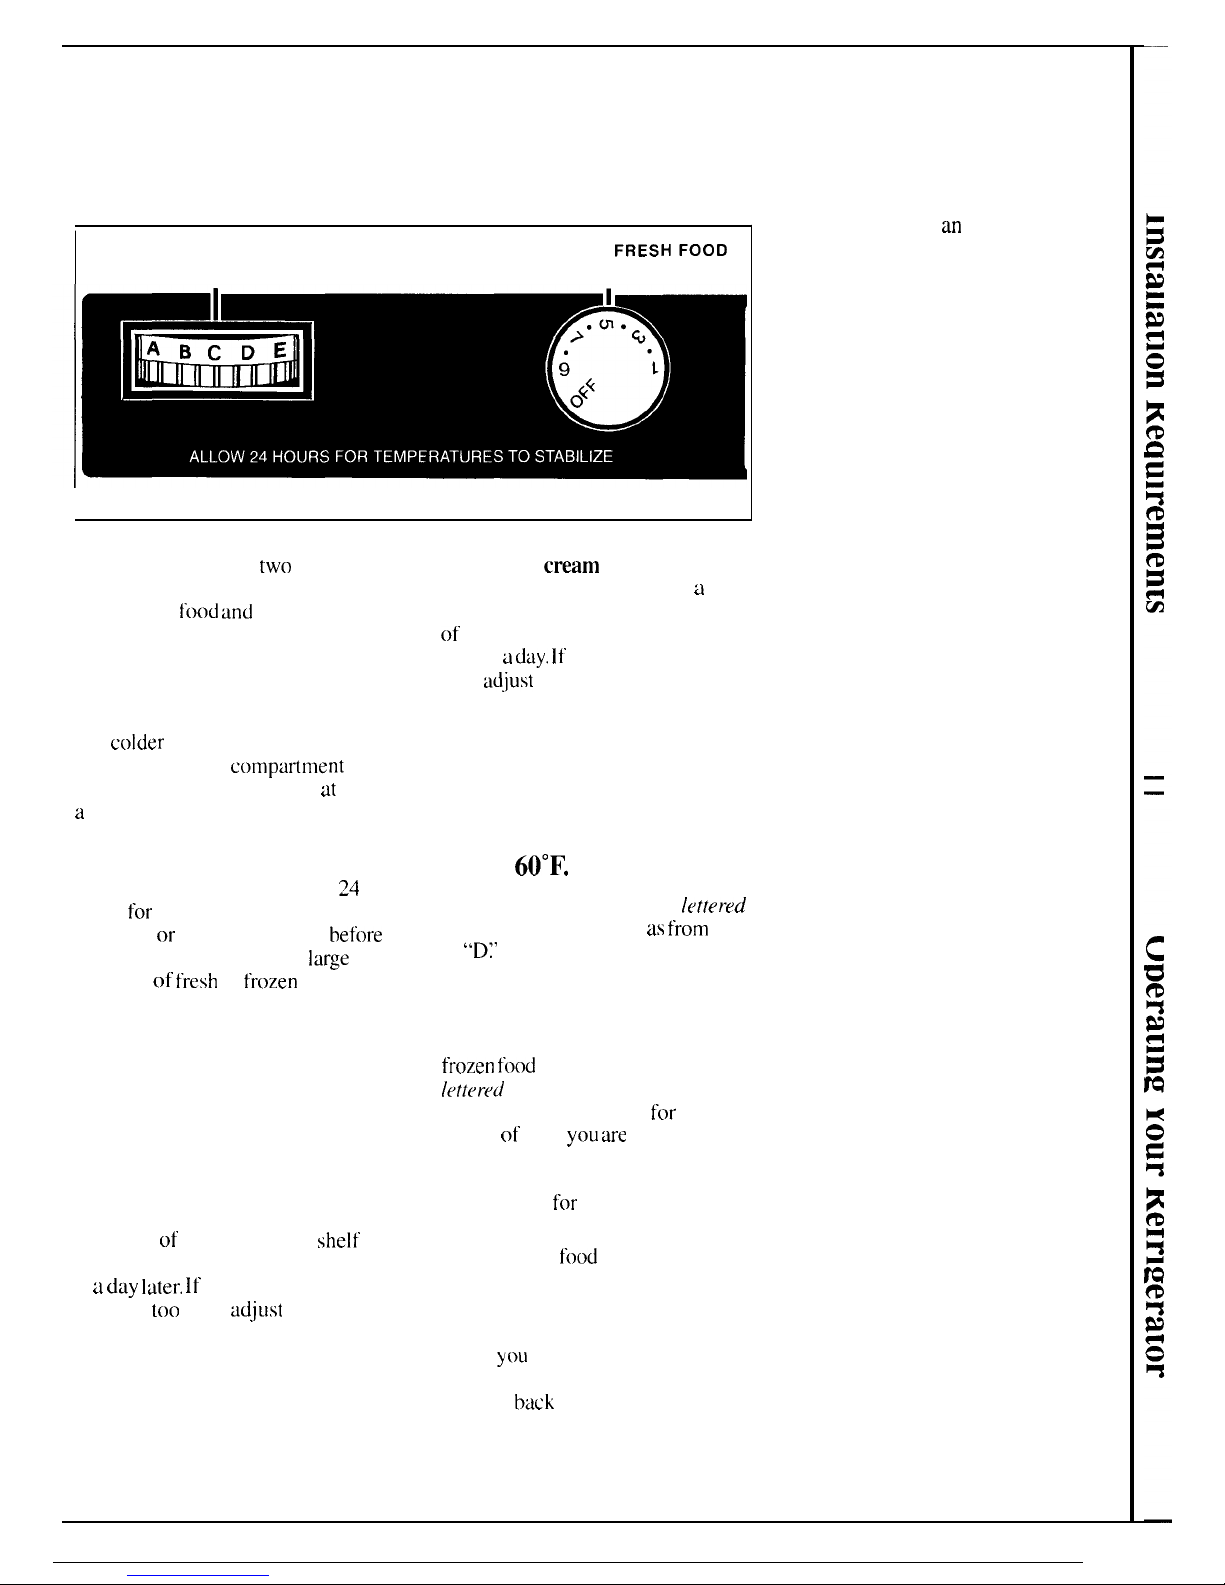
TEMPERATURE CONTROLS
Your refrigerator has
two
controls
that let you regulate the temperature
in the fresh
food and
freezer
compartments.
INITIALLY, set the FRESH
FOOD controls at 5 and the
FREEZER control at C.
For
colder
or warmer temperatures,
adjust the desired
comptirtment
control one letter or number
at
a
time.
IMPORTANT
When initially setting the controls,
or when adjusting them, allow
24
hours
for
the temperatures to
stabilize,
or
even out. Do this
before
filling the refrigerator with
large
amounts of
fresh
or
frozen
foods.
Note: Turning the fresh food
control to “OFF” stops cooling in
BOTH compartments—fresh
food AND freezer—but does not
shut off power to the refrigerator.
How to Test Temperatures
Use the milk test for the fresh
food compartment.
Place a
container
of milk on the top
shelf
in
the fresh food compartment. Check
it a
day later. If
the milk is too
warm or
too
cold,
adjust
the
temperature controls.
Use the ice
cream
test for the
freezer compartment.
Place
a
container of ice cream in the center
of
the freezer compartment. Check
it after
a day. If
it’s too hard or too
soft,
adjust
the temperature controls.
Always allow
24
hours for the
refrigerator to reach the
temperature you set.
If you turn your
household thermostat
below
60°F.
at night
. . you may want to turn the
leffered
control one step colder, as
from
“C”
to
“D:’
Cooler temperatures in the
house may cause the compressor to
operate less frequently, thus
allowing the freezer compartment
to warm somewhat. To protect your
frozen food
supply, leave your
Ietter(’d
setting at this colder setting
for the entire winter or
for
whatever
period of time
you are
turning down
your thermostat. This is especially
important when the thermostat is
turned down
for
an extended period.
This change should have no effect
on your fresh
food
compartment.
However, if freezing occurs, turn
the numbered control one step
warmer, as from
6
’5” to “4.”
When
yOLI
stop turning the
thermostat down, turn temperature
controls
back
to their regular
settings.
Automatic
Energy Saver System
You won’t find an “energy saver”
switch on this refrigerator.
Warm liquid from the refrigerator’s
condenser is automatically
circulated around the front edge of
the freezer compartment to help
keep moisture from forming on the
outside of the refrigerator during
humid weather.
Many refrigerators use special
electric heaters. This refrigerator
needs none. That’s why there is no
“energy saver” switch.. there’s no
need for it.
No Defrosting
It is not necessary to defrost the
freezer or fresh food compartments.
Your refrigerator is designed and
equipped to defrost itself
automatically.
5
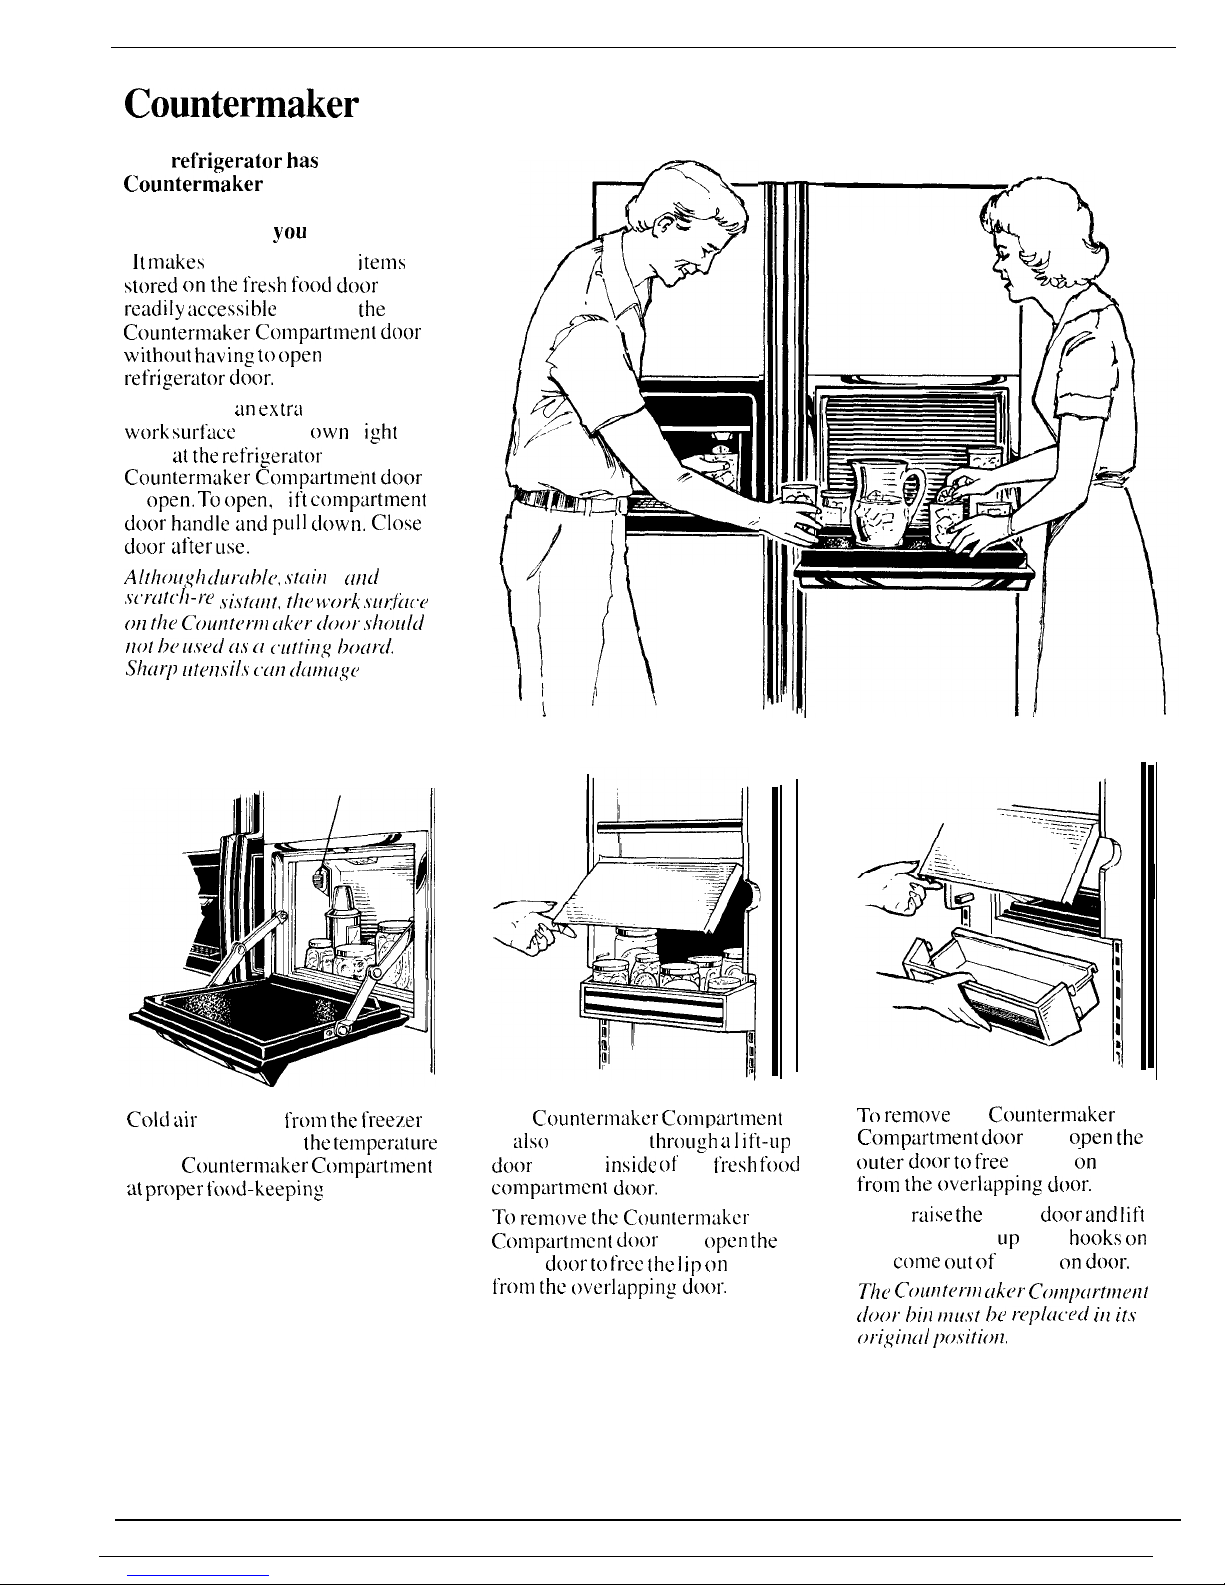
Countermaker
Compartment
This
ret’rigerator has
a special
Countermaker Compartment
with its own door that becomes
a counter when
you
open it.
●
It mtikes
frequently used
items
stored on the fresh f(~(~d door
re:~dily :~ccessible
through
the
Counternlaker
Colllptirtlllent
door
without h:lving to open
the main
refriger:ltor door.”
● It provides
:m extr~l
counter-high
work surtfice
with its
own
I
ight
right at
the refrigertitor
when the
C(~unterm:lker Conlp~lrtment d(~or
is
open. T() open,
I
ift compartment
door” h;indle Lmd pull down. c](~se
door after
LISC.
AltlIOlI<q/I
[iLIrlIb[C),
,$’tllitl
-
(!11([
,~c’r(ltc’ll-r(’t ~i.$tcitlt,
tll(’ }%’t)rk
,jl[rt~lcll
011
t/7[)
~’OUllt[’t-lll[ lko/.” (/()()t
,\’/l<;Ll[(~
t)t)t 1)~’ LI.s~Jd llt$ cl
(L[ttit],q I]()(tt(l.
S}I(Ir17 [!t(~il~il$ c(iIl (I(lttlct,s(’
it.
Cold Air Duct ,
Cold k~ir
entering
from [he freezer
compartment keeps
the tempertlture
in the
Counterm:lker Conlp~irtment
at proper tood-keeping”
levels.
The
C~~unternl~lker Conl~~lrtment
is
~dso
accessible
through ii 1 ift-up
door”
011 the
inside
of the
Iresh food”
c{>nlpiirtmcnt d~~t)r.
T() remove the Counternl~lkcr
C(~nlpartnlcnt door”
bin,
open the
outer
doc)t” to free the 1 ip on
the bin
from the overlapping door.”
Ill
T(J remove
the
Countermtiker
Compartment door”
bin,
open the
—
outer” door” to tree
the lip
;)n
the bin
from the overlapping door.”
Then
r:iise the
inner
door” and lift
the bin straight
Llp
until
hooks on
bin
come out
of tracks on
door.
Tl~(I coLllltot-lll(t k6Jl-” Cot}ll)(!rtttlolll”
(loot.” I)itt t71[(.st 1>(’ rc’j)l(lc.(’(! ill it.$
oricqitl(tl l)(),~iti()ll.
6
 Loading...