

Page 1
Operating Instructions
OVEN
GB
GB
English,1
RS
Русский, 11
CISFB 21.2/HA
CISFB 21.2 IX/HA
Contents
Installation, 1-3
Positioning
Electrical connections
Data plate
Description of the appliance, 4
Overall view
Control panel
Start-up and use, 5
Starting the oven
How to use the timer
Cooking modes, 6
Cooking modes
Practical cooking advice
Cooking advice table
Precautions and tips, 8
General safety
Disposal
Respecting and conserving the environment
Assistance
Maintenance and care, 9
Switching the appliance off
Cleaning the appliance
Cleaning the oven door
Replacing the light bulb
Page 2

Installation
560 mm.
45 mm.
GB
Before placing your new appliance into operation
please read these operating instructions carefully.
They contain important information for safe use, for
installation and for care of the appliance.
Please keep these operating instructions for future
reference. Pass them on to possible new owners of
the appliance.
Positioning
Keep packaging material out of the reach of
children. It can become a choking or suffocation
hazard. (see Precautions and tips).
The appliance must be installed by a qualified
person in compliance with the instructions provided.
Incorrect installation may cause harm to persons,
animals or may damage property.
Fitting the appliance
Use the appropriate cabinet to ensure that the
appliance functions properly.
The panels adjacent to the oven must be made of
heat-resistant material.
Cabinets with a veneer exterior must be
assembled with glues which can withstand
temperatures of up to 100°C.
Ventilation
To ensure good ventilation, the back panel of the
cabinet must be removed. It is advisable to install
the oven so that it rests on two strips of wood, or on
a completely flat surface with an opening of at least
45 x 560 mm (see diagrams).
Centring and fastening
Position the 4 tabs on the side of the oven according
to the 4 holes of the outer frame. Adjust the tabs
according to the thickness of the cabinet side panel,
as shown below:
thickness of 20 mm: take off
the removable part of the tab
(see diagram)
to install the oven under the counter (see diagram)
and in a kitchen unit, the cabinet must have the
following dimensions:
567 mm.
45 mm.
558 mm.
593 mm.
23 mm.
595 mm.
5 mm.
595 mm.
545 mm.
24 mm.
The appliance must not come into contact with
electrical parts once it has been installed.
The consumption indications on the data plate have
been calculated for this type of installation.
thickness of 18 mm: use the
first groove, which has already
been set in the factory (see
diagram)
thickness of 16 mm: use the
second groove (see diagram)
Secure the appliance to the cabinet by opening the
oven door and putting 4 screws into the 4 holes of
the outer frame.
! All parts which ensure the safe operation of the
appliance must not be removable without the aid of
a tool.
2
Page 3

Electrical connections
! Ovens equipped with a three-pole power supply
cable are designed to operate with alternating
current at the voltage and frequency indicated on
the data plate located on the appliance (see below).
Fitting the power supply cable
1. Open the terminal
board by inserting a
screwdriver into the
side tabs of the cover.
Use the screwdriver as
a lever by pushing it
down to open the cover
(see diagram).
2. Loosen the cable
clamp screw and
remove it, using a
screwdriver as a lever
(see figure).
3. Remove the wire
contact screws L-N, then fasten the wires
under the screw heads,
respecting the colour
code: Blue (N), Brown
(L) and Yellow-Green
Verde (
Connecting the supply cable to the mains
Install a standardised plug corresponding to the
load indicated on the data plate (see side).
The appliance must be directly connected to the
mains using an omnipolar circuit-breaker with a
minimum contact opening of 3 mm installed between
the appliance and the mains, suitable for the load
indicated and complying with current electrical
regulations (the earthing wire must not be interrupted
by the circuit-breaker). The supply cable must not
come into contact with surfaces with temperatures
higher than 50°C.
).
The voltage must be in the range between the
values indicated on the data plate (see below).
The socket is compatible with the plug of the
appliance. If the socket is incompatible with the
plug, ask an authorised technician to replace it.
Do not use extension cords or multiple sockets.
! Once the appliance has been installed, the power
supply cable and the electrical socket must be
easily accessible.
! The cable must not be bent or compressed.
! The cable must be checked regularly and replaced
by authorised technicians only (see Assistance).
! The manufacturer declines any liability should
these safety measures not be observed.
DATA PLATE
width cm 43.5
Dimensions
Volume
Electrical
connections
ENERGY LABEL
height cm 32
depth cm 40
lt. 56
voltage: 230V ~ 50/60Hz (see data
plate)
maximum power absorbed 2250W
Directive 2002/40/EC on the label
of electric ovens
Norm EN 50304
Energy consumption for Natural
convection heating mode:
=
Convection
GB
! The installer must ensure that the correct electrical
connection has been made and that it is compliant
with safety regulations.
Before connecting to the power supply, make sure
that:
The appliance is earthed and the plug is
compliant with the law.
The socket can withstand the maximum power of
the appliance, which is indicated on the data
plate (see below).
This appliance conforms to the
following European Economic
Community directives:
- 73/23/EEC of 19/02/73 (Low
Voltage) and subsequent
amendments;
-89/336/EEC of 03/05/89
(Electromagnetic Compatibility)
and subsequent amendments;
- 93/68/EEC of 22/07/93 and
subsequent amendments.
- 2002/96/EC
3
Page 4
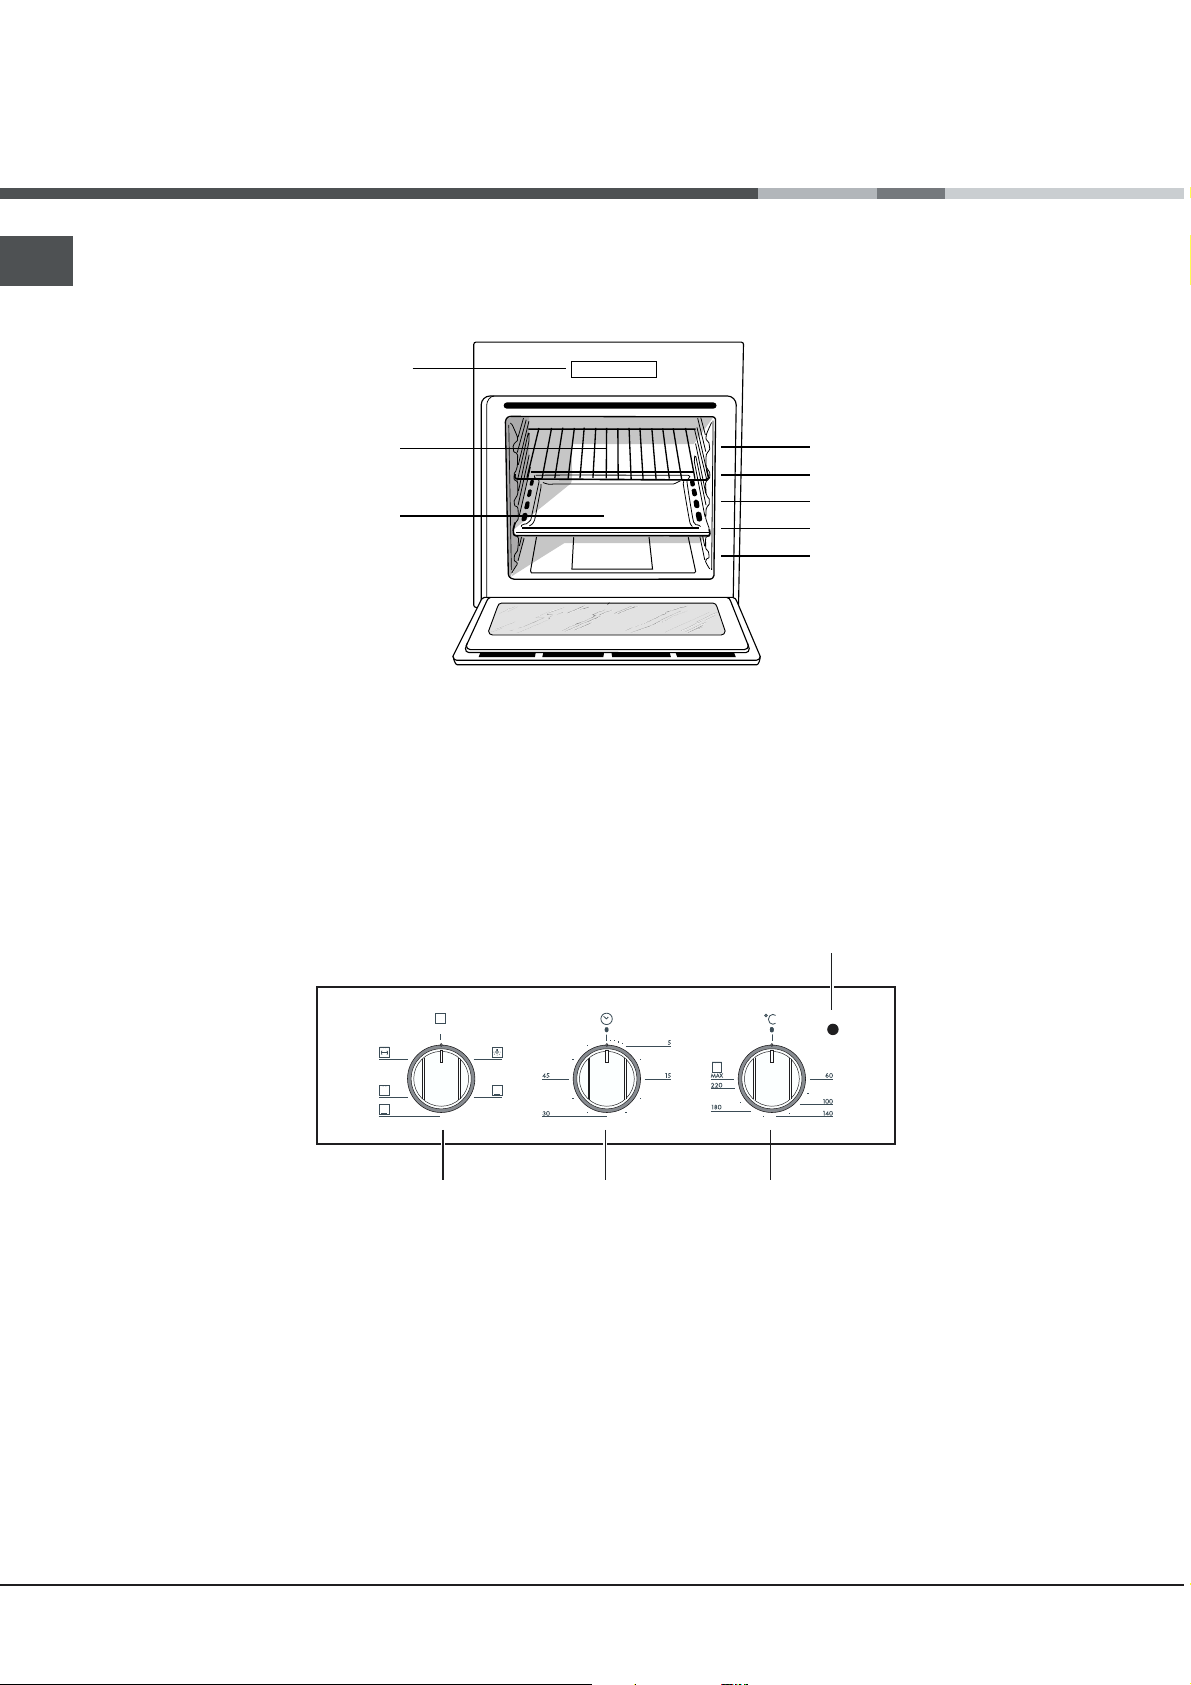
Description of the appliance
GB
Overall view
Control panel
GRILL
DRIPPING PAN
GUIDES for the
sliding racks
position 5
position 4
position 3
position 2
position 1
Control panel
0
SELECTOR
knob
TIMER
knob *
THERMOSTAT
indicator light
THERMOSTAT
knob
* Only on certain models
4
Page 5
Start-up and use
! The first time you use your appliance, heat the
empty oven with its door closed at its maximum
temperature for at least half an hour. Ensure that the
room is well ventilated before switching the oven off
and opening the oven door. The appliance may
produce a slightly unpleasant odour caused by the
burning away of protective substances used during
the manufacturing process.
Starting the oven
1. Select the desired cooking mode by turning the
SELECTOR knob.
2. Select the desired temperature with the
THERMOSTAT knob. See the Cooking advice table
for cooking modes and the suggested cooking
temperatures (see Cooking Modes).
3. When preheating is finished, the THERMOSTAT
indicator light will stay on: place the food in the
oven.
4. You may do the following during cooking:
- change the cooking mode by turning the
SELECTOR knob.
- change the temperature by turning the
THERMOSTAT knob.
- stop cooking by turning the SELECTOR knob to the
0 position.
Cooling ventilation
In order to cool down the external temperature of the
oven, some models are fitted with a cooling fan that
blows out air between the control panel and the oven
door.
! Once the cooking has been completed, the cooling
fan remains on until the oven has cooled down
sufficiently.
Oven light
It goes on when selecting
knob. It stays on when a cooking mode is selected.
&&
&
with the SELECTOR
&&
How to use the timer *
1. To set the buzzer, turn the TIMER knob clockwise
almost one complete revolution.
2. Turn the knob anticlockwise to set the desired
time: align the minutes shown on the knob with the
indicator on the control panel.
3. The timer operates in minutes: when the selected
time has elapsed, a buzzer will sound.
! The timer does not turn the oven on or off.
GB
! Never put objects directly on the oven bottom to
avoid damaging the enamel coating.
! Always place cookware on the rack(s) provided.
* Only on certain models
5
Page 6
GB
Cooking modes
Cooking modes
! A temperature value can be set for all cooking
modes between 60°C and Max, except for
GRILL (recommended: set only to MAX power
level);
= TRADITIONAL OVEN mode
Both the top and bottom heating elements will come
on. With this traditional cooking mode, it is best to
use one cooking rack only; if more than one rack is
used, the heat will be distributed unevenly.
O PASTRY mode
The bottom heating element comes on.
This mode is ideal for baking and cooking delicate
foods - especially cakes that need to rise because
the heat coming from the bottom helps the leavening
process.
Please note that it takes a considerable amount of
time for the higher temperatures to be reached,
therefore we recommend you use the TRADITIONAL
OVEN in these cases.
? TOP OVEN mode
The top heating element comes on. This mode can
be used to brown food at the end of cooking.
The The
The Rotisserie *
The The
To operate the rotisserie
(see diagram) proceed as
follows:
1. Place the dripping pan in position 1.
2. Place the rotisserie support in position 3 and
insert the spit in the hole provided on the back
panel of the oven.
3. Start the rotisserie using the knob to select MODE
.
Practical cooking advice
! Do not place racks in position 1 and 5 during fan-
assisted cooking. Excessive direct heat can burn
temperature sensitive foods.
! In the GRILL cooking modes, place the dripping
pan in position 1 to collect cooking residues (fat
and/or grease).
GRILL
GRILL mode
The top heating element comes on. The extremely
high and direct temperature of the grill makes it
possible to brown the surface of meats and roasts
while locking in the juices to keep them tender. The
grill is also highly recommended for dishes that
require a high temperature on the surface: such as
beef steaks, veal, rib steak, filets, hamburgers etc...
Some grilling examples are included in the Practical
Cooking Advice paragraph. Always cook in this
mode with the oven door closed.
Insert the rack in position 3 or 4. Place the food in
the centre of the rack.
We recommend that you set the maximum power
level. The top heating element is regulated by a
thermostat and may not always be on.
* Only on certain models
6
Page 7

Cooking advice table
GB
Cooking
modes
Convection
Oven
Pastry Mode
Top oven
Grill
Foods
Duck
Roast veal or beef
Pork roast
Biscuits (short pastry)
Tarts
Lasagne
Lamb
Mackerel
Plum-cake
Cream puffs
Sponge-cake
Savoury pies
Raised Cakes
Tarts
Fruit cakes
Brioches
Browning food t o perfect cooking
Soles and cuttlefish
Squid and prawn kebabs
Cod filet
Grilled vegetables
Veal steak
Cutlets
Hamburgers
Mackerels
Toasted sandwiches
With rotisserie (where present)
Veal on the spit
Chicken on the spit
Lamb on the spit
Weight
(in kg)
1
1
1
1
1
1
1
1
0.3
0.5
1.5
0,5
1
1
0,5
- 3/4 15 220 -
1
1
1
1
1
1
1
1
n.° 4
1.0
1.5
1.0
Rack
position
3
3
3
3
3
3
2
2
2
3
3
3
3
3
3
3
4
4
4
¾
4
4
4
4
4
-
-
-
Pre-
heating
time (min)
15
15
15
15
15
10
10
10
10
10
10
15
15
15
15
15
5
5
5
5
5
5
5
5
5
5
5
5
Recommended
temperature
200
200
200
180
180
190
180
180
170
180
170
200
160
180
180
160
Max
Max
Max
Max
Max
Max
Max
Max
Max
Max
Max
Max
Cooking
time
(minutes)
65-75
70-75
70-80
15-20
30-35
35-40
50-60
30-35
40-50
30-35
20-25
30-35
30-40
35-40
50-60
25-30
8-10
6-8
10
10-15
15-20
15-20
7-10
15-20
2-3
80-90
70-80
70-80
7
Page 8

Precautions and tips
GB
! The appliance was designed and manufactured in
compliance with international safety standards. The
following warnings are provided for safety reasons and
must be read carefully.
General safety
The appliance was designed for domestic use inside
the home and is not intended for commercial or
industrial use.
The appliance must not be installed outdoors, even in
covered areas. It is extremely dangerous to leave the
appliance exposed to rain and storms.
When handling the appliance, always use the handles
provided on the sides of the oven.
Do not touch the appliance with bare feet or with wet or
moist hands and feet.
The appliance must be used to cook food by adults
only and according to the instructions in this manual.
When the appliance is in use, the heating elements
and some parts of the oven door become extremely
hot. Make sure you don't touch them and keep
children well away.
Ensure that the power supply cable of other electrical
appliances does not come into contact with the hot
parts of the oven.
Never carry out any cleaning or maintenance work
without having unplugged the plug from the mains.
In the case of a malfunction, under no circumstances
should you attempt to repair the appliance yourself.
Repairs carried out by inexperienced persons may
cause injury or further malfunctioning of the appliance.
Contact a Service Centre (see Assistance).
Do not rest heavy objects on the open oven door.
Disposal
Observe local environmental standards when
disposing packaging material for recycling purposes.
Observe existing legislation when disposing of the old
appliance.
The European Directive 2002/96/EC on Waste Electrical
and Electronic Equipment (WEEE), requires that old
household electrical appliances must not be disposed
of in the normal unsorted municipal waste stream. Old
appliances must be collected separately in order to
optimise the recovery and recycling of the materials
they contain and reduce the impact on human health
and the environment. The crossed out wheeled bin
symbol on the product reminds you of your obligation,
that when you dispose of the appliance it must be
separately collected.
Consumers should contact their local authority or
retailer for information concerning the correct disposal
of their old appliance.
The openings used for ventilation and dispersion of
heat must never be covered.
Always grip the oven door handle in the centre: the
ends may be hot.
Always use oven gloves to place cookware in the oven
or when removing it.
Do not use aluminium foil to line the bottom of the
oven.
Do not place flammable materials in the oven: if the
appliance is switched on by mistake, it could catch
fire.
Always make sure the knobs are in the l/
position when the appliance is not in use.
When unplugging the appliance always pull the plug
from the mains socket, do not pull on the cable.
¡
Respecting and conserving the environment
By using the appliance in the hours between late
afternoon and early morning, you can help reduce the
work load placed on electrical companies.
Always keep the oven door closed when using the
GRILL and GRATIN mode to attain best results and to
save energy (approximately 10%).
Regularly check the door seals and wipe clean to
ensure they are free of debris so that they stick
properly to the door and do not allow heat to disperse.
Assistance
Communicating:
appliance model (Mod.)
serial number (S/N)
This information is found on the data plate located on the
appliance and/or on the packaging.
8
Page 9

Maintenance and care
Switching the appliance off
Disconnect your appliance from the electricity supply
before carrying out any work on it.
Cleaning the appliance
The stainless-steel or enamel-coated external parts as
well as the rubber seals may be cleaned using a
sponge that has been soaked in lukewarm water and
neutral soap. If these stains are difficult to remove, use
only specialised products. After cleaning, rinse and
dry thoroughly. Do not use abrasive powders or
corrosive substances.
Ideally, the inside of the oven should be cleaned after
each use, when it is still lukewarm. Use hot water and
detergent, rinse and dry with a soft cloth. Do not use
abrasive products.
The accessories can be washed like everyday
crockery (even in your dishwasher).
Never use steam cleaners or pressure cleaners on the
appliance.
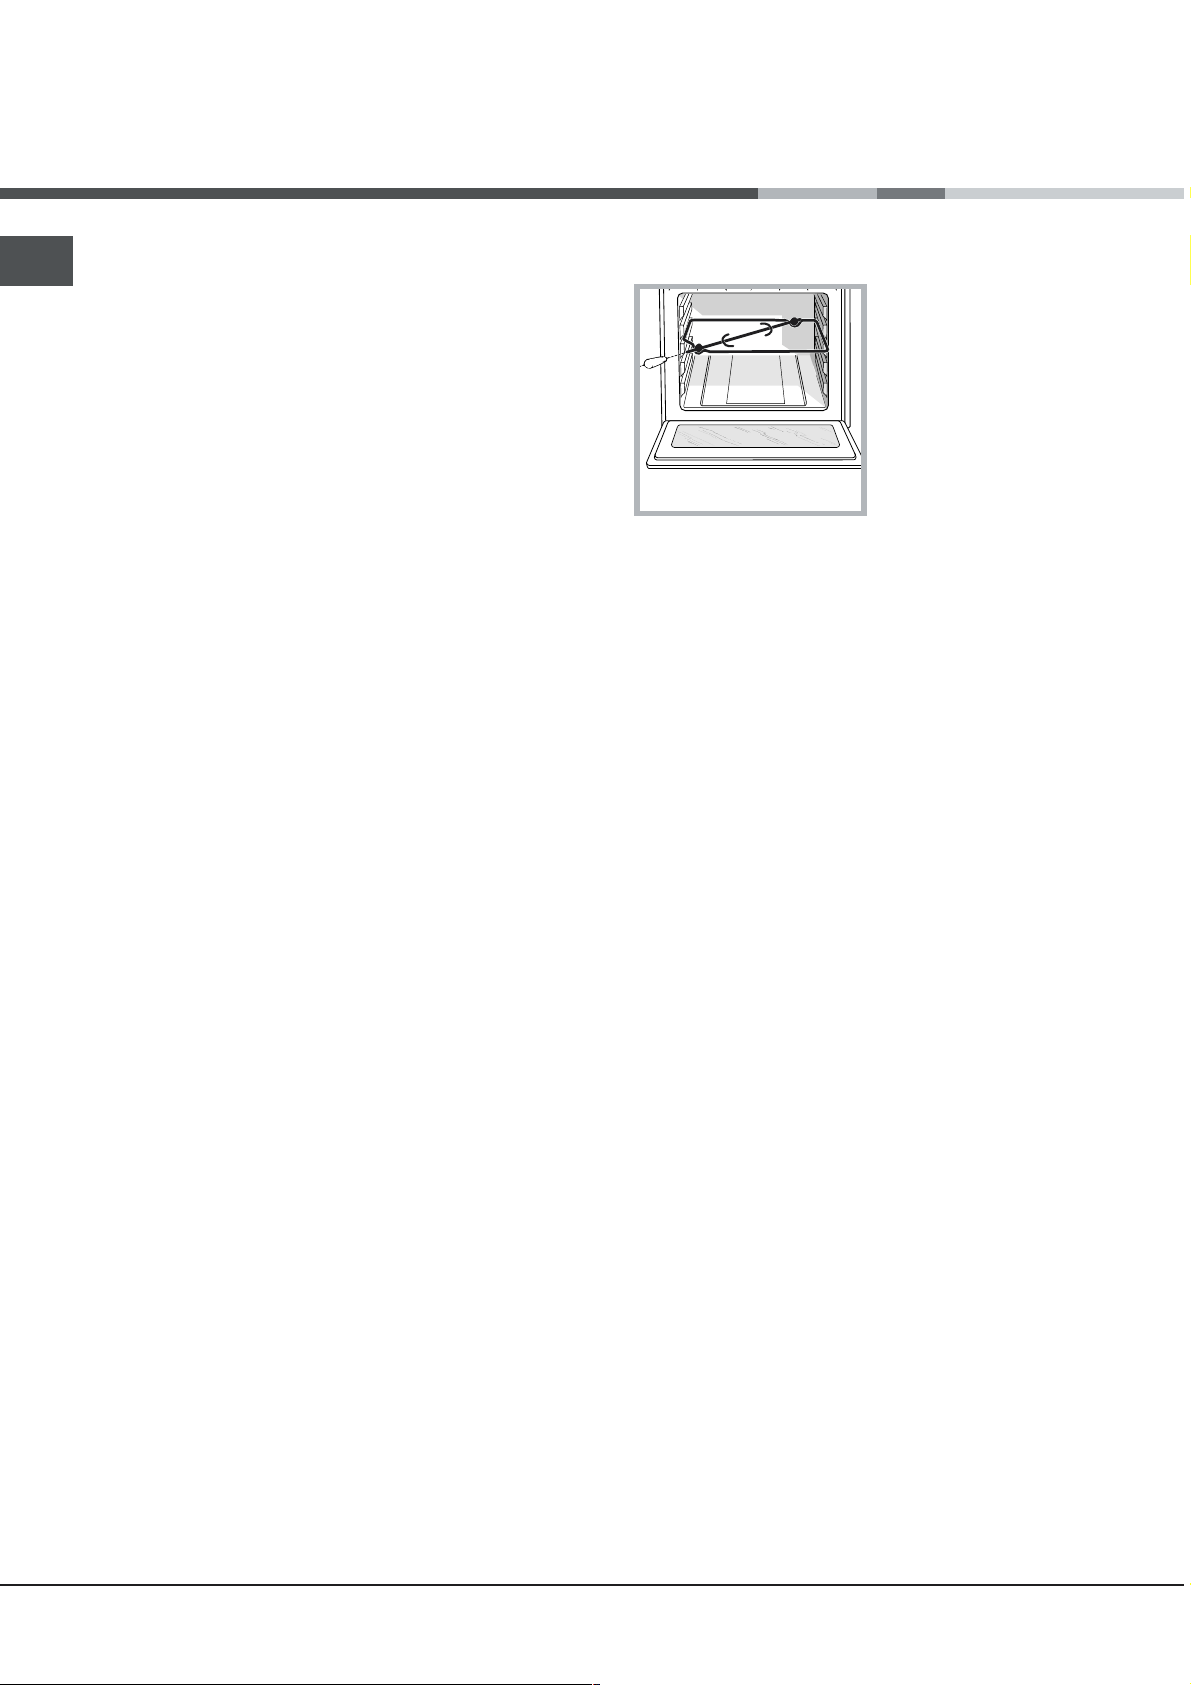
Cleaning the oven door
Clean the glass part of the oven door using a sponge
and a non-abrasive cleaning product, then dry thoroughly
with a soft cloth. Do not use rough abrasive material or
sharp metal scrapers as these could scratch the surface
and cause the glass to crack.
To clean more thoroughly, you can remove the oven door.
Inspecting the seals
GB
Check the door seals around the oven periodically. If the
seals are damaged, please contact your nearest Aftersales Service Centre (see Assistance). We recommend
not using the oven until the seals have been replaced.
Replacing the light bulb
To replace the oven light bulb:
1. Remove the glass cover of the lamp-holder.
2. Remove the light bulb and replace it with a similar one:
Wattage 25 W, cap E 14.
3. Replace the glass cover (see diagram).
1. Open the oven door fully (see
diagram)
2. Lift up and turn the small
levers located on the two hinges
(see diagram)
3. Grip the door on the two
external sides and close it
approximately half way.
Pull the door towards you lifting it
out of its seat (see diagram).
To replace the door, reverse this
sequence.
9
Page 10

Руководство по
эксплуатации
GB
English, 1
CISFB 21.2/HA
CISFB 21.2 IX/HA
RS
Русский,10
ДУХОВОЙ ШКАФ
Содержание
RU
Монтаж, 11-12
Расположение
Электрическое подсоединение
Подсоединение к газопроводу
Паспортная табличка
Описание изделия, 13
Общий вид
Панель управления
Включение и эксплуатация, 14
Эксплуатация духового шкафа
Таймер
Характеристики горелок и форсунок
Программы, 15-16
Программы приготовления
Практические советы по приготовлению
Таблица приготовления
Предосторожности и рекомендации, 17
Общие требования к безопасности
Утилизация
Экономия электроэнергии и охрана окружающей среды
Техническое обслуживание и уход, 18
Отключение электропитания
Чистка изделия
Чистка дверцы
Замена лампочки
Сервисное обслуживание
Page 11

Монтаж
560 mm.
45 mm.
Важно сохранить данное руководство для его
последующих консультаций. В случае продажи,
передачи изделия или при переезде на новое
место жительства необходимо проверить, чтобы
руководство оставалось вместе с изделием, для
того чтобы его новый владелец мог ознакомиться
с правилами эксплуатации и с соответствующими
предупреждениями.
Внимательно прочитайте инструкции: в них
содержатся важные сведения об установке,
эксплуатации и безопасности изделия.
Расположение
Не разрешайте детям играть с упаковочными
материалами. Упаковка должна быть уничтожена в
соответствии с правилами раздельного сбора
мусора (см. Предосторожности и рекомендации).
Установка изделия производится в соответствии с
данными инструкциями квалифицированными
специалистами. Неправильная установка изделия
может стать причиной повреждения имущества и
причинить ущерб людям и домашним животным.
Встроенный монтаж
Для обеспечения исправного функционирования
встраиваемого изделия кухонный элемент должен
иметь соответствующие характеристики:
Вентиляция
Для обеспечения надлежащей вентиляции
необходимо снять заднюю панель ниши кухонного
элемента. Рекомендуется установить духовой
шкаф на два деревянных бруска или на сплошное
основание с отверстием диаметром не менее 45 х
560 мм (см чертежи).
Центровка и крепление
4 крепежных элемента с боков духового шкафа
должны быть отрегулированы в соответствии с 4
отверстиями в периметральной раме в
зависимости от толщины боковой панели
кухонного элемента:
толщина 20 мм: полностью
удалите съемную часть
крепежного элемента (ñì.
схему);
RU
панели кухонных элементов, прилегающих к
духовому шкафу, должны быть выполнены из
термостойкого материала.
клей кухонных элементов элементов из
фанерованного дерева должен быть устойчивым
к температуре 100°C.
для встраивания духового шкафапод кухонным
топом (см. рисунок) или в колонну ниша кухонного
элемента должна иметь следующие размеры:
567 mm.
45 mm.
558 mm.
593 mm.
23 mm.
595 mm.
5 mm.
595 mm.
545 mm.
24 mm.
После встраивания изделия в кухонный элемент
должна быть исключена возможность касания к
электрическими частями. Расход электроэнергии,
указанный на паспортной табличке изделия, был
замерен для данного типа монтажа.
толщина 18 мм: используйте
первый паз, согласно уже
готовой конфигурации
производителя (см. схему);
толщина 16 мм: используйте
второй паз (см. схему).
Для крепления изделия к кухонному элементу:
откройте дверцу духового шкафа и завинтите 4
шурупа для деревянных панелей в 4 отверстия в
периметральной раме.
Все защитные элементы должны быть
закреплены таким образом, чтобы их можно было
снять только при помощи специального
инструмента.
11
Page 12

RU
Электрическое подсоединение
Духовые шкафы, укомплектованные трехполюсным
кабелем электропитания, расчитаны на
функционирование с переменным током с
напряжением и частотой электропитания,
указанными на паспортной табличке с данными (ñì.
íèæå).
Подсоединение кабеля электропитания
1. Откройте зажимную
коробку, нажав при
помощи отвертки на
выступы с боков
крышки: потяните и
откройте крышку
(см. схему).
2. Отвинтите винт
кабельного сальника и
выньте его, поддев
отверткой (см. схему).
сетевая розетка должна быть рассчитана на
максимальную потребляемую мощность
изделия, указанную на паспортной табличке (ñì.
íèæå);
напряжение сети электропитания должно
находиться в пределах значений, указанных на
паспортной табличке (ñì. íèæå);
сетевая розетка должна быть совместима со
штепсельной вилкой изделия. В противном
случае замените розетку или вилку; не
используйте удлинители или тройники.
Изделие должно быть установлено таким образом,
чтобы сетевой шнур и сетевая розетка были легко
доступны.
етевой шнур изделия не должен быть согнут или
сжат.
Регулярно проверяйте состояние сетевого шнура
и в случае необходимости поручите его замену
только уполномоченным техникам (см. Техническое
обслуживание).
3. Отвинтите винты
контактов L-N-
и
затем прикрепите
провода под
головками винтов,
соблюдая цветовую
маркировку Синий (N)
Коричневый (L) Желтозеленый (
).
Подсоединение сетевого шнура изделия к сети
электропитания
Установите на сетевой шнур нормализованную
штепсельную вилку, расчитанную на нагрузку,
указанную на паспортной табличке (см. сбоку).
В случае прямого подключения к сети
электропитания между кухонной плитой и сетью
необходимо установить мультиполярный
выключатель с минимальным расстоянием между
контактами 3 мм, расчитанный на данную нагрузку
и соответствующий действующим нормативам
(выключатель не должен размыкать провод
заземления). Сетевой шнур должен быть
расположен таким образом, чтобы ни в одной точке
его температура не превышала температуру
помещения более чем на 50°C.
Электромонтер несет ответственность за
правильное подключение изделия к электрической
сети и за соблюдение правил безопасности.
Перед подсоединением сетевого шнура проверьте
следующее:
сетевая розетка должна быть соединена с
заземлением и соответствовать нормативам;
Фирма снимает с себя всякую
ответственность в случае несоблюдения
вышеописанных правил.
ТЕХНИЧЕСКИЕ ДАННЫЕ
Габаритные
размеры
Объем
Электропитание
МАРКИРОВКА
ПОТРЕБЛЕНИЯ
ЭЛЕКТРОЭНЕРГИИ
ширина 43,5 см.
высота 32 см.
глубина 40 см.
ë 56
напряжение 230 В ~ 50/60 Гц,
макс. поглощаемая мощность
2250 Вт
Директива 2002/40/СЕ об
этикетках электрических
духовых шкафов. Норматив EN
50304 – Расход электроэнергии
– натуральная конвекция –
режим нагревания:
=
Традициональная;
Данное изделие соответствует
следующим Директивам
Европейского Сообщества:
73/23/CEE от 19/02/73 (Низкое
напряжение) с последующими
изменениями – 89/336/СЕЕ от
03/05/89 (Электромагнитная
совместимость) с
последующими изменениями –
93/68/СЕЕ от 22/07/93 с
последующими изменениями.
2002/96/СЕ
12
Page 13

Описание изделия
Общий вид
Панель управления
ПРОТИВЕНЬ
РЕШЕТКА
RU
ВЫДВИЖНЫЕ
НАПРАВЛЯЮЩИЕ
для противеней и решеток
положение 5
положение 4
положение 3
положение 2
положение 1
Панель управления
0
p3*% 2*= "/K%!=
!›,=
C!,%2%"…,
p3*% 2*=
2=L!= *
k=C%*=
-3…*,%…,!%"=…,
3.%"*,
p3 2%!
2C!=23!/
C!,%2%"…,
Имеется только в некоторых моделях
*
13
Page 14

Включение и
эксплуатация
RU
При первом включении духового шкафа
рекомендуем прокалить его примерно в течение
30 минут при максимальной температуре с
закрытой дверцей. Затем выключите духовой
шкаф, откройте дверцу и проветрите помещение.
Запах, который вы можете почувствовать, вызван
испарением веществ, использованных для
предохранения духового шкафа.
Включение духового шкафа
1. Выберите нужную программу приготовления при
помощи рукоятки ПРОГРАММЫ.
2. Выберите температуру при помощи регулятора
ТЕРМОСТАТ. В специальной таблице приводится
перечень типов приготовления с
соответствующими рекомендуемыми
температурами (см. Программы).
Включенный индикатор ТЕРМОСТАТА означает
текущую фазу нагрева духовки до заданной
температуры.
В процессе приготовления в любой момент можно:
- изменить программу приготовления при помощи
рукоятки ПРОГРАММЫ;
- изменить температуру при помощи регулятора
ТЕРМОСТАТ;
- прервать приготовление, повернув рукоятку
ПРОГРАММЫ в положение «0».
Никогда не ставьте никаких предметов на дно
духового шкафа, так как они могут повредить
эмалированное покрытие.
Всегда ставьте посуду на прилагающуюся
решетку.
Охладительная вентиляция
Для понижения температуры вокруг работающего
духового шкафа некоторые модели оснащаются
охладительным вентилятором. Этот вентилятор
направляет струю воздуха между панелью
управления и дверцей духового шкафа.
По завершении приготовления вентилятор
продолжает работать вплоть до надлежащего
охлаждения духовки.
По завершении приготовления вентилятор
продолжает работать вплоть до надлежащего
охлаждения духовки.
Освещение духового шкафа
Загорается при выборе
ПРОГРАММЫ. Остается включенной при выборе
программы приготовления.
Таймер
1. Прежде всго необходимо завести таймер,
повернув рукоятку ТАЙМЕР по часовой стрелке
почти на один полный оборот.
2. Поворачивая рукоятку обратно, против часовой
стрелки, задается нужное время минуты на
рукоятке ТАЙМЕРА должны совпасть с отметками
на панели управления.
3. Таймер: по истечении заданного времени
раздается звуковой сигнал.
Таймер не управляет включением или
выключением духового шкафа.
*
&&
& при помощи рукоятки
&&
14
Имеется только в некоторых моделях
*
Page 15

Программы
Программы приготовления
Для всех программ можно задать температуру от
60°C до МАКС кроме:
ГРИЛЬ (рекомендуется устанавливать только
МАКС. температуру);
= Программа ТРАДИЦИОНАЛЬНАЯ ДУХОВКА
Включаются два нагревательных элемента:
нижний и верхний. В режиме традиционального
приготовления рекомендуется использовать
только один уровень: при использовании
нескольких уровней распределение температуры
будет неоптимальным.
O Программа КОНДИТЕРСКАЯ ВЫПЕЧКА
Включается нижний нагревательный элемент.
Данная функция предназначена для
приготовления деликатных блюд, таких как
кондитерская выпечка, требующая подъема теста,
чему способствует выделение тепла снизу.
Хотим обратить ваше внимание на то, что для
достижения более высоких температур требуется
больше времени, следовательно в этих случаях
следует использовать режим «Традициональная
духовка».
? Программа НАГРЕВ СВЕРХУ
Включается верхний нагревательный элемент. Эта
функция может быть использована для доводки
готовых блюд.
Программа ГРИЛЬ
Включается верхний нагревательный элемент.
Значительная температура прямого действия
гриля позволяет получить быстрое образование
корочки на поверхности продукта, которая
препятствует выходу соков и сохраняет продукт
нежным и сочным внутри. Использование функции
гриль в особенности рекомендуется для блюд, для
приготовления которых требуется высокая
поверхностная температура: телячьих и говяжьих
бифштексов, антрекотов, вырезки, гамбургеров и
т.д. В параграфе «Практические советы по
приготовлению» приводятся некоторые примеры
использования духового шкафа. Готовьте блюда с
закрытой дверцей духового шкафа.
Вертел *
Для включения вертела
(см. рисунок) выполните
следующие операции:
1. установите противень на 1-ый уровень;
2. установите держатель вертела на 3-ый уровень
и вставьте вертел в специальное отверстие в
задней стенке духового шкафа;
3. включите вертел при помощи рукоятки
ПРОГРАММЫ
;
Практические советы по
приготовлению
В режиме вентилируемого приготовления не
используйте 1-ый и 5-ый уровни: они
подвергаются прямому воздействию горячего
воздуха, который может сжечь деликатные
продукты.
При использовании режима ГРИЛЬ поместите
противень на уровень 1 для сбора жидкостей,
выделяемого при жарке (сок и/или жир).
ГРИЛЬ
Установите решетку на уровень 3 или 4,
поместите продукты в центр решетки.
Рекомендуется выбрать максимальную
мощность духовки. Не беспокойтесь, если
верхний элемент не остается постоянно
включенным: его работа управляется
термостатом.
RU
Имеется только в некоторых моделях
*
15
Page 16

RU
ðó
ðåãó
ð
ðîäó
ó
ó
ð
ð
ð
ðó
ð
ð
ð
ó
ð
ð
ð
ð
óìáð
ð
ð
ð
ð
ðó
ó
ð
ð
ð
óð
ð
ð
ô
ургер
ð
ð
ð
ð
óð
ð
Таблица приготовления
Положение
коятки
ляции
Статическое Óòêà
К ондите
выпечка
Íàã
Ã
ñêàÿ
ев сверхуДоведение доготовности - 3/4 15 220 -
èëü К амбала и каракатицы
иготавливаемый
Ï
ï
êò
Æà
кое из телятины или
говядины
Æà
кое из свинины
Печенье (песочное)
Песочный то
Лазанья
Áà
анина
Ск
К екс
Экле
Бисквит
Несладкие пи
Дрожжевая выпечка
Песочный то
Ф
ктовый торт
Слоеные б
К альма
шамп
Филе т
Овощи-г
Телячий би
Отбивные
Гамб
Скумбрия
Го
ячие бутерброды
Íà âå
Телятина на ве
К
ица на вертеле
Áà
анина на вертеле
ò
èÿ
û
îãè
ò
лочки
ы и креветки на
àõ
åñêè
èëü
штекс
òåëå (если имеется)
òåëå
Âåñ
(êã)
0.3
0.5
1.5
0,5
0,5
Íîìå
1.0
1.5
1.0
1
1
1
1
1
1
1
1
1
1
1
1
1
1
1
1
1
1
4
Расположение
на уровнях
ä
ховки сниз
вверх
3
3
3
3
3
3
2
2
2
3
3
3
3
3
3
3
4
4
4
3/4
4
4
4
4
4
-
-
-
Â
ï
íàã
åìÿ
едварительного
ева (минуты)
15
15
15
15
15
10
10
10
10
10
10
15
15
15
15
15
5
5
5
5
5
5
5
5
5
5
5
5
Положение
коятки
òå
мостата
200
200
200
180
180
190
180
180
170
180
170
200
160
180
180
160
Ìàêñ.
Ìàêñ.
Ìàêñ.
Ìàêñ.
Ìàêñ.
Ìàêñ.
Ìàêñ.
Ìàêñ.
Ìàêñ.
Ìàêñ.
Ìàêñ.
Ìàêñ.
åìÿ
Â
ï
иготовления
(ìèí
65-75
70-75
70-80
15-20
30-35
35-40
50-60
30-35
40-50
30-35
20-25
30-35
30-40
35-40
50-60
25-30
8-10
6-8
10
10-15
15-20
15-20
7-10
15-20
2-3
80-90
70-80
70-80
òû)
16
Page 17

Предосторожности и
рекомендации
Изделие спроектировано и изготовлено в
соответствии с международными нормативами по
безопасности. Необходимо внимательно прочитать
настоящие предупреждения, составленные в
целях вашей безопасности.
Общие требования к безопасности
Данное устройство является встраиваемым
бытовым электроприбором класса 3.
Для исправного функционирования
газовых устройств необходимо
отрегулировать воздухообмен. Проверьте,
чтобы при установке этих устройств
соблюдались требования, описанные в
параграфе «Расположение».
Данное изделие предназначается для
непрофессионального использования в
домашних условиях.
Запрещается устанавливать изделие на улице,
даже под навесом, так как воздействие на него
дождя и грозы является чрезвычайно опасным.
Для перемещения изделия всегда беритесь за
специальные ручки, расположенные с боков
духового шкафа.
Не прикасайтесь к изделию влажными руками,
босиком или с мокрыми ногами.
Изделие предназначено для приготовления
пищевых продуктов, может быть использовано
только взрослыми лицами в соответствии с
инструкциями, приведенными в данном
техническом руководстве.
В процессе эксплуатации изделия
нагревательные элементы и некоторые
части дверцы духового шкафа сильно
нагреваются. Необходимо проявлять
острожность во избежание контактов с
этими частями и не разрешать детям
приближаться к духовке.
Следите, чтобы сетевые шнуры других бытовых
электроприборов не прикасались к горячим
частям духового шкафа.
Не закрывайте вентиляционные решетки и
отверстия рассеивания тепла.
Беритесь за ручку дверцы в центре: с боков она
может быть горячей.
Всегда надевайте кухонные варежки, когда
ставите или вынимаете блюда из духовки.
Не покрывайте дно духового шкафа фольгой.
Не храните в духовом шкафу возгораемых
предметов. при случайном включении изделия
такие материалы могут загореться.
Всегда проверяйте, чтобы регуляторы
находились в положении l/
не используется.
Не тяните за кабель электропитания для
отсоединения вилки изделия из сетевой
розетки, возьмитесь за вилку рукой.
Перед началом чистки или технического
обслуживания изделия всегда вынимайте
штепсельную вилку из сетевой розетки.
В случае неисправности категорически
запрещается открывать внутренние механизмы
изделия с целью их самостоятельного ремонта.
Обращайтесь в Центр Технического
обслуживания (см. Техобслуживание).
Не ставьте тяжелые предметы на открытую
дверцу духового шкафа
¡ , когда изделие
Утилизация
Уничтожение упаковочных материалов:
соблюдайте местные нормативы по утилизации
упаковочных материалов.
Согласно Европейской Директиве 2002/96/СЕ
касательно утилизации электронных и
электрических электроприборов электроприборы
не должны выбрасываться вместе с обычным
городским мусором. Выведенные из строя
приборы должны собираться отдельно для
оптимизации их утилизации и рекуперации
составляющих их материалов, а также для
безопасности окружающей среды и здоровья.
Символ зачеркнутая мусорная корзинка,
имеющийся на всех приборах, служит
напоминанием об их отдельной утилизации.
За более подробной информацией о правильной
утилизации бытовых электроприборов
пользователи могут обратиться в специальную
государственную организацию или в магазин.
Экономия электроэнергии и охрана
окружающей среды
Если вы будете пользоваться духовым шкафом
вечером и до раннего утра, это поможет
сократить нагрузку потребления электроэнергии
электростанциями.
Рекомендуется всегда готовить в режиме
ГРИЛЬ с закрытой дверцей: это необходимо для
значительной экономии электроэнергии
(примерно 10%), а также для лучших
результатов приготовления.
Содержите уплотнения в исправном и чистом
состоянии, проверяйте, чтобы они плотно
прилегали к дверце и не пропускали утечек
тепла.
RU
17
Page 18

Техническое
обслуживание и уход
RU
Отключение электропитания
Перед началом какой-либо операции по
обслуживанию или чистке отсоедините изделие от
сети электропитания.
Чистка изделия
Не используйте паровые чистящие агрегаты или
агрегаты под высоким давлением для чистки
изделия.
Наружные эмалированные элементы или детали
из нержавеющей стали, а также резиновые
уплотнения можно протирать губкой, смоченной
в теплой воде или в растворе нейтрального
моющего средства. Для удаления особо
трудных пятен используйте специальные
чистящие средства, имеющиеся в продаже.
После чистки рекомендуется тщательно удалить
остатки моющего средства влажной тряпкой и
высушить духовку. Не используйте абразивные
порошки или коррозийные вещества.
Следует производить внутреннюю чистку
духового шкафа после каждого его
использования, не дожидаясь его полного
охлаждения. Используйте теплую воду и
моющее средство, ополосните и протрите
мягкой тряпкой. Избегайте использования
абразивных средств.
Съемные детали можно легко вымыть как
любую другую посуду, также в посудомоечной
машине.
3. возьмитесь за дверцу
руками с двух сторон,
плавно закройте ее, но не
полностью; Затем потяните
дверцу на себя, снимая ее с
петель (см. схему).
Для установки дверцы на место выполните
вышеописанные операции в обратном порядке.
Проверка уплотнений
Регулярно проверяйте состояние уплотнения
вокруг дверцы духового шкафа. В случае
повреждения уплотнения обращайтесь в
ближайший Центр Технического Обслуживания
(см. Техническое обслуживание). Не
рекомендуется пользоваться духовкой с
поврежденным уплотнением.
Замена лампочки
Замена лампочки в
духовом шкафу:
Чистка дверцы
Для чистки стекла дверцы используйте
неабразивные губки и чистящие средства, затем
вытрите насухо мягкой тряпкой. Не используйте
твердые абразивные материалы или острые
металлические скребки, которые могут поцарапать
поверхность и разбить стекло.
Для более тщательной чистки можно снять дверцу
духовки.
1. полностью откройте
дверцу духовки (см. схему);
2. поднимите и поверните
шпонки на двух шарнирах
(см. схему);
1. Отвинтите стеклянную крышку плафона
лампочки;
2. Выкрутите лампочку и замените ее на новую
такого же типа: мощность 25 Вт, резьба Е 14.
3. Восстановите крышку на место (см. схему).
Сервисное обслуживание
Никогда не обращайтесь к неуполномоченным
техникам.
При обращении в Центр Сервисного
Обслуживания необходимо сообщить:
Тип неисправности;
Модель изделия (Мод.)
Номер тех. паспорта (серийный ¹)
Эти данные вы найдете на паспортной табличке,
расположенной на изделии.
18
Page 19

RU
19
Page 20

RU
07/2007 - 195061728.00
XEROX BUSINESS SERVICES
20
 Loading...