

Page 1

Page 2

Page 3

Models: CIS944
Page 4
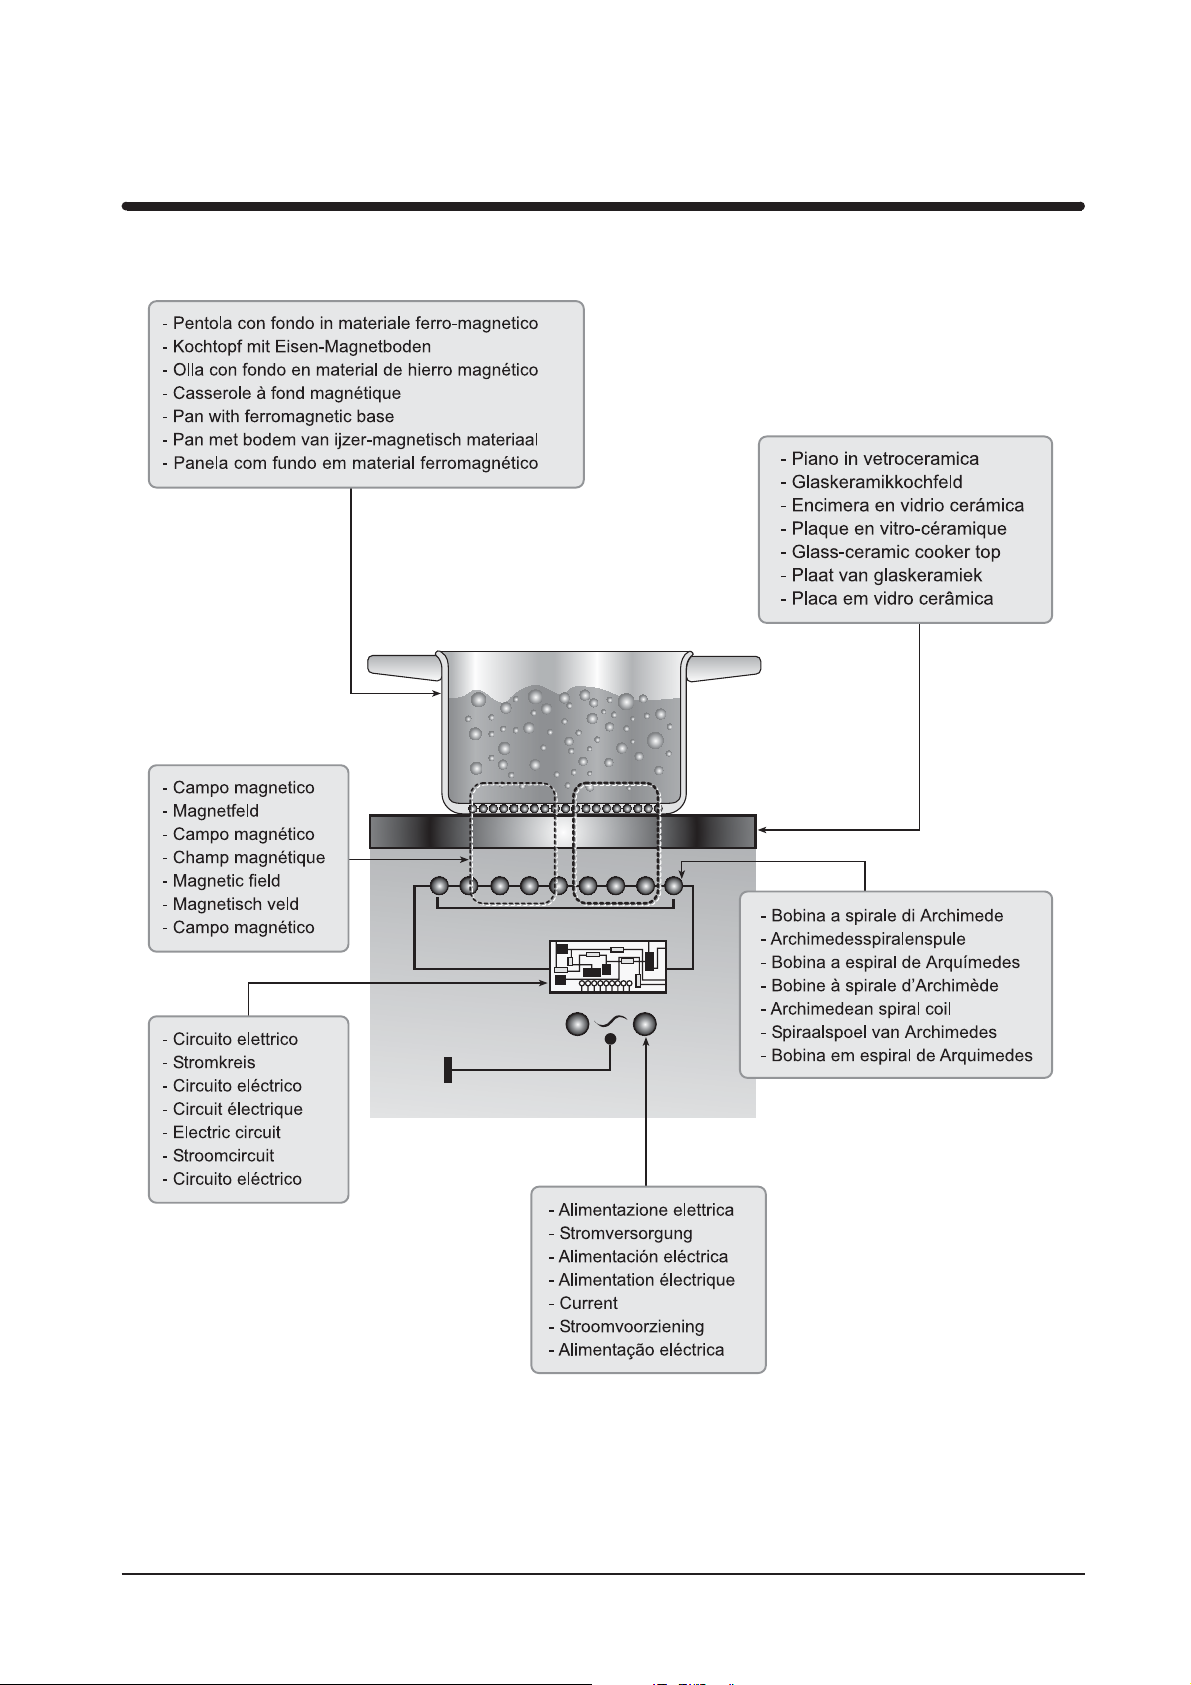
Fig.1
4
Page 5
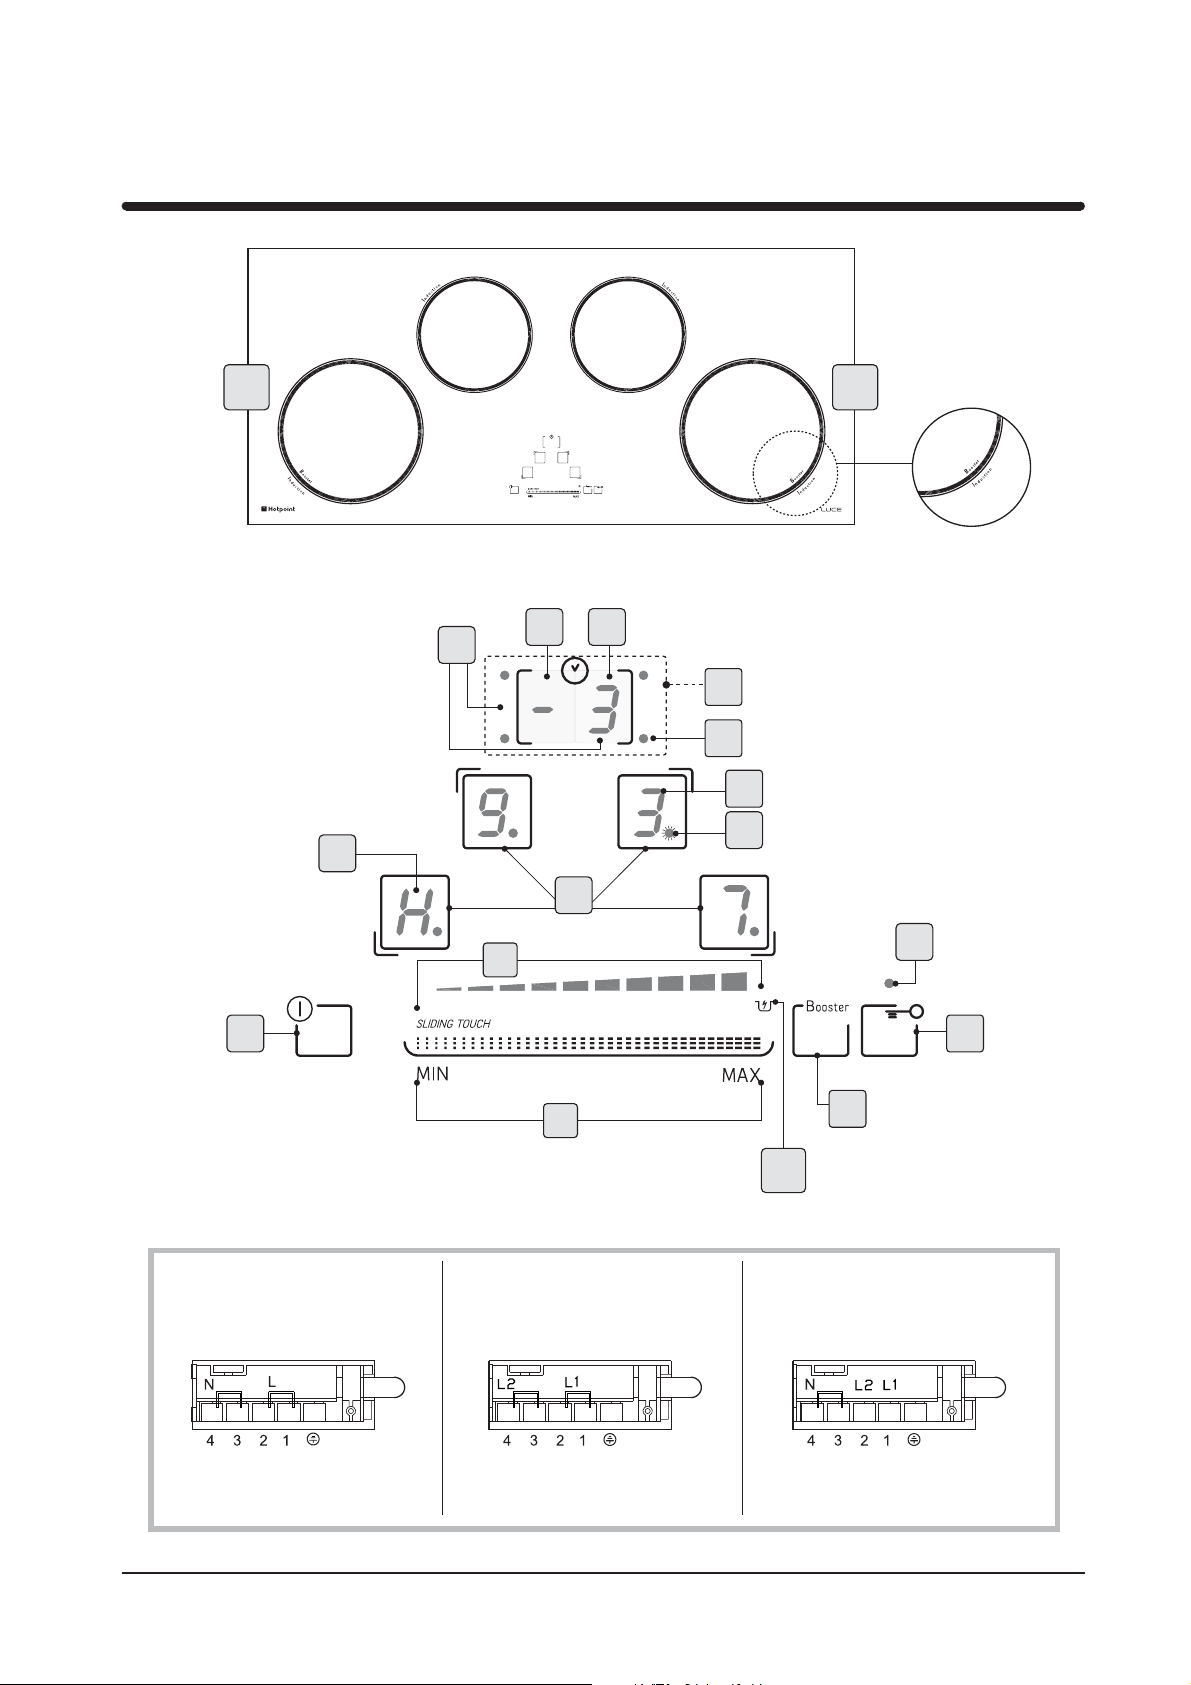
Fig.2
1
F
N
1
N
2
2
F
Fig.2C
BOOSTER
N
Q
O
R
1
R
I
E
D
2
C
A
220-240V~ H05V2V2-F 3G 2.5mm
Fig.2B
1
D
2
220-240V2~ H05V2V2-F 3G 2.5mm
S
S
1
L
2
380-415V2N ~ H05V2V2-F 4G 2.5mm
B
2
5
Page 6
A B
Fig.3
A
30 mm
50 min
40 mm
410
880
900
55-51
50
390
50 min
Fig.4
Fig.5
B
- 40 %
6
Page 7

Fig.6A
Fig.6B
50 mm
4 mm
25mm
80 mm
500 x 10
Fig.7A
Fig.7B
40mm
50 mm
500 x 50
4 mm
500 x 10
7
Page 8

8
Page 9

User instructions
GB
English, 9
CIS944
Summary
Installation 4 - 7
General 10
The principle of induction
Advantages
Cooking vessels
Safety precaution 10
Installation instructions 11
Positioning
Electrical connections
Use and maintenance 11
Use
Lock function
Magnetic sensor
Timer
Minute Minder (Countdown)
Booster
Heat up (Rapid heating)
Maintenance
GB
Technical data 14
Page 10

General
GB
General
Carefully read the contents of this leaflet since it provides
important instructions regarding safety of installation, use
and maintenance.
Keep the leaflet for possible future consultation. All the
operations relating to installation (electrical connections)
must be carried out by specialised personnel in conformity
with the regulations in force.
1.1 The principle of induction:
The system of cooking by induction is based on the physical phenomenon of magnetic induction.
The fundamental feature of this system is direct transfer
of heat energy from the generator to the pan without intermediate means (different from traditional cooker tops
see Fig.1).
1.2 Advantages:
If you compare your electric cooker tops, with the induction
cooker top, the result will be:
- Safer: low temperature on the glass surface.
- Quicker: brief heating times.
- More precise: the top reacts immediately to your com-
mands
- More efficient: 90% of the energy absorbed is transformed into heat.
Furthermore, once the pan has been removed from the
hob, heat transmission is stopped immediately, thereby
preventing the needless dispersion of heat.
The system also automatically recognises the various
diameters of all pans and uses a suitable power level for
each size.
This means that we are able to use pans of various sizes,
provided that the pan diameter is no more than 10%
larger - or 40% smaller - than the printed detail marked
on the hob (Fig.4B).
Caution: if you are using a pan with a diameter which is
more than 40% smaller than the printing marked on the
glass, the cooking zone may not be activated.
1.3 Cooking vessels (Fig.4A):
Cooking by induction uses magnetism to generate heat.
The vessels must therefore contain iron.
Check if the vessel material is magnetic using a magnet.
Important:
To prevent permanent damage to the cooker surface,
do not use:
- Pans with bases that are not perfectly flat.
- Metal pans with enamelled bases.
- Do not use pans with rough bases as they may scratch
the hob’s surface.
Safety precaution
This apparatus is not suitable for use by children or persons who need supervision. Do not allow children to play
with the apparatus. Before using the induction cooker top
it is important to check that the apparatus is compatible
with anyone who has a pacemaker and active surgical
implants.
Before connecting the appliance to the electricity
supply:
- Check that the voltage and power values listed on the
data plate (positioned on the lower part of the appliance)
are compatible with the electricity supply and socket. If
you have any doubts, please consult a qualified electrician for assistance.
Important:
- Metal objects such as knives, forks, spoons or lids must
not be placed on the cooker surface as they can get hot.
- After use, switch the cooker off using the control device
and do not rely on the pan detector.
- Avoid liquid spilling, therefore to boil or heat liquids
reduce the heat supply.
- Do not leave the heating elements switched on with
empty vessels or without vessels.
- When you have finished cooking, switch off the relative
resistance using the control indicated below.
- Never use aluminium foil for cooking, or never place
products wrapped in aluminium foil onto the cooking
surface. The aluminium would melt and damage your
apparatus irreversibly.
- Never heat a tin or can of food without opening it – it
could explode! This warning applies to hobs of all types.
Attention: Steam cleaners must not be used.
Attention: If the surface is cracked, switch the apparatus
off to prevent electric shocks.
This appliance conforms to the European Directive
EC/2002/96, Waste Electrical and Electronic Equipment
(WEEE). By making sure that this appliance is disposed
of in a suitable manner, the user is helping to prevent
potential damage to the environment or to public health.
The
symbol on the product or on the accompanying
paperwork indicates that the appliance should not be
treated as domestic waste, but should be delivered to
a suitable electric and electronic appliance recycling
collection point. Follow local guidelines when disposing
of waste. For more information on the treatment, re-use
and recycling of this product, please contact your local
authority, domestic waste collection service or the shop
where the appliance was purchased.
10
Page 11

Use and maintenance
Installation instructions
These instructions address specialised installers and
serve as a guide for installation, adjustment and maintenance in conformity with the laws and regulations in force.
Positioning (Fig.3):
The appliance is made for fixing into a worktop, as shown
in the relevant figure. Apply the supplied sealant to the
entire perimeter of the hob and insert it into the fitment
hole (for sizing see Fig.3B). Fix the appliance into the
worktop with the 4 stays, rotating them according to the
top’s depth (Fig.3A). If the underside of the appliance
will be accessible after installation, a separator panel G
(Fig.6A) will need to be mounted maintaining the distances
shown (Fig.6B). If the appliance is installed over an oven
the panel is not necessary (Fig.7A - Fig.7B).
Important: if there is an oven under the induction hob it
is advisable for it to have a cooling fan.
Do not use the induction hob while PYROLITIC cleaning
is in process.
Warning: to allow the circulation of as much fresh air as
necessary, there must be at least 40 mm between the
induction hob module and any appliance installed under
it (Fig.7B).
In any event, adequate aeration must be provided.
To allow fresh air circulation there must be openings in the
kitchen furniture (Fig.6A - Fig.7A) of the sizes indicated
in Fig.6B - Fig.7B.
Electrical connections (Fig.2B):
Before making the electrical connections, check that:
- the ground cable is 2 cm longer than the other cables;
- the system ratings meet the ratings indicated on the
identification plate fixed on the lower part of the worktop;
- the system is fitted with efficient earthing compliant to the
laws and regulations in force. Earthing is obligatory by law.
If the appliance is not fitted with a cable, use type:
“H05V2V2-F” for a power level of up to 6400 Watts. The
cross-section of the cable should be at least 2.5 mm², or
4 mm² for greater power levels. The cable should never
reach a temperature which is 50°C above the temperature of the room in which it is installed. The appliance
is designed for permanent connection to the electricity
supply and should therefore be fitted with an omnipolar
switch which has a minimum opening of 3 mm between
contacts. The switch should be suitable for the charge
indicated on the appliance data plate and must conform
to all current legislation (the yellow/green earth wire must
not be interrupted by the switch).
The omnipolar switch must be easy to reach once the
installation process has been completed.
Use and maintenance
Use (Fig.2):
A= ON/OFF Button
B= Key Button
C= ON/OFF indicator key button
D1= Slider Control
D2= Cooking level indicator
E= Cooking zone selection button
I= Residual heat symbol “H”
L1= Quick Heat Function (Heat up) ON/OFF button
N= Timer Buttons
N1 = Tenths display
N2 = Units display
O = Hob indicator with timer function active
Q= Timerz Display
R = Cooking zone display
R1 = Active cooking zone indicator
S = Booster
- To start the hob, press the button (A), on all displays
(R) the zeros will appear for 20 seconds with flashing
decimal points.
If no operation is performed within this time period, the
hob switches off.
- It is possible to switch a cooking zone on by selecting
one of the 4 buttons (E). The cooking zone is active when
the decimal point becomes fixed.
Set the desired cooking level by acting on the SLIDER
control (D1).
Note: to set the cooking level, just slide your finger over
the SLIDER control (D1).
From Left to Right the temperature level is increased
(D2) from 1to9. To decrease just perform the operation
in the reverse order.
The cooking level (e.g. 6) will appear on the cooking zone
display (R).
Note: you may also directly press any point on the SLIDER
control without running your finger along it; in this case the
temperature level corresponding to the point at which the
control was touched will be activated directly.
- To select the double cooking zone, where applicable,
first press button (E), then adjust the cooking level (D1)
and press the double zone selector button (
To deactivate the double zone, press button (E) followed
by button (F).
- There are several different ways of switching off a
cooking zone:
1- Select it and run your finger over the SLIDER control
until you reach “0”.
2- Select it and directly press the “-” symbol on the SLIDER
control.
- When a cooking zone (E) is switched to the OFF setting
and the temperature of the glass surface remains above
approximately 50°, the display (R) corresponding to that
F).
GB
11
Page 12

GB
zone will show a luminous signal alternating between “0”
and “H”. If the hob is switched to the OFF setting (A), the
luminous signal will display the letter “H” in a fixed manner.
Warning:
To prevent damage being inflicted on the electronic circuits, the hob is fitted with an overheating safety system.
In situations where the appliance is used at high power
levels for a prolonged period of time, the hob may switchoff
one or more of the activated zones temporarily, until the
temperatures return to the set levels.
On the display corresponding to the cooking zone which
has been temporarily switched off, the power level will be
shown in alternation with a E/2.
This will stop flashing once the cooking zone has beenreactivated.
Lock function (Fig.2 - (B)):
To prevent the hob from being used by children, all
functions may be locked by pressing the Lock button
(B); this function is active when the indicator light (C) is
illuminated.
- To activate or deactivate it, press and hold button (B)
for approximately two seconds.
- If the hob is switched on and the Lock function is
enabled, button A will still work.
Magnetic sensor (Fig.2 - (I)):
- The hob is equipped with a pan sensor; when the pan
is removed or badly positioned, the
If, on the other hand, the surface of the glass is still hot,
the
symbol will appear alternating with the .
O.S.D. (Overflow Safety Device) (Fig.2):
The hob is equipped with a safety system which moves all
hotplates to the OFF position and activates the safety lock
when liquids or items are detected on the control panel A.
These symbols will flash on the display:
. They can be deactivated by removing the item
or the liquid. The hob will switch off automatically.
Attention!
When the hob switches on, the timer display Q stays on
at the value
seconds the display Q shows nothing.
Timer (Fig.2 - (Q)):
Note: The Timer can be activated on all 4 cooking zones
at the same time.
This function allows to establish the time (from 1 to 99
minutes) or automatic switch-off of the cooking zone
selected.
Activation:
1- Select the cooking zone (E).
If the function is not activated, after a few
symbol will appear;
2- Set the cooking level (from 1 to 9) desired, by acting
on the SLIDER control (D1).
3- Press the Timer button (N), the display will show
At this point, the hob indicator (O) with the timer function
active, starts to flash.
4- Set the unit time (N2) desired from 0 to 9 by acting on
the SLIDER control (D1) e.g.
5- After a few seconds the unit value (N2) and the tenths
(N1) will appear fixed on the display
- if you want to set a time exceeding 9 minutes e.g:
, just run your finger over the SLIDER control (D1).
- if, on the contrary, no operation is performed, it stops
flashing after a few seconds and the Timer display (Q)
will show the cooking time previously set
6- At the end of the programmed time, the timer display
(Q) and the hob indicator (O) will start to flash followed
by an acoustic sound.
To deactivate the acoustic signal just press the timer
button N, otherwise it will deactivate automatically after
2 minutes.
To deactivate the timer function before the set time:
- select the cooking zone (E) and press one of the two
buttons (N).
When the zone indicator (R) on display (E) stops flashing,
the function is no longer active.
Note: To display the residual cooking time, just press the
cooking zone (E) of interest selection button.
Minute Minder (Countdown) (Fig.2 - (Q)):
Attention! This function can only be used if no
cooking zone (E) has the timer inserted.
- The Minute Minder allows to set an established countdown that goes from 1 to 99 minutes.
On expiry of the time, the hob emits an acoustic signal
without changing the active functions.
- The function activates only if the cooking level is set at
“0” on all displays (R).
- Press the Timer button (N) and set the time with the same
procedure as the Timer function, with the unique exception
that the indicators (O) do not switch on.
Note: Whenever the Timer is to be activated on at least
one zone, the Minute Minder deactivates automatically.
To activate the Timer instead of the Minute Minder,
proceed as follows:
1- Use one of the buttons to select (E) the cooking zone
where the timer function is to be activated.
2- Set the cooking level by acting on the SLIDER control
(D1).
3- Select the Timer button (N).
4- Select the button (E) again where the timer function is
to be activated.
5- Select the Timer button (N).
6- Set the cooking time by acting on the SLIDER control
(D1).
.
;
.
,
12
Page 13

Booster (Fig.2 - (S)):
Depending on the appliance model, it may be fitted with a
Booster system which can be used to speed up cooking
times through the application of a power level which is
greater than the nominal value, within a defined period of
time. The cooking zones which can be used in conjunction
with this function are indicated in Booster Fig.2C.
To activate the Booster, switch the interested cooking area
on at any power level and press key S (Fig.2). This allows
to reach higher temperatures in a short time disbursing the
maximum power possible. Once the function is activated a
red LED and a P will appear on the display for ten minutes.
After this time the cooking area will automatically return
to power level 9.
Attention!
- If your appliance has two zone cooking (Booster) using
the Booster function, these can be activated simultaneously.
- When the Booster function is active and the lower or
upper vertical cooking zone is to be switched on or is
already on (F1 or F2 - Fig.2) for the duration period of
the Booster and if maximum level is set, the power will
decrease slightly.
- The Booster may not activate if, the cooking zone (with
the word Booster) has been previously activated with high
temperature levels.
- In order to use the Booster function, wait for the P on
the display R to stop flashing and the temperature inside
the cooking surface to decrease.
Maintenance (Fig.5):
Remove any residues of food and drops of grease from
the cooking surface using the special scraper supplied
on request.
Clean the heated area as thoroughly as possible using
SIDOL, STAHLFIX or similar products and a cloth/paper,
then rinse with water and dry with a clean cloth.
Using the special scraper (optional) immediately remove
any fragments of aluminium and plastic material that
have unintentionally melted on the heated cooking area
or residues of sugar or food with a high sugar content. In
this way, any damage to the cooktop surface is prevented.
Under no circumstances use abrasive sponges or irritating chemical detergents such as oven sprays or stain
removers.
THE MANUFACTURER DECLINES ALL RESPONSIBILITY FOR EVENTUAL DAMAGES CAUSED BY BREACHING THE ABOVE WARNINGS.
GB
Heat up (Fig.2 - (L1)) (Rapid heating):
The Heat up function can be used to set the cooking
zone to its maximum temperature for a specified period
of time, after which the temperature will return to a lower
value set previously.
To activate the Heat up function, select one of the
cooking zones (E).
Set the cooking level at “9” by acting on the SLIDER
control (D1), press Heat up (L1)and the cooking zone
will show the letter “A”. This means that the (Heat up)
function is active.
Set the desired cooking level (between 1 and 8); the
cooking zone display will now show the letter “A” and
the desired cooking level (e.g. 6) alternately.
- If no cooking level variation is made, the indicator (D2
switches off.
Note: it is possible ONLY to increase the previously-set
cooking level:
1- Select the cooking zone (E) where the Heat up
function is active.
2- Increase the desired temperature by running your finger
over the SLIDER control (D1).
When the Heat up function has finished running, the hob
will emit a sound signal or BEEP; the relevant cooking
zone will continue to operate and the cooking level set
previously, e.g. 6.
)
13
Page 14

GB
TECHNICAL DATA
Packaging (HxWxD) 130x966x500 mm
Volume 0.066 m
Useful
measurements
relating to the hob
compartment
width 900 mm
depth 410 mm
height 55-51 mm
3
Voltage and frequency 220-240 ~ 380-415V 2N ~ 50/60Hz 7.4kW
EC Directives: 2006/95/EC dated 12/12/06 (Low Voltage)
and subsequent amendments - 2004/108/EC dated 15/12804 (Electromagnetic Compatibility)
and subsequent amendments - 90/396/EEC dated 29/06/90 (Gas)
and subsequent amendments - 93/68/EEC dated 22/07/93
and subsequent amendments - 2002/96/EC
Hobs
CIS944
Cooking zone Power (W)
Rear right 1400
Front right 2300/3000 (Booster)
Front left 2300/3000 (Booster)
Rear left 1400
Max power 7400
14
Page 15

Guarantee
12 months Parts and Labour Guarantee
Your appliance has the benefit of our manufacturer’s guarantee, which covers the cost of breakdown repairs for
twelve months from the date of purchase.
This gives you the reassurance that if, within that time, your appliance is proven to be defective because of either
workmanship or materials, we will, at our discretion, either repair or replace the appliance at no cost to you.
This guarantee is subject to the following conditions:
- The appliance has been installed and operated correctly and in accordance with our operating and
maintenance instructions.
- The appliance is used only on the electricity or gas supply printed on the rating plate.
- The appliance has been used for normal domestic purposes only.
- The appliance has not been altered, serviced, maintained, dismantled, or otherwise interfered with by any
person not authorised by us.
- Any repair work must be undertaken by us or our appointed agent.
- Any parts removed during repair work or any appliance that is replaced become our property.
- The appliance is used in the United Kingdom or Republic of Ireland.
The guarantee does not cover:
- Damage resulting from transportation, improper use, neglect or interference or as a result of improper
installation.
- Replacement of any consumable item or accessory. These included but not limited to: plugs, cables,
batteries, light bulbs, fluorescent tubes and starters, covers and filters.
- Replacement of any removable parts made of glass or plastic.
THIS GUARANTEE WILL NOT APPLY IF THE APPLIANCE HAS BEEN USED IN COMMERCIAL OR NONDOMESTIC PREMISES.
5 Year Parts Guarantee
Hotpoint also offers you a free 5 year parts guarantee. This additional guarantee is conditional on you registering
your appliance with us and the parts being fitted by one of our authorised engineers. There will be a charge for
our engineer’s time. To activate the extra parts warranty on your appliance, simply call our registration line on
08448 24 24 24 (Republic of Ireland 01 230 0800)
Extended Guarantees
We offer a selection of protection plans that enable you to fully cover yourself against the expense of repair bills
for the life of your policy. To find the ideal plan for you please call our advice line on 08448 226 226 (Republic of
Ireland 01 230 0233).
Free Helpdesk Service
We have a dedicated team who can provide free advice and assistance with your appliance if you experience
any technical difficulties within the first 90 days of ownership. Simply call our Hotpoint Service Hotline on 08448
224 224 (Republic of Ireland 0818 313 413) for telephone assistance, or, where necessary, to arrange for an
engineer to call.
Page 16

After Sales Service
No one is better placed to care for your Hotpoint appliance during the course of its working life than us – the
manufacturer.
Essential Contact Information
Hotpoint Service
We are the largest service team in the country offering you access to 400 skilled telephone advisors and 1000
fully qualified engineers on call to ensure you receive fast, reliable, local service.
UK: 08448 224 224
Republic of Ireland: 0818 313 413
www.hotpointservice.co.uk
Please note: Our advisors will require the following information:
Model number:
Serial number:
Parts and Accessories
We supply a full range of genuine replacement parts as well as accessory products that protect and hygienically
clean your appliance to keep it looking good and functioning efficiently throughout its life.
UK: 08448 225 225
Republic of Ireland: 0818 313 413
www.hotpointservice.co.uk
Appliance Registration
We want to give you additional benefits of Hotpoint ownership. To activate your free 5 year parts guarantee you
must register your appliance with us.
UK: 08448 24 24 24
Republic of Ireland: 01 230 0800
www.hotpointservice.co.uk
Indesit Company UK Ltd. Morley Way, Peterborough, PE2 9JB
Indesit Company Unit 49 Airways Industrial Estate, Dublin 17
Recycling and Disposal Information
As part of Hotpoint’s continued commitment to helping the environment, Hotpoint reserves the right to use quality,
recycled components to keep down customer costs and minimise material wastage.
Please dispose of packaging and old appliances carefully. To minimise the risk of injury to children, remove the
door, plug, and cut the mains cable off flush with the appliance. Dispose of these parts separately to ensure that
the appliance can no longer be plugged into mains socket, and the door cannot be locked shut.
Page 17

17
Page 18

18
Page 19

Page 20

3LIP0333
 Loading...