

Page 1

Installation and User
Handbook
Retention of the Instruction Book
This Instruction Book must be kept handy for reference as it contains important details on the
safe and proper use of the appliance.
If you sell or pass the appliance to someone else,or move house and leave it behind,make sure
this Book is also provided so the new owner can become familiar with the appliance and safety
warnings.
BL31 - Integrated
Larder Fridge
Page 2
Your New Integrated Appliance
Using your new integrated appliance is very simple.Nevertheless,to get the best results it is
important that you read right through this handbook before using your integrated appliance
for the first time.
Electrical Requirements
WARNING:This appliance must be earthed.
Fuses
Your appliance comes fitted with a plug and a 13A fuse.If you need to replace the fuse,only
those rated at 13A and ASTA approved to BS1362 should be used. I f you lose the fuse cover,
a replacement may be obtained from your local authorised Service Centre or Electricity
company. Correct replacement is identified by colour coding or the marking on base of
plug.
WARNING:Do not use plug unless fuse cover is fitted.
Changing the Plug
Cut off and dispose of the supplied plug if it does not fit your socket.
WARNING:To avoid a shock hazard do not insert the discarded plug into a socket
anywhere else.
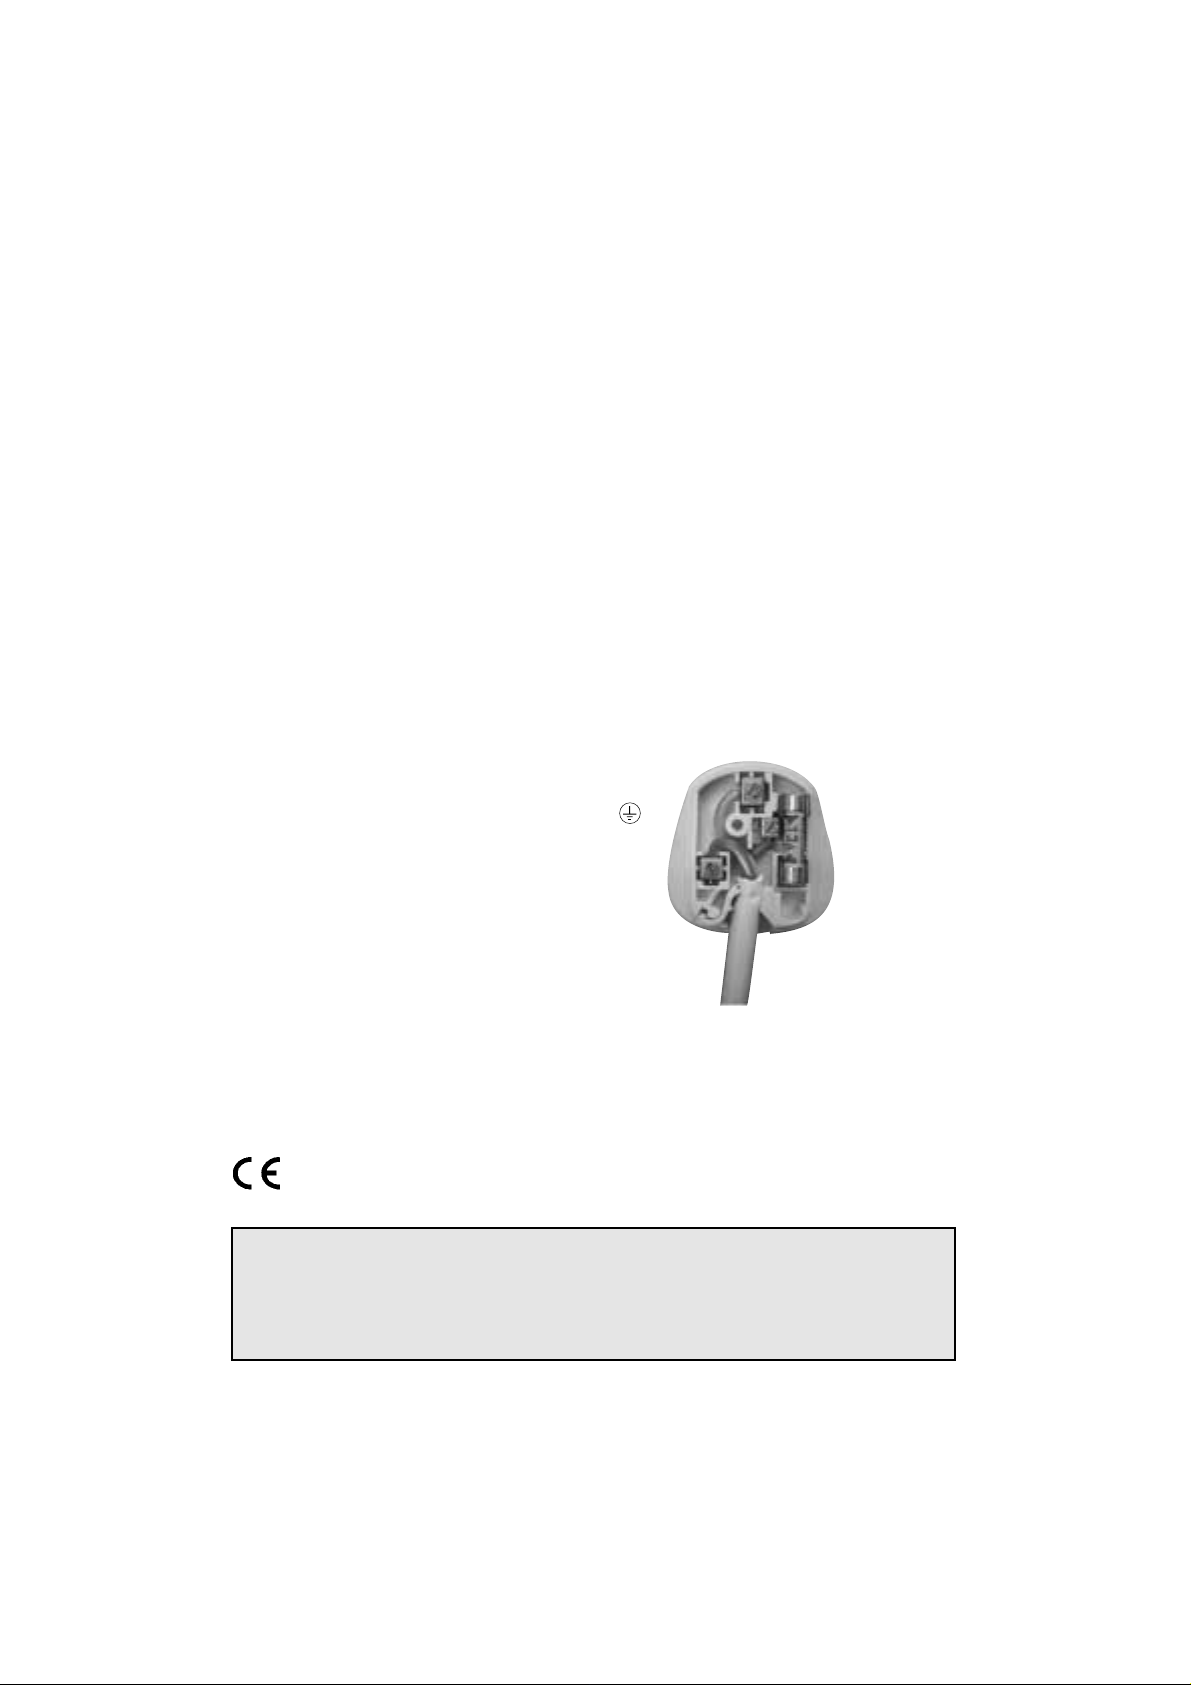
IMPORTANT:WIRES IN THE MAINS
LEAD ARE COLOURED IN
ACC ORDANCE WITH THE
FOLLOWING CODE:
Green/Yellow - Earth
Blue - Neutral
Brown - Live
If you change the plug,the colour of
wires in the mains lead may not
correspond with the colour of the
markings identifying terminals in the
plug. You should therefore wire it as
shown.
Changing the Mains
Lead
A special lead can be ordered from our Service Department UK:08709 066 066 or
Republic of Ireland:1850 302 220
If you have damaged the existing lead or require a longer one a charge will be made.It is
strongly advised that this work is carried out by a qualified electrician.
CE marking certifies that this appliance conforms to the following EEC directives:Low Voltage Equipment - 72/23/EEC & 93/68 EEC
Electromagnetic Compatibility - 89/336/EEC,92/31/EEC & 93/68/EEC
Green and yellow (Earth)
wire to terminal
marked ‘E’ ,
symboL, or
coloured green
and yellow.
Blue (Neutral)
wire to terminal
marked ‘N’or
coloured black.
13A ASTAapproved
fuse to BS1362.
Brown (Live)
wire to terminal
marked ‘L’or
coloured red.
Cord clamp
2
WARNING:AVOID ACCIDENTS TO CHILDREN.WHEN DISC ARDING AN OLD FRIDGE OR
FREEZER BE CERTAIN TO MAKE THE LOCK UNUSABLE.IF POSSIBLE,REMOVE THE DOOR
AND DISCARD SEPERATELY.
DO NOT ATTEMPT TO SIT ON TOP OF YOUR APPLIANCE.IT IS NOT DESIGNED FOR SUCH
USE AND YOU COULD INJURE YOURSELF OR DAMAGE THE APPLIANCE BY SUCH ABUSE.
Page 3

3
Contents Page
Electrical Requirements 2
Disposal Notes/Technical Safety 3
Installation 4-7
Model BL31 Get to know your Integrated Larder Fridge 8
Getting your Integrated Larder Fridge ready for use 9
Controlling the Temperature 9
Storing Food 10
Do’s & Don’ts 11
Caring for your Integrated Larder Fridge 12-13
If your Integrated Larder Fridge Won’t Work 14
After Sales 15
Guarantee 16
Key Contacts Back Cover
Disposal Notes:
The packaging is designed to protect the appliance and individual components during transport and is
made of recyclable materials.
Corrugated board/board
Moulded polystyrene (foamed,CFC-free polystyrene.
Polythene bags and sheets
Polyproplene straps
Keep packaging materials away from children - polythene sheets and bags can suffocate!.
Please return packaging material to your nearest official collection point so that the various materials can be
reused or recycled as far as possible.
Ensure that the refrigerant circuit is not damaged,before the appliance that is no longer needed is taken
away for disposal. In this way the refrigerant will not escape into the environment.
Exact details of the refrigerant used can be found on the type plate.The heat insulator is PU with Pentane.
Information on collection dates or collection points can be obtained from the waste disposal authorities or
local council.
Technical Safety
The refrigerant R600a is environmentally friendly but flammable, tak e care not to damage the refrigerant
circuit pipes.If refrigerant does escape,immediately ensure that the area is well ventilated.
Do not use electrical appliances;i.e ice makers, inside the appliance.
In the event that the appliance is damaged,contact the supplier immediately before connecting to the
mains.
To guarantee safe operation,ensure that the appliance is set up and connected as described in these
operating instructions,and that any repairs and work on the appliance are only carried out by an authorised
service office.
Page 4

Installing Your Integra ted Appliance
Please read through this section before
starting any work.
The installation location should be in a dry,
well ventilated room. The appliance should
not be exposed to direct sunlight and should
not be near a heat source (e.g.a radiator,
cooker).If required,use an insulating plate.
Warning!
The appliance contains the environmentally
friendly but flammable refrigerant R600a.
Ensure that the refrigerant circuit is NOT
damaged during transportation and
installation.
Leaking refrigerant may ignite or cause eye
injuries.
The more refrigerant in an appliance,the
larger the room must be in which the
appliance is situated.If a leak occurs in a room
which is to small,a flammable gas-air mixture
may form.
The room must be at least 1 m
3
per 8g of
refrigerant.The amount of refrigerant in
your appliance is indicated on the rating
plate located inside the appliance,on the
bottom left hand side.
If refrigerant is leaking out:
● Avoid naked flames and ignition sources
near the installation location.
● Unplug the appliance and thoroughly
ventilate the room for several minutes.
Installation of the appliance under the
worktop
Although you will need to provide all tools
required for the installation,all fittings are
supplied with the appliance.
4
Page 5
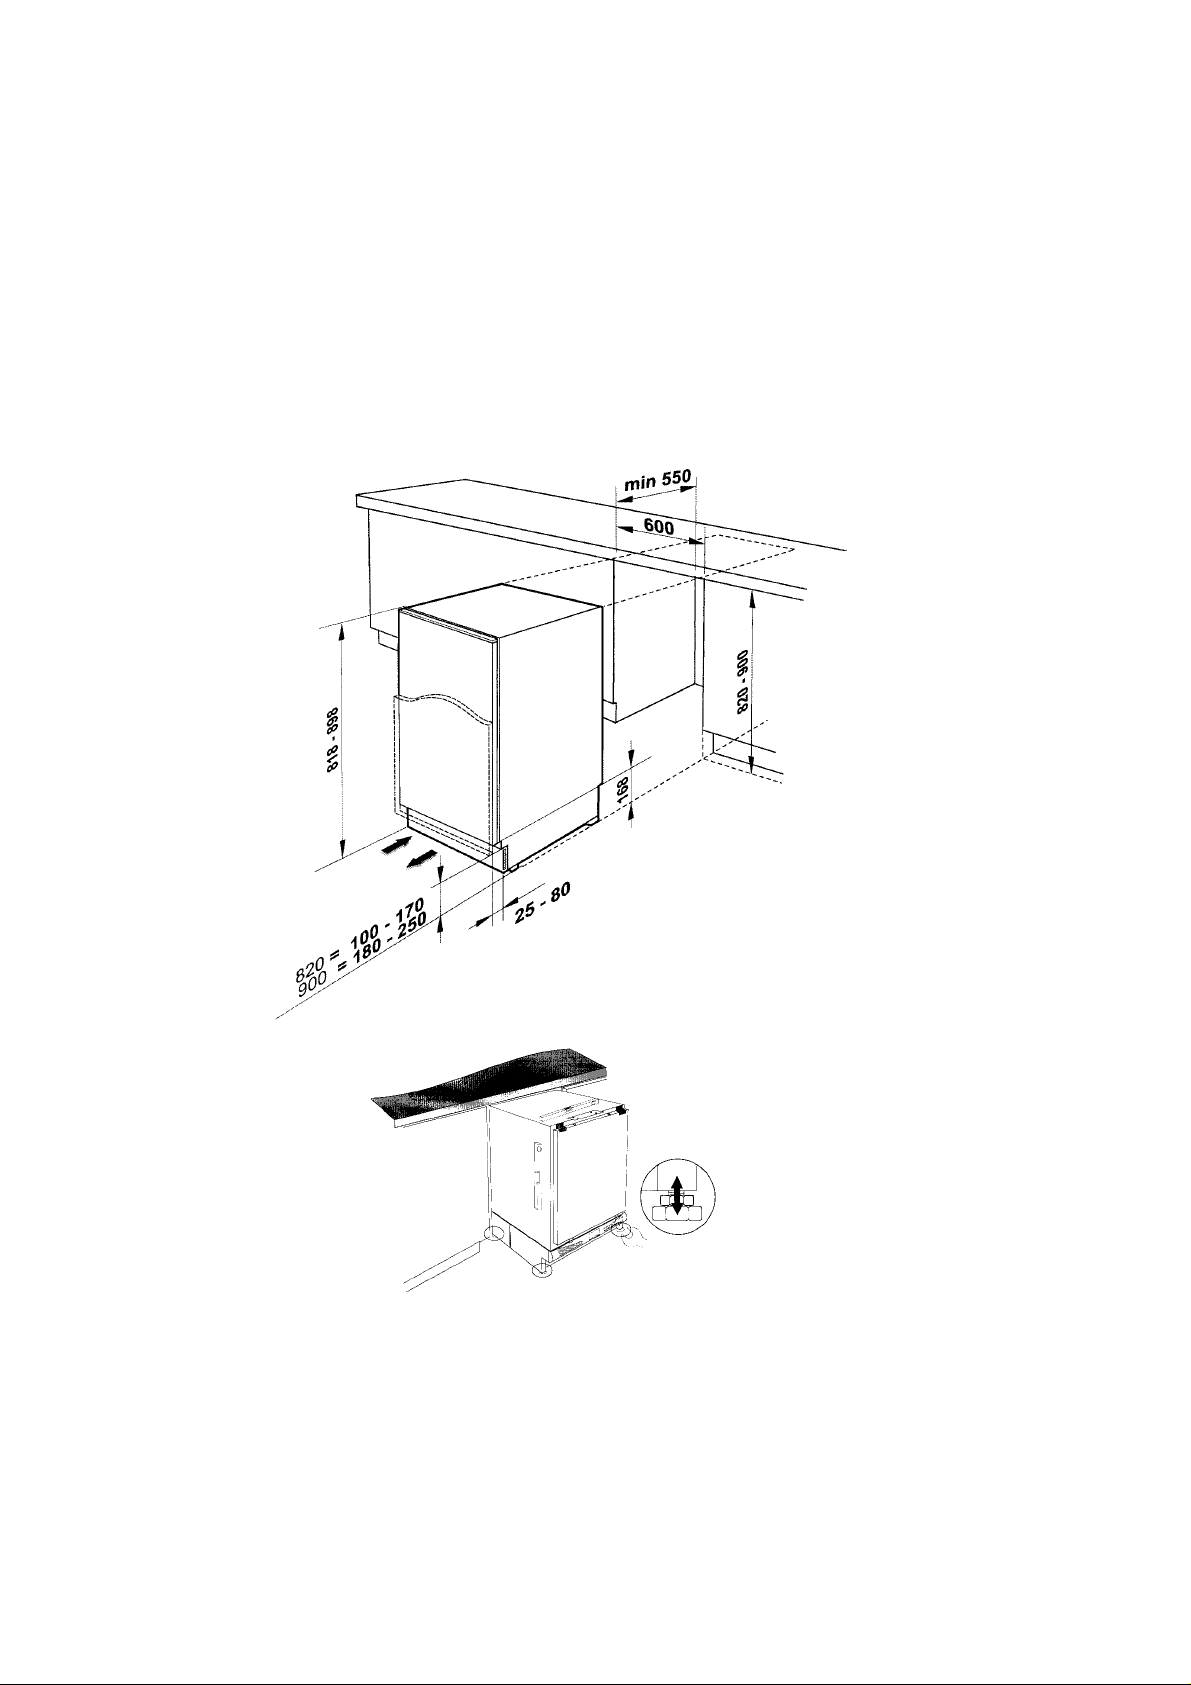
Before fitting
The electrical socket should be easily accessible.
Do not connect the appliance to the electricity supply until installation is completed.
Make sure that the appliance is sitting level on the floor by adjusting all four feet.
Installing Your Integra ted Appliance
5
Page 6
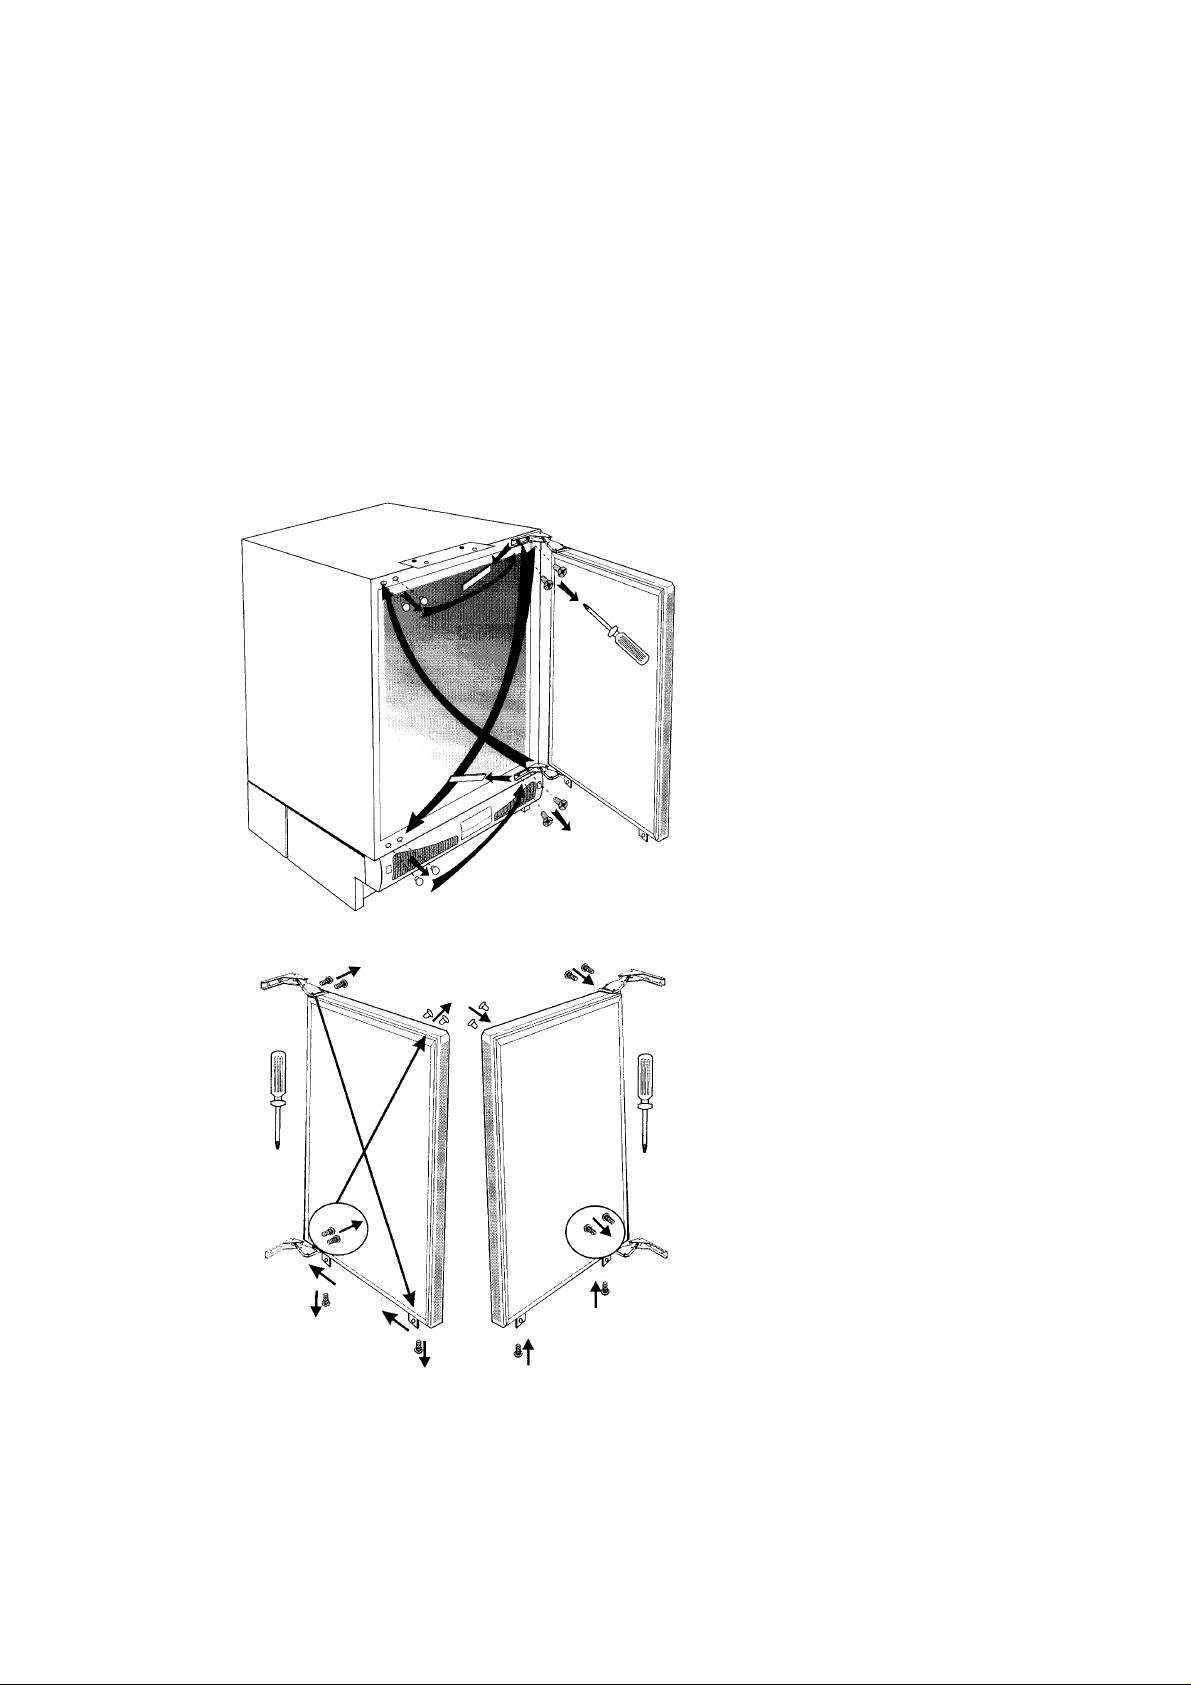
Before fitting,if needed,change over the
way the door opens as show below.
6
Changing over the
door hinges
Page 7

Fastening the appliance under the
worktop.
Secure the appliance bracket under the
worktop by two fixing screws.
Mounting the kitchen cabinet door.
Remove the top bracket from the appliance
and secure to the door panel.
Minimum door width - 595mm
Minimum door height - 650mm
Fitting the door panel to the appliance.
Adjusting the base.
Cut out the plinth of the cabinet to match the
aplliance bottom ventilation grille.
7
Page 8

WARNING:CHILDREN SHOULD NOT BE ALLOWED TO PLAY WITH THE APPLIANCE OR
TAMPER WITH THE CONTROLS.
BL31 FEATURES:
1 Shelf
2 Defrost water outlet
3 Crisp tray and serving tray
1.Shelf
The shelves are adjustable and can be pulled
out and used on any of the guide slots.They
can also be used in a tilted position to allow
the safe storage of bottles,jars etc.on there
sides.To tilt a shelf,place the back of the shelf
on a lower slot than the front.
2.The defrost water outlet
The interior of the refrigerator is cooled with a
cooling plate incorporated in the rear wall.
Under the plate there is a channel and an
outlet for the defrosted water.
Regularly check the outlet and channel for
food deposits which could clog the drain hole.
If the hole is blocked,use a plastic straw to
clean it out.
3.Crisp tray and serving tray
The tray at the bottom of the refigerator is
covered with the serving tray.This cover
protects stored food from excessive drying.
The door liner
The door liner consists of various shelves or
holders used for storing eggs,cheese,butter
and yogurt as well as other small packages ,
tubes,cans etc.
The lower shelf is used for storing bottles.
The interior light
The light will come on when the door is
opened.
8
Get to know your Integrated Larder Fridge
Model
BL31
Page 9

Before using your Integrated Larder Fridge for
the first time the interior,including the door
and all removable parts should be wiped out.
Use a damp cloth wrung out in either a
solution of one teaspoon of bicarbonate of
soda to one pint of water, or M ilton sterilising
fluid diluted according to the manufacturer’s
instructions.
WARNING:NEVER USE ANY HOUSEHOLD
CLEANER OR DETERGENT,ABRASIVE
POWDERS OR WAX POLISH.THESE NOT
ONLY DAMAGE THE SURFACES, THEY ALSO
LEAVE A SMELL IN THE LARDER FRIDGE.
Final Check
Before you start using the Larder Fridge,check
that:
1. I t is thoroughly dr y inside
2. Air can circulate freely
3. The feet have been adjusted,ie the feet
are firmly on the ground and ensure the
appliance is level.
Starting
Insert the plug into the wall socket and switch
on the electricity supply.Open your Larder
Fridge door and the light will come on. There
is a control dial on the right hand side of
Larder Fridge interior.Turning the
temperature selector dial from ‘O’ (off)
towards ‘7’ to the medium setting ‘4’. You will
hear a noise as the compressor starts up.
Running in the Compressor
Your Larder Fridge is operated by a
compressor which switches on and off in
order to maintain the Larder Fridge’s
temperature. The compressor is a precision
piece of machinery like a car engine and
requires a a running in period of up to two
months.During this time the compressor has
to work a little harder and this may result in
more noise than usual.
Temperature selection
* Higher settings on the knob (towards 7)
mean lower temperatures.temperature in
the interior of the appliance may even
drop below 0˚C.
When the ambient temperature is normal,
we recommend the medium setting (4).
* The temperature in the refrigerator is
affected by how often the door is opened
and the amount of fresh food recently
stored.
* In the (off) position,the appliance does
not operate (the cooling system is
switched off).The power supply to the
interior light will not be affected and the
light will operate when the door is
opened.
Tips for energy saving
* Try not to open the door to often.
* Check that air is circulating properly
through the plinth grille.(e.g.the grille is
not blocked or covered).
Getting your Integrated Larder Fridge Ready
for Use
9
OFF
Plinth grille
Page 10

You can store most fresh foods in your Integrated Larder Fridge.Recommended maximum
storage times are given in the table below.
Days
Raw fresh meat joints,steaks,chops 3-5
offal (liver, k idney etc) minced meat, sausages 2
Cooked meat including made up dishes and left overs 2-3
Poultry fresh whole (store giblets separately) 2-3
cooked 2-3
giblets 2
Fish raw 1-2
cooked 2-3
Bacon 7-10
Milk,Cream, Salad;vegetables 3-4
Weeks
Butter,Margarine and cooking fats 3-4
Cheese hard 3-4
cream 1
Eggs 2
All foods should be wrapped or covered to prevent drying out and flavour transference.Plastic
bags,containers with lids,foil and plastic stretch wrap are ideal. Never put hot or warm food into
your Larder Fridge as this reduces efficiency.
Storing Food
10
Page 11

Do’s and Don’ts
DO
Do:- Take off any unsuitable leaves on
vegetables and wipe off any soil.
Do:- Leave lettuce,cabbage,parsley and
cauliflower on the stem.
Do:- Wrap cheese firstly in greaseproof
paper and then in a polythene bag
excluding as much air as possible.For
best results take out of the fridge an
hour before eating.
Do:- Wrap raw meat and poultry loosely in
polythene or aluminium foil.This
prevents drying.
Do:- Wrap fish and offal in polythene bags.
Do:- Wrap foods which have a strong odour
or can dry out in polythene
bags,aluminium foil or place in airtight
containers.
Do:- Wrap bread well to keep it fresh.
Do:- Chill white wines,beer,lager and
mineral water before serving.
Do:- Make sure that the gutter at the back
of the interior of the Larder fridge is
always clear. Check regularly and
remove any particles of food which
may collect there.
Do:- Keep raw meat and poultry below
cooked food and dairy products.
Do: Clean out the salad bins regularly and
check that nothing has dripped into
them.
Do:- Keep food for as shorter time as
possible and adhere to ‘sell by’dates.
DON’T
Don’t:-Store bananas in your Larder fridge.
Don’t:-Store melon in your Larder Fridge.It
can be chilled for short periods as long
as it is wrapped to avoid it flavouring
other products.
Don’t:-Wash eggs as this removes their
natural protective film.Wipe them
instead.
Don’t:-Use eggs straight from the Larder
Fridge,especially when making cakes
or mayonnaise.Allow them to reach
room temperature before use.
Don’t:-Leave the door open for long periods
as this will make the Larder Fridge
more costly to run.
Don’t:-Cover the shelves with any protective
materials which may obstruct air
circulation through them.
Don’t:-Let anything touch the cooling plate
at the back of the Larder Fridge.
Don’t:-Try to keep frozen food which has
thawed;it should be eaten within 24
hours.
Don’t:-Store poisonous or any dangerous
substances in the Larder Fridge.Your
Larder Fridge has been designed for
the storage of edible foodstuffs only.
Don’t:-Consume food which has been stored
for an excessive time in the Larder
Fridge.
Don’t:-Put hot or warm food straight into the
Larder Fridge.
Don’t:-Let food juices drip onto other foods
in the Larder Fridge.
11
Page 12

Caring for your Integrated Larder Fridge
Cleaning your Integrated Larder Fridge
It is a good idea to clean the inside of your
Larder Fridge regularly. Always switch off at
the socket outlet and pull out the mains
plug first.
Remove any food.Wipe out the inside of the
Larder Fridge using a clean cloth wrung out in
either a solution of one teaspoon of
bicarbonate of soda to one pint of water,or
Milton diluted according to the
manufacturer’s instructions.
The complete interior including the door,and
removable parts,should be washed with care
ensuring that the cloth does not become
caught on any part of the appliance.Never
use any household cleaner or detergent,
abrasive powders or wax polish. These not
only damage the surfaces,but also leave a
smell in the Larder Fridge.Make sure that no
particles of food are left in the interior gutter.
If the drain hole becomes blocked it may be
cleared by pushing the end of a pipe cleaner
or drinking straw through the drain hole and
gently moving it up and down.The rubber
door seal must be cleaned with soap and
water only as a detergent will damage it.
Automatic defrosting
The refrigerator requires no defrosting,since
the ice at the rear wall melts automatically
when the compressor is off and water slides
downwards through the hole in the rear wall.
This is collected in a receptacle placed at the
bottom of the appliance.
Going Away
If you expect to be away for any length of
time and don’t want to use your Larder Fridge,
switch off at the power point and pull out the
plug.Remove all food and wipe out the
interior.Always leave the door ajar to prevent
the accumulation of odours.
How to Replace the Interior Light
Should the light fail to work,switch off at the
power point and pull out the plug.Remove
the shelves to make access easier. Access to
the bulb is from the rear of the cover(arrow 1)
and remove the cover in the direction of
(arrow 2).
Unscrew the old bulb.Screw the new bulb
securely into the holder. R eplace the plug in
the power point and switch on.If the light
fails to work,do not worry,it will not affect the
working of your Larder Fridge.Obtain a
replacement (max 15 watt 220-240V
alternating current,E14 lampholder) from
your nearest Spares Centre and replace the
old bulb.
12
Page 13

Caring for your Integrated Larder Fridge
Cleaning the condenser
Make sure the appliance is disconnected
from the power supply.
Dust from the condenser should be
vacuumed as follows;
* Through the plinth grille,release the
fastener.
* Pull the grille towards you and remove it.
* Remove the bottom board of the kitchen
cabinet.
* Pull the condenser dish out.
* Use the vacuum cleaner to clean the dust
from the condenser.
* Replace the condenser dish and the grille
in the opposite order.
After cleaning,connect the appliance to the
power supply and reload it.
Periodical cleaning of the condenser.
Make sure the appliance is disconnected
from the power supply.
In order to optimize the operation of the
appliance and save energy,it is
recommended to periodically clean the
dust from the condenser at the back of the
appliance.
* Empty the contents of the appliance.
* Remove the supporting panel from the
bottom of the kitchen cabinet.
* Remove the screws fixing the appliance to
the kitchen worktop.
* Pull the appliance out and expose the
condenser at the back of the appliance.
* Unscrew the screws from the condenser
cover and remove the cover.
* Clean the dust and dir t from the
condenser.
After cleaning,refit the appliance back in
position,turn the power supply back on and
reload.
13
Page 14

If your Integrated Larder Fridge Won’t Work
.....Don’t Panic!!!
Just run through these quick checks before
calling your nearest Service Office.
1. Check that the plug is firmly in the wall
socket and that the power supply is on.
2. Check the power supply to the socket by
plugging in another appliance.
3. I f the other appliance works,check the
fuse in the Larder Fridge’s plug.
4. I f you have changed the plug,check the
wiring (see page 2).
5. M ake sure the appliance is switched on
(the thermostat knob is not in the OFF
position)
6. I f there is excessive noise or vibration,
ensure the Larder Fridge is raised fully to
touch the underside of the worktop.
Normal noises may be heard such as;
gurgling and the flow of liquid,this may
be louder when the appliance is first
switched on.
7. I f the interior light fails to work,refer to
page 12 for further instructions.
8. I f water appears on the inside floor or
under the salad bins,check that the gutter
drain hole has not become blocked,the
drain hole may be cleared by pushing the
end of a pipe cleaner or drinking straw
through the drain hole and gently moving
it up and down.(NB Water droplets on the
cooling plate or back wall are normal).
If,after following all these instructions,you are
still having problems,contact your nearest
Service Office (see back page).
14
Page 15

15
After Sales Ser vice
SERVICE U.K.
08709 066 066
Monday - Friday 8am - 8pm,
Saturday 8am - 6pm,
Sunday 10am - 6pm.
Republic of Ireland
1850 302 220
Monday - Friday 8am - 5.30pm,
Saturday 9.00am - 12.30pm.
Service Cover...
We appreciate you choosing this quality appliance and we are sure that it will give you many
years of excellent service.
Not only have you bought a first class appliance, you’ve also bought a commitment from
us to look after your appliance.
We believe our Care Service is the best in the business and yet another good reason you’ll
be glad you chose this appliance.
Every appliance has been designed and manufactured to the highest standards.However,
in the event of any problem developing,our trained professional engineers are just a
phone call away with one real objective - to satisfy you by providing an efficient, effec tive
and courteous service,at a time convenient to you.
Your Guarantee...
The guarantee is subject to the provision(s) that the appliance:
a) Has been used solely in accordance with the instruction book.
b) Has been properly connected to a suitable electricity supply voltage as stated on the
rating plate attached to the equipment.
c) Has not been subjected to misuse or accident or been modified or repaired by any
person other than an authorised employee or agent.
d) Has been correctly installed.
e) Has been used solely for domestic purposes and is on domestic premises.
Your guarantee is only applicable in the U.K.and the Republic of Ireland.
If you suspect a fault with your appliance,to avoid unnecessary inconvenience and expense
please ensure that the checks detailed in the ‘...Won’t Work’sections,pages 13,20 or 25
have been carried out before contacting the SERVICENETWORK.
Should you require service our receptionist will require the following information:
● Your post code,name and address,type of appliance,model number. (found on the
appliance rating plate or in the handbook).
Guarantee/Contract/Insurance Policy Details.
Date of Purchase,and where you purchased it from.
Easy Payment Methods...
You can pay for any of our services offered either by Credit Card (Visa,M asterCard),Cheque
and Debit Card.Or in installments by Direct Debit provided you include a Care Plus scheme.
Page 16

Guarantee
High quality after-sales service levels...
● IN GUARANTEE (Year 1)
All appliances carry a FREE fully inclusive 12 months parts and labour guarantee.
If service under your Year 1 Guarantee is required please have available evidence of your date
of purchase when the engineer calls.
● OUT OF GUARANTEE (Years 2-10)
Once an appliance is over 12 months old,and goes out of guarantee,we offer you a very
simple choice of service levels:
CARE LEVEL 1: No advance fee payable,no registration necessary.
Should a repair be needed in years 2-10,(i.e.over 12 months old) your Regional Service Centre will
advise you of the fixed labour charge we will make.Although this charge will vary according to
your location and the type of appliance you own,it is fixed regardless of the time taken or the
number of visits needed to complete the repair.
The cost of parts where required will be charged additional to the fixed labour charge, but again
this cost will have a maximum level of which you will be advised by your Regional Service Centre.
The repair itself is fully guaranteed for 12 months.
CARE LEVEL 2: Annual fee payable all inclusive cover provided.
You may prefer the peace of mind of an all-inclusive type of cover:this is provided by our Care
Plus Scheme which,for an annual fee covers the cost of any parts or labour.This applies on
appliances up to 10 years old.
For your convenience this fee can be paid in installments by Direct Debit.Payments can also be
made by Credit Card (Visa,MasterCard),Cheque and Debit Card.
CARE LEVEL 3: Kitchen Cover
For an extra fee,you can also purchase Kitchen Cover for all of our brand appliances you own,
provided they are under 10 years old.To join simply call 0800 716 356 and register.
EASY ACCESS REPAIR SERVICE
One number - 08709 066 066 connects you automatically to your U.K.Regional Service Centre to
arrange for your local engineers to call.
Office opens 7 days a week,364 days a year,
Monday - Friday 8am - 8pm,Saturday 8am - 6pm,Sunday 10am - 6pm.
For the Republic of Ireland call 1850 302 220,
Monday - Friday 8am - 5.30pm,Saturday 9.00am - 12.30pm.
This is the largest appliance manufacturer service team in Europe. Trained specialists covering all
our appliances (and directly employed by us).
If contacted before 10am,we try to offer a service call the same day where required or the next
working day.(Monday to Friday). On request, your service call can be the first or last of the day
with am or pm timings always available.We can also cater to meet your specific needs ie.avoiding
school hours whenever we can.
A chargeable service is offered on the basis of payment on completion to our service engineer,
who will issue a receipt.
Our Service Engineers drive recognisable vans,wear uniforms and carry identity cards.
Our Service Engineers will only fit genuine parts.
ANSWERCENTRE
Information and advice regarding specific appliance features and pricing on any of our
appliances,before or after purchase.
From anywhere in the U.K.,telephone 08701 50 60 70 from 8.45am - 5.30pm, Monday - Friday.
PARTS NATIONAL MAIL ORDER HOTLINE
The Parts Mail Order Hotline enables you to order parts directly from the manufacturer over the
phone. A wide range of parts and accessories are available for your appliance.
Telephone: 08709 077 077 Fax: 0541 532 532
Republic of Ireland Parts Telephone:01 842 6836
Monday - Friday 8.30am - 5.30pm, S aturday 8.30am - 12 noon.
Ring quoting your appliance model number and we will help you get the right parts.National
Warehouse comprehensively stocked over 33,000 parts lines. Parts stocked for all models. Parts
carried for all appliances up to 10 years old,(15 on Heating appliances).Optional 24 hour express
courier service.(Additional charge).
CAREFORTHE DISABLED
We offer a range of accessories which enable our blind arthritic or disabled customers to use most
of our appliances.Simply call 08709 077 077 and provide the model number details.
16
Page 17

Page 18

Page 19

Page 20

General Domestic Appliances Limited,Morley Way,Peterborough,PE2 9JB
Part No.FP069 - 01
Key Contacts
Service
UK:08709 066 066
Republic of Ireland:1850 302 220
You will be asked for the following information:-
Name,address and postcode.
Telephone number
Model / Serial number of the appliance
Clear and concise details of the query or fault
Place and Date of purchase
(Please keep the receipt as evidence will be required when the engineer calls).
Extended Warranty
To join:UK 08709 088 088
Republic of Ireland:1850 302 220
Genuine Parts & Accessories
Mail Order Hotline
UK:08709 077 077
Republic of Ireland:(01) 842 6836
For further product information
08701 50 60 70
All Services are offered as an extra benefit and do not affect your statutory rights.
 Loading...