

Page 1
Istruzioni per luso
CONGELATORE
Italiano, 1
English, 9
DE
Deutsch, 25
Nederlands
P
Portuges, 49
Ðóсский, 57
BFS 121 I/HA
GBI
NL
RU
, 33
F
Français, 17
E
Espanol, 41
Sommario
I
Installazione, 2
Posizionamento e collegamento
Descrizione dellapparecchio, 3
Vista dinsieme
Avvio e utilizzo, 4
Avviare lapparecchio
Utilizzare al meglio il congelatore
Manutenzione e cura, 5
Escludere la corrente elettrica
Pulire lapparecchio
Evitare muffe e cattivi odori
Sbrinare lapparecchio
Precauzioni e consigli, 6
Sicurezza generale
Smaltimento
Risparmiare e rispettare lambiente
Anomalie e rimedi, 7
Assistenza, 8
Assistenza Attiva 7 giorni su 7
Page 2

Installazione
! È importante conservare questo libretto per poterlo
I
consultare in ogni momento. In caso di vendita,
di cessione o di trasloco, assicurarsi che resti insieme
allapparecchio per informare il nuovo proprietario
sul funzionamento e sui relativi avvertimenti.
! Leggere attentamente le istruzioni: ci sono importanti
informazioni sullinstallazione, sulluso e sulla sicurezza.
Posizionamento e collegamento
Posizionamento
1. Posizionare lapparecchio in un ambiente ben aerato e
non umido.
2. Non ostruire le griglie posteriori di ventilazione:
compressore e condensatore emettono calore e
richiedono una buona aerazione per funzionare bene
e contenere i consumi elettrici.
3. Lasciare lapparecchio lontano da fonti di calore (la
luce solare diretta, una cucina elettrica).
Collegamento elettrico
Dopo il trasporto, posizionare lapparecchio
verticalmente e attendere almeno 3 ore prima di
collegarlo allimpianto elettrico. Prima di inserire la spina
nella presa della corrente, accertarsi che:
la presa abbia la messa a terra e sia a norma di legge;
la presa sia in grado di sopportare il carico massimo
di potenza della macchina, indicato nella targhetta
caratteristiche posta nel vano frigorifero in basso
a sinistra (es 150 W);
la tensione di alimentazione sia compresa nei valori
indicati nella targhetta caratteristiche, posta in basso
a sinistra (es 220-240 V);
la presa sia compatibile con la spina dellapparecchio.
In caso contrario richiedere la sostituzione della spina
a un tecnico autorizzato (vedi Assistenza); non usare
prolunghe e multiple.
! Ad apparecchio installato, il cavo elettrico e la presa
della corrente devono essere facilmente raggiungibili.
! Il cavo non deve subire piegature o compressioni.
! Il cavo deve essere controllato periodicamente
e sostituito solo da tecnici autorizzati (vedi Assistenza).
! Lazienda declina ogni responsabilità qualora
queste norme non vengano rispettate.
2
Page 3
Descrizione
dellapparecchio
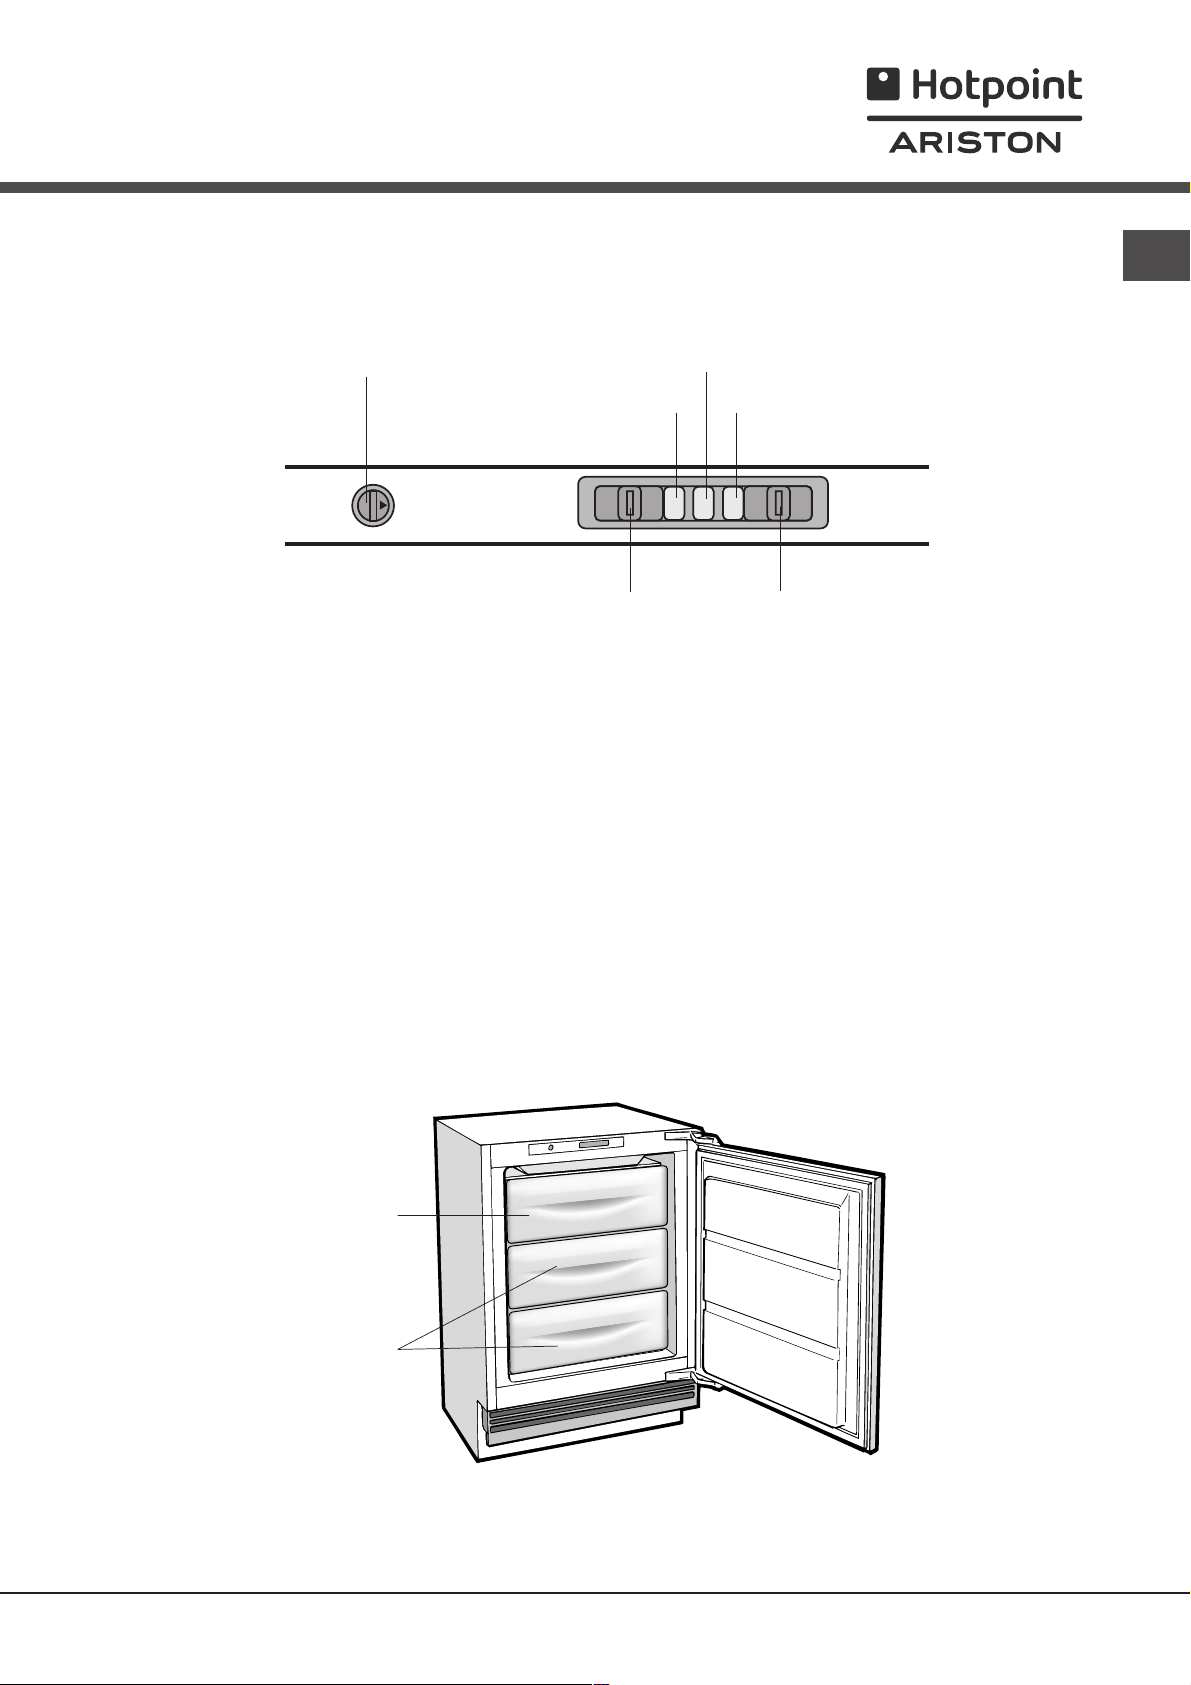
Vista dinsieme
Le istruzioni sulluso valgono per diversi modelli per cui è possibile che la figura presenti particolari differenti rispetto a
quelli dellapparecchio acquistato.
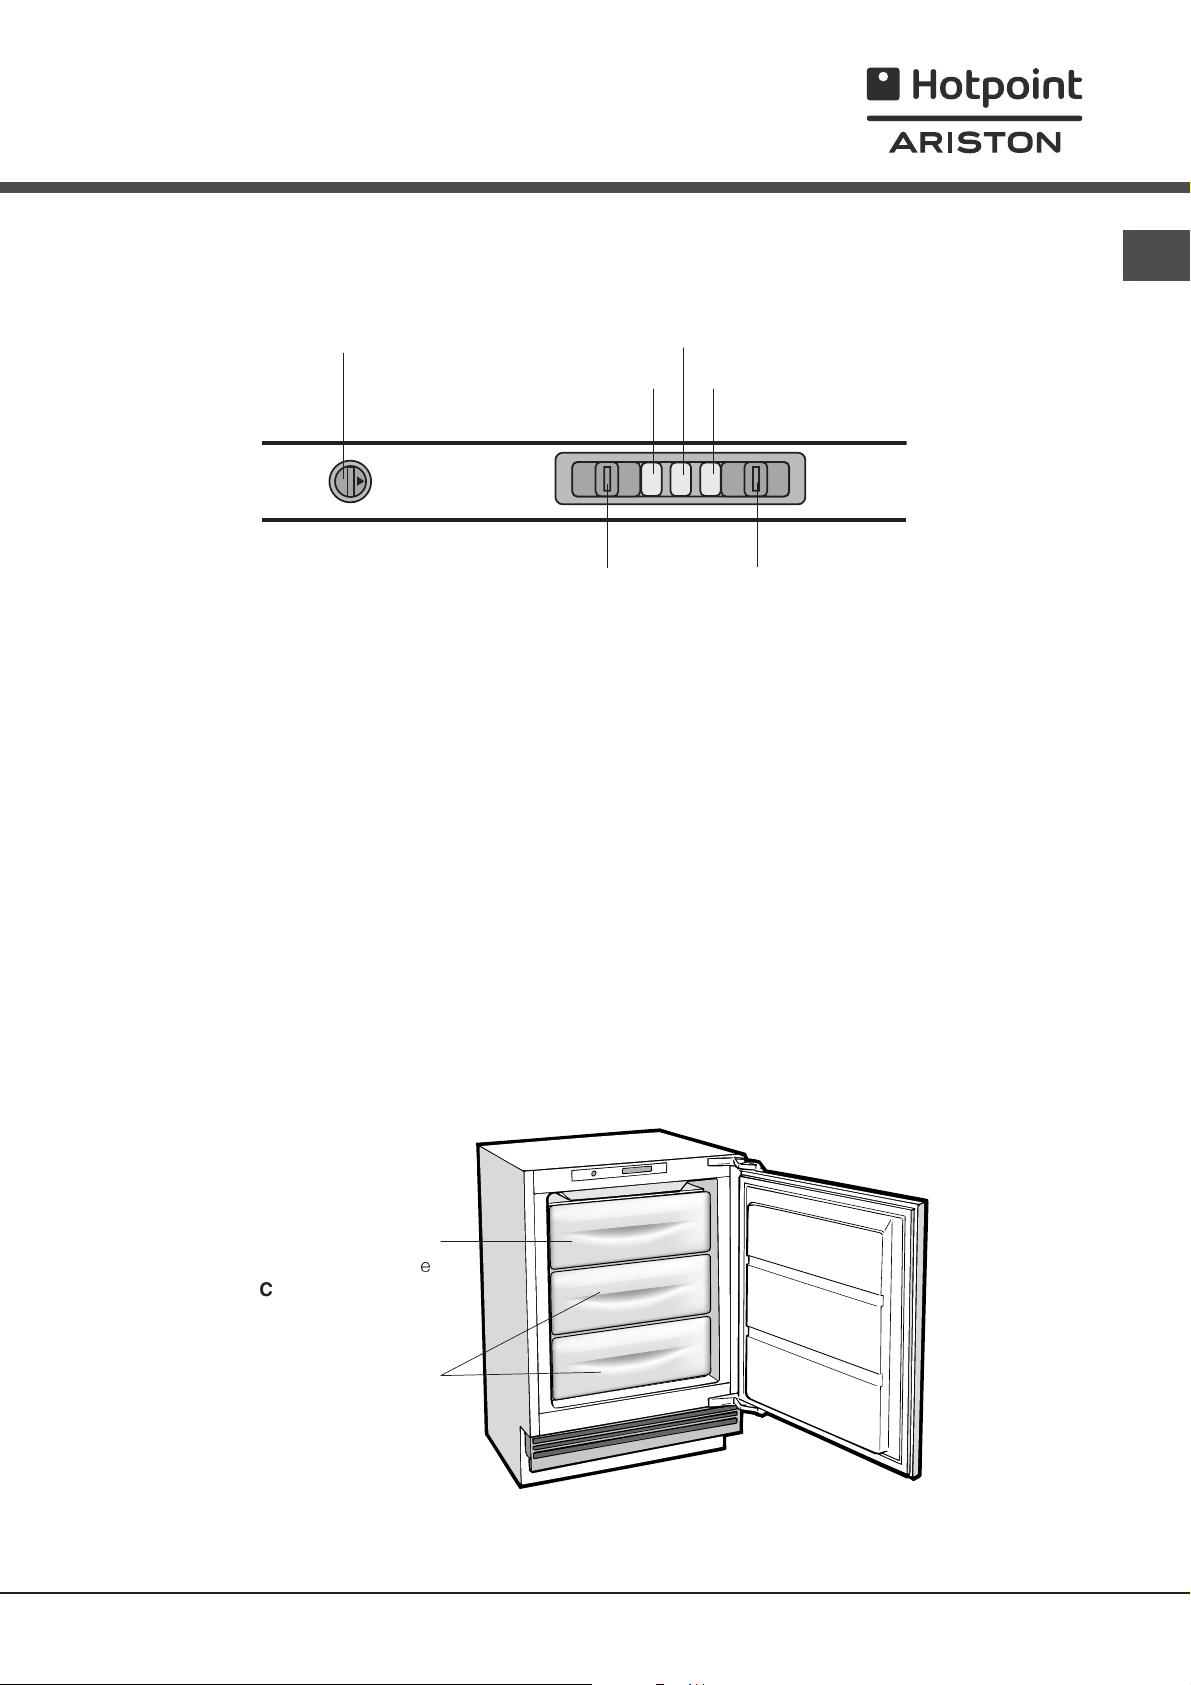
Manopola
REGOLAZIONE DELLA
TEMPERATURA
2
1
Spia GIALLA
3
5
4
INTERRUTTORE-1
Manopola REGOLAZIONE DELLA TEMPERATURA
Regola automaticamente la temperatura all'interno
del'apparecchio.
Ruotando la manopola dalla posizione 1 alla posizione 5
è possibile ottenere temperature sempre più fredde.
Spia GIALLA
Quando è accesa (spostare l'interruttore-1 verso sinistra)
permette il funzionamento continuo del compressore per
raggiungere le basse temperature necessarie al
congelamento rapido delle derrate fresche.
Spostando l'interruttore-1 verso destra (lampada gialla
coperta) il congelamento funziona secondo la
regolazione del termostato.
SN
Spia ROSSA
Si accende quando la temperatura all'interno
dell'apparecchio è insufficiente per conservare delle
derrate.
Spia VERDE
Quando è accesa (spostare l'interruttore-2 verso destra)
indica che l'apparecchio è collegato alla rete di
alimentazione. Spostando l'interruttore-2 verso sinistra
(lampada verde coperta) l'apparecchio è disinserito dalla
presa di corrente.
Spia ROSSA
Spia VERDE
I0
INTERRUTTORE-2
I
Vano
CONGELAMENTO
CONSERVAZIONE
Vano
CONSERVAZIONE
e
3
Page 4

Avvio e utilizzo
Avviare lapparecchio
I
! Prima di avviare lapparecchio, seguire
le istruzioni sullinstallazione (vedi Installazione).
! Prima di collegare lapparecchio pulire bene i vani
e gli accessori con acqua tiepida e bicarbonato.
1. Inserire la spina nella presa e accertarsi che si
accenda la spia VERDE e ROSSA (spostare
l'interruttore-2 verso destra).
2. Accendere la spia GIALLA (spostare l'interruttore-1
verso sinistra).
3. Quando la spia rossa si sarà spenta provvedere allo
spegnimento della spia GIALLA (spostare
l'interruttore-1 verso destra). A questo punto il
congelatore può essere utilizzato.
Utilizzare al meglio il congelatore
Per regolare la temperatura utilizzare la manopola
REGOLAZIONE DELLA TEMPERATURA.
1 = meno freddo 5 = più freddo
Si consiglia, comunque, una posizione media.
Non ricongelare alimenti che stanno per scongelare o
scongelati; tali alimenti devono essere cotti per essere
consumati (entro 24 ore).
Gli alimenti freschi da congelare non devono essere
posti a contatto con quelli già congelati; vanno
sistemati nel vano CONGELAMENTO e
CONSERVAZIONE.
Non mettere nel congelatore bottiglie di vetro
contenenti liquidi, tappate o chiuse ermeticamente,
perché potrebbero rompersi.
La quantità massima giornaliera di alimenti da
congelare è indicata sulla targhetta caratteristiche,
posta allinterno del congelatore (esempio: Kg/24h 4).
Effettuare loperazione di congelamento accendendo
la spia GIALLA e dopo questa operazione introdurre i
cibi da congelare nel vano superiore avendo cura che
gli stessi siano disposti, il più possibile, a contatto
diretto con i piani raffreddanti e che non siano messi a
contatto con eventuali derrate già congelate nello
stesso vano.
Dopo 24 ore, terminato il congelamento, provvedere
allo spegnimento della lampada gialla.
! Questa operazione non va dimenticata se si vogliono
evitare imutili sprechi di energia elettrica.
Lintroduzione di notevoli quantitativi di cibi da
congelare può riscaldare momentaneamente la
temperatura allinterno del congelatore (accensione
della spia ROSSA). Tale situazione, essendo
transitoria, non pregiudica la buona conservazione
degli alimenti già stivati.
Per ottenere una buona conservazione di alimenti
surgelati o di cibi congelati non posizionare mai
lindice della manopola del termostato al di sotto di 1,
qualunque sia la temperatura ambiente. Per
temperature ambiente fino a 25°-27°C lindice della
manopola va posizionato tra 1 e 2 mentre per
temperature ambiente fino a 32°C tra 2 e 3.
! Durante il congelamento evitare di aprire la porta.
! In caso di interruzione di corrente o di guasto, non
aprire la porta del congelatore: in questo modo congelati
e surgelati si conserveranno senza alterazioni per circa
9-14 ore.
! Spia ROSSA. Quando questa spia si accende per un
tempo prolungato, significa che il funzionamento del
congelatore non è regolare e che la temperatura si sta
alzando troppo. (Chiamare il Centro di Assistenza
Tecnica.)
Tale spia può accendersi per un breve periodo:
a) quando si apre la porta per un tempo prolungato (in
fase di caricamento o prelievo di derrate).
b) quando si accende la spia GIALLA.
In questi due casi l'accensione della spia non indica
nessun difetto/anomalia nel congelatore
4
Page 5

Manutenzione e cura
Escludere la corrente elettrica
Durante i lavori di pulizia e manutenzione è necessario
isolare lapparecchio dalla rete di alimentazione:
1. provvedere allo spegnimento della spia VERDE
(spostare l'interruttore-2 verso sinistra);
2. staccare la spina dalla presa.
Pulire lapparecchio
Le parti esterne, le parti interne e le guarnizioni in
gomma possono essere pulite con una spugnetta
imbevuta di acqua tiepida e bicarbonato di sodio o
sapone neutro. Non usare solventi, abrasivi,
candeggina o ammoniaca.
Gli accessori estraibili possono essere messi a bagno
in acqua calda e sapone o detersivo per piatti.
Sciacquarli e asciugarli con cura.
Evitare muffe e cattivi odori
Lapparecchio è fabbricato con materiali igienici
che non trasmettono odori. Per mantenere questa
caratteristica è necessario che i cibi vengano sempre
protetti e chiusi bene. Ciò eviterà anche
la formazione di macchie.
Nel caso si voglia spegnere lapparecchio per un
lungo periodo, pulire linterno e lasciare le porte
aperte.
Sbrinare lapparecchio
I
! Attenersi alle istruzioni sottostanti.
Per sbrinare lapparecchio non usare oggetti taglienti ed
appuntiti che potrebbero danneggiare irreparabilmente il
circuito refrigerante.
Se lo strato di brina è superiore ai 5 mm è necessario
effettuare lo sbrinamento manuale:
1. Il giorno precedente, accendere la spia GIALLA
(spostare l'interruttore-1 verso sinistra) per raffreddare
ulteriormente gli alimenti.
2. Escludere la corrente elettrica.
3. Avvolgere surgelati e congelati in carta da giornale e
metterli in un altro congelatore o in un luogo fresco.
4. Lasciare aperta la porta finché la brina non si sia
sciolta completamente; facilitare loperazione
sistemando nel congelatore contenitori con acqua
tiepida.
5. Pulire e asciugare con cura il vano congelatore prima
di riaccendere lapparecchio.
6. Prima di inserire i cibi nel vano congelatore attendere
circa 2 ore per il ripristino delle condizioni ideali di
conservazione.
5
Page 6

Precauzioni e consigli
! Lapparecchio è stato progettato e costruito
I
in conformità alle norme internazionali di sicurezza.
Queste avvertenze sono fornite per ragioni
di sicurezza e devono essere lette attentamente.
Questa apparecchiatura è conforme
alle seguenti Direttive Comunitarie:
- 73/23/CEE del 19/02/73 (Bassa Tensione)
e successive modificazioni;
- 89/336/CEE del 03/05/89 (Compatibilità
Elettromagnetica) e successive modificazioni;
- 2002/96/CE..
Sicurezza generale
Lapparecchio è stato concepito per un uso di tipo
non professionale allinterno dellabitazione.
Lapparecchio deve essere usato per conservare e
congelare cibi, solo da persone adulte e secondo le
istruzioni riportate in questo libretto.
Lapparecchio non va installato allaperto, nemmeno
se lo spazio è riparato, perché è molto pericoloso
lasciarlo esposto a pioggia e temporali.
Non toccare lapparecchio a piedi nudi o con le mani
o i piedi bagnati o umidi.
ATTENZIONE: non danneggiare il circuito refrigerante
Non toccare le parti interne raffreddanti: cè pericolo
di ustionarsi o ferirsi.
Non staccare la spina dalla presa della corrente
tirando il cavo, bensì afferrando la spina.
È necessario staccare la spina dalla presa prima di
effettuare operazioni di pulizia e manutenzione. Non è
sufficiente spegnere la spia VERDE (apparecchio
spento) per eliminare ogni contatto elettrico.
In caso di guasto, in nessun caso accedere ai
meccanismi interni per tentare una riparazione.
Non utilizzare, allinterno degli scomparti conservatori
di cibi congelati, utensili taglienti ed appuntiti o
apparecchi elettrici se non sono del tipo
raccomandato dal costruttore.
Non mettere in bocca cubetti appena estratti dal
congelatore.
Smaltimento
Smaltimento del materiale di imballaggio: attenersi alle
norme locali, così gli imballaggi potranno essere
riutilizzati.
La direttiva Europea 2002/96/CE sui rifiuti di
apparecchiature elettriche ed elettroniche (RAEE),
prevede che gli elettrodomestici non debbano essere
smaltiti nel normale flusso dei rifiuti solidi urbani. Gli
apparecchi dismessi devono essere raccolti
separatamente per ottimizzare il tasso di recupero e
riciclaggio dei materiali che li compongono ed
impedire potenziali danni per la salute e lambiente. Il
simbolo del cestino barrato è riportato su tutti i
prodotti per ricordare gli obblighi di raccolta separata.
Per ulteriori informazioni, sulla corretta dismissione
degli elettrodomestici, i detentori potranno rivolgersi al
servizio pubblico preposto o ai rivenditori.
Risparmiare e rispettare lambiente
Installare lapparecchio in un ambiente fresco e ben
aerato, proteggerlo dallesposizione diretta ai raggi
solari, non disporlo vicino a fonti di calore.
Per introdurre o estrarre gli alimenti, aprire le porte
dellapparecchio il più brevemente possibile.
Ogni apertura delle porte causa un notevole dispendio
di energia.
Non riempire con troppi alimenti lapparecchio: per
una buona conservazione, il freddo deve poter
circolare liberamente. Se si impedisce la circolazione, il
compressore lavorerà continuamente.
Non introdurre alimenti caldi: alzerebbero la
temperatura interna costringendo il compressore a un
grosso lavoro, con grande spreco di energia elettrica.
Sbrinare lapparecchio qualora si formasse del
ghiaccio (vedi Manutenzione); uno spesso strato di
ghiaccio rende più difficile la cessione di freddo agli
alimenti e fa aumentare il consumo di energia.
Mantenere efficienti e pulite le guarnizioni in modo che
aderiscano bene alle porte e non lascino uscire il
freddo (vedi Manutenzione)
Non permettere ai bambini di giocare con
lapparecchio. In nessun caso devono sedersi sui
cassetti o appendersi alla porta.
Gli imballaggi non sono giocattoli per bambini.
6
Page 7

Anomalie e rimedi
Può accadere che lapparecchio non funzioni. Prima di telefonare allAssistenza (vedi Assistenza), controllare
che non si tratti di un problema facilmente risolvibile aiutandosi con il seguente elenco.
Anomalie:
La spia VERDE non si accende.
La spia ROSSA sempre accesa.
Il motore funziona di continuo.
Lapparecchio emette
molto rumore.
Possibili cause / Soluzione:
La spina non è inserita nella presa della corrente o non abbastanza da
fare contatto, oppure in casa non cè corrente.
La porta non è ben chiusa o viene aperta di continuo.
La manopola REGOLAZIONE DELLA TEMPERATURA non è in posizione
corretta.
la spia GIALLA è accesa (vedi Descrizione.).
La porta non è ben chiusa o viene aperta di continuo.
La temperatura dellambiente esterno è molto alta.
Lo spessore della brina supera i 2-3 mm (vedi Manutenzione).
Lapparecchio non è stato installato ben in piano (vedi Installazione).
Lapparecchio è stato installato tra mobili o oggetti che vibrano
ed emettono rumori.
Il gas refrigerante interno produce un leggero rumore anche quando
il compressore è fermo: non è un difetto, è normale.
I
7
Page 8
Assistenza
Prima di contattare lAssistenza:
I
Verificare se lanomalia può essere risolta autonomamente (vedi Anomalie e Rimedi).
In caso negativo, contattare il Numero Unico Nazionale 199.199.199.
195065639.01
12/2007 - Xerox Business Services
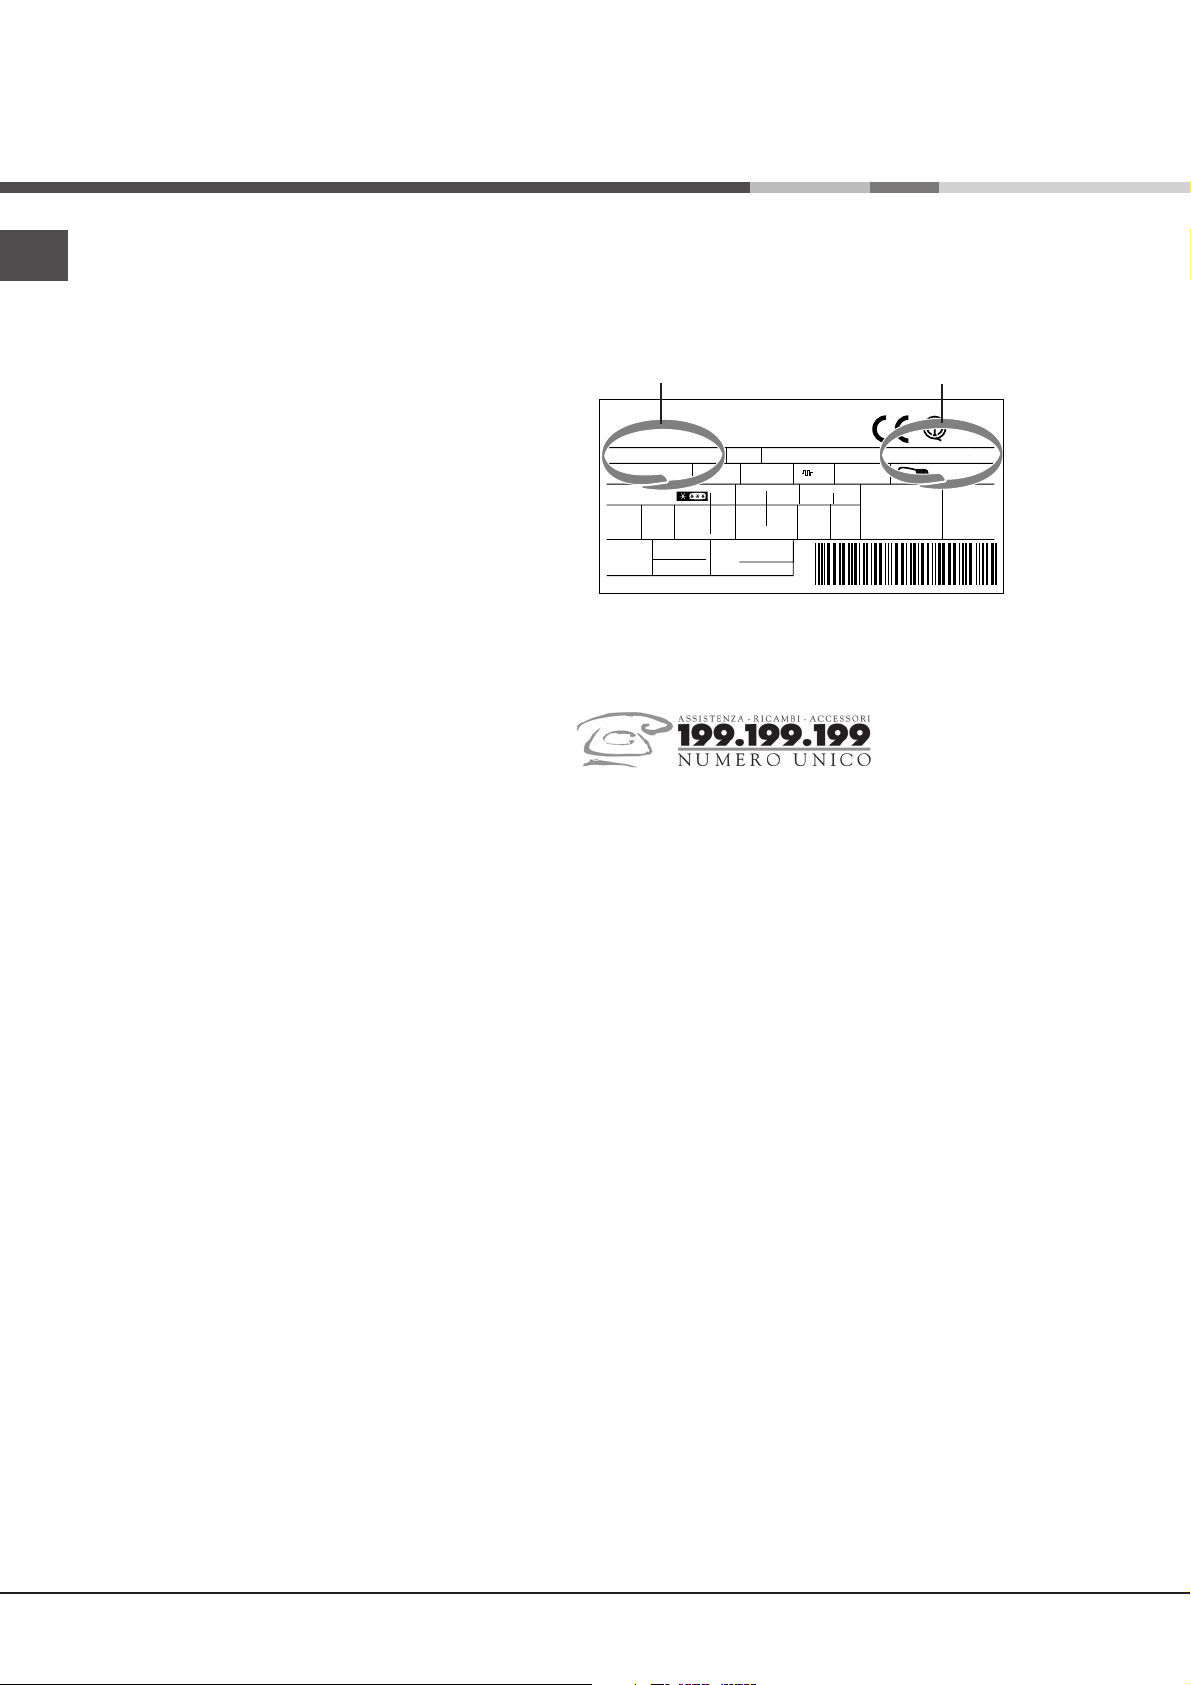
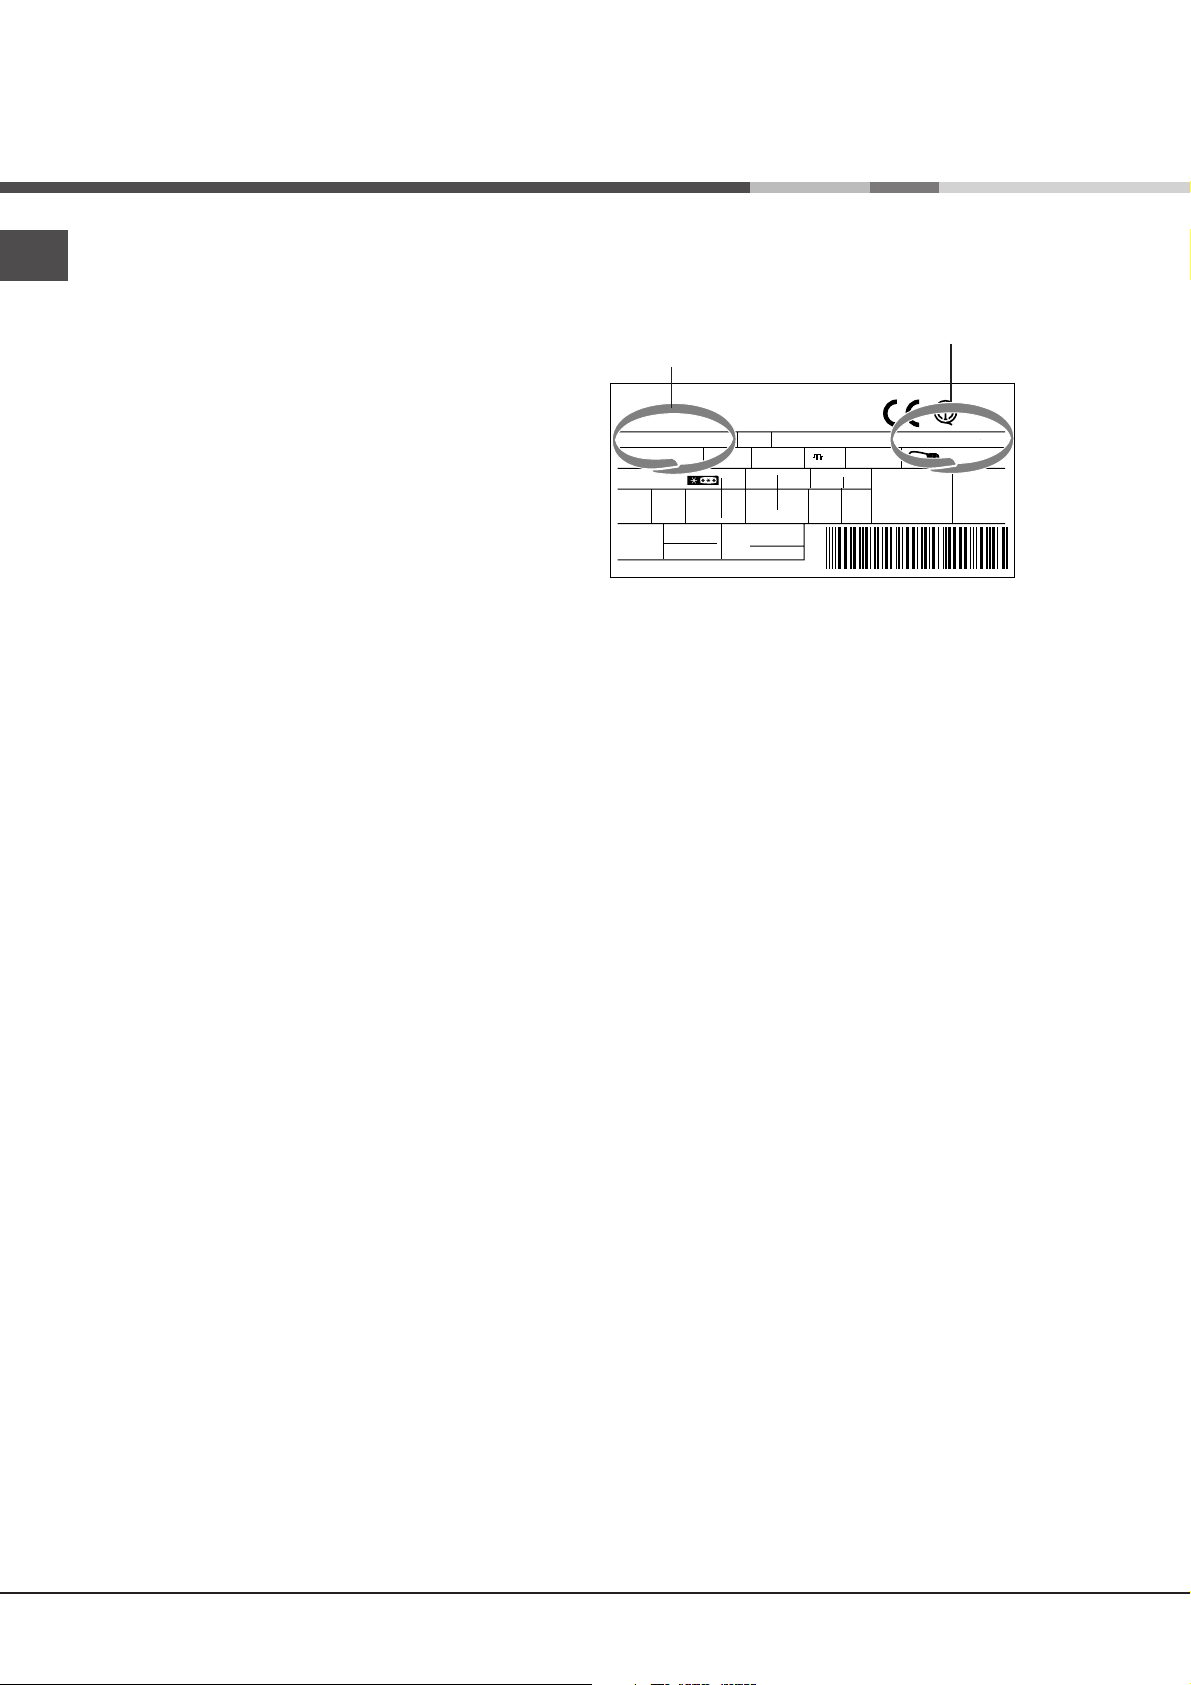
modello
numero di serie
Comunicare:
il tipo di anomalia
il modello della macchina (Model.)
il numero di serie (S/N)
Queste informazioni si trovano sulla targhetta
caratteristiche posta allinterno dellapparecchio.
Gross
Bruto
Brut
TI
75
Test
P.S-I.
RG 2330
Mod.
220 - 240 V- 50 Hz 150 W
340
Total
Gross
Bruto
Brut
Compr.
R 134 a
Syst.
kg 0,090
Kompr.
Made in Italy 13918
93139180000 S/N 704211801
Net
Util
Utile
Pressure
HIGH-235
LOW 140
Cod.
Gross
Bruto
Brut
Fuse
W
A
Freez. Capac
Poder de Cong
4,0
kg/24 h
Max 15 w
Class
Clase
Classe
N
Assistenza Attiva 7 giorni su 7
Se nasce il bisogno di assistenza o manutenzione basta chiamare il Numero Unico Nazionale 199.199.199* per essere
messi subito in contatto con il Centro Assistenza Tecnica più vicino al luogo da cui si chiama. È attivo 7 giorni su 7,
sabato e domenica compresi, e non lascia mai inascoltata una richiesta.
* Al costo di 14,25 centesimi di Euro al minuto (iva inclusa) dal Lun. al Ven. dalle 08:00 alle 18:30, il Sab. dalle 08:00 alle
13:00 e di 5,58 centesimi di Euro al minuto (iva inclusa) dal Lun. al Ven. dalle 18:30 alle 08:00, il Sab. dalle 13:00 alle
08:00 e i giorni festivi, per chi chiama dal telefono fisso. Per chi chiama da radiomobile le tariffe sono legate al piano
tariffario delloperatore telefonico utilizzato. Le suddette tariffe potrebbero essere soggette a variazione da parte
delloperatore telefonico; per maggiori informazioni consultare il sito www.aristonchannel.com.
8
Page 9
Operating Instructions
FREEZER
Italiano, 1
English, 9
DE
Deutsch, 25
Nederlands
P
Portuges, 49
Ðóсский, 57
BFS 121 I/HA
GBI
NL
RU
, 33
F
Français, 17
E
Espanol, 41
Contents
GB
Installation, 10
Positioning and connection
Description of the appliance, 11
Overall view
Start-up and use, 12
Starting the appliance
Using the freezer to its full potential
Maintenance and care, 13
Switching the appliance off
Cleaning the appliance
Avoiding mould and unpleasant odours
Defrosting the appliance
Precautions and tips, 14
General safety
Disposal
Respecting and conserving the environment
Troubleshooting, 15
Assistance, 16
Page 10

Installation
GB
! Before placing your new appliance into operation
please read these operating instructions carefully. They
contain important information for safe use, for installation
and for care of the appliance.
! Please keep these operating instructions for future
reference. Pass them on to possible new owners of the
appliance.
Positioning and connection
Positioning
1. Place the appliance in a well-ventilated humidity-free
room.
2. Do not obstruct the rear fan grills. The compressor and
condenser give off heat and require good ventilation to
operate correctly and save energy.
3. Ensure the appliance is away from any sources of heat
(direct sunlight, electric stove, etc.).
Electrical connections
After the appliance has been transported, carefully place
it vertically and wait at least 3 hours before connecting it
to the electricity mains. Before inserting the plug into the
electrical socket ensure the following:
The appliance is earthed and the plug is compliant
with the law.
The socket can withstand the maximum power of the
appliance, which is indicated on the data plate
located inside the freezer (e.g. 150 W).
The voltage is in the range of values indicated on the
data plate located inside the freezer (e.g. 220-240V).
The socket is compatible with the plug of the appliance. If
the socket is incompatible with the plug, ask an
authorised technician to replace it (see Assistance). Do not
use extension cords or multiple sockets.
! Once the appliance has been installed, the power
supply cable and the electrical socket must be easily
accessible.
! The cable must not be bent or compressed.
! The cable must be checked regularly and replaced by
authorised technicians only (see Assistance).
! The manufacturer declines any liability should
these safety measures not be observed.
10
Page 11
Description of the
appliance
Overall view
The instructions contained in this manual are applicable to different model refrigerators. The diagrams may not directly
represent the appliance purchased.
TEMPERATURE
CONTROL Knob
YELLOW indicator Light
2
1
3
5
4
TEMPERATURE CONTROL Knob
This regulates the temperature inside the appliance
automatically. Turn the knob from setting 1 to 5 for
increasingly colder temperatures.
To adjust the thermostat, use a coin to turn the knob.
YELLOW Light
When this light is on (move the switch-1 to the left), the
compressor will operate continuously to reach the lower
temperatures necessary for freezing fresh foods quickly.
By moving the switch-1 to the right (yellow light covered)
the freezer is operated by the thermostat.
SN
SWITCH-1
RED Light
This light goes on when the temperature inside the
appliance is not sufficient to preserve foodstuffs.
GREEN Light
When the light is on (move the switch-2 to the right) this
indicates that the appliance is connected to the mains.
When the switch-2 is moved to the left (green light
covered), the appliance is disconnected from the mains.
RED indicator Light
GREEN indicator Light
I0
SWITCH-2
GB
FREEZER and
STORAGE
compartment
STORAGE
compartment
11
Page 12
Start-up and use
GB
Starting the appliance
! Before starting the appliance, follow the
installation instructions (see Installation).
! Before connecting the appliance, clean the
compartments and accessories well with lukewarm
water and bicarbonate.
1. Insert the plug into the socket and ensure that the
GREEN and RED indicator light is on (move the
switch-2 to the right).
2. Turn on the YELLOW indicator light (move the switch-
1 to the left).
3. When the RED indicator light is off, turn off the
YELLOW indicator light (move the switch-1 to the
right). The freezer is now ready to be used.
Using the freezer to its full potential
Use the TEMPERATURE CONTROL knob to adjust the
temperature.
1 = warmest 5 = coldest
We recommend, however, a medium position.
Do not re-freeze food that is defrosting or that has
already been defrosted. These foods must be cooked
and eaten (within 24 hours).
Fresh food that needs to be frozen must not come into
contact with food that has already been defrosted.
Fresh food must be stored in the top FREEZER and
STORAGE compartment.
Do not place glass bottles which contain liquids, and
which are corked or hermetically sealed in the freezer
because they could break.
The maximum quantity of food that may be frozen daily is
indicated on the plate containing the technical properties
located within the freezer (for example: Kg/24h: 4).
In order to freeze fresh foods, the switch must be
turned to the left (the YELLOW idicator light will come
on). Then introduce the food to be frozen into the top
compartment, placing them - to the furthest extent
possible - in direct contact with the cooling plate and
away from any frozen food being stored.
After 24 hours have passed and the food has been
frozen, turn the freezer switch back to the normal
setting (the YELLOW light will turn off).
! Remember to carry out this last step in order.
Placing large amounts of fresh food in the freezer may
temporarily increase the temperature inside the
appliance (this is indicated when the RED indicator
light illuminates). This situation, as it is only temporary,
does not adversely affect the storage conditions of
food that is already frozen.
To preserve frozen and deep-frozen foods well, never
set the thermostat below 1, no matter what the room
temperature is.
For room temperatures from 25°C to 27°C the knob
should be set between 1 and 2 while for room
temperatures of up to 32°C, set between 2 and 3.
! Do not open the door during freezing.
! If there is a power cut or malfunction, do not open the
freezer door. This will help maintain the temperature
inside the freezer, ensuring that foods are conserved for
at least 9 -14 hours.
! RED Indicator Light. When this red light comes on for a
prolonged period of time, it means that the freezer is not
functioning properly and the temperature is rising too
much. (Call your Service Centre)
This warning light might come on for a brief period
when:
a) the door is left open for an extended period of time
(when the freezer is being loaded or unloaded).
b) turn on the YELLOW indicator light.
In these two cases, the fact that the warning light comes
on does not indicate that the freezer is malfunctioning or
there is a defect.
12
Page 13
Maintenance and care
Switching the appliance off
During cleaning and maintenance it is necessary to
disconnect the appliance from the electricity supply:
1. turn off the GREEN indicator light (move the switch-2
to the left);
2. pull the plug out of the socket.
Cleaning the appliance
The external and internal parts, as well as the rubber
seals may be cleaned using a sponge that has been
soaked in lukewarm water and bicarbonate of soda or
neutral soap. Do not use solvents, abrasive products,
bleach or ammonia.
The removable accessories may be soaked in warm
water and soap or dishwashing liquid. Rinse and dry
them carefully.
Avoiding mould and unpleasant odours
The appliance is manufactured with hygienic materials
which are odour free. In order to maintain an odour
free refrigerator and to prevent the formation of stains,
food must always be covered or sealed properly.
If you want to switch the appliance off for an extended
period of time, clean the inside and leave the doors
open.
Defrosting the appliance
! Follow the instructions below.
Do not use objects with sharp or pointed edges to
defrost the appliance as these may damage the
refrigeration circuit beyond repair.
If the frost layer is greater than 5 mm, it is necessary to
defrost manually:
1.
The day before defrosting, turn on the YELLOW
indicator light (move the switch-1 to the left) to further
cool the food.
2. Switching the appliance off.
3. Wrap frozen foods in newspaper and place them in
another freezer or in a cool place.
4. Leave the door open until the frost has melted
completely. This can be made easier by placing
containers with lukewarm water in the freezer
compartment..
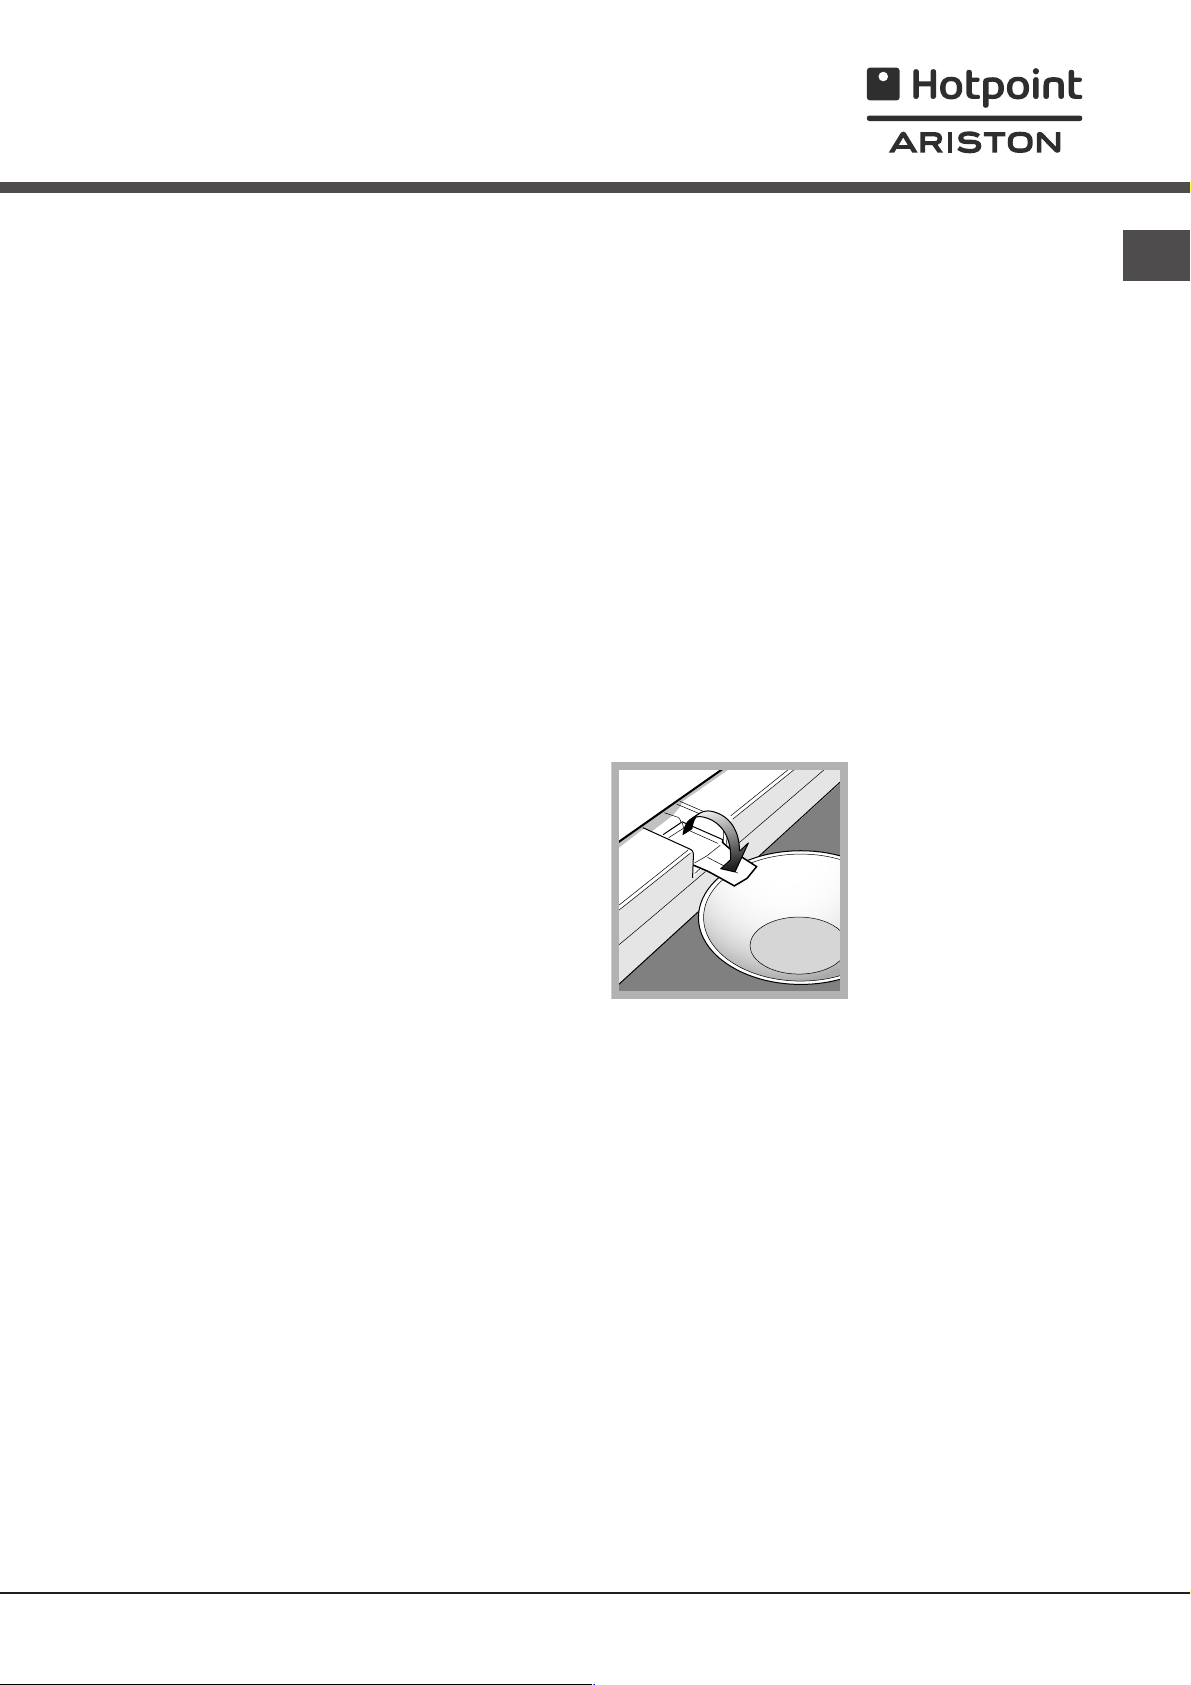
5. Certain appliances are
fitted with the DEFROST
WATER DRAIN system.
Let the water flow into a
container (see diagram).
GB
6. Clean and dry the freezer compartment carefully before
switching the appliance on again.
7. Wait for approximately 2 hours, i.e. until the ideal
storage conditions have been restored, before placing
food in the freezer compartment.
13
Page 14

Precautions and tips
GB
! The appliance was designed and manufactured in
compliance with international safety standards. The
following warnings are provided for safety reasons and
must be read carefully.
This appliance complies with the following
Community Directives:
- 73/23/EEC of 19/02/73 (Low Voltage) and
subsequent amendments;
-89/336/EEC of 03.05.89 (Electromagnetic
Compatibility) and subsequent amendments;
- 2002/96/CE..
General safety
The appliance was designed for domestic use inside the
home and is not intended for commercial or industrial use.
The appliance must be used to store and freeze food
products by adults only and according to the instructions
in this manual.
The appliance must not be installed outdoors, even in
covered areas. It is extremely dangerous to leave the
appliance exposed to rain and storms.
Do not touch the appliance with bare feet or with wet or
moist hands and feet.
Disposal
Observe local environmental standards when
disposing packaging material for recycling purposes.
The European Directive 2002/96/EC on Waste
Electrical and Electronic Equipment (WEEE), requires
that old household electrical appliances must not be
disposed of in the normal unsorted municipal waste
stream. Old appliances must be collected separately
in order to optimise the recovery and recycling of the
materials they contain and reduce the impact on
human health and the environment. The crossed out
wheeled bin symbol on the product reminds you of
your obligation, that when you dispose of the
appliance it must be separately collected.
Consumers should contact their local authority
or retailer for information concerning the
correct disposal of their old appliance.
Respecting and conserving the
environment
Install the appliance in a fresh and well-ventilated
room. Ensure that it is protected from direct sunlight
and do not place it near heat sources.
WARNING: do not damage the refrigerant circuit.
Do not touch the internal cooling elements: this could
cause skin abrasions or frost/freezer burns.
When unplugging the appliance always pull the plug from
the mains socket, do not pull on the cable.
Before cleaning and maintenance, always switch off the
appliance and disconnect it from the electrical supply.
It is not sufficient to turn off the GREEN indicator light
(appliance off) to eliminate all electrical contact.
In the case of a malfunction, under no circumstances
should you attempt to repair the appliance yourself.
Repairs carried out by inexperienced persons may
cause injury or further malfunctioning of the appliance.
Do not use any sharp or pointed utensils or electrical
equipment - other than the type recommended by the
manufacturer - inside the frozen food storage
compartments.
Do not put ice cubes taken directly from the freezer into
your mouth.
Do not allow children to tamper with the controls or play
with the appliance. Under no circumstance should they
be allowed to sit on the bins or to hang from the door.
Try to avoid keeping the door open for long periods or
opening the door too frequently in order to conserve
energy.
Do not fill the appliance with too much food: cold air
must circulate freely for food to be preserved properly.
If circulation is impeded, the compressor will work
continuously.
Do not place hot food directly into the refrigerator. The
internal temperature will increase and force the
compressor to work harder and will consume more
energy.
Defrost the appliance if ice forms (see Maintenance).
A thick layer of ice makes cold transference to food
products more difficult and results in increased energy
consumption.
Regularly check the door seals and wipe clean to
ensure they are free of debris and to prevent cold air
from escaping (see Maintenance).
Keep packaging material out of the reach of children! It can
become a choking or suffocation hazard.
14
Page 15
Troubleshooting
If the appliance does not work, before calling for Assistance (see Assistance), check for a solution from the following list.
Malfunctions:
The green GREEN indicator light
does not illuminate.
The RED indicator light remains
illuminated constantly.
The motor runs continuously.
The appliance makes a lot of noise.
Possible causes / Solutions:
The plug has not been inserted into the electrical socket, or not far enough
to make contact, or there is no power in the house.
The door is not closed properly or has been open continuously.
The TEMPERATURE ADJUSTMENT knob is not in the correct position.
The YELLOW indicator light is on (see Description).
The door is not closed properly or is continuously opened.
The outside ambient temperature is very high.
The thickness of the frost exceeds 2-3 mm (see Maintenance).
The appliance has not been installed on a level surface (see Installation).
The appliance has been installed between cabinets that vibrate and make
noise.
The internal refrigerant makes a slight noise even when the compressor is
off. This is not a defect, it is normal.
GB
15
Page 16
Assistance
195065639.01
12/2007 - Xerox Business Services
GB
Before calling for Assistance:
Check if the malfunction can be solved on your own (see Troubleshooting).
If after all the checks, the appliance still does not operate or the problem persists, call the nearest Service
Centre
model serial number
Communicating:
type of malfunction
appliance model (Model)
serial number (S/N)
Information can be found on the rating plate
located inside the appliance.
Gross
Bruto
Brut
TI
75
Test
P.S-I.
RG 2330
Mod.
220 - 240 V- 50 Hz 150 W
340
Total
Gross
Bruto
Brut
Compr.
R 134 a
Syst.
kg 0,090
Kompr.
Made in Italy 13918
93139180000 S/N 704211801
Net
Util
Utile
Pressure
HIGH-235
LOW 140
Cod.
Gross
Bruto
Brut
Fuse
W
A
Freez. Capac
Poder de Cong
4,0
kg/24 h
Max 15 w
Class
Clase
Classe
N
Never call on unauthorized technicians and always refuse spare parts which are not originals.
16
Page 17
Mode demploi
GBI
F
CONGELATEUR
Sommaire
F
Installation, 18
Mise en place et raccordement
Italiano, 1
English, 9
DE
Deutsch, 25
Nederlands
P
Portuges, 49
Ðóсский, 57
BFS 121 I/HA
NL
RU
Français, 17
Espanol, 41
, 33
E
Description de lappareil, 19
Vue densemble
Mise en marche et utilisation, 20
Mise en service de lappareil
Pour profiter à plein de votre congélateur
Entretien et soins, 21
Mise hors tension
Nettoyage de lappareil
Contre la formation de moisissures et de mauvaises odeurs
Dégivrage de lappareil
Précautions et conseils, 22
Sécurité générale
Mise au rebut
Economies et respect de lenvironnement
Anomalies et remèdes, 23
Assistance, 24
Page 18

Installation
! Conservez ce mode demploi pour pouvoir le consulter à
F
tout moment. En cas de vente, de cession ou de
déménagement, veillez à ce quil suive lappareil pour
informer le nouveau propriétaire sur son fonctionnement et
lui fournir les conseils correspondants.
! Lisez attentivement les instructions: elles contiennent des
conseils importants sur linstallation, lutilisation et la
sécurité de votre appareil.
Mise en place et raccordement
Mise en place
1. Placez lappareil dans une pièce bien aérée et non humide.
2. Ne bouchez pas les grilles daération arrière: le
compresseur et le condensateur produisent de la chaleur
et exigent une bonne aération pour bien fonctionner avec
une moindre consommation délectricité.
3. Installez lappareil loin de sources de chaleur (lumière
directe du soleil, cuisinière électrique).
Raccordement électrique
Après le transport, placez lappareil à la verticale et
attendez au moins 3 heures avant de le raccorder à
linstallation électrique. Avant de brancher la fiche dans la
prise de courant, assurez-vous que:
la prise est bien munie dune terre conforme à la loi;
la prise est bien apte à supporter la puissance maximale
de lappareil, indiquée sur la plaquette signalétique placée
à lintérieur du congélateur (150 W par ex.);
la tension dalimentation est bien comprise entre les
valeurs indiquées sur la plaquette signalétique, placée à
lintérieur du congélateur (220-240 V par ex.);
la prise est bien compatible avec la fiche de lappareil.
En cas dincompatibilité, faites remplacer la fiche par un
technicien agréé (voir Assistance); nutilisez ni rallonges
ni prises multiples.
! Après installation de lappareil, le câble électrique et la
prise de courant doivent être facilement accessibles.
! Le câble ne doit être ni plié ni excessivement écrasé.
! Contrôlez le câble périodiquement pour son remplacement
faites appel à un technicien agréé (voir Assistance).
! Nous déclinons toute responsabilité en cas de non
respect des normes énumérées ci-dessus.
18
Page 19
Description de
lappareil
Vue densemble
Ces instructions dutilisation sappliquent à plusieurs modèles, il se peut donc que les composants illustrés présentent
des différences par rapport à ceux de lappareil que vous avez acheté. Vous trouverez dans les pages suivantes la
description des objets plus complexes.
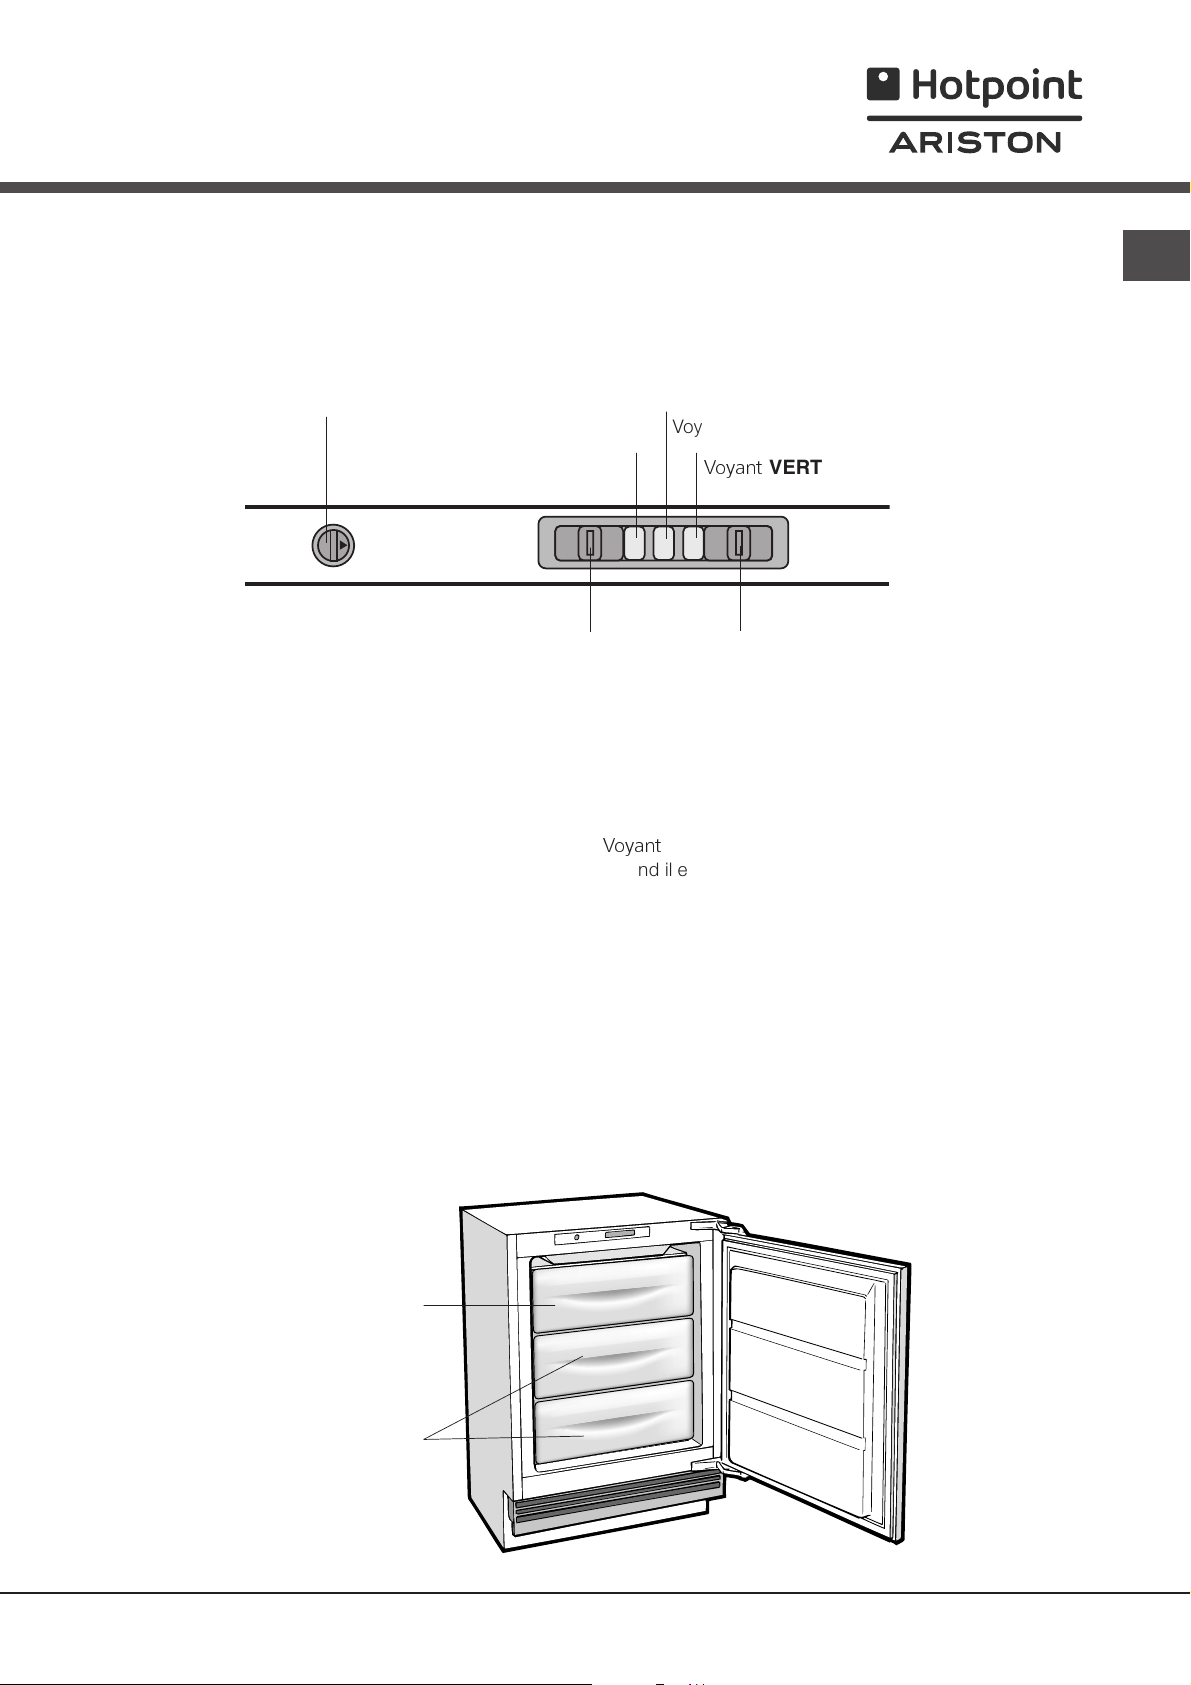
Bouton
RÉGLAGE DE LA
TEMPÉRATURE
2
1
Voyant JAUNE
3
5
4
INTERRUPTEUR-1
Bouton RÉGLAGE DE LA TEMPÉRATURE
Il règle automatiquement la température à lintérieur de
lappareil.
En tournant le bouton de la position 1 à la position 5, on
peut obtenir des températures de plus en plus froides.
Voyant JAUNE
Quand il est allumé (déplacez linterrupteur-1 vers la
gauche) il indique que le compresseur fonctionne de
façon continue pour atteindre les basses températures
nécessaires à la congélation rapide des denrées fraîches.
En déplaçant linterrupteur-1 vers la droite (voyant jaune
caché) le congélateur fonctionne suivant le réglage du
thermostat.
SN
Voyant ROUGE
Il sallume pour indiquer que la température à lintérieur
de lappareil est insuffisante pour la conservation des
aliments.
Voyant
Quand il est allumé (déplacez linterrupteur-2 vers la
droite) il indique que lappareil est branché au réseau
dalimentation.
En déplaçant linterrupteur-2 vers la gauche (voyant vert
caché), lappareil est débranché du réseau dalimentation.
Voyant ROUGE
Voyant
VERT
VERT
INTERRUPTEUR-2
I0
F
Compartiment
CONGELATION et
CONSERVATION
Compartiment
CONSERVATION
19
Page 20

Mise en marche et
utilisation
Mise en service de lappareil
F
! Avant de mettre lappareil en service, suivez bien
les instructions sur linstallation (voir Installation).
! Avant de brancher votre appareil, nettoyez bien les
compartiments et les accessoires à leau tiède
additionnée de bicarbonate.
1. Branchez la fiche dans la prise et assurez-vous que les
voyants VERT et ROUGE sallument (déplacez
linterrupteur-2 vers la droite).
2. Allumez le voyant JAUNE (déplacez linterrupteur-1
vers la gauche).
3. Quand le voyant rouge séteint, il faut aussi éteindre le
voyant JAUNE (déplacez linterrupteur-1 vers la droite).
Votre congélateur est alors prêt à lemploi.
Pour profiter à plein de votre congélateur
Pour régler la température, utilisez le Bouton RÉGLAGE
DE LA TEMPÉRATURE.
1 = moins froid 5 = plus froid
Une position intermédiaire est de toute manière
conseillée.
Ne recongelez pas des aliments décongelés ou en
cours de décongélation; il faut les faire cuire et les
consommer (dans les 24 heures).
Les aliments frais à congeler ne doivent pas être placés
au contact daliments déjà congelés; il faut les stocker
dans le compartiment supérieur CONGELATION et
CONSERVATION.
Ne stockez pas dans votre congélateur des bouteilles
en verre contenant des liquides, bouchées ou fermées
hermétiquement, elles pourraient se briser.
Létiquette placée à lintérieur du congélateur vous
renseigne sur la quantité maximale daliments pouvant
être congelée quotidiennement (par exemple: kg/24h 4).
Pour procéder à lopération de congélation, allumez le
voyant JAUNE et introduisez les aliments à congeler
dans le compartiment supérieur en les rangeant de
manière à ce quils soient placés tout contre les
plaques refroidissantes et à ce quils ne touchent
surtout pas aux aliments déjà congelés stockés dans
le même compartiment.
Au bout de 24 heures, quand la congélation est
terminée, éteignez la lampe jaune.
! Il ne faut pas oublier deffectuer cette opération pour
éviter tout gaspillage dénergie.
Lintroduction de grosses quantités d'aliments à
congeler peut réchauffer momentanément la
température à l'intérieur du congélateur (allumage de la
voyant rouge). Cette situation transitoire, ne
compromet pas la conservation des aliments déjà
stockés.
Pour assurer une bonne conservation des produits
surgelés ou des aliments congelés, ne jamais placer le
repère du bouton du thermostat sur une position
inférieure à 1, quelle que soit la température ambiante.
Pour des températures ambiantes allant jusquà 2527°C, le repère du thermostat devra être placé entre 1
et 2 alors que pour des températures ambiantes allant
jusquà 32°C, il devra être placé entre 2 et 3.
! Evitez douvrir la porte pendant la phase de congélation.
! En cas de coupure de courant ou de panne, nouvrez
pas la porte du congélateur : les produits surgelés et
congelés se conserveront ainsi sans problème pendant 9 14 heures environ.
! Voyant ROUGE. Lallumage prolongé du voyant rouge
indique que le congélateur ne fonctionne pas bien et quà
lintérieur la température monte trop. (Appelez le Service
Après-Vente.).
Il arrive que ce voyant sallume pendant un bref laps de
temps:
a) quand la porte reste ouverte trop longtemps (lors du
stockage des denrées ou de leur prélèvement).
b) quand le voyant JAUNE sallume.
Dans ces deux cas, lallumage du voyant nindique aucun
défaut ou anomalie de fonctionnement du congélateur.
20
Page 21

Entretien et soin
Mise hors tension
Pendant les opérations de nettoyage et dentretien,
mettez lappareil hors tension en débranchant la fiche de
lappareil de la prise de courant:
1. Eteignez le voyant VERT (déplacez linterrupteur-2 vers
la gauche);
2. débranchez la fiche de la prise de courant.
Nettoyage de lappareil
Nettoyez lextérieur, lintérieur et les joints en
caoutchouc à laide dune éponge imbibée deau tiède
additionnée de bicarbonate de soude ou de savon
neutre. Nutilisez pas de solvants, de produits abrasifs,
deau de Javel ou dammoniaque.
Mettez tremper les accessoires amovibles dans de
leau chaude additionnée de savon ou de liquide
vaisselle. Rincez-les et essuyez-les soigneusement.
Dégivrage de lappareil
F
! Conformez-vous aux instructions suivantes.
Ne pas utiliser dobjets pointus et coupants pour dégivrer
lappareil, ils risqueraient dendommager irréparablement
le circuit réfrigérant.
Si la couche de givre dépasse 5 mm, procédez à un
dégivrage manuel:
1. la veille, allumez le voyant JAUNE (déplacez
linterrupteur-1 vers la gauche) pour refroidir encore
plus les aliments.
2. Mise hors tension.
3. Enveloppez vos produits surgelés ou congelés dans du
papier et placez-les dans un endroit frais.
4. Laissez la porte ouverte jusquà ce que le givre fonde
complètement; pour accélérer cette opération placez
dans le compartiment congélateur des récipients deau
tiède.
Contre la formation de moisissures et
de mauvaises odeurs
Cet appareil est fabriqué dans des matériaux
hygiéniques qui ne transmettent pas dodeur. Pour
sauvegarder cette caractéristique, veillez à bien
emballer et couvrir vos aliments. Vous éviterez par la
même occasion la formation de taches.
Si vous devez laisser votre appareil éteint pendant une
période de temps prolongée, nettoyez-le bien lintérieur
et laissez les portes ouvertes.
5. Nettoyez et séchez soigneusement le compartiment
congélateur avant de rallumer lappareil.
6. Avant da ranger vos aliments dans le congélateur,
attendez environ 2 heures pour le rétablissement des
conditions idéales de conservation des aliments.
21
Page 22

Précautions et conseils
F
! Lappareil a été conçu et fabriqué conformément aux
normes internationales de sécurité. Ces conseils sont
fournis pour des raisons de sécurité et doivent être lus
attentivement.
Cet appareil est conforme aux Directives
Communautaires suivantes:
- 73/23/CEE du 19/02/73 (Basse Tensione) et
modifications suivantes;
-89/336/CEE du 03/05/89 (Compatibilité
Electromagnétique) et modifications suivantes;
- 2002/96/CE.
Sécurité générale
Cet appareil a été conçu pour un usage familial, de
type non professionnel.
Cet appareil qui sert à conserver et à congeler des
aliments ne doit être utilisé que par des adultes
conformément aux instructions du mode demploi.
Cet appareil ne doit pas être installé en extérieur,
même dans un endroit à labri, il est en effet très
dangereux de le laisser exposé à la pluie et aux
orages.
Attention: ne pas endommager le circuit réfrigérant
Ne touchez pas à lappareil pieds nus ou si vos mains
ou pieds sont mouillés ou humides.
Mise au rebut
Mise au rebut du matériel demballage : conformez-
vous aux réglementations locales, les emballages
pourront ainsi être recyclés.
La Directive Européenne 2002/96/EC sur les Déchets
des Equipements Electriques et Electroniques (DEEE),
exige que les appareils ménagers usagés ne soient pas
jetés dans le flux normal des déchets municipaux. Les
appareils usagés doivent être collectés séparément
afin doptimiser le taux de récupération et le recyclage
des matériaux qui les composent et réduire limpact
sur la santé humaine et lenvironnement. Le symbole
de la poubelle barrée est apposée sur tous les
produits pour rappeler les obligations de collecte
séparée.
Les consommateurs devront contacter les
autorités locales ou leur revendeur concernant la
démarche à suivre pour lenlèvement de leur vieil
appareil.
Economies et respect de
lenvironnement
Installez votre appareil dans un endroit frais et bien
aéré, protégez-le contre lexposition directe aux rayons
du soleil et ne le placez pas près de sources de
chaleur.
Ne touchez pas aux parties refroidissantes: vous
pourriez vous brûler ou vous blesser.
Pour débrancher la fiche de la prise de courant, sortez
la fiche, ne tirez surtout pas sur le câble.
Avant deffectuer toute opération de nettoyage ou
dentretien, débranchez la fiche de la prise de courant.
Il ne suffit pas de placer le bouton de REGLAGE DE
LA TEMPERATURE sur
éliminer tout contact électrique.
En cas de panne, nessayez en aucun cas daccéder
aux mécanismes internes pour tenter de réparer
lappareil.
Ne pas utiliser, à lintérieur des compartiments de
conservation pour aliments congelés, dustensiles
pointus et coupants ou dappareils électriques dun
type autre que celui recommandé par le fabricant.
Ne pas porter à la bouche des glaçons à peine sortis
du congélateur.
Ne permettez pas aux enfants de jouer avec lappareil.
Il ne faut en aucun cas quils sasseyent sur les tiroirs
ou quils saccrochent à la porte.
Les emballages ne sont pas des jouets pour enfants.
(appareil éteint) pour
Pour introduire ou sortir les aliments, nouvrez les
portes de lappareil que le temps strictement
nécessaire.
Chaque ouverture de porte cause une considérable
dépense dénergie.
Ne chargez pas trop votre appareil:
pour une bonne conservation des aliments, le froid doit
pouvoir circuler librement. Si la circulation est entravée,
le compresseur travaillera en permanence.
Nintroduisez pas daliments chauds: ces derniers font
monter la température intérieure ce qui oblige le
compresseur à travailler beaucoup plus en gaspillant
un tas délectricité.
Dégivrez lappareil dès que de la glace se dépose (voir
Entretien); une couche de glace trop épaisse gêne
considérablement la cession de froid aux aliments et
augmente la consommation délectricité.
Gardez toujours les joints propres et en bon état pour
quils adhèrent bien aux portes et ne laissent pas le
froid séchapper (voir Entretien).
22
Page 23

Anomalies et remèdes
Il peut arriver que lappareil ne fonctionne pas. Avant de téléphoner au service de dépannage (voir Assistance), contrôlez sil
ne sagit pas dun problème facile à résoudre à laide de la liste suivante.
Anomalies:
Le voyant VERT ne sallume pas.
Voyant ROUGE allumée en
permanence
Le moteur est branché en
permanence.
Lappareil est très bruyant.
Causes / Solution possibles:
La fiche nest pas branchée dans la prise de courant ou pas assez enfoncée
pour quil y ait contact ou bien il y a une coupure de courant.
La porte nest pas bien fermée ou a été ouverte continuellement.
La porte est ouverte trop souvent.
La position du bouton de REGLAGE DE LA TEMPERATURE nest pas
correcte
Le voyant JAUNE est allumé (voir Desc.).
La porte nest pas bien fermée ou trop souvent ouverte.
La température à lextérieur est très élevée.
Lépaisseur du givre dépasse 2-3 mm (voir Entretien).
Lappareil na pas été installé bien à plat (voir Installation).
Lappareil est installé entre des meubles ou des objets qui vibrent et font du
bruit.
Le gaz réfrigérant interne produit un léger bruit même quand le compresseur
est à larrêt: il ne sagit pas dun défaut, cest tout à fait normal.
F
23
Page 24

Assistance
195065639.01
12/2007 - Xerox Business Services
F
Vérifiez si vous pouvez résoudre lanomalie vous-même (voir Anomalies et Remèdes).
Si, malgré tous ces contrôles, lappareil ne fonctionne toujours pas et linconvénient persiste, faites appel au
service après-vente le plus proche de chez vous.
Avant de contacter le centre dAssistance:
modèle
numéro de série
Signalez:
le type danomalie
le modèle de lappareil (Mod.)
le numéro de série (S/N)
Vous trouverez ces informations sur la plaque
d'identification fixée à l'intérieur de lappareil..
Gross
Bruto
Brut
TI
75
Test
P.S-I.
RG 2330
Mod.
220 - 240 V- 50 Hz 150 W
340
Total
Gross
Bruto
Brut
Compr.
R 134 a
Syst.
kg 0,090
Kompr.
Made in Italy 13918
93139180000 S/N 704211801
Net
Util
Utile
Pressure
HIGH-235
LOW 140
Cod.
Gross
Bruto
Brut
Fuse
W
A
Freez. Capac
Poder de Cong
4,0
kg/24 h
Max 15 w
Class
Clase
Classe
N
Ne faites jamais appel à des techniciens non agréés et refusez toujours des pièces détachées non
originales.
24
Page 25

Gebrauchsanleitungen
Einbautiefhühlgeräte
Italiano, 1
English, 9
DE
Deutsch, 25
Nederlands
P
Portuges, 49
Ðóсский, 57
BFS 121 I/HA
GBI
NL
RU
Français, 17
Espanol, 41
, 33
E
Inhaltsverzeichnis
DE
Installation, 26
F
Aufstellort und elektrischer Anschluss
Beschreibung Ihres Gerätes, 27
Geräteansicht
Inbetriebsetzung und Gebrauch, 28
Einschalten Ihres Gerätes
Optimaler Gebrauch der Gefrierzone
Wartung und Pflege, 29
Abschalten Ihres Gerätes vom Stromnetz
Reinigung Ihres Gerätes
Vermeidung von Schimmelpilz- und Geruchsbildung
Abtauen Ihres Gerätes
Vorsichtsmaßregeln und Hinweise, 30
Allgemeine Sicherheit
Entsorgung
Energie sparen und Umwelt schonen
Störungen und Abhilfe, 31
Kundendienst, 32
Page 26

Installation
DE
! Es ist äußerst wichtig, diese Bedienungsanleitung
sorgfältig aufzubewahren, um sie jederzeit zu Rate ziehen
zu können. Sorgen Sie dafür, dass sie im Falle eines
Umzugs oder Übergabe an einen anderen Benutzer das
Gerät stets begleitet, damit auch der Nachbesitzer die
Möglichkeit hat, diese zu Rate zu ziehen.
! Lesen Sie bitte folgende Hinweise aufmerksam durch, sie
liefern wichtige Informationen hinsichtlich der Installation,
dem Gebrauch und der Sicherheit.
Aufstellort und elektrischer Anschluss
Aufstellort
1. Stellen Sie das Gerät in einem gut belüfteten und
trockenen Raum auf.
2. Die hinteren Belüftungsöffnungen dürfen nicht zugestellt
bzw. abgedeckt werden: Kompressor und Kondensator
geben Wärme ab und benötigen eine gute Belüftung
um optimal zu arbeiten und den Stromverbrauch nicht
unnötig zu erhöhen.
3. Stellen Sie das Gerät fern von Wärmequellen auf
(direkte Sonnenbestrahlung, Elektroherd).
Elektrischer Anschluss
Warten Sie nach dem Transport etwa 3 Stunden, bevor
Sie das Gerät an das Elektronetz anschließen. Vor
Einfügen des Steckers in die Steckdose ist
sicherzustellen, dass
die Steckdose über eine normgerechte Erdung verfügt;
die Steckdose die auf dem Typenschild (befindlich im
Inneren des Gefrierschranks) angegebene max.
Leistungsaufnahme des Gerätes trägt (z.B. 150 W);
die Netzspannung den auf dem Typenschild
(befindlich im Inneren des Gefrierschranks)
angegebenen Werten entspricht (z.B. 220-240 V);
die Steckdose mit dem Netzstecker übereinstimmt.
Sollte dies nicht der Fall sein, dann lassen Sie den
Netzstecker durch autorisiertes Fachpersonal (siehe
Kundendienst) austauschen; verwenden Sie auf keinen
Fall Verlängerungen oder Vielfachsteckdosen.
! Netzkabel und Stecker müssen bei installiertem Gerät
leicht zugänglich sein.
! Das Netzkabel darf nicht gebogen bzw. eingeklemmt
werden.
! Das Netzkabel muss regelmäßig kontrolliert werden. Es
darf nur durch autorisiertes Personal (siehe
Kundendienst) ausgetauscht werden.
! Der Hersteller lehnt jede Verantwortung ab, falls
diese Vorschriften nicht eingehalten werden sollten.
26
Page 27

Beschreibung Ihres
Gerätes
Geräteansicht
Die Gebrauchsanleitungen gelten für mehrere Gerätemodelle. Demnach ist es möglich, dass die Abbildung Details enthält,
über die Ihr Gerät nicht verfügt.
Schalter zur
TEMPERATUREINSTELLUNG
GELBE Kontrollleuchte
2
1
3
5
4
SCHALTER-1
Schalter zur TEMPERATUREINSTELLUNG
Regelt automatisch die interne Temperatur des Geräts.
Durch Drehen des Schalters in die Positionen 1 bis 5
kann die Temperatur jeweils kälter eingestellt werden.
SN
ROTE Kontrollleuchte
Diese Leuchte schaltet sich ein, wenn die
Tiefkühltemperatur im Gerät für die Konservierung der
Lebensmittel nicht ausreicht.
ROTE Kontrollleuchte
GRÜNE Kontrollleuchte
I0
SCHALTER-2
DE
GELBE Kontrollleuchte
Wenn diese Leuchte eingeschaltet ist (den Schalter-1
nach links drehen), dann läuft der Kompressor im
Dauerbetrieb, bis die zum schnellen Einfrieren
notwendigen Tiefkühltemperaturen erreicht sind.
Wird der Schalter-1 nach rechts gedreht (gelbe Leuchte
ausgeschaltet), dann läuft das Gerät mit der mittels
Thermostat eingestellten Temperatur.
Fach zum
GEFRIEREN und
LAGERN
GRÜNE Kontrollleuchte
Diese Leuchte zeigt an (den Schalter-2 nach rechts
drehen), dass das Gerät an das Stromnetz
angeschlossen ist. Drehen Sie den Schalter-2 nach links
(grüne Leuchte schaltet sich aus), um das Gerät
abzuschalten.
Fach zum
LAGERN
27
Page 28

Inbetriebsetzung und
Gebrauch
DE
Inbetriebsetzung Ihres Gerätes
! Bevor Sie Ihr Gerät in Betrieb setzen, beachten Sie
bitte aufmerksam die Installationshinweise (siehe
Installation).
! Bevor Sie das Gerät anschließen, müssen die Fächer
und das Zubehör gründlich mit lauwarmem Wasser und
Bikarbonat gereinigt werden.
1. Inserire la spina nella presa e accertarsi che si
accenda la spia VERDE e ROSSA (spostare
l'interruttore-2 verso destra).
2. Accendere la spia GIALLA (spostare l'interruttore-1
verso sinistra).
3. Quando la spia rossa si sarà spenta provvedere allo
spegnimento della spia GIALLA (spostare
l'interruttore-1 verso destra). A questo punto il
congelatore può essere utilizzato.
Optimaler Gebrauch der Gefrierzone
Stellen Sie über den TEMPERATURSCHALTER die
Temperatur ein.
1 = höchste Temperatur 5 = kälteste Temperatur
Es empfiehlt sich, einen mittleren Wert einzustellen.
An- oder aufgetautes Gefriergut darf nicht wieder eingefroren
werden. Solche Lebensmittel müssen zu einem Fertiggericht
verarbeitet werden (innerhalb 24 Std.)
Bereits gefrorene Lebensmittel dürfen nicht mit den frisch
einzufrierenden Lebensmitteln in Berührung kommen.
Letztere müssen in der oberen Schale GEFRIEREN und
LAGERN eingefroren werden.
Das Einordnen großer Mengen an einzufrierenden
Speisen kann vorübergehend zu einem
Temperaturanstieg im Inneren des Gefrierschranks
führen (die ROTE Leuchte schaltet sich ein). Dadurch
wird jedoch nicht die ordnungsgemäße Konservierung
des bereits vorhandenen Gefriergutes beeinträchtigt.
Per ottenere una buona conservazione di alimenti
surgelati o di cibi congelati non posizionare mai
lindice della manopola del termostato al di sotto di 1,
qualunque sia la temperatura ambiente. Per
temperature ambiente fino a 25°-27°C lindice della
manopola va posizionato tra 1 e 2 mentre per
temperature ambiente fino a 32°C tra 2 e 3.
! Während des Schnellgefrierens sollte das Öffnen der Tür
vermieden werden.
! Auch während eines Stromausfalls oder einer Störung
sollte die Gefrierzonentür nicht geöffnet werden: Das Gefrierbzw. Tiefkühlgut hält sich so unverändert für ungefähr 9-14
Stunden.
! ROTE Kontrollleuchte. Leuchtet diese Warnleuchte
über einen längeren Zeitraum auf, dann bedeutet dies,
dass Ihr Gefriergerät nicht ordnungsgemäß arbeitet und
dass die Temperatur zu sehr ansteigt. (Rufen Sie in
diesem Fall den Kundendienst an.)
Diese Kontrollleuchte kann sich kurzzeitig einschalten,
wenn:
a) die Tür über einen längeren Zeitraum geöffnet bleibt
(Einlagern oder Entnahme von Lebensmitteln).
b) die GELBE Kontrollleuchte eingeschaltet wird.
In diesen beiden Fällen bedeutet die rote Leuchte nicht,
dass das Gerät nicht ordnungsgemäß funktioniert.
Lagern Sie in der Gefrierzone bitte keine hermetisch
verschlossenen Glasflaschen mit Flüssigkeiten, beim
Gefrieren könnten sie platzen.
Die Höchstmenge an Lebensmitteln, die täglich
eingefroren werden kann, ist auf dem Typenschild
(befindlich in der
24h 4).
Zum Einfrieren schalten Sie die GELBE
Kontrollleuchte ein und legen Sie dann die
Lebensmittel in das obere Fach; achten Sie darauf,
dass die Lebensmittel möglichst direkt auf dem
Frierboden liegen und nicht auf anderen, bereits
eingefrorenen Lebensmitteln.
Nach 24 Stunden sind die Lebensmittel eingefroren
und die gelbe Kontrollleuchte kann ausgeschaltet
werden.
! Bitte vergessen Sie diesen Schritt nicht, damit nicht
unnötig Energie verschwendet wird.
28
Gefrierzone) ersichtlich (Beispiel: Kg/
Page 29

Wartung und Pflege
Abschalten Ihres Gerätes vom
Stromnetz
Bei Reinigungs- und Wartungsmaßnahmen muss das
Gerät durch Herausziehen des Netzsteckers vom
Stromnetz getrennt werden.
Es genügt nicht, die GRÜNE Kontrollleuchte
auszuschalten (Schalter-2 nach links drehen), um das
Gerät vom Stromnetz zu trennen
Reinigung Ihres Gerätes
Das Gehäuse des Gerätes, außen und innen, sowie
die Türdichtungen können mit einem mit Wasser und
Bikarbonat oder einer milden Spüllauge getränkten
Schwamm gereinigt werden. Vermeiden Sie Löse-,
Scheuer-, Bleichmittel oder Ammoniak.
Das Zubehör kann herausgenommen und in einer
warmen Spüllauge gereinigt werden. Anschließend
sorgfältig klarspülen und trockenreiben.
Vermeidung von Schimmelpilz- und
Geruchsbildung
Das Gerät wurde mit hygienischen Materialien gefertigt,
die keine Gerüche übertragen. Um diese Eigenschaft
nicht zu verlieren, sind die Lebensmittel stets gut
verschlossen bzw. verpackt zu lagern. Hierdurch wird
auch die Bildung von Flecken vermieden.
Abtauen Ihres Gerätes
DE
! Verfahren Sie hierzu wie nachstehend beschrieben.
Verwenden Sie zum Abtauen des Gerätes bitte keine
scharfen oder spitzen Gegenstände, die den Kühlkreis
hoffungslos beschädigen könnten.
Ist die Reifschicht jedoch zu dick, muss manuell
abgetaut werden:
1. Schalten Sie die GELBE Kontrollleuchte am Vortag ein
(Schalter-1 nach links drehen), um die Lebensmittel
zusätzlich zu kühlen.
2. Abschalten Ihres Gerätes vom Stromnetz
3. Wickeln Sie das Gefrier- bzw. Tiefkühlgut dicht ein
und legen Sie es in einen anderen Tiefkühlschrank
oder bewahren Sie es an einem ähnlich kalten Ort auf.
4. Lassen Sie die Gerätetür offen stehen, bis der Reif
völlig aufgetaut ist. Dies kann durch Einstellen eines
Topfes mit warmem Wasser beschleunigt werden.
5. Reinigen Sie die Gefrierzone gründlich und trocknen
Sie sie sorgfältig aus, bevor Sie das Gerät wieder
einschalten.
6. Warten Sie bitte 2 Stunden, bis die idealen
Gefrierbedingungen wieder gegeben sind, bevor Sie
das Gefriergut in die Gefrierzone geben.
Soll das Gerät für längere Zeit stillgelegt werden,
reinigen Sie den Innenraum und lassen Sie die
Gerätetür offenstehen.
29
Page 30
Vorsichtsmaßregeln und
Hinweise
DE
! Das Gerät wurde nach den strengsten internationalen
Sicherheitsvorschriften entworfen und gebaut.
Nachstehende Hinweise werden aus Sicherheitsgründen
geliefert und sollten aufmerksam gelesen werden.
Dieses Gerät entspricht den folgenden EGRichtlinien:
-73/23/EWG vom 19.02.73 (Niederspannung)
und nachfolgenden Änderungen
- 89/336/EWG vom 03.05.89
(elektromagnetische Verträglichkeit) und
nachfolgenden Änderungen;
- 2002/96/CE.
Allgemeine Sicherheit
Dieses Gerät ist für den nicht professionellen Einsatz im
privaten Haushalt bestimmt.
Das Gerät ist zum Kühlen und Einfrieren von
Lebensmitteln zu verwenden, und nur von Erwachsenen
gemäß den Hinweisen der vorliegenden
Gebrauchsanleitungen zu benutzen.
Der Kühl-/ und Gefrierkombi darf nicht im Freien
aufgestellt werden, auch nicht, wenn es sich um einen
geschützten Platz handelt. Es ist gefährlich, das Gerät
Gewittern und Unwettern auszusetzen.
Berühren Sie das Gerät nicht, wenn Sie barfuß sind, und
auch nicht mit nassen oder feuchten Händen oder
Füßen.
Ber ühren Sie nicht den Rückwandverdampfer:
es besteht Verletzungsgefahr.
Ziehen Sie den Gerätestecker nicht am Netzkabel aus
der Steckdose, sondern nur am Stecker selbst.
Vor allen Reinigungs- und Wartungsmaßnahmen muss
der Netzstecker gezogen werden.
GRÜNE Kontrollleuchte auszuschalten (Gerät
ausgeschaltet), um das Gerät vom Stromnetz zu
trennen.
Bei etwaigen Störungen versuchen Sie bitte nicht, das
Gerät selbst zu reparieren.
Verwenden Sie im Innern der Gefriergutlagerfächer
bitte keine scharfen oder spitzen Gegenstände oder
Elektrogeräte, sondern nur die vom Hersteller
erlaubten Hilfsmittel.
Eiswürfel nicht sofort in den Mund nehmen.
Erlauben Sie Kindern nicht, mit dem Gerät zu spielen. Auf
keinen Fall dürfen sie sich auf die Gefrierfachschalen setzen,
oder sich an die Tür hängen.
Es genügt nicht, die
Entsorgung
Entsorgung de
die lokalen Vorschriften, Verpackungsmaterial kann
wiederverwertet werden.
Gemäß der Europäischen Richtlinie 2002/96/EC über
Elektro- und Elektronik-Altgeräte (WEEE) dürfen
Elektrohaushalts-Altgeräte nicht über den
herkömmlichen Haushaltsmüllkreislauf entsorgt
werden. Altgeräte müssen separat gesammelt werden,
um die Wiederverwertung und das Recycling der
beinhalteten Materialien zu optimieren und die
Einflüsse auf die Umwelt und die Gesundheit zu
reduzieren. Das Symbol durchgestrichene Mülltonne
auf jedem Produkt erinnert Sie an Ihre Verpflichtung,
dass Elektrohaushaltsgeräte gesondert entsorgt
werden müssen.
Endverbraucher können sich an Abfallämter der
Gemeinden wenden, um mehr Informationen über die
korrekte Entsorgung ihrer Elektrohaushaltsgeräte zu
erhalten.
s Verpackungsmaterials: Befolgen Sie
Energie sparen und Umwelt schonen
Stellen Sie das Gerät in einem trockenen, gut
belüftbaren Raum auf, nicht direkt in der Sonne oder in
der Nähe von Wärmequellen.
Öffnen Sie die Gerätetür so kurz wie möglich, wenn Sie
Lebensmittel lagern oder herausnehmen.
Bei jeder Türöffnung geht wertvolle Energie verloren.
Das Gerät sollte nicht überladen werden:
Zur Haltbarkeit der Lebensmittel muss die Kälte frei
zirkulieren können. Die Behinderung der Zirkulation hat
zur Folge, dass der Kompressor ständig arbeitet.
Stellen Sie keine warmen Speisen in das Gerät: sie
würden die Temperatur erheblich erhöhen und den
Kompressor zu einer höheren Leistung zwingen, was
eine unnötige Verschwendung an Energie bedeutet.
Sobald sich Eis bildet, muss das Gerät abgetaut
werden (siehe Wartung), eine dicke Eisschicht
erschwert die Kälteübertragung auf das Kühlgut und
erhöht den Stromverbrauch.
Halten Sie die Dichtungen stets effizient und sauber,
damit sie ordnungsgemäß an den Türen anhaften und
die Kälte nicht entweichen lassen (siehe Wartung).
Verpackungsmaterial ist kein Spielzeug für Kinder.
30
Page 31

Störungen und Abhilfe
Gerätestörung: Bevor Sie sich an den Technischen Kundendienst wenden (siehe Kundendienst), vergewissern Sie sich
bitte zuerst, ob es sich um eine Kleinigkeit handelt, die Sie selbst beheben können. Ziehen Sie hierzu nachstehendes
Verzeichnis zu Rate.
Störungen:
Die GRÜNE Kontrollleuchte
schaltet sich nicht ein.
Die ROTE Kontrollleuchte
ist immer eingeschaltet.
Der Motor läuft ununterbrochen.
Das Betriebsgeräusch ist zu stark.
Mögliche Ursachen / Abhilfe:
Der Netzstecker steckt nicht in der Steckdose, oder er sitzt nicht fest, so
dass kein Kontakt hergestellt wird; oder es besteht ein Stromausfall.
Die Tür ist nicht richtig geschlossen oder wird dauernd geöffnet.
Der TEMPERATURSCHALTER ist nicht richtig eingestellt.
Die GELBE Kontrollleuchte ist eingeschaltet (siehe Beschreibung).
Die Tür ist nicht richtig geschlossen oder wird zu häufig geöffnet.
Die Umgebungstemperatur ist sehr hoch.
Die Reifschicht ist stärker als 2-3 mm (siehe Wartung).
Das Gerät wurde nicht eben aufgestellt (siehe Installation).
Das Gerät wurde zwischen Möbelteilen oder Gegenständen aufgestellt,
die vibrieren und daher zur Geräuschbildung Ihres Gerätes beitragen.
Das Kühlmittel verursacht ein leises Geräusch auch wenn der
Kompressor nicht arbeitet: dies ist kein Fehler sondern ganz normal.
DE
31
Page 32

Kundendienst
195065639.01
12/2007 - Xerox Business Services
DE
Bevor Sie sich an den Kundendienst wenden:
Prüfen Sie, ob die Störung selbst behoben werden kann (siehe Störungen und Abhilfe).
Ist dies nicht der Fall, dann kontaktieren Sie die Inlands-Sammelnummer 199.199.199.
Modell Modellnummer
Geben Sie bitte Folgendes an:
die Art der Störung
das Gerätemodell (Mod.)
die Modellnummer (S/N).
Entnehmen Sie diese Daten bitte dem
Typenschild (befindlich im Kühlraum unten
links).
RG 2330
Mod.
220 - 240 V- 50 Hz 150 W
340
Total
Gross
Bruto
Brut
Compr.
R 134 a
Syst.
kg 0,090
Kompr.
Made in Italy 13918
Gross
Bruto
Brut
75
Test
P.S-I.
TI
Net
Util
Utile
Pressure
HIGH-235
LOW 140
93139180000 S/N 704211801
Cod.
Gross
Bruto
Brut
W
Fuse
A
Freez. Capac
Poder de Cong
kg/24 h
4,0
Max 15 w
Class
Clase
Classe
N
Beauftragen Sie auf keinen Fall einen nicht befugten Kundendienst und lassen Sie ausschließlich
Original-Ersatzteile einbauen.
32
Page 33

Gebruiksaanwijzingen
Inhoud
Installatie, 34
GBI
F
Plaatsen en aansluiten
VRIEKAST
NL
Italiano, 1
DE
Deutsch, 25
P
Portuges, 49
BFS 121 I/HA
English, 9
NL
Nederlands
RU
Ðóсский, 57
Français, 17
Espanol, 41
, 33
E
Beschrijving van het apparaat, 35
Algemeen aanzicht
Starten en gebruik, 36
Het apparaat starten
Optimaal gebruik van de diepvrieskast
Onderhoud en verzorging, 37
De elektrische stroom afsluiten
Het apparaat reinigen
Het vermijden van schimmel en vervelende luchtjes
Het apparaat ontdooien
Voorzorgsmaatregelen en advies, 38
Algemene veiligheid
Afvalverwijdering
Het milieu sparen en respecteren
Storingen en oplossingen, 39
Service, 40
Page 34

Installatie
NL
! Bewaar dit boekje zorgvuldig voor eventuele
toekomstige raadpleging. Wanneer u het product
weggeeft, verkoopt of wanneer u verhuist, dient u dit
boekje bij het apparaat te bewaren zodat alle nodige
informatie voorhanden blijft.
! Lees de gebruiksaanwijzingen zorgvuldig door: er staat
belangrijke informatie in over installatie, gebruik en
veiligheid.
Plaatsen en aansluiten
Plaatsen
1. Plaats het apparaat in een goed geventileerd en droog
vertrek.
2. Laat de ventilatieroosters aan de achterzijde vrij: de
compressor en de condensator geven warmte af en
vereisen een goede ventilatie om goed te functioneren
en het elektriciteitsverbruik te beperken.
3. Houdt het apparaat ver van hittebronnen vandaan
(direct zonlicht, elektrisch gasfornuis).
Elektrische aansluiting
Zet het apparaat na het transport verticaal en wacht
minstens 3 uur voordat u het aansluit aan het
elektriciteitsnet. Voordat u de stekker in het stopcontact
steekt, dient u zich ervan te verzekeren dat:
het stopcontact geaard is en voldoet aan de geldende
normen;
het stopcontact in staat is de maximum stroomsterkte
van de machine te verdragen, die is aangegeven op
het typeplaatje in de freezer (bv.150 W);
de voedingsspanning klopt met wat er op het
typeplaatje in de freezer is aangegeven (bv.220-240 V);
het stopcontact en de stekker overeenkomen.
Als dat niet het geval is, dient een erkende monteur
de stekker te vervangen (zie Service); gebruik geen
verlengsnoeren of dubbelstekkers.
! Wanneer het apparaat geïnstalleerd is, moeten het
snoer en het stopcontact makkelijk te bereiken zijn.
! Het snoer mag niet worden gebogen of samengedrukt.
! Het snoer moet van tijd tot tijd worden gecontroleerd
en mag alleen door erkende monteurs worden
vervangen (zie Service).
! De fabrikant kan niet verantwoordelijkheid
worden gesteld als deze normen niet worden
nageleefd.
34
Page 35

Beschrijving van
het apparaat
Algemeen aanzicht
Deze gebruiksaanwijzingen gelden voor verscheidene modellen en het is daarom mogelijk dat de figuur andere details
afbeeldt dan het door u aangeschafte apparaat.
TEMPERATUURKNOP
2
1
3
5
4
TEMPERATUURKNOP
Deze regelt automatisch de temperatuur in het apparaat
Door de knop van stand 1 naar stand 5 te draaien,
verkrijgt men een steeds lagere temperatuur.
De thermostaat wordt geregeld door de knop met
behulp van een muntje te draaien.
GELE lampje
Dit lampje brandt (schakelaar-1 naar links verplaatsen)
wanneer de compressor op ononderbroken wijze
functioneert, teneinde de lage temperatuur te bereiken
die voor het invriezen van verse levensmiddelen
benodigd is. Door de schakelaar-1 naar rechts te
verplaatsen (het GELE lampje is nu afgedekt),
functioneert de diepvriezer weer volgens de
thermostaatinstelling.
SN
SCHAKELAAR-1
GELE lampje
ROOD ilampje
Dit lampje gaat branden om aan te geven dat de
binnentemperatuur niet toereikend is voor de
conservering van de levensmiddelen
GROEN lampje
Dit lampje brandt (schakelaar-2 naar rechts verplaatsen)
wanneer de netstroom is ingeschakeld. Door de
schakelaar-2 naar links te verplaatsen (het groene lampje
is nu afgedekt) wordt de stroomtoevoer uitgeschakeld.
ROOD lampje
GROEN lampje
I0
SCHAKELAAR-2
NL
INVRIES- en
BEWAARGEDEELTE
BEWAARGEDEELTE
35
Page 36

NL
Starten en gebruik
Het apparaat starten
! Voordat u het apparaat in gebruik stelt, dient u de
instructies voor wat betreft de installatie na te
volgen (zie Installatie).
! Voordat u het apparaat aansluit, dient u zowel het koel-
als het diepvriesgedeelte, alsook het toebehoren met
lauw water en soda te reinigen.
Voor een goed behoud van de diepvriesprodukten mag
de thermostaatknop, ongeacht de
omgevingstemperatuur, nooit lager dan op 1 worden
afgesteld.
Voor omgevingstemperaturen tot 25°-27°C dient de
thermostaatknop op een stand tussen 1 en 2 te worden
afgesteld en bij omgevingstemperaturen tot 32°C op een
stand tussen 2 en 3.
.
1. Steek de stekker in het stopcontact en let op of het
GROENE lampje aan gaat zowel als het RODE
(schakelaar-2 naar rechts verplaatsen).
2. dient u tevens het GELE lampje in te schakelen
(schakelaar-1 naar links verplaatsen).
3. Zodra het RODE lampje uitgaat, dient u ook het GELE
lampje uit te schakelen (schakelaar-1 naar rechts
verplaatsen). Nu kan de freezer in gebruik worden
genomen.
Optimaal gebruik van de diepvrieskast
De TEMPERATUURKNOP regelt automatisch de
temperatuur in de freezer:
1 = minder koud 5 = kouder
Wij raden een gemiddelde stand aan.
Vries nooit etenswaar in die op het punt staat te
ontdooien of al is ontdooid; dergelijke etenswaar moet
gelijk worden gekookt en gegeten (binnen 24 uur).
Verse etenswaren die moeten worden ingevroren
mogen nooit in contact raken met etenswaren die al
bevroren zijn; verse etenswaren moeten in het bovenste
INVRIES- en BEWAARGEDEELTE worden gezet.
Plaats nooit glazen flessen met vloeistof in de
diepvrieskast, vooral niet als er een dop op zit of als ze
hermetisch zijn afgesloten, ze zouden kunnen barsten.
De maximum hoeveelheid die men dagelijks in kan
vriezen is aangegeven op het typeplaatje in de
koelkast. Kg/24h 4).
Om in te vriezen dient u het GELE lampje in te
schakelen en vervolgens de in te vriezen etenswaren in
het bovenvak te plaatsen. Hierbij behoren de
etenswaren zoveel mogelijk in direct contact te staan
met de koelvlakken, daarbij oplettend dat ze de in
hetzelfde vak reeds bevroren etenswaren niet raken.
Na 24 uur wordt, als het invriezen klaar is,
GELE lampje weer uit te schakelen
! Deze procedure moet men niet vergeten om
onnodig energieverbruik te voorkomen.
Het inladen van grote hoeveelheden etenswaren die
ingevroren moeten worden kan de temperatuur in de
vrieskast tijdelijk verhogen (RODE lampje gaat aan).
Aangezien deze toestand van tijdelijke aard is levert hij
geen gevaar op voor het goed conserveren van de
reeds aanwezige etenswaren.
.
dient uhet
! Open de deur van de diepvrieskast niet tijdens het
invriezen.
! Wanneer de stroom wegvalt of wanneer er een storing
optreedt, dient u de deur van de diepvrieskast niet te
openen: de levensmiddelen blijven op deze manier nog
ongeveer 9 à 14 uur goed bewaard.
! RODE lampje. Als dit RODE lampje aan gaat en aan
blijft, dan betekent het dat de vrieskast niet regelmatig
functioneert en dat de temperatuur te hoog wordt. (U
moet de Technische Dienst erbij halen)
Dit lampje kan voor een korte periode aangaan:
a) als de deur iets te lang open is geweest (voor het
inladen of eruit halen van levesnmiddelen);
het GELE lampje in te schakelen
b)
In deze gevallen betekent het aangaan van het RODE
lampje niet dat er een storing van de vrieskast is
opgetreden.
.
36
Page 37

Onderhoud en
verzorging
De elektrische stroom afsluiten
Tijdens schoonmaak of onderhoud moet u het apparaat
afsluiten van de elektrische stroom:
dient uhet
1.
(schakelaar-2 naar links verplaatsen);
2. haal de stekker uit het stopcontact.
GROEN
lampje weer uit te schakelen
Het apparaat reinigen
De buitenkant, de binnenkant en de rubberen
afdichtingen kunnen worden schoongemaakt met een
lauwe spons en soda of een neutraal
schoonmaakmiddel. Gebruik geen oplosmiddelen,
schuurmiddelen, chloor of ammonia.
Het uitneembare toebehoren kan worden afgewassen
met warm water en schoonmaak- of afwasmiddelen.
Spoel en droog alles goed af.
Het vermijden van schimmel en
vervelende luchtjes
Het apparaat is vervaardigd uit hygiënisch materiaal
dat geen luchtjes absorbeert. Teneinde deze
eigenschappen te behouden moet u levensmiddelen
altijd goed bewaren en afsluiten. Hierdoor vermijdt u
ook het vormen van vlekken.
Het apparaat ontdooien
NL
! Houdt u aan onderstaande instructies.
Gebruik om het apparaat te ontdooien geen scherpe of
puntige voorwerpen. Deze zouden het koelcircuit
onherstelbaar kunnen beschadigen.
Als de ijslaag dikker is dan 5 mm moet u een
handmatige ontdooiing uitvoeren:
1. de dag voordat u dit doet, dient u tevens het GELE
lampje in te schakelen (schakelaar-1 naar links
verplaatsen), om de levensmiddelen nog dieper in te
vriezen.
2. De elektrische stroom afsluiten. .
3. Omwikkel de etenswaren uit de diepvries met papier
en leg ze op een koele plaats.
4. Laat de deur van de diepvrieskast open totdat het ijs
compleet gesmolten is; dit proces kunt u versnellen
door er bakken met lauw water in neer te zetten.
5. Maak de diepvrieskast goed schoon en droog hem
grondig af voordat u hem weer aanzet.
6. Nadat u de etenswaren in de diepvrieskast heeft
geplaatst moet u circa 2 uur wachten totdat het
apparaat weer op normale wijze functioneert.
Als u het apparaat voor langere tijd uitzet moet u de
binnenkant reinigen en de deuren openlaten.
37
Page 38

Voorzorgsmaatregelen
en advies
NL
! Het apparaat is ontworpen en vervaardigd volgens de
geldende internationale veiligheidsvoorschriften. Deze
aanwijzingen zijn geschreven voor uw veiligheid en u dient
ze derhalve goed door te nemen.
Dit apparaat voldoet aan de volgende EU
Richtlijnen:
- 73/23/EEG van 19/02/73 (Laagspanning) en
daaropvolgende wijzigingen;
- 89/336/EEG van 03/05/89
(Elektromagnetische Compatibiliteit) en
daaropvolgende wijzigingen;
- 2002/96/CE.
Algemene veiligheid
Dit apparaat is vervaardigd voor niet-professioneel
gebruik binnenshuis.
Het apparaat dient te worden gebruikt voor het bewaren
en het invriezen van levensmiddelen. Het dient uitsluitend
door volwassenen te worden gebruikt, volgens de
aanwijzingen die aangegeven zijn in dit instructieboekje.
Het apparaat dient niet buitenshuis te worden geplaatst,
ook niet in overdekte toestand. Het is erg gevaarlijk als
het in aanraking komt met regen of als het onweert.
Belangrijk: let erop dat u het koelcircuit niet beschadigt.
Afvalverwijdering
Verwijdering van het verpakkingsmateriaal: houdt u
aan de plaatselijke normen, zodat het
verpakkingsmateriaal hergebruikt kan worden.
De Europese Richtlijn 2002/96/EC over Vernietiging
van Electrische en Electronische Apparatuur (WEEE),
vereist dat oude huishoudelijke electrische apparaten
niet mogen vernietigd via de normale ongesorteerde
afvalstroom. Oude apparaten moeten apart worden
ingezameld om zo het hergebruik van de gebruikte
materialen te optimaliseren en de negatieve invloed
op de gezondheid en het milieu te reduceren. Het
symbool op het product van de afvalcontainer met
een kruis erdoor herinnert u aan uw verplichting, dat
wanneer u het apparaat vernietigt, het apparaat apart
moet worden ingezameld.
Consumenten moeten contact opnemen met de
locale autoriteiten voor informatie over de juiste wijze
van vernietiging van hun oude apparaat.
Het milieu sparen en respecteren
Plaats het apparaat in een koele, goed geventileerde
ruimte, behoedt het voor directe zonnestralen, plaats
het niet dichtbij een warmtebron.
Raak het apparaat niet blootsvoets of met natte handen
of voeten aan.
Raak nooit de koelelementen aan de binnenkant aan: u
zou zich kunnen verbranden of verwonden.
Haal de stekker nooit uit het stopcontact door aan het
snoer te trekken.
Maak de koelkast niet schoon of voer geen onderhoud uit
als de stekker nog in het stopcontact zit. Het is niet genoeg
dient u het GROENE lampje uit te schakelen
uit) om alle elektrische contacten uit te schakelen.
Als het apparaat defect is, mag u nooit aan het interne
systeem sleutelen om een reparatie uit te voeren.
Gebruik in de vakken waar ingevroren levensmiddelen
worden bewaard geen scherpe of puntige voorwerpen of
elektrische apparaten die niet door de fabrikant worden
aanbevolen.
Plaats nooit ijsblokjes die net uit de diepvrieskast komen
in uw mond.
Laat kinderen niet met het apparaat spelen. Ze mogen in
ieder geval nooit op de lades zitten of aan de deur
hangen.
Het verpakkingsmateriaal is geen speelgoed voor
kinderen.
(apparaat
Laat de deur, wanneer u etenswaren in de koel- of
diepvrieskast zet of eruit haalt, zo kort mogelijk
openstaan.
Elke keer dat de deur opengaat ontstaat een
aanzienlijk energieverlies.
Vul het apparaat niet met teveel etenswaren: voor een
optimale conservering moet de koude luchtstroom
vrijuit kunnen circuleren. Als u de circulatie
belemmert, zal de compressor constant blijven
werken.
Zet geen warme levensmiddelen in het apparaat: deze
zouden de binnentemperatuur verhogen waardoor de
compressor harder werkt en er een groter elektrisch
verbruik ontstaat.
Ontdooi het apparaat als er ijsvorming plaatsvindt (zie
Onderhoud); een dikke laag ijs vertraagt de
koudeoverdracht naar de levensmiddelen en verhoogt
het energieverbruik.
Houdt de afdichtingen efficiënt en schoon, zodat ze
goed aan de deuren sluiten en de kou niet laten
ontsnappen (zie Onderhoud).
38
Page 39

Storingen en oplossingen
Het zou kunnen gebeuren dat het apparaat niet functioneert. Voordat u de Servicedienst belt (zie Service), moet u
controleren dat het geen probleem is dat u kunt oplossen met behulp van volgende lijst.
Storingen:
Het groene controlelampje GROEN
gaat niet aan.
Het controlelampje ROOD
aan.
De motor blijft voortdurend
functioneren.
Het apparaat maakt veel lawaai.
blijft altijd
Mogelijke oorzaken / Oplossingen:
De stekker zit niet in het stopcontact, of niet voldoende om contact te
maken. Wellicht zit het hele huis zonder stroom.
De deur is niet goed dicht of wordt voortdurend open gemaakt.
De TEMPERATUURKNOP staat niet op de juiste stand.
Het GELE lichtje is aan (zie de beschrijving).
De deur is niet goed dicht of wordt constant geopend.
De buitentemperatuur is erg hoog.
De ijslaag is meer dan 2-3 mm hoog (zie Onderhoud).
Het apparaat staat niet waterpas (zie Installatie).
Het apparaat staat tussen meubels of objecten die trillen of geluid
maken.
Het verkoelingsgas maakt een licht geluid ook wanneer de compressor
stil staat: dit is normaal, het is geen storing.
NL
39
Page 40

Service
195065639.01
12/2007 - Xerox Business Services
NL
Voordat u de Servicedienst belt:
Controleer of u de storing niet zelf kunt oplossen (zie Storingen en oplossingen).
Indien, ondanks alle controles, het apparaat niet goed werkt en de storing blijft bestaan, kunt u zich tot de
dichtstbijzijnde Technische Dienst wenden.
serienummer
Max 15 w
Class
Clase
Classe
4,0
N
U moet doorgeven:
het type storing
het model apparaat (Mod.)
het serienummer (S/N)
Deze informatie bevindt zich op het typeplaatje
links onderin het koelgedeelte.
model
Gross
Bruto
Brut
75
Test
P.S-I.
TI
Net
Util
Utile
Pressure
HIGH-235
LOW 140
Cod.
RG 2330
Mod.
220 - 240 V- 50 Hz 150 W
340
Total
Gross
Bruto
Brut
Compr.
R 134 a
Syst.
kg 0,090
Kompr.
Made in Italy 13918
93139180000 S/N 704211801
Fuse
A
W
Gross
Bruto
Brut
Freez. Capac
Poder de Cong
kg/24 h
Wendt u zich nooit tot onbevoegde installateurs en weiger altijd de installatie van niet originele
onderdelen
40
Page 41

Instrucciones para el uso
Sumario
Instalación, 42
GBI
F
Colocación y conexión
CONGELADOR
E
Italiano, 1
English, 9
DE
Deutsch, 25
Nederlands
P
Portuges, 49
Ðóсский, 57
BFS 121 I/HA
NL
RU
, 33
Français, 17
E
Espanol, 41
Descripción del aparato, 43
Vista en conjunto
Puesta en funcionamiento y uso, 44
Poner en marcha el aparato
Utilizar el congelador en forma óptima
Mantenimiento y cuidados, 45
Cortar la corriente eléctrica
Limpiar el aparato
Evitar la formación de moho y malos olores
Descongelar el aparato
Precauciones y consejos, 46
Seguridad general
Eliminación
Ahorrar y respetar el ambiente
Anomalías y soluciones, 47
Asistencia, 48
Page 42

Instalación
! Es importante conservar este manual para poder consultarlo
E
cuando sea necesario. En caso de venta, cesión o traslado,
verifique que permanezca junto al aparato para informar al
nuevo propietario sobre su funcionamiento y sobre las
precauciones durante su uso
! Lea atentamente las instrucciones: contienen importante
información sobre la instalación, sobre el uso y sobre la
seguridad.
Colocación y conexión
Colocación
1. Coloque el aparato en un ambiente bien aireado y seco.
2. No obstruya las rejillas posteriores de ventilación: el
compresor y el condensador emiten calor y requieren una
buena aireación para funcionar bien y limitar el consumo
eléctrico.
3. Mantenga el aparato alejado de fuentes de calor (por ej. la
luz solar directa o una cocina eléctrica).
Conexión eléctrica
Después de su transporte, coloque el aparato
verticalmente y espere 3 horas como mínimo antes de
conectarlo a la instalación eléctrica. Antes de enchufarlo
en el tomacorriente, controle que:
el toma posea la conexión a tierra y que sea conforme
a la ley;
la toma pueda soportar la carga máxima de potencia
de la máquina indicada en la placa de características
ubicada en el interior del congelador (ej. 150 W);
la tensión de alimentación esté comprendida entre los
valores indicados en la placa de características
ubicada en el interior del congelador (ej. 220-240V);
el toma sea compatible con el enchufe del aparato.
Si no fuera así, solicite la sustitución del enchufe a un
técnico autorizado (ver Asistencia); no utilice
prolongaciones ni conexiones múltiples.
! Una vez instalado el aparato, el cable eléctrico y el toma
de corriente deben ser fácilmente accesibles.
! El cable no debe sufrir pliegues ni compresiones.
! El cable debe ser controlado periódicamente y
sustituido por técnicos autorizados (ver Asistencia).
! La empresa declina toda responsabilidad en los
casos en que no hayan sido respetadas estas
normas.
42
Page 43

Descripción del
aparato
Vista en conjunto
Las instrucciones sobre el uso son válidas para distintos modelos y por lo tanto es posible que la figura presente detalles
diferentes a los del aparato que Ud. ha adquirido.
Perilla de REGULACIÓN DE
LA TEMPERATURA
2
1
3
5
4
Perilla de REGULACIÓN DE LA TEMPERATURA
Regola automaticamente la temperatura all'interno
del'apparecchio.
Ruotando la manopola dalla posizione 1 alla posizione 5
è possibile ottenere temperature sempre più fredde.
Lámpara AMARILLA
Cuando está encendida (llevar el interruptor-1 hacia la
izquierda) permite el funcionamiento continuo del
compresor para alcanzar las bajas temperaturas
necesarias para el congelamiento rápido de los
alimentos frescos. Desplazando el interuptor-1 hacia la
derecha (lámpara amarilla cubierta) el congelamiento se
realiza según la regulación del termostato.
Lámpara AMARILLA
SN
INTERRUPTOR-1
Lámpara ROJA
Se enciende cuando la temperatura en el interior del
aparato es insuficiente para conservar los alimentos.
Lámpara VERDE
Cuando está encendida (desplace el interruptor-2 hacia
la derecha) indica que el aparato está conectado a la red
de alimentación. Desplazando el interruptor hacia la
izquierda (lámpara verde cubierta), el aparato está
desconectado de la red de alimentación.
Lámpara ROJA
Lámpara VERDE
I0
INTERRUPTOR-2
E
Compartimiento
CONGELAMIENTO y
CONSERVACIÓN
Compartimiento
CONSERVACIÓN
43
Page 44

Puesta en
funcionamiento y uso
Poner en marcha el aparato
E
! Antes de poner en marcha el aparato, siga las
instrucciones sobre la instalación (ver Instalación).
! Antes de conectar el aparato, limpie bien los
compartimientos y los accesorios con agua tibia y bicarbonato.
1. Introduzca el enchufe en la toma y verifique que se
enciendan los pilotos VERDE y ROJO (llevar el
interruptor-2 hacia la derecha).
2. Encienda el piloto AMARILLO (llevar el interruptor-1
hacia la izquierda).
3. Cuando el piloto rojo se haya apagado, proceda a
apagar el piloto AMARILLO (llevar el interruptor-1
hacia la derecha). A partir de ese momento se puede
utilizar el congelador.
Utilizar el congelador en forma óptima
Para regular la temperatura utilice la perilla de
REGULACIÓN DE LA TEMPERATURA.
1 = menos frío 5 = más frío
Se aconseja, en todo caso, poner una posición media.
No vuelva a congelar alimentos que se están por
descongelar o descongelados; dichos alimentos deben
ser previamente cocinados para ser consumidos (dentro
de las 24 horas).
Los alimentos frescos por congelar no se deben colocar
en contacto con los ya congelados; se deben colocar en
el compartimiento superior CONGELAMIENTO y
CONSERVACIÓN.
No coloque en el congelador botellas de vidrio que
contengan líquidos, tapadas o cerradas herméticamente
porque podrían romperse.
La cantidad diaria máxima de alimentos que se puede
congelar está indicada en la placa de características
ubicada en el interior del congelador (por ejemplo:
Kg/24h 4).
Pour procéder à lopération de congélation, allumez le
voyant JAUNE et introduisez les aliments à congeler
dans le compartiment supérieur en les rangeant de
manière à ce quils soient placés tout contre les
plaques refroidissantes et à ce quils ne touchent
surtout pas aux aliments déjà congelés stockés dans
le même compartiment. Au bout de 24 heures, quand
la congélation est terminée, éteignez la lampe jaune.
! No debe olvidar realizar esta operation si quiere
evitar gastos inútiles de energía.
La introducción de notables cantidades de alimentos
para congelar puede aumentar momentáneamente la
temperatura en el interior del congelador (encendido de
la lámpara roja). Dicha situación, siendo transitoria, no
perjudica la buena conservación de los alimentos
contenidos en el congelador.
Para obtener una buena conservación de alimentos
surgelados o congelados, no situar nunca el índice del
selector del termostato por debajo de 1, cualquiera
sea la temperatura ambiente. Para temperaturas
ambiente de hasta 25°-27°C el índice del selector
debe colocarse entre 1 y 2 mientras que para
temperaturas ambiente de hasta 32°C entre 2 y 3.
! Durante el congelamiento evite abrir la puerta.
! Cuando se produzca una interrupción de corriente o una
avería, no abra la puerta del congelador: de este modo, los
alimentos congelados se conservarán sin alteración durante
aproximadamente 9-14 horas.
! Luz testigo ALARMA. Cuando esta luz testigo roja
permanece encendida durante un tiempo prolongado,
significa que el funcionamiento del congelador no es regular
y que la temperatura se está elevando demasiado. (Llame
al Centro de Asistencia Técnica.)
Dicha luz testigo puede encenderse durante un breve
período de tiempo:
a) cuando la puerta permanece abierta durante un
tiempo prolongado (durante la carga o toma de
productos).
b) cuando se enciende el piloto AMARILLO.
En estos dos casos el encendido de la luz testigo no
indica ningún desperfecto/anomalía en el congelador.
44
Page 45

Mantenimiento y cuidados
Cortar la corriente eléctrica
Durante los trabajos de limpieza y mantenimiento, es
necesario aislar el aparato de la red de alimentación
eléctrica:
1. Proceda a apagar el piloto VERDE (llevar el
interruptor-2 hacia la izquierda);
2. desenchufe el aparato.
Limpiar el aparato
Las partes externas, las partes internas y las juntas de
goma se pueden limpiar con una esponja embebida
en agua tibia y bicarbonato de sodio o jabón neutro.
No utilice solventes, productos abrasivos, lejía o
amoníaco.
Los accesorios extraíbles se pueden colocar en
remojo en agua caliente y jabón o detergente para
platos. Enjuáguelos y séquelos con cuidado.
Evitar la formación de moho y malos
olores
El aparato está construido con materiales higiénicos
que no transmiten olores. Para mantener esta
característica es necesario que los alimentos estén
siempre protegidos y bien cerrados. Esto evitará
también la formación de manchas.
Descongelar el aparato
E
! Respete las instrucciones que se dan a continuación.
Para descongelar el aparato no utilice objetos cortantes
o con punta porque podrían dañar irremediablemente el
circuito refrigerante.
Si la capa de escarcha es superior a los 5 mm es
necesario realizar una descongelación manual:
1. el día anterior, encienda el piloto AMARILLO (llevar el
interruptor-1 hacia la izquierda) para enfriar más los
alimentos.
2. Cortar la corriente eléctrica.
3. Envuelva los alimentos congelados en papel de
periódico y colóquelos en otro congelador o en un
lugar fresco.
4. Deje la puerta abierta hasta que la escarcha se haya
derretido completamente; facilite la operación
colocando en el compartimiento congelador
recipientes con agua tibia.
5. Limpie y seque con cuidado el compartimiento
congelador antes de volver a encender el aparato.
6. Antes de introducir los alimentos en el compartimento
congelador, espere aproximadamente 2 horas para
restablecer las condiciones ideales de conservación.
Si se debe apagar el aparato por un largo período,
limpie su interior y deje las puertas abiertas.
45
Page 46

Precauciones y consejos
! El aparato ha sido proyectado y fabricado en
E
conformidad con las normas internacionales sobre
seguridad. Estas advertencias se suministran por
razones de seguridad y deben ser leídas atentamente.
Este equipamiento es conforme con las
siguientes Directivas Comunitarias:
- 73/23/CEE del 19/02/73 (Baja Tensión) y
sucesivas modificaciones;
-89/336/CEE del 03/05/89 (Compatibilidad
Electromagnética) y sucesivas modificaciones;
- 2002/96/CE.
Seguridad general
El aparato ha sido pensado para un uso de tipo no
profesional en el interior de una vivienda.
El aparato debe ser utilizado para conservar y
congelar alimentos sólo por personas adultas y según
las indicaciones contenidas en este manual.
El aparato no se debe instalar al aire libre ni siquiera si
el lugar está protegido debido a que es muy peligroso
dejarlo expuesto a la lluvia y tormentas.
Atención: no dañe el circuito refrigerante
No toque el aparato estando descalzo o con las
manos o pies mojados o húmedos.
No toque las piezas refrigerantes internas: podría
quemarse o herirse.
No desenchufe el aparato tirando del cable sino
sujetando el enchufe.
Es necesario desenchufar el aparato antes de realizar
operaciones de limpieza y de mantenimiento. No es
suficiente llevar el mando para LA REGULACIÓN DE
LA TEMPERATURA hasta la posición
apagado) para eliminar todo contacto eléctrico.
En caso de avería, nunca acceda a los mecanismos
internos para intentar una reparación.
En el interior de los compartimientos donde se
conservan alimentos congelados, no utilice utensilios
cortantes o con punta ni aparatos eléctricos, que no
sean los recomendados por el fabricante.
No introduzca en su boca cubitos apenas extraídos
del congelador.
No permita a los niños que jueguen con el aparato.
No se deben sentar en los cajones o colgarse de la
puerta.
Eliminación
Eliminación del material de embalaje: respete las
normas locales, de esta manera los embalajes podrán
ser reutilizados.
En base a la Norma europea 2002/96/CE de Residuos
de aparatos Eléctricos y Electrónicos (RAEE), los
electrodomésticos viejos no pueden ser arrojados en
los contenedores municipales habituales; tienen que
ser recogidos selectivamente para optimizar la
recuperación y reciclado de los componentes y
materiales que los constituyen, y reducir el impacto en
la salud humana y el medioambiente. El símbolo del
cubo de basura tachado se marca sobre todos los
productos para recordar al consumidor la obligación
de separarlos para la recogida selectiva.
El consumidor debe contactar con la autoridad local o
con el vendedor para informarse en relación a la
correcta eleminación de su electrodoméstico viejo.
Ahorrar y respetar el ambiente
Instale el aparato en una ambiente fresco y bien
aireado, protéjalo de la exposición directa a los rayos
solares y no lo coloque cerca de fuentes de calor.
Para introducir o extraer los alimentos, abra las puertas
del aparato el menor tiempo posible.
Cada apertura de las puertas produce un notable
gasto de energía.
No llene con demasiados alimentos el aparato: para
una buena conservación, el frío debe poder circular
libremente. Si se impide la circulación, el compresor
trabajará continuamente.
(aparato
No introduzca alimentos calientes: elevarían la
temperatura interior obligando al compresor a un
mayor trabajo con un gran gasto de energía eléctrica.
Descongele el aparato si se formara hielo (ver
Mantenimiento); una espesa capa de hielo vuelve más
difícil la cesión de frío a los alimentos y hace aumentar
el consumo de energía.
Mantenga eficientes y limpias las juntas para que se
adhieran bien a las puertas y no dejen salir el frío (ver
Mantenimiento).
Los embalajes no son juguetes para los niños.
46
Page 47

Anomalías y
soluciones
Puede suceder que el aparato no funcione. Antes de llamar a la Asistencia (ver Asistencia), controle que no se trate de un
problema fácilmente solucionable con la ayuda de la siguiente lista.
Anomalías:
La luz testigo verde de ALIMENTACIÓN
no se enciende.
El piloto de ALARMA está siempre
encendido.
El motor funciona continuamente.
El aparato hace mucho ruido.
Posibles causas / Solución:
El enchufe no está introducido en el tomacorriente o no lo está
suficientemente como para hacer contacto o bien en la casa no hay
corriente.
La puerta no está bien cerrada o se abre continuamente.
La puerta se abre muy a menudo;
El mando de REGULACIÓN DE LA TEMPERATURA no está en la
posición correcta.
La lámpara AMARILLA está encendida (ver Descripción).
La puerta no está bien cerrada o se abre continuamente.
La temperatura del ambiente externo es muy alta.
El espesor de la escarcha supera los 2-3 mm (ver Mantenimiento).
El aparato no fue instalado en un lugar bien plano (ver Instalación).
El aparato ha sido instalado entre muebles u objetos que vibran y
producen ruidos.
El gas refrigerante interior produce un ligero ruido aún cuando el
compresor está detenido: no es un defecto, es normal.
E
47
Page 48

Asistencia
195065639.01
12/2007 - Xerox Business Services
Antes de llamar a la Asistencia:
E
Verifique si la anomalía puede ser resuelta autónomamente (ver Anomalías y Soluciones).
Se, apesar de todos os controlos, o aparelho não funcionar e a anomalia que notou continuar a verificar-se,
chamar o Centro de Assistência Técnica mais próximo.
modelo
número de serie
Comunique:
el tipo de anomalía
el modelo de la máquina (Modele)
el número de serie (S/N)
Podrá encontrar la información en la placa de
características en el interior del aparato
Gross
Bruto
Brut
TI
75
Test
P.S-I.
RG 2330
Mod.
220 - 240 V- 50 Hz 150 W
340
Total
Gross
Bruto
Brut
Compr.
R 134 a
Syst.
kg 0,090
Kompr.
Made in Italy 13918
93139180000 S/N 704211801
Net
Util
Utile
Pressure
HIGH-235
LOW 140
Cod.
Gross
Bruto
Brut
Fuse
W
A
Freez. Capac
Poder de Cong
4,0
kg/24 h
Max 15 w
Class
Clase
Classe
N
Nunca recorrer a técnicos não autorizados e recusar sempre a instalação de peças sobresselentes
não originais.
La siguiente información es válida solo para España
Para otros países de habla hispana consulte a su vendedor
Ampliación de garantía
Llame al 902.363.539 y le informaremos sobre el fantástico plan de ampliación de garantía hasta 5 años.
Consiga una cobertura total adicional de
Piezas y componentes
Mano de obra de los técnicos
Desplazamiento a su domicilio de los técnicos
Y NO PAGUE AVERIAS NUNCA MAS
Servicio de asistencia técnica (SAT)
Llame al 902.133.133 y nuestros técnicos intervendrán con rapidez y eficacia, devolviendo el electrodoméstico a sus
condiciones óptimas de funcionamiento.
En el SAT encontrará recambios, accesorios y productos específicos para la limpieza y mantenimiento de su
electrodoméstico a precios competitivos.
ESTAMOS A SU SERVICIO
48
Page 49

Instruções para a utilização
CONGELADOR
Italiano, 1
English, 9
DE
Deutsch, 25
Nederlands
P
Portuges, 49
Ðóсский, 57
BFS 121 I/HA
GBI
NL
RU
Français, 17
Espanol, 41
, 33
E
Índice
P
Instalação, 50
F
Posicionamento e ligação
Descrição do aparelho, 51
Vista geral
Início e utilização, 52
Iniciar o aparelho
Utilize melhor o congelador
Manutenção e cuidados, 53
Interromper a corrente eléctrica
Limpar o aparelho
Evite bolor e maus cheiros
Degelar o aparelho
Precauções e conselhos, 54
Segurança geral
Eliminação
Economizar e respeitar o meio ambiente
Anomalias e soluções, 55
Assistência, 56
Page 50

Instalação
P
! É importante guardar este folheto para poder consultálo a qualquer momento. No caso de venda, cessão ou
mudança, assegure-se que o mesmo permaneça junto
com o aparelho para informar ao novo proprietário sobre
o funcionamento e as suas respectivas advertências.
! Leia com atenção as instruções: há informações
importantes sobre a instalação, a utilização e a
segurança.
Posicionamento e ligação
Posicionamento
1. Posicione o aparelho num ambiente bem ventilado e
não húmido.
2. Não tape as grades traseiras de ventilação: o
compressor e o condensador emitem calor e
necessitam de uma boa ventilação para funcionarem
bem e os consumos de electricidade diminuírem.
3. Deixe o aparelho longe de fontes de calor (a luz do sol
directa, um fogão eléctrico).
Ligação eléctrica
Depois do transporte, posicione o aparelho na vertical e
aguarde pelo menos 3 horas antes de ligar o sistema
eléctrico. Antes de colocar a ficha na tomada eléctrica,
certifique-se que:
a tomada tenha uma ligação à terra e seja em
conformidade com a legislação;
a tomada seja capaz de suportar a carga máxima de
potência da máquina, indicada na placa de
identificação situada dentro do compartimento
congelador (p. ex.: 150 W);
a tensão de alimentação seja entre os valores
indicados na placa de identificação, situada dentro do
congelador (p. ex.: 220-240 V);
a tomada seja compatível com a ficha do aparelho.
Em caso contrário peça a substituição da ficha a um
técnico autorizado (veja a Assistência); não utilize
extensões nem tomadas múltiplas.
! Com o aparelho instalado, deve ser fácil o acesso ao
cabo eléctrico e à tomada eléctrica.
! O cabo não deve ser dobrado nem sofrer pressões.
! O cabo deve ser verificado periodicamente e
substituído somente por técnicos autorizados (veja a
Assistência).
! A empresa exime-se de qualquer
responsabilidade se estas regras não forem
obedecidas.
50
Page 51

Descrição do aparelho
Visão geral
Estas instruções sobre a utilização são válidas para vários modelos, portanto é possível que na figura haja pormenores
diferentes do aparelho que adquiriu.
Manípulo
REGULAÇÃO DA
TEMPERATURA
O indicador luminoso AMARELO
2
1
3
5
4
Manípulo REGULAÇÃO DA TEMPERATURA
Este selector permite a regulação da temperatura interna
do congelador.
Ao girar o selector entre a posição 1 e a posição 4 é
possível obter temperaturas sempre mais frias.
O indicador luminoso AMARELO
Quando está aceso (mover o interruptor-1 para a
esquerda), consente o funcionamento contínuo do
compressor para que sejam alcançadas as temperaturas
baixas necessárias para o congelamento veloz de
alimentos frescos.
Ao mover o interruptor-1 para a direita (indicador
luminoso amarelo coberto), o congelamento funciona
conforme a regulação do termostato.
SN
INTERRUPTOR-1
Indicador luminoso VERMELHO
Acende-se quando a temperatura dentro do aparelho
não é suficiente para conservar os alimentos.
O indicador luminoso VERDE
Quando está aceso (mover o interruptor-2 para a direita),
indica que o aparelho está ligado à rede de alimentação.
Movendo o interruptor-2 para a esquerda (indicador
luminoso verde coberto), o aparelho está desligado da
rede de alimentação.
Indicador luminoso VERMELHO
Indicador luminoso VERDE
I0
INTERRUPTOR-2
P
Compartimento para
CONGELAÇÃO e
CONSERVAÇÃO
Compartimento para
CONSERVAÇÃO
51
Page 52

Início e utilização
P
! Antes de iniciar o aparelho, obedeça as instruções
para a instalação (veja a Instalação).
! Antes de ligar o aparelho limpe bem os
compartimentos e os acessórios com água morna e
bicarbonato.
1. Ligue a ficha na tomada e certifique-se que os
indicadores luminosos VERDE e VERMELHO
acendem-se (deslocar o interruptor-2 para a direita).
2. Acender o indicador luminoso AMARELO (deslocar o
interruptor-1 para a esquerda).
3. Quando o indicador luminoso vermelho estiver
desligado, desligue o indicador AMARELO (deslocar
o interruptor-1 para a direita). Nesta altura o
congelador já poderá utilizado.
Utilize melhor o congelador
Para regular a temperatura utilize o Manípulo
REGULAÇÃO DA TEMPERATURA
1
= menos frio 4 = mais frio.
É aconselhado em todo o caso uma posição média
Não congele novamente alimentos que estiverem a
descongelar-se ou descongelados; estes alimentos
devem ser cozidos para ser consumados (dentro de
24 horas).
Os alimentos frescos a serem congelados não devem
ser colocados encostados nos já congelados; mas
devem ser guardados no compartimento superior de
CONGELAÇÃO e CONSERVAÇÃO.
Não coloque no congelador garrafas de vidro
contendo líquidos, tampadas ou fechadas
hermeticamente, porque poderão partir-se.
A quantidade máxima quotidiana de alimentos a ser
congelada é indicada na placa das características
situada no interior do congelador (exemplo: Kg/24h
4).
Efectue a operação de degelo ligando o indicador
luminoso AMARELO e depois disto introduza os
alimentos a serem congelados no compartimento
superior, prestando atenção para que os mesmos
fiquem dispostos, o mais possível, em contacto
directo com os planos refrigerantes e que não entrem
em contacto com eventuais alimentos já congelados
presentes no mesmo compartimento. Após 24 horas,
uma vez terminado o degelo, desligue a lâmpada
amarela.
! Esta operação não deve ser esquecida, se desejarse evitar inúteis desperdícios de electricidade.
Iniciar o aparelho
A introdução de notáveis quantidades de alimentos a
serem congelados pode aquecer momentaneamente
a temperatura no interior do congelador (acende-se a
lâmpada vermelha). Esta situação, por ser transitória,
não prejudica a boa conservação dos alimentos já
guardados.
Para obter uma boa conservação dos alimentos
congelados ou dos pratos congelados, nunca colocar o
ponteiro do selector do termostato abaixo do 1, seja
qual for a temperatura ambiente. Para uma temperatura
ambiente até 25° ou 27°C o ponteiro do selector deve
ser colocado entre 2 e 3, enquanto que para
temperaturas ambiente de até 32°C entre 3 e 4.
! Durante a congelação evite abrir a porta.
! Em caso de interrupção de corrente ou de avaria, não
abra a porta do congelador: desta maneira os alimentos
congelados em casa ou industriais não sofrerão
alterações durante aproximadamente 9 ~ 14 horas.
! Indicador luminoso de ALARME. Quando este
indicador luminoso vermelho estiver acesso durante um
prazo prolongado, significa que o funcionamento do
congelador não está regular e que a temperatura está a
subir excessivamente. (Chamar o Centro de Assistência
Técnica.)
Este indicador luminoso pode acender-se um breve
período:
a) quando a porta permanecer aberta durante um prazo
prolongado (ao colocar-se ou retirar-se alimentos).
b) quando acende-se o indicador luminoso AMARELO.
Nestes casos o indicador acende-se mas não estará a
indicar defeito/anomalia alguma do congelador.
52
Page 53

Manutenção e cuidados
Interromper a corrente eléctrica
Durante as operações de limpeza e manutenção é
necessário isolar o aparelho da rede eléctrica:
1. Desligar o indicador luminoso VERDE (deslocar o
interruptor-2 para a esquerda);
2. desligue a ficha da tomada eléctrica.
Limpar o aparelho
As partes externas, as partes internas e as
guarnições de borracha podem ser limpadas com
uma esponja molhada de água morna e bicarbonato
de sódio ou sabão neutro. Não empregue solventes,
abrasivos, água de javel nem amoníaco.
Os acessórios removíveis podem ser colocados de
molho em água quente e sabão ou detergente para
pratos. Enxagúe-os e enxugue-os com cuidado.
Evite bolor e maus cheiros
Este aparelho foi fabricado com materiais higiénicos
que não transmitem odores. Para manter esta
característica é necessário os alimentos serem
sempre protegidos e bem fechados. Isto também
evitará a formação de manchas.
Se for deixar o aparelho muito tempo desligado,
limpe-o por dentro e deixe as portas abertas.
Descongelar o aparelho
P
! Obedeça as seguintes instruções.
Para degelar o aparelho não utilize objectos cortantes e
pontiagudos que poderiam danificar irremediavelmente o
circuito refrigerante.
Se a camada de gelo for superior a 5 mm. será
necessário degelar manualmente:
1. O dia anterior, acender o indicador luminoso
AMARELO (deslocar o interruptor-1 para a esquerda)
para arrefecer ainda mais os alimentos.
2. Interromper a corrente eléctrica
3. Envolva os alimentos congelados industrialmente ou
em casa com folhas de papel e guarde-os num sítio
fresco.
4. Deixe a porta aberta até o gelo ter-se derretido
inteiramente; para facilitar a operação coloque
recipientes com água morna dentro do compartimento
congelador.
5. Alguns aparelhos são
equipados com um
SISTEMA DE DRAIN
para conduzir a água
para fora. Deixe a água
defluir para um recipiente
(veja a figura).
6. Limpe e enxugue o compartimento congelador com
cuidado antes ligar novamente o aparelho.
7. Antes de introduzir os alimentos no compartimento
do congelador, aguardar aproximadamente duas
horas para o restabelecimento das condições ideais
de conservação.
53
Page 54

Precauções e conselhos
P
! Este aparelho foi projectado e fabricado em
conformidade com as regras internacionais de
segurança. Estas advertências são fornecidas para
razões de segurança e devem ser lidas com atenção.
Esta aparelhagem é em conformidade com a
seguintes Directivas da Comunidade Europeia:
- 73/23/CEE do 19/02/73 (Baixa Tensão) e
sucessivas modificações;
- 89/336/CEE do 03/05/89 (Compatibilidade
Electromagnética) e sucessivas modificações;
- 2002/96/CE..
Segurança geral
Este aparelho foi concebido para uma utilização de
tipo não profissional, no âmbito de uma morada.
Este aparelho deve ser utilizado somente por pessoas
adultas, para conservar e congelar alimentos, segundo
as instruções apresentadas neste folheto.
Este aparelho não deve ser instalado ao ar livre mesmo
se num sítio abrigado, porque é muito perigoso deixálo exposto à chuva e temporais.
Eliminação
Eliminação do material de embalagem: obedeça as
regras locais, ou reutilize as embalagens.
A directiva Europeia 2002/96/CE referente à gestão
de resíduos de aparelhos eléctricos e electrónicos
(RAEE), prevê que os electrodomésticos não devem
ser escoados no fluxo normal dos resíduos sólidos
urbanos. Os aparelhos desactualizados devem ser
recolhidos separadamente para optimizar a taxa de
recuperação e reciclagem dos materiais que os
compõem e impedir potenciais danos para a saúde
humana e para o ambiente. O símbolo constituído por
um contentor de lixo barrado com uma cruz deve ser
colocado em todos os produtos por forma a recordar
a obrigatoriedade de recolha separada.
Os consumidores devem contactar as autoridades
locais ou os pontos de venda para solicitar
informação referente ao local apropriado onde devem
depositar os electrodomésticos velhos.
Economizar e respeitar o meio
ambiente
Atenção: não danifique o circuito de refrigeração.
Não toque neste aparelho com os pés descalços nem
com as mãos ou os pés molhados ou húmidos.
Não toque nas partes de refrigeração internas: há
perigo de queimaduras e feridas.
Não puxe o cabo eléctrico para desligar a ficha da
tomada, mas pegue pela ficha.
É necessário desligar a ficha da tomada antes de
realizar operações de limpeza e manutenção. Não é
suficiente colocar os selectores de regulação da
temperatura na posição
eliminar todos os contactos eléctricos.
No caso de avaria, nunca mexa nos mecanismos
internos para tentar reparar.
Não utilize, no interior dos compartimentos para
guardar alimentos congelados, utensílios cortantes e
pontiagudos ou dispositivos eléctricos se não forem do
tipo recomendado pelo construtor.
Não coloque na boca cubos de gelo assim que os
retirar do congelador.
Não permita que crianças brinquem com este
aparelho. Em nenhum caso pode-se sentar-se nas
gavetas ou pendurar-se na porta.
(aparelho desligado) para
Instale este aparelho num ambiente fresco e bem
ventilado, proteja-o contra a exposição directa aos
raios do sol, não o coloque perto de fontes de calor.
Para colocar ou retirar alimentos, abra as portas
deste aparelho o mais rapidamente possível.
Cada vez que abrir as portas causa um notável gasto
de energia.
Não encha este aparelho com alimentos demais:
para uma boa conservação, o frio deve poder circular
livremente. Se impedir-se a circulação, o compressor
funcionará continuamente.
Não coloque dentro alimentos quentes: aumentarão a
temperatura interna forçando o compressor a
funcionar muito, com grande desperdício de energia
eléctrica.
Descongele este aparelho quando se formar gelo
(veja a Manutenção); uma camada grossa de gelo
torna mais difícil a transmissão do frio aos alimentos e
aumenta o consumo de energia.
Mantenha as guarnições eficientes e limpas, de
maneira que adiram bem nas portas e não deixem o
frio sair (veja a Manutenção).
Os embalagens não são brinquedos para as crianças.
54
Page 55

Anomalias e soluções
Pode acontecer que este aparelho não funcione. Antes de telefonar à Assistência técnica (veja a Assistência), verifique se
não se trata de um problema fácil de resolver com a ajuda da seguinte lista.
Anomalias:
O indicador luminoso VERDE não se
acende.
Indicador luminoso VERMELHO
sempre aceso.
O motor está a funcionar
continuamente.
O aparelho está a fazer ruído.
Possíveis cause / Solução:
A ficha não está ligada na tomada eléctrica ou não está bem ligada e
portanto não há contacto, ou então não há corrente em casa.
A porta não está bem fechada ou é aberta continuamente.
O selector REGULAÇÃO DA TEMPERATURA não está na posição certa.
O indicador luminoso AMARELO está aceso (veja Descrição).
A porta não está bem fechada ou é aberta continuamente.
A temperatura do ambiente externo está muito alta.
A espessura do gelo ultrapassa 2 ~ 3 mm. (veja a Manutenção).
O aparelho não foi instalado bem plano (veja a Instalação).
O aparelho foi instalado entre móveis ou objectos que vibram e emitem
ruídos.
O gás refrigerante interno produz um ruído leve mesmo quando o
compressor estiver parado: não é um defeito, é normal.
P
55
Page 56

Assistência
195065639.01
12/2007 - Xerox Business Services
P
Verifique se pode resolver a anomalia (veja as Anomalias e Soluções).
Se, apesar de todos os controlos, o aparelho não funcionar e a anomalia que notou continuar a verificar-se,
chamar o Centro de Assistência Técnica mais próximo.
Antes de contactar a Assistência técnica:
modelo
número de série
Comunique:
o tipo de anomalia
o modelo da máquina (Model)
o número de série (S/N)
Estas informações encontram-se na placa de
identificação situada no compartimento
congelador.
Gross
Bruto
Brut
TI
75
Test
P.S-I.
RG 2330
Mod.
220 - 240 V- 50 Hz 150 W
340
Total
Gross
Bruto
Brut
Compr.
R 134 a
Syst.
kg 0,090
Kompr.
Made in Italy 13918
93139180000 S/N 704211801
Net
Util
Utile
Pressure
HIGH-235
LOW 140
Cod.
Gross
Bruto
Brut
Fuse
W
A
Freez. Capac
Poder de Cong
4,0
kg/24 h
Max 15 w
Class
Clase
Classe
N
Nunca recorrer a técnicos não autorizados e recusar sempre a instalação de peças sobresselentes
não originais.
56
Page 57

Руководство по эксплуатации
МОРОЗИЛЬНИК
Italiano, 1
English, 9
DE
Deutsch, 25
Nederlands
P
Portuges, 49
Русский, 57
BFS 121 I/HA
GBI
NL
RU
Français, 17
Espanol, 41
, 33
E
Содержание
RU
Установка, 58
F
Расположение и подсоединение
Описание изделия, 59
Общий вид
Включение и эксплуатация, 60
Включение изделия
Оптимальное использование морозильной камеры
Техническое обслуживание и уход, 61
Отключение электропитания
Чистка изделия
Предотвращение появления плесени и неприятных
запахов
Замена лампочки
Предосторожности и рекомендации, 62
Общие правила безопасности
Утилизация
Экономия электроэнергии и охрана окружающей среды
Неисправности и методы их
устранения, 63
Техническое обслуживание, 64
Page 58

Установка
RU
! Важно сохранить данное руководство для
последующих консультаций. В случае продажи,
передачи изделия или при переезде на новую квартиру
необходимо проверить, чтобы руководство оставалось
вместе с изделием, для того чтобы его новый владелец
мог ознакомиться с правилами эксплуатации
холодильника и с соответствующими
предупреждениями.
! Внимательно прочитайте инструкции: в них
содержатся важные сведения об установке,
эксплуатации и безопасности изделия.
Расположение и подсоединение
Расположение
1. Установите изделие в сухом помещении с хорошей
вентиляцией. .
2. Не закрывайте вентиляционные решетки,
расположенные в задней части изделия: компрессор
и конденсатор вырабатывают тепло, и для их
исправного функционирования требуется хорошая
вентиляция, что позволяет также сократить расход
электроэнергии.
3. Не устанавливайте изделие рядом с источниками
тепла. (прямой солнечный свет, кухонные плиты).
Электрическое подсоединение
После доставки изделия установите его в вертикальное
положение и подождите не менее 3 часов перед его
подсоединением к сети электропитания. Перед
подсоединением вилки изделия к электрической розетке
необходимо проверить следующее:
электрическая розетка должна быть соединена с
заземлением и соответствовать нормативам;
электрическая розетка должна быть расчитана на
максимальную мощность изделия, указанную на
табличке с техническими характеристиками,
расположенной в левом нижнем углу внутри
холодильной камеры (например, 150 Вт);
напряжение электропитания должно быть в
пределах, указанных на табличке с техническими
характеристиками, расположенной в левом нижнем
углу внутри холодильной камеры (например, 220240 В);
электрическая розетка должна быть совместима с
вилкой изделия.
В противном случае поручите замену вилки изделия
уполномоченному технику (см. Обслуживание); не
используйте удлинители и тройники.
! Изделие должно быть установлено таким образом,
чтобы электрический провод и электророзетка были
легко доступны.
! Электрический провод изделия не должен быть согнут
или сжат.
! Регулярно проверяйте состояние электрического
провода изделия и при необходимости поручайте его
замену только уполномоченным техникам (ñì.
Обслуживание).
! Фирма снимает с себя всякую ответственность в
случае несоблюдения вышеописанных правил.
58
Page 59

Описание изделия
Общий вид
Руководство по эксплуатации относится к нескольким моделям, поэтому возможно, что на рисунке показаны детали,
отличные от приобретенного вами изделия. Описание наиболее сложных комплектующих приведено на следующих
страницах.
Регулятор
ТЕМПЕРАТУРЫ
2
1
3
5
4
ВЫКЛЮЧАТЕЛЬ - 1
Регулятор ТЕМПЕРАТУРЫ
Автоматически регулирует температуру в камере.
При вращении регулятора из положения 1 в
положение 5 температура в камере понижается.
ЖЕЛТЫЙ индикатор
Когда включен этот индикатор (переместите
выключатель-1 влево), он означает работу
компрессора в непрерывном режиме для достижения
низкой температуры, необходимой для быстрого
замораживания свежих продуктов.
При перемещении выключателя-1 вправо (желтый
индикатор закрыт) температура внутри морозильной
камеры будет настраиваться терморегулятором.
SN
ЖЕЛТЫЙ
индикатор
КРАСНЫЙ индикатор
Этот индикатор загорается, когда температура внутри
камеры слишком высокая для хранения продуктов.
ЗЕЛЕНЫЙ индикатор
Когда этот индикатор включен (переместите
выключатель-2 вправо), он означает, что изделие
подключено к сети электропитания. При перемещении
выключателя-2 влево (зеленый индикатор закрыт)
изделие обесточивается.
КРАСНЫЙ индикатор
ЗЕЛЕНЫЙ индикатор
I0
ВЫКЛЮЧАТЕЛЬ - 2
RU
Отделение для
ЗАМОРАЖИВАНИЯ è
ХРАНЕНИЯ
Отделение для
ХРАНЕНИЯ
59
Page 60

Включение и
эксплуатация
RU
Порядок включения изделия
! Перед тем как включить изделие выполните
указания по установке (см. Установка).
! Перед подсоединением изделия к сети
электропитания тщательно вымойте камеры и
аксессуары теплой водой с содой.
1. Вставьте штепсельную вилку изделия в сетевую
розетку и проверьте, чтобы ЗЕЛЕНЫЙ и КРАСНЫЙ
индикаторы загорелись (переместите выключатель2 вправо).
2. Включите ЖЕЛТЫЙ индикатор (переместите
выключатель-1 влево).
3. Когда красный индикатор погаснет, выключите
ЖЕЛТЫЙ индикатор (переместите выключатель-1
вправо). На данном этапе можно использовать
морозильную камеру.
Оптимальное использование
морозильной камеры
Per regolare la temperatura utilizzare la manopola
REGOLAZIONE DELLA TEMPERATURA.
1 = meno freddo 5 = più freddo
Si consiglia, comunque, una posizione media.
Не замораживайте повторно полностью или
частично размороженные продукты, так как они
должны быть приготовлены и употреблены в пищу в
течение 24 часов после их разморозки.
Не помещайте свежие замораживаемые продукты
рядом с уже замороженными. Поместите свежие
продукты в верхнее отделение ЗАМОРАЖИВАНИЕ И
ХРАНЕНИЕ.
Не помещайте в морозильную камеру герметично
закрытые стеклянные бутылки с жидкостью, так как
они могут взорваться.
На табличке с техническими характеристиками,
расположенной в левом нижнем углу холодильной
камеры, указан максимальный объем
замораживаемых продуктов в день (например: кг/24
ч 4).
Замораживание продуктов производится после
включения ЖЕЛТОГО индикатора, после чего
можно поместить свежие продукты в верхнюю
камеру, размещая продукты по возможности
непосредственно на охладительных полках и
обращая внимание, чтобы они не касались
мороженых продуктов, уже находящихся в
морозильной камере.
Через 24 часа, по завершении замораживания,
выключите желтый индикатор.
! Не забудьте выполнить эту операцию во
избежание расхода лишней электроэнергии.
Помещение в морозильную камеру больших
объемов свежих продуктов может привести к
временному повышению температуры внутри
камеры (загорается КРАСНЫЙ индикатор). Так как
это временное явление, состояние сохранности
мороженых продуктов от этого не ухудшается.
Для обеспечения качественного хранения
мороженых продуктов никогда не устанавливайте
индикатор терморегулятора ниже отметки 1
независимо от температуры окружающей среды.
Для температуры помещения вплоть до 25°-27°C
индикатор регулятора должен быть установлен
между 1 и 2, а для температуры вплоть до 32°C
между 2 и 3.
! Избегайте открывания двери морозильной камеры в
процессе замораживания.
! В случае внезапного отключения электропитания или
неисправности не открывайте дверь морозильной
камеры: таким образом замороженные продукты
сохранятся без вреда примерно в течение 9-14 часов.
! КРАСНЫЙ индикатор. Когда этот индикатор горит в
течение длительного времени, это означает, что
морозильная камера работает аномально, и что
внутри нее слишком высокая температура.
(Обратитесь в Технический Сервис.)
Этот индикатор может загореться на короткое время:
a) когда дверца камеры остается открытой в течение
длительного времени (в процессе помещения в
камеру продуктов или вынимания продуктов из
нее).
b) когда загорается ЖЕЛТЫЙ индикатор.
В этом случае включенный индикатор не означает
никакой аномалии/неисправности морозильной
камеры.
60
Page 61

Техническое
обслуживание и уход
Отключение электропитания
Перед началом чистки или технического обслуживания
изделия необходимо отключить изделие от сети
электропитания:
1. выключите ЗЕЛЕНЫЙ индикатор (переместите
выключатель-2 влево);
2. выньте вилку изделия из электрической розетки.
Уход за изделием
Наружные, внутренние элементы и резиновые
прокладки можно протирать губкой, смоченной в
теплом содовом растворе или в растворе
нейтрального моющего средства. Не используйте
растворители, абразивные чистящие средства,
отбеливатели или аммиак.
Съемные детали можно мыть под горячей водой с
мылом или со средством для мытья посуды.
Ополосните и тщательно высушите.
Предотвращение появления плесени и неприятных
запахов
Разморозка изделия
RU
! Строго следуйте описанным ниже инструкциям.
Для разморозки изделия не используйте острые или
режущие инструменты, которые могут непоправимо
повредить охладительную циркуляцию.
Если толщина инея превышает 5 мм, необходимо
произвести разморозку вручную:
1. за один день включите ЖЕЛТЫЙ индикатор
(переместите выключатель-1 влево) для
дополнительного охлаждения продуктов.
2. Отключение электропитания
3. Заверните мороженые продукты в бумагу и
переложите в другую морозилку или в холодное
место.
4. Оставьте дверь морозильной камеры открытой до
полного размораживания инея. Вы можете ускорить
эту операцию, поместив в морозильную камеру
емкость с теплой водой.
5. Вымойте и тщательно высушите морозильную
камеру перед включением изделия.
Изделие изготовлено из гигиеничных материалов, не
задерживающих запахи. Для сохранения этой
характеристики важно, чтобы продукты были всегда
плотно закрыты в своих упаковках. Это помогает
также избежать образования пятен.
Если требуется отключить изделие на длительный
период, вымойте его изнутри и оставьте двери
открытыми.
6. Перед помещением продуктов в морозильную
камеру подождите примерно 2 часа для
восстановления оптимальной температуры
хранения.
61
Page 62

Предосторожности и
рекомендации
RU
! Изделие спроектировано и изготовлено в соответствии с
международными нормативами безопасности. Необходимо
внимательно прочитать настоящие предупреждения,
составленные в целях вашей безопасности.
Данное изделие соответствует следующим
Директивам Европейского Сообщества:
-73/23/CEE от 19/02/73 (Низкое напряжение) с
последующими изменениям;
- 89/336/CEE от 03/05/89 (Электромагнитная
совместимость) с последующими
изменениями;
- 2002/96/CE.
Общие правила безопасности
Данное изделие предназначается для
непрофессионального использования в домашних
условиях.
Изделие предназначено для хранения и
замораживания продуктов, может быть использовано
только взрослыми людьми в соответствии с
инструкциями, приведенными в данном техническом
руководстве.
Запрещается устанавливать изделие на улице, даже
под навесом, так как воздействие на него дождя и
грозы является чрезвычайно опасным.
Не прикасайтесь к изделию влажными руками, а также
находясь босиком или с мокрыми ногами.
Не прикасайтесь к внутренним комплектующим
циркуляции хладагента: существует опасность ожегов
или порезов.
Не тяните за провод электропитания для отсоединения
вилки изделия из электрической розетки, возьмитесь за
вилку рукой.
Перед началом чистки или технического обслуживания
изделия необходимо вынуть вилку из электророзетки.
Для полного отключения электропитания
недостаточно выключить ЗЕЛЕНЫЙ индикатор
(изделие выключено).
В случае неисправности категорически запрещается
открывать внутренние механизмы изделия с целью
самостоятельного ремонта.
Для разморозки морозильных камер запрещается
использовать нерекомендованные производителем
холодильника острые, режущие инструменты или
электроприборы.
Не кладите в рот кубики льда, только что вынутые из
морозильной камеры.
Не разрешайте детям играть с изделием.
Категорически запрещается садиться на выдвижные
ящики холодильника или опираться на двери.
Не разрешайте детям играть с упаковочными
материалами.
Утилизация
Уничтожение упаковочных материалов: соблюдайте
местные нормативы по утилизации упаковочных
материалов.
Европейская директива 2002/96/EC об утилизации
электрического и электронного оборудования
(WEEE) устанавливает правила утилизации
вышедших из строя бытовых электроприборов.
В целях минимизации отрицательного воздействия
утилизованных приборов на окружающую среду,
снижения рисков для здоровья населения, а также
оптимизации процесса переработки и повторного
использования материалов, сбор изношенного
оборудования должен осуществляться вне рамок
общегородских систем сбора и утилизации мусора.
Символ «перечеркнутого мусорного ведра»,
нанесенный на продукцию, напоминает об
обязанности соблюдения специальной процедуры
утилизации бытовой техники.
Потребитель может сдать изношенное оборудование
в специальных пунктах приема или, если это
разрешено национальными законодательствами,
возвратить компании при покупке нового,
аналогичного продукта.
На сегодняшний день все ведущие производители
бытовой техники активно работают над созданием
систем сбора и утилизации изношенной бытовой
техники.
Экономия электроэнергии и охрана
окружающей среды
Установите изделие в нежарком помещении с
хорошей вентиляцией, вдали от прямого
воздействия солнечного света и источников тепла.
При открывании дверей холодильнка старайтесь
держать их открытыми как можно меньше.
При каждом открывании дверей происходит
значительный расход электроэнергии.
Не помещайте в холодильник слишком много
продуктов. для надлежащего хранения продуктов
необходимо обеспечить свободную циркуляцию
холода между ними. В случае отсутствия такой
циркуляции компрессор будет работать непрерывно.
Не помещайте в холодильник горячие продукты: это
приведет к повышению температуры внутри
холодильника со значительной нагрузкой на
компрессор и значительным расходом
электроэнергии.
Следите за состоянием уплотнителей и прочищайте
их при необходимости. Уплотнители должны хорошо
прилегать к дверям, не пропуская холод (ñì.
Техническое обслуживание).
62
Page 63

Неисправности и
методы их устранения
Если ваш холодильник не работает. Прежде чем обратиться в Центр Технического обслуживания (см. Техническое
обслуживание), проверьте, можно ли устранить неисправность, используя рекомендации, приведенные в следующем
перечне.
Неисправности:
ЗЕЛЕНЫЙ индикатор не включается.
КРАСНЫЙ индикатор постоянно
включен.
Компрессор работает непрерывно.
Холодильник работает слишком
шумно.
Возможные причины / Методы устранения:
Вилка не соединена с электрической розеткой или соединена плохо и
не обеспечивает контакта, или отключилось электропитание.
Дверца камеры плохо закрыта или часто открывается.
Рукоятка РЕГУЛЯТОРА ТЕМПЕРАТУРЫ установлена в неправильном
положении.
ЖЕЛТЫЙ индикатор включен (см. Описание.).
Дверца камеры плохо закрыта или часто открывается.
Слишком высокая температура в помещении.
Толщина слоя инея превышает 2-3 мм (см. Техническое
обслуживание).
Изделие установлено неровно (см. Установка).
Изделие установлено между вибрирующими или шумоиздающими
кухонными элементами или предметами.
Хладагент в циркуляции производит легкий шум также при
остановленном компрессоре: это не является неисправностью, а
нормальным явлением.
RU
63
Page 64

Техническое
обслуживание
195065639.01
12/2007 - Xerox Business Services
RU
Перед тем как обратиться в Центр Технического обслуживания:
проверьте, можно ли устранить неисправность самостоятельно (см. Неисправности и методы их
устранения).
модель
серийный номер
При обращении в Центр Технического
Обслуживания необходимо сообщить:
тип неисправности
модель изделия (Мод.)
номер тех. паспорта (серийный ¹)
Все эти данные вы найдете на табличке с
техническими характеристиками,
расположенной в левом нижнем углу
холодильной камеры.
RG 2330
Mod.
220 - 240 V- 50 Hz 150 W
340
Total
Gross
Bruto
Brut
Compr.
R 134 a
Syst.
kg 0,090
Kompr.
Made in Italy 13918
Gross
Bruto
Brut
75
Test
P.S-I.
TI
Net
Util
Utile
Pressure
HIGH-235
LOW 140
93139180000 S/N 704211801
Cod.
Gross
Bruto
Brut
W
Fuse
A
Freez. Capac
Poder de Cong
kg/24 h
4,0
Max 15 w
Class
Clase
Classe
N
Не пользуйтесь услугами лиц, не уполномоченных производителем.
При ремонте требуйте использования оригинальных запасных частей.
64
 Loading...