

Page 1

Instructions for
installation and use
WASHING MACHINE
EN
English,1
AQUALTIS
UK
Українська,13
TR
Türkçe,25
Contents
Installation, 2-3
Unpacking and levelling
Connecting the electricity and water supplies
Technical data
Care and maintenance, 4
Cutting off the water and electricity supplies
Cleaning the machine
Cleaning the detergent dispenser drawer
Caring for your appliance drum
Cleaning the pump
Checking the water inlet hose
Precautions and tips, 5
General safety
Disposal
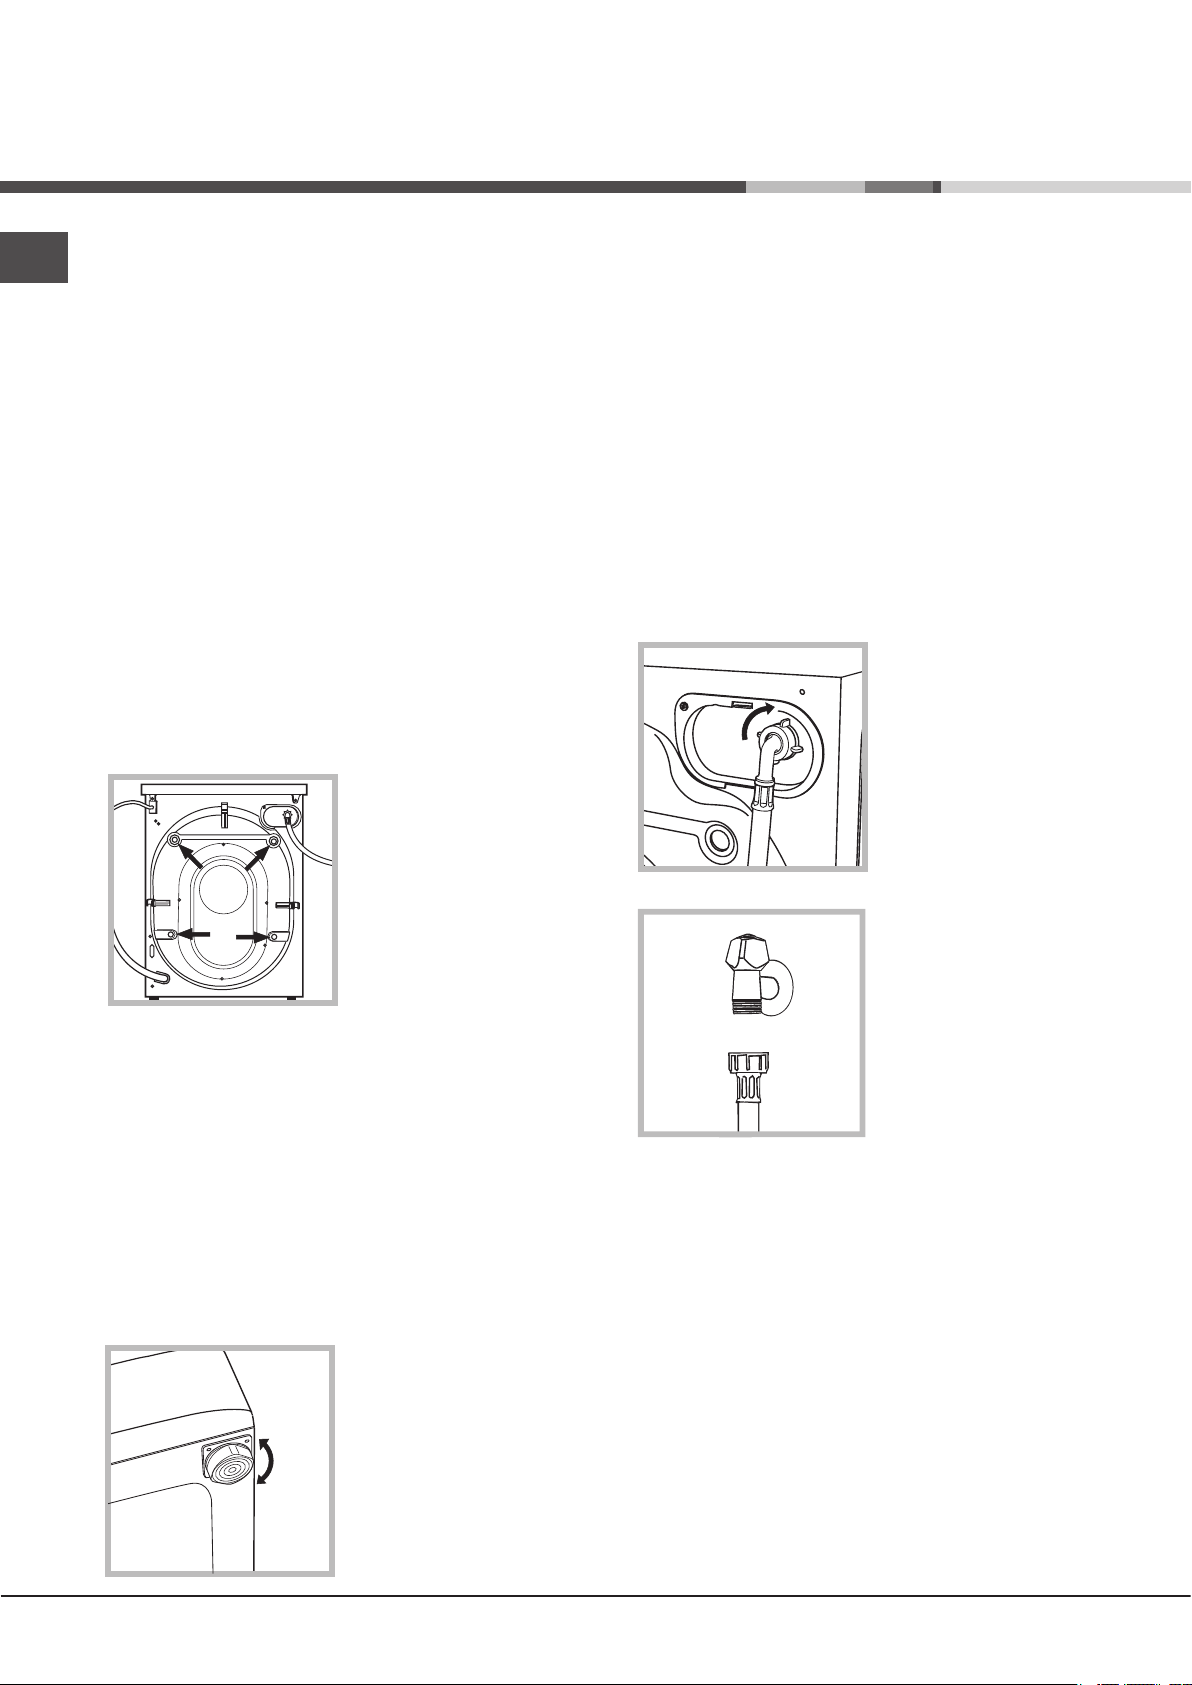
Opening the porthole door manually
Description of the machine, 6-7
Control panel
Running a wash cycle, 8
EN
AQ92F 29
Wash cycles and options, 9
Table of wash cycles
Wash options
Detergents and laundry, 10
Detergent
Preparing the laundry
Washing recommendations
Load balancing system
Trouble shooting, 11
Assistance, 12
1
Page 2
Installation
EN
! This instruction manual should be kept in a
safe place for future reference. If the washing
machine is sold, given away or moved, please
ensure the manual is kept with the machine,
so that the new owner may benefit from the
advice contained within it.
! Read these instructions carefully: they
contain vital information relating to the safe
installation and operation of the appliance.
! Inside the pack containing this manual, you
will also find the guarantee and all the details
necessary for installation.
Unpacking and levelling
Unpacking
1. Once you have removed all the packaging
from the washing machine, make sure it has
not been damaged during transportation.
If it has been damaged, contact the retailer
and do not proceed any further with the
installation process.
2. Remove the 4
protective screws
(used during
transportation) and
the corresponding
spacer, located on
the rear part of the
appliance (see figure).
3. Close off the holes using the plastic plugs
supplied in the pack.
4. Keep all the parts in a safe place; they will
be needed again if the washing machine is
moved to another location, to prevent the
inside of the appliance being damaged.
! Packaging materials should not be used as
toys for children.
! If the appliance is levelled correctly, it will
be more stable and much less likely to cause
vibrations and noise while it is operating,
particularly during the spin cycle.
! If it is placed on carpet or a rug, adjust the
feet in such a way as to allow a sufficient
ventilation space underneath the washing
machine.
Connecting the electricity and
water supplies
Connecting the water inlet hose
! Before connecting the inlet hose to the water
supply, run the water until it is perfectly clear.
1. Connect the inlet
hose to the machine
by screwing it onto
the cold water inlet of
the appliance, which
is situated on the top
right-hand side of
the rear part of the
appliance (see figure).
2. Connect the inlet
hose by screwing it to
a cold water tap using
a 3/4 gas threaded
connection (see
figure).
3. Make sure that the hose is not folded over
or bent.
Levelling
1. Place the washing machine on a flat sturdy
floor, without resting it up against walls or
cabinets.
2. If the floor is
uneven, the front feet
of the machine may
be adjusted until it
reaches a horizontal
position (the angle of
inclination must not
exceed 2 degrees).
22
! The water pressure at the tap must fall within
the values indicated in the Technical data table
(see next page).
! If the inlet hose is not long enough, contact a
specialised shop or an authorised technician.
! Never use second-hand or old inlet hoses;
use the products supplied with the machine.
Page 3
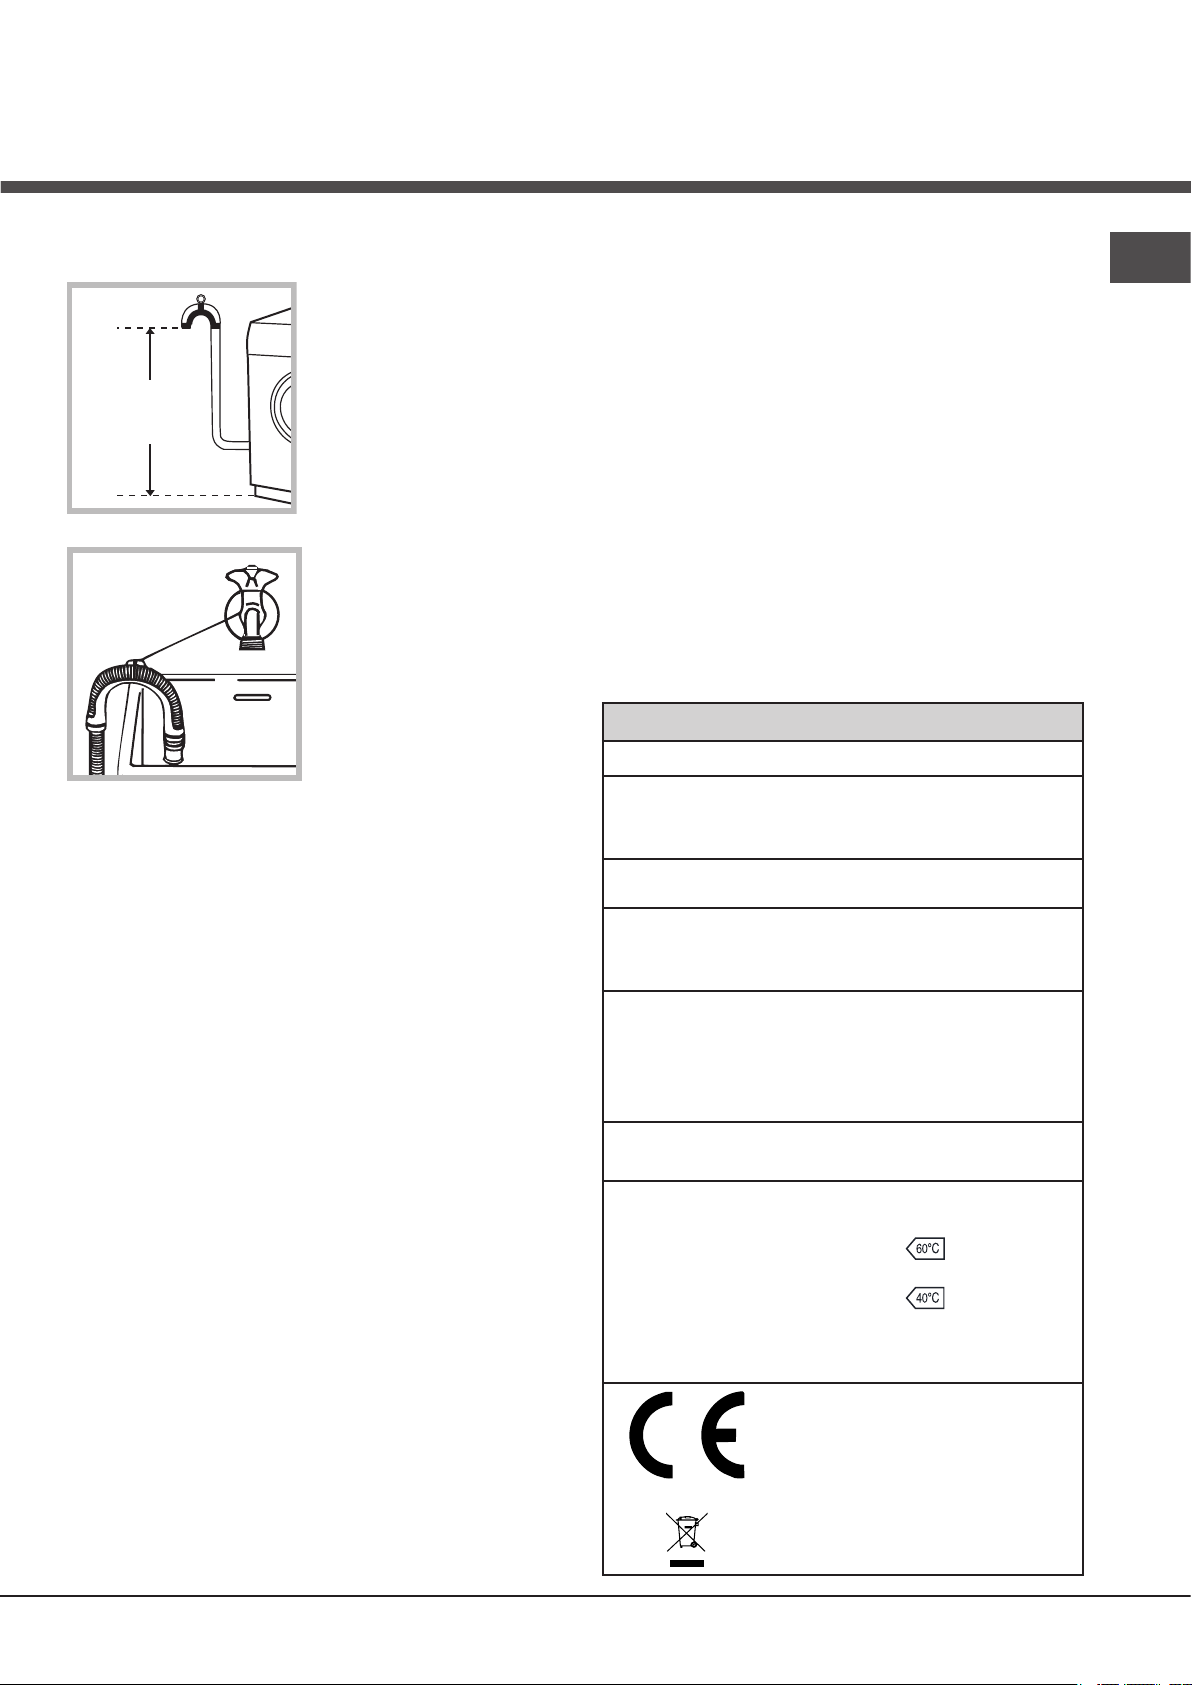
Connecting the drain hose
65 - 100 cm
! Do not use extension cords or multiple sockets.
EN
Connect the drain
hose to drain duct
piping or a wall drain
located between 65
and 100 cm above
the floor, making sure
it is not bent at all.
Alternatively, rest the
drain hose on the
side of a washbasin
or bathtub, fastening
the duct supplied to
the tap (see figure).
The free end of the
hose should not be
underwater.
! We advise against the use of hose extensions;
if it is absolutely necessary, the extension must
have the same diameter as the original hose
and must not exceed 150 cm in length.
! The cable should not be bent or compressed.
! The power supply cable and plug must only
be replaced by authorised technicians.
Warning! The company shall not be held
responsible in the event that these regulations
are not respected.
Technical data
Model
Dimensions
Capacity
AQ92F 29
width 59.5 cm
height 85 cm
depth 58 cm
from 1 to 9 kg
Electrical connections
Before plugging the appliance into the
electricity socket, make sure that:
• the socket is earthed and complies with all
applicable laws;
• the socket is able to withstand the maximum
power load of the appliance as indicated in
the Technical data table (see opposite);
• the power supply voltage falls within the
values indicated in the Technical data table
(see opposite);
• the socket is compatible with the plug of the
appliance. If this is not the case, have the
socket or the plug replaced.
! The machine must not be installed outdoors,
even in covered areas. It is extremely
dangerous to leave the appliance exposed to
rain, storms and other weather conditions.
! The mains socket must remain within easy reach
after the washing machine has been installed.
Electrical
connections
Water connections
Spin speed
Test wash
cycles in
accordance with
directives
1061/2010
and
1015/2010
please refer to the technical
data plate fixed to the machine
maximum pressure
1 MPa (10 bar)
minimum pressure
0.05 MPa (0.5 bar)
drum capacity 58 litres
up to 1200 rotations per
minute
programme
;
Cotton standard 60°C.
programme ;
Cotton standard 40°C.
This appliance conforms to
the following EC Directives:
- 2004/108/EC (Electromagnetic Compatibility)
- 2006/95/EC (Low Voltage)
- 2012/19/EU
3
Page 4
Care and maintenance
1
2
1
2
2
EN
Cutting off the water and
electricity supplies
• Turn off the water tap after every wash cycle.
This will limit wear on the hydraulic system in
the machine and help to prevent leaks.
• Unplug the appliance when cleaning it and
during all maintenance work.
Cleaning the machine
The outer parts and rubber components of the
appliance can be cleaned using a soft cloth
soaked in lukewarm soapy water. Do not use
solvents or abrasives.
Cleaning the detergent dispenser
drawer
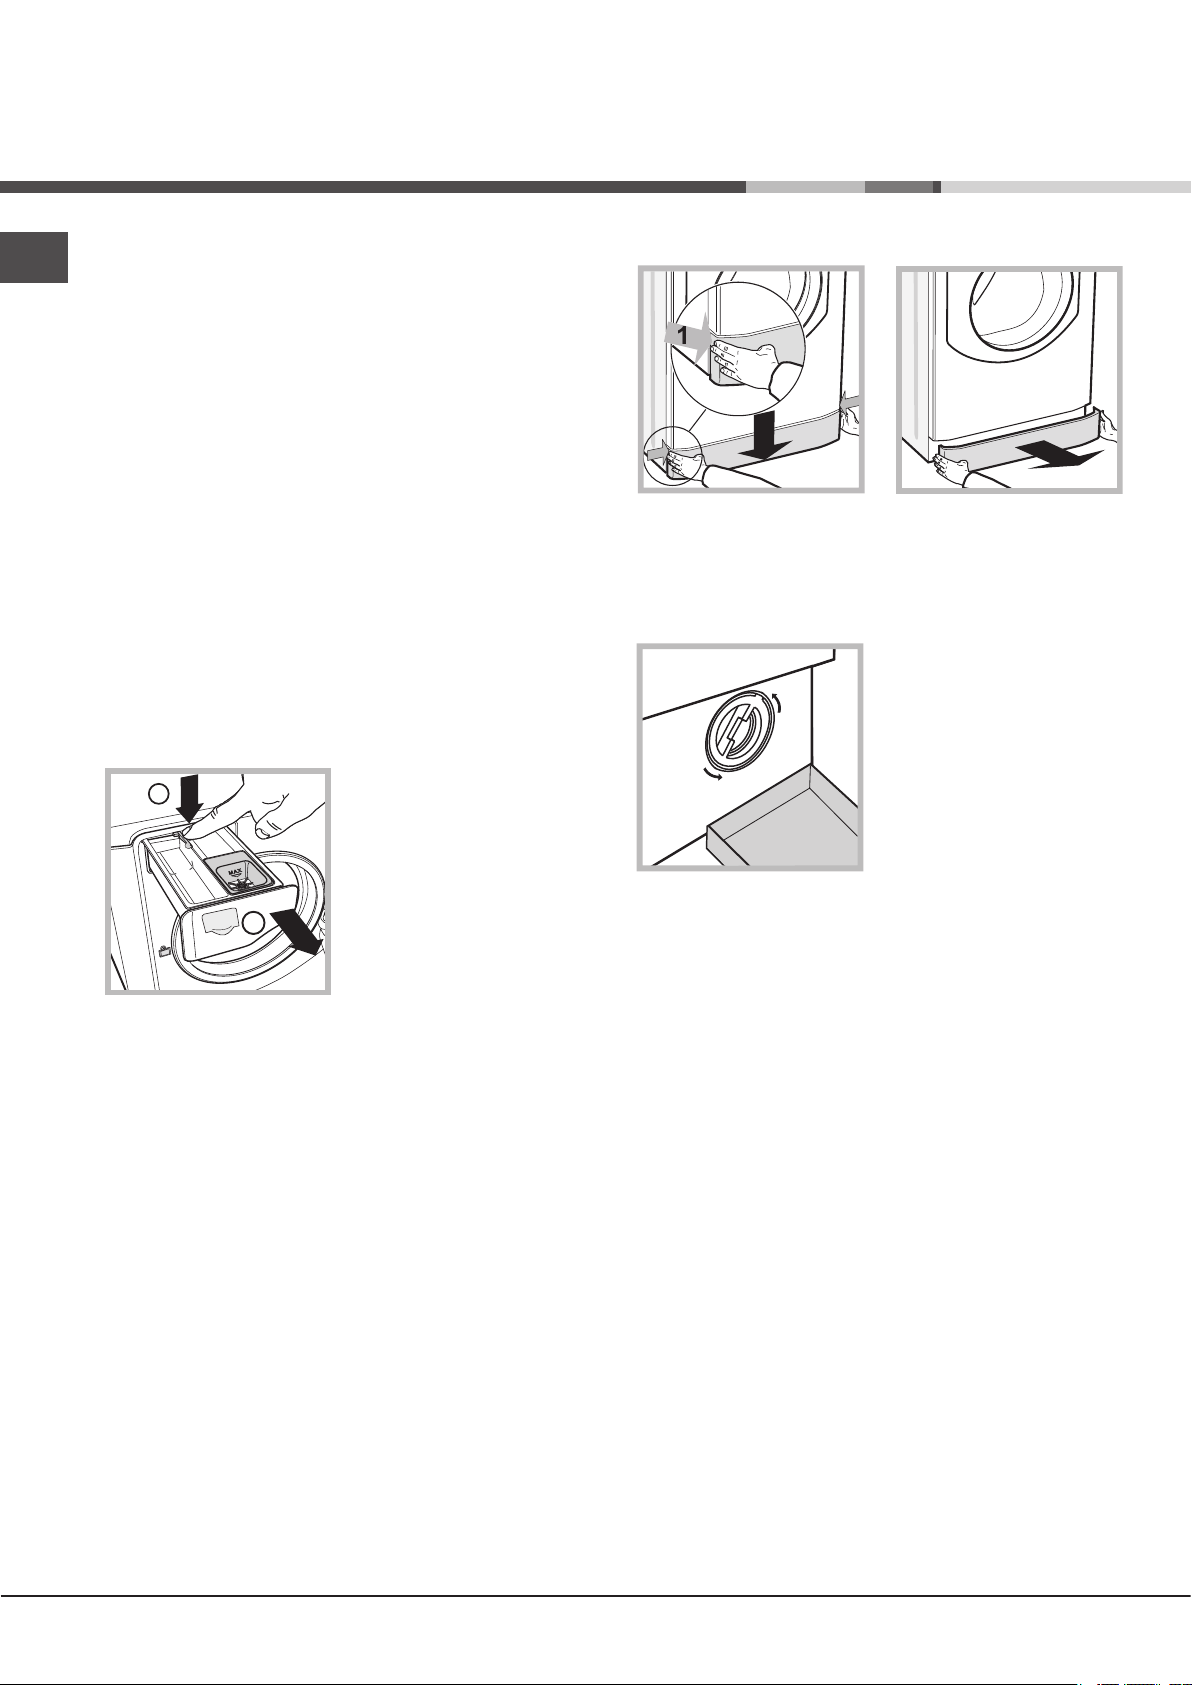
To remove the drawer,
press lever (1) and pull
the drawer outwards (2)
(see figure).
Wash it under running
water; this procedure
should be repeated
frequently.
Caring for your appliance drum
To access the pre-chamber:
1. take off the cover panel on the front of the
machine by first pressing it in the centre and
then pushing downwards on both sides until
you can remove it (see figures);
2. position a container
so that it will collect the
water which flows out
(approximately 1.5 l)
(see figure);
3. unscrew the lid by
rotating it in an anticlockwise direction (see
figure);
4. clean the inside thoroughly;
5. screw the lid back on;
6. reposition the panel, making sure the hooks
are securely in place before you push it onto
the appliance.
• Always leave the door ajar to prevent
unpleasant odours from forming.
Cleaning the pump
The washing machine is fitted with a selfcleaning pump which does not require any
maintenance. Sometimes, small items (such
as coins or buttons) may fall into the protective
pre-chamber at the base of the pump.
! Make sure the wash cycle has finished and
unplug the appliance.
4
Checking the water inlet hose
Check the inlet hose at least once a year. If
there are any cracks, it should be replaced
immediately: during the wash cycles, water
pressure is very strong and a cracked hose
could easily split open.
Page 5
Precautions and tips
! The machine was designed and constructed in
accordance with international safety regulations. The
following information is provided for safety reasons and
must therefore be read carefully.
General safety
• This appliance was designed for domestic use only.
• This appliance can be used by children
aged from 8 years and above and
persons with reduced physical, sensory or
mental capabilities or lack of experience
and knowledge if they have been given
supervision or instruction concerning use of
the appliance in a safe way and understand
the hazards involved. Children shall not
play with the appliance. Cleaning and user
maintenance shall not be made by children
without supervision.
• Do not touch the machine when barefoot or with wet or
damp hands or feet.
• Do not pull on the power supply cable when unplugging
the appliance from the electricity socket. Hold the plug
and pull.
• Do not touch the drained water as it may reach
extremely high temperatures.
• Never force the porthole door. This could damage the
safety lock mechanism designed to prevent accidental
opening.
• If the appliance breaks down, do not under any
circumstances access the internal mechanisms in an
attempt to repair it yourself.
• Always keep children well away from the appliance while
it is operating.
• If it must be moved, proceed with the help of two or
three people and handle it with the utmost care. Never
try to do this alone, because the appliance is very heavy.
• Before loading laundry into the washing machine, make
sure the drum is empty.
that household appliances should not be disposed of
using the normal solid urban waste cycle. Exhausted
appliances should be collected separately in order to
optimise the cost of re-using and recycling the materials
inside the machine, while preventing potential damage
to the atmosphere and to public health. The crossed-out
dustbin is marked on all products to remind the owner
of their obligations regarding separated waste collection.
For more information relating to the correct disposal of
household appliances, owners should contact their local
authorities or appliance dealer.
Opening the porthole door manually
In the event that it is not possible to open the porthole door
due to a powercut, and if you wish to remove the laundry,
proceed as follows:
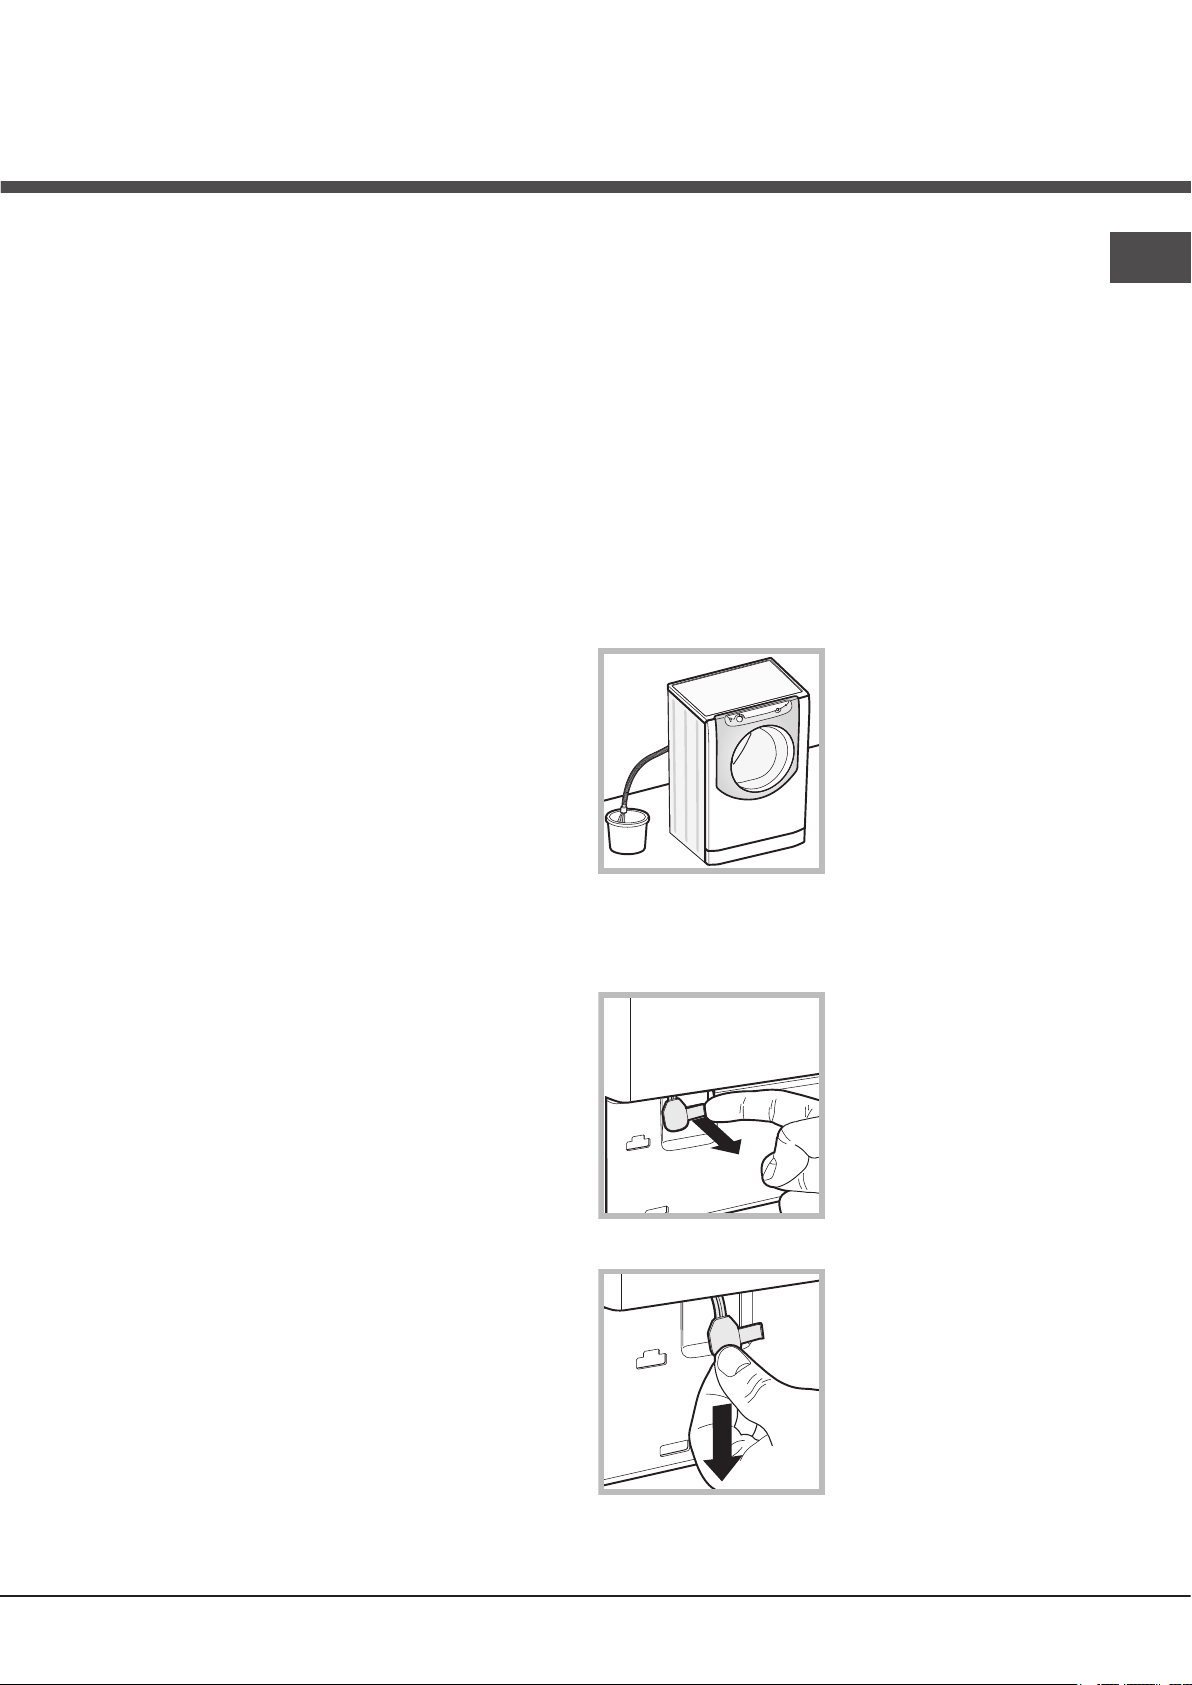
1. remove the plug from the
electrical socket.
2. make sure the water level
inside the machine is lower
than the door opening; if
it is not, remove excess
water using the drain hose,
collecting it in a bucket as
indicated in the figure.
3. remove the cover panel on the lower front part of the
washing machine (see overleaf).
4. pull outwards using the
tab as indicated in the figure,
until the plastic tie-rod is freed
from its stop position; pull
downwards until you hear a
“click”, which indicates that
the door is now unlocked.
EN
Load balancing system
Before every spin cycle, to avoid excessive vibrations
before every spin and to distribute the load in a uniform
manner, the drum rotates continuously at a speed which
is slightly greater than the washing rotation speed. If,
after several attempts, the load is not balanced correctly,
the machine spins at a reduced spin speed. If the load is
excessively unbalanced, the washing machine performs
the distribution process instead of spinning. To encourage
improved load distribution and balance, we recommend
small and large garments are mixed in the load.
Disposal
• Disposing of the packaging materials: observe local
regulations so that the packaging may be re-used.
• The European Directive 2012/19/EU relating to Waste
Electrical and Electronic Equipment (WEEE) states
5. open the door; if this is
still not possible repeat the
procedure.
6. reposition the panel, making sure the hooks are securely
in place before you push it onto the appliance.
5
Page 6
3
1
2
1
8
0
2
1
0
1
5
0
1
2
0
9
0
6
0
B
A
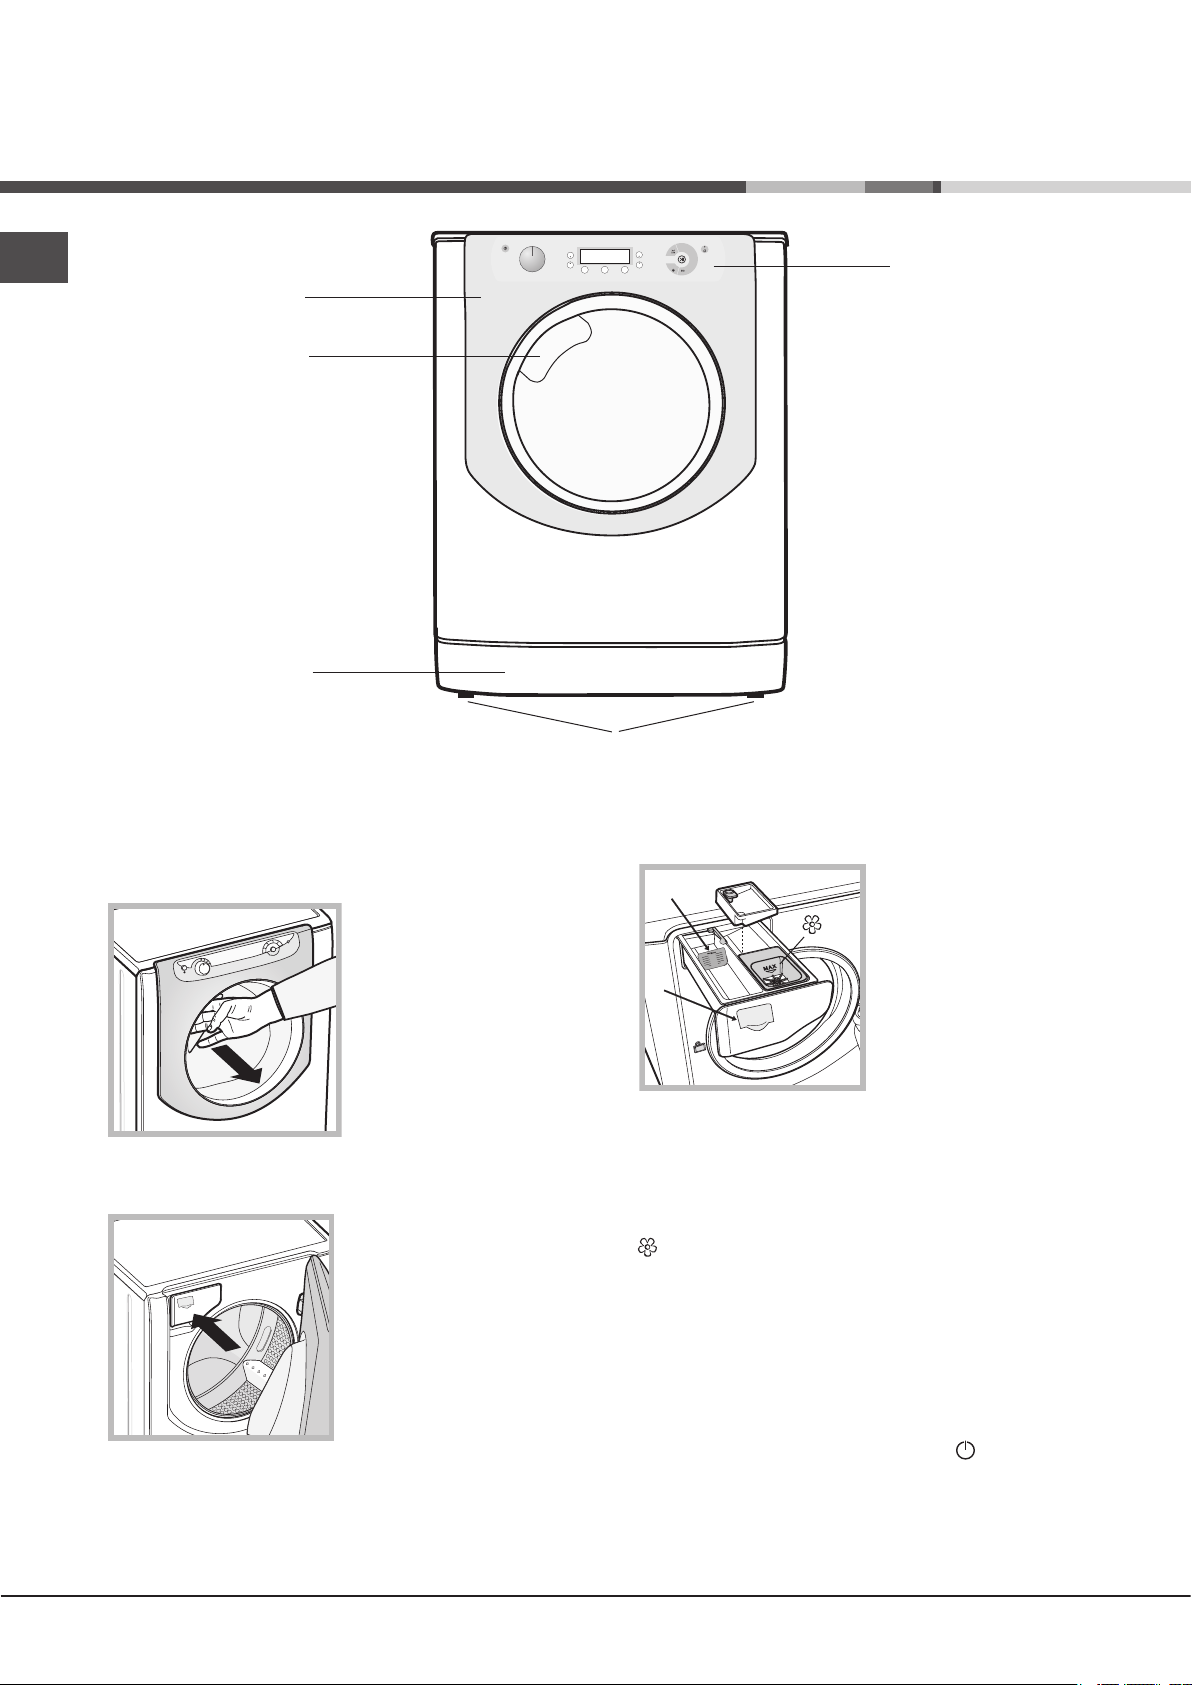
Description of the machine
EN
PORTHOLE DOOR
PORTHOLE DOOR
HANDLE
KICK STRIP
CONTROL
PANEL
ADJUSTABLE FEET
PORTHOLE DOOR
Always use the handle to
open the porthole door (see
figure).
1. pre-wash compartment:
use powder detergent.
! Before pouring in the
detergent, make sure that
extra compartment 3 has
been removed.
2. main wash compartment:
If liquid detergent is used,
it is recommended that the
removable plastic partition A
(supplied) be used for proper dosage.If powder detergent
is used, place the partition into slot B.
DETERGENT DISPENSER DRAWER
3. extra compartment: Bleach
! The use of extra compartment 3 excludes the pre-
The detergent dispenser
drawer is located inside
the machine and can be
accessed by opening the
door.
For more information on
detergent measures, please
refer to the chapter entitled
“Detergents and laundry”.
wash function.
washing additives compartment: for fabric softener
or liquid additives. We recommend that the maximum
level indicated by the grille is not exceeded, and that
concentrated fabric softeners are diluted.
Standby mode
This washing machine, in compliance with new energy
saving regulations, is fitted with an automatic standby
system which is enabled after about 30 minutes if no
activity is detected. Press the ON-OFF button briefly and
wait for the machine to start up again.
Consumption in off-mode: 0,5 W
Consumption in Left-on: 8 W
6
Page 7
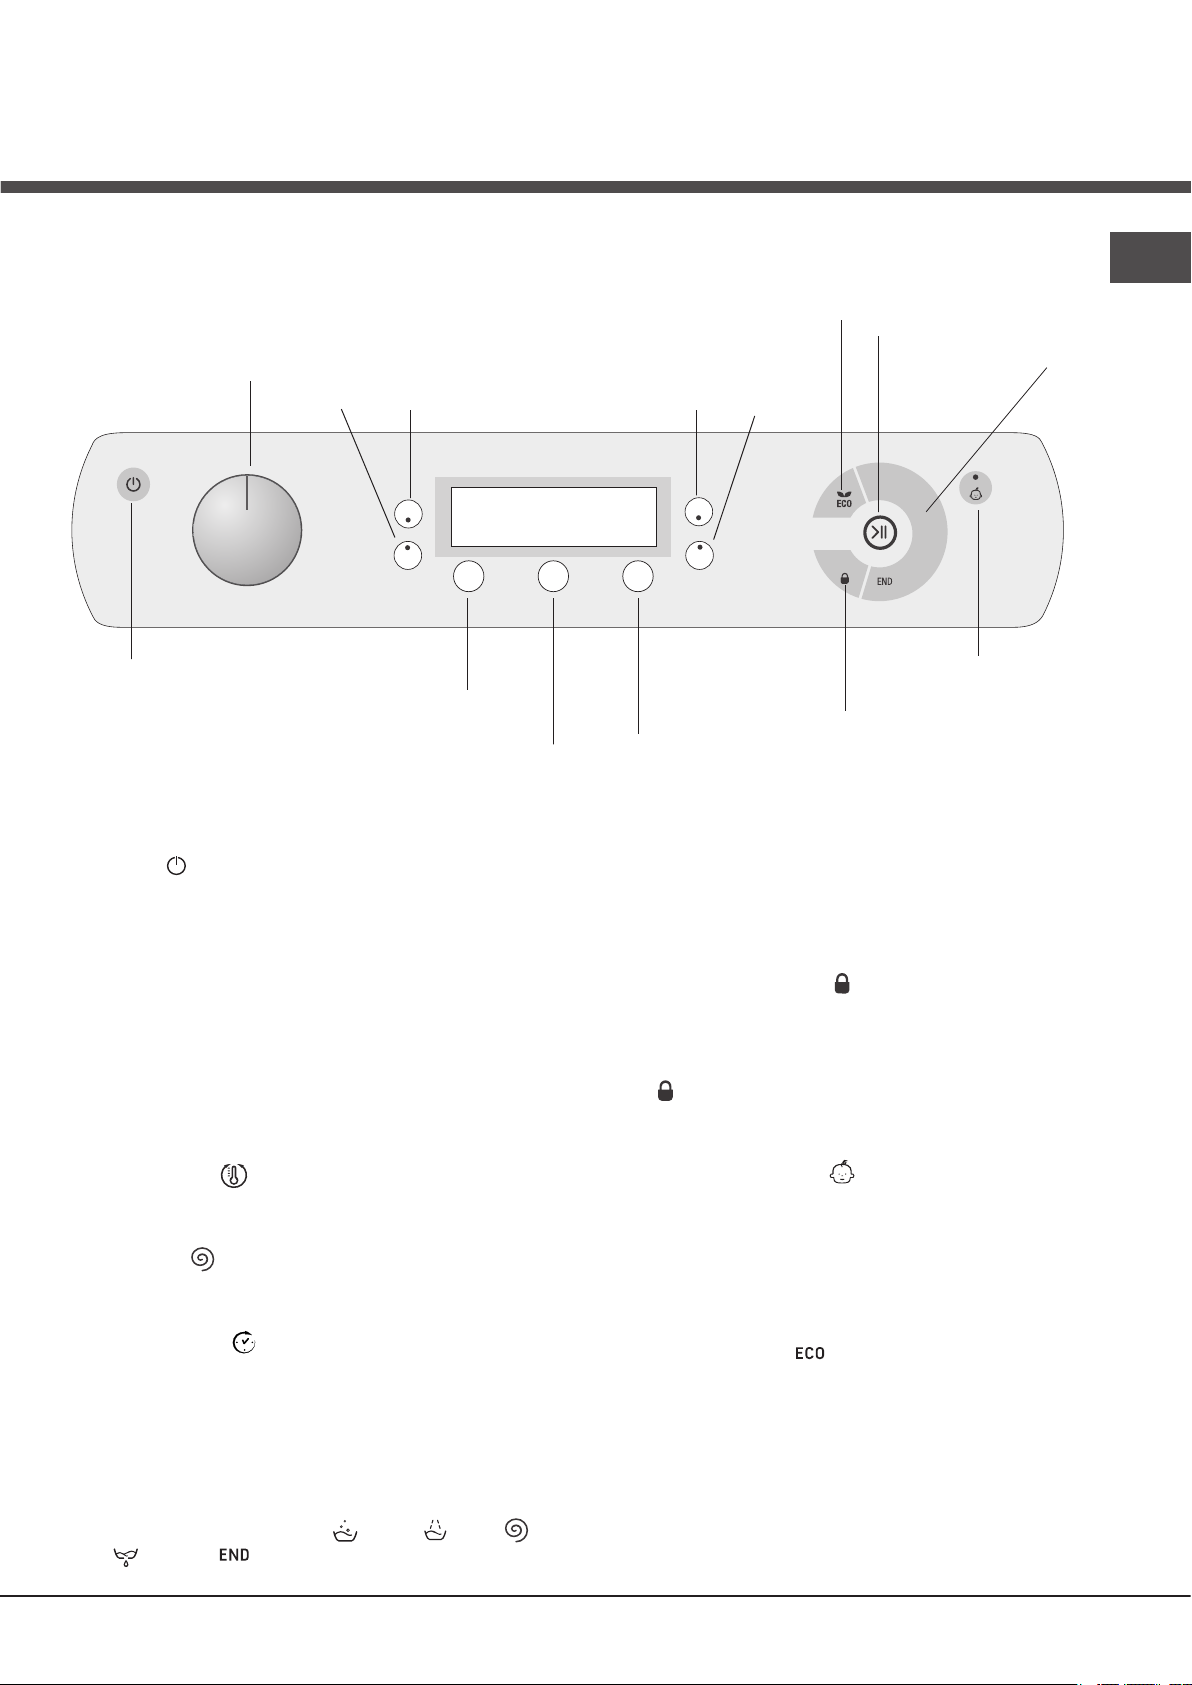
Control panel
WASH CYCLE
SELECTOR knob
OPTION buttons
with indicator lights
DISPLAY
OPTION buttons
with indicator lights
ECO
indicator light
START/
PAUSE
button with
indicator light
EN
WASH
CYCLE
PHASE
icons
Button with ON/OFF
indicator light
TEMPERATURE button
SPIN button
Button with ON/OFF indicator light: press this briefly
to switch the machine on or off. The green indicator light
indicates that the machine is switched on. To switch off the
washing machine during the wash cycle, press and hold
the button for approximately 3 seconds; if the button is
pressed briefly or accidentally the machine will not switch
off. If the machine is switched off during a wash cycle, this
wash cycle will be cancelled.
WASH CYCLE SELECTOR knob: may be turned in
either direction. To select the most suitable wash cycle,
please refer to the “Table of wash cycles”.
The knob will not move during the wash cycle.
TEMPERATURE button: press to modify or exclude
the temperature setting; the value selected will appear on
the display above (see “Running a wash cycle”).
SPIN CYCLE button: press to modify or exclude the
spin cycle; the value selected will appear on the display
above (see “Running a wash cycle”).
DELAYED START button: press to set a delayed start
for the selected wash cycle; the set delay time will appear
on the display above (see “Running a wash cycle”).
OPTION buttons with indicator lights: press to select the
available options. The indicator light corresponding to the
selected option will remain lit (see “Running a wash cycle”).
DELAYED
START
button
LOCK
indicator light
CONTROL PANEL
LOCK button with
indicator light
START/PAUSE button with indicator light: when the green
indicator light flashes slowly, press the button to start a
wash cycle. Once the cycle has begun the indicator light
will remain lit in a fixed manner. To pause the wash cycle,
press the button again; the indicator light will flash in an
orange colour. If the “LOCK” indicator light is switched
off, the door may be opened. To start the wash cycle from
the point at which it was interrupted, press the button
again.
LOCK indicator light: indicates that the porthole door
is locked. To open the door, pause the wash cycle (see
“Running a wash cycle”).
CONTROL PANEL LOCK button with indicator light:
to activate or deactivate the control panel lock, press and
hold the button for approximately 2 seconds. when the
indicator light is illuminated, the control panel is locked
(apart from the ON/OFF button). This means it is possible
to prevent wash cycles from being modified accidentally,
especially where there are children in the home.
ECO indicator light: the icon lights up when, after
altering the washing parameters, an energy saving of
at least 10% is made. Furthermore, before the machine
enters “Standby” mode, the icon will light up for a few
seconds; when the machine is switched off the estimated
energy saving will be around the 80% mark.
WASH CYCLE PHASE icons: these illuminate to indicate the
progress of the wash cycle (Wash – Rinse – Spin –
Drain ). The text lights up when the cycle is complete.
7
Page 8
Running a wash cycle
EN
WARNING: before you use the washing machine for the
first time, run a wash cycle with detergent and no laundry,
using the 90° cottons cycle without pre-wash.
1. SWITCH THE MACHINE ON. Press the button.
All the indicator lights will illuminate for 1 second; the
indicator light corresponding to the button will then
remain lit in a fixed manner and the START/PAUSE
indicator light will flash slowly.
2. LOAD THE LAUNDRY. Open the porthole door.
Load the laundry, making sure you do not exceed the
maximum load value indicated in the table of wash
cycles on the following page.
3. MEASURE OUT THE DETERGENT. Pull out the
detergent dispenser drawer and pour the detergent into
the relevant compartments as described in “Description
of the machine”.
4. CLOSE THE PORTHOLE DOOR.
5. SELECT THE PROGRAMME. Turn the WASH CYCLE
SELECTOR KNOB right or left, until you have selected
the desired wash cycle. A temperature and spin speed
is set for each wash cycle; these may be adjusted.
6. CUSTOMISE THE WASH CYCLE. Use the relevant
buttons on the control panel:
Modify the temperature and/or spin speed.
The machine automatically displays the maximum
temperature and spin speed values set for the selected
cycle, or the most recently-used settings if they are
compatible with the selected cycle. The temperature
can be decreased by pressing the button, until the
cold wash ( ) setting is reached. The spin speed may
be progressively reduced by pressing the button,
until it is completely excluded ( ). If these buttons are
pressed again, the maximum values are restored.
! Exception: if the
temperature can be increased up to a value of 90°C.
Set a delayed start.
Press the button until you have reached the desired
delay time. During the setting process, the delay time is
shown on the display and the symbol flashes.
After selecting a delayed start time, the fixed symbol
and the cycle duration will appear on the display. Press
the button once to display the selected delay time.
To remove the delayed start option, press the button
until the display shows the text OFF; the symbol will
disappear.
! Once the START/PAUSE button has been pressed, the
time delay may only be decreased.
programme is selected, the
! If the selected option is not compatible with the
selected wash cycle, this incompatibility will be signalled
by the flashing of the indicator light and a sound alert
(3 beeps); the option will not be activated.
! If the selected option is not compatible with another
option that has been selected previously, the indicator
light corresponding to the first option selected will
flash and only the second option will be activated; the
indicator light corresponding to the button will remain lit
in a constant manner.
7. START THE PROGRAMME. Press the START/PAUSE
button. The corresponding indicator light remains lit in a
fixed manner and the porthole door locks (the LOCK
indicator light illuminates). The icons corresponding to
the wash cycle phases will light up during the cycle to
indicate which phase is currently in progress.
To change a wash cycle once it has already started,
pause the washing machine by pressing the START/
PAUSE button; then select the desired cycle and press
the START/PAUSE button again.
To open the door during a wash cycle, press the START/
PAUSE button; if the LOCK indicator light is switched
off you may open the door. Press the START/PAUSE
button again to restart the wash cycle from the point at
which it was interrupted.
8. THE END OF THE WASH CYCLE. This is indicated
by the illuminated text END. The porthole door may be
opened immediately. If the START/PAUSE indicator light
is flashing, press the button to end the cycle. Open the
door, unload the laundry and switch off the machine.
! If you wish to cancel a cycle which has already begun,
press and hold the button until the cycle stops and the
machine switches off.
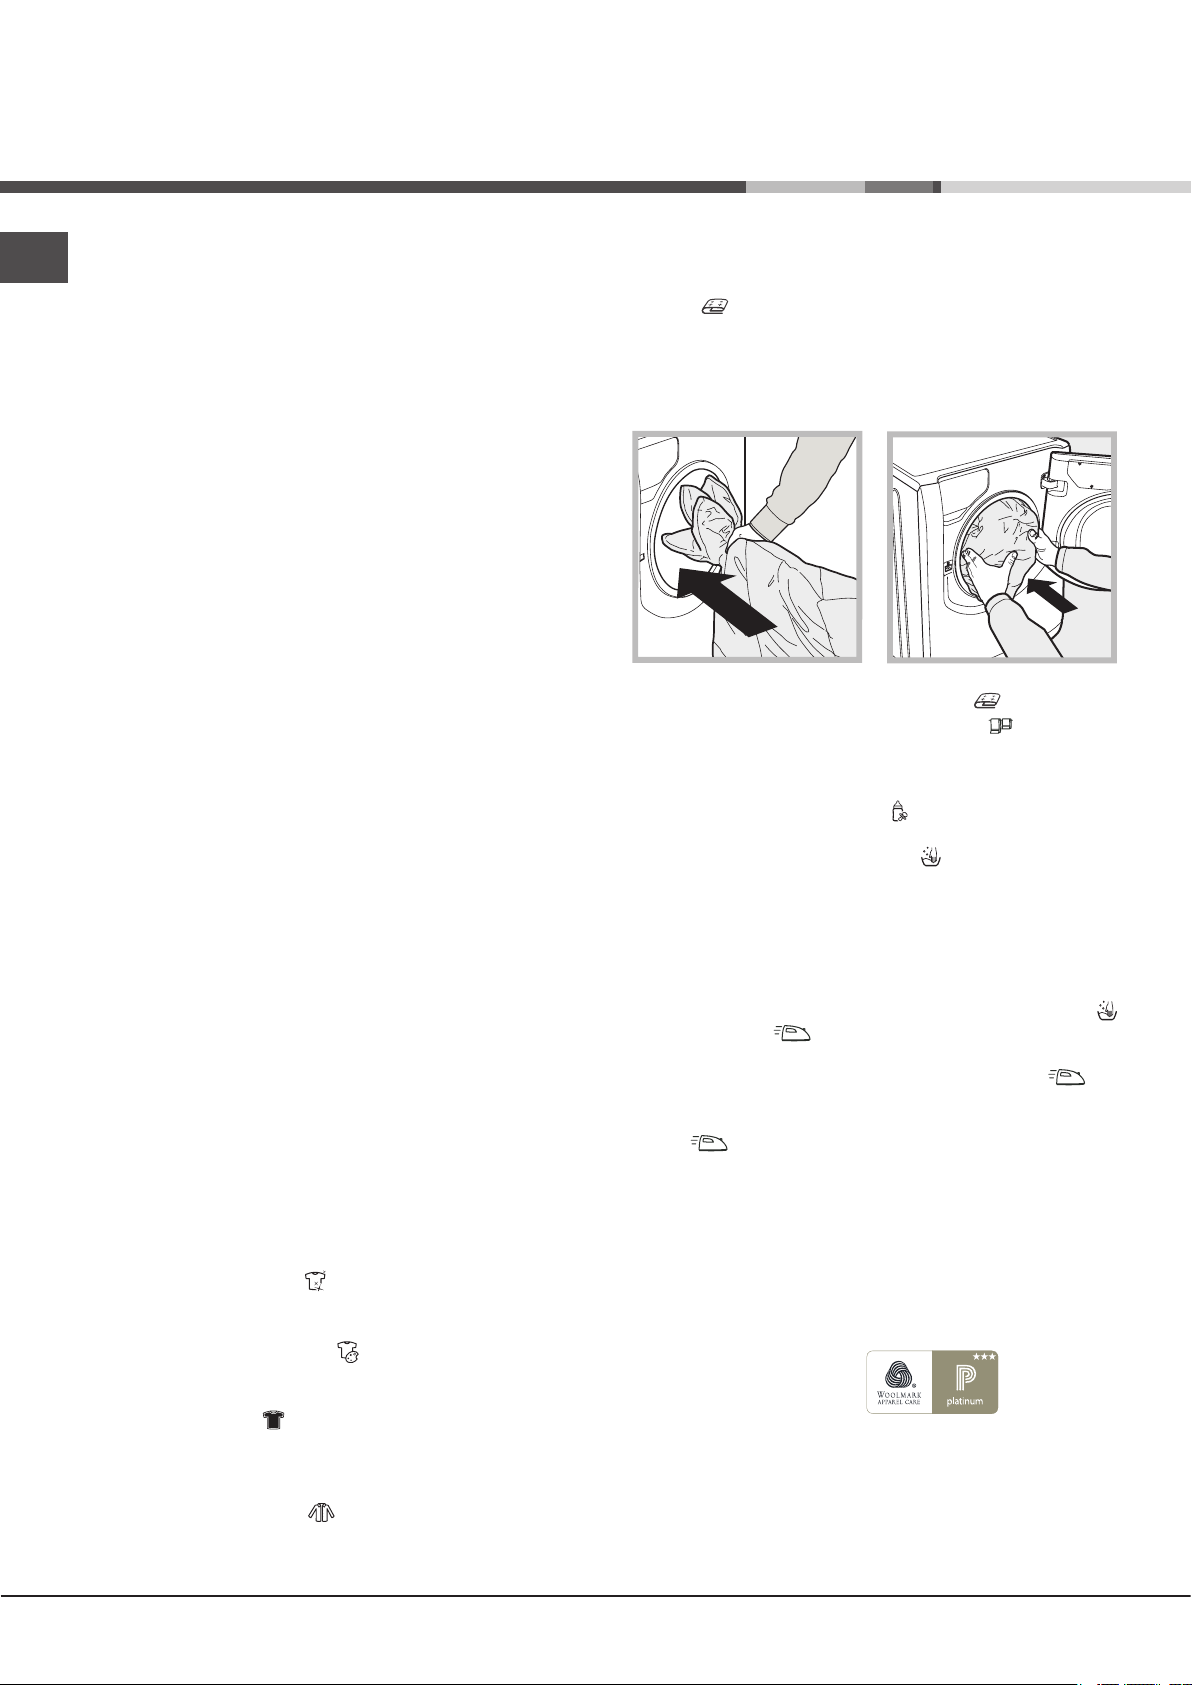
Bag for quilts, curtains and delicate garments
The Aqualtis washing machine makes it easier for you
to wash even the most valuable and delicate garments
in complete confidence thanks to the special bag which
protects the laundry (this is supplied with the machine).
We recommend that the bag is used every time you wash
quilts and padded items with an outer layer made
using synthetic material.
Modify the cycle settings.
Press the OPTION buttons to customise the wash cycle
in accordance with your own requirements.
• Press the button to activate the option; the
corresponding indicator light will switch on.
• Press the button again to disable the option; the
indicator light will switch off.
8
Page 9
3
1
2
Wash cycles and options
Table of wash cycles
Detergent and additives
Description of the wash cycle
Icon
Synthetics Resistant 60° 800
Synthetics Resistant (4) 40° 800
Whites
Coloureds
Darks
Shirts
Duvets: for down-stuffed garments. 30° 1000 -
Bed&Bath for bedlinen and towels. 60° 1200
Rinse
Spin and Pump out - 1200 - - - - 9 - - - 16’
Anti Allergy
Ultradelicates
Wool: for wool, cashmere, etc. 40° 800 -
Mix 30': to refresh lightly soiled garments quickly (not suitable for
wool, silk and clothes which require washing by hand).
Cotton Standard 60°C (1): heavily soiled whites and resistant colours.
Cotton Standard 40°C (2): lightly soiled whites and delicate colours. 40° 1200 -
Cotton Standard 20°C: lightly soiled whites and delicate colours. 20° 1200 -
The length of cycle shown on the display or in this booklet is an estimation only and is calculated assuming standard working conditions. The actual duration can vary according to factors such as water temperature and pressure, the amount of detergent used, the amount and type of load inserted, load balancing and any wash options selected.
Note: 10 minutes after the START, the machine will recalculate the time remaining until the end of the wash cycle on the basis of the load inside it; this value
will then be shown on the display.
1) Test wash cycle in compliance with directive 1061/2010: set wash cycle with a temperature of 60°C.
This cycle is designed for cotton loads with a normal soil level and is the most efficient in terms of both electricity and water consumption; it should be used for
garments which can be washed at 60°C. The actual washing temperature may differ from the indicated value.
2) Test wash cycle in compliance with directive 1061/2010: set wash cycle with a temperature of 40°C.
This cycle is designed for cotton loads with a normal soil level and is the most efficient in terms of both electricity and water consumption; it should be used for
garments which can be washed at 40°C. The actual washing temperature may differ from the indicated value.
3) At 60 °C the “Prewash” function cannot be selected.
For all Test Institutes:
2) Long wash cycle for cottons: set wash cycle with a temperature of 40°C.
4) Long wash cycle for synthetics: set wash cycle with a temperature of 40°C.
Max.
temp. (°C)
60° 1200
40° 1200
30° 800 -
40° 600 -
60° 1200 -
30° 0 -
30° 800 -
60°
(Max. 90°)
Max.
speed
(rpm)
Prewash
- 1200 - -
(3)
1200
Wash
Bleach
-
-
-
-
-
-
-
Fabric
softener
Residual
Energy con-
dampness %
Max. load (kg)
4,5 45 1,17 65 120’
4,5 45 0,62 52 100’
5 - - - 195’
5 - - - 115’
5 - - - 80’
2 - - - 80’
3,5 - - - 115’
9 - - - 150’
9 - - - 49’
5 - - - 200’
1 - - - 80’
2 - - - 90’
3,5 70 0,11 41 30’
9 53 1,43 57,5 210’
9 53 1,03 85 195’
9 - - - 185’
Total water lt
sumption kWh
Cycle dura-
EN
tion
Wash options
Extra rinse
By selecting this option, the efficiency of the rinse is increased
and optimal residual detergent removal is guaranteed. It is
particularly useful for skin which is sensitive to detergents. We
recommend this option is used with a full load of washing, or
when a large amount of detergent is required.
! It cannot be used in conjunction with , , , , .
Easy Iron
By selecting this option, the wash and spin cycles will be
modified in order to reduce the formation of creases.
At the end of the cycle the washing machine drum will
rotate slowly; the “Easy Iron” and START/PAUSE indicator
lights will flash. To end the cycle press the START/PAUSE
button or the “Easy Iron” button.
! It cannot be used in conjunction with , , , , , .
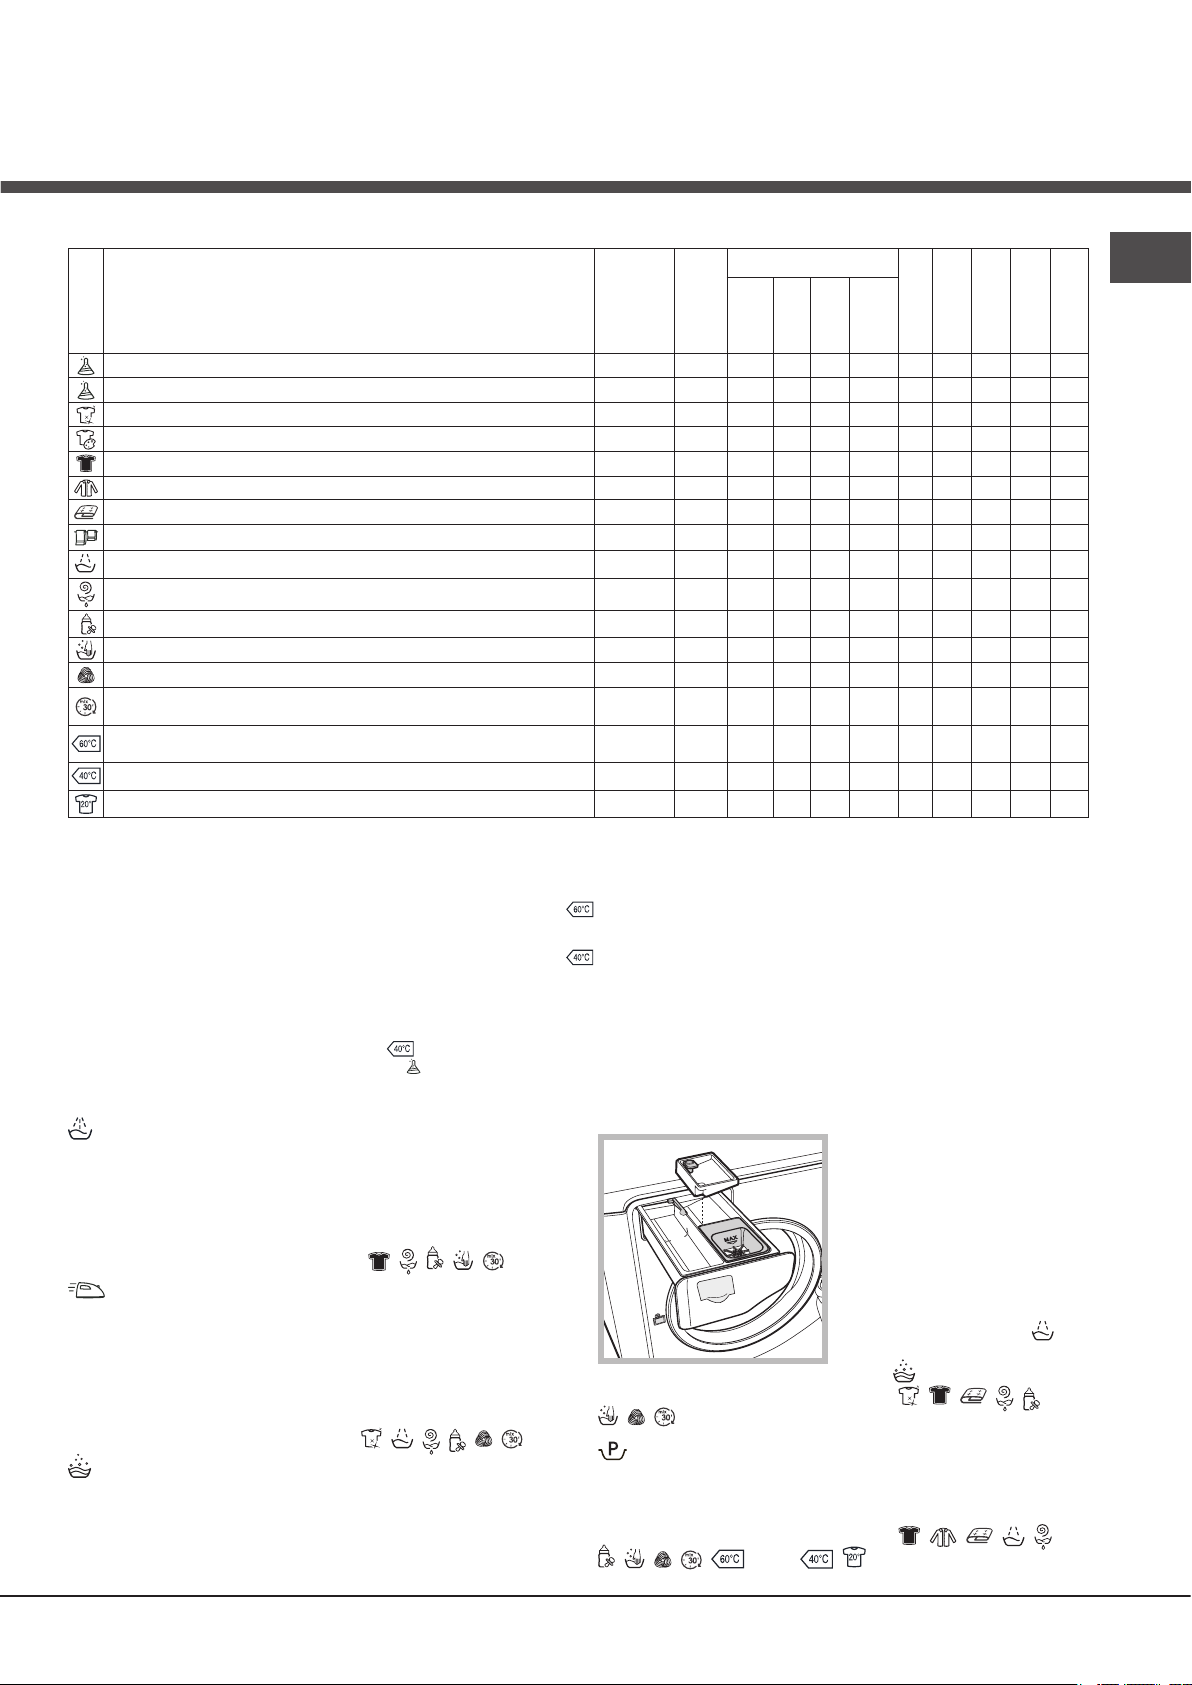
Super Wash
This option offers a high-performance wash due to the greater
quantity of water used in the initial phase of the cycle, and
due to the increased wash cycle duration, is particularly
useful for the removal of stubborn stains. It can be used with
or without bleach. If you desire bleaching, insert the extra
tray compartment (3) into
compartment 1. When pouring
in the bleach, be careful not
to exceed the “max” level
marked on the central pivot
(see figure). To bleach laundry
without carrying out a full
wash cycle, pour the bleach
into the extra compartment 3,
select the “Rinse” cycle”
and activate the “Super Wash”
option .
! It cannot be used in conjunction with , , , , ,
, , .
Prewash
If this function is selected, the pre-wash cycle will run; this is
useful for removing stubborn stains.
N.B.: put the detergent in the relevant compartment.
! It cannot be used in conjunction with , , , , ,
, , , , (60°), , .
9
Page 10
Detergents and laundry
EN
Detergent
The type and quantity of detergent required depend on
the type of fabric you are washing (cotton, wool, silk,
etc.), as well as its colour, the washing temperature, the
level of soiling and the hardness of the water in the area.
Measuring out the detergent carefully will avoid wastage
and help to protect the environment: although they are
biodegradable, detergents still contain ingredients which
alter the balance of nature.
We recommend the following:
• use powder detergents for white cotton garments and
pre-washing.
• use liquid detergents for delicate cotton garments and
for all low-temperature wash cycles.
• use gentle liquid detergents for wool and silk
garments.
The detergent should be poured into the relevant
compartment - or the dispenser placed directly inside the
drum - before the wash cycle begins. In the latter case, it will
not be possible to select the Cottons with pre-wash cycle.
! Use powder detergent for white cotton garments, for
pre-washing, and for washing at temperatures over 60°C
! Follow the instructions given on the detergent packaging.
! Do not use hand washing detergents because these
create too much foam.
Preparing the laundry
• Shake out the garments before loading them into the
machine.
• Divide the laundry according fabric type (symbol on the
washing instruction label) and colour, making sure you
separate the coloured garments from the white ones;
• Empty all pockets and check the buttons;
• Do not exceed the values listed in the “Table of wash cycles”,
which refer to the weight of the laundry when dry.
How much does your laundry weigh?
1 sheet 400-500 g
1 pillowcase 150-200 g
1 tablecloth 400-500 g
1 bathrobe 900-1200 g
1 towel 150-250 g
1 pair of jeans 400-500 g
1 shirt 150-200 g
Washing recommendations
Whites: use this cycle to wash white clothes. The
programme is designed to maintain the brightness of
white clothes over time.
Coloureds: use this cycle to wash bright coloured
clothes. The programme is designed to maintain bright
colours over time.
Darks: Use cycle to wash dark-coloured garments.
This programme is designed to maintain dark colours
over time. We recommend using a liquid detergent for the
best results when washing dark-coloured garments.
Shirts: use the special wash cycle to wash shirts in
different fabrics and colours to guarantee they receive the
best possible care.
Duvets: to wash double or single duvets (the weight of
which should not exceed 3,5 kg), cushions or clothes
padded with goose down such as puffa jackets, use the
special wash cycle. We recommend that duvets are
placed in the drum with their edges folded inwards (see
figure) and that no more than ¾ of the total volume of the
drum is used. To achieve the best results, we recommend
that a liquid detergent is used and placed inside the
detergent dispenser drawer.
Quilts: to wash quilts with a synthetic outer layer, use the
bag provided and set the wash cycle to .
Bedlinen and towels: Use programme to wash bed
linen and towels in one single cycle: it optimises softener
performance and helps you save time and energy. We
recommend the use of powder detergent
Anti Allergy: use programme to remove major allergens
such as pollen, mites, cat’s and dog’s hair.
Ultradelicates: use programme to wash very delicate
garments having strasses or sequins.
We recommend turning the garments inside out before
washing and placing small items into the special bag
for washing delicates. Use liquid detergent on delicate
garments for best results.
To wash Silk garments and Curtains (these should be
folded and placed inside the bag provided), select cycle
and then option (in this case it will also be possible
to enable the “Extra Rinse” option); the machine will
end the cycle while the laundry is soaking and the
indicator light will flash. To drain the water so that the
laundry may be removed, press the START/PAUSE button
or the button.
Wool: the wool wash cycle on this Hotpoint-Ariston
machine has been tested and approved by The Woolmark
Company for washing wool garments labelled as hand
washable provided that the garments are washed
according to the instructions on the garment label and
those issued by the manufacturer of this washing machine.
Hotpoint-Ariston is the first washing machine brand to be
approved by The Woolmark Company for Apparel CarePlatinum for its washing performance and consumption of
energy and water. (M1318)
In UK, Eire, Hong Kong and India the Woolmark trade mark
is a Certification trade mark.
Cotton Standard 20°C: ideal for lightly soiled cotton
loads. The effective performance levels achieved at cold
temperatures, which are comparable to washing at 40°,
are guaranteed by a mechanical action which operates at
varying speed, with repeated and frequent peaks.
10
Page 11
Trouble shooting
Your washing machine could occasionally fail to work. Before contacting the Technical Assistance Centre (see “Assistance”),
make sure that the problem cannot be solved easily using the following list.
Problem:
The washing machine does not
switch on.
The wash cycle does not start.
The washing machine does not fill
with water.
The washing machine door
remains locked.
The machine continuously fills
with water and drains.
The washing machine does not
drain or spin.
The machine vibrates a lot during
the spin cycle.
The washing machine leaks.
The icons corresponding to the
“Phase in progress” flash rapidly
at the same time as the ON/OFF
Possible causes / Solutions:
• The appliance is not plugged into the socket fully, or not enough to make
contact.
• There is no power in the house.
• The door is not closed properly.
• The START/PAUSE button has not been pressed.
• The water tap has not been opened.
• A delayed start has been set.
• The water inlet hose is not connected to the tap.
• The hose is bent.
• The water tap has not been opened.
• There is no water supply in the house.
• The pressure is too low.
• The START/PAUSE button has not been pressed.
• If you have selected the option, at the end of the cycle the washing machine
drum will rotate slowly; to end the cycle press the START/PAUSE button or the
option.
• The drain hose is not fitted at a height between 65 and 100 cm from the floor
(see “Installation”).
• The free end of the hose is under water (see “Installation”).
• If the dwelling is on one of the upper floors of a building, there may be
problems relating to water drainage, causing the washing machine to fill with
water and drain continuously. Special anti-draining valves are available in shops
and help to prevent this inconvenience.
• The wall drainage system is not fitted with a breather pipe.
• The wash cycle does not include draining: Some wash cycles require the drain
phase to be started manually (see “Wash cycles and options”).
• The “Easy iron” option is enabled: to complete the wash cycle, press the
START/PAUSE button (“Wash cycles and options”).
• The drain hose is bent (see Installation).
• The drainage duct is clogged.
• The drum was not unlocked correctly during installation (see “Installation”).
• The machine is not level (see “Installation” ).
• The machine is trapped between cabinets and walls (see “Installation”).
• The load is unbalanced (see “Detergents and laundry”).
• The water inlet hose is not screwed on properly (see “Installation”).
• The detergent dispenser is blocked (to clean it, see “Care and maintenance”).
• The drain hose is not fixed in place properly (see “Installation”).
• Switch off the machine and unplug it, wait for approximately 1 minute and
then switch it back on again. If the problem persists, contact the Technical
Assistance Service.
indicator light.
EN
There is too much foam.
The washing machine door
• The detergent is not suitable for machine washing (it should display the text
“for washing machines” or “hand and machine wash”, or the like).
• Too much detergent was used.
• Perform the manual unlocking procedure (see “Precautions and tips”).
remains locked.
! Note: to exit “Demo mode”, switch machine off, then press and hold the two “START/PAUSE” and “ON/OFF” buttons
simultaneously for 3 seconds.
11
Page 12

Assistance
EN
Before calling for Assistance:
• Check whether you can solve the problem by yourself (see “Trouble shooting”);
• Restart the wash cycle to check whether the problem has been solved;
• If it has not, contact the Authorised Technical Assistance Service.
! If the washing machine has been installed or used incorrectly, you will have to pay for the call-out service.
! Always request the assistance of authorised technicians.
Please have the following information to hand:
• the type of problem;
• the appliance model (Mod.);
• the serial number (S/N).
The above information can be found on the data plate located on the appliance itself.
12
Page 13

Інструкція з монтажу та
експлуатації
UK
Українська
AQUALTIS
ПРАЛЬНА МАШИНА
Зміст
Встановлення, 14-15
Розпакування і вирівнювання
Підключення води й електроенергії
Технiчнi данi
Технічне обслуговування та догляд, 16
Відключення води й електричного живлення
Миття машини
Чистка касети для миючих засобів
Догляд за барабаном для білизни
Чищення насосу
Стеження за шлангом для подачі води
Запобіжні заходи та поради, 17
Загальна безпека
Система балансування завантаження
Утилізація
Ручне відкривання дверцят люку
UK
AQ92F 29
Опис машини, 18-19
Панель управління
Як здійснювати цикл прання, 20
Програми й опції, 21
Таблиця програм
Опції прання
Пральні засоби і білизна, 22
Засіб для прання
Підготовка білизни
Поради з прання
Несправності та засоби їх усунення, 23
Допомога, 24
13
Page 14

Встановлення
UK
! Необхідно зберігати дану брошуру, щоб
мати можливість проконсультуватися з нею
у будь-який момент. У випадку продажу,
передачі або переїзду, переконайтеся
у тому, що вона залишається разом із
пральною машиною
! Уважно вивчіть інструкцію: в ній міститься
важлива інформація про встановлення,
використання та безпеку.
! У пакеті з інструкцією ви знайдете,
окрім гарантії, докладну інформацію для
встановлення.
Розпакування і вирівнювання
Розпакування
1. Розпакувавши пральну машину,
перевірте її на наявність пошкоджень під
час транспортування.
Якщо такі є, не виконуйте нiяких
пiдключень та негайно зверніться до
постачальника.
2. Видаліть
4 запобіжних
гвинти для
транспортування
і відповідну
розпірну деталь,
розташовану ззаду
(див. малюнок).
3. Закрийте отвір пробками з пластмаси,
що містяться у пакеті.
4. Зберігайте всі деталі; якщо пральна
машина має перевозиться, вони знову
можуть бути потрібними, щоб уникнути
внутрішніх пошкоджень.
! Забороняйте дiтям гратися з упаковками.
Вирівнювання
! Правильне вирівнювання надасть
стабільність й усуне вібрацію, а також
знизить рівень шуму, особливо під час
роботи центрифуги.
! У випадку встановлення машини на
килимовому покритті або килимах, ніжки
необхідно відрегулювати таким чином,
щоб гарантувати під пральною машиною
необхідний простір для вентиляції.
Підключення води й
електроенергії
Контроль шланга для подачі води
! До підключення шланга подачі води до
водопроводу, злийте деяку кількість води,
доки вона не йтиме чистою.
1. Підключіть
шланг подачі
води до машини,
під’єднавши його до
виходу на задньому
боці угорі праворуч
(див. малюнок).
2. Підключити
живлячий
трубопровід,
прикрутивши його
до крану холодної
води за допомогою
штуцеру з газовою
різьбою 3/4 (див.
малюнок). Перед
пiдключенням
спустiть воду, доки вона не стане
прозорою.
1. Встановіть пральну машину на плоскій
та твердій підлозі, не притуляючи її до стін
або меблів.
2. Компенсуйте
нерівності,
відкручуючи або
вкручуючи ніжки,
доки машина не
стане горизонтально
(вона не повинна
відхилятися більш
ніж на 2 градуси).
14
3. Зверніть увагу, щоб шланг не мав згинів
та утисків.
! Тиск води в крані має відповідати
значенням у таблиці Технічних даних (див.
сторінку поруч).
! Якщо довжини шланга для води не
вистачає, зверніться у спеціалізовану
крамницю або до уповноваженого фахівця.
! Ніколи не використовуйте уживані або
старі шланги для роботи під тиском, а
тільки шланги, що поставляються разом із
машиною.
Page 15

Підключення шланга для зливу води
65 - 100 cm
Цей прилад вiдповiдає таким
- 2006/95/CE (Низька напруга)
Підключіть зливний
шланг до каналізації
або до зливного
отвору у стіні на
висоті від 65 до 100
см від підлоги, не
допускаючи його
згинання.
! Коли машина вже встановлена, має
забезпечуватися вільний доступ до її
розетки.
! Не використовуйте подовжувачі й
трійники.
! Кабель не повинен мати згинів або
утисків.
! Заміна кабелю живлення й вилки мають
виконуватися тільки фахівцями.
UK
Або ж встановіть
вихід зливного
шланга на край
рукомийника
або ванни,
використавши
дугу, що спрямовує
кінець шланга (див.
малюнок).
Не залишайте
вільний кінець
зливного шланга зануреним у воду.
! Використання подовжувача шланга
не рекомендоване. В разi необхiдностi
використання подовжувача шланга,
переконайтеся у тому, що він має той
самий діаметр та його довжина не
перевищує 150 см.
Електричні підключення
Перш нiж увiмкнути вилку в електричну
розетку, переконайтеся, що:
• розетка має заземлення у відповідності
до встановлених норм;
• розетка розрахована на максимальне
навантаження у межах потужності
машини, зазначене у таблиці Технічних
даних (див. малюнок поруч);
• напруга живлення перебуває у межах,
зазначених у таблиці Технічних даних
(див. малюнок поруч);
• розетка підходить до вилки машини. В
іншому випадку замініть розетку або
вилку.
! Машину не можна встановлювати поза
приміщенням, навіть, під час його ремонту,
тому що дуже небезпечно піддавати її
впливу дощу і грози.
Увага! Підприємство знімає з себе
відповідальність, якщо вказані норми не
дотримуватимуться.
Технiчнi данi
Модель AQ92F 29
ширина 59,5 см
Розмiри
Кiлькiсть
бiлизни
Електричні
підключення
Водопровднi
пiдключення
Швидкiсть
центрифуги
Програми
контролю
згiдно з
нормою
1061/2010
1015/2010
висота 85 см
глибина 58 см
вiд 1 до 9 кг
див. шильдік з технiчними
даними на машинi
максимальний тиск
1 мПа (10 бар)
мiнiмальний тиск
0,05 мПа (0,5 бар)
об’єм баку – 58 лiтри
до 1200 обертiв на
хвилину
програма
;
Стандартний бавовна 60°C.
програма ;
Стандартний бавовна 40°C.
європейським директивам:
- 2004/108/CE
(Електромагнітна
сумiснiсть)
- 2012/19/EU
15
Page 16

1
2
1
2
2
Технічне обслуговування та
догляд
UK
Відключення води й електричного
живлення
• Закривайте водопровідний кран
після кожного прання. У такий спосіб
зменшується знос гідравлічної частини
машини й усувається небезпека витоку.
• Виймайте штепсель з розетки під час
миття машини і під час робіт з технічного
обслуговування.
Миття машини
Зовнішня частина і гумові деталі можуть
бути вимиті тканиною, змоченою у теплій
воді й милі. Не використовуйте розчинники
або абразиви.
Чистка касети для миючих засобів
Щоб витягти касету,
натисніть на важіль
(1) і потягніть касету
назовні (2) ( див.
малюнок).
Промийте під
проточною водою;
ця процедура
має проводитися
регулярно.
Догляд за барабаном для білизни
• Завжди залишайте відкритими дверцята
люку, тоді не утворюватимуться
неприємні запахи.
Щоб потрапити до форкамери:
1. знiмiть захисну панель з передньої
частини машини шляхом натискання у
центрi, потiм натиснiть униз з обох бокiв та
витягнiть її (див.малюнки).
2. встановіть
контеинер, щоб
зібрати воду, яка
виходить (приблизно
1.5 л) (див. малюнок).
3. відкрутіть кришку,
обертаючи іі проти
годинниковоі стрілки
(див. малюнок);
4. акуратно очистіть внутрішню частину;
5. накрутіть кришку;
6. встановіть панель на місце,
пересвідчіться у тому, що крюки були
вставлені у спеціальні петлі, пiсля чого
притиснiть її до машини.
Стеження за шлангом для подачі
води
Чищення насосу
Машина обладнана насосом з
автоматичною чисткою, що не вимагає
технічного обслуговування. Може
трапитися так, що малі предмети (монети,
ґудзики) потраплять до форкамери, що
захищає насос, розташований у її нижній
частині.
! Переконайтеся у тому, що цикл прання
закінчено, і витягніть штепсель з розетки.
16
Перевіряйте шланг для подачі води не
менше одного разу на рік. Якщо на ньому
є тріщини, він підлягає заміні: під час
прання високий тиск може призвести до
розірвання.
Page 17

Запобіжні заходи та
поради
! Машина була спроектована і вироблена у відповідності
з міжнародними нормами безпеки. Дані попередження
складені для забезпечення безпеки і тому їх треба
уважно прочитати.
Загальна безпека
• Дане обладнання було розроблене виключно для
побутового використання.
• Дозволяється користування цим
приладом дітьми віком від 8 років,
а також особами з обмеженими
фізичними, сенсорними або розумовими
можливостями або особами без
належного досвіду і знань, якщо вони
перебувають під постійним контролем
або проінструктовані щодо правил з
небезпечного використання приладу
і усвідомлюють ступені ризику. Не
дозволяйте дітям гратися з приладом.
Операції з очищення і догляду не повинні
виконуватися дітьми без належного
контролю.
• Не торкайтеся до машини голими ногами або мокрими
чи вологими руками й ногами.
• Не виймайте штепсель з електричної розетки,
витягуючи його за провід, тримайтеся тільки за самий
штепсель.
• Будьте обережні: вода, що зливається, може мати
високу температуру.
• У жодному випадку не застосовуйте силу до дверцят
люку: це може ушкодити запобiжний механiзм проти
випадкових вiдкривань.
• Якщо машина не працює у разi поломки, у жодному
випадку не намагайтеся дiстатися внутрiшнiх
механiзмiв з метою самостійного ремонту.
• Слiдкуйте, щоб дiти не наближалися до працюючої
машини.
• Якщо необхідно перенести машину, такі дії мають
виконуватися двома або трьома вантажниками (а не
одним!) за умови максимальної уваги, Нi в якому разi однiєю особою, тому що машина дуже важка.
• Перш ніж завантажити білизну, перевірте, щоб
барабан був порожній.
побутові електроприлади не можуть перероблятися
у звичайному порядку для твердих міських відходів.
Зняті з експлуатації побутові прилади мають бути
зібрані окремо для оптимізації ступеню відновлення й
рециклу матеріалів, що входять до їхнього складу, та
з метою усунення потенційної шкоди для здоров’я та
довкілля. Символ закресленої корзини, зображений
на всіх виробах, нагадує про необхідність окремої
утилізації.
Щодо подальшої iнформацiї стосовно правильної
утилiзацiї електропобутових приладiв, власники
можуть звернутися до вiдповiдних мiських служб або
до продавцiв.
Ручне відкривання дверцят люку
У випадку, якщо неможливо відкрити дверцята люку із-за
відсутності електроенергії і ви хотіли б відкласти прання,
треба діяти таким чином:
1. витягніть штепсель з
електричної розетки.
2. Перевірте, щоб рівень
води усередині машини був
нижче рівня дверцят люку;
якщо це не так, злиите
надлишок води через
зливнии шланг, збираючи
іі у відрі, як показано на
малюнку.
3. знiмiть з пральної машини
передню захисну панель
(див.наступну сторiнку).
4. Потягніть за язичок,
показаний на малюнку,
назовні до звільнення
пластмасової тяги зі стопора;
тягніть послідовно вниз доки
не відчуєте що усередині
клацнуло, це означає, що
дверцята розблоковано.
UK
Система балансування завантаження
Перед кожним віджимом, для запобігання надмірній
вібрації і для рівномірного розподілу навантаження,
барабан здійснює оберти на дещо більшій швидкості, ніж
швидкість прання. Якщо по закінченні декількох спроб
завантажені речі ще не були правильно відбалансовані,
машина здійснює віджим на швидкості, нижчій від
передбаченої. У випадку надмірної незбалансованості
пральна машина здійснює розподіл замість віджиму. З
метою оптимального розподілу завантаження та його
правильного балансування рекомендується одночасне
прання великих і малих речей.
Утилізація
• Утилізація пакувального матеріалу: додержуйтесь
місцевих норм, так як пакування може бути
використане повторно.
• Європейська директива 2012/19/EU з відходів від
електричної й електронної апаратури передбачає, що
5. відкрийте дверцята; у
випадку, якщо це досі ще
неможливо – повторіть
процедуру.
6. встановіть панель на місце, пересвідчіться у тому,
що крюки були вставлені у спеціальні петлі, пiсля чого
притиснiть її до машини.
17
Page 18

Опис машини
3
1
2
1
8
0
2
1
0
1
5
0
1
2
0
9
0
6
0
B
A
UK
ДВЕРЦЯТА ЛЮКУ
ПАНЕЛЬ
КОМАНД
РУЧКА ДВЕРЦЯТ
ЛЮКУ
ДЕКОРАТИВНА
НИЖНЯ ПАНЕЛЬ
НІЖКИ, ЩО
РЕГУЛЮЮТЬСЯ
ДВЕРЦЯТА ЛЮКУ
1. ванночка для
попереднього прання:
Для відкриття
дверцят люку завжди
використовуйте
спеціальну ручку (див.
малюнок).
використовуйте миючий
засіб у порошку.
! Перш нiж додати
миючии засіб, перевірте,
щоб не була вставлена
додаткова ванночка 3.
2. ванночка для прання:
Якщо використовується
рідкий пральний засіб, рекомендується застосовувати
вимірювальний компонент A з комплекту постачання
для правильного дозування. При використанні
порошкового прального засобу вставьте цей
компонент у нішу B.
КАСЕТА ДЛЯ ПРАЛЬНИХ ЗАСОБIВ
Касета для пральних
засобiв знаходиться
всередині машини; щоб
її дiстатися, відкрийте
дверцята.
Про дозування пральних
засобів йдеться у розділі
3. додаткова ванночка: Відбілювач
! Використання додатковоі ванночки 3 виключає
попереднє прання.
ванночка для додаткових засобів: для
пом’якшувачів або додаткових рідин. Рекомендується
ніколи не перевищувати максимальний рівень,
відмічений сіткою, і розбавляти концентровані
пом’якшувачі.
“Пральні засоби і білизна”.
Режим очiкування
Вiдповiдно до норм, пов’язаних з заощадження
енергiї, цю пральну машину оснащено системою
автовимкнення (stand by), яка активується через
декiлька (30) секунд вiдсутностi роботи з боку
машини. Швидко натиснiть кнопку ON/OFF та
зачекайте вiдновлення роботи машини.
Споживання у вимкненому режимі: 0,5 W
Споживання в увімкненому режимі: 8 W
18
Page 19

Панель управління
Ручка
ПРОГРАМИ
Кнопки й індикаторні
лампи ОПЦІЇ
Кнопки й індикаторні
лампи ОПЦІЇ
Дисплей
Індикаторна
лампа EКO
Кнопка з індикаторною
лампою START/PAUSE
Піктограми
ФАЗИ
ПРАННЯ
UK
Кнопка з індикаторною
лампою ON/OFF
Кнопка з індикаторною лампою ON/OFF: швидко
натисніть і відпустіть кнопку для вмикання або
вимикання машини. Зелена індикаторна лампа
означає, що машина ввімкнена. Для вимикання
пральної машини під час прання необхідно
утримувати кнопку натиснутою приблизно більш ніж
3 сек.; короткочасне або випадкове натискання не
дозволить вимкнути машину. Вимикання машини під
час циклу прання вiдмiнює це прання.
Ручка ПРОГРАМИ: може обертатися в обох
напрямках. Щоб встановити найбільш придатну
програму див. “Таблицю програм”.
Під час прання ручка залишається нерухомою.
Кнопка ТЕМПЕРАТУРА: натисніть для внесення
змін або виключення температури; значення
відображається на дисплеї, який знаходиться вище
(див. “Як здійснювати цикл прання”).
Кнопка ВIДЖИМУ: натисніть для внесення змін або
виключення центрифуги; значення відображається
на дисплеї, який знаходиться вище (див. “Як
здійснювати цикл прання”).
Кнопка ВIДКЛАДЕНЕ ПРАННЯ: натиснiть для
використання машини в режимі відкладеного прання;
значення часу затримки відображається на дисплеї,
який знаходиться вище (див. “Як здійснювати цикл
прання”).
Кнопки й індикаторні лампи ОПЦІЇ: натиснiть для
вибору наявних опцій. Горить індикаторна лампа,
що відноситься до вибраної опції прання (див. “Як
здійснювати цикл прання”).
ТЕМПЕРАТУРА
Кнопка
Кнопка
ВІДЖИМ
Кнопка
ВIДКЛАДЕНЕ
ПРАННЯ
Кнопка з індикаторною лампою
БЛОКУВАННЯ КОМАНД
Iндикаторна
лампа LOCK
Піктограми ФАЗИ ПРАННЯ: загораються при
проходженні відповідних фаз циклу (Прання Полоскання - Віджим – Злив ).
Надпис спалахує після закінчення циклу.
Кнопка з індикаторною лампою START/PAUSE: коли
зелена індикаторна лампа блимає з повільними
інтервалами, натисніть на кнопку для запуску прання.
Якщо цикл розпочався, індикаторна лампа горить
постійно. Щоб війти в режим паузи під час прання,
знову натисніть на кнопку; індикаторна лампа почне
горіти оранжевим кольором. Якщо індикаторна
лампа “LOCK ” погасне, можна відкривати люк для
завантаження білизни.
Щоб продовжити прання з місця, де воно було
перервано, знову натисніть на кнопку.
Iндикаторна лампа LOCK: показує, що люк для
завантаження заблокований. Щоб вiдкрити дверцята,
встановiть цикл у режим паузи (див. “Як здійснювати
цикл прання”).
Кнопка з індикаторною лампою БЛОКУВАННЯ
КОМАНД: щоб активувати або дезактивувати блок
панелі команд, натисніть і утримуйте кнопку приблизно
2 секунди. Увімкнена індикаторна лампа вказує, що
панелькоманд заблоковано (за винятком кнопки ON/
OFF). У цей спосіб перешкоджають випадковій зміні
програм, передусім, якщо у домі є діти.
Індикаторна лампа ЕКО: Пiктограма спалахує,
якщо пiд час змiни параметрiв миття, вiдбувається
заожадження енергiї не менше за 10%.
Крiм того, перш нiж машина увiйде у режим очiкування
“Stand by”, позначка спалахне на декiлька секунд;
у вимкненiй машинi оцiнюване енергозбереження
складатиме приблизно 80%.
19
Page 20

Як здійснювати цикл прання
UK
ПРИМІТКА: при першому використанні пральної
машини, здійсніть цикл прання без білизни, але
з миючим засобом, в режимі прання бавовняних
виробів при температурі 90 градусів без попереднього
прання.
1. УВІМКНЕННЯ МАШИНИ. Натисніть кнопку . Всі
індикаторні лампи загоряться на 1 секунду але
горіти залишиться тільки індикаторна лампа кнопки
, індикаторна лампа кнопки START/PAUSE, що
повільно блиматиме.
2. ЗАВАНТАЖЕННЯ БІЛИЗНИ Відкрийте люк.
Завантажте білизну, звернувши увагу, щоб не
перевищити кількість білизни, зазначену в таблиці
програм на наступній сторінці.
3. додавання засобу для прання. Витягніть касету
і додайте миючий засіб у відповідні ванночки як
вказано в “Описі машини”.
4. ЗАКРИЙТЕ ЛЮК.
5. ВИБІР ПРОГРАМИ. Поверніть РУЧКУ ПРОГРАМ
праворуч або ліворуч до вибору бажаної програми;
кожна програма має відповідну температуру прання
та швидкість віджиму, ці параметри можуть бути
змінені.
6. ПЕРСОНАЛИЗАЦІЯ ЦИКЛУ ПРАННЯ.
Використовуйте спеціальні кнопки на панелі команд:
Зміна температури та/або швидкостi
віджиму.
На дисплеї автоматично вiдображається
максимальна температура i швидкiсть центрифуги,
передбаченi для заданої програми. Або останнi
заданi параметри, якщо вони є сумiсними з вибраною
програмою. Натискаючи на кнопку , зменшують
температуру прання до прання у холодній воді
( ). Натискаючи на кнопку , поступово
зменшують швидкість віджиму, аж до його
відключення взагалi ( ). Наступне натискання на
кнопки призводить до повернення у верхню позицію –
до максимальних значень.
! Виключення: при виборі програми , температура
може збільшитися до 90 градусів.
Задати вiдстрочене прання.
Натискайте вiдповiдну кнопку аж до бажаного часу
вiдстрочення. Пiд час налаштування вiдобразиться
час вiдстрочення разом з позначкою , яка
блиматиме.
Пiсля встановлення вiдстроченого прання на
дисплеї з’явиться позначка , яка горiтиме
постiйним свiтлом, разом з тривалiстю циклу. При
одноразовому натисканнi на кнопку з’явиться
заданий час вiдстрочення.
Щоб скасувати вiдстрочене прання, натискайте на
кнопку, доки на дисплеї не з’явиться напис OFF;
позначка згасне.
! Якщо потребуються змiни, але кнопку START/
PAUSE вже натиснуто, час вiдстрочення може лише
зменшуватися.
Модифiкацiя характеристик циклу.
Використовуйте кнопки ОПЦІЇ для персоналізації
прання згідно власним потребам.
• Натисніть на кнопку, щоб активізувати вибір;
загориться відповідна індикаторна лампа.
• Натисніть знову на кнопку, щоб дезактивувати
вибір; індикаторна лампа погасне.
! Якщо вибрано опцiю, несумiсною з заданою
програмою, надається сигнализацiя через
блимання iндикаторної лампи та звуковий сигнал
(тричi); опцiя не активується.
! Якщо вибрана опція несумісна з іншою раніше
вибраною, індикаторна лампа, що відповідає
первинній опції почне блимати, при цьому буде
активована тільки друга опція, індикаторна лампа
кнопки горітиме постійно.
7. ЗАПУСК ПРОГРАМИ. Натисніть кнопку START/
PAUSE. Загориться відповідна індикаторна лампа,
і люк заблокується (ввімкнена індикаторна лампа
LOCK ). Піктограми, що відносяться до фаз
прання, загоряться під час циклу, показуючи зміну
фаз.
Для зміни програми, під час виконання циклу,
переведіть пральну машину в режим паузи,
натиснувши на кнопку START/PAUSE; виберіть
бажаний цикл і знову натисніть кнопку START/
PAUSE.
Щоб вiдкрити дверцята пiд час циклу, натиснiть
кнопку START/PAUSE; згасла iндикаторна лампа
LOCK дозволяє вiдкрити люк. Знову натисніть на
кнопку START/PAUSE, щоб запустити програму з
того моменту, на якому вона була перервана.
8. ЗАВЕРШЕННЯ ПРОГРАМИ. Відображається
вмиканням надпису END. Дверцята люку можна
відкрити відразу. Якщо індикаторна лампа START/
PAUSE блимає, натисніть на кнопку, щоб завершити
цикл. Відкрийте дверцята люку, витягніть білизну й
вимкнiть машину.
! Для вiдмiни вже працюючого циклу натиснiть
кнопку, утримуючи її, й цикл буде перервано, пiсля
чого машина вимкнеться.
Мiшечок для стьобаних ковдр, штор та делiкатних речей
Завдяки спеціальному мішечку, що входить у комплект
постачання, Aqualtis дозволяє Вам також прати дорогі
та делікатні речі, гарантуючи іх максимальнии захист.
Ми рекомендуємо використовувати кожного разу
мішечок для прання стьобаних ковдр та пуховопiр’яних виробiв із зовнішньою підкладкою із
синтетичного матеріалу.
20
Page 21

Програми й опції
3
1
2
Таблиця програм
Пральнi засоби та
Макс.
Опис програми
Програми
Синтетичнi
Синтетичнi (4)
Білі речі
Кольорові речі
Темні речі
Сорочки
Пухо-пiр`янi вироби: для пухо-пiр`яних вироб.
Бiлизна “7 днiв”: для постільної білизни і банного приладдя.
Полоскання
Вiджим і Злив
Протиалергійне прання
Делікатне
Вовна: для речей з вовни, кашемiру, тощо.
Mix 30’: Для швидого освiження злегка забруднених речей (не
рекомендоване для вовняних, шовкових речей або речей для
ручного прання)
Стандартний Бавовна 60° (1): дуже забрудненi стiйкi бiлi та
кольоровi тканини.
Стандартний Бавовна 40° (2): дуже забрудненi делiкатнi бiлi та
кольоровi тканини.
Стандартний Бавовна 20°: дуже забрудненi делiкатнi бiлi та
кольоровi тканини.
Тривалість циклу, вказана на дисплеї або в керівництві, разрахована на основі стандартних умов роботи. Фактичний час може залежати від чисельних факторів, таких як температура і
тиск подаваної води, температура у приміщенні, кількість миючого засобу, кількість і тип завантаженої білизни, зрівноваження завантаженої білизни, додаткові обрані опції.
Примiтка: приблизно за 10 хвилин пiсля пуску (START) машина розрахує та вiдобразить час, який залишився до завершення програми, який залежитиме вiд завантаження.
1) Програма керування згiдно до норми 1061/2010: встановити програму з температурою 60°C.
Цей цикл призначений для прання бавовняних речей із звичайним ступенем забруднення. Ефективність циклу підвищується завдяки комбінованому споживанню енергії та води. Він
має використовуватися для речей, які придатні для прання при температурі 60°C. Фактична температура прання може дещо відрізнятися від заявленої.
2) Програма керування згiдно до норми 1061/2010: встановити програму з температурою 40°C.
Цей цикл призначений для прання бавовняних речей із звичайним ступенем забруднення. Ефективність циклу підвищується завдяки комбінованому споживанню енергії та води. Він
має використовуватися для речей, які придатні для прання при температурі 40°C. Фактична температура прання може дещо відрізнятися від заявленої.
3) При температурі 60°C функцію “Попереднє прання” не можна буде активувати.
Для всiх Установ з проведення випробувань:
2) Програма тривалого прання речей з бавовни: встановити програму з температурою 40°C.
4) Програма тривалого прання синтетичних речей: встановити програму з температурою 40°C.
темп.
(°C)
60° 800
40° 800
60° 1200
40° 1200
30° 800 -
40° 600 -
30° 1000 -
60° 1200
- 1200 - -
- 1200 - - - - 9 - - - 16’
60° 1200 -
30° 0 -
40° 800 -
30° 800 -
60°
(Max. 90°C)
40° 1200 -
20° 1200 -
Макс.
швидкiсть
(обертiв
за
хвилину)
1200
Опції прання
Додаткове полоскання
При виборі даної опції збільшується ефективність
полоскання й гарантується максимальне
видаленняпральногозасобу. Він зручний для людей
зі шкірою, особливо чутливою до миючих засобів.
Рекомендується її використання із пральною машиною
при повному завантаженні або з використанням
підвищених доз пральних засобів.
! Не працює з програмами , , , , .
Полегшене прасування
При виборі даної опції, режими прання і віджиму будуть
відповідно змінені для зменшення утворення складок.
Після закінчення циклу пральна машина почне виконувати
повільне обертання барабана; індикаторні лампи “
Полегшене прасування” і START/PAUSE блимають. Щоб
закінчити цикл, натисніть на кнопку START/PAUSE або
кнопку “Подовжений цикл”.
! Цикл неможливо активувати на програмах , , ,
, , .
Super Wash
Завдяки використанню більшої кількості води на
початку циклу та бiльшiй тривалостi програми,
на центральному стрижнi (див.малюнок). Якщо ви
бажаєте тільки відбілювати без виконання повного
прання, заповнiть вiдбiлювачем додаткову ванночку 3,
задайте програму “Полоскання” та активуйте опцiю
“Super Wash” .
! Не активується на програмах , , , , , , , .
Попереднє прання
Вибiр цiєї функцiї вмикає попереднє прання, яке є
корисним для видалення стiйких плям.
Увага: Додайте миючий засiб у вiдповiдне вiддiлення.
! Не активується у програмах , , , , , , ,
, , (60°), , .
додатковi засоби
Відбіл-
Прання
пранням
Попереднiм
(3)
-
-
-
-
-
-
-
така опція гарантує
високоякісне прання.
Може використовуватися
з або без відбілювача.
При необхiдностi виконати
також відбілювання вставте
додаткову ванночку 3,
що входить до комплекту
постачання, у ванночку 1.
Пiд час дозування
вiдбiлювача не перевищуйте
максимальний рiвень “max”
Пом’
ювач
якшувач
4,5 45 1,17 65 120’
4,5 45 0,62 52 100’
3,5 - - - 115’
3,5 70 0,11 41 30’
%)
Остаточна
аження (кг)
Макс.завант-
5 - - - 195’
5 - - - 115’
5 - - - 80’
2 - - - 80’
9 - - - 150’
9 - - - 49’
5 - - - 200’
1 - - - 80’
2 - - - 90’
9 53 1,43 57,5 210’
9 53 1,03 85 195’
9 - - - 185’
Споживання
вологість (
електроенергії
kWh)
(
Загальна
lt)
Тривалiсть
кількість води (
UK
циклу
21
Page 22

Миючі засоби і білизна
UK
Засіб для прання
Вибір і кількість миючого засобу залежать від типу
тканини (бавовна, вовна, шовк...), кольорів, температури
прання, ступеню забруднення і жорсткості води.
Правильне дозування миючих засобів дозволяє уникнути
зайвих витрат й захищає довкілля: миючі засоби, які
здатні біологічно руйнуватися, містять елементи, що
змінюють рівновагу навкiлля.
Рекомендується:
• використовувати миючі засоби в порошку для білизни з
білої бавовни і для попереднього прання.
• використовувати рідкі миючі засоби для тонких речей з
бавовни і для всіх програм при низькій температурі.
• використовувати рідкі делікатні миючі засоби для
вовни і шовку.
Миючий засіб необхідно додати ще до початку прання
у спеціальну ванночку, або у дозатор, який потрібно
покласти прямо у бак. У цьому випадку не можна
вибирати цикл Бавовна з попереднім пранням.
! Використовуйте порошкові пральні засоби для білих
бавовняних речей, а також для попереднього прання або
прання при температурі вище 60°C.
! Слiдуйте вказiвкам на упаковках пральних засобiв.
! Не використовуйте засоби для ручного прання, тому що
вони утворюють надто багато піни.
Підготовка білизни
• Перш нiж завантажувати речi, добре розкрийте їх.
• Розсортуйте білизну згідно типу тканини (символ на
етикетці) і кольору, звернувши увагу на розділення
білої і кольорової білизни;
• Перевірте кишені й ґудзики;
• Не перевищуйте значення, вказані у “Таблиці
програм” , що відносяться до ваги сухої білизни.
Скільки важить білизна?
1 простирадло 400-500 гр.
1 наволочка 150-200 гр.
1 скатертина 400-500 гр.
1 халат 900-1200 гр.
1 рушник 150-250 гр.
1 джинси 400-500 гр.
1 сорочка 150-200 гр.
Поради з прання
Білі речі: цей програму використовується для прання
білих речей. Завдяки цій програмі забезпечується
тривале зберігання сяючого білого кольору.
Кращі результати отримуються при використанні
порошкового миючого засобу.
Кольорові речі: цей програму використовується
для прання світлих речей. Завдяки цій програмі
забезпечується тривале зберігання насичених
кольорів.
Темні речі: використовуйте програму для прання
речей темного кольору. программа розроблена з
метою збереження темного кольору з часом. Кращі
результати досягаються при використанні рідкого
прального засобу для речей темного кольору.
Сорочки: для забезпечення максимального догляду
використовуйте спецiальну програму для прання
сорочок з рiзноманiтних тканин та рiзних кольорiв.
Пухо-пiр‘янi вироби: для прання виробів із
наповненням гусячим пухом, таких як “подвіині” и
одинарні ковдри (які не перевищують за вагою 3,5 кг),
подушки, куртки, використовуите спеціальну програму
. Такі вироби рекомендується завантажити у
барабан у згорнутому вигляді з краями, загорнутими
досередини (див. малюнок), при цьому не перевищуите
¾ об’єму самого барабану. Для оптимального прання
рекомендується використовувати рідкий миючий засіб,
який необхідно налити у касету для миючих засобів.
Стьобанi ковдри: щоб випрати стьобані ковдри з
синтетичною підкладкою, використовуйте спеціальний
мішечок, що входить у комплект постачання та програму .
Білизна для ванної і постільна білизна: ця
пральна машина дозволяє випрати білизну з
усього дому за один єдиний цикл , що оптимізує
використання пом’якшувача й заощаджує час і енергію.
Рекомендується використання миючих засобів у порошку.
Протиалергійне прання: використовуйте програму
для видалення основних алергенів, таких як пилок,
кліщі, котяча і собача шерсть.
Делікатне: використовуйте програму для прання
дуже делікатних речей, наприклад, зі стразами або
іншими оздобленнями.
Перш ніж запускати прання, рекомендується
вивернути речі навиворіт і вкласти дрібні речі в
спеціальний мішечок для прання делікатних речей.
Кращі результати досягаються при використанні
рідкого прального засобу для делікатних речей
Для прання шовкових речей або портьєр
(pекомендується скласти та вкласти у мішечок, що
входить до комплекту постачання) виберіть цикл
і активуйте опцію (В цьому випадку можна буде
активувати також опцію “Додаткове полоскання”);
машина закінчить цикл із замоченою білизною й
блиманням відповідної індикаторної лампи . Щоб
злити воду й отримати можливість витягнути білизну,
натисніть на кнопку START/PAUSE або кнопку .
Вовна: Цикл прання “Вовна” цієї пральної машини
Hotpoint-Ariston протестований і затверджений
компанією Woolmark у відношенні до прання вовняних
речей, класифікованих як для “ручного прання”,
за умови виконання прання згідно до інструкцій,
наведених на етикетці виробу, і вказівок виробника
електропобутового приладу. Hotpoint-Ariston - перша
марка пральних машин, яка отримала від компанії
Woolmark сертифікацію Woolmark Apparel Care Platinum за власні показники прання і витрати води й
електроенергії. (M1318)
Стандартний Бавовна 20°: ідеальна для бавовняних
забруднених речей. Добре прання, в тому числі у
холодній воді, яке можна порівняти з пранням при 40°,
гарантується механічною роботою, яка здійснюється на
змінній швидкості із частими повторюваними піками.
22
Page 23

Несправності та засоби їх
ліквідації
Може трапитися так, що машина не буде працювати. До того як зателефонувати у Сервiсний центр (див. “Допомога”),
перевірте, чи не є дана несправність проблемою, що легко вирішується, звернувшись до списку нижче.
Несправності:
Пральна машина не вмикається.
Цикл прання не розпочинається.
У машину не надходить вода.
Дверцята люку машини
залишаються заблокованими.
Машина безперервно заливає і
зливає воду.
Пральна машина не зливає воду
чи не вiджимає.
Пральна машина дуже вiбрує пiд
час вiджиму.
Машина пропускає воду.
Піктограми, що відносяться до
“Поточної фази” швидко блимають
одночасно з індикаторною лампою
ON/OFF.
Утворюється занадто багато піни.
Дверцята люку машини
залишаються заблокованими.
Можливі причини/Рішення:
• Штепсель не вставлений в електричну розетку або вставлений не до кiнця.
• У будинку немає електроенергії.
• Дверцята люку погано закриті.
• Кнопка START/PAUSE не була натиснута.
• Водопровідний кран закритий.
• Якщо вiдстрочення задане на час запуску.
• Шланг подачі води не підключено до водопровiдного крану.
• Перегин у шлангу.
• Водопровідний кран закритий.
• У водопроводі немає води.
• Недостатній тиск.
• Кнопка START/PAUSE не була натиснута.
• Вибір опції наприкінці циклу прання призведе до повільного
обертання барабану; для завершення циклу натиснiть кнопку START/
PAUSE або кнопку .
• Зливний шланг не знаходиться на відстані від 65 до 100 см від підлоги
(див. див. “Встановлення”).
• Кінець зливного шланга занурений у воду (див. див. “Встановлення”).
• Якщо квартира знаходиться на верхніх поверхах будинку, можливо,
відбувається сифонний ефект, при якому машина безперервно заливає
й зливає воду. Щоб його ліквідувати, існують спеціальні антисифонні
клапани, які можна придбати у торговельній мережі.
• Стiнний каналiзацiйний злив не має віддушини для виходу повiтря.
• Програма не передбачає зливання: у деяких програмах його потрібно
вмикати вручну (див. “Програми і опції”).
• Активована опція : для завершення програми, натисніть кнопку
START/PAUSE (див. “Програми і опції”).
• Перегин зливного шланга (див. див. “Встановлення”).
• Засмітився зливний шланг.
• Барабан, у момент встановлення, не був правильно розблокований
(див. “Встановлення”).
• Машина стоїть не на плоскій поверхні (див. “Встановлення”).
• Машина затиснута між меблями і стіною (див. див. “Встановлення”).
• Дисбаланс завантаження (див. “Миючі засоби і білизна”).
• Погано пригвинчений шланг подачі води (див. “Встановлення”).
• Забруднена касета для миючих засобів (як вимитидив. “Технічне
обслуговування і догляд”).
• Погано закріплений зливний шланг (див. “Встановлення”).
• Вимкніть машину й витягніть штепсель з розетки, зачекайте близько
1 хвилини й увімкніть її повторно. Якщо несправність не усунено,
зателефонуйте у Сервiсний центр.
• Миючий засіб не підходить для пральної машини (має бути напис “для
машинного прання”, “для ручного й машинного прання”, або подібний).
• Перевищена доза миючого засобу.
• Виконайте процедуру ручного розблокування (див. “Запобіжні заходи й
поради”.)
UK
! Примiтка: для виходу з “Режим демо”, закрити машину, натискайте одночасно протягом 3 секунд кнопки та .
23
Page 24

Допомога
UK
Перш ніж телефонувати у Сервiсний центр:
• Перевірте, чи можна самостійно вирішити проблему ( див. “Несправності і засоби їх усунення”);
• Запустіть програму повторно, щоб перевірити чи усунено несправність;
• При негативному результаті, зверніться у Авторизований сервiсний центр.
! В разi помилкового встановлення обо неправильного використання пральної машини операцiї, якi
проводитимуть фахiвцi Сервiсного центру, будуть платними.
! Звертайтеся виключно до уповноважених фахівців.
Повідомити:
• тип несправності;
• модель машини (Мод.);
• серійний номер (С/Н).
Ці дані знаходяться на інформаційній пластині на самій машині.
24
ТОВ «Індезіт Україна»
Україна, 01001, м. Київ,
пров. Музейний, 4
Page 25

Montaj ve kullanım
talimatları
ÇAMAŞIR MAKİNESİ
TR
Türkçe
AQUALTIS
AQ92F 29
İçindekiler
Montaj, 26-27
Ambalajdan çıkarma ve tesviye
Elektrik ve su bağlantılarının yapılması
Teknik bilgiler
Bakım ve onarım, 28
Su ve elektrik bağlantılarının kesilmesi
Makinenin temizlenmesi
Deterjan dağıtma çekmecesinin temizlenmesi
Cihaz tamburuna bakım yapılması
Pompanın temizlenmesi
Su giriş hortumunun kontrol edilmesi
Önlem ve öneriler, 29
Genel güvenlik
Yük dengeleme sistemi
Atma
Yan kapağın manüel olarak açılması
Makinenin tanıtımı, 30-31
Kumanda paneli
TR
Bir programın çalıştırılması, 32
Programlar ve seçenekleri, 33
Program tablosu
Yıkama seçenekleri
Deterjan ve çamaşır, 34
Deterjan
Çamaşırın hazırlanması
Yıkama önerileri
Sorun giderme, 35
Teknik Servis, 36
25
Page 26

Montaj
TR
! Bu kullanma kılavuzunun saklanması daha
sonradan da okunup faydalı olabilmesi
açısından önemlidir. Çamaşır makinesinin
satılması, devri veya nakli durumlarında da,
bu kılavuzun çamaşır makinesi ile birlikte
kalmasını sağlayınız.
! Talimatları dikkatlice okuyunuz: montaj,
kullanım ve güvenliğe ilişkin önemli bilgiler
içermektedir.
! Bu kılavuzu içeren torbanın içinde garanti
dahil montaj için gereken detaylar mevcuttur.
Ambalaj malzemesinin kaldırılması
ve makinenin seviye ayarının
yapılması
Ambalaj malzemesinin kaldırılması
1. Ambalajı açıldıktan sonra çamaşır
makinesinin taşıma esnasında hasar
görmemiş olduğunu kontrol ediniz.
Hasar görmüş ise monte etmeden satıcıya
başvurunuz.
2. Arkada bulunan 4
adet nakliye emniyet
vidalarını ve ilgili ara
parçasını çıkartınız
(bkz. şekil).
3. Nakliye
emniyetlerinin
boşaltığı deliklere
ambalaj torbasındaki
plastik tıpaları takınız.
4. Tüm parçaları saklayınız; iç hasar görmesini
önlemek için herhangi bir nakliye sırasında
çamaşır makinenisini yine nakliye emniyetleri
takılı olarak taşıyınız.
! Ambalajlar çocuk oyuncağı değildir.
Tesviye
! Makinenin seviyesinin dikkatlice
ayarlanması makinenin titremesini, özellikle
sıkma programı çalışırken ses çıkarmasını ve
yerinden oynamasını engeller.
! Zeminde moket veya halı olması halinde,
ayakları makinenin altında havalandırma
sağlanacak şekilde ayarlayınız.
Elektrik ve su bağlantıları
Su besleme hortumunun bağlanması
! Su besleme hortumunu su şebekesine
bağlamadan önce berrak su gelene kadar
suyu akıtınız.
1. Su besleme
hortumunu arka
kısımının üst sağ
köşesinde bulunan su
girişine vidalayarak
makineye bağlayınız
(bkz. şekil).
2. Giris hortumunu
3/4 gaz vidalı baglantı
kullanarak bir soguk
su musluguna
baglayın (sekle
bakınız).
Baglantıyı yapmadan
önce, iyice temiz
olana kadar suyun
akmasına izin verin.
3. Hortumun katlanmamasına ve
ezilmemesine dikkat ediniz.
1. Çamaşır makinesini düz ve sert bir
zemine yerleştiriniz, duvar veya mobilyalara
dayamayınız.
2. Ayarlanabilir
ayakları gevşeterek
ya da sıkarak
makinenin zemine
tamamen oturmasını
sağlayınız (en fazla 2
derece eğilebilir).
26
! Musluğun su basıncının Teknik Veriler
tablosunda belirtildiği gibi olması gerekir (bkz.
yan sayfa).
! Besleme hortumunun boyu yetersiz ise
yetkili bir satış mağazasına veya teknik
servise başvurunuz.
! Eski veya kullanılmış hortumları asla
kullanmayınız. Makine ile birlikte verilmiş
olanları kullanınız.
Page 27

Tahliye hortumunun bağlanması
65 - 100 cm
Tahliye hortumunu,
katlanmamasına
dikkat ederek
zeminden veya
yerden 65 cm ile 100
cm arasındaki bir
yükseklikten duvar
tahliyesine takınız.
veya, ambalaj
torbasındaki
hortum dirseğiyle,
düşmeyecek
şekilde sabitleyerek
boşaltma hortumunu
lavabo ya da küvete
asınız (bkz. şekil).
Tahliye hortumunun
serbest ucunun suya
girmemesi gerekir.
! Tahliye hortumunun ek yapılarak
uzatılmaması tavsiye edilir; başka seçenek
yoksa, uzatma hortumunun çapının da aynı
olması ve 150 cm’yi. den uzun olmaması
gerekir.
! Uzatma kablosu ve çoklu prizler
kullanmayınız.
! Kablonun ezilmemesi ve katlanmaması gerekir.
! Beslenme kablosu ve priz yalnızca yetkili
servis tarafından değiştirilmelidir.
Dikkat! Bu şartlara uyulmaması halinde rma
tüm sorumluluklardan muaftır.
Teknik bilgiler
Model AQ92F 29
geniþlik 59,5 cm
Ölçüler
Kapasite 1 - 9 kg
yükseklik 85 cm
derinlik 58 cm
TR
Elektirik bağlantısı
Makinenin şini bir elektrik prizine takmadan
önce aşağıdakileri kontrol ediniz:
• tesisat topraklı prize sahip ve yürürlükteki
normlara uygun olmalıdır;
• elektrik prizi, Teknik Veriler tablosunda
belirtilen makinenin maksimum güç yükünü
taşıyabilmelidir (bkz. yan taraf);
• besleme gerilimi Teknik Veriler tablosunda
belirtilen değer sınırı kapsamında olmalıdır
(bkz. yan taraf);
• priz ve makinenin şi birbiriyle uyumlu
olmalıdır. Aksi takdirde ya prizi, yada şi
değiştiriniz.
! Makine, üzeri kapalı bile olsa açık alanlara
monte edilmez, zira yağmur ve fırtınaya
maruz kalması son derece tehlikelidir.
! Makine monte edildikten sonra priz kolayca
erişilebilir durumda olmalıdır.
Elektrik baðlantýlarý
Su baðlantýlarý
Sýkma hýzý
1061/2010
ve 1015/2010
sayýlý direktiflere
göre kontrol
programlarý
makine üstünde takýlý olan
teknik veriler plakasýna
bakýnýz.
max. su basýncý
1 MPa (10 bar)
min. su basýncý
0,05 MPa (0,5 bar)
tambur kapasitesi 58 litre
maksimum dakikada 1200
devire kadar
program
;
Pamuklu Standart 60°C.
program
;
Pamuklu Standart 40°C.
Bu makina aþaðýda belirtilen
AB normlarýna uygundur:
- 2004/108/CE (Elektromanyetik Uyum)
- 2012/19/EU
- 2006/95/CE (Alçak gerilim)
27
Page 28

1
2
1
2
2
Bakım ve onarım
TR
Su ve elektrik bağlantılarının
kesilmesi
• Her programdan sonra musluğu kapatın.
Bu makine içerisindeki hidrolik sistemin
aşınmasını sınırlayacak ve sızıntıların
önlenmesine yardımcı olacaktır.
• Temizlik ve tüm bakım işleri sırasında
cihazı şten çekin.
Makinenin temizlenmesi
Cihazın dış parçaları ve kauçuk parçaları
soğuk sabunlu suya batırılmış yumuşak bir
bez kullanılarak temizlenebilir. Çözücü veya
aşındırıcı kullanmayın.
Deterjan çekmecesinin
temizlenmesi
Çekmeceyi çıkarmak
için, kola(1) basın ve
çekmeceyi (2) dışarı
doğru çekin (şekile
bakınız).
Musluk suyunun
altında yıkayın,
bu işlem sık sık
tekrarlanmalıdır.
Cihaz tamburuna bakım yapılması
Ön hazneye erişmek için:
1. Çıkarana kadar ilk önce ortaya doğru
bastırarak ve her iki yanından iterek
makinenin önündeki kapak panelini
çıkarın(şekile bakınız);
2. Akan suyu toplamak
için bir kap yerleştirin
(yaklaşık 1.5 l) (şekile
bakınız);
3. saat yönünde
çevirerek kapağı
yerinden çıkarın
(şekile bakınız);
4. içerisini iyice temizleyin;
5. kapağı geri takın;
6. cihazın üstüne itmeden önce kancaların
güvenli bir şekilde yerine takıldığından emin
olarak, paneli yerine yerleştirin.
• İstenmeyen kokuların oluşmasını önlemek
için kapağı daima aralık bırakın.
Pompanın temizlenmesi
Çamaşır makinesine, bakım gerektirmeyen
kendini temizleyen bir pompa takılmıştır.
Bazen, küçük cisimler (madeni para veya
düğme gibi) pompanın alt bölümündeki
koruyucu ön hazneye düşebilir.
! Programın bittiğinden ve cihazın şten çekili
olduğundan emin olun.
28
Su giriş hortumunun kontrol
edilmesi
Giriş hortumunu yılda bir kez kontrol
edin. Herhangi bir çatlak varsa, hemen
değiştirilmesi gerekmektedir: program
sırasında su basıncı çok güçlüdür, çatlak bir
hortum kolayca yarılabilir.
Page 29

Önlem ve öneriler
! Makine uluslararası güvenlik düzenlemelerine uygun
olacak şekilde tasarlanmış ve imal edilmiştir. Aşağıdaki
bilgiler güvenlik amacıyla verilmiştir ve bu nedenle dikkatli
bir şekilde okunması gerekmektedir.
Genel güvenlik
• Bu cihaz sadece ev kullanımı için tasarlanmıştır.
• Bu cihaz, eğer gözetim altında bulunuyorlar
ise veya güvenli şekilde ve ilişkin tehlikeler
göz önünde bulundurularak, cihazın kullanımı
hakkında uygun eğitim almışlar ise, 8 yaşından
büyük çocuklar ve ziksel, duyusal veya mental
kapasitelerden yoksun veya yetersiz tecrübe
ve bilgiye sahip kişiler tarafından kullanılabilir.
Çocuklar, cihaz ile oynamamalıdır. Bakım
ve temizlik işlemleri, denetimsiz çocuklar
tarafından gerçekleştirilmemelidir.
• Makineye yalınayak veya el ya da ayaklar ıslakken
dokunmayın.
• Cihazı elektrik prizinden çekerken güç kablosundan
çekmeyin. Fişi tutup, çekin.
• Yüksek sıcaklığa ulaşabileceği için boşaltılan suya
dokunmayın.
• Kapağı asla zorlamayın. Bu kazayla açılmasını
önlemek için tasarlanan güvenlik kilidi mekanizmasına
hasar verebilir.
• Cihaz arızalanırsa, ne olursa olsun kendi kendinize
tamir etmeyi denemek için iç mekanizmaya
dokunmayın.
• Çocukları daima çalışır durumdayken cihazdan uzak
tutun.
• Taşınması gerekirse, iki veya üç kişinin yardımı
hareket ettirin ve azami dikkatle taşıyın. Cihaz çok
ağır olduğundan dolayı, kesinlikle bunu tek başınıza
yapmayı denemeyin.
• Çamaşırı, çamaşır makinesinin içine yerleştirirken,
tamburun boş olduğundan emin olun.
Yük dengeleme sistemi
Her sıkma aşamasından önce aşırı titreşimi önlemek
ve yükü tek bir yönde dağıtmak için, tambur yıkama
dönüş hızından biraz daha fazla olan bir hızda sürekli
döner. Birkaç denemeden sonra, yük doğru şekilde
dengelenmezse, makine düşük bir dönüş hızında döner.
Yük çok dengesizse, çamaşır makinesi döndürme yerine
dağıtma işlemini uygular. Gelişmiş yük dağılımı ve
dengeyi desteklemek için, küçük ve büyük giysilerin yük
içerisinde karıştırılmasını öneririz.
Hurda cihazlar, atmosfere ve halk sağlığına yönelik
potansiyel tehlikeyi önlemenin yanısıra makine
içerisindeki malzemelerin tekrar kullanım ve geri
dönüşüm maliyetini en uygun hale getirmek için
ayrı ayrı toplanmalıdır. Ayrılmış atık toplama ile ilgili
yükümlülüklerini cihaz sahiplerine hatırlatmak için tüm
ürünler çarpı konulmuş çöp kutusu ile işaretlenmiştir.
Eve ait cihazların doğru şekilde atılması ile ilgili daha
fazla bilgi almak için, cihaz sahipleri yerel makamlarla
ve cihaz satıcıları ile temas kurmalıdır.
• Atık Elektrikli ve Elektronik Eşyaların (AEEE) Kontrolü
Yönetmeliği.
• AEEE Yönetmeliğine uygundur.
Yan kapağın manüel olarak açılması
Elektrik kesintisinden dolayı kapağın açılması mümkün
olmadığında ve çamaşırı çıkarmak istiyorsanız:
1. Fişi elektrik prizinden
çekin.
2. Makine içerisindeki suyun
kapak açılışından daha
düşük seviyede olmasına
dikkat edin, bu durumda
değilse, fazla suyu şekilde
gösterildiği gibi tahliye
hortumunu kullanarak bir
kovanın içerisine boşaltın.
3. çamaşır makinesinin ön alt tarafındaki kapak panelini
çıkarın (arka sayfaya bakınız).
4. Şekilde gösterildiği gibi
plastik bağlama çubuğu
durma konumundan
serbest kalana kadar tırnağı
kullanarak çekip çıkarın,
kapak kilidinin açıldığını
gösteren “çıt” sesini duyana
kadar aşağı doğru çekin.
5. kapağı açın, kapak
açılmazsa, işlemi tekrar
yapın.
TR
Atma
• Ambalaj malzemelerinin atılması: Ambalaj
malmzelerinin tekrar kullanılabilmesi için yerel
düzenlemelere uyun.
• Atık Elektrikli ve Elektronik Cihazlarla ilgili Avrupa
Birliği Yönergesi 2012/19/EU evde kullanılan cihazların
normal katı kentsel atık dönüşümünü kullananlarla
birlikte atılmaması gerektiğini ifade etmektedir.
6. cihazın üstüne itmeden önce kancaların güvenli bir
şekilde yerine takıldığından emin olarak, paneli yerine
yerleştirin.
29
Page 30

3
1
2
1
8
0
2
1
0
1
5
0
1
2
0
9
0
6
0
B
A
Makinenin tanıtımı
TR
KAPAK
KAPAK
TUTMA YERİ
AYAK
ÇARPMASINDAN
KORUYUCU PANEL
Kumanda
paneli
AYARLANABİLİR
AYAKLAR
KAPAK
1. ön yıkama bölmesi: toz
deterjan kullanın.
Kapağı açmak için her
zaman tutma yerini kullanın
(şekle bakınız).
! Deterjanı dökmeden
önce, ilave bölme 3’ün
çıkarıldığından emin olun.
2. ana yıkama bölmesi: Sıvı
deterjan kullanılması halinde
doğru doz ayarlaması için
makinede gösterilen A
kademesini kullanmanız
önerilir. Toz deterjan ile
yıkamalarda B kademesini kullanınız.
3. ilave bölme: çamaşır suyu
DETERJAN ÇEKMECESİ
! İlave bölme 3’ün kullanımı ön yıkama işlevini önler.
çamaşır katkı maddeleri bölmesi: kumaş
Deterjan çekmecesi
makinenin içerisinde
bulunmaktadır, kapak
açılarak erişilebilir.
yumuşatıcıları ve sıvı katkı maddeleri. Kadran tarafından
gösterilen maksimum seviyenin aşılmamasını ve
yoğunlaştırılmış kumaş yumuşatıcılarının suyla
seyreltilmemesini öneririz.
Deterjan miktarı hakkında
daha fazla bilgi için, lütfen
“Deterjan ve çamaşır” başlıklı
bölüme bakınız.
Bekleme modu
Yeni enerji tasarrufu düzenlemeleri ile uyumlu bu çamaşır
makinesine herhangi bir faaliyet algılanmadığında 30
dakika içinde devreye sokulan otomatik bekleme sistemi
yerleştirilmiştir ON/OFF düğmesine bir süre basın ve
makinenin tekrar çalışmasını bekleyin.
Off-mode’da tüketim: 0,5 W
Left-on’da tüketim: 8 W
30
Page 31

Kumanda paneli
PROGRAM SEÇİCİ
döner düğme
Gösterge lambaları
bulunan SEÇİM
düğmesi
Ekranı
Gösterge lambaları
bulunan SEÇİM
düğmesi
ECO
gösterge
lambası
Gösterge lambası bulunan
START/PAUSE
PROGRAM
AŞAMA simgeleri
ON/OFF gösterge
lambası bulunan düğme
SICAKLIK AYARİ
düğmesi
DEVIR AYARİ
ON/OFF gösterge lambası bulunan düğme: Makineyi
açıp, kapamak için bu düğmeye bir süre basın. Yeşil
gösterge lambası makinenin açık olduğunu gösterir.
Program sırasında, çamaşır makinesini kapatmak için,
yaklaşık 3 saniye düğmeyi basılı tutun, düğmeye bir süre
veya istemeden basılırsa, makine kapanmayacaktır.
Program sırasında makine kapatılırsa, bu program iptal
edilecektir.
PROGRAM SEÇİCİ döner düğme: her iki yöne de
döndürülebilir. En uygun programı seçmek için, lütfen
“Programlar Tablosu”’na bakınız. Program sırasında
döner düğme hareket etmeyecektir.
SICAKLIK AYARİ düğmesi: sıcaklık ayarında
değişiklik yapmak veya devre dışı bırakmak için basın,
seçilen değer üstteki ekranda görüntüye gelecektir (“Bir
programın çalıştırılması”’na bakınız).
DEVIR AYARİ düğmesi: sıcaklık ayarında değişiklik
yapmak veya devre dışı bırakmak için basın, seçilen
değer üstteki ekranda görüntüye gelecektir (“Bir
programın çalıştırılması”’na bakınız).
YİKAMA ZAMANİ ERTELEME düğmesi: seçilen
program için gecikmeli çalışmayı ayarlamak amacıyla
basın; ayarlanan gecikmeli çalıştırma süresi üstteki
ekranda görüntüye gelecektir (“Bir programın
çalıştırılması”’na bakınız).
Gösterge lambaları bulunan SEÇİM düğmesi: mevcut
seçenekleri seçmek için basın. Seçilen seçeneğe karşılık
gelen gösterge lambası yanacaktır (“Bir programın
çalıştırılması”’na bakınız).
düğmesi
YİKAMA ZAMANİ
ERTELEME
düğmesi
LOCK
gösterge
lambası
Gösterge lambası bulunan
ÇOCUK KİLİDİ düğmesi
PROGRAM AŞAMA simgeleri: bu simgeler program
sürecini göstermek için aydınlanır (Yıkama –
Durulama –Sıkma – Boşatlma ). yazısı
program bitiminde yanar.
Gösterge lambası bulunan START/PAUSE düğmesi:
yeşil gösterge lambası yavaş yavaş yanıp söner, bir
program başlatmak için düğmeye basın. Program başlar
başlamaz, gösterge lambası sürekli yanacaktır. Programı
duraklatmak için, düğmeye tekrar basın, gösterge
lambası turuncu renkte yanıp sönecektir. “LOCK”
gösterge lambası kapanırsa, kapak açılmayabilir.
Programı yarıda kesildiği noktadan başlatmak için,
düğmeye tekrar basın.
LOCK gösterge lambası: kapağın kilitli olduğunu
gösterir. Kapağı açmak için, programı duraklatın (“Bir
programın çalıştırılması”’na bakınız).
Gösterge lambası bulunan ÇOCUK KİLİDİ düğmesi:
kontrol panelini devreye sokmak veya devreden çıkarmak
için, düğmeyi yaklaşık 2 saniye basılı tutun. Gösterge
lambası aydınlatıldığında, kumanda paneli kilitlenir
(ON/OFF tuşu hariç). Bu, özellikle çocuklar evde olduğu
sırada, programda kazayla değişiklik yapılmasını
önlemenin mümkün olduğu anlamına gelir.
ECO gösterge lambası: simgesi yandığında, Yıkama
parametreleri değiştirildikten sonra, en az %10 enerji
tasarrufu sağlanır. Ayrıca, makine “Bekleme” moduna
girmeden önce, simge birkaç saniye yanacak; makine
kapandığında hesaplanana enerji tasarrufu %80 işareti
etrafında olacaktır.
31TR31
Page 32

Bir programın çalıştırılması
TR
UYARI: Çamaşır makinasının ilk kullanımından önce, ön
yıkamasız 90 pamuklu programını kullanarak deterjanla
çamaşırsız bir yıkama yapın
1. MAKİNEYİ AÇ. düğmesine basın. Bütün gösterge
lambaları 1 saniyeliğine yanacaktır, düğmesine ait
gösterge lambası sürekli yanık kalacak ve START/
PAUSE gösterge lambası hızlı bir şekilde yanıp
sönecektir.
2. PROGRAMI SEÇİN. İstediğiniz programı seçene
kadar PROGRAM SEÇİCİ DÖNER DÜĞME’yi sağa
veya sola çevirin. Sıcaklık ve dönüş hızı her program
için ayrı ayrı ayarlıdır, bunlarda değişiklik yapılabilir.
3. ÇAMAŞIRI YERLEŞTİRİN.Kapağı açın. Bir sonraki
sayfadaki programlar tablosunda gösterilen maksimum
yük değerini aşmamaya dikkat ederek çamaşırı
yerleştirin.
4. DETERJANI ÖLÇÜP AYIRIN. Deterjan çekmecesini
çekip çıkarın ve “Makinenin Tanıtımı” bölümünde
belirtilen ilgili bölmelere deterjanı dökün.
5. KAPAĞI KAPATIN.
6. PROGRAMI ÖZELLEŞTİRİN. Kumanda panelindeki
ilgili düğmeleri kullanın:
Sıcaklık ve/veya dönüş hızını değiştirin.
Makine, seçilen programla uyumlu ise maksimum
sıcaklığı, seçilen program için ayarlı dönüş hızı
değerlerini veya en son kullanılan ayarları otomatik
olarak görüntüler. Soğuk yıkama ( ) ayarına ulaşana
kadar sıcaklık düğmesine basılarak düşürülebilir.
Devir hızı, tamamen devre dışı bırakılana kadar ( )
düğmesine basılarak kademe kademe azaltılabilir.
Bu düğmelere tekrar basılırsa, maksimum değerler
sıfırlanır.
! İstisna: programı seçildiğinde sıcaklık derecesi
90°C ye kadar yükseltilebilir.
Yıkama Zamanı Erteleme ayarla.
İstediğiniz gecikme süresine ulaşana kadar düğmeye
basın. Ayarlama işlemi sırasında, gecikme süresi
ekranda gösterilir ve sembolü yanıp söner.
Gecikmeli çalıştırma süresi seçildikten sonra, sabit
sembolü ve çevrim süresi ekranda belirecektir. Seçilen
gecikme süresini görüntülemek için düğmeye bir kez
basın. Gecikmeli çalıştırma seçeneğini iptal etmek için,
ekran OFF yazısını gösterene kadar düğmeye basın,
sembolü ekrandan kaybolacaktır.
! START/PAUSE düğmesine basılır basılmaz, gecikme
süresi düşürülecektir.
• Seçimi devre dışı bırakmak için düğmeye tekrar
basın, gösterge lambası kapanacaktır.
! Seçim, seçilen program ile uyumlu değilse, bu
uyumsuzluk gösterge lambasının hızlı bir şekilde yanıp
sönmesi ve bir alarm sesi (3 bip) ile bildirilecektir,
seçim devreye sokulmayacaktır.
! Seçim önceden seçilmiş başka bir seçim ile uyumlu
değilse, seçilen ilk seçime ait gösterge lambası yanıp
sönecek ve sadece ikinci seçim devreye sokulacaktır,
düğmeye ait gösterge lambası sürekli yanacaktır.
7. PROGRAMI BAŞLATIN. START/PAUSE düğmesine
basın. İlgili gösterge lambası sürekli yanar ve kapak
kilitlenir ( LOCK gösterge lambası yanar). Program
sırasında aşamanın yürütülmekte olduğunu göstermek
için program aşamalarına ait simgeler yanacaktır.
Bir kez başlamış olan programı değiştirmek için,
START/PAUSE düğmesine basarak çamaşır
makinesini duraklatın, daha sonra istenilen programı
seçin ve tekrar START/PAUSE düğmesine basın.
Program sırasında kapağı açmak için, START/
PAUSE düğmesine basın, LOCK gösterge lambası
kapalıysa, kapağı açabilirsiniz. Programı yarıda
kesildiği noktadan başlatmak için, START/PAUSE
düğmesine tekrar basın.
8. PROGRAM BİTTİ. Bu durum aydınlatılan END yazısı
ile gösterilir. Kapak hemen açılmayabilir. START/
PAUSE gösterge lambası yanıyorsa, programı sona
erdirmek için düğmeye basın. Kapağı açın, çamaşırı
boşaltın ve makineyi kapatın.
! Başlamış olan bir programı iptal etmek istiyorsanız,
program durana ve makine kapanan kadar düğmesini
basılı tutun.
Örtü, perde ve hassas giysiler için çanta
Aqualtis çamaşır makinesi, çamaşırı koruyan özel çanta
sayesinde en değerli ve hassas çamaşırları bile güven
içerisinde yıkamanızı sağlar (bu çanta makine ile birlikte
verilmektedir). Sentetik malzeme kullanılarak yapılan
bir dış tabakaya sahip örtüleri ve pamuklu eşyaları
her yıkadığınızda çantayı kullanmanızı öneririz.
Program ayarlarini değiştirin.
İhtiyacınıza uygun olarak programı özelleştirmek için
SEÇİM düğmelerine basın.
• Seçimi etkinleştirmek için düğmeye basın, ilgili
gösterge lambası yanacaktır.
32
Page 33

Programlar ve seçenekleri
3
1
2
Deterjan ve katký
Program tablosu
Yýkama çevrimi açýklamasý
Simge
Sentetik
Sentetik (4)
Beyazlar
Renkliler
Koyu renkler
Gömlekler
Yorgan: Doldurulmuþ giysiler için
Nevresim ve havlular için haftalýk yýkama
Durulama
Sýkma ve Boþaltma
Anti alerjik
Ultra narýnler
Yünlü: Yün, kaþmir vs.
Karýþýk 30’: Az kirlenmiþ giysileri hemen temizlemek için (elle yýka-
mayý gerektiren yün, ipek ve elbiseler için uygun deðildir).
Pamuklu Standart 60°C (1): çok kirli dayanıklı beyaz ve renkliler.
Pamuklu Standart 40°C (2): çok kirli beyazlar ve hassas renkliler.
Pamuklu Standart 20°C: çok kirli beyazlar ve hassas renkliler.
Ekran veya kitapçık üzerinde gösterilen devre süresi, standart şartlara göre hesaplanmış tahmini bir süredir. Geçerli olan süre, girişteki sıcaklık derecesi ve suyun basıncı, ortam sıcaklığı,
deterjan miktarı, yük miktarı ve tipi, yükün dengesi, seçilen ilave seçenekler gibi sayısız faktörlere göre değişiklik gösterebilmektedir.
Not: BAŞLAT işleminden 10 dakika sonra, makine içerisindeki yükü temel alarak programın sonuna kadar kalan süreyi tekrar hesaplayacaktır.
1) 1061/2010 direktine göre deneme programları: programını 60°C’ye ayarlayınız.
Bu devre, orta kirlilikteki pamuklu çamaşırları temizlemek için uygundur ve 60 °C’de yıkanabilir çamaşırlar üzerinde kullanılacak, kombine enerji ve su
tüketimi açısından en etkili devredir. Geçerli olan yıkama sıcaklık derecesi, belirtilen sıcaklık derecesinden farklı olabilir.
2) 1061/2010 direktine göre deneme programları: programını 40°C’ye ayarlayınız.
Bu devre, orta kirlilikteki pamuklu çamaşırları temizlemek için uygundur ve 40 °C’de yıkanabilir çamaşırlar üzerinde kullanılacak, kombine enerji ve su
tüketimi açısından en etkili devredir. Geçerli olan yıkama sıcaklık derecesi, belirtilen sıcaklık derecesinden farklı olabilir.
3) 60 °C sıcaklıkta “Ön yıkama” fonksiyonu etkinleştirilemez.
Maks.
Sýcak
(°C)
60° 800
40° 800
60° 1200
40° 1200
30° 800 -
40° 600 30° 1000 60° 1200
60° 1200 -
30° 0 -
40° 800 -
30° 800 -
60°
(Max. 90°)
40° 1200 -
20° 1200 -
Maks.
Hýz (dev/
dak.)
- 1200 - -
- 1200 - - - - 9 - - - 16’
1200
maddeleri
Ön
yýkamalý
(3)
suyu
Çamaþýr
Çamaþýr
deterjaný
-
-
-
-
-
-
-
(kg)
týcý
Maks. yük
Yumuþa-
4,5 45 1,17 65 120’
4,5 45 0,62 52 100’
5 - - - 195’
5 - - - 115’
5 - - - 80’
2 - - - 80’
3,5 - - - 115’
9 - - - 150’
9 - - - 49’
5 - - - 200’
1 - - - 80’
2 - - - 90’
3,5 70 0,11 41 30’
9 53 1,43 57,5 210’
9 53 1,03 85 195’
9 - - - 185’
Enerji tüketi-
Kalan nem %
mi kWh
Toplam su lt
süresi
Çevrim
Tüm Test Enstitüleri için:
2) Pamuklu uzun programı; programda 40°C’ye ayarlayınız.
4) Sentetik için uzun yıkama çevrimi; programda 40°C’ye ayarlayınız.
Yıkama seçenekleri
Ekstra Durulama
Bu seçeneği seçenerek, durulamanın verimliliği arttırılır
ve kalan deterjanın iyice çıkarılması sağlanır. Özellikle
deterjanlar için hassas olan ipek için kullanışlıdır. Bu
seçeneğin tam yüklü yıkamada ve çok fazla miktarda
deterjan gerekli olduğunda kullanılması önerilir.
! Bu programlarda uygulanamaz: , , , , .
Kolay Ütüleme
Bu seçeneğin seçilmesi, yıkama ve sıkma programlarında
iz oluşumunun azaltılması için değişiklik yapacaktır.
Program sonunda, çamaşır makinesi tamburu yavaş bir
şekilde dönecek, “Kolay Ütüleme” ve START/PAUSE
gösterge lambaları yanıp sönecektir. Programı sona
erdirmek için, START/PAUSE düğmesine veya “Kolay
Ütü” düğmesine basın.
! Bu programlarda uygulanamaz: , , , , , .
Süper Yıkama
Bu seçenek, programın ilk aşamasında büyük miktarda
su kullandığından ve arttırılmış programı süresinden
dolayı yüksek performanslı bir yıkama sağlar. Bu
fonksiyon özellikle inatçı lekelerin çıkarılması için
kullanışlıdır. Çamaşır suyu
ile veya çamaşır suyu
olmadan kullanılabilir.
Ağartma isterseniz, ilave
raf bölmesini (3) bölme 1 ‘in
içerisine yerleştirin. Çamaşır
suyunu bölmeye dökerken,
ortadaki milde işaretli
“max”(maksimum) seviyesini
aşmamaya dikkat edin
(şekile bakınız). Tam yıkama
işlemi olmadan çamaşırı ağartmak için, çamaşır suyunu
ilave bölme 3’e dökün, “Durulama” programını ’i seçin
ve “Süper Yıkama” seçeneği ’i devreye sokun.
! Bu programlarda uygulanamaz: , , , , ,
, , .
Ön yıkama
Bu işlev seçildiğinde en dayanıklı lekeleri çıkarmak için
kullanılan ön yıkama gerçekleştirilir.
Not: Mevcut olan hazneye deterjan koyunuz.
! Bu programlarda uygulanamaz: , , , , ,
, , , , (60°), , .
33TR33
Page 34

Deterjan ve çamaşır
TR
Deterjan
Gerekli deterjan miktarı, renk, yıkama sıcaklığı, kirlenme
seviyesi ve bölgedeki suyun sertliğinin yanı sıra yıkamakta
olduğunuz kumaş türüne (pamuk, yün, ipek vs.) bağlıdır.
Deterjanın dikkatli bir şekilde ölçülüp ayrılması israfı
önleyecek ve çevrenin korunmasına yardımcı olacaktır:
Biyolojik olarak çözünebilir olmalarına rağmen, deterjanlar
yin ede doğanın dengesini değ iştirecek maddeleri
içermektedir.
Aşağıdakileri yapmanızı önermekteyiz:
• beyaz pamuklu elbiseler ve ön yıkama için toz deterjan
kullanın.
• Hassas pamuklu giysiler ve düşük sıcaklığa sahip tüm
programlar için sıvı deterjan kullanın.
• yünlü ve ipek giysiler için hassas sıvı deterjanlar kullanın.
Program başlamadan önce, deterjan ilgili bölmeye –
veya doğrudan tamburun içerisine yerleştirilen dağıtıcıya
dök ülmelidir. Son durumda, ön yıkama programl ı
Pamukluların seçilmesi mümkün olmayacaktır.
! Çok fazla köpük yapacağından çitileme deterjanı
kullanmayın.
! Beyaz pamuklu çamaşırlar, ön yıkama ve 60°C’den yüksek
sıcaklık derecesi ile yıkamalar için toz deterjan kullanınız.
! Deterjan ambalajı üzerinde aktarılan bilgileri takip ediniz.
Çamaşırın hazırlanması
• Makinenin içerisine yerleştirmeden önce giysileri silkin.
• Renkli giysileri beyaz olanlardan ayırmaya dikkat ederek,
çamaşırı kumaş türüne (yıkama talimatı etiketindeki
sembol) ve rengine göre ayırın;
• Bütün cepleri boşaltın ve düğmeleri kontrol edin,
• Kurulama sırasında çamaşırın ağırlığını gösteren
“Programlar Tablosu”’’daki değerleri aşmayın.
Çamaşırınızin ağırlığı ne kadardır ?
1 çarşaf 400-500 gr
1 yastık kılıfı 150-200 gr
1 masa örtüsü 400-500 gr
1 bornoz 900-1200 gr
1 havlu 150-250 gr
1kot pantolon 400-500 gr
1 gömlek 150-200 gr
Yıkama önerileri
Beyazlar: beyaz çamaşırları yıkama devresini kullanınız.
Program , zaman içinde beyaz parlaklığının korunması
için düşünülmüştür. Daha iyi sonuçlar için, toz deterjanın
kullanılması tavsiye edilir.
Renkliler: açık renk çamaşırları yıkama devresini
kullanınız. Program, zaman içinde renklerin canlılığının
korunması için düşünülmüştür.
Koyu renkler: Koyu renk çamaşırların yıkanması için
programını kullanınız. Program, koyu renklerin uzun süre
korunması için düşünülmüştür. En iyi sonuçlar elde etmek
için koyu renk çamaşırları yıkarken sıvı deterjan kullanılması
önerilir.
Gömlek: Mümkün olan en iyi şekilde korunmalarını
sağlamak için farklı kumaş tipindeki ve renkteki gömlekleri
yıkamak için özel yıkama programını kullanın.
Yorgan: Çift katlı veya tekli yorganları (ağırlığı 3,5 kg’ı
aşmayan), yastıkları, puf mont gibi içerisine kaz tüyü
yerleştirilmiş giysileri yıkamak için, özel programını
kullanın. Yorganları kenarlarını içeri doğru katlayarak
tambura yerleştirmenizi (şekile bakınız) ve tamburun toplam
hacminin ¾’ ünden fazlasını kullanmamanızı tavsiye ederiz.
En iyi sonucu almak için, sıvı detarjan kullanmanızı ve
deterjan çekmecesine yerleştirmenizi tavsiye ederiz.
Örtü: Sentetik dış yüzeye sahip örtüleri yıkamak için,
makine ile birlikte verilen çantayı kullanın ve programı
’a ayarlayın.
Yatak çarşafı ve havlular: Tek yıkama performansıyla
havlu ve yatak çarşaflarını yıkamak için yumuşatıcı
kullanımını en uygun hale getiren, zaman ve enerji tasarrufu
yapmanızı sağlayan programını kullanınız. Toz deterjan
kullanılması önerilir.
Anti alerjik: Polen, mayt, kedi ve köpek tüyü gibi temel
alerjenleri ortadan kaldırmak için programını kullanınız.
Ultra narınler: Taşlı veya pullu giysiler gibi çok hassas
çamaşırları yıkamak için programını kullanınız.
Çamaşırları yıkamadan önce ters çevirmeniz ve küçük
parçaları hassas çamaşırların yıkanması için kullanılan özel
torba içerisine koymanız önerilir.
Daha iyi sonuçlar elde etmek için hassas çamaşırlara özel
sıvı deterjanın kullanılması önerilir.
İpekli kumaşların ve perdelerin (bunlar katlanmalı ve birlikte
verilen çantanın içerisine yerleştirilmelidir) yıkanması için
programını seçiniz ve opsiyonunu devreye sokunuz (Bu
durumda, “Ekstra Durulama” seçeneğini de etkinleştirmek
mümkün olacaktır); makine çamaşır ıslatılırken programı
sona erdirecek ve gösterge lambası yanıp sönecektirtir.
Çamaşır çıkarılmadan önce suyu tahliye etmek için, START/
PAUSE düğmesine veya düğmesine basın.
Yünlü: Bu Hotpoint-Ariston çamaşır makinesinin “Yünlüler”
yıkama devresi, yıkama işlemi giysilerin etiketi üzerinde
aktarılan talimatlara ve elektrikli ev aletinin üretici rması
tarafından verilen talimatlara riayet ederek gerçekleştirildiği
sürece, “elde yıkanabilir” olarak sınıflandırılan yünlü
çamaşırların yıkanması için Woolmark Company tarafından
test edilmiş ve onaylanmıştır. Hotpoint-Ariston, yıkama
performanslarından ve su ve elektrik tüketiminden dolayı
Woolmark Company tarafından Woolmark Apparel Care Platinum sertifikasını elde eden ilk çamaşır makinesi
markasıdır. (M1318)
Pamuklu Standart 20°C: kirli pamuklu çamaşırlar için
idealdir. 40°’de bir yıkama ile mukayese edilebilen, soğuk
suda da etkili olan performanslar, yinelenen ve karşılaştırılan
en yüksek hız varyasyonu ile çalışan mekanik bir hareket
ile sağlanır.
34
Page 35

Sorun giderme
Çamaşır makineniz bazen çalışmayabilir. Teknik Destek Merkezi ile temas kurmadan önce (“Teknik Servis” ’e bakınız),
aşağıdaki listeyi kullanarak sorunun kolayca çözülüp çözülemeyeceğinden emin olunuz.
Sorun:
Çamaşır makinesi çalışmıyor.
Program başlamadı.
Çamaşır makinesi su almıyor.
Çamaşır makinesi kilitli kalıyor.
Makine süreki su alıp, tahliye
ediyor.
Çamaşır makinesi tahliye veya
dönüş yapmıyor.
Sıkma sırasında makine
çok titriyor.
Çamaşır makinesi su sızdırıyor.
“Yürütülmekte olan aşama” ile
ilgili simgeler ON/OFF gösterge
Olası nedenleri / Çözümler:
• Cihazın şi prize düzgün bir şekilde takılmamıştır veya yeterli temas yoktur.
• Evde elektrik yoktur.
• Kapak düzgün şekilde kapatılmamıştır.
• START/PAUSE düğmesine basılmamıştır.
• Su musluğu açık değildir.
• Gecikmeli bir çalıştırma ayarlanmıştır.
• Su giriş hortumu musluğa bağlanmamıştır.
• Hortum bükülmüştür.
• Su musluğu açık değildir.
• Evde su yoktur.
• Basınç çok düşüktür.
• START/PAUSE düğmesine basılmamıştır.
• “Kolay ütü ” opsiyonunu seçince, devre sonunda çamaşır makinesi
tamburun yavaş dönmesini sağlayacaktır, programı durdurmak için, “START/
PAUSE” düğmesine veya “Kolay ütü ” düğmesine basın.
• Tahliye hortumu yerden 65 ila 100 cm arasındaki bir yüksekliğe
yerleştirilmemiştir (“Montaj”’a bakınız).
• Hortumun boşta kalan ucu suyun altındadır (“Montaj”’a bakınız).
• Ev binanın üst katlarından birindeyse, çamaşır makinesinin sürekli su alıp
tahliye etmesine neden olan su drenajı ile ilgili bir sorun vardır. Bu güçlüğün
giderilmesine yardımcı olacak özel tahliye önleyici valer mağazalarda
satılmaktadır.
• Duvar tahliye sistemine havalandırma borusu takılmamıştır.
• Program tahliyeyi içermemektedir: Bazı programlar tahliye aşamasının
manüel olarak çalıştırılmasını gerektirir (“Programlar ve seçenekleri”’ne
bakınız).
• “Kolay ütü” seçeneği devre dışı bırakılır: programı tamamlamak için,
START/PAUSE düğmesine basın (“Programlar ve seçenekleri”).
• Tahliye hortumu bükülmüştür (Montaj’a bakınız).
• Pis su borusu tıkanmıştır.
• Tamburun montaj sırasında doğru şekilde kilidi açılmamıştır (“Montaj”’a bakınız).
• Makine dengeli değildir (“Montaj”’a bakınız).
• Makine dolap ve duvar arasında sıkışmıştır (“Montaj”’a bakınız).
• Yük dengesizdir (see “Deterjan ve çamaşır”’ na bakınız).
• Su giriş hortumu düzgün şekilde takılmamıştır(“Montaj”’a bakınız).
• Deterjan dağıtıcısı tıkalıdır (temizlemek için, “Bakım ve onarım”’a bakınız).
• Tahliye hortumu yerine düzgün şekilde yerleştirilmemiştir (“Montaj”’a bakınız).
• Makineyi kapatıp, şini çekin, yaklaşık 1 dakika bekleyin ve daha sonra
tekrar açın. Sorun devam ederse, Teknik Destek Servis’i ile temas kurun.
lambası ile aynı anda hızlı bir
şekilde yanıp sönüyor.
TR
Çok fazla köpük var.
Çamaşır makinesi kilitli kalıyor.
! Not: “Demo mod”’undan çıkmak için, çamaşır makinesi kapatmak, “START/PAUSE” ve “ON/OFF” düğmelerinin her
ikisine de aynı anda 3 saniye kadar basın.
• Deterjan çamaşır makinesi için uygun değildir (“çamaşır makineleri için” veya
“Elde ve makinede yıkama” ya da benzeri bir yazının ekrana gelmesi gerekir).
• Çok fazla deterjan kullanılmıştır.
• Manüel kilitleme işlemi uygulayın (“Önlemler ve ip uçları”’na bakınız).
35
Page 36

Teknik Servis
195113402.00
03/2013 - Xerox Fabriano
TR
Destek bölümünü aramadan önce:
• Sorunu kendi kendinize çözüp çözemeyeceğinizi kontrol edin (“Sorun Giderme”’ye bakınız);
• Sorunun çözülüp çözülmediğini kontrol etmek için programı yeniden başlatın;
• Çözülmediyse, yetkili Teknik Servisi ile temas kurun.
! Çamaşır makinesi hatalı bir şekilde monte edilmiş veya kullanılmamışsa, servis çağırma için ücret ödemeniz
gerekecektir.
! Her zaman yetkili servis yardımı talep edin.
Lütfen aşağıdaki bilgileri hazır durumda bulundurun:
• Sorunun türü;
• cihaz modeli (Mod.);
• seri numarası (S/N).
Yukarıdaki bilgiler cihazın üzerine yerleştirilen künye levhasından alınabilir.
Cihazın ömrü 10 yıldır.
Tüm Türkiye’de; Yetkili Teknik Servis, Orijinal Yedek Parça, Bakım Ürünlerimiz ve Garanti ile ilgili bilgi için:
0 212 444 50 10
36
 Loading...