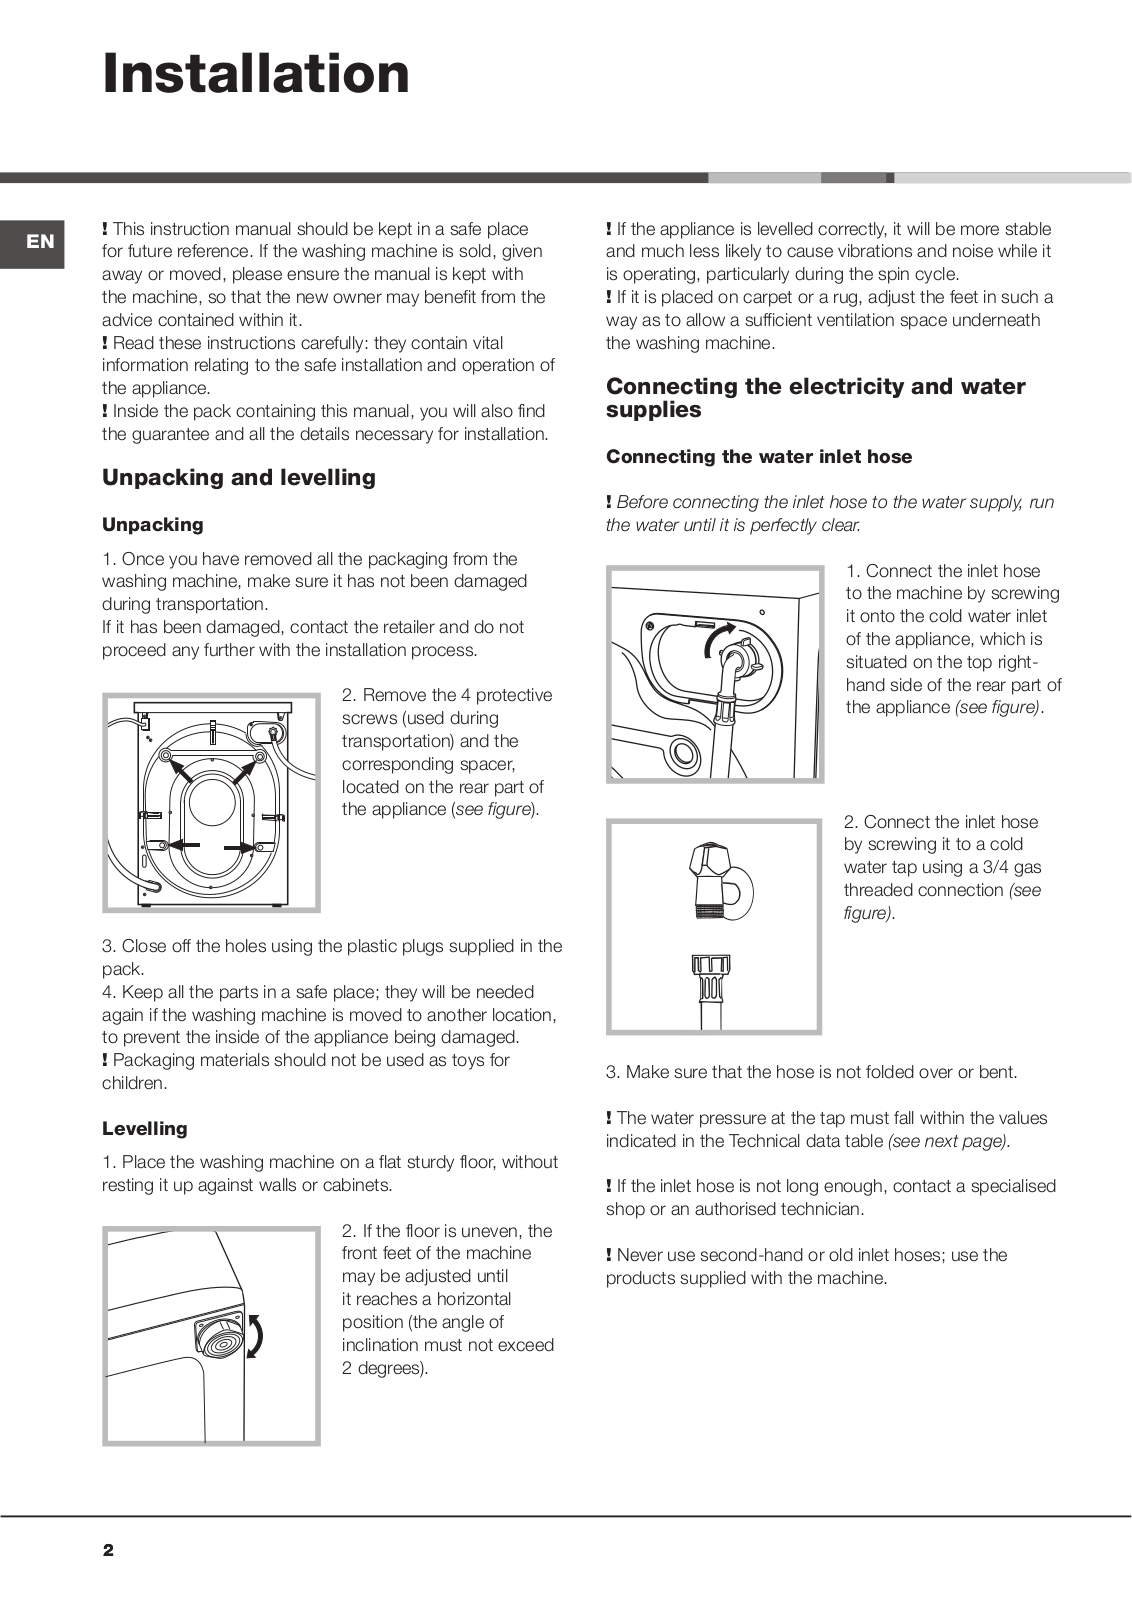
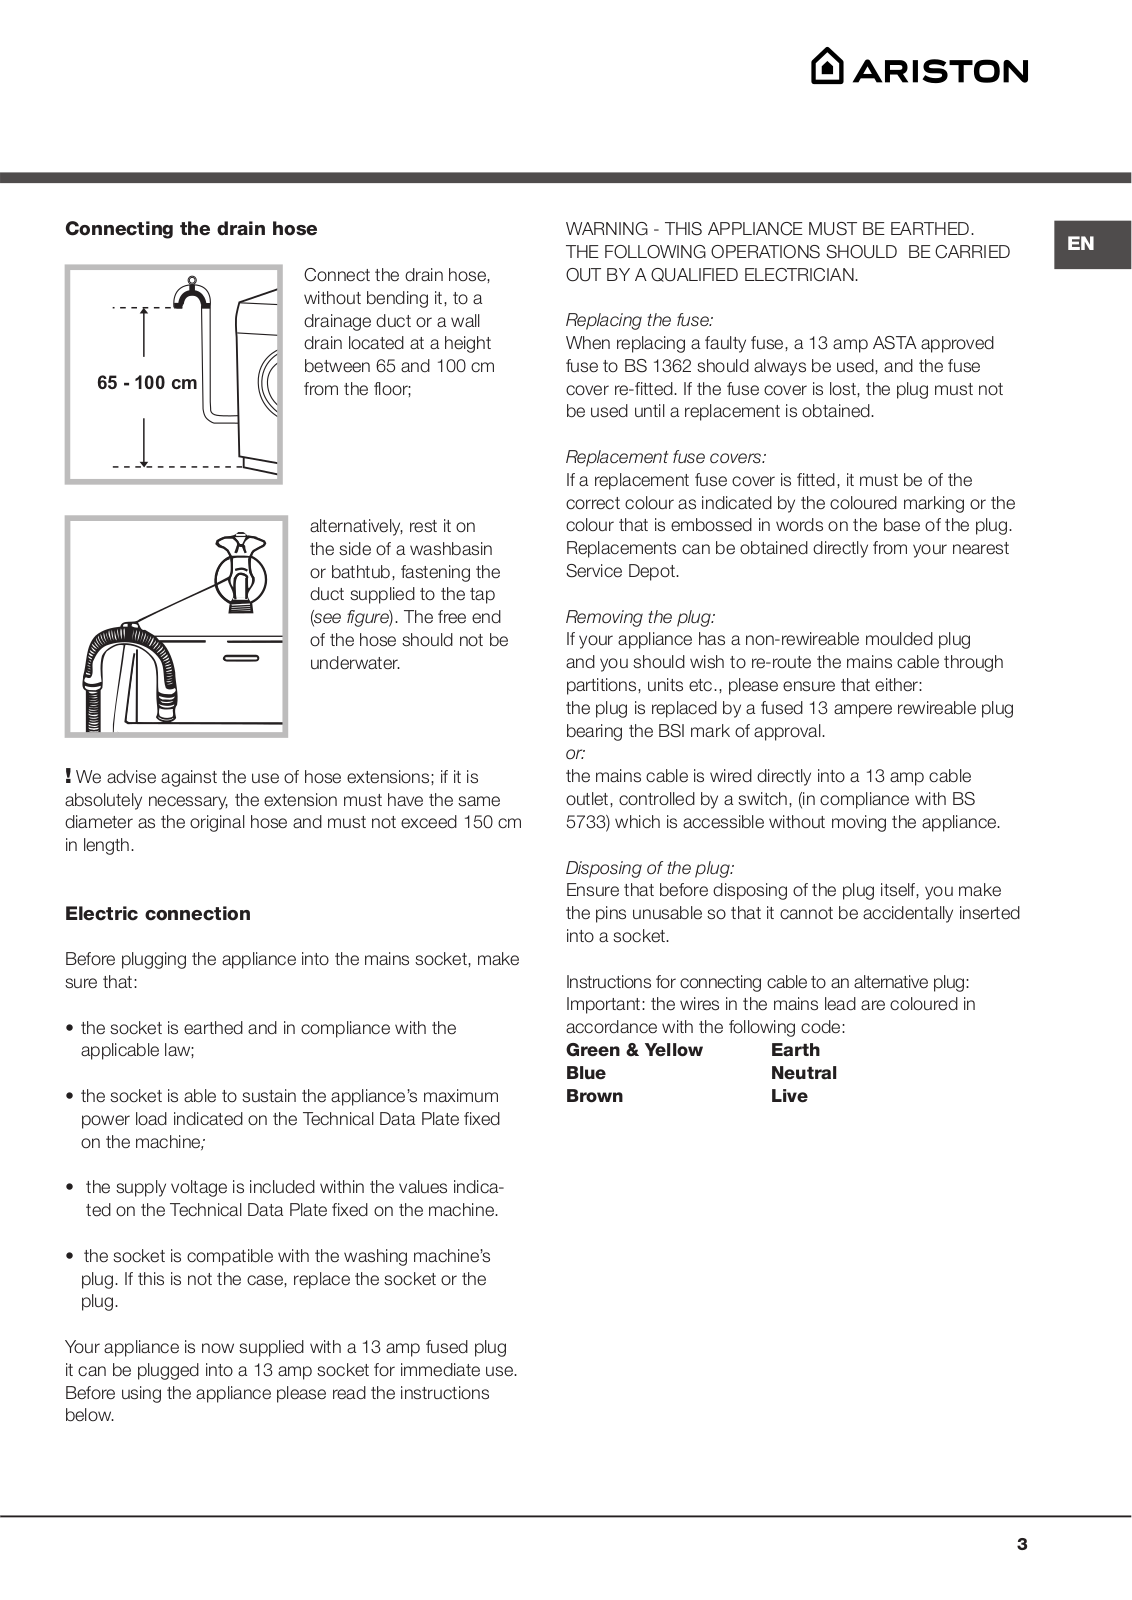
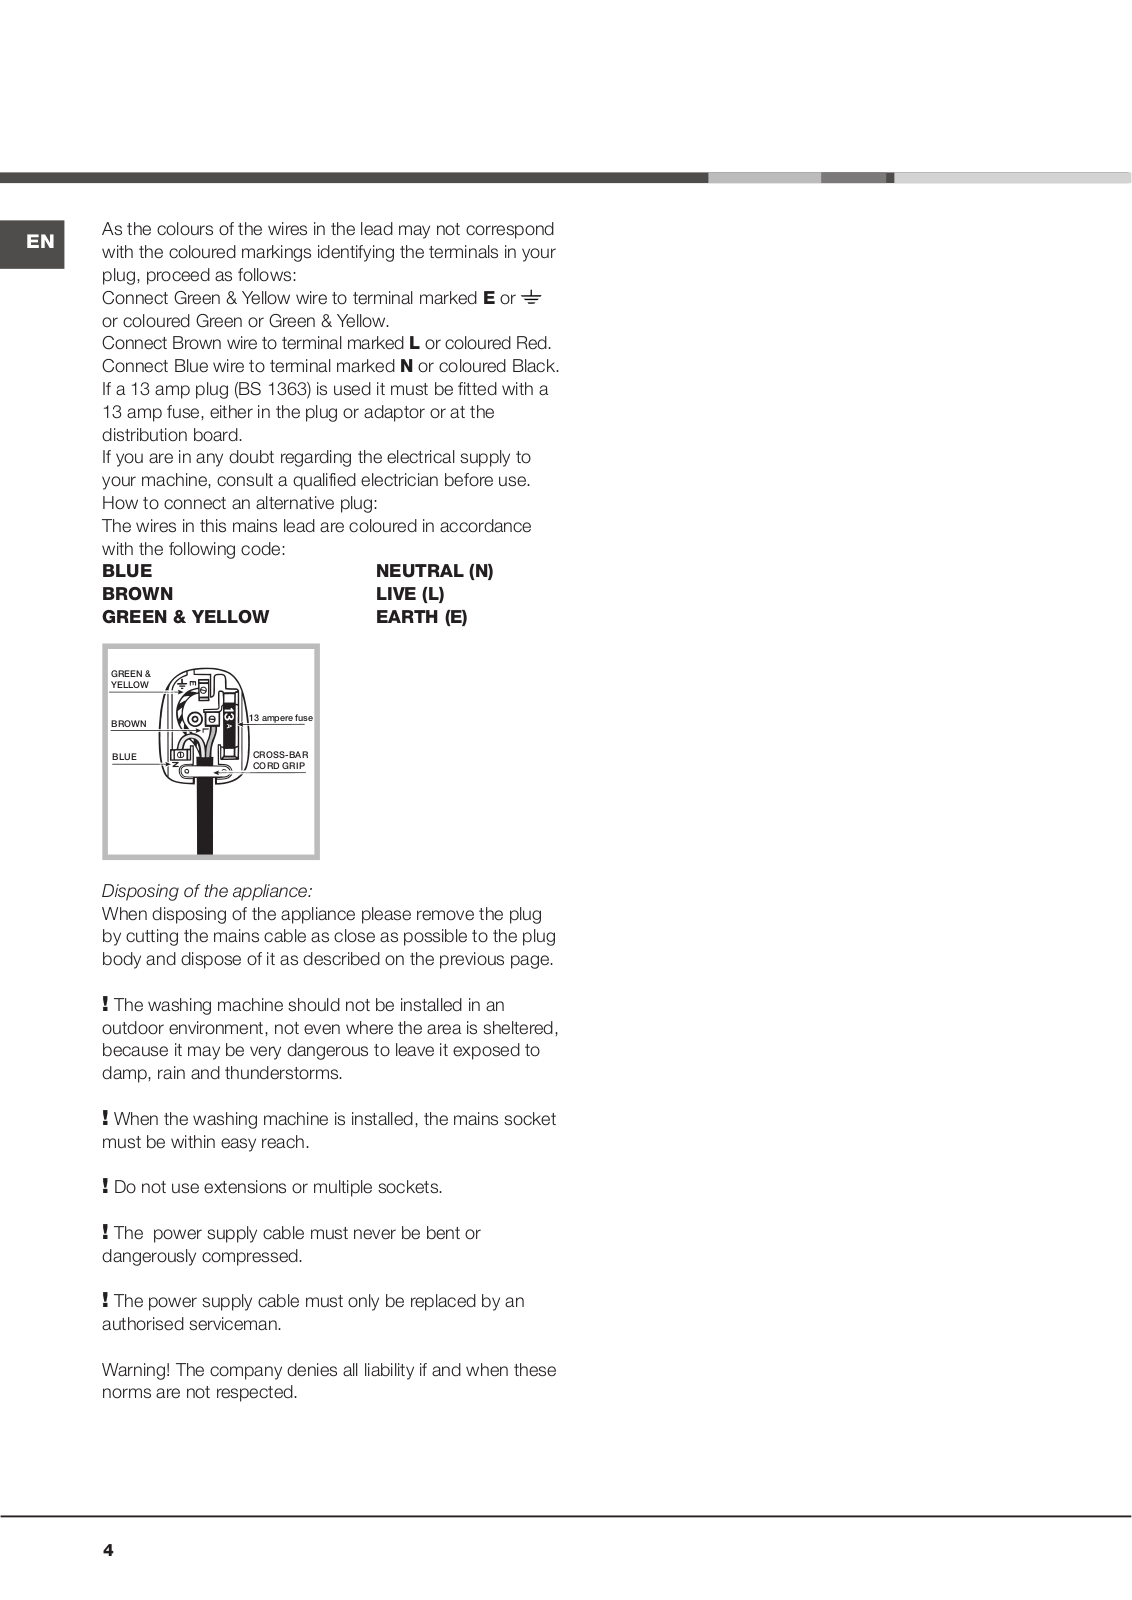
Hotpoint AQ92F 297 EX.60HZ User Manual

Instructions for installation and use

WASHING MACHINE

GB PT ES

English,1

Português,15 Español,29

Contents

EN


Installation, 2-3-4-5

Unpacking and levelling

Connecting the electricity and water supplies

Technical data

AR

,43

AQUALTIS

AQ92F 297

Description of the machine, 6-7

Control panel

Running a wash cycle, 8

Wash cycles and options, 9

Table of wash cycles Wash options

Detergents and laundry, 10

Detergent

Preparing the laundry Washing recommendations

Precautions and advice, 11

General safety

Load balancing system Disposal

Opening the porthole door manually

Care and maintenance, 12

Cutting off the water and electricity supplies Cleaning the machine

Cleaning the detergent dispenser drawer Caring for your appliance drum Cleaning the pump

Checking the water inlet hose

Trouble shooting, 13

Assistance, 14

1

Installation

! This instruction manual should be kept in a safe place EN for future reference. If the washing machine is sold, given

away or moved, please ensure the manual is kept with the machine, so that the new owner may benefit from the advice contained within it.

!Read these instructions carefully: they contain vital information relating to the safe installation and operation of the appliance.

!Inside the pack containing this manual, you will also find the guarantee and all the details necessary for installation.

Unpacking and levelling

Unpacking

1. Once you have removed all the packaging from the washing machine, make sure it has not been damaged during transportation.

If it has been damaged, contact the retailer and do not proceed any further with the installation process.

2. Remove the 4 protective screws (used during transportation) and the corresponding spacer, located on the rear part of the appliance (see figure).

3.Close off the holes using the plastic plugs supplied in the pack.

4.Keep all the parts in a safe place; they will be needed again if the washing machine is moved to another location, to prevent the inside of the appliance being damaged.

! Packaging materials should not be used as toys for children.

Levelling

1. Place the washing machine on a flat sturdy floor, without resting it up against walls or cabinets.

2. If the floor is uneven, the front feet of the machine may be adjusted until

it reaches a horizontal position (the angle of inclination must not exceed 2 degrees).

!If the appliance is levelled correctly, it will be more stable and much less likely to cause vibrations and noise while it is operating, particularly during the spin cycle.

!If it is placed on carpet or a rug, adjust the feet in such a way as to allow a sufficient ventilation space underneath the washing machine.

Connecting the electricity and water supplies

Connecting the water inlet hose

! Before connecting the inlet hose to the water supply, run the water until it is perfectly clear.

1. Connect the inlet hose to the machine by screwing it onto the cold water inlet of the appliance, which is situated on the top righthand side of the rear part of the appliance (see figure).

2. Connect the inlet hose by screwing it to a cold water tap using a 3/4 gas threaded connection (see figure).

3. Make sure that the hose is not folded over or bent.

!The water pressure at the tap must fall within the values indicated in the Technical data table (see next page).

!If the inlet hose is not long enough, contact a specialised shop or an authorised technician.

!Never use second-hand or old inlet hoses; use the products supplied with the machine.

2

Connecting the drain hose

65 - 100 cm

Connect the drain hose, without bending it, to a drainage duct or a wall drain located at a height between 65 and 100 cm from the floor;

alternatively, rest it on the side of a washbasin or bathtub, fastening the duct supplied to the tap (see figure). The free end of the hose should not be underwater.

! We advise against the use of hose extensions; if it is absolutely necessary, the extension must have the same diameter as the original hose and must not exceed 150 cm in length.

Electric connection

Before plugging the appliance into the mains socket, make sure that:

the socket is earthed and in compliance with the applicable law;

the socket is able to sustain the appliance’s maximum power load indicated on the Technical Data Plate fixed on the machine;

the supply voltage is included within the values indicated on the Technical Data Plate fixed on the machine.

the socket is compatible with the washing machine’s plug. If this is not the case, replace the socket or the plug.

Your appliance is now supplied with a 13 amp fused plug it can be plugged into a 13 amp socket for immediate use. Before using the appliance please read the instructions below.

WARNING - THIS APPLIANCE MUST BE EARTHED.

THE FOLLOWING OPERATIONS SHOULD BE CARRIED EN OUT BY A QUALIFIED ELECTRICIAN.

Replacing the fuse:

When replacing a faulty fuse, a 13 amp ASTA approved fuse to BS 1362 should always be used, and the fuse cover re-fitted. If the fuse cover is lost, the plug must not be used until a replacement is obtained.

Replacement fuse covers:

If a replacement fuse cover is fitted, it must be of the correct colour as indicated by the coloured marking or the colour that is embossed in words on the base of the plug. Replacements can be obtained directly from your nearest Service Depot.

Removing the plug:

If your appliance has a non-rewireable moulded plug and you should wish to re-route the mains cable through partitions, units etc., please ensure that either:

the plug is replaced by a fused 13 ampere rewireable plug bearing the BSI mark of approval.

or:

the mains cable is wired directly into a 13 amp cable outlet, controlled by a switch, (in compliance with BS 5733) which is accessible without moving the appliance.

Disposing of the plug:

Ensure that before disposing of the plug itself, you make the pins unusable so that it cannot be accidentally inserted into a socket.

Instructions for connecting cable to an alternative plug: Important: the wires in the mains lead are coloured in accordance with the following code:

Green & Yellow

Earth

Blue

Neutral

Brown

Live

3


As the colours of the wires in the lead may not correspond


EN


with the coloured markings identifying the terminals in your


plug, proceed as follows:


Connect Green & Yellow wire to terminal marked E or


or coloured Green or Green & Yellow.


Connect Brown wire to terminal marked L or coloured Red.


Connect Blue wire to terminal marked N or coloured Black.


If a 13 amp plug (BS 1363) is used it must be fitted with a


13 amp fuse, either in the plug or adaptor or at the


distribution board.


If you are in any doubt regarding the electrical supply to


your machine, consult a qualified electrician before use.


How to connect an alternative plug:


The wires in this mains lead are coloured in accordance


with the following code:


BLUE


NEUTRAL (N)


BROWN


LIVE (L)


GREEN & YELLOW

EARTH (E)


GREEN &


YELLOW


BROWN

13 ampere fuse


BLUE

CROSS-BAR


CORD GRIP


Disposing of the appliance:

When disposing of the appliance please remove the plug by cutting the mains cable as close as possible to the plug body and dispose of it as described on the previous page.

!The washing machine should not be installed in an outdoor environment, not even where the area is sheltered, because it may be very dangerous to leave it exposed to damp, rain and thunderstorms.

!When the washing machine is installed, the mains socket must be within easy reach.

!Do not use extensions or multiple sockets.

!The power supply cable must never be bent or dangerously compressed.

!The power supply cable must only be replaced by an authorised serviceman.

Warning! The company denies all liability if and when these norms are not respected.

4


Technical data


EN


Model

AQ92F 297


width 59.5 cm


Dimensions

height 85 cm


depth 58 cm


Capacity

from 1 to 9 kg


Electrical

please refer to the technical data plate


connections

fixed to the machine


maximum pressure 1 MPa (10 bar)


Water connections

minimum pressure 0.05 MPa (0.5 bar)


drum capacity 58 litres


Spin speed

up to 1200 rotations per minute


Test Programmes

programme

; temperature 60°C +


according to SASO


antifoam


2692.2007/2693.207


5

Description of the machine

EN


CONTROL


PORTHOLE DOOR

PANEL


PORTHOLE DOOR

HANDLE

KICK STRIP

ADJUSTABLE FEET

PORTHOLE DOOR

Always use the handle to open the porthole door (see figure).

DETERGENT DISPENSER DRAWER

The detergent dispenser drawer is located inside the machine and can be accessed by opening the door.

For more information on detergent measures, please refer to the chapter entitled

“Detergents and laundry”.


A

1. pre-wash compartment:


use powder detergent.


2. main wash compartment:


1

If liquid detergent is used,

B

2

it is recommended that the

removable plastic partition A


(supplied) be used for proper


dosage.If powder detergent is


used, place the partition into


slot B.

washing additives compartment: for fabric softener or liquid additives. We recommend that the maximum level indicated by the grille is not exceeded, and that concentrated fabric softeners are diluted.

Standby mode

This washing machine, in compliance with new energy saving regulations, is fitted with an automatic standby system which is enabled after about 30 minutes if no activity is detected. Press the ON-OFF button briefly and wait for the machine to start up again.

6


Control panel


EN


ECO


WASH


indicator light


CYCLE


START/

PHASE


icons


OPTION buttons

OPTION buttons


PAUSE

WASH CYCLE


with indicator lights

with indicator lights


button with


SELECTOR knob


indicator light


DISPLAY

Button with ON/OFF

TEMPERATURE button


DELAYED


CONTROL PANEL


indicator light


START

LOCK


LOCK button with


SPIN button


button

indicator light

indicator light


Button with ON/OFF indicator light: press this briefly to switch the machine on or off. The green indicator light indicates that the machine is switched on. To switch off the washing machine during the wash cycle, press and hold the button for approximately 3 seconds; if the button is pressed briefly or accidentally the machine will not switch off. If the machine is switched off during a wash cycle, this wash cycle will be cancelled.

WASH CYCLE SELECTOR knob: may be turned in either direction. To select the most suitable wash cycle, please refer to the “Table of wash cycles”.

The knob will not move during the wash cycle.

TEMPERATURE button: press to modify or exclude the temperature setting; the value selected will appear on the display above (see “Running a wash cycle”).

SPIN CYCLE button: press to modify or exclude the spin cycle; the value selected will appear on the display above (see “Running a wash cycle”).

DELAYED START button: press to set a delayed start for the selected wash cycle; the set delay time will appear on the display above (see “Running a wash cycle”).

OPTION buttons with indicator lights: press to select the available options. The indicator light corresponding to the selected option will remain lit (see “Running a wash cycle”).

WASH CYCLE PHASE icons: these illuminate to indicate the progress of the wash cycle (Wash – Rinse – Spin – Drain ). The text lights up when the cycle is complete.

START/PAUSE button with indicator light: when the green indicator light flashes slowly, press the button to start a wash cycle. Once the cycle has begun the indicator light will remain lit in a fixed manner. To pause the wash cycle, press the button again; the indicator light will flash in an orange colour. If the “LOCK” indicator light is switched off, the door may be opened. To start the wash cycle from the point at which it was interrupted, press the button again.

LOCK indicator light: indicates that the porthole door is locked. To open the door, pause the wash cycle (see “Running a wash cycle”).

CONTROL PANEL LOCK button with indicator light: to activate or deactivate the control panel lock, press and hold the button for approximately 2 seconds. when the indicator light is illuminated, the control panel is locked. This means it is possible to prevent wash cycles from being modified accidentally, especially where there are children in the home.

ECO indicator light: the icon lights up when, after altering the washing parameters, an energy saving of at least 10% is made. Furthermore, before the machine enters “Standby” mode, the icon will light up for a few

seconds; when the machine is switched off the estimated energy saving will be around the 80% mark.

7

Running a wash cycle

WARNING: before you use the washing machine for the EN first time, run a wash cycle with detergent and no laundry,

using the 90° cottons cycle without pre-wash.

1.SWITCH THE MACHINE ON. Press the button. All the indicator lights will illuminate for 1 second; the indicator light corresponding to the button will then remain lit in a fixed manner and the START/PAUSE indicator light will flash slowly.

2.LOAD THE LAUNDRY. Open the porthole door. Load the laundry, making sure you do not exceed the maximum load value indicated in the table of wash cycles on the following page.

3.MEASURE OUT THE DETERGENT. Pull out the detergent dispenser drawer and pour the detergent into the relevant compartments as described in “Description of the machine”.

4.CLOSE THE PORTHOLE DOOR.

5.SELECT THE PROGRAMME. Turn the WASH CYCLE SELECTOR KNOB right or left, until you have selected the desired wash cycle. A temperature and spin speed is set for each wash cycle; these may be adjusted.

6.CUSTOMISE THE WASH CYCLE. Use the relevant buttons on the control panel:

Modify the temperature and/or spin speed.

The machine automatically displays the maximum temperature and spin speed values set for the selected cycle, or the most recently-used settings if they are compatible with the selected cycle. The temperature can be decreased by pressing the button, until the cold wash () setting is reached. The spin speed may be progressively reduced by pressing the button, until it is completely excluded (). If these buttons are pressed again, the maximum values are restored.

! Exception: if the programme is selected, the temperature can be increased up to a value of 90°C.

Set a delayed start.

Press the button until you have reached the desired delay time. During the setting process, the delay time is shown on the display and the symbol flashes.

After selecting a delayed start time, the fixed symbol and the cycle duration will appear on the display. Press the button once to display the selected delay time.

To remove the delayed start option, press the button until the display shows the text OFF; the symbol will disappear.

! Once the START/PAUSE button has been pressed, the time delay may only be decreased.

Modify the cycle settings.

Press the OPTION buttons to customise the wash cycle in accordance with your own requirements.

Press the button to activate the option; the corresponding indicator light will switch on.

Press the button again to disable the option; the indicator light will switch off.

!If the selected option is not compatible with the selected wash cycle, this incompatibility will be signalled by the flashing of the indicator light and a sound alert (3 beeps); the option will not be activated.

!If the selected option is not compatible with another option that has been selected previously, the indicator light corresponding to the first option selected will flash and only the second option will be activated; the indicator light corresponding to the button will remain lit in a constant manner.

7.START THE PROGRAMME. Press the START/PAUSE button. The corresponding indicator light remains lit in a

fixed manner and the porthole door locks (the LOCK indicator light illuminates). The icons corresponding to the wash cycle phases will light up during the cycle to indicate which phase is currently in progress.

To change a wash cycle once it has already started, pause the washing machine by pressing the START/ PAUSE button; then select the desired cycle and press the START/PAUSE button again.

To open the door during a wash cycle, press the START/

PAUSE button; if the LOCK indicator light is switched off you may open the door. Press the START/PAUSE button again to restart the wash cycle from the point at which it was interrupted.

8.THE END OF THE WASH CYCLE. This is indicated by the illuminated text END. The porthole door may be opened immediately. If the START/PAUSE indicator light is flashing, press the button to end the cycle. Open the door, unload the laundry and switch off the machine.

! If you wish to cancel a cycle which has already begun, press and hold the button until the cycle stops and the machine switches off.

Bag for quilts, curtains and delicate garments

The Aqualtis washing machine makes it easier for you to wash even the most valuable and delicate garments in complete confidence thanks to the special bag which protects the laundry (this is supplied with the machine).

We recommend that the bag is used every time you wash quilts and padded items with an outer layer made using synthetic material.

8

Hotpoint AQ92F 297 EX.60HZ User Manual

Wash cycles and options

Table of wash cycles

Icon

Description of the wash cycle


Synthetics

Synthetics (4)

Whites

Coloureds

Darks

Steam Refresh

Duvets: for down-stuffed garments.

Bed&Bath for bedlinen and towels.

Rinse

Spin and Pump out

Anti Allergy

Ultradelicates

Wool: for wool, cashmere, etc.

Mix 30': to refresh lightly soiled garments quickly (not suitable for wool, silk and clothes which require washing by hand).

Cotton Standard 60°C (1): heavily soiled whites and resistant colours.

Cotton Standard 40°C: lightly soiled whites and delicate colours.

Cotton Standard 20°C: lightly soiled whites and delicate colours.


Detergent and additives

(kg)


Max.

Max.


loadMax.

Prewash

Wash

Fabric softener

temp.

speed


(°C)

(rpm)


60°

800

3

40°

800

3

60°

1200

4

40°

1200

4

30°

800

-

4

-

-

-

-

-

1,5

30°

1000

-

2

60°

1200

9

-

1200

-

-

9

-

1200

-

-

-

9

60°

1200

-

4

30°

0

-

1

40°

800

-

2

30°

800

-

3

60°

1200

(3)

9

(Max. 90°)

40°

1200

-

9

20°

1200

-

9


EN

Cycle -duration

.display the on checked be can cycles wash the of duration The (*)

The length of cycle shown on the display or in this booklet is an estimation only and is calculated assuming standard working conditions. The actual duration can vary according to factors such as water temperature and pressure, the amount of detergent used, the amount and type of load inserted, load balancing and any wash options selected.

(*) Note: 10 minutes after the START, the machine will recalculate the time remaining until the end of the wash cycle on the basis of the load inside it; this value will then be shown on the display.

For all Test Institutes:

1) Test Programmes according to SASO 2692.2007/2693.2007: set wash cycle with a temperature of 60°C + antifoam.

Wash options

Steam Hygiene

This option enhances washing performance by generating steam during the wash cycle that eliminates any bacteria from fibres while treating them at the same time. Place the laundry in the drum, choose a compatible programme and select option “ “.

! The steam generated during washing machine operation may cause the porthole door to become hazy.

! It cannot be used in conjunction with , , , , ,

, , , , (90°).

Easy Iron

By selecting this option, the wash and spin cycles will be modified in order to reduce the formation of creases.

At the end of the cycle the washing machine drum will rotate slowly; the “Easy Iron” and START/PAUSE indicator lights will flash. To end the cycle press the START/PAUSE button or the “Easy Iron” button.

! It cannot be used in conjunction with , , , ,

, , .

Prewash

If this function is selected, the pre-wash cycle will run; this is useful for removing stubborn stains.

N.B.: put the detergent in the relevant compartment.

! It cannot be used in conjunction with ,

,

, , ,

, , , ,

(60°),

, .


Extra rinse

By selecting this option, the efficiency of the rinse is increased and optimal residual detergent removal is guaranteed. It is particularly useful for skin which is sensitive to detergents. We recommend this option is used with a full load of washing, or when a large amount of detergent is required.

! It cannot be used in conjunction with , , ,, ,.

9

Detergents and laundry

EN

Detergent

The type and quantity of detergent required depend on


the type of fabric you are washing (cotton, wool, silk, etc.),


as well as its colour, the washing temperature, the level of


soiling and the hardness of the water in the area.


Measuring out the detergent carefully will avoid wastage and help


to protect the environment: although they are biodegradable,


detergents still contain ingredients which alter the balance of nature.


We recommend the following:


• use powder detergents for white cotton garments and


pre-washing.


• use liquid detergents for delicate cotton garments and for


all low-temperature wash cycles.


• use gentle liquid detergents for wool and silk garments.


Thedetergentshouldbepouredintotherelevantcompartment-or


the dispenser placed directly inside the drum - before the wash


cycle begins. In the latter case, it will not be possible to select the


Cottons with pre-wash cycle.


! Do not use hand washing detergents because these create


too much foam.


! Use powder detergent for white cotton garments, for pre-


washing, and for washing at temperatures over 60°C.


! Follow the instructions given on the detergent packaging.

Preparing the laundry

Shake out the garments before loading them into the machine.

Divide the laundry according fabric type (symbol on the washing instruction label) and colour, making sure you separate the coloured garments from the white ones;

Empty all pockets and check the buttons;

Do not exceed the values listed in the “Table of wash cycles”, which refer to the weight of the laundry when dry.

How much does your laundry weigh?

1 sheet

400-500 g

1 pillowcase

150-200 g

1 tablecloth

400-500 g

1 bathrobe

900-1200 g

1 towel

150-250 g

1 pair of jeans

400-500 g

1 shirt

150-200 g

Washing recommendations

Whites: use this cycle to wash white clothes. The programme is designed to maintain the brightness of white clothes over time.

Coloureds: use this cycle to wash bright coloured clothes. The programme is designed to maintain bright colours over time.

Darks: Use cycle to wash dark-coloured garments. This programme is designed to maintain dark colours over time. We recommend using a liquid detergent for the best results when washing dark-coloured garments.

Steam Refresh: this programme refreshes garments by removing bad odours and relaxing the fibres (1,5 kg, roughly 3 items). Insert dry items only (that are not dirty) and select programme ““. The garments will be damp once the cycle is completed, so we recommend hanging them to dry. The “ “ programme makes ironing easier. Moreover, with the “Steam Perfume” laundry balls, your favourite perfume can be added to your laundry. Place a few drops of perfume on the sponge contained inside the laundry ball, close it and insert it

into the drum together with the laundry. Then launch the specific programme “ “. At the end of the cycle, garments will be relaxed and fragrant.

!The indicator light for the “ ” option will switch on when this cycle is selected.

!Not recommended for wool or silk garments.

!Do not add too much perfume to the sponge in order to avoid it dripping.

!Do not add softeners or detergents.

Duvets: to wash double or single duvets (the weight of which should not exceed 2 kg), cushions or clothes padded with goose down such as puffa jackets, use the special wash cycle. We recommend that duvets are placed in the drum with their edges folded inwards (see figure) and that no more than ¾ of the total volume of the drum is used. To achieve the best results, we recommend that a liquid detergent is used and placed inside the detergent dispenser drawer.

Quilts: to wash quilts with a synthetic outer


layer, use the bag provided and set the wash cycle to

.

Bedlinen and towels: Use programme

to wash bed

linen and towels in one single cycle: it optimises softener


performance and helps you save time and energy. We


recommend the use of powder detergent


Anti Allergy: use programme

to remove major allergens

such as pollen, mites, cat’s and dog’s hair.


Ultradelicates: use programme

to wash very delicate

garments having strasses or sequins.


We recommend turning the garments inside out before washing and placing small items into the special bag for washing delicates. Use liquid detergent on delicate garments for best results.

To wash Silk garments and Curtains (these should be folded

and placed inside the bag provided), select cycle

and then

option

(in this case it will also be possible to enable the

“Extra Rinse” option); the machine will end the cycle while

the laundry is soaking and the

indicator light will flash. To

drain the water so that the laundry may be removed, press the START/PAUSE button or the button.

Wool: the wool wash cycle on this Ariston machine has been tested and approved by The Woolmark Company for washing wool garments labelled as hand washable provided that the garments are washed according to the instructions on the garment label and those issued by the manufacturer of this washing machine. Ariston is the first washing machine brand to be approved by The Woolmark Company for Apparel CarePlatinum for its washing performance and consumption of energy and water. (M1318)

Cotton Standard 20°: ideal for lightly soiled cotton loads. The effective performance levels achieved at cold temperatures, which are comparable to washing at 40°, are guaranteed by a mechanical action which operates at varying speed, with repeated and frequent peaks.

10

Precautions and tips

! The machine was designed and constructed in accordance with international safety regulations. The following information is provided for safety reasons and must therefore be read carefully.

General safety

This appliance was designed for domestic use only.

This appliance is not intended for use by persons (including children) with reduced physical, sensory or mental capabilities, or lack of experience and knowledge, unless they have been given supervision or instruction concerning use of the appliance by a person responsible for their safety. Children should be supervised to ensure that they do not play with the appliance.

the machine must only be used by adults, in accordance with the instructions given in this manual.

Do not touch the machine when barefoot or with wet or damp hands or feet.

Do not pull on the power supply cable when unplugging the appliance from the electricity socket. Hold the plug and pull.

Do not touch the drained water as it may reach extremely high temperatures.

Never force the porthole door. This could damage the safety lock mechanism designed to prevent accidental opening.

If the appliance breaks down, do not under any circumstances access the internal mechanisms in an attempt to repair it yourself.

Always keep children well away from the appliance while it is operating.

If it must be moved, proceed with the help of two or three people and handle it with the utmost care. Never try to do this alone, because the appliance is very heavy.

Before loading laundry into the washing machine, make sure the drum is empty.

Load balancing system

Before every spin cycle, to avoid excessive vibrations before every spin and to distribute the load in a uniform manner, the drum rotates continuously at a speed which is slightly greater than the washing rotation speed. If, after several attempts, the load is not balanced correctly, the machine spins at a reduced spin speed. If the load is excessively unbalanced, the washing machine performs the distribution process instead of spinning. To encourage improved load distribution and balance, we recommend small and large garments are mixed in the load.

Disposal

Disposing of the packaging materials: observe local regulations so that the packaging may be re-used.

The European Directive 2012/19/EU relating to Waste Electrical and Electronic Equipment (WEEE) states

that household appliances should not be disposed of

using the normal solid urban waste cycle. Exhausted EN appliances should be collected separately in order to

optimise the cost of re-using and recycling the materials inside the machine, while preventing potential damage to the atmosphere and to public health. The crossed-out dustbin is marked on all products to remind the owner of their obligations regarding separated waste collection. For more information relating to the correct disposal of household appliances, owners should contact their local authorities or appliance dealer.

Opening the porthole door manually

In the event that it is not possible to open the porthole door due to a powercut, and if you wish to remove the laundry, proceed as follows:

1. remove the plug from the electrical socket.

2. make sure the water level inside the machine is lower than the door opening; if

it is not, remove excess water using the drain hose, collecting it in a bucket as indicated in the figure.

3. remove the cover panel on the lower front part of the washing machine (see overleaf).

4. pull outwards using the tab as indicated in the figure, until the plastic tie-rod is freed from its stop position; pull downwards until you hear a “click”, which indicates that the door is now unlocked.

5. open the door; if this is still not possible repeat the procedure.

6. reposition the panel, making sure the hooks are securely in place before you push it onto the appliance.

11

Care and maintenance


Cutting off the water and electricity

EN

supplies


• Turn off the water tap after every wash cycle. This will


limit wear on the hydraulic system in the machine and


help to prevent leaks.


• Unplug the appliance when cleaning it and during all


maintenance work.


Cleaning the machine


The outer parts and rubber components of the appliance


can be cleaned using a soft cloth soaked in lukewarm


soapy water. Do not use solvents or abrasives.


Cleaning the detergent dispenser


drawer

1

1

2

2

To remove the drawer, press lever (1) and pull the drawer outwards (2) (see figure).

Wash it under running water; this procedure should be repeated frequently.

To access the pre-chamber:

1. take off the cover panel on the front of the machine by first pressing it in the centre and then pushing downwards on both sides until you can remove it (see figures);

2. position a container so that it will collect the water which flows out (approximately 1.5 l) (see figure);

3. unscrew the lid by rotating it in an anti-clockwise direction (see figure);

4.clean the inside thoroughly;

5.screw the lid back on;

6.reposition the panel, making sure the hooks are securely in place before you push it onto the appliance.

Caring for your appliance drum

Always leave the door ajar to prevent unpleasant odours from forming.

Cleaning the pump

The washing machine is fitted with a self-cleaning pump which does not require any maintenance. Sometimes, small items (such as coins or buttons) may fall into the protective pre-chamber at the base of the pump.

Make sure the wash cycle has finished and unplug the appliance.

Checking the water inlet hose

Check the inlet hose at least once a year. If there are any cracks, it should be replaced immediately: during the wash cycles, water pressure is very strong and a cracked hose could easily split open.

12

Trouble shooting

Your washing machine could occasionally fail to work. Before contacting the Technical Assistance Centre (see “Assistance”),

EN

make sure that the problem cannot be solved easily using the following list.

Problem:

The washing machine does not switch on.

Possible causes / Solutions:

The appliance is not plugged into the socket fully, or not enough to make contact.

There is no power in the house.

The wash cycle does not start.

The door is not closed properly.

The START/PAUSE button has not been pressed.

The water tap has not been opened.

A delayed start has been set.

The washing machine does not fill with water.

The washing machine door remains locked.

The machine continuously fills with water and drains.

The water inlet hose is not connected to the tap.

The hose is bent.

The water tap has not been opened.

There is no water supply in the house.

The pressure is too low.

The START/PAUSE button has not been pressed.

If you have selected the option, at the end of the cycle the washing machine drum will rotate slowly; to end the cycle press the START/PAUSE button or the option.

The drain hose is not fitted at a height between 65 and 100 cm from the floor (see “Installation”).

The free end of the hose is under water (see “Installation”).

If the dwelling is on one of the upper floors of a building, there may be problems relating to water drainage, causing the washing machine to fill with water and drain continuously. Special anti-draining valves are available in shops and help to prevent this inconvenience.

The wall drainage system is not fitted with a breather pipe.

The washing machine does not drain or spin.

The wash cycle does not include draining: Some wash cycles require the drain phase to be started manually (see “Wash cycles and options”).

The “Easy iron” option is enabled: to complete the wash cycle, press the START/PAUSE button (“Wash cycles and options”).

The drain hose is bent (see Installation).

The drainage duct is clogged.

The machine vibrates a lot during the spin cycle.

The washing machine leaks.

The drum was not unlocked correctly during installation (see “Installation”).

The machine is not level (see “Installation” ).

The machine is trapped between cabinets and walls (see “Installation”).

The load is unbalanced (see “Detergents and laundry”).

The water inlet hose is not screwed on properly (see “Installation”).

The detergent dispenser is blocked (to clean it, see “Care and maintenance”).

The drain hose is not fixed in place properly (see “Installation”).

The icons corresponding to the “Phase in progress” flash rapidly at the same time as the ON/OFF indicator light.

Switch off the machine and unplug it, wait for approximately 1 minute and then switch it back on again. If the problem persists, contact the Technical Assistance Service.

There is too much foam.

The washing machine door remains locked.

The detergent is not suitable for machine washing (it should display the text “for washing machines” or “hand and machine wash”, or the like).

Too much detergent was used.

Perform the manual unlocking procedure (see “Precautions and tips”).

! Note: to exit “Demo mode”, switch machine off, then press and hold the two “START/PAUSE” and “ON/OFF” buttons simultaneously for 3 seconds.

13

Assistance


Before calling for Assistance:


EN


• Check whether you can solve the problem by yourself (see “Trouble shooting”);


• Restart the wash cycle to check whether the problem has been solved;


• If it has not, contact the Authorised Technical Assistance Service.


! If the washing machine has been installed or used incorrectly, you will have to pay for the call-out service.


! Always request the assistance of authorised technicians.


Please have the following information to hand:

the type of problem;

the appliance model (Mod.);

the serial number (S/N).

The above information can be found on the data plate located on the appliance itself.

14

MÁQUINA DE LAVAR ROUPA

Instruções para a instalação e a utilização

PT

Português

AQUALTIS

AQ92F 297

Sumário

PT


Instalação, 16-17-18-19

Desembalar e nivelar

Ligações hidráulicas e eléctricas

Dados técnicos

Descrição da máquina, 20-21

Painel de comandos

Como efectuar um ciclo de lavagem, 22

Programas e opções, 23

Tabela dos Programas Opções de Lavagem

Detergentes e roupa, 24

Detergente

Preparar a roupa

Conselhos de lavagem

Precauções e conselhos, 25

Segurança geral

Sistema de balanceamento da carga

Eliminação

Abertura manual da porta de vidro

Manutenção e cuidados, 26

Interromper a alimentação de água e de corrente eléctrica Limpar a máquina

Limpar a gaveta dos detergentes Cuidados com o tambor Limpar a bomba

Verificar o tubo de alimentação de água

Anomalias e soluções, 27

Assistência, 28

15

Instalação

! É importante guardar este livrete para poder consultá-lo PT a qualquer momento. Se a máquina for vendida, cedida ou transferida, certifique-se que este livrete permaneça com a

máquina.

!Leia com atenção estas instruções: há importantes informações acerca da instalação, da utilização e da segurança.

!No envelope que contém este manual

encontrará, além da garantia, também algumas peças que servirão para a instalação.

Desembalar e nivelar

Desembalar

1. Uma vez desembalada a máquina de lavar roupas, verifique que a mesma não tenha sofrido danos durante o transporte.

Se estiver danificada não efectue a sua ligação e contacte o revendedor.

2. Tire os 4 parafusos de protecção para o transporte e o respectivo calço, situados na parte traseira

(veja a figura).

3.Tampe os furos com as tampas em plástico contidas no envelope.

4.Conserve todas as peças; se for necessário transportar a máquina de lavar roupa, terão de ser montadas outra vez para evitar danos internos.

! Embalagens não são brinquedos para as crianças!

Nivelamento

1. Posicione a máquina de lavar roupa sobre um pavimento plano e rígido, sem encostá-la em paredes ou móveis.

2. Compense as irregularidades desatarraxando ou atarraxando os pés até que a máquina esteja nivelada horizontalmente (não deve ter uma inclinação superior aos 2 graus).

!Um cuidadoso nivelamento dá estabilidade e evita vibrações e ruídos sobretudo na fase de centrifugação.

!Se a máquina for posicionada sobre tapete ou alcatifa, regule os pés em modo que embaixo da máquina de lavar roupa haja espaço suficiente para a ventilação.

Ligações hidráulicas e eléctricas

Ligação do tubo de alimentação da água

! Antes de ligar o tubo de alimentação à rede hídrica, deixe a água escorrer até que seja límpida.

1. Ligue o tubo de alimentação na máquina de lavar roupa atarraxado no apropriado fornecimento da água, na parte traseira, em cima à direita (veja a figura).

2. Realize a ligação do tubo de alimentação parafusando-o a uma torneira de água fria com bocal de rosca de 3/4 gás

(ver figura).

3. Tome cuidado para o tubo não ser dobrado nem esmagado.

!A pressão hídrica da torneira deve ser entre os valores da tabela dos Dados técnicos (veja a página ao lado).

!Se o comprimento do tubo de alimentação não for suficiente, contacte uma oficina especializada ou um técnico autorizado.

!Nunca utilize tubos de alimentação de água velhos ou usados, mas sim aqueles fornecidos em dotação com a máquina.

16

Terra
Neutro Sob tensão

Ligação do tubo de descarga

65 - 100 cm

Ligue o tubo de descarga, sem dobrá-lo, a um conduto de descarga ou a uma descarga de parede colocados entre 65 e 100 cm do chão;

em alternativa, coloque na beira de um lavabo ou de uma banheira, prendendo na torneira a guia fornecida (veja a figura). A ponta solta do tubo de descarga não deve permanecer emergida na água.

! É desaconselhado empregar tubos de extensão; mas se for indispensável, a extensão deve ter o mesmo diâmetro do tubo original e não medir mais de 150 cm de comprimento.

Ligação eléctrica

Antes de ligar a ficha na tomada eléctrica, certifique-se que:

a tomada tenha uma ligação à terra e seja nos termos da legislação;

a tomada tenha a capacidade para suportar a carga máxima de potência da máquina, indicada na tabela dos Dados técnicos;

a tensão de alimentação seja entre os valores indicados na tabela dos Dados técnicos (veja ao lado);

a tomada seja compatível com a ficha da máquina de lavar roupa. Se não for, substitua a tomada ou a ficha.

Este electrodoméstico agora é equipado com uma ficha de 13 amperes que pode ser ligada a uma tomada compatível, para uma utilização imediata. Leia as seguintes instruções antes de utilizar este electrodoméstico.

ATENÇÃO – O ELECTRODOMÉSTICO DEVE SER LIGADO

À MASSA. PT AS ACTIVIDADES DESCRITAS A SEGUIR DEVEM SER EFECTUADAS POR UM ELECTRICISTA QUALIFICADO.

Substituição de fusível:

Quando for substituir um fusível defeituoso, utilize sempre fusíveis de 13 amperes ‘ASTA’ em conformidade com o padrão BS1362 e coloque novamente a tampa do fusível. Se tiver perdido a tampa de fusível, não utilize a ficha antes desta peça que faltava ser colocada novamente.

Tampas de fusível:

Se for substituir a tampa do fusível, assegure-se que a cor seja a certa, indicada pelo código ou pelos dizeres coloridos na base da ficha. Para as peças de reposição, contacte directamente o centro de assistência técnica mais próximo.

Desmontar a ficha:

Se o electrodoméstico for equipado com uma ficha incorporada que não possa ser novamente ligada aos cabos e for necessário fazer passar o cabo por divisões, aparelhos etc. certifique-se que:

a ficha seja substituída por uma que possa ser ligada a cabos de 13 amperes com o selo BSI

ou:

o cabo de rede esteja ligado directamente à ficha de 13 amperes, comandada por um interruptor (em conformidade com a norma BS 5733), acessível sem ser necessário deslocar o electrodoméstico.

Eliminação da ficha:

Antes de deitar fora uma ficha eléctrica, inutilize os seus pinos de maneira que não seja mais possível colocá-la acidentalmente numa tomada.

Instruções para a ligação do cabo a uma nova ficha eléctrica:

Importante: a cor dos fios do cabo da rede indica os seguintes códigos:

Amarelo/verde Azul Castanho

17

Loading...
+ 39 hidden pages