

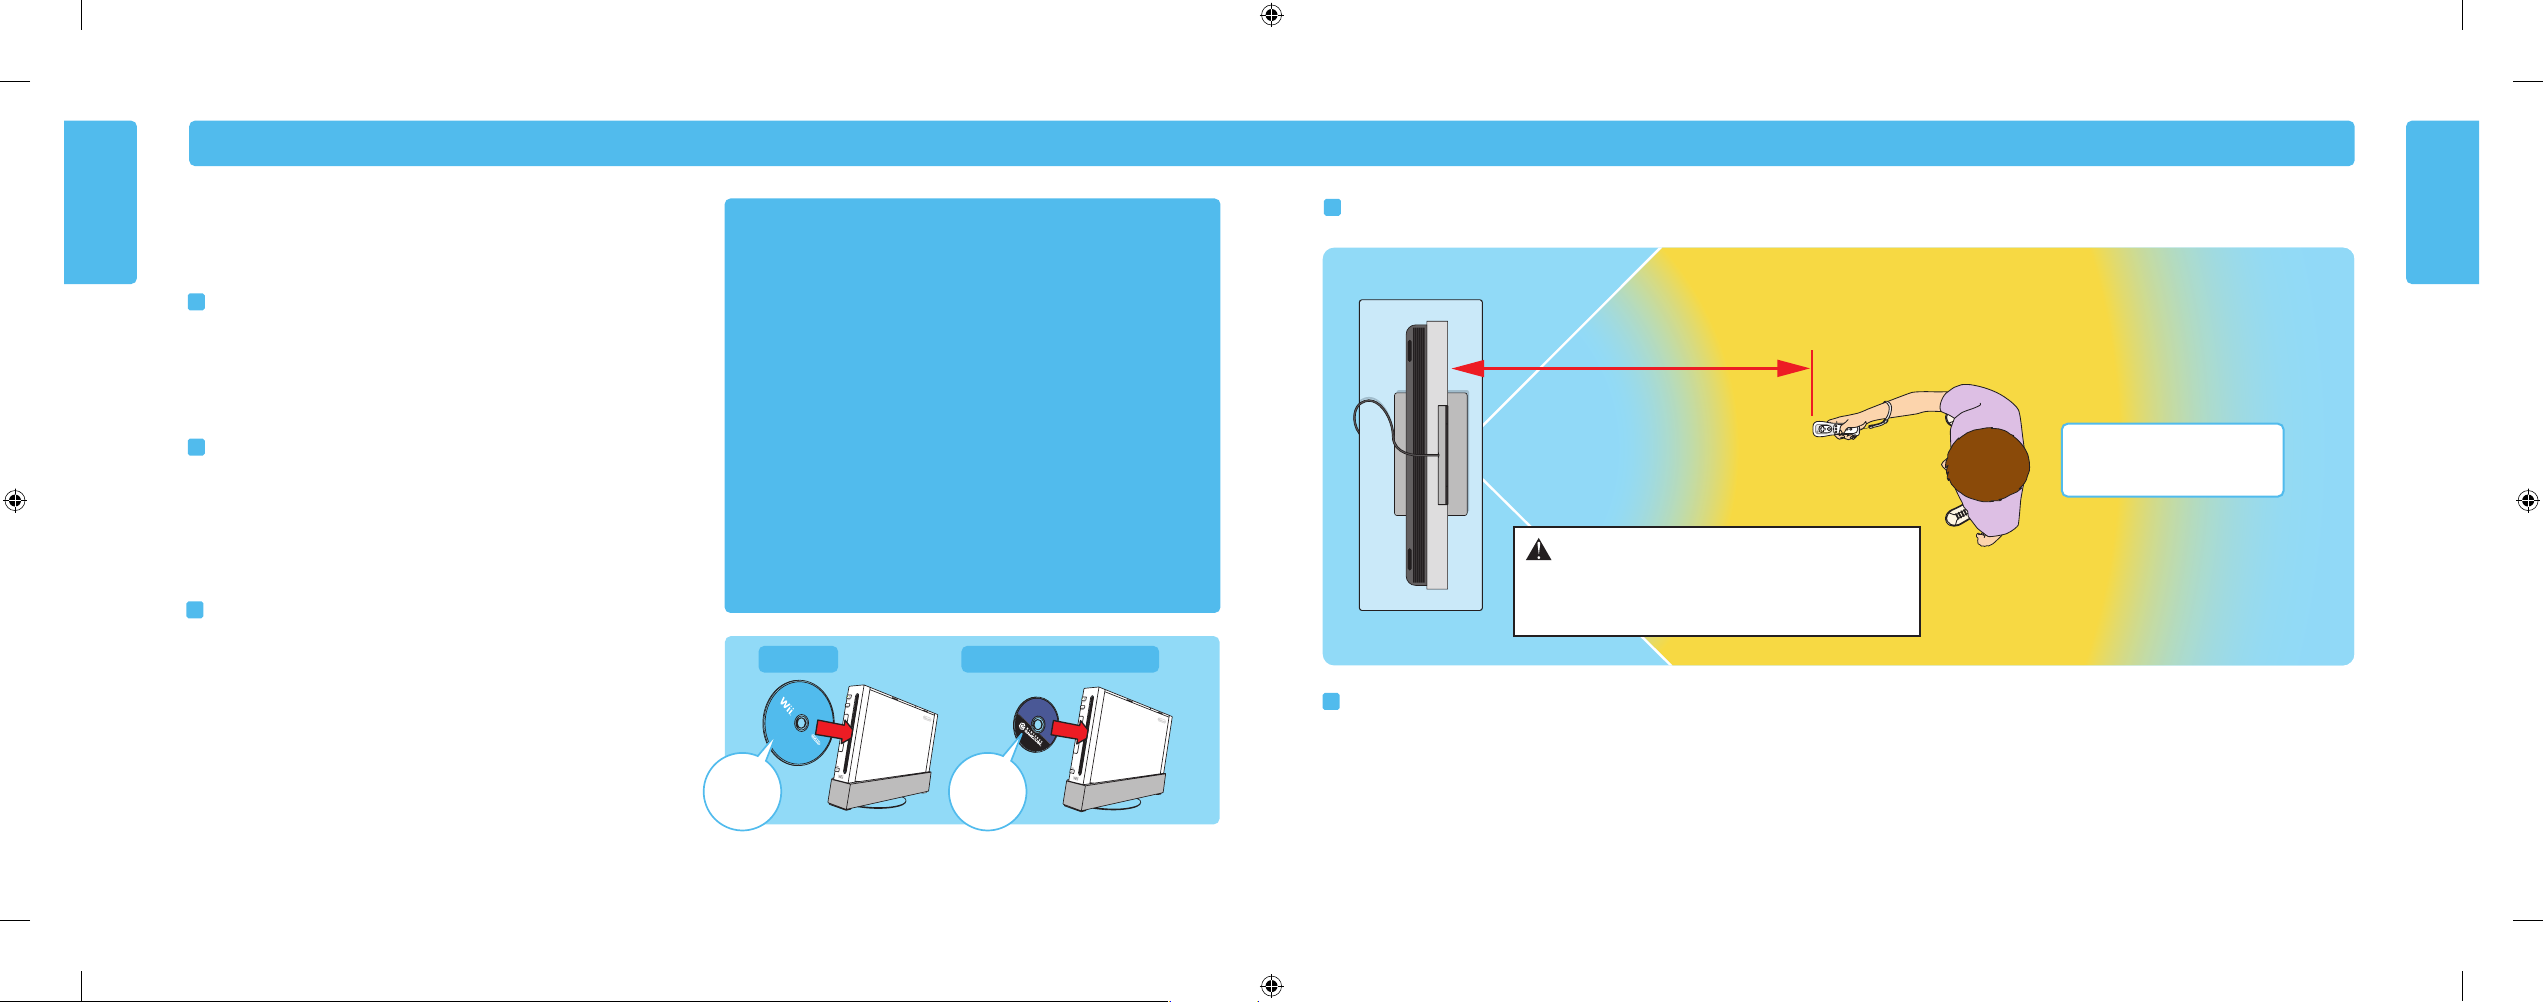
For best operation, play
directly in front of the TV.
Recommended distance: 3’– 10’
(from Sensor Bar to Wii Remote Plus)
24 25
Using Game Discs
Using Game Discs
Wii System Play Guidelines
Playing a Wii or Nintendo GameCube
Game Disc
Before Inserting a Disc
• Turn ON the power for your TV and any audio equipment connected to your
gameplay setup.
• Select the correct input setting for your TV. (See page 18, TV and Audio/Video
Settings.)
Insert a Game Disc
Insert your Game Disc into the Game Disc slot on the front of the console. The Wii
console will turn ON automatically.
• If your console is placed vertically, the disc label will face to the right.
• If your console is placed horizontally, the disc label will face upwards.
Starting the Game
1. Using the Wii Remote Plus, move the cursor over the Disc Channel option on the
Wii Menu screen and press the A Button to make a selection.
NOTE: Please read the Disc Channel section in the Operations
manual included with your Wii system for complete information on using Game Discs in the Wii console.
2. Select “PLAY” on the game title screen to begin the game. Review the
instruction booklet for the game you are playing for specific game
information.
Game Disc Usage Precautions
Please read and follow the precautions listed below when using Wii or
GameCube Game Discs in the Wii Console. Failure to do so may result in
damage to your Wii system or game discs.
• To avoid pinching your finger, do not load the disc with your finger in the
hole. Always handle the disc by the edges.
• Do not touch the bottom unprinted surface of the Game Disc. Always handle
the disc by the edges.
• Do not use cracked, deformed or repaired discs.
• Do not bend or put excessive pressure on discs when loading into console.
• Do not leave discs in direct sunlight or expose them to high temperatures,
high humidity or dust, dirt or other contaminates.
• When not using discs, store them in their cases to prevent them from getting
scratched, dirty or damaged.
• Do not write on, or place stickers on any part of the disc.
• If a disc becomes dirty or contaminated with fingerprints, the system may not
be able to read the game data correctly. If necessary, clean the disc with a
soft, slightly damp cotton cloth (use water only). Clean the disc from center
towards the edges; do not use a circular motion.
Wii System Play Guidelines
CAUTION - Adequate Space Required
Be sure you have enough space around you during game play.
To avoid injury or damage, make sure other people or objects are
not within your range of motion.
For best results when using the Wii system, follow these recommendations.
For best use of the Wii Remote Plus, follow these guidelines:
• Avoid blocking the signal between the remote, the Sensor Bar and the Wii console
with objects.
•
Use the remote the correct distance from the Sensor Bar. The optimal distance is
between 3 and 10 feet.
• Avoid bright light sources, including sunlight, behind or near the TV, shining towards
the remote or reflecting off of the screen.
• Avoid highly reflective surfaces near the Sensor Bar.
• Avoid sources of infrared light in the gameplay area such as electric, propane or
kerosene heaters, flames from fireplaces or candles, and stoves or other sources of heat.
• If the remote seems to operate eratically, check and adjust the Sensor Bar sensitivity if
necessary. (See page 52 in the Wii Operations Manual - Channels and Settings.)
Be sure to read the following pages on using the Wii Remote Plus, Nunchuk,
and Nintendo GameCube controllers before using the Wii system.
NOTE: A GameCube controller is required for playing GameCube games.
Wii Disc
Nintendo GameCube Disc
Label faces
towards the
right side of the
Wii console
Label faces
towards the
right side of the
Wii console
Confidential
Until Jan 31, 2011
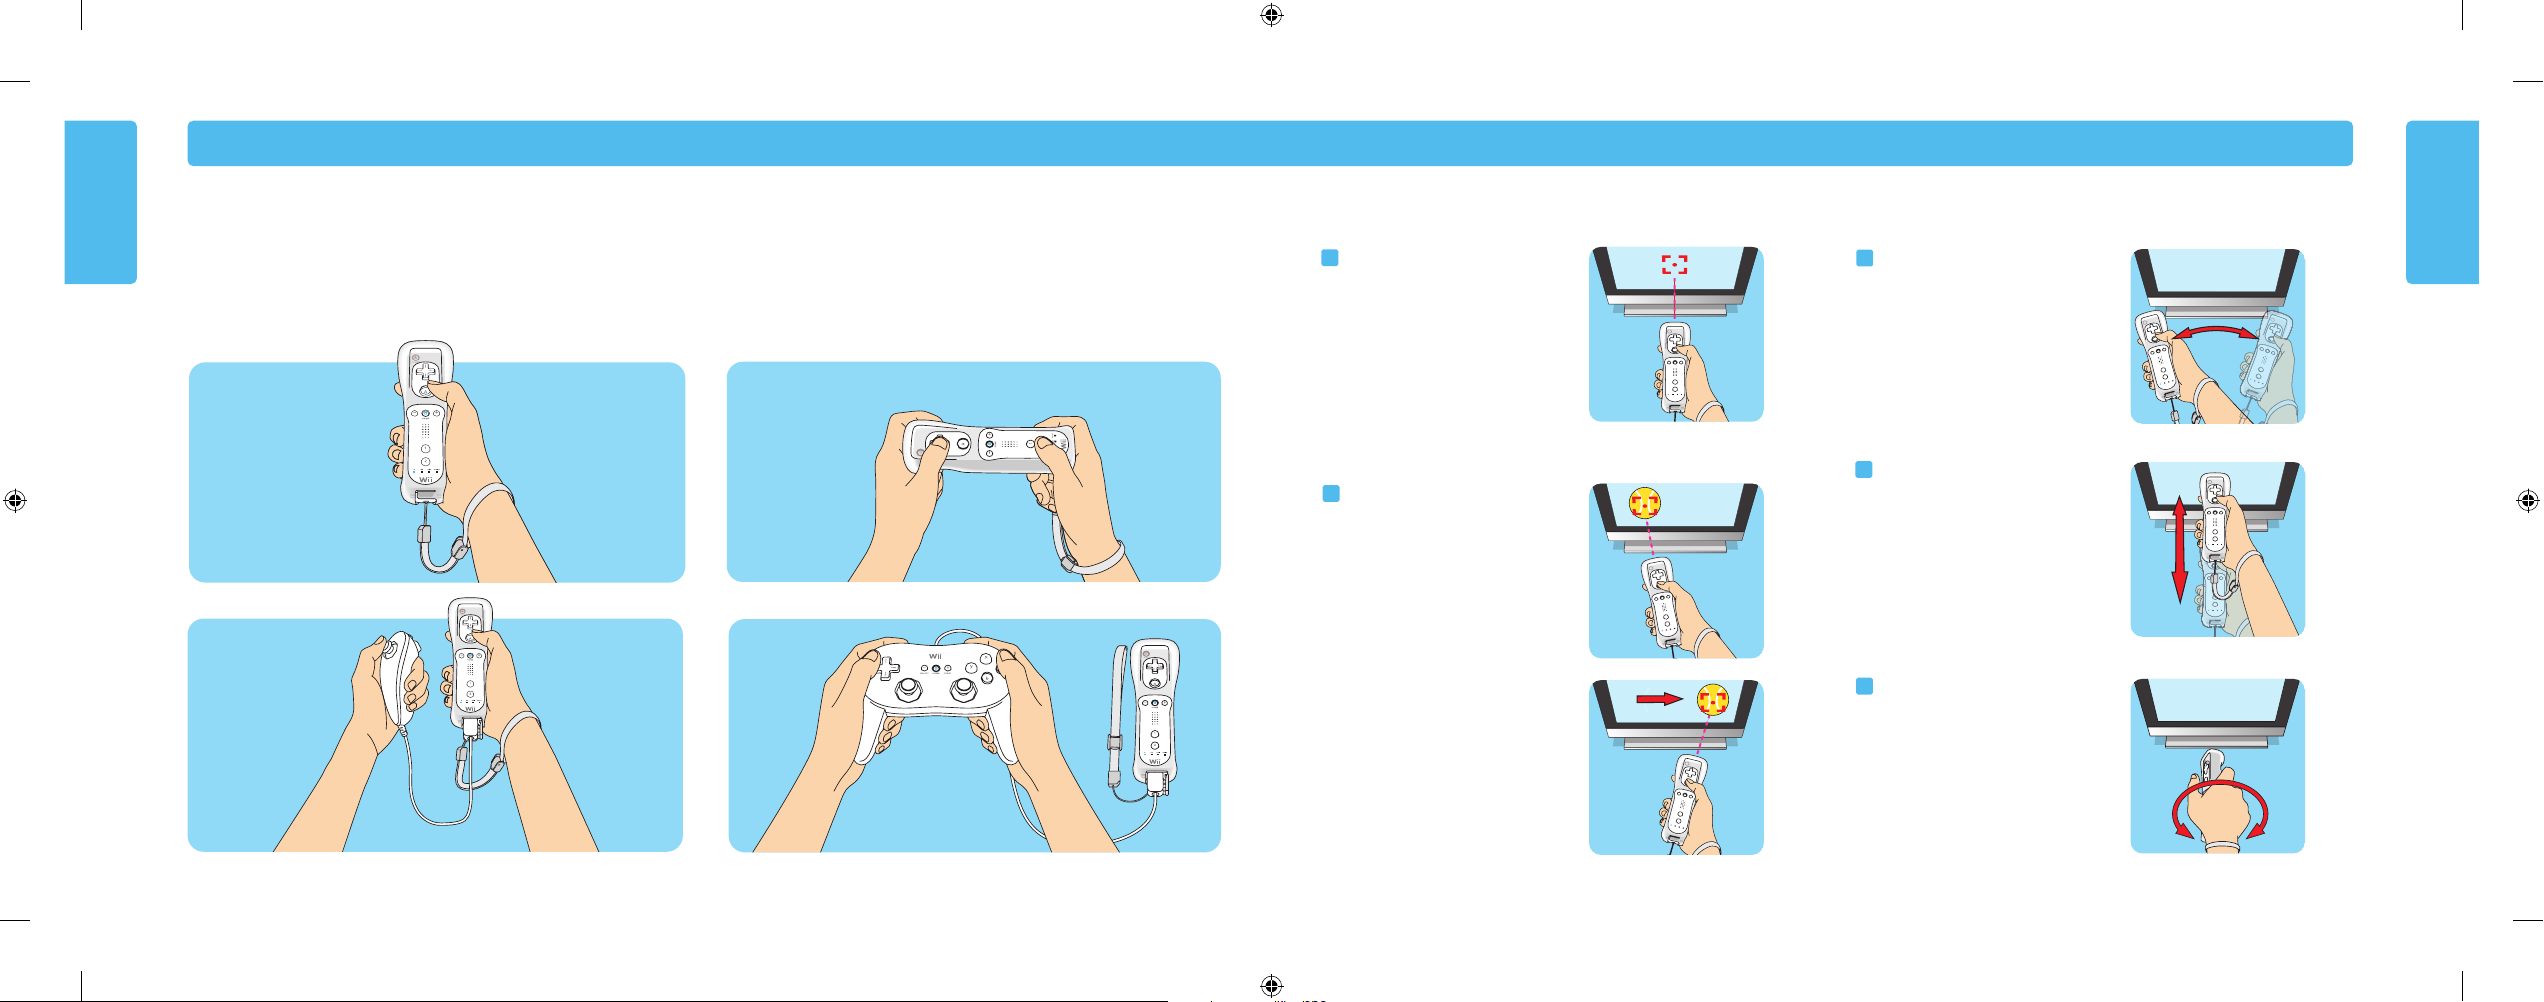
Wii Remote Plus –
Vertical Position
Wii Remote Plus and Nunchuk
Wii Remote Plus
and Classic Controller Pro™ (sold separately)
Wii Remote Plus – Horizontal Position
26
27
Using the Wii Remote Plus
Using the Wii Remote Plus
Using the Wii Remote Plus
Wii Remote Plus Configurations
Depending on the game, the way you hold and operate the remote will vary. You may need to hold the remote in either one or two hands. Read the instruction booklet for the
game you are playing for information about what kind of gameplay control is required for that game.
The remote can be used by itself, or in different configurations when connected up to other Wii accessories. These configurations can be used right or left handed.
Basic Operations
Point
Point the remote at a specific place on
the TV screen.
Waving
Wave the remote back and forth from
side to side
Pushing or Pulling
Move the remote forward and backward.
Twisting
Move the remote in a twisting motion by
rotating your arm.
Holding or Grabbing
Point the remote at a specific place on
the TV screen and move the remote
while holding down a button.
Confidential
Until Jan 31, 2011
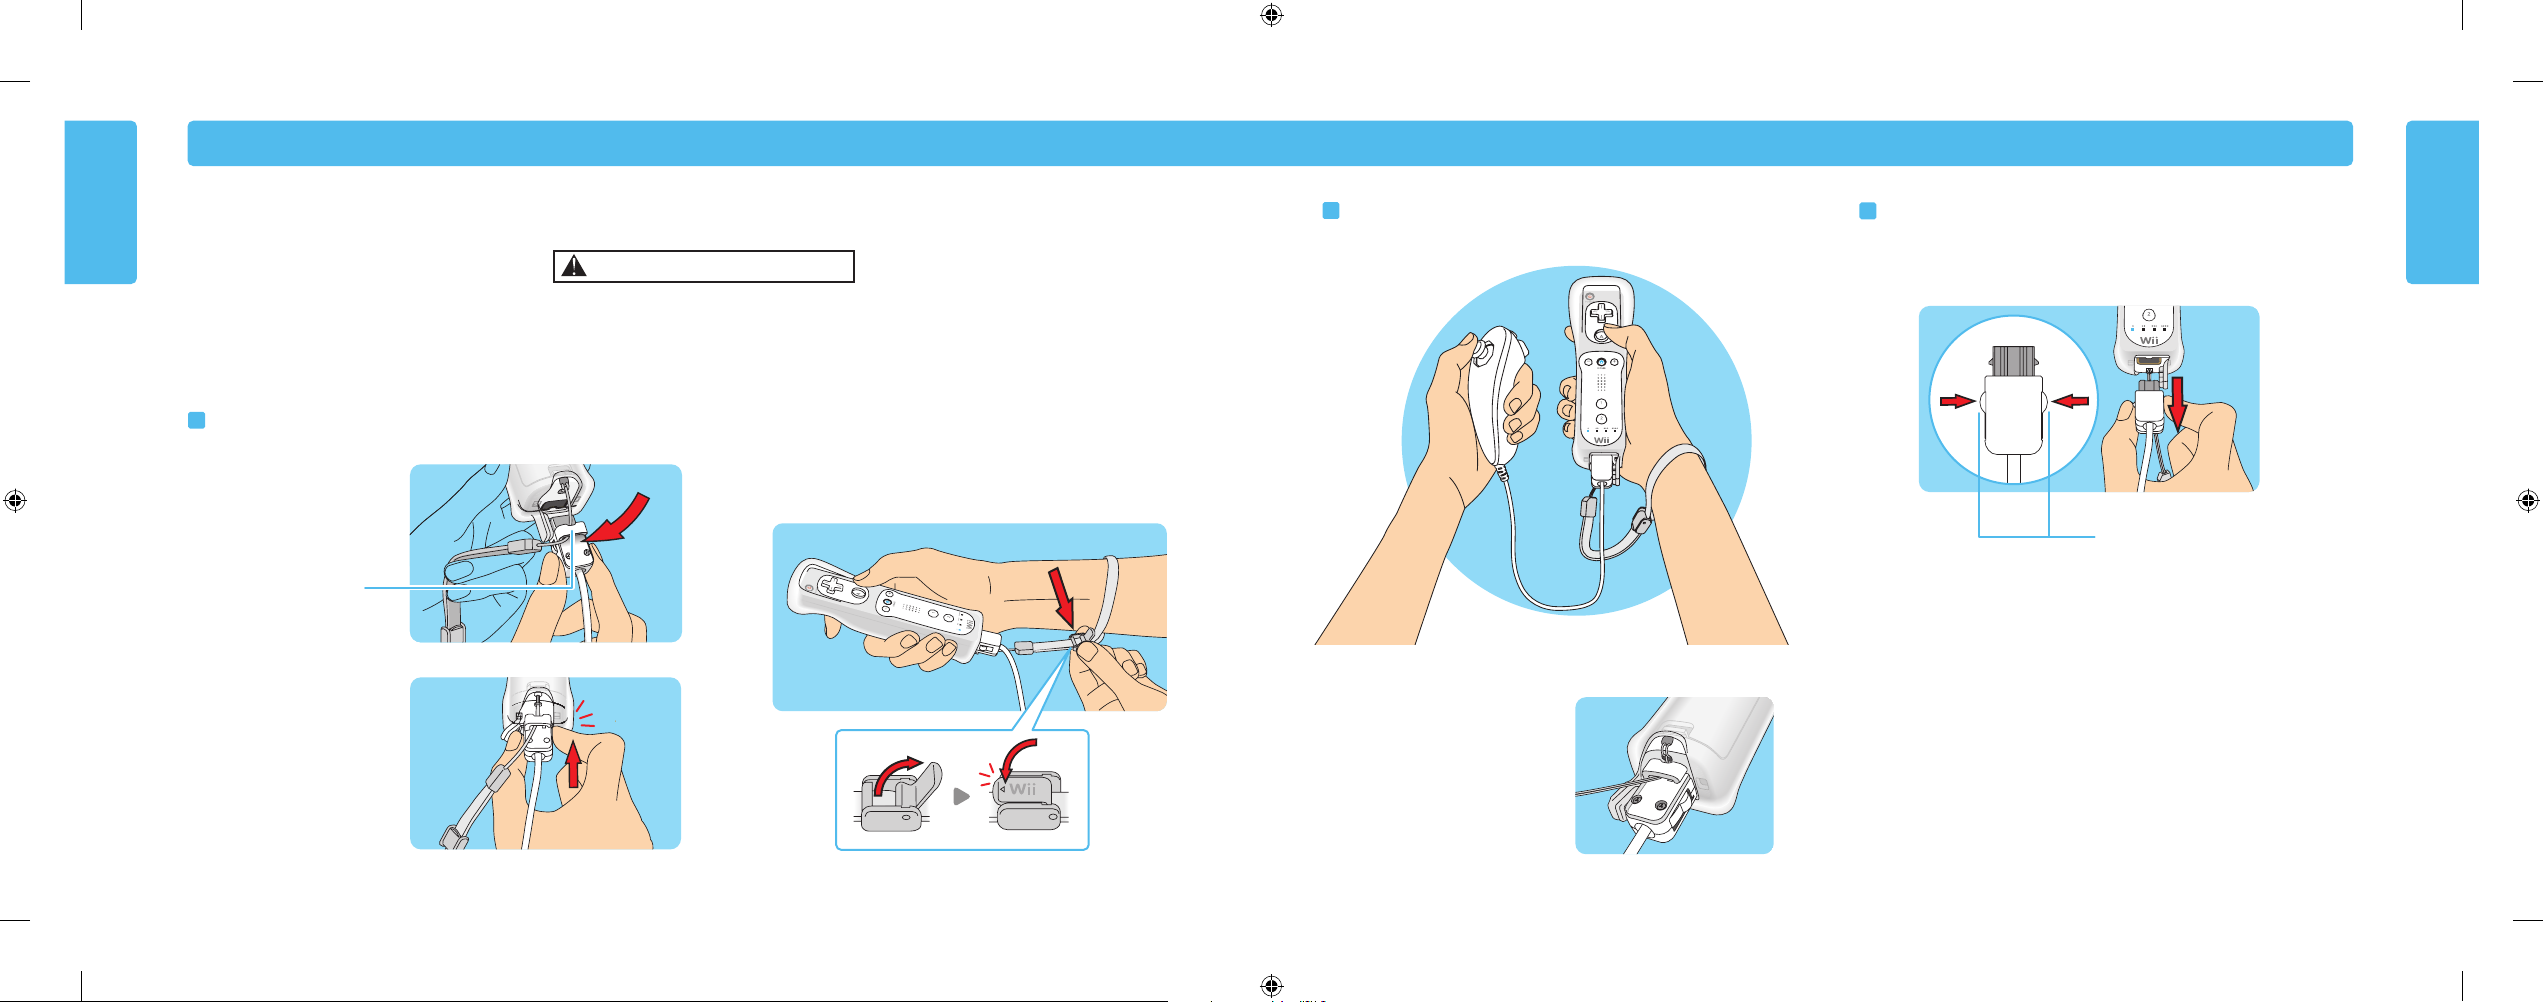
Lock/Release Levers
Squeeze levers to remove
plug from Wii Remote Plus.
28 29
Using the Nunchuk
Using the Nunchuk
Using the Nunchuk
Setup and Use of the Nunchuk
Wii gameplay with the Wii Remote Plus and Nunchuk can involve rapid or vigorous motion. Please use the wrist strap to prevent losing your grip on the remote
and causing damage to the remote and surrounding objects, or injury to other people.
Be sure to install the Nunchuk as described. Use the connector hook on the Nunchuk plug with the wrist strap cord to prevent the Nunchuk plug from becoming
separated from the External Extension connector on the remote and striking objects or people.
2. Insert the Nunchuk plug into the
External Extension Connector on
the bottom of the remote until it
“clicks” into place.
IMPORTANT: Make sure the
wrist strap cord runs through
the connector hook.
Connecting the Nunchuk
1. Feed the cord on the wrist strap
through the connector hook.
Disconnecting the Nunchuk
Press the Lock/Release Levers on the sides of the Nunchuk plug and pull the plug
straight out of the External Extension Connector on the bottom of the remote.
3. Open the lever on the strap lock and place your hand through the wrist strap. Hold
the remote firmly in your hand. Slide the strap lock up so that the strap will not fall
off your wrist. Do not over tighten the strap lock so that it’s uncomfortable. It
should just be tight enough to hold the wrist strap in place. Close the lever to
hold the strap lock in place.
Holding the Nunchuk and Wii Remote Plus
Connector Hook
CAUTION - Use the Wrist Strap
Confidential
Until Jan 31, 2011

Nintendo GameCube
Controller
30 31
Using Nintendo GameCube Controllers
Using Nintendo GameCube Controllers
Using Nintendo GameCube Controllers
Setup of Nintendo GameCube Controllers
NOTE: When using GameCube controllers with the Wii console, be sure and
use the stand plate to help prevent the console from being tipped over by
pulling on the controller cable. (See page 11, Vertical Placement.)
Optionally, the console can be placed horizontally. When using GameCube
Controllers in the horizontal position, the controller socket cover can be
removed to allow the console to lay flat. See page 31 for instructions on
removing the cover.
Connecting GameCube Controllers
NOTE: GameCube controllers only work when playing GameCube games on the
Wii console.
• Plug the controllers into the GameCube controller sockets on the side of
the console.
• Review the instruction booklet for the game you are playing for the number and
position of controllers required for that specific game.
• The Classic Controller™ does not work with GameCube games.
Removing the Controller Socket Cover
If you are using the Wii console in a horizontal position, you must remove
the controller socket cover when using GameCube Controllers to allow the
console to lay completely flat.
1. Stand the Wii console upright as shown and squeeze gently until you feel a
slight click.
2. Remove the cover by pulling straight up out of the console.
3. The cover can be replaced by reinserting the cover straight down into the console
until it clicks into place.
NOTE: The GameCube Memory Slot Cover can be removed with the same
procedure, and should be removed if you are using GameCube Memory
Cards when the Wii console is placed horizontally.
Horizontal
Position
Press in
and up
Use the Wii stand plate when
using GameCube controllers
to prevent the console from
tipping over.
Confidential
Until Jan 31, 2011

miniSD card
and Adapter
microSD card
and Adapter
SD card
Note:
Label faces
towards the Wii
game disc slot
No picture on TV screen
• Make sure you have completed all steps, in the order that they appear, on the Quick
Setup sheet included with your system.
• Make sure that all components of your setup are plugged into power outlets and that
all components are turned ON.
• Make sure that cable connections are correctly installed and that all plugs are securely
plugged into the appropriate connectors.
• Make sure that the INPUT settings are correct for your particular setup. (Review page 18
on Input Select information.)
No sound is heard or sound quality is poor
• Make sure the TV volume is not turned off or muted.
•
Make sure that all audio connections are correctly installed and that all plugs are
securely plugged into the appropriate connectors.
• Make sure the Wii AV Cable is plugged into the "input" connectors on the
TV or VCR, not the "output" connectors.
• Make sure that the INPUT settings are correct for your particular setup. (Review
page 18 on Input Select information.)
• The sound in some games doesn't begin until the game begins.
• If you have a mono TV or VCR and have left one of the audio cables unconnected
you may not get all game sounds. Use a "Y" Adapter to get both left and right
sound channels.
• If your TV/VCR have both mono and stereo
options, make sure they match your setup.
• Check the instruction booklet for the game you are playing to see if there are
volume controls or mono/stereo options that can be set from within the game.
The console Power LED does not come on, or goes off
during game play
•
Make sure the AC Adapter is plugged into both the wall outlet and the back of
the console.
•
If the light is still off, disconnect the AC Adapter plug from the wall outlet, wait 2
minutes and plug it back into the outlet. Turn the console power ON.
System unable to read disc or
game disc will not
operate in console
NOTE: Game Discs will not start automatically. You must start disc games from the Disc
Channel on the Channel Menu screen.
• Make sure the disc is inserted correctly. The label side of the disc must face to the
right if the Wii console is set up vertically, or must face up if the Wii console is set
up horizontally.
• Check to be sure that the Game Disc is clean and in good condition. If dirty, wipe with
a soft cloth, from the center to the outside. Do not wipe with a circual motion.
You can
also try using the Wii Lens Cleaning Kit (sold separately) to clean the internal lens.
• Eject the Game Disc, and turn the power OFF and then ON. Reinsert the disc and try
playing the game again.
• Check that the Game Disc will work on your version of the Wii. This system will only
work with Game Discs made for use in the USA, Canada, Mexico and Latin America.
Game Disc slot does not light blue or lights briefly.
This is the normal operation of the Game Disc slot. The slot only lights temporarily
when the system is turned on by a) inserting a Game Disc, b) using the Power
Button on the Wii Remote Plus or c) using the Power Button on the Wii console.
The Game Disc slot will also light temporarily if you receive a message via
WiiConnect24 (this feature must be turned on to receive messages, see page 62 in
the Wii Operations Manual - Channels and Settings for more information).
Troubleshooting (Before seeking assistance, review the following problems and solutions.)
Troubleshooting
32 33
Using Memory Cards
Using Memory Cards
Using SD Memory Cards
SD cards are used in many digital cameras and cell
phones and for data storage on PCs. The Wii console
accepts only SD or SDHC cards (32 GB maximum),
including miniSD or SDHC and microSD or SDHC
cards when used with their respective adapters.
An SD memory card can be used to store the following data from the
Wii system memory:
• Game save information from Wii games (depending on the game,
some information cannot be copied to SD cards)
• Certain data from the Wii Channel applications
• Games downloaded through the Wii Shop Channel such as Virtual
Console™ and WiiWare™ games
• Add-on content downloaded within a game
NOTE: Games and add-on content copied to an SD card cannot
be used with a different Wii console.
To use an SD card, open the SD card slot cover on the
front of the console and insert the SD card until it clicks
into place.
See the SD Card Menu and Photo
Channel sections in the Wii Operations
Manual - Channels and Settings for
more information on using SD cards
with the Wii system.
Using Nintendo GameCube Memory Cards
NOTE: Nintendo GameCube Memory cards can only be used to save game
information for Nintendo GameCube Game Discs.
To use a Nintendo GameCube Memory card, open the slot cover and insert the
memory card as shown below.
Note: Label faces
towards the top or
right side of the
Wii console.
If purchasing a new SD card, a list of cards that have been tested to work with the Wii console can
be found in the Wii - Systems and Accessories section of http://support.nintendo.com
CAUTION: Do not insert or remove memory cards when reading or writing
information to or from the card or initializing the card. Doing so may damage the
Wii console or memory card, or permanently destroy data.
Can’t get past the Language Select screen
• Synchronize your Wii Remote Plus controllers using the procedure on page 22.
• Review the Sensor Bar setup instructions on pages 13-16 to ensure proper placement
and installation.
Confidential
Until Jan 31, 2011

Wii Remote Plus lights blink, but don’t stay lit
(remote does not sync)
• Review the Sensor Bar setup instructions in this manual to ensure proper placement.
• Make sure batteries are not depleted.
• Try resetting the Wii Remote Plus - remove the batteries, wait one minute,
then replace the batteries. Wait a few seconds, and then try synchronizing
the remote again.
• If you are unable to re-sync the remote, try the following procedure:
1. Turn off the power of the Wii console with the POWER Button on the front of
the console.
2. Unplug the power cord from the wall outlet for a few seconds, then plug it back
in again.
3. Turn on the power of the Wii console.
4. When you see the Health and Safety screen, press and hold the SYNCHRO
Button on the console down for 15 seconds. This will clear any sync
information left on the console.
5. Synchronize your Wii Remote Plus controllers using the procedure on page 22.
Wii Remote Plus or controller accessory buttons stick
Clean sticking buttons using the following procedure:
1. For the Wii Remote Plus, remove batteries and disconnect any accessories
before cleaning.
2. Use an unused toothbrush and hot tap water. Do not use boiling water, soap
or detergent.
3. Dip the toothbrush in hot water and shake off excess amount. Lightly scrub
sticking buttons, working the bristles around sides of buttons and into cracks.
4. Dry controller with soft cloth or towel and let air dry for at least 2 hours.
5. Test buttons and repeat procedure if necessary. Do not submerge in, or pour
any type of liquid onto a controller or accessory.
Wii Remote Plus doesn't properly respond to player
motion (erratic hand cursor, can’t swing bat, can’t bowl, etc.)
• If the lights on your remote blink, but do not stay lit, see the first troubleshooting
step on this page, at left.
• Review the Sensor Bar setup instructions in this manual to ensure proper
placement.
• Make sure no objects are blocking the signals between the Sensor Bar, the Wii
console, and the Wii Remote Plus.
• Make sure batteries are not depleted.
• Use the Sensor Bar Stand if the Sensor Bar is located below under the TV.
• Check and adjust the Sensor Bar sensitivity if necessary. (See page 52 in the Wii
Operations Manual - Channels and Settings.)
The following conditions can interfere with the operation of the remote:
1. Using the remote too close or too far from the Sensor Bar. The optimal distance
is between 3 and 10 feet.
2. Bright light sources, including sunlight, behind or near the TV, shining towards
the remote or reflecting off the TV screen.
3. Highly reflective surfaces near the sensor bar.
4. Sources of infrared light in the gameplay area such as electric, propane or
kerosene heaters, flames from fireplaces or candles, and stoves or other sources
of heat.
5. Radio frequency interference may cause the Wii Remote Plus to work erratically.
Check for and move or turn off wireless devices such as cordless phones,
wireless computer keyboards or mice or other similar devices.
If you think any of these conditions are affecting the operation of the remote, try
removing or reducing the source of interference.
Troubleshooting
FCC Information
34 35
Troubleshooting
FCC Information
Regulations for Equipment Use in U.S.A. and Canada
FCC and Industry Canada Information
In order to comply with FCC radio-frequency radiation exposure guidelines for an uncontrolled
exposure, this device and its antenna must not be co-located or operating in conjunction with any
other antenna or transmitter. This device complies with Part 15 of the FCC Rules and RSS-210 of
Industry Canada. Operation is subject to the following two conditions: (1) this device may not
cause harmful interference, and (2) this device must accept any interference received, including
interference that may cause undesired operation. Changes or modifications not expressly
approved by the manufacturer could void the user's authority to operate this device.
NOTE: This equipment has been tested and found to comply with the limits for a Class B digital
device, pursuant to part 15 of the FCC Rules. These limits are designed to provide reasonable
protection against harmful interference in a residential installation. This equipment generates,
uses and can radiate radio frequency energy and, if not installed and used in accordance with the
instructions, may cause harmful interference to radio communications. However, there is no
guarantee that interference will not occur in a particular installation. If this equipment does cause
harmful interference to radio or television reception, which can be determined by turning the
equipment off and on, the user is encouraged to try to correct the interference by one or more of
the following measures:
• Reorient or relocate the receiving antenna.
• Increase the separation between the equipment and receiver.
• Connect the equipment into an outlet on a circuit different from that to which the
receiver is connected.
• Consult the dealer or an experienced radio/TV technician or call Nintendo
Consumer Service at 1-800-255-3700 for assistance.
The user may find the following booklet prepared by the Federal Communications Commission
helpful: How to Identify and Resolve Radio-TV Interference Problems. This booklet is available
from the U.S. Government Printing Office, Washington, D.C., 20402, Stock No. 004-000-00345-4.
The term IC before the certification/registration number only signifies that the Industry Canada
technical specifications were met.
If your Wii system still does not operate correctly after trying
the troubleshooting steps, DO NOT return the console to the
store. You will lose saved game data and all Wii Shop
Channel downloads and Wii Points.
Visit support.nintendo.com for assistance and additional
troubleshooting and repair options or call 1-800-255-3700.
When playing a game that includes Wii MotionPlus
features, the Wii Remote Plus operates erratically
or unexpectedly.
• The Wii Remote Plus may need to be recalibrated due to the following:
1. Changing batteries in the Wii Remote Plus during gameplay.
2. Moving Wii MotionPlus from a cold environment into a warm environment.
To recalibrate the Wii Remote Plus, place it on a flat horizontal surface with the buttons
facing down. It should be 20” or more from your television and Wii console for
correct calibration. Wait for a few seconds and check the operation. Also, review the
instruction manual for the game you are playing for more information.
NOTE: This procedure must be done during gameplay.
Confidential
Until Jan 31, 2011

Warranty and Service information
Unlicensed Accessories
Do not attach unlicensed accessories to the Wii Remote Plus, as the use of unlicensed accessories may lead to injury to yourself or others and may cause
performance issues and/or damage to the system. Use of any such unlicensed accessories will invalidate your Nintendo product warranty.
36
Warranty and Service Information
Mode d’emploi de la Wii
Installation de la console
You may need only simple instructions to correct a problem with your product. Try our web site at support.nintendo.com or call our Consumer Assistance Hotline at 1-800-255-3700,
rather than going to your retailer. Hours of operation are 6 a.m. to 7 p.m., Pacific Time, Monday - Sunday (times subject to change). If the problem cannot be solved with the troubleshooting
information available online or over the telephone, you will be offered express factory service through Nintendo. Please do not send any products to Nintendo without contacting us first.
HARDWARE WARRANTY
Nintendo of America Inc. ("Nintendo") warrants to the original purchaser that the hardware product shall be free from defects in material and workmanship for twelve (12) months from the date of
purchase. If a defect covered by this warranty occurs during this warranty period, Nintendo will repair or replace the defective hardware product or component, free of charge.* The original purchaser is
entitled to this warranty only if the date of purchase is registered at point of sale or the consumer can demonstrate, to Nintendo’s satisfaction, that the product was purchased within the last 12 months.
GAME & ACCESSORY WARRANTY
Nintendo warrants to the original purchaser that the product (games and accessories) shall be free from defects in material and workmanship for a period of three (3) months from the date of purchase. If a
defect covered by this warranty occurs during this three (3) month warranty period, Nintendo will repair or replace the defective product, free of charge.*
SERVICE AFTER EXPIRATION OF WARRANTY
Please try our web site at support.nintendo.com or call the Consumer Assistance Hotline at 1-800-255-3700 for troubleshooting information and repair or replacement options and pricing.*
*
In some instances, it may be necessary for you to ship the complete product, FREIGHT PREPAID AND INSURED FOR LOSS OR DAMAGE, to Nintendo. Please do not send any products to Nintendo without
contacting us first.
WARRANTY LIMITATIONS
THIS WARRANTY SHALL NOT APPLY IF THIS PRODUCT: (a) IS USED WITH PRODUCTS NOT SOLD OR LICENSED BY NINTENDO (INCLUDING, BUT NOT LIMITED TO, NON-LICENSED GAME ENHANCEMENT AND
COPIER DEVICES, ADAPTERS, SOFTWARE, AND POWER SUPPLIES); (b) IS USED FOR COMMERCIAL PURPOSES (INCLUDING RENTAL); (c) IS MODIFIED OR TAMPERED WITH; (d) IS DAMAGED BY NEGLIGENCE,
ACCIDENT, UNREASONABLE USE, OR BY OTHER CAUSES UNRELATED TO DEFECTIVE MATERIALS OR WORKMANSHIP; OR (e) HAS HAD THE SERIAL NUMBER ALTERED, DEFACED OR REMOVED.
ANY APPLICABLE IMPLIED WARRANTIES, INCLUDING WARRANTIES OF MERCHANTABILITY AND FITNESS FOR A PARTICULAR PURPOSE, ARE HEREBY LIMITED IN DURATION TO THE WARRANTY PERIODS
DESCRIBED ABOVE (12 MONTHS OR 3 MONTHS, AS APPLICABLE). IN NO EVENT SHALL NINTENDO BE LIABLE FOR CONSEQUENTIAL OR INCIDENTAL DAMAGES RESULTING FROM THE BREACH OF ANY IMPLIED
OR EXPRESS WARRANTIES. SOME STATES DO NOT ALLOW LIMITATIONS ON HOW LONG AN IMPLIED WARRANTY LASTS OR EXCLUSION OF CONSEQUENTIAL OR INCIDENTAL DAMAGES, SO THE ABOVE
LIMITATIONS MAY NOT APPLY TO YOU.
This warranty gives you specific legal rights. You may also have other rights which vary from state to state or province to province. Nintendo’s address is: Nintendo of America Inc., P.O. Box 957, Redmond,
WA 98073-0957 U.S.A. This warranty is only valid in the United States and Canada.
Rev. R
Confidential
Until Jan 31, 2011
 Loading...