

Page 1

Hoshizaki America, Inc.
Hoshizaki
Water Electrolyzer
Model
ROX-20TB2-U
“A Superior Degree
of Reliability”
www.hoshizaki.com
SERVICE MANUAL
Number: X002-858
Issued: 3-9-2012
Page 2

IMPORTANT
Only qualified service technicians should install, service, and maintain the
unit. No service or maintenance should be undertaken until the technician
has thoroughly read this Service Manual. Failure to service and maintain
the equipment in accordance with this manual may adversely affect safety,
performance, component life, and warranty coverage.
Hoshizaki provides this manual primarily to assist qualified service technicians in the
maintenance and service of the unit.
Should the reader have any questions or concerns which have not been satisfactorily
addressed, please call, write, or send an e-mail message to the Hoshizaki Technical
Support Department for assistance.
HOSHIZAKI AMERICA, INC.
618 Highway 74 South
Peachtree City, GA 30269
Attn: Hoshizaki Technical Support Department
Phone: 1-800-233-1940 Technical Support
(770) 487-2331
Fax: 1-800-843-1056
(770) 487-3360
E-mail: techsupport@hoshizaki.com
Web Site: www.hoshizaki.com
NOTE: To expedite assistance, all correspondence/communication MUST include the
following information:
• Model Number
• Serial Number
• Complete and detailed explanation of the problem.
1
Page 3

IMPORTANT
This manual should be read carefully before the unit is serviced or maintenance
operations are performed. Only qualified service technicians should install,
service, and maintain the unit. Read the warnings contained in this booklet
carefully as they give important information regarding safety. Please retain this
booklet for any further reference that may be necessary.
I. GENERAL INFORMATION --------------------------------------------------------------------------5
1. SAFETY INSTRUCTIONS -------------------------------------------------------------------------5
2. PRODUCT INFORMATION -----------------------------------------------------------------------7
[a] FEATURES ----------------------------------------------------------------------------------------7
[b] MODEL NAME -----------------------------------------------------------------------------------8
3. DIMENSIONS/SPECIFICATIONS ---------------------------------------------------------------9
4. PERFORMANCE DATA -------------------------------------------------------------------------- 10
II. TECHNICAL INFORMATION --------------------------------------------------------------------- 11
1. PRINCIPLE OF ELECTROLYSIS -------------------------------------------------------------- 11
2. CONSTRUCTION ---------------------------------------------------------------------------------- 14
[a] GENERAL --------------------------------------------------------------------------------------- 14
[b] MECHANISM ----------------------------------------------------------------------------------- 16
[c] CONTROL BOX -------------------------------------------------------------------------------- 17
3. WIRING DIAGRAM -------------------------------------------------------------------------------- 19
4. WATER CIRCUIT ---------------------------------------------------------------------------------- 20
5. FUNCTIONS AND OPERATION --------------------------------------------------------------- 21
[a] NORMAL MODE ------------------------------------------------------------------------------- 21
[b] SHORT MODE --------------------------------------------------------------------------------- 21
[c] ADJUSTMENT MODE ------------------------------------------------------------------------ 21
[d] CHECK MODE --------------------------------------------------------------------------------- 22
CONTENTS
PAGE
III. SERVICE INFORMATION ------------------------------------------------------------------------ 27
1. ERROR CODES ----------------------------------------------------------------------------------- 27
2. SERVICE DIAGNOSIS --------------------------------------------------------------------------- 27
3. FLOW RATE ADJUSTMENT -------------------------------------------------------------------- 29
4. REMOVAL AND REPLACEMENT OF COMPONENTS ---------------------------------- 30
[a] ELECTROLYTIC CELL ----------------------------------------------------------------------- 30
2
Page 4
Important Safety Information
Throughout this manual, notices appear to bring your attention to situations which could
result in death, serious injury, or damage to the unit.
WARNING
NOTICE
Indicates a situation which could result in damage to the unit or
IMPORTANT
In the context of this manual, the term "sanitizing water" refers to acidic water and
"cleaning water" refers to alkaline water.
Indicates a hazardous situation which could result in death or
serious injury.
property.
Indicates important information about the use and care of the
unit.
WARNING
This product should be destined only to the use for which it has been
expressly conceived. Any other use should be considered improper and
therefore dangerous. The manufacturer cannot be held responsible for injury
or damage resulting from improper, incorrect, and unreasonable use.
To reduce the risk of death, electric shock, serious injury, or fi re, follow
basic precautions including the following:
• Only qualifi ed service technicians should install and service the unit.
• This unit must be installed in accordance with applicable national, state, and
local codes and regulations.
• This unit requires an independent power supply. See the nameplate for
proper voltage and breaker/fuse size. Failure to use a proper breaker or fuse
can result in a tripped breaker, blown fuses, or damage to existing wiring.
This could lead to heat generation or fi re.
• THIS APPLIANCE MUST BE GROUNDED. This appliance is equipped
with a NEMA 5-15 three-prong grounding plug to reduce the risk of potential
shock hazards. It must be plugged into a properly grounded, independent
3-prong wall outlet. If the outlet is a 2-prong outlet, it is your personal
responsibility to have a qualified electrician replace it with a properly
grounded, independent 3-prong wall outlet. Do not remove the ground prong
from the power cord and do not use an adapter plug. Failure to follow these
instructions may result in death, electric shock, or fi re.
• Turn off the power supply before servicing. Lockout/Tagout to prevent the
power supply from being turned back on inadvertently.
• Do not make any alterations to the unit. Alterations could result in electric
shock, injury, fi re, or damage to the unit.
• This unit is not intended for outdoor use (including under canopy). Exposure
to rain may cause electric leak or shock. Direct sunlight can damage the
plastic tank exterior, resulting in cracks and water leaks.
3
Page 5

• Ensure adequate ventilation. Hydrogen gas or chlorine gas may cause
health problems.
• Do not mix electrolyzed water with other chemicals. Mixture with acidic
or chlorine-based chemicals can cause chlorine gas, resulting in health
problems.
• Do not use a large volume of sanitizing water only. Generation of a
large amount of chlorine gas may cause health problems or corrosion of
surrounding equipment.
• Do not use a flame near a container or tank holding electrolyzed water.
Hydrogen gas from cleaning water may cause ignition.
4
Page 6

I. GENERAL INFORMATION
1. SAFETY INSTRUCTIONS
The following instructions contain important safety precautions and should be strictly
observed.
WARNING
1. When there is no need to energize the unit during disassembly or cleaning,
be sure to unplug the unit or disconnect the main power supply before
servicing the unit to prevent electric shocks.
2. If the unit must be energized for inspection of the electric circuit, use rubber
gloves to avoid contact with any live parts, which may result in electric
shocks.
3. Check for proper ground connections, and repair if necessary to prevent
electric shocks.
4. Always use service parts intended for the applicable model for replacement
of defective parts. Use proper tools to secure the wiring. Otherwise
abnormal operation or trouble may occur and cause electric leaks or fi re.
5. Check for proper part installations, wiring conditions and soldered or
solderless terminal connections to avoid smoke, fi re or electric shocks.
6. Be sure to replace damaged or deteriorated power cords and lead wires to
prevent electric shocks, fl ames or smoke.
7. Lead wires using solderless terminals or the like must be bound with their
closed ends up to avoid entrance of moisture that could lead to electric leaks
or fi re.
8. After servicing, always use a megohmmeter (500VDC) to check for
the insulation resistance of minimum 1 megohm between the live part
(attachment plug) and the dead metal part (ground terminal). Negligence in
checking may cause electric leaks or shocks.
9. Do not service the electrical parts with wet hands to prevent electric leaks or
shocks.
10. Always ask the user to keep children away from the work area. They may
be injured by tools or disassembled products.
5
Page 7
NOTICE
1. After servicing, be sure to check for water leaks from the water supply and
drain lines to prevent wetting the surrounding properties.
2. After servicing, always check for proper operation.
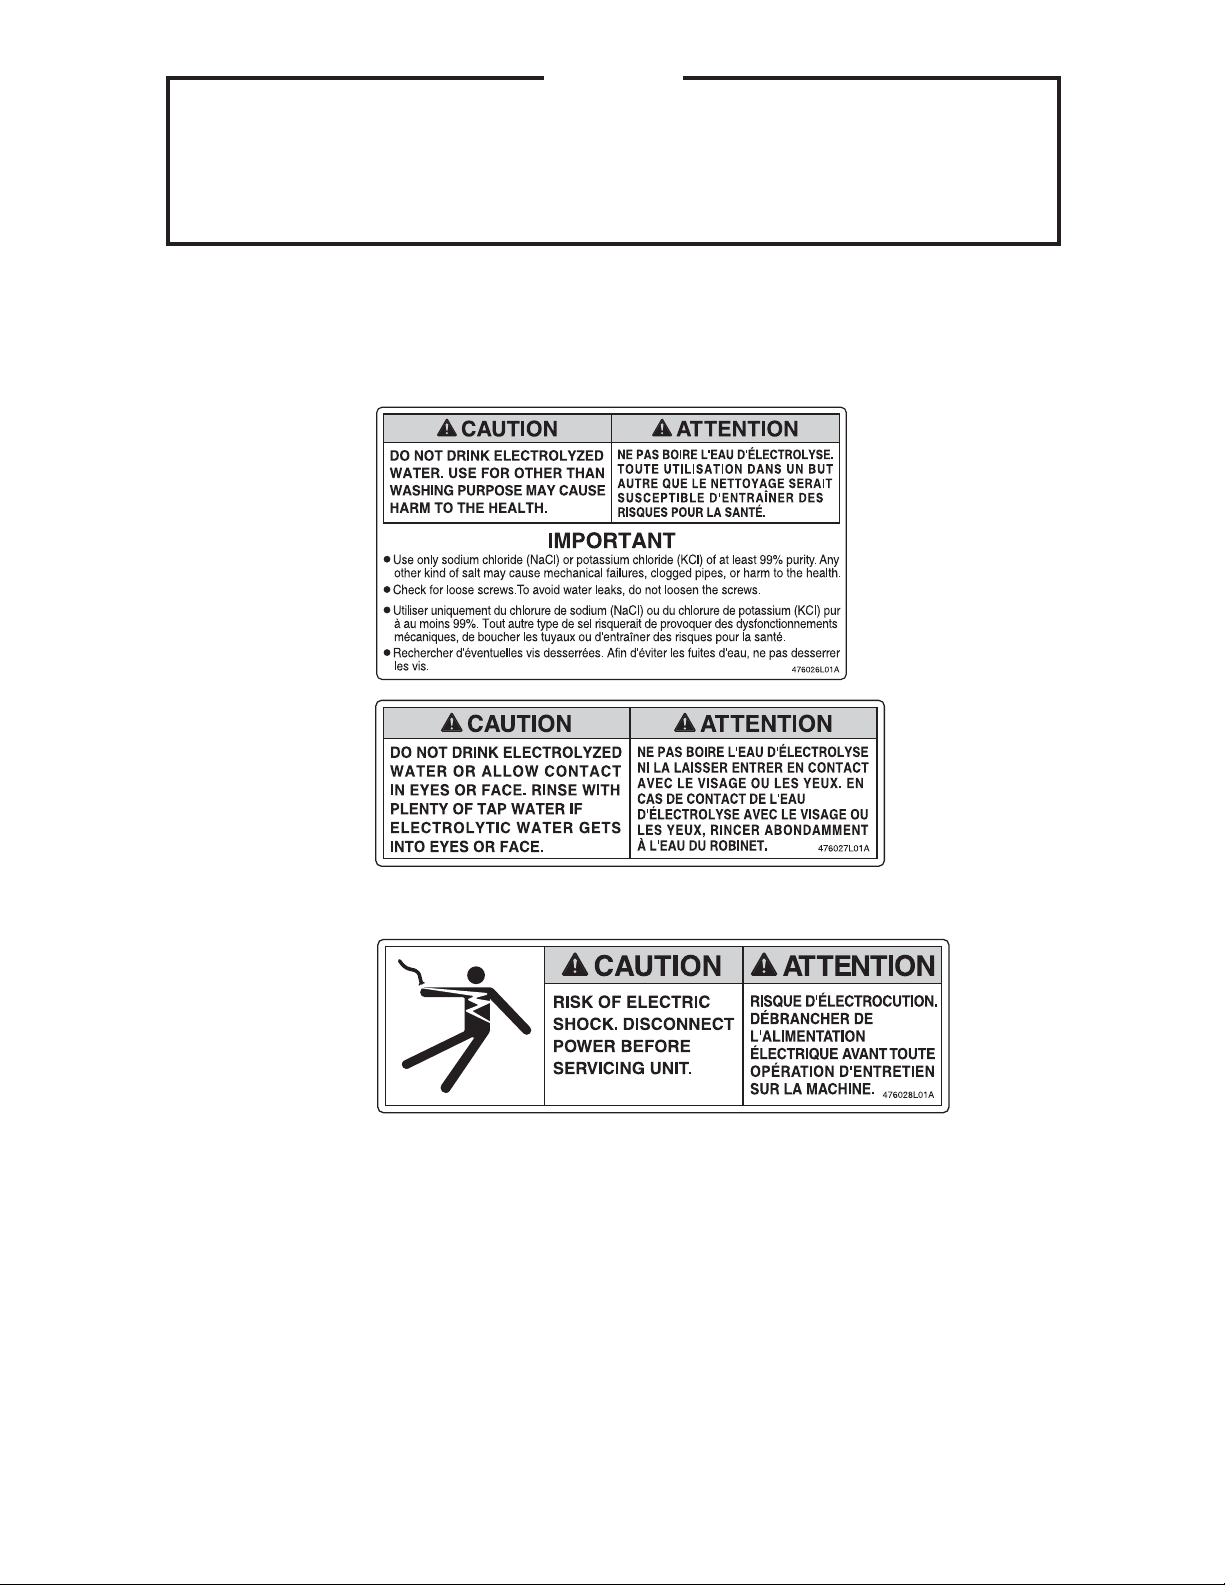
CAUTION LABEL LOCATIONS
The following caution labels are attached where special care should be taken.
On top panel
Inside door
6
Page 8

2. PRODUCT INFORMATION
[a] FEATURES
1) Space saving
The compact unit [W11" x D16" x H12" (W280 x D400 x H310 mm)] allows for
installation under sink.
2) Various optional parts available
Float switch: Detects the tank water level to automatically
start/stop operation. Includes the upper
and lower sanitizing water tank level float
switches and upper and lower cleaning
water tank level fl oat switches.
Outlet valve: Allows use of electrolyzed water stored in
the tank, as required. Connected with the
electrolyzed water outlets [for sanitizing
and cleaning water outlets] on the water
tank. Use as needed [yellow for sanitizing
water, blue for cleaning water].
3) Concentrated salt water direct injection system
Direct addition of concentrated salt water held in the salt water tank (accessory) into
the water fl ow requires no tank for diluted salt water, resulting in reducing the space
required.
4) Built-in current sensor
No salt concentration sensor is required. The built-in current sensor provides highly
accurate control.
5) Constant-voltage DC power supply
Current control by a constant-voltage power supply uses the salt concentration to
correct reduction of the electrolyzation effi ciency, resulting in stable concentration of
available chlorine.
6) Available chlorine concentration 20 - 30 mg/L or more
Sanitizing water contains undissociated hypochlorous acid (HOCl) which sanitizes
faster than sodium hypochlorite (NaOCl) and does not leave residue.
7) Built-in fl ow rate adjusting valve
The built-in fl ow rate adjusting valve automatically controls the fl ow rate according to
the selection (low, medium, high).
7
Page 9

[b] MODEL NAME
ROX - 20 T B2 - U
For USA
Development order
Table-top or under-sink installation
Maximum fl ow rate (x 0.1 L/min)
Hoshizaki water electrolyzer
8
Page 10
3. DIMENSIONS/SPECIFICATIONS
9
Page 11

4. PERFORMANCE DATA
The following graph shows the electrode performance curve. The electrode life cycle
depends on the free chlorine concentration as well as the raw water quality. To optimize
the electrolyzed water, we recommend the electrolytic cell should be replaced every 3,000
hours of operation.
60
50
40
30
20
Available Chlorine <ppm>
10
0
0 500 1000 1500 2000 2500 3000 3500 4000 4500 5000
Time <h>
10
Page 12

II. TECHNICAL INFORMATION
1. PRINCIPLE OF ELECTROLYSIS
Water (H2O) we use in our daily life has a mysterious power. Adding a small amount of salt
(NaCl) to water (H2O) and electrolyzing it with special electrodes will generate "electrolytic
oxidizing water (acidic water)" with strong oxidizing effects and "electrolytic reducing water
(alkaline water)" with strong reducing effects. Here we explain this electrolysis process and
the meaning of such terms as "pH" and "oxidization/reduction" which may sound unfamiliar.
Electrolysis Process - See the diagram on the following page for the electrolysis
mechanism inside the electrolytic cell.
1) Electrolysis with a higher salt concentration around 5 - 20% is apt to generate chlorine
gas (Cl2) at the anode. The electrolyzer with a lower salt concentration around 0.07 -
0.15% is apt to generate hypochlorous acid (HOCl) at the anode.
2) At the anode, oxidization will generate hypochlorous acid (HOCl) and chlorine gas (Cl2).
3) At the cathode, reduction will generate hydrogen gas (H2) and sodium hydroxide (NaOH).
Oxidization/Reduction - Oxidization and reduction occur a the same time, while electrons
are transferred.
1) Oxidization - Reaction of a substance to emit electrons.
2) Reduction - Reaction of a substance to receive electrons.
Oxidization/Reduction Potential - Degree of liability to oxidization and reduction,
indicated in "mV".
1) Positive potential - An oxidizing agent (= a substance capable of oxidizing other
substances) is contained. The higher potential shows the higher tendency to oxidize
other substances.
2) Negative potential - An reducing agent (= a substance capable of reducing other
substances) is contained. The lower potential shows the higher tendency to reduce
other substances.
pH - Concentration index of hydrogen ions. pH7 means neutrality, the higher pH alkalinity,
and the lower pH acidity.
11
Page 13

(
)
(
)
Flow of electrons
12 V DC
DC Power Supply
Anode
(OX)
-
2e
Hypochlorous Acid
HOCl
+
Na
Diaphragm
HOCl
-
Cl
Negative ions
drawn to anode
Electrolytic Cell
H
2
H
Sodium Hydroxide
(NaOH)
Positive ions drawn
to cathode
+
Na
-
OH
-
OH
Na Na
O
2
H2O
-
Cl
Na
+
Cathode
RED
-
2e
Salt Water (NaCl)
Reactions at Anode
Chloride ions (Cl-) and hydroxide ions emit
electrons (e-) to the anode, which become
hypochlorous acid (HOCl).
Reactions at Cathode
Sodium ions (Na+) receive electrons (e-)
from the cathode and become sodium
metal (Na) which reacts with water (H2O)
and becomes sodium hydroxide (NaOH)
and hydrogen gas (H2).
12
Page 14

Salt water contains four kinds of ions; sodium ions (Na+), chlorine ions (Cl-), hydrogen ions
(H+) and hydroxide ions (OH-).
NaCl + H
O → Na+ + Cl- + H+ + OH
2
-
(Mix water and salt) Salt water (4 kinds of ions)
When two electrodes are inserted into salt water and voltage is applied:
Negative ions (Cl-) are drawn to the anode, and
Positive ions (Na+) are drawn to the cathode.
At the anode, hydrogen chloride (HCl) and hypochlorous acid (HOCl) are generated.
2Cl- + H
O → HCl + HOCl + 2e
2
-
Electrons (2e-) are emitted to the anode, which means the acidic water (HCl + HOCl)
causes
oxidization. [As electrons are emitted, the oxidization/reduction potential becomes positive
(+mV).]
Chlorine ions also emit electrons and become chlorine gas (Cl2).
2Cl- → Cl
2
+ 2e
-
(Cl2 = chlorine gas)
At the cathode, sodium hydroxide (NaOH) and hydrogen gas (H2) are generated.
Na+ + H2O + H+ + 2e- → NaOH + H
2
Electrons (2e-) are received from the cathode, which means the alkali water (NaOH)
causes reduction. [As electrons are received, the oxidization/reduction potential becomes
negative (-mV).]
13
Page 15

2. CONSTRUCTION
[a] GENERAL
(1) Operation Panel [Body]
Displays the present state of the electrolyzer.
(2) Door
Provided behind are the power switch (ground fault interrupter) and the buttons to
adjust the operating conditions and various set values.
14
Page 16

(3) Coin Lock
Locks the door.
(4) Cleaning Water Outlet
Dispenses cleaning water (sanitizing water in flushing process). Should be
connected with the cleaning water outlet [remote].
(5) Sanitizing Water Outlet
Dispenses sanitizing water (cleaning water in flushing process). Should be
connected with the sanitizing water outlet [remote].
(6) Water Supply Inlet
Should be connected with the water supply hose (G3/4) provided.
(7) Panel
Only a responsible maintainer or service personnel may open.
(8) Rear Panel
Only a responsible maintainer or service personnel may open for connection of the
remote controller cable.
(9) Panel (L)
Only a responsible maintainer or service personnel may open.
(10) Panel (R)
Only a responsible maintainer or service personnel may open for connection of the
remote controller cable.
(11) Leg
Do not remove. Not adjustable. Use spacers, if required, for stable installation.
(12) Drain Outlet
Can be connected with a drain pipe (G1/2), if the internal water circuit should be
drained.
(13) Power Cord
Single phase 115V. Be careful not to jerk or pinch.
(14) Salt Water Filter
Removes foreign matter from concentrated salt water in the salt water tank. Do not
clog. Clean at least once a month.
(15) Salt Water Hose
Supplies concentrated salt water from the salt water tank. Do not curve or bend by
force.
(16) Remote Controller Receptacle
Connects the remote controller cable with the electrolyzer body. Remove the
grommet, and attach the super lock of the remote controller.
(17) Operation Panel [Remote]
For the remote controller. Attachable at a point of use.
(18) Cleaning Water Outlet [Remote]
Should be connected with the cleaning water outlet to dispense cleaning water
(sanitizing water in fl ushing process).
(19) Sanitizing Water Outlet [Remote]
Should be connected with the sanitizing water outlet to dispense sanitizing water
(cleaning water in fl ushing process).
(20) Controller Bracket
Fixes the remote controller. Secure on a wall with anchor bolts.
15
Page 17

(21) Cable
Electrically connects the remote controller and the electrolyzer body. Be sure to
make the connection when using the remote controller.
(22) Salt Water Tank
Makes 1.32 gal (5 L) of electrolyte (concentrated salt water) and adds it to water
(diluted salt water).
(23) Motion Sensor
Non-contact sensor to start and stop dispensing electrolyzed water.
[b] MECHANISM
33 24
29 30
28 27 26
31
34
(24) Control Box
Functions as the brain of the electrolyzer to control its operation
(25) Dispense Button [Body]
Starts and stops dispensing sanitizing water and cleaning water.
(26) Water Valve
Supplies water from the water supply hose to the electrolytic cell.
(27) Flow Switching Valve
Operates every 12 hours to change the fl ow direction when the DC voltage to the
electrolytic cell reverses.
(28) Gear Motor
Rotates the impeller inside the fl ow switching valve.
32
25
16
Page 18

(29) Microswitch [Location]
Senses the location of the fl ow switching valve.
(30) Microswitch [Direction]
Senses the direction of the fl ow switching valve.
(31) Flow Control Valve
Located between the water supply inlet and the electrolytic cell. Adjusts the rate of
water supply.
(32) Electrolytic Cell
Electrolyzes diluted salt water to generate sanitizing water and cleaning water.
(33) Salt Water Pump (Electromagnetic Pump)
Feeds a fi xed amount of concentrated salt water (electrolyte) into the electrolytic
cell.
(34) Thermistor
Senses the water temperature and automatically reduces the electrolytic current to
prevent excessive available chlorine concentration in low temperature conditions.
[c] CONTROL BOX
35
37
44
45
42
43
46
47
40
41
36
39
38
17
Page 19

(35) Relay (X1)
Located on the supply line of the switching regulator [electrolytic cell]. Turns on/off
the switching regulator by using a make contact.
(36) CB Relay
Changes the polarity of the voltage on the electrolytic cell.
(37) Current Sensor
Measures the current of the electrolytic cell.
(38) Noise Absorber
Noise absorbing board provided with a surge absorber.
(39) Switching Regulator [Main Control Board]
DC power supply to drive the DC electrical components.
(40) Main Control Board
Functions as the brain of the controls to verify inputs and command outputs.
(41) Switching Regulator [Electrolytic Cell]
DC power supply for electrolysis in the electrolytic cell.
(42) Power Switch (Ground Fault Interrupter)
Shuts off the primary power supply in case of ground leakage or overcurrent.
(43) Display
Displays the cell run time (h) normally and the present conditions of the electrolyzer
by switch operation.
(44) Display Select Button
In the normal mode, selects the display indication between the cell run time, current,
and voltage.
(45) Flush Button
In the normal mode, operates the fl ow changing valve to fl ush the water circuit.
(46) Set/Reset Button
Adjusts various set values.
(47) Flow Rate Select Button
Adjusts the fl ow rate.
18
Page 20

3. WIRING DIAGRAM
19
Page 21

4. WATER CIRCUIT
Pressure
Gauge
Filter
Water
Supply
Pressure Reducing
Valve (Accessory)
Water Electrolyzer
(ROX-20TB2-U)
Control Box
Thermistor
Flow Switching
Valve
Pressure Reducing
Valve (35 psi)
Water
Softener
Water Valve
Flow Control
Valve
Salt Water
Pump
Electrolytic
Cell
Salt
Water
20
Remote Controller
or Tank
Page 22

5. FUNCTIONS AND OPERATION
[a] NORMAL MODE
The following menus are available in the normal mode. The display shows from 1 to 3
every time the display select button is pressed.
No. Menu Description
1 Cell run time (h) Total electrolytic cell run time at present.
2 Current (A)
3 Voltage (V)
[b] SHORT MODE
Use this mode to change the polarity every 2 minutes.
1) While the power switch (ground fault interrupter) is off, hold down the fl ush button and
set/reset button.
2) Turn on the power switch (ground fault interrupter).
3) After 5 seconds, release the fl ush button and set/reset button.
Current fl owing in electrolytic cell at present as measured by
current sensor.
Voltage provided on electrolytic cell at present as measured
by main control board.
Note: The operation lamp fl ashes while the short mode is selected.
[c] ADJUSTMENT MODE
The following menus are available in the adjustment mode.
No. Menu Factory default Adjustable range/increments
A1 Current (A) Lo: 10, Std: 10, Hi: 10
A2 Voltage (V) Lo: 12, Std: 12, Hi: 12 7.0 to 18.0/0.1
A3 Total fl ow rate (L/min) Lo: 3.0, Std: 4.0, Hi: 6.0 1.5 to 8.0/0.1
A4 Combination 1 Main: 1, Sub: 2
A5 Portion control time (min) 1 1 to 60/1
Cleaning water dispensing
A6
time for hand washing (s)
Sanitizing water dispensing
A7
time for hand washing (s)
Cell run time/reversal time
A8
reset
A9 Initial fl ash time (s) Std Std, 0 to 20/1
30 15 to 120/5
30 15 to 120/5
N/A
5.0 to 18.0/0.1
[wt=77°F(25°C)]
Display present run time, then
hold down set/reset button
(10s) to reset
21
Page 23

No. Menu Factory default Adjustable range/increments
A10 Cell replacement time (h) 3000 1500 to 9000/100
A11 Cell reversal time (h) 12 0.033 (check), 1 to 150/1
Continuous dispensing
A12
protection time (min)
A13 Single nozzle 2 Single: 1, Std: 2
Water temperature correction
A14
factor
Flow rate adjustment factor,
A15
operation time factor
A16 Skip N/A Skip
Flow rate correction value (L/
A17
min)
Water softener regeneration
A18
output cycle (h)
Salt water supply factor,
A19
feedback
Salt water supply factor, initial
A22
non-electrolysis time (s)
Salt water supply factor,
A23
feedback cycle
Salt water supply factor,
A25
stroke subtraction after
reaching set point (times/s)
A26 Reset N/A
Flow control valve open/
A27
closed
Cont Cont, 10 to 720/10
4 0 to 8/1
0.3 0.1 to 2.0/0.1
0 -0.5 to 0.5/0.1
0 0 to 100/1
1.0 1.0 to 5.0/0.1
5 1 to 10/1
1.0 1.0 to 5.0/0.1
N/A Skip
Display "rSEt", then hold down
set/reset button (10s) to reset
N/A Display current status
* Basically do NOT adjust the menus in gray.
[d] CHECK MODE
The following menus are available in the check mode.
No. Menu
C1 Inputs
C2 Inputs
C3 Outputs
C4 Salt water pump stroke (spm: strokes per minute)
C5 Total fl ow rate (L/min)
C6 Water temperature (°C)
C7 Set current at present water temperature (A)
C8 Corrected current (A)
C9 Elapsed cell reversal time (min)
22
Page 24

No. Menu
C10 Elapsed time after regeneration output (h)
C11 Last error number
C12 Cell run time at last error
C13 Cell reversal time at last error
C14 Current at last error
C15 Voltage at last error
C16 Total fl ow rate at last error
C17 Salt water pump stroke at last error (spm: strokes per minute)
C18 Water temperature at last error (°C)
C19 Set current at water temperature at last error (A)
C20 Corrected current at last error (A)
C21 Second from last error number
C22 Cell run time at second from last error
C23 Cell reversal time at second from last error
C24 Current at second from last error
C25 Voltage at second from last error
C26 Total fl ow rate at second from last error
C27 Salt water pump stroke at second from last error (spm: strokes per minute)
C28 Water temperature at second from last error (°C)
C29 Set current at water temperature at second from last error (A)
C30 Corrected current at second from last error (A)
C31 Third from last error number
C32 Cell run time at third from last error
C33 Cell reversal time at third from last error
C34 Current at third from last error
C35 Voltage at third from last error
C36 Total fl ow rate at third from last error
C37 Salt water pump stroke at third from last error (spm: strokes per minute)
C38 Water temperature at third from last error (°C)
C39 Set current at water temperature at third from last error (A)
C40 Corrected current at third from last error (A)
C41 Model confi guration (8: ROX-20TB2-U, 10: ROX-20TB2-U with tank)
C42 Control board version
* Fahrenheit and celusius conversion formulae:
°C = (°F - 32) x 5/9
°F = (9/5) x °C + 32
23
Page 25

p
ON: closed
p
g
OFF: open
valve
location
Flow sw
Flow sw
valve
direction
micro SW
micro SW
Float SW
left tank
lower
ON: closed
OFF: open
ON: closed
OFF: open
Float SW
right tank
ON: closed
OFF: open
Float SW
protection
right pump
Float SW
left tank
upper
upper
ON: closed
OFF: open
ON: closed
OFF: open
ON: closed
OFF: open
lower
right tank
Float SW
ON: closed
OFF: open
Float SW
left pump
protection
Element A
Element B
Motor rotation opens/closes valve
Spare
SW 1
ON: closed
OFF: open
SW
External
TP1
0° (close)
hall
element A
ON: closed
OFF: open
Model
input 1
Unused
ON: closed
OFF: open
ON: closed
OFF: open
ON:
detected
OFF: not
detected
Always
OFF
ON:
closed
Model
Always
Level
sensor
en
OFF:
o
input 3
TP2
315° (open)
element B
OFF
Unused
Unused
ON: salt water
tank full
OFF: salt water
tank not full
ON: closed
OFF: open
ON:
hall
detected
OFF: not
detected
Always
OFF
ON: not
full
Tank input
ON:
provided
Remote
OFF: full
(20TB+tank)
rovided
OFF: not
controller
ON: closed
OFF: open
Model
input 2
OFF
Always
Unused
eratin
Flow control
valve o
Close Open
OFF
Always
Always
Unused
OFF
Always
OFF
Always
Unused
OFF
Always
OFF
OFF
Always
Unused
Flow control valve mechanism
Unused
C1 Display
Unused
Always
OFF
Unused
Unused
Always
OFF
Unused
Model inputs
1: ON when ROX-10WB-U is used
2: ON when ROX-20TB2-U is used
3: ON when ROX-20TB2-U with tank is usedٕٕ
Element A detection (0°) ٟٟ
Element B detection (315°) ٨٨ٟ, ٨ = hall element detection
24
Page 26

Body
flow rate select
SW (SW64)
ON: on
OFF: off
Body
set/reset SW
(SW63)
ON: on
OFF: off
OFF
Always
ON: on
OFF: off
Body
dispense
SW (SW60)
Unused
Ext. right
beam
sensor input
ON: detected
OFF: not
detected
beam
Ext. left
Remote
sensor input
R button
(SW50)
Unused
Always
OFF
ON: detected
OFF: not
detected
ON: on
OFF: off
Always
OFF
OFF
Always
Unused
Body
display select
SW (SW61)
Hand or
pool
ON: detected
OFF: not
detected
sensitivity
Remote
sensor lower
Ext. left beam
M button
(SW51)
Unused
ON: on
OFF: off
ON: closed
OFF: open
ON: on
OFF: off
Always
OFF
ON: on
OFF: off
Body
(SW62)
flush SW
ON: on
OFF: off
(SW52)
Remote
L button
Unused
ON: detected
OFF: not
detected
sensitivity
sensor lower
Ext. right beam
OFF
Always
(0.5 second delay after detection)
OFF
Always
Unused
Unused
Unused
OFF
Always
Unused
C2 Display (ROX-20TB2-U)
Unused
Always
OFF
Always
OFF
Always
OFF
Always
Always
OFF
Unused
OFF
Unused
Unused
Unused
Unused
Always
OFF
Always
OFF
Always
OFF
25
OFF
Always
Unused
Unused
OFF
Always
R
OFF
Always
Unused
Unused
Hand or pool Beam sensor detection
M
L
ON when tank is used Beam sensor input: real-time display of sensor reaction
Remote panel
(with/without remote controller short circuit connector) Beam sensor lower sensitivity: display according to operation
Page 27

X2
sw valve
relay
ON: positive
OFF: negative
ON: excited
OFF: not
excited
ON during
electrolysis
ON: excited
OFF: not
excited
X3
ON: excited
OFF: not
excited
ON: excited
OFF: not
excited
ON: excited
OFF: not
X8
TDT right
excited
pump
X1
polarity sw
relay (10WB)
add salt
output
X10
regeneration
output signal
(12V)
ON: excited
OFF: not
excited
X9
pump
TDT left
X14
polarity sw
relay (20TB)
Flow
control
valve 1
ON: full
OFF: not
full
X6
ON: positive
OFF: negative
ON: excited
OFF: not
excited
ON: excited
OFF: not
excited
Combination
of 2 valves
X7
output
inspection
X5
WV
relay
X11
unused
ON: negative
OFF: positive
X15
polarity sw
relay (20TB)
X13
unused
Flow
control
valve 2
OFF
Always
ON: excited
OFF: not
excited
ON: excited
OFF: not
excited
ON: excited
OFF: not
excited
Combination
of 2 valves
X4
DC power
ON: excited
OFF: not
X12
Always
supply relay
excited
unused
OFF
ON: on
OFF: off
Fan motor
OFF
Always
Unused
Tank output
(20TB+tank)
OFF
Always
Unused
C3 Display
Unused
Unused
Unused
Always
OFF
Always
OFF
Always
OFF
Always
Unused
OFF
Unused
Unused
Unused
Unused
Always
OFF
Always
OFF
Always
OFF
26
Unused
OFF
Always
OFF
Always
Unused
Unused
Flow control valve 1 b2 ON ON OFF OFF
Brake Close Open Stop
Flow control valve outputs
Flow control valve 2 C2 ON OFF ON OFF
Brake: valve stopping, Close: decreasing flow rate, Open: increasing flow rate, Stop: valve OFF
Page 28

III. SERVICE INFORMATION
1. ERROR CODES
Lamp No. Error Problem Operation
Flow rate stayed below 0.13
Error E11 Low water
Error E14 Water shutoff
Error E53 Contactor supply
Error E61
— E74 Thermistor
— E82
Add salt
water
— EE1 Model setting
Error EF0 Control board EEPROM error Production stops Error no.
Flow switching
valve
Float switch (if
provided with
tank)
— Salt water level
gal/min (0.5 L/min) for 10 sec
with water valve on
Flow rate stayed above 0.13
gal/min (0.5 L/min) for 10 sec
with water valve off
Current stayed below 0.5A for 2
sec
Switching did not complete
within 30 sec
Open circuit [-22°F (-30°C)] or
short circuit [140°F (60°C)]
Upper switch on, lower switch
off
Salt water pump stayed at 700
spm (strokes per minute) for 90
sec
Model setting connector lost or
wrong
Production stops after
water valve turns off
two times
Production stops after
water valve turns on
two times
Production stops after
contactor switches
three times
Production stops Error no.
Production continues
as 41°F (5°C) (open
circuit) or 86°F (30°C)
(short circuit)
Production continues
(for at least 3 min)
Production stops (Add salt lamp on)
Production stops Error no.
Control panel
Error no.
Error no.
Error no.
Alternate between
normal display
and error no.
Alternate between
normal display
and error no.
display
2. SERVICE DIAGNOSIS
Lamp Error code Problem Check Possible cause Remedy
Add salt
water
— Salt water pump stayed
700 spm (strokes per
minute) for 90 sec
Salt water tank Low salt water
concentration
Salt water hose Loose connection to
salt water tank
Clogged Unclog
Vapor lock Prime
Filter Dirty Clean
Switching
regulator
(electrolytic cell)
Magnetic switch Defective Repair or replace
Relay Defective Repair or replace
Current sensor Defective Repair or replace
Defective Repair or replace
DC supply line open
circuit
Bad contacts Repair
Bad contacts Repair
Add salt in salt
water tank
Reconnect
Correct
27
Page 29

Lamp Error code Problem Check Possible cause Remedy
Add salt
water
Error E11 Flow control valve (fl ow
Error E14 Flow rate sensor
Error E53 Electrolytic current
Error E61 Flow switching did not
— E74 Thermistor open circuit
— E82 Upper fl oat switch turned
— EE1 Model setting connector
— EF0 EEPROM memory
— (Continued) Salt water pump Defective Repair or replace
rate sensor) detected
fl ow rate below 0.13 gal/
min (0.5 L/min) for 10
sec with water valve on
detected fl ow rate above
0.13 gal/min (0.5 L/min)
for 10 sec with water
valve off
stayed below 0.5A for 2
sec
complete within 30 sec
[-22°F (-30°C)] or short
circuit [140°F (60°C)]
was detected
on and lower fl oat switch
turned off
lost or wrong
element error
Improper stroke dial
setting
Supply line open circuit Correct
Signal line open circuit Correct
Water supply line Water failure Recover water
Electrolyzed
water outlet
Joint hose Crushed or bent Correct
Filter Clogged Unclog
Water valve Defective Repair or replace
Flow rate sensor Defective Repair or replace
Water valve Defective Repair or replace
Flow rate sensor Defective Repair or replace
Current sensor Defective Repair or replace
Switching
regulator
Main control
board
Gear motor Defective Repair or replace
Location
microswitch
Direction
microswitch
Thermistor Defective Repair or replace
Float switch Defective Repair or replace
Main control
board
Main control
board
Blocked Unblock
Scaled Replace
Clogged Unclog
Supply line open circuit Correct
Clogged Unclog
Signal line open circuit Correct
Clogged Unclog
12V DC line open
circuit
Signal line open circuit Correct
Defective Repair or replace
Defective Repair or replace
Loose chip insertion Correct
Overrun Lubricate motor
Defective Repair or replace
Defective Repair or replace
Incorrect wiring
connector
Defective Replace
Set to "E" (far to
left)
supply
Correct
shaft
Correct
28
Page 30

3. FLOW RATE ADJUSTMENT
Pressing fl ow rate select
button will not change fl ow
rate and display
Dispensing action is
stopped
Yes
Normal (Nor.) mode is
selected
Yes
Flow control valve connector
is disconnected
Yes
1. Flow control valve defective
2. Open circuit
No
No
No
Stop dispensing and press
fl ow rate select button
Select normal (Nor.) mode
and press fl ow rate select
button
Reconnect
Valves and pipes free from
Yes
foreign matter or clogging
Flow rate remains
unchanged or below
"HI" setting
Water supply pressure not less
than 0.15 MPa (21.76 psi)
Yes
Low water
supply pressure
Pressure ensured even
with a large amount of tap
water used elsewhere
Yes
Low water
supply pressure
No
No
No
Remove foreign matter,
unclog or replace
Note: The actual fl ow rate may differ from the setting depending on variation of the fl ow
rate sensor in the fl ow control valve.
e.g. Total fl ow rate setting [standard 1.06 gal/min (4.0 L/min)] --> actual fl ow rate [1.19
gal/min (4.5 L/min)]
If the difference is too large, use the adjustment mode (AdJ.) to adjust the total fl ow
rate (A3).
e.g. Total fl ow rate setting [0.92 gal/min (3.5 L/min)] --> actual fl ow rate [1.06 gal/min
(4.0 L/min)]
29
Page 31

4. REMOVAL AND REPLACEMENT OF COMPONENTS
[a] ELECTROLYTIC CELL
WARNING
To prevent electric shock, be careful not to crush or drag the pipes or wires
when removing the electrolytic cell.
NOTICE
To prevent water leaks resulting in wetting the surrounding properties, be sure to
drain water before removing the electrolytic cell.
1) Remove the front panel, turn off the power switch (ground fault interrupter), and unplug
the unit.
2) Close the water supply line shut-off valve, and disconnect the water supply, cleaning
water, and sanitizing water hoses.
3) Unscrew and remove the top and side panels.
4) Remove the drain cap on the back of the unit to drain the electrolytic cell.
5) Disconnect the power cord (red/black) on the electrolytic cell from the terminal block.
6) Remove the four union nuts from the electrolytic cell.
7) Unscrew the cell stopper and frame assembly, and remove the cell stopper from the unit
base.
8) Slide out the electrolytic cell towards you.
9) To replace, reverse the above pocedure.
30
 Loading...