

Hoshizaki FM-120KE-HC, FM-120KE-HCN, FM-120KE-50-HC, FM-120KE-50-HCN, FM-80KE-HC User guide
...
SELF-CONTAINED ICE MAKER
MACHINE A GLACE A BACINTEGRE
EISBEREITER MIT EINGEBAUTEM VORRATSBEHÄLTER
IJSMACHINE MET INGEBOUWDE BUNKER
MÁQUINA DE CUBITOS DE HIELO AUTÓNOMA
MACCHINA PER LA PRODUZIONE DI GHIACCIO AUTOCONTENUTA
INSTRUCTION MANUAL
(original instructions)
NOTICE D’UTILISATION
(instructions traduites)
BEDIENUNGSANLEITUNG
(Übersetzung)
GEBRUIKSAANWIJZING
(vertaalde instructies)
MANUAL DE INSTRUCCIONES
(instrucciones traducidas)
FM-120KE-HC
FM-120KE-HCN
FM-120KE-50-HC
FM-120KE-50-HCN
FM-80KE-HC
FM-80KE-HCN
MANUALE D’ISTRUZIONI
(traduzione)
FOR END USER
POUR UTILISATEUR
FÜR DEN ENDKUNDEN
VOOR DE GEBRUIKER
PARA USUARIO
PER L’UTENTE FINALE
Telford 70 Stafford Park 7, Telford, Shropshire TF3 3BQ UK
L1F114201 (120116)

ENGLISH
IMPORTANT SAFETY INFORMATION ...................................................................................................1
I. INSTALLATION INSTRUCTIONS ......................................................................................................3
1. CONSTRUCTION ........................................................................................................................... 3
2. LOCATION .....................................................................................................................................3
3. ELECTRICAL CONNECTIONS ...................................................................................................... 3
4. WATER SUPPLY AND DRAIN CONNECTIONS ...........................................................................4
II. OPERATING INSTRUCTIONS ........................................................................................................... 4
1. START UP ...................................................................................................................................... 5
2. SHUT DOWN .................................................................................................................................. 5
3. PREPARING THE ICEMAKER FOR LONG STORAGE ................................................................5
III. MAINTENANCE .................................................................................................................................. 6
1. CLEANING .....................................................................................................................................6
2. INSPECTION AND MAINTENANCE .............................................................................................. 7
3. BEFORE CALLING FOR SERVICE ...............................................................................................7
4. DISPOSAL ...................................................................................................................................... 8
5. WARRANTY ...................................................................................................................................8
SPECIFICATIONS ....................................................................................................................................9
FRANCAIS
DEUTSCH
INFORMATIONS DE SECURITE IMPORTANTES ................................................................................ 10
I. CONSIGNES D’INSTALLATION ......................................................................................................12
1. CONSTRUCTION ......................................................................................................................... 12
2. EMPLACEMENT ..........................................................................................................................12
3. BRANCHEMENTS ELECTRIQUES .............................................................................................13
4. BRANCHEMENTS D’ARRIVEE ET DE VIDANGE D’EAU ........................................................... 13
II. CONSIGNES D’UTILISATION .......................................................................................................... 14
1. MISE EN MARCHE ......................................................................................................................14
2. ARRET .......................................................................................................................................... 14
3. PREPARATION DU DISTRIBUTEUR DE GLACE EN VUE D’UN ENTREPOSAGE
DE LONGUE DUREE ................................................................................................................... 14
III. ENTRETIEN .....................................................................................................................................15
1. NETTOYAGE ................................................................................................................................ 15
2. INSPECTION ET ENTRETIEN ..................................................................................................... 16
3. AVANT D’APPELER UN REPARATEUR ..................................................................................... 17
4. MISE AU REBUT .......................................................................................................................... 18
5. GARANTIE ...................................................................................................................................18
SPECIFICATIONS ..................................................................................................................................19
WICHTIGE SICHERHEITSHINWEISE ...................................................................................................20
I. INSTALLATIONSANLEITUNG .........................................................................................................22
1. KONSTRUKTION .........................................................................................................................22
2. AUFSTELLORT ............................................................................................................................ 22
3. ELEKTRISCHE ANSCHLÜSSE ...................................................................................................23
4. WASSERZULAUF- UND WASSERABFLUSSANSCHLÜSSE ..................................................... 23
II. BEDIENUNGSANLEITUNG .............................................................................................................24
1. INBETRIEBNAHME ...................................................................................................................... 24
2. AUSSCHALTEN ...........................................................................................................................24
3. MASSNAHMEN FÜR DIE LANGFRISTIGE LAGERUNG DES EISBEREITERS ........................24
III. WARTUNG .......................................................................................................................................25
1. REINIGUNG .................................................................................................................................25
2. INSPEKTION UND WARTUNG .................................................................................................... 26
3. VOR ANRUF DES KUNDENDIENSTES ...................................................................................... 27
4. ENTSORGUNG ............................................................................................................................ 28
5. GEWÄHRLEISTUNG .................................................................................................................... 28
TECHNISCHE DATEN ........................................................................................................................... 29

NEDERLANDS
BELANGRIJKE VEILIGHEIDSINFORMATIE ......................................................................................... 30
I. INSTALLATIE-INSTRUCTIES .......................................................................................................... 32
1. CONSTRUCTIE ............................................................................................................................ 32
2. PLAATSING .................................................................................................................................. 32
3. ELEKTRISCHE AANSLUITINGEN ............................................................................................... 33
4. AANSLUITING VAN WATERTOEVOER- EN WATERAFVOERLEIDINGEN ..............................33
II. BEDIENINGSINSTRUCTIES ............................................................................................................ 34
1. OPSTARTEN ................................................................................................................................ 34
2. UITZETTEN .................................................................................................................................. 34
3. DE IJSMAKER GEREEDMAKEN VOOR LANGDURIGE OPSLAG ............................................. 34
III. ONDERHOUD ..................................................................................................................................35
1. REINIGING ................................................................................................................................... 35
2. INSPECTIE EN ONDERHOUD ....................................................................................................36
3. VOORDAT U BELT VOOR SERVICE .......................................................................................... 37
4. VERWIJDERING ..........................................................................................................................38
5. GARANTIE ...................................................................................................................................38
SPECIFICATIES.....................................................................................................................................39
ESPAÑOL
ITALIANO
INFORMACIÓN IMPORTANTE DE SEGURIDAD ................................................................................. 40
I. INSTRUCCIONES DE INSTALACIÓN ............................................................................................. 42
1. ESTRUCTURA .............................................................................................................................42
2. UBICACIÓN .................................................................................................................................. 42
3. CONEXIONES ELÉCTRICAS ......................................................................................................43
4. SUMINISTRO DE AGUA Y CONEXIONES DE DRENAJE .......................................................... 43
II. INSTRUCCIONES DE UTILIZACIÓN ............................................................................................... 44
1. PUESTA EN MARCHA ................................................................................................................. 44
2. DESCONEXIÓN ...........................................................................................................................44
3. PREPARACIÓN DE LA MÁQUINA DE HIELO PARA UN ALMACENAMIENTO
PROLONGADO ............................................................................................................................ 44
III. MANTENIMIENTO ............................................................................................................................ 45
1. LIMPIEZA .....................................................................................................................................45
2. REVISIÓN Y MANTENIMIENTO .................................................................................................. 46
3. ANTES DE LLAMAR AL SERVICIO TÉCNICO ............................................................................ 47
4. ELIMINACIÓN ..............................................................................................................................48
5. GARANTÍA ...................................................................................................................................48
ESPECIFICACIONES ............................................................................................................................49
INFORMAZIONI IMPORTANTI SULLA SICUREZZA ............................................................................50
I. ISTRUZIONI PER L’INSTALLAZIONE .............................................................................................52
1. COMPONENTI .............................................................................................................................52
2. UBICAZIONE ................................................................................................................................ 52
3. COLLEGAMENTI ELETTRICI ......................................................................................................52
4. COLLEGAMENTO ALL’APPROVVIGIONAMENTO DELL’ACQUA E COLLEGAMENTO
DI SCARICO ................................................................................................................................. 53
II. ISTRUZIONI DI FUNZIONAMENTO ................................................................................................53
1. AVVIO ........................................................................................................................................... 54
2. ARRESTO ....................................................................................................................................54
3. PREPARATIVI PER LA CONSERVAZIONE A LUNGO TERMINE DELLA MACCHINA ............. 54
III. MANUTENZIONE ............................................................................................................................. 55
1. PULIZIA ........................................................................................................................................55
2. CONTROLLO E MANUTENZIONE ..............................................................................................56
3. PRIMA DI RIVOLGERSI ALL’ASSISTENZA ................................................................................56
4. SMALTIMENTO ............................................................................................................................ 58
5. GARANZIA ...................................................................................................................................58
SPECIFICHE .......................................................................................................................................... 59
ENGLISH
IMPORTANT SAFETY INFORMATION
Throughout this manual, notices appear to bring your attention to situations which could result in
death, serious injury, or damage to the unit.
WARNING
CAUTION
NOTICE
HYGIENE
IMPORTANT
This icemaker uses HFC-free refrigerant (propane) and HFC-free foam insulation that are nonozone-depleting and environmentally sustainable materials having very low global warming
potential.
Indicates a hazardous situation which, if not avoided, could result in death or
serious injury.
Indicates a hazardous situation which, if not avoided, could result in minor or
moderate injury.
Indicates a hazardous situation which, if not avoided, could result in damage
to the unit.
Indicates important precautions for hygiene and food safety.
Indicates important information about the use and care of the unit.
WARNING
This icemaker contains ammable refrigerant in its cooling unit; maintenance and recharging
must therefore only be carried out by authorized technicians.
The refrigerant contained in this icemaker is ammable and sealed in the refrigeration system.
Although the refrigerant does not leak out under normal usage, take utmost care when
handling this icemaker so as not to cause any damages to the system.
In the case of accidental damage to the refrigeration system causing refrigerant leak:
* Do not create a source of ignition in the area.
* Do not operate electrical switches or plugs in the area.
* Do not use naked ame.
* Immediately ventilate the area by opening doors and/or windows.
* Call service engineer.
IMPORTANT
This booklet is an integral and essential part of the product and should be kept and preserved
by the user.
Please read carefully the guidelines and warnings contained herein as they are intended to
provide the user with essential information for the continued safe use and maintenance of the
product. In addition, it provides GUIDANCE ONLY to the user on the correct services and site
location of the icemaker.
Please preserve this booklet for any further consultation that may be necessary.
1
ENGLISH
WARNING
This is a commercial icemaker, and should be destined only to be used for the purpose for
which it has been expressly designed and attached to a suitable storage bin as specied by
Hoshizaki.
Any other use should be considered improper and therefore dangerous. The manufacturer
will not be held liable or responsible for any damage caused by improper, incorrect and
unreasonable use.
The installation, and relocation if necessary, must be carried out by qualied personnel,
in accordance with current regulations, according to the manufacturer’s instructions.
Keep ventilation openings, in the appliance enclosure or in the built-in structure, clear of
obstruction.
Do not use mechanical devices or other means to accelerate the defrosting process, other
than those recommended by the manufacturer.
The use of any electrical appliance involves the observance of some fundamental rules. In
particular:
* Instances of high humidity and moisture increase the risk of electrical short circuits and
potential electrical shocks. If in doubt, disconnect the icemaker.
* Do not damage the power cord or pull it in order to disconnect the icemaker from the
electrical supply network.
* If the supply cord is damaged, it must be replaced by a replacement cord available from
Hoshizaki Parts/Service Centres.
* Do not touch the electrical parts or operate the switches with damp hands.
* This appliance is not intended for use by persons (including children) with reduced physical,
sensory or mental capabilities, or lack of experience and knowledge, it can however be used
by children aged from 8 years and above and persons with reduced physical, sensory or
mental capabilities, or lack of experience and knowledge providing they have been given
supervision or instruction concerning use of the appliance by a person responsible for their
safety.
* Children shall not play with the appliance.
* Cleaning and user maintenance shall not be made by children without supervision.
* Do not attempt to modify the icemaker. Only qualied personnel may disassemble or repair
the appliance.
2
I. INSTALLATION INSTRUCTIONS
ENGLISH
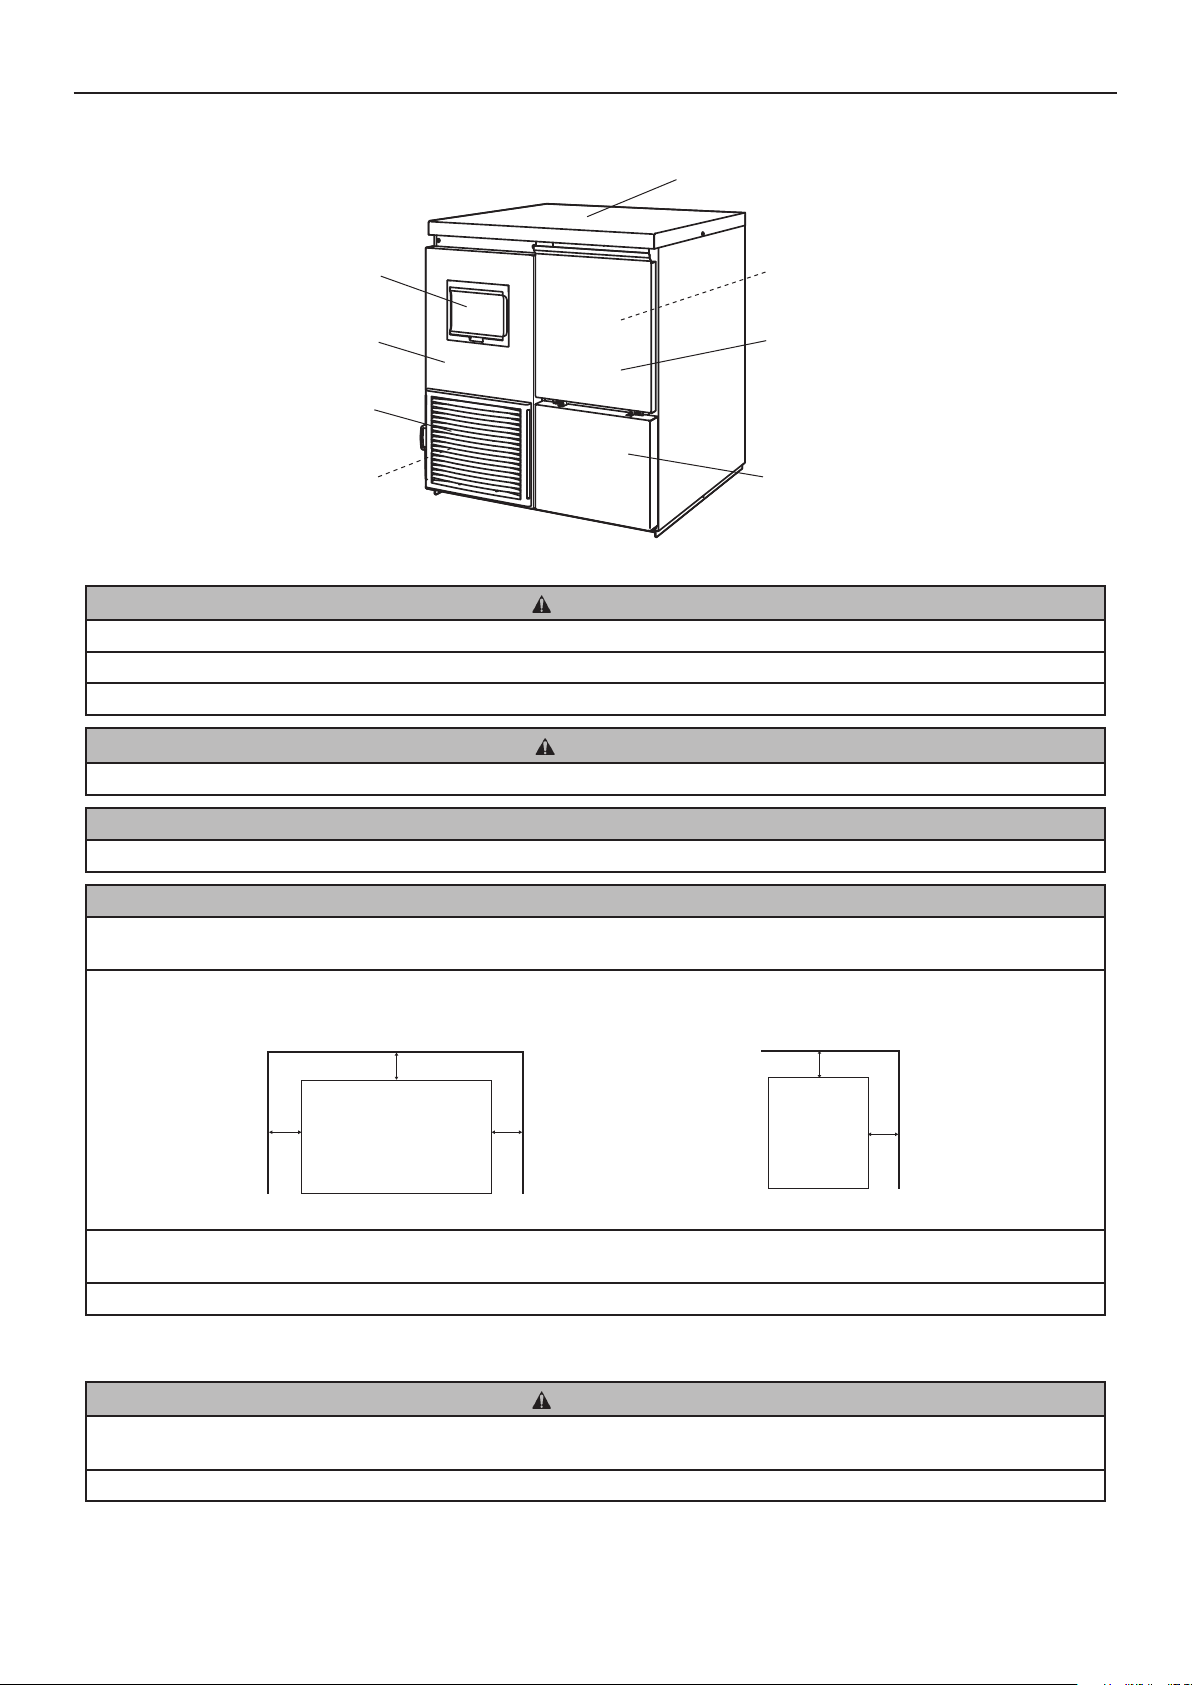
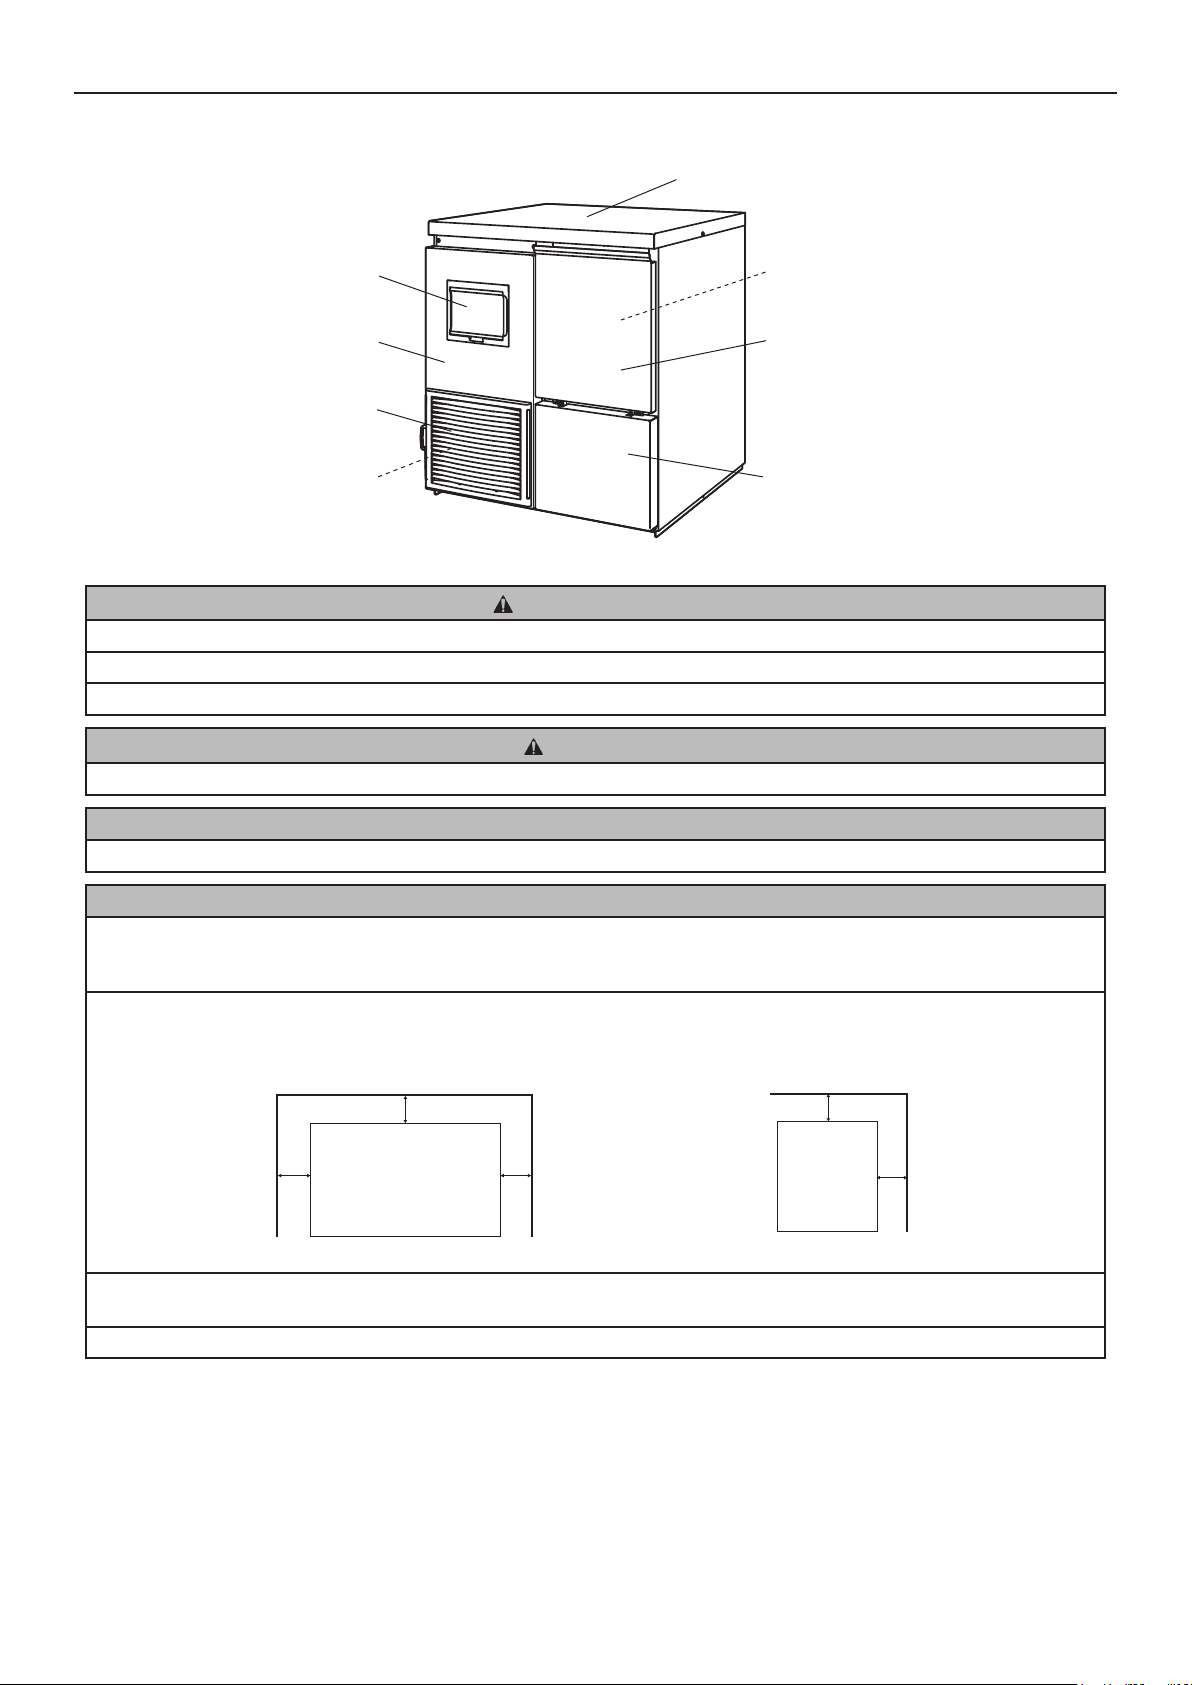
1. CONSTRUCTION
Operation Panel
Front Panel (Left)
Louver
Air Filter
Top Panel
Storage Bin
Door
Front Cover
2. LOCATION
WARNING
This icemaker is not intended for outdoor use.
The icemaker should not be located next to ovens, grills or other high heat producing equipment.
This appliance is not suitable for installation in an area where a water jet could be used.
CAUTION
The location should provide a rm and level foundation for the icemaker.
NOTICE
Do not place anything on top of the icemaker or in front of the louver.
IMPORTANT
Normal operating ambient temperature should be within 5°C to 40°C. Water connection is cold water only. Operation of the
icemaker, for extended periods, outside of these normal temperature ranges may affect production capacity.
Allow the clearance specied below for proper air circulation and ease of maintenance and/or service should they be required.
Top View
Rear
15cm
Left
15cm
ICEMAKER
Front
Right
15cm
In some high humidity environments, condensation may form inside the machine and drip onto the oor. Do not install where
the oor can be affected by water.
Avoid prolonged exposure of the appliance to direct sunlight.
Side View
Front
Top
15cm
ICEMAKER
15cm
Rear
3. ELECTRICAL CONNECTIONS
WARNING
THIS APPLIANCE MUST BE EARTHED
This icemaker requires an earth that meets the national and local electrical code requirements.
Disconnect the main power supply before any maintenance, repairs or cleaning is undertaken.
3
ENGLISH
* Usually an electrical permit and services of a licensed electrician are required.
For the U.K. and the Republic of Ireland only
* The wires in the mains lead are coloured in accordance with the following code:
Green & Yellow = Earth
Blue = Neutral
Brown = Live
As the colours of the wire in the mains lead of this appliance may not correspond with the coloured markings identifying the
terminals in your plug, proceed as follows:
The wire which is coloured Green-and-Yellow must be connected to the terminal in the plug which is marked with the letter
E or by the symbol
terminal which is marked with the letter N or coloured Black. The wire which is coloured Brown must be connected to the
terminal which is marked with the letter L or coloured Red.
* Should the socket outlets in the installation site not be suitable for the plug supplied with your product, the plug must be
removed (cut off if it is moulded on plug) and an appropriate plug tted.
If the non-rewirable plug has been cut from the power supply cord, it must be disposed of. There should be no attempt to
reuse it. Inserting such a plug into a socket elsewhere presents a serious risk of electrical shock.
* The non-rewirable plug must never be used without a fuse cover being tted.
or coloured Green or Green-and-Yellow. The wire which is coloured Blue must be connected to the
The correct replacement for the detachable fuse cover is identiable from the manufacturer’s reference number stamped on
the plug.
Supply of replacement fuse covers can be obtained from Hoshizaki Parts/Service Centres.
Fuses should be rated at 13A and approved to BS 1362.
4. WATER SUPPLY AND DRAIN CONNECTIONS
WARNING
Connect to potable cold water supply only.
* The connections to the mains water supply must be made in accordance with the countries’ current requirements of the Water
Supply or Water Fittings Regulations.
* Icemaking water must be potable water. Where scaling can be caused by water quality, installation of an external lter or
softener is recommended. Contact your local water treatment professional or Hoshizaki service agent.
* A plumbing permit and services of a licensed plumber may be required in some areas.
II. OPERATING INSTRUCTIONS
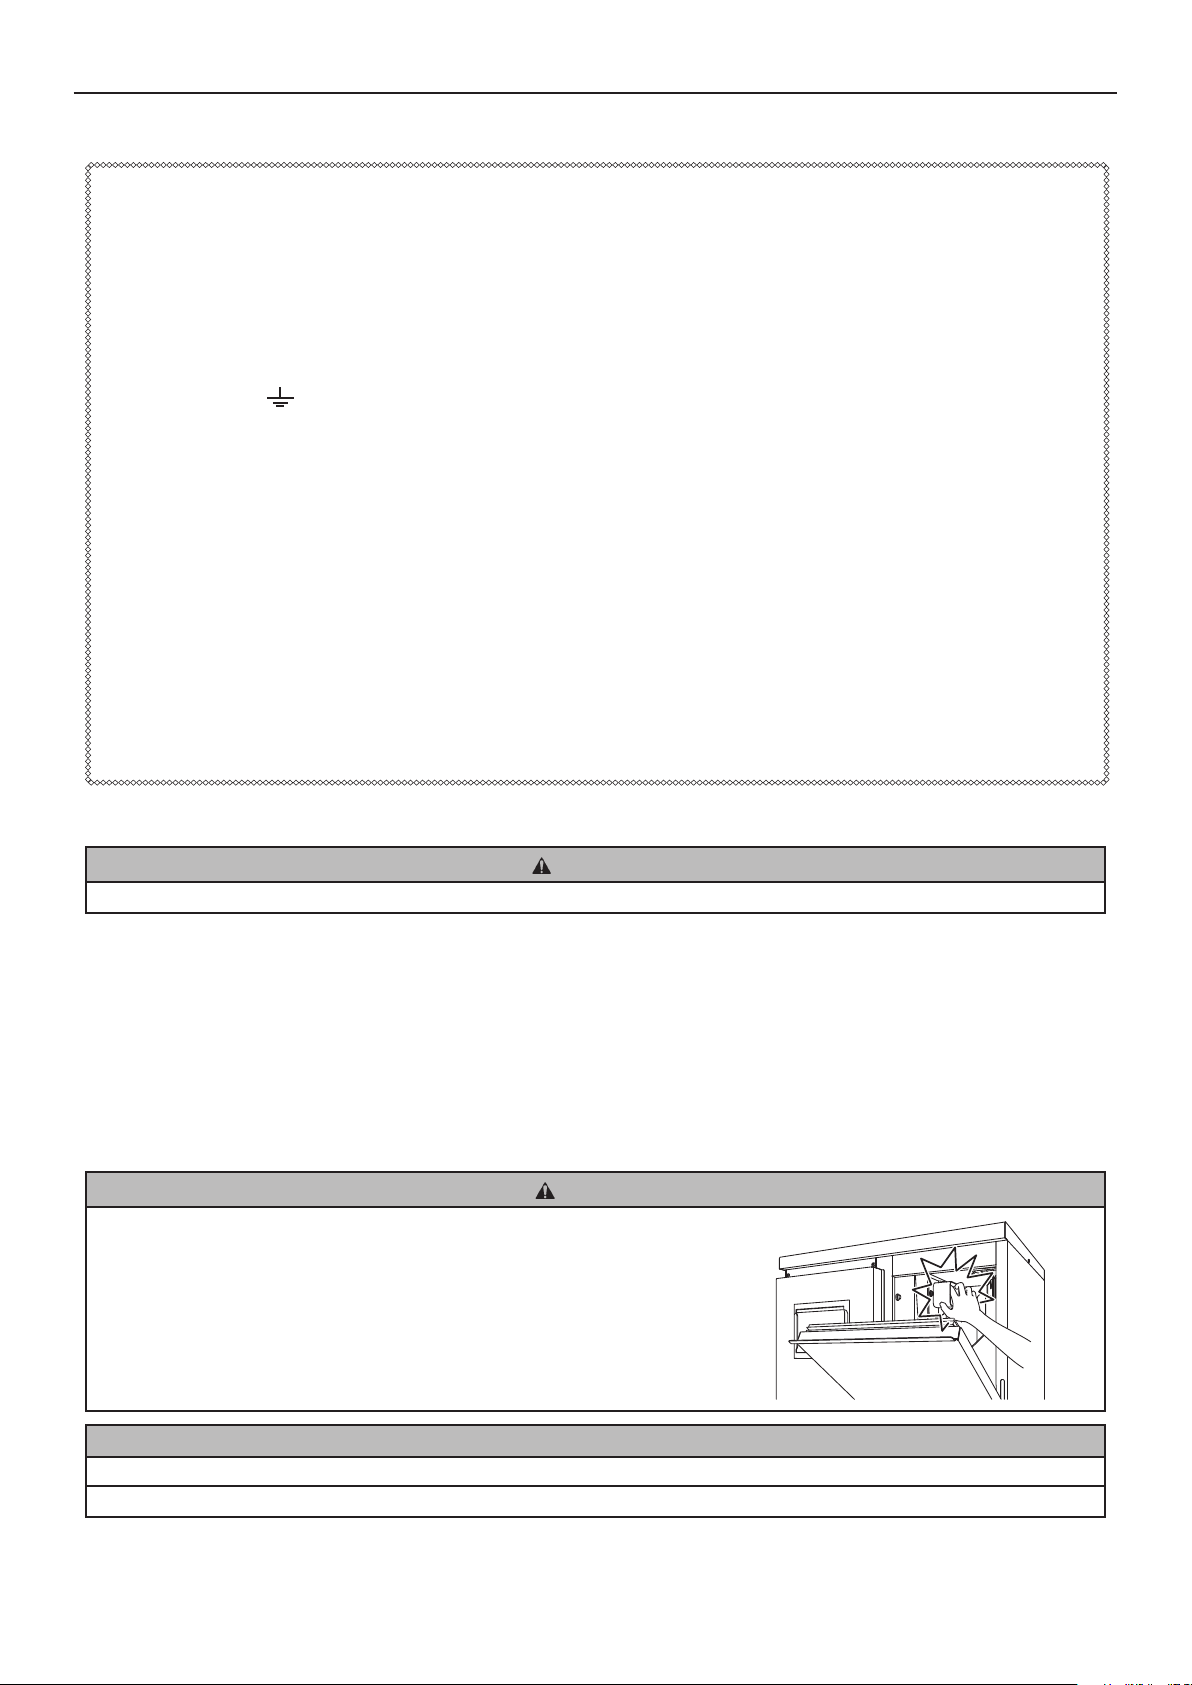
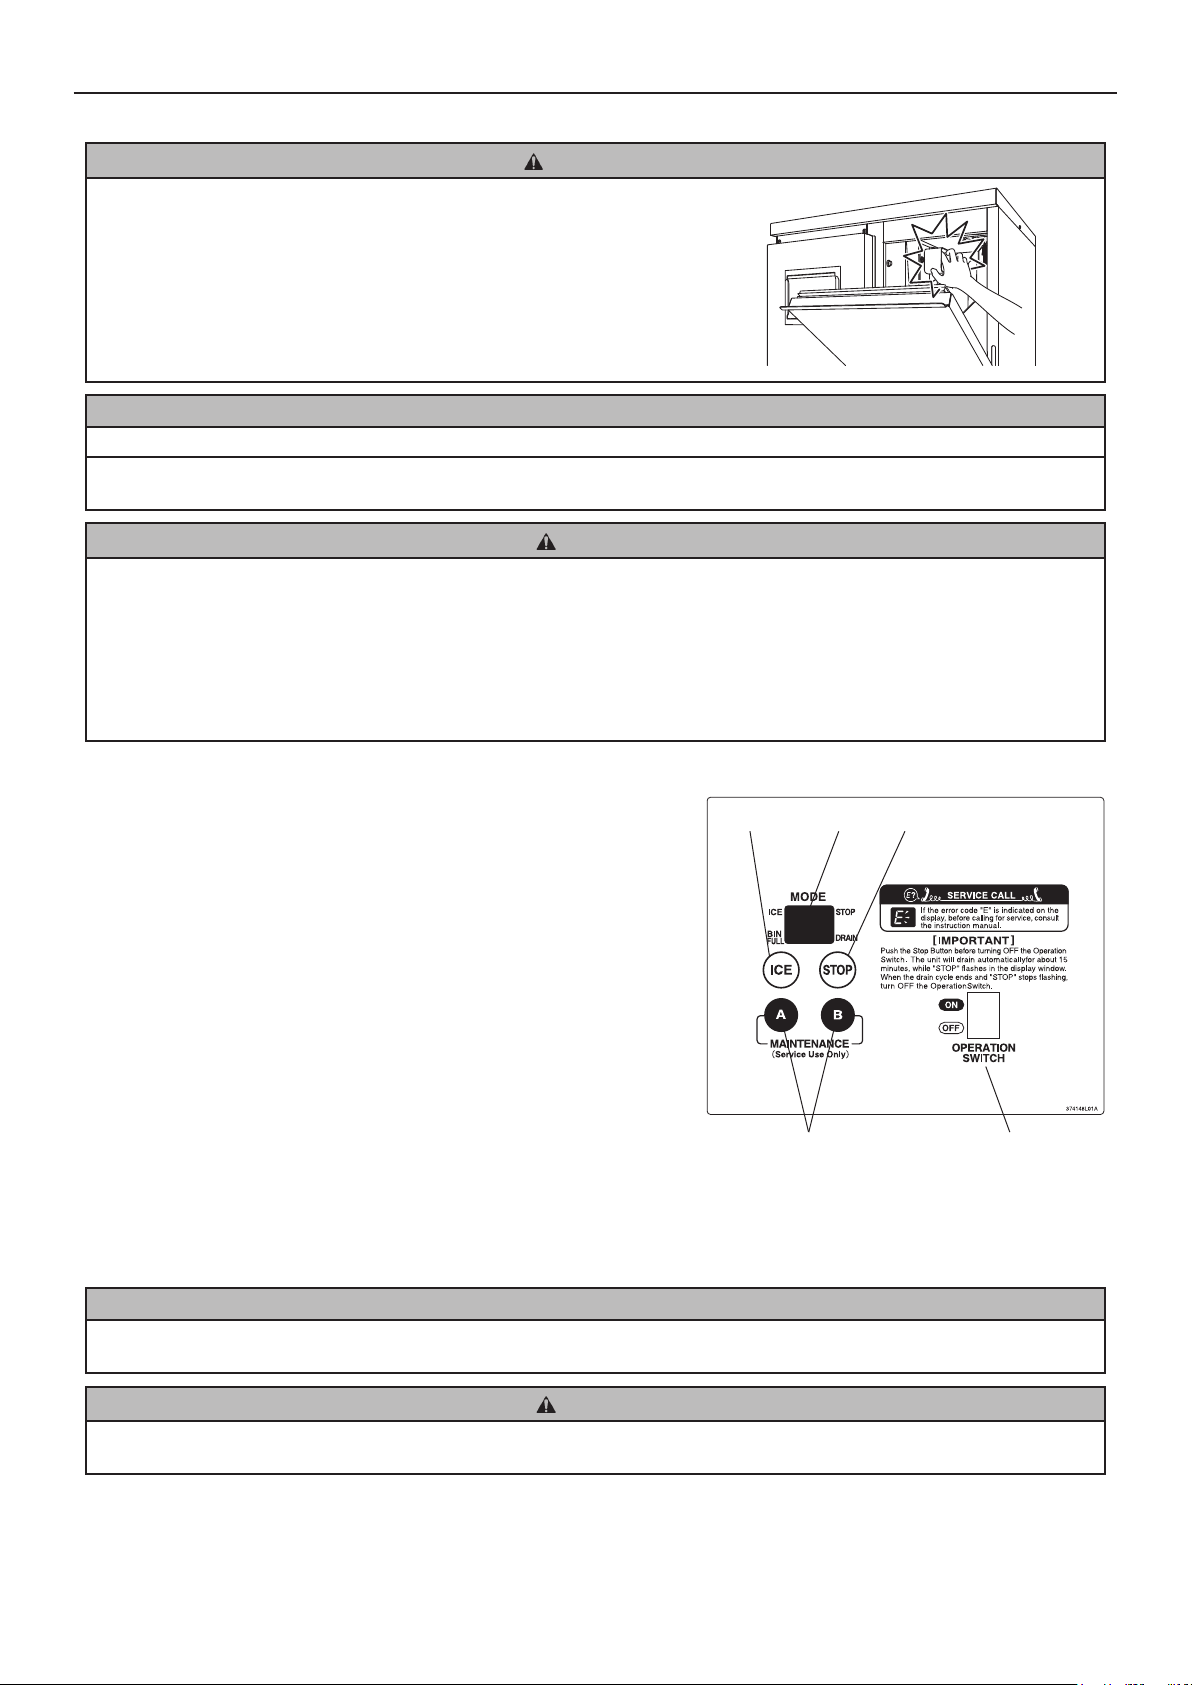
CAUTION
Do not step into the storage bin, or put your hands into the machine
compartment inside the storage bin. Children can get trapped inside, or the
icemaking mechanism may suddenly move, resulting in injury.
NOTICE
All parts are factory-adjusted. Improper adjustments may result in failure.
If the unit is turned off, wait for at least 3 minutes before restarting the icemaker to prevent damage to the compressor.
4
ENGLISH
HYGIENE
This icemaker is designed to produce edible ice. To keep the icemaker hygienic:
* Wash your hands before removing ice. Use the plastic scoop provided (accessory).
* The storage bin is for ice use only. Do not store anything else in the bin nor use other electrical appliances in the bin.
* Clean the storage bin before use (see “III. 1. CLEANING”).
* Keep the scoop clean. Clean it by using a neutral cleaner and rinse thoroughly.
* Close the door after removing ice to prevent entrance of dirt, dust or insects into the storage bin.
1. START UP
The installer will normally commission the icemaker to start the automatic
icemaking process. To ensure continuous operation, make sure that:
* The water supply tap is on, and
* The icemaker is connected to the power supply.
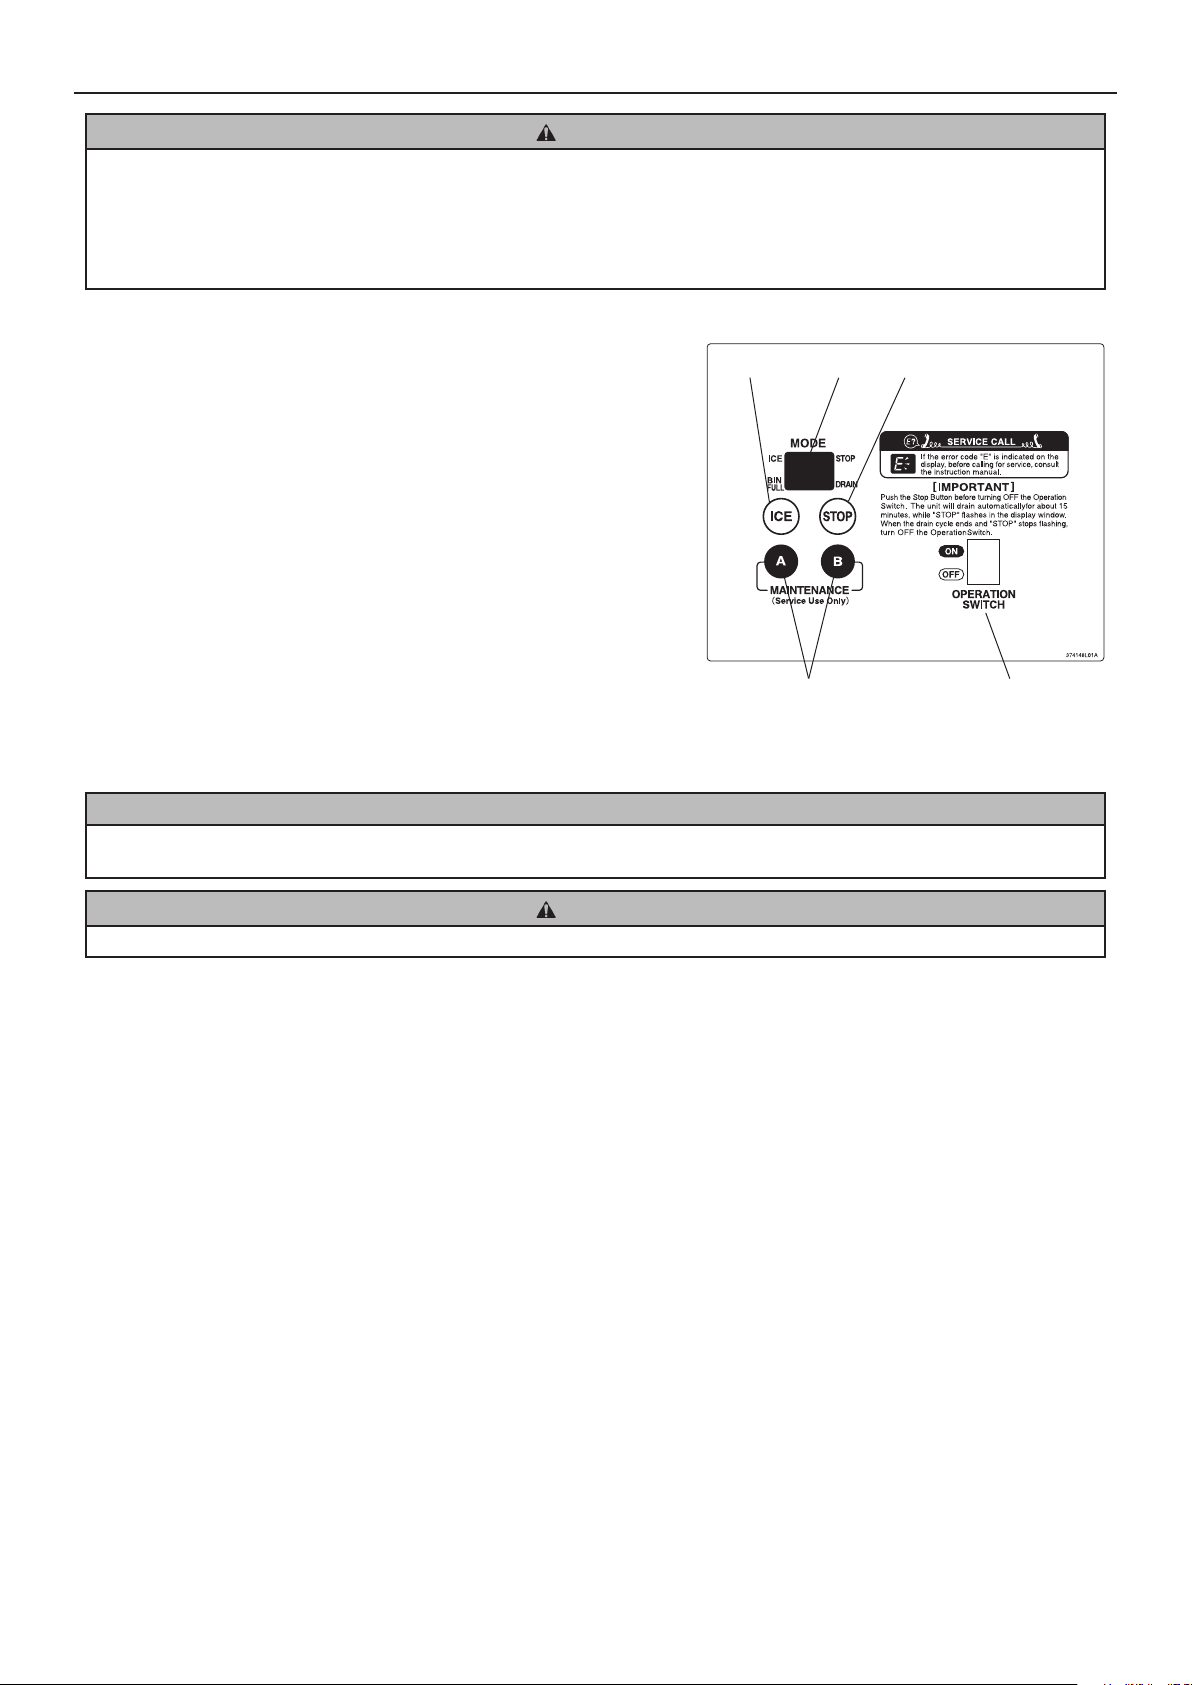
To start the icemaking process, check the position of the operation switch
on the operation panel:
“OFF” position - Move it to the “ON” position.
“ON” position - Press the ice button.
Ice Button Display Stop Button
Operation Panel
2. SHUT DOWN
Push the stop button on the operation panel. The display will blink in the
“STOP” mode for 15 minutes during the drain control operation and will start
to illuminate constantly at the end of drain control.
Maintenance Button
(service use only)
Operation Switch
3. PREPARING THE ICEMAKER FOR LONG STORAGE
NOTICE
This icemaker will not work at subfreezing temperatures. To prevent damage to the water supply line, drain the icemaker when
air temperature is below zero.
HYGIENE
When shutting down the icemaker for two or more days, drain the icemaker to prevent contamination in the water circuit.
1) Follow the instructions in “2. SHUT DOWN”.
2) Move the operation switch to the “OFF” position.
3) Close the water supply tap.
4) Remove the inlet hose from the water tap, and drain the hose.
5) Disconnect the power supply.
6) Remove all ice from the storage bin, and clean the bin.
7) Ask for draining of the icemaker by professional qualied personnel.
8) To restart the icemaker, follow the instructions in “1. START UP”.
5
ENGLISH
III. MAINTENANCE
1. CLEANING
WARNING
Before carrying out any cleaning or maintenance operations, unplug the icemaker from the electrical supply network.
This appliance must not be cleaned by use of a water jet.
CAUTION
When using a neutral cleaner or sodium hypochlorite, thoroughly read and understand the instructions provided to prevent
potential health problems.
NOTICE
Ask a trained service person to clean and sanitize the icemaker water system at least twice a year and to check and clean the
condenser at least once a year.
To prevent possible damage, do not clean the plastic parts with water above 40°C or in a dishwasher.
[a] Machine and Bin Exterior
Wipe the exterior at least once per week with a clean, soft cloth. Use a damp cloth containing a neutral cleaner to wipe off
grease or dirt.
[b] Scoop and Storage Bin Handle Cleaning/Sanitisation (Daily)
1) Either mix 1 litre of water with 4 ml of 5.25% sodium hypochlorite solution in a suitable container, or the recommended
Hoshizaki sanitiser as directed.
2) Soak the scoop in the solution for more than 3 minutes. Rinse thoroughly, and shake to remove surplus liquid.
Note: Using a cloth to dry may re-contaminate.
3) Use a neutral cleaner to wash the storage bin handle. Rinse thoroughly.
4) Soak a clean cloth with the sanitising solution, and wipe the handle. Use fresh water and a clean cloth to rinse/dry.
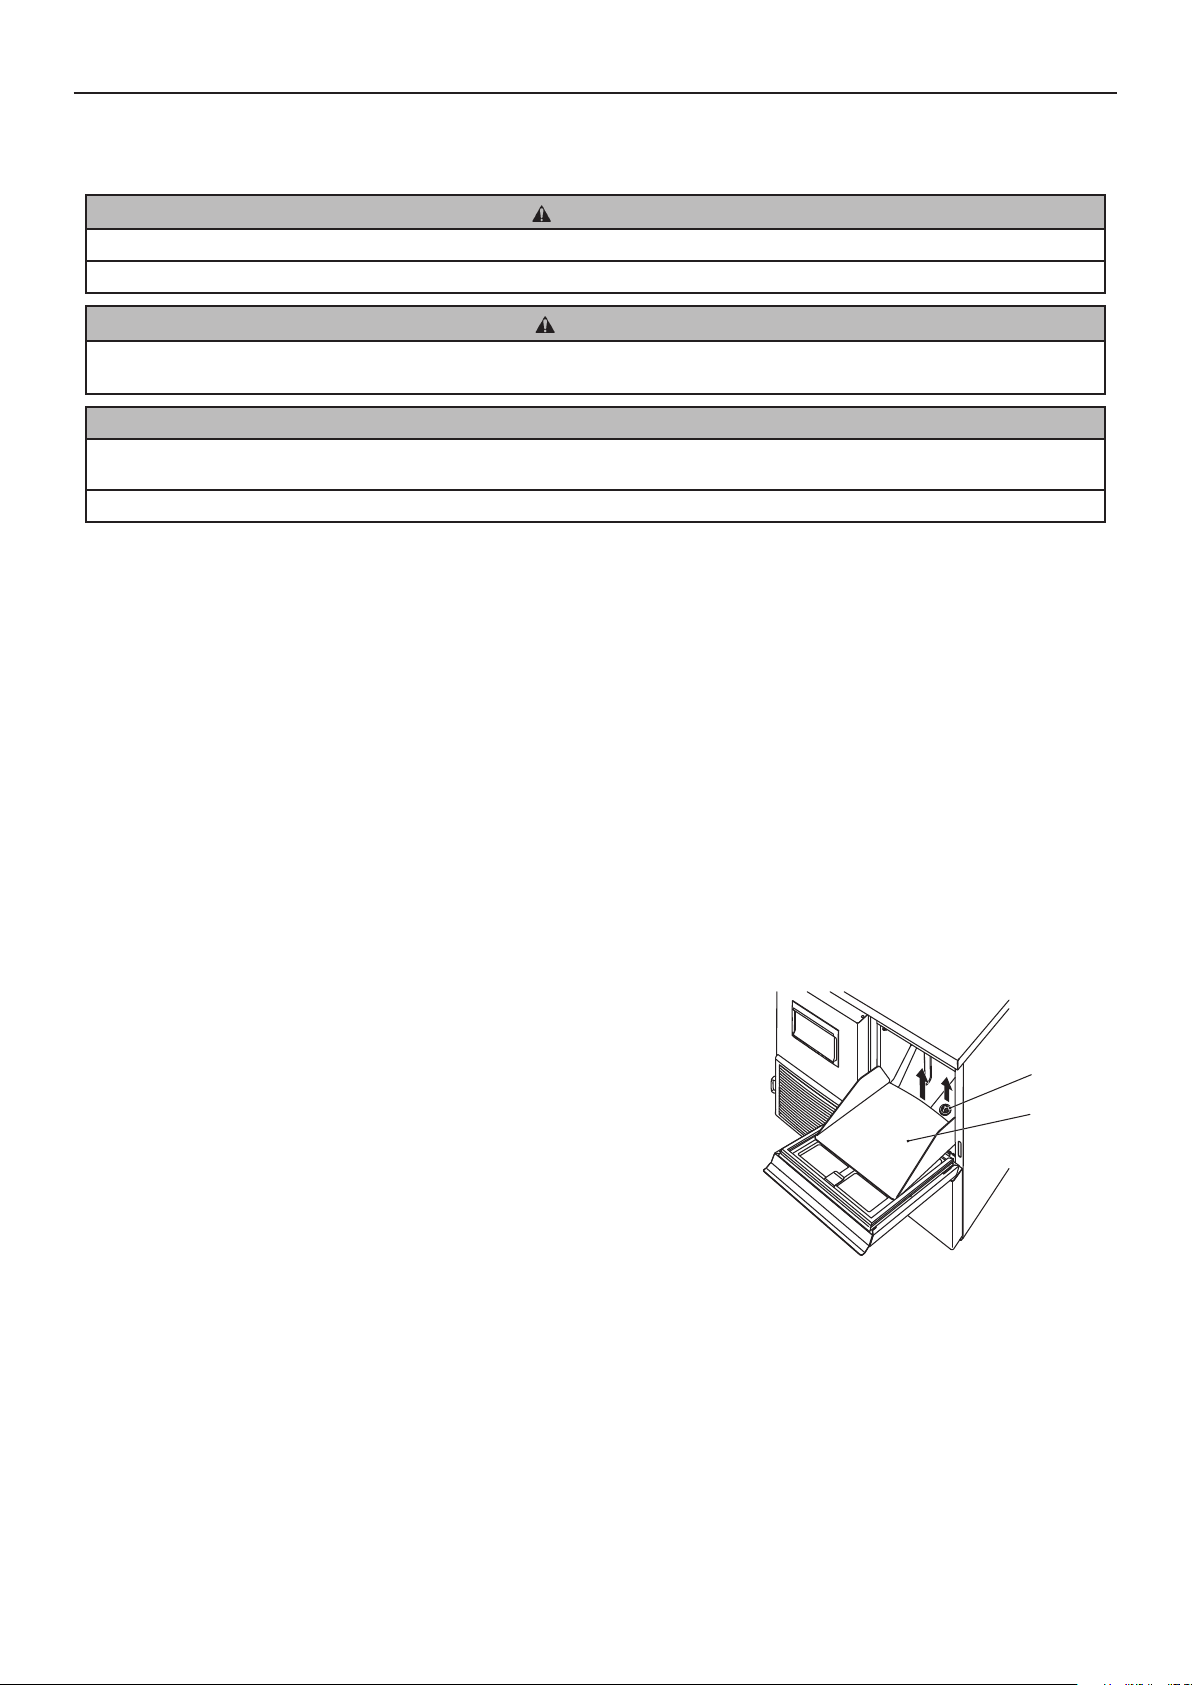
[c] Storage Bin Interior Cleaning/Sanitisation (Weekly)
1) Open the storage bin door, and remove all ice.
2) Slightly warp the slope to release it from the left and right shafts.
3) Remove the drain cap located in the base of the storage bin.
4) Wash the bin liner, slope and drain cap with a neutral non-abrasive cleaner.
Rinse thoroughly.
Note: Take care not to damage the bin control actuator at the top of the bin.
5) Either mix 5 litres of water with 18 ml of 5.25% sodium hypochlorite solution in a
suitable container, or the recommended Hoshizaki sanitiser as directed.
Drain Cap
Slope
6) Soak a clean sponge or cloth with the solution, and wipe the bin liner surfaces, slope and drain cap.
7) Ret the slope and drain cap.
8) Wipe the surface of the bin door with the solution. Close the bin door.
9) The remaining solution can be used to sanitise utensils.
Note: Do not wipe dry or rinse after sanitising, but allow to air dry.
6
ENGLISH
[d] Storage Bin Door
Clean the storage bin door at least once a week, using a neutral non-abrasive cleaner. Rinse thoroughly after cleaning and
sanitise as required.
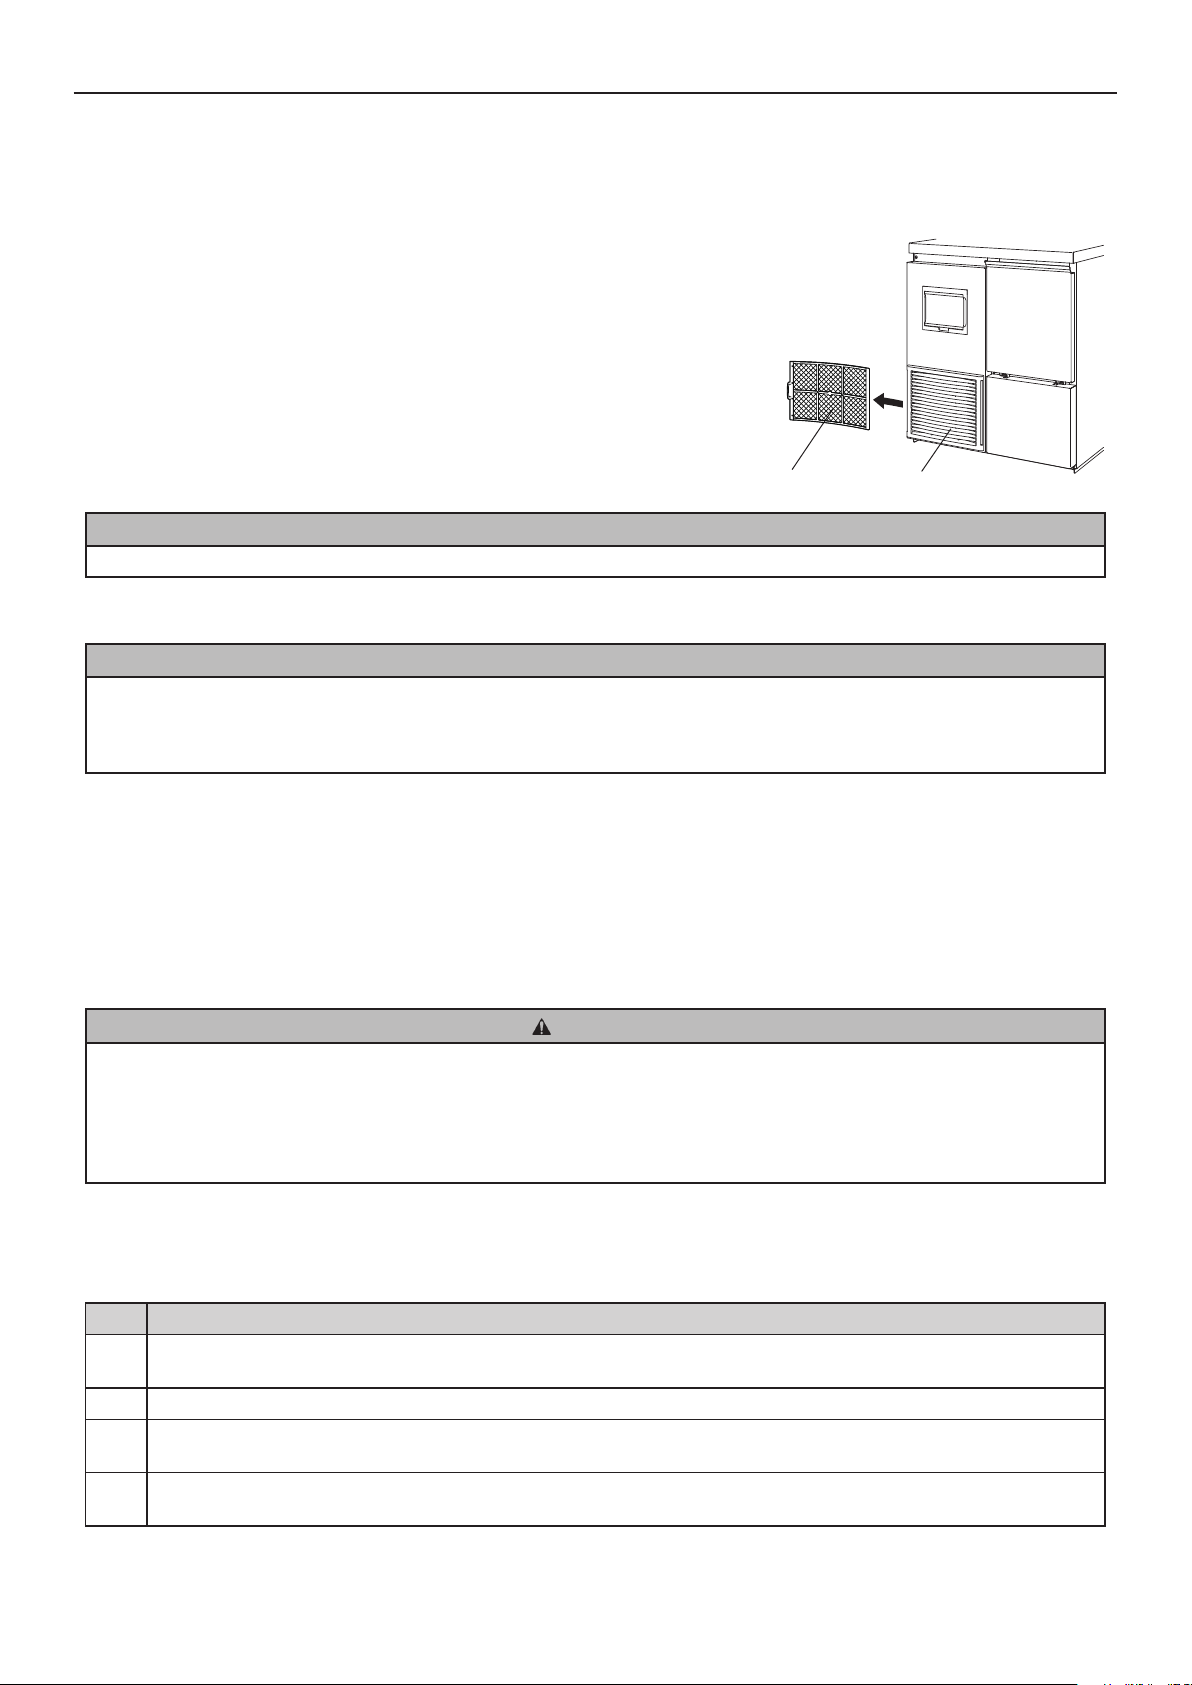
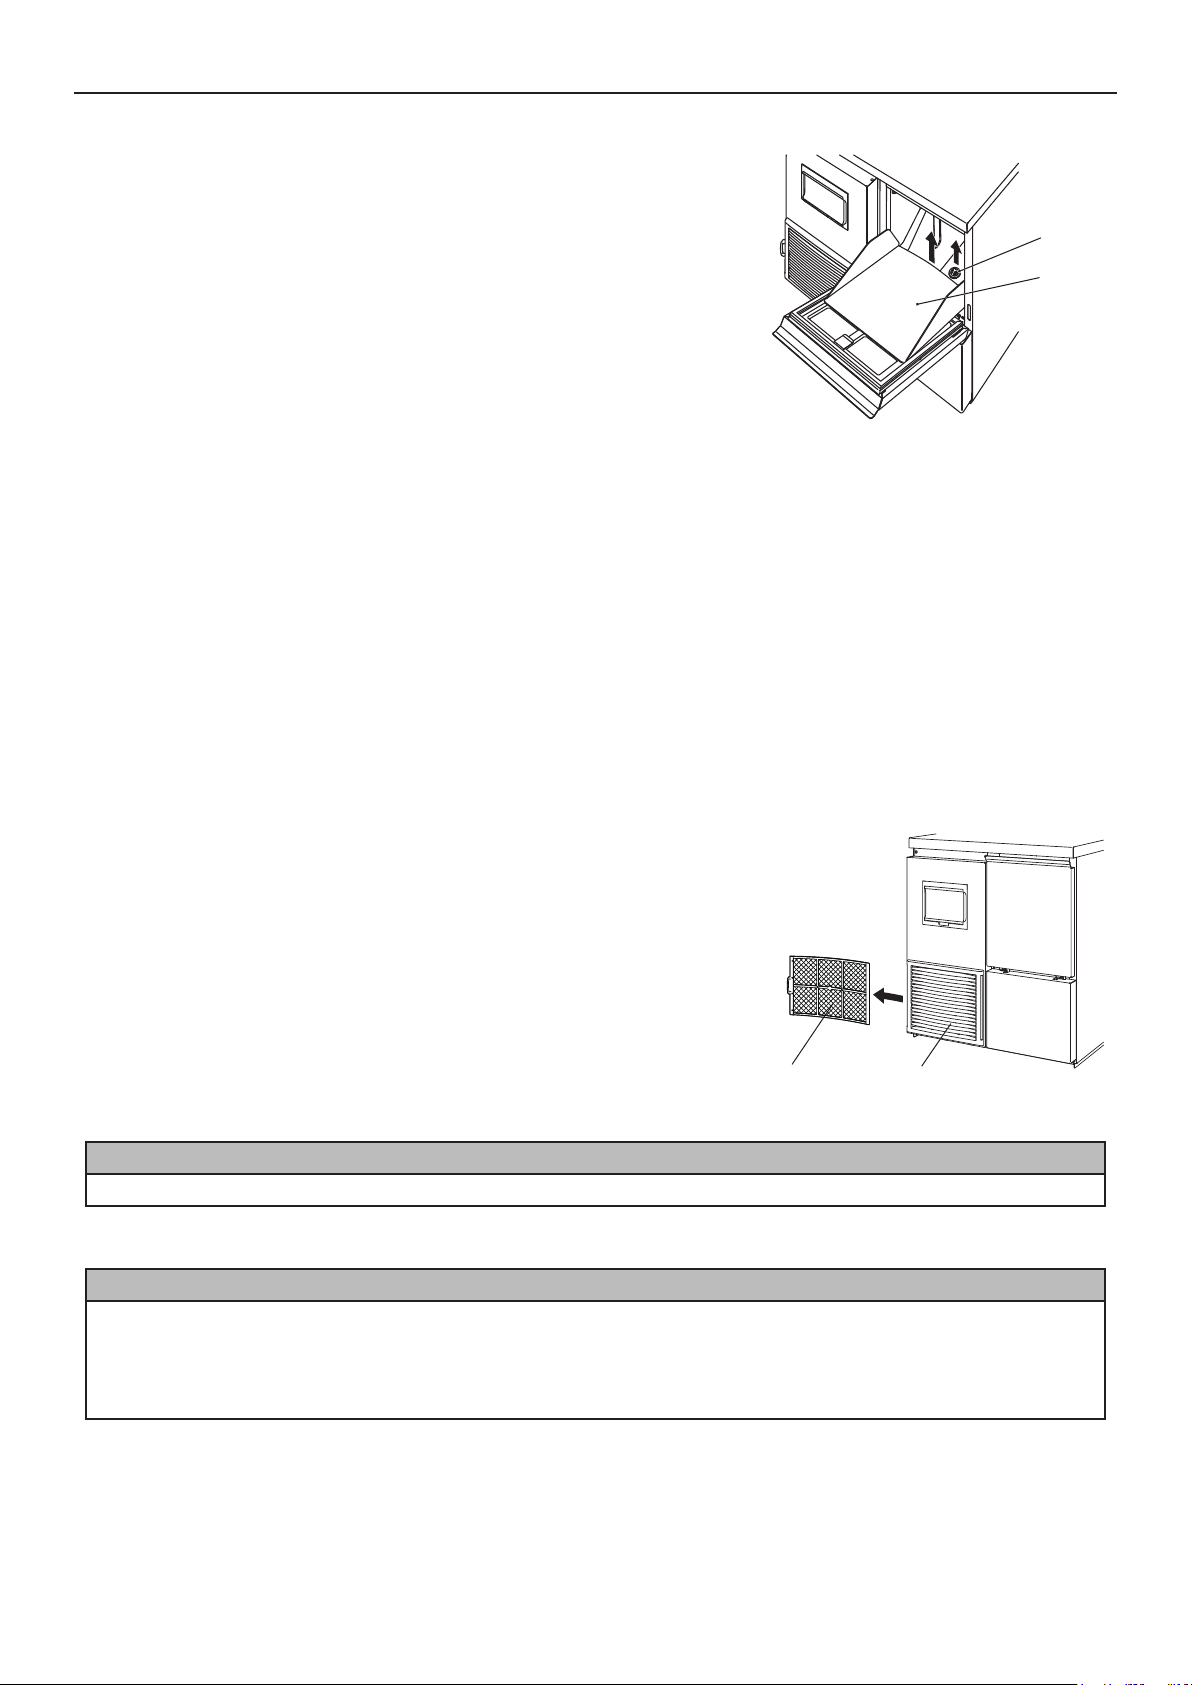
[e] Air Filter
Plastic mesh air lters remove dirt or dust from the air, and keep the condenser
from getting clogged. If the lters get clogged, the icemaker’s performance will be
reduced. Remove and clean the air lter(s) at least twice per month:
1) Slide the air lter off the louver.
2) Clean the air lter by using a vacuum cleaner. When severely clogged, use
warm water and a neutral cleaner to wash the air lter.
3) Rinse and dry the air lter thoroughly.
Air Filter
Louver
NOTICE
After cleaning, be sure to place the air lter back in position.
2. INSPECTION AND MAINTENANCE
NOTICE
To achieve optimum icemaker performance, the following parts need periodic inspection and maintenance:
Extruding head (upper bearing)
Housing (lower bearing)
Mechanical seal
These parts should be inspected after two years from installation or 10,000 hours of operation, whichever comes rst, and once
a year afterwards. Replacement of these parts is required if wear exceeds factory recommendations.
Their service life, however, depends on water quality and environment. More frequent inspection and maintenance are
recommended in bad or severe water conditions.
Consult with your local Hoshizaki service agent about inspection and maintenance service.
3. BEFORE CALLING FOR SERVICE
WARNING
Do not damage the refrigerant circuit. In the case of accidental damage to the refrigeration system causing refrigerant leak:
* Do not create a source of ignition in the area.
* Do not operate electrical switches or plugs in the area.
* Do not use naked ame.
* Immediately ventilate the area by opening doors and/or windows.
* Call service engineer.
[a] Error Code Indication
If the error code “E” is indicated on the display, before calling for service, check the following.
Code Remedy
E0 Possibility of water leaks. Turn OFF operation switch, and turn it ON again. If error code appears again, call for
service.
E1 Low ice production. Turn OFF operation switch, and turn it ON again. If error code appears again, call for service.
E2 Water supply circuit failure. Turn OFF operation switch, and turn it ON again. If error code appears again, call for
service.
E3 Gear motor failure. Turn OFF operation switch, and turn it ON again after 10 minutes. If error code appears again, call
for service.
7
ENGLISH
E4 Abnormal high side pressure. Clean air lter. Check that icemaker is properly installed according to installation manual.
Turn OFF operation switch, and turn it ON again. If error code appears again, call for service.
E5 Electric circuit failure. Turn OFF operation switch, and turn it ON again. If error code appears again, call for service.
E8 Compressor could be overheated. Check that icemaker is properly installed according to installation manual. Turn OFF
operation switch, and turn it ON again after 10 minutes. If error code appears again, call for service.
EA Electric circuit failure. Turn OFF operation switch, and turn it ON again. If error code appears again, call for service.
Eb Electric circuit failure. Turn OFF operation switch, and turn it ON again. If error code appears again, call for service.
EC Electric circuit failure. Turn OFF operation switch, and turn it ON again. If error code appears again, call for service.
EE Gear motor failure. Turn OFF operation switch, and turn it ON again. If error code appears again, call for service.
EF Supply voltage is too low. Check that voltage is in required range and icemaker is not sharing a single receptacle with
other appliances. Turn OFF operation switch, and turn it ON again. If error code appears again, call for service.
EH Electric circuit failure. Turn OFF operation switch, and turn it ON again. If error code appears again, call for service.
EL Bin control switch has failed. Turn OFF operation switch, and turn it ON again. If error code appears again, call for
service.
En Electric circuit failure. Turn OFF operation switch, and turn it ON again. If error code appears again, call for service.
EU Controller board failure. Turn OFF operation switch, and turn it ON again. If error code appears again, call for service.
[b] No Error Code Indication
If the icemaker does not work properly or does not work at all and no error code is indicated on the display, before calling for
service, check that:
* The power is supplied to the unit.
* The water is turned on.
* The air lter is clean.
For further assistance or advice, contact your local Hoshizaki service agent.
4. DISPOSAL
Comply with local regulations regarding disposal of this appliance and its refrigerant gas. Before you scrap the appliance, take
off the door to prevent children trapped.
Correct disposal of this product:
This marking indicates that this product should not be disposed with other household wastes throughout the EU. To
prevent possible harm to the environment or human health from uncontrolled waste disposal, recycle it responsibly
to promote the sustainable reuse of material resources. To return your used device, use the return and collection
systems or contact the retailer where the product was purchased. They can take this product for environmental safe
recycling.
5. WARRANTY
Hoshizaki warrants to the original owner/user that all Hoshizaki branded products shall be free of defects in material and/or
workmanship for the duration of the “warranty period”. The warranty shall be effective for two years from the date of installation.
Hoshizaki’s liability under the terms of the warranty are limited and shall exclude routine servicing, cleaning, essential
maintenance and/or repairs occasioned by misuse and installations not in accordance with Hoshizaki guidelines.
Warranty repairs should be completed by an approved Hoshizaki dealer or service agency using genuine Hoshizaki components.
To obtain full details of your warranty and approved service agency, please contact your dealer/supplier, or the nearest Hoshizaki
Service ofce:
Europe, Middle East, Africa
Hoshizaki UK - UK, Ireland
TEL: +44 845 456 0585
FAX: +44 132 283 8331
uksales@hoshizaki.co.uk
Hoshizaki Middle East - Middle East
TEL: +971 48 876 612
FAX: +971 48 876 613
sales@hoshizaki.ae
8
ENGLISH
Hoshizaki Deutschland - Germany, Switzerland, Austria
TEL: +49 2154 92810
FAX: +49 2154 928128
info@hoshizaki.de
Hoshizaki France - France
TEL: +33 1 48 63 93 80
FAX: +33 1 48 63 93 88
info@hoshizaki.fr
Hoshizaki Iberia - Spain, Portugal
TEL: +34 93 478 09 52
FAX: +34 93 478 08 00
info@hoshizaki.es
Hoshizaki Nederland & België - Netherlands, Belgium,
Luxembourg
TEL: +31 20 5650420 (Nederland)
TEL: +32 2 712 30 30 (België)
FAX: +31 20 6918768
sales@hoshizaki.nl (Nederland)
info@hoshizaki.be (België)
Hoshizaki Europe B.V. - all other countries within Europe
and Africa
TEL: +31 20 6918499
FAX: +31 20 6918768
sales@hoshizaki.nl
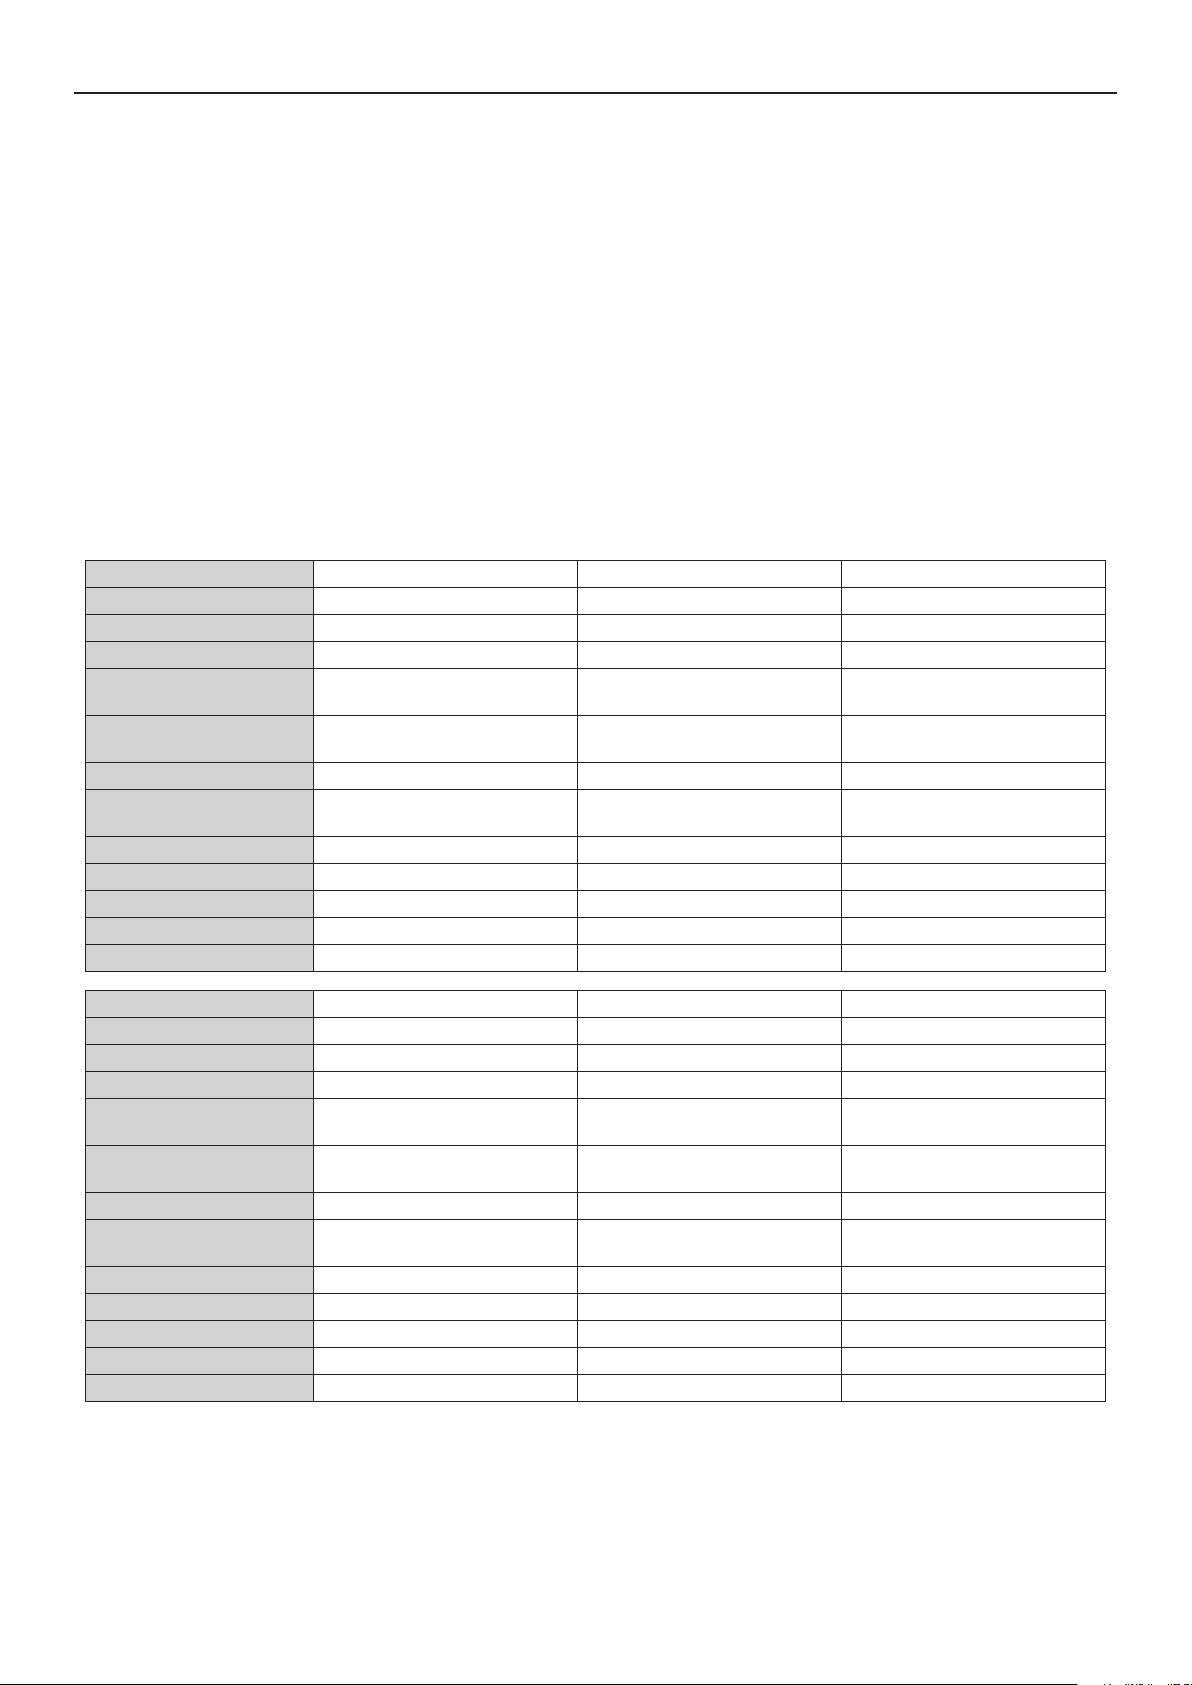
SPECIFICATIONS
Model FM-120KE-HC FM-120KE-HCN FM-120KE-50-HC
Type Air-cooled, ake ice Air-cooled, nugget ice Air-cooled, ake ice
Power Supply 1 phase 220-240V 50Hz 1 phase 220-240V 50Hz 1 phase 220-240V 50Hz
Electric Consumption 355W 355W 355W
Ice Production per 24h 125kg
Dimensions 640mm(W) x 600mm(D) x
Refrigerant R290, 100g R290, 100g R290, 100g
Insulation Foam Blowing
Agent
Weight Net: 66kg (Gross: 76kg) Net: 66kg (Gross: 76kg) Net: 76kg (Gross: 88kg)
Ambient Temp 5 - 40°C 5 - 40°C 5 - 40°C
Water Supply Temp 5 - 35°C 5 - 35°C 5 - 35°C
Water Supply Pressure 0.05 - 0.8 MPa (0.5 - 8 bar) 0.05 - 0.8 MPa (0.5 - 8 bar) 0.05 - 0.8 MPa (0.5 - 8 bar)
Voltage Range Rated voltage ± 6% Rated voltage ± 6% Rated voltage ± 6%
(ambient 10°C, water 10°C)
800(798-833)mm(H)
HFC-free HFC-free HFC-free
110kg
(ambient 10°C, water 10°C)
640mm(W) x 600mm(D) x
800(798-833)mm(H)
125kg
(ambient 10°C, water 10°C)
940mm(W) x 600mm(D) x
800(798-833)mm(H)
Model FM-120KE-50-HCN FM-80KE-HC FM-80KE-HCN
Type Air-cooled, nugget ice Air-cooled, ake ice Air-cooled, nugget ice
Power Supply 1 phase 220-240V 50Hz 1 phase 220-240V 50Hz 1 phase 220-240V 50Hz
Electric Consumption 355W 270W 270W
Ice Production per 24h 110kg
Dimensions 940mm(W) x 600mm(D) x
Refrigerant R290, 100g R290, 63g R290, 63g
Insulation Foam Blowing
Agent
Weight Net: 76kg (Gross: 88kg) Net: 65kg (Gross: 75kg) Net: 65kg (Gross: 75kg)
Ambient Temp 5 - 40°C 5 - 40°C 5 - 40°C
Water Supply Temp 5 - 35°C 5 - 35°C 5 - 35°C
Water Supply Pressure 0.05 - 0.8 MPa (0.5 - 8 bar) 0.05 - 0.8 MPa (0.5 - 8 bar) 0.05 - 0.8 MPa (0.5 - 8 bar)
Voltage Range Rated voltage ± 6% Rated voltage ± 6% Rated voltage ± 6%
(ambient 10°C, water 10°C)
800(798-833)mm(H)
HFC-free HFC-free HFC-free
85kg
(ambient 10°C, water 10°C)
640mm(W) x 600mm(D) x
800(798-833)mm(H)
75kg
(ambient 10°C, water 10°C)
640mm(W) x 600mm(D) x
800(798-833)mm(H)
9
FRANCAIS
INFORMATIONS DE SECURITE IMPORTANTES
Tout au long de ce manuel, des avis attirent votre attention sur des situations qui pourraient
entraîner la mort, des blessures graves ou des dégâts à l’appareil.
AVERTISSEMENT
ATTENTION
AVIS
HYGIENE
IMPORTANT
La machine à glace emploie du uide frigorigène exempt de HFC (propane) et une isolation en
mousse exempte de HFC, non nocifs pour la couche d’ozone, ainsi que des matériaux durables
qui ont très peu d’impact sur le réchauffement mondial.
Signale une situation dangereuse qui, si elle n’est pas évitée, peut
entraîner des blessures graves voire mortelles.
Signale une situation dangereuse qui, si elle n’est pas évitée, peut
entraîner des blessures mineures ou modérées.
Signale une situation dangereuse qui, si elle n’est pas évitée, peut
entraîner des dégâts à l’appareil.
Signale des précautions importantes à prendre en matière d’hygiène
et de sécurité alimentaire.
Signale des informations importantes sur l’utilisation de l’appareil et
son entretien.
AVERTISSEMENT
L’unité de refroidissement de la machine à glace contenant des uides frigorigènes inammables,
son entretien et son rechargement ne doivent être réalisés que par des techniciens agréés.
Le uide frigorigène de cette machine à glace est inammable et est enfermé dans le système
de réfrigération. Bien que le fluide frigorigène ne présente aucun risque de fuite dans des
conditions d’utilisation normales, manipulez la machine à glace avec la plus grande précaution
an d’éviter d’endommager le système.
En cas de fuite de fluide frigorigène résultant d’un dommage accidentel au système de
réfrigération :
* Interdire toute étincelle ou corps incandescent dans le voisinage.
* N’utiliser aucun interrupteur ni prise électrique dans le voisinage.
* Ne pas utiliser de amme nue.
* Ventiler immédiatement la pièce en ouvrant les portes et/ou fenêtres.
* Appeler un technicien de réparation.
IMPORTANT
Ce livret est un élément essentiel qui fait partie intégrante du produit et il doit être conservé
soigneusement par l’utilisateur.
Veuillez lire attentivement les conseils et avertissements qu’il contient car ils ont pour but
de fournir à l’utilisateur des informations essentielles pour la bonne utilisation et l’entretien
correct du produit. En outre, il fournit à l’utilisateur des INDICATIONS sur les utilisations et les
emplacements corrects de la machine à glace.
Veuillez conserver précieusement ce livret pour toute référence ultérieure.
10
FRANCAIS
AVERTISSEMENT
Cette machine à glace a été conçue pour des applications commerciales ; elle ne peut être
utilisée qu’aux fins auxquelles elle est expressément destinée, et fournie avec un bac de
stockage adapté tel que spécié par Hoshizaki.
Toute autre utilisation doit être considérée comme inappropriée et donc dangereuse.
Le fabricant décline toute responsabilité pour les dégâts provoqués par une utilisation
inappropriée, incorrecte et abusive.
L’installation, et le transfert le cas échéant, doivent être effectués par un personnel
qualié, conformément aux réglementations en vigueur et aux consignes du fabricant.
Veillez à ce que les ouvertures de ventilation de l’enceinte de l’appareil et de la structure
intégrée ne soient pas obstruées.
Pour accélérer le processus de décongélation, ne pas utiliser d’équipements mécaniques ni
des méthodes autres que celles recommandées par le fabricant.
L’utilisation de tout appareil électrique implique le respect de certaines règles fondamentales.
En particulier :
* La présence d’une humidité élevée augmente le risque de courts-circuits électriques et de
décharges électriques. En cas de doute, débrancher la machine à glace.
* Ne pas endommager le cordon d’alimentation et ne pas tirer dessus pour débrancher la
machine à glace.
* Si le cordon d’alimentation est endommagé, il doit être remplacé par un cordon de rechange
disponible auprès des centres de pièces détachées et d’entretien Hoshizaki.
* Ne pas toucher les pièces électriques ni les commutateurs avec les mains humides.
* Cette machine n’est pas prévue pour une utilisation par des personnes (y compris des
enfants) aux capacités physiques, sensorielles ou mentales réduites, ou manquant
d’expérience ou de connaissances. Elle peut cependant être utilisée par des enfants d’au
moins 8 ans et des personnes aux capacités physiques, sensorielles ou mentales réduites,
ou manquant d’expérience ou de connaissances, si une personne responsable de leur
sécurité les surveille ou leur a indiqué les consignes d’utilisation de la machine.
* Les enfants ne doivent pas jouer avec la machine.
* Le nettoyage et l’entretien régulier ne doivent pas être effectués par des enfants sans
surveillance.
* Ne pas tenter de modier la machine à glace. Cet appareil ne peut être démonté ou réparé
que par du personnel qualié.
11
FRANCAIS
I. CONSIGNES D’INSTALLATION
1. CONSTRUCTION
Panneau de commande
Panneau avant (gauche)
Volet d’aération
Filtre à air
Panneau supérieur
Bac de stockage
Porte
Panneau avant
2. EMPLACEMENT
AVERTISSEMENT
Cette machine à glace n’est pas conçue pour être utilisée à l’extérieur.
La machine à glace ne doit pas être placée à proximité de fours, de grills ou de toute autre source de chaleur importante.
Cet appareil n’est pas conçu pour être installé dans une zone où un jet d’eau peut être utilisé.
ATTENTION
La machine à glace doit avoir une assise solide et horizontale.
AVIS
Ne rien poser sur le dessus de la machine ni devant le volet d’aération.
IMPORTANT
La température ambiante normale de service doit être comprise entre 5 °C et 40 °C. Le raccordement à l’eau est uniquement
pour de l’eau froide. Le fonctionnement de la machine en dehors de ces plages de températures, pendant des durées
prolongées, risque d’affecter la capacité de production de glaçons.
Pour assurer une bonne circulation d’air et faciliter les opérations de maintenance ou d’entretien, prévoir le dégagement
indiqué ci-dessous.
Vue de dessus
Arrière
15 cm
Gauche
15 cm
MACHINE A GLACE
Avant
Droite
15 cm
Dans certains environnements très humides, de la condensation peut se former à l’intérieur de la machine et couler sur le sol.
Ne pas installer l’appareil sur un sol que l’eau pourrait endommager.
Eviter toute exposition prolongée de l’appareil à la lumière directe du soleil.
Vue latérale
Avant
Haut
15 cm
MACHINE
A GLACE
15 cm
Arrière
12
FRANCAIS
3. BRANCHEMENTS ELECTRIQUES
AVERTISSEMENT
CET APPAREIL DOIT ETRE MIS A LA TERRE
Cette machine à glace doit avoir une mise à la terre qui respecte les réglementations électriques nationales et locales.
Avant toute opération de maintenance, réparation ou nettoyage, débrancher l’alimentation électrique.
* Il faut généralement obtenir une autorisation pour effectuer l’installation électrique et recourir aux services d’un électricien
qualié.
Pour le Royaume-Uni et la République d’Irlande uniquement
* Les ls du cordon d’alimentation électrique présentent le codage couleur suivant :
Vert et jaune = Terre
Bleu = Neutre
Marron = Sous tension
La couleur des conducteurs du cordon d’alimentation de cet appareil peut ne pas correspondre au marquage couleur des
bornes de votre che ; dans ce cas, procéder comme suit :
Le l vert et jaune doit être relié à la borne de la che repérée par la lettre E ou par le symbole
verte et jaune. Le conducteur bleu doit être raccordé à la borne portant la lettre N ou de couleur noire. Le conducteur marron
doit être raccordé à la borne portant la lettre L ou de couleur rouge.
* Si la che livrée avec la machine ne convient pas aux prises du local d’installation, l’enlever (la couper s’il s’agit d’une che
moulée) et en monter une autre.
Une che non recâblable enlevée doit être jetée. Elle ne peut en aucun cas être réutilisée. L’insertion de ce type de che
dans une autre prise présente des risques graves de décharges électriques.
* La che non recâblable ne doit jamais être utilisée sans un protège-fusible.
Le numéro de référence du protège-fusible amovible est imprimé sur la che. Utiliser cette référence pour toute commande
de pièce.
Il est possible de se procurer des protège-fusibles de remplacement auprès des centres de pièces détachées et d’entretien
Hoshizaki.
La capacité nominale des fusibles doit être de 13 A ; ils doivent être agréés selon la norme BS 1362.
ou la couleur verte ou
4. BRANCHEMENTS D’ARRIVEE ET DE VIDANGE D’EAU
AVERTISSEMENT
Raccorder à l’arrivée d’eau potable froide uniquement.
* Les raccordements à l’arrivée d’eau du réseau doivent être réalisés conformément aux exigences nationales en vigueur des
réglementations sur l’arrivée d’eau ou les raccords.
* L’eau utilisée pour la fabrication de la glace doit être potable. Si la qualité de l’eau entraîne la formation de tartre, le montage d’un
ltre externe ou d’un adoucisseur est recommandé. Contactez le professionnel du traitement de l’eau ou l’agent de service
Hoshizaki local.
* Dans certaines régions, il est possible qu’il faille obtenir une autorisation pour effectuer les travaux de plomberie et avoir
recours aux services d’un plombier autorisé.
13
FRANCAIS
II. CONSIGNES D’UTILISATION
ATTENTION
Ne pas marcher dans le bac de stockage ni mettre ses mains dans le
compartiment de la machine situé à l’intérieur. Les enfants pourraient s’y
retrouver coincés, ou le mécanisme de fabrication de glace se mettre en
marche accidentellement, entraînant des risques de blessures.
AVIS
Toutes les pièces sont réglées en usine. Tout mauvais réglage risque de provoquer une panne.
Après avoir arrêté l’appareil, attendre au moins 3 minutes avant de le remettre sous tension pour éviter d’endommager le
compresseur.
HYGIENE
Cette machine à glace est conçue pour produire de la glace alimentaire. Pour la maintenir dans un parfait état d’hygiène :
* Se laver les mains avant de retirer la glace. Utiliser la pelle en plastique (accessoire) prévue à cet effet.
* Le bac de stockage est destiné uniquement à la glace. Ne conserver rien d’autre dans ce bac, et ne pas y utiliser d’autres
équipements électriques.
* Avant d’utiliser la machine, nettoyer le bac de stockage (voir « III. 1. NETTOYAGE»).
* Veiller à la propreté de la pelle. La nettoyer en utilisant un produit nettoyant neutre et la rincer soigneusement.
* Une fois la glace retirée, fermer la porte pour éviter que des saletés, de la poussière ou des insectes ne s’introduisent dans
le bac de stockage.
1. MISE EN MARCHE
L’installateur met généralement la machine à glace en service pour
mettre en route la production automatique de glace. Afin de garantir un
fonctionnement en continu, s’assurer que :
* Le robinet d’arrivée d’eau est ouvert et
* La machine à glace est branchée sur l’alimentation électrique.
Pour démarrer le processus de fabrication de la glace, contrôler la position
du bouton de marche/arrêt du panneau de commande :
Position « OFF » (Arrêt) - Mettre le bouton en position « ON » (Marche).
Position « ON » (Marche) - Appuyer sur le bouton ICE (Glace).
Panneau de commande
Bouton StopBouton Ice Afchage
2. ARRET
Appuyer sur le bouton Stop du panneau de commande. L’affichage
clignotera en mode « STOP » pendant 15 minutes durant l’opération de
commande de vidange et s’allumera en continu à la n de la commande de
vidange.
Bouton Maintenance
(utilisé pendant
l’entretien uniquement)
Bouton de marche/
arrêt
3. PREPARATION DU DISTRIBUTEUR DE GLACE EN VUE D’UN ENTREPOSAGE DE LONGUE DUREE
AVIS
La machine à glace ne fonctionnera pas aux températures au-dessous de zéro. Pour prévenir tout dommage au niveau de la
conduite d’arrivée d’eau, vidanger la machine à glace lorsque la température de l’air est inférieure à zéro.
HYGIENE
En cas de mise hors tension de la machine à glace pendant au moins deux jours, la vidanger pour éviter une contamination
du circuit d’eau.
14
FRANCAIS
1) Suivre les instructions de la section « 2. ARRET ».
2) Mettre le bouton de marche/arrêt sur « OFF » (Arrêt).
3) Fermer le robinet d’arrivée d’eau.
4) Débrancher le tuyau d’arrivée du robinet et vidanger le tuyau.
5) Débrancher l’alimentation.
6) Retirer toute la glace se trouvant dans le bac de stockage et nettoyer le bac.
7) Faire effectuer la vidange de la machine à glace par un technicien qualié.
8) Pour redémarrer la machine à glace, suivre les instructions de la section « 1. MISE EN MARCHE ».
III. ENTRETIEN
1. NETTOYAGE
AVERTISSEMENT
Avant toute opération de nettoyage ou d’entretien, débrancher l’alimentation électrique de la machine à glace.
Cet appareil ne doit pas être nettoyé à l’aide d’un jet d’eau.
ATTENTION
En cas d’utilisation d’un produit neutre ou d’hypochlorite de sodium, bien lire et comprendre les consignes fournies pour éviter
des problèmes de santé potentiels.
AVIS
Faire nettoyer et désinfecter le système d’eau de la machine à glace par un technicien qualié au moins deux fois par an et faire
vérier et nettoyer le condenseur au moins une fois par an.
An d’éviter tout dommage possible, ne pas nettoyer les pièces en plastique avec de l’eau à plus de 40 °C ou dans un lave-vaisselle.
[a] Extérieur de la machine et du bac
Essuyer l’extérieur au moins une fois par semaine à l’aide d’un chiffon doux et propre. Pour éliminer les traces de graisse ou les
salissures, utiliser un chiffon imbibé d’un produit de nettoyage neutre.
[b] Nettoyage/désinfection de la pelle et de la poignée du bac de stockage (quotidiennement)
1) Mélanger 1 litre d’eau avec 4 ml de solution renfermant 5,25 % d’hypochlorite de sodium dans un récipient adapté, ou utiliser
le désinfectant recommandé par Hoshizaki.
2) Laisser tremper la pelle dans la solution pendant plus de 3 minutes. Rincer à fond et agiter pour éliminer l’excédent de liquide.
Remarque : le séchage à l’aide d’un chiffon risque de provoquer une nouvelle contamination.
3) Utiliser un produit neutre pour nettoyer la poignée du bac de stockage. Rincer soigneusement.
4) Imbiber un chiffon propre de solution désinfectante et essuyer la poignée. Rincer avec de l’eau propre et sécher à l’aide d’un
chiffon propre.
15
FRANCAIS
[c] Nettoyage/désinfection de l’intérieur du bac de stockage (hebdomadairement)
1) Ouvrir la porte du bac de stockage et retirer toute la glace.
2) Courber légèrement le plan incliné pour le libérer des guides gauche et droit.
3) Retirer le bouchon de vidange situé à la base du bac de stockage.
4) Laver le revêtement du bac, le plan incliné et le bouchon de vidange avec un
produit nettoyant neutre non abrasif. Rincer soigneusement.
Remarque : ne pas endommager l’actionneur de commande de bac situé dans la
partie supérieure du collecteur.
5) Mélanger 5 litres d’eau avec 18 ml de solution renfermant 5,25 % d’hypochlorite
de sodium ou utiliser le désinfectant recommandé par Hoshizaki.
6) Imbiber de solution une éponge ou un chiffon propre et essuyer le revêtement du bac, le plan incliné et le bouchon de vidange.
7) Remettre le plan incliné et le bouchon de vidange en place.
8) Nettoyer la surface de la porte du collecteur avec la solution. Fermer la porte du bac.
9) Vous pouvez utiliser le reste de la solution pour désinfecter les ustensiles.
Remarque : après désinfection, ne pas sécher ni rincer. Laisser sécher à l’air.
Bouchon de
vidange
Pente
[d] Porte du collecteur
Nettoyer la porte du bac de stockage au moins une fois par semaine en utilisant un produit de nettoyage neutre non abrasif.
Rincer soigneusement après le nettoyage et désinfecter si nécessaire.
[e] Filtre à air
Des ltres à air en plastique permettent de ltrer les impuretés et la poussière de
l’air, et empêchent l’obturation du condenseur. En cas de colmatage des ltres,
les performances de la machine à glace seront affectées. Déposer et nettoyer
le(s) ltre(s) à air au moins deux fois par mois :
1) Faire glisser le ltre à air hors du volet d’aération.
2) Utiliser un aspirateur pour nettoyer le filtre à air. En cas de colmatage
important, laver le ltre à air en utilisant une solution d’eau chaude et de produit
nettoyant neutre.
3) Rincer et sécher soigneusement le ltre à air.
Filtre à air
Volet d’aération
AVIS
Après nettoyage, veiller à remettre en place le ltre à air.
2. INSPECTION ET ENTRETIEN
AVIS
Pour obtenir des performances optimales de votre machine à glace, il est nécessaire d’effectuer une inspection et un entretien
périodiques sur les pièces suivantes :
Tête d’extrusion (palier supérieur)
Carter (palier inférieur)
Joint mécanique
Ces pièces doivent être inspectées au bout de deux ans à compter de l’installation ou au bout de 10 000 heures de
fonctionnement, selon la première échéance, puis une fois par an. Le remplacement de ces pièces est requis si l’usure dépasse
les recommandations d’usine.
16
 Loading...