

Hoshizaki FM-120KE-HC, FM-120KE-HCN, FM-120KE-50-HC, FM-120KE-50-HCN, FM-80KE-HC INSTALLATION MANUAL
...
SELF-CONTAINED ICE MAKER
MACHINE A GLACE A BACINTEGRE
EISBEREITER MIT EINGEBAUTEM VORRATSBEHÄLTER
IJSMACHINE MET INGEBOUWDE BUNKER
MÁQUINA DE CUBITOS DE HIELO AUTÓNOMA
MACCHINA PER LA PRODUZIONE DI GHIACCIO AUTOCONTENUTA
INSTALLATION MANUAL
(original instructions)
NOTICE D’INSTALLATION
(instructions traduites)
INSTALLATIONSANLEITUNG
(Übersetzung)
INSTALLATIE VOORSCHRIFT
(vertaalde instructies)
MANUAL DE INSTALACION
(instrucciones traducidas)
FM-120KE-HC
FM-120KE-HCN
FM-120KE-50-HC
FM-120KE-50-HCN
FM-80KE-HC
FM-80KE-HCN
MANUALE PER L’INSTALLAZIONE
(traduzione)
FOR QUALIFIED INSTALLER ONLY
RESERVE A L’INSTALLATEUR
FÜR DEN INSTALLATEUR
VOOR DE BEVOEGDE INSTALLATEUR
SOLAMENTE PARA INSTALADOR CUALIFICADO
SOLTANTO PER INSTALLATORI QUALIFICATI
Telford 70 Stafford Park 7, Telford, Shropshire TF3 3BQ UK
L2F114201 (120116)

ENGLISH
IMPORTANT SAFETY INFORMATION ...................................................................................................1
1. CONSTRUCTION .................................................................................................................................3
2. ACCESSORIES....................................................................................................................................3
3. UNPACKING ........................................................................................................................................3
4. LOCATION ...........................................................................................................................................4
5. INSTALLATION .................................................................................................................................... 4
6. ELECTRICAL CONNECTIONS ............................................................................................................ 4
7. WATER SUPPLY AND DRAIN CONNECTIONS ................................................................................. 5
8. START-UP PROCEDURE ....................................................................................................................6
9. FINAL CHECKS ...................................................................................................................................6
FRANCAIS
DEUTSCH
NEDERLANDS
INFORMATIONS DE SECURITE IMPORTANTES .................................................................................. 7
1. CONSTRUCTION .................................................................................................................................9
2. ACCESSOIRES....................................................................................................................................9
3. DEBALLAGE ........................................................................................................................................9
4. EMPLACEMENT ................................................................................................................................10
5. INSTALLATION .................................................................................................................................. 10
6. BRANCHEMENTS ELECTRIQUES ................................................................................................... 10
7. BRANCHEMENTS D’ARRIVEE ET DE VIDANGE D’EAU .................................................................11
8. PROCEDURE DE MISE EN MARCHE ..............................................................................................12
9. DERNIERS CONTROLES..................................................................................................................12
WICHTIGE SICHERHEITSHINWEISE ...................................................................................................13
1. KONSTRUKTION ............................................................................................................................... 15
2. ZUBEHÖR .......................................................................................................................................... 15
3. AUSPACKEN .....................................................................................................................................15
4. AUFSTELLORT .................................................................................................................................. 16
5. INSTALLATION .................................................................................................................................. 16
6. ELEKTRISCHE ANSCHLÜSSE .........................................................................................................16
7. WASSERZULAUF- UND WASSERABFLUSSANSCHLÜSSE...........................................................17
8. STARTVERFAHREN ..........................................................................................................................18
9. ABSCHLUSSTESTS ..........................................................................................................................18
BELANGRIJKE VEILIGHEIDSINFORMATIE ......................................................................................... 20
1. CONSTRUCTIE ..................................................................................................................................22
2. TOEBEHOREN ..................................................................................................................................22
3. UITPAKKEN .......................................................................................................................................22
4. PLAATSING .......................................................................................................................................23
5. INSTALLATIE ..................................................................................................................................... 23
6. ELEKTRISCHE AANSLUITINGEN.....................................................................................................23
7. AANSLUITING VAN WATERTOEVOER- EN WATERAFVOERLEIDINGEN .................................... 24
8. OPSTARTPROCEDURE ....................................................................................................................25
9. LAATSTE CONTROLES ....................................................................................................................25
ESPAÑOL
ITALIANO
INFORMACIÓN IMPORTANTE DE SEGURIDAD ................................................................................. 26
1. ESTRUCTURA ................................................................................................................................... 28
2. ACCESORIOS....................................................................................................................................28
3. DESEMBALAJE .................................................................................................................................28
4. UBICACIÓN........................................................................................................................................29
5. INSTALACIÓN....................................................................................................................................29
6. CONEXIONES ELÉCTRICAS ............................................................................................................ 29
7. SUMINISTRO DE AGUA Y CONEXIONES DE DRENAJE ................................................................30
8. PROCEDIMIENTO DE PUESTA EN MARCHA .................................................................................31
9. COMPROBACIONES FINALES ......................................................................................................... 31
INFORMAZIONI IMPORTANTI SULLA SICUREZZA ............................................................................32
1. COMPONENTI ...................................................................................................................................34
2. ACCESSORI ......................................................................................................................................34
3. DISIMBALLAGGIO ............................................................................................................................. 34
4. UBICAZIONE......................................................................................................................................35
5. INSTALLAZIONE................................................................................................................................35
6. COLLEGAMENTI ELETTRICI ............................................................................................................ 35
7. COLLEGAMENTO ALL’APPROVVIGIONAMENTO DELL’ACQUA E COLLEGAMENTO
DI SCARICO.......................................................................................................................................36
8. PROCEDURA DI AVVIO .................................................................................................................... 37
9. CONTROLLI FINALI ........................................................................................................................... 37
ENGLISH
IMPORTANT SAFETY INFORMATION
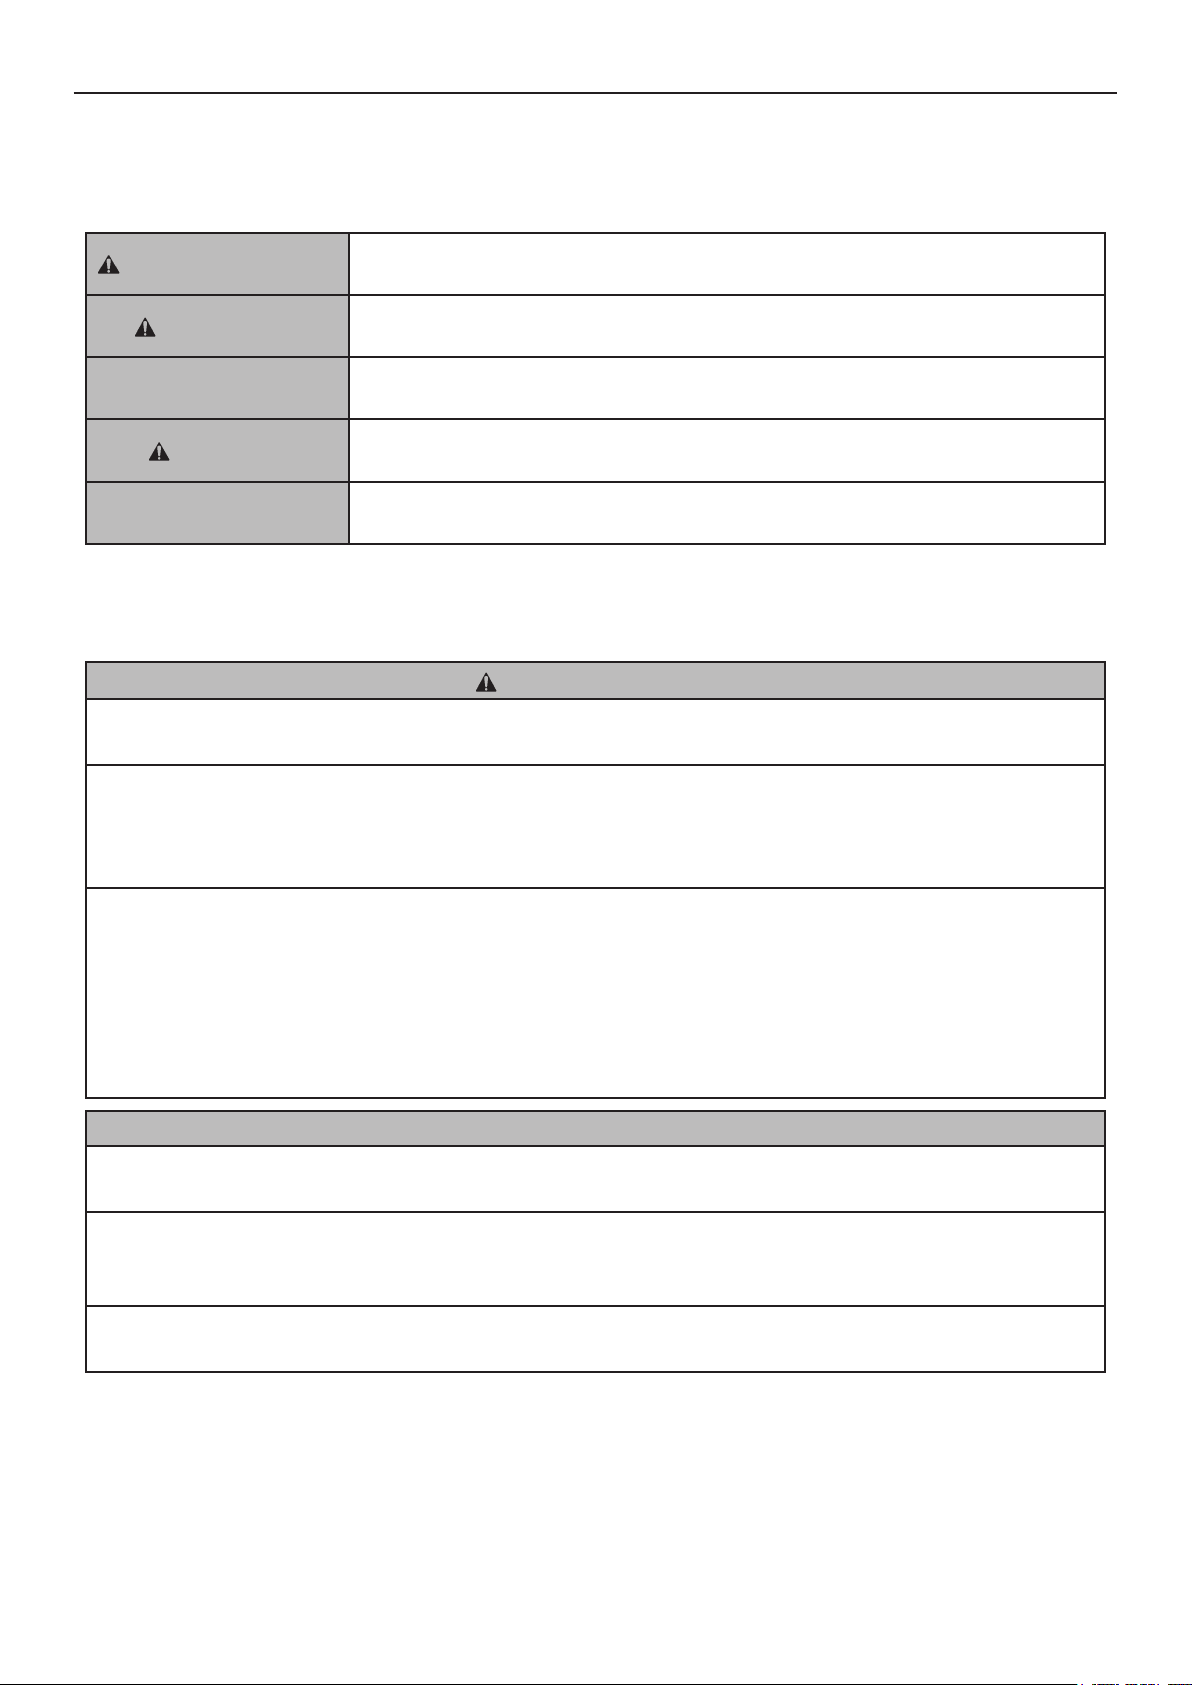
Throughout this manual, notices appear to bring your attention to situations which could result in
death, serious injury, or damage to the unit.
WARNING
CAUTION
NOTICE
HYGIENE
IMPORTANT
This icemaker uses HFC-free refrigerant (propane) and HFC-free foam insulation that are nonozone-depleting and environmentally sustainable materials having very low global warming
potential.
Indicates a hazardous situation which, if not avoided, could result in death or
serious injury.
Indicates a hazardous situation which, if not avoided, could result in minor or
moderate injury.
Indicates a hazardous situation which, if not avoided, could result in damage to
the unit.
Indicates important precautions for hygiene and food safety.
Indicates important information about the use and care of the unit.
WARNING
This icemaker contains ammable refrigerant in its cooling unit; maintenance and recharging
must therefore only be carried out by authorized technicians.
The refrigerant contained in this icemaker is ammable and sealed in the refrigeration system.
Although the refrigerant does not leak out under normal usage, take utmost care when
handling this icemaker so as not to cause any damages to the system.
In the case of accidental damage to the refrigeration system causing refrigerant leak:
* Do not create a source of ignition in the area.
* Do not operate electrical switches or plugs in the area.
* Do not use naked ame.
* Immediately ventilate the area by opening doors and/or windows.
* Call service engineer.
IMPORTANT
In order to carry out safe and proper installation of the product, please read this booklet
carefully beforehand and follow the instructions contained within.
On completion of the installation, start up the icemaker to check for any abnormalities. Instruct
the user on how to use and maintain the icemaker in accordance with the instruction manual.
This booklet should be handed over to the user after the installation and be preserved by the
user together with the instruction manual for any further consultation that may be necessary.
1
ENGLISH
WARNING
This is a commercial icemaker, and should be destined only to be used for the purpose for
which it has been expressly designed.
Any other use should be considered improper and therefore dangerous. The manufacturer
will not be held liable or responsible for any damage caused by improper, incorrect and
unreasonable use.
The installation, and relocation if necessary, must be carried out by qualied personnel,
in accordance with current regulations, according to the manufacturer’s instructions.
Keep ventilation openings, in the appliance enclosure or in the built-in structure, clear of
obstruction.
Do not use mechanical devices or other means to accelerate the defrosting process, other
than those recommended by the manufacturer.
If the supply cord is damaged, it must be replaced by a replacement cord available from
Hoshizaki Parts/Service Centres.
2
ENGLISH
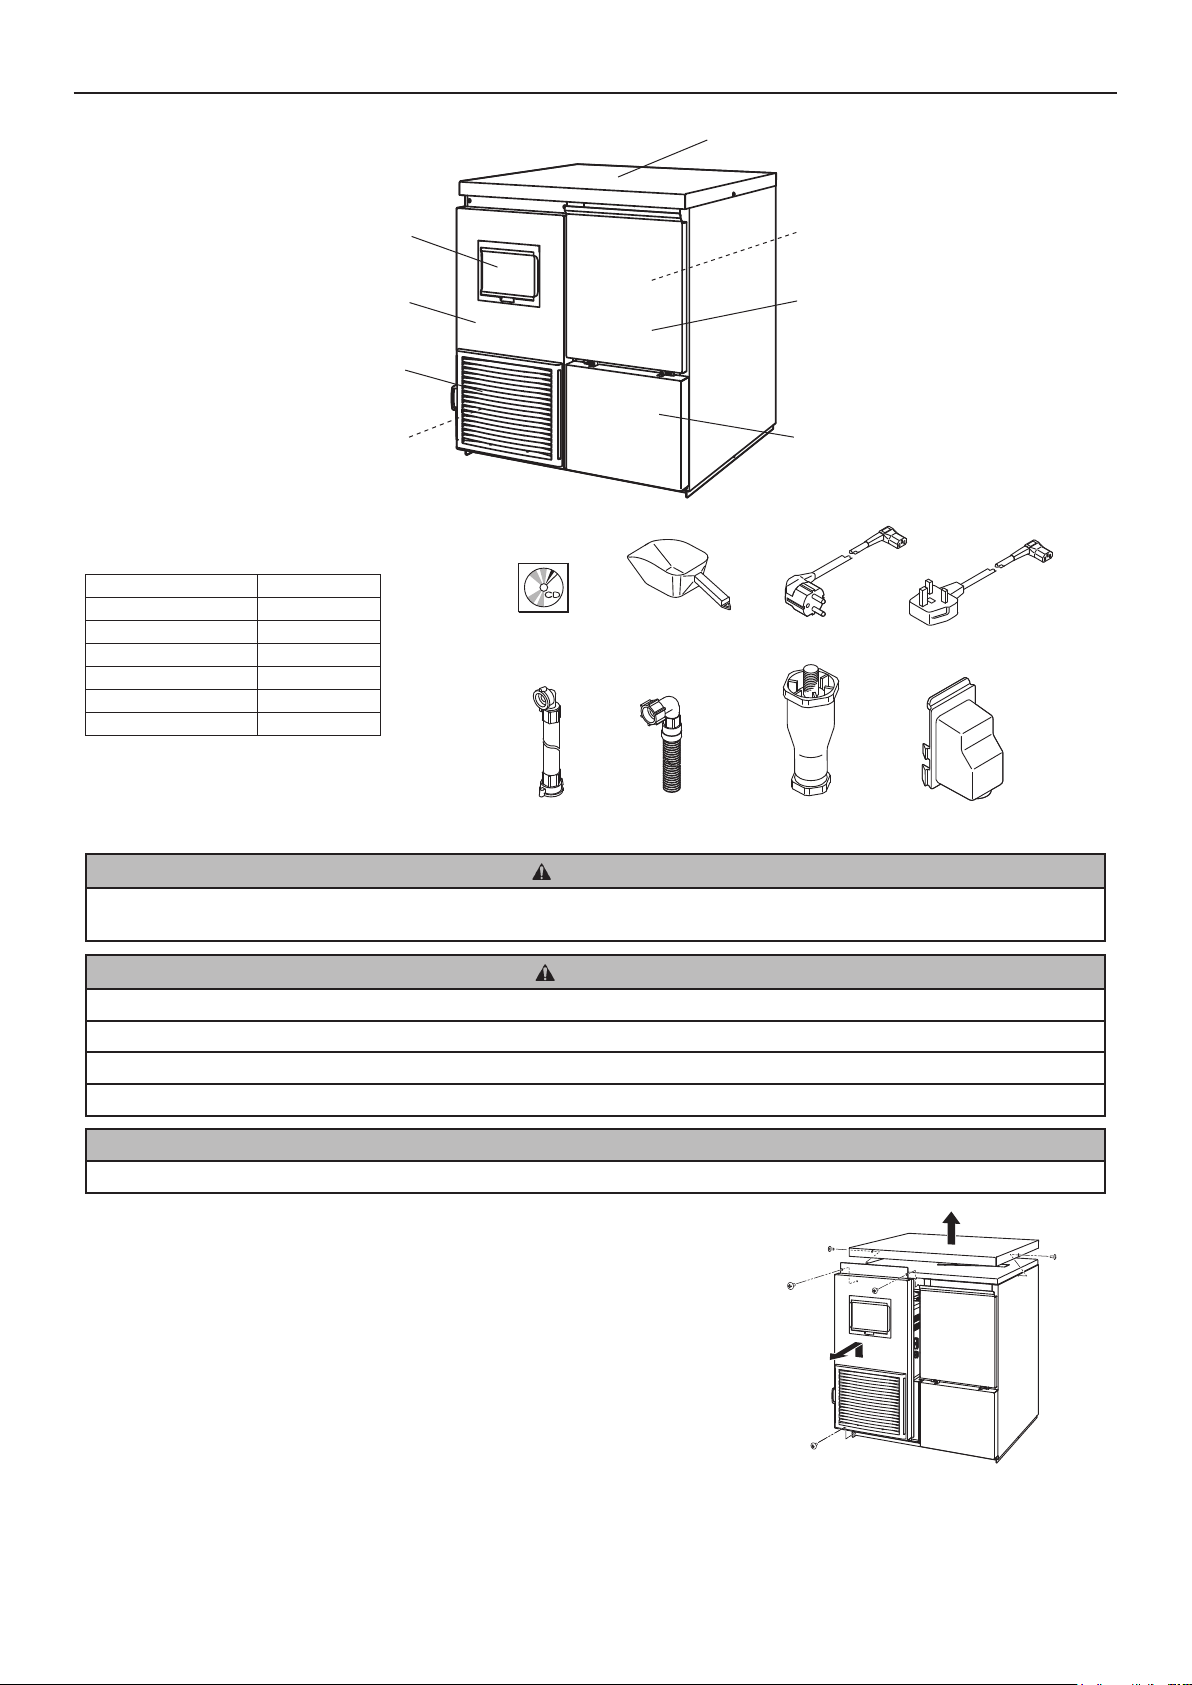
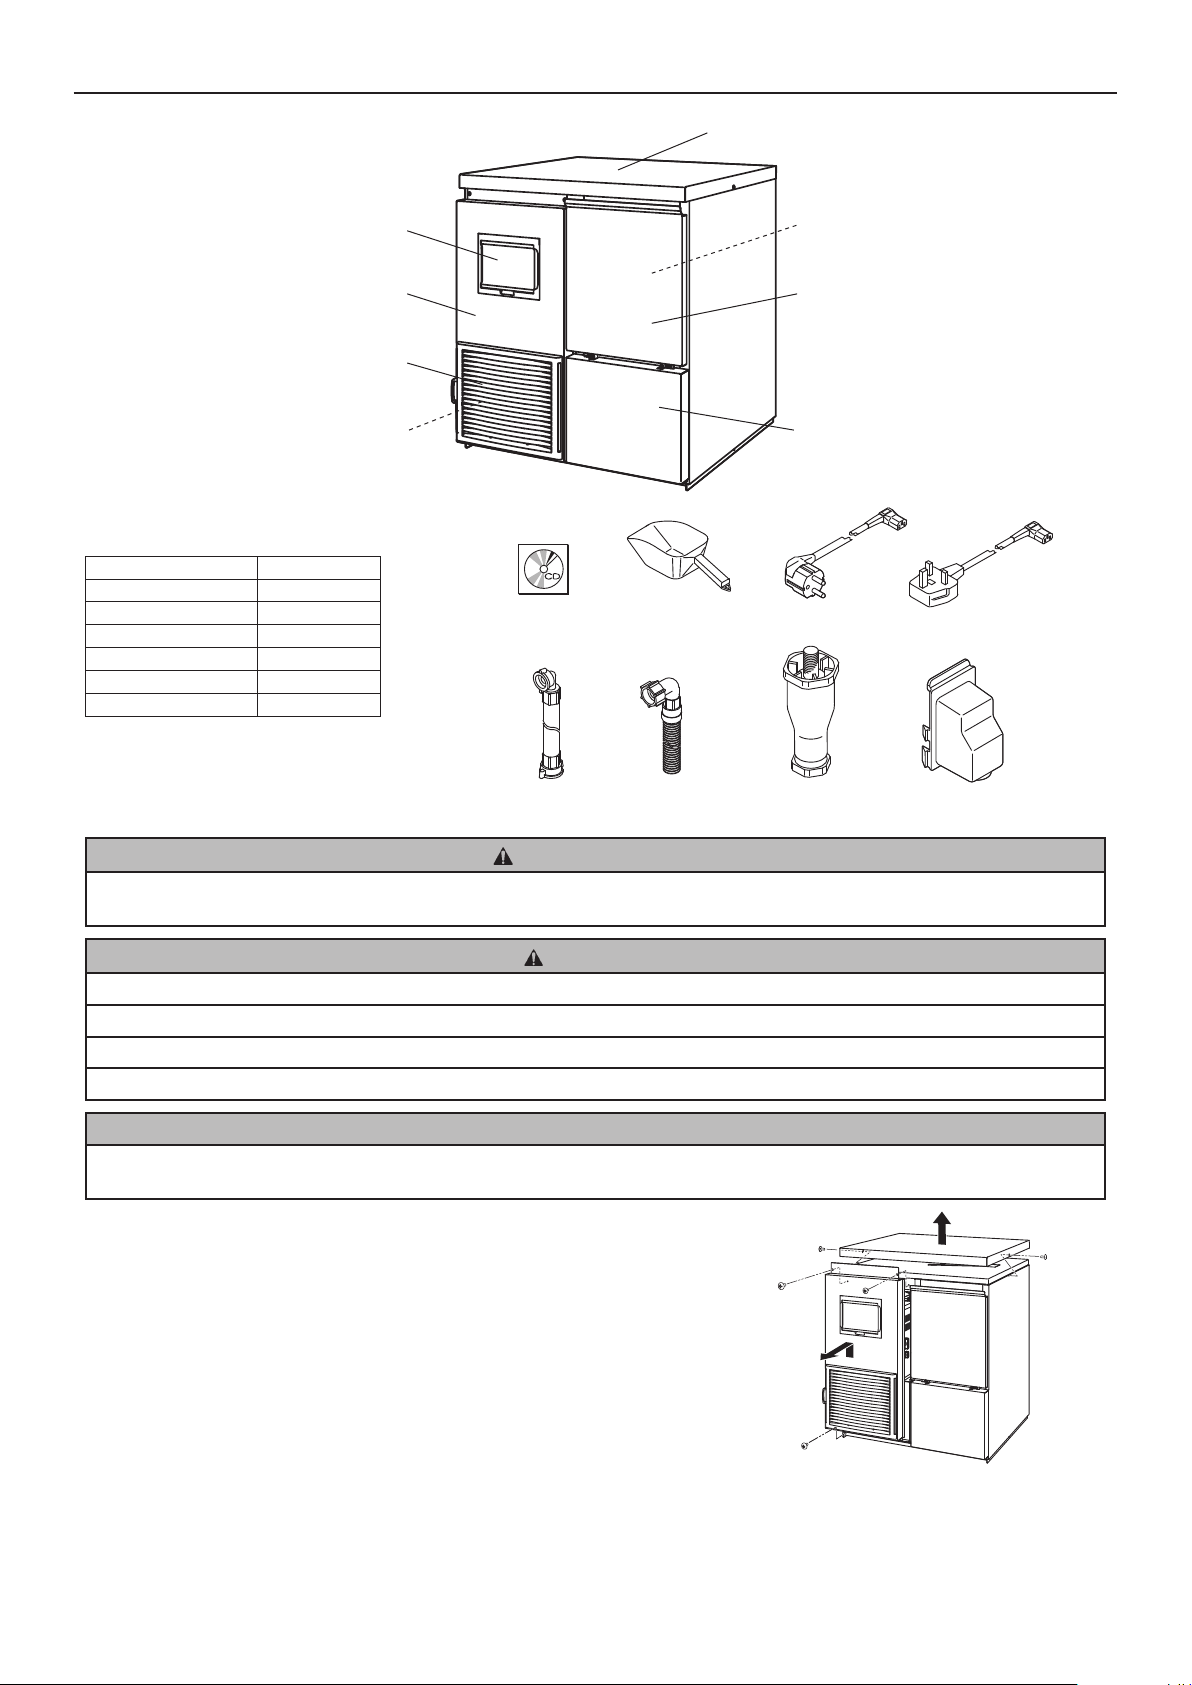
1. CONSTRUCTION
Operation Panel
Front Panel (Left)
2. ACCESSORIES
CD 1
Inlet Hose 1
Outlet Hose 1
Adjustable Leg 4
Power Supply Cord 1
Connector Cover 1
Scoop 1
Louver
Air Filter
CD
Scoop
Top Panel
Storage Bin
Door
Front Cover
Power Supply Cord
Inlet Hose
Outlet Hose
Adjustable Leg
Connector Cover
3. UNPACKING
WARNING
Children should not be allowed in reach of the packaging elements (plastic bags and expanded polystyrene) as they are
potential sources of danger.
CAUTION
Do not lift or manoeuvre the carton by using the shipping bands.
When moving the unit by hand, remove the panels and hold the unit frame.
Always wear protective gloves when carrying the unit.
When handling the carton or the unpacked unit, work in pairs to prevent injury.
NOTICE
Remove shipping carton, tape(s) and packing. If packing material is left in the icemaker, it will not work properly.
1) After removing the packaging, make sure that the icemaker and the storage
bin are in good condition. If in doubt, please do not use the icemaker but
apply to professionally qualied personnel.
2) Remove the shipping tape holding the door and front panel (left).
3) Open the door and remove the package of accessories. Check the contents
according to “2. ACCESSORIES”.
Front Panel
(Left)
Top Panel
4) Remove the front panel (left) and top panel.
5) Remove the protective plastic film from the exterior. If the icemaker is
exposed to the sun or to heat, remove the lm after the icemaker cools.
3
Top Panel: Remove the screws and lift off.
Front Panel (Left): Remove the screws. Lift up
and pull toward you.
ENGLISH
4. LOCATION
WARNING
This icemaker is not intended for outdoor use.
The icemaker should not be located next to ovens, grills or other high heat producing equipment.
This appliance is not suitable for installation in an area where a water jet could be used.
CAUTION
The location should provide a rm and level foundation for the icemaker.
NOTICE
Do not place anything on top of the icemaker or in front of the louver.
IMPORTANT
Normal operating ambient temperature should be within 5°C to 40°C. Water connection is cold water only. Operation of the
icemaker, for extended periods, outside of these normal temperature ranges may affect production capacity.
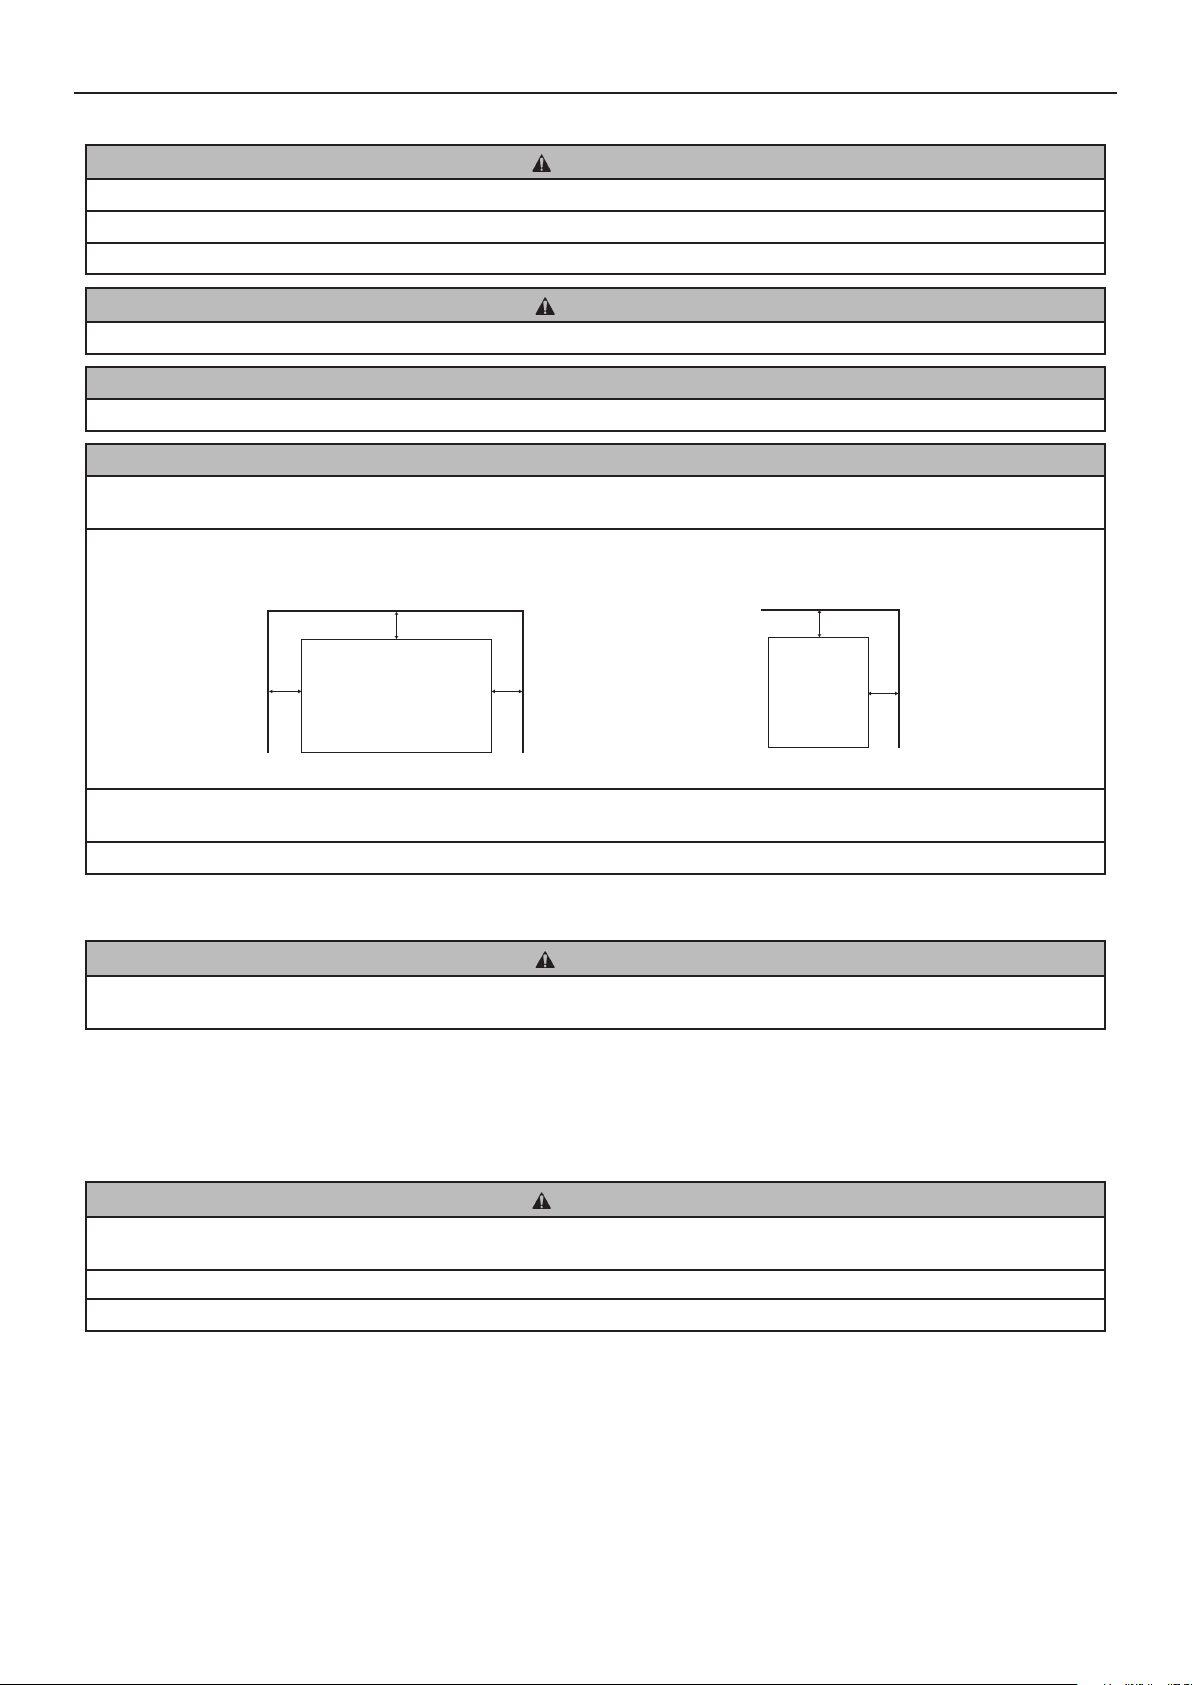
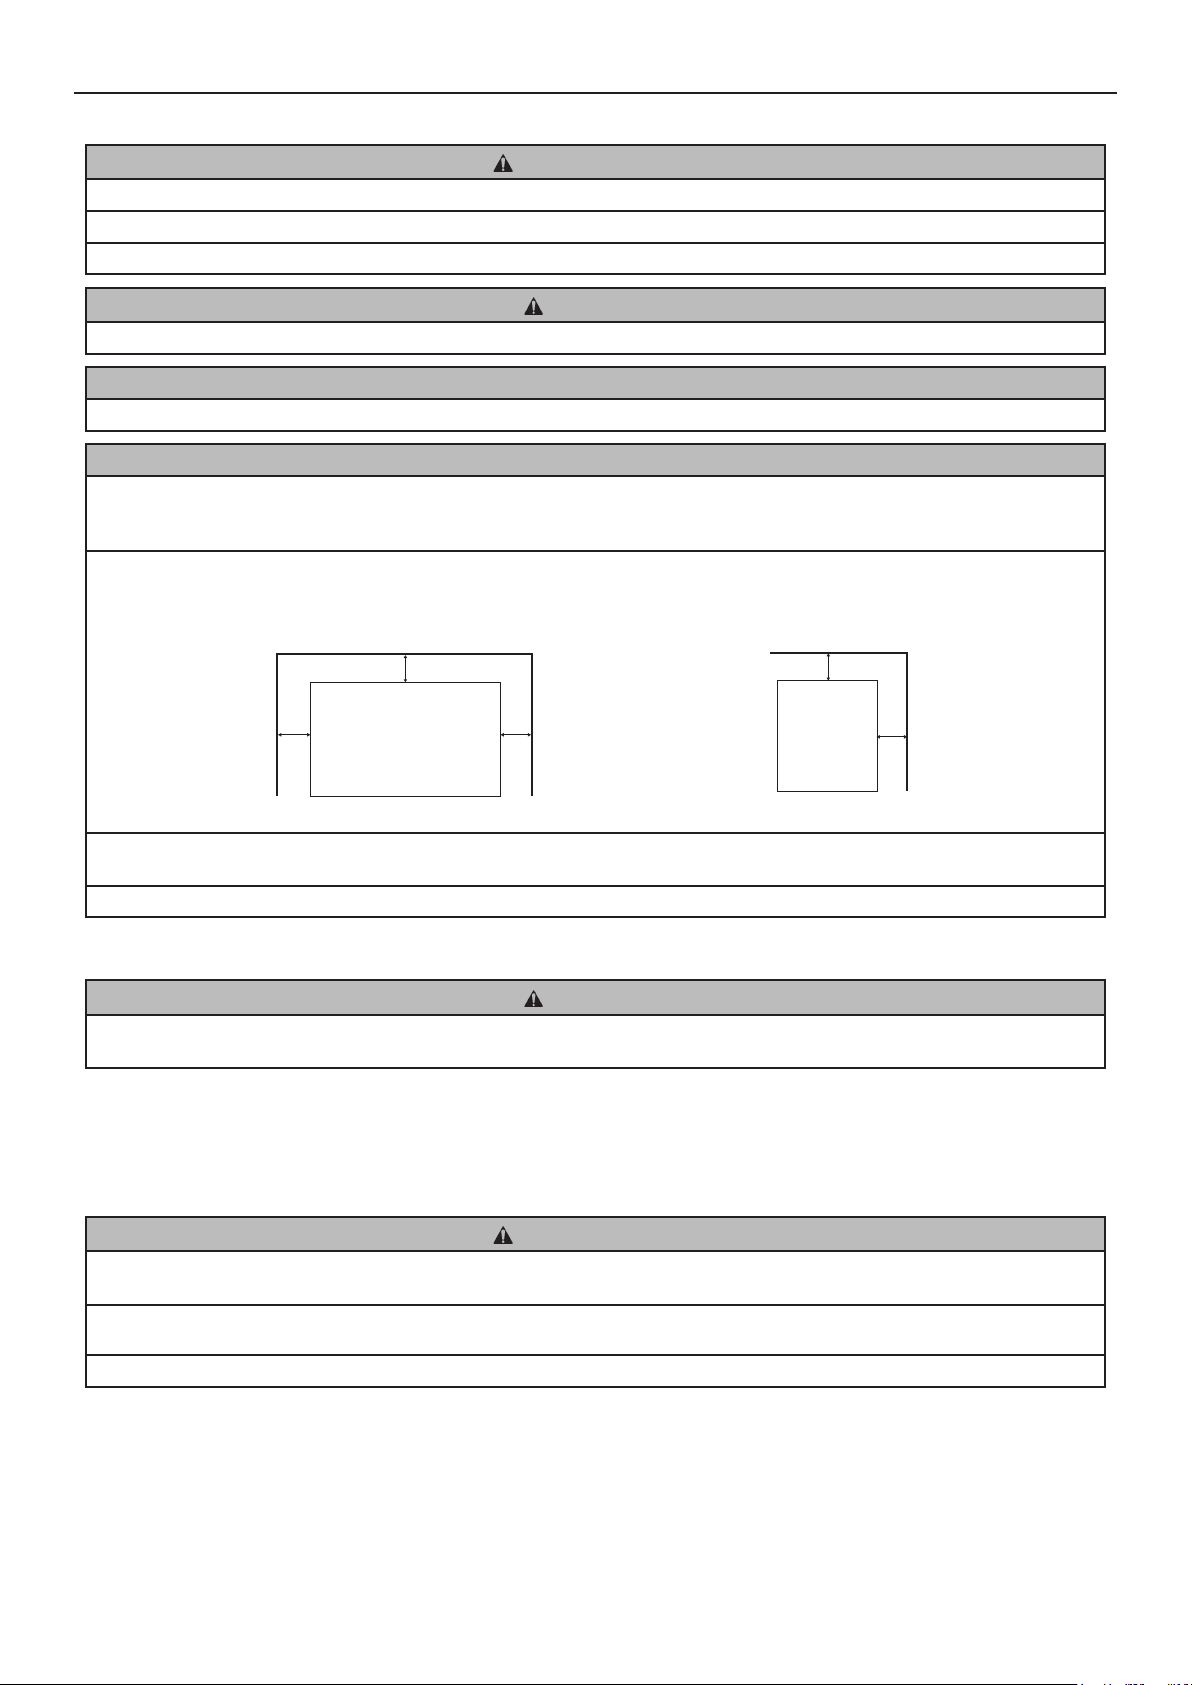
Allow the clearance specied below for proper air circulation and ease of maintenance and/or service should they be required.
Top View
Rear
15cm
Side View
Top
15cm
15cm
Right
Front
ICEMAKER
15cm
Rear
Left
15cm
In some high humidity environments, condensation may form inside the machine and drip onto the oor. Do not install where
the oor can be affected by water.
Avoid prolonged exposure of the appliance to direct sunlight.
ICEMAKER
Front
5. INSTALLATION
CAUTION
Incorrect installation can cause harm to people, animals or other items, for which the manufacturer cannot be held
responsible.
1) Position the icemaker in the selected permanent site.
2) Level the icemaker in both the left-to-right and front-to-rear directions by adjusting the legs.
6. ELECTRICAL CONNECTIONS
WARNING
THIS APPLIANCE MUST BE EARTHED
This icemaker requires an earth that meets the national and local electrical code requirements.
To prevent possible severe electrical shock to individuals or extensive damage to the unit, install a proper earth wire to the icemaker.
Disconnect the main power supply before any maintenance, repairs or cleaning is undertaken.
* This appliance requires a separate 220 - 240VAC, 13A supply. The electrical supply must be protected by a suitable circuit
breaker.
* Usually an electrical permit and services of a licensed electrician are required.
4
ENGLISH
For the U.K. and the Republic of Ireland only
* The wires in the mains lead are coloured in accordance with the following code:
Green & Yellow = Earth
Blue = Neutral
Brown = Live
As the colours of the wire in the mains lead of this appliance may not correspond with the coloured markings identifying the
terminals in your plug, proceed as follows:
The wire which is coloured Green-and-Yellow must be connected to the terminal in the plug which is marked with the letter
E or by the symbol
terminal which is marked with the letter N or coloured Black. The wire which is coloured Brown must be connected to the
terminal which is marked with the letter L or coloured Red.
* Should the socket outlets in the installation site not be suitable for the plug supplied with your product, the plug must be
removed (cut off if it is moulded on plug) and an appropriate plug tted.
If the non-rewirable plug has been cut from the power supply cord, it must be disposed of. There should be no attempt to
reuse it. Inserting such a plug into a socket elsewhere presents a serious risk of electrical shock.
* The non-rewirable plug must never be used without a fuse cover being tted.
The correct replacement for the detachable fuse cover is identiable from the manufacturer’s reference number stamped on
the plug.
or coloured Green or Green-and-Yellow. The wire which is coloured Blue must be connected to the
Supply of replacement fuse covers can be obtained from Hoshizaki Parts/Service Centres.
Fuses should be rated at 13A and approved to BS 1362.
7. WATER SUPPLY AND DRAIN CONNECTIONS
WARNING
Connect to potable cold water supply only.
* The connections to the mains water supply must be made in accordance with the countries’ current requirements of the Water
Supply or Water Fittings Regulations.
* Icemaking water must be potable water. Where scaling can be caused by water quality, installation of an external lter or
softener is recommended. Contact your local water treatment professional or Hoshizaki service agent.
* Water supply pressure should be minimum 0.05 MPa (0.5 bar) and maximum 0.8 MPa (8 bar). If the pressure exceeds 0.8 MPa (8
bar), use a proper pressure reducing valve. Do NOT throttle back the supply tap.
* A plumbing permit and services of a licensed plumber may be required in some areas.
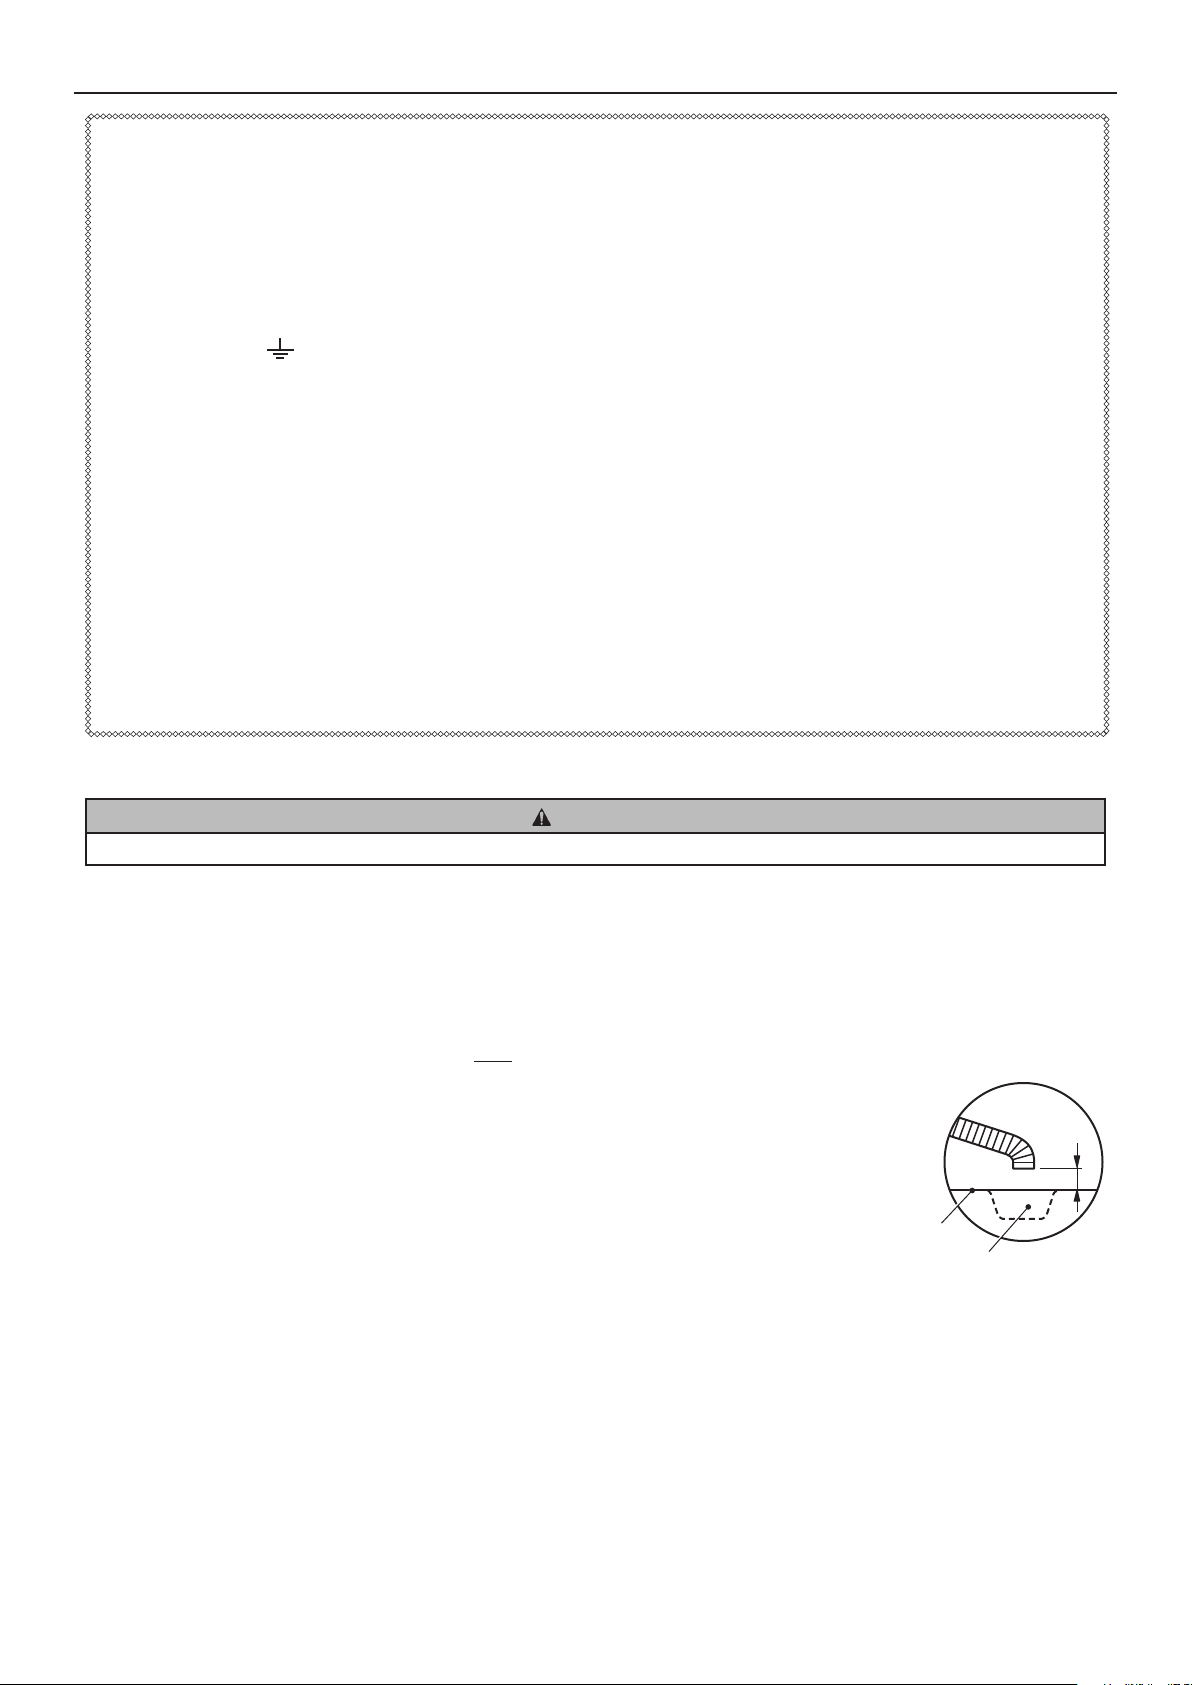
* The icemaker drain is gravity ow, so ensure drain pipe has an adequate pitch or fall.
* Drain lines should not be piped directly to the sewer system. A vertical air gap of a minimum of 5
cm should be between the end of the drain pipes from the icemaker and storage bin and the oor
drain.
* Be sure to use the new hose-sets supplied with the appliance. Do not reuse any old hose-sets.
Floor
5cm air gap
Drain
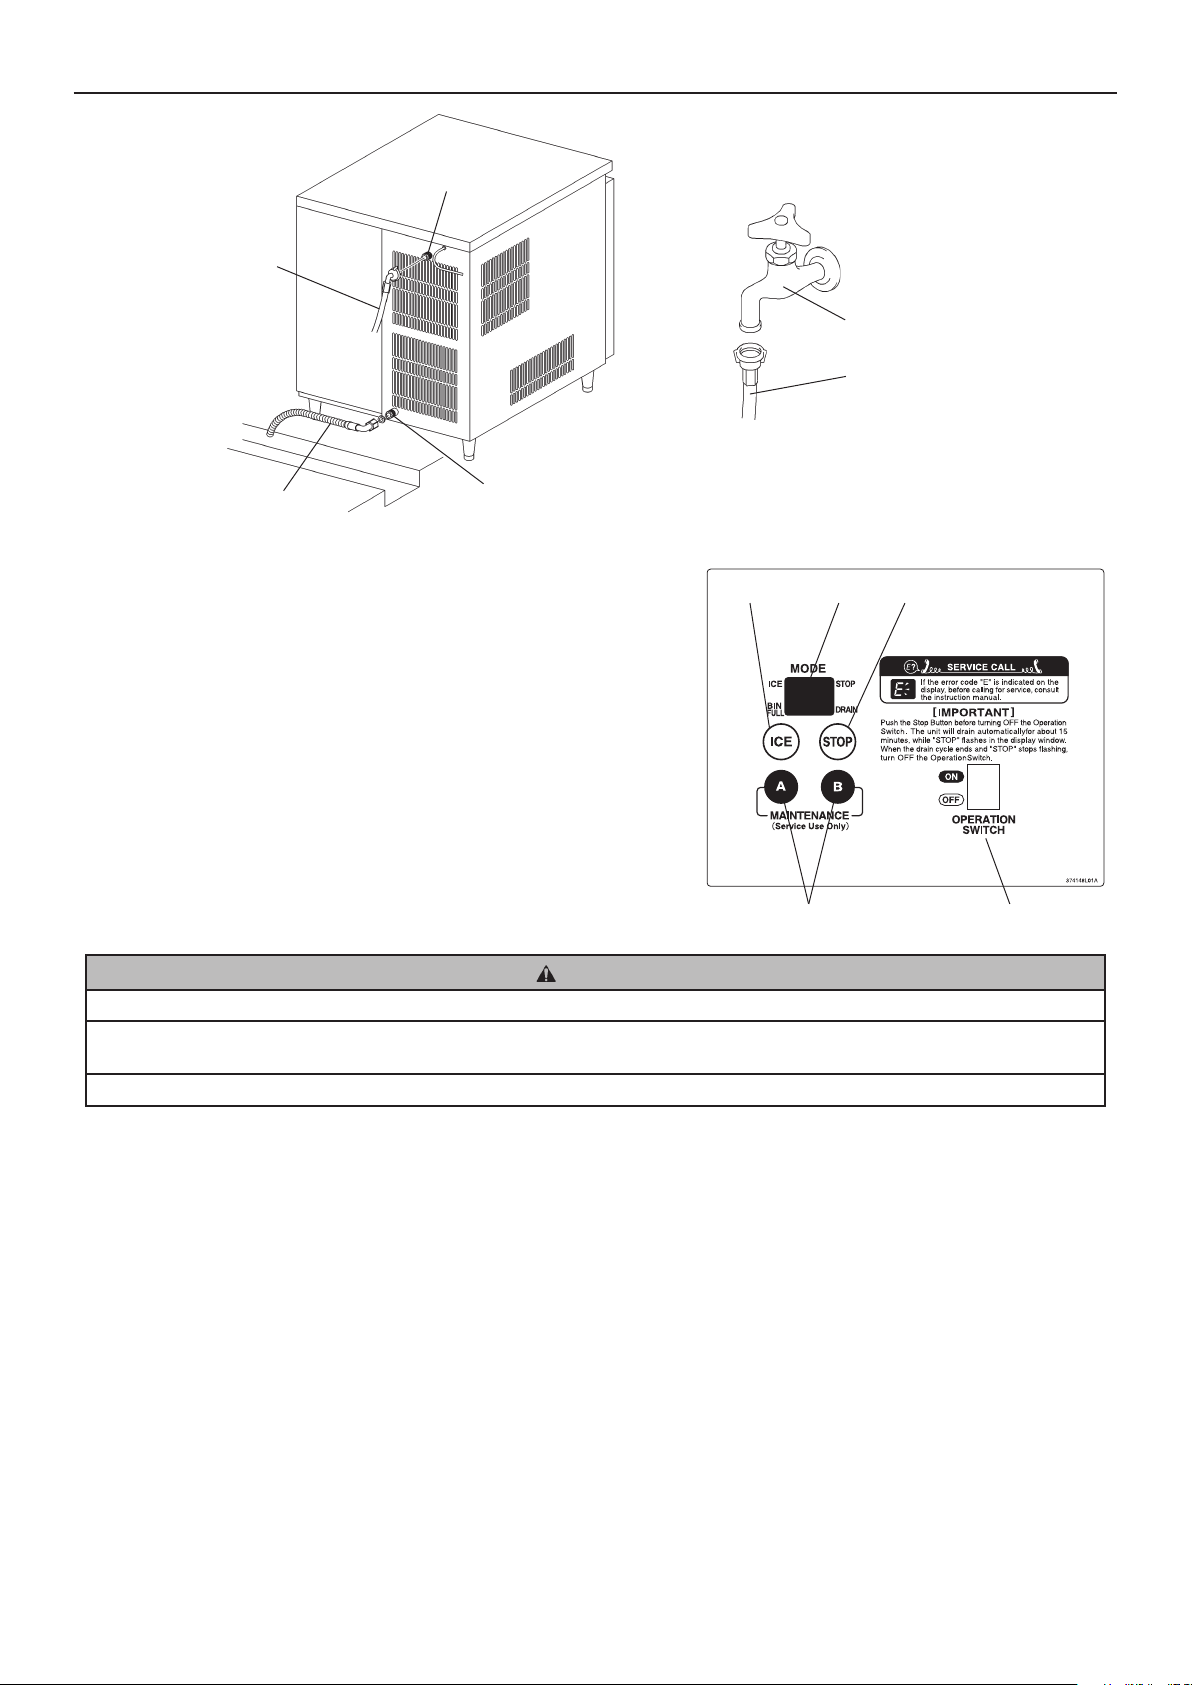
1) Attach the angled end of white exible inlet hose (accessory) to the G3/4 tting on the top rear of the icemaker as indicated,
ensuring rubber sealing washer is correctly positioned. Hand tighten sufciently to provide leak free joint.
2) Attach the other end of inlet hose to the water tap, noting washer is correctly positioned before hand tightening as above. It is
a wise precaution to have a stop valve within easy reach.
3) Hand tighten grey flexible outlet hose (accessory) onto the R3/4 fitting at the bottom rear of the icemaker as indicated,
ensuring rubber washer is correctly positioned to obtain a leak free joint. The pipe can be cut to length as necessary to suit
position of main drain.
5
ENGLISH
Inlet Hose
Water Supply
Inlet G3/4
Water Supply Tap
Inlet Hose
Outlet Hose
8. START-UP PROCEDURE
1) Check that the power supply cord is disconnected.
2) Move the operation switch on the operation panel to the “ON” position.
3) Open the water supply tap.
4) Connect the power supply and energise.
5) The display will illuminate in the “ICE” mode.
6) The following should occur in sequence:
a) Water reservoir will ll.
b) Gear motor will start.
c) Compressor will start.
Drain Outlet
R3/4
Operation Panel
Ice Button Display Stop Button
Maintenance Button
(service use only)
Operation Switch
HYGIENE
Check the conditions and quality of the ice production.
Do not use ice produced in the trial run. It might be contaminated with foreign matter in the water circuit. Discard or ush down
the drain.
Clean the storage bin before use (see “III. 1. CLEANING” in instruction manual).
9. FINAL CHECKS
1) Check for correct supply voltage.
2) Check that the icemaker is properly earthed.
3) Check that the icemaker is free from vibration.
4) Check that all the panels are xed and secure.
5) Check for proper operation according to “8. START-UP PROCEDURE”.
6) Check the water supply and drain connections for water leaks.
7) Instruct the user on correct machine use. Hand the instruction manual to the user.
6
FRANCAIS
INFORMATIONS DE SECURITE IMPORTANTES
Tout au long de ce manuel, des avis attirent votre attention sur des situations qui pourraient
entraîner la mort, des blessures graves ou des dégâts à l’appareil.
AVERTISSEMENT
ATTENTION
AVIS
HYGIENE
IMPORTANT
La machine à glace emploie du uide frigorigène exempt de HFC (propane) et une isolation en
mousse exempte de HFC, non nocifs pour la couche d’ozone, ainsi que des matériaux durables
qui ont très peu d’impact sur le réchauffement mondial.
Signale une situation dangereuse qui, si elle n’est pas évitée,
peut entraîner des blessures graves voire mortelles.
Signale une situation dangereuse qui, si elle n’est pas évitée, peut
entraîner des blessures mineures ou modérées.
Signale une situation dangereuse qui, si elle n’est pas évitée, peut
entraîner des dégâts à l’appareil.
Signale des précautions importantes à prendre en matière d’hygiène
et de sécurité alimentaire.
Signale des informations importantes sur l’utilisation de l’appareil et
son entretien.
AVERTISSEMENT
L’unité de refroidissement de la machine à glace contenant des uides frigorigènes inammables,
son entretien et son rechargement ne doivent être réalisés que par des techniciens agréés.
Le uide frigorigène de cette machine à glace est inammable et est enfermé dans le système
de réfrigération. Bien que le fluide frigorigène ne présente aucun risque de fuite dans des
conditions d’utilisation normales, manipulez la machine à glace avec la plus grande précaution
an d’éviter d’endommager le système.
En cas de fuite de fluide frigorigène résultant d’un dommage accidentel au système de
réfrigération :
* Interdire toute étincelle ou corps incandescent dans le voisinage.
* N’utiliser aucun interrupteur ni prise électrique dans le voisinage.
* Ne pas utiliser de amme nue.
* Ventiler immédiatement la pièce en ouvrant les portes et/ou fenêtres.
* Appeler un technicien de réparation.
IMPORTANT
An d’installer correctement le produit avec toutes les garanties de sécurité, veuillez d’abord
lire attentivement cette notice et suivez soigneusement les instructions.
A la n de l’installation, mettre la machine à glace en service pour vérier l’absence d’anomalies.
Indiquer à l’utilisateur comment utiliser et entretenir la machine à glace conformément à la
notice d’utilisation.
Cette notice doit être remise à l’utilisateur après l’installation et conservée par ce dernier avec
la Notice d’utilisation pour consultation ultérieure éventuelle.
7
FRANCAIS
AVERTISSEMENT
Cette machine à glace a été conçue pour des applications commerciales ; elle ne peut être
utilisée qu’aux ns auxquelles elle est expressément destinée.
Toute autre utilisation doit être considérée comme inappropriée et donc dangereuse.
Le fabricant décline toute responsabilité pour les dégâts provoqués par une utilisation
inappropriée, incorrecte et abusive.
L’installation, et le transfert le cas échéant, doivent être effectués par un personnel
qualié, conformément aux réglementations en vigueur et aux consignes du fabricant.
Veillez à ce que les ouvertures de ventilation de l’enceinte de l’appareil et de la structure
intégrée ne soient pas obstruées.
Pour accélérer le processus de décongélation, ne pas utiliser d’équipements mécaniques ni
des méthodes autres que celles recommandées par le fabricant.
Si le cordon d’alimentation est endommagé, il doit être remplacé par un cordon de rechange
disponible auprès des centres de pièces détachées et d’entretien Hoshizaki.
8
FRANCAIS
1. CONSTRUCTION
Panneau de commande
Panneau avant (gauche)
Volet d’aération
2. ACCESSOIRES
CD 1
Flexible d’arrivée 1
Tuyau de sortie 1
Pied réglable 4
Cordon d’alimentation 1
Capot de connecteur 1
Pelle à glaçons 1
Filtre à air
Panneau supérieur
Pelle à glaçons
Bac de stockage
Porte
Panneau avant
Cordon d’alimentationCD
3. DEBALLAGE
Flexible d’arrivée
Tuyau de
sortie
Pied réglable Capot de
connecteur
AVERTISSEMENT
Les enfants doivent être tenus à l’écart des éléments d’emballage (sacs en plastique et polystyrène expansé) car ils
constituent des sources de danger potentielles.
ATTENTION
Ne pas soulever ou déplacer le carton en utilisant les sangles d’emballage.
En cas de déplacement de l’appareil à la main, retirer les panneaux et tenir le châssis de l’appareil.
Toujours porter des gants de protection lors du transport de l’appareil.
Lors de la manipulation du carton ou de l’appareil déballé, travailler à deux pour éviter les blessures.
AVIS
Enlever le carton de transport, le ruban adhésif et le matériel d’emballage. S’il reste des matériaux d’emballage dans la
machine à glace, elle ne fonctionnera pas correctement.
|1) Après avoir enlevé les matériaux d’emballage, vérifier que la machine à
glace et le bac de stockage sont en bon état. En cas de doute, ne pas
utiliser la machine à glace et faire appel à un technicien qualié.
2) Retirer le ruban d’expédition maintenant la porte et le panneau avant
(gauche).
3) Ouvrir la porte et retirer le groupe d’accessoires. Vérifier le contenu
conformément à la section « 2. ACCESSOIRES ».
Panneau
avant
(gauche)
Panneau supérieur
4) Enlever les panneaux avant (gauche) et supérieur.
5) Retirer le lm protecteur en plastique recouvrant l’extérieur de la machine.
Si la machine à glace a été exposée au soleil ou à la chaleur, la laisser
refroidir avant d’enlever le lm.
9
Panneau supérieur : Déposer les vis et le
soulever.
Panneau avant (gauche) : Retirer les vis. Soulever
et tirer vers soi.
FRANCAIS
4. EMPLACEMENT
AVERTISSEMENT
Cette machine à glace n’est pas conçue pour être utilisée à l’extérieur.
La machine à glace ne doit pas être placée à proximité de fours, de grills ou de toute autre source de chaleur importante.
Cet appareil n’est pas conçu pour être installé dans une zone où un jet d’eau peut être utilisé.
ATTENTION
La machine à glace doit avoir une assise solide et horizontale.
AVIS
Ne rien poser sur le dessus de la machine ni devant le volet d’aération.
IMPORTANT
La température ambiante normale de service doit être comprise entre 5 °C et 40 °C. Le raccordement à l’eau est uniquement
pour de l’eau froide. Le fonctionnement de la machine en dehors de ces plages de températures, pendant des durées
prolongées, risque d’affecter la capacité de production de glaçons.
Pour assurer une bonne circulation d’air et faciliter les opérations de maintenance ou d’entretien, prévoir le dégagement
indiqué ci-dessous.
Vue de dessus
Arrière
15 cm
Vue latérale
Haut
15 cm
15 cm
Droite
Avant
MACHINE
A GLACE
15 cm
Arrière
Gauche
15 cm
MACHINE A GLACE
Avant
Dans certains environnements très humides, de la condensation peut se former à l’intérieur de la machine et couler sur le sol.
Ne pas installer l’appareil sur un sol que l’eau pourrait endommager.
Eviter toute exposition prolongée de l’appareil à la lumière directe du soleil.
5. INSTALLATION
ATTENTION
Une installation incorrecte de la machine peut avoir des conséquences néfastes sur les personnes, les animaux ou d’autres
choses, pour lesquelles le fabricant ne peut être tenu responsable.
1) Placer la machine à glace à l’endroit dénitif choisi.
2) A l’aide des pieds, régler l’horizontalité avant/arrière et gauche/droite de la machine à glace.
6. BRANCHEMENTS ELECTRIQUES
AVERTISSEMENT
CET APPAREIL DOIT ETRE MIS A LA TERRE
Cette machine à glace doit avoir une mise à la terre qui respecte les réglementations électriques nationales et locales.
Pour éviter tout risque de décharges électriques graves ou de dégâts importants à l’appareil, installer un câble de mise à la
terre approprié sur la machine.
Avant toute opération de maintenance, réparation ou nettoyage, débrancher l’alimentation électrique.
* Cet appareil nécessite une alimentation 220 - 240 V CA 13 A séparée. L’alimentation électrique doit être protégée par un
disjoncteur approprié.
* Il faut généralement obtenir une autorisation pour effectuer l’installation électrique et recourir aux services d’un électricien qualié.
10
 Loading...