

Horizon SXE7.7 Owner’s Manual
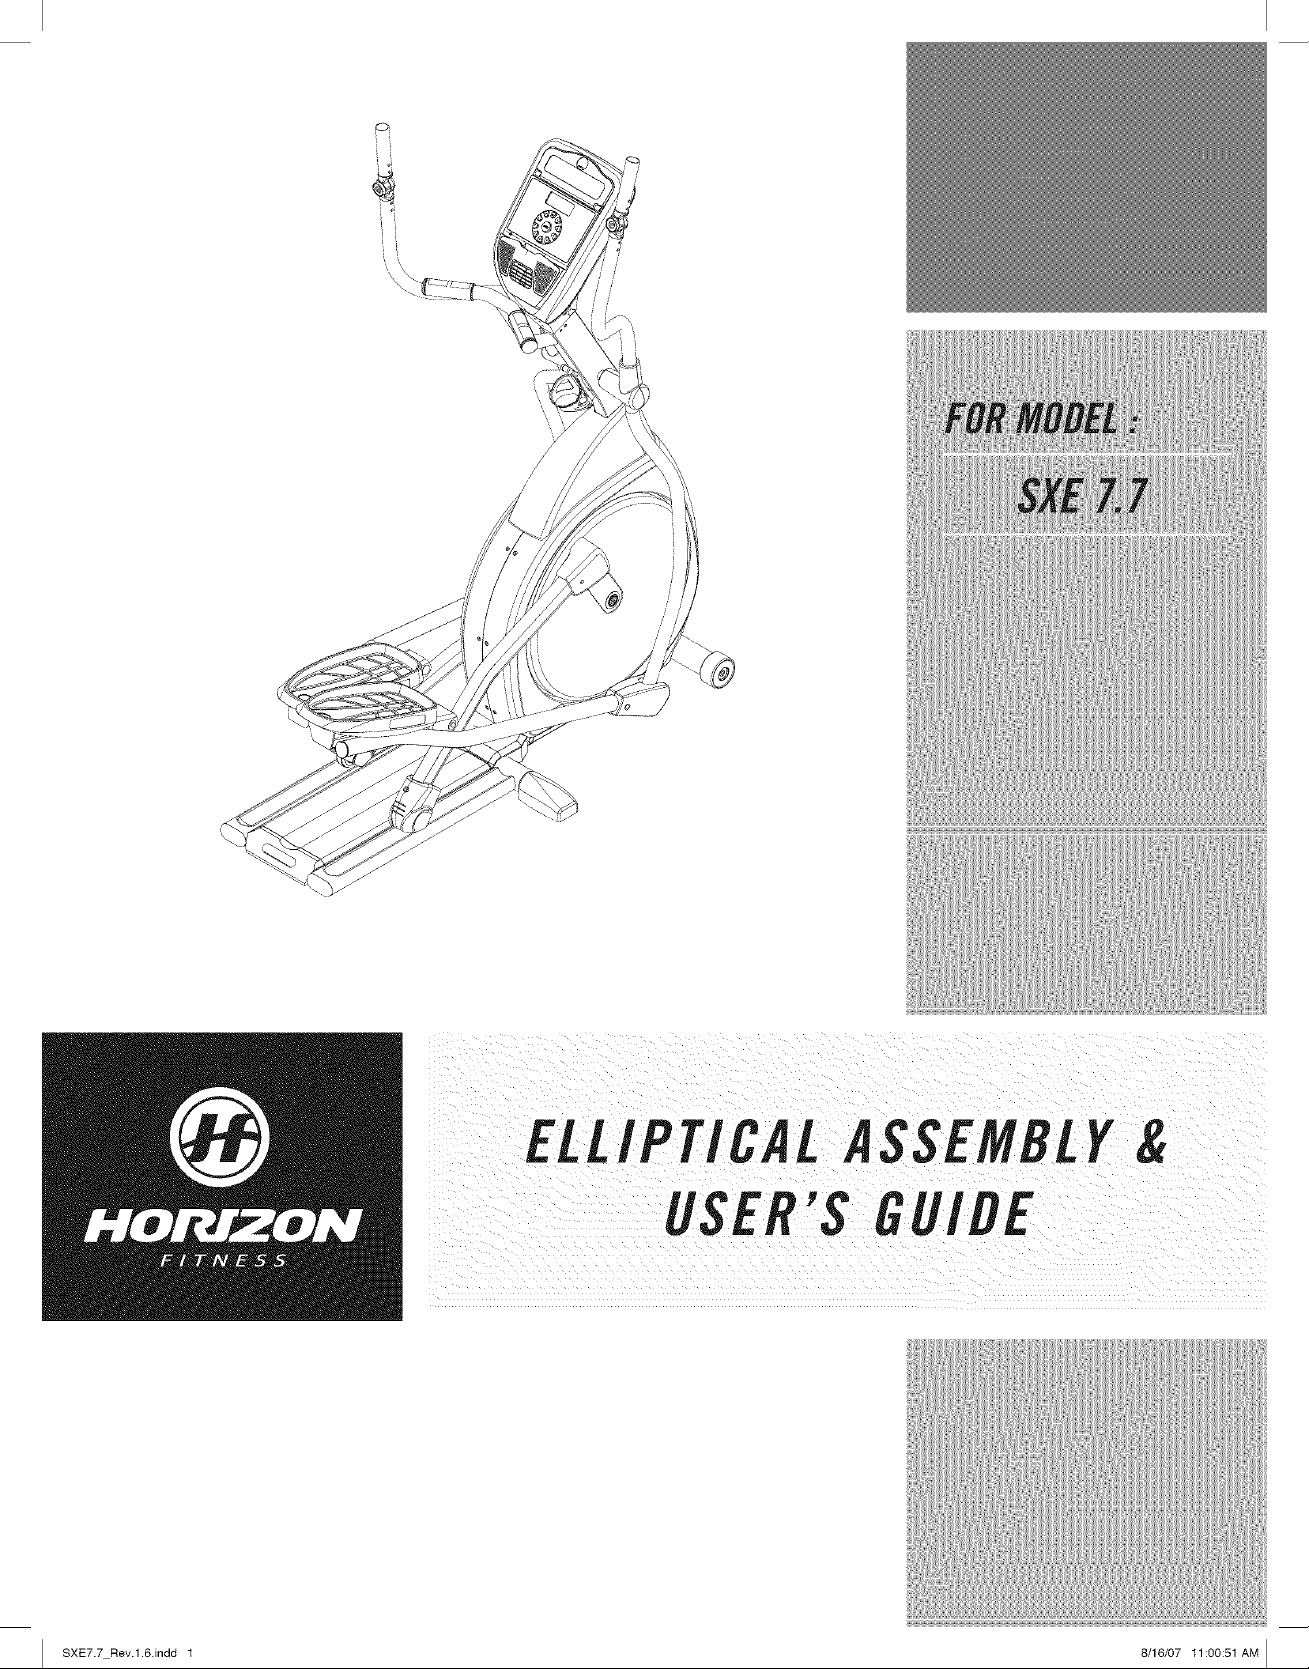
ELLIPTICAL ASSEMBLY&
USER'S GUIDE
I SXE7.7 Rev.l.6.indd 1 8/16/07 11:00:51 AM I
!ii........................................................................................................................................................................................iJ _!!!!!!!!!!!!!!!!!!!!!!!!!!!!!!!!!!!!!!!!!!!!!!i
CONGRATULATIONSand TttAflKYOUforyourpurchaseof this HorizonFitnessefliptical/
Whetheryour goal is to win races or simply enjoy a fuller, healthier fifestyle, a HorizonFitness elliptical
can help you attain it- adding club-quafity performance toyour at-home workouts, with the ergonomics
and innovative features you need to get stronger and healthier, faster. Because we're committed to
designing fitness equipment from the inside out, we use only the highest quafity components. It's a
commitment we back with one of the strongest frame-to-brake warranty packages in the industry.
Youwant exerciseequipment that offersthemost comfort, the best reliability and the highest quality
in its class.
HorizonFitnessdelivers.
Important Precautions
Assembly 5
Before YouBegin i4
Elliptical Operation 15
Conditioning Guidelines 2i
Troubleshooting & Maintenance 27
Limited Warranty 34
CONTACTINFORMATION Back Cover
4
I SXE7.7 Rev.l.6.indd 2-3 8/16/07 11:00:51 AM I
iiI_¢_,i
_iii i
SAVETHESEINSTRUCtiONS
Readall instructions before using this elliptical. Whenusing an electrical product, basic precautions
shouldalwaysbefollowed,including thefollowing:Readaft instructionsbeforeusingthis elliptical It is the
responsibifityof the ownerto ensurethat aft usersof this efliptical areadequatelyinformedofaft warnings
and precautions.If you haveany questionsafter reading this manual, contactSearsat the numberlisted
on thebackcoverof this manual
If you experience any kind of pain, including, but not limited to chest pains, nausea, dizziness, or
shortness of breath, stop exercising immediately and consult your physician before continuing.
o Maintain a comfortable pace. Donot sprint above 80 rpms on this machine.
o Tomaintain balance, it is recommended to keep a grip on the handlebars while exercising, mounting or
dismounting the machine.
o Donot wear clothes that might catch onany part of the elliptical
o Donot turn pedal arms by hand.
o Make sure handlebars are secure before each use.
o Donot insert or drop any object into any opening.
• Unplug elliptical before moving or cleaning it. Toclean, wipe surfaces down with soap and slightly damp
cloth only,:never use solvents. (SeeMAINTENANCE)
o This elliptical should not be used by persons weighing more than 275 pounds. Failure to comply will void
the warranty.
o This elliptical is intended for in-home use only. Do not use this elliptical in any commercial, rental, school
or institutional setting. Failure to comply will void the warranty.
o Donot use elliptical in any location that is not temperature controlled, such as but not limited to garages,
porches, pool rooms, bathrooms, carports or outdoors. Failure to comply may void the warranty.
o Use the elliptical only as described in this manual
o Keep the topside of the foot support clean and dry.
o Care should be taken when mounting or dismounting the equipment. Before mounting or dismounting,
move the pedal on the mounting or dismounting side to its lowest position and bring the machine to a
complete stop.
o Disconnect aft power before servicing the equipment.
IMPORTANT..READTHESESAFETYINSTRUCtiONSBEFOREUSE!
ii! ii i i!i!ili !i ii i ii, ii iil i! ii i ii!!i!i !!ii il i i i!i:
Thereareseveralareasdunng the assemblyprocessof a elflpticat that specialattention mustbepa_dIt zs
i veryimportant to followthe assemblyinstructionscorrectlyand to makesureall parts arefirmly tightened,
theassembly,instructions arenot foilowedcorrectly, not
i tightened and will seemlooseand may causeirritating noisesl Topreventdamageto the
i assembly,instructionsmust be reviewedandcorrectiveactions shouldbe taken.
i
UNPACKING
Unpackthe productwhereyou will be usingit. Placethe producton a levelflat surface.It is recommended
that you place a protectivecovering onyour floor.During each assemblystep, ensurethat ALLnuts and
boltsare in placeandpartially threadedin beforecompletelytightening anyONEbolt.
NOTE:A light application of greasemay aid in the installation of hardware.Anygrease,suchas lithium
bikegreaseis recommended.
I SXE7.7 Rev.l.6Jndd 4-5
essentialthatyoureiiipticaiiS,Sedonlyindoors,in ciimaiecontroiiedroom:ffyoureiiipU_ai_asbee,
i exposedto colder iemperaturesor high moistureClimateS; it is Strongly,recommendedthat the elliptical is
rme! q te_!ra!u (o tim Se: Fa!,q ay!!!s! ,rem!t ! !,ctr!,! ! !a'!!re
MODELNAME:
i l
Referto the SERIALNUMBERandMODELNAMEwhencafling forservice.
8/16/07 11:00:55 AM I
1:2_i
_iii i
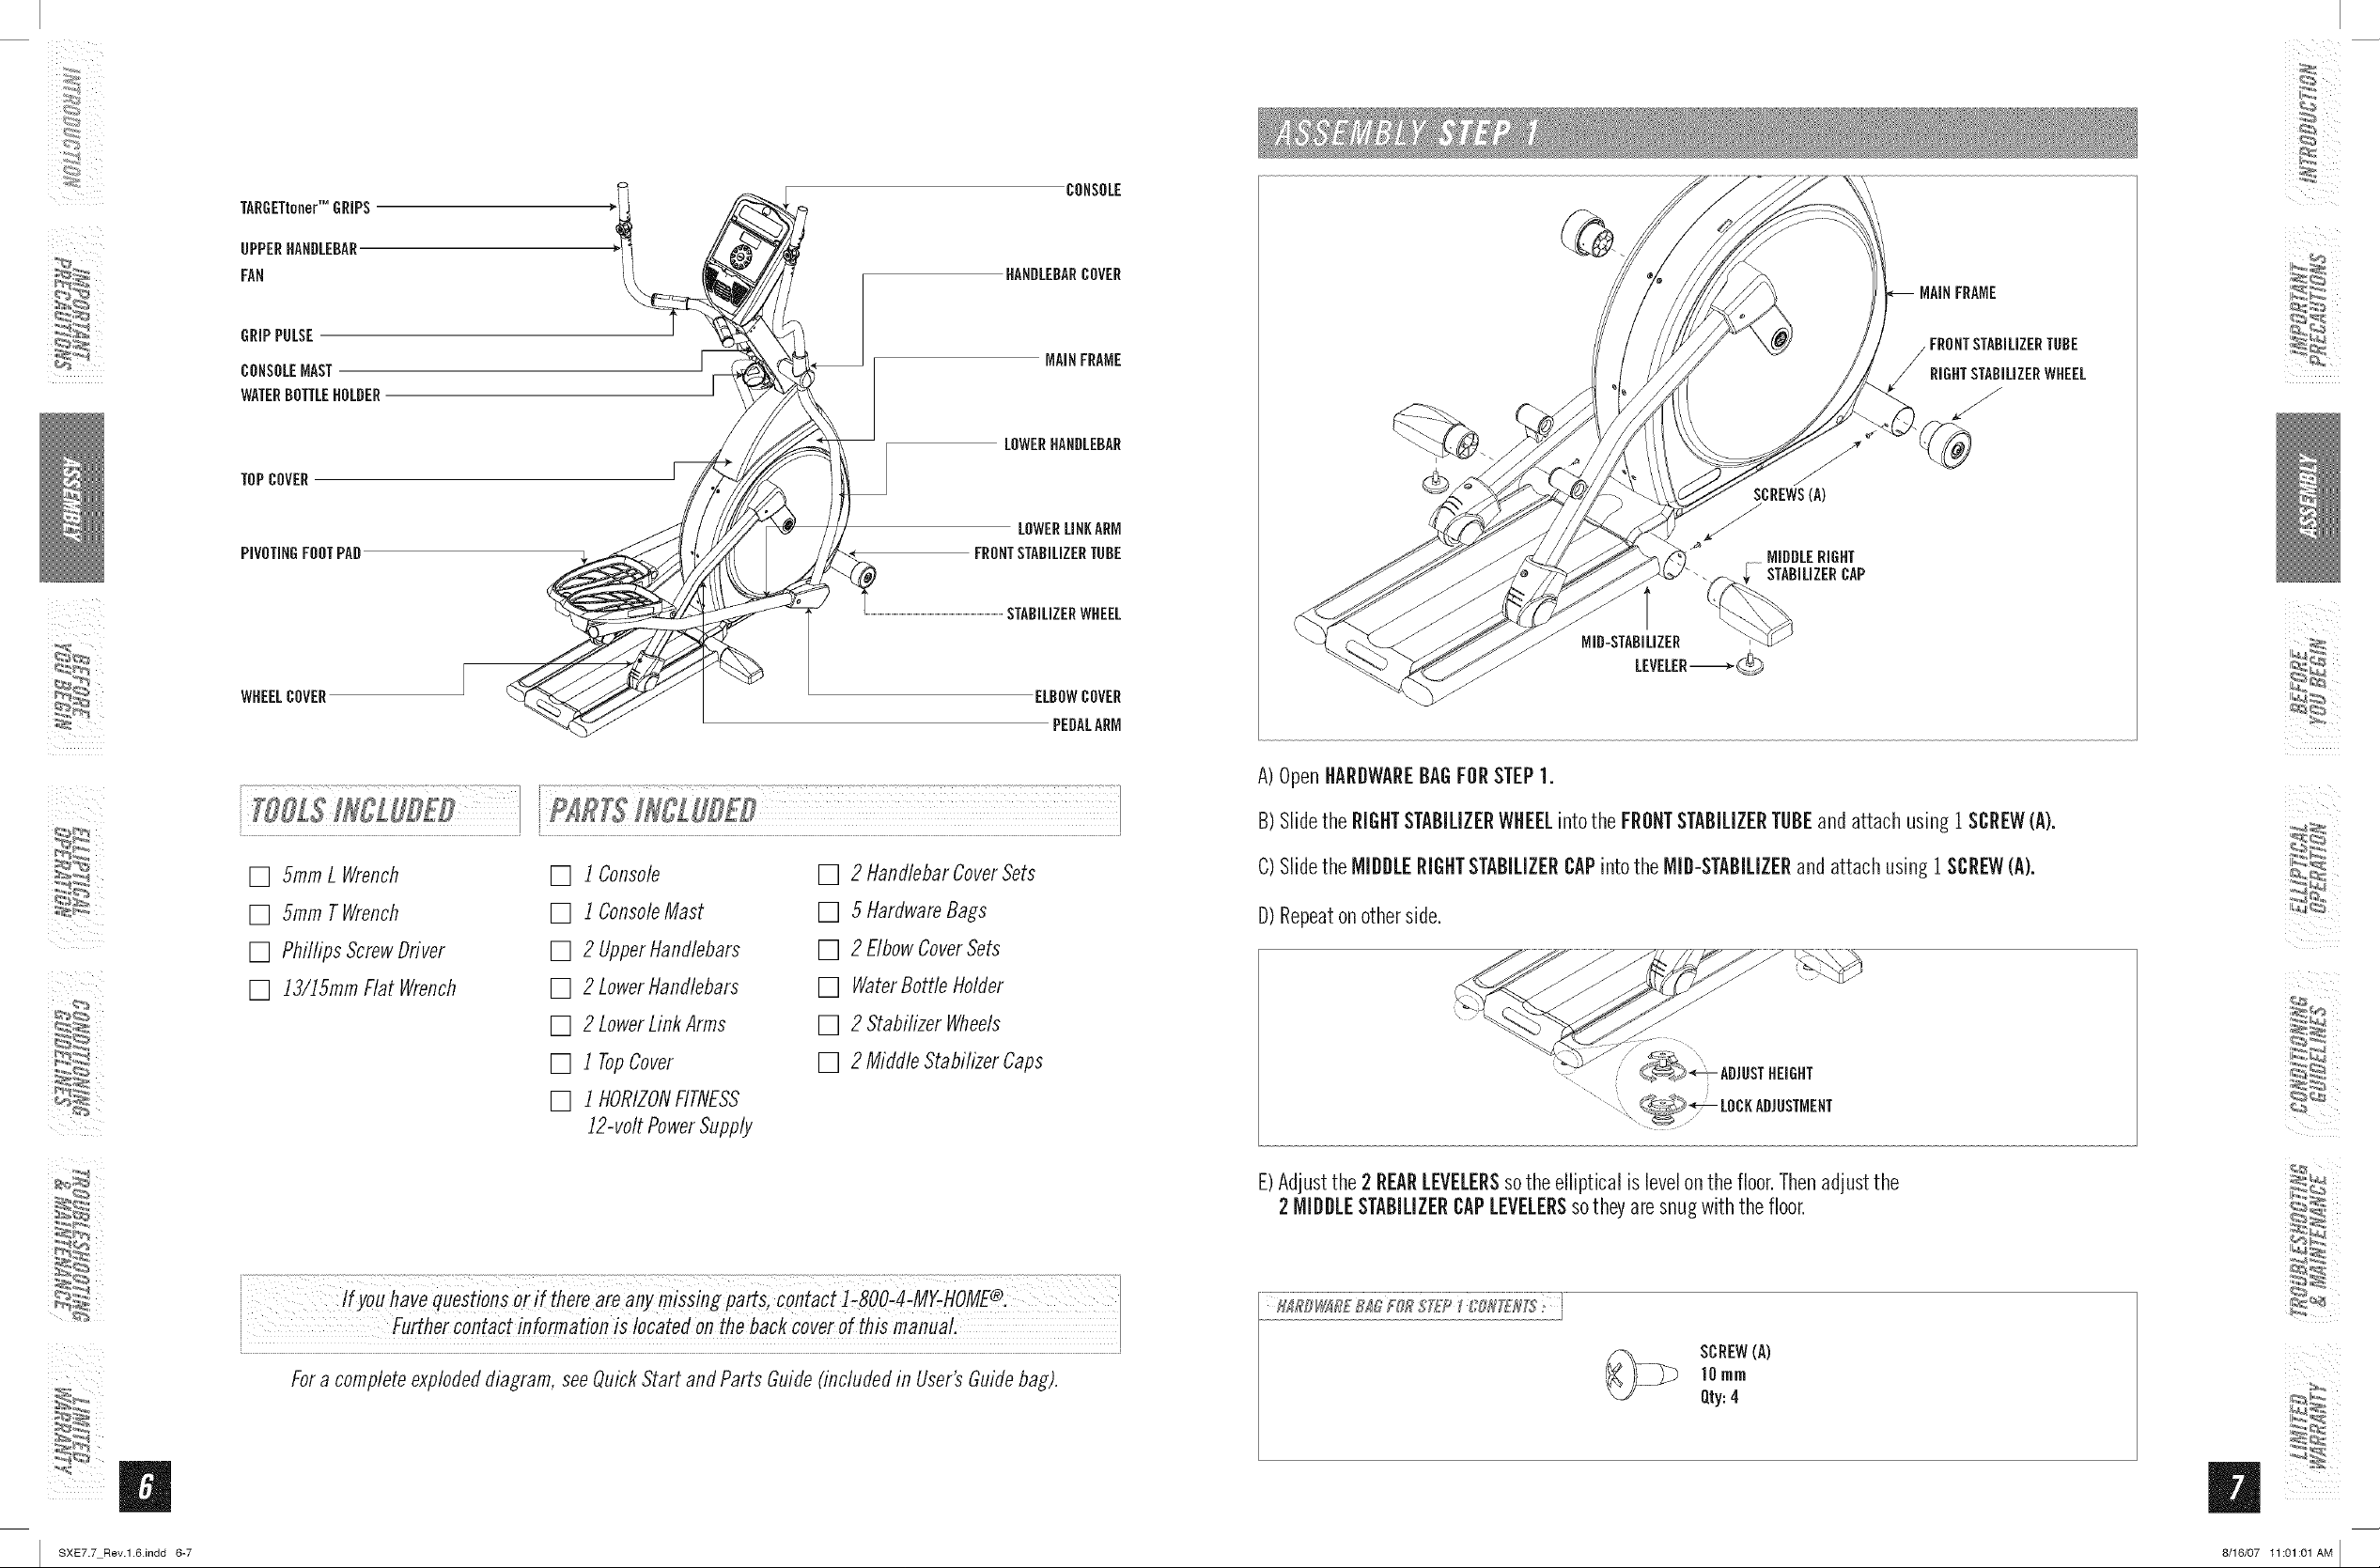
TARGETtonerTM GRIPS
UPPERHANDLEBAR
FAN
GRiPPULSE
CONSOLEMAST
WATERBOTTLEHOLDER
TOPCOVER
PIVOTINGFOOTPAD
WHEELCOVER ELBOWCOVER
HANDLEBARCOVER
LOWERHANDLEBAR
FRONTSTABILIZERTUBE
STABiLiZERWHEEL
CONSOLE
MAINFRAME
LOWERLINKARM
PEDALARM
MID-STABILIZER
LEVELER-_,-_
SCREWS(A)
/
MIDDLERIGHT
STABILIZERCAP
[] 5ramL Wrench
[] 5ram TWrench
[] Phillips ScrewDriver
[] ]3/15mm Flat Wrench
[] i Console
[] ] ConsoleMast
[] 2 Upperl-tandlebars
[] 2 LowerHandlebars
[] 2 LowerLinkArms
[] i TopCover
[] i HORIZONFITNESS
]2-volt PowerSupply
[] 2 HandlebarCoverSets
[] 5 HardwareBags
[] 2 ElbowCoverSets
[] WaterBottleHolder
[] 2 StabilizerWheels
[] 2 MiddleStabilizerCaps
co,taCt! 8OO MY-HOME®
A)OpenHARDWAREBAGFORSTEP1.
B)SlidetheRIGHTSTABILIZERWHEELintotheFRONTSTABILIZERTUBEandattachusing1SCREW(A).
C)Slidethe MIDDLERIGHTSTABILIZERCAPintothe MID-STABILIZERand attach using 1SCREW(A).
D)Repeatonotherside.
\ ...............................................................
E)Adjustthe 2 REARLEVELERSsotheelliptical islevelonthe floor.Thenadjustthe
2 MIDDLESTABILIZERCAPLEVELERSsotheyaresnugwith thefloor.
I SXE7.7 Rev.l.6Jndd 6-7
i Furthercontactinformation !s locatedon theback coverofthismanuaL
Fora completeexplodeddiagram,seeQuickStartand PartsGuide(includedin User'sGuidebag).
SCREW(A)
]0 rnrn
Qty:4
_,r,
8/18/07 11:01:01 AM I
I_ i
_iii i
SPRINGWASHER(C)
BOLT(B)
i FLATWASHER(B)
CONSOLEMAST
PRE-ATTACHEB
SCREWS
WATERBOTTLEHOLDER-
TOPCOVER_-_
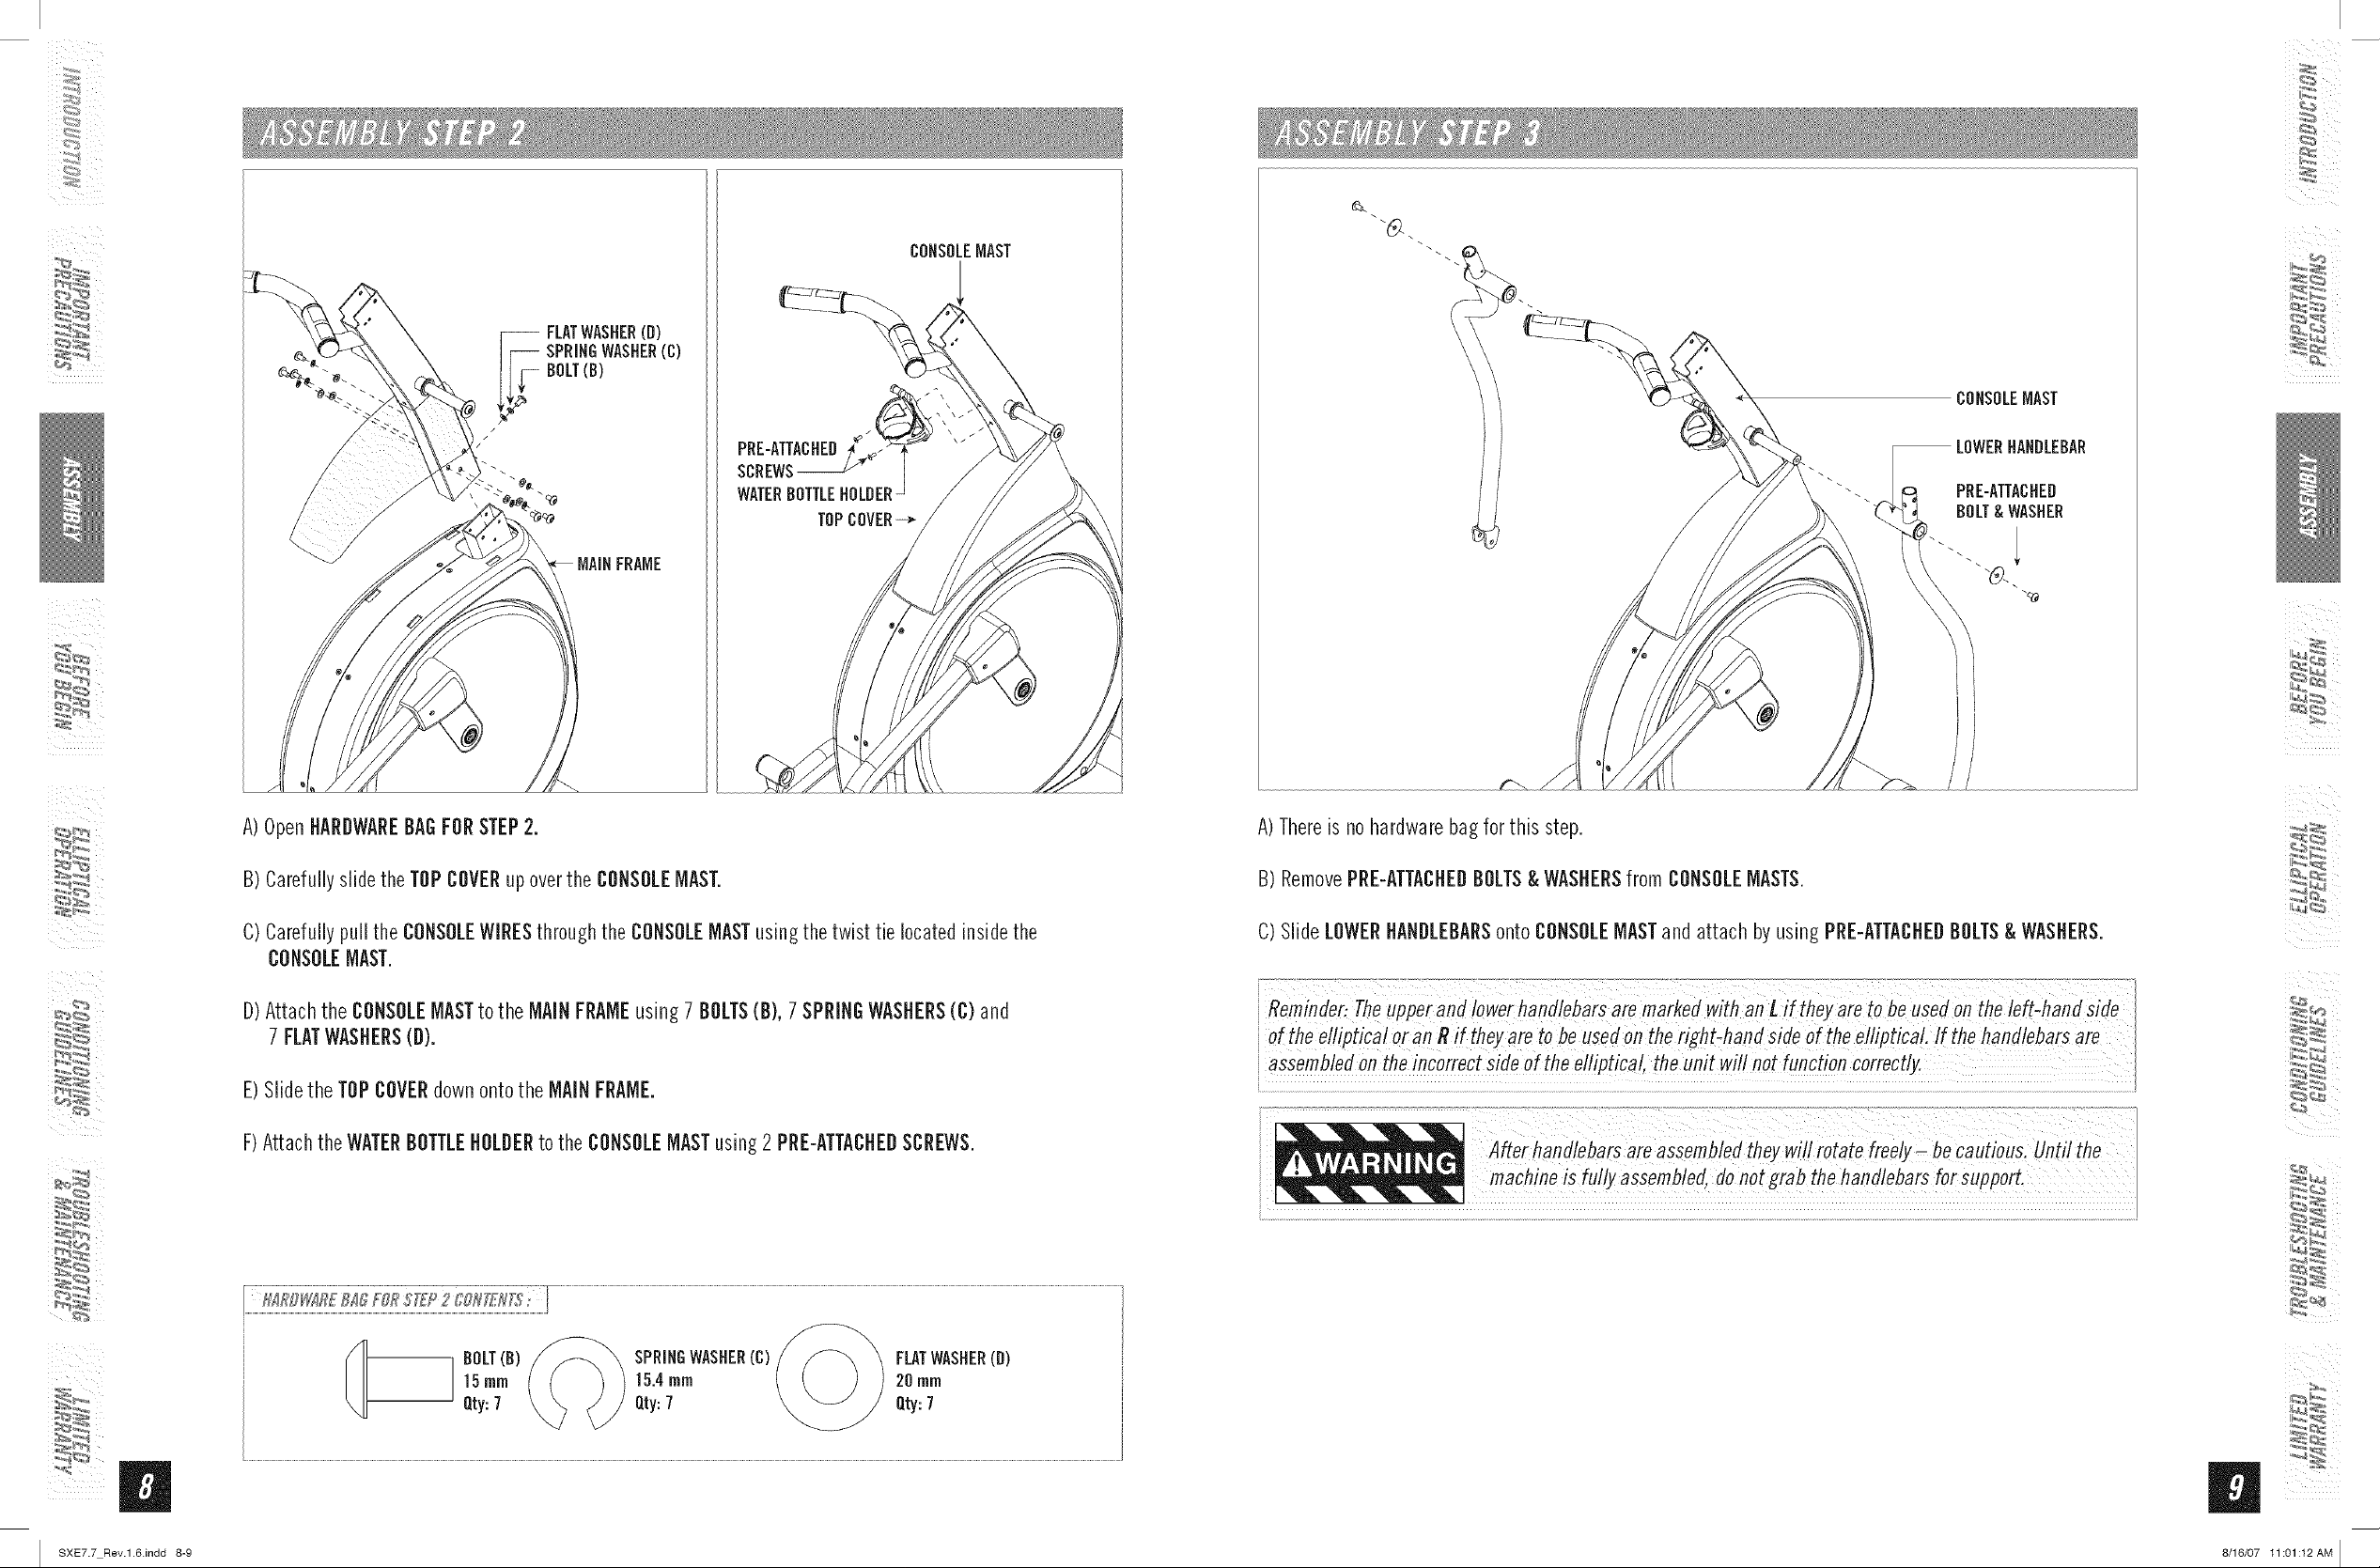
A)OpenHARDWAREBAGFORSTEP2.
B)CarefullyslidetheTOPCOVERupoverthe CONSOLEMAST.
C)Carefullypullthe CONSOLEWIRESthroughthe CONSOLEMASTusingthetwist tie locatedinsidethe
CONSOLEMAST.
D)Attachthe CONSOLEMASTto the MAiNFRAMEusing 7 BOLTS(B), 7SPRINGWASHERS(C) and
7 FLATWASHERS(D).
E)Slidethe TOPCOVERdownontothe MAiNFRAME.
F)Attach theWATERBOTTLEHOLDERtothe CONSOLEMASTusing2 PRE-ATTACHEDSCREWS.
A)Thereisno hardwarebagforthis step.
B)RemovePRE-ATTACHEDBOLTS& WASHERSfrom CONSOLEMASTS.
C)Slide LOWERHANDLEBARSontoCONSOLEMASTandattach byusing PRE-ATTACHEDBOLTS& WASHERS.
ioft/Tee!!ipt!ca!oran_ift/Teyaretobe.se_/o,7t/Teright_/Ta,_iS!Uedt/Te_!!iPt!_L!f_/_e/_an_/!ebar_ar_
!!em!!e ! !nc!rrec!!!_e !! the!!!ip!!ca th w!!!n! n!fi!, !or!e!
_,r,
I SXE7.7 Rev.l.6.indd 8-9 8/16/07 11:01:12AM I
/:2_ i
BOLT(F) FLATWASHER(G)
FLATWASHER(E)
PEDALARM
SPACER(H)
SPACER(0) TEFLONWASHER(I)
LOWERLINKARM LOWER
HANDLEBAR
/
LOWERMNKARM
LOWERHANDLEBAR
iNSiDEELBOWCOVER ELBOWCOVER
/
\
//
........ NUT(L)
OUTSIDE
_iii i
PEHALARM
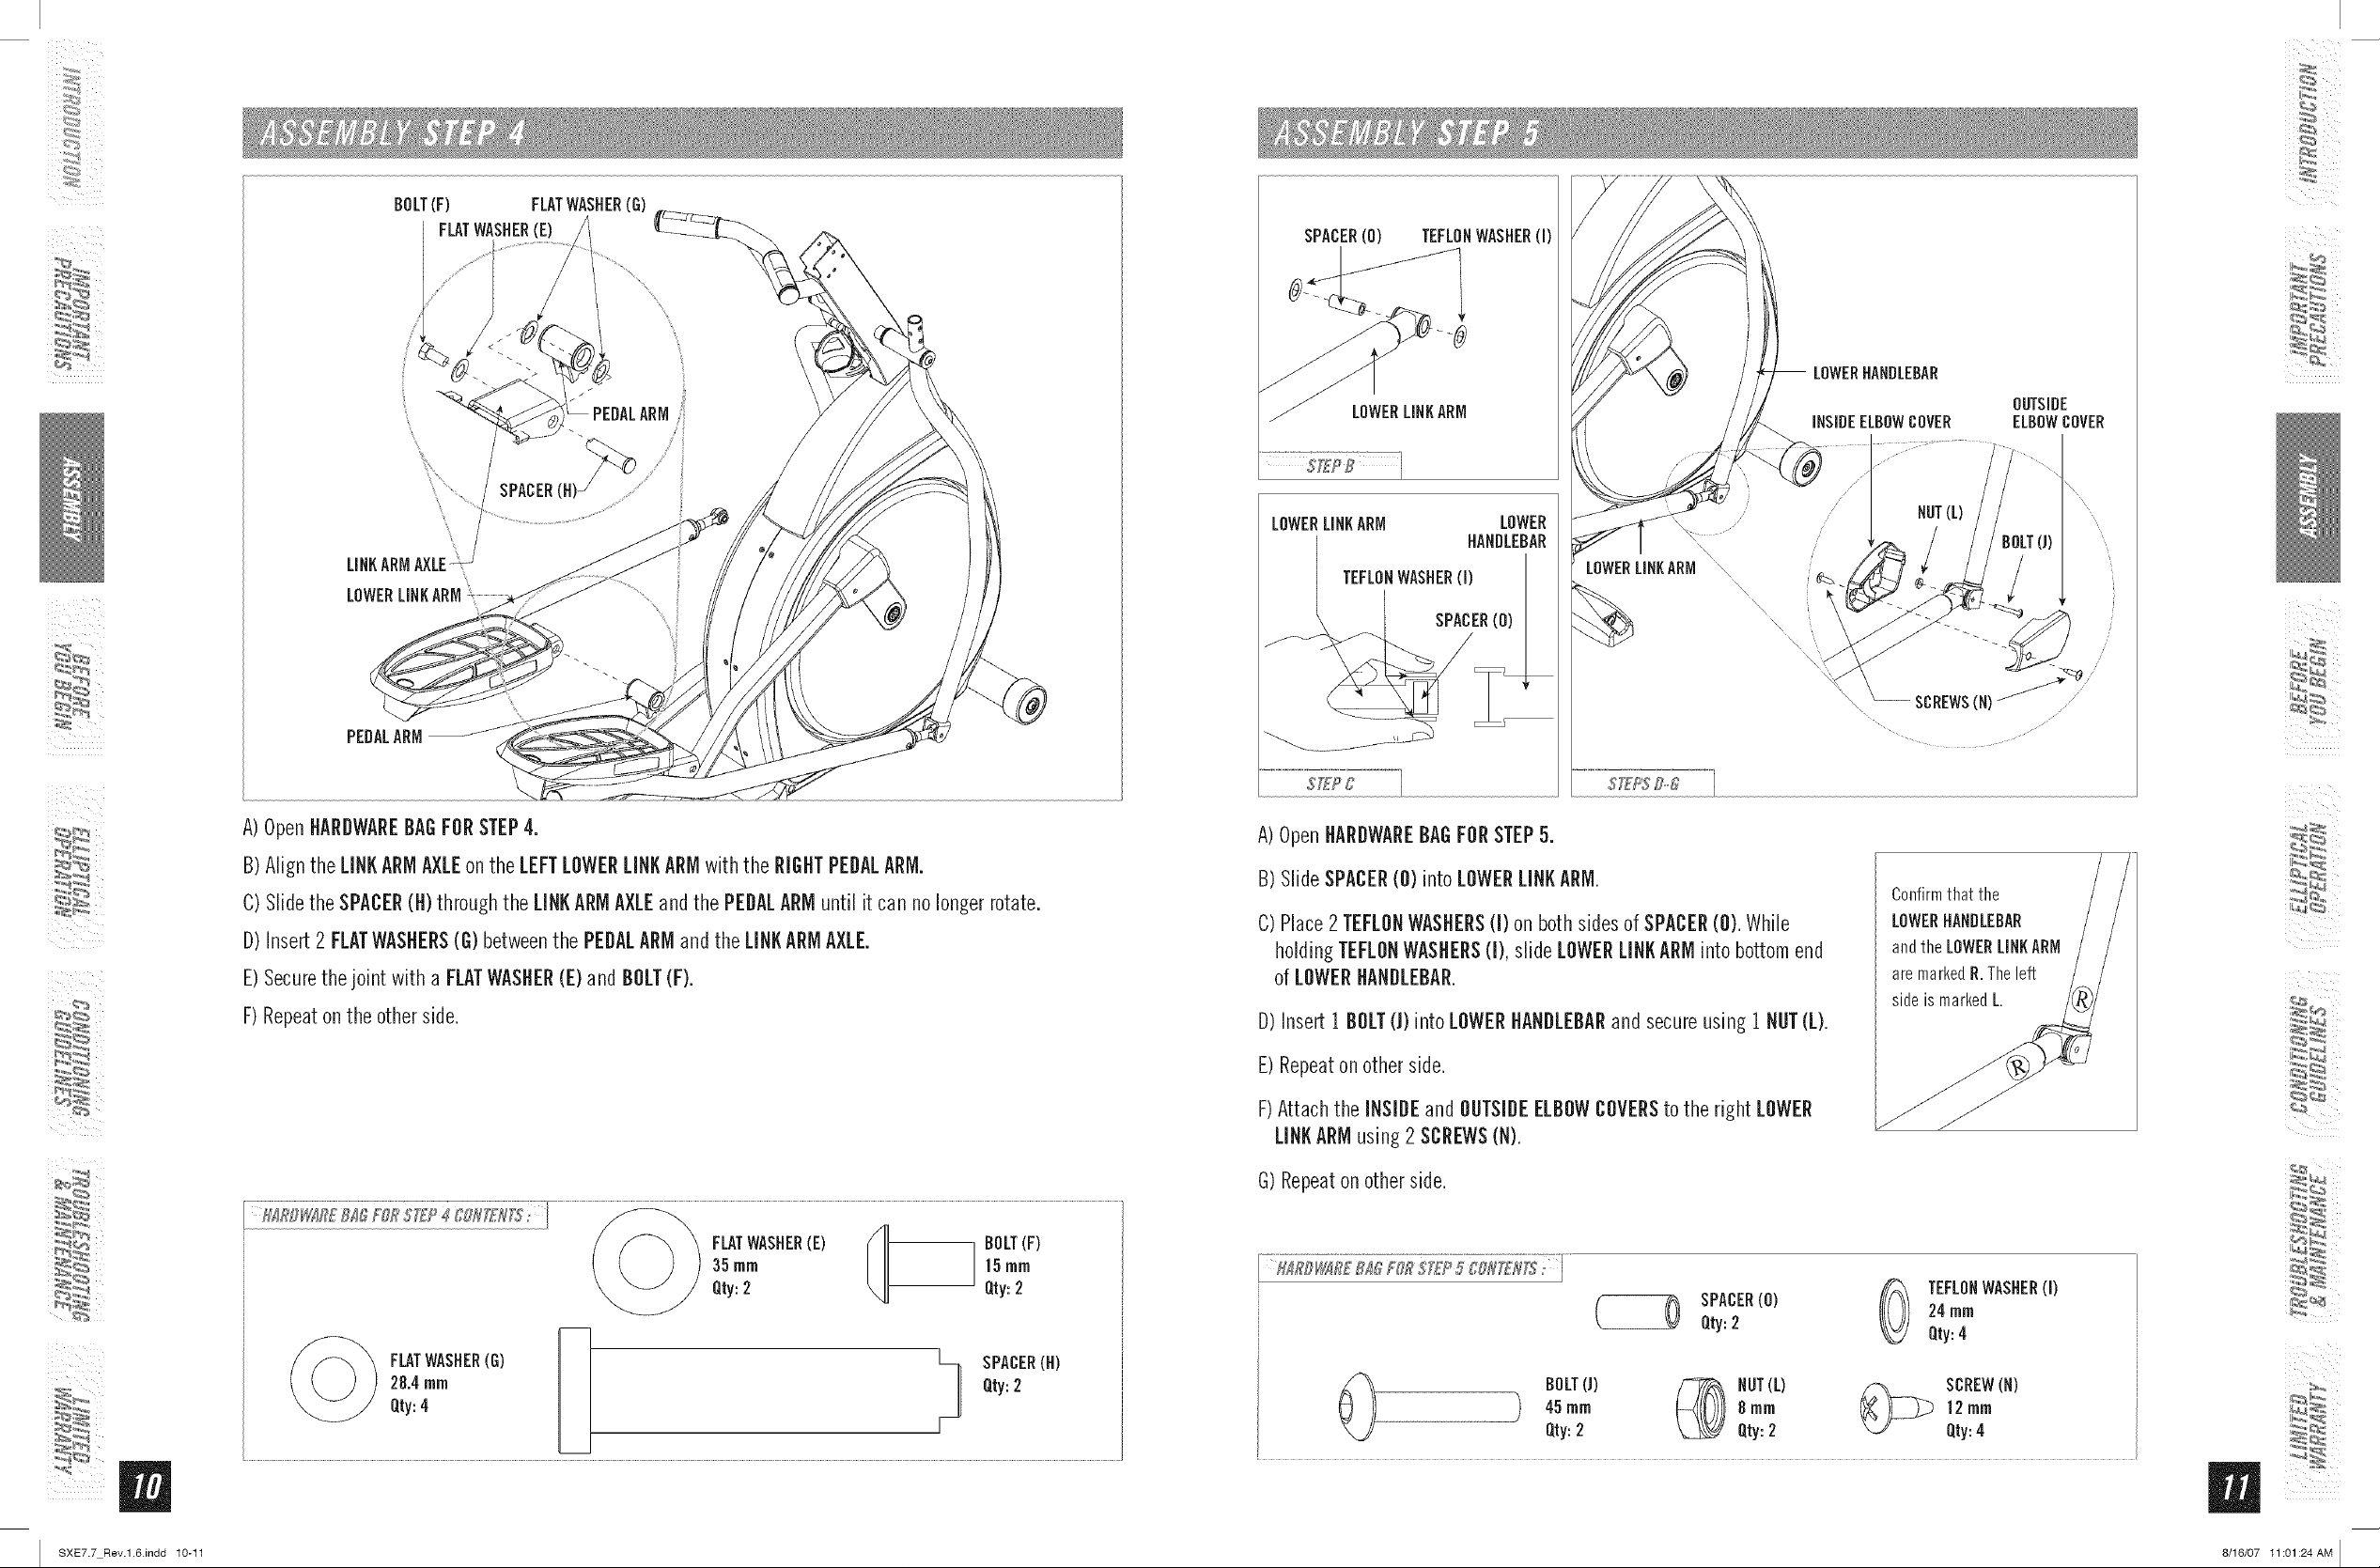
A)OpenHARDWAREBAGFORSTEP4.
B)AligntheLINKARMAXLEonthe LEFTLOWERLINKARMwiththe RIGHTPEDALARM.
C)Slidethe SPACER(H)throughthe LINKARMAXLEandthe PEDALARMuntil itcanno longerrotate.
D)Insert 2 FLATWASHERS(G)betweenthe PEDALARMandthe LINKARMAXLE.
E)Securethejoint with a FLATWASHER(E)and BOLT(F).
F)Repeaton the otherside.
/ TEFLONWASHER(I)
A)OpenHARDWAREBAGFORSTEP5.
B)SlideSPACER(0) intoLOWERLINKARM.
C)Place2TEFLONWASHERS(I) onbothsidesof SPACER(0). While
holdingTEFLONWASHERS(I), slideLOWERLINKARMinto bottomend
of LOWERHANDLEBAR.
D)Insert 1 BOLT(]) into LOWERHANDLEBARand secureusing1 NUT(L).
E)Repeaton otherside.
F)Attach the INSIDEand OUTSIDEELBOWCOVERStothe right LOWER
LINKARMusing2 SCREWS(N).
yyi
Confirmthat the
LOWERHAHHLEHAH
andtheLOWERLINKARM
aremarkedH.Theleft
sideis markedL.
G)Repeatonotherside.
SPACER(0) 24rnrn
Qty:2 Qty:4
BOLT(J) _ HOT(L) /_ SCREW(H)
Qty:28"4FLAT4rnrnWASHER(G) _-- [--L/ SPACERQty:2 (H)
I SXE7.7 Rev.l.6.indd 10-11 8/16/07 11:01:24AM I
45rnrn _ 8 rnrn _ 12rnrn
Qty:2 Qty:2 Qty:4
TEFLONWASHER(I)
_,r,
 Loading...