

Horizon RC-40, RC-30 Owner’s Manual
BIKE USER'S GUIDE
CONGRATULATIONSand THANKYOUforyourpurchaseof this HorizonFitnessbike!
Whetheryour goal is to win races or simply enjoy a fuller, healthier lifestyle, a Horizon Fitness bike can
help you attain it - adding club-quafity performance to your at-home workouts, with the ergonomics
and innovative features you need to get stronger and healthier, faster. Because we're committed to
designing fitness equipment from the inside out, we use only the highest quality components. It's a
commitment we back with one of the strongest frame-to-brake warranty packages in the industry.
Youwant exerciseequipment that offersthe most comfort, the best reliability and the highest quality
in its class.
HorizonFitness delivers.
Important Precautions
Assembly
Before YouBegin 13
Bike Operation 14
Conditioning Guidelines 29
Troubleshooting & Maintenance 35
Limited Warranty 39
CONTACTINFORMATION Back Panel
4
5
SAVETHESEINSTRUCTIONS
Read all instructions before using this bike. When using an electrical product, basic precautions should
always be foflowed, including the foflowing: Readaftinstructions beforeusing this bike. It is the responsibility
of the owner to ensure that aft users of this bike are adequately informed of aft warnings and precautions. If
you have any questions after reading this manual, contact Customer TechSupport at the number listed on
the back panel of this manual
• Ifyou experiencechest pains, nausea, dizziness, or shortness of breath, stop exercising immediately and
consult your physician before continuing.
• Maintain a comfortable pace.
• Tomaintain balance, it is recommended to keep a grip on the handlebars while exercising, mounting or
dismounting the machine.
• Do not wear clothes that might catch on any part of the bike.
• Do not insert or drop any object into any opening.
• Unplug bike before moving or cleaning it. Toclean, wipe surfaces down with soap and slightly damp cloth
only: never use solvents. (SeeMAINTENANCE)
• This bike should not be used by persons weighing more than 275 pounds (RC-30) or 300 pounds (RC-40).
Failure to comply will void the warranty.
• This bike is intended for in-home use only. Do not use this bike in any commercial, rental, school or
institutional setting. Failure to comply will void the warranty.
• Do not use bike in any location that is not temperature controlled such as but not fimited to: garages,
porches, pool rooms, bathrooms, car ports or outdoors. Failure to comply may void the warranty.
• Use the bike only as described in this manual
i!tiseSsentia!thatyo,rbike!s"Sedo,lyindoors,inaciimateco,trolled exposedto
i co!der temperature s or high moisture c!imates, it is strongly recommended that the bike is warmed up to room
!!,a!!rO!!,O !a!,!!0 a, "a"!rO
:_
IMPORTANT..READTHESESAFETYINSTRUCTIONSBEFOREUSE!
Thereareseveralareasduringthe assemblyprocessofa bikethat special attention mustbe paid. It is very
important tofollowtheassemblyinstructionscorrectlyand tomakesureaftparts arefirmiy tightened. If the
assemblyinstructionsarenotfollowedcorrectly,thebikecouldhaveframeparts that arenot tightenedand
will seem!ooseandmaycauseirritating noises.To_reventdamageto the bike. the assemblyinstructions
must be reviewedand correctiveactions shouldbetaken.
UNPACKING
Unpackthe productwhereyou will be usingit. Placethe productona levelflat surface.It is recommended
that you place a protective coveringonyour floor.During eachassemblystep, ensurethat ALLnuts and
boltsare in placeand partially threadedin beforecompletelytightening anyONEbolt.
NOTE:A light application of greasemay aid in the installation of hardware.Anygrease, suchas lithium
bikegreaseis recommended.
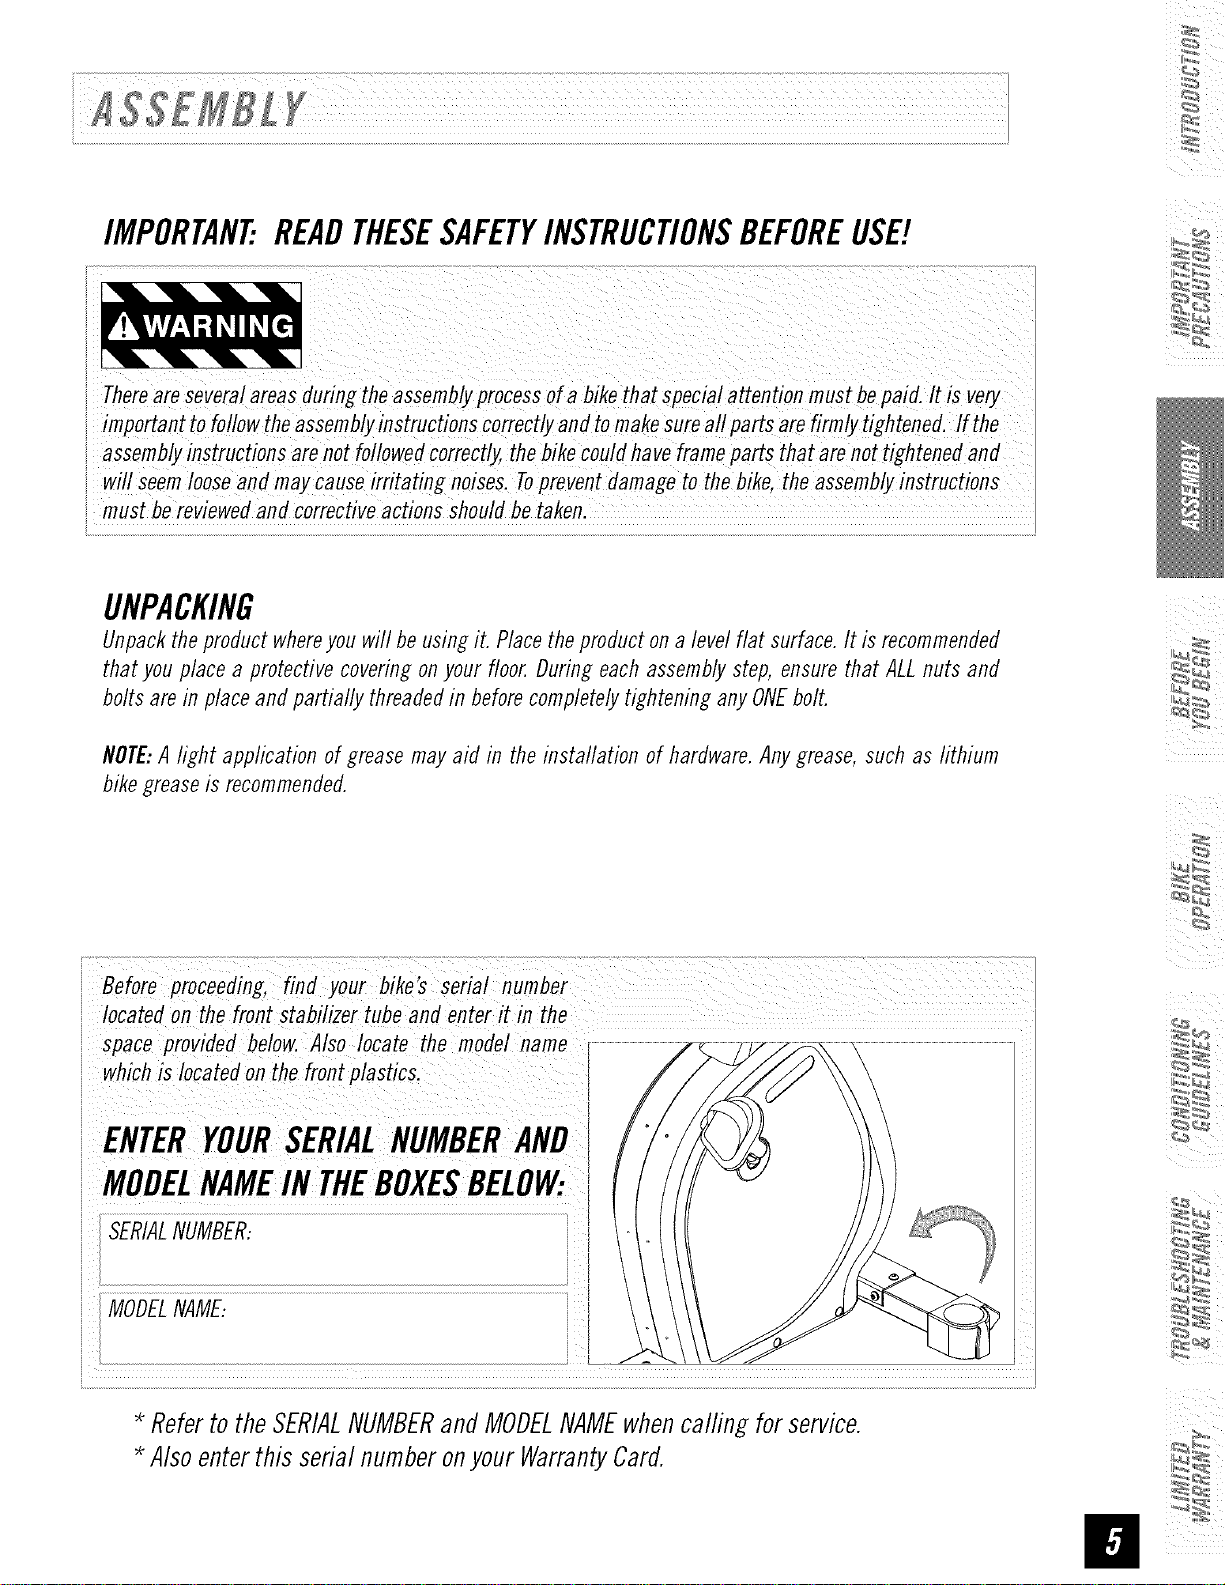
spaceprovided below. Also locate the model name
whichis locatedon the front plasfics,
ENTER SERIALNUMBERAND
MODELNAMEIN THEBOXESBELOW:
i
MODELNAME:
* RefertotheSERIALNUMBERandMODELNAMEwhencalfing forservice.
*Alsoenterthis serialnumberonyourWarrantyCard.
ii
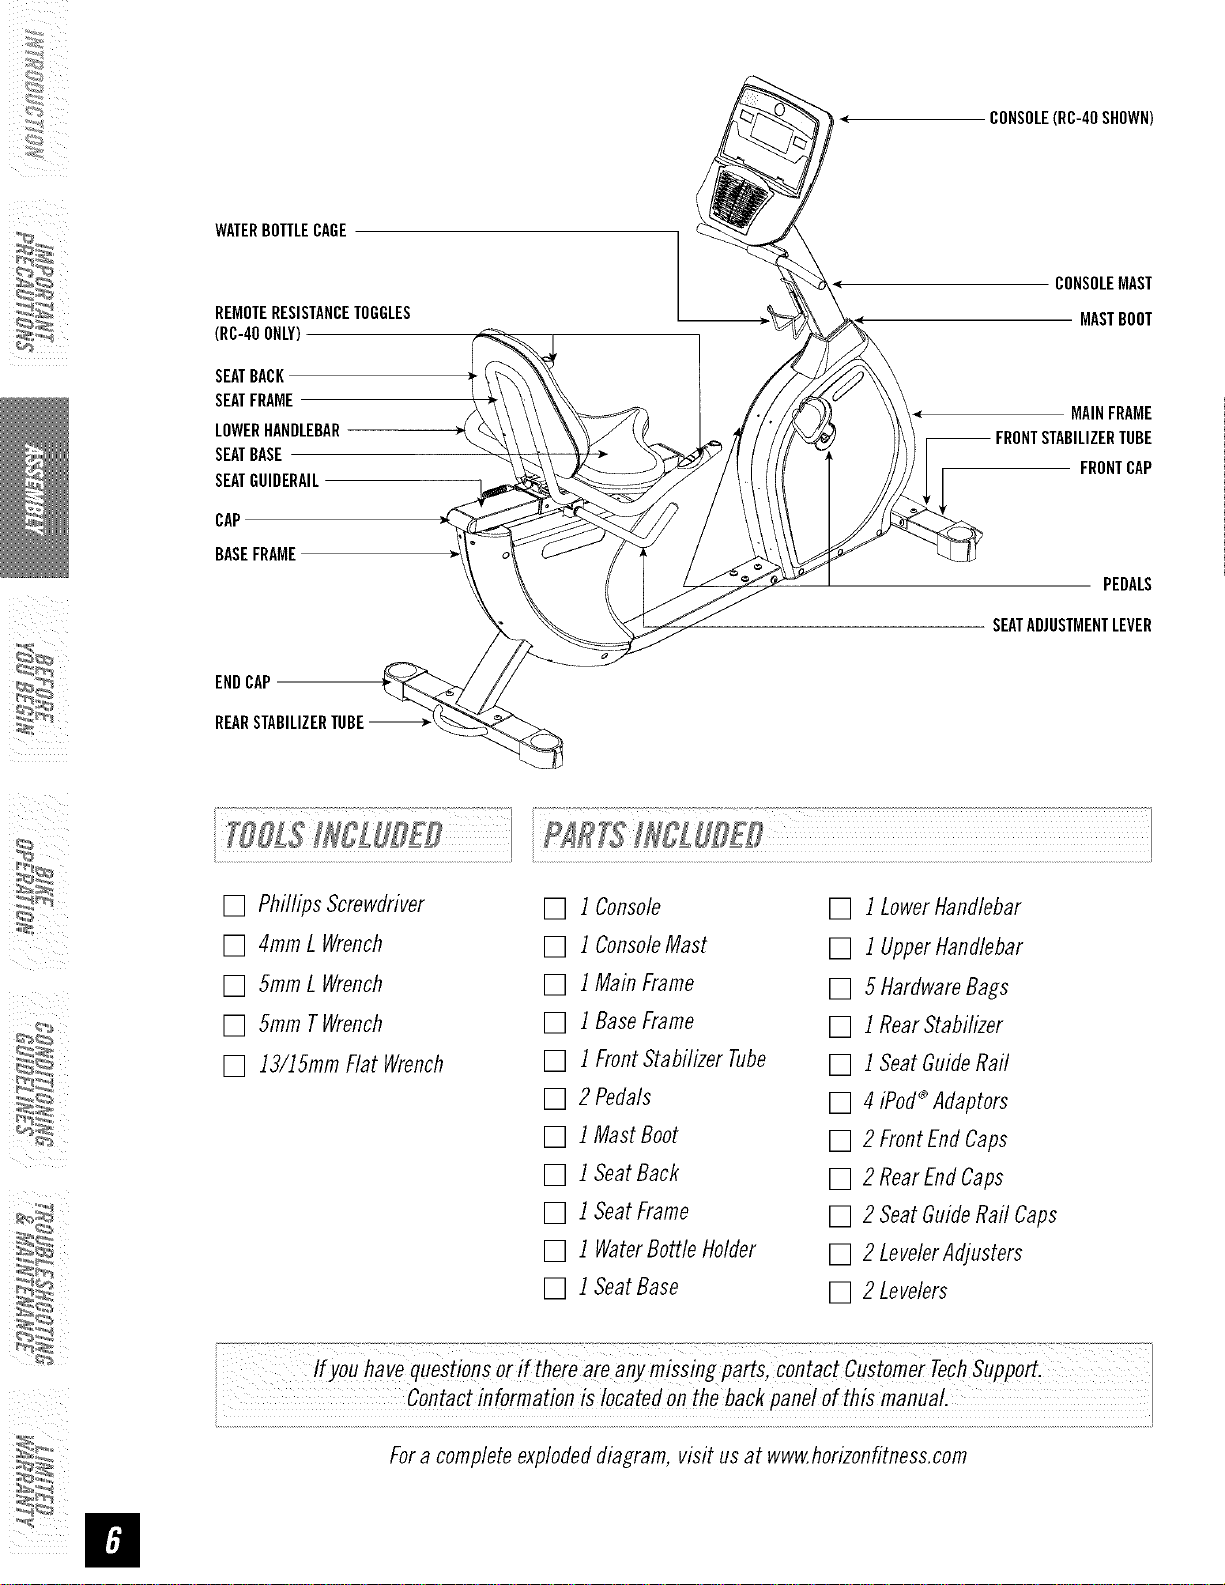
CONSOLE(RC-40SHOWN)
WATERBOTTLECAGE
CONSOLEMAST
REMOTERESISTANCETOGGLES
(RC-40ONLY)
SEATBACK
SEATFRAME
LOWERHANDLEBAR
SEATBASE
SEATGUIDERAIL
CAP
BASEFRAME
-- FRONTSTABILIZERTUBE
MASTBOOT
MAINFRAME
FRONTCAP
PEDALS
ENDCAP
REARSTABILIZERTUBE---_
[] Phillips Screwdriver
[] 4ramL Wrench
[] 5ramL Wrench
[] 5ram TWrench
[] 13/15mmFlat Wrench
SEATADJUSTMENTLEVER
[] 1 Console [] 1 Lower Handlebar
[] 1 Console Mast [] 1 Upper Handlebar
[] 1 Main Frame [] 5 Hardware Bags
[] 1 Base Frame [] 1 Rear Stabilizer
[] 1 Front Stabilizer Tube [] 1 Seat Guide Rail
[] 2 Pedals [] 4 iPod®Adaptors
[] 1 Mast Boot [] 2 Front End Caps
[] 1 Seat Back [] 2 Rear End Caps
i iI
:_
[] 1 Seat Frame [] 2 Seat Guide Rail Caps
[] 1 Water Bottle Holder [] 2 Leveler Adjusters
[] 1 Seat Base [] 2 Levelers
Ifyou have questio,sor ffihere ire _nymissingpartsl co_tactcUstomerTecbSU_PO_.
i Contact information is located On the back Pane! ofthismanuaL
Fora completeexplodeddiagram, visit usat www.horizonfitness.com
FRONTSTABILIZERTUBE-
MAiN
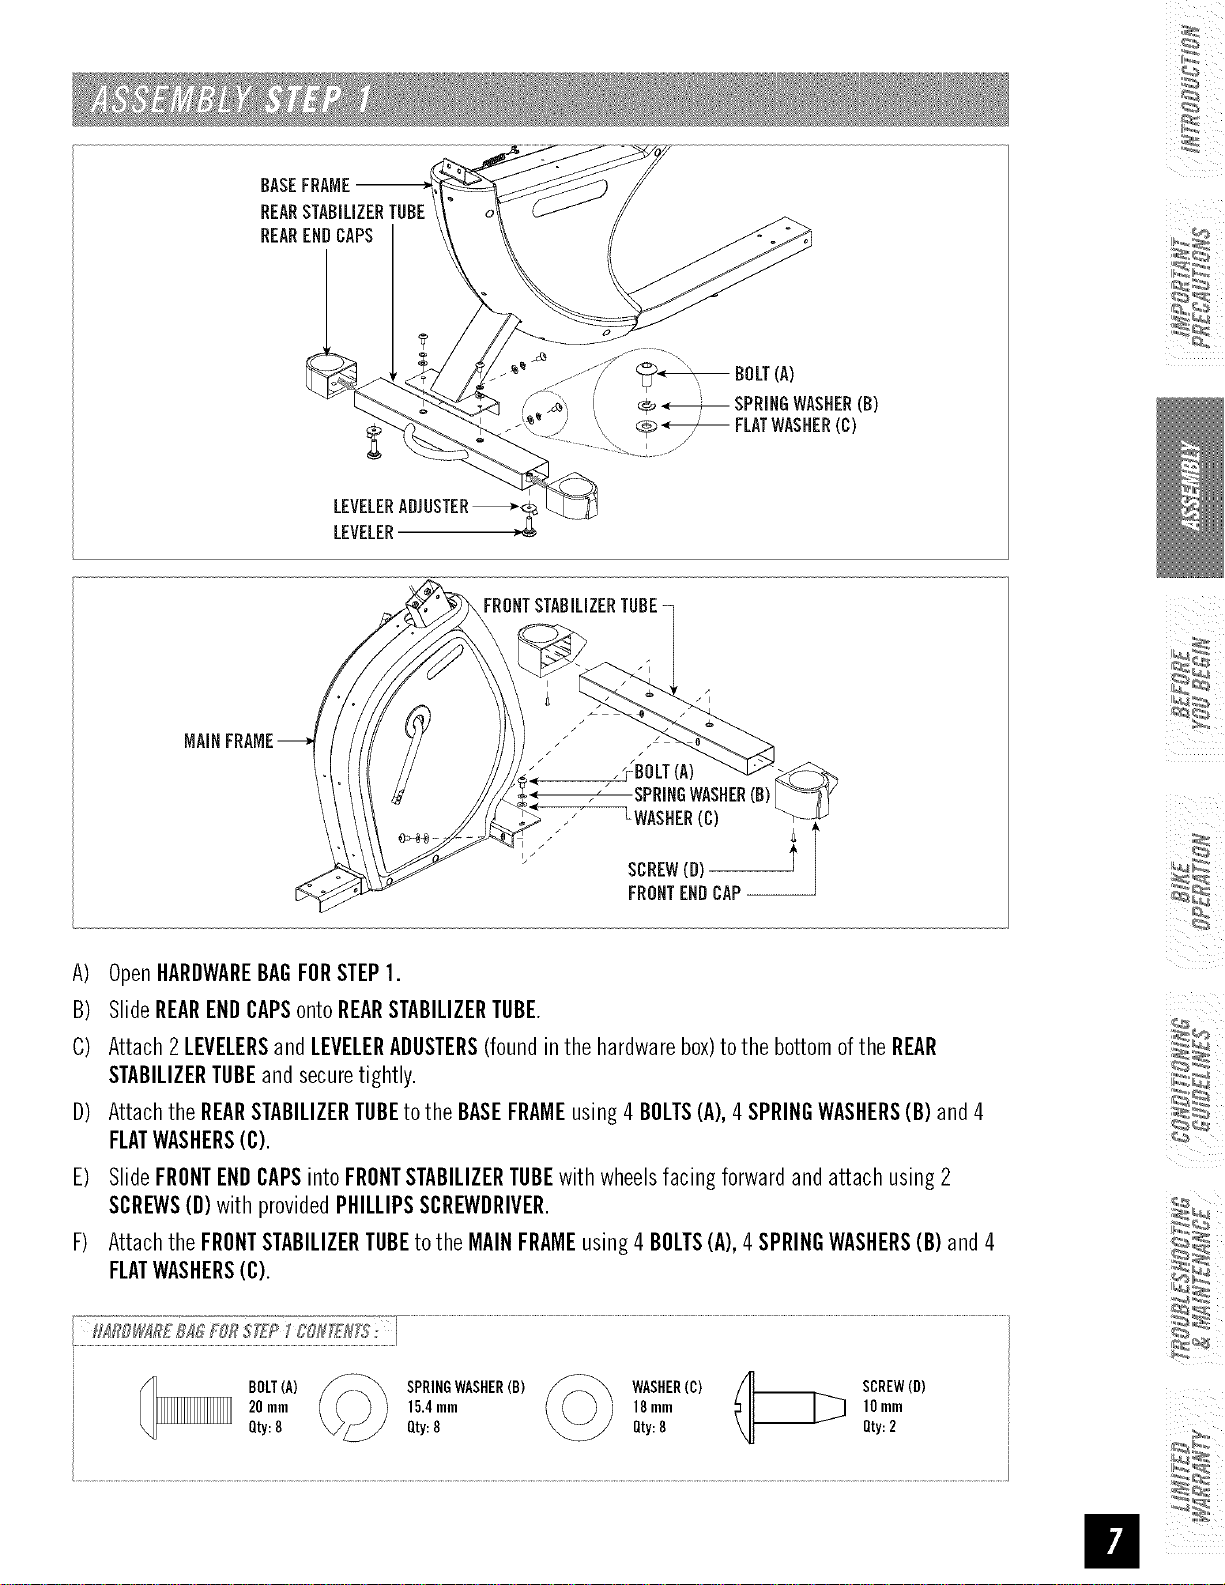
A) OpenHARDWAREBAGFORSTEP1.
B) SlideREARENDCAPSontoREARSTABILIZERTUBE.
C) Attach2 LEVELERSandLEVELERADUSTERS(foundinthe hardwarebox)to the bottomof the REAR
STABILIZERTUBEandsecuretightly.
D) AttachtheREARSTABILIZERTUBEto the BASEFRAMEusing4 BOLTS(A),4SPRINGWASHERS(B) and4
FLATWASHERS(C).
E) SlideFRONTENDCAPSintoFRONTSTABILIZERTUBEwithwheelsfacing forwardand attach using 2
SCREWS(D)withprovidedPHILLIPSSCREWDRIVER.
F) Attach the FRONTSTABILIZERTUBEtothe MAINFRAMEusing4 BOLTS(A),4 SPRINGWASHERS(B) and 4
FLATWASHERS(C).
/D
20mm
Qty:8
SPRINGWASHER(B)
15.4mm
Qty:8
WASHER(C) /1_ SCREW(D)
18ram _ 10ramQty:8 Qty:2
ii
/
I
I
WASHER
/
/
/
f
/
/
/
SPRINGWASHER(B)
HOLT(A)
//
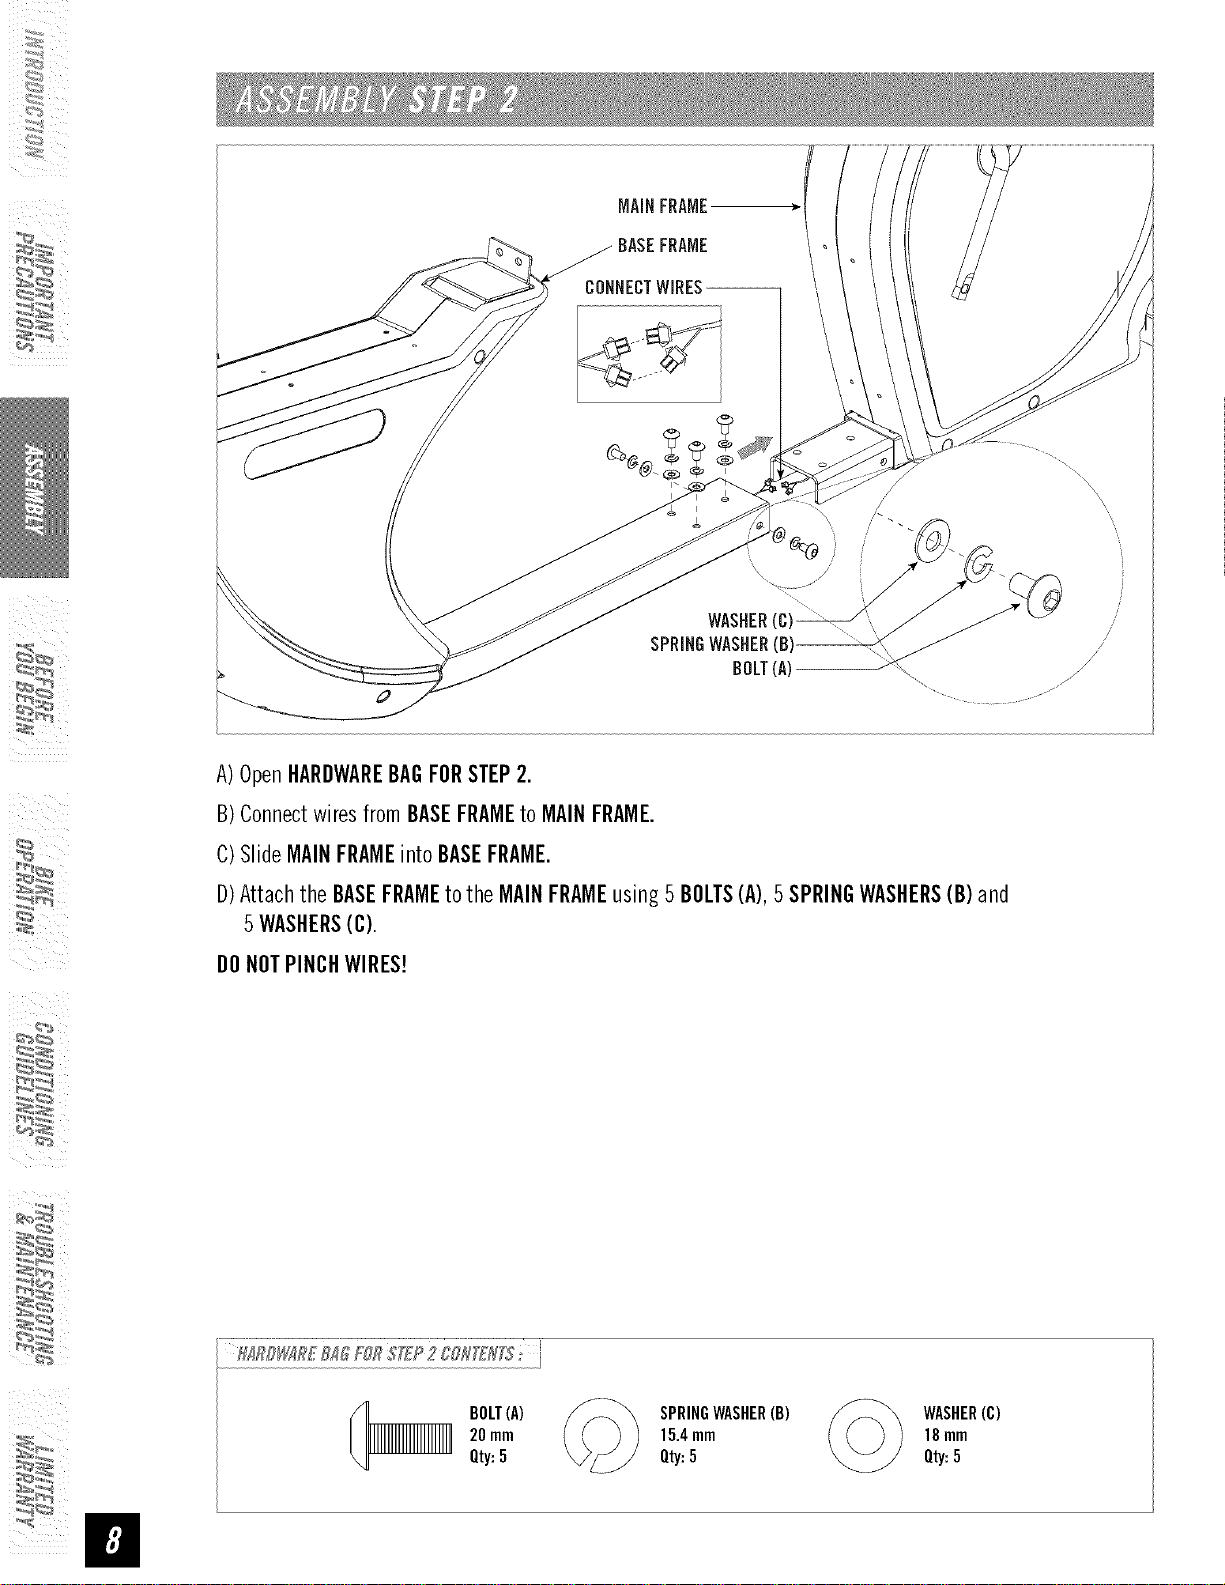
A)OpenHARDWAREBAGFORSTEP2.
B)Connectwires from BASEFRAMEto MAINFRAME.
C)SlideMAINFRAMEintoBASEFRAME.
D)Attachthe BASEFRAMEto the MAINFRAMEusing 5 BOLTS(A),5 SPRINGWASHERS(B)and
5WASHERS(C).
DONOTPINCHWIRES!
20nlm
SPRINGWASHER(B) /_._ WASHER(C)
BOLT(A)
Qty:5
:_
15.4ran1 _ 18ran1
Qty:5 Qty:5
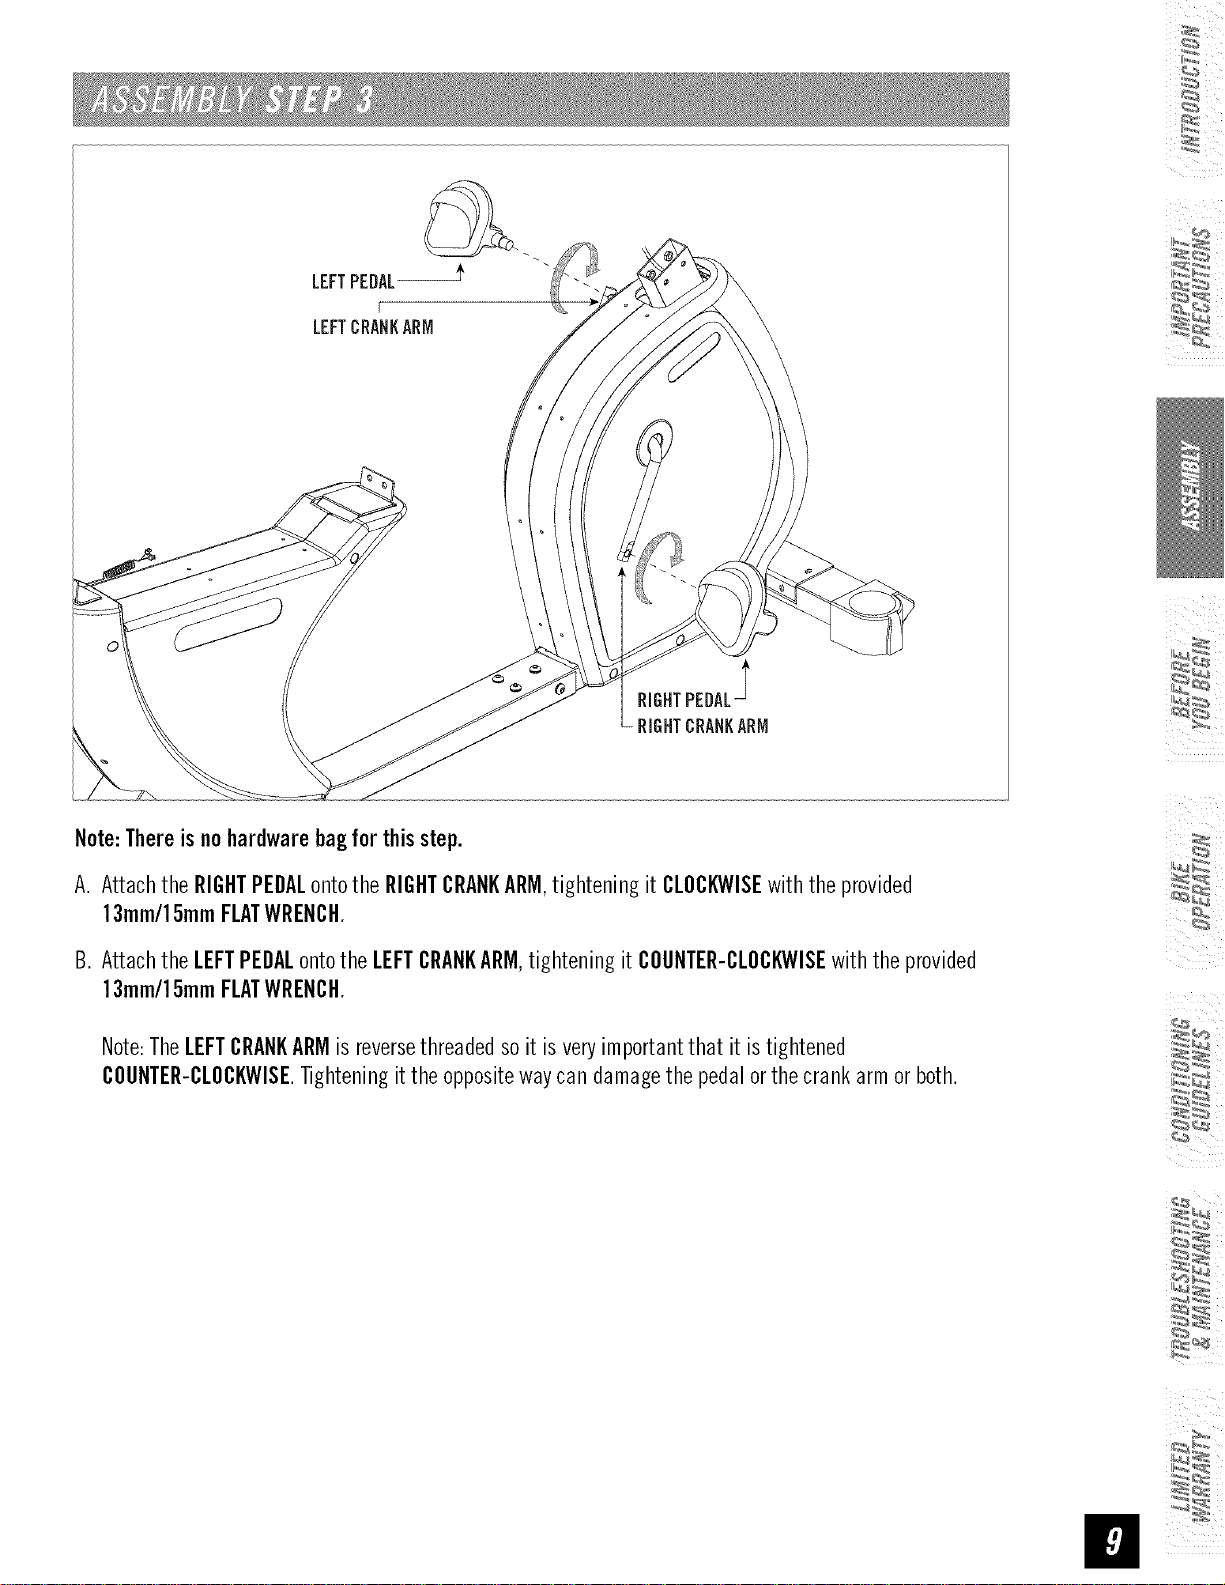
Note:Thereisnohardwarebagfor thisstep.
A. Attach the RIGHTPEDALontothe RIGHTCRANKARM,tightening it CLOCKWISEwith the provided
13mm/15mmFLATWRENCH.
B. Attach the LEFTPEDALontothe LEFTCRANKARM,tightening it COUNTER-CLOCKWISEwith the provided
13mm/15mmFLATWRENCH.
Note:TheLEFTCRANKARMisreversethreadedsoit is veryimportantthat it istightened
COUNTER-CLOCKWISETighteningit the oppositewaycandamagethe pedalor the crank armor both.
ii
STEPD J
SEATFRAME_ SEATLEVER--
SEATBASE
FRAME
GUI,E.AIL¸¸¸
SEATLEVERCLAMP
\ J
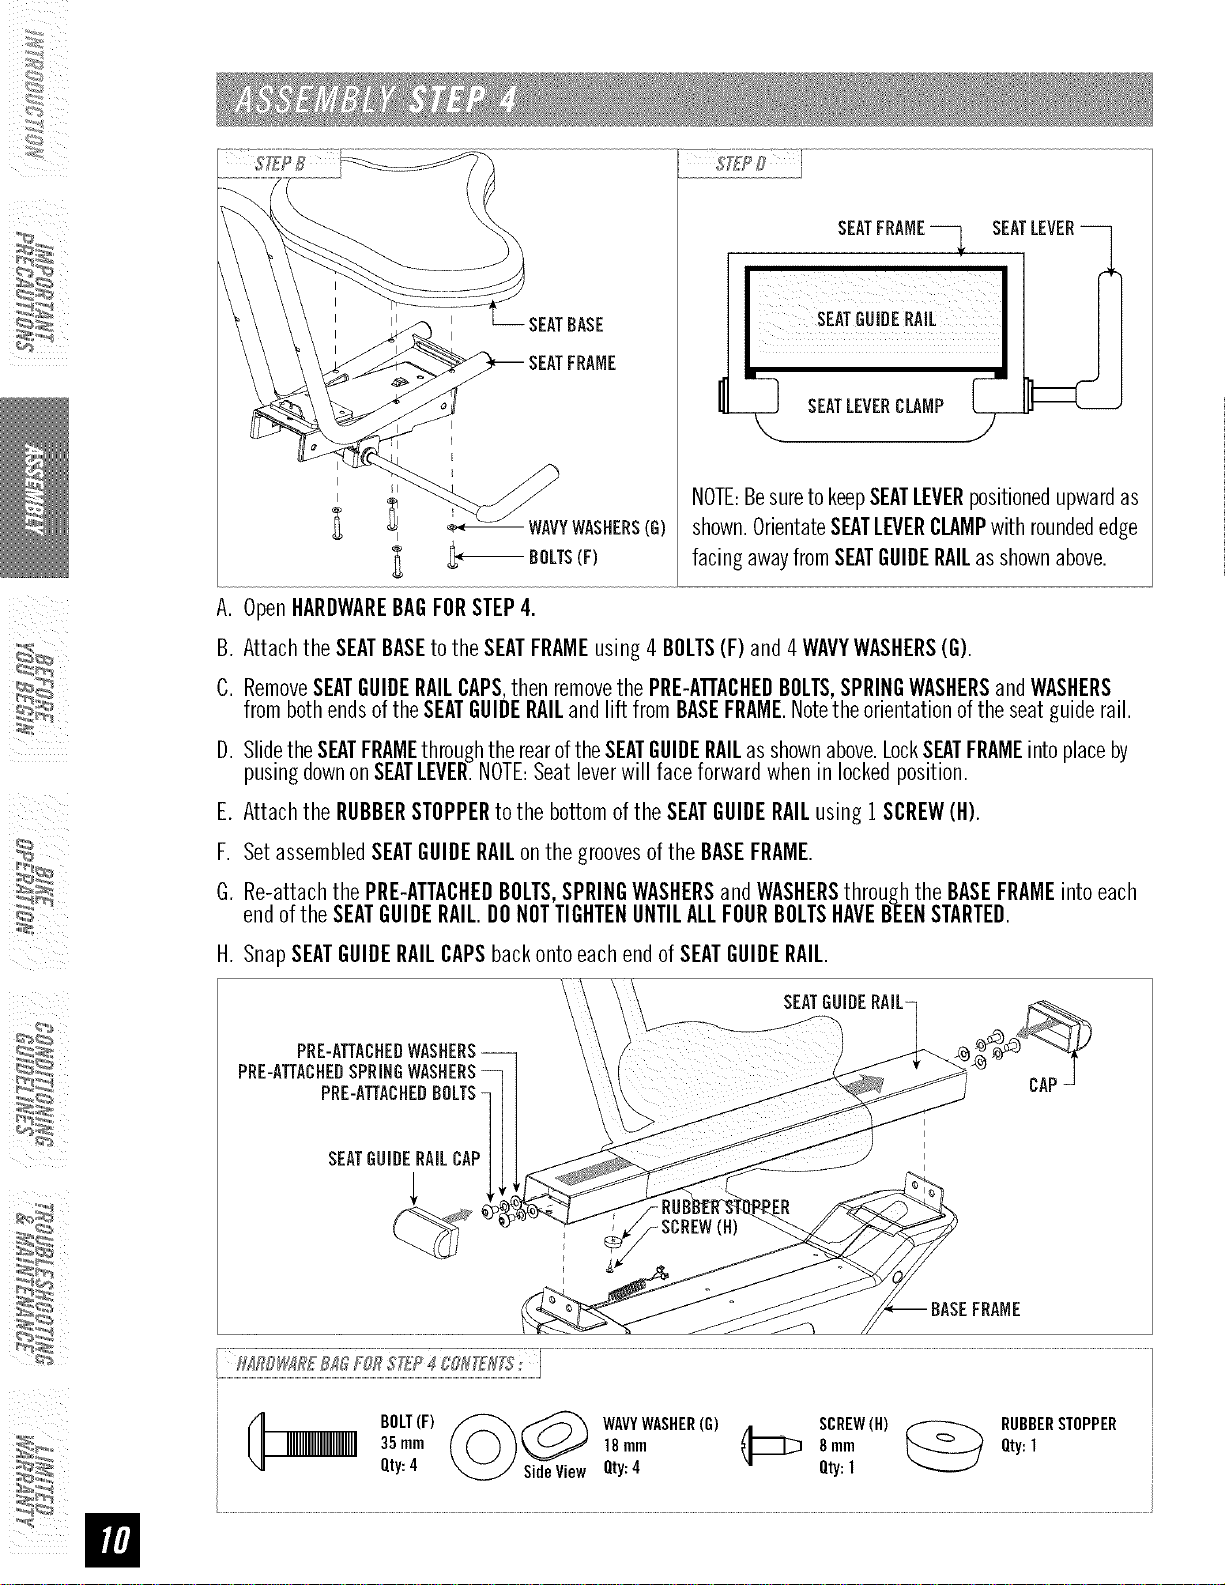
NOTE:BesuretokeepSEATLEVERpositionedupwardas
WAVYWASHERS(G)
BDLTS(F)
A. OpenHARDWAREBAGFORSTEP4.
B. Attach the SEATBASEtothe SEATFRAMEusing4 BOLTS(F)and 4WAVYWASHERS(G).
C. RemoveSEATGUIDERAILCAPS,then removethePRE-ATTACHEDBOLTS,SPRINGWASHERSandWASHERS
frombothendsoftheSEATGUIDERAILandliftfromBASEFRAME.Notetheorientationofthe seatguiderail.
D. SlidetheSEATFRAMEthroughtherearoftheSEATGUIDERAILas shownabove.LockSEATFRAMEintoplaceby
pusingdownonSEATLEVER.NOTE:Seatleverwill faceforward whenin lockedposition.
E. Attach the RUBBERSTOPPERto the bottomofthe SEATGUIDERAILusing 1SCREW(H).
F. SetassembledSEATGUIDERAILonthegroovesofthe BASEFRAME.
G. Re-attachthe PRE-ATTACHEDBOLTS,SPRINGWASHERSandWASHERSthrough the BASEFRAMEintoeach
endof theSEATGUIDERAIL.O0NOTTIGHTENUNTILALLFOURBOLTSHAVEBEENSTARTED.
shown.OrientateSEATLEVERCLAMPwith roundededge
facingawayfromSEATGUIDERAILasshownabove.
i iI
:_
H. SnapSEATGUIDERAILCAPSbackontoeachendof SEATGUIDERAIL.
PRE-ATTACHEBWASHERS
PBE-ATTACHEBSPRINGWASHERS
PBE-ATTACUEDBDLTS-
IIIIIIIIIIIIIIIIIIIIIIIBOLT(F)
35rnm
Qty:4
_ WAVYWASHER(G) _ SCREW(H) _RUBBERSTOPPER18rnn1 8ram Qty:l
SideView Qty:4 Qty:1
COVEREDWIRE
RECESS
EXPOSEDWIRES
i ,\\\\
l \\
WIRECLIP
SEATFRAME
RC-49SHOIWR
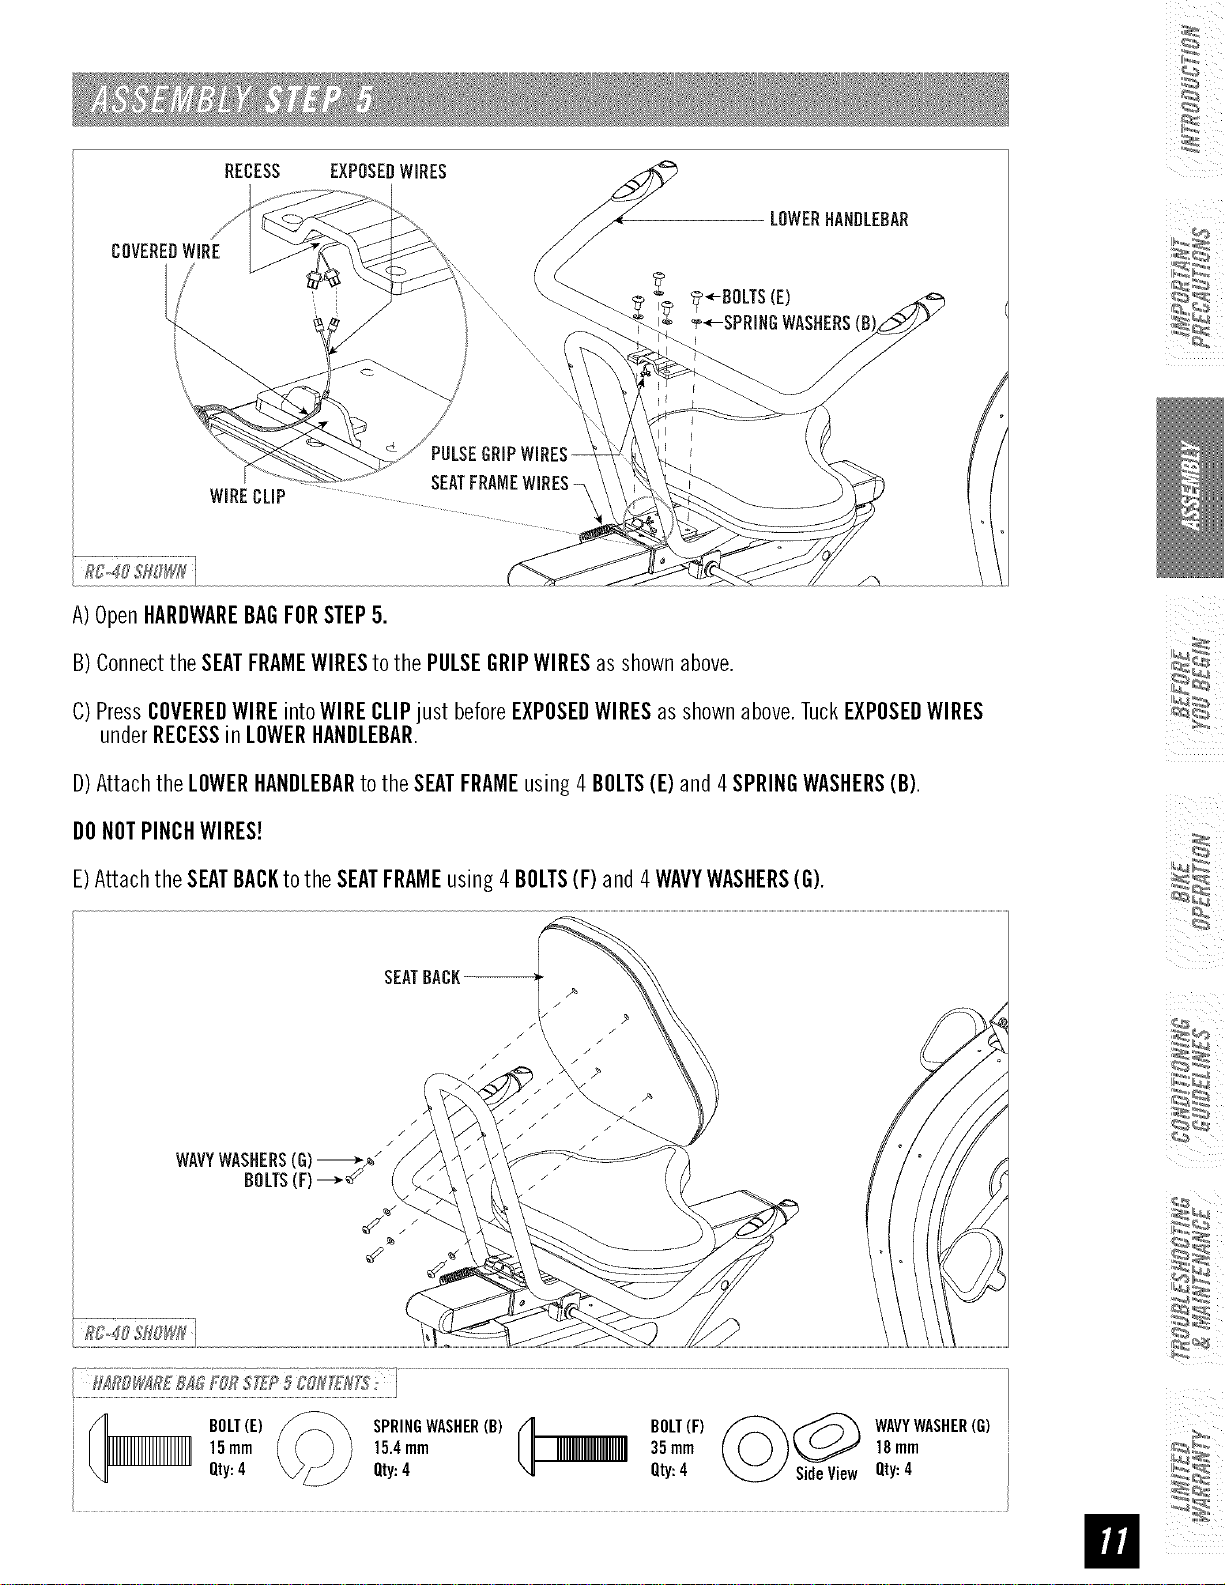
A)Open HARDWAREBAI FORSTEP5.
I) Connect tie SEATFRAMEWIRESto tie PULSEIRIP WIRESas shown above.
C) Press COVEREIWIREintoWIRECLIPjust before EXPOSEIWIRESas shown alove. TuckEXPOSEIWIRES
unler RECESSin LOWERIANILEBAR.
D)Attach the LOWERIANILEBARto tie SEATFRAMEusinl 4 BOLTS(1) anl 4 SPRINI WASHERS(B).
DONOTPINCHWIRES!
E)Attachthe SEATBACKto theSEATFRAMEusing 4 BOLTS(F) and4 WAVYWASHERS(G).
15turn
BOLT(E)
Qty:4
SPRINGWASHER(B) ('1__ BOLT(F)
15.4mm I__ 35mm
Qty:4 Qty:4
SideView
WAVYWASHER(G)
18mm
Qty:4
UPPERHANDLEBAR
SPRINGWASHER(B)
BOLT(K)
TOPCAP
SETSCREW(I)
BOLT(A) ,_ /
SPRINGWASHER(B)J_@_ Y,
FLATWASHER(C)_ _._ _ /
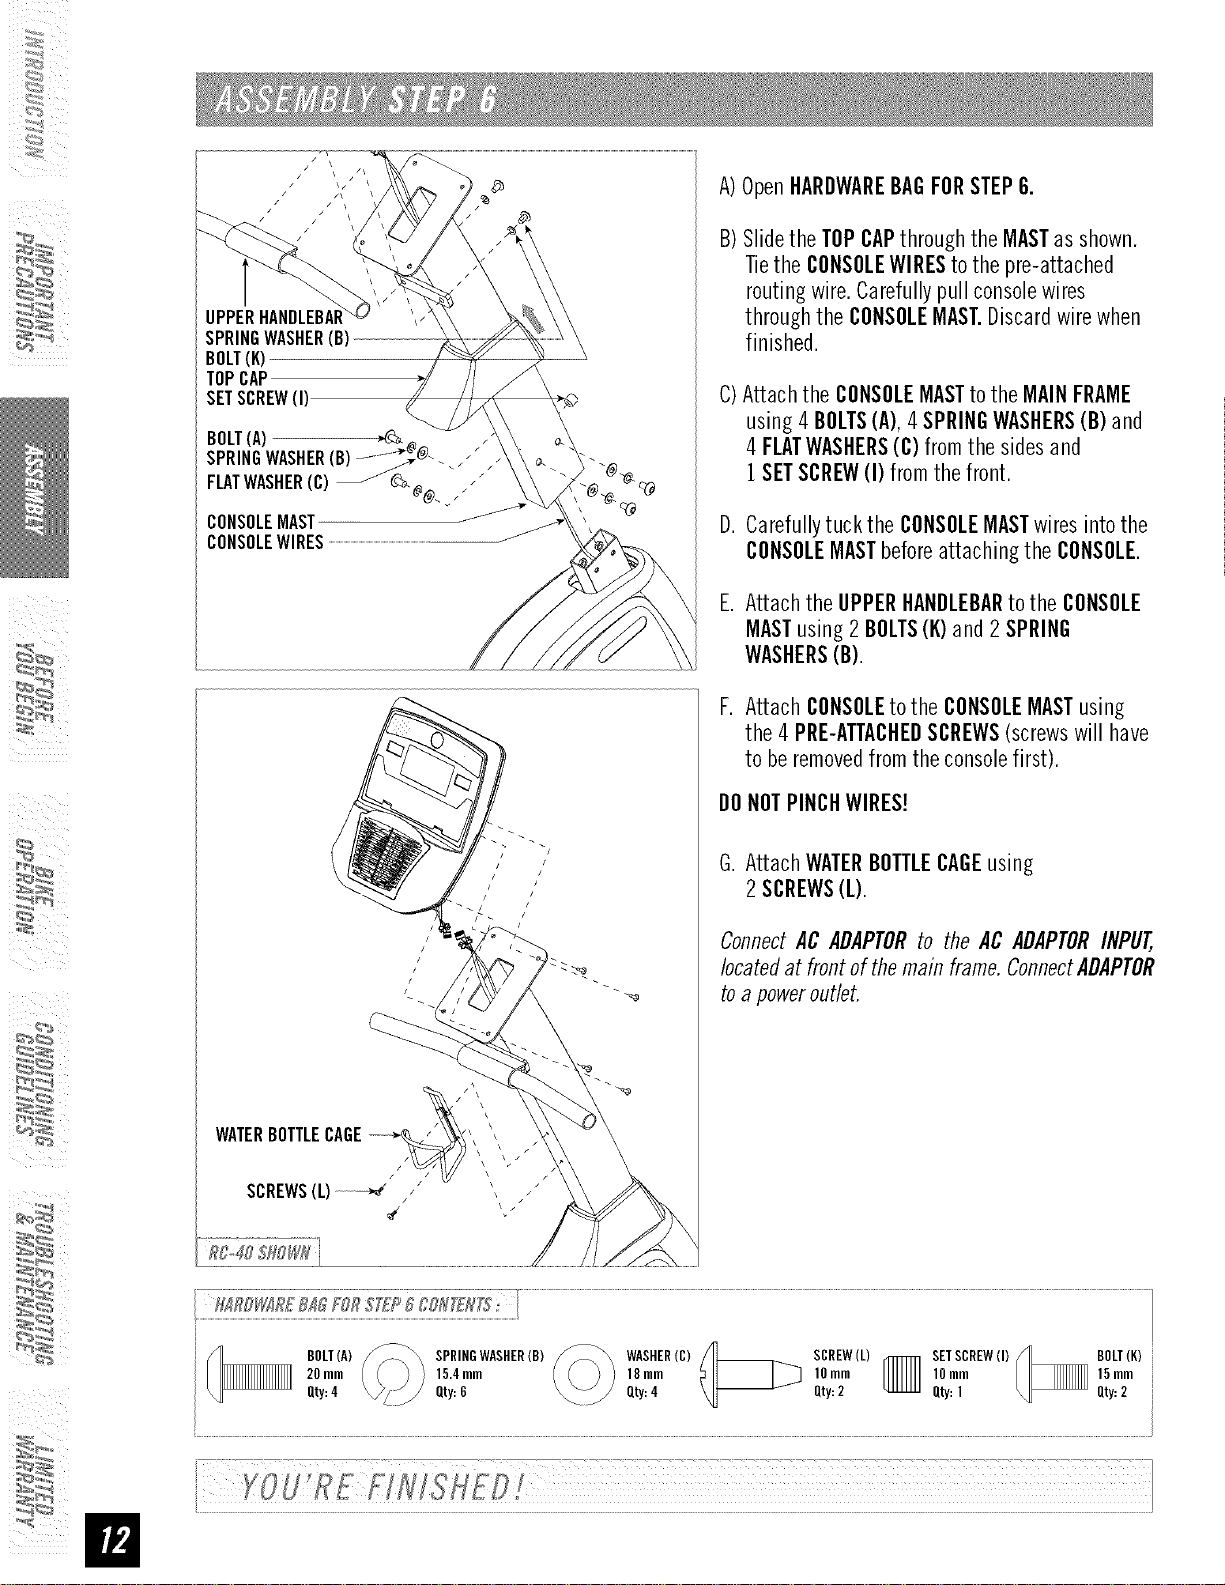
A)OpenHARDWAREBAGFORSTEPG.
B)Slidethe TOPCAPthroughthe MASTas shown.
Tiethe CONSOLEWIREStothe pre-attached
routingwire.Carefullypull consolewires
throughthe CONSOLEMAST.Discardwirewhen
finished.
c)Attachthe CONSOLEMASTto the MAINFRAME
using4 BOLTS(A),4 SPRINGWASHERS(B)and
4 FLATWASHERS(C)from the sidesand
1SETSCREW(I) from the front.
CONSOLEMAST
CONSOLEWIRES
D.Carefullytuck the CONSOLEMASTwires intothe
CONSOLEMASTbeforeattachingthe CONSOLE.
E. Attach the UPPERHANDLEBARto the CONSOLE
MASTusing2 BOLTS(K)and2 SPRING
WASHERS(B).
F. Attach CONSOLEto the CONSOLEMASTusing
the 4 PRE-ATTACHEDSCREWS(screwswill have
to beremovedfromthe consolefirst).
DONOTPINCHWIRES!
G. Attach WATERBOTTLECAGEusing
/i
4
2 SCREWS(L).
Connect AC ADAPTORto the AC ADAPTORINPUT,
located at front of the main frame. ConnectADAPTOR
to a power outlet.
WATERBOTTLECAGE
BOLT(A)
20mm
Qty:4
:_
SPRINGWASHER(B) WASHER(C) /1_ SCREW(L)
Qty:6 Qty:4 Qty:2
15.4mm 18mm _ 10mm
/11
SETSCREW(I)
lOmm
Qty:1
BOLT(K)
15 mm
Qty:2
CONGRATULATIONS!onchoosingyourbike.You'vetakenanimportantstepindevelopingand
sustaining an exerciseprogram! Yourbike is a tremendouslyeffective tool for achievingyour personal
fitnessgoals. Regularuseofyour bike can improvethequalityofyourlife in somanyways.
HEREAREJUSTAFEWOFTHEHEALTHBENEFITSOFEXERCISE:
• WeightLoss
• A HealthierHeart
• ImprovedMuscleTone
• IncreasedDailyEnergyLevels
The key to reaping these benefits is to develop an exercise habit. Your new bike wifl help you eliminate
obstacles that prevent you from exercising. Inclement weather and darkness won't interfere with your
workout when you use your bike in the comfort ofyour home. This guide provides you with basic information
for using and enjoying your new machine.
LOCATIONOFTHEBIKE
Placethebikeona levelsurface.Donot place thebikein anyareathat will blockanyventor air openings.
Thebikeshouldnot belocatedin a garage,coveredpatio, nearwater or outdoors.
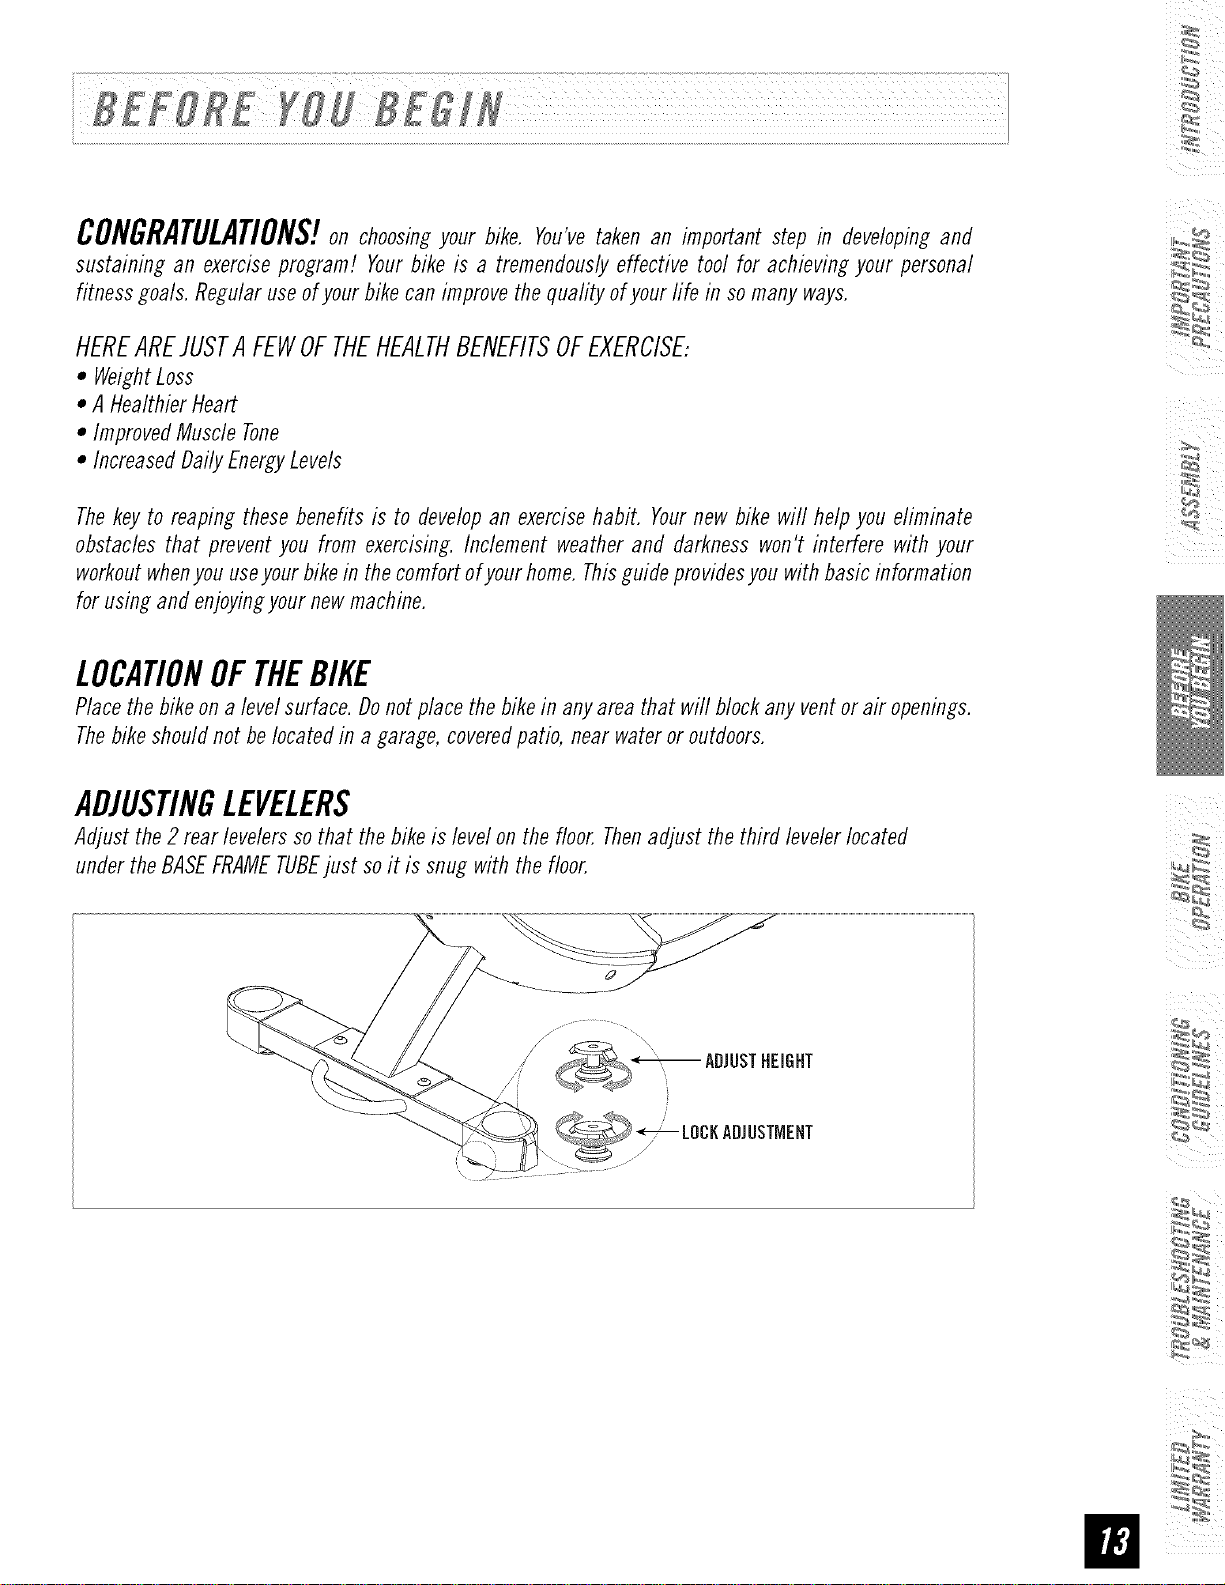
ADJUSTINGLEVELERS
Adjust the 2 rearlevelerssothat thebikeis levelon the floor.Thenadjust the third levelerlocated
undertheBASEFRAMETUBEjust soit is snug with the floor.
 Loading...