

Page 1
Benutzerhandbuch
User Manual
Manuel de l’utilisateur
Gebruikershandleiding
Hergestellt in China
Made in china
Fabriqué en Chine
Gemaakt in China
H-racer
Das kleinste mit Wasserstoff betriebene Auto der Welt
The world’s smallest hydrogen car
La plus petite voiture à pile à combustible d’hydrogène du monde
De kleinste waterstofgas auto ter wereld
www.conrad.com
www.horizonfuelcell.com
Page 2
Benutzerhandbuch
Mode d’emploi et Guide d’expérimentation
Warnung
Um das Risiko von Schäden an ihrem Eigentum, Verletzungen oder Tod zu vermeiden
beachten Sie:
Der Gebrauch dieses Produktes ist ausschliesslich für Personen ab einem Alter von 12 Jahren nur
unter Aufsicht Erwachsener denen die Vorkehrungen und Anweisungen dieser Bedienungsanleitung
vertraut sind, gestattet. Halten Sie Kinder unter einem Alter von 12 Jahren fern, da kleine Teile
enthalten sein könnten, welche leicht verschluckt werden könnten. Die enthaltene Wasserstofftankstelle
erzeugt Gase, die leicht entzündlich sind. Verwenden sie die Wasserstofftankstelle nicht für andere
Zwecke, als in der Bedienungsanleitung geschildert sind. Halten sie den H-racer und die
Wasserstofftankstelle fern von Feuer und offener Flamme. Lesen Sie die Anweisungen aufmerksam.
Vergewissern sie sich alle Inhalte verstanden zu haben.
Warning
To avoid the risk of property damage, serious injury or death:
This kit is intended only for use by persons 12 years old and up, and only under the supervision of adults
who have read and understood the instructions provided in the kit’s user manual. Keep children under the age of 12
away as it contains small parts that could be swallowed. The Hydrogen Station generates gases that are very
easily ignited. Do not use the Hydrogen Station for any other purpose than refueling the H-racer, as
instructed in this user manual. Keep the Hydrogen Station and H-racer away from fire or flame.
Read the instructions carefully before use and have them ready for reference.
Attention
Pour éviter tout risque de dégâts matériels, de blessures graves ou de mort :
Ce kit n’est destiné qu’à l’usage de personnes ayant 12 ans et plus, et ce, sous la supervision
d’adultes ayant lu et compris les instructions données dans ce manuel. Ne pas laisser à la portée
d’enfants en-dessous de 12 ans car ce kit contient de petits éléments susceptibles d’être avalés. La
station d’hydrogène génère des gaz inflammables. Ne pas utiliser la station d’hydrogène à d’autres
fins que l’alimentation du H-racer, comme indiqué dans le manuel. Ne pas laisser la Station
d’hydrogène et le H-racer à proximité de flammes ou d’étincelles. Lire attentivement les instructions
avant de procéder à l’utilisation et les conserver pour toute référence. Il est formellement interdit de
démonter les éléments de ce kit (pile à combustible, cellule d'électrolyse,…) !!!
Waarschuwing
Om risicos van beschadiging, ernstige verwonding of dood te voorkomen:
Deze pakket mag alleen ingebruik genomen worden door personen die ouder dan 12 jaar zijn, en
onder toezicht van volwassenen die al de veiligheidsmaatregelen in deze pakket bekend zijn. Hou de
kinderen jonger dan 12 jaar buiten bereik, omdat kleine onderdelen mogelijk ingeslikken kunnen
worden. Het Waterstof Station genereert het gas dat gemakkelijk aangestoken wordt. Gebruik het
Waterstof Station niet anders dan voor H-racer, of anders dan omgeschreven in de gebruikershandleiding. Hou het Waterstof Station en H-racer buiten de omvang van brand of vlaam.
Lees deze handleiding zorgvuldig door alvorens het ingebruik te nemen en bewaar deze handleiding
voor later gebruik.
F
User Manual
D
Inhaltsverzeichnis:
1.
Über den H-racer
2.
H-racer Montageanleitung
3.
Vorbereitung der Wasserstofftankstelle
4.
Erschaffung von erneuerbaren Wasserstof f durch Sonnenenergie
5.
Auftankvorgang
6.
Fehlerbehebung
GB
Contents:
1.
About the H-racer
2.
H-racer Assembly Instructions
3.
Preparing the Hydrogen Station for operation
4.
Creating renewable Hydrogen using power from the sun
5.
Refueling and operation
6.
Troubleshooting
F
Sommaire:
1.
Présentation du H-racer
2.
Comment assembler le H-racer
3.
Préparation de la station d’hydrogène avant la mise en route
4.
Générer de l’hydrogène renouvelable en utilisant l’énergie solaire
5.
Alimentation et fonctionnement
6.
Dépannage
NL
Inhoudsopgave:
1.
Over de H-racer
2.
Introducties Assemblage H-racer
3.
Het Waterstof Station Bereidmaken voor bewerkingen
4.
Het genereren van omkeerbaar waterstofgas door het gebruiken van zonlicht
5.
Brandstof herladen en de bewerkingen
6.
Problemen en Oplossingen
Gebruikershandleiding
s1
s4
s10
s12
s13
s17
p19
p22
p28
p30
p31
p35
p37
p40
p46
p48
p49
p53
p55
p58
p64
p66
p67
p71
Page 3
1. Über den H-racer
1. Über den H-racer
Der H-racer ist ein futuristisches Spielzeugauto welches eine der aufregendsten und
Der H-racer ist ein futuristisches Spielzeugauto welches eine der aufregendsten und
vorteilhaftensten Technologien des 21.Jahrhunderts enthält. Der H-Racer arbeitet mit 100% reinem
vorteilhaftensten Technologien des 21.Jahrhunderts enthält. Der H-Racer arbeitet mit 100% reinem
Kraftstoff, produziert durch eine solarbetriebene Wasserstofftankstelle, welche Wasser mit Hilfe von
Kraftstoff, produziert durch eine solarbetriebene Wasserstofftankstelle, welche Wasser mit Hilfe von
Sonnenlicht in Wasserstoff umwandelt. Um die Qualität unserer Umwelt langfristig zu verbessern
Sonnenlicht in Wasserstoff umwandelt. Um die Qualität unserer Umwelt langfristig zu verbessern
ist es erforderlich den Einfluss steigender Energiepreise sowie die Abhängigkeit von importierten Öl
ist es erforderlich den Einfluss steigender Energiepreise sowie die Abhängigkeit von importierten Öl
auf unseren Alltag zu reduzieren. Dieses Produkt demonstriert die Lösung der Zukunft. Die Zeit ist
auf unseren Alltag zu reduzieren. Dieses Produkt demonstriert die Lösung der Zukunft. Die Zeit ist
reif eine neue Technolgie einzuführen – Die Brennstoffzellentechnologie.
reif eine neue Technolgie einzuführen – Die Brennstoffzellentechnologie.
Autos, betrieben mit erneuerbarer Energie, sind der ultimative Traum vieler weltführender
Autos, betrieben mit erneuerbarer Energie, sind der ultimative Traum vieler weltführender
Automobilkonzerne, Ingenieure und Wissenschaftler, um den Menschen von der Gunst dieser
Automobilkonzerne, Ingenieure und Wissenschaftler, um den Menschen von der Gunst dieser
neuen Technolgie zu überzeugen und um bisher herkömmliche Methoden in den Schatten zu
neuen Technolgie zu überzeugen und um bisher herkömmliche Methoden in den Schatten zu
stellen. Mit neuen Entwicklungen wird Wasserstoff schon bald bisherige Kraftstoffe ablösen.
stellen. Mit neuen Entwicklungen wird Wasserstoff schon bald bisherige Kraftstoffe ablösen.
Wasserstoff bietet viele Vorteile: Es ist nicht giftig, erneuerbar, kohlenstofffrei und es ist das am
Wasserstoff bietet viele Vorteile: Es ist nicht giftig, erneuerbar, kohlenstofffrei und es ist das am
reichlichsten vorhandene Element in unseren Universum. Viele unserer heutigen und zukünftig
reichlichsten vorhandene Element in unseren Universum. Viele unserer heutigen und zukünftig
aufkommenden Probleme könnten mit dieser neuen Technologie aus der Welt geschaffen werden.
aufkommenden Probleme könnten mit dieser neuen Technologie aus der Welt geschaffen werden.
Brennstoffzellenautos stossen lediglich reines Wasser aus. Dies ist auch der Grund warum
Brennstoffzellenautos stossen lediglich reines Wasser aus. Dies ist auch der Grund warum
Brennstoffzellenautos, die Wasserstoff nutzen, auch besser bekannt sind als „Fahrzeug ohne
Brennstoffzellenautos, die Wasserstoff nutzen, auch besser bekannt sind als „Fahrzeug ohne
Schadstoffaustoss”.
Schadstoffaustoss”.
Warum Wasserstoff ?
Unsere Zivilisation verbraucht kohlenstoffbasierende Energieträger 100.000 mal schneller als wie
Unsere Zivilisation verbraucht kohlenstoffbasierende Energieträger 100.000 mal schneller als wie
diese neu verfügbar sind. Von Tag zu Tag tauchen neue Fragen bezüglich der Energielieferanten
diese neu verfügbar sind. Von Tag zu Tag tauchen neue Fragen bezüglich der Energielieferanten
der Zukunft auf. Dabei steht vorwiegend die Frage im Vordergrund, ob diese in der Lage sind, der
der Zukunft auf. Dabei steht vorwiegend die Frage im Vordergrund, ob diese in der Lage sind, der
stark ansteigenden Energienachfrage entgegenzutreten. Da wir uns der Versorgung mit Öl sowie
stark ansteigenden Energienachfrage entgegenzutreten. Da wir uns der Versorgung mit Öl sowie
der noch vorhandenen Ölkapazitäten nie sicher sein können, stehen wir schon heute unter
der noch vorhandenen Ölkapazitäten nie sicher sein können, stehen wir schon heute unter
gewaltigen Druck. Öl ist notwendig für das Wohlbefinden gesamter Nationen. Von daher sind neue
gewaltigen Druck. Öl ist notwendig für das Wohlbefinden gesamter Nationen. Von daher sind neue
Technolgien, um die Abhängigkeit von importierten Öl zu reduzieren, strategisch notwendig.
Technolgien, um die Abhängigkeit von importierten Öl zu reduzieren, strategisch notwendig.
Infolgedessen arbeiten Wissenschaftler der ganzen Welt akribisch daran neue Energielösungen zu
Infolgedessen arbeiten Wissenschaftler der ganzen Welt akribisch daran neue Energielösungen zu
entwickeln ,darunter auch an der Brennstoffzellentechnologie.
entwickeln ,darunter auch an der Brennstoffzellentechnologie.
Ein noch größeres Problem ensteht bei der Verbrennung von Öl. Der in fossilen Treibstoffen
Ein noch größeres Problem ensteht bei der Verbrennung von Öl. Der in fossilen Treibstoffen
enthaltene Kohlenstoff wird bei der Verbrennung in unseren Autos in Form von CO2 freigesetzt, und
enthaltene Kohlenstoff wird bei der Verbrennung in unseren Autos in Form von CO2 freigesetzt, und
ist zusammen mit anderen giftigen Schadgasen massgeblich für die Luftverschmutzung und CO2
ist zusammen mit anderen giftigen Schadgasen massgeblich für die Luftverschmutzung und CO2
Belastung unserer Atmosphäre verantwortlich. Die Ansammlung von Kohlenstoffdioxid ist der Grund
Belastung unserer Atmosphäre verantwortlich. Die Ansammlung von Kohlenstoffdioxid ist der Grund
von Treibhauseffekten und globaler Erwärmung. Seit mehr als 100 Jahren haben die Menschen
von Treibhauseffekten und globaler Erwärmung. Seit mehr als 100 Jahren haben die Menschen
ernorme Mengen an kohlenstoffbasierende Kraftstoffe verbrannt, was infolgedessen zu einer
ernorme Mengen an kohlenstoffbasierende Kraftstoffe verbrannt, was infolgedessen zu einer
Erhitzung unserer Atmosphäre führte und immer noch führt. Folgen der globalen Erwärmung sind
Erhitzung unserer Atmosphäre führte und immer noch führt. Folgen der globalen Erwärmung sind
gefährliche Stürme, Wüstenbildung, schrumpfende Gletscher, schmelzende Polarkappen,
gefährliche Stürme, Wüstenbildung, schrumpfende Gletscher, schmelzende Polarkappen,
unbeständige Ozeanströmungen und steigende Meeresspiegel, um nur einige Auswirkungen zu
unbeständige Ozeanströmungen und steigende Meeresspiegel, um nur einige Auswirkungen zu
nennen.
nennen.
Viele der führenden Automobilkonzerne weltweit entwickeln Wasserstoff / Brennstoffzellenfahrzeuge
mit der Hoffnung diese revolutionäre Technolgie schon bald der Öffentlichkeit vorzustellen zu können.
Der H-Racer ist das kleinste mit Wasserstoff betriebene Brennstoffzellenauto der Welt und eine
Miniaturversion von Echtzeitautos, welche derweil in verschiedensten Forschungslaboratorien
entwickelt werden. Wenngleich viel einfacher aufgebaut, enthält dieses nur etwa handgroße
Spielzeugauto alle notwendigen Vorraussetzungen, um diese neuartige Technik zu demonstrieren.
Es enthält einen an Bord integrierten Wasserstoffspeicher, ein Brennstoffzellensystem welches mit
dem Motor des Fahrzeugs verbunden ist und ein Ventilsystem zur Befüllung mit Wasserstoff, welches
den Tank des Autos mit einer externen Wasserstofftankstelle verbindet.
Der H-racer ist zudem sehr sicher. Dank seiner geringen Größe werden nur geringe Mengen an
Wasserstoff benötigt um das Auto anzutreiben. Während des Gebrauchs werden lediglich winzige
Mengen an Wasser aus der Brennstoffzelle ausgestoßen. Der Anteil des von der Brennstoffzelle
ausgestoßenen Wasser ist allerdings so gering, das man dies kaum wahrnimmt.
Aus diesen Gründen braucht unsere Gesellschaft neue und erneuerbare Kraftstoffe. Über lange
Aus diesen Gründen braucht unsere Gesellschaft neue und erneuerbare Kraftstoffe. Über lange
Sicht stellt die Verwendung von Wasserstoff die beste Lösung dafür da.
Sicht stellt die Verwendung von Wasserstoff die beste Lösung dafür da.
Wasserstoff ist das am häufigsten vorhandene Element im Universum und enthält, bezogen auf das
Gewicht, die größte Energiemenge. Dieser kohlenstofffreie Kraftstoff kann entweder durch
herkömmliche oder erneuerbare Stromquellen wie Solar- oder Windenergie produziert werden.
Wenn erst einmal gewonnen, kann Wasserstoff jederzeit in nutzbare Energie in verschiedensten
Anwendungen, darunter auch Autos, umgewandelt werden. Dies bedeutet gleichzeitig auch, das der
täglich von uns benötigte Kraftstoff überall und ohne Einschränkungen produziert werden kann.
Grund dafür ist die Brennstoffzelle, die den Wasserstoff verbraucht und als Resultat Elektrizität und
Wasser erzeugt. Um diesen natürlichen Kreislauf zu komplementieren wird das Wasser wiederum
benutzt um Wasserstoff und Sauerstoff ohne giftige Abgase zu erzeugen. Es ist nur eine Frage der
Zeit wann diese neuartige Technolgie zu unserem Alltag gehören wird!
In der ganzen Welt werden verschiedene Projekte entwickelt die sich die Nutzung von Wasserstoff
als Ziel gesetzt haben (siehe Projekt „Wasserstoffautobahn”). Schon heute gibt es über 200
Wasserstofftankstellen die weltweit die Versorgung der ersten Brennstoffzellenautos gewährleisten.
1
2
Page 4
Was ist eine Brennstoffzelle und wie funktioniert Sie ?
Was ist eine Brennstoffzelle und wie funktioniert Sie ?
Eine Brennstoffzelle ist eine Vorrichtung die Wasserstoff in nutzbare elektrische Energie umwandeln
Eine Brennstoffzelle ist eine Vorrichtung die Wasserstoff in nutzbare elektrische Energie umwandeln
kann. Es handelt sich um eine Ansammlung von Schichten aus neuartigem Material bei der
kann. Es handelt sich um eine Ansammlung von Schichten aus neuartigem Material bei der
Wasserstoff und Sauerstoff miteinander reagieren um Elektrizität und Wasser ohne Verbrennung zu
Wasserstoff und Sauerstoff miteinander reagieren um Elektrizität und Wasser ohne Verbrennung zu
bilden.
bilden.
Stromkreis
(40%-60% Effizienz)
e
e
e
e
Brennstoff Wasserstoff (H2)
Rückführung von Brennstoff
Gasdiffusionselektrode (Anode)
2
Gasverteiler (Platte)
Katalysator
e
e
e
e
2
2H
Protonenaustauschmembran
O
2
O
O
Sauerstoff (O2)
Hitze
Luft + Wasserdampf
Gasverteiler (Platte)
Gasdiffusionselektrode (Kathode)
Katalysator
2. H-racer Montageanleitung2. H-racer Montageanleitung
Warnung: Bittle lesen sie die Bedienungsanleitung sorgfältig bevor
Warnung: Bittle lesen sie die Bedienungsanleitung sorgfältig bevor
sie mit dem Zusammenbau beginnen.
sie mit dem Zusammenbau beginnen.
Um das Risiko von Schäden an Eigentum, Verletzungen oder den Tod zu vermeiden beachten
Um das Risiko von Schäden an Eigentum, Verletzungen oder den Tod zu vermeiden beachten
Sie:
Sie:
1. Lesen sie aufmerksam und vergewissern sie sich die Anweisungen verstanden zu haben, bevor
1. Lesen sie aufmerksam und vergewissern sie sich die Anweisungen verstanden zu haben, bevor
sie mit der Zusammensetzung beginnen.
sie mit der Zusammensetzung beginnen.
2. Der Gebrauch dieses Produktes ist ausschliesslich für Personen ab einem Alter von 12 Jahren und
2. Der Gebrauch dieses Produktes ist ausschliesslich für Personen ab einem Alter von 12 Jahren und
unter Aufsicht Erwachsener, denen die Vorkehrungen und Anweisungen dieser Bedienungsanleitung
unter Aufsicht Erwachsener, denen die Vorkehrungen und Anweisungen dieser Bedienungsanleitung
vertraut sind, gestattet.
vertraut sind, gestattet.
3. Bei der Zusammensetzung können Werkzeuge benutzt werden.
3. Bei der Zusammensetzung können Werkzeuge benutzt werden.
4. Einige Bauteile sind klein und zerbrechlich: Bitte seien sie vorsichtig bei der Zusammensetzung
4. Einige Bauteile sind klein und zerbrechlich: Bitte seien sie vorsichtig bei der Zusammensetzung
um etwaige Bruchschäden zu vermeiden. Behandeln Sie alle Bestandteile dieses Kits mit Vorsicht
um etwaige Bruchschäden zu vermeiden. Behandeln Sie alle Bestandteile dieses Kits mit Vorsicht
5. Versuchen Sie nicht Bauteile dieses Kits zu entfernen.
5. Versuchen Sie nicht Bauteile dieses Kits zu entfernen.
6. Die Wassertofftankstelle erzeugt Gase welche leicht entzündlich sind. Bitte beachten Sie:
6. Die Wassertofftankstelle erzeugt Gase welche leicht entzündlich sind. Bitte beachten Sie:
- Benutzen Sie die Wasserstofftankstelle nicht für andere Zwecke als in den Anweisungen
- Benutzen Sie die Wasserstofftankstelle nicht für andere Zwecke als in den Anweisungen
erwähnt.
erwähnt.
- Halten Sie den H-Racer und die Wasserstofftankstelle sowie alle weiteren Bestandteile dieses
- Halten Sie den H-Racer und die Wasserstofftankstelle sowie alle weiteren Bestandteile dieses
Kits fern von Feuer und Flammen.
Kits fern von Feuer und Flammen.
Wirklich ernst zunehmendes Interesse an Brennstoffzellen gab es erst ab den 60er Jahren, als
diese für die ersten Raumfahrtmission zum Mond eingesetzt wurden. Noch heute stellt die Brennstoffzelle Elektrizität und Wasser für Raumfahrtmissionen her und gilt als unverwechselbare Technolgie die zur Förderung des Wandels zur erneuerbaren Energie gezielt eingesetzt wird. Brennstoffzellenautos, die Wasserstoff als Kraftsstoff verwenden, werden auch „zero emission vehicles
(„emissionsfreie Fahrzeuge”)“ genannt. Wenn alle Autos wie nun die Brennstoffzellenautos nur in
Kombination mit Wassertoff produziert durch erneuerbare Energiequellen wie Solar- oder Windenergie angetrieben werden, wäre unsere Kraftstoffzufuhr unbegrenzt und der V erbrauch von W asserstoff durch Brennstoffzellen wäre nicht mit unnötiger Luftverschmutzung verbunden.
Im Inneren des H-racer befindet sich eine Protonenaustauschmembrane (PEM) Brennstoffzelle
(siehe auch Kapitel 2, Teileliste – Teil E). Sie erzeugt elektrische Energie indem sie Wasserstoff aus
dem an Bord befindlichen Wasserstofftank (siehe auch Kapitel 2, Teileliste – Teil C) aufnimmt,
welcher später mit Sauerstoff aus der Luft reagiert. Nachdem sie den H-Racer vollständig zusammen gebaut haben, können sie unterhalb des Gehäuses die Lufteinlässe der Brennstoffzelle erkennen, welche die Zufuhr von Sauerstoff aus der Atmosphäre gewährleisten (Wasserstof fzufuhr erfolgt
von der gegenüberliegenden Seite). Diese Anordnung der Brennstoffzelle wird auch „luftatmende”
Wasserstoff/Luft Brennstoffzelle genannt da diese Sauerstoff aus der Luft aufnimmt, als würde sie
“atmen”.
Teileliste:
A. Fahrgestell
B. Karosserie (Gehäuse)
C. Behälter zur
Wasserstoffspeicherung
D. Zwei Einlaßventile zur Betankung
E. Brennstoffzelle
F. Spritze mit Ventil zur Gasspülung
G. 3 biegsame Schläuche
H. 4 Schrauben
I. H2 Aufkleber
J
J. Wasserstofftankstelle
Sonnenkollektor
K.
Schraubenzieher nicht enthalten
K
3 4
Page 5
Schritt 1
Platzieren Sie das Fahrgestell (Teil A) auf einer ebenen Oberfläche. Positionieren Sie die
Brennstoffzelle (Teil E) in den rechteckigen Steckplatz welcher sich in der Mitte des Fahrgestells
hinter dem schwarzen Motor befindet. Beachten Sie das die 2 Düsen der Brennstoffzelle (Teil A)
nach oben gerichtet sind und der Rote Stecker der Brennstoffzelle unterhalb des blauen Getriebes
des Motors angeordnet ist (siehe 1A).
Schritt 3
Wenn Sie die Brennstoffzelle (Teil E) positoniert haben kippen Sie diese so, dass die Rückseite das
Fahrgestell berührt und das Vorderteil der Brennstoffzelle leicht nach oben gerichtet ist, oberhalb der
kleinen Leiste hinter dem Motor (siehe 1A). Schauen Sie unter das Fahrgestell um sicher zu stellen,
das die Schrauben innerhalb der rechteckigen Öffnung sind (siehe 1B). Nun drücken Sie das
Vorderteil der Brennstoffzelle fest in das Fahrgestell bis Sie es klicken hören (siehe 1C).
Schritt 2
Verbinden Sie einen der enthaltenen biegsamen Schläuche (Teil G) mit der Düse des Einlassventils.
(Teil D) (siehe 2A & 2B).
TIPP: Um die biegsamen Schläuche mit den Düsen zu verknüpfen, verbinden Sie den Schlauch indem Sie ihn
gegen die Düse drehen, dann drücken sie die Düse in den Schlauch bis dieser sich angepasst hat.
3A
Platzieren Sie das Einlaßventil zur Betankung (Teil D) in der Öffnung die sich an der Seite des
Fahrgestells befindet (siehe 3A). Befestigen Sie das Einlaßventil in der Halterung, die sich an der
Seite des Fahrgestells befindet. Mit einer Bewegung nach unter klicken Sie das Ventil in seine
Halterung und stellen dabei gleichzeitig sicher, dass das Ventil stabil befestigt ist und das sich keine
Zwischenräume gebildet haben.
Schritt 4
4A
Verbinden Sie den zweiten biegsamen Schlauch (Teil G) mit der Düse welche sich auf dem Deckel
des Behälters zur Wasserstoffspeicherung (Teil C) befindet (Siehe 4A & 4B).
3B
4B
2C
Verbinden Sie das andere Ende des Schlauches mit der Düse welche am nächsten zum roten
Stecker der Brennstoffzelle (Teil E) liegt (siehe 2C & 2D). Stellen Sie sicher das der Schlauch
vollständig mit der Düse der Brennstoffzelle sowie mit dem Einlassventil verbunden ist, sodass der
Betankung nichts im Wege steht.
2D
5
4C
Verbinden Sie das andere Ende des Schlauches mit der Düse der Brennstoffzelle, welche am
nächsten zum schwarzen Stecker liegt (siehe 4C).
6
Page 6
Schritt 5
Nachdem der Behälter zur Wasserstoffspeicherung (Teil C) mit der Brennstoffzelle (Teil E) verbunden
ist, können Sie ihn in der länglichen Halterung vor der Brennstoffzelle anbringen. Wenn der Behälter
positioniert ist, drücken Sie leicht bis er sich der Struktur angepasst hat. Um Schäden am Auto zu
vermeiden drücken Sie nicht mit zu viel Kraft (siehe 5A & 5B um das letzendliche Aussehen des
montierten Fahrgestells festzustellen).
5A 5B
Herzlichen Glückwunsch!
Sie haben nun das Brennstoffzellensystem des kleinsten mit
Wasserstoff betriebenen Autos der Welt zusammengesetzt!
Schritt 6
6A
Verbinden Sie das rote Kabel des Fahrgestells (Teil A) mit dem roten Stecker an der
Brennstoffzelle (Teil E). (Siehe 6A). Verbinden Sie das schwarze Kabel des Fahrgestells (Teil A)
mit dem schwarzen Stecker an der Brennstoffzelle (Teil E). (Siehe 6B).
Warnung:
Vergewissern Sie sich das die Kabelverbindung korrekt ist, ansonsten kann dies zu
Schäden am Auto sowie am Brennstoffzellensystem führen. Stellen Sie zudem sicher das
die Kabel nicht die Räder des Autos berühren.
6B
Schritt 7 Zeit den H-Racer zu schliessen!
7A
Nehmen Sie die Karosserie (Teil B) des Autos und platzieren Sie diese auf dem Fahrgestell
(Siehe 7A & 7B).
7B
7
8
Page 7
Tipp: Um folgende Schritte ausführen zu können sollten Kinder unter einem Alter von 14 Jahren die
Hilfe von Erwachsenen in Anspruch nehmen:
7C
Halten Sie das vollständig montierte Auto bereit
und drehen Sie es auf die andere Seite um,
sodass Sie die 4 Löcher am äusseren
Fahrgestellrand in der Nähe der 4 Räder
erkennen können. Gleichen Sie die Löcher des
Fahrgestells den Löchern der Karosserie an
(siehe 7C).
7D
Nun benutzen Sie einen Schraubenzieher um die
Karosserie mit dem Fahrgestell zu befestigen.
Dafür verwenden Sie die 4 beigefügten
Schrauben (Teil H).Stellen Sie sicher das die
Schrauben gerade im Fahrgestell montiert sind.
Ziehen Sie die Schrauben nicht fest bevor alle 4
Schrauben im Fahrgestell platziert sind.
Befestigen Sie die Schrauben, sodass kein
Zwischenraum vorhanden bleibt. Sollten Sie
Schwierigkeiten beim befestigen der Schrauben
haben verwenden Sie Vaseline (nicht beigefügt)
um diesen Vorgang zu erleichtern.
Die Montage ihres H-racers ist nun abgeschlossen.
Das Auto ist nun bereit um mit Wasserstoff betankt zu werden!
Schritt 8 Platzieren des „H2” Aufklebers auf der vorderen Haube der Karosserie
8A
Positionieren Sie das Auto auf einer ebenen
Fläche und in ihre Richtung gerichtet.
Entnehmen Sie den H2 Aufkleber und
positionieren Sie ihn entsprechend der
Abbildung (siehe 8A).
8B
Achten Sie darauf das ein Abstand
von ca. 1mm zwischen Aufkleber und
Blauen Streifen vorhanden ist und
das der Aufkleber in der Mitte der
Haube positionert ist (siehe 8B).
3. Vorbereitung der Wasserstofftankstelle3. Vorbereitung der Wasserstofftankstelle
Die Wasserstofftankstelle kann geringe Mengen an Wasserstoff produzieren. Dies kann entweder
geschehen durch Elektrizität, erzeugt durch die beigefügte Solarzelle, oder durch 2 AA Alkaline
Batterien (nicht beigefügt). Wenn Sie die Solarzellen verwenden, achten Sie bitte darauf sie im
direkten Sonnenlicht zu platzieren um maximale Energie zu erzeugen.
Bei Benutzung bei Nacht oder regnerischen Wetter ist die Wasserstofftankstelle ausschliesslich mit
Batterien funktionsfähig. Auch bei Erzeugung von Energie mit Hilfe der Solarzelle ist die Platzierung
der Batterien in der Wasserstofftankstelle empfohlen. Nur so ist es ihnen möglich während des
Betankens jederzeit zwischen Solar „☼" und Batterie „DC" zu schalten, wenn bspw. auf Grund von
unerwarteten Wetteränderungen der Tankvorgang beschleunigt werden soll.
Achten Sie auf ihre Wasserstofftankstelle:
Benutzen Sie die Wasserstofftankstelle niemals länger als 20 Minuten am Stück. Wenn Sie ihren
H-racer vollständig betankt haben, schalten Sie die Wasserstofftankstelle für mindestens 10
Minuten aus.
Warnung:
Längere Benutzung kann die Wasserstofftankstelle funktionsunfähig machen.
9
10
Page 8
Aktivierung der DC Stromversorgung:
Öffnen Sie das Batteriefach unterhalb der Tankstelle indem
sie es in Pfeilrichung schieben (siehe 1A & 1B).
TIPP: Es ist empfehlenswert zwei AA Alkaline Batterien
zu verwenden.
1A
1B
4. Erschaffung von erneuerbaren Wasserstoff durch
4. Erschaffung von erneuerbaren Wasserstoff durch
Sonnenenergie :
Sonnenenergie :
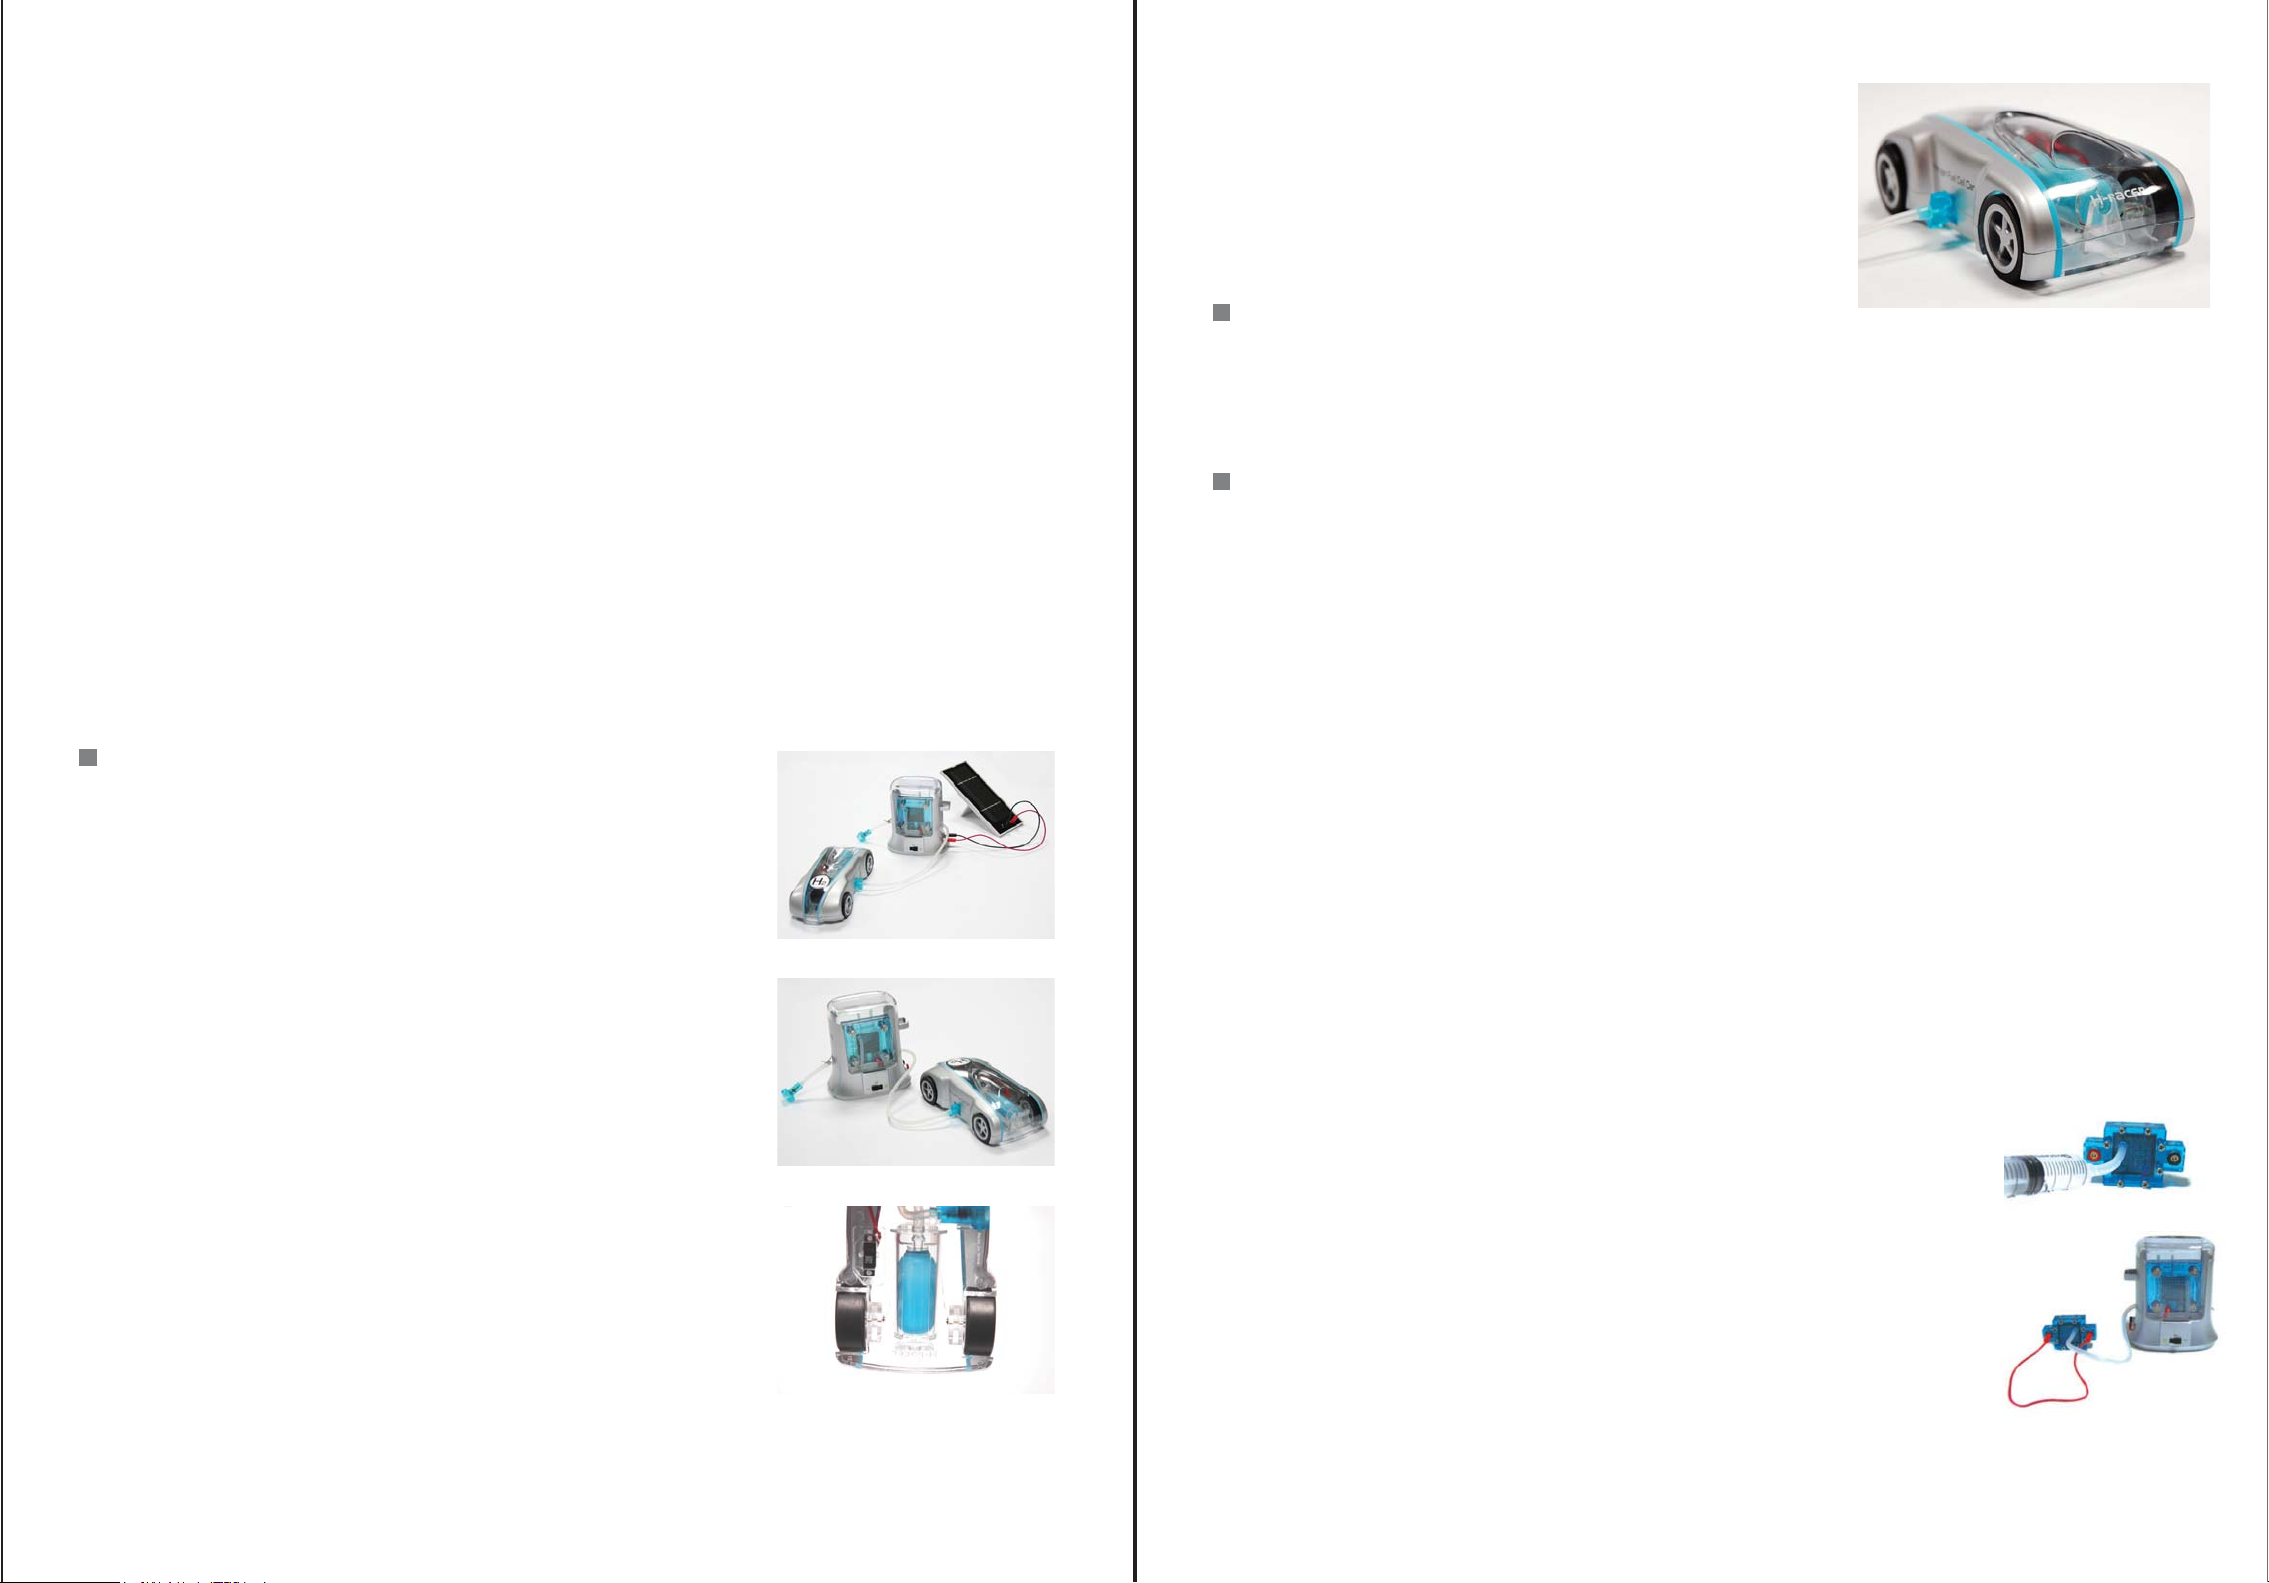
Schritt 1
Befestigen Sie das Hinterteil der Solarzelle mit der mitgelieferten rechteckigen Stütze. Es liegt an
ihnen ob Sie die Stütze entweder vertikal oder horizontal an der Solarzelle anbringen.
Schritt 2
Platzieren Sie zwei 1.5V AA Alkaline Batterien im
Batteriefach wie beschrieben und schliessen Sie das
Batteriefach (siehe 1C).
1C
Giessen Sie langsam Wasser in die Wassertanköffnung oberhalb der Tankstelle bis der Tank
vollständig mit Wasser befüllt ist (Siehe 1D & 1E).
1D
1E
2A
Verbinden Sie das schwarze Kabel mit der schwarzen Buchse auf der Solarzelle und das rote Kabel
mit der roten Buchse auf der Solarzelle (siehe 2A). Verbinden Sie das andere Ende des schwarzen
Kabels mit der schwarzen Buchse an der Tankstelle. Das gleiche tun Sie mit dem anderen Ende des
Roten Kabels welches Sie mit der roten Buchse an der Tankstelle verbinden (siehe 2B).
Warnung:
Vergewissern Sie sich das die Kabelverbindung korrekt ist ,eine andere Verbindung würde die
Tankstelle zerstören. Fügen Sie keine alternativen Energiequellen über 2.5 Volt hinzu.
Schritt 3
Platzieren Sie die Solarzelle im direkten Sonnenlicht.
Schritt 4
Schalten Sie die Tankstelle auf das „☼" Zeichen um. Das kleine blaue Licht signalisiert ihnen, das die
Tankstelle nun Wasserstoff durch Sonnenlicht produziert. Ein weiteres Indiz für die Produktion von
Wasserstoff sind die Luftblasen die sich auf der rechten Seite des Wassertanks bilden. Um die
Produktion von Wasserstoff zu stoppen, schalten Sie die Tankstelle aus. Sollte es dunkel werden,
Wolken aufziehen oder wenn sie den Tankvorgang beschleunigen wollen, können sie jederzeit auf
Batterien wechseln . Dazu wechseln sie auf „DC”. In diesem Fall würde Wasserstoff mit Hilfe der zwei
AA Alkaline Batterien (nicht beigefügt), welche Sie zuvor im Inneren der Tankstelle platziert haben,
produziert werden.
2B
TIPP: Für eine optimale Durchführung sowie für eine längere Lebenszeit ihrer Tankstelle ist die
Verwendung von Destillierten Wasser empfehlenswert. Dieses bekommen Sie in ihrer örtlichen
Drogerie oder Apotheke.
Warnung
Halten Sie die Schalter fern von Nässe.
Achten Sie darauf das das Wasser für mindestens 5 Minuten ruht bevor Sie fortfahren. Dies lässt
eine bessere Absorbierung des Wasser zu.
11
TIPP: Nutzen Sie die Solarzelle nur im direkten Sonnenlicht und nicht in lichtundurchlässigen
Räumen. Stellen Sie sicher das Sie die Tankstelle ausschalten nachdem Sie den H-racer betankt
haben. Permanenter Betrieb würde die Tankstelle beschädigen.
Der H-racer ist nun bereit mit Hilfe der Sonne mit Kraftstoff zu betanken.
12
Page 9
5. Auftankvorgang
Um den H-racer mit Wasserstoff aufzutanken, benötigen Sie die Wasserstofftankstelle, die
Spritze mit Ventil zur Gasspülung (Teil F) und das zweite Einlaßventil zur Betankung (Teil D)
zusammen mit einem Gummischlauch (Teil G).
Bei der Betankung muss beachtet werden, dass das Energiesystem des H-racers ausschliesslich
Wasserstoff als Kraftstoff akzeptiert. Sollten andere Gase verwendet werden, würde dies
gleichzeitig bedeuten, das die Brennstoffzelle nicht arbeiten könnte und das Auto nicht
funktionsfähig wäre. Um eine optimale Performance zu erlangen stellen Sie sicher das der H-racer
sowie die Wasserstofftankstelle frei von jeglichen Gasen sind.
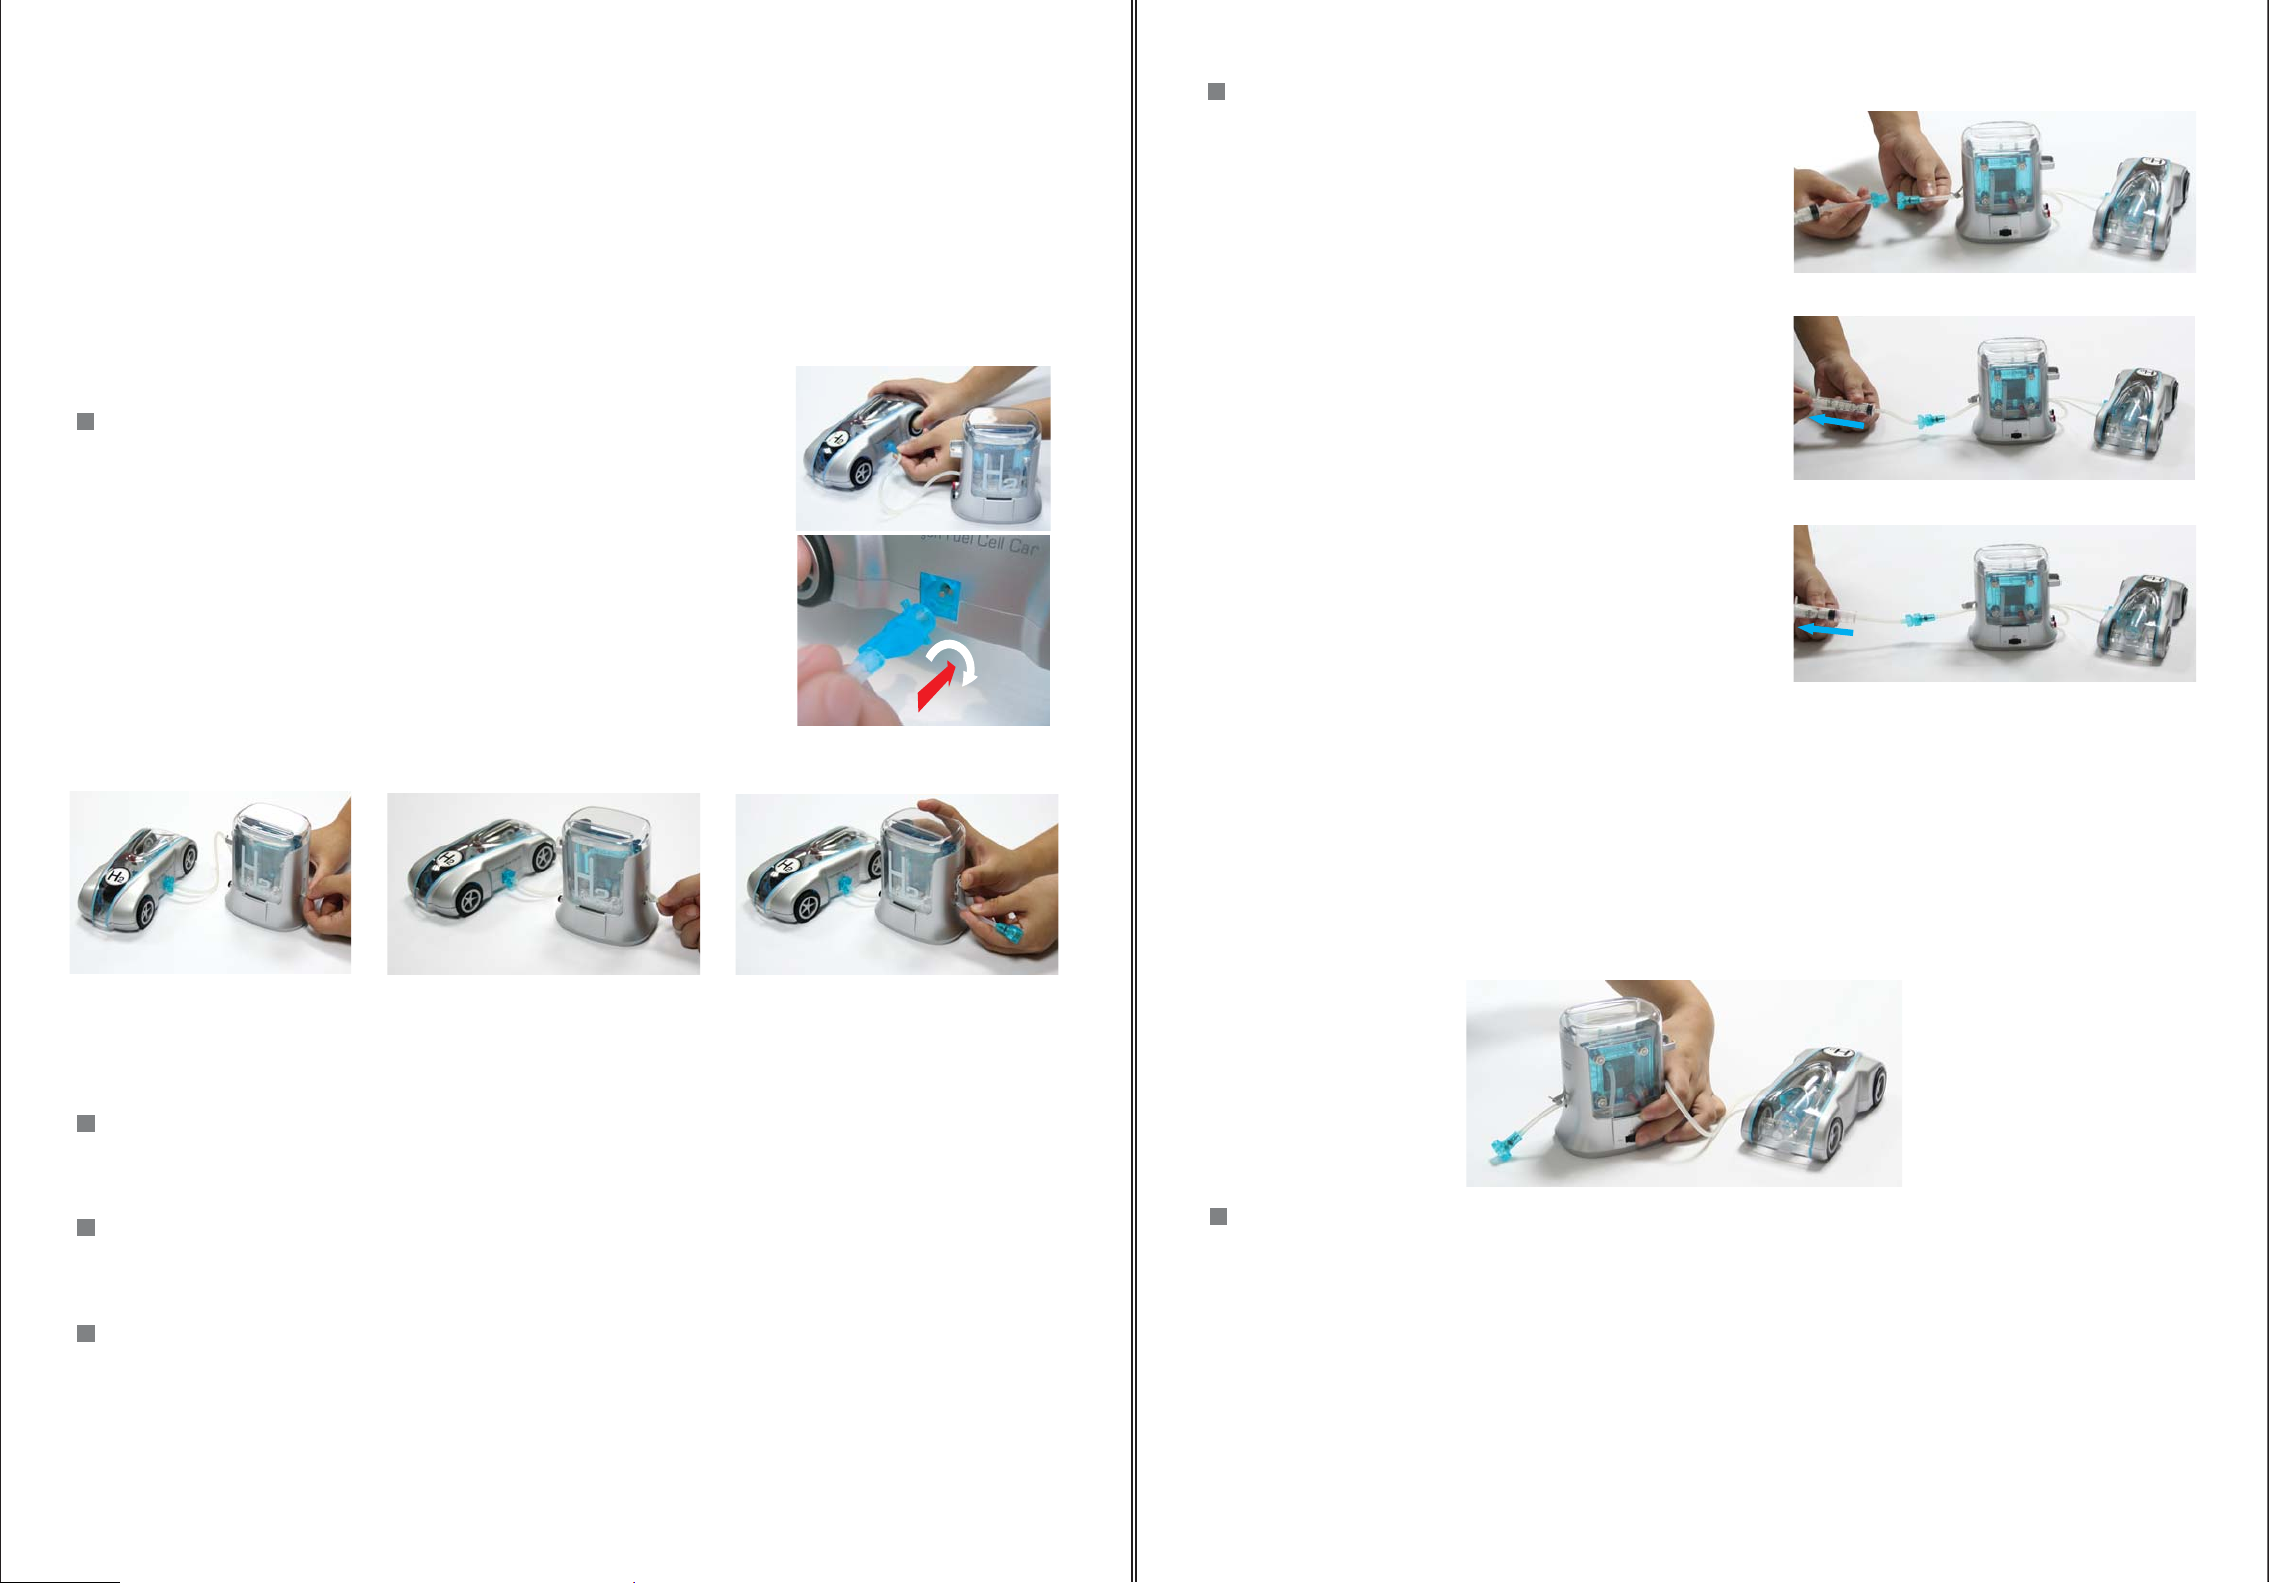
Schritt 5
Nehmen Sie die Spritze mit Ventil zur Gasspülung
(Teil F) zur Hand. Drücken Sie den Kolben in den
Zylinder (Bestandteile der Spritze) um somit Luft aus
der Spritze zu befördern. Genauso wie Sie das Ventil
(Tankrüssel) des Gummischlauches mit dem Ventil
des Autos verbunden haben, verbinden Sie nun das
Verbindungsventil der Spritze mit dem zusätzlichen
.
Gummischlauch mit Ventil welchen Sie zuvor mit der
Wasserstofftankstelle verbunden haben (siehe
5A).
5A
Schritt1
Stellen Sie sicher das die Schalter unterhalb des Fahrgestells
sowie an der Wasserstofftankstelle ausgeschaltet sind.
Verbinden Sie das Ventil (Tankrüssel) des Gummischlauches
der Wasserstofftankstelle mit der Ventilöffnung an der Seite
des Autos. Dann drehen Sie das Ventil des Schlauches der
Wasserstofftankstelle im Uhrzeigersinn um die
Wasserstoffzufuhr zu ermöglichen (siehe 1A & 1B).
Wenn die zwei Ventile miteinander verknüpft sind, können Sie
loslassen, da nun beide Ventile in Position sind.
1A
1B
TIPP: Das Verbindungsventil der Spritze ist
zerbrechlich. Drücken Sie deshalb während Sie das
Ventil im Uhrzeigersinn befestigen.
Um das komplette Brennstoffzellensystem zu
reinigen, ziehen Sie den inneren Kolben der Spritze
in ihre Richtung. Während Sie dieses tun,
beobachten Sie den Ballon im Gastank. Bei korrekter
Ausführung dieses Schritts werden Sie sehen das
Luft aus dem Ballon gezogen wird. Wenn die
gesamte Luft aus dem Ballon entwichen ist können
Sie die Spritze loslassen (siehe 5B & 5C).
TIPP: Um zu verhindern das Luft zurück in den Ballon gelangt, ziehen Sie nicht an der Spritze wenn
der Ballon leer ist. Lassen Sie die Luft nicht ins Innere zurückziehen. Das Ziel ist es so viel Luft wie
möglich aus der Wasserstofftankstelle zu entfernen.
Trennen Sie nun die Spritze mit dem Verbindungsventil von dem zusätzlichen Ventil des
Gummischlauches welcher mit der Tankstelle verbunden ist, indem Sie gegen den Uhrzeigersinn
drehen. Der Tank ist nun gereinigt und bereit um Wasserstoff von der Tankstelle aufzunehmen.
5B
5C
2A
TIPP: Der Schlauch sowie das Ventil (Tankrüssel) der Wassertofftankstelle sind zerbrechlich.
Drücken Sie deshalb während Sie das Ventil im Uhrzeigersinn befestigen.
Schritt 2
Mit der Gewissheit dass die beiden Ventile weiterhin miteinander verbunden sind, öffnen Sie die
kleine graue Druckklappe an der Seite der Wasserstofftankstelle (siehe 2A & 2B).
Schritt 3
Verbinden Sie nun den dritten biegsamen Schlauch (Teil G) mit der Düse des zweiten Einlassventils
(Teil D) (siehe Schritt 2 der Montageanleitung).
Schritt 4
Halten Sie die graue Druckklappe geöffnet und verknüpfen Sie das offene Ende des
Gummischlauches mit der kleinen Düse die sich hinter der grauen Druckklappe befindet (siehe 4A).
2B
4A
13
6A
Schritt 6
Aktivieren Sie die Wasserstofftankstelle indem Sie den Schalter entweder auf „DC” oder „☼"
stellen (Der Schalter befindet sich auf der Rückseite der Wasserstofftankstelle). Sie können auf
„DC” stellen wenn Sie die Alkaline Batterien im Batteriefach untergebracht haben oder auf „☼" wenn
die Wasserstofftankstelle mit der Solarzelle verbunden ist. Wenn Sie die Solarzelle verwenden,
stellen Sie sicher das ausreichend Sonnenlicht vorhanden ist. Sollte es regnerisch oder dunkel sein
schalten Sie bitte auf Batterien („DC”) um.
14
Page 10
TIPP: Sollten die kleinen Luftblasen in der Mitte des Wassertanks ausgestossen werden, sehen Sie
bitte in der Fehlerbehebung nach (Abschnitt 4).
Sobald Sie die Wasserstofftankstelle aktiviert haben wird Wasserstoff durch den Elektrolyseur
produziert und in den Gummischlauch, der mit dem Auto verbunden ist, freigegeben. Mit Ausführen
dieses so wichtigen Reinigungsschrittes werden atmosphärische Gase, die zuvor in das
Brennstoffzellensystem des Autos gelangt sind, entfernt. Beachten Sie dass das Energiesystem des
H-racers ausschliesslich mit Wasserstoff funktionsfähig ist. Sollten andere Gase gegenwärtig sein,
so kann das Auto sich nicht fortbewegen. Der wie oben beschriebene Reinigungsvorgang mit Hilfe
der Spritze ist ein wichtiger Schritt um jegliche unerwünschten Gase (wie z.B. Stickstoff) vom Tank
des Autos fernzuhalten bevor dieses betankt wird.
Bevor Sie mit Hilfe der Spritze (Teil F) die Luft aus dem Ballon gezogen haben, war jene Luft zum
grössten Teil Stickstoff aus der Atmosphäre. Der besagte Stickstoff ist allerdings verantwortlich dafür,
dass der Wasserstoff nicht mit dem Sauerstoff in der Brennstoffzelle reagieren kann, was gleichzeitig
bedeutet, dass sich das Auto nicht fortbewegen kann, auch wenn der Wasserstofftank vollständig
aufgetankt sein sollte.
TIPP: Um die Reichweite und Laufzeit des H-racers zu verbessern empfiehlt es sich den
Reinigungs- und Betankungsvorgang einmal bis zweimal zu wiederholen. Des weiteren werden
unerwünschte Gase mit dieser Methode verdünnt und die Reinheit des Wasserstoffs wird verbessert.
Warnung: Bitte lassen Sie diesen Schritt nicht aus – alles andere würde die Laufzeit des
Autos erheblich reduzieren.
Schritt 7
Wenn nun alle Ventile korrekt miteinander verknüpft sind und der
sich an Bord befindliche Tank mit Wasserstoff betankt wird,
vergewissern Sie sich das der Schalter unter dem Fahrgestell
ausgeschaltet ist.
Wenn dieser Prozess abgeschlossen ist und der Ballon voll ist,
schalten Sie die Tankstelle aus („off“ Schalter).
TIPP: Nach 20 Minuten Gebrauch am Stück schalten Sie die
Wasserstofftankstelle aus und lassen Sie sie für mindestens
10 Minuten ruhen, bevor Sie die den Vorgang wiederholen
sollten.
Warnung: Längere Benutzung kann die Wasserstofftankstelle
funktions- unfähig machen.
Schritt 8
Entfernen Sie den Tankschlauch mit dem Ventil nun von dem Ventil des Autos. Um dies tun zu
können ohne Kraftstoff aus dem Wasserstofftank zu verlieren, müssen Sie das Ventil mit dem
Gummischlauch gegen den Uhrzeigersinn drehen bis das Ventil aus dem Auto vortritt. Wenn sie die
Verbindung trennen, drücken Sie das Ventil nicht in das Auto, da dies Luft aus dem Ballon
herauslassen würde. Achten Sie sorgfältig darauf das keine Luft aus den Ballon heraustritt und dass
das Auto keinen Kraftstoff verliert.
Schritt 9
Der Wasserstofftank sollte nun aufgefüllt sein, sodass das Auto nun betriebsbereit ist! Um das Auto
fahren zu lassen, suchen Sie bitte nach einer ebenen Fläche ohne Hindernisse. Schalten sie das Auto
an (stellen Sie den Schalter unter dem Auto dazu auf „on”) , stellen Sie es auf den Boden und sehen
Sie wie es fährt.
Das an Bord befindliche Brennstoffzellensystem wird solange Wasserstoff konsumieren bis der
Wasserstofftank fast leer ist, oder sich andere Gase in der Brennstoffzelle ansammeln. Bei vollen Tank
und einigen zuvor bereits durchgeführten Versuchen kann der H-racer bis zu 3 Minuten absolvieren.
Es kann dabei vorkommen, dass das Auto nach etwa 20-30 Sekunden stoppt. Sollte dies der Fall sein,
drücken Sie gegen das Einlassventil (Teil D) an der Seite des Autos um atmosphärische Gase
(hauptsächlich Stickstoff), die sich angesammelt haben, aus dem Auto zu entfernen.
Um das Auto neu zu starten, drücken sie ihren Finger leicht gegen das Ventil während Sie das Auto
angeschaltet lassen. Der Ballon wird daraufhin zwar ein wenig Luft verlieren, der Motor des Autos
hingegen wird wieder funktionionsfähig sein. Durch drücken gegen das Ventil entfernen Sie
überflüssigen Stickstoff, welcher zuvor erheblichen Einfluss auf den Wasserstoff hatte. Nur durch
aufmerksames Lesen der Bedienungsanleitung ist es ihnen möglich diese natürlichen Vorgang schon
von vornherein zu verhindern.
Achten Sie genau auf den Ballon im Inneren des Gastanks, da
dieser schon schnell Konturen annehmen wird. Bei Betrieb mit
neuen Batterien dauert es mindestens 1 Minute bis der Ballon mit
Wasserstoff befüllt ist (Stellen Sie den Schalter dazu auf „DC”).
Wenn sie die Solarzelle benutzen sollten stellen Sie diese ins direkte
Sonnenlicht. Es dauert etwa 10 Minuten bei starken Sonnenlicht und
Verwendung der enthaltenen Solarzelle bis der Tank des Autos mit
Wasserstoff befüllt ist. Bei schwacher Sonneneinstrahlung kann der
Tankprozess entweder länger als 10 Minuten andauern oder gar
nicht stattfinden.
Schalten Sie die Tankstelle nicht aus bevor der Ballon im Behälter
zur Wasserstoffspeicherung nicht voll ist (Der Ballon im Tank nimmt
dabei die selben Konturen wie der transparente Behälter zur
Wasserstoffspeicherung an (Zylinder)).
TIPP: Wenn Sie den Ballon zu weit auffüllen, kann dies dazu führen,
dass die Gummiabdichtung reißt. Es würde dazu führen, dass das
System nicht länger gasdicht ist.
TIPP1: Um die Performance ihres Autos zu verbessern, ist es empfehlenswert, die Spritzmethode
einige Male zu wiederholen (Schritt 5). Ohne Ausführung dieses Schritts würde die Laufzeit rapide
reduziert werden.
Wenn das Auto Gas verbraucht hat, stellen Sie es aus (verwenden Sie dazu den Schalter unter dem
Auto) und wiederholen Sie Schritt 5, um alle Gase aus dem Tank zu entfernen.
TIPP2: Wenn die Brennstoffzelle für eine Weile nicht gebräuchlich gewesen ist und nicht gut
funktioniert. Die Brennstoffzelle muss durch Befüllen von Wasser und dann Kurzschluss aufgewärmt
werden. Diesen Schritten folgen, um sie zu reaktivieren.
a. Den blauen Ventilanschluss vom Gummischlauch entfernen, der an der
bereitgestellten Spritze befestigt wird
b. Ca. 0.2ml von destilliertem Wasser in die Spritze saugen und das geöffnete
Ende des Spritze-Gummischlauches mit einer der Düsen auf der Brennstoffzelle
anschließen, und das destillierte Wasser in die Brennstoffzelle langsam drücken.
Dies für 10 Minuten sitzen lassen. (Siehe Abbildung a)
c. Den Schalter auf der Wasserstoff-Station auf die DC Seite verschieben und
überprüfen, dass die Lichter blitzen und die Sauerstoffluftblasen bilden sich auf
der rechten Seite des Wasserbehälters.
d. Den Gummischlauch von dem blauen Betankensventilanschluss der
Wasserstoff-Station entfernen und den Gummischlauch an die obere Düse der
Brennstoffzelle anschließen.
e. Dann gebrauchen Sie die rote Leitung mit den doppelköpfigen
Bananensteckern, ein Ende an die rote Anschlussbuchse und das andere Ende
an die schwarze Anschlussbuchse auf der Brennstoffzelle anschließen. Die
Brennstoffzelle vertikal setzen. (Siehe Abbildung b).
f. Die Leitung für 5 Minuten anschließen lassen, und dann trennen. Die
Brennstoffzelle ist jetzt zum Gebrauch bereit.
a
b
15
16
Page 11
6. Fehlerbehebung
1. Der H-racer fährt nicht oder nur langsam:
a. Überprüfen Sie ob der Ballon im Tank des Autos voll ist, die Drähte nicht die Räder berühren und
das der Schalter unter dem Auto auf „on” ist.
b.Wenn der Ballon leer sein sollte, bitte die Schritte in Abschnitt 5 „Auftankvorgang” erneut
vornehmen. Schalten Sie das Auto dann wieder an.
c. Wenn der Ballon des Behälters zur Wasserstoffspeicherung voll erscheint, haben unerwünschte
Gase den Weg in das System gefunden. Der H-racer funktioniert jedoch ausschliesslich mit reinen
Wasserstoff, welcher aus dem Tank des Autos stammt. Um diese Gase zu beseitigen drücken sie
ihren Finger leicht gegen das Ventil des Autos während Sie das Auto angeschaltet lassen. Sie
werden bemerken, dass das Auto wieder zu fahren beginnt.
d. Wenn die Drähte die Räder berühren schieben Sie diese ein wenig zur Seite, sodass das Auto frei
fahren kann.
2. Der Ballon im Inneren des Tanks lässt sich nicht auftanken:
a. Stellen Sie sicher, dass sich die Gummiabdichtung, welche den Ballon sichert, platziert ist.
b. Überprüfen Sie die Verbindungen im Inneren des Autos und stellen Sie sicher, dass das Ventil
(Tankrüssel) mit dem Gummischlauch zum Betanken, mit dem Ventil des Autos verbunden ist. Es ist
empfehlenswert die Verbindungen neu zu bilden um sicher zu gehen.
c. Überprüfen Sie ob der Tank der Wasserstofftankstelle mit Wasser (Destilliertes Wasser*) gefüllt ist
und warten Sie mindestens 5 Minuten bevor Sie die Tankstelle einschalten. Wenn Sie diese
eingeschaltet haben, sollten sich in der Wasserstofftankstelle kleine Luftblasen auf der rechten Seite
des Wassertanks freisetzen.
d. Wenn jedoch alle Verbindungen korrekt sind und Luftblasen freigesetzt werden, der Ballon sich
jedoch immer noch nicht auffüllen lässt, ist ihre Tankstelle infolge falscher Handhabung beschädigt.
Bitte versuchen Sie nicht die Tankstelle zu reparieren sondern kontaktieren Sie
support@horizonfuelcell.com, um Hilfe zu bekommen.
4. Die Luftblasen erscheinen in der Mitte des Wassertanks:
a. Stellen Sie den Schalter der Wasserstofftankstelle auf „off” unmittelbar nachdem der Elektrolyseur
getrocknet ist.
b. Sehen Sie in Abschnitt 3C der Fehlerbehebung nach um weitere Details zur Problemlösung
herauszufinden.
5. Die blauen LED leuchtet nicht und keine Luftblasen erscheinen im Wassertank
der Wasserstofftankstelle.
a. Wenn Sie die enthaltene Solarzelle verwenden, überpruefen Sie ob die Kabelverbindungen korrekt
sind. Wenn es wolkig oder dunkel sein sollte kann keine Elektrizität erzeugt werden und die
Wasserstofftankstelle funktioniert nicht. In diesem Fall müssten Sie auf „DC” umstellen.
b. Wenn Sie die 2AA Alkaline Batterien verwenden, überprüfen Sie ob diese richtig im Batteriefach
der Wasserstofftankstelle untergebracht sind. Wenn die Wasserstofftankstelle dennoch nicht
funktioniert, könnte es daran liegen, dass die Batterien leer sind. In diesem Falle ersetzen Sie die
Batterien.
c. Sehen Sie in Abschnitt 3C der Fehlerbehebung nach um weitere Details zur Problemlösung
herauszufinden.
6. Der H-Wagen läuft langsam und dauert kurze Zeit, aber der
Wasserstoffspeicherzylinder ist vom Wasserstoff befüllt.
a. Die Brennstoffzelle muss durch Befüllen von Wasser und dann Kurzschluss aufgewärmt werden.
Den Schritten folgen, wie in Tip 2 auf Seite 32 beschrieben, um die Brennstoffzelle zu reaktivieren.
b. Nachdem Sie beendet haben, die Brennstoffzelle zu gebrauchen, wird es äußerst empfohlen, sie
innerhalb des mitgelieferten abgedichteten Aluminiumbeutels zu setzen. Dieses wird die
Brennstoffzelle schützen, während Sie den H-Wagen nicht gebrauchen.
Wenn Sie weitere Fragen und Anmerkungen haben sollten kontaktierenSie bitte
support@horizonfuelcell.com
3. Die Luftblasen erscheinen nur sehr langsam im Wassertank der Tankstelle:
a. Bei Verwendung der Solarzelle stellen Sie sicher das diese im direkten Sonnenlicht platziert ist.
Da der solarbetriebene Auftankprozess langsamer vonstatten geht als der batteriebetriebene
Auftankprozess, ist es üblich das die Luftblasen nur langsam im Wasserstofftank erscheinen. Die
enthaltene standardmässige Solarzelle lässt eine Betankung des H-racers bei starker
Sonneneinstrahlung in ca. 10 Minuten zu.
b. Wenn die Luftblasen bei der Vewendung von Batterien nur langsam erscheinen, tauschen Sie bitte
die Alkaline Batterien in der Wasserstofftankstelle aus.
c. Der Elektrolyseur der Wasserstofftankstelle könnte ausgetrocknet sein infolge von zu häufiger
Verwendung. In diesem Fall nehmen Sie die Spritze zur Hand und entfernen Sie den blauen
Verbindungsstecker vom Schlauchventil, sodass lediglich der Schlauch mit der Spritze verbunden ist.
Drücken Sie die gesamte Luft aus der Spritze. Positionieren Sie die Spritze mitsamt dem Schlauch
im Inneren des Wassertanks, an der Stelle wo die Luftblasen ausgestossen werden. Nun saugen Sie
Wasser in den Zylinder der Spritze. Achten Sie dabei auch auf die Schläuche in der
Wasserstofftankstelle um sicher zu stellen das Wasser herausgepumpt wird und in die Spritze
gesaugt wird. Dieser Vorgang führt dazu dass der Elektrolyseur wieder „befeuchtet” wird und
Wasserstoff leichter produziert werden kann. Warten Sie danach etwa 2-3 Minuten bevor Sie die
Wasserstofftankstelle wieder in Betrieb nehmen. Nun sollte die Wasserstoffproduktion wieder wie
normal vorgesehen funktionieren können! Verwenden Sie die Wasserstofftankstelle nicht zu lange an
einem Stück. Permanenter Betrieb (über 20 Minuten) würde die Wasserstofftankstelle langfristig
beschädigen. Schalten Sie die Tankstelle unmittelbar nach der Betankung des H-racers aus.
*Sie können Destilliertes Wasser in ihrer örtlichen Drogerie oder Apotheke erwerben
Willkommen im Zeitalter des Wasserstoffs!
17
18
Page 12

1. About the H-racer
1. About the H-racer
The H-racer is a futuristic toy car that contains one of the most exciting and advanced technologies
The H-racer is a futuristic toy car that contains one of the most exciting and advanced technologies
of the 21st century. This car operates on 100% clean fuel produced by a miniature solar-powered
of the 21st century. This car operates on 100% clean fuel produced by a miniature solar-powered
hydrogen refueling station that converts water to hydrogen using energy captured from the sun. To
hydrogen refueling station that converts water to hydrogen using energy captured from the sun. To
help improve the quality of our environment, reduce the impact of soaring energy costs, and
help improve the quality of our environment, reduce the impact of soaring energy costs, and
decrease our dependence on imported oil, the time is right to start introducing the world to the
decrease our dependence on imported oil, the time is right to start introducing the world to the
benefits of hydrogen fuel cell technologies.
benefits of hydrogen fuel cell technologies.
Cars running on clean and renewable fuel are the ultimate dream of many of today's world leaders,
Cars running on clean and renewable fuel are the ultimate dream of many of today's world leaders,
engineers and scientists seeking to eliminate mankind's reliance on fossil fuels in favor of
engineers and scientists seeking to eliminate mankind's reliance on fossil fuels in favor of
climate-friendly energy resources. With new advances in technology, hydrogen is fast becoming the
climate-friendly energy resources. With new advances in technology, hydrogen is fast becoming the
world's next fuel. Hydrogen offers many important advantages: it is non-toxic, renewable, clean to
world's next fuel. Hydrogen offers many important advantages: it is non-toxic, renewable, clean to
use, carbon-free, and it is the most abundant element in our universe. By using fuel cell technology
use, carbon-free, and it is the most abundant element in our universe. By using fuel cell technology
to convert hydrogen to electricity without any combustion, this approach offers a significant solution
to convert hydrogen to electricity without any combustion, this approach offers a significant solution
to many of our global energy, environmental and security problems. The only exhaust resulting from
to many of our global energy, environmental and security problems. The only exhaust resulting from
hydrogen fuel cell cars is pure water. This is why fuel cell cars that use hydrogen as a fuel are also
hydrogen fuel cell cars is pure water. This is why fuel cell cars that use hydrogen as a fuel are also
known as "zero emission vehicles."
known as "zero emission vehicles."
Why Hydrogen?
Our civilization consumes carbon-based fossil fuels 100,000 times faster than they are being made
Our civilization consumes carbon-based fossil fuels 100,000 times faster than they are being made
available, raising many questions about global supplies and whether they are able to meet the
available, raising many questions about global supplies and whether they are able to meet the
world's fast-growing global energy demand. With geopolitical uncertainties in oil producing countries
world's fast-growing global energy demand. With geopolitical uncertainties in oil producing countries
and insufficient oil refining capacity, our global economy is already under significant pressure. Oil is
and insufficient oil refining capacity, our global economy is already under significant pressure. Oil is
critical to the well-being of entire nations, therefore new technologies that can reduce the
critical to the well-being of entire nations, therefore new technologies that can reduce the
dependence on imported oil are becoming strategic. National security concerns are now
dependence on imported oil are becoming strategic. National security concerns are now
encouraging scientists from all over the world to develop new energy technology solutions such as
encouraging scientists from all over the world to develop new energy technology solutions such as
hydrogen fuel cells.
hydrogen fuel cells.
An even greater issue has to do with the consumption of oil itself. Fossil fuels contain carbon, and
An even greater issue has to do with the consumption of oil itself. Fossil fuels contain carbon, and
burning gasoline in our cars creates toxic air pollution in our cities and contributes to massive
burning gasoline in our cars creates toxic air pollution in our cities and contributes to massive
amounts of carbon dioxide being released into our atmosphere. Carbon dioxide accumulation is the
amounts of carbon dioxide being released into our atmosphere. Carbon dioxide accumulation is the
cause of greenhouse effects and global warming. For more than 100 years, humans have burned
cause of greenhouse effects and global warming. For more than 100 years, humans have burned
tremendous amounts of carbon-based fuels, causing our atmosphere to heat up. Global warming
tremendous amounts of carbon-based fuels, causing our atmosphere to heat up. Global warming
can now be witnessed by increasingly violent storms, desertification, shrinking mountain glaciers,
can now be witnessed by increasingly violent storms, desertification, shrinking mountain glaciers,
melting polar ice caps, changing ocean currents and rising sea water levels. We are just starting to
melting polar ice caps, changing ocean currents and rising sea water levels. We are just starting to
notice the effects.
notice the effects.
Most of the world's automotive companies are developing hydrogen fuel cell vehicles with the hope of
introducing this revolutionary technology to the public over the next years.
The H-racer is the world's smallest hydrogen fuel cell car, and the miniature version of real-size
hydrogen powered cars being developed today in laboratories. Although simpler in design, this
palm-size fuel cell car contains all the necessary technology to make it run. It includes an on-board
hydrogen storage tank, a fuel cell system connected to the car's electric motor, and a hydrogen
refueling valve system that can connect the car's storage tank to an external hydrogen refueling
station.
The H-racer is also very safe. Given its small size, only tiny quantities of hydrogen are needed to
power the car. Its only emission is just tiny quantities of pure water that come directly out of the fuel
cell during operation. The amount of water produced by the fuel cell power system is so small that
you will not even notice it.
Our society needs a new and renewable fuel and hydrogen is the best solution for the long term.
Our society needs a new and renewable fuel and hydrogen is the best solution for the long term.
Indeed, hydrogen is the most abundant element in our universe and carries the most energy per
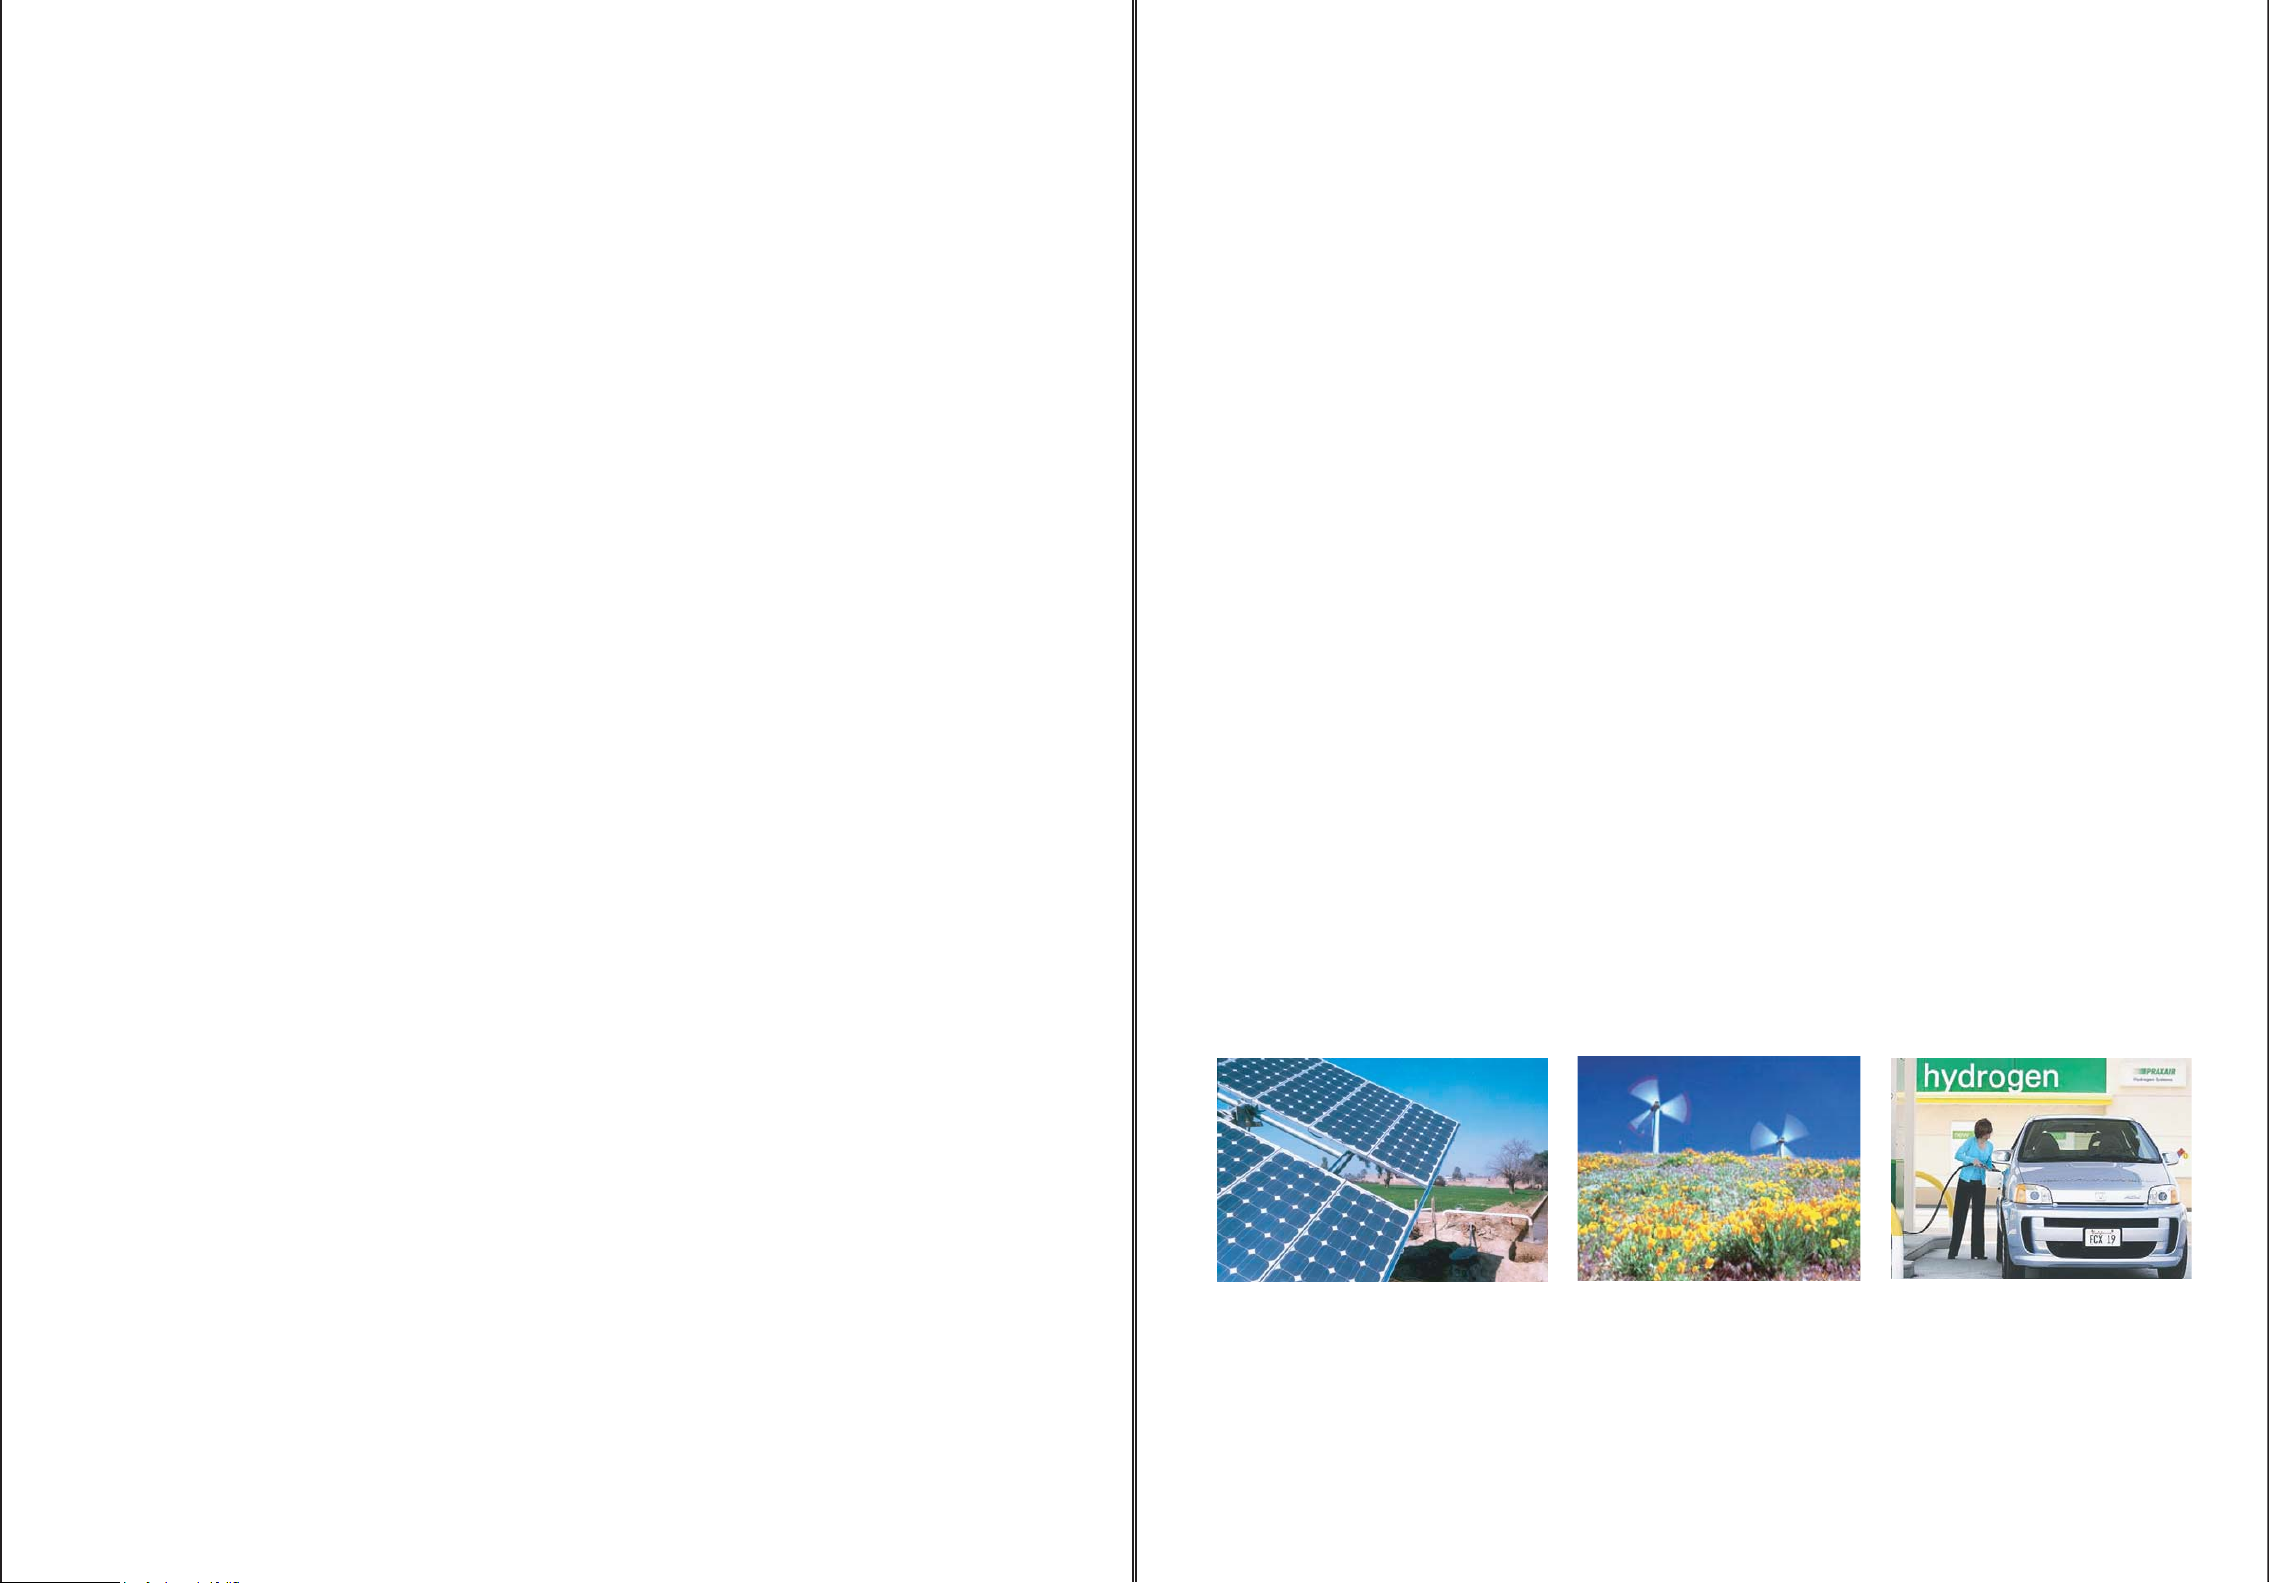
unit of weight. This carbon-free fuel can be produced either using traditional or renewable power
sources such as solar or wind power. Once captured, hydrogen can be converted back to usable
energy in numerous applications, including cars. This means our every day fuel can be produced
locally, and in unlimited quantities. When it is consumed in the fuel cell, the result is electricity and
water. This water can then be used to produce hydrogen and oxygen, making the cycle is
continuous and natural, with no toxic emissions. There are many challenges to making this a reality,
but it's only a matter of time... ...and human ingenuity!
19
Around the world, several "Hydrogen Highway" projects are being developed and over 200
hydrogen refueling stations have already been built to service the first fuel cell cars.
20
Page 13

What is a fuel cell and how does it work?
What is a fuel cell and how does it work?
A fuel cell is a device that can convert hydrogen to usable electric power. The fuel cell is an assembly
A fuel cell is a device that can convert hydrogen to usable electric power. The fuel cell is an assembly
of advanced material layers where hydrogen and oxygen react with each other to generate electricity
of advanced material layers where hydrogen and oxygen react with each other to generate electricity
and water, without any combustion.
and water, without any combustion.
Electric Circuit
(40%-60% Efficiency)
e
e
e
e
2
Fuel H (Hydrogen)
Used Fuel Recirculates
Gas Diffusion Electrode (Anode)
Flow Field Plate
Catalyst
e
e
e
e
2
2H
Proton Exchange Membrane
O
2
O
O
2
O (Oxygen)
Heat
Air + Water Vapor
Flow Field Plate
Gas Diffusion Electrode (Cathode)
Catalyst
2. H-racer Assembly Instructions2. H-racer Assembly Instructions
WARNING: PLEASE READ CAREFULLY BEFORE STARTING
WARNING: PLEASE READ CAREFULLY BEFORE STARTING
To avoid the risk of property damage, serious injury or death:
To avoid the risk of property damage, serious injury or death:
1. Read carefully and fully understand the instructions before starting assembly of this kit.
1. Read carefully and fully understand the instructions before starting assembly of this kit.
2. This kit is intended only for use by persons 12 years old and up, and only under the supervision of
2. This kit is intended only for use by persons 12 years old and up, and only under the supervision of
adults who have read and understood the instructions in this user manual.
adults who have read and understood the instructions in this user manual.
3. When assembling this kit, tools may be used. Extra care should be taken to avoid personal injury.
3. When assembling this kit, tools may be used. Extra care should be taken to avoid personal injury.
4. Some parts are small and fragile: please be careful when handling and connecting parts to avoid
4. Some parts are small and fragile: please be careful when handling and connecting parts to avoid
breakage. Handle all parts and components with care.
breakage. Handle all parts and components with care.
5. Do not attempt to use any part, item, or component provided in this kit for any other purpose than
5. Do not attempt to use any part, item, or component provided in this kit for any other purpose than
what is instructed in this manual. Do not attempt to disassemble any part, item or component in this
what is instructed in this manual. Do not attempt to disassemble any part, item or component in this
kit.
kit.
Hydrogen station generates gases that are very easily ignited.
6. The
6. The
Therefore:
Therefore:
- Do not use the
- Do not use the
instructed in this user manual.
instructed in this user manual.
- Keep the
- Keep the
contained in this kit away from fire or flame.
contained in this kit away from fire or flame.
Hydrogen station generates gases that are very easily ignited.
Hydrogen Station for any other purpose than refueling the H-racer, as
Hydrogen Station for any other purpose than refueling the H-racer, as
H-racer and the Hydrogen Station, as well as all items, components and parts
H-racer and the Hydrogen Station, as well as all items, components and parts
Serious interest in fuel cells did not begin until the 1960's, when they were used as power for man's
first missions to the moon. Although fuel cells still provide electricity and water for today's space
missions, this unique technology is now aimed at promoting a global transition to renewable energy
sources. Fuel cell cars that use hydrogen as fuel are called "zero emission vehicles." If fuel cell cars
were to use hydrogen produced by renewable sources of energy such as solar or wind power, our
fuel supply would be unlimited - and consumption of hydrogen through fuel cells would not create any
waste nor air pollution.
Inside the H-racer is a Proton Exchange Membrane (PEM) fuel cell (see section 2, List of parts and
components - part E). It generates electrical energy by consuming hydrogen located in the on-board
hydrogen storage tank (see section 2, List of parts and components, part C), which reacts with
oxygen from the air. If you look underneath the chassis of your fully assembled H-racer, you will see
the fuel cell has air inlets that allow oxygen from our atmosphere to enter the fuel cell (Hydrogen
reaches the fuel cell from the opposite side). This fuel cell configuration is also called an
"air-breathing" hydrogen/air fuel cell, absorbing oxygen from the air - as if it was "breathing".
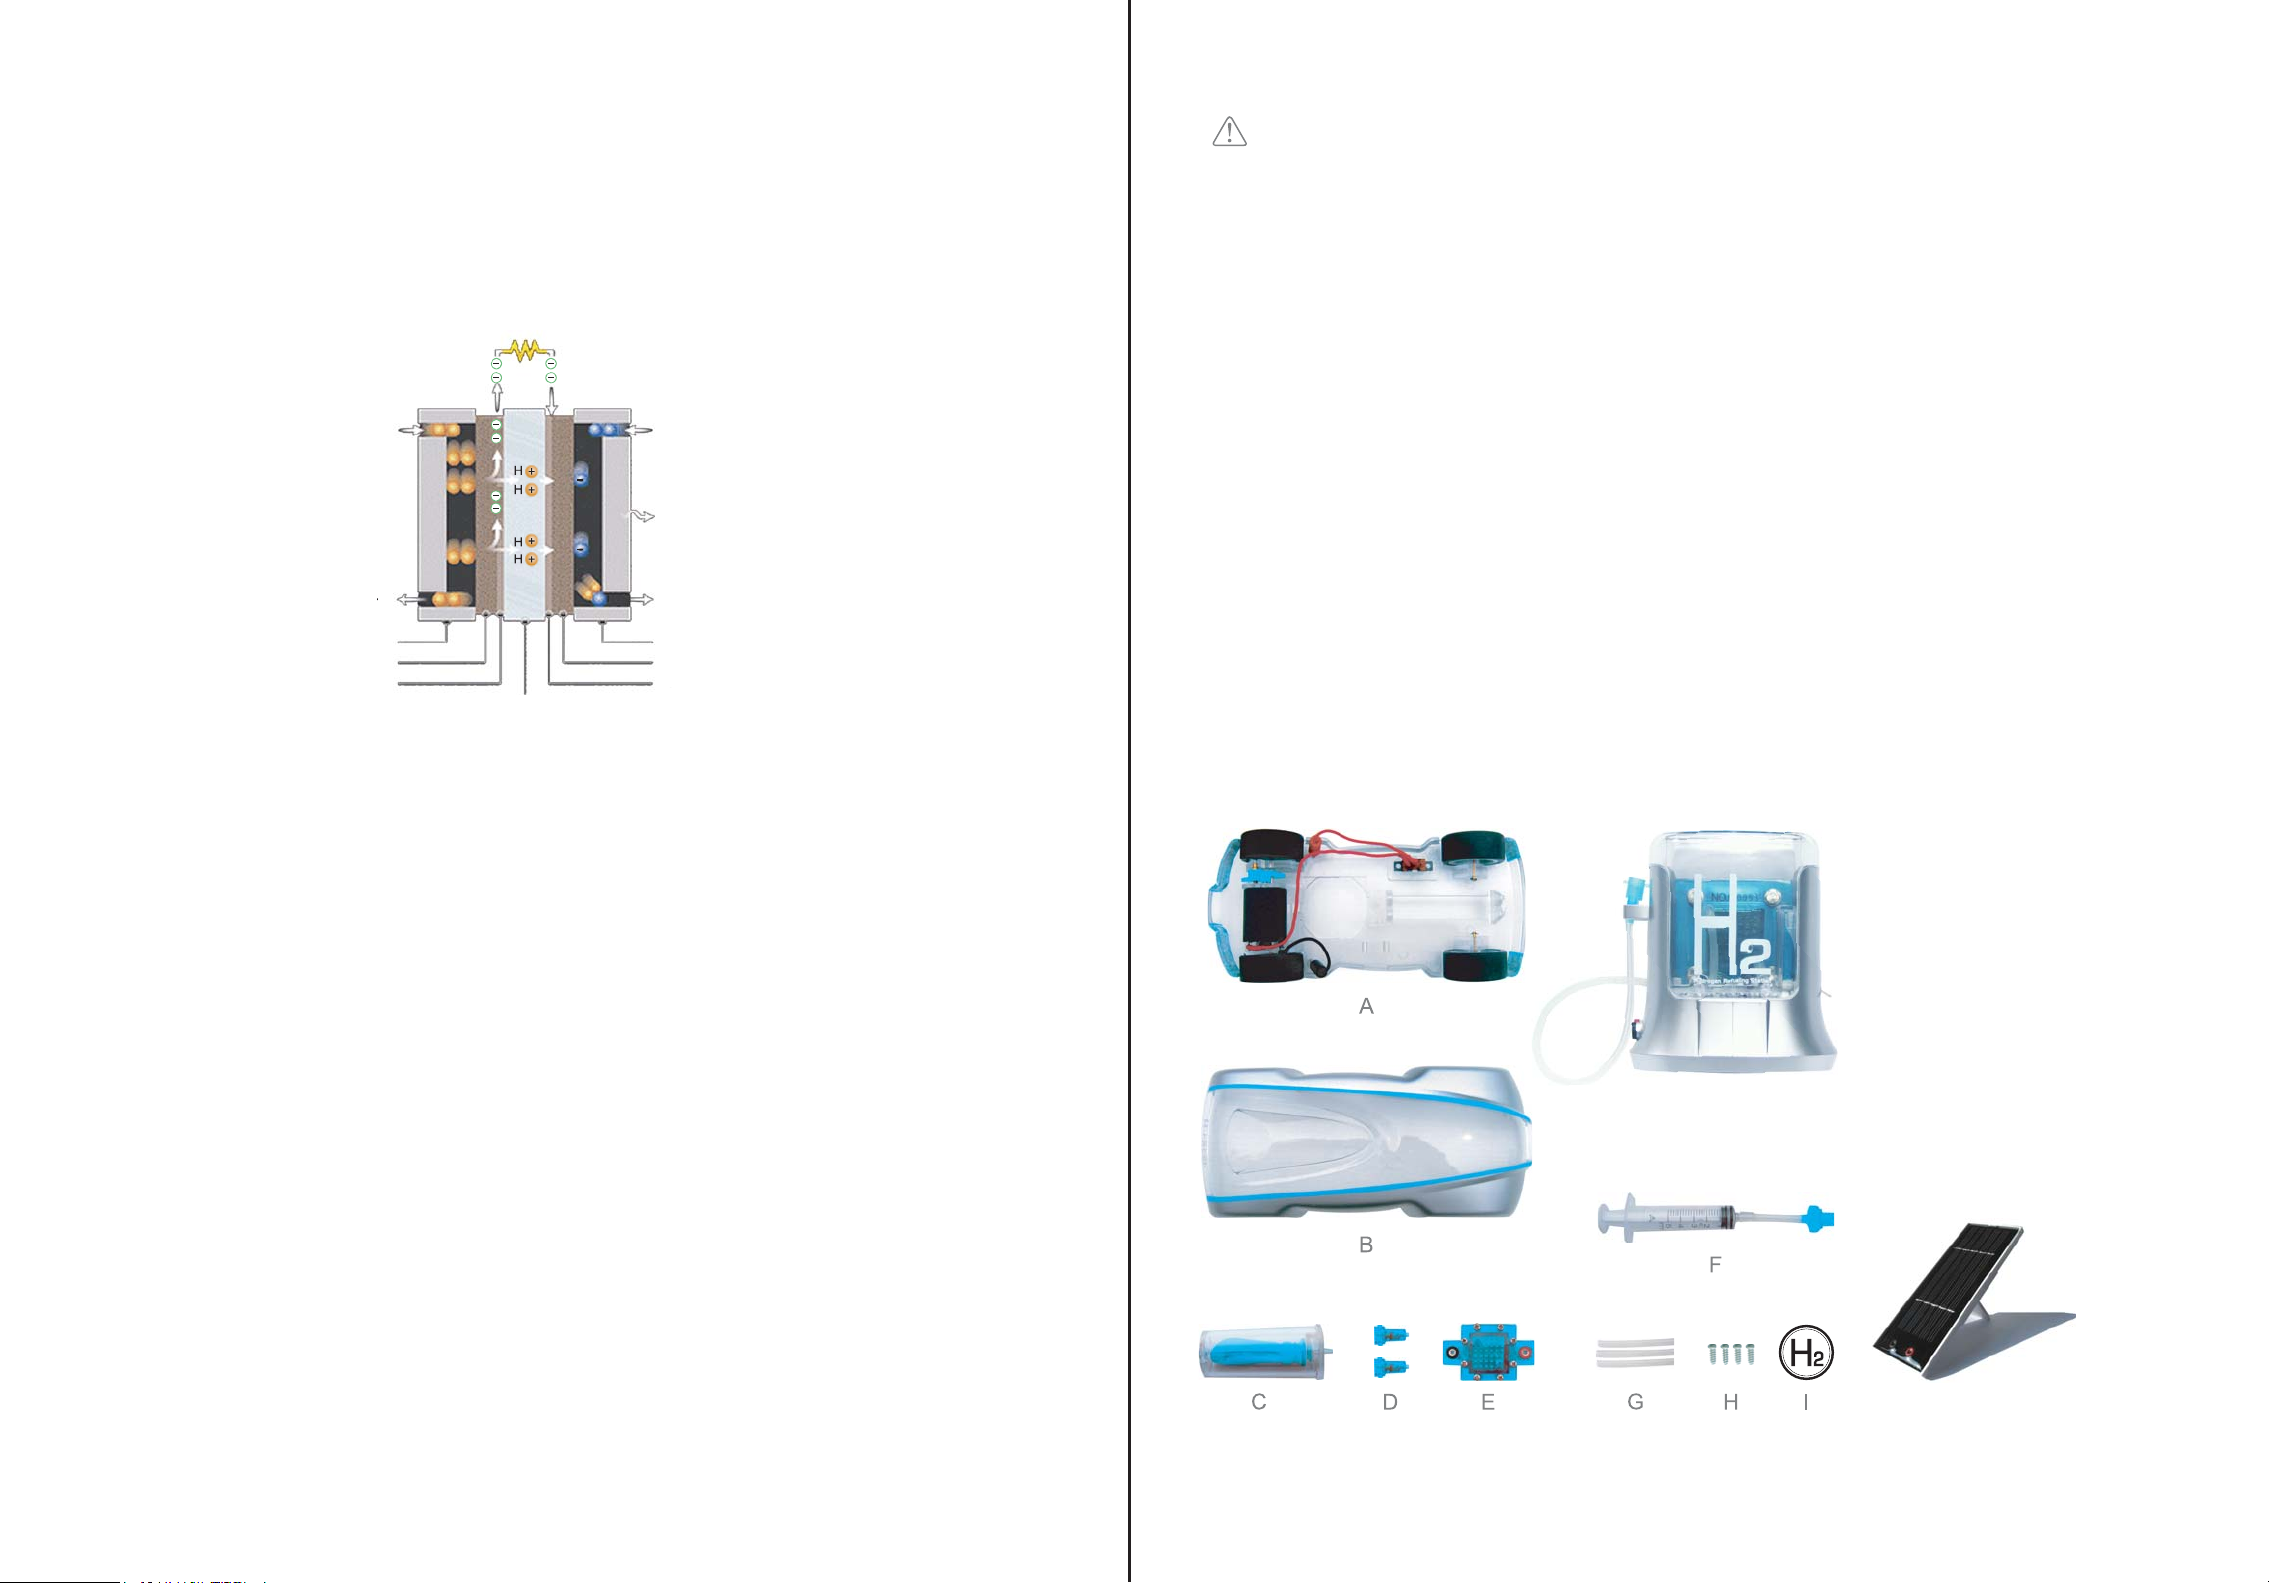
List of parts and components:
A. Car chassis
B. Car body
C. Hydrogen storage cylinder
D. Two refueling input valves
E. Fuel cell
F. Gas purging syringe with valve
G. Three flexible tubes
H. Set of 4 screws
I. Decoration sticker
J. Hydrogen Station
K.Solar panel
J
Screwdriver not included
21
K
22
Page 14

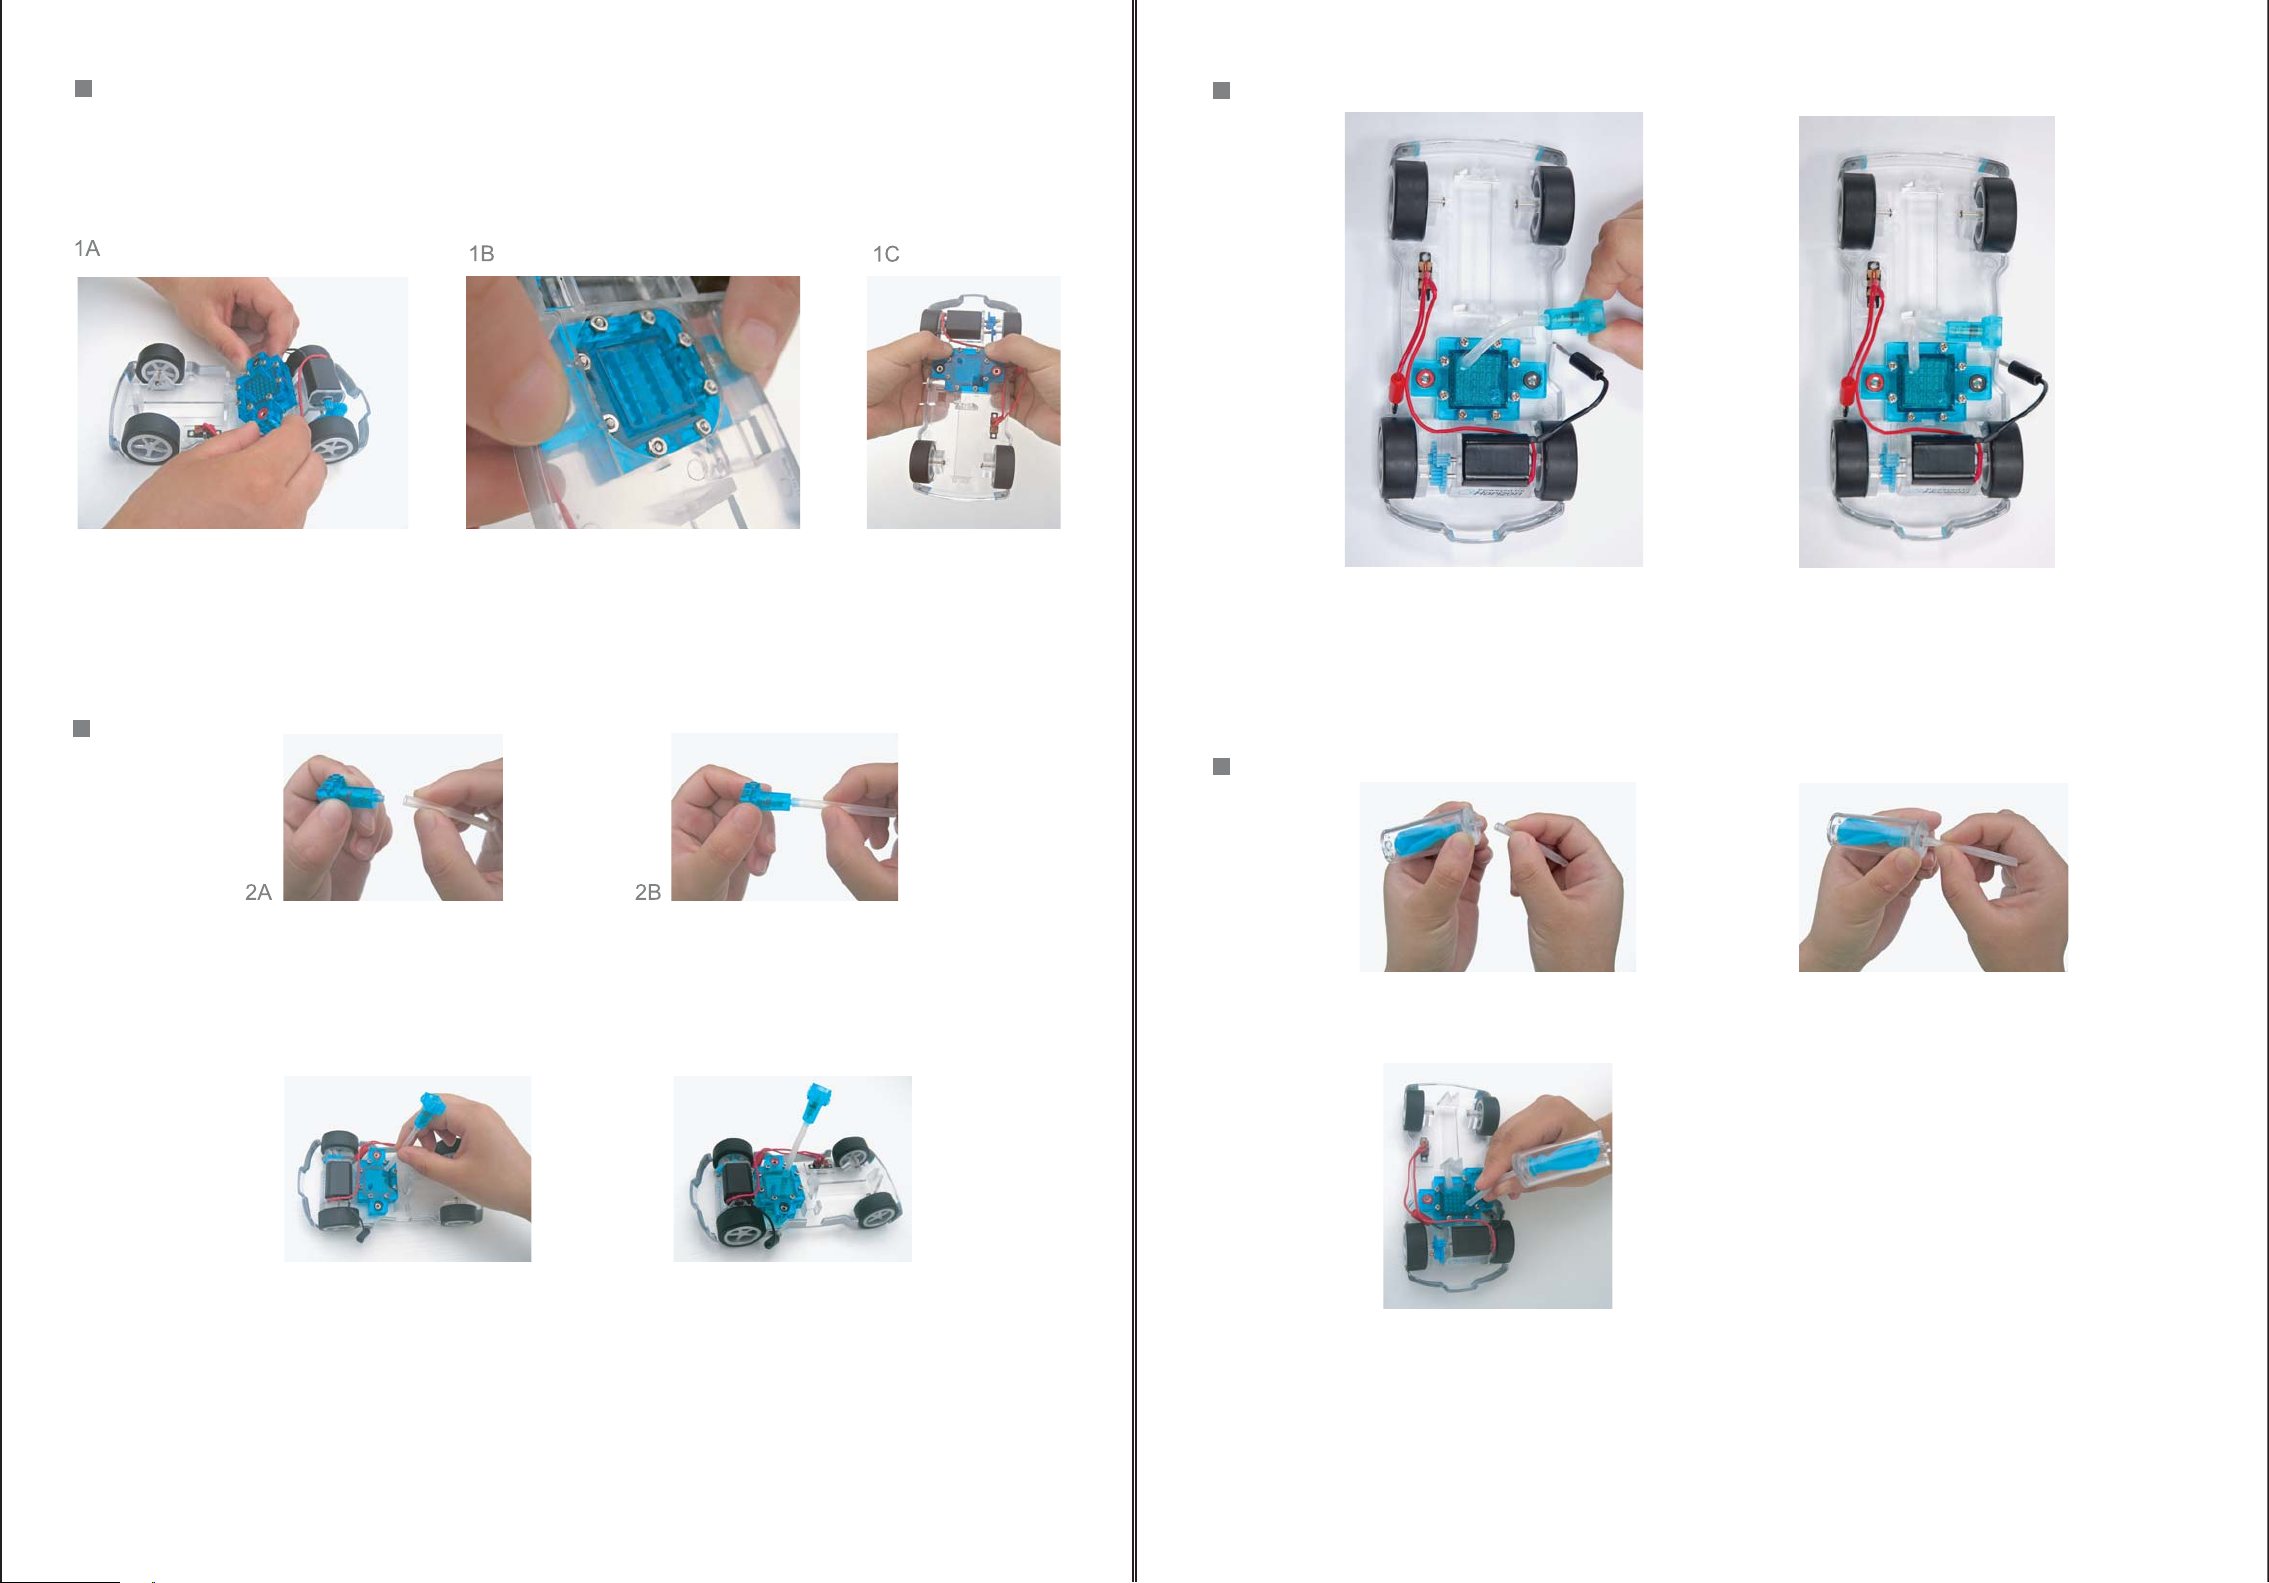
Step 1
Place the chassis (part A) on a flat surface. Position the fuel cell (part E) onto the square slot located
in the middle of the car chassis behind the black motor - with the two nozzles on the fuel cell (part E)
facing upward and the red jack of the fuel cell located below the blue gears of the motor (see 1A).
Step 3
As you position the fuel cell (part E), tilt the fuel cell so that the back of the fuel cell touches the
chassis and the front of the fuel cell is positioned slightly upward, above the small ledge behind the
motor (see 1A). Look underneath the chassis to make sure the bolts on the fuel cell are inside the
bottom ledge of the square opening in the chassis (see 1B). Now firmly push the front of the fuel cell
into the chassis, until you hear a click (see1C).
Step 2
Connect one of the flexible tubes (part G) to the nozzle located on the input valve (part D) (see 2A & 2B).
TIP: To fit the flexible tubes onto the nozzles, connect the tube by twisting it against the nozzle, then push the
nozzle into the tube until the tube is fitted snuggly to the base of the nozzle.
3A
Place the refueling input valve (part D) above the opening in the side of the chassis (see 3A). Slide
the refueling input valve (part D) into its mount, located at the opening on the side of the chassis
(see 3B). Make sure that the small ridges on the outer edge of the input valve (part D) are positioned
at the sides. With a downward motion, click the valve into place ensuring it is smoothly aligned with
the outer surface of the chassis.
Step 4
4A
Connect the second flexible tube (part G) to the nozzle located on the lid of the hydrogen storage
cylinder (part C) (See 4A & 4B).
3B
4B
2D2C
Connect the other end of this flexible tube to the nozzle closest to the red jack of the fuel cell (part E)
(see 2C & 2D). Make sure the tube is inserted all the way to the base of the nozzle of the fuel cell
and the refueling input valve. The input valve and the fuel cell should now be connected together by
one of the flexible tubes (see 2D).
23
4C
Connect the other end of the tube on to the fuel cell nozzle closest to the black jack (See 4C).
24
Page 15

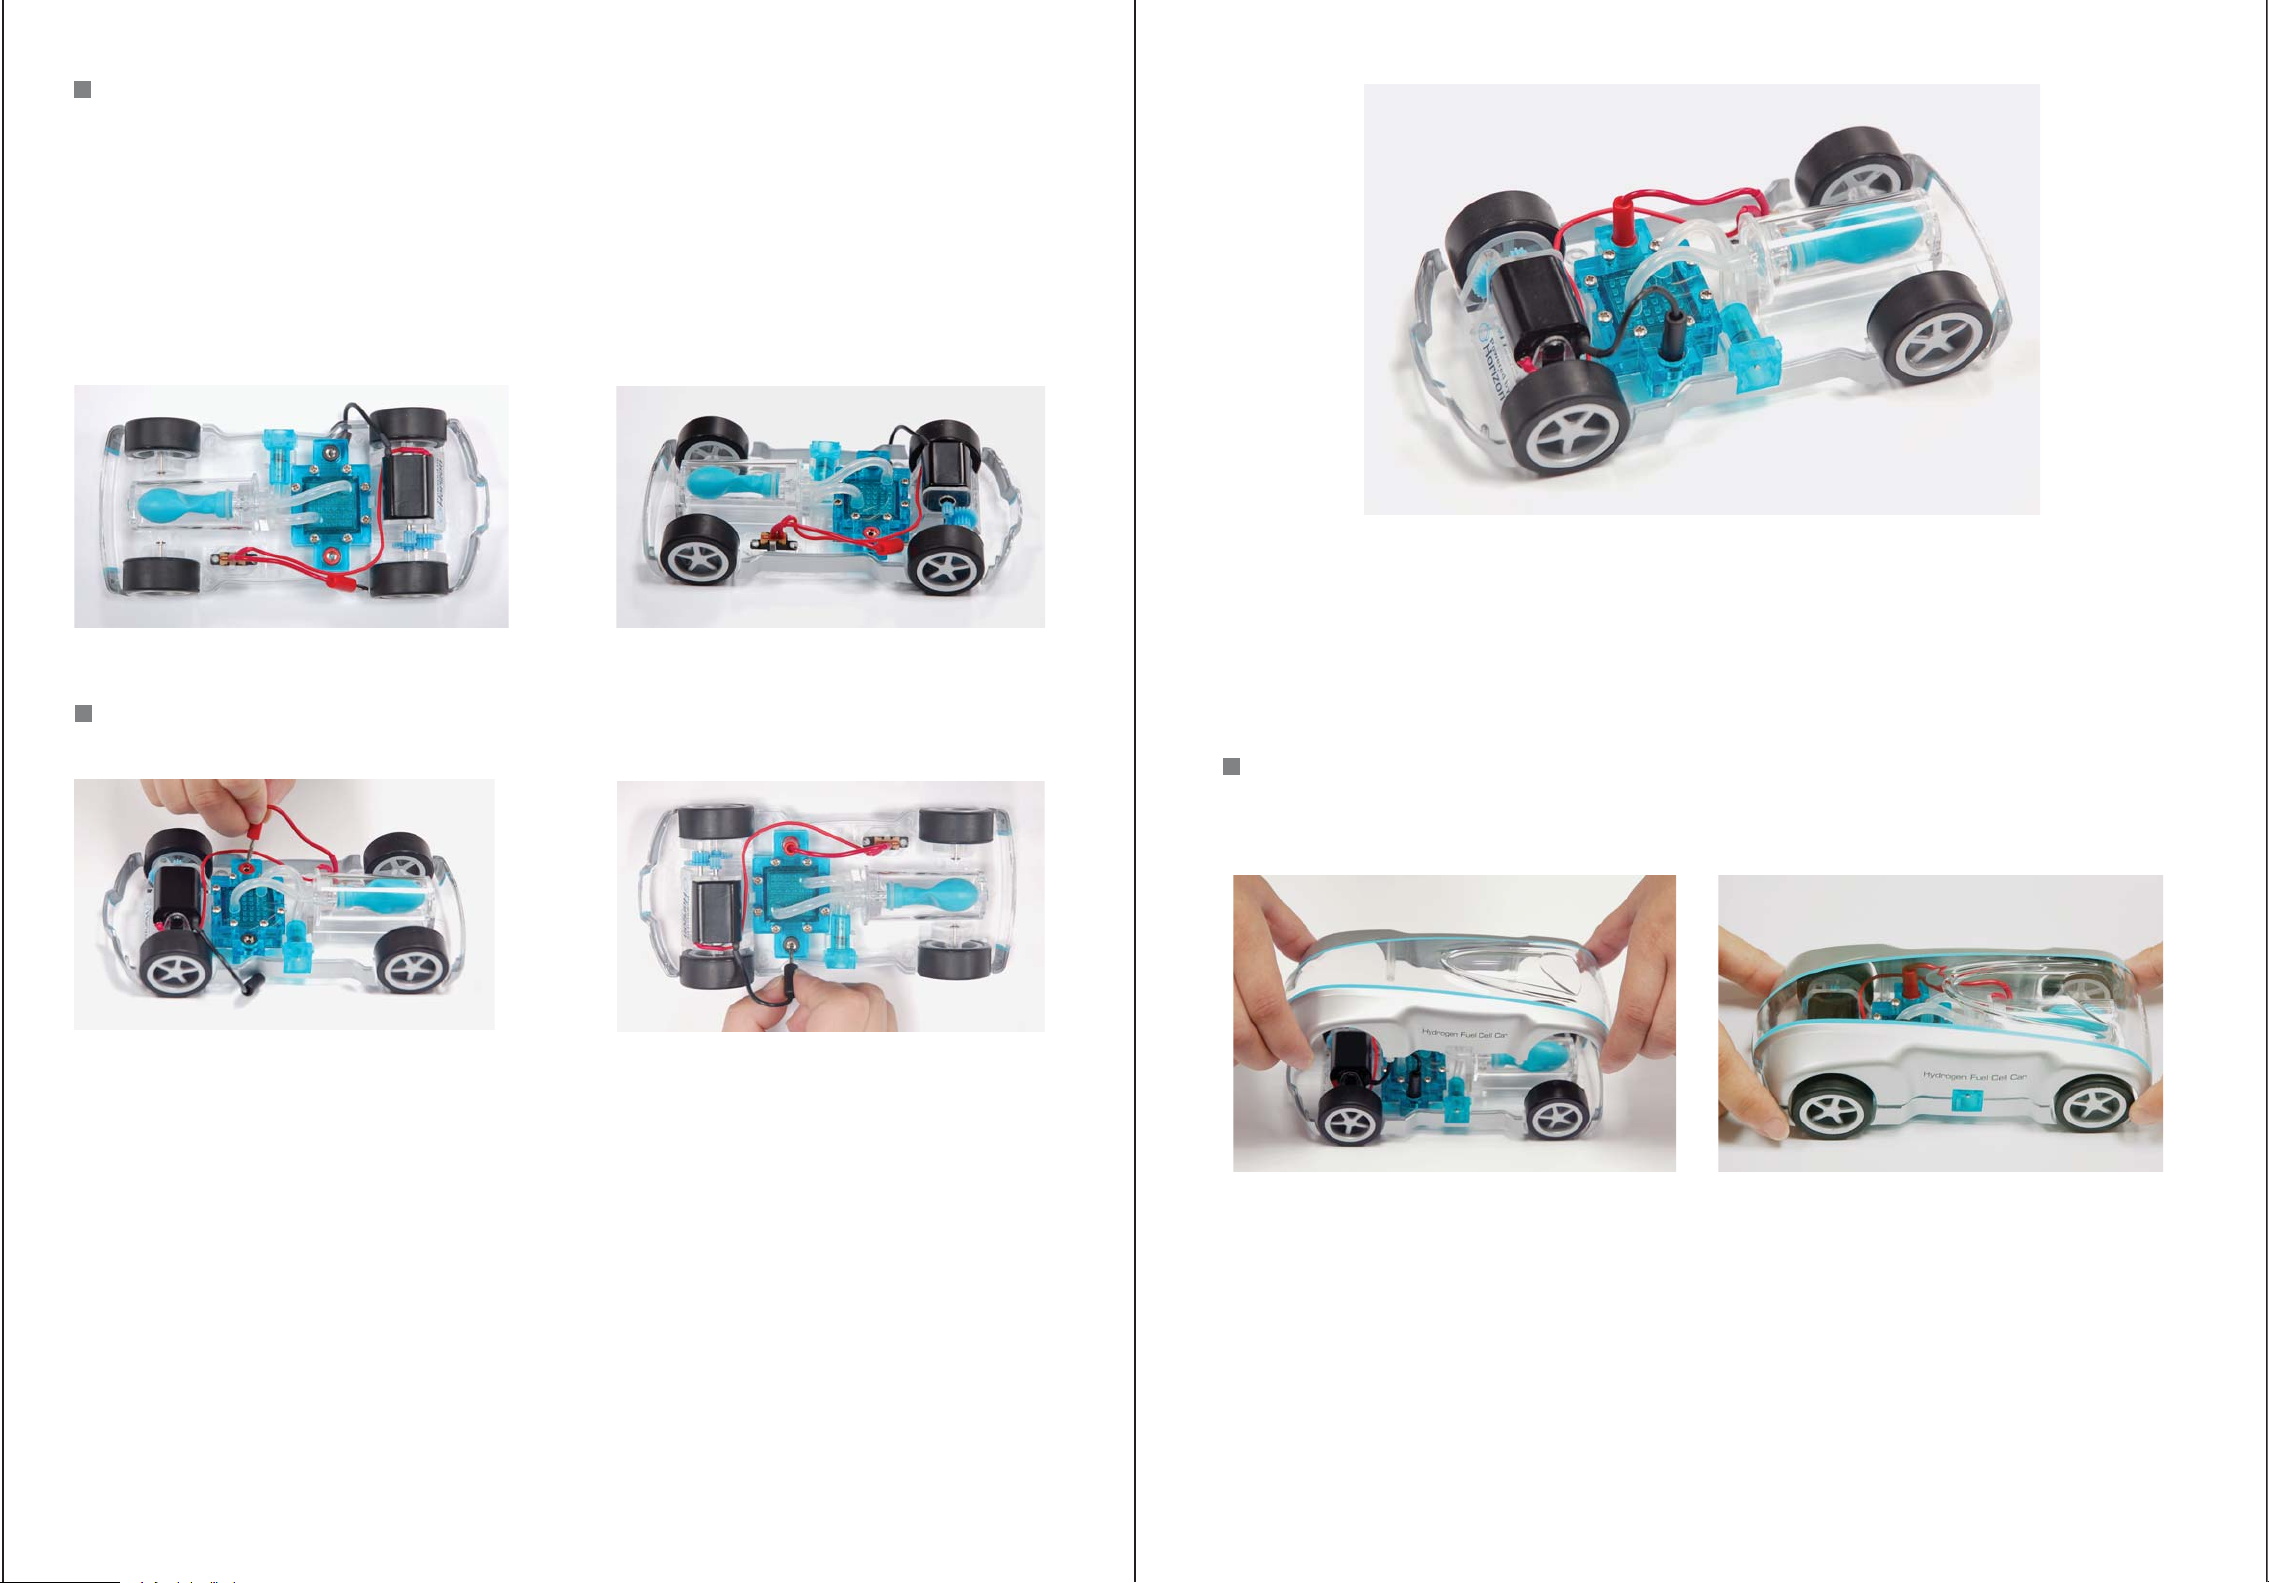
Step 5
Now that the hydrogen storage cylinder (part C) is connected to the fuel cell (part E), position the
hydrogen storage cylinder onto the two mounts located directly above the rectangular opening on the
chassis.
Once the cylinder is positioned on the two mounts, press lightly until it fits onto the structure. To avoid
damage or breakage, be careful not to press the cylinder onto the mounts with too much force (see
5A & 5B to check the final appearance of the assembled chassis).
5A 5B
Step 6
Congratulations!
You have now assembled the fuel cell power system
of the world's smallest hydrogen car!
6A
Connect the red wire of the chassis (part A) to the red jack of the fuel cell (part E). (See 6A)
Connect the black wire of the chassis (part A) to the black jack of the fuel cell (part E). (See 6B)
Warning:
Make sure these connections are correct. Any other connection will destroy the
operation of the car and its fuel cell power system; also ensure the wires are not touching
the wheels.
6B
Step 7 Time to close up the
7A
H-racer!
7B
25
Find the body of the car (part B) and place it above the chassis (see 7A & 7B).
26
Page 16

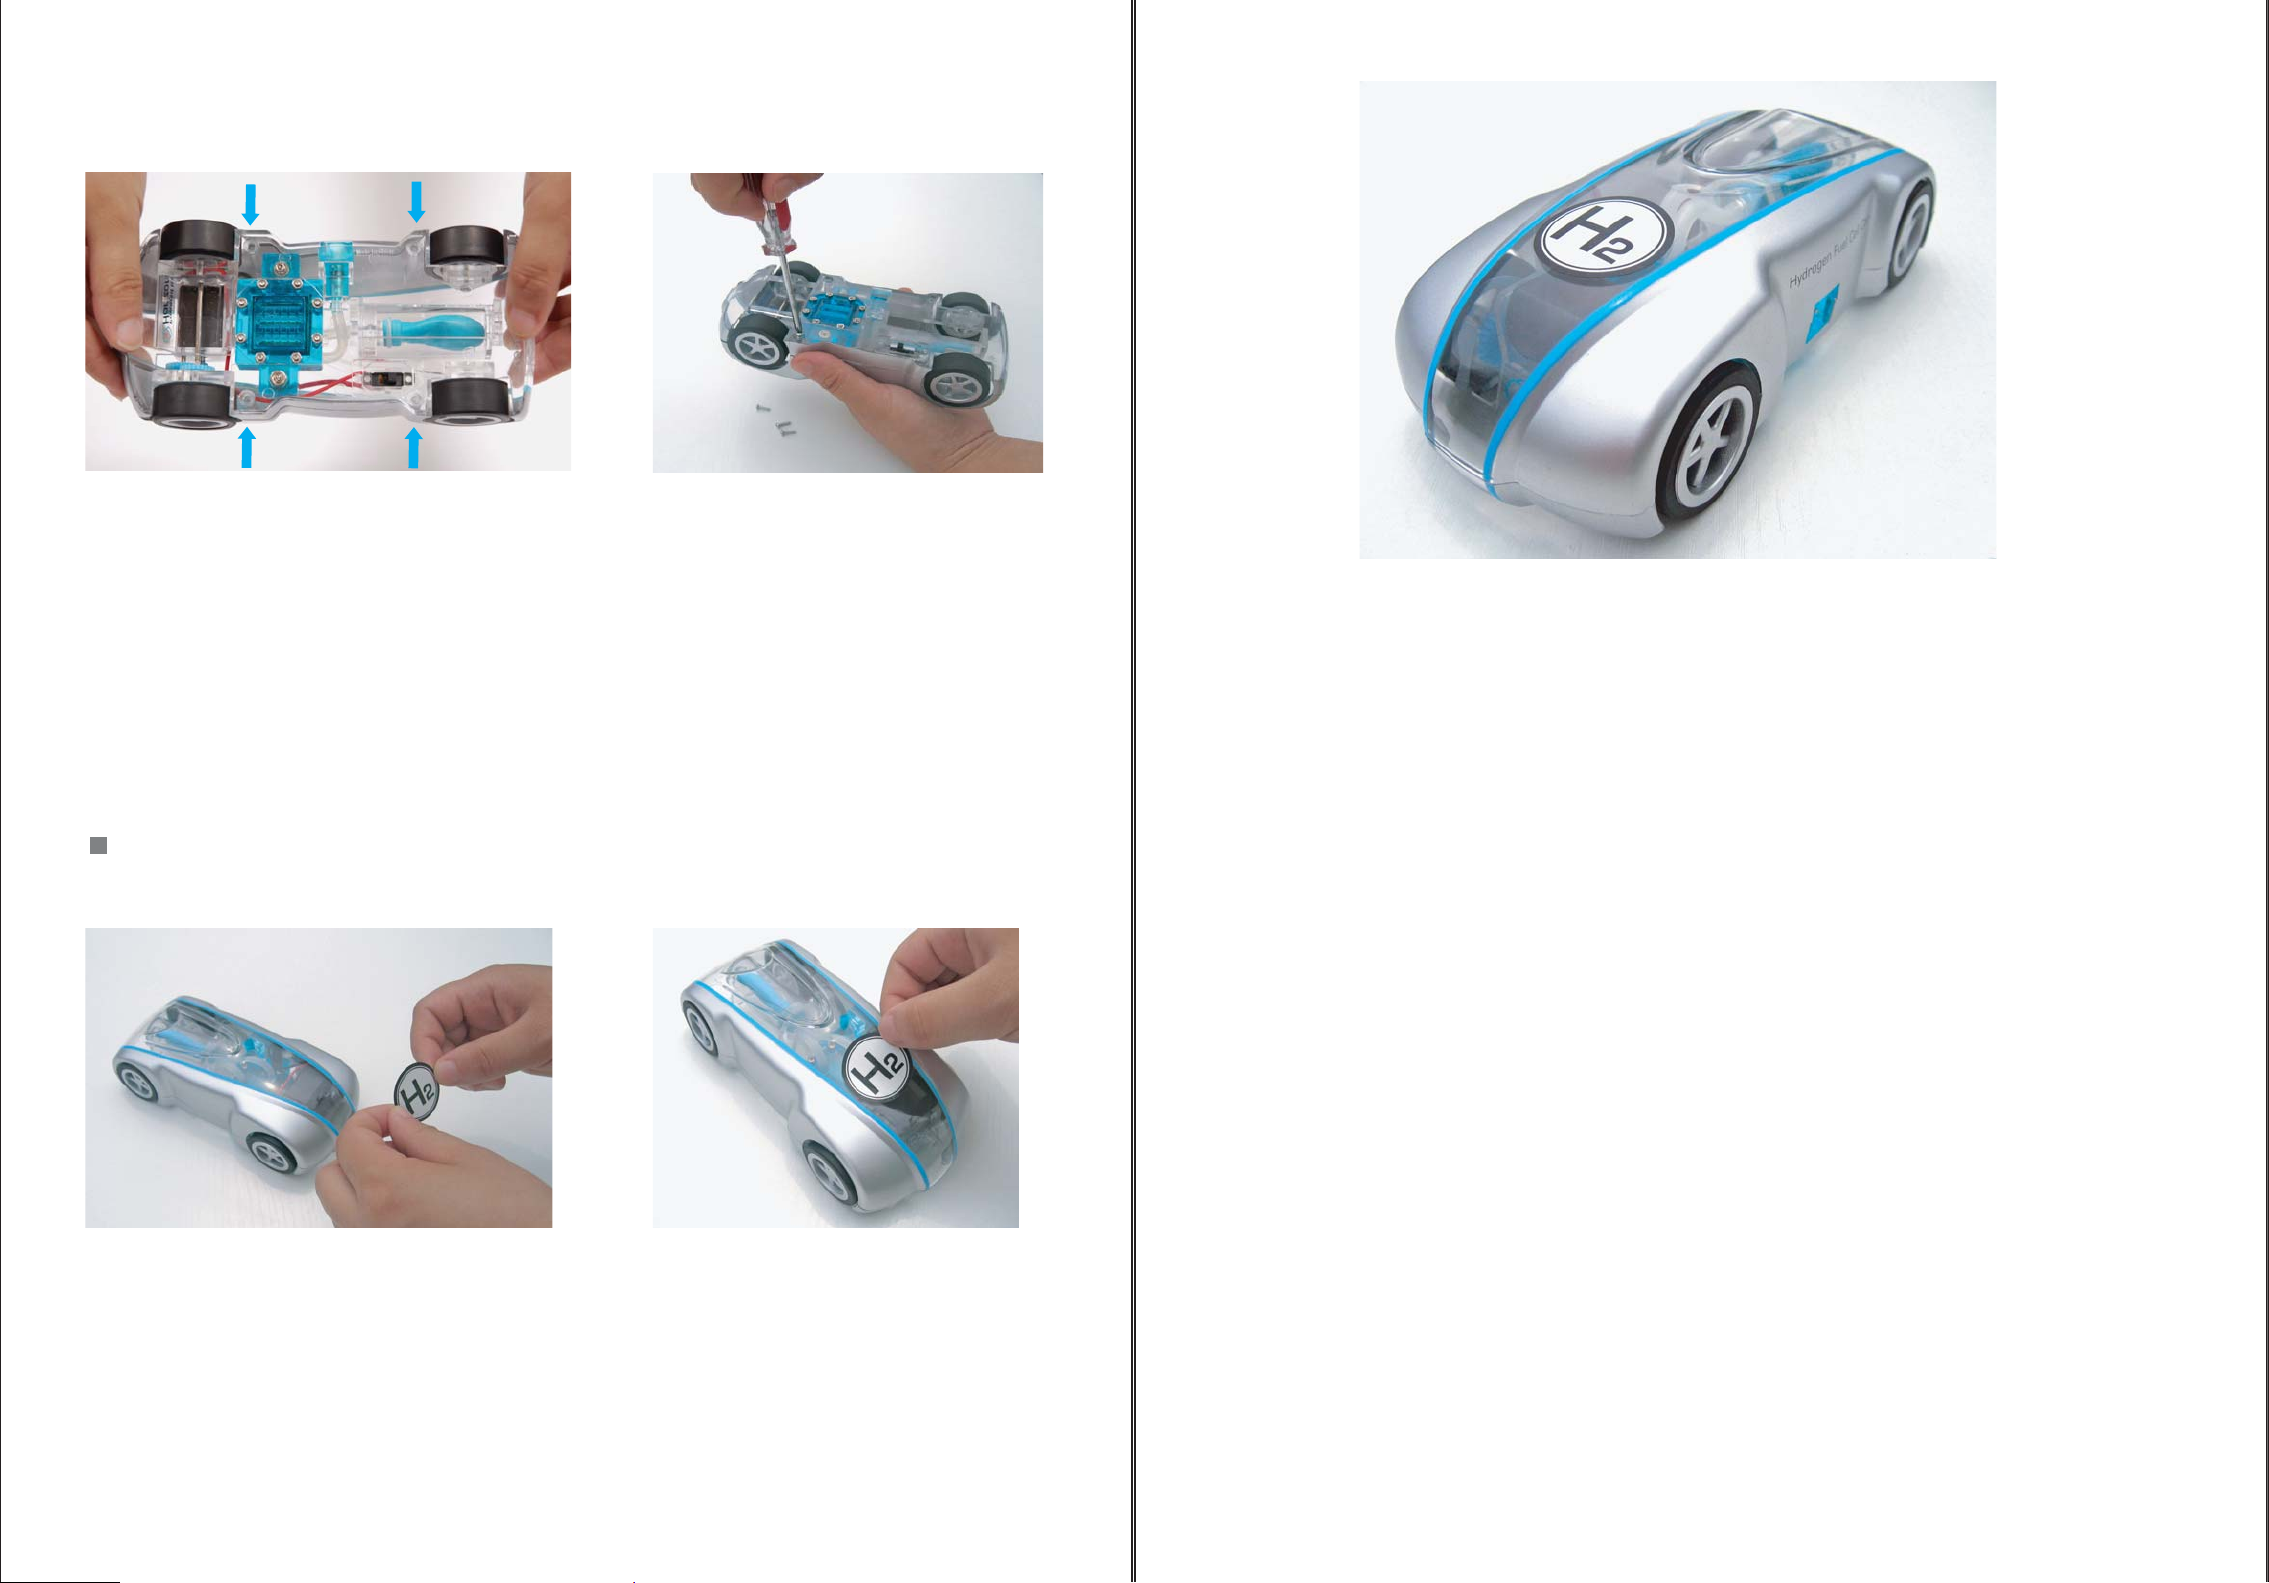
TIP: If you are under the age of 14, it is recommended you ask an adult for help for the following steps:
☼
7C 7D
Hold the fully-assembled chassis in your hand
and turn it upside down to find 4 small holes near
the edges of the chassis and near the 4 wheels.
Align the holes on the chassis with the holes on
the car top body (see 7C).
Step 8 Applying the "H " sticker on the front hood of the car body
8A 8B
2
Use a screwdriver (not included) to attach the
body to the chassis using the set of 4 small
screws (part H), and make sure the screws are
entered straight into the chassis. Do not tighten
the screws until all screws are partially entered
into the chassis. Drive the screws into the chassis
until no gaps are left between the body and the
chassis. Ask an adult to help fasten the screws as
this requires some force. To ease this process,
you can add a tiny amount of petroleum jelly (not
included) inside the screw mounts.
The assembly of your H-racer is now completed.
The car is now ready to be fueled with hydrogen!
3. Preparing the Hydrogen Station for operation3. Preparing the Hydrogen Station for operation
This refueling station can produce tiny quantities of hydrogen on your command, either by using
electricity generated by a solar panel (standard solar cell power source included), or 2 AA alkaline
batteries (not included). If you are using the solar panel, you must place it in direct sunlight for optimal
results.
Position the car on a flat surface, with the front
of the car facing you. Remove the sticker from
its backing and position it according to the
picture (see 8A).
27
There should be about 1 mm between
each side of the sticker and the blue
stripes on the car body, and the
sticker should be placed in the center
of the front hood (see 8B).
For night time operation or during cloudy weather, the refueling station can also use 2 AA alkaline
batteries. Placing these batteries inside the refueling station is recommended even if you are only
" to "DC" power
using power generated from the solar panel. This enables you to switch from solar "
at any time during refueling, or to accelerate refueling in case of a sudden change in weather.
Taking care of your Hydrogen Station:
Do not use the
Hydrogen Station for more than 20 minutes at a time. Once refueling of the
H-racer is complete, turn the Hydrogen Station off and let it rest for at least 10 minutes.
Warning:
Continuous operation of the Hydrogen Station will damage it permanently.
28
Page 17

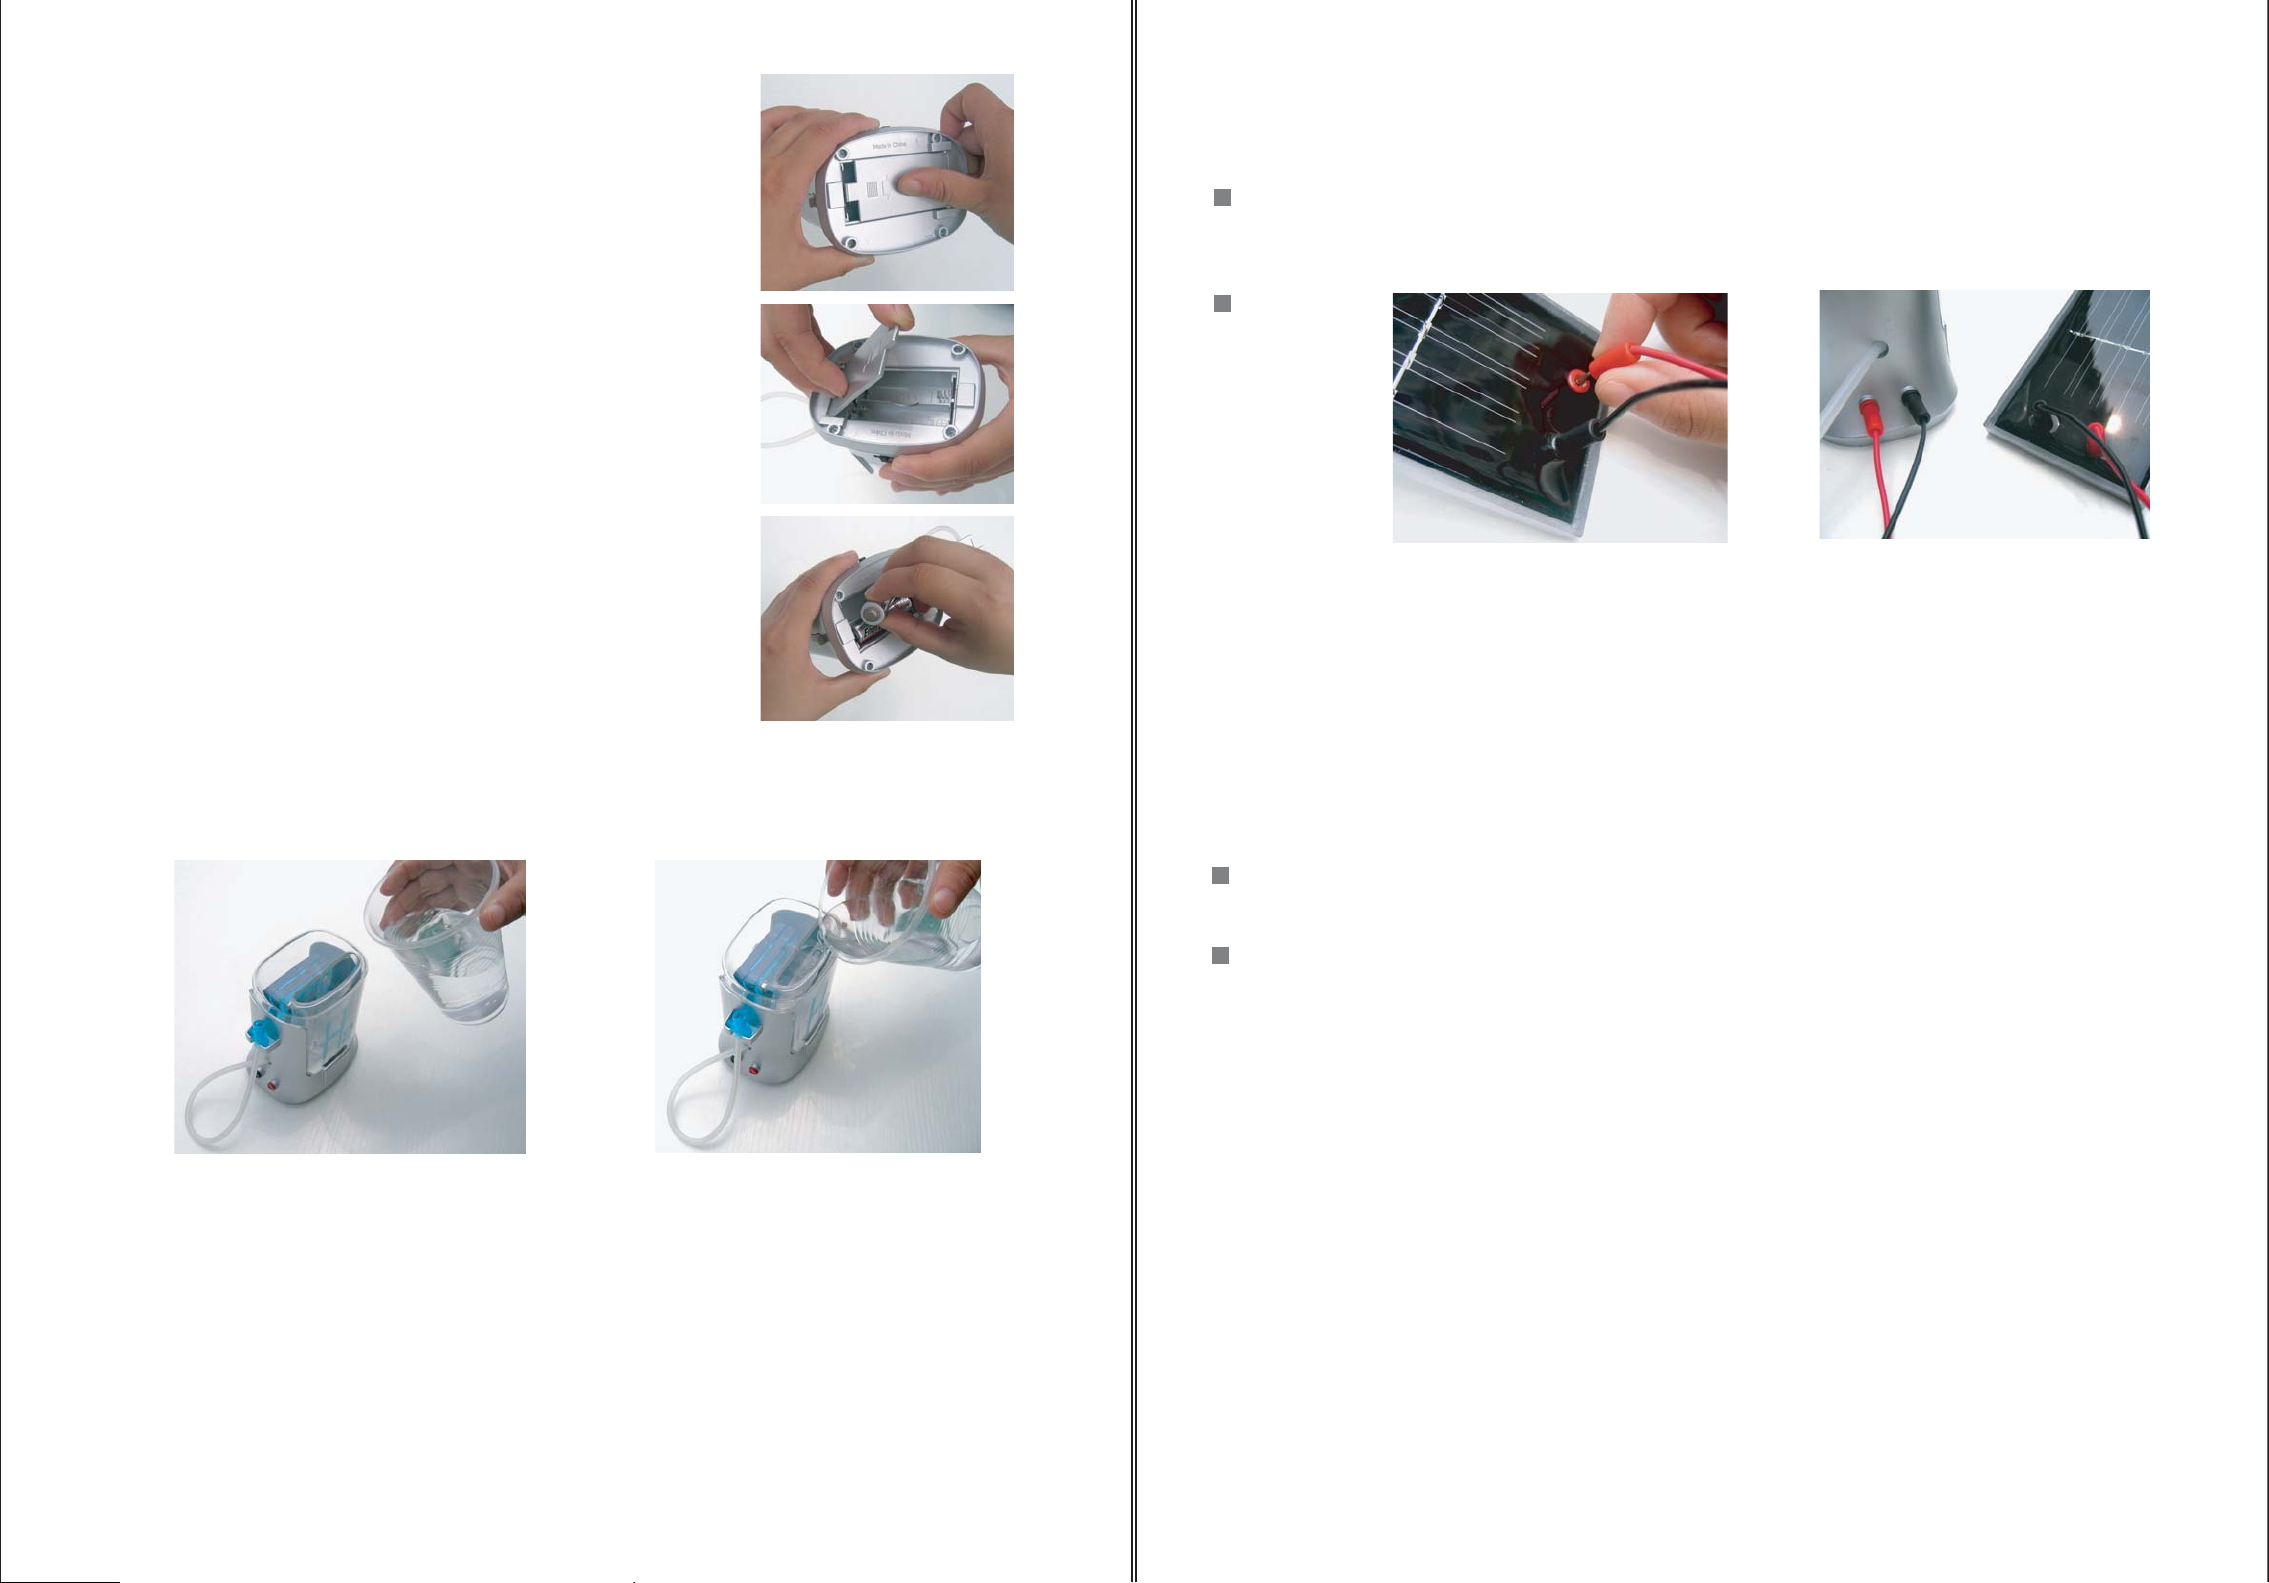
Enabling DC powered operation:
Open the battery compartment located underneath
the refueling station by sliding the cover according
to the arrow (see 1A & 1B).
TIP: It is highly recommended to use two AA
alkaline batteries.
Place two 1.5V AA alkaline batteries inside the
battery compartment as indicated, then close the
battery compartment (see 1C).
1A
1B
4. Creating renewable hydrogen using power from the sun4. Creating renewable hydrogen using power from the sun
Step 1
Attach the back of the solar panel to its small rectangular support provided in the kit. You can decide
to place the solar panel vertically or horizontally depending on how you position the support on the
back of the panel.
Step 2
2A
Connect the black cable to the black input jack on the solar cell, and the red cable to the red input
jack on the solar cell (see 2A).
Connect the other end of the black cable to the black input jack of the refueling station. Similarly,
connect the red cable to the red input jack of the refueling station (see 2B).
2B
1C
Slowly pour water into the water tank opening above the refueling station until the water level reaches
the top (see 1D & 1E).
1D
TIP: For optimal operation and longer life of the refueling station, use of distilled water is highly
recommended. You can purchase distilled water from your local drugstore or phamacy.
1E
Warning:
Make sure these connections are correct or else this will destroy the refueling station. Do not
attach an alternative power source that produces over 2.5 Volts.
Step 3
Place the solar panel in direct sunlight.
Step 4
Switch the refueling station to the "☼" sign. The small blue lights will now be flashing and you are now
producing hydrogen fuel using unlimited power from the sun! You can see you are producing
hydrogen when small oxygen bubbles form on the right side of the water tank. Turn the switch off and
the hydrogen production will stop. If it is getting dark, or if the sun is not very powerful, or if you want
to accelerate refueling time, you can at any time switch the refueling station to "DC". In this case
hydrogen would be produced using the power of two AA alkaline batteries (not included) placed
earlier inside the refueling station.
TIP: Use the solar panel power option outdoors in direct sunlight, and not in a confined or indoor
location. Be sure to turn off the refueling station after refueling of the H-racer is completed. Continous
operation of the Hydrogen Station will damage it permanently.
Warning:
Avoid getting the refueling station switch wet.
Let the water rest in the tank for at least 5 minutes before moving on to the next step. This allows the
electrolyzer time to absorb the water.
29
You are now ready to fuel and refuel your H-racer using the power of the sun -
a free, clean, renewable and unlimited source of power for the
H-racer.
30
Page 18

5. Refueling and operation
To refuel the H-racer with hydrogen you will need the Hydrogen Station, the gas purging
syringe with valve (part F), and the additional input valve (part D) with rubber tubing (part G).
H-racer’s power system only accepts hydrogen as its fuel. If other gases are present, the fuel
The
cell cannot operate and the car will not move. For optimal performance of the H-racer the system
has to be purged of all the gases within the car and station.
Step 5
Find the gas purging syringe with connector valve
(part F). Push all the air out of the syringe, by
pushing the inner container of the syringe into its
outer container. In the same way as connecting the
refueling station’s output valve to the car’s input
valve, now connect the syringe’s connector valve
with the additional input valve you have just
.
connected to the refueling station (see 5A).
5A
Step 1
Make sure the switches underneath the car's chassis and on the
side of the Hydrogen Station are at the "off" position. Connect
the refueling station’s output valve to the car’s input valve by
firmly pressing the syringe’s connector valve into the car's input
valve, and simultaneously turning the output valve clockwise.
(see 1A & 1B).
Once the two valves are connected you can let go of the output
valve as both valves are now locked into position.
TIP: The refueling station’s output valve is fragile. If you do not
continue to “press in” while you are turning the output valve
clockwise, you will risk breaking the output valve.
1A
1B
TIP: The syringe’s connector valve is fragile. If you
do not continue to “press in” while you are turning the
syringe connector valve clockwise, you will risk
breaking the connector valve.
To purge the complete fuel cell power system, pull
the inner container of the syringe towards you while
watching the balloon inside the gas storage tank
carefully. Make sure you remove all the air out of the
balloon by pulling on the syringe. Stop pulling on the
syringe once all the air is removed from the balloon
(see 5B & 5C).
TIP: To avoid air coming back into the balloon, stop pulling on the syringe once the balloon is empty do not go too far, as this will cause air suction once you disconnect. Do not let the air be pulled back
inside, the objective is to eliminate as much air as possible from the car’s refueling system.
Disconnect the syringe connector valve from the additional input valve attached to the refueling
station by turning it anti-clockwise quickly and lightly, allowing the connector to pop out. Your storage
tank is now purged and ready to receive hydrogen from the refueling station.
5B
5C
2A
Step 2
Ensuring the refueling station’s output valve remains connected to the car, open the small, grey
pressure valve on the side of the refueling station (see 2A & 2B).
Step 3
Connect the third flexible tubes (part G) to the nozzle located on the additional input valve (part D)
(see Step 2 of Assembly Instructions).
Step 4
Holding the pressure valve open, insert the open end of the rubber tube onto the little nozzle inside
the grey pressure valve (see 4A).
2B
31
4A
6A
Step 6
Activate the refueling station by switching it to the "DC" position or the "☼" position (switch located
behind the
inside the refueling station or the "☼" position if your refueling station is connected to its solar panel.
If you are using a solar panel, make sure it is facing strong and direct sunlight. If it is cloudy or if it is
night time, you will need to switch to "DC".
Hydrogen Station). You can switch to "DC" if you have added the alkaline batteries
32
Page 19

TIP: If the small bubbles of oxygen are being released through the middle of the water tank, see
troubleshooting section 4.
Once the operation is complete and the balloon is full, make
sure you turn the refueling station to the "off" position.
When the Hydrogen Station is activated, hydrogen is being produced by the electrolyzer and
released into the refueling station's output tube. By completing this essential purging step - you are
removing atmospheric gases that have naturally penetrated the car's fuel storage system. The
H-racer’s power system only accepts hydrogen as its fuel. If other gases are present, the fuel cell
cannot operate and the car will not move. The syringe purging method described above is an
important step included to remove all unwanted gases ( such as nitrogen) from the car’s hydrogen
storage tank, before refueling.
Before pulling air out of the balloon using the gas purging syringe (part F), the majority of this air was
nitrogen from our atmosphere. Nitrogen will block the hydrogen from reacting with oxygen inside the
car’s fuel cell and the car will stop running even if the hydrogen storage tank’s balloon appear to be
full.
Tip: You may want to repeat the air removal and refueling steps one or two times to optimize the run
time of the H-racer. This method further dilutes the unwanted gases and enhances the purity of
your stored hydrogen fuel.
Warning: If you skip this step - the car’s run time will be seriously reduced.
Step 7
While the refueling system is locked and operational, and the car's
on-board gas storage tank is starting to fill up with pure hydrogen,
make sure the switch beneath the car's chassis is at the "off"
position.
TIP: After 20 minutes of continuous use, turn the Hydrogen
Station
starting it again.
Warning:
Continuous operation of the Hydrogen Station will damage
it permanently.
Step 8
Disconnect the refueling valve from the car’s input valve. In order to do so without losing any fuel stored
inside the car’s hydrogen storage tank, you must turn the refueling valve anti-clockwise quickly and lightly
until it pops out from its locked connection. As you disconnect, do not press the refueling valve into the car
as this will deflate the balloon. Some practice may be required, but the balloon should not deflate and the
car’s fuel should remain stored inside the storage cylinder.
Step 9
The hydrogen storage tank is now full and the H-racer is ready to race! To run the car, find a smooth, flat
surface free of obstacles. Turn the switch located beneath the car's chassis to the "on" position, place it on
the ground and watch the car go!
The on-board fuel cell system will consume hydrogen until the car’s storage tank is almost empty, or until
other gases start accumulating in the fuel cell. It is estimated that on a full tank and after a number of
warm-up runs the H-racer will run for up to 3 minutes.
You may see that the car stops running after 20-30 seconds. If this is the case, you will need to lightly
push in the car’s refueling input valve (part D) to release the atmospheric gases (mostly nitrogen) which
have accumulated in the fuel cell.
To re-start the car, just use your finger to slightly push in the car’s input valve while keeping the car
switched on. The balloon will deflate a little, but the car's motor will run again. By pushing this valve, you
will have released the excess nitrogen and unblocked the access to hydrogen. This is a natural occurance
you can try to avoid by carefully following all the steps in this user manual.
off, and let it rest for at least 10 minutes before
Look carefully at the balloon inside the car's on-board gas storage
tank as it starts to move and take shape. It will take at least 1 minute
for the balloon to fill with hydrogen using the "DC" power switch if
the batteries are new.
If you are using the solar panel, make sure it is placed in direct
sunlight. It will take about 10 minutes in strong sun light for the car's
tank to fill up with hydrogen using the standard solar panel included.
If the sun is not strong enough, it will either take much longer than
10 minutes, or refueling will not occur at all.
Keep the refueling station powered until the balloon inside the
hydrogen storage cylinder is full (the balloon inside the storage
tank will take the shape of the transparent cylinder).
TIP: Expanding the balloon fully within the cylinder may cause the
rubber seal to become dislodged. If this happens the system is no
longer gas tight and the seal needs to be resecured.
TIP1: To make sure the car consumes its entire tank of gas on one single run, it is recommended to
use the syringe method (Step 5) to remove this newly supplied hydrogen from the car’s tank and
repeat the fueling process once more. This step further dilutes the nitrogen inside the tank and
enhances the purity of your hydrogen fuel. Without proceeding with this step, the car’s run system
time can be seriously reduced.
Once the car runs out of gas, switch the car off (using the switch underneath the chassis) and repeat
step 5 to remove all remaining gases out of the car's storage tank.
TIP2: If the fuel cell has not been in use for a while and is not working well. The fuel cell needs to be
warmed up by adding water and then being short circuited. Follow these steps to reactivate it.
a. Remove the blue valve connector from the rubber hose attached to the syringe provided.
b. Draw about 0.2ml of distilled water into the syringe and attach the open end
of the syringe rubber hose to one of the nozzles on the fuel cell, slowly
pushing the distilled water into the fuel cell. Allow this to sit for 10 minutes.
( see picture a )
c. Move the switch on the Hydrogen Station to the DC side and check the
lights are flashing and the oxygen bubbles are forming on the right side of the
water tank.
d. Take the Hydrogen Station’s blue refueling valve connector off the rubber
hose and connect the rubber hose to the upper nozzle of the fuel cell.
e. Then using the red wire with the double-headed banana plugs, connect one
end to the red jack and the other end to the black jack on the fuel cell. Put the
fuel cell standing up vertically. (see picture b)
f. Keep the wire connected for 5 minutes, and then disconnect. The fuel cell
will now be ready for use.
a
b
33
34
Page 20

6. Troubleshooting
1. The H-racer does not move or runs slower:
a. Check to see if the balloon inside the car's storage tank is full, the wires are not touching the
wheels and the switch underneath the car chassis is at the "on" position.
b. If the balloon is empty, you must complete the steps in section 5 "Refueling and Operating", then
turn the car switch to the "on" position.
c. If the hydrogen storage cylinder's inner balloon appears to be full, unwanted gases have entered
your system. The H-racer only operates on pure hydrogen drawn from its storage tank. One quick fix
is to use your finger to lightly push in the car’s refueling input valve (part D), while leaving the car
switched "on". You will notice the car will start moving again. By doing this you would have removed
some of the unwanted gases from the balloon inside the hydrogen storage cylinder.
d. If the wires are touching the wheels move them away so the wheels run freely.
2. The balloon inside the car's storage tank does not fill up:
a. Check the rubber seal securing the balloon inside the cylinder has not become dislodged.
b. Make sure all the tubes inside the car are well connected and that the output valve of the refueling
station is well connected to the input valve of the car (press the output valve tightly into the input
valve). You may want to unplug and plug the connectors once more to be sure.
c. Make sure you filled the Hydrogen Station's water tank with water (distilled water*) and waited for 5
minutes before turning it on. When it is switched on, check to see that the refueling station is
releasing small bubbles on the right hand side of the water tank.
d. If all connections are correct and bubbles are released, and the balloon still does not fill up - your
H-racer refueling system is damaged due to improper use. Do not attempt to repair or fix your
H-racer, contact support@horizonfuelcell.com for assistance.
4. The bubbles are appearing from the center of the water tank:
a. Turn the refueling station switch to the off position straight away as the electrolyzer is dehydrated.
b. See troubleshooting section 3 c. for details on how to “humidify” the electrolyzer.
5. The blue LED lights do not flash and no bubbles appear in the Hydrogen Station’s
water tank.
a. If you are using the included solar panel, check whether the cable connections are correct. If the
weather is cloudy or if it is dark, electricity will not be generated and the Hydrogen Station will not
operate. In this case, you must switch to DC power.
b. If you are using 2AA alkaline batteries, please check they are correctly inserted into the battery box
underneath the Hydrogen Station. If the refueling station still does not operate, the batteries may be
out of power. Please replace the batteries with new alkaline batteries.
c. See troubleshooting section 3 c. for details on how to “humidify” the electrolyzer.
6. The H-racer runs slowly and lasting for a short time, but the hydrogen
storage cylinder is full of hydrogen.
a. The fuel cell needs to be warmed up by adding water and short circuited. Follow the steps as
described in Tip 2 on page 32 to reactivate the fuel cell.
b. After you have finished using the fuel cell, it is highly recommended to place it inside the air-sealed
aluminum bag provided. This will protect the fuel cell while you are not using the H-racer.
If you have any further issues contact support@horizonfuelcell.com
3. The bubbles are appearing slowly in the Hydrogen Station’s water tank:
a. If you are using solar panels, make sure the solar panel is in direct sunlight. The solar powered
refueling process is slower than if "DC" powered. Therefore it is normal that the bubbles are
appearing more slowly in the Hydrogen Station’s water tank. The standard solar cell included with the
Hydrogen Station fills the H-racer after at least 10 minutes in strong sunlight.
b. If you are using the "DC" power option and bubbles are appearing slowly, please replace the
alkaline batteries inside the Hydrogen Station with new alkaline batteries.
c.The Hydrogen Station’s electrolyzer may have dried up as a result of continous use or an extended
storage period. In this case find the syringe and remove the blue connector from its tip, leaving the
flexible tube attached to the syringe. Push all the air out of the syringe. Position the flexible tube
inside the water tank, at the tip of the tube where the oxygen bubbles are released from.
Use the syringe to suck water out into the syringe container. Watch the tubes inside the refueling
station closely to make sure water is being “pumped out” into the syringe. This process hydrates the
electrolyser and facilitates hydrogen production. Once this is completed, wait 2-3 minutes before
operating the refueling station again. All should be back to normal!
Be careful not to use the refueling station continuously. Continuous use (over 20 minutes) will
damage the refueling station permanently. Turn off the refueling station immediately after the
refueling of the H-racer is complete.
*you can purchase distilled water at your local drugstore or pharmacy.
welcome to the Hydrogen Age!
35
36
Page 21

1. Présentation du H-racer
1. Présentation du H-racer
Le H-racer est une voiture motorisée, miniature et futuriste qui utilise l’une des technologies les plus
Le H-racer est une voiture motorisée, miniature et futuriste qui utilise l’une des technologies les plus
avancées et fascinantes du XXI siècle. Cette voiture est propulsée
avancées et fascinantes du XXI siècle. Cette voiture est propulsée
par un combustible 100 % propre produit par un générateur d’hydrogène. Celle-ci fonctionne en
par un combustible 100 % propre produit par un générateur d’hydrogène. Celle-ci fonctionne en
transformant de l’eau en hydrogène grâce à l’énergie solaire. Afin d’améliorer la qualité de
transformant de l’eau en hydrogène grâce à l’énergie solaire. Afin d’améliorer la qualité de
l’environnement, diminuer l’impact de l’accroissement des coûts de l’énergie et réduire notre
l’environnement, diminuer l’impact de l’accroissement des coûts de l’énergie et réduire notre
dépendance sur les importations de pétrole, le moment est venu d’exposer au monde les avantages
dépendance sur les importations de pétrole, le moment est venu d’exposer au monde les avantages
des technologies des piles à combustible à hydrogène.
des technologies des piles à combustible à hydrogène.
Les automobiles fonctionnant au carburant propre et renouvelable constituent le rêve ultime de
Les automobiles fonctionnant au carburant propre et renouvelable constituent le rêve ultime de
nombreux dirigeants, ingénieurs et scientifiques actuels cherchant à éliminer la dépendance humaine
nombreux dirigeants, ingénieurs et scientifiques actuels cherchant à éliminer la dépendance humaine
aux énergies fossiles au profit des ressources qui n’induisent pas de destruction climatique. Fort de
aux énergies fossiles au profit des ressources qui n’induisent pas de destruction climatique. Fort de
nouvelles avancées technologiques ; l’hydrogène est en passe de devenir le prochain combustible
nouvelles avancées technologiques ; l’hydrogène est en passe de devenir le prochain combustible
mondial. En effet, ce gaz comporte des avantages considérables : il n’est pas toxique, est
mondial. En effet, ce gaz comporte des avantages considérables : il n’est pas toxique, est
renouvelable, propre, ne contient pas d’atomes de carbone et est l’élément le plus abondant de
renouvelable, propre, ne contient pas d’atomes de carbone et est l’élément le plus abondant de
l’univers. A travers l’utilisation de la technologie des piles à combustible pour transformer de
l’univers. A travers l’utilisation de la technologie des piles à combustible pour transformer de
l’hydrogène en électricité sans combustion, cette approche présente une solution considérable aux
l’hydrogène en électricité sans combustion, cette approche présente une solution considérable aux
problèmes énergétiques, environnementaux et de sécurité. Le seul déchet résultant des voitures
problèmes énergétiques, environnementaux et de sécurité. Le seul déchet résultant des voitures
fonctionnant à l’hydrogène est l’eau. C’est la raison pour laquelle ce type de véhicule est connu sous
fonctionnant à l’hydrogène est l’eau. C’est la raison pour laquelle ce type de véhicule est connu sous
le terme « d’automobile à émission zéro. »
le terme « d’automobile à émission zéro. »
Notre civilisation consomme les carburants fossiles 100.000 fois plus vite que ceux-ci ne viennent à
Notre civilisation consomme les carburants fossiles 100.000 fois plus vite que ceux-ci ne viennent à
approvisionner les réserves énergétiques, ce qui soulève donc des questions concernant l’état des
approvisionner les réserves énergétiques, ce qui soulève donc des questions concernant l’état des
nos réserves et leur capacité à satisfaire la demande globale d’énergie de plus en plus croissante.
nos réserves et leur capacité à satisfaire la demande globale d’énergie de plus en plus croissante.
Vu les incertitudes géopolitiques touchant les pays producteurs de pétrole et l’insuffisance des
Vu les incertitudes géopolitiques touchant les pays producteurs de pétrole et l’insuffisance des
capacités de raffinage, l’économie mondiale subit une pression considérable. Le pétrole étant
capacités de raffinage, l’économie mondiale subit une pression considérable. Le pétrole étant
essentiel à la préservation du bien-être des nations, développer de nouvelles technologies pouvant
essentiel à la préservation du bien-être des nations, développer de nouvelles technologies pouvant
réduire notre dépendance aux importations de pétrole devient donc stratégique. Les inquiétudes
réduire notre dépendance aux importations de pétrole devient donc stratégique. Les inquiétudes
autour de la sécurité nationale poussent les scientifiques du monde entier à mettre au point de
autour de la sécurité nationale poussent les scientifiques du monde entier à mettre au point de
nouvelles solutions technologiques, telles que les piles à combustible à l’hydrogène.
nouvelles solutions technologiques, telles que les piles à combustible à l’hydrogène.
Un enjeu encore plus important concerne la consommation de pétrole. Les combustibles fossiles
Un enjeu encore plus important concerne la consommation de pétrole. Les combustibles fossiles
contiennent du carbone et en utilisant de l’essence comme carburant, nous générons une pollution
contiennent du carbone et en utilisant de l’essence comme carburant, nous générons une pollution
toxique d’ampleur considérable, notamment dans nos régions urbaines, et contribuons à l’émission
toxique d’ampleur considérable, notamment dans nos régions urbaines, et contribuons à l’émission
dans l’atmosphère d’énormes quantités de dioxyde de carbone. Or, l’accumulation de dioxyde de
dans l’atmosphère d’énormes quantités de dioxyde de carbone. Or, l’accumulation de dioxyde de
carbone est la cause de l’effet de serre et du réchauffement planétaire. Depuis plus d’un siècle,
carbone est la cause de l’effet de serre et du réchauffement planétaire. Depuis plus d’un siècle,
l’homme a brulé des quantités colossales de combustibles à base de carbone, ce qui a déclenché le
l’homme a brulé des quantités colossales de combustibles à base de carbone, ce qui a déclenché le
réchauffement atmosphérique. A l’heure actuelle, le réchauffement climatique se manifeste par des
réchauffement atmosphérique. A l’heure actuelle, le réchauffement climatique se manifeste par des
tempêtes d’une violence sans précédent, le phénomène de désertification, la fonte des calottes
tempêtes d’une violence sans précédent, le phénomène de désertification, la fonte des calottes
polaires et des glaciers, les variations des courants marins et la montée du niveau océanique. On
polaires et des glaciers, les variations des courants marins et la montée du niveau océanique. On
commence tout juste à percevoir ces effets..
commence tout juste à percevoir ces effets..
Notre Société a besoin d’un combustible nouveau et renouvelable et l’hydrogène est la meilleure
Notre Société a besoin d’un combustible nouveau et renouvelable et l’hydrogène est la meilleure
solution à long terme.
solution à long terme.
La plupart des compagnies automobiles mondiales développent actuellement des véhicules
fonctionnant à pile à combustible à hydrogène, cela dans l’espoir de présenter, dans les années à
venir, cette technologie révolutionnaire au grand public.
Le H-racer est la plus petite voiture au monde dotée d’un système de piles à combustible à
hydrogène. Il est aussi la version miniature de voitures grandeur nature fonctionnant à l’hydrogène et
actuellement conçues en laboratoire. Bien qu’ayant une conception moins élaborée, cette voiture aux
dimensions réduites contient toute la technologie requise pour une mise en route réussie. Elle
consiste en un réservoir d’hydrogène incorporé, un système de pile à combustible relié au moteur
électrique de la voiture et un système de valves d’alimentation en hydrogène à travers une connexion
directe entre le réservoir et une station externe d’alimentation.
De plus, le H-racer ne comporte aucun danger car étant donné sa petite dimension, il ne nécessite
qu’une quantité minuscule d’hydrogène pour fonctionner. La seule substance émise est une quantité
infiniment petite d’eau qui s’échappe directement de la pile à combustible lors de son utilisation. La
quantité d’eau produite est à peine perceptible.
L’hydrogène est l’élément le plus abondant de l’univers et le plus énergétique par unité de poids. Ce
combustible, sans carbone, peut être produit en utilisant soit les sources d’énergie traditionnelles,
soit les énergies renouvelables solaires ou éoliennes. Une fois obtenu, l’hydrogène peut être
reconverti en énergie utilisable dans de nombreuses applications, notamment dans le domaine
automobile. Cela implique donc que le combustible que nous utilisons chaque jour peut être produit
localement et en quantités illimitées. Lors du processus de consommation d’hydrogène dans la pile à
combustible, on obtient de l’électricité et de l’eau. Cette eau peut ainsi être réutilisée pour produire
de l’hydrogène et de l’oxygène, ce qui résulte en un cycle continu et naturel, sans aucune émission
toxique. Il reste encore du chemin à parcourir avant que l’utilisation quotidienne de l’hydrogène
devienne une réalité concrète, mais ce n’est qu’une question de temps…et d’ingéniosité !
Dans le monde entier, plusieurs » projets HYDROGENE » sont en cours et plus de 200 stations
d’alimentations en hydrogène ont été construites pour assurer le service auprès des premières
voitures dotées d’un système de pile à combustible.
37
38
Page 22

Qu’est-ce qu’une pile à combustible et comment fonctionne-t-elle ?
Qu’est-ce qu’une pile à combustible et comment fonctionne-t-elle ?
Une pile à combustible est un dispositif qui transforme de l’hydrogène en énergie électrique propre à
Une pile à combustible est un dispositif qui transforme de l’hydrogène en énergie électrique propre à
l’utilisation. La pile à combustible est une superposition de couches de matières avancées où
l’utilisation. La pile à combustible est une superposition de couches de matières avancées où
l’hydrogène et l’oxygène réagissent ensemble pour générer de l’électricité et de l’eau, sans
l’hydrogène et l’oxygène réagissent ensemble pour générer de l’électricité et de l’eau, sans
combustion.
combustion.
Circuit électrique
(40-60 % d’efficacité)
e
e
e
e
Combustible H2 (Hydrogène)
Combustible utilisé circulé
Plaque du champ d’écoulement
Electrode de diffusion de gaz (anode)
Catalyseur
Membrane d’échange de protons (PEM)
e
e
e
e
2
2H
O
2
O
O
O2 (Oxygène)
Chaleur
Air + vapeur d’eau
Plaque du champ d’écoulement
Electrode de diffusion de gaz (cathode)
Catalyseur
2. Comment assembler le H-racer2. Comment assembler le H-racer
ATTENTION : Lisez attentivement avant de commencer.
ATTENTION : Lisez attentivement avant de commencer.
Pour éviter tout risque de dégâts matériels, de blessures graves ou de mort :
Pour éviter tout risque de dégâts matériels, de blessures graves ou de mort :
1. Lire attentivement et comprendre les instructions afin de commencer l’assemblage de ce kit.
1. Lire attentivement et comprendre les instructions afin de commencer l’assemblage de ce kit.
2. Ce kit n’est destiné qu’à l’usage de personnes ayant 12 ans et plus, et ce, seulement sous la
2. Ce kit n’est destiné qu’à l’usage de personnes ayant 12 ans et plus, et ce, seulement sous la
supervision d’adultes ayant lu et compris les instructions données dans ce manuel.
supervision d’adultes ayant lu et compris les instructions données dans ce manuel.
3. En assemblant ce kit, des outils peuvent être utilisés. Une plus grande vigilance est requise pour
3. En assemblant ce kit, des outils peuvent être utilisés. Une plus grande vigilance est requise pour
éviter tout risque de blessure.
éviter tout risque de blessure.
4. Certaines parties sont petites et fragiles. Manier et connecter les parties avec précaution pour
4. Certaines parties sont petites et fragiles. Manier et connecter les parties avec précaution pour
éviter toute endommagement. Manier toutes les parties et les composants avec précaution.
éviter toute endommagement. Manier toutes les parties et les composants avec précaution.
5. Aucune partie, ni aucun élément ou composant de ce kit ne peut être utilisé à d’autres fins que
5. Aucune partie, ni aucun élément ou composant de ce kit ne peut être utilisé à d’autres fins que
celles indiquées dans ce manuel. Ne pas tenter de démonter aucune partie, ni aucun élément ou
celles indiquées dans ce manuel. Ne pas tenter de démonter aucune partie, ni aucun élément ou
composant de ce kit.
composant de ce kit.
6. La station d’hydrogène génère des gaz inflammables.
6. La station d’hydrogène génère des gaz inflammables.
Donc :
Donc :
- Ne pas utiliser la station d’hydrogène pour des fonctions autres que la alimentation du H-racer,
- Ne pas utiliser la station d’hydrogène pour des fonctions autres que la alimentation du H-racer,
comme indiqué dans ce manuel;
comme indiqué dans ce manuel;
- Ne laisser ni le H-racer, ni la station d’hydrogène, ainsi qu’aucune partie, aucun élément ou
- Ne laisser ni le H-racer, ni la station d’hydrogène, ainsi qu’aucune partie, aucun élément ou
composant contenu dans ce kit, à proximité de flammes ou d’étincelles.
composant contenu dans ce kit, à proximité de flammes ou d’étincelles.
L’intérêt pour les piles à combustible n’a réellement démarré que vers les années 60 où elles furent
utilisées lors des premières missions lunaires. Même si les piles à combustible sont encore utilisées
dans le cadre de la production d’eau et d’électricité lors de missions spatiales, cette technologie
unique vise désormais à promouvoir une transition globale vers les sources d’énergies
renouvelables. Les voitures fonctionnant à pile à combustible à hydrogène sont connues sous le
terme de véhicules à zéro émission. Si celles-ci étaient amenées à utiliser de l’hydrogène produit par
des sources renouvelables d’énergie, telle l’énergie solaire ou éolienne, notre approvisionnement en
combustible serait illimité et la consommation d’hydrogène à travers les piles à combustible ne
générerait ni déchet ni pollution atmosphérique.
Le H-racer contient une pile à combustible doté d’une membrane échangeuse de protons, PEM (voir
section 2, liste des parties et des composants - partie E). Elle génère de l’énergie électrique en
consommant de l’hydrogène, contenu à bord du réservoir d’hydrogène (voir section 2, liste des
parties et des composants- partie C), qui réagit avec l’oxygène. Si vous regardez sous le châssis de
votre H-racer, une fois l’assemblage complétée, vous verrez que la pile à combustible possède des
entrées d’air qui permettent à l’oxygène de l’atmosphère d’y pénétrer (l’hydrogène pénètre la pile par
le coté opposé). Cette configuration de pile à combustible est aussi connu sous le terme de «
respiration d’air ». La pile à combustible à hydrogène/air, absorbant de l’oxygène de l’air comme si
elle respirait.
Liste des parties et composantes :
A. Le châssis de la voiture
B. La carrosserie
C. Cylindre de stockage d’hydrogène
D. Deux valves d’alimentation
E. Pile à combustible
F. Seringue munie de valve
pour purger le gaz
G. Trois tubes flexibles
H. Ensemble de quatre visses
I. Autocollant (pour décorer)
J. Station d’hydrogène
J
K.Panneau solaire
Tournevis non inclus
39
K
40
Page 23

Etape 1
Placez le châssis (partie A) sur une surface plane. Positionnez la pile à combustible (partie E) sur le
carré situé au milieu du châssis à l’arrière du moteur noir- avec les deux embouts sur la pile à
combustible (partie E), tournés vers le haut et la prise rouge de la pile à combustible située sous la
boîte de vitesse bleue du moteur (voir 1A).
Etape 3
Quand vous positionnez la pile à combustible (partie E), inclinez la pile de sorte que l’arrière de la
pile touche le châssis et que le devant de la pile soit positionnée légèrement en avant, au-dessus du
bord à l’arrière du moteur (voir 1A). Regardez en dessous du châssis et vérifiez que les boulons sur
la pile sont situés à l’intérieur des bords inférieurs du carré (voir 1B). Maintenant, enfoncez
fermement la pile vers l’intérieur du châssis jusqu’à ce que vous entendiez un clic (voir 1C).
Etape 2
Raccordez l’un des tubes flexibles (partie G) à l’embout situé sur la valve d’entrée (partie D) (voir 2A et
2B).
ASTUCE : Pour raccorder les tubes flexibles dans les embouts, connectez le tube en le pressant contre
l’embout, ensuite poussez l’embout dans le tube jusqu’à ce que celui-ci soit bien maintenu à la base de
l’embout.
3A
Positionnez la valve d’alimentation (partie D) au-dessus de l’ouverture située sur le côté du châssis
(voir 3A). Glissez la valve d’alimentation (partie D) sur son support, situé dans l’ouverture sur le côté
du châssis (voir 3B). Vérifiez que les petites nervures sur le bord extérieur de la valve d’entrée (partie
D) sont positionnées sur les côtés. Placez la valve en la cliquant avec un mouvement de rotation.
Vérifiez que l’alignement avec la surface extérieure du châssis est correctement effectué.
Etape 4
4A
Raccordez la seconde partie du tube flexible (partie G) à l’embout situé sur le couvercle du cylindre
de stockage d’hydrogène (partie C) (voir 4A et 4B).
3B
4B
2D2C
Raccordez l’autre extrémité de ce tube flexible à l’embout le plus proche de la prise rouge de la pile à
combustible (partie E) (voir 2C et 2D). Vérifiez que le tube est bien inséré à la base de l’embout de la
pile et de la valve d’entrée. La valve d’entrée et la pile sont maintenant raccordées l’un à l’autre par
l’un des tubes flexibles.
41
4C
Reliez l’autre extrémité du tube à l’embout la plus proche de la prise noire (voir 4C).
42
Page 24

Etape 5
Maintenant que le cylindre de stockage d’hydrogène (partie C) est connecté à la pile (partie E),
positionnez le cylindre sur les deux supports situés directement au-dessus de l’ouverture
rectangulaire du châssis.
Une fois le cylindre placé sur les deux supports, appuyez légèrement jusqu’a ce qu’elle s’emboîte
dans la structure. Pour éviter d’endommager le H-racer, veillez à ne pas trop forcer en pressant le
cylindre sur les supports (voir 5A et 5B pour vérifier le montage final du châssis).
5A 5B
Félicitations !
Vous avez terminé l’assemblage du système de pile à combustion
de la plus petite voiture à pile à combustible
à l’hydrogène du monde !
Etape 6
6A 6B
Connectez le fil rouge du châssis (partie A) à la prise rouge de la pile (partie E). (Voir 6A)
Connectez le fil noir du châssis (partie A) à la prise noire de la pile (partie E). (Voir 6B)
Attention :
Vérifiez que les connexions sont bien établies. Toute mauvaise connexion abîmera le
fonctionnement de la voiture et de son système de pile à combustion; vérifiez aussi que
les fils ne sont pas en contact avec les roues.
Il est temps de refermer le H-racer !
7A
7B
43
Prenez la carrosserie de la voiture et placez-la au-dessus du châssis (voir 7A et 7B).
44
Page 25

ASTUCE : Si vous avez moins de 14 ans, faîtes-vous aider un adulte pour les étapes suivantes :
7C 7D
Retournez-le châssis complet en le maintenant
aux extrémités. Vous trouverez 4 petits trous près
des bords du châssis et près des 4 roues. Alignez
les trous du châssis avec ceux de la carrosserie
(voir 7C).
Etape 8 L’application de l’autocollant « H2 » sur le capot de la voiture
2
Fixez la carrosserie au châssis à l’aide d’un
tournevis (non-inclus) et des 4 vis fournies (partie
H). Il est impératif que toutes les vis soient
insérées partiellement avant d’être vissées
complètement. Serrez à fond les vis dans le
châssis. Faites-vous aider d’un adulte pour visser
le châssis car cela requiert un peu de force. Afin
de faciliter le procédé, vous pouvez rajouter une
petite quantité de lubrifiant (non fournis) à
l’intérieur des supports destinés aux vis.
8A 8B
L’assemblage de votre H-racer est maintenant terminé.
La voiture est désormais prête à être alimentée en hydrogène !
3. Préparation de la station d’hydrogène avant la mise en route3. Préparation de la station d’hydrogène avant la mise en route
Cette station d’alimentation peut produire de minuscules quantités d’hydrogène à la demande, en
utilisant soit de l’électricité générée par un panneau solaire (inclus), soit 2 piles alcalines AA (non
incluses). Si vous utilisez un panneau solaire, placez-le directement au soleil pour des résultats
optimaux.
La nuit ou par ciel couvert, la station d’alimentation peut également utiliser 2 piles alcalines AA. Il est
conseillé d’insérer les piles dans la station d’alimentation même si vous utiliser uniquement de
l’énergie générée par le panneau solaire. Cela vous permet de passer du solaire « ☼ » à
l’alimentation à courant continu « DC » à n’importe quel instant au cours de l’alimentation, ou pour
accélérer le processus d’alimentation en cas de changement subite du temps.
Placez la voiture en face de vous sur une
surface plane. Retirez l’autocollant de son
support et positionnez-le conformément à
l’illustration (voir 8A).
45
Laissez un espace d’1mm entre
chaque côté de l’autocollant et les
rayures de la carrosserie. Placez
l’autocollant au centre du capot (voir
8B).
L’entretien de votre station :
Lorsque vous utilisez la station d’hydrogène, ne dépassez pas les 20 minutes. Une fois la
alimentation du H-racer complétée, éteignez la station d’hydrogène et laissez-la reposer
pendant au moins 10 minutes.
Attention :
Une utilisation continue endommagera définitivement la Station d’hydrogène.
46
Page 26

Pour l’alimentation à courant
continu « DC » :
Ouvrez le compartiment destiné à contenir les piles,
situé en-dessus de la station d’alimentation en
hydrogène en glissant le couvercle suivant la flèche
(voir 1A et 1B).
ASTUCE : Il est fortement conseillé d’utiliser
deux piles alcalines AA.
Mettez deux piles alcalines 1.5V AA dans le
compartiment à piles conformément à l’illustration,
ensuite refermez le compartiment à piles (voir 1C).
1A
1B
1C
4. Générer de l’hydrogène renouvelable en utilisant l’énergie solaire4. Générer de l’hydrogène renouvelable en utilisant l’énergie solaire
Etape 1
Attachez l’arrière du panneau solaire à son petit support rectangulaire inclus dans le kit. Vous pouvez
choisissez à placer le panneau solaire soit verticalement soit horizontalement en fonction de la
position du support situé à l’arrière du panneau.
Etape 2
2A
Connectez le fil noir à la prise noire située sur la pile solaire et connectez le fil rouge à la prise rouge
située sur la pile solaire (voir 2A).
Connectez l’autre extrémité du fil noir à la prise noire de la station d’alimentation. De la même
manière, connectez le fil rouge à la prise rouge de la station d’alimentation (voir 2B).
Attention :
Si les connexions ne sont pas correctement effectuées, cela endommagera définitivement la
Station. Ne branchez pas de source d’énergie alternative qui dépasse les 2,5 volts.
2B
Versez lentement l’eau jusqu’à ce que le réservoir soit rempli.
1D
ASTUCE : Pour optimiser le fonctionnement et la durée de vie de la Station d’alimentation,
l’utilisation d’eau distillée est fortement recommandée. L’eau distillée est disponible en
grandes surfaces.
Attention :
L’interrupteur de la station d’alimentation ne doit à aucun moment être en contact avec
l’eau.
Laissez reposer l’eau dans le réservoir pendant au moins 5 minutes avant de passer à l’étape
suivante, ce qui favorisera l’absorption de l’eau par l’électrolyseur.
1E
Etape 3
Exposez le panneau solaire directement à la lumière du soleil.
Etape 4
Mettez la station d’alimentation en position « ☼ ». Les petites lumières bleues clignotent et
maintenant vous produisez du combustible d’hydrogène issu de l’énergie solaire illimité ! Vous
pouvez vérifier que la production d’hydrogène s’effectue correctement en remarquant que de petites
bulles d’oxygène se forment sur la partie droite du réservoir. La production d’hydrogène s’arrête
quand vous éteignez l’interrupteur, c’est-à-dire en le mettant en position « Off ». S’il fait nuit, que les
rayons du soleil ne sont pas assez forts ou que vous souhaitiez diminuer le temps de chargement, en
positionnant l’interrupteur sur « DC » (courant continu), vous pouvez activer l’alimentation en courant
continu à n’importe quel moment. L’hydrogène sera alors produite grâce à l’énergie des deux AA piles
alcalines (non-incluses) déjà insérées dans la station d’alimentation.
ASTUCE : Utilisez le panneau solaire à l’extérieur et directement sous les rayons du soleil
plutôt que dans un endroit confiné ou situé à l’intérieur. Veillez à éteindre la station
d’alimentation après que la alimentation du H-racer est terminée. L’opération continue et
prolongée de la station d’hydrogène entraînerait des dommages irréversibles.
Vous êtes maintenant prêt à alimenter et à réalimenter votre H-racer grâce à
l’énergie solaire – une source d’énergie gratuite, propre, renouvelable et illimitée
pour votre H-racer !
47
48
Page 27

5. Alimentation et fonctionnement
Pour réalimenter le H-racer avec l'hydrogène, vous aurez besoin de la Station d’Hydrogène, le
seringue de purge muni de valve (partie F) et la valve d'entrée supplémentaire (partie D) avec les
tubes en caoutchouc (partie G).
Le système d’alimentation énergétique du H-racer accepte uniquement de l’hydrogène comme
combustible. Si d’autres gaz sont présents, la pile à combustible ne peut fonctionner, et par
conséquent, la voiture n’avancera pas. Pour un fonctionnement optimal du H-racer, le système doit
être purgé de tous les gaz contenus dans la voiture et de la station.
Etape 1
Vérifiez que les interrupteurs situés au-dessous du châssis de la
voiture et sur le côté de la Station d’Hydrogène sont sur la
position « Off ». Raccordez la valve de sortie de la station
d’alimentation à la valve d'entrée de la voiture en poussant
fermement la valve de connexion de la seringue dans la valve
d’entrée de la voiture tout en tournant la valve de sortie dans le
sens des aiguilles d’une montre (voir 1A et 1B).
Une fois les deux valves raccordées, vous pouvez relâcher la
valve de sortie car les deux valves sont désormais bien
maintenues en position.
ASTUCE : La valve de sortie de la station d’alimentation est
fragile. Il est recommandé d’appuyer continuellement quand
vous la tournez dans le sens des aiguilles d’une montre
pour éviter tout risque de rupture de la valve.
1A
1B
Etape 5
Munissez vous de la seringue, avec valve de
connexion intégrée, destinée à la purge de gaz
(partie F). Evacuez l’air hors de la seringue, en
poussant le conteneur intérieur de la seringue dans
son conteneur extérieur. De la même façon que vous
avez raccordé la valve de sortie de la station
d’alimentation à la valve d’entrée de la voiture, reliez
la valve de connexion de la seringue à la valve
.
d’entrée supplémentaire que vous venez de rattacher
à la station de d’alimentation.(Voir 5A)
ASTUCE : La valve de connexion de la seringue
est fragile. Il est recommandé d’appuyer
continuellement quand vous la tournez dans le
sens des aiguilles d’une montre pour éviter tout
risque d’endommager la valve.
Pour purger complètement le système de pile à
combustible, tirez le conteneur intérieur de la
seringue vers vous tout en surveillant le ballon à
l’intérieur du réservoir de gaz. Assurez vous
d’évacuer tout l’air contenu à l’intérieur du ballon en
tirant sur la seringue. Dès que tout l’air est évacué,
arrêtez de tirer sur la seringue. (Voir 5B&5C)
5A
5B
2A
Etape 2
En vous assurant que la valve de sortie de la station d’alimentation reste connectée à la voiture,
ouvrez la petite valve de pression grise qui se trouve sur le coté de la station. (voir 2A&2B)
Etape 3
Raccordez le troisième tube flexible à l’embout situé sur la valve d’entrée supplémentaire
(Voir étape 2 de comment assembler votre H-racer)
Etape 4
En maintenant ouverte la valve de pression, insérez l’extrémité ouverte du tube en caoutchouc sur
l’embout situé à l’intérieur de la valve. (Voir 4A)
2B
4A
ASTUCE : Pour éviter que l’air ne pénètre à nouveau à l’intérieur du ballon, arrêtez de tirer sur
la seringue une fois le ballon est vide car cela entraînera une succion de l’air dès que vous
cessez l’opération. L’objectif étant d’éliminer autant d’air que possible du système de pile à
combustible, veiller à ne laisser pas l’air pénétrer à nouveau dans le ballon.
Disconnect the syringe connector valve from the additional input valve attached to the refueling
station by turning it anti-clockwise quickly and lightly, allowing the connector to pop out. Your storage
tank is now purged and ready to receive hydrogen from the refueling station.
6A
Etape 6
Mettez en marche la station d’alimentation en enclenchant la position DC ou la position☼
(l’interrupteur situé derrière la station d’hydrogène) Vous pouvez la mettre en alimentation à courant
continu, c’est-à-dire, en position DC, si vous avez inséré des piles alcalines dans la station ou en la
position ☼, si votre station d’alimentation est reliée à un panneau solaire. Si vous utilisez un panneau
solaire, assurez vous que celui ci est directement et fortement exposé à la lumière du soleil. Si le
temps est nuageux ou qu’il fait nuit, vous devrez alors permuter vers la position DC.
49
50
Page 28

ASTUCE: Si des petites bulles d’air s’échappent de l’intérieur du réservoir d’eau, voir
Dépannage section 4.
Une fois l’opération achevée et le ballon rempli, assurez vous
d’avoir éteint la station d’alimentation en la mettant en position
OFF.
Quand la station d’hydrogène est activée, l’hydrogène est produit par l’électrolyseur et passe par le
tube de sortie de la station d’alimentation. En achevant cette étape essentielle qu’est la purge, vous
évacuez tous les gaz atmosphériques qui ont naturellement pénétré le système de stockage de
combustible de la voiture. Si d’autres gaz sont présents, la pile à combustible ne pourra fonctionner
et la voiture ne roulera pas. La méthode de purge par l’utilisation de la seringue, comme décrite
précédemment, est une étape importante incluse pour évacuer tous les gaz indésirables, tel de
l’azote, du réservoir de stockage d’hydrogène, avant l’alimentation en hydrogène.
L’air aspirée hors du ballon, en utilisant la seringue de purge (partie F), était au préalable composée
en majeure partie d’azote de l’atmosphère. L’azote va empêcher l’hydrogène de réagir avec de
l’oxygène à l’intérieur de la pile à combustible et la voiture ne pourra plus rouler même si le ballon du
réservoir d’hydrogène paraît rempli.
ASTUCE: Vous pouvez si vous le désirez, répéter les étapes de purge de l’air et de l’alimentation
pour optimiser le temps de course du H-racer. Cette méthode aura pour effet de diluer encore plus
les gaz indésirables et améliora la pureté de l’hydrogène stocké.
Attention : Si vous omettez cette étape, le temps de course de la voiture sera grandement
réduit.
Etape 7
Quand que le système d’alimentation est verrouillé et opérationnel et
que le réservoir de gaz à bord de la voiture commence à se remplir
d’hydrogène pur, vérifiez que l’interrupteur, situé en dessous du
châssis de la voiture, est sur la position OFF.
Surveillez le ballon qui commence à bouger et prendre forme à
l’intérieur du réservoir à bord de la voiture. En utilisant un courant
continu, attendez au moins une minute pour que le ballon se
remplisse d’hydrogène si les piles sont neuves.
Si vous utilisez un panneau solaire, assurez vous qu’il est exposé
directement au soleil. En pleine lumière, cela prendra 10 minutes
pour que le réservoir de la voiture se remplisse d’hydrogène en
utilisant le panneau solaire standard inclus. Si les rayons du soleil
ne sont pas assez forts, soit l’opération prendra plus de 10minutes,
soit l’alimentation en hydrogène ne s’effectuera simplement pas.
Maintenez la station d’alimentation en marche jusqu’à ce que le
ballon à l’intérieur du cylindre de stockage d’hydrogène soit rempli
(le ballon à l’intérieur du réservoir prendra la forme du cylindre
transparent).
ASTUCE : Ne pas gonfler complètement le ballon à l’intérieur du
cylindre car cela risquerait de déloger le joint d’étanchéité en
caoutchouc. Si cela se produit, le système ne sera plus hermétique
et le joint devra être refixé.
51
ASTUCE : Apres 20minutes d’utilisation continue, éteignez la
station d’hydrogène et laisser la reposer pendant au moins 10
minutes avant de la remettre en marche.
Attention: l’utilisation continue de la station d’hydrogène
l’endommagera définitivement.
Etape 8
Déconnectez la valve d’alimentation en hydrogène de la valve d’entrée de la voiture. Pour procéder sans
aucune perte du combustible stocké dans le réservoir d’hydrogène de la voiture, vous devez rapidement
et légèrement tourner la valve d’alimentation en sens inverse des aiguilles d’une montre jusqu’à ce qu’il se
détache. En le déconnectant, ne poussez pas la valve d’alimentation vers l’intérieur de la voiture car cela
dégonflera le ballon. Un peu de pratique peut s’avérer nécessaire, mais le ballon ne devra pas se
dégonfler et le combustible de la voiture devra demeurer dans le cylindre de stockage.
Etape 9
Le réservoir d’hydrogène est désormais plein et le H-racer enfin prêt à la course ! Faire rouler la voiture
sur une surface plane et sans obstacles. Mettez l’interrupteur situé sous le châssis en position « ON »,
placez la voiture au sol et regardez la rouler !
Le système de pile à combustible à bord de la voiture consommera l’hydrogène jusqu’à ce que le
réservoir de stockage soit presque vide ou jusqu’à ce que d’autres gaz commencent à s’accumuler à
l’intérieur de la pile à combustible. Il est estimé qu’avec un réservoir rempli et après avoir effectué
quelques tours de piste d’échauffement, le H-racer peut rouler jusqu’à 3 minutes.
Il se peut que la voiture s’arrête de rouler après 20-30 secondes. Dans ce cas, vous devrez pousser
légèrement la valve d’alimentation en hydrogène vers l’intérieur (partie D), pour évacuer les gaz
atmosphériques (principalement de l’azote) qui se sont accumulés à l’intérieur de la pile.
Pour redémarrer la voiture, utilisez simplement votre doigt pour pousser vers l’intérieur la valve d’entrée
tout en gardant la voiture en position ON. Le ballon se dégonflera un peu mais le moteur de la voiture
fonctionnera à nouveau. En poussant cette valve, vous avez évacué l’excès d’azote et débloqué l’accès à
l’hydrogène. C’est un phénomène naturel que vous pouvez éviter en suivant attentivement les instructions
de ce manuel.
ASTUCE 1: Pour vous assurer que la voiture consomme tout le réservoir de gaz sur un seul tour de
piste, il est recommandé d’utiliser la méthode de la seringue (Etape 5) pour enlever tout l’hydrogène
fraîchement alimentée du réservoir de la voiture et de répéter le procédé d’alimentation encore une
fois. Cette étape diluera encore plus l’azote contenu dans le réservoir et améliorera la pureté du
combustible. Si vous ne procédez pas à cette étape, cela réduira grandement le temps de
fonctionnement du système de la voiture.
Une fois que la voiture est à cours de combustible, éteignez la voiture (en utilisant l’interrupteur sous
le châssis) et répétez l’etape5 pour enlever tous les gaz restants du réservoir de stockage de la
voiture.
ASTUCE 2: Si la cellule de carburant n’est pas utilisée pour le moment et elle ne fonctionne pas
bien, la cellule de carburant a besoin d’être chauffée en ajoutant de l’eau et ensuite connectée au
circuit court. Suivez ces étapes pour le réactiver.
a. Enlevez le connecteur bleu de la valve du nez en caouchouc attaché à la séringue fournie.
b. Versez environ 0.2ml d’eau distillée dans la séringue et attachez le bout de
l’ouverture du nez en caouchouc de la séringue à un des nez sur la cellule de
carburant, en poussant lentement l’eau distillée dans la cellule de carburant.
Permettez-le d’asseoir pour 10 minutes ( voir la figure a)
c. Déplacez l’interrupteur sur la Station Hydrogène au côté DC et vérifiez si
les lumières se clignotent et les bulles d’oxygène sont formées sur le côté
droit du réservoir d’eau.
d. Enlevez le connecteur bleu de la valve de ravitaillement en carburant de la
Station Hydrogène du nez en caouchouc et connectez le nez en caouchouc
avec la douille supérieure de la cellule de carburant.
e. Ensuite, au moyen de fil rouge avec les prises de banane à double tête,
connectez un bout au cric rouge et un autre au cric noir sur la cellule de
carburant. Mettez la cellule de carburant redresser de façon verticale. ( voir la
figure b).
f. Laissez le fil connecter pendant 5 minutes, et ensuite déconnectez-le. La
cellule de carburant sera maintenant prête pour l’utilisation.
a
b
52
Page 29

6. DEPANNAGE
1. Le H-racer n’avance pas ou ralentit:
a. Vérifiez que le ballon à l’intérieur du réservoir de stockage de la voiture est bien rempli, que les fils
ne sont pas en contact avec les roues et que l’interrupteur situé sous le châssis de la voiture est sur
la position « On ».
b. Si le ballon est vide, vous devez compléter les étapes décrites dans la section5 (Alimentation et
fonctionnement), ensuite mettre l’interrupteur en position « On »
c. Si le ballon à l’intérieur du cylindre de stockage d’hydrogène semble être plein, cela veut dire que
des gaz indésirables ont pénétré le système ; Le H-racer peut fonctionner seulement sur de
l’hydrogène pur fourni par le réservoir de stockage. Un moyen rapide de régler le problème est
d’utiliser votre doigt pour pousser vers l’intérieur la valve d’entrée tout en gardant la voiture en
position ON. Vous verrez que la voiture roulera à nouveau. En procédant ainsi, vous avez évacué
tous les gaz indésirables du ballon qui se trouve à l’intérieur du cylindre de stockage.
d. Si les fils sont en contact avec les roues, déplacez les pour permettre le mouvement libre des
roues.
2. Le ballon se trouvant à l’intérieur du réservoir de stockage de la voiture ne se
remplit pas.
a. Vérifiez que le joint d’étanchéité en caoutchouc maintenant le ballon à l’intérieur du réservoir n’est
pas délogé.
b. Assurez vous que tous les tubes à l’intérieur de la voiture soient bien raccordés et que la valve de
sortie de la station d’alimentation est bien reliée à la valve d’entrée. (poussez la valve de sortie
fermement à l’intérieur de la valve d’entrée). Si vous le souhaitez, vous pouvez débrancher et
brancher les connecteurs à nouveau pour vous assurer que les raccords sont bien établis.
c. Vérifiez que le réservoir d’eau de la station d’approvisionnement en hydrogène est effectivement
rempli d’eau (de l’eau distillée) et patientez 5minutes avant de la mettre en marche. Quand vous la
mettez en marche, regardez si de petites bulles d’air s’échappent du coté droit du réservoir d’eau.
d. Si tous les branchements ont été correctement effectués, que des bulles d’air s’échappent
néanmoins et que le ballon ne se remplit pas, le système d’approvisionnement de votre H-racer est
endommagé due à une mauvaise utilisation du H-racer. N’essayez pas de réparer le H-racer. Pour
toute assistance, contactez support@horizonfuelcell.com .
4. Les bulles apparaissent au milieu du réservoir d’eau.
a. Eteignez immédiatement la station d’alimentation car l’électrolyseur est déshydraté.
b. Voir Dépannage section 3c) pour les détails sur comment « humidifier » l’électrolyseur.
5. Les voyants LED ne clignotent pas et aucune bulle n’apparaît dans le réservoir d’eau
de la station d’hydrogène.
a. Si vous utilisez le panneau solaire fourni, assurez vous que les câbles ont été convenablement
connectés. Si le temps est nuageux ou qu’il fait nuit, l’électricité ne sera pas générée et la station
d’hydrogène ne fonctionnera pas. Dans ce cas, vous devez passer à l’alimentation au courant
continu.
b. Si vous utilisez des piles alcalines 2AA, assurez vous qu’elles sont correctement insérées à
l’intérieur du compartiment à pile sous la station d’hydrogène. Si la station d’alimentation ne
fonctionne toujours pas, les piles peuvent hors d’usage. Remplacez donc les piles.
c. Voir Dépannage section 3c) pour les détails sur comment « humidifier » l’électrolyseur.
6. Le H-coureur court lentement et maintient cet état pendant une courte période,
mais le cylindre de stockage d'hydrogène est plein de l'hydrogène.
a. La cellule de carburant doit être réchauffée en ajoutant l'eau et être court-circuitée. Suivre les
étapes comme décrit dans le Conseil 2 à la page 32 pour réactiver la cellule de carburant.
b. Après que vous ayez fini d'employer la cellule de carburant, il est fortement recommandé de la
placer à l’intérieur du sac d’étanche d'aluminium fourni. Cela protégera la cellule de carburant
pendant que vous n'employez pas le H-coureur.
Si vous avez d’autres questions, contactez support@horizonfuelcell.com
Bienvenue dans l’ère de l’hydrogène !
3. Les bulles apparaissent lentement dans le réservoir d’eau de la station d’hydrogène.
a. Le processus d’alimentation par énergie solaire s’effectue moins rapidement que par courant
continu. De ce fait, il est normal que les bulles apparaissent plus lentement dans le réservoir d’eau
de la station d’hydrogène. La pile solaire standard incluse avec la Station d’Hydrogène va remplir le
H-racer après au moins 10 minutes d’exposition intense à la lumière du soleil.
b. Si vous utilisez une alimentation à courant continu et que les bulles apparaissent lentement,
remplacez les piles alcalines à l’intérieur de la station d’hydrogène par de nouvelles piles.
c.L’électrolyseur de la station d’hydrogène peut s’être asséché du à une utilisation continue ou un
temps de stockage trop prolongé. Dans ce cas, prenez la seringue et enlevez le connecteur bleu qui
se trouve à son extrémité, laissant le tube flexible attaché à la seringue. Poussez l’air hors de la
seringue. Positionnez le tube flexible à l’intérieur du réservoir d’eau, à l’extrémité de la seringue là où
les bulles d’oxygène s’échappent. Aspirez l’eau dans le conteneur de la seringue en utilisant celle-ci.
Observez les tubes de la station d’alimentation pour vous assurer que l’eau est effectivement «
pompée » dans la seringue. Ce procédé va hydrater l’électrolyseur et faciliter la production
d’hydrogène. Une fois le procédé achevé, attendez 2-3 minutes avant de faire à nouveau fonctionner
la station d’hydrogène. Tout devrait par la suite marcher !
Soyez vigilant à ne pas effectuer une utilisation continue de la station. Une utilisation continue (plus
de 20 minutes) endommagera la station d’approvisionnement définitivement. Eteignez la station dès
que l’alimentation du H-racer est terminée.
53
54
Page 30

1. Over de H-racer
1. Over de H-racer
De H-racer is een toekomstig speelgoed auto die spannendste en vooruitgegane technologie uit
De H-racer is een toekomstig speelgoed auto die spannendste en vooruitgegane technologie uit
21ste eeuw bevat. Deze auto gebruikt 100% schone brandstof die door een miniature solaire
21ste eeuw bevat. Deze auto gebruikt 100% schone brandstof die door een miniature solaire
brandstofcel produceert waarvan het waterstofgas uit water door gevangen zonlicht komt. Om het
brandstofcel produceert waarvan het waterstofgas uit water door gevangen zonlicht komt. Om het
milieu te beschermen, om de kosten van brandstof te besparen en om de afhankelijkheid van
milieu te beschermen, om de kosten van brandstof te besparen en om de afhankelijkheid van
ingevoerde olie te verlagen, het is juist de tijd om de voordelen van de waterstof brandstofcel
ingevoerde olie te verlagen, het is juist de tijd om de voordelen van de waterstof brandstofcel
technologie te starten introduceren.
technologie te starten introduceren.
Autos die van schone en omkeerbare brandstoffen afhangen zijn de uiterste droom van de meeste
Autos die van schone en omkeerbare brandstoffen afhangen zijn de uiterste droom van de meeste
wereld’s leiders, ingineurs en wetenschappers wie de afhankelijkheid van de huidige
wereld’s leiders, ingineurs en wetenschappers wie de afhankelijkheid van de huidige
ingebruiknemende fossiele brandstoffen willen opheffen waarna ten voorkeur milieu-vriendelijke
ingebruiknemende fossiele brandstoffen willen opheffen waarna ten voorkeur milieu-vriendelijke
energiebronnen uitzoeken. Met nieuwe vooruitgangen in technologiëen, waterstofgas is snel de
energiebronnen uitzoeken. Met nieuwe vooruitgangen in technologiëen, waterstofgas is snel de
volgende brandstof van de wereld geworden. Waterstofgas heeft veel belangrijke voordelen: het is
volgende brandstof van de wereld geworden. Waterstofgas heeft veel belangrijke voordelen: het is
ongiftig, omkeerbaar, schoon te gebruiken, koolvrij, en waterstof is het rijkste element in ons
ongiftig, omkeerbaar, schoon te gebruiken, koolvrij, en waterstof is het rijkste element in ons
universum. Door het gebruiken van brandstofcel technologie om waterstofgas zonder verbranding
universum. Door het gebruiken van brandstofcel technologie om waterstofgas zonder verbranding
naar elektriciteit om te wisselen, is deze aanpak een schitterende oplossing voor de energie-, milieu-
naar elektriciteit om te wisselen, is deze aanpak een schitterende oplossing voor de energie-, milieu-
en veiligheids-kwestie van ons planeet. De enige verbruik van waterstofgas brandstofcel auto is puur
en veiligheids-kwestie van ons planeet. De enige verbruik van waterstofgas brandstofcel auto is puur
water. Het is de reden dat de waterstofgas gebruikende autos ook bekend zijn als “Nul emissie
water. Het is de reden dat de waterstofgas gebruikende autos ook bekend zijn als “Nul emissie
voertuigen”.
voertuigen”.
Meesten van de wereld automotieven bedrijfen zijn aan het ontwikkelen van waterstofgas
brandstofcel voertuigen, en hopelijk in de komende jaren om deze revolutionaire technologie aan de
publiek te introduceren.
De H-racer is de kleinste waterstofgas brandstofcel aut ter wereld, het is de miniature versie van
echte waterstofgas gebruikende autos die tegenwoordig in de laboratoriums worden ontwikkeld.
Ondanks het eenvoudig in het ontwerp is, deze mini brandstofcel auto houdt alle benodigde
technologie in om het werkend te stellen. Het heeft een aan-boord waterstofgas opslagbusje, een
brandstofcel systeem aangesloten op de auto’s elektrische motor, en een waterstofgas herladen
ventielsysteem dat het opslagbusje met het externe waterstofgas herladen station kunt verbinden.
Waarom Waterstofgas?
De behoeften van waterstofgas groeien 100,000 keren sneller op dan dat het wordt geproduceerd, er
De behoeften van waterstofgas groeien 100,000 keren sneller op dan dat het wordt geproduceerd, er
onstaan daarom meer vragen over de globale bevoorrading als het in staat is om de wereld’s snelle
onstaan daarom meer vragen over de globale bevoorrading als het in staat is om de wereld’s snelle
opgroeiende energiebehoeften te voldoen. Met geopolitieke onzekerheden in olie productie landen
opgroeiende energiebehoeften te voldoen. Met geopolitieke onzekerheden in olie productie landen
en onvoldoende olie behandelingsvermogen, onze globale economie is al onder druk. Olie is kritiek
en onvoldoende olie behandelingsvermogen, onze globale economie is al onder druk. Olie is kritiek
naar de welzijn van het land, daarom nieuwe technologiëen die de afhanklijkheden op geïmporteerde
naar de welzijn van het land, daarom nieuwe technologiëen die de afhanklijkheden op geïmporteerde
olie verminderen, strategisch zijn. Nationale veiligheidsorganen heeft tegenwoordig aanmoedigende
olie verminderen, strategisch zijn. Nationale veiligheidsorganen heeft tegenwoordig aanmoedigende
wetenschappers uit de hele wereld verzameld om nieuwe energie technologie te ontwikkelen, net als
wetenschappers uit de hele wereld verzameld om nieuwe energie technologie te ontwikkelen, net als
waterstofgas brandstofcel.
waterstofgas brandstofcel.
Een nog grotere kwestie is over olie zelf. Brandstoffen zijn kool en benzine in onze auto, waaruit
Een nog grotere kwestie is over olie zelf. Brandstoffen zijn kool en benzine in onze auto, waaruit
giftige vervuiling in onze stden crereert, net als kooldioxide. Kooldioxide accumulatie is de oorzaak
giftige vervuiling in onze stden crereert, net als kooldioxide. Kooldioxide accumulatie is de oorzaak
van groenhuis effect en glabale opwarming. Voor meer dan 100 jaren, mensen hebben talloze kool
van groenhuis effect en glabale opwarming. Voor meer dan 100 jaren, mensen hebben talloze kool
gebrandt, en het opwarmen van onze sfeer veroorzaakt. Globale opwarming zijn tegenwoordig
gebrandt, en het opwarmen van onze sfeer veroorzaakt. Globale opwarming zijn tegenwoordig
gesymboliseerd door krachtige storms, woestijnvorming, het smelten van ijsbergen op twee polen,
gesymboliseerd door krachtige storms, woestijnvorming, het smelten van ijsbergen op twee polen,
het stromen van oceaan veranderen en het zeewater niveau verhogen.
het stromen van oceaan veranderen en het zeewater niveau verhogen.
Onze samenleving heeft een nieuwe en omkeerbare brandstof nodig, en waterstofgas is de beste
Onze samenleving heeft een nieuwe en omkeerbare brandstof nodig, en waterstofgas is de beste
oplossing.
oplossing.
Inderdaad, waterstofgas is een rijk element in onze universum en bevat de meeste energie per
gewichteenheid. Deze koolvrije brandstof kan geproduceerd worden of door traditionale of
omkeerbare energiebronnen als solaire of wind stromen. Eens geproduceerd, waterstofgas wordt
geconverteerd terug naar bruikbare energie in talloze applicaties, inclucief autos. Deze betekent dat
onze dagelijkse brandstof lokaal geproduceerd kunt worden, en onbeperkt aantal. Als het in
brandstofcel consumeert, de resultaat is elektriciteit en water. Het water wordt dan gebruikt om
waterstofgas en zuurstofgas te produceren, om de cyclo continu en natuurlijk aan te houden, zonder
giftige circulaten. Er zijn veel uitndigingen om het in het werklijkheid te brengen, de kwestie is alleen
tijd.... en mensen-vindingrijkheid!
55
Over de wereld, diverse “Waterstofgas Snelweg” projecten zijn in ontwikkeling en over 200
waterstofgas tankstations zijn al opgehowd om service voor de eerste brandstofcellen autos te
bedienen.
56
Page 31

Wat is brandstofcel en hoe werkt het?
Wat is brandstofcel en hoe werkt het?
Een brandstofcel is een apparaat dat waterstofgas door elektriciteit converteert. De brandstofcel is
Een brandstofcel is een apparaat dat waterstofgas door elektriciteit converteert. De brandstofcel is
een combinatie van materialen lagen waarin waterstofgas en zuurstofgas met elkaar reageren om
een combinatie van materialen lagen waarin waterstofgas en zuurstofgas met elkaar reageren om
elektriciteit en water te genereren, zonder verbranding.
elektriciteit en water te genereren, zonder verbranding.
Elektrisch Circuit
(40%- 60% Efficiëntie)
e
e
e
e
Brandstof H2 (Waterstofgas)
Gebruikt brandstof Recirculaat
Flow-field Plaat
Gas Verspreiding Elektrode (Anode)
Katalysator
e
e
e
e
2
2H
Proton Uitwisselingsmembraan
O
2
O
O
O2 (Zuurstofgas)
Hitte
Lucht + Waterdamp
Flow-field Plaat
Gas Verspreiding Elektrode (Kathode)
Katalysator
2. Introducties Assemblage H-racer2. Introducties Assemblage H-racer
WAARSCHUWING: LEES HET ZORGVULDIG DOOR ALVORENS
WAARSCHUWING: LEES HET ZORGVULDIG DOOR ALVORENS
HET TE STARTEN
HET TE STARTEN
Om risicos van beschadiging, ernstige verwonding of dood te voorkomen:
Om risicos van beschadiging, ernstige verwonding of dood te voorkomen:
1. Lees deze introducties zorgvuldig door alvorens het ingebruik te nemen en bewaar deze
1. Lees deze introducties zorgvuldig door alvorens het ingebruik te nemen en bewaar deze
handleiding voor later gebruik.
handleiding voor later gebruik.
2. Deze pakket mag alleen ingebruik genomen worden door personen die ouder dan 12 jaar zijn, en
2. Deze pakket mag alleen ingebruik genomen worden door personen die ouder dan 12 jaar zijn, en
onder toezicht van volwassenen die al de veiligheidsmaatregelen in deze pakket bekend zijn.
onder toezicht van volwassenen die al de veiligheidsmaatregelen in deze pakket bekend zijn.
3. Terwijl deze pakket wordt geassemblageerd, mogen gereedschappen worden gebruikt. Extra
3. Terwijl deze pakket wordt geassemblageerd, mogen gereedschappen worden gebruikt. Extra
aandacht is benodigd om verwonding te voorkomen.
aandacht is benodigd om verwonding te voorkomen.
4. Enige onderdelen zijn klein en breekbaar; wees voorzichtig terwijl u ermee werkt om breuken te
4. Enige onderdelen zijn klein en breekbaar; wees voorzichtig terwijl u ermee werkt om breuken te
voorkomen. Alle onderdelen en gedeelten met zorg behandelen.
voorkomen. Alle onderdelen en gedeelten met zorg behandelen.
5. Gebruik alle meegeleverde gedeelten, itemen of onderdelen alleen voor het zich bestemd doel.
5. Gebruik alle meegeleverde gedeelten, itemen of onderdelen alleen voor het zich bestemd doel.
Probeer nooit enig gedeelte, item of onderdeel uit elkaar te zetten.
Probeer nooit enig gedeelte, item of onderdeel uit elkaar te zetten.
6. Het Waterstofgas Station genereert gassen die makkelijk brandbaar zijn.
6. Het Waterstofgas Station genereert gassen die makkelijk brandbaar zijn.
Daarom:
Daarom:
- Gebruik het Waterstof Station niet anders dan voor H-racer, of anders dan omgeschreven in de
- Gebruik het Waterstof Station niet anders dan voor H-racer, of anders dan omgeschreven in de
gebruikershandleiding.
gebruikershandleiding.
- Hou de H-racer en het Waterstof Station, ook alle itemen, onderdelen en gedeelten ingehouden in
- Hou de H-racer en het Waterstof Station, ook alle itemen, onderdelen en gedeelten ingehouden in
deze pakket buiten de omvang van brand of vlaam.
deze pakket buiten de omvang van brand of vlaam.
Serieuze interest in brandstofcel werd niet genomen tot 1960, als het voor de missies naar de maan
werd gebruikt. Hoewel de waterstofgas tegenwoordig nog steeds elektriciteit en water aanbiedt voor
de missies, deze unieke technologie richt nu op een globale transit om omkeerbare energie te
promoteren. Brandstofcel auto dat waterstofgas als brandstof neemt zijn “Nul Vervuiling Automobiel”.
Als brandstofcel autos door zonlicht of windkracht geopereerd worden, onze brandstof voorzieningen
zijn onbeperkt – en consumptie van waterstof via brandstofcellen verspilt niet en vervuilt niet.
De H-racer bevat een omkeerbare Proton Uitwisselingsmembraan (PEM) brandstofcel (zie sectie 2,
Lijst onderdelen – gedeelte E). Elektrische energie wordt door het consumeren van waterstofgas en
zuurstofgas gegenereerd die allebei in de ingeplaatsde opslagbusjes (zie sectie 2, Lijst Onderdelen –
Gedeelte C) staan, waarbij het waterstofgas met zuurstofgas reageert. Als u naar de chassis van de
volledige geassemblageerde H-racer kijkt, vindt u dat de brandstofcel luchtinlaten heeft die
zuurstofgas uit de atmosfeer binnen de brandstofcel laten gaan (Waterstfgas gaat van de andere
kant van de brandstofcel binnen). Deze brandstofcel configuratie is ook genoemd als “Lucht-ademen”
waterstof/lucht brandstofcel, het trekt zuurstof uit de lucht in – net als het “ademt”.
Lijst onderdelen:
A. Voertuigchassis
B. Carrosserie
C. Waterstof opslagbusje
D. Twee brandstof invoerventiels
E. Brandstofcel
F. Gas uitlaat syrinx met ventiel
G. Drie flexibele buizen
H. Set van 4 schroefjes
I. Decoratie sticker
J. Waterstofgas Station
K. Zonnepaneel
J
Schroefdraaier niet ingehouden
57
K
58
Page 32

Stap 1
Leg de chassis (Gedeelte A) op een platte grond. Plaats de brandstofcel (Gedeelte E) op een
vierkant blokje in het midden van de chassis achter de zwarte motor – en zorg ervoor dat twee
spuitmondjes van de brandstofcel (Gedeelte E) naar boven staan en de rode contactbus van de
brandstofcel onder de blauwe tandwielen van de motor staat (Zie 1A).
Als u de brandstofcel (Gedeelte E) plaatst, leun de brandstofcel zodat de achterkant van de
brandstofcel in contact met de chassis staat en de voorkant van de brandstofcel naar boven, en een
kleine richel achter de motor (Zie 1A) staat. Kijk naar de onderkant van de chassis en zorg ervoor dat
de bouten op de brandstofcel binnen de vierkante kleine richel op de chassis staan (Zie 1B). Druk nu
op de voorkant van de brandstofcel vast in de chassis, totdat u een “kik” hoort (Zie 1C).
Stap 2
Stap 3
3A
Plaats de herladen invoerventiel (Gedeelte D) boven de opening op de zijkant van de chassis (Zie
3A). Schuif de herladen invoerventiel (Gedeelte D) in zijn positie, het is gelocaceerd op de zijkant van
de chassis (Zie 3B). Zorg ervoor dat de zijkanten van de herladen invoerventiel (Gedeelte D) goed
geplaatsd worden, Met een slijd naar beneden, de ventiel gaat in positie door het erop te klikken,
zorg ervoor dat het juist met de uitere rand van de chassis gelijk worden.
3B
Sluit een uiteinde van de flexbele buizen (Gedeelte G) op het spuitmondje van de invoerventiel
(Gedeelte D) aan (Zie 2A & 2B).
TIP: Om de flexibele buizen op de spuitmondjes aan te sluiten, sluit het aan door het twisten tegen het
spuitmondje, dan schuif het spuitmondje in de buis totdat de buis aangesloten is op de basis van het
spuitmondje.
2D2C
Sluit het andere uiteinde van de flexibele buis op het spuitmondje naast de rode contactbus van de
brandstofcel (Gedeelte E) (Zie 2C & 2D). Zorg ervoor dat de flexibele buis helemaal op de basis van
het spuitmondje van de brandstofcel en de herladen invoerventiel aangesloten is. De invoerventiel en
de brandstofcel worden nu door een van de flexibele buizen (Zie 2D) aangesloten.
Stap 4
4A
Sluit een uiteinde van tweede flexibele buis (Gedeelte G) op het spuitmondje van de waterstofgas
opslagbusje (Gedeelte C) (Zie 4A & 4B) aan.
4C
Sluit een ander uiteinde van de buis op het spuitmondje van de brandstofcel naast de zwarte
contactbus (Zie 4C) aan.
4B
59
60
Page 33

Stap 5
Op dit moment is het waterstofgas opslagbusje (gedeelte C) aangesloten op de brandstofcel
(Gedeelte E), plaats het waterstofgas opslagbusje in de twee driehoekige blokjes op de chassis.
Als het opslagbusje op deze twee blokjes wordt bevestigd, druk zacht erop om het vast te maken.
Om beschadiging of breuken te voorkomen, druk niet te hard op het opslagbusje (Zie 5A & 5B om de
voltooide geassemblageerde chassis te bekijken).
5A 5B
Gefiliciteerd!
U heeft al het brandstofcel systeem van de wereld’s
kleinste waterstofgas auto geassemblageerd!
Stap 6
6A 6B
Sluit de rode draad van de chassis (Gedeelte A) op de rode contactbus van de brandstofcel
(Gedeelte E) aan. (Zie 6A)
Sluit de zwarte draad van de chassis (Gedeelte A) op de zwarte contactbus van de brandstofcel
(Gedeelte E) aan. (Zie 6B)
Waarschuwing:
Zorg ervoor dat deze aansluitingen juist zijn. Andere aansluiting gaat de bewerking van de
auto en zijn brandstofcel systeem beschadigen; zorg ook ervoor dat de draden niet in
contact met de wielen komen.
Stap 7 Tijd om H-racer af te sluiten!
7A
Neem de carrosserie (Gedeelte B) en plaats het boven de chassis (Zie 7A & 7B).
7B
61
62
Page 34

TIP: Als u onder 14 jaar bent, het is aanbevolen dat er een volwassen bij zijn om hulp te krijgen voor de stappen
als volgende:
7C 7D
Hou de volledige geassemblageerde chassis in
uw hand en draai het bovenwards om 4 kleine
gaten vlakbij de randen en de wielen van de
chassis te vinden. Stel de gaten op de chassis
juist op de top carrosserie (Zie 7C).
Gebruik een schroefdraaier (niet ingehouden) om
de carrosserie aan de chassis te bevestigen door
het ingebruiknemen van 4 stel kleine schroefjes
(Gedeelte H), en zorg ervoor dat de schroefjes
recht in de chassis indraaien. Draai de schroefjes
niet vast totdat alle schroefjes gedeeltelijk in de
chassis indraaien. Draai de schroefjes in de
chassis totdat er geen holte tussen carrosserie en
chassis bestaat. Vraag een volwassen om hulp
als de schroefjes kracht nodig hebben. Om het
process te voltooien, u kunt kleine petroleum
geleitjes (niet ingehouden) binnen de
schroefbouten toevoegen.
Stap 8 "H2 " sticker op de voorkant van de carrosserie plakken
8A 8B
Deze auto is bereid om waterstofgas in te laden!
De assemblage van uw H-racer is nu voltooid.
3. Het Waterstof Station Bereidmaken voor bewerkingen3. Het Waterstof Station Bereidmaken voor bewerkingen
Dit herladen station kan weinig aantal waterstofgas ten opdracht van u produceren, oftewel door het
gebruiken van elektriciteit die door een zonnepaneel (standaard solair celenergiebron ingehouden)
genereert, oftewel door 2 AA alkalïne batterijen (niet ingehouden). Als u zonnepaneel gebruikt, u moet
het onder de zon plaatsen om optimale resultaten rechtstreeks te krijgen.
Bewerkingen in nacht of tijdens een hemelachtig weer, het herladen station kan ook 2 AA alkalïne
batterijen gebruiken. Het is aanbevolen dat deze batterijen binnen het herladen station plaatsen zelfs
u de energie uit zonnepaneel haalt. Het helpt u alle tijden tijdens het herladen van solair "☼" naar
"DC" energie om te schakelen, of het herladen versnellen in geval van een plotselinge verandering
van weer.
Plaats de auto op een platte grond, met de
voorkant van de auto tegen u. Verwijder de
sticker van zijn backing en plak het volgens de
afbeelding op (Zie 8A).
63
Er moet 1 mm tussen elke kant van
de sticker en de blauwe strippen op
de carrosserie, en de sticker moet in
het midden op de voorkant opgeplakt
worden (Zie 8B).
Zorg goed voor uw Waterstofgas Station:
Gebruik het Waterstofgas Station eens niet langer dan 20 minuten. Als het herladen van H-racer
voltooid is, schakel het Waterstofgas Station uit en het tenminste 10 minuten laten staan.
Waarschuwing:
Continue bewerkingen van de Waterstofgas Station brengt er permanente beschadigingen toe.
64
Page 35

DC toevoer bewerking activeren:
Doe de batterijdoos die zich onder het herladen station
bevindt open door de deksel slijden volgens de
aanwijzingspijlen (Zie 1A & 1B).
TIP: Het is aanbevolen om twee AA alkalïne batterijen
te gebruiken.
Plaats twee 1.5V AA alkalïne batterijen binnen de
batterijdoos als het aanwijst, dan sluit de batterijdoos af
(Zie 1C).
1A
1B
1C
4. Het genereren van omkeerbaar waterstofgas door het gebruiken van zonlicht4. Het genereren van omkeerbaar waterstofgas door het gebruiken van zonlicht
Stap 1
Bevestig de achterkant van zonnepaneel op de meegeleverde kleine driehoekige statief. U kunt het
zonnepaneel verticaal of horizontaal bevestigen, het hangt af van hoe u de positie van de statief wilt
plaatsen.
Stap 2
2A
Sluit de zwarte kabel aan op de zwarte invoercontactbus van het zonnepaneel, en de rode kabel op
de rode invoercontactbus (Zie 2A).
Sluit het andere uiteinde van de zwarte kabel aan op de zwarte invoercontactbus van het herladen
station. Op dezelfde manier, sluit de rode kabel aan op de rode invoercontact bus van het herladen
station (Zie 2B).
Waarschuwing:
Zorg ervoor dat deze aansluitingen juist zijn, anders het gaat het herladen station vernietigen.
Bevestig geen andere alternatieve energiebron dat meer dan 2.5 Volts produceert.
2B
Voeg langzaam puur water in de watertank naar de opening boven het herladen station totdat het
water standaar tot de top bereikt (Zie 1D & 1E).
1D
TIP: Voor optimale bewerkingen en langer gebruiksduur van het herladen station, gedistilleerd
water is aanbevolen. U kunt het gedistilleerde water bij lokale apotheek verkrijgen.
Waarschuwing:
Natte schakelaar van het herladen station voorkomen.
1E
Stap 3
Leg het zonnepaneel onder directe zonlicht.
Stap 4
Schakel het herladen station op "☼" staat. De kleine blauwe lichten gaan knipperen en u produceert
nu waterstofgas uit de eindeloze zonlicht! U kunt het zien wanneer u het waterstofgas produceert, de
bubbels van zuurstofgas vormen uit de rechterkant van de watertank. Schakel het uit en de productie
van waterstofgas gaat stoppen. Als het donker wordt, of de zon niet krachtig is, of u de productie wilt
versnellen, u kunt ter alle tijden de schakelaar naar “DC” omschakelen. In dit geval, de productie van
waterstofgas gebruikt twee AA alkalïne batterijen (niet ingehouden) die eerder in het herladen station
geïnstalleerd waren.
TIP: Gebruik zonnepaneel buiten onder direct zonlicht, en niet in een donkere of binnen locatie. Zorg
ervoor dat het herladen station wordt uitgeschakeld na het herladen van H-racer is voltooid. Continue
bewerkingen van de Waterstofgas Station brengt er permanente beschadigingen toe.
U bent nu bereid om uw H-racer op te laden of te herladen door de energie uit de
zon - gratis, schone, omkeerbare en rijke bron van energie voor de H-racer.
Laat het water in de tank tenminste 5 minuten staan voordat naar volgende stap gaat. Het geeft de
elektrolyzer genoege tijd om het water in te trekken.
65
66
Page 36

5. Herladen en Bewerkingen
Om H-racer met waterstofgas te herhalen heeft u Waterstofgas Station nodig, gas uitlaat syrinx met
ventiel (Gedeelte F), en de toevoegende invoerventiel (Gedeelte D) met rubbere buizen (Gedeelte
G).
De H-racer’s energiesysteem accepteert alleen waterstofgas als de brandstof. Als andere gassen
aanwezig zijn, de brandstofcel werkt niet en de auto beweegt niet. Voor optimale prestatie van de
H-racer moeten de gassen binnen het systeem zowel de auto als het station uitgelaten worden.
Stap 1
Zorg ervoor dat de schakelaars onder de auto’s chassis en op
de zijkant van het Waterstofgas Station op “UIT” positie staan.
Sluit het herladen station’s uitvoerventiel op de auto’s
invoerventiel aan door het vastdrukken van de syrinx’s
connector in de auto’s invoerventiel, en tegelijkertijd de
uitvoerventiel met de klok mee draaien. (Zie 1A & 1B).
Als twee ventiels aangesloten zijn, open de uitvoerventiel als
beide ventiels nu op positie zijn.
TIP: De uitvoerventiel van het herladen station is breekbaar. Als
niet doorgaat met “indrukken” terwijl u de uitvoerventiel met de
klok mee draait, u loopt in risico dat u de uitvoerventiel breekt.
1A
1B
Stap 5
Vind de gas uitlaat syrinx met aansluitventiel
(Gedeelte F). Druk alle lucht uit de syrinx, door het
drukken op de interne container van het syrinx tot het
einde van zijn externe container. Op dezelfde manier
als het aansluiten uitvoerventiel van het herladen
station op de invoerventiel van de auto, sluit nu de
aansluitventiel van de syrinx op de toegevoegde
.
invoerventiel die u juist op het herladen station
aansluit (Zie 5A).
TIP: De aansluitventiel van de syrinx is breekbaar.
Als niet doorgaat met “indrukken” terwijl u de
aansluitventiel met de klok mee draait, u loopt in
risico dat u de aansluitventiel breekt.
Om de lucht binnen het brandstofcel systeem
volledig uit te laten, trek de interne container van de
syrinx naar u toe terwijl zorgvuldig de ballon binnen
het opslagbusje kijkt. Zorg ervoor dat u alle lucht uit
de ballon verwijdert door het trekken van syrinx.
Stoppen met het trekken als de lucht binnen de
ballon verwijderd wordt (Zie 5B & 5C).
5A
5B
5C
2A
Stap 2
Zorg ervoor dat de uitvoerventie van het herhalen station blijft aangesloten op de auto, open de
kleine, grijze drukventiel op de zijkant van het herladen station (Zie 2A & 2B).
Stap 3
Sluit de derde flexibele buis (Gedeelte G) op het spuitmondjes van toegevoegde invoerventiel
(Gedeelte D) aan (Zie Stap 2 van Instructies Assemblage).
Stap 4
Hou de drukventiel open, stop een open uitzeinde van de rubbere buis op het kleine spuitmondje
binnen de grijze drukventiel (Zie 4A).
2B
4A
TIP: Om de lucht terug naar ballon te voorkomen, stoppen met het trekken van syrinx als de ballon
leeg is – ga niet verder, omdat het de lucht zuiging zou veroorzaken als u het losmaakt. Laat de lucht
niet naar binnen terugzuigen, het doel is om de lucht van het herladen systeem zoveel mogelijk te
verwijderen.
Maak de syrinx aansluitventiel los van de toegevoegde invoerventiel die op het herladen station
aangesloten is, door het snel en zacht draaien van tegen de klok in, het helpt de connector los te
krijgen. Uw opslagbusje is nu leeggemaakt en bereid om waterstofgas uit het herladen station op te
slagen.
6A
Stap 6
Schakel het herladen station in door het schuiven van de schakelaar naar “DC” of "☼" positie (De
schakelaar op de achterkant van Waterstofgas Station). U kunt het naar “DC” omschakelen als u de
alkalïne batterijen geïnstalleerd of op “☼” positie het zonnepaneel gebruikt. Als u zonnepaneel
gebruikt, zorg ervoor dat het onder directe en sterke zonlicht staat. Als het hemelachtig is of in de
nacht, u zou beter het naar “DC” omschakelen.
67
68
Page 37

TIP: Als de kleine bubbels van zuurstofgas komen uit via het midden van de watertank, zie sectie 4,
problemen en oplossingen.
Als de bewerkingen voltooid zijn en de ballon vol is, zorg ervoor
dat u de schakelaar van het herladen station naar “UIT” positie
schuift.
Als het Waterstofgas Station is geactiveerd, waterstofgas wordt door elektrolyzer geproduceerd en
het gaat binnen het herladen station’s uitvoer buis. Door het voltooien van deze essentiële
leegmaking stap – u verwijdert de gassen uit de atomosfeer die binnen het auto brandstof
opslagsysteem bestaat. De H-racer’s energiesysteem accepteert alleen waterstofgas als zijn
brandstof. Als andere gassen aanwezig zijn, de brandstofcel werkt niet en de auto beweegt niet. De
methode van het syrinx leegmaken is een belangrijke stap om alle ongewensde gassen (als
stikstofgas) te verwijderen uit het auto’s waterstofgas opslagbusje, voor het herladen.
Voordat u de lucht uit de ballon uitlaat door het gebruiken van gas uitlaat syrinx (Gedeelte F), het
meesten gas van deze lucht is stikstofgas uit ons atmosfeer. Stikstofgas blokkeert het reageren van
waterstof met zuurstofgas en de auto stopt werken zelfs het waterstofgas opslagbusje vol met
waterstofgas ingevult wordt.
Tip: U kan de verwijdering van lucht en de herhalden stappen een of twee keer herhalen om de
levensduur van H-racer te verlengen. Deze methode verwijdert ongewensde gassen en garandeert
de puurheid van uw waterstofgas brandstof.
Waarschuwing: als u deze stap skipt – de auto’s levensduur wordt ernstig verkort.
Stap 7
Terwijl het herladen systeem geblokkeerd maar werkend is, en het
opslagbusje op de auto start puur waterstofgas op te vullen, zorg
ervoor dat de schakelaar onder de chassis op “UIT” positie staat.
Kijk zorgvuldig op de ballon binnen het opslagbusje als het start
bewegen en vormt. Het duurt tenminste 1 minuut om het
opslagbusje met waterstofgas op te vullen door het gebruiken van
“DC” als de batterijen nieuw zijn.
Als u zonnepaneel gebruikt, zorg ervoor dat het onder directe
zonlicht staat. Het duurt ongeveer 10 minuten onder sterke zonlicht
om het opslagbusje met waterstofgas op te vullen. Als de zonlicht
niet zo sterk is, het duurt of langer dan 10 minuten, of dan gebeurt
echter helemaal niet.
Hou het herhalden station aan totdat het waterstofgas opslagbusje
opgevuld wordt (de ballon binnen het opslagbusje vult alle ruimte
van de cilinder op).
TIP: Het ballon in de cilinder oneindig opvullen zou de rubbere ring
beschadigen. Als het gebeurt, het systeem is niet meer waterdicht
en de ring moet vervangd worden.
TIP: Na 20 minuten of langer gebruik, schakel het
Waterstofgas Station uit, en het voor 10 minuten laten staan
voordat het opnieuw start.
Waarschuwing:
Continue bewerkingen van de Waterstofgas Station brengt
er permanente beschadigingen toe.
Stap 8
Maak de herladen ventiel van de auto’s invoerventiel los. Om het zonder verlies van waterstofgas te doen,
u moet de herladen ventiel tegen klok in snel en zacht draaien totdat het los van zijn geblokkeerde
aansluiting te krijgen. Als u het losmaakt, druk de herladen ventiel niet in de auto omdat het de ballon gaat
disvormen. Oefeningen zouden nodig hebben, maar de ballon mag niet disvormd worden en de auto’s
brandstof moet binnen het opslagbusje blijven.
Stap 9
Het waterstofgas opslagbusje is nu vol en de H-racer is klaar voor een race! De auto laten bewegen, ga
naar een platte grond zonder obstakels. Schuif de schakelaar onder de chassis naar “AAN” positie, en leg
de auto op grond en het bewegen van de auto bekijken!
De aan-boord brandstofcel systeem consumeert waterstofgas totdat het auto’s opslagbusje bijna leeg is,
of tot andere gas in de brandstofcel verzamelt. Het is geschatten dat een vol opslagbusje een paar keer
opwarmingsraces kunt ondersteunen en H-racer kan meer dan 3 minuten werken.
U zou de auto zien stoppen na 20-30 seconden. In dit geval, u zou beter de herladen invoerventiel
(Gedeelte D) drukken om de gassen (Meestal stikstofgas) uit de atmosfeer uit te laten dat in de
brandstofcel verzamelt.
Om de auto te herstarten, neem uw vinger en druk zacht op de invoerventiel als de auto ingeschakeld is.
De ballon disvormt een beetje, maar de motor start opnieuw. Door het opdrukken van de ventiel, u moet
stikstofgas uit te laten en waterstofgas in te laten. Het gebeurt ordelijk als u de stappen in deze
handleiding zorgvuldig volgt.
TIP1: Om het zeker te stellen dat de auto voor een race een volle tank gas verbruikt, het is
aanbevolen om syrinx methode (Stap 5) te gebruiken om de resterende waterstofgas uit te laten en
het herladen proces opnieuw te starten. Deze stap laat de stikstof uit en garandeert de puurheid van
het waterstofgas als de brandstof. Zonder deze stap te volgen, de levensduur van de auto zou
ernstig verkort.
Als de auto op met gas is, schakel de auto uit (door het schuiven van de schakelaar onder de chassis) en
stap 5 herhalen om alle resterende gassen uit het opslagbusje te laten.
TIP2: Als de brandstofcel lang niet in gebruik genomen worden of niet goed werkt, de brandstofcel
moet opgewarmd worden door het toevoegen van water en kort laten circuleren. Volgende stappen
volgen om het te activeren.
a. Verwijder de connector van blauwe ventiel van de rubbere buis op de syrinx.
b. Haal 0.2ml gedistilleerd water in de syrinx en sluit het uiteinde van de
syrinx op een spuitmondje van brandstofcel aan, druk langzaam het
gedistilleerde water binnen de brandstofcel. Laat het 10 minuten staan (Zie
afbeelding a).
c. Schuif de schakelaar van het Waterstof Station naar DC en controleer of de
lichten knipperen en de bubbels van zuurstofgas uitkomen van de rechterkant
van de watertank.
d. Zet de rubbere buis en de connector van de herladen ventiel van het
Waterstof Station apart en sluit de rubbere buis op het bovenstaande
spuitmondje van de brandstofcel aan.
e. Gebruik dan de rode draad met dubbel-headed banaan plugs, sluit een
uiteinde op de rode contactbus aan, en het andere uiteinde op de zwarte
contactbus van de brandstofcel aan. Laat de brandstofcel vertikaal staan. (Zie
afbeelding b)
f. Hou de draad aangesloten voor 5 minuten, en dan losmaken. De
brandstofcel is bereid om te gebruiken.
a
b
69
70
Page 38

6. Problemen en Oplossingen
1. De H-racer beweegt niet of gaat langzamer:
a. Controleer als de ballon binnen het auto opslagbusje vol is, de draden niet in contact met de
wielen komen en de schakelaar onder de chassis op “AAN” positie staat.
b. Als de ballon leeg is, u moet de stappen in sectie 5 “Herladen en Bewerkingen” herhalen, dan
schakel pas de auto in.
c. Als de ballon van het waterstofgas opslagbusje vol is, ongewensde gassen zijn binnen het
systeem. De H-racer werkt alleen op puur waterstofgas dat uit het opslagbusje komt. Een snelle fix is
dat uw vinger zacht de herladen invoerventiel (Gedeelte D) drukt, terwijl de auto “aan” is. U merkt
meteen dat de auto weer gaat bewegen. Door deze bewerking wordt u geholpen om ongewensde
gassen uit het systeem te halen.
d. Als de draden in contact met de wielen komen, haal de draden weg zodat de wielen vrij kunnen
draaien.
2. De ballon binnen het opslagbusje vult niet op:
a. Controleer als de rubbere ring binnen het opslagbusje verslet wordt of niet..
b. Zorg ervoor dat alle buizen binnen de auto goed aangesloten zijn en de uitvoerventiel van het
herladen station goed op de invoerventiel van de auto aangesloten is (druk op de uitvoerventiel zacht
binnen het invoerventiel). U kunt de connectors opnieuw unpluggen en dan inpluggen om het te
verzekeren.
c. Zorg ervoor dat u de Waterstof Station’s watertank met water invult (gedistilleerd water*) en
wachten voor 5 minuten voor het ingeschakeld is. Als het ingeschakeld is, controleer als kleine
bubbels uit de recherkant van de herhalden station watertank komen.
d. Als alle aansluitingen juist zijn, en de bubbels komen steeds uit, maar de ballon vult niet op – uw
H-racer herladen systeem is al beschadigd vanwege onjuist gebruik. Probeer uw H-racer niet te
repareren of fixen, neem contact op met support@horizonfuelcell.com voor assistentie.
3. De bubbles komen langzaam uit het Waterstofgas Station’s watertank:
a. Als u zonnepaneel gebruikt, zorg ervoor dat het zonnepaneel onder directe zonlicht staat. Het
solaire herhalden proces is langzamer dan “DC”. Daarom is het normaal dat de bubbels langzamer
uitkomen. De standaard solaire cel met Waterstofgas Station vult pas de H-racer op tenminste na 10
minuten onder sterke zonlicht.
b. Als u “DC” gebruikt, en de bubbels langzaam uitkomen, vervangen de alkalïne batterijen binnen
het Waterstofgas Station door nieuwe alkalïne batterijen.
c. De elektrolyzer van het Waterstofgas Station kan opgedrogen ten gevolge van continu gebruik of
een buitengewoon opslagperiode. In dit geval, vind de syrinx en verwijder de blauwe connector van
zijn spuitmondje, laat de flexibele buis verbonden aan syrinx. Plaats de flexibele buis binnen de
watertank, en op het spuitmondje van de buis waarvan de zuurstofgas uitkomen.
Gebruik de syrinx om water uit de syrinx container te zuigen. Kijk zorgvuldig naar de buizen binnen
het herladen station om het te verzekeren dat water “uitgepompd” naar syrinx. Het proces bewatert
de elektrolyzer en vereenvoudigt waterstofgas productie. Als het voltooid is, 2-3 minuten wachten
voor het herstarten van het herladen station. Alles zou weer normaal gaan!
4. De bubbels komen uit het midden van de watertank:
a. Schakel het herladen station uit als de elektrolyzer on-bewaterd is.
b. Zie sectie 3 c van de problemen en oplossingen voor details over hoe de elektrolyzer gaat
bewateren.
5. De blauwe LED lichten knipperen niet en geen bubbels komen uit het Waterstofgas
Station’s watertank.
a. Als u meegeleverd zonnepaneel gebruikt, controleer als de kabels goed aangesloten zijn. Als het
weer hemelachtig is of het donker is, elektriciteit wordt niet genereerd en het Waterstofgas Station
gaat niet werken. In dit geval, u moet het naar DC omschakelen.
b. Als u 2AA alkalïne batterijen gebruikt, controleer als zij goed ingestopd in de batterijdoos onder het
Waterstofgas Station. Als het herhalden station niet werkt, de batterijen zouden leeg zijn. Vervangen
de batterijen met nieuwe alkalïne batterijen.
c. Zie sectie 3 c van de problemen en oplossingen voor details over hoe de elektrolyzer gaat
bewateren.
6. De H-racer gaat langzaam en duurt voor een korte tijd, maar het waterstofgas
opslagbusje is vol met waterstofgas.
a. De brandstofcel is benodigd opgewarmd worden door het toevoegen van water en een korte
circulatie. Volg de stappen omgeschreven in Tip 2 op pagina 32 om de brandstofcel opnieuw te
activeren.
b. Nadat u de brandstofcel gebruikt heeft, het is aanbevolen dat u het binnen een meegeleverd
lucht-sealed aluminum tasje indoet. Het beschermt de brandstofcel als u H-racer niet gebruikt.
Als u verdere assistentie nodig heeft, neem contact op met support@horizonfuelcell.com
Welkom bij Hydrogen Age!
Wees zorgvuldig dat het herladen station niet continu gebruiken. Continu gebruik (over 20 minuten)
gaat het herladen station permanent beschadigen. Schakel het herladen station meteen uit nadat het
herladen van H-racer voltooid is.
*U kunt gedistilleerd water bij apotheek verkrijgen.
71
72
 Loading...