

Page 1
FITNESS
T101
T102
GS950T
Lire le GUIDE DU TAPIS ROULANT avant de se servir du present MANUEL D'UTILISATION.
Read the TREADMILL GUIDE before using this OWNER'S MANUAL.
Lea la GUiA DE LA CAMINADORA antes de usar este MANUAL DEL PROPIETARIO.
T103
CT7.1
Page 2

3 ENGLISH
30 FRANQAIS
58 ESPAI'T4OL
Page 3
Page 4
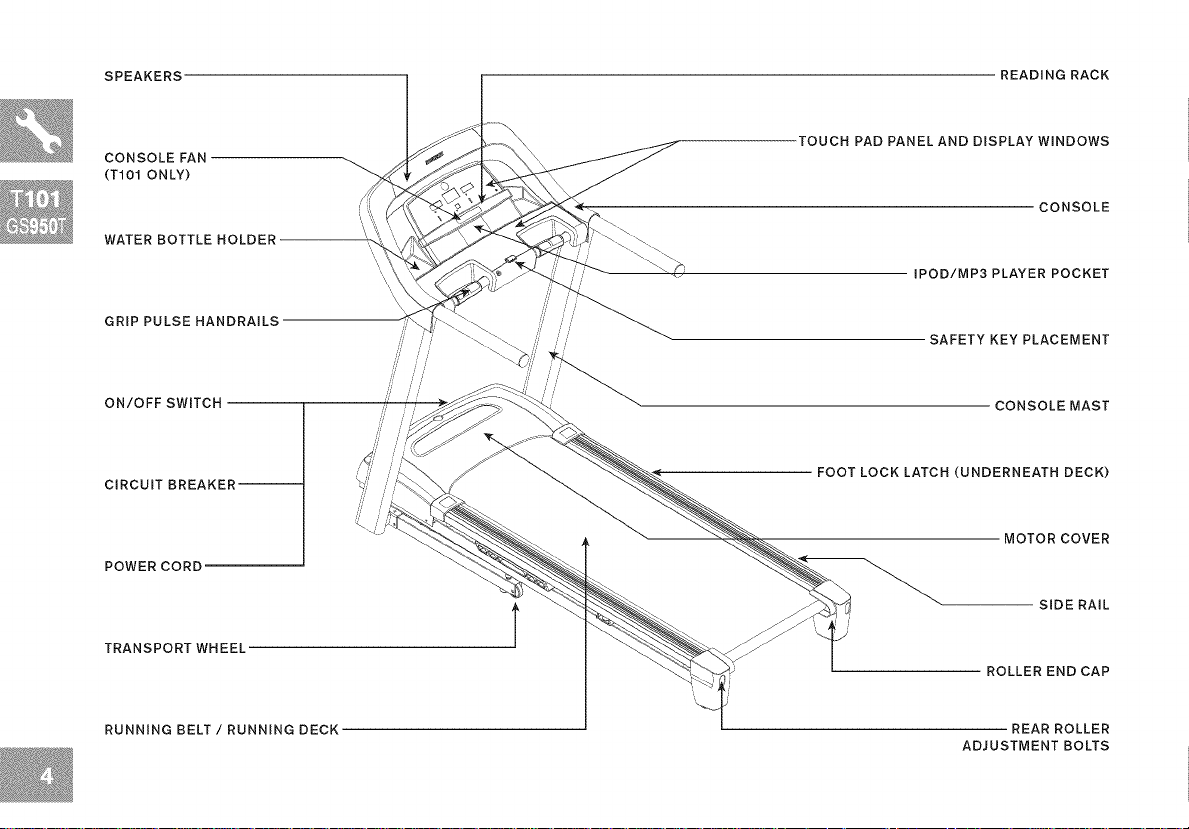
SPEAKERS READING RACK
CONSOLE FAN
(T101 ONLY)
WATER BOTTLE HOLDER
GRIP PULSE HANDRAILS
ON/OFF SWITCH
CIRCUIT BREAKER--
POWERCORD
TRANSPORT WHEEL
TOUCH PAD PANEL AND DISPLAY WINDOWS
CONSOLE
\
\\
//
FOOT LOCK LATCH (UNDERNEATH DECK)
IPOD/MP3 PLAYER POCKET
SAFETY KEY PLACEMENT
CONSOLE MAST
MOTOR COVER
SIDE RAIL
T
ROLLER END CAP
RUNNING BELT / RUNNING DECK REAR ROLLER
ADJUSTMENT BOLTS
Page 5
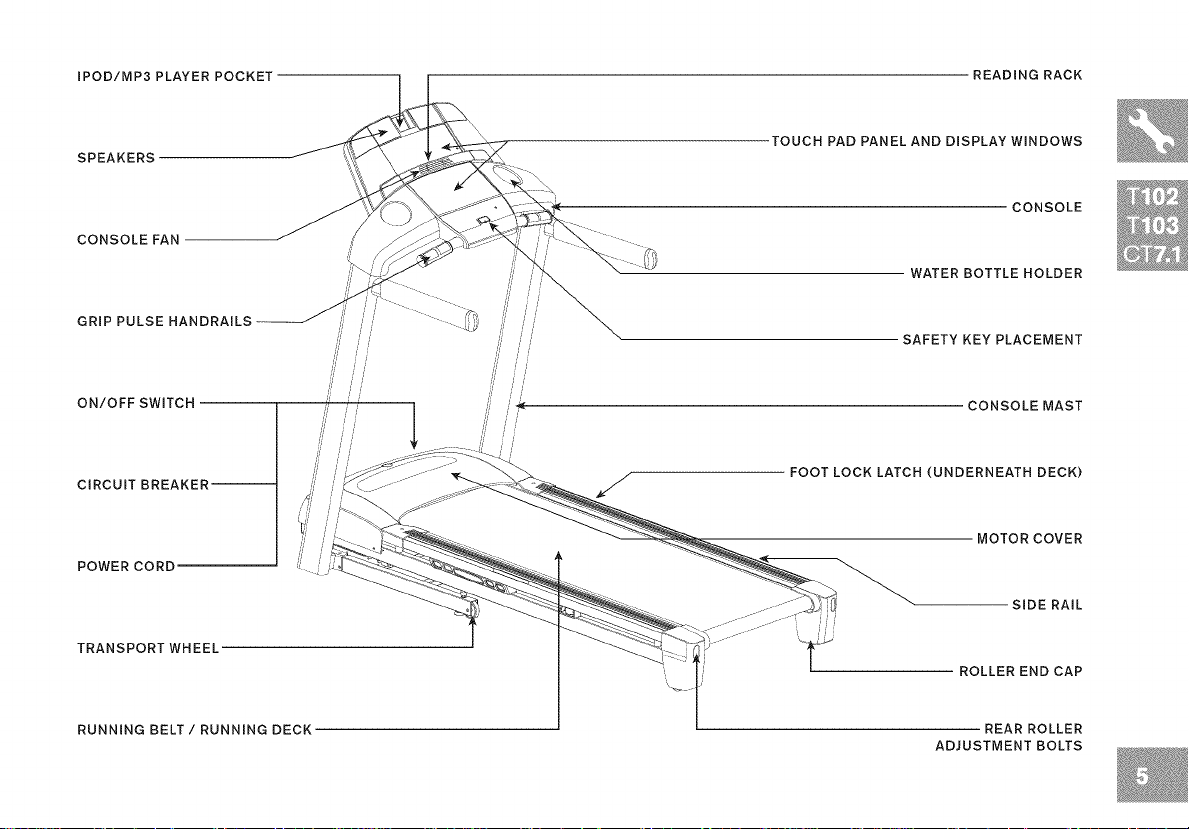
IPOD/MP3 PLAYER POCKET READING RACK
SPEAKERS
CONSOLE FAN
GRIP PULSE HANDRAILS
ON/OFF SWITCH
CIRCUIT BREAKER--
POWER CORD
TRANSPORT WHEEL
i i
TOUCH PAD PANEL AND DISPLAY WINDOWS
CONSOLE
WATER BOTTLE HOLDER
SAFETY KEY PLACEMENT
CONSOLE MAST
i
FOOT LOCK LATCH (UNDERNEATH DECK)
/
MOTOR COVER
SIDE RAIL
ROLLEREND CAP
RUNNING BELT / RUNNING DECK REAR ROLLER
ADJUSTMENT BOLTS
Page 6
TOOLS INCLUDED:
[] 6 mm T-Wrench
[] 5 mm L-Wrench
PRE ASSEMBLY
UNPACKING
PARTS INCLUDED:
[] 1 Console Assembly
[] 2 Console Masts
[] 3 Hardware Bags
[] 1 Safety Key
[] 1 Audio Adapter Cable
[] 1 Bottle of Silicone Lubricant
(for 2 applications)
[] 3 iPod _ Dock Inserts (T103 only)
[] 1 iPod :_ Dock Rubber Plug (T103 only)
'_ NEED HELP?
If you have questions or if
there are any missing parts.
contact Customer Tech
Support. Contact information
s located on the back panel
of this manual.
Place the treadmill carton on a level flat surface. It is recommended that you place a
protective covering on your floor. Take CAUTION when handling and transporting this
unit. Never open box when it is on its side. Once the banding straps have been removed,
do not lift or transport this unit unless it is fully assembled and in the upright folded
position, with the lock latch secure. Unpack the unit where it will be used. The enclosed
treadmill is equipped with high-pressure shocks and may spring open if mishandled.
Never grab hold of any portion of the incline frame and attempt to lift or move the treadmill.
,_ WARNING
DONOT ATTEMPT TO LIFT THE TREADMILL! Do not move or lift treadmill
from packaging until specified to do SO in the assembly instructions. You may
remove the plastic Wrap fr0m c0ns0!e masts
,_ WARNING
FAILURE TO FOLLOW THESE INSTRUCT!ONS COULD RESULT IN INJURY!
NOTE: During each assembly step, ensure that ALL nuts and bolts are in place and
partially threaded in before completely tightening any ONE bolt.
NOTE: A light application of grease may aid in the installation of hardware. Any grease,
such as lithium bike grease is recommended.
Page 7

ASSEMBLY STEP 1
I HARDWARE BAG 1 CONTENTS : ]
BOLT (A)
20 mm
Oty: 4
LEFT i
CONSOLE @
MAST
/
RUNNING DECK
SPRING WASHER (B) FLAT WASHER (C)
15 mm 15 mm
Qty: 4 Oty: 4
Cut the yellow banding straps and lift the
RUNNING DECK upward until the FOOT
LATCH locks. Remove all contents from
underneath the running deck.
B
Open HARDWARE BAG 1.
C
With the RUNNING DECK in the raised
position, attach the LEFT CONSOLE MAST
to the BASE FRAME using 4 BOLTS (A),
4 SPRING WASHERS (B) and 4 FLAT
WAS H ERS (C).
Page 8
ASSEMBLY STEP 2
I HARDWARE BAG 2 CONTENTS : ]
BOLT (A) SPRING WASHER (B) FLAT WASHER (C)
20 mm 15 mm 15 mrn
Qty: 4 Qty: 4 Qty: 4
_._ BOLTS (A)
• _ SPRING WASHERS (B)
(C)
A
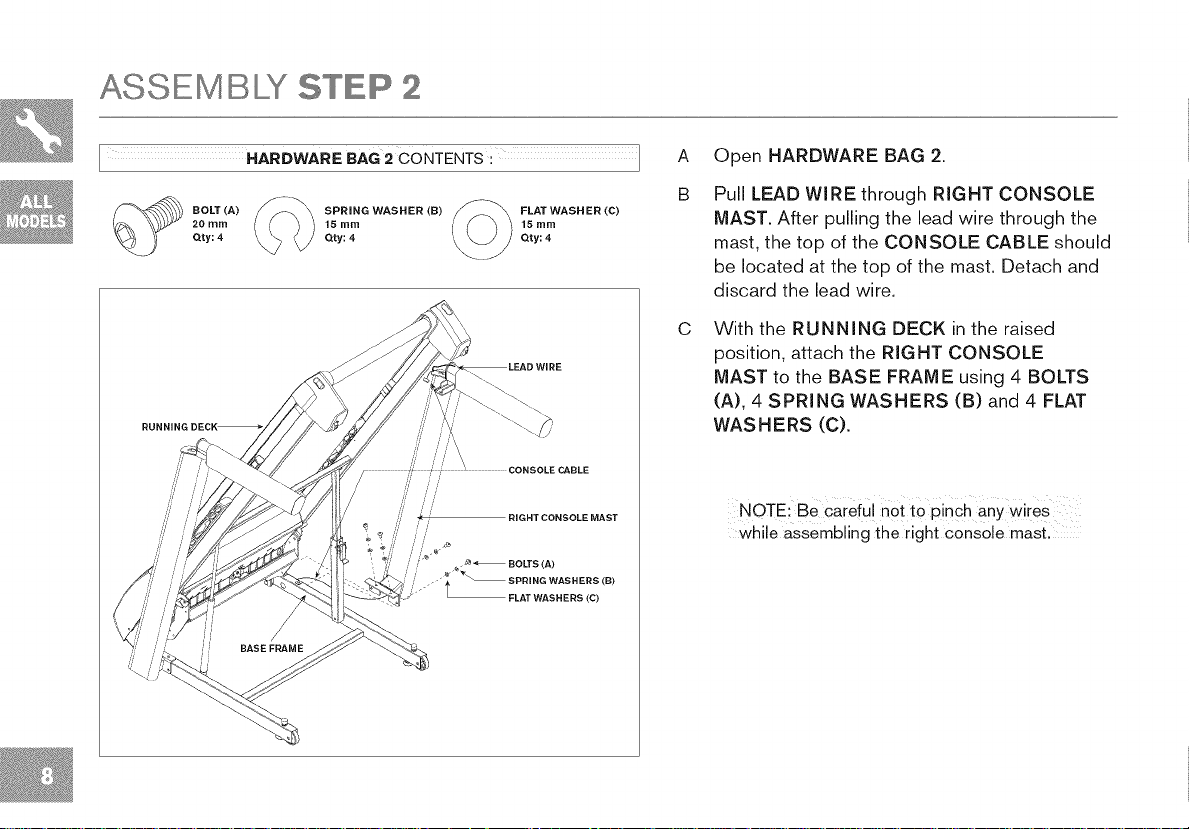
Open HARDWARE BAG 2.
B
Pull LEAD WIRE through RIGHT CONSOLE
MAST. After pulling the lead wire through the
mast, the top of the CONSOLE CABLE should
be located at the top of the mast. Detach and
discard the lead wire.
C
With the RUNNING DECK in the raised
position, attach the RIGHT CONSOLE
MAST to the BASE FRAME using 4 BOLTS
(A), 4 SPRING WASHERS (B) and 4 FLAT
WAS H ERS (C).
NOTE: Be carefu ! n0tt0 pinc h any Wires
while assembling the right console mast.
Page 9
ASSEMBLY STEP 3
HARDWARE 3 CONTENTS
BOLT (D) SPRING WASHER (B) /_-_ FLAT WASHER (C)
Qty: 4 Qty: 4 Qty: 4
45 turn 15 turn _ 15 rnm
GS950T, T101 CONSOLE CT7,1,
ASSEMBLE
LEFT SiDE
FIRST
BAG : ]
T102, T103
CONSOLE
CONSOLE CABLES
,® FLAT WASHERS (C)
'_ <_ SPRING WASHERS (B)
, <_ BOLTS (D)
CONSOLE MAST
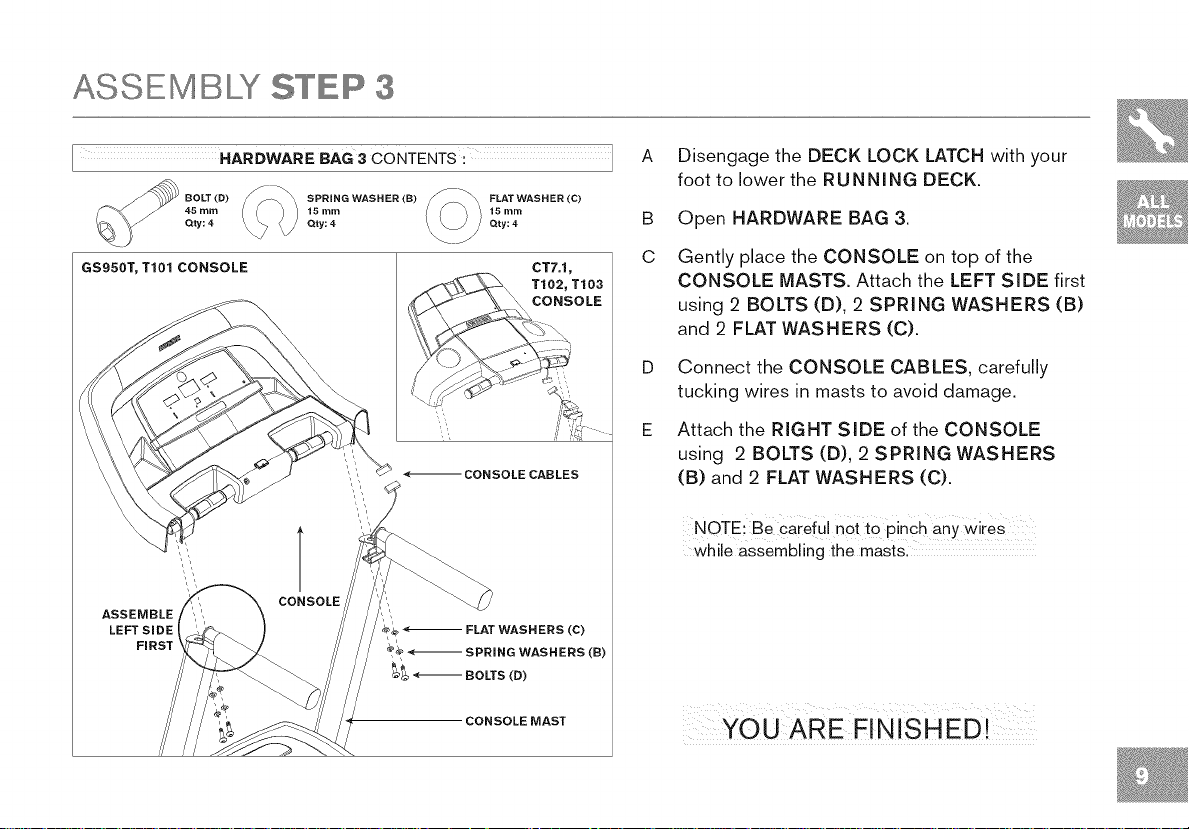
Disengage the DECK LOCK LATCH with your
foot to lower the RUNNING DECK.
B
Open HARDWARE BAG 3.
C
Gently place the CONSOLE on top of the
CONSOLE MASTS. Attach the LEFT SiDE first
using 2 BOLTS (D), 2 SPRING WASHERS (B)
and 2 FLAT WASHERS (C).
Connect the CONSOLE CABLES, carefully
tucking wires in masts to avoid damage.
Attach the RIGHT SIDE of the CONSOLE
using 2 BOLTS (D), 2 SPRING WASHERS
(B) and 2 FLAT WASHERS (C).
NOTE: Be careful not to pinch anywires
while assembling the masts.
YOU ARE FIN ISH ED !
Page 10

Page 11
Page 12

@ @
Page 13

T101 CONSOLE OPERATION
Note: There is a thin protective sheet of clear plastic on the overlay of the console that should be removed before use.
A) LED DISPLAY WINDOWS: time, distance, calories, heart rate, speed, incline and workout profiles.
B) TARGET LED iNDiCATORS: indicate what target (if any) is set for the current program.
C) WORKOUT LED INDICATORS: indicate what workout is set for the current program.
D) SELECT TARGET: press to select your desired target.
E) SELECT WORKOUT: press to select your desired workout.
F) GO: press to begin exercising, start your workout, or resume exercising after pause.
G) STOP: press to pause/end your workout. Hold for 3 seconds to reset the console.
H) COOL DOWN: press to enter cool down mode. Cool down lasts for 4 minutes and reduces speed and incline to allow your
heart to readjust to decreased demand.
I) INCLINE A / "v KEYS: used to adjust incline in small increments (0.50/0 Increments).
J) SPEED + / = KEYS: used to adjust speed in small increments (0.1 Mph increments).
K) INCLINE QUICK KEYS: used to reach desired incline more quickly.
L) SPEED QUICK KEYS: used to reach desired speed more quickly.
M) ENTER AND A / "_" KEYS: used to adjust target and workout settings. Press ENTER to change display feedback during workout.
N) FAN KEY: press to turn fan on and off.
O) FAN: personal workout fan.
P) SPEAKERS: music plays through speakers when your CD / MP3 player is connected to the console.
Q) AUDIO IN JACK: plug your CD / MP3 player into the console using the included audio adaptor cable.
R) AUDIO OUT / HEADPHONE JACK: plug your headphones into this jack to listen to your music through the headphones.
Note: when headphones are plugged into the headphone jack the sound will no longer come out through the speakers.
S) MP3 PLAYER POCKET: used to store your MP3 player.
T) WATER BOTTLE POCKETS: holds personal workout equipment.
U) READING RACK: holds reading material.
V) SAFETY KEY POSITION: enables treadmill when safety key is inserted.
Page 14
Page 15
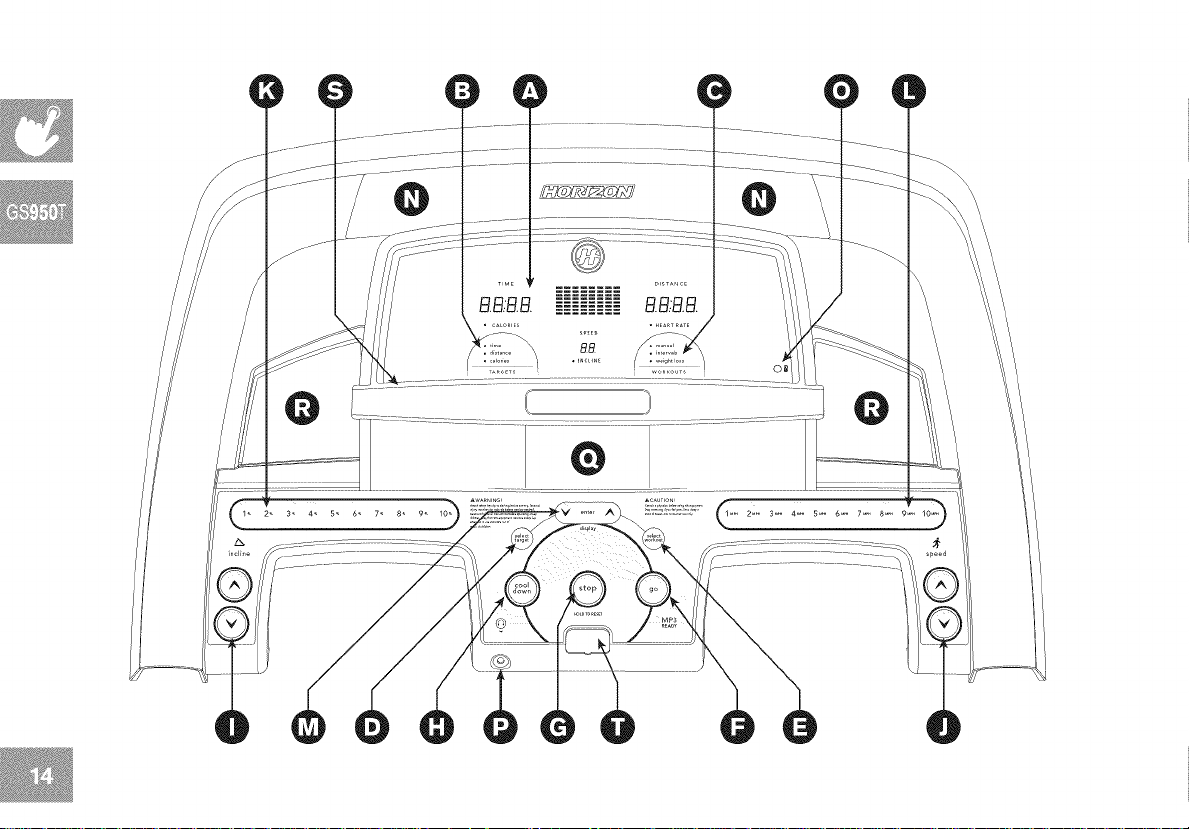
GS950T CONSOLE OPERATION
Note: There is a thin protective sheet of clear plastic on the overlay of the console that should be removed before use.
A) LED DISPLAY WINDOWS: time, distance, calories, heart rate, speed, incline and workout profiles.
B) TARGET LED iNDiCATORS: indicate what target (if any) is set for the current program.
C) WORKOUT LED INDICATORS: indicate what workout is set for the current program.
D) SELECT TARGET: press to select your desired target.
E) SELECT WORKOUT: press to select your desired workout.
F) GO: press to begin exercising, start your workout, or resume exercising after pause.
G) STOP: press to pause/end your workout. Hold for 3 seconds to reset the console.
H) COOL DOWN: press to enter cool down mode. Cool down lasts for 4 minutes and reduces speed and incline to allow your
heart to readjust to decreased demand.
I) INCLINE A / "v KEYS: used to adjust incline in small increments (0.50/0 Increments).
J) SPEED + / = KEYS: used to adjust speed in small increments (0.1 Mph increments).
K) INCLINE QUICK KEYS: used to reach desired incline more quickly.
L) SPEED QUICK KEYS: used to reach desired speed more quickly.
M) ENTER AND A / v KEYS: used to adjust target and workout settings. Press ENTER to change display feedback during workout.
N) SPEAKERS: music plays through speakers when your CD / MP3 player is connected to the console.
O) AUDIO IN JACK: plug your CD / MP3 player into the console using the included audio adaptor cable.
P) AUDIO OUT / HEADPHONE JACK: plug your headphones into this jack to listen to your music through the headphones.
Note: when headphones are plugged into the headphone jack the sound will no longer come out through the speakers.
Q) MP3 PLAYER POCKET: used to store your MP3 player.
R) WATER BOTTLE POCKETS: holds personal workout equipment.
S) READING RACK: holds reading material.
T) SAFETY KEY POSITION: enables treadmill when safety key is inserted.
Page 16
Page 17
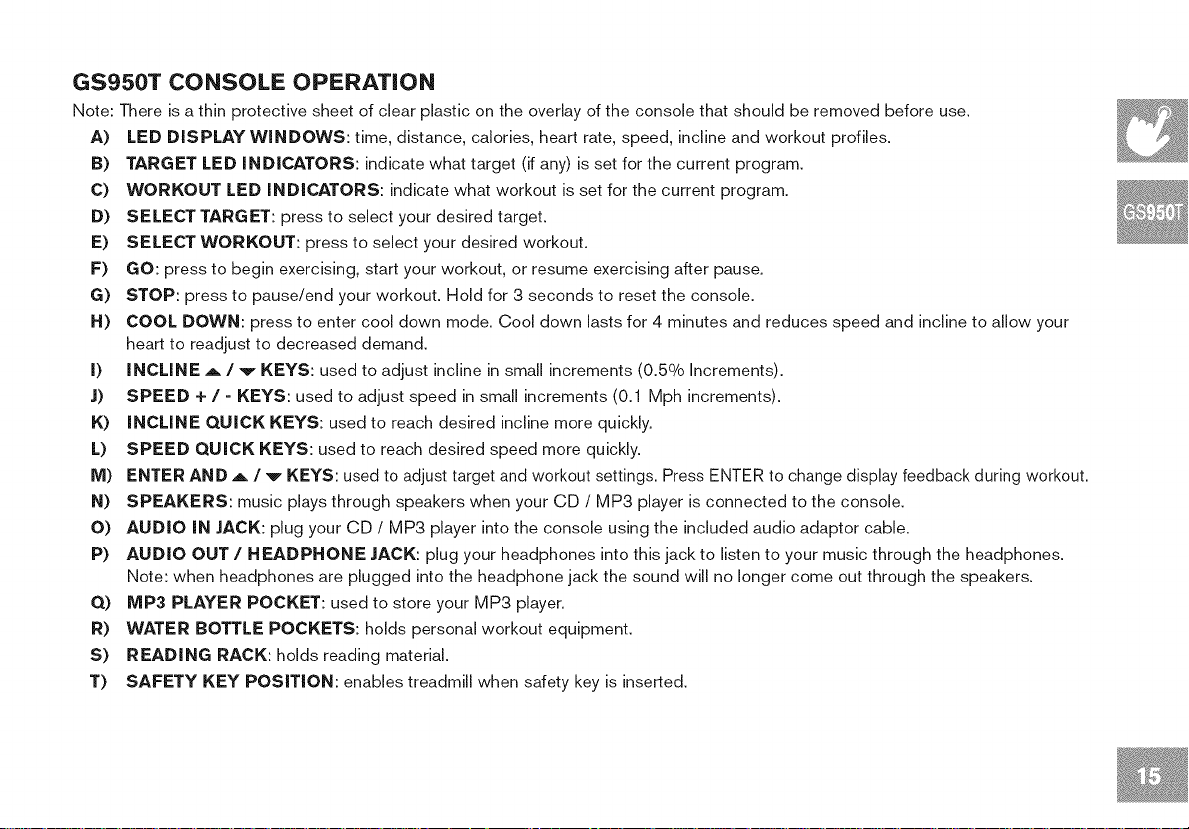
T102, CT7,1 CONSOLE OPERATION
Note: There is a thin protective sheet of clear plastic on the overlay of the console that should be removed before use.
A) DISPLAY WINDOWS: time, distance, calories, heart rate, speed, incline and workout profiles.
B) ALPHANUMERIC DISPLAY: displays goal and program information.
C) SELECT TARGET: press to select your desired target.
D) SELECT WORKOUT: press to select your desired workout.
E) GOAL CENTERTM: press to set or view your goal.
F) START: press to begin exercising, start your workout, or resume exercising after pause.
G) STOP: press to pause/end your workout. Hold for 3 seconds to reset the console.
H) INCLINE -_ / v KEYS: used to adjust incline in small increments (0.50/0 increments).
I) SPEED + / = KEYS: used to adjust speed in small increments (0.1 MPH increments).
J) INCLINE QUICK KEYS: used to reach desired incline more quickly.
K) SPEED QUICK KEYS: used to reach desired speed more quickly.
L) CHANGE DISPLAY: press to change display feedback during workout.
M) ENTER: used to confirm target and workout settings.
N) FAN KEY: press to turn fan on and off.
O) FAN: personal workout fan.
P) SPEAKERS: music plays through speakers when your CD / MP3 player is connected to the console.
Q) AUDIO IN JACK: plug your CD / MP3 player into the console using the included audio adaptor cable.
R) AUDIO OUT / HEADPHONE JACK: plug your headphones into this jack to listen to your music through the headphones.
Note: when headphones are plugged into the headphone jack the sound will no longer come out through the speakers.
S) MP3 PLAYER POCKET: used to store your MP3 player.
T) WATER BOTTLE POCKETS: holds personal workout equipment.
U) READING RACK: holds reading material.
V) SAFETY KEY POSITION: enables treadmill when safety key is inserted.
Page 18
/
\
Page 19
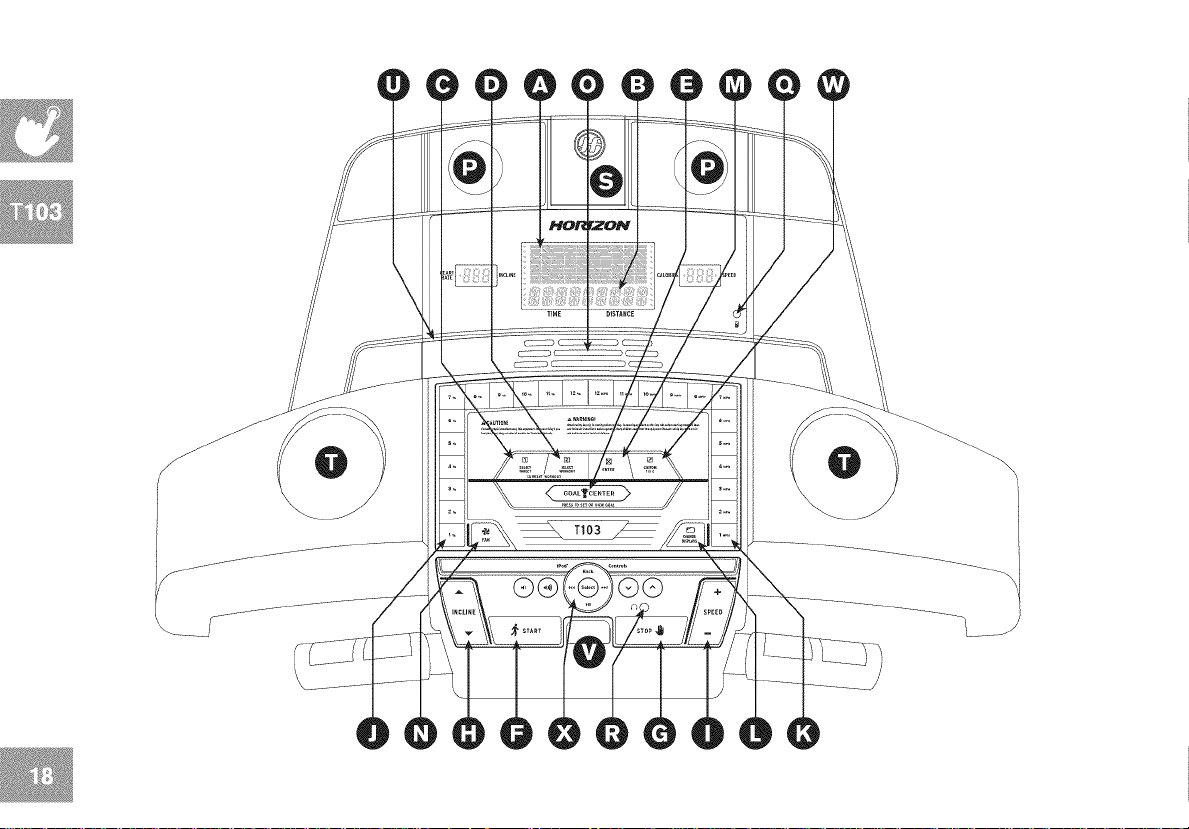
T103 CONSOLE OPERATION
Note: There is a thin protective sheet of clear plastic on the overlay of the console that should be removed before use.
A) DISPLAY WINDOWS: time, distance, calories, heart rate, speed, incline and workout profiles.
B) ALPHANUMERIC DISPLAY: displays goal and program information.
C) SELECT TARGET: press to select your desired target.
D) SELECT WORKOUT: press to select your desired workout.
E) GOAL CENTERTM: press to set or view your goal.
F) START: press to begin exercising, start your workout, or resume exercising after pause.
G) STOP: press to pause/end your workout. Hold for 3 seconds to reset the console.
H) iNCLiNE A / v KEYS: used to adjust incline in small increments (0.50/0 increments).
I) SPEED + / = KEYS: used to adjust speed in small increments (0.1 MPH increments).
J) iNCLiNE QUICK KEYS: used to reach desired incline more quickly.
K) SPEED QUICK KEYS: used to reach desired speed more quickly.
L) CHANGE DISPLAY: press to change display feedback during workout.
M) ENTER: used to confirm target and workout settings.
N) FAN KEY: press to turn fan on and off.
O) FAN: personal workout fan.
P) SPEAKERS: music plays through speakers when your CD / MP3 player is connected to the console.
Q) AUDIO iN JACK: plug your CD / MP3 player into the console using the included audio adaptor cable.
R) AUDIO OUT / HEADPHONE JACK: plug your headphones into this jack to listen to your music through the headphones.
Note: when headphones are plugged into the headphone jack the sound will no longer come out through the speakers.
S) IPOD _ DOCKING STATION: used to dock and charge your iPod (not included).
T) WATER BOTTLE POCKETS: holds personal workout equipment.
U) READING RACK: holds reading material.
V) SAFETY KEY POSITION: enables treadmill when safety key is inserted.
W) CUSTOM 1 OR 2 KEY: press to select Custom 1 or Custom 2 program.
X) IPOD _ CONTROLS: press to adjust your attached iPod audio settings. See page 23 for more info.
Page 20
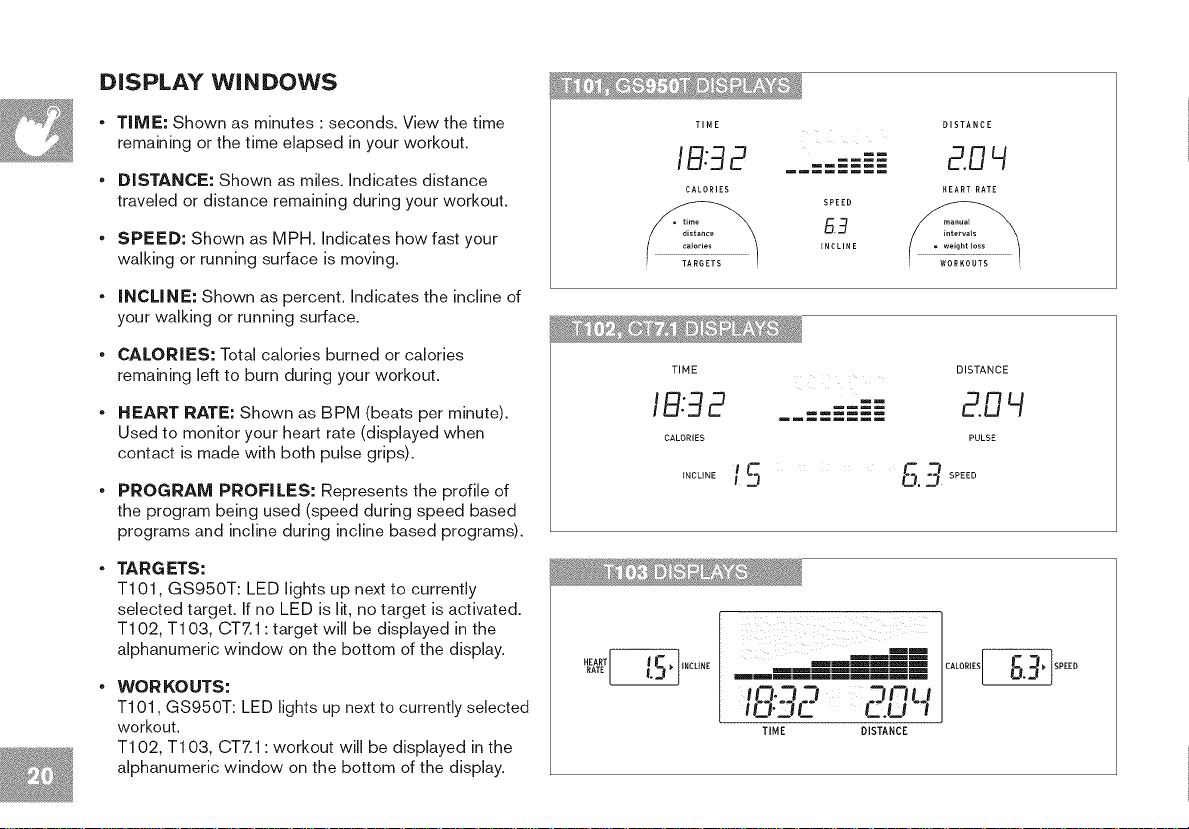
DISPLAY WI NDOWS
, TIME: Shown as minutes : seconds. View the time
remaining or the time elapsed in your workout.
. DISTANCE: Shown as miles. Indicates distance
traveled or distance remaining during your workout.
, SPEED: Shown as MPH. Indicates how fast your
walking or running surface is moving.
. INCLINE: Shown as percent. Indicates the incline of
your walking or running surface.
. CALORIES: Total calories burned or calories
remaining left to burn during your workout.
- HEART RATE: Shown as BPM (beats per minute).
Used to monitor your heart rate (displayed when
contact is made with both pulse grips).
, PROGRAM PROFILES: Represents the profile of
the program being used (speed during speed based
programs and incline during incline based programs).
. TARGETS:
T101, GS950T: LED lights up next to currently
selected target. If no LED is lit, no target is activated.
T102, T103, CT7.1 : target will be displayed in the
alphanumeric window on the bottom of the display.
. WORKOUTS:
T101, GS950T: LED lights up next to currently selected
workout.
T102, T103, CT7.1 : workout will be displayed in the
alphanumeric window on the bottom of the display.
TIME
[B:-..32
CALORIES
TIME
/B:92
CALORIES
......./5
_mmm
SPEED
5.3
_NCLINE
m_
n_m
/ / iiiii _
mmmmmm
mmmmmmmm
mmmmmmmmmm
ll=b_--J =l _--_lrH. I
nZI.ZiC C.U "l
TIME DISTANCE
mmmm
mm
DISTANCE
2.0W
HEART RATE
DISTANCE
2.0W
PULSE
CALORIES _ SPEED
Page 21
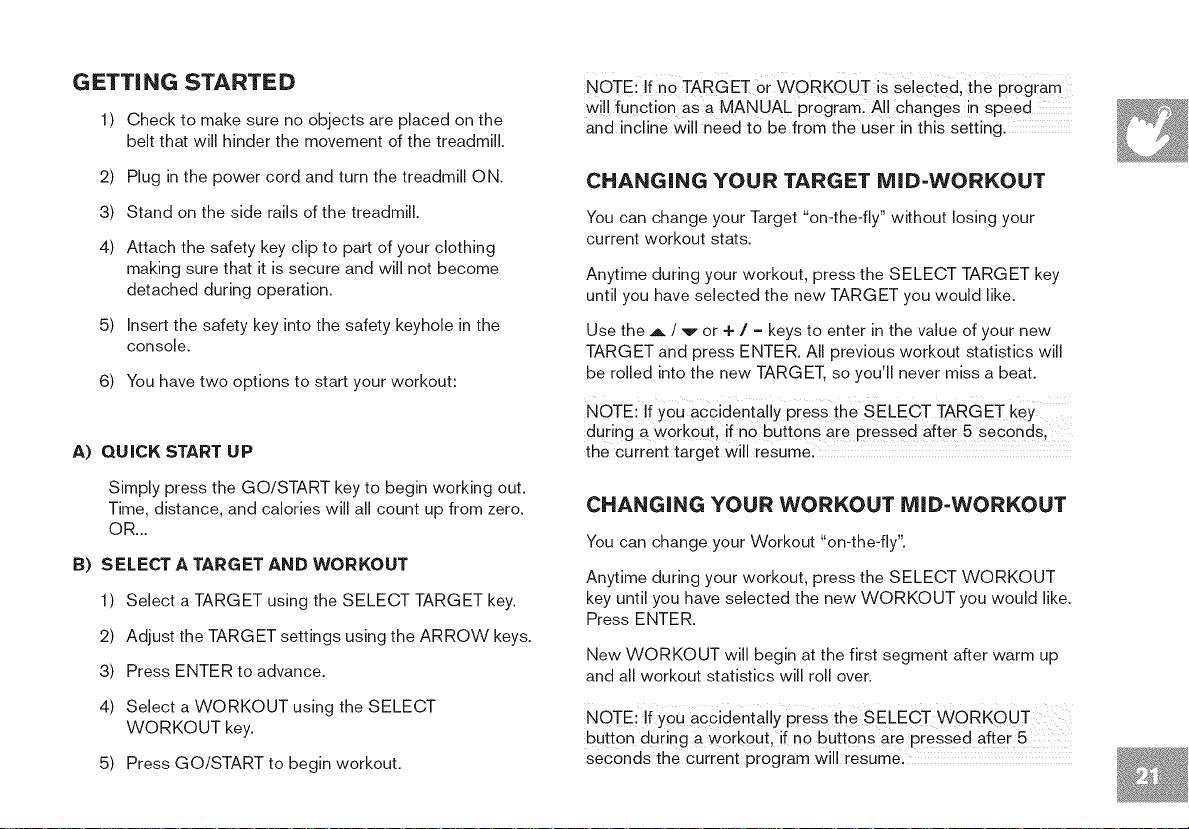
GETT| NG STARTED
1) Check to make sure no objects are placed on the
belt that will hinder the movement of the treadmill.
NOTE: !f no TARGET or WORKOUT is seiecied, the progiam
wi!l function asa MANUAL program. AI! change s in speed
and incline will need to be from the user in this setting.
2) Plug in the power cord and turn the treadmill ON.
3) Stand on the side rails of the treadmill.
4)
Attach the safety key clip to part of your clothing
making sure that it is secure and will not become
detached during operation.
5)
Insert the safety key into the safety keyhole in the
console.
6) You have two options to start your workout:
A) QUICK START UP
Simply press the GO/START key to begin working out.
Time, distance, and calories will all count up from zero.
OR...
B) SELECT A TARGET AND WORKOUT
1) Select a TARGET using the SELECT TARGET key.
2) Adjust the TARGET settings using the ARROW keys.
3) Press ENTER to advance.
4) Select a WORKOUT using the SELECT
WORKOUT key.
5) Press GO/START to begin workout.
CHANGING YOUR TARGET MID-WORKOUT
You can change your Target "on-the-fly" without losing your
current workout stats.
Anytime during your workout, press the SELECT TARGET key
until you have selected the new TARGET you would like.
Use the A / v or + / = keys to enter in the value of your new
TARGET and press ENTER. All previous workout statistics will
be rolled into the new TARGET, so you'll never miss a beat.
NOTE: If y0u accidentally press the SELECT TARGET keY
during a workout, if no buttons are pressed afte[ 5 SeCOnds,
the current target will resume.
CHANGING YOUR WORKOUT MID=WORKOUT
You can change your Workout "on-the-fly".
Anytime during your workout, press the SELECT WORKOUT
key until you have selected the new WORKOUT you would like.
Press ENTER.
New WORKOUT will begin at the first segment after warm up
and all workout statistics will roll over.
NOTEI If you accidentally press the SELECT WORKOUT
butt0n during a workout, if no buttons are pressed after 5
seconds the current program will resume.
Page 22
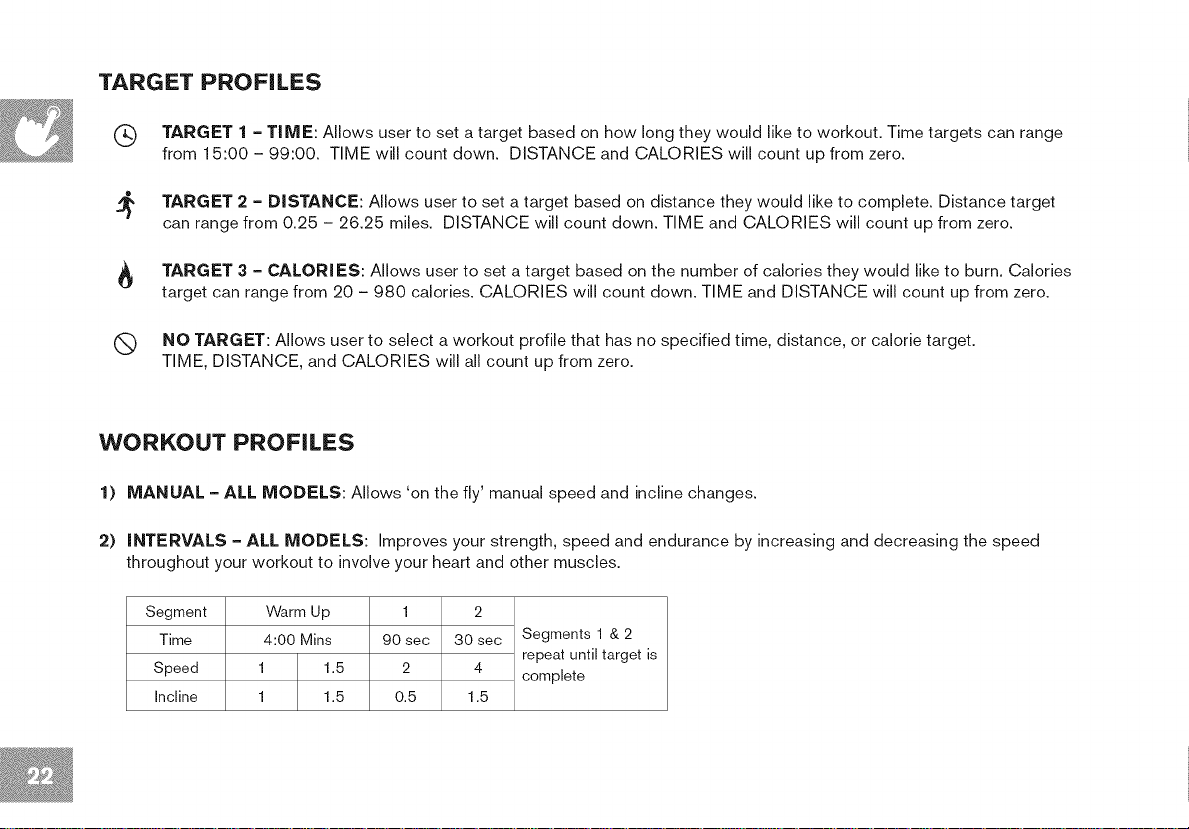
TARGET PROFILES
(_ TARGET 1 = TI ME: Allows user to set a target based on how long they would like to workout. Time targets can range
from 15:00 - 99:00. TIME will count down. DISTANCE and CALORIES will count up from zero.
_, TARGET 2 = DISTANCE: Allows user to set a target based on distance they would like to complete. Distance target
can range from 0.25 - 26.25 miles. DISTANCE will count down. TIME and CALORIES will count up from zero.
TARGET 3 = CALORI ES: Allows user to set a target based on the number of calories they would like to burn. Calories
target can range from 20 - 980 calories. CALORIES will count down. TIME and DISTANCE will count up from zero.
(_ NO TARGET: Allows user to select a workout profile that has no specified time, distance, or calorie target.
TIME, DISTANCE, and CALORIES will all count up from zero.
WORKOUT PROFILES
1)2)MANUAL = ALL MODELS: Allows 'on the fly' manual speed and incline changes.
INTERVALS = ALL MODELS: Improves your strength, speed and endurance by increasing and decreasing the speed
throughout your workout to involve your heart and other muscles.
Segment Warm Up 1 2
Time 4:00 Mins 90 sec 30 sec Segments 1 & 2
Speed 1 1.5 2 4 complete
Incline 1 1.5 0.5 1.5
repeat until target is
Page 23
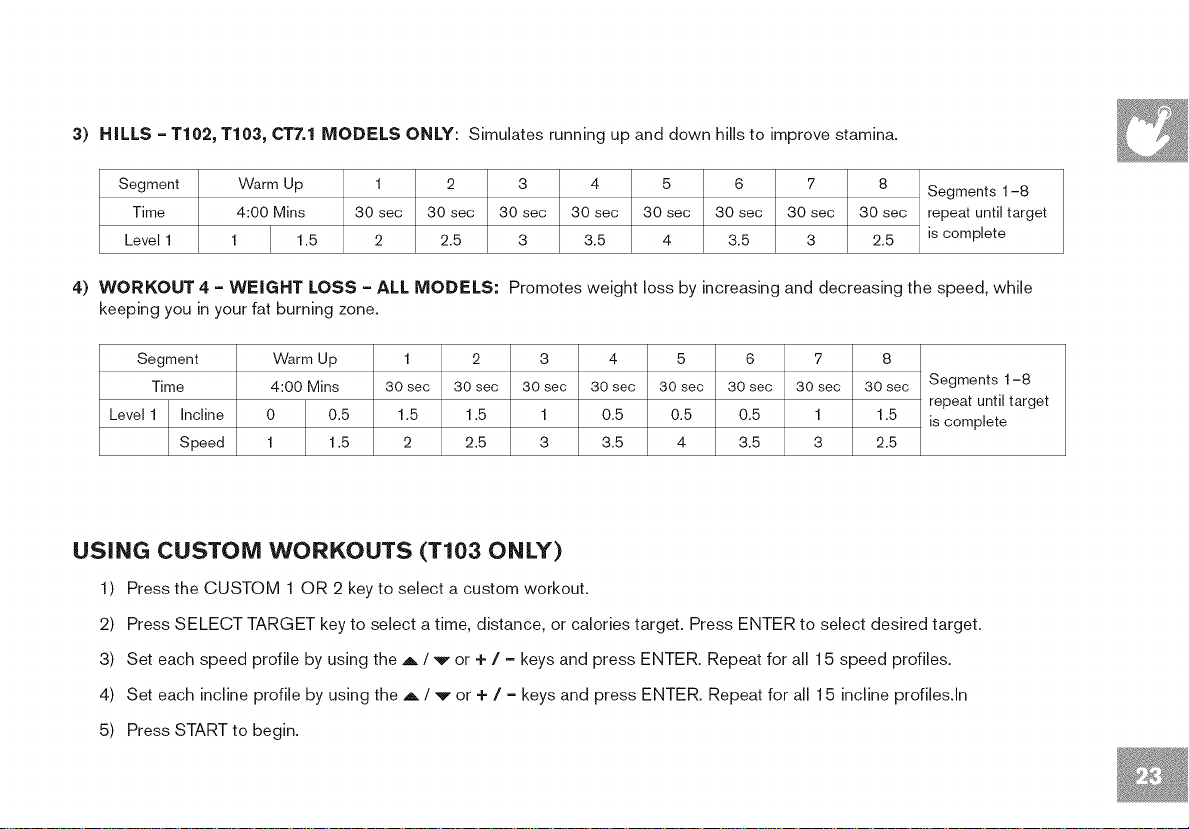
3) HILLS = T102, T103, 0T7.1 MODELS ONLY: Simulates running up and down hills to improve stamina.
Segment
Time
Level 1
Warm Up
4:00 Mins
1 1.5
1 2 3 4 5 6 7 8 Segments 1-8
30 sec 30 sec 30 sec 30 sec 30 sec 30 sec 30 sec 30 sec repeat until target
2 2.5 3 3.5 4 3.5 3 2.5 is complete
4) WORKOUT 4 = WEIGHT LOSS = ALL MODELS: Promotes weight loss by increasing and decreasing the speed, while
keeping you in your fat burning zone.
Segment
Time
Level 1 Incline
Speed
Warm Up 1 2 3 4 5 6 7 8
4:00 Mins 30 sec 30 sec 30 sec 30 sec 30 sec 30 sec 30 sec 30 sec Segments 1-8
repeat until target
0 0.5 1.5 1.5 1 0.5 0.5 0.5 1 1.5 is complete
1 1.5 2 2.5 3 3.5 4 3.5 3 2.5
USING CUSTOM WORKOUTS (T103 ONLY)
1) Press the CUSTOM 1 OR 2 key to select a custom workout.
2) Press SELECT TARGET key to select a time, distance, or calories target. Press ENTER to select desired target.
3) Set each speed profile by using the A / '_, or + / = keys and press ENTER. Repeat for all 15 speed profiles.
4) Set each incline profile by using the A / "v, or + / = keys and press ENTER. Repeat for all 15 incline profles.ln
5) Press START to begin.
Page 24
GOAL CENTIFR TM
(T102, T103, CT7.1 ONLY)
Research shows that those who create and track their fitness goals, on average, achieve greater success than those who do not.
Because your new treadmill is equipped with Horizon's exclusive GOAL CENTER TM Performance Tracker, you've taken an important
step towards achieving your fitness goals. GOAL CENTER TM is innovative new software, integrated into your treadmill console, that
will allow you to track your fitness goals over time, without the need for paper journals or logs. Read further to learn about how GOAL
CENTER TM can help motivate you to enhance your performance.
GOAL CENTER'-" SETUP
1) Select USER 1 or USER 2 using the A / v or + / = keys and press ENTER.
2) Press and hold GOAL CENTER TM for approximately five seconds.
3) Press SELECT TARGET key to select time, distance or calorie goal.
4) Use A / v or + / = keys to select goal value and press ENTER.
5) Use the A / v or + / = keys to select the NUMBER OF DAYS to complete the goal.
6) Press ENTER again to exit the setup mode.
NOTE: These steps can also be used to erase an existing goal and set a new one.
VIEWING GOAL PROGRESS
When logged into your user profile, you can view progress toward your goal by pressing the GOAL CENTER TM key. The console will scroll
the remaining time, distance or calories, depending on the goal selected and will also scroll the time remaining to achieve that goal.
NOTE: For workout data to accumulate towards a user's goal, you MUST first select that user before beginning a workout.
Page 25
TO RESET THE CONSOLE
Hold STOP key for 3 seconds.
COOL DOWN
(T101, GS950T ONLY)
Puts treadmill into coo[ down mode. Cool down lasts for four minutes and reduces speed and incline to allow your heart to readjust
to decreased demand.
FiNiSHiNG YOUR WORKOUT
When your workout is complete, the monitor display wiil flash "FINISHED" and beep. Your workout information wiil stay displayed on
the console for 30-45 seconds and then reset.
CLEAR CURRENT SELECTION
To clear the current program selection or screen, hold the STOP button for 3-5 seconds.
USING YOUR CD / MP3 PLAYER
1) Connect the included AUDIO ADAPTOR CABLE to the AUDIO IN JACK on the top right of the console and the headphone
jack on your CD / MP3 player.
2) Use your CD / MP3 player buttons to adjust song settings.
3) Remove the AUDIO ADAPTOR CABLE when not in use.
4) If you don't want to use the SPEAKERS, you can plug your headphones into the AUDIO OUT JACK at the bottom of the
console.
Page 26
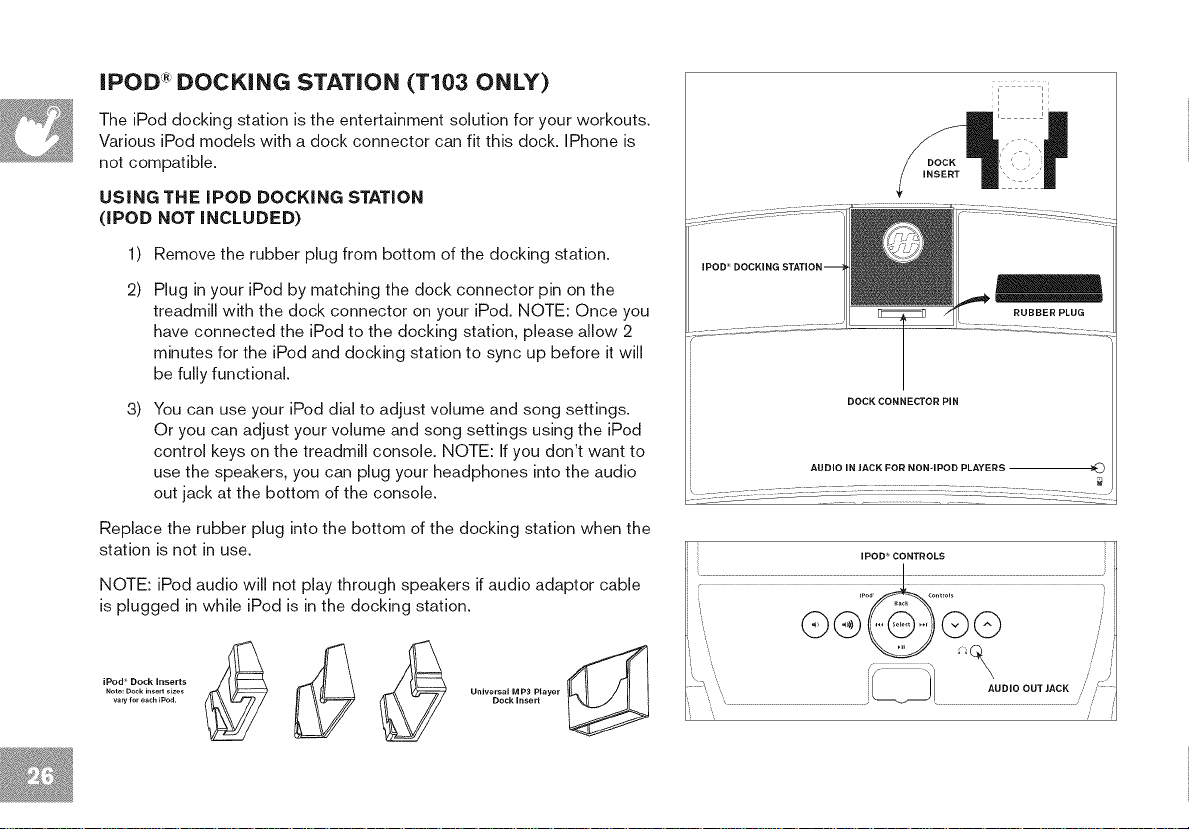
IPOD :"_DOCKING STATION (T103 ONLY)
The iPod docking station is the entertainment solution for your workouts.
Various iPod models with a dock connector can fit this dock. IPhone is
not compatible.
USING THE IPOD DOCKING STATION
(IPOD NOT iNCLUDED)
1)
Remove the rubber plug from bottom of the docking station.
2)
Plug in your iPod by matching the dock connector pin on the
treadmill with the dock connector on your iPod. NOTE: Once you
have connected the iPod to the docking station, please allow 2
minutes for the iPod and docking station to sync up before it will
be fully functional.
3)
You can use your iPod dial to adjust volume and song settings.
Or you can adjust your volume and song settings using the iPod
control keys on the treadmill console. NOTE: If you don't want to
use the speakers, you can plug your headphones into the audio
out jack at the bottom of the console.
Replace the rubber plug into the bottom of the docking station when the
station is not in use.
NOTE: iPod audio will not play through speakers if audio adaptor cable
is plugged in while iPod is in the docking station.
DOCK CONNECTOR PIN
AUDIO IN JACK FOR NON-IPOD PLAYERS _)
IPOD _ CONTROLS
Note: Dock insert sizes
vary for each iPod.
iPod Dock Inserts
Ulliversal MP3 Player I[_ II /' I_ I
Dock insert
Page 27

27
Page 28

WEIGHT CAPACITY
EXCLUSIONS AND LiMiTATiONS
T101 = 300 Ibs (136 kilograms)
T102 = 325 Ibs (147 kilograms)
T103 = 350 Ibs (159 kilograms)
GS950T = 300 Ibs (136 kilograms)
CT7,1 = 325 Ibs (147 kilograms)
FRAME, LiFETiME
Horizon Fitness warrants the frame against defects in
workmanship and materials for the lifetime of the original
owner, so long as the device remains in the possession of
the original owner. (The frame is defined as the welded metal
base of the unit and does not include any parts that can be
removed.)
MOTOR, LIFETIME
Horizon Fitness warrants the motor against defects in
workmanship and materials for the lifetime of the original
owner, so long as the device remains in the possession of
the original owner.
ELECTRONICS & PARTS , 1YEAR (T103 = 2 YEAR)
Horizon Fitness warrants the electronic components, finish
and all original parts for a period of one year (T103 = two
years) from the date of original purchase, so long as the
device remains in the possession of the original owner.
LABOR, 1 YEAR
Horizon Fitness shall cover the labor cost for the repair of the
device for a period of one year from the date of the original
purchase, so long as the device remains in the possession of
the original owner.
Who IS covered:
, The original owner and is not transferable.
What IS covered:
, Repair or replacement of a defective motor, electronic
component, or defective part and is the sole remedy of the
warranty.
What IS NOT covered:
Normal wear and tear, improper assembly or maintenance,
or installation of parts or accessories not originally
intended or compatible with the equipment as sold.
Damage or failure due to accident, abuse, corrosion,
discoloration of paint or plastic, neglect, theft, vandalism,
fire, flood, wind, lightning, freezing, or other natural
disasters of any kind, power reduction, fluctuation or failure
from whatever cause, unusual atmospheric conditions,
collision, introduction of foreign objects into the covered
unit, or modifications that are unauthorized or not
recommended by Horizon Fitness.
Incidental or consequential damages. Horizon Fitness
is not responsible or liable for indirect, special or
consequential damages, economic loss, loss of property,
or profits, loss of enjoyment or use, or other consequential
damages of whatsoever nature in connection with the
purchase, use, repair or maintenance of the equipment.
Page 29

SERVICE/RETURNS
" Equipmentusedforcommercialpurposesoranyuseother
thanasinglefamilyorHousehold,unlessendorsedby
HorizonFitnessforcoverage.
" Equipment owned or operated outside the US and
Canada.
" Delivery, assembly, installation, setup for original or
replacement units or labor or other costs associated with
removal or replacement of the covered unit.
, Any attempt to repair this equipment creates a risk of
injury. Horizon Fitness is not responsible or liable for any
damage, loss or liability arising from any personal injury
incurred during the course of, or as a result of any repair or
attempted repair of your fitness equipment by other than
an authorized service technician. All repairs attempted by
you on your fitness equipment are undertaken AT YOUR
OWN RISK and Horizon Fitness shall have no liability
for any injury to the person or property arising from such
repairs.
In-home service is available within 150 miles of the nearest
authorized repair center (Mileage beyond 150 miles from
an authorized service center is the responsibility of the
consumer).
®
All returns must be pre-authorized by Horizon Fitness.
®
Horizon Fitness' obligation under this warranty is limited
to replacing or repairing, at Horizon Fitness' option, the
same or comparable model at one of its authorized service
centers.
A Horizon Fitness authorized service center must receive
all equipment for which a warranty claim is made. This
equipment must be received with all freight and other
transportation charges prepaid, accompanied by sufficient
proof of purchase.
Replacement units, parts and electronic components
reconditioned to As-new Condition by Horizon Fitness
or its vendors may sometimes be supplied as warranty
replacement and constitute fulfillment of warranty terms.
This warranty gives you specific legal rights, and your
rights may vary from state to state.
Page 30

Page 31

Page 32

HAUT-PARLEURS SUPPORT DE LECTURE
VENTILATEUR DE LA
CONSOLE(T101 UNIQUEMENT)
PORTE-BIDON
MAINS COURANTES DU
CARDIO- FRC_QUENCEM',_TRE
INTERRUPTEUR
MARCHE-ARRC:T
COUPE-CIRCUIT --
CORDON
D'ALIM ENTATION --
ROULETTE DE TRANSPORT
BANDE/PLATE-FORME BOULONS DE RC:GLAGE
CLAVIER TACTILE ET FENC:TRES D'AFFICHAGE
CONSOLE
_LOGEMENT D'UN iPOD_/BALADEUR MP3
EMPLACEMENT DE LA CLC: DE S¢:CURIT¢:
MONTANT DE CONSOLE
PC:DALE DE VERROUILLAGE
(SOUS LA PLATE-FORME)
COUVERCLE DU MOTEUR
RAiL LATC:RAL
CHAPEAU D'EXTRC:MITC:
DE ROULEAU
DU ROULEAU ARRIC:RE
Page 33

LOGEMENTD'UN SUPPORT DE LECTURE
iPOD"/BALADEUR MP3
HAUT-PARLEURS
VENTILATEUR DE
LACONSOLE
MAINS COURANTES DU
CARDIO-FRf:OU EN CEM €:TRE
{NTERRUPTEUR
MARCHE-ARRC:T
COUPE-CIRCUIT --
CORDON
D'ALIM ENTATION
ROULETTE DE TRANSPORT
CLAVIER TACTILE ET FEN_:TRES D'AFFICHAGE
CONSOLE
PORTE-BIDON
EMPLACEMENT DE LA CLC: DE S¢:CURIT¢:
//
MONTANT DE CONSOLE
PC:DALE DE VERROUILLAGE
(SOUS LA PLATE-FORME)
COUVERCLE DU MOTEUR
RAIL LATC:RAL
CHAPEAU D'EXTR_:MITC:
DE ROULEAU
BANDE/PLATE-FORME BOULONS DE RC:GLAGE
DU ROULEAU ARRI#RE
Page 34

OUT|LS |NCLUS :
[] Cle a manche en T, de 6 mm
[] Cle a manche en L, de 5 mm
PREoASSEMBLAGE
DEBALLAGE
P|ECES |NCLUSES :
[] 1 ensemble console
[] 2 montants de console
[] 3 sacs de visserie
[] 1 cle de securit6
[] 1 cable adaptateur audio
[] 1 bouteille de lubriflant aux silicones
(pour 2 applications)
[] 3 inserts pour socle de
synchronisafion du iPod M°(onl T103)
[] 1 bouchon de caoutchouc de socle de
synchronisafion du iPod M°(onl T103)
'_' BESOIN D'AIDE ?
En cas de questions OU s'i!
manqu e des Pi#ces, s,adresser
au service de s0utien technique
b. la clientele. Les informations
pour communique[ avec Ce
service figurent au verso du
present manuel
Poser I'emballage du tapis roulant sur une surface plane. II est conse[lle de placer une
toile de protection sur le sol. Prendre des PRECAUTIONS pour le maniement et le
transport de cette unite. Ne jamais ouvrir I'emballage d'expedition s'il repose sur le flanc.
Apres avo[r retire les bandes de cerclage, ne pas soulever n[ transporter I'un[te rant
qu'elle n'a pas ere completement assemblee en position verficale, repl[ee et verrouillee.
Deballer I'unite la ou elle sera mise en service. Le tapis roulant emballe est equip6
d'amorfisseurs haute press[on; [I peut se deployer soudainement en cas de manutenfion
defectueuse. Ne jamais saisir une partie quelconque du cadre d'inclinaison ni tenter de
soulever ou de deplacer le tapis roulant.
,_ AVERTISSEM ENT
N E PAS ESSAYER D E SOU LEVER LETAPIS R©U LAN T. Ne pas d#p!ace[ le tapis
roulant ou le sorti r de son embal!age avant que ce ne soit Specifie dans !es instructions
d'assemblage, On peut enlever !'emba!!age plastique des montants de console,
_, AVERTISSEM ENT
L'INOBSERVATION DE CES INSTRUCTIONS PEUT t_TRE CAUSE DE BLESSURES.
REMARQUE :S'assurer a chaque Crape de I'assemblage que TOUTES les vis et TOUS
les ecrous sont bien en place et part[ellement serres avant de les serrer a fond.
REMARQUE : Une legere application de graisse peut faciliter I'installation de la
qu[ncailler[e. Toute graisse, comme la graisse au lithium pour velos est recommandee.
Page 35

ETAPE 1 DE L ASSEMBLAGE
I CONTENU DU SACHET DE VISSERIE 1
BOULON (A)
20 ram
Quantite : 4
PLATE-FOR M E
//
MONTANT DE '
CONSOLE
GAU CH E
t _RONDELLES ELASTIQUES (B)
/ /
_ <-- RONDELLES PLATES (C)
BOULONS (A)
RONDELLE
LeLASTiQU E (B)
15 mm
Quantite : 4
RONDELLE
PLATE (C)
15 ram
Quantite : 4
Couper les bandes de cerclage jaunes et
relever la PLATE-FORME jusqu'& ce que la
PEDALE DE VERROUILLAGE s'enclenche.
Enlever tout objet qui se trouve sous
la plate-forme.
B
Ouvrir le SACHET DE VISSERIE 1.
C
La PLATE-FORME relevee, fixer le MONTANT
DE CONSOLE GAUCHE au B.&TI avec 4
BOULONS (A), 4 RONDELLES F=LASTIQUES
(B) et 4 RONDELLES PLATES (C).
Page 36

ETAPE 2 DE UASSEMBLAGE
CONTENU DU SACHET DEVISSERIE 2 : J
BOULON (A)
20 mm
Quantite : 4
RONDELLE
ELAST|QU E (B)
15 mm
Quantite : 4
CABLES DE LA CONSOLE
RONDELLE
PLATE (C)
15 mm
Quantite : 4
(c)
A
Ouvrir le SACHET DE VISSERIE 2.
B
Passer le FIL DE GUIDAGE dans le
MONTANT DE CONSOLE DROIT. Cela fait, le
bout des CABLES DE LA CONSOLE doit se
trouver en haut du montant. Detacher le fil de
guidage et le mettre au rebut.
C
La PLATE-FORME relevee, fixer le
MONTANT DE CONSOLE DROIT au BATI
avec 4 BOULONS (A), 4 RONDELLES
I_LASTIQUES (B) et 4 RONDELLES
PLATES (C).
REMARQU E: Veiller & ne pinCei aucun
des crib es ors de 'assemb age du
montant de console droit.
(B)
Page 37

ETAPE 3 DE L ASSEMBLAGE
J CONTENU DUSACHET DE VISSERIE 3 : ]
BOULON (D) RONDELLE RONDELLE PLATE (C)
45 mm ELASTIQUE (B) 15 mm
Quantite : 4 15 mm Quantite : 4
CONSOLES GS950T, T101
ASSEMBLER
D'ABORD LE
COTE GAUCH E
Quantite : 4
CONSOLES
CT7J, T102,
T103
CONSOLE
IVIONTANT DE CONSOLE
Avec le pied, desenclencher la PC:DALE DE
VERROUILLAGE pour abaisser la PLATE-
FORME.
B
Ouvrir le SACHET DE VISSERIE 3.
C
Placer delicatement la CONSOLE sur les
MONTANTS DE CONSOLE. Fixer d'abord
le COTE GAUCHE avec 2 BOULONS
(D), 2 RONDELLES €:LASTIQUES (B) et
2 RONDELLES PLATES (C).
Connecter les CABLES DE LA CONSOLE, en
les tirant delicatement dans es montants pour
eviter tout dommage.
Fixer leCOT# DROIT de a CONSOLE
avec 2 BOULONS (D), 2 RONDELLES
ELASTIQUES (B) et 2 RONDELLES
PLATES (C).
REMARQUE : Veiller b.ne pmcer aucun
des c&bles Iors de I'assemblage des
montants.
TRAVAIL TERMINI .
Page 38

Page 39

Page 40

@ @
Page 41

FONCTIONNEiVlENT DE LA CONSOLE DU MODELE T101
Remarque : Avant d'utiliser la console, il faut enlever la fine pellicule protectrice en plastique qui la recouvre.
A) FENf=TRES D'AFFICHAGE _, DEL : Duree, distance,
calories, frequence cardiaque, vitesse, indinaison et profils
d'exercices.
B) INDICATEURS.& DEL D'OBJECTIF : Indiquent I'objectif
(s'il y en a un) fixe pour le programme en cours.
C) INDICATEURS A DEL D'EXERCICES : Indiquent les
exercices fixes pour le programme en cours.
D) SELECT TARGET (CHOIX DE L'OBJECTIF) : Appuyer
sur cette touche pour choisir I'objectif voulu.
E) SELECT WORKOUT (CHOIX DES EXERClCES) :
Appuyer sur cette touche pour choisir les exercices voulus.
F) GO (MARCHE): Appuyer sur cette touche pour
commencer & s'exercer, lancer une seance d'entra_nement,
ou reprendre les exercices apres une pause.
G) STOP (ARRI_T) : Appuyer sur cette touche pour faire une
pause/terminer une seance d'entrafnement. Tenir la touche
pendant 3 secondes pour reinitialiser la console.
H) COOL DOWN (RECUP_=RATION) : Appuyer sur cette
touche pour passer en mode de recup6ration. Une periode
de recup6ration dure 4 minutes, avec reduction de la
vitesse et de Hnclinaison pour permettre au cceur de
s'ajuster & une sollicitation moindre.
I) iNCLiNE C / B (TOUCHES DE REGLAGE DE
L'INCLINAISON) : Servent a.regler I'inclinaison par petits
increments de 0,5 %.
J) SPEED + / - (TOUCHES D'AUGMENTATION OU
DE RI=DUCTION DE LA VITESSE) : Servent & regler la
vitesse par petits incr6ments de 0,1 mi/h.
K) TOUCHES DE R_:GLAGE RAPIDE DE
L'iNCLINAISON : Servent & atteindre plus rapidement
I'inclinaison voulue.
L) TOUCHES DE RI_GLAGE RAPIDE DE LA VITESSE :
Servent & atteindre plus rapidement la vitesse voulue.
M) TOUCHES ENTER ET C / B : Servent b. ajuster I'objectif
et les reglages d'exercice. Appuyer sur la touche ENTER
pour changer les parametres d'affichage pendant une
seance d'entrafnement.
N) TOUCHE FAN (VENTILATEUR) :Appuyer sur cette
touche pour actionner ou arr_ter le ventilateur.
O) VENTILATEUR : Ventilateur personnel pour les exercices.
P) HAUT=PARLEURS : Diffusent la musique quand un
lecteur de CD / baladeur MP3 est connecte & la console.
Q) PRISE D'ENTRI_E AUDIO : Brancher un lecteur
de CD / baladeur MP3 & la console avec le cable
adaptateur audio indus.
R) PRISE DE SORTIE AUDIO / PRISE POUR CASQUE
D'ECOUTE : Utilisee pour entendre la musique par le
casque d'ecoute. Remarque : Lorsque le casque d'ecoute
est enfiche dans la prise correspondante, le son n'est plus
envoye aux haut-parleurs.
S) LOGEMENT D'UN BALADEUR MP3 : Sert & ranger un
baladeur M P3.
T) POCHES POUR BOUTEILLE D'EAU : Contiennent le
materiel d'exercice.
U) SUPPORT DE LECTURE : Pour poser un magazine
ou un livre.
V) POSITION DE LA CLE DE S_:CURITE : Permet au
tapis roulant de fonctionner Iorsque la cle de securit6
est inser6e.
Page 42

Page 43

FONCTIONNEiVlENT DE LA CONSOLE DU MODELE GS950T
Remarque : Avant d'utiliser la console, il faut enlever la fine pellicule protectrice en plastique qui la recouvre.
A) FEN_:TRES D'AFFICHAGE A DEL : Duree, distance,
calories, frequence cardiaque, vitesse, inclinaison et profils
d'exercices.
B) INDICATEURS A DEL D'OBJECTIF : Indiquent I'objectif
fixe pour le programme en cours.
C) INDICATEURS A DEL D'EXERCICES : Indiquent les
exercices fixes pour le programme en cours.
D) SELECT TARGET (CHOIX DE L'OBJECTIF) :Appuyer
sur cette touche pour choisir I'objectif voulu.
E) SELECT WORKOUT (CHOIX DES EXERCICES) :
Appuyer sur cette touche pour choisir les exercices voulus.
F) GO (MARCHE): Appuyer sur cette touche pour
commencer & s'exercer, lancer une seance d'entra_nement,
ou reprendre les exercices apres une pause.
G) STOP (ARRI_T) : Appuyer sur cette touche pour faire une
pause/terminer une seance d'entrafnement. Tenir la touche
pendant 3 secondes pour reinitialiser la console.
H) COOL DOWN (RI_CUPI_RATION) : Appuyer sur cette
touche pour passer en mode de recup6ration. Une periode
de recup6ration dure 4 minutes, avec reduction de la
vitesse et de Hnclinaison pour permettre au cceur de
s'ajuster A une sollicitation moindre.
I) iNCLiNE C / B (TOUCHES DE REGLAGE DE
L'INCLINAISON) : Servent A regler I'inclinaison par petits
increments de 0,5 %.
J) SPEED + / - (TOUCHES D'AUGMENTATION OU DE
RI_DUCTION DE LA VITESSE) : Servent A regler la
vitesse par petits increments de 0,1 mi/h.
K) TOUCHES DE RF:GLAGE RAPIDE DE
L'iNCLINAISON : Servent Aatteindre plus rapidement
I'inclinaison voulue.
L) TOUCHES DE R_:GLAGE RAPIDE DE LA VITESSE :
Servent A atteindre plus rapidement la vitesse voulue.
M) TOUCHES ENTER ET C / B : Servent A ajuster I'objectif
et les reglages d'exercice, Appuyer sur la touche ENTER
pour changer les parametres d'affichage pendant une
seance d'entrafnement,
N) HAUT-PARLEURS : Diffusent la musique quand un
lecteur de CD / baladeur MP3 est connecte A la console.
O) PRISE D'ENTRI_E AUDIO : Brancher un lecteur
de CD / baladeur MP3 A la console avec le cable
adaptateur audio indus.
P) PRISE DE SORTIE AUDIO / PRISE POUR CASQUE
D'I_COUTE : Utilisee pour entendre la musique par le
casque d'ecoute. Remarque : Lorsque le casque d'ecoute
est enfiche dans la prise correspondante, le son n'est plus
envoye aux haut-parleurs.
Q) LOGEMENT D'UN BALADEUR MP3 :Sert A ranger un
baladeur M P3.
R) POCHES POUR BOUTEILLE D'EAU : Contiennent le
materiel d'exercice.
S) SUPPORT DE LECTURE : Pour poser un magazine
ou un livre.
T) POSITION DE LA CLl_ DE S_:CURIT_: : Permet au
tapis roulant de fonctionner Iorsque la cle de securit6
est inser6e.
Page 44

Page 45

FONCTIONNEiVlENT DE LA CONSOLE DES MODELES T102, CT7,1
Remarque : Avant d'utiliser la console, il faut enlever la fine pellicule protectrice en plastique qui la recouvre.
A) FEN_:TRES D'AFFICHAGE : Duree, distance, calories,
frequence cardiaque, vitesse, inclinaison et profils
d'exercices.
B) AFFICHAGE ALPHANUM_:RIQUE : Affiche les
informations relatives A I'objectif et au programme choisi.
C) SELECT TARGET (CHOIX DE L'OBJECTIF) :Appuyer
sur cette touche pour choisir I'objectif voulu.
D) SELECT WORKOUT (CHOiX DES EXERCICES) :
Appuyer sur cette touche pour choisir les exercices voulus.
E) GOAL CENTER TM (CENTRE D'OBJEOTIFS) : Appuyer
sur cette touche pour fixer ou visualiser I'objectif voulu.
F) START (MARCHE) : Appuyer sur cette touche pour
commencer & s'exercer, lancer une seance d'entrafnement,
ou reprendre les exercices apres une pause.
G) STOP (ARRET) : Appuyer sur cette touche pour faire une
pause/terminer une seance d'entrafnement. Tenir la touche
pendant 3 secondes pour reinitialiser la console.
H) INCLINE C / B (TOUCHES DE R#GLAGE DE
L'INCLINAISON) : Servent & regler I'inclinaison par petits
increments de 0,5 %.
I) SPEED + / - (TOUCHES D'AUGMENTATION OU DE
REDUCTION DE LA VITESSE) : Servent & regler la
vitesse par petits increments de 0,1 mi/h.
J) TOUCHES DE REGLAGE RAPIDE DE
L'iNCLINAISON : Servent & atteindre plus rapidement
I'inclinaison voulue.
K) TOUCHES DE RSGLAGE RAPIDE DE LAVITESSE :
Servent & atteindre plus rapidement la vitesse voulue.
L) CHANGE DISPLAYS (CHANGEMENT
D'AFFICHAGE) : Appuyer sur cette touche pour
changer les parametres d'affichage pendant une seance
d'entrafnement.
Hi) ENTER (VALiDATiON) : Cette touche sert& confirmer
I'objectif et les reglages d'exercice.
N) TOUCHE FAN (VENTILATEUR) : Appuyer sur cette
touche pour actionner ou arr_ter le ventilateur.
O) VENTILATEUR : Ventilateur personnel pour les exercices.
P) HAUT=PARLEURS : Diffusent la musique quand un
lecteur de CD / baladeur MP3 est connecte & la console.
Q) PRISE D'ENTRLeE AUDIO : Brancher un lecteur
de CD / baladeur MP3 & la console avec le c&ble
adaptateur audio inclus.
R) PRISE DE SORTIE AUDIO / PRISE POUR CASQUE
D'I=COUTE : Utilisee pour entendre la musique par le
casque d'ecoute. Remarque : Lorsque le casque d'ecoute
est enfiche dans la prise correspondante, le son n'est plus
envoye aux haut-parleurs.
S) LOGENIENT D'UN BALADEUR NIP3 :Sert & ranger un
baladeur M P3.
T) POCHES POUR BOUTEILLE D'EAU : Contiennent le
materiel d'exercice.
U) SUPPORT DE LECTURE : Pour poser un magazine
ou un livre.
V) POSiTiON DE LA CLl_ DE S_:CURIT_: : Permet au
tapis roulant de fonctionner Iorsque la cle de securit6
est inser6e.
Page 46

/
\
Page 47

FONCTIONNEiVlENT DE LA CONSOLE DU MODELE T103
Remarque : Avant d'utiliser la console, il faut enlever la fine pellicule protectrice en plastique qui la recouvre.
A) FEN_:TRES D'AFFICHAGE : Duree, distance, calories,
frequence cardiaque, vitesse, indinaison et profils
d'exercices.
B) AFFICHAGE ALPHANUM_:RIQUE : Affiche les
informations relatives A I'objectif et au programme choisi.
C) SELECT TARGET (CHOIX DE L'OBJECTIF) : Appuyer
sur cette touche pour choisir I'objectif voulu.
D) SELECT WORKOUT (CHOIX DES EXERCICES) :
Appuyer sur cette touche pour choisir les exercices voulus.
E) GOAL CENTEW M(CENTRE D'OBJECTIFS) : Appuyer
sur cette touche pour fixer ou visualiser I'objectif voulu.
F) START (MARCHE) : Appuyer sur cette touche pour
commencer & s'exercer, lancer une seance d'entrafnement,
ou reprendre les exercices apres une pause.
G) STOP (ARRF=T) :Appuyer sur cette touche pour faire une
pause/terminer une seance d'entrafnement. Tenir la touche
pendant 3 secondes pour reinitialiser la console.
H) iNCLiNE C / B (TOUCHES DE RI_GLAGE DE
L'INCLINAISON) : Servent b.regler I'inclinaison par petits
increments de 0,5 %.
I) SPEED + / - (TOUCHES D'AUGMENTATION OU DE
REZDUCTION DE LA VITESSE) : Servent & regler la
vitesse par petits increments de 0,1 mi/h.
J) TOUCHES DE R_:GLAGE RAPIDE DE
UINCLINAISON : Servent & atteindre plus rapidement
Hnclinaison voulue.
K) TOUCHES DE RIFGLAGE RAPIDE DE LAVITESSE :
Servent & atteindre plus rapidement la vitesse voulue.
L) CHANGE DISPLAYS (CHANGEMENT
D'AFFICHAGE) : Appuyer sur cette touche pour
changer les parametres d'affichage pendant une seance
d'entrafnement.
M) ENTER (VALIDATION) : Cette touche sert & confirmer
I'objectif et les reglages d'exercice.
N) FAN KEY : Appuyer sur cette touche pour actionner ou
arr_ter le ventilateur.
O) VENTILATEUR : Ventilateur personnel pour les exercices.
P) HAUT=PARLEURS : Diffusent la musique quand un
lecteur de CD / baladeur MP3 est connecte & la console.
Q) PRISE D'ENTREE AUDIO : Brancher un lecteur
de CD / baladeur MP3 & la console avec le cable
adaptateur audio indus.
R) PRISE DE SORTIE AUDIO / PRISE POUR CASQUE
D'ECOUTE : Utilisee pour entendre la musique par le
casque d'ecoute. Remarque : Lorsque le casque d'ecoute
est enfiche dans la prise correspondante, le son n'est plus
envoye aux haut-parleurs.
S) SOCLE DE SYNCHRONISATION iPOD" : Sert
synchroniser et & charger un iPod (non compris).
T) POCHES POUR BOUTEILLE D'EAU : Contiennent le
materiel d'exercice.
U) SUPPORT DE LECTURE : Pour poser un magazine
ou un livre.
V) POSITION DE LA CLI_ DE SI_CURITI_ : Permet au
tapis roulant de fonctionner Iorsque la cle de securit6
est inser6e.
W) TOUCHE CUSTOM 1 OR 2 (PERSONNALISATION
10U 2) : Appuyer sur ces touches pour choisir le
programme Custom 1 ou Custom 2.
X) TOUCHES DE COMMANDE DE L'iPOD : Appuyer
sur ces touches pour ajuster les reglages audio de I'iPod
branch& Voir page 54 pour plus ample information.
Page 48

FENETRES D'AFFiCHAGE
. TiME (DUR_:E) : Indiquee en minutes et secondes.
Affichage de la duree restante ou ecoul6e des
exercices.
. DISTANCE : Indiquee en milles. Affichage de la
distance parcourue ou de la distance restante &
parcourir durant la seance d'entrafnement.
. SPEED (ViTESSE) : Indiquee en mi/h. Affichage de
la vitesse de deplacement de la bande.
. iNCLiNE (INCLINAISON) : Affichee sous forme de
pourcentage. Indique Hnclinaison de la bande.
. CALORIES : Nombre total de calories brQlees
ou de calories restant & brQler pendant la seance
d'entrafnement.
. HEART RATE (FREQUENCE CARDIAQUE) :
Indique les battements par minute. Permet & I'utilisateur
de surveiller sa frequence cardiaque (s'affiche Iorsque
le contact est etabli avec les deux poignees du cardio-
frequencemetre).
. PROGRAM PROFILES (PROFILS DES
PROGRAMMES) : Represente le profil du
programme utilise (indique la vitesse Iors de I'utilisation
de programmes bases sur la vitesse, et Hnclinaison
Iors de I'ufilisation de programmes bases sur
Hnclinaison).
. TARGETS (OBJECTIFS) :
T101, GS950T : Le voyant & DEL voisin de I'objectif
choisi s'eclaire. Si aucune DEL n'est eclair6e, aucun
objectif n'est activ& T102, T103, CT7.1 : Uobjectif
est affiche dans la fen_tre alphanumerique, & la partie
inferieure de I'affichage.
. WORKOUTS (EXERCICES) :
T101, GS950T : Le voyant A DEL voisin de I'exercice
choisi s'eclaire. T102, T103, CTZ1 : Uexercice est
affiche dans la fen_tre alphanumerique, & la partie
inferieure de I'affichage.
[B:-..32
CALORIES
TIME
IB:92
CALORIES
.......15
_V_T_INCLI*E
TIME
i_ / i i i/i i ii
/ / iilj _
mmmmmm
mmmmmmmm
mmmmmmmmmm
I I--b_--J --I _--_lrlL I
nZl.ZiC C.U *l
TIME DISTANCE
_mmm
SPEED
5.3
_NCLINE
n_m
m_
mmmm
DISTANCE
2.0W
HEART RATE
DISTANCE
2.0W
PULSE
mm
CALORIES _ SPEED
Page 49

POUR COMMENCER
1) S'assurer que den n'est sur le tapis roulant ou ne
risque d'en entraver le mouvement.
2) Brancher le cordon d'alimentation et mettre le tapis
roulant sous tension.
3) Se tenir sur les rails lateraux du tapis roulant.
4) Fixer I'attache de la cle de securit6 a un de ses
v_tements et s'assurer qu'elle ne se detache pas du
v_tement pendant la seance d'exercise.
5) Inserer la cle de securit6 dans la serrure de la
console.
6) II existe deux options pour commencer une seance
d'exercice :
A) MISE EN MARCHE RAP|DE
II suffit d'appuyer sur la touche GO/START pour
commencer a s'exercer. Le decompte de la duree, de
la distance et des calories progresse a partir de zero.
OU...
B) CHO|S|R UN OB.IECT|F ET DES E×ERCICES
1) Choisir un OBJECTIF a I'aide de la touche SELECT
TARGET.
2) Ajuster les reglages de I'OBJECTIF I'aide des
touches FLECHEES.
3) Appuyer sur la touche ENTER pour passer au reglage
suivant.
4) Choisir un EXERCICE a I'aide de la touche SELECT
WORKOUT.
5) Appuyer sur la touche GO/START pour commencer
s'exercer.
REMARQUE : Si aucun OBJECTIF ou aucun EXERCICE
n'est choisi le programme fonctionne comme un programme
MAN U EL: Ace r6glage, tousles changements de vitesse et
d inclinaison doivent 6tre app0rtes parl utilisateur.
CHANGEMENT D'OBJECTIF EN COURS DE
SEANCE D'ENTRAJNEMENT
On peut changer d'objectif manuellement sans perdre les
statistiques de la seance d'entrafnement en cours.
A n'importe quel moment d'une seance d'entrafnement, appuyer
sur la touche SELECT TARGET jusqu'& ce qu'on ait choisi le
nouvel OBJECTIF voulu.
Utiliser les touches C / B ou + / = pour entrer la valeur du nouvel
OBJECTIF et appuyer sur la touche ENTER. Toutes les statistiques
prec6dentes de la seance d'entrafnement sont integr6es au nouvel
OBJECTIE de sorte qu'on ne perd jamais aucune donnee.
REMARQU E: Si on aPpuie par megarde SUr !a touCheS ELECT
TARGET pendaDt une s6ance dlentraTnemen t et si on nlappuie
sur aucune autre touche dans les 5 sec0ndes qui suivent,
I,objectif en cours reste en vigueur.
CHANGEMENT D'EXERCICE EN COURS DE
SEANCE D'ENTRAiNEMENT
On peut changer manuellement d'exercices.
A n'importe quel moment d'une seance d'entrafnement, appuyer
sur la touche SELECT WORKOUT jusqu'& ce qu'on ait choisi les
nouveaux EXERCICES voulus. Appuyer sur la touche ENTER.
Les nouveaux EXERCICES commencent au premier segment
apres I'echauffement et toutes les statisfiques de la seance
d'entrafnement sont integr6es au nouvel objectif.
REMARQU E : Si on appuie pat me_,ga[de sur !a touche SELECT
WORKOUT pendant une seance d entrafnement et si on
n,appuie sur aucune autre touche dan s !es5 secondes qu!
suivent, le programme en cours reste en vigueur.
Page 50

PROF|LS D'OBJECT|FS
®
TARGET 1 = TIME (OBJECTIF 1 - DUREE) : Permet & I'utilisateur de fixer un objectif selon le temps qu'il veut
consacrer & ses exercices. Les objectifs de duree peuvent after de 15:00 & 99:00. Decompte regressif de la DUREE. Le
decompte de la DISTANCE et des CALORIES progresse & partir de zero.
TARGET 2 - DISTANCE (OBJECTIF 2 - DISTANCE) : Permet & I'utilisateur de fixer un objectif selon la distance qu'il
veut parcourir. Cet objectif peut after de 0,25 & 26,25 milles. Decompte regressif de la DISTANCE. Le decompte de la
DUREE et des CALORIES progresse & partir de zero.
TARGET 3 = CALORIES (OBJECTIF 3 = CALORIES) : Permet & I'utilisateur de fixer un objectif selon le nombre de
calories qu'il veut brQler. Cet objectif peut after de 20 & 980 calories. Decompte regressif des CALORIES. Le decompte
de la DUREE et de la DISTANCE progresse & partir de zero.
®
NO TARGET (AUCUN OBJECTIF) : Permet & I'utilisateur de choisir un profil d'exercices sans specifier d'objectif de
duree, de distance ou de nombre de calories & eliminer. Le decompte de la DUREE, de la DISTANCE et des CALORIES
progresse & partir de zero.
PROF|LS D'EXERCICES
1) MANUAL (MANUEL) = TOUSLES MODELES : Permet de changer manuellement la vitesse et I'inclinaison.
2) iNTERVALS (INTERVALLES) - TOUSLES MODELES : Accro_t la force, la vitesse et I'endurance en elevant et en reduisant la
vitesse tout au long de la seance d'entrafnement, pour faire travailler tant le cceur que les muscles.
Segment
Duree
Vitesse
Inclinaison
Echauffement 1 2
4:00 min 90 s 30 s et 2 se repetent
1 1.5 2 4 jusqu'& ce que
1 1.5 0.5 1.5 I'objectif soit atteint.
Les segments 1
Page 51

3) HILLS (COLLINES) = MODELES T102, T103, 0T7.1 UNIQUEMENT : Simule des montees et des descentes, pour accroftre
I'endurance.
Segment
Duree
Echauffement 1 2 3 4 5 6 7 8 Les segments
4:00 min 30 s 30 s 30 s 30 s 30 s 30 s 30 s 30 s 1-8 se repetent
jusqu'& ce que
Degre 1
1 1.5 2 2.5 3 3.5 4 3.5 3 2.5 I'objectif fixe soit
atteint.
4) WORKOUT 4 = WEIGHT LOSS (ENTRAJNEMENT 4 - PERTE DE POIDS) = TOUS LES MODELES : Favorise la perte de
poids en elevant et en r6duisant la vitesse, tout en maintenant dans la zone ou I'on br_le les graisses.
Segment
Duree
Degre 1 Inclinaison
Vitesse
Echauffement 1 2 3 4 5 6 7 8 Les segments
4:00 min 30 s 30 s 30 s 30 s 30 s 30 s 30 s 30 s 1-8 se repetent
jusqu'& ce que
0 0.5 1.5 1.5 1 0.5 0.5 0.5 1 1.5 I'objectif fixe soit
1 1.5 2 2.5 3 3.5 4 3.5 3 2.5 atteint.
UT|L|SAT|ON D'EXERCICES PERSONNAL|SES (T103 UNIQUENIENT)
1) Appuyer sur la touche CUSTOM 1 OR 2 pour choisir un entrafnement personnalis&
2) Appuyer sur la touche SELECT TARGET pour choisir un objecfif de duree, de distance ou d'elimination de calories. Appuyer
sur la touche ENTER pour choisir I'objecfif voulu.
3) Regler chaque profil de vitesse & I'aide des touches C / B ou + / = et appuyer sur la touche ENTER. Rep6ter pour les 15
profils de vkesse.
4) Regler chaque profil d'inclinaison & I'aide des touches C / B ou + / = et appuyer sur la touche ENTER. Rep6ter pour les 15
profils d'inclinaison.
5) Appuyer sur la touche START pour commencer & s'exercer.
Page 52

GOAL CENTER TM
(T102, T103, CT7.1 UN|QUEMENT)
Des recherches ont permis de conclure que ceux qui se fixent des objectifs d'entrafnement physique et s'y tiennent, obfiennent
en moyenne de meilleurs resultats que ceux qui ne le font pas. Uacquisition de ce nouveau tapis roulant equip6 d'un GOAL
CENTER TM, systeme de suivi des performances exclusif & Horizon, est une etape importante vers la concretisation de vos objectifs
d'entrafnement. Le GOAL CENTER TM est un Iogiciel novateur integr6 & la console du tapis roulant, qui permet de suivre les progres
vers la concretisation d'objecfifs d'entrafnement au fil du temps, et dispense d'avoir & tenir manuellement un journal ou un registre. Lire
de la documentation pour s'informer davantage sur la maniere dont le GOAL CENTER TM peut aider &se motiver pour ameliorer ses
performances.
R_:GLAGE DU GOAL CENTER TM
1) Choisir USER 1 ou USER 2 (UTILISATEUR 1 ou UTILISATEUR 2) & I'aide des touches C / B ou + / = et appuyer sur la touche
ENTER.
2) Appuyer sur la touche GOAL CENTER TM et la tenir pendant environ cinq secondes.
3) Appuyer sur la touche SELECT TARGET pour choisir I'objecfif de duree, de distance ou d'elimination de calories.
4) Utiliser les touches C / B ou + / = pour choisir la valeur de I'objectif, et appuyer sur la touche ENTER.
5) Utiliser les touches C / B ou + / = pour choisir le NOMBRE DE JOURS necessaire pour atteindre I'objectif.
6) Appuyer b. nouveau sur la touche ENTER pour quitter le mode de reglage.
REMARQUE : Ces etapes peuvent aussi servir & effacer un objectif en vigueur et & fixer un nouvel objectif.
V|SUALISAT|ON DES PROGRI_S VERS LA CONCRET|SAT|ON D'UN OBJECT|F
Lorsqu'on entre dans le profil d'utilisateur, on peut visualiser les progres vers la concretisation de son objectif en appuyant sur la touche
GOAL CENTER TM. La console fair defiler la duree restante, la distance ou les calories, selon I'objectif choisi et fair aussi defiler la duree
restante pour atteindre cet objectif.
REMARQUE : Pour que les donnees d'une seance d'entrafnement soient affectees & I'objectif d'un utilisateur, on DOlT choisir cet
utilisateur avant de commencer la seance d'entrafnement.
Page 53

POUR RE|N|T|AL|SER LA CONSOLE
Appuyer sur la touche STOP et la ten[r pendant 3 secondes.
RDcCUPERATION
(T101, GS950T UN|QUEMENT)
Mettre le tapis roulant en mode recup6ration. Une periode de recup6ration dure 4 minutes, avec reduction de la v[tesse et de
I'[ncl[naison pour permettre au cceur de s'ajuster a une soll[ckat[on mo[ndre.
FiN D'UNE SEANCE D'ENTRAJNEMENT
Lorsque la seance d'entraTnement est terminee, le mot _ FINISHED ,, ciignote sur I'ecran d'affichage et un bip retentit. Les
rense[gnements sur la seance d'entratnement restent affiches pendant 30 a 45 secondes avant d'etre re[nk[al[s6s.
ANNULATION DE LA Si_=LECTION ACTUELLE
Pour annuler la selection du programme ou I'ecran actuel, appuyer sur la touche STOP pendant 3-5 secondes.
UT|L|SAT|ON D'UN LECTEUR DE CD / BALADEUR MP3
1) Connecter le CABLE D'ADAPTATEUR AUDIO fourni a la PRISE D'ENTREE AUDIO (a la partie superieure droite de la
console) et a la prise pour casque d'ecoute du lecteur de CD / baladeur MP3.
2) Utiliser les touches du lecteur de CD / baladeur MP3 pour regler les caractedstiques de la diffusion.
3) Enlever le C/_,BLE D'ADAPTATEUR AUDIO Iorsqu'on ne s'en sert pas.
4) Si on ne veut pas utiliser les HAUT-PARLEURS, on peut brancher le casque d'ecoute a la PRISE DE SORTIE AUDIO, a la
partie inferieure de la console.
Page 54

SOCLE DE SYNCHRON|SAT|ON iPOD "_
(T103 UN|QUEMENT)
Le socle de synchronisation iPod est la solution de divertissement pendant
les seances d'entrafnement. Divers modeles de iPod equip6s d'un
connecteur pour socle de synchronisation peuvent convenir & ce socle de
synchronisation. Le iPhone n'est pas compatible.
UT|L|SATION DU SOCLE DE SYNCHRONISAT|ON DE UiPOD
(|POD NON COMPRiS)
1) Enlever le bouchon de caoutchouc de la partie inferieure du socle
de synchronisation.
2) Brancher HPod en appariant la broche du connecteur pour socle
de synchronisation du tapis roulant au connecteur pour socle de
synchronisation de HPod. REMARQUE : Apres avoir connecte
HPod au socle de synchronisation, il faut attendre 2 minutes que
HPod et le socle se synchronisent pour que HPod soit totalement
fonctionnel.
3) On peut utiliser le cadran de I'iPod pour regler le volume et les
caracteristiques de la diffusion. On peut aussi ajuster le volume et les
caracteristiques de la diffusion &tI'aide des touches de commande
de I'iPod integrees _. la console du tapis roulant. REMAROUE : Si
on ne veut pas utiliser les haut-parleurs, on peut brancher le casque
d'ecoute _. la prise de sortie audio, _.la pattie inferieure de la console.
Replacer le bouchon de caoutchouc & la pattie infedeure du socle de
synchronisation Iorsque le socle n'est pas utilis&
REMAROUE : L'audio de I'iPod n'est pas diffusee par les haut-parleurs si
le c&ble de raccordement audio est branche alors que HPod est dans le
socle de synchronisation.
BROCHE DU CORNECTEUR POUR
SOCLE DE SYNCHRONISATION
PRISE D'EHTREE POUR LECTEURS NON-|POD _
TOUCHES DE COMMAHDE DE UiPOD _
synchronisation insert de
du |Pod _ synchronisation
Rentarque : La taille des universel pour
inserts pour socle de baladeurs M P3
synchronisation de chaque
|Pod" est different e.
Page 55

55
Page 56

POIDS MAXIMAL DE UUTILISATEUR
EXCLUSIONS ET LIMITATIONS
T101 = 136 kg (300 Ib)
T102 = 147 kg (325 Ib)
T103 = 159 kg (350 Ib)
GS950T = 136 kg (300 Ib)
CT7,1 = 147 kg (325 Ib)
CADRE, DUREE DE VIE
Horizon Fitness garantit le cadre contre les vices de
fabrication ou de materiau pendant toute la duree de vie du
proprietaire, tant que le proprietaire initial possede I'appareil.
(Le cadre se definit comme la base en metal soude de
Fappareil et qui ne comporte aucune piece amovible.)
MOTEUR, DUREE DE VIE
Horizon Fitness garantit le moteur contre les vices de
fabrication ou de materiau pendant toute la duree de vie du
proprietaire, tant que le proprietaire initial possede Fappareil.
ELECTRONIQUE ET P|_=CES , 1 AN (T103 = 2 ANS)
Horizon Fitness garant[t les composants electron[ques, la
finition et toutes les pieces d'origine pendant un an (T103
= deux ans) & compter de la date de I'achat, tant que le
proprietaire initial possede Fappareil.
MAIN=D'(_UVRE * 1 AN
Horizon Fitness prend & sa charge les frais de main-d'oeuvre
pour la reparation de Fappareil pendant un an & compter
de la date de Fachat, tant que le proprietaire initial possede
Fappareil.
Qui EST couvert :
" Le propr[eta[re initial ; la garant[e n'est pas transferable.
Qu'est-ce qu[ EST couvert :
, La reparation ou le remplacement du moteur defectueux,
de composants electroniques defectueux ou de pieces
defectueuses. IIs constituent les seuls correctifs au titre de
la garant[e.
Qu'est-ce qui N'EST PAS couvert :
Uusure normale, Fassemblage ou Fentretien [ncorrects ou
Hnstallation de pieces ou d'accessoires incompatibles ou
non destines & 1'6quipement tel qu'il est vendu.
Les dommages ou la d6faillance dus b.un accident,
I'utilisation abusive, la corrosion, la d6coloration de
la pe[nture ou du plastique, la negligence, le vol, le
vandalisme, I'incendie, Hnondation, le vent, la foudre,
le gel ou d'autres catastrophes naturelles quelle qu'en
soit la nature, une reduction, fluctuation ou d6faillance
d'alimentation de quelque origine que ce soit, des
conditions atmospheriques inhabituelles, une collision,
Hntroduction d'objets etrangers dans Funite ou des
modifications non autorisees ou non recommandees par
Horizon Fitness.
Les dommages accessoires ou [mmater[els. Horizon
Fitness n'est pas responsable des dommages indirects,
speciaux ou immateriels, des pertes economiques,
des pertes mat6rielles ou de profits, des privations
de jouissance ou d'utilisation, ou d'autres dommages
Page 57

SERVlCE/RETOU RS
[mmater[elsdequelquenaturequeceso[tenrelation
avecFachat,Fut[l[sat[on,lareparationouFentret[ende
1'6qu[pement.
, Les equ[pements util[s6s & des fins commerc[ales ou
&toutes autres fins que celles d'une famille unique
ou d'un foyer, saul acceptation de la couverture par
Horizon Fitness.
, Les 6quipements detenus ou ut[l[s6s hors des Etats-Un[s
et du Canada.
, La I[vraison, I'assemblage, I'[nstallation, le reglage
des unites d'origine ou de remplacement ou la main-
d'ceuvre et les autres frais associes & I'enlevement ou au
remplacement de I'unite couverte.
" Toute tentative de reparation de cet equ[pement cree un
risque de blessure. Horizon Fitness n'est pas responsable
des dommages, pertes ou responsabilites decoulant
de toute blessure subie Iors de ou du fair de toute
reparation ou tentative de reparation de Fequipement de
condifionnement physique par quiconque autre qu'un
technicien agre6. Toutes les tentatives de reparation de
1'6quipement de conditionnement physique par Futilisateur
sont effectuees/_ SES RISQUES ET PERILS. Horizon
Fitness decline toute responsabilite en matiere de
blessures ou de dommages quels qu'ils soient causes par
de telles reparations.
Le service & domicile est assure dans un rayon de 240 km
par le centre de reparation agre6 le plus proche. (Au-del&
de cette distance, le k[Iom6trage parcouru est & la charge
du client).
®
Tout retour dolt 6tre pre-approuv6 par Horizon Fitness.
®
Les obligations de Horizon Fitness en vertu de cette
garanfie se limitent & la r6parafion ou au remplacement
de 1'6quipement, & la discr6fion de Horizon Fitness, par le
m6me modele ou un modele comparable dans Fun de ses
services d'entret[en agre6s.
Un service d'entret[en agre6 par Horizon Fitness dolt
recevoir tout Fequipement pour lequel la demande de
garantie est formul6e. Cet equipement doit 6tre expedi6 en
port paye, accompagne d'une preuve d'achat suffisante.
Les appare[Is de rechange, les pieces et les composants
electroniques remis a.neuf par Horizon Fitness ou ses
fournisseurs peuvent parfois 6tre fournis comme pieces
de rechange et constituent une parfaite application des
dispositions de la garanfie.
Cette garantie donne des droits specifiques. Les droits de
Futilisateur peuvent varier d'une province & Fautre.
Page 58

Page 59

Page 60

ALTOPARLANTES EBTANTE DELECTURA
VENTILADOR DE CONSOLA
(SOLO EN EL MODELO T101)
CAVIDAD PARA BOTELLA --
DEAGUA
EMPUNADURASCON
SENSOR DEPULSO
INTERRUPTOR DE
ENCENDIDO Y APAGADO
CORTACIRCUITO --
CABLE DE CORRIENTE --
RUEDITA DE TRANSPORTE
PANEL DE CONTROL TACTIL Y
VENTANILLAS DE INDICADORES
CONBOLA
BOLSILLOPARAIPOD /MP3
RANURA PARA LA LLAVE
DE SEGURIDAD
POSTE DE LA CONSOLA
MECANISMO DE BLOQUEO ACCIONADO CON EL PIE
(DEBAJO DE LA PLATAFORMA)
CUBIERTA DEL MOTOR
RIEL LATERAL
TAPA DEL RODILLO
PLATAFORMA/BANDA PARA CORRER PERNOS DE REGULACION
DEL RODILLO POSTERIOR
Page 61

BOLSILLO PARA iPOD"/MP3 ESTANTE DE LECTURA
ALTOPARLANTES
VENTELADOR DE CONSOLA
EMPUNADURASCON
SENSORDEPULSO
ENTERRUPTOR DE
ENCENDIDO Y APAGADO
CORTACIRCUITO
CABLE DE CORRIENTE --
RUEDETA DE TRANSPORTE
i/ / /
i/ / /
;/
i/ /
PANEL DE CONTROL T.,_CTIL Y
VENTANILLAS DE INDICADORES
CONSOLA
CAVIDAD PARA BOTELLA
/
MECANISMO DE BLOOUEO ACCIONADO CON EL PIE
RANURA PARA LA LLAVE
POSTE DE LA CONSOLA
(DEBAJO DE LA PLATAFORMA)
CUBIERTA DEL MOTOR
TAPA DEL RODILLO
DEAGUA
DESEGURIDAD
RIEL LATERAL
PLATAFORMA/BANDA PARA CORRER PERNOS DE REGULACION
DEL RODILLO POSTERIOR
Page 62

HERRAMIENTAS
|NCLU|DAS:
PREENSAMBLAJE
[] Llave en T de 6 mm
[] Llave en L de 5 mm
P|EZA$ |NCLU|DA$:
[] 1 conjunto de consola
[] 2 postes de la consola
[] 3 bolsas de tornilleria
[] 1 Ilave de seguridad
[] 1 cable adaptador de audio
[] 1 botella de lubricante de silicona
(para 2 aplicaciones)
[] 3 insertos para iPod (Solo T103)
[] 1 inserto de Goma para iPod (Solo T103)
&NECES|TA
'_ AYU DA?
Si tiene preguntas o si le
faltan piezas, p6ngase en
ccqtacto con el servicio de
asistencia tecnica a clientes.
En la contraportada de este
manual aparece informaci6n
adicional de contacto.
DESEIViPAQUE
Coloque la caja en que viene la caminadora sobre una superficie plana y nivelada. Le
recomendamos colocar una cubierta protectora sobre el piso bajo la maquina. Tenga
CUIDADO al transportar y mover esta unidad. No abra la caja cuando este colocada de
costado. Una vez que haya retirado el enfajillado, no levante ni transporte esta unidad a
menos que ya este completamente ensamblada yen la posici6n doblada vertical, con el
mecanismo de bloqueo bien fijo en la posicion de cerrado. Desempaque la unidad en el
lugar en que la vaya a usar. Esta caminadora estA equipada con amortiguadores de alta
presion que podrian abrirse a presion si se tratan sin cuidado. Nunca sostenga ninguna
parte de la estructura que produce la inclinaci6n para levantar o mover la caminadora.
,_ ADVERTENCIA
TRATE DE LEVANTAR LA CAMINADORA! NO mueva ni leVante a
caminadora de su embalaje mient[as las instrucciones de ensamblaje no Ie ....
indiquen que Io haga. Puede quitar el protector do plastico do los postes de
la consola.
,_ ADVERTENCIA
iSI NO CUMPLE CON ESTAS INSTRUCCIONES PODRIA SUFRIR LESIONES!
NOTA: Durante cada uno de los pasos de ensamblaje asegurese de que TODAS las
tuercas y los pernos esten en su lugar y parcialmente enroscados antes de apretar bien
ALGON tornillo.
NOTA: Una ligera capa de grasa podria facilitar la instalaci6n de latornilleria. Se recomienda
utilizar cualquier tipo de grasa, por ejemplo grasa de litio para bicicletas,
Page 63

PASO 1 DE ENSAMBLAJE
J CONTENIDO DE LA 8OLSA DE TOBNILLERiA 1: ]
PERNO (A)
20 ram
Cantidad: 4
PLATAFORMA
POSTE /
iZQUIERDO @
DE LA
CONSOLA
,_'_ ARANDELAS PLANAS (C)
_ _"-- ARANDELAS ELASTICAS (B)
PIERNOS (A)
ARANDELA
ELASTICA (B)
15 mm
Cantidad: 4
ARANDELA
PLANA (C)
15 ram
Cantidad: 4
Corte el enfajillado amarillo y levante la
PLATAFORMA hacia arriba, hasta que se
enganche el IVIECANISMO DE BLOQUEO
ACCIONADO POR EL PiE. Retire todo Io que
haya debajo de la plataforma.
Abra la BOLSA DE TORNILLERiA 1.
B
C
Con la PLATAFORMA hacia arriba, una el
POSTE IZQUIERDO DE LA CONSOLA
al BASTIDOR BASE con 4 PERNOS
(A), 4 ARANDELAS ELASTICAS (B) y 4
ARANDELAS PLANAS (C).
Page 64

PASO 2 DE ENSAMBLAJE
J CONTENIDO DE LA 8OLSA DE TORNILLERiA 2: ]
PERNO (A)
20 mm
Cantidad: 4
ARANDELA
ELASTICA (B)
15 mm
Cantidad: 4
/
ALAMBRE DE
ARANDELA
PLANA (C)
15 mm
Cantidad: 4
(A)
(8)
(¢)
Abra la BOLSA DE TORNILLERiA 2.
A
B
Meta el ALAMBRE DE ALIMENTACION DEL
CABLE por el POSTE DERECHO DE LA
CONSOLA. Una vez que haya pasado todo
el alambre de alimentacion del cable a traves
del poste, la punta superior del CABLE DE LA
CONSOLA debe quedar en la parte superior
del poste. Suelte y deseche el alambre de
alimentacion.
C
Con la PLATAFORMA hacia arriba, una
el POSTE DERECHO DE LA CONSOLA
al BASTIDOR BASE con 4 PERNOS
(A), 4 ARANDELAS EL._,STICAS (B) y
4 ARANDELAS PLANAS (C).
NOTA: Tenga cuidado de no pellizcai algQn
cable a! ensamblar el posts derecho de la
consola.
Page 65

PASO 3 DE ENSAMBLAJE
'1 CONTENIDO DE LABOLSA DE TORNILLERiA 3: lj
45 mm ELASTICA (B) PLANA (C)
_ PERNO (D) ARANDELA ARANDELA
CONSOLA PARA MODELOS GS950T Y T101 CONSOLAPARA
IENSAMBLE
PRIMERO
EL LADO
IZQUIERDO
Cantidad: 4 15 mm 15 mm
CONSOLA '
, _ '_ POSTE DE LA CONSOLA
_ , ,/
Cantidad: 4 Cantidad: 4
MODELOSCT7.1
"[102YT103
CABLES DE LA CONSOLA
/ '_ _ ARANDELAS PLANAS (C)
/iS/ _<_<__ ARANDELASpERNOS(D) EL"_'ST| CAS (B)
//
Con el pie suelte el MECANISMO DE
BLOQUEO DE LA PLATAFORMA para bajarla.
B
Abra la BOLSA DE TORNILLERiA 3.
C
Coloque con cuidado la CONSOLA sobre
los POSTES DE LA CONSOLA. Fije primero
el LADO IZQUIERDO con 2 PERNOS
(D), 2 ARANDELAS ELASTICAS (B) y 2
ARANDELAS PLANAS (C).
Conecte los CABLES DE LA CONSOLA,
metiendo con cuidado los cables dentro de los
postes para evitar que se da_en.
Fije el LADO DERECHO de la CONSOLA con
2 PERNOS (D), 2 ARANDELAS ELASTICAS
(B) y 2 ARANDELAS PLANAS (C).
NOTA: Tenga cuidad0 de nO pellizCar algan
cable al ensamblar los postes.
i FIN DELE NSAM B LAJE!
Page 66

Page 67

Page 68

@ @
Page 69

FUNCiONAMIENTO DE LA CONSOLA EN EL MODELO T101
Nota: La consola tiene una cubierta plastica delgada de protecci6n que es necesario quitar antes de usar la consola.
A) VENTANILLAS DE INDICADORES LED: Tiempo,
distancia, calorias, ritmo cardiaco, velocidad, inclinaci6n y
perfiles de sesiones de ejercicio.
B) INDICADORES LED DE META: Indican que meta (si
existe) se ha establecido para el programa actual.
C) INDICADORES LED DE SESION DE EJERCICIO:
Indican que sesion de ejercicio se ha establecido para el
programa actual.
D) SELECT TARGET [SELECCIONAR META]: Oprima
para elegir su met&
E) SELECT WORKOUT [SELECCIONAR SESION DE
EJERCICIO]: Oprima para elegir su sesion de ejercicio.
F) GO [INICIAR]: Oprima para comenzar a hacer ejercicio,
para comenzar una sesion especifica de ejercicio, o para
reiniciar despues de una pausa.
G) STOP [PARAR]: Oprima para hacer una pausa o terminar
su sesi6n de ejercicio. Sostenga oprimida esta tecla
durante 3 segundos para poner en ceros la consola.
N) COOL DOWN [ENFRIAMIENTO]: Oprima para iniciar el
periodo de enfriamiento. El periodo de enfriamiento dura 4
minutos y disminuye la velocidad y la inclinaci6n para que
su corazon tenga oportunidad de volver a adaptarse a la
menor demanda de energia.
I) iNCLiNE C / B [TECLAS DE AJUSTE DE
INCLINACION]: Se usan para ajustar la inclinaci6n en
pequeflos incrementos (de 0.5%).
J) SPEED + / = [TECLAS DE AJUSTE DE VELOCIDAD]:
Se usan para ajustar la velocidad en pequeflos
incrementos (de 0.1 millas/hr).
K) TECLAS R.&PIDAS DE INCLINACION: Se usan para
llegar a la inclinaci6n deseada m&s r&pidamente.
L) TECLAS RAPIDAS DE VELOCIDAD: Se usan para
Ilegar a la velocidad deseada m&s r&pidamente.
M) ENTER Y C / B [TECLAS DE REGISTRO Y DE
AJUSTE]: Se usan para ajustar los valores meta y de
sesi6n de ejercicio. Oprima ENTER para cambiar la
informaci6n que le da la pantalla durante su sesi6n de
ejercicio.
N) FAN [TECLA DE VENTILADOR]: Oprima para encender
o apagar el ventilador.
O) VENTILADOR: Ventilador personal para la sesi6n de
ejercicio.
P) ALTOPARLANTES: Escuche mosica por los altopadantes
cuando tenga conectado un reproductor de CD o de MP3
a la consola.
Q) ENCNUFE DE ENTRADA DE AUDIO: Conecte su
reproductor de CD o de MP3 en la consola con el cable
adaptador de audio que se induye.
R) ENCHUFE DE SALIDA DE AUDIO / AURICULARES:
Conecte sus auriculares en este enchufe para escuchar
la mosica a traves de los auriculares. Nota: Cuando se
conectan los auriculares en el enchufe para auriculares, el
sonido deja de salir de los altopadantes.
S) BOLSILLO PARA MP3: 0selo para colocar su
reproductor de M P3.
T) CAVlDADES PARA BOTELLAS DE AGUA: Sirven para
colocar Io que necesite para su sesi6n de ejercicio.
U) ESTANTE DE LEOTURA: 0selo para colocar material de
lectura.
V) RANURA PARA LA LLAVE DE SEGURIDAD: Permite
que la caminadora funcione cuando la Ilave de seguridad
est& en su lugar.
Page 70

Page 71

FUNCiONAMIENTO DE LA CONSOLA EN EL MODELO GS950T
Nota: La consola tiene una cubierta plastica delgada de protecci6n que es necesario quitar antes de usar la consola.
A) VENTANILLAS DE INDICADORES LED: Tiempo,
distancia, calorias, ritmo cardiaco, velocidad, inclinaci6n y
perfiles de sesiones de ejercicio.
B) INDICADORES LED DE META: Indican que meta (si
existe) se ha establecido para el programa actual.
C) INDICADORES LED DE SESION DE E]ERCICIO:
Indican que sesi6n de ejercicio se ha establecido para el
programa actual.
D) SELECT TARGET [SELECCIONAR META]: Oprima
para elegir su meta.
E) SELECT WORKOUT [SELECCIONAR SESION DE
EJERCICIO]: Oprima para elegir su sesi6n de ejercicio.
F) GO [INICIAR]: Opdma para comenzar a hacer ejercicio,
para comenzar una sesi6n especiflca de ejercicio, o para
reiniciar despues de una pausa.
G) STOP [PARAR]: Oprima para hacer una pausa o terminar
su sesi6n de ejercicio. Sostenga oprimida esta tecia
durante 3 segundos para poner en ceros la consola.
N) COOL DOWN [ENFRIAMIENTO]: Oprima para iniciar el
periodo de enfriamiento. El periodo de enfriamiento dura 4
minutos y disminuye la velocidad y la inclinacion para que
su corazon tenga oportunidad de volver a adaptarse a la
menor demanda de energia.
i) iNCLiNE C / B [TECLAS DE AJUSTE DE
iNCLINACION]: Se usan para ajustar Ja incJinacion en
pequehos incrementos (de 0.5%).
J) SPEED + / - [TECLAS DE AJUSTE DE VELOCIDAD]:
Se usan para ajustar la velocidad en pequehos
incrementos (de 0.1 millas/hr).
K) TECLAS RAPIDAS DE INCLINACION: Se usan para
llegar a la inclinaci6n deseada m&s r&pidamente.
L) TECLAS RAPIDAS DE VELOCIDAD: Se usan para
llegar a la velocidad deseada m&s r&pidamente.
IVi) ENTER Y C / B [TECLAS DE REGISTRO Y DE
AJUSTE]: Se usan para ajustar los valores meta y de
sesion de ejercicio. Oprima ENTER para cambiar la
informacion que le da la pantalla durante su sesion de
ejercicio.
N) ALTOPARLANTES: Escuche mosica per los altopadantes
cuando tenga conectado un reproductor de CD o de MP3
a la consola.
O) ENCNUFE DE ENTRADA DE AUDIO: Conecte su
reproductor de CD o de MP3 en la consola con el cable
adaptador de audio que se incluye.
P) ENCNUFE DE SALIDA DE AUDIO / AURICULARES:
Conecte sus auriculares en este enchufe para escuchar
la musica a traves de los auriculares. Nota: Cuando se
conectan los auriculares en el enchufe para auriculares, el
sonido deja de salir de los altopadantes.
Q) BOLSILLO PARA MP3: 0selo para colocar su
reproductor de M P3.
R) CAVIDADES PARA BOTELLAS DE AGUA: Sirven para
colocar Io que necesite para su sesion de ejercicio.
S) ESTANTE DE LEOTURA: 0selo para colocar material de
lectura.
T) RANURA PARA LA LLAVE DE SEGURIDAD: Permite
que la caminadora funcione cuando la Ilave de seguridad
est& en su lugar.
Page 72

Page 73

FUNCiONAMIENTO DE LA CONSOLA EN LOS MODELOS T102 Y CT7,1
Nota: La consola tiene una cubierta plastica delgada de protecciGn que es necesario quitar antes de usar la consola.
A) VENTANILLAS DE INDICADORES: Tiempo, distancia,
calorias, ritmo cardiaco, velocidad, inclinacion y perfiles de
sesiones de ejercicio.
B) INDICADOR ALFANUMERICO: Indica la meta y la
informacion del programa.
C) SELECT TARGET [SELECCIONAR META]: Oprima
para elegir su met&
D) SELECT WORKOUT [SELECCIONAR SESION DE
EJERCICIO]: Oprima para elegir su sesi6n de ejercicio.
E) GOAL CENTER TM [CENTRO DE METAS]: Oprima para
establecer over su meta.
F) START [INIOlAR]: Oprima para comenzar a hacer
ejercicio, para comenzar una sesi6n especifica de
ejercicio, o para reiniciar despues de una pausa.
G) STOP [PARAR]: Oprima para hacer una pausa o terminar
su sesi6n de ejercicio. Sostenga oprimida esta tecla
durante 3 segundos para poner en ceros Jaconsola.
N) iNCLiNE C / B [TECLAS DE AJUSTE DE
INCLINACION]: Se usan para ajustar la inclinaciGn en
pequehos incrementos (de 0.5%).
I) SPEED + / = [TECLAS DE AJUSTE DE VELOCIDAD]:
Se usan para ajustar la velocidad en pequehos
incrementos (de 0.1 millas/hr).
J) TECLAS RAPIDAS DE INCLINAClON: Se usan para
llegar a la inclinacion deseada mas rapidamente.
K) TECLAS RAPIDAS DE VELOCIDAD: Se usan para
llegar a la velocidad deseada m&s r&pidamente.
L) CHANGE DISPLAY [CAMBIO DE INFORMACION]:
Oprima para cambiar la informacion en la pantalla durante
la sesion de ejercicio.
Ni) ENTER: Se usa para confirmar los valores meta y de
sesion de ejercicio.
N) FAN [TECLA DE VENTILADOR]: Oprima para encender
o apagar el ventilador.
O) VENTILADOR: Ventilador personal para la sesion de
ejercicio.
P) ALTOPARLANTES: Escuche mQsica por los altopadantes
cuando tenga conectado un reproductor de CD o de MP3
a la consola.
Q) ENCHUFE DE ENTRADA DE AUDIO: Conecte su
reproductor de CD o de MP3 en la consola con el cable
adaptador de audio que se incluye.
R) ENCHUFE DE SALIDA DE AUDIO / AURICULARES:
Conecte sus auriculares en este enchufe para escuchar
la musica a traves de los auriculares. Nota: Cuando se
conectan los auriculares en el enchufe para auriculares, el
sonido deja de salir de los altoparlantes.
S) BOLSILLO PARA MP3: 0selo para colocar su
reproductor de M P3.
T) CAVIDADES PARA BOTELLAS DE AGUA: Sirven para
colocar Io que necesite para su sesion de ejercicio.
U) ESTANTE DE LEOTURA: 0selo para colocar material de
lectura.
V) RANURA PARA LA LLAVE DE SEGURIDAD: Permite
que la caminadora funcione cuando la llave de seguridad
est& en su lugar.
Page 74

/
\
Page 75

FUNCiONAMIENTO DE LA CONSOLA EN EL MODELO T103
Nota: La consola tiene una cubierta plastica delgada de protecciGn que es necesario quitar antes de usar la consola.
A) VENTANILLAS DE INDICADORES: Tiempo, distancia,
calorias, ritmo cardiaco, velocidad, inclinaciGn y perfiles de
sesiones de ejercicio.
B) INDICADOR ALFANUMERICO: Indica la meta y la
informaciGn del programa.
C) SELECT TARGET [SELECCIONAR META]: Oprima
para elegir su met&
D) SELECT WORKOUT [SELECCIONAR SESION DE
EJERCICIO]: Oprima para elegir su sesiGn de ejercicio.
E) GOAL CENTER TM [CENTRO DE METAS]: Oprima para
establecer o ver su meta.
F) START [INICIAR]: Oprima para comenzar a hacer
ejercicio, para comenzar una sesiGn especifica de
ejercicio, o para reiniciar despues de una pausa.
G) STOP [PARAR]: Oprima para hacer una pausa o terminar
su sesiGn de ejercicio. Sostenga oprimida esta tecia
durante 3 segundos para poner en ceros la consola.
H) iNCLiNE C / B [TECLAS DE AJUSTE DE
INCLINACION]: Se usan para ajustar la inclinaciGn en
pequeflos incrementos (de 0.5%).
I) SPEED + / - [TECLAS DE AJUSTE DE VELOCIDAD]:
Se usan para ajustar la velocidad en pequeflos
incrementos (de 0.1 millas/hr).
J) TECLAS RAPIDAS DE INCLINACION: Se usan para
llegar a la inclinaciGn deseada mas ra.pidamente.
K) TECLAS RAPIDAS DE VELOCIDAD: Se usan para
llegar a la velocidad deseada mas rapidamente.
L) CHANGE DISPLAY [CAMBIO DE INFORMACION]:
Oprima para cambiar la informaciGn en la pantalla durante
la sesiGn de ejercicio.
M) ENTER: Se usa para confirmar los valores meta y de
sesiGn de ejercicio.
N) FAN [TECLA DE VENTILADOR]: Oprima para encender
o apagar el ventilador.
O) VENTILADOR: Ventilador personal para la sesiGn de
ejercicio
P) ALTOPARLANTES: Escuche mQsica por los altopadantes
cuando tenga conectado un reproductor de CD o de MP3
a la consola.
Q) ENCHUFE DE ENTRADA DE AUDIO: Conecte su
reproductor de CD o de MP3 en la consola con el cable
adaptador de audio que se induye.
R) ENCHUFE DE SALIDA DE AUDIO / AURICULARES:
Conecte sus auriculares en este enchufe para escuchar
la musica a traves de los auriculares. Nota: Cuando se
conectan los auriculares en el enchufe para auriculares, el
sonido deja de salir de los altopadantes.
S) BASE DE CONEXION DE iPOD_: Se usa para colocar,
conectar y cargar su iPod (no se incluye).
T) CAVlDADES PARA BOTELLAS DE AGUA: Sirven para
colocar Io que necesite para su sesiGn de ejercicio.
U) ESTANTE DE LEOTURA: 0selo para colocar material de
lectura.
V) RANURA PARA LA LLAVE DE SEGURIDAD: Permite
que la caminadora funcione cuando la llave de seguridad
est& en su lugar.
W) CUSTOM 1 OR 2 [TECLA PARA PROGRAMAS
PERSONALIZADOS 1 6 2]: Oprima para seleccionar el
programa personalizado 1 6 2.
X) CONTROLES PARA iPOD®: Oprima para controlar sus
preferencias de audio en el iPod que haya conectado.
Consulte m&s informaciGn en la p&gina 82.
Page 76

VENTAN|LLAS DE |NDICADORES
, TIME [TIEMPO]: Aparece en minutos: segundos;
indica el tiempo restante o el que ha pasado en su
sesion de ejercicio.
, DISTANCE [DISTANCIA]: Aparece en millas; indica
la distancia recorrida o la distancia por recorrer
durante su sesion de ejercicio.
, SPEED [VELOCIDAD]: Aparece en millas/hora;
indica a que velocidad se mueve la superficie para
caminar o correr.
, INCLINE [INCLINACION]: Se muestra como
porcentaje; indica la inclinaci6n de la superficie para
caminar o correr.
, CALORIES [CALORiAS]: Indica el numero total de
calorias quemadas o por quemar durante su sesion de
ejercicio.
, HEART RATE [RITMO CARDiACO]: Aparece como
latidos/minuto; indica su ritmo cardiaco (cuando se
sujetan ambas empuhaduras con sensor de pulso).
, PERFILES DE PROGRAMAS: Representa el perfil
del programa que esta. siendo usado (velocidad
durante los programas basados en velocidad e
inclinacion durante los programas basados en
inclinacion).
,, TARGETS [METAS]:
T101, GS950T: El diodo LED se ilumina junto a
la meta que esta. seleccionada. Si ningQn diodo
LED este. iluminado significa que no se ha activado
ninguna meta. T102, T103, CT7.1 : La meta se indica
en la ventanilla alfanumerica en la parte inferior de la
pantalla.
, WORKOUTS [SESIONES DE EJERCICIO]:
T101, GS950T: El diodo LED se ilumina junto
a la sesion de ejercicio que est& seleccionada.
T102, T103, CT7.1 : La sesion de ejercicio se indica
en la ventanilla alfanumerica en la parte inferior de la
pantalla.
TIME
[B: 2
CALORIES
TIME
/B:92
CALORIES
.......15
_mmm
SPEED
5.9
_NCLINE
m_
n_m
/ / iiiii _
mmmmmm
mmmmmmmm
mmmmmmmmmm
ll-I._--J-I _oo-oo..I
uZI.ZiC C.U "l
TIME DISTANCE
mmmm
mm
DISTANCE
2.Off
HEART RATE
DISTANCE
2.0W
PULSE
CALORIES _ SPEED
Page 77

PARA EMPEZAR
1) Verifique que no haya objetos en la banda que
pudieran impedir el funcionamiento de la caminadora.
2) Conecte el cable de corriente y encienda la
caminadora.
3)
Coloque los pies en los deles laterales de la
caminadora.
4)
Sujete el broche de la Ilave de seguridad en alguna
parte de su ropa, y asegurese de que quede bien
sujeto y de que no se pueda soltar durante su sesi6n
de ejercicio.
5)
Introduzca la Ilave de seguridad en su ranura en la
consola.
6) Tiene dos opciones para comenzar su sesi6n de
ejercicio:
A) iNICIO R.&PIDO
Simplemente oprima la tecla de inicio GO/START para
comenzar a hacer ejercicio. El tiempo, la distancia y las
calorias comienzan a contar a partir de cero. O...
B) SELECC|ONE UNA META Y UNA SES|ON DE
EJERC|C|O
1) Seleccione una META por medio de la tecla SELECT
TARGET.
2) Regule los valores de su META por medio de Jas
teclas de FLECHAS.
3) Oprima ENTER para seguir adeJante.
4) Seleccione una SESION DE EJERCICIO por medio
de JatecJa SELECT WORKOUT.
5) Oprima la tecla de inicio GO/START para que de
inicio Jasesi6n de ejercicio.
NOTA: Si n0 se!ec_i0na Una META 0 unasESION DE:
EJERC!CIO, el programa funciona e n la modalidad manual. En
esta modalidad el usuario debe hacer tedos los cambios de
Ve!ocidad e inclinacion que desee
PARA CAMBIAR SU META UNA VEZ INICIADA
LA SESION DE EJERCICIO
Puede cambiar su meta sin necesidad de detenerse y sin perder
las estadisticas de su sesi6n de ejercicio actual.
En cualquier momento durante su sesi6n de ejercicio oprima la
tecla SELECT TARGET hasta que aparezca la nueva META que
desee.
Use las tedas C / B o + / - para registrar el valor de su nueva
META y oprima ENTER. Todos los datos estadisficos anteriores
ser&n transfeddos a la nueva META, para que usted no pierda nada
de informaci6n.
NOTA: Si accidenta!mente oprime la tec!a SELECT TARGET
durante una s÷si6n de ejercicio, pe[0 no 0prime ninguna otra
tecla durante 5 segund0 s, !a meta actua! seguir& activa.
PARA CAMBIAR EL PROGRAMA UNA VEZ
INICIADA SU SESION DE E.IERClCIO
Usted puede cambiar el programa de su sesi6n de ejercicio sin
necesidad de detenerse.
En cualquier momento durante su sesi6n de ejercicio, oprima la
tecla SELECT WORKOUT hasta que aparezca el nuevo programa
de SESION DE EJERCICiO que desee. Oprima ENTER.
El nuevo programa de SESION DE EJERCICIO comienza durante
el primer segmento despues del periodo de calentamiento, y todos
los datos estadisticos de su sesi6n de ejercicio ser#.n transfer!dos.
NOTA: Si aCCidenta!mente 0prime la tecla SELECTWORKOUT
durante una sesi6n de ejercicio, pero no opr!me ningun a otra
tecla du[ante 5 segundos, su programa de sesi6n de ejercicio
actual seguirA active.
Page 78

PERF|LES DE METAS
®
TARGET 1 - TIME [META 1 - TIEMPO]: Le permite al usuario establecer una meta basada en el tiempo que debe
durar su sesi6n de ejercicio. La meta de fiempo se puede establecer entre 15:00 y 99:00 minutos. El TIEMPO se cuenta
en forma regresiva. La DISTANCIA y las CALORIAS comienzan a contarse a partir de cero.
TARGET 2 - DISTANCE [META 2 =DISTANCIA]: Le permite al usuario establecer una meta basada en la distancia
que desea cubrir. La meta de distancia se puede establecer de 0.25 a 26.25 miflas. La DISTANCIA se cuenta en forma
regresiva. El TIEMPO y las CALORJAS comienzan a contarse a partir de cero.
TARGET 3 - CALORIES [META 3 =CALORJAS]: Le permite al usuario establecer una meta basada en el numero de
calorias que desea quemar. Esta meta se puede establecer de 20 a 980 calorias. Las CALORJAS se cuentan en forma
regresiva. El TIEMPO y la DISTANCIA comienzan a contarse a partir de cero.
®
NO TARGET [NJNGUNA M ETA]: Le permite al usuario seleccionar un perfil de sesi6n de ejercicio sin una meta
especifica de tiempo, distancia o calorias. El TIEMPO, la DISTANCIA y las CALORJAS comienzan a contarse a partir
de cero.
PERF|LES DE SES|ONES DE EJERCICIOS
1) MANUAL = TODOS LOS MODELOS: Le permite aJ usuario hacer cambios de velocidad y de indinaci6n sin necesidad de
detenerse.
2) INTERVALS (INTERVALOS) = TODOS LOS MODELOS: Le ayuda a mejorar su fuerza, velocidad y resistencia al aumentar
y disminuir la velocidad durante toda su sesi6n de ejercicio para que participen mejor su coraz6n y otros mQsculos.
Segmento
Tiempo
Velocidad
Inclinaci6n
Calentamiento 1 2
4:00 min 90 seg 30 seg 2 se repiten hasta
1 1.5 2 4 que se Ilega a la
1 1.5 0.5 1.5
Los segmentos 1 y
meta.
Page 79

3) HILLS [COLINAS] - SOLO LOS MODELOS T102, T103 Y O1"7.1: Este perfil simuia subir y bajar colinas para mejorar la
resistencia o el aguante.
Segmento
Tiempo
Nivel 1
Calentamiento 1 2 3 4 5 6 7 8 Los segmentos
4:00 min 30 seg 30 seg 30 seg 30 seg 30 seg 30 seg 30 seg 30 seg del 1 al 8 se
repiten hasta que
1 1.5 2 2.5 3 3.5 4 3.5 3 2.5 se Ilega a la meta.
4) WORKOUT 4 = WEIGHT LOSS (SESION DE EJERCICIO 4 = CONTROL DE PESO) = TODOS LOS MODELOS:
Le ayuda a bajar de peso al aumentar y disminuir la velocidad, al mismo tiempo que le mantiene a usted en su zona 6ptima para
quemar grasa.
Segmento
Tiempo
Nivel1 Inclinaci0n
Vel0cidad
Calentamiento 1 2 3 4 5 6 '7 8
4:00 min 30 seg 30 seg 30 seg 30 seg 30 seg 30 seg 30 seg 30 seg del 1 al 8 se
0 0.5 1.5 1.5 1 0.5 0.5 0.5 1 1.5 repiten hasta que
1 1.5 2 2.5 3 3.5 4 3.5 3 2.5 se Ilega a la meta.
Los segmentos
PARA USAR SES|ONES DE EJERCICIO PERSONAL|ZADAS (SOLO EN EL IVIODELO T103)
1) Oprima la tecla CUSTOM 1 OR 2 para seleccionar un programa personalizado de sesion de ejercicio.
2) Oprima la tecla SELECT TARGET para elegir una meta de tiempo, distancia o calorias. Oprima ENTER para seleccionar
la meta deseada.
3) Defina cada perfil de velocidad por medio de las tedas C / B o + / = y oprima ENTER. Repita con el resto de los
15 perfiles de velocidad.
4) Defina cada perfil de indinaci6n por medio de las tedas C / B o + / = y oprima ENTER. Repita con el resto de los
15 perfiles de indinaci6n.
5) Oprima la teda START para comenzar.
Page 80

GOAL CENTER TM [CENTRO DE IVlETAS]
(SOLO EN LOS MODELOS T102, T103 Y CT7.1)
Se ha demostrado por medio de investigaciones que aquellas personas que crean y dan seguimiento a sus metas de salud fisica,
en promedio obtienen m&s exito que quienes no Io hacen. Ya que su caminadora estb. equipada con el exdusivo sistema para dar
seguimiento a sus resultados por medio del centro de metas GOAL CENTER TM de Horizon, usted ha dado un paso importante para
alcanzar sus metas de salud fisica. GOAL CENTER TM es un nuevo software innovador, integrado a la consola de su caminadora, que le
permite dar seguimiento a sus metas de salud fisica al paso del tiempo, sin necesidad de Ilenar bit&coras en papel. Lea m&s para que
se entere como GOAL CENTER TM le puede ayudar a mantenerse motivado para mejorar sus resultados.
PARA CONF|GURAR EL GOAL CENTER TM
1) Seleccione USER 1 o USER 2 (USUARIO 1 o USUARIO 2) por medio de las teclas C/B o + / = y oprima ENTER.
2) Oprima y mantenga oprimida la tecla GOAL CENTER TM durante aproximadamente 5 segundos.
3) Oprima la tecla SELECT TARGET para seleccionar su meta de tiempo, distancia o calorias.
4) Use las teclas de C / B o + / = para seleccionar el valor de la meta y oprima ENTER.
5) Use las tedas de C / B o + / = para seleccionar el NUMERO DE DiAS para Ilegar a esa meta.
6) Oprima ENTER de nuevo para salir del modo de configuraci6n.
NOTA: Estos pasos tambien se pueden usar para eliminar una meta anterior y establecer una nueva.
PARA VER EL PROGRESO PARA ALCANZAR LA META
Cuando este registrado en su perfil de usuario, puede observar su progreso para Ilegar a la meta que se haya propuesto con solo
oprimir la tecla GOAL CENTER TM. La consola circula para indicar el tiempo, la distancia o las calorias restantes de acuerdo a la meta
seleccionada y tambien le indica el tiempo restante para Ilegar a dicha meta.
NOTA: Para que los datos de las sesiones de ejercicio se acumulen para alcanzar la meta de un usuario, ES NECESARIO que primero
se seleccione a dicho usuario antes de comenzar cada una de las sesiones de ejercicio.
Page 81

PARA PONER LA CONSOLA EN CEROS
Oprima la teda de paro STOP durante 3 segundos.
ENFR|AM|ENTO
(SOLO EN LOS MODELOS T101 Y GS950T)
Esta funcion pone la caminadora en el modo de enfriamiento. El periodo de enfriamiento dura 4 minutos y disminuye la velocidad y la
indinacion para que su corazon tenga oportunidad de volver a adaptarse a la menor demanda de energia.
PARA TERM|NAR SU SES|ON DE EJERCiC|O
La pantalla centellea la palabra "FINISHED" y emite un sonido para indicade que ha terminado su sesion de ejercicio. La informacion
de su sesion de ejercicio aparece en la consola durante 30 a 45 segundos y luego se borra.
PARA ELliVlINAR LA SELECCION ACTUAL
Para eliminar ia seleccion actual de programa o para borrar ia pantalia, sostenga oprimida ia tecia de paro STOP de 3 a 5 segundos.
PARA USAR SU REPRODUCTOR DE CD / MP3
1) Conecte el CABLE ADAPTADOR DE AUDIO, que incluimos, al ENCHUFE DE ENTRADA DE AUDIO que est& en el lado
derecho superior de la consola y al enchufe para auriculares de su reproductor de CD / MP3.
2) Use las tedas de su reproductor de CD / MP3 para hacer los ajustes necesarios de sonido y de eleccion de piezas musicales.
3) Retire el CABLE ADAPTADOR DE AUDIO cuando no Io este usando.
4) Si no quiere usar los ALTOPARLANTES de la caminadora, puede conectar sus auriculares en el ENCHUFE DE SALIDA DE
AUDIO que est& en la parte inferior de la consola.
Page 82

BASE DE CONEX|(:DN DE iPOD";
(SOLO EN EL IVIODELO T103)
La base de conexi6n de iPod es la soluci6n 6ptima de entretenimiento
para sus sesiones de ejercicio. Varios modelos de iPod con un conector
de base de conexi6n se adaptan a esta base. El iPhone no es compatible.
PARA USAR LA BASE DE CONEX|ON DE iPOD
(EL iPOD NO EST.& INCLUIDO)
1) Retire el tap6n de goma de la parte inferior de la base de conexi6n.
2) Conecte su iPod emparejando el pasador de conexi6n de la base
de conexi6n en la caminadora con el conector de su iPod. NOTA:
Una vez que haya conectado el iPod a la base de conexi6n, espere
2 minutos para que el iPod y la base de conexi6n se sincronicen
para que el sistema quede totalmente funcional.
3) Puede usar el disco de su iPod para regular el volumen y la
elecci6n de piezas musicales. Tambien puede regular el volumen
y la elecci6n de piezas musicales por medio de los controles para
el iPod en la consola de la caminadora. NOTA: Si no quiere usar
los altopadantes de la caminadora, puede conectar sus auriculares
en el enchufe de salida de audio que est& en la parte inferior de la
consola.
Vuelva a colocar el tap6n de goma en la parte inferior de la base de
conexi6n cuando no la este usando.
NOTA: El audio del iPod no suena por los altopadantes si se conecta el
cable adaptador de audio mientras el iPod est& en la base de conexi6n.
PASADOR DE CONEXlON DE LA BASE DE CONEXION
ENCHUFE DE ENTBADA DE AUDIO
PABA BEPBODUCTOBES QUE NO SON iPOD )_
CONTBOLES PABA iPOD _
de conexibn del iPod _
Nota: El tamailo de los insertos
para la base de _nexibn varia
,.......
de acuerdo al iPod.
Inserto universal para tIL_l / Jl I
la base de conexion
para reproductores MP3
Page 83

Page 84

CAPACIDAD DE PESO
TIG1 =300 Jb (136 kg)
T102 = 325 Ib (147 kg)
T103 = 350 Ib (159 kg)
GS950T = 300 Ib (136 kg)
CT7,1 = 325 Ib (147 kg)
BAST|DOR " DE POR V|DA
Horizon Fitness garantiza al propietario original, de por vida,
el bastidor contra defectos en mano de obra y materiales,
siempre y cuando el aparato permanezca en posesi6n del
propietario original. (El bastidor se define como la base de
piezas soldadas de metal de la unidad y no incluye ninguna
pieza desmontable.)
MOTOR . DE POR VIDA
Horizon Fitness garantiza al propietario original, de por vida, el
freno contra defectos en mano de obra y materiales, siempre
y cuando el aparato permanezca en posesi6n del propietario
original.
PIEZAS Y COMPONENTES ELECTRONICOS . 1 Al_lO
(T103 = 2 Al_lOS)
Horizon Fitness garantiza los componentes electr6nicos y
todas las piezas originales durante un periodo de 1 aflo
(T103 = 2 aflos) a partir de la fecha de adquisici6n original,
siempre y cuando el aparato permanezca en posesi6n del
propietario original.
MANO DE OBRA . 1 Al_lO
Horizon Fitness deber& cubrir los costos de mano de obra
de las reparaciones al aparato durante un periodo de 1 aflo a
partir de la fecha de adquisici6n original, siempre y cuando el
aparato permanezca en posesi6n del propietario original.
EXCLUSIONES Y LIM|TACIONES
A quien protege esta garantia:
. AI propietario original y la garantia no es transferible.
QUE protege esta garantia:
. La reparaci6n o el cambio de un motor defectuoso, de
componentes electr6nicos defectuosos, o de piezas
defectuosas, yes el Onico recurso de esta garantia.
QUE NO protege esta garantia:
. El desgaste normal, el ensamblaje o el mantenimiento
incorrecto, o la instalaci6n de piezas o de accesorios que
originalmente no tenian el prop6sito o la compatibilidad con
el equipo al momento de su venta.
. Daflos o fallos debido a un accidente, maltrato, corrosi6n,
decoloraci6n de pintura o de plb,stico, negligencia, robo,
vandalismo, incendio, inundaci6n, viento, rel&mpagos,
congelaci6n, u otras causas naturales de cualquier
tipo, falta, fhctuaciones o reducci6n de corriente por
cualquier causa, condiciones atmosfericas anormales,
choques, introducci6n de objetos extraflos dentro de la
unidad cubierta, o modificaciones no autorizadas o no
recomendadas por Horizon Fitness.
. Daflos incidentales o resultantes. Horizon Fitness no es
responsable de daflos indirectos, especiales o resultantes,
perdidas econ6micas, perdida de propiedad o de utilidades,
perdida de disfrute o de uso, u otros daflos resultantes de
cualquier naturaleza en relaci6n con la adquisici6n, el uso,
la reparaci6n o el mantenimiento del producto.
Page 85

. Elequipoalqueseledeusoconpropositoscomercialeso
cualquierotropropositoquenoseaenelhogardeunasola
familia,amenosqueHorizonFitnessIohayaaprobado.
. EquipoguardadoousadofueradelosEE.UU.oCanad&
. Entrega,ensamblaje,instalacion,configuraciondeunidades
originalesodereemplazo,omanodeobrauotroscostos
asociadosconelretirooelreemplazodelaunidadbajo
garantia.
. Cualquierintentoderepararesteequipocontieneel
riesgodelesiones.HorizonFitnessnoesresponsablede
dahos,perdidasoresponsabilidadquesurjadelesiones
personalessufridasduranteelcursode,ocomoresultado
de,cualquierreparacionointentodereparaciondesu
equipodeacondicionamientofisicoporcualquierpersona
quenoseatecnicodeunservicioautorizado.Todaslas
reparacionesqueustedintentehacerensuequipode
acondicionamientofisicolashaceASUPROPIORIESGO
yHorizonFitnessnoser&responsableporningunalesi6na
personasopropiedadquesurjandedichasreparaciones.
SERViCIO Y DEVOLUCIONES
, Hay servicio a domicilio s61o dentro de los primeros
240 km (150 millas) del centro de reparaciones autorizado
mAs cercano.
* Horizon Fitness debe autorizar con anterioridad todas las
devoluciones.
, La obligaci6n de Horizon Fitness de acuerdo a esta garantia
se limita a cambiar o reparar, a opcion de Horizon Fitness,
el producto en uno de sus centros autorizados de servicio.
* Todos los productos para los que se hace un redamo bajo
garantia deben ser recibidos por un centro autorizado
de servicio Horizon Fitness. Estos productos deben ser
recibidos con todos los cargos de envio y de transporte
pagados con anticipacion, acompahados de suficientes
comprobantes de compra.
. En ocasiones se pueden suministrar piezas y componentes
electronicos que Horizon Fitness o sus proveedores
reacondicionen a un "estado equivalente al nuevo" como
piezas de reemplazo bajo garantia y constituir cumplimiento
de los terminos de la garantia.
. Esta garantia le otorga derechos legales especificos, y sus
derechos pueden variar de estado a estado.
Page 86

Page 87

Page 88

CUSTOMER
TECH SUPPORT
DO NOT RETURN TO THE RETAILER
if you have any problems during assembly or if
par[s are missing.
For fast and friendly service, please contact one
of our trained customer technicians via pnone,
ema or our website.
We want to know if you have a problem and we
want to have an oppor[un ty to correct it for you,
NOTE: Please read the TROUBLESHOOTI 'qG
section inthe TREADMILL GUIDE oefore
contacting Customer Tech SupporL Additional
product information is available on our website.
SERVICE DE SOUTIEN
TECHNIQUE A LA CLIENTELE
En cos ae difficulte Iors de I'assemblage ou sl
aes pieces manquem. NE PAS RENVOYER
L'APPAREIL AU DETAILLANT.
Pour un service raoide et amicaL commumquer avec
un ae nos techniciens qualifies, bar tel6bhone, ceurrie
ou notre site Web.
Horizon Fitness tient B.ce uu'on lui signale tout
Drobleme d'utilisat on. afin de bouvotr y remedter.
REMARQUE : Ltre la sectton DEPANNAGE dL
GUIDE DU TAPIS ROULANT avant de comaoter te
servtce de soutien technique b. la clientele. Pour plus
ample information sur le produit, visiter notre site Web.
SERVICIO DE ASISTENCIA
TECNICA A CLIENTES
Si ttene problemas durante el ensamblaje o si lefaltan oiezas NO
DEVUELVA ESTE APARATO AL VENDE DOn MINORISTA.
Para obtener servtcto raptue y amable, comun]quese pot
telefonc correo eleotr0mco o a traves de nuestro sitio en
Internet con aiguno de nuestros teonicos oaoaoltaoos en ayuaa
a Cllenies.
K as interesa saber s] usted ttene alg0n problema y queremos
tener la oportumoao de corregir la situaci6r
N OTA: Antes de comunlcarse con el servicio de asistencia tecnica
a chentes, ea la secclon de q_ESOLUCION DE PROBLEMAS
en la GUIA DE LA CAMINADORA. Puede encontrar informaci6n
adioional de producto en nuestro sitio en Jnternet
T101. T102, T103, GS950T. CT7.1 Rev. 1.2 I 2009 Horizon Fitness
Designed & Engineered in the U.S.A. ° Made in China I Congu et developp6 aux Etats-Unis. , Fabrique en Chine I Dise¢io y tecnologia de los EE.UU. , Hecho en China
US6273843 US6682460 US7104930
TW 494765 TW 586429 CN 01230904.4
CN 03206094.7
 Loading...