

Horizon EX-76 Owner’s Manual

ELLIPTICAL USER'S GUIDE
CONGRATULATIONSand THANKYOUforyourpurchaseof this HorizonSerieselliptical!
Whetheryour goal is to win races or simply enjoy a fufler, healthier fifestyle, a Horizon Series efliptical
can help you attain it- adding club-quafity performance toyour at-home workouts, with the ergonomics
and innovative features you need to get stronger and healthier, faster. Because we're committed to
designing fitness equipment from the inside out, we use only the highest quality components. It's a
commitment we back with one of the strongest frame-to-brake warranty packages in the industry.
Youwant exerciseequipment that offers the most comfort, the best reliability and the highest quality
in its class.
TheHorizonSeriesdelivers.
Important Precautions
Assembly 6
Before YouBegin 17
Elliptical Operation 18
Conditioning Guidelines 31
Troubleshooting & Maintenance 38
Limited Warranty 42
CONTACTINFORMATION Back Panel
SAVETHESEINSTRUCTIONS
Read all instructions before using this elliptical. When using an electrical product, basic precautions
should always be foflowed, including the following: Read aft instructions before using this elliptical It is the
responsibility of the owner to ensure that all users of this elliptical are adequately informed of aft warnings
and precautions. If you have any questions after reading this manual, contact Customer TechSupport at
the number listed on the back panel of this manual
• If you experience any kind of pain, including, but not limited to chest pains, nausea, dizziness, or
shortness of breath, stop exercising immediately and consult your physician before continuing.
• Maintain a comfortable pace. Do not sprint above 80 rpms on this machine.
• Tomaintain balance, it is recommended to keep a grip on the handlebars while exercising, mounting or
dismounting the machine.
• Do not wear clothes that might catch on any part of the elliptical
• Do not turn pedal arms by hand.
• Make sure handlebars are secure before each use.
• Do not insert or drop any object into any opening.
• Unplug elliptical before moving or cleaning it. Toclean, wipe surfaces down with soap and slightly damp
cloth only; never use solvents. (SeeMAINTENANCE)
• This elliptical should not be used bypersons weighing more than 300 pounds. Failure to comply will void
the warranty.
• This elliptical is intended for m-home use only. Donot use this elliptical in any commercial, rental, school
or institutional setting. Failure to comply will void the warranty.
• Donot useelliptical m any location that is not temperature controlled, such as but not limited togarages,
porches, pool rooms, bathrooms, car ports or outdoors. Failure to comply may void the warranty.
• Use the efliptical only as described in this manual
• Keep the topside of the foot support clean and dry.
• Care should be taken when mounting or dismounting the equipment. Before mounting or dismounting,
bring the efliptical to 0% incline and move the pedal on the mounting or dismounting side to its lowest
position and bring the machine to a complete stop.
• Disconnect all power before servicing the equipment.
At NO time Shouldpets orChildren under the age of !2 be closer to the elliptical than I 0 feet. ]
At NOtime should children under the age of !2 use the elliptical.
Children over the age of 12 should not use the elliptical without adu!t supervision,
i : T!_ _:TT : ii ¸¸¸¸ '!_ !
!t is eSsentiaithat your ellipticai iS used Onlyindoors,in a climate Controlledrooml if your ellipticai has been
i exposedto c!!der temperaturesor highmoisture climates, it is strongly recommendedthat the elliptical is
i warmedupto r°°m temperaturebeforefirst time use;Fa!!ure tOdoso maycausePrematureelectr°nic failure_
:_
connectthisexerciseProducttoaproperlygroundedoutlet Only.See grounding
GROUNDINGINSTRUCTIONS
Thisproductmustbegrounded.If a elliptical shouldmalfunctionorbreakdown,groundingprovidesapath
of least resistancefor electricalcurrenttoreducetherisk of electricalshock.Thisproductis equippedwith
a cordhavingan equipment-groundingconductorand agroundingplug. Theplug must bepluggedinto an
appropriateoutlet that is properlyinstalled andgroundedin accordancewith local codesand ordinances.
ImproPerConn;ct;_n_i theequi:pmen;-groundifigcoMucto_canresuit in arisk of
i _ electricshock.Checkwitha qualifiedelectricianor servicemanifyou arein doubt
to whetber the productis properlygrouMed. Oonot modifyt/Tepiug provided
the product,!f it wil! not fit the outlet' havea properoutlet installed by a
q"a!!f!ele t,!cia
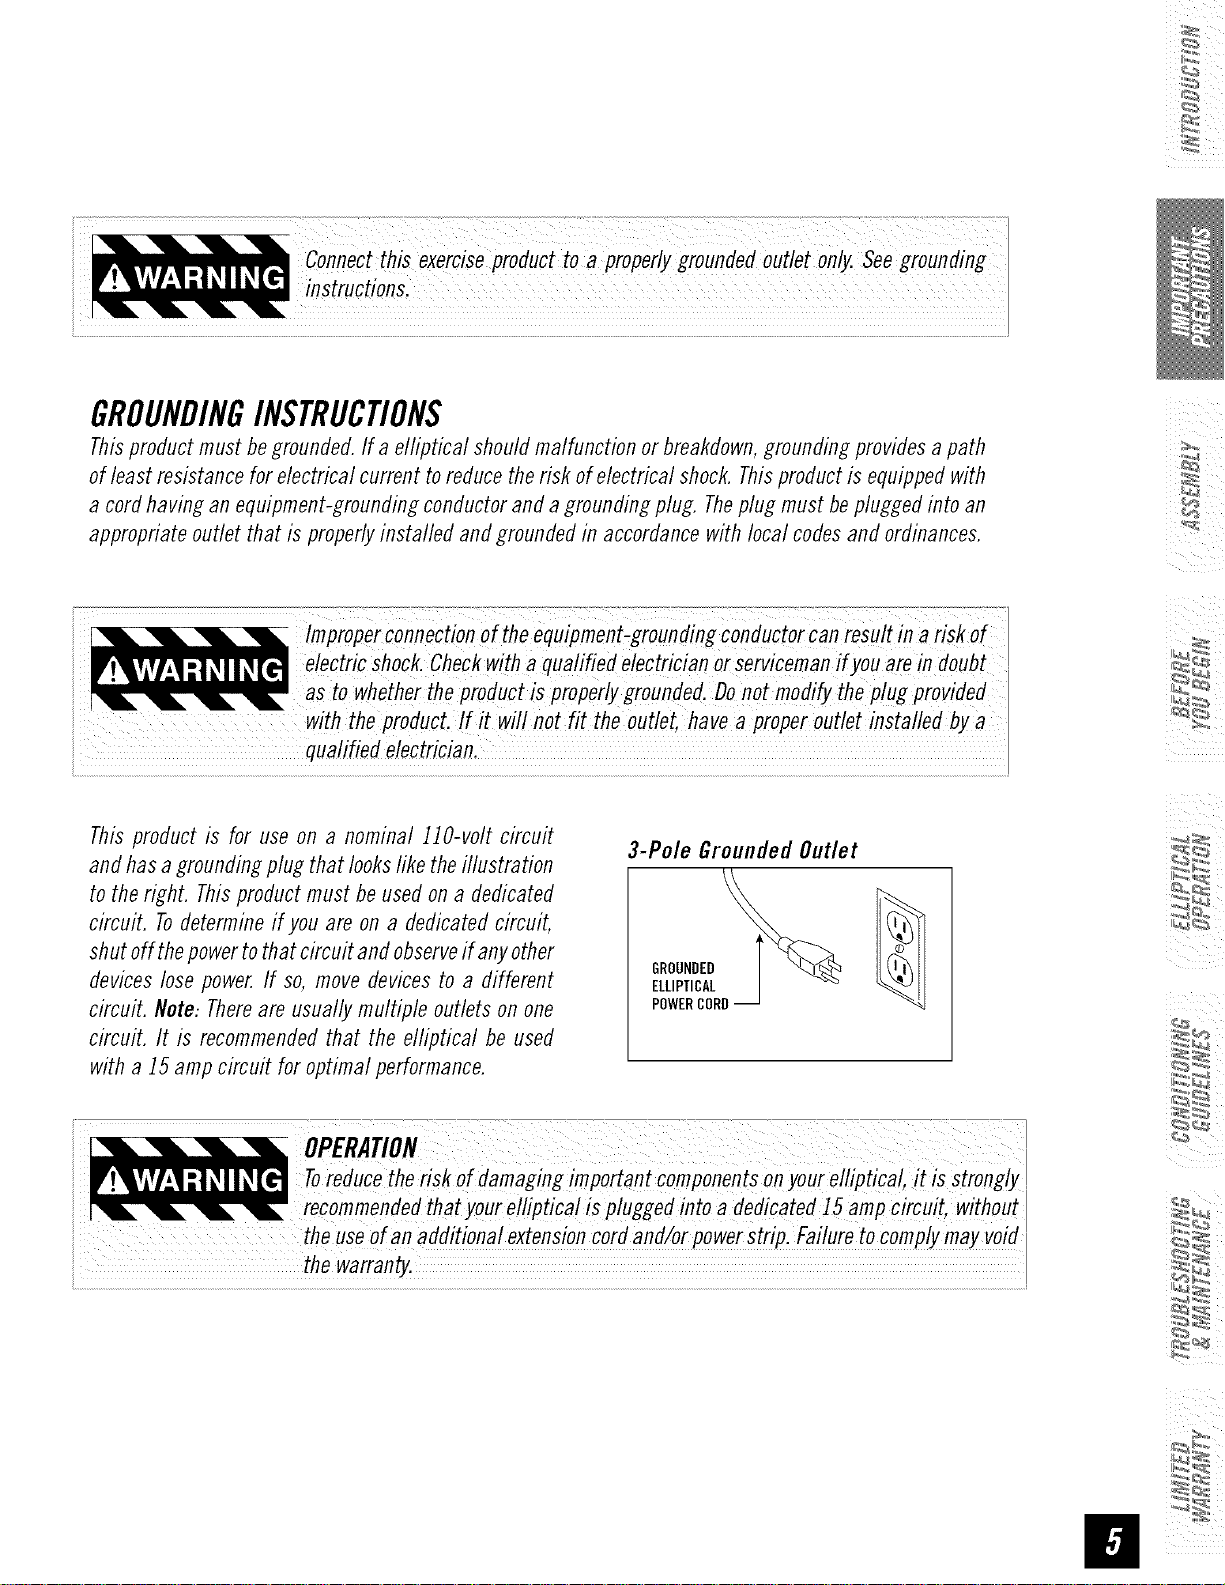
Thisproduct is for use on a nominal 110-volt circuit
and hasa groundingplug that lookslike theillustration
to the right. Thisproduct must be usedona dedicated
circuit. Todetermineif youare on a dedicatedcircuit,
shutoffthepowerto that circuitandobserveif anyother
deviceslosepower.If so, move devicesto a different
circuit. Note: Thereare usuallymultiple outlets on one
circuit. It is recommendedthat the elliptical be used
with a 15ampcircuit for optimal performance.
recommendedtbatyour ellipfica! is fl!uggedinto adedicated15amp circuit, without
the useof an additional extensioncordand/orpowerstrip. Failureto complymay void
3-Pole Grounded Outlet
GROUNDED
ELLIPTICAL
POWERCORD

ii
IMPORTANT..READTHESESAFETYINSTRUCTIONSBEFOREUSE!
Thereare severalareasduring the assemblyprocessof an elfiptical that special attention must be paid.
It is veryimportant to follow the assembly instructions correctlyand to make sure aft parts are firmly
tightened. If theassemblyinstructionsarenot followedcorrectly,the elliptical couldhave frameparts that
arenot tightenedand ,viiiseemlooseand maycauseirritating noises. Topreventdamageto theelliptical,
theassemblyinstructions must be reviewedand correctiveactionsshouldbe taken.
UNPACKING
Unpacktheproduct whereyou will be using it. Placetheproduct ona levelflat surface.It is recommended
that you place a protectivecoveringonyour floor.Duringeach assemblystep, ensurethat ALLnuts and
boltsarein place andpartially threadedin beforecompletelytightening anyONEbolt.
NOTE:A light application of greasemay aid in the installation of hardware.Anygrease,such as lithium
bikegreaseis recommended.
Before proceeding,find you( eflipticai's seriai number
Iocated on the front stabilizer tube and enter it in the
i spaceprovided below. Also locate the model name
whichis locatedon themast booL
iENTER YOURSERIALNUMBERAND
MODELNAMEINTHEBOXESBELOW..
E
SERIALNUMBER:
Referto theSERIALNUMBERandMODELNAMEwhencalfing forservice.
Alsoenterthis serial numberonyourWarrantyCard.
:_
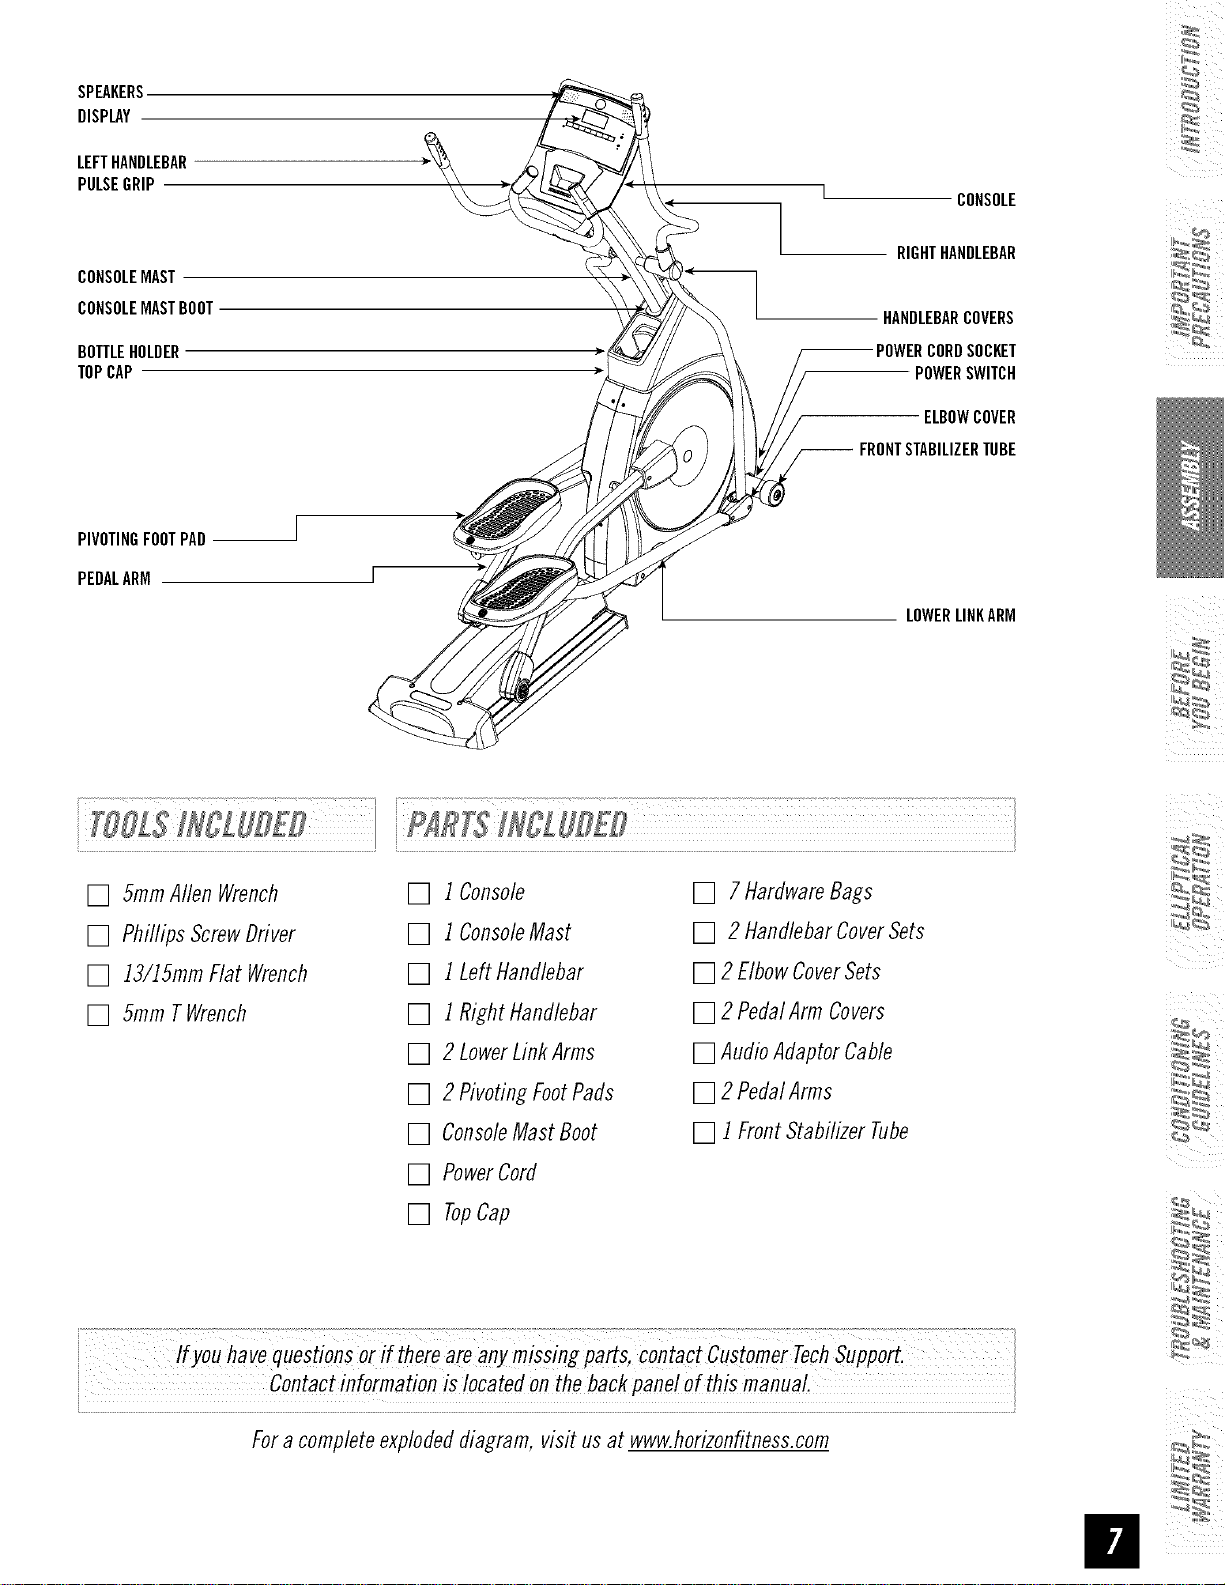
SPEAKERS
DISPLAY
LEFTHANDLEBAR
PULSEGRIP
CONSOLEMAST
CONSOLEMASTBOOT
BOTTLEHOLDER
TOPCAP
] CONSOLE
RIGHTHANDLEBAR
HANDLEBARCOVERS
CORDSOCKET
POWERSWITCH
ELBOWCOVER
-- FRONTSTABILIZERTUBE
PIVOTINGFOOTPAD J
PEDALARM
[] 5ramAllen Wrench
[] Phillips ScrewDriver
[] 13/15mmFlat Wrench
[] 5ram TWrench
F
LOWERLINKARM
[] 1Console
[] 1ConsoleMast
[] 1LeflHandlebar
[] 1RightHandlebar
[] 2 LowerLinkArms
[] 2 PivotingFootPads
[] 7 HardwareBags
[] 2 HandlebarCoverSets
[] 2 ElbowCoverSets
[] 2 PedalArm Covers
[] AudioAdaptorCable
[] 2 PedalArms
[] ConsoleMastBoot
[] 1FrontStabilizer Tube
[] PowerCord
[] TopCap
i €ontact inf°rmati°nis !°catedon theback pane!o(this manual.
Fora completeexplodeddiagram, visit us at www.horizonfitness.com
ii
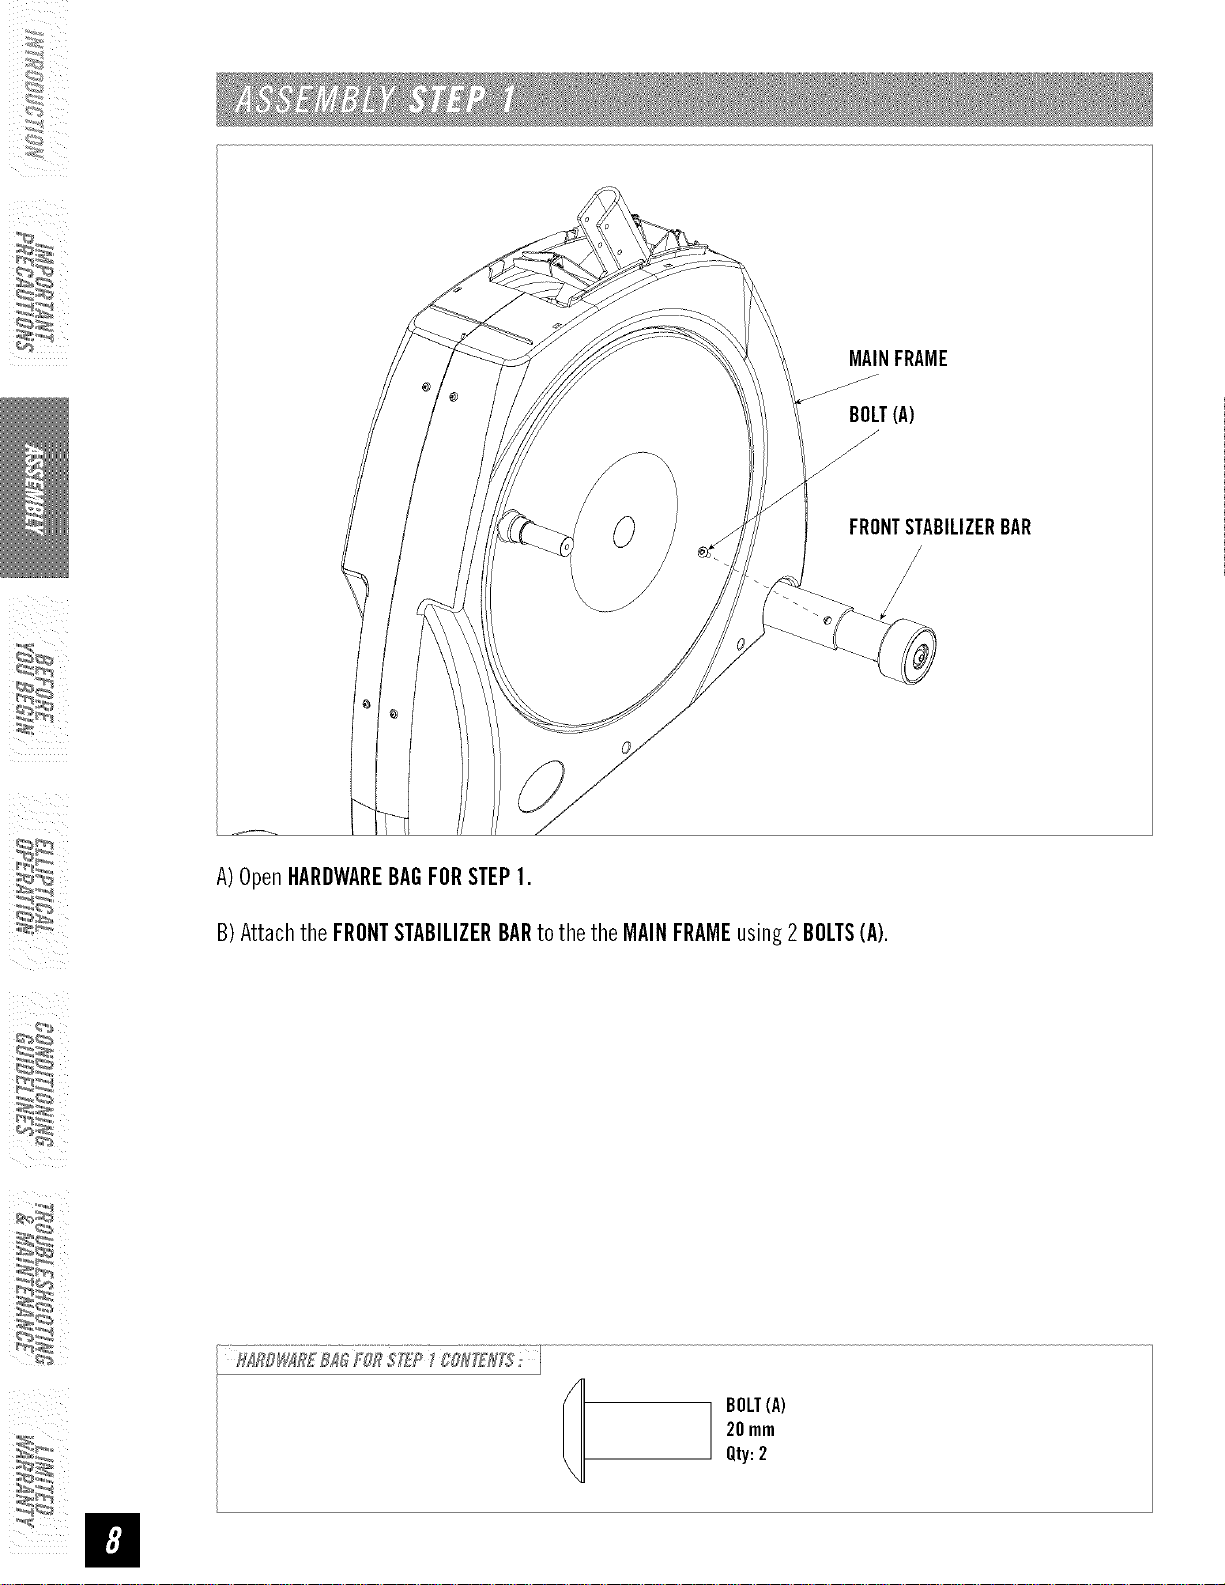
MAINFRAME
FRONTSTABILIZERBAR
\
A)OpenHARDWAREBAGFORSTEP1.
B)Attachthe FRONTSTABILIZERBARto the theMAINFRAMEusing2 BOLTS(A).
20mm
BOLT(A)
Qty:2
:_
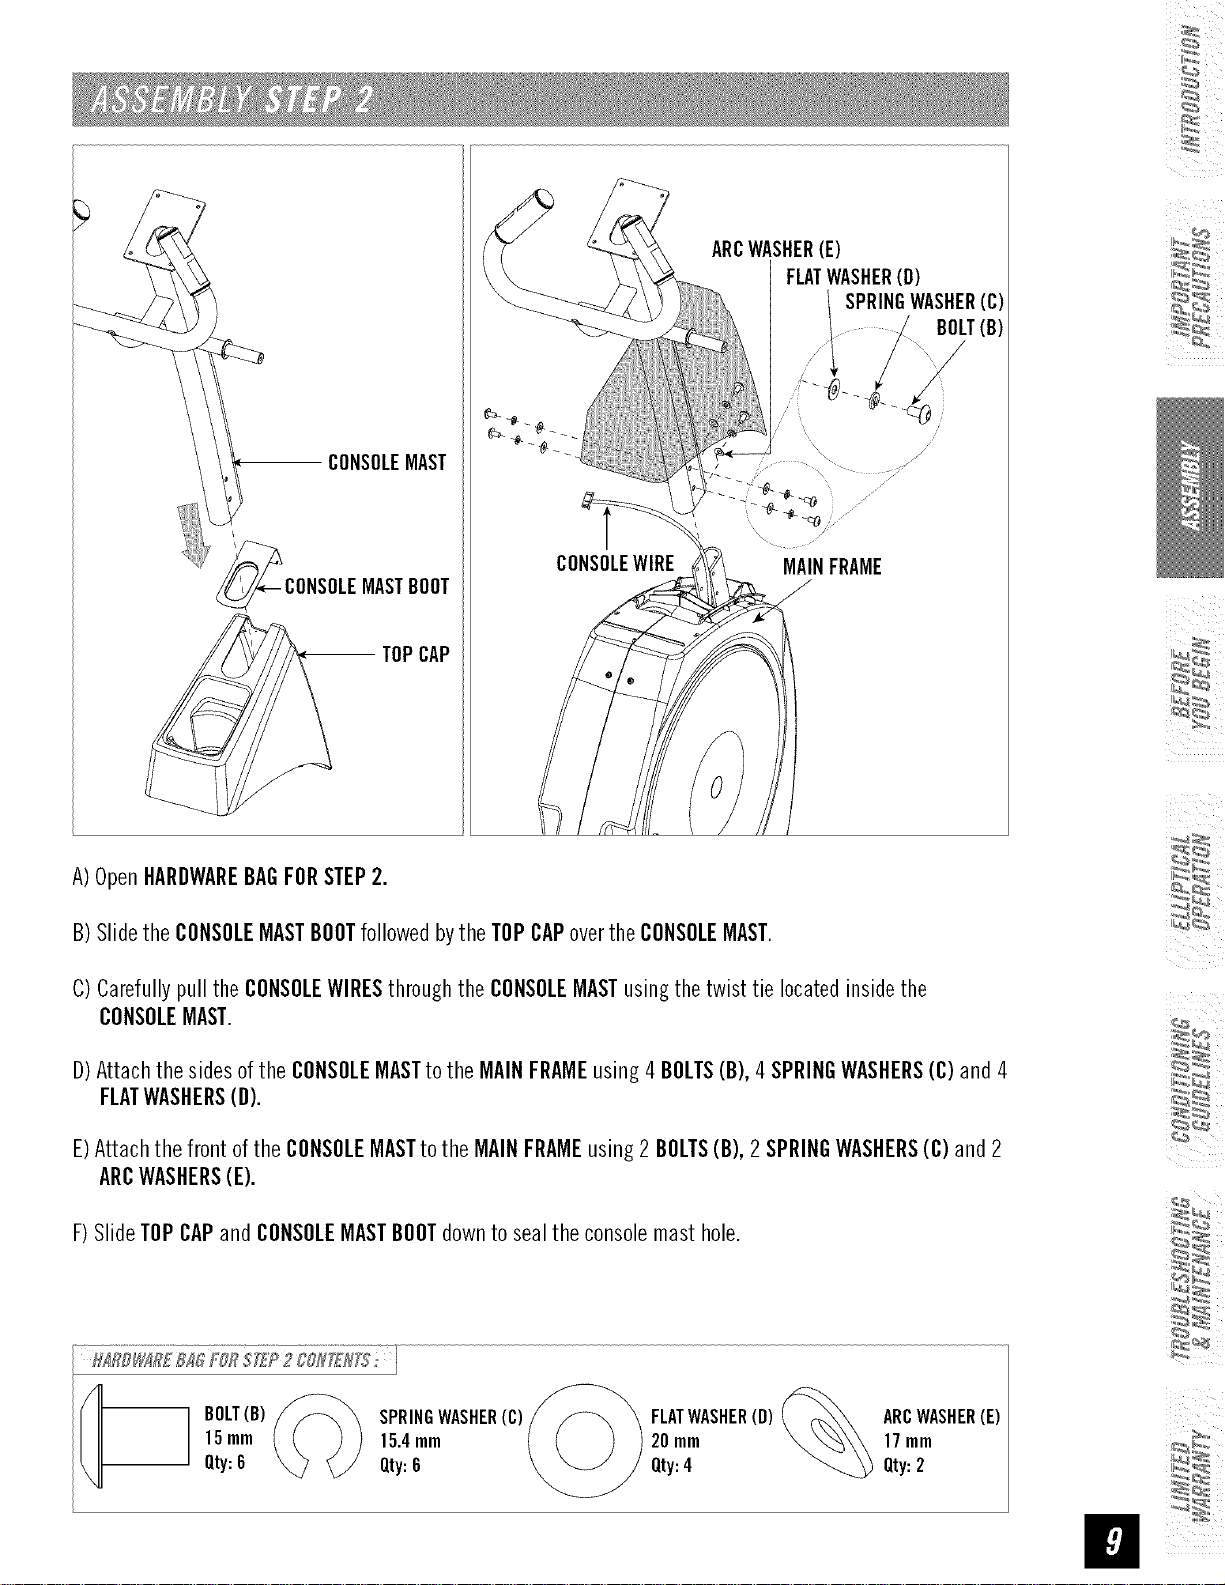
TOPCAP
CONSOLEWIRE
ARCWASHER(E)
FLATWASHER(O)
SPRINGWASHER(C)
BOLT(B)
\ J
MAINFRAME
A)OpenHARDWAREBAGFORSTEP2.
B)Slidethe CONSOLEMASTBOOTfollowedbythe TOPCAPoverthe CONSOLEMAST.
C)Carefullypull the CONSOLEWIRESthroughthe CONSOLEMASTusingthetwist tie locatedinsidethe
CONSOLEMAST.
D)Attachthe sidesof the CONSOLEMASTto theMAINFRAMEusing 4 BOLTS(B),4 SPRINGWASHERS(C)and 4
FLATWASHERS(D).
E)Attachthe front ofthe CONSOLEMASTto the MAINFRAMEusing2 BOLTS(B),2 SPRINGWASHERS(C)and2
ARCWASHERS(E).
F)SlideTOPCAPandCONSOLEMASTBOOTdownto sealthe consolemast hole.
H_RDI,_I_R£_8 NR 5"TI!22 00NT£RII": I
15== 15.4== I ) 1
BOLT(B) SPRINGWASHER(C)
Qty:6 Qty:6 \ _ /
FLATWASHER(D)
20mm
Qty:4
ARCWASHER(E)
17ram
Qty:2
ii
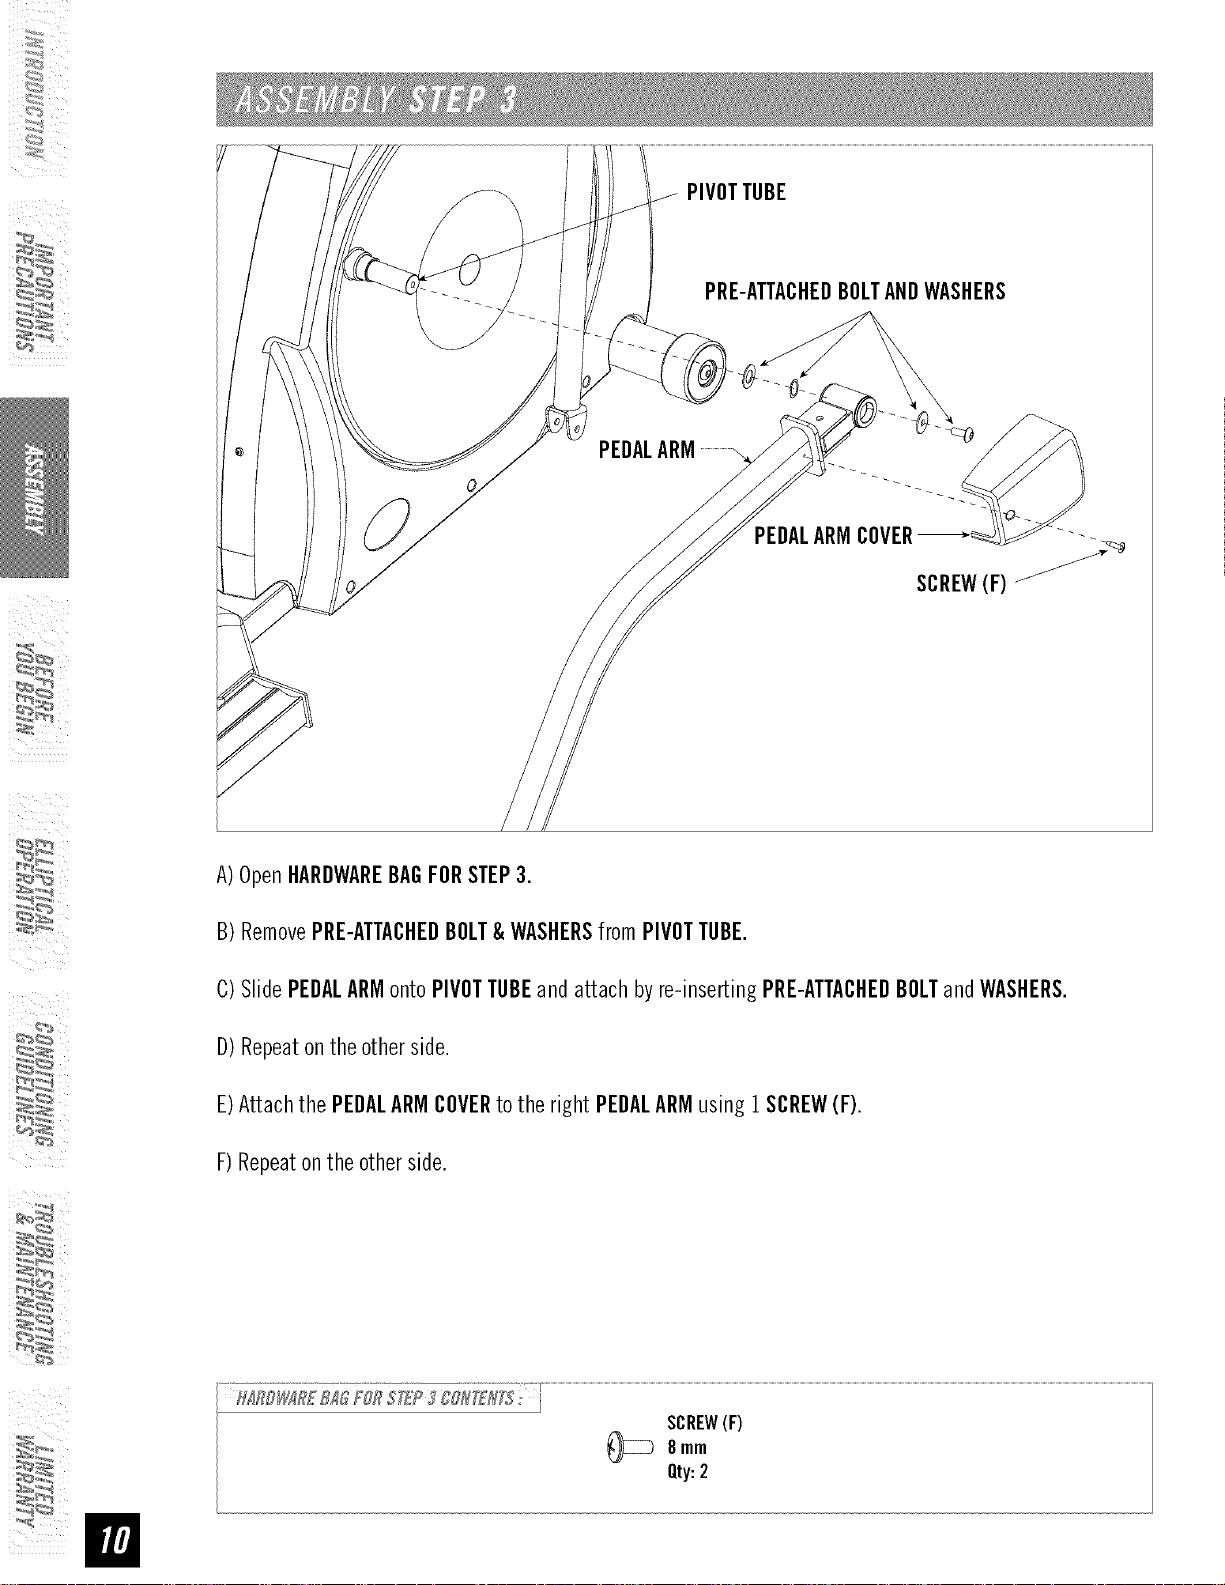
PIVOTTUBE
PRE-ATTACHEBBOLTANDWASHERS
PEDALARM.......................
PEDALARMCOVER _._
SCREW(F)
A)OpenHARDWAREBAGFORSTEP3.
B)RemovePRE-ATTACHEDBOLT& WASHERSfrom PIVOTTUBE.
C)Slide PEDALARMonto PIVOTTUBEand attach byre-inserting PRE-ATTACHEDBOLTandWASHERS.
D)Repeatonthe other side.
E)Attachthe PEDALARMCOVERto the right PEDALARMusing1SCREW(F).
F)Repeaton the otherside.
SCREW(F)
_ 8mm
Qty:2
:_
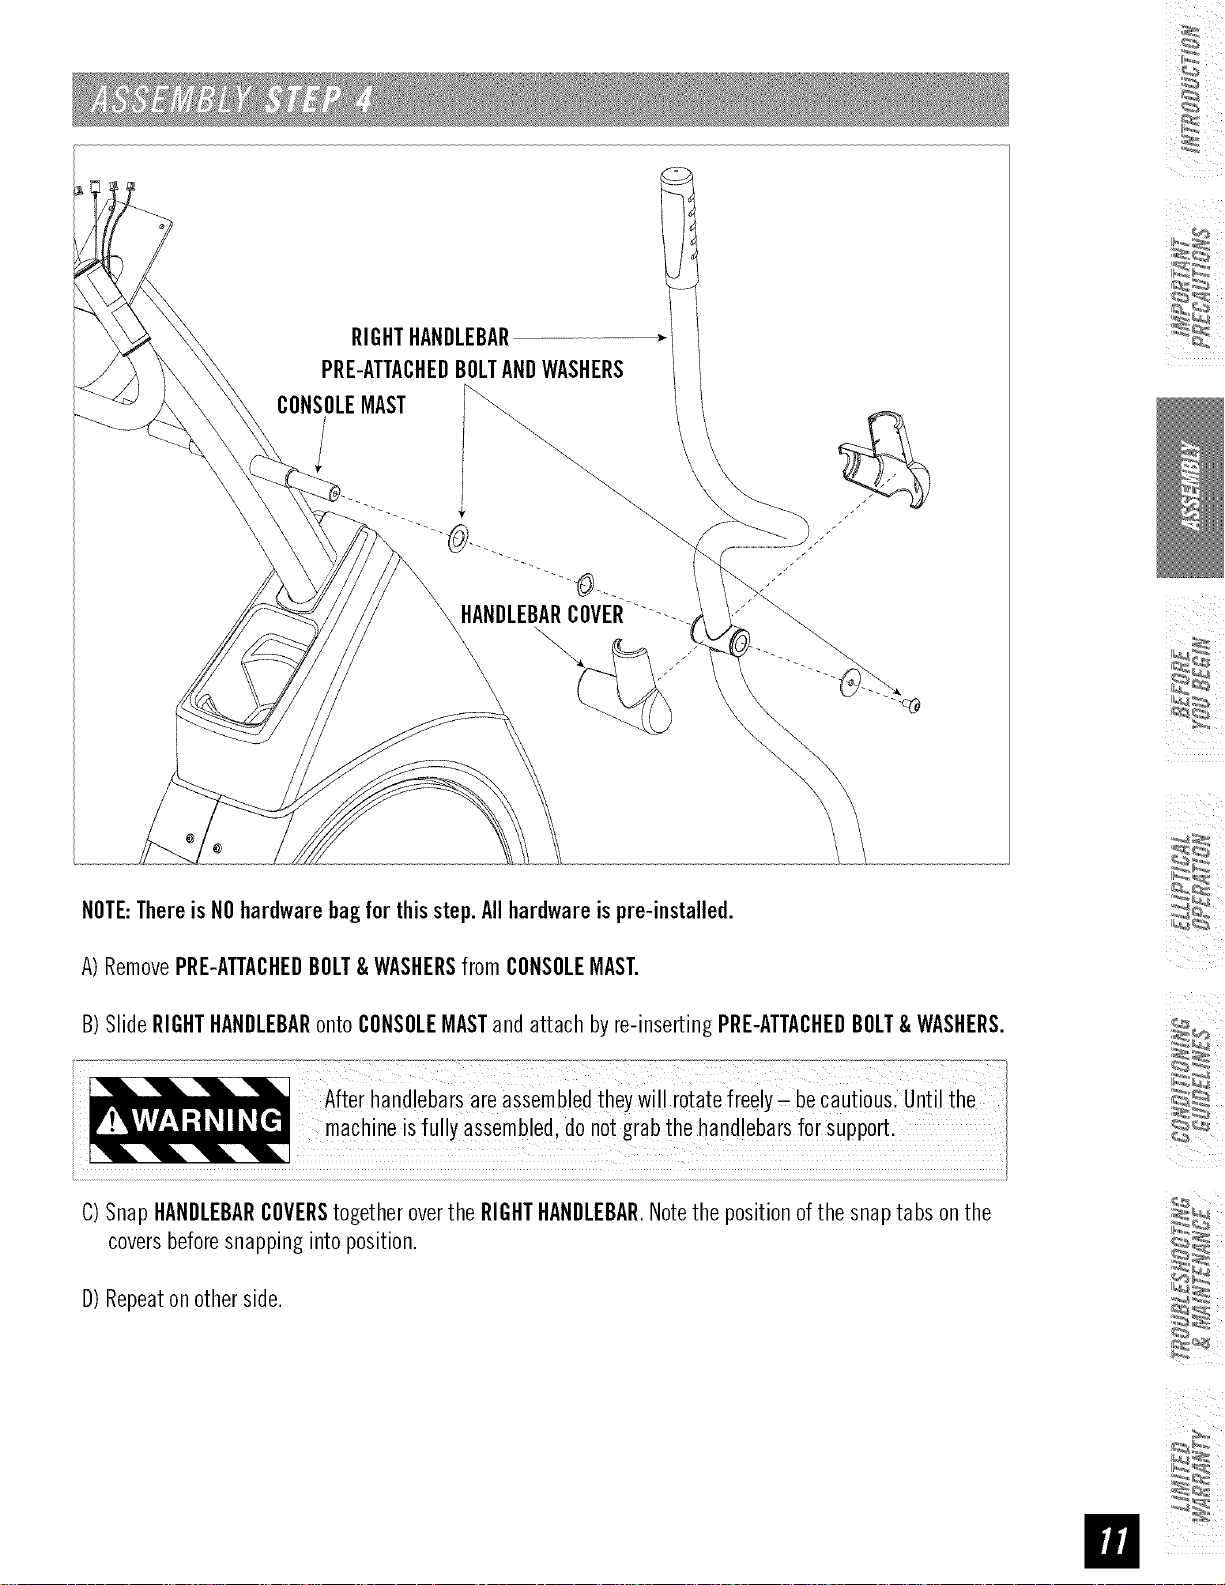
RIGHTHANDLEBAR
PRE-ATTACHEDBOLTANDWASHERS
CONSOLEMAST
/
NOTE:Thereis NOhardwarebagfor thisstep.Allhardwareispre-installed.
A)RemovePRE-ATTACHEDBOLT&WASHERSfrom CONSOLEMAST.
B)SlideRIGHTHANDLEBARontoCONSOLEMASTandattach byre-insertingPRE-ATTACHEDBOLT&WASHERS.
Afterhand!ebaBareassembledtheywil! rotatefreely_ be cautious Unti! ihe
machine is fully assembled do notgrabthe handlebarsforsupport.
C)SnapHANDLEBARCOVERStogetheroverthe RIGHTHANDLEBAR.Notethe position ofthe snaptabs onthe
coversbeforesnappinginto position.
D)Repeatonotherside.
ii
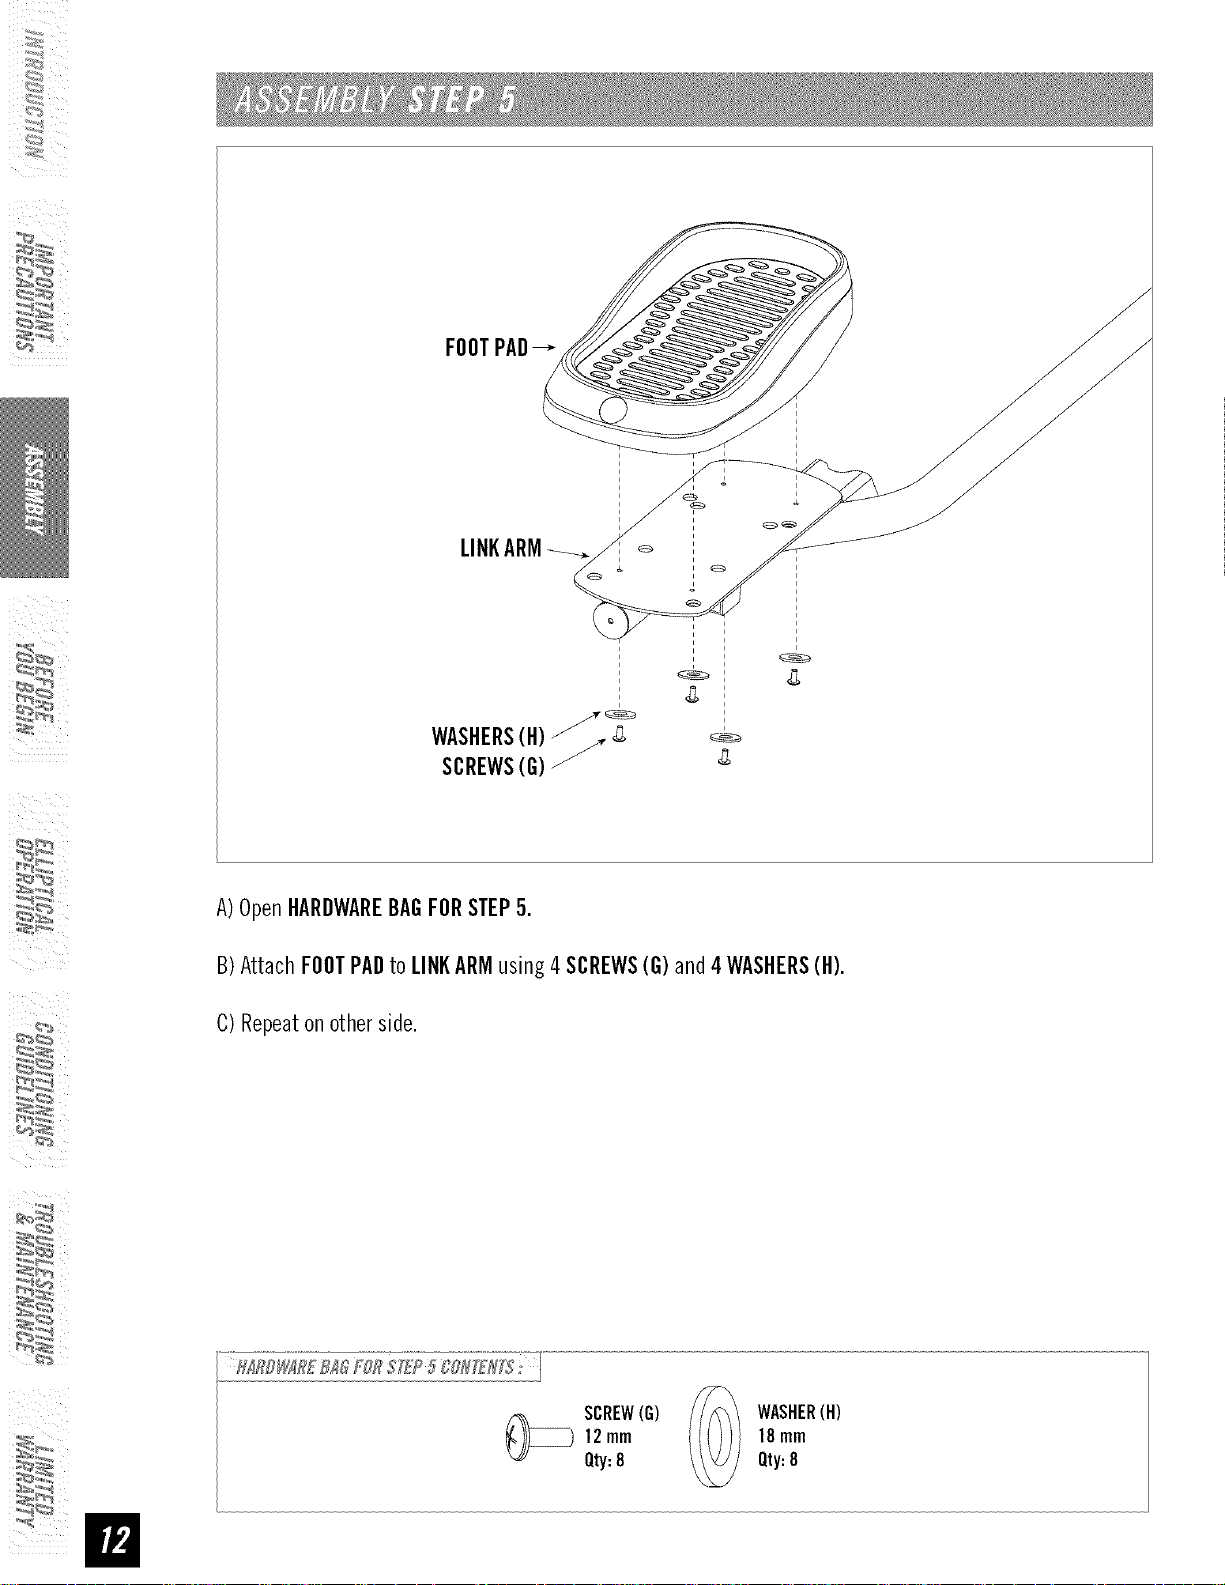
FOOTPADs-
WASHERS(H) _ _ _-_
SCREWS(G) Zj
A)OpenHARDWAREBAGFORSTEP5.
B)AttachFOOTPADto LINKARMusing 4SCREWS(G)and4 WASHERS(H).
C)Repeatonotherside.
SCREW(G) WASHER(H)
12mm 18mm
Qty:8 Qty:8
:_
CONNECTINGTUBE
PEDALARM
LINKARM
PEDALARM
-- UBRACKET--
SPLITTEFLON
BOLT(1.
WASHER(J) il
CONNECTINGTUBE
FLATWASHER(K)
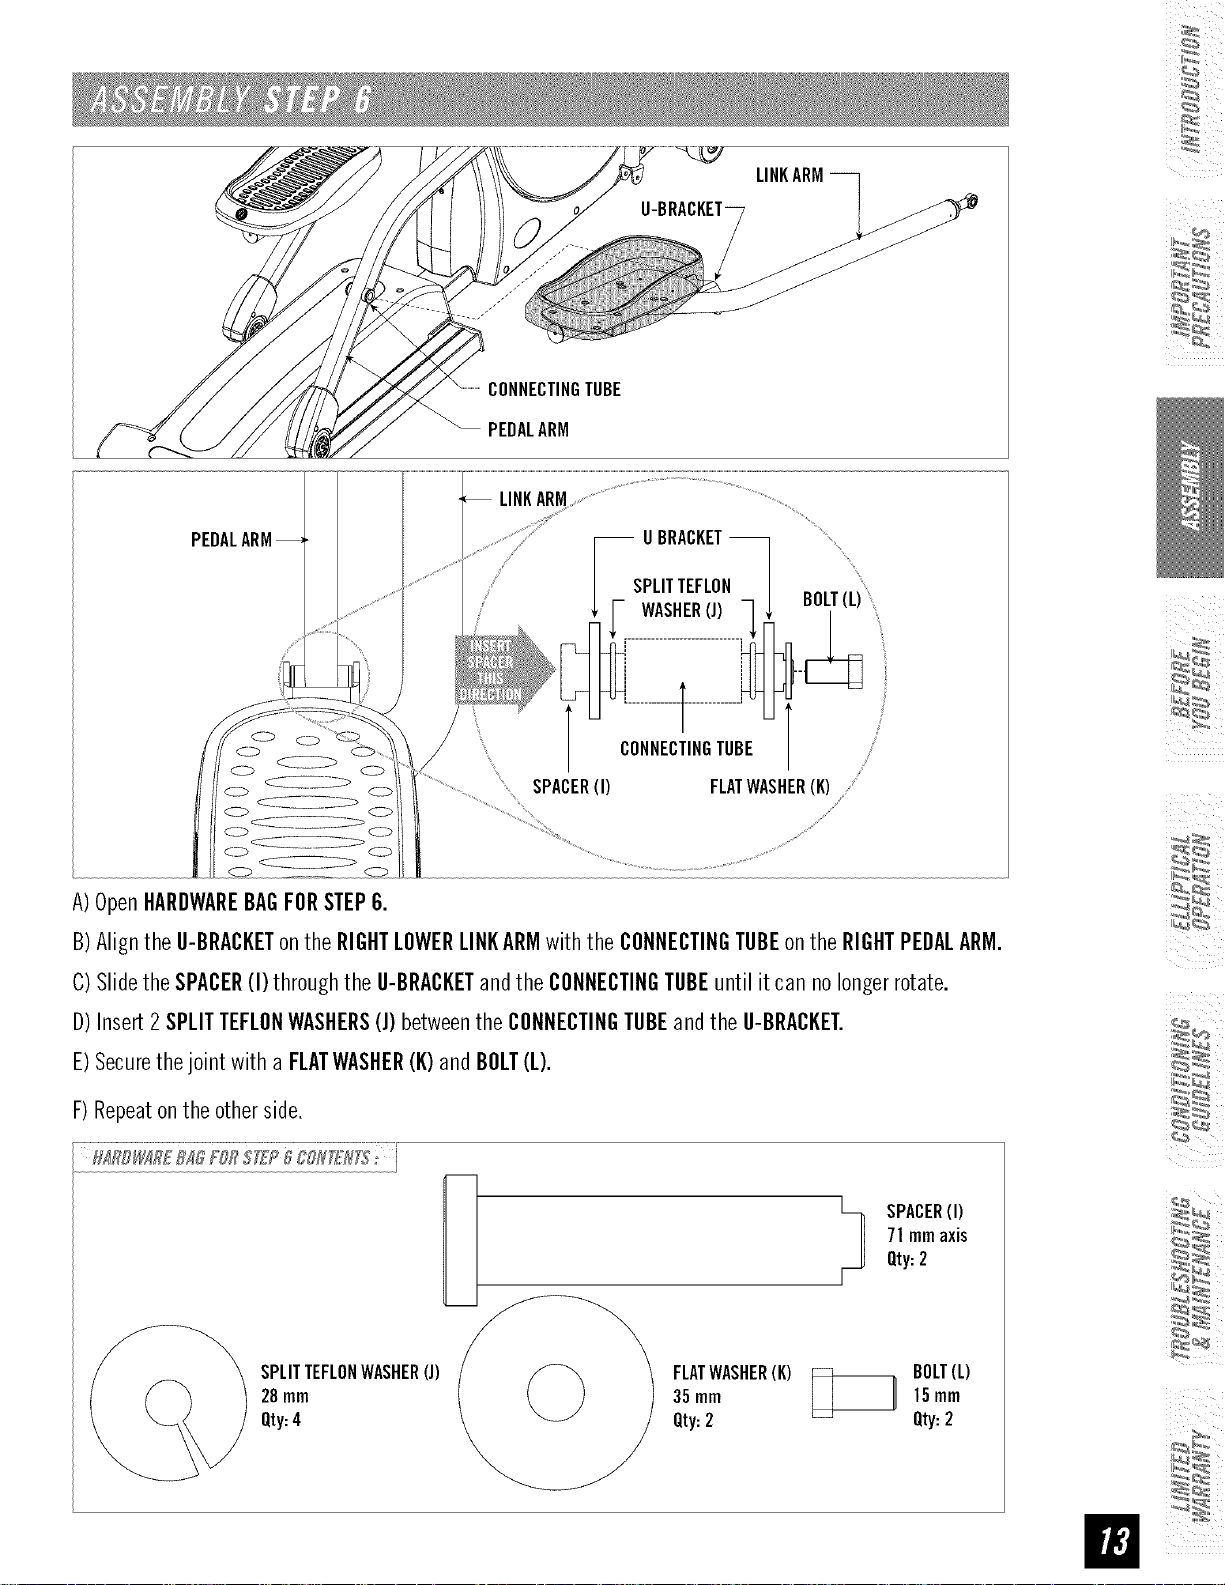
A)OpenHARDWAREBAGFORSTEP6.
B)AligntheU-BRACKETontheRIGHTLOWERLINKARMwiththe CONNECTINGTUBEonthe RIGHTPEDALARM.
C)Slidethe SPACER(I) throughthe U-BRACKETandthe CONNECTINGTUBEuntil itcan nolongerrotate.
D)Insert2SPLITTEFLONWASHERS(J)betweenthe CONNECTINGTUBEandthe U-BRACKET.
E)Securethejoint witha FLATWASHER(K)and BOLT(L).
F)Repeaton the otherside.
SPLITTEFLONWASHER(J) ; _ _
28mm
Qty:4
FLATWASHER(K)
35mm
Qty:2
t SPACER(I)
7] mmaxis
Qty:2
F
15turn
BOLT(L)
Qty:2
ii
LOWERLINKARM LOWER
_ HANDLEBAR
ACERRINGS(N) /
LOWERHANDLEBAR
NUT(Q) __
BOLT(M)
AsNERiP
LOWERLINKARM
SPACERRINGS(N)
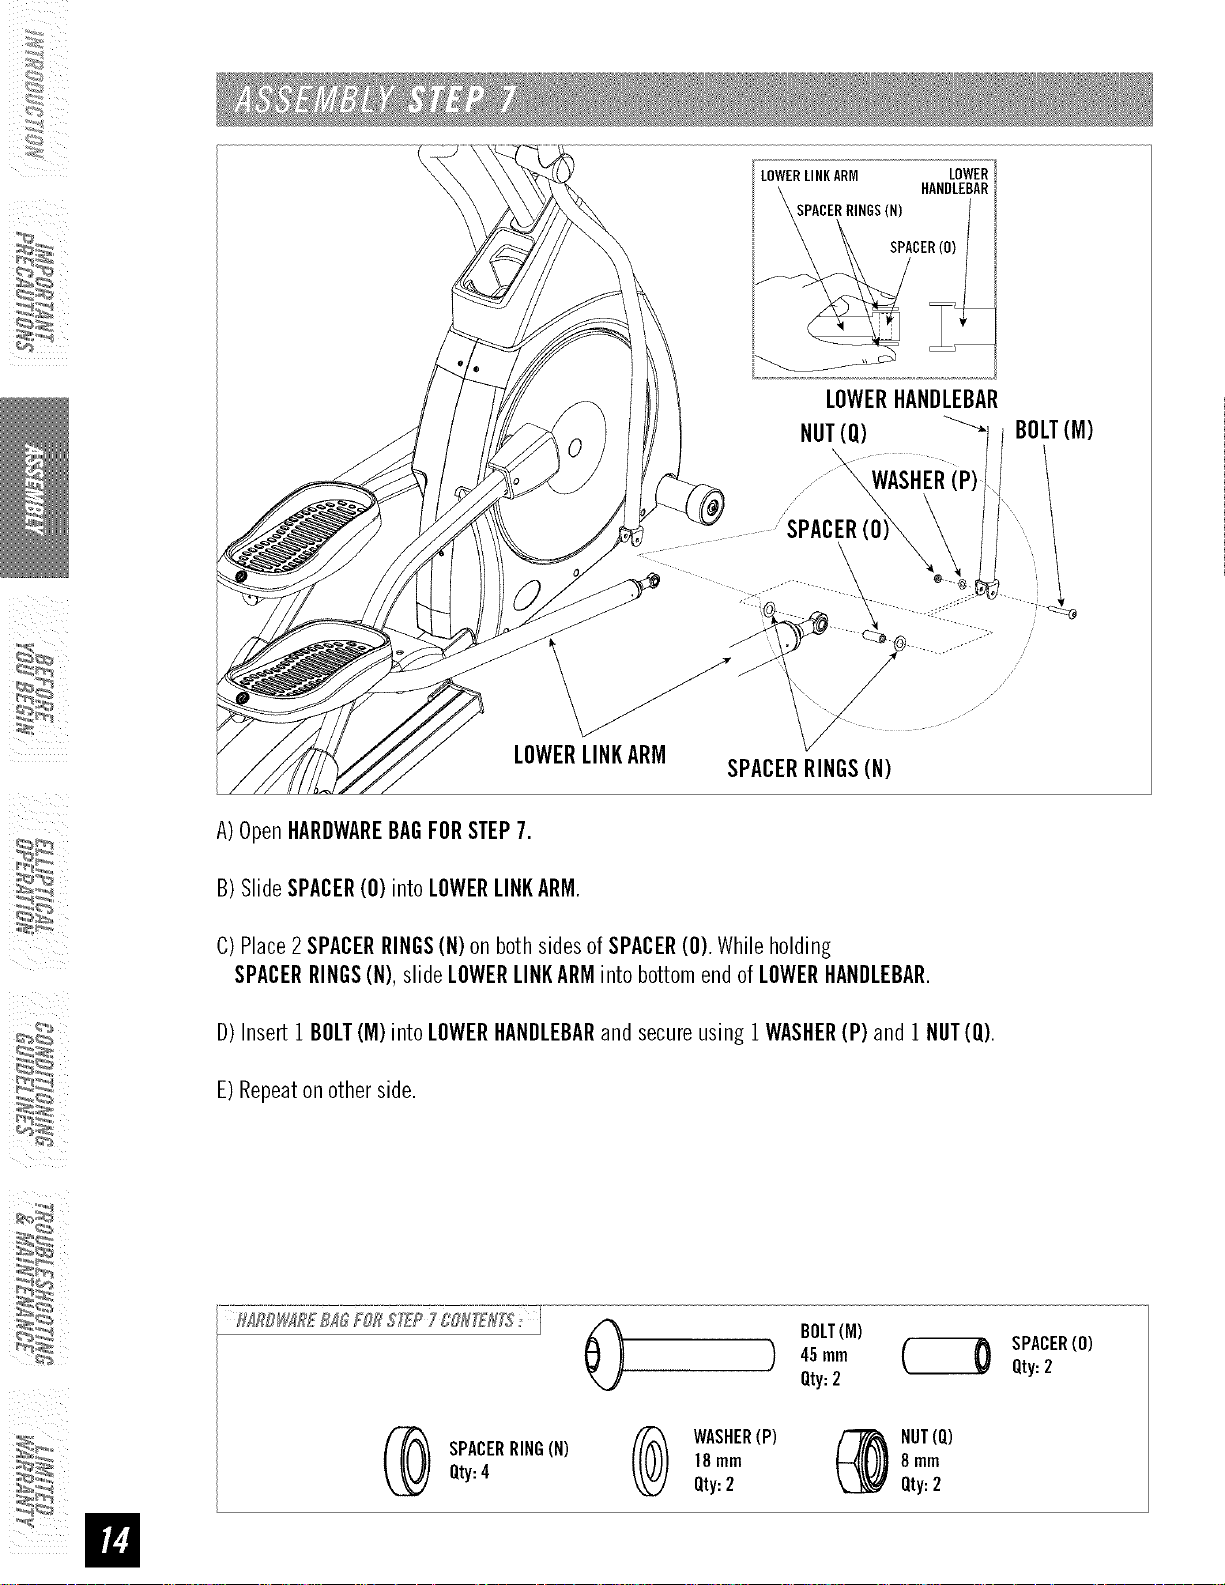
A)OpenHARDWAREBAGFORSTEP7.
B)SlideSPACER(O) intoLOWERLINKARM.
C)Place2SPACERRINGS(N) on bothsidesof SPACER(O).Whileholding
SPACERRINGS(N),slideLOWERLINKARMintobottomendof LOWERHANDLEBAR.
D)Insert1 BOLT(M) intoLOWERHANDLEBARandsecureusing1WASHER(P) and 1 NUT(Q).
E)Repeaton otherside.
45mm
BOLT(M) (_
Qty:2
SPACERRING(N) 18mm 8 mm
(_ (_ WASHER(P) (_ NUT(Q)
Qty:4
Qty:2 Qty:2
SPACER(0)
Qty:2
 Loading...