

Horizon EX-56 Owner’s Manual
ELLIPTICAL USER'S GUIDE

CONGRATULATIONSand THANKYOUforyourpurchaseof this HorizonSerieselliptical!
Whetheryour goal is to win races or simply enjoy a fufler, healthier fifestyle, a Horizon Series efliptical
can help you attain it- adding club-quafity performance toyour at-home workouts, with the ergonomics
and innovative features you need to get stronger and healthier, faster. Because we're committed to
designing fitness equipment from the inside out, we use only the highest quality components. It's a
commitment we back with one of the strongest frame-to-brake warranty packages in the industry.
Youwant exerciseequipment that offers the most comfort, the best reliability and the highest quality
in its class.
TheHorizonSeriesdelivers.
Important Precautions
Assembly
Before YouBegin
Elliptical Operation
14
15
Conditioning Guidelines 21
Troubleshooting & Maintenance 27
Limited Warranty 31
CONTACTINFORMATION Back Panel
4
5
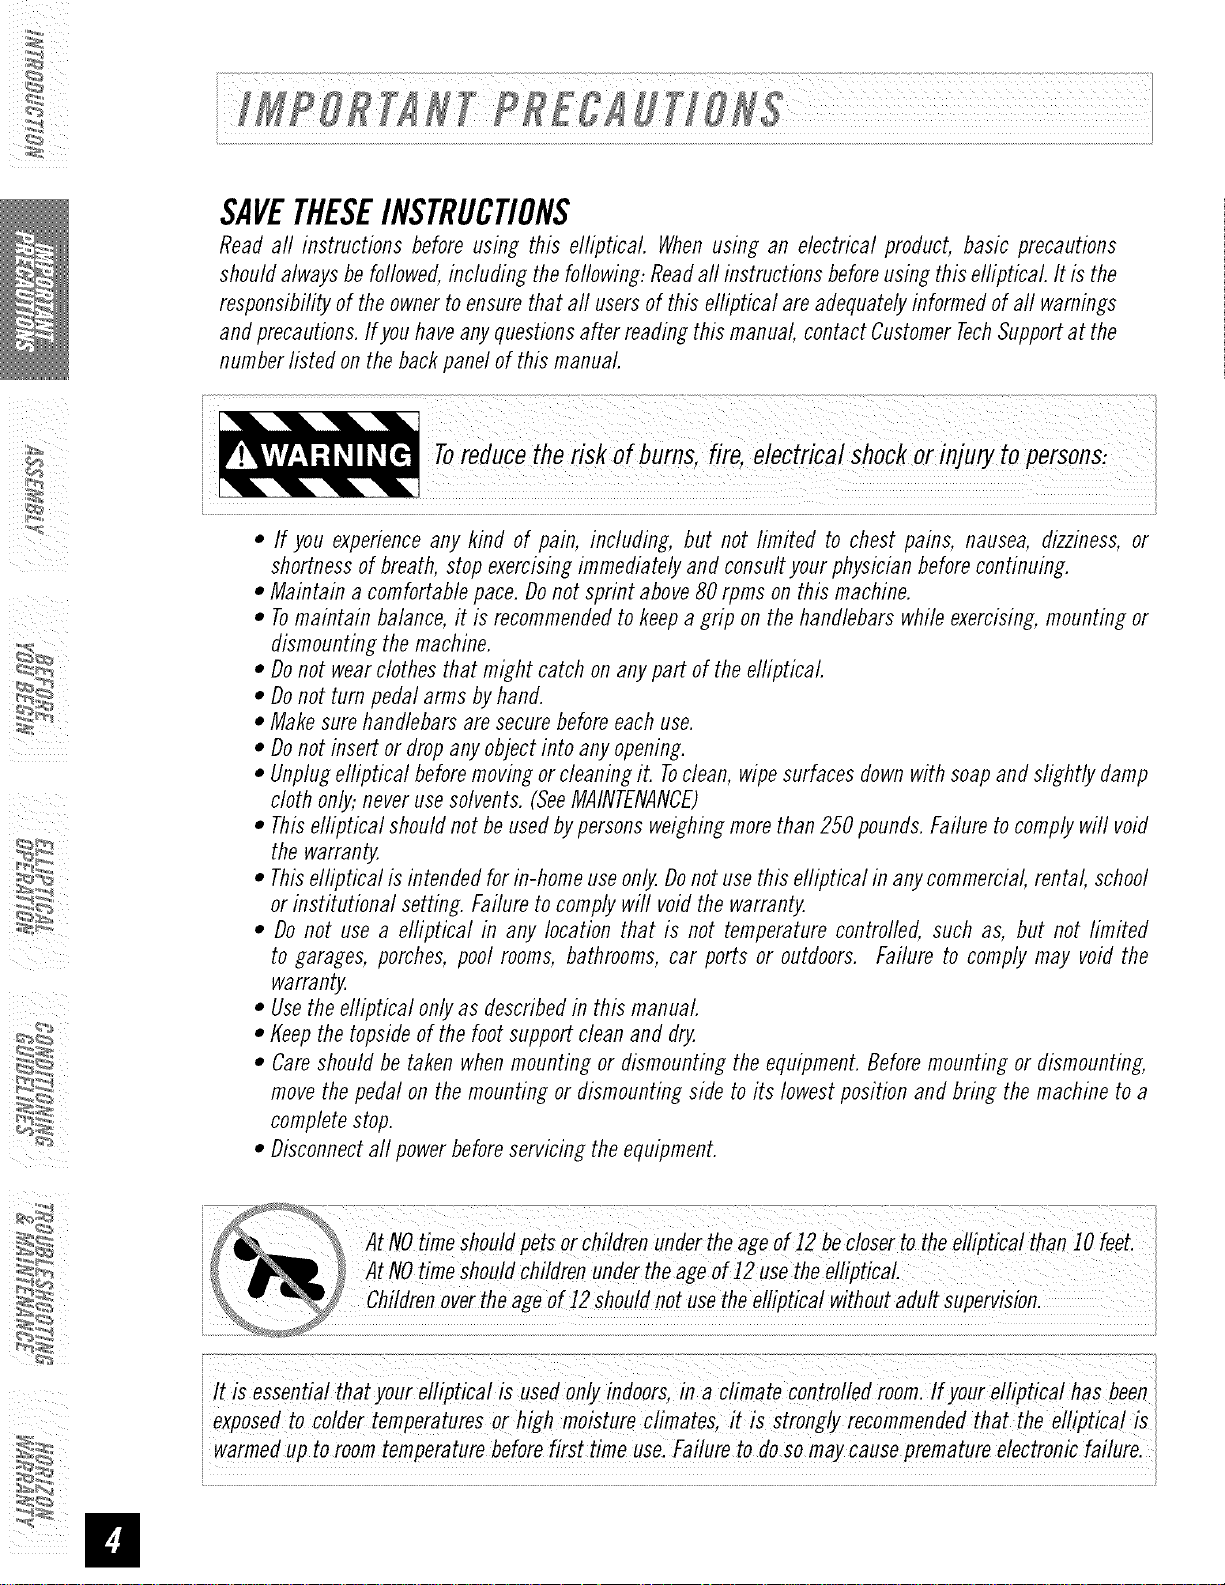
SAVETHESEINSTRUCTIONS
Read all instructions before using this elliptical. When using an electrical product, basic precautions
should always be followed, including the following- Readaft instructions before using this elliptical It is the
responsibility of the owner to ensure that aft users of this elliptical are adequately informed of aft warnings
and precautions. If you have any questions after reading this manual, contact Customer TechSupport at the
number listed on the back panel of this manual
• If you experience any kind of pain, including, but not limited to chest pains, nausea, dizziness, or
shortness of breath, stop exercising immediately and consult your physician before continuing.
• Maintain a comfortable pace. Donot sprint above 80 rpms on this machine.
• Tomaintain balance, it is recommended to keep a grip on the handlebars while exercising, mounting or
dismounting the machine.
• Donot wear clothes that might catch on any part of the elliptical
• Donot turn pedal arms by hand.
• Make sure handlebars are secure before each use.
• Donot insert or drop any object into any opening.
• Unplug elliptical beforemoving or cleaning it. Toclean, wipe surfaces down with soap and slightly damp
cloth only, never use solvents. (SeeMAINTENANCE)
• This elliptical should not be used by persons weighing more than 250 pounds. Failure to comply will void
the warranty.
• This elliptical is intended for in-home use only. Donot use this efliptical in any commercial, rental, school
or institutional setting. Failure to comply will void the warranty.
• Do not use a elliptical in any location that is not temperature controlled, such as, but not limited
to garages, porches, pool rooms, bathrooms, car ports or outdoors. Failure to comply may void the
warranty.
• Use the efliptical only as described in this manual
• Keep the topside of the foot support clean and dry.
• Care should be taken when mounting or dismounting the equipment. Before mounting or dismounting,
move the pedal on the mounting or dismounting side to its lowest position and bring the machine to a
complete stop.
• Disconnect all power before servicing the equipment.
tNO ; e;hou;_ ;ts;_hildre_ nde_thea ;;ii b _i;to;ie;lli ;_alti_n _0
A t;m p u g 2 e L ;pt
At NOtimeshould ChildrenUndertheageof ;2 usethe ellipticaL
i i!_...................__I'T _i_¸ _':_ : I
i lt is essential that your e/lipticai is used only indoors, in a Climate controlled roomi lf your eilipficai has been
i exposed to coider tem_eraiures o_ high mo;sture Climates, it is strongly recomme_ded that the ellipficai
warmed uP tOr°°m temperatu re before first time use. Failure to do SOmay cause Premature electronic fai!ure.
IMPORTANT..READTHESESAFETYINSTRUCTIONSBEFOREUSE!
Thereareseveralareasduringtheassemblyprocessofa elfipfical that specialattention mustbepaid. It is
veryimportant to followtheassemblyinstructions correctlyand tomakesureaftparts arefirmly tightened.
If the assemblyinstructions are not followedcorrectly,the elliptical could have frame,oaRsthat arenot
tightenedand will seemloose and may cause irritating noises. Toprevent damageto the eflipticaL the
assemblyinstructions must bereviewedand correctiveactionsshouldbe taken.
UNPACKING
Unpacktheproduct whereyou will be using it. Placetheproduct ona levelflat surface.It is recommended
that you place a protectivecoveringonyour floor.Duringeach assemblystep, ensurethat ALLnuts and
boltsarein place andpartially threadedin beforecompletelytightening anyONEbolt.
NOTE:A light application of greasemayaid in theinstallation of hardware.Anygrease,such as lithium
bikegreaseis recommended.
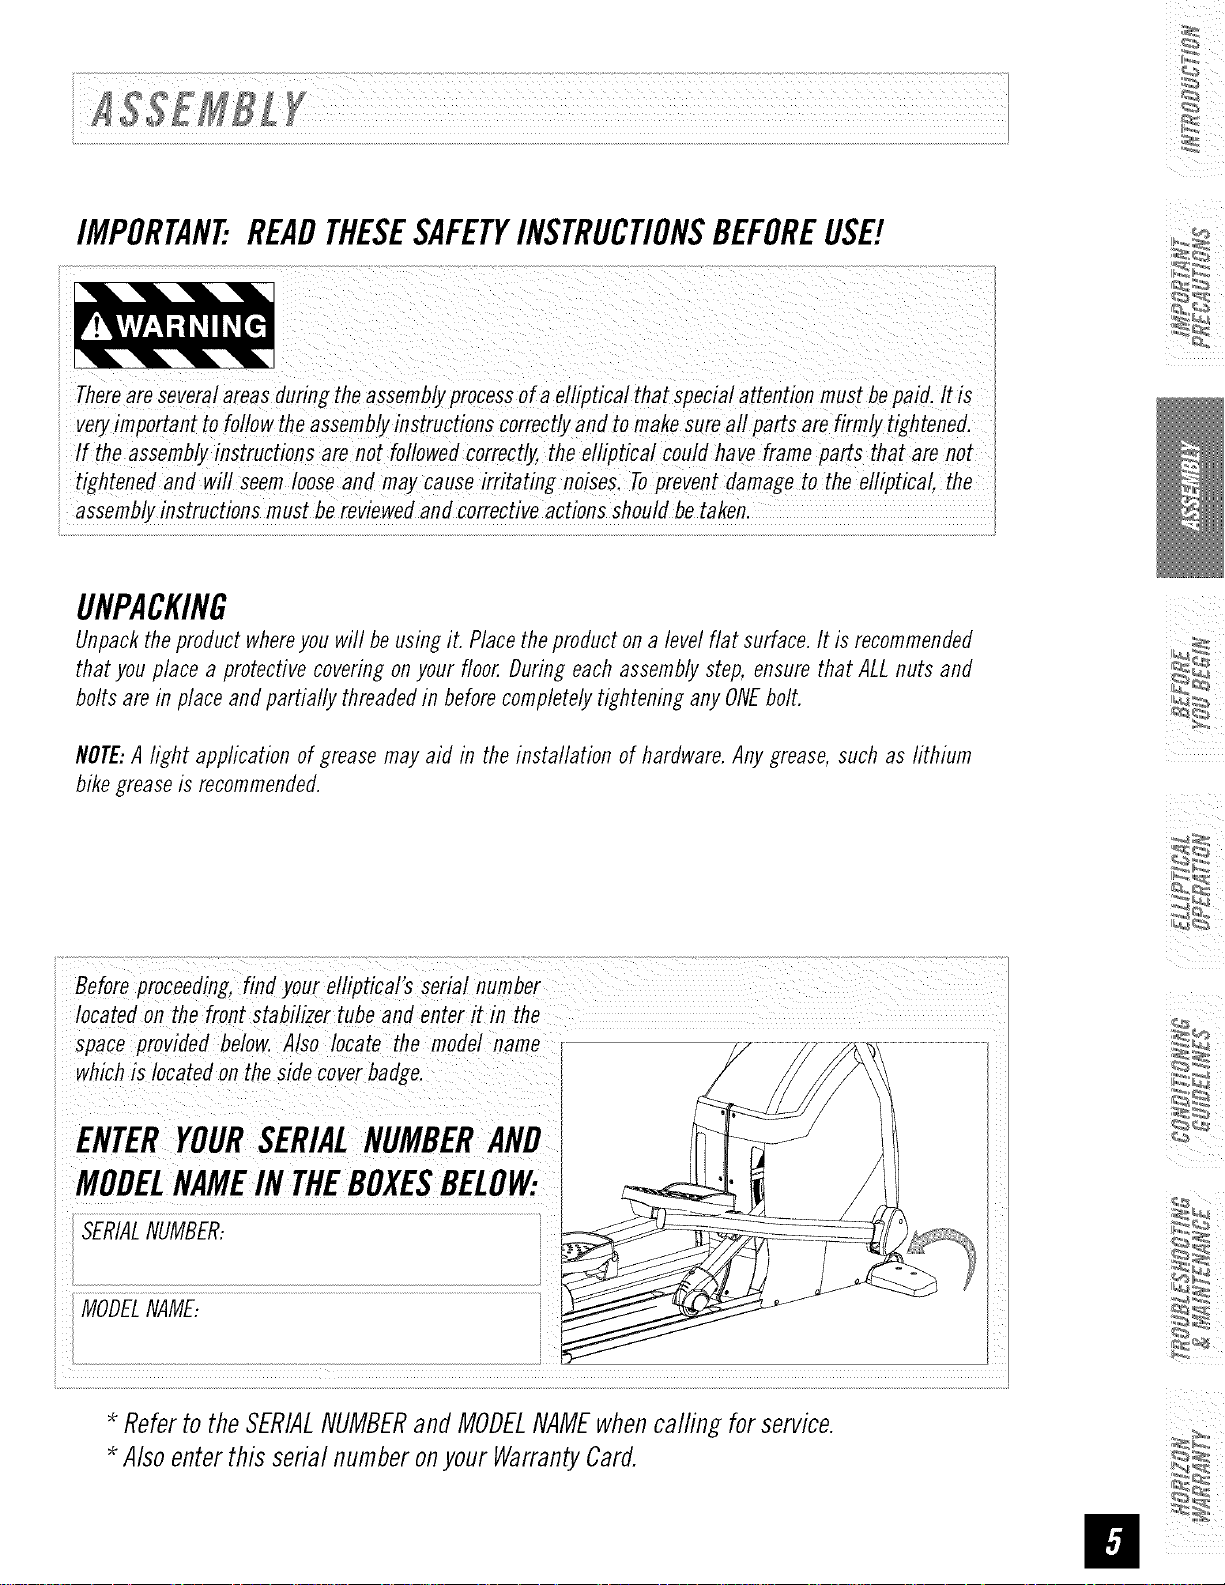
Befo_p_oceed_.g,_ayo,_ei_/'_ ¸¸seMi.,mber ;
i iocated on thefront stabilizer tube and enter it in the
i space provided below. Also locate the model name[
is locatedon theside coverbadge.
i i
i i
ENTERYOURSERIALNUMBERAND
i [
MOOEL INTHEBOXESBEL0W:
MODELNAME:
* Referto theSERIALNUMBERandMODELNAMEwhencalfing forservice.
* AlsoenterthisserialnumberonyourWarrantyCard.
E
I
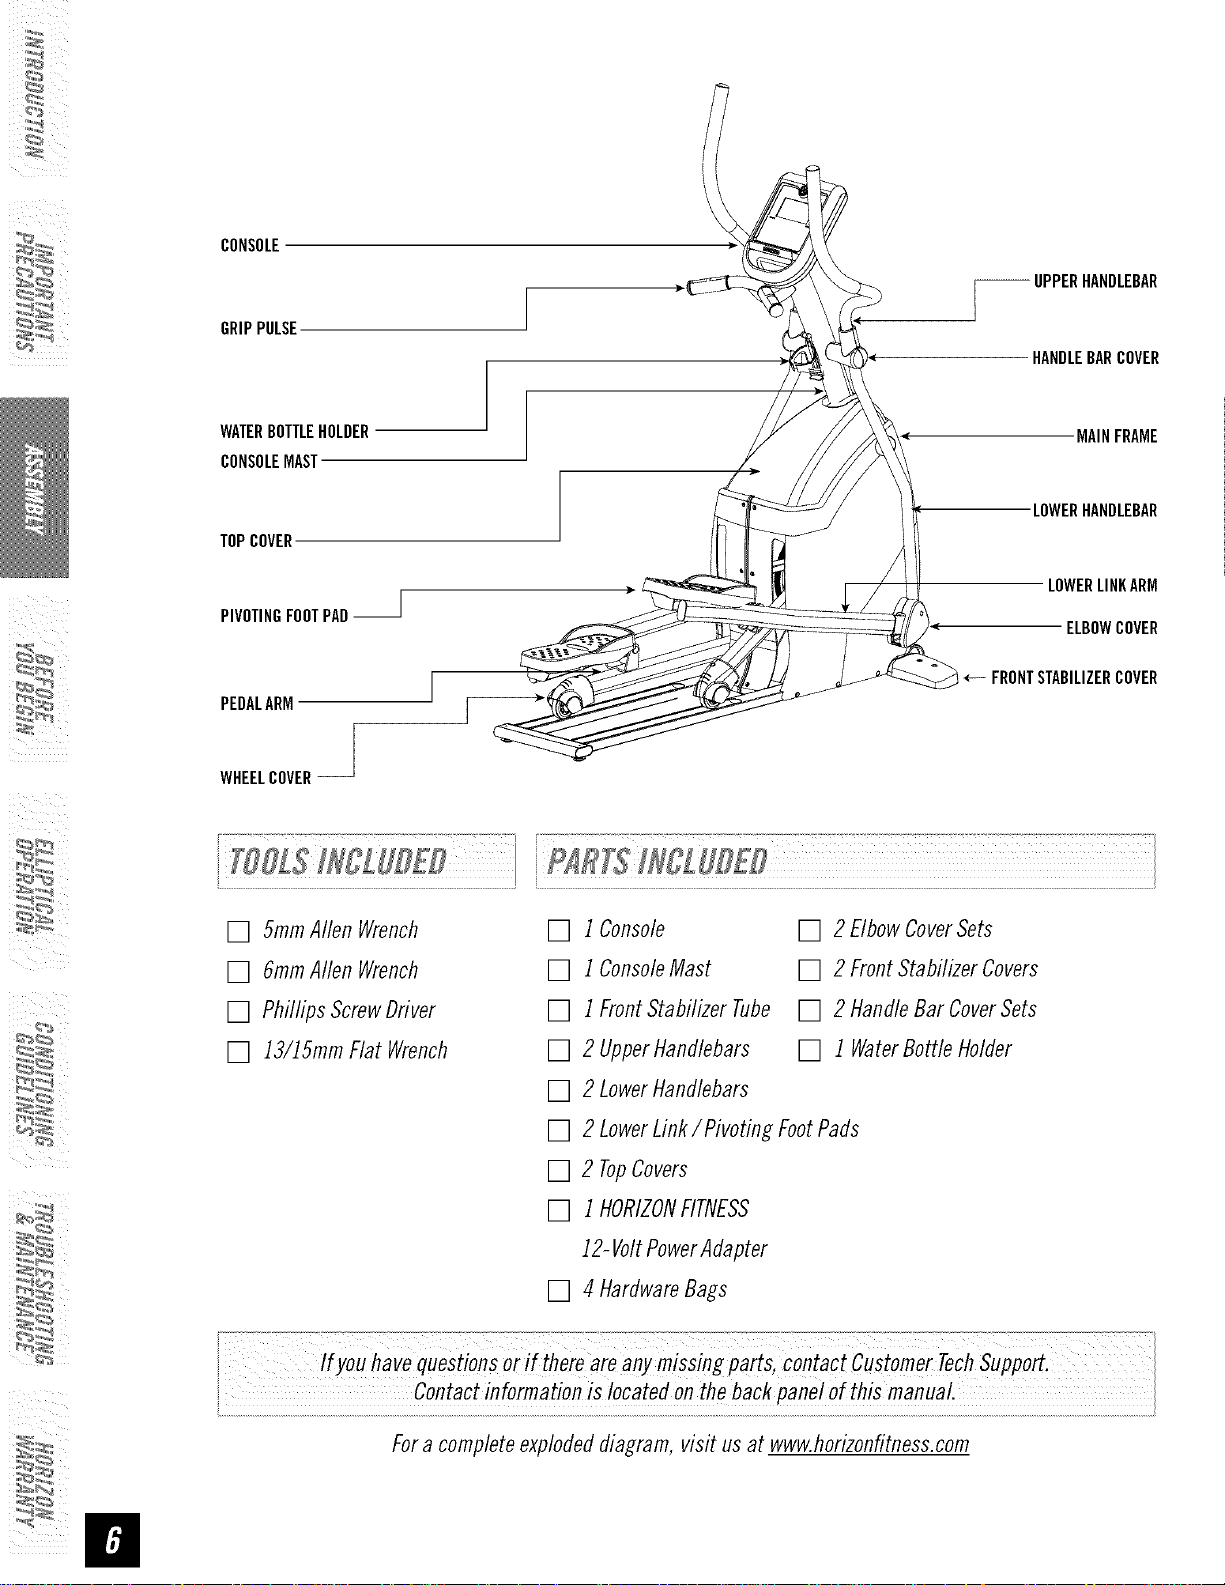
CONSOLE
GRIPPULSE
UPPERHANDLEBAR
HANDLEBARCOVER
WATERBOTTLEHOLDER
CONSOLEMAST
TOPCOVER
PIVOTINGFOOTPAD--
PEDALARM
WHEELCOVER--
[] 5ramAllen Wrench
[] 6ramAllen Wrench
[] Phillips ScrewDriver
[] 1Console
[] 1ConsoleMast
[] 1FrontStabilizerTube
MAINFRAME
LOWERHANDLEBAR
LOWERLINKARM
ELBOWCOVER
FRONTSTABILIZERCOVER
[] 2 EIbowCoverSets
[] 2 FrontStabilizerCovers
[] 2 HandleBar CoverSets
[] 13/15mmFlat Wrench
[] 2 UpperHandlebars
[] 1 WaterBottleHolder
[] 2 LowerHandlebars
[] 2 LowerLink/Pivoting FootPads
[] 2 TopCovers
[] 1HORIZONFITNESS
12-VoltPowerAdapter
[] 4 HardwareBags
i havequestionsoriftherearean missingpa s,co"tactc,stomerTechSuppo .
contact information is locaiedonthe backpane!o! this manuaI.
Fora completeexplodeddiagram, visit us at www.horizonfitness.com
E
REARSTABILIZER
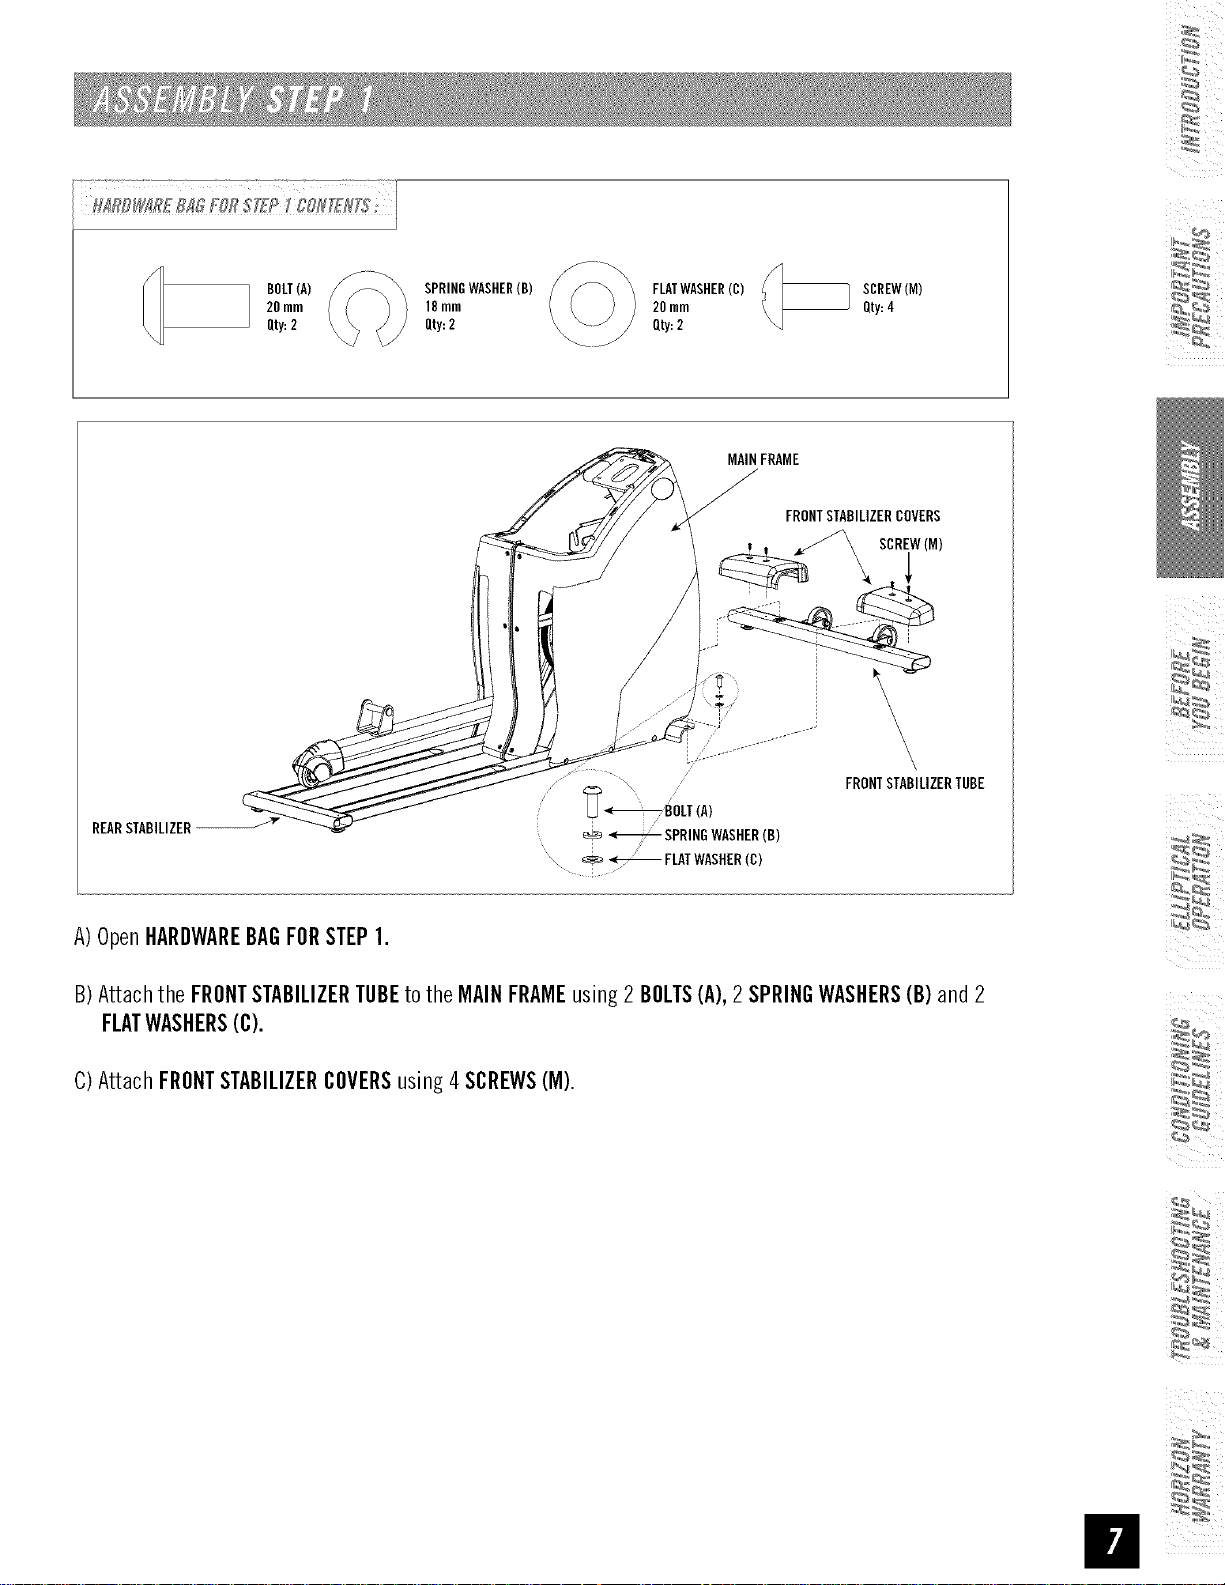
BOLT(A)
20ram
Qty:2
SPRINGWASHER(B)
18mm
Qty:2
FLATWASHER(C)
20ram
Qty:2
MAINFRAME
J
\
_BOLT_A)
÷_ SRR,NOWAS,ER_B)
_ FLATWASHER(C)
i
SCREW(M)
Qty:4
A)OpenHARDWAREBAGFORSTEP1.
B)Attachthe FRONTSTABILIZERTUBEtothe MAINFRAMEusing2 BOLTS(A),2 SPRINGWASHERS(B)and 2
FLATWASHERS(C).
C)AttachFRONTSTABILIZERCOVERSusing4 SCREWS(M).
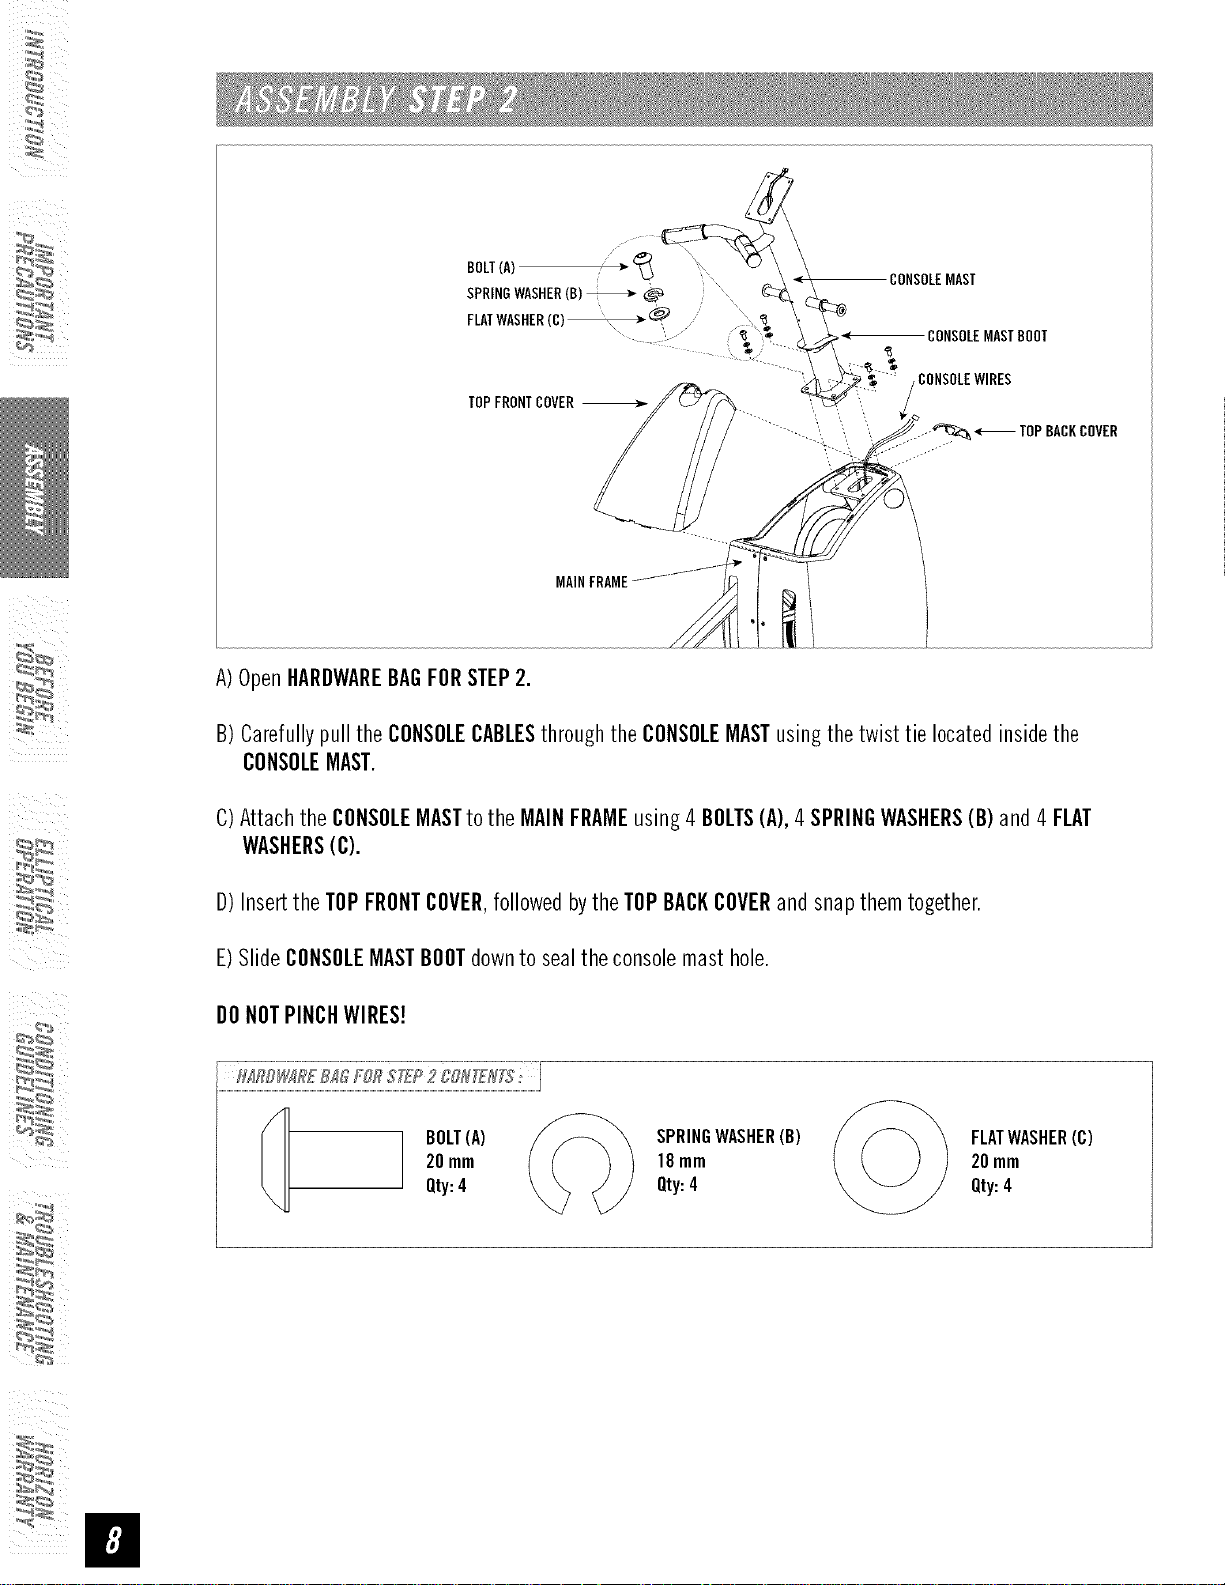
CO,SOLEOAS,
A)OpenHARDWAREBAGFORSTEP2.
B)Carefullypullthe CONSOLECABLESthroughthe CONSOLEMASTusingthetwist tie locatedinsidethe
CONSOLEMAST.
C)Attachthe CONSOLEMASTto the MAINFRAMEusing4 BOLTS(A),4SPRINGWASHERS(B) and 4 FLAT
WASHERS(C).
D)Insertthe TOPFRONTCOVER,followedbythe TOPBACKCOVERandsnapthem together.
E)SlideCONSOLEMASTBOOTdownto sealthe consolemast hole.
DONOTPINCHWIRES!
BOLT(A)
20mm
Qty:4
SPRINGWASHER(B) / S_ \
18mm
Qty:4
FLATWASHER(C)
20mm
Qty:4
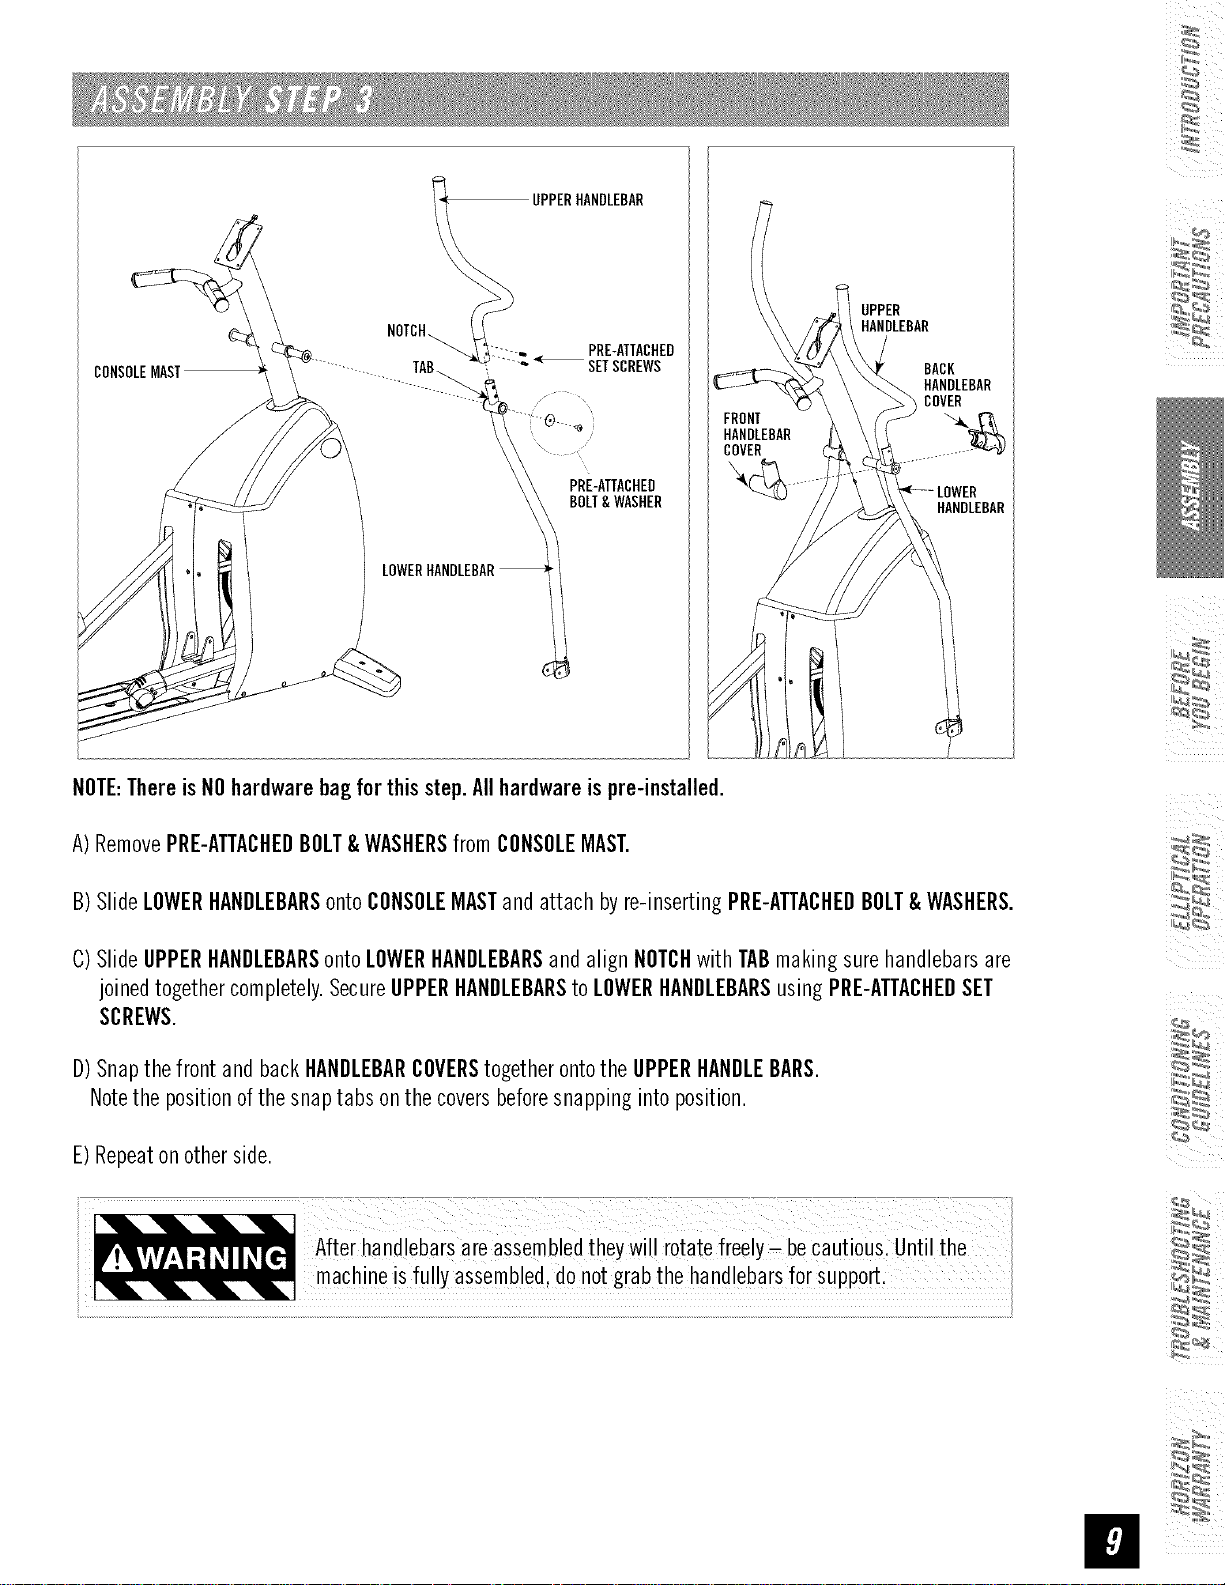
__ UPPERHANDLEBAR
NOTCH_y. PRE-ATTACHED
"_-L_......~ _ SETSCREWS
PRE-ATTACHED
BOLT& WASHER
LOWERHANDLEBAR
NOTE:Thereis NOhardwarebagforthisstep.Allhardwareispre-installed.
A)RemovePRE-ATTACHEDBOLT& WASHERSfromCONSOLEMAST.
UPPER
HANDLEBAR
BACK
HANDLEBAR
COVER
HANDLEBAR
B)SlideLOWERHANDLEBARSontoCONSOLEMASTandattach byre-insertingPRE-ATTACHEDBOLT&WASHERS.
C)Slide UPPERHANDLEBARSontoLOWERHANDLEBARSandalign NOTCHwith TABmakingsurehandlebarsare
joinedtogethercompletely.SecureUPPERHANDLEBARSto LOWERHANDLEBARSusing PRE-ATTACHEDSET
SCREWS.
D)Snapthe front and backHANDLEBARCOVERStogetherontothe UPPERHANDLEBARS.
Notethe positionof the snaptabs onthe coversbeforesnapping into_osition.
E)Repeaton otherside.
44_
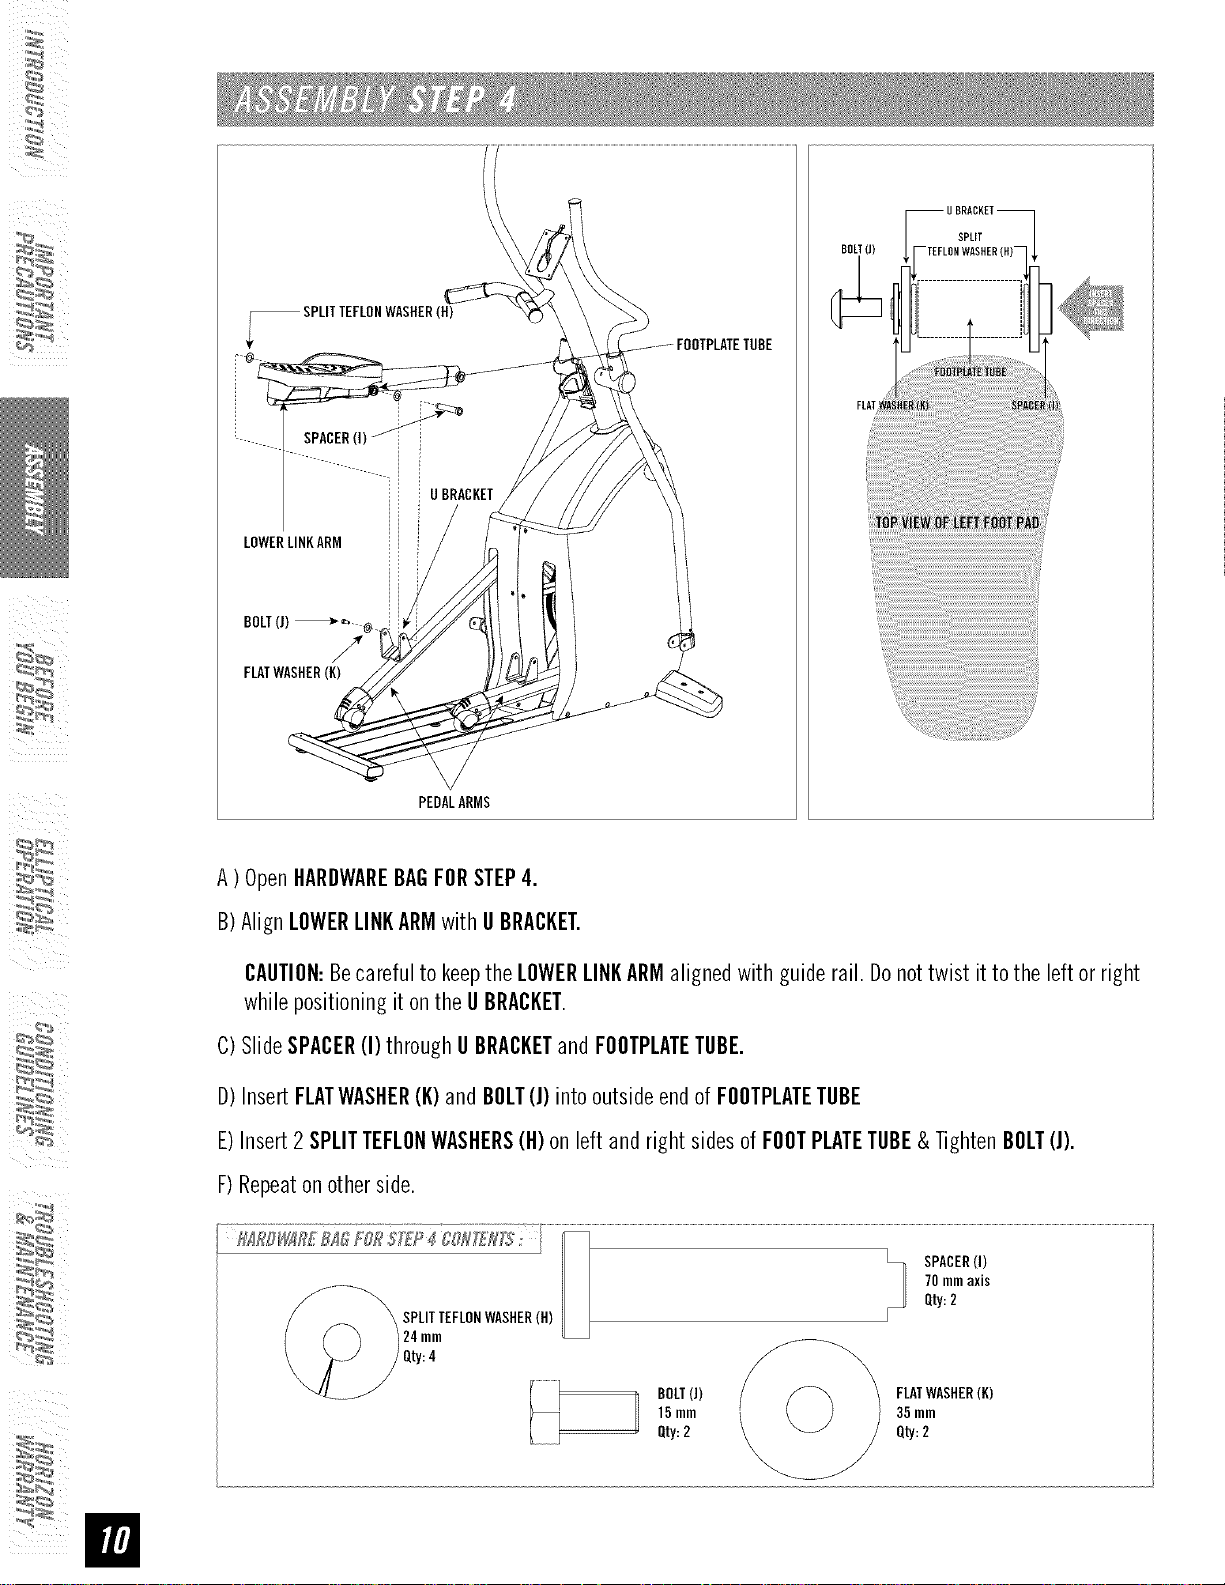
_ SPLITTEFLONWASHER(H)
SPACER(I)
ii i UBRACKET
LOWERLINKARM
BOLT(J)_ _.,_@.
/
FLMWASHER(K)
PEDALARMS
BOLT(J)
SPLIT
-TEFLONWASHER
A) OpenHARDWAREBAGFORSTEP4.
B)AlignLOWERLINKARMwithU BRACKET.
CAUTION:Becareful to keeptheLOWERLINKARMalignedwith guiderail. Donottwist itto the leftor right
whilepositioningit ontheUBRACKET.
C)SlideSPACER(I) throughUBRACKETand FOOTPLATETUBE.
D)InsertFLATWASHER(K)and BOLT(J)into outsideendof FOOTPLATETUBE
E)Insert2 SPLITTEFLONWASHERS(H)on leftand right sidesof FOOTPLATETUBE& TightenBOLT(J).
F)Repeatonother side.
BOLT(J)
15mm
Qty:2
FLATWASHER(K)
35mm
Qty:2
GUIDERAIL
i LOWERLINKARM LOWERI
_ ......_ SPACER(G)
LOWERLINKARM TEFLONWASHERS(H)
HANULEBARi
LOWERHANDLEBAR
\
NUT(E) BOLT(F)
/
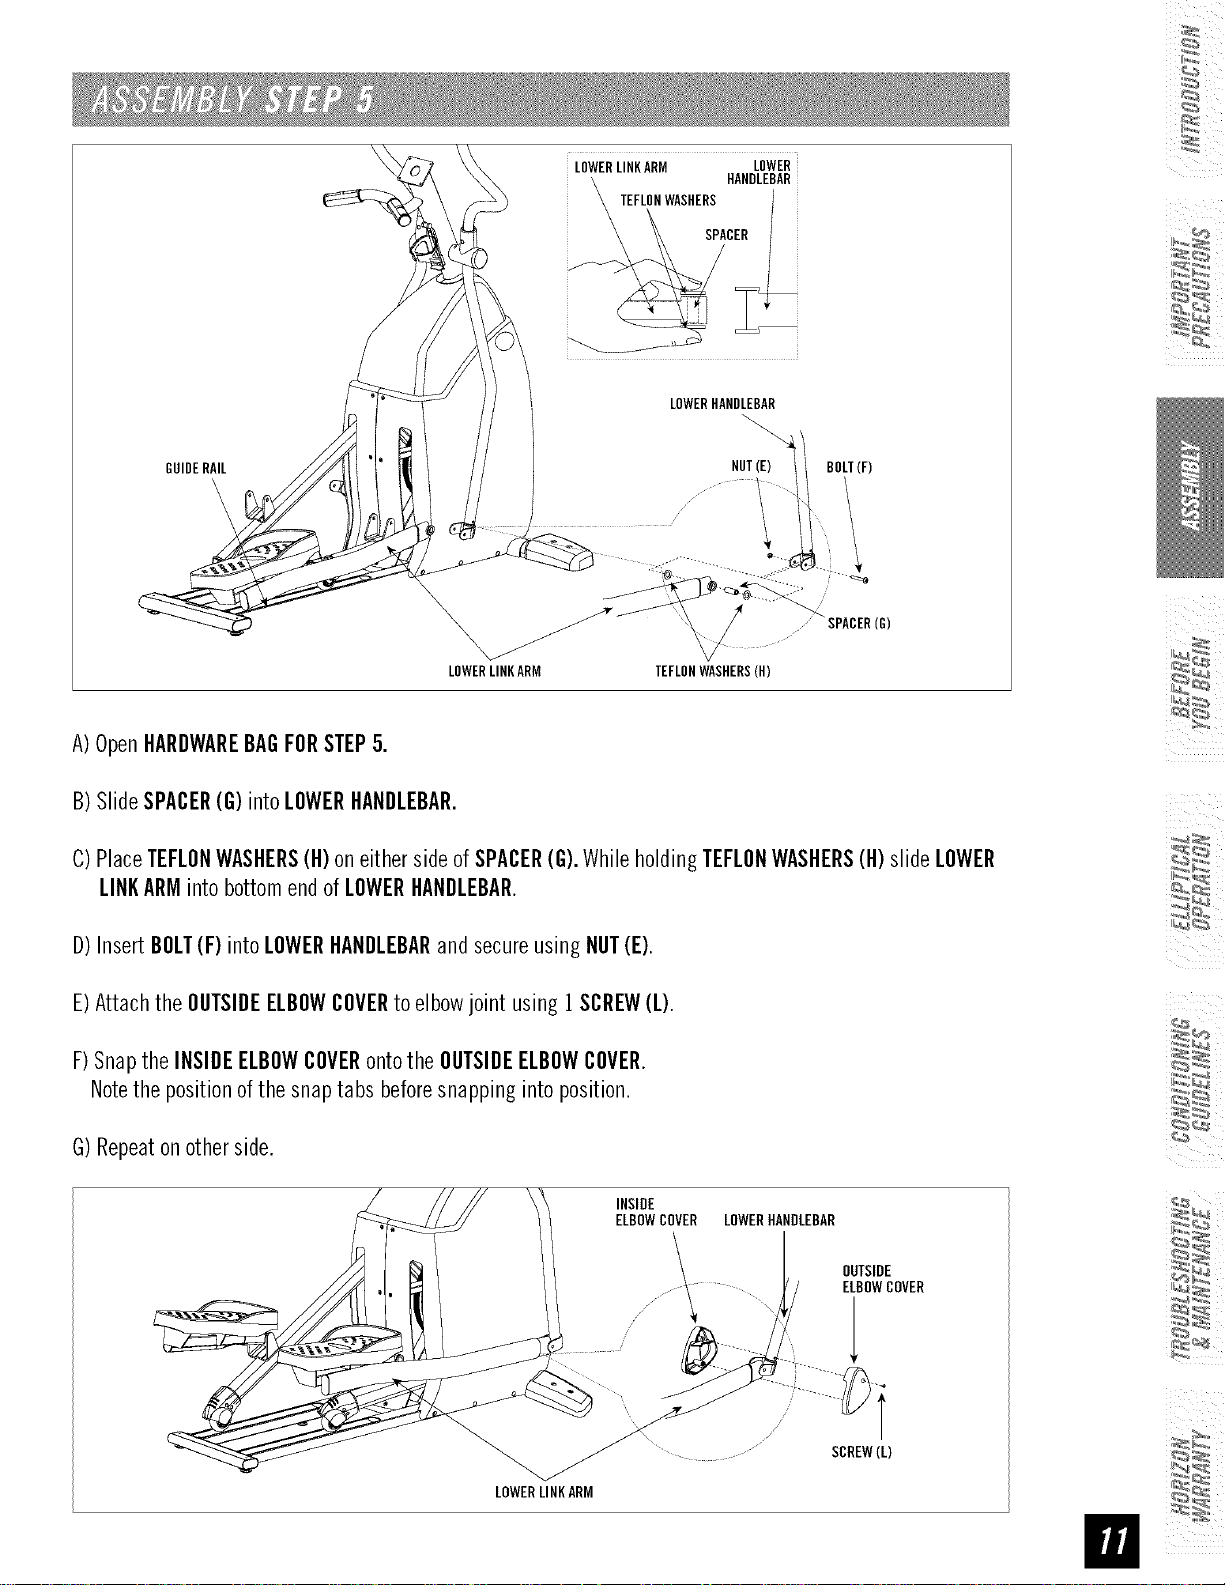
A)OpenHARDWAREBAGFORSTEP5.
B)SlideSPACER(G) intoLOWERHANDLEBAR.
C)PlaceTEFLONWASHERS(H)on eithersideof SPACER(G).WhileholdingTEFLONWASHERS(H)slide LOWER
LINKARMintobottomendof LOWERHANDLEBAR.
D)InsertBOLT(F) intoLOWERHANDLEBARand secureusingNUT(E).
E)Attachthe OUTSIDEELBOWCOVERto elbowjoint using 1SCREW(L).
F)Snapthe INSIDEELBOWCOVERontothe OUTSIDEELBOWCOVER.
Notethe positionof the snaptabs beforesnappingintoposition.
G)Repeatonotherside.
INSIDE
ELBOWCOVER LOWERHANDLEBAR
OUTSIDE
ELBOWCOVER
LOWERLINKARM
T
SCREW(L)
 Loading...