

Horizon E700, E500 Owner’s Manual

ELLIPTICAL USER'S GUIDE

CONGRATULATIONSand THANKYOUforyourpurchaseof this HorizonClubelliptical!
Whetheryour goal is to win races or simply enjoy a fuller, healthier lifestyle, a Horizon Club elliptical can
help you attain it - adding club-quafity performance to your at-home workouts, with the ergonomics
and innovative features you need to get stronger and healthier, faster. Because we're committed to
designing fitness equipment from the inside out, we use only the highest quality components. It's a
commitment we back with oneof the strongest frame-to-brake warranty packages in the industry.
Youwant exerciseequipment that offersthemost comfort, the best reliability and the highest quality
in its class.
TheHorizonC/ubElliptica/s de/iver.
Important Precautions
Assembly 5
Before YouBegin 17
Elliptical Operation 18
Conditioning Guidelines 35
Troubleshooting & Maintenance 39
Limited Warranty 43
CONTACTINFORMATION Back Panel
SAVETHESEINSTRUCTIONS
Read all instructions before using this elliptical. When using an electrical product, basic precautions
should always be followed, including the following: Read aft instructions before using this elliptical It is the
responsibility of the owner to ensure that aft users of this efliptical are adequately informed of aft warnings
and precautions. If you have any questions after reading this manual, contact Customer TechSupport at
the number listed on the back panel of this manual
• If you experience any kind of pain, including, but not limited to chest pains, nausea, dizziness, or
shortness of breath, stop exercising immediately and consult your physician before continuing.
• Maintain a comfortable pace. Donot sprint above 80 rpms on this machine.
• Tomaintain balance, it is recommended to keep a grip on the handlebars while exercising, mounting or
dismounting the machine.
• Donot wear clothes that might catch on any part of the elliptical.
• Donot turn pedal arms by hand.
• Make sure handlebars are secure before each use.
• Donot insert or drop any object into any opening.
• Unplug elliptical before moving or cleaning it. Toclean, wipe surfaces down with soap and slightly damp
cloth only,:never use solvents. (SeeMAINTENANCEpage 38)
• This elliptical should not be used by persons weighing more than 275 pounds on the ESO0and 300
pounds on the ETO0and ESO0.Failure to comply will void the warranty.
• This efliptical is intended for in-home use only. Donot use this elliptical in any commercial, rental, school
or institutional setting. Failure to comply wifl void the warranty.
• Donot use efliptical in any location that is not temperature controlled, such as but not limited to garages,
porches, pool rooms, bathrooms, car ports or outdoors. Failure to comply may void the warranty.
• Use the elliptical only as described in this manual
• tfeep the topside of the foot support clean and dry
• Care should be taken when mounting or dismounting the equipment. First bring the efliptical to a furl
stop. Second, carefully rotate one footpad to its lowest position. Third, mount or dismount from this side
of the elliptical.
• Disconnect aft power before servicing the equipment.
......................
i tt is essential that your elliptica! is used only indoors, in a climate controlled room: lf your ellipficai has been
i exposed to Co/derie mperaiure s high moisture climates, is Strongly recommended thatthe e!lipticaiis
:_
i warmed up to room temperature before first time uselFailure to do so may cause premature electronic failure.
IMPORTANT..READTHESESAFETYINSTRUCTIONSBEFOREUSE!
Thereare several areas during the assembly process of a elliotical that special attention must be paid. It is
very important to follow the assembly instructions correctly and to make sure aft parts are firmly tightened.
If the assembly instructions are not followed correctly, the elliptical could have frame parts that are not
tightened and will seem loose and may cause irritating noises. Toprevent damage to the elliptical the
assembly instructions must be reviewed and corrective actions should be taken.
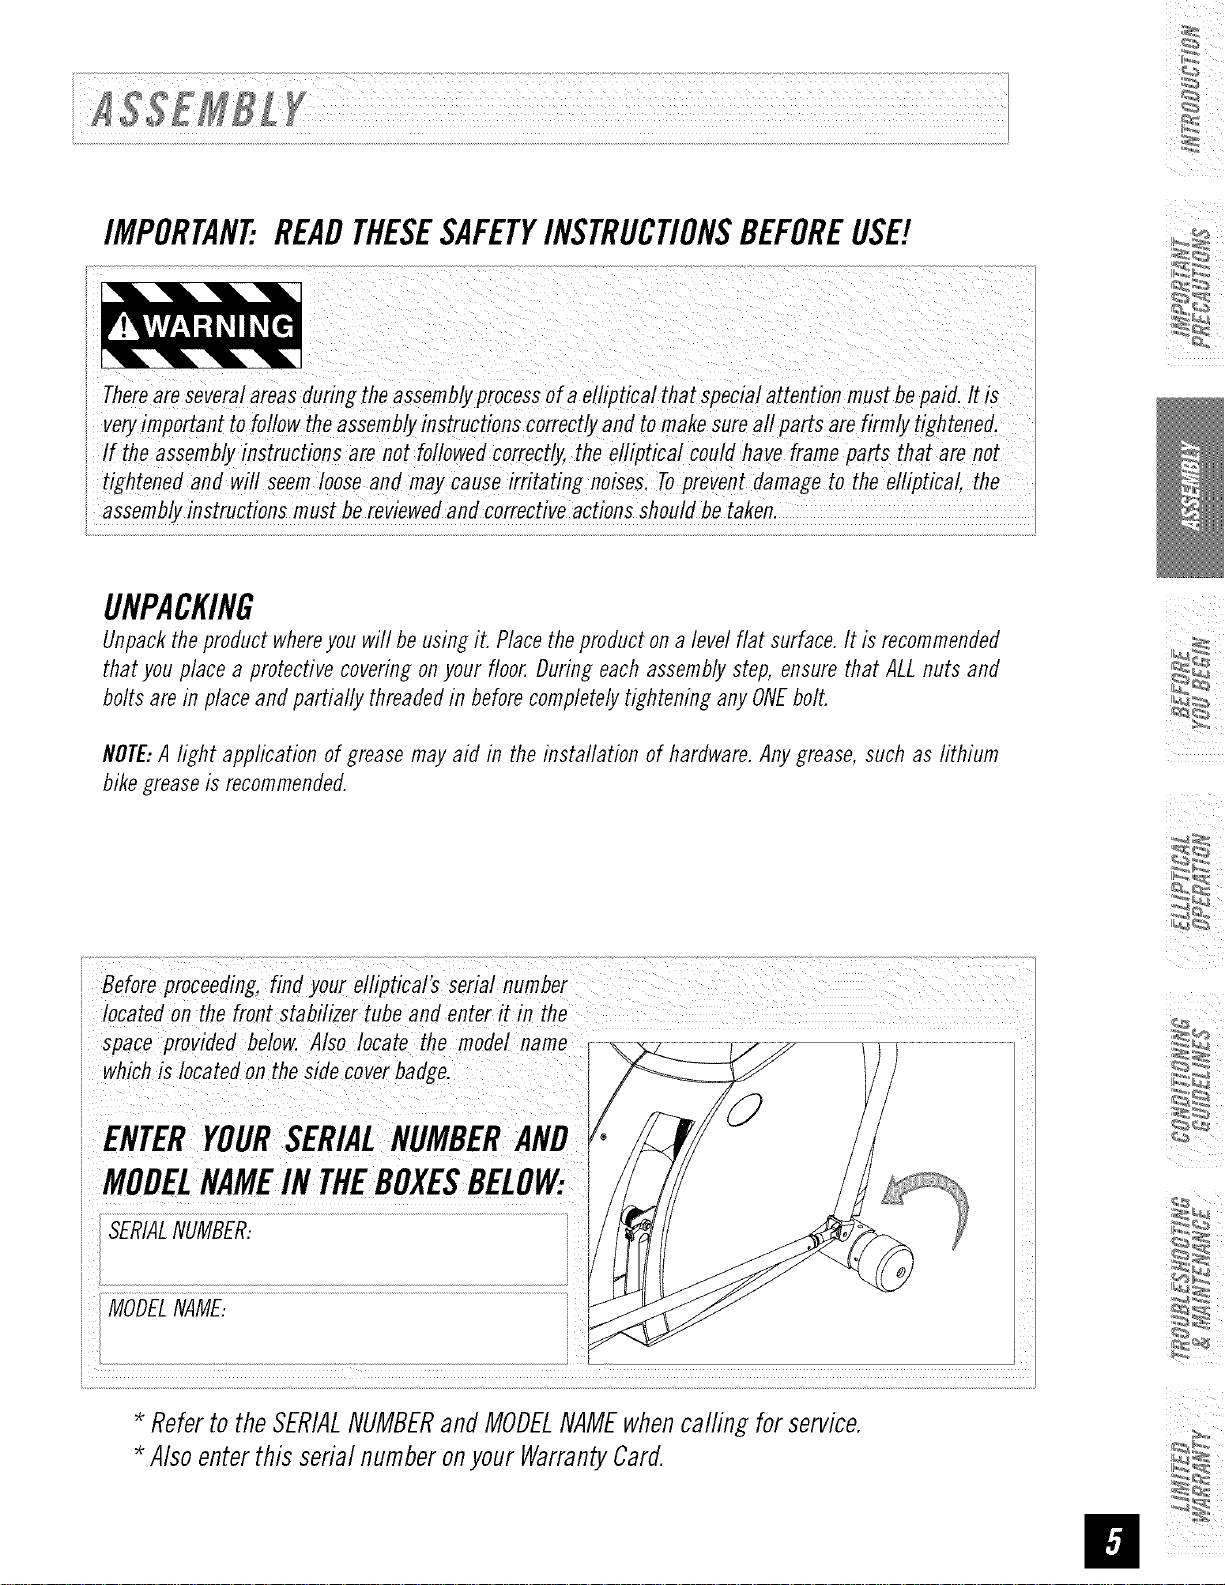
UNPACKING
Unpack the product whereyou will be using it. Place the product on a level flat surface. It is recommended
that you place a protective covering on your floor. During each assembly step, ensure that ALL nuts and
bolts are in place and partially threaded in before completely tightening any ONEbolt.
NOTE:A light application of greasemayaid in the installation of hardware.Anygrease, suchas lithium
bikegreaseis recommended.
Before proceeding, find you_ eilipticai's seriai number
i iocated on the front stabilizer tube and enter it in the
i space provided below. Also locate the modelname
i which is Iocated on the side cover badge,
ENTERYOURSERIALNUMBER
, MODELNAMEINTHEBOXESBELOW:
MODELNAME:
Referto the SERIALNUMBERandMODELNAMEwhencalfing for service.
Alsoenterthis serial numberonyour WarrantyCard.
ii
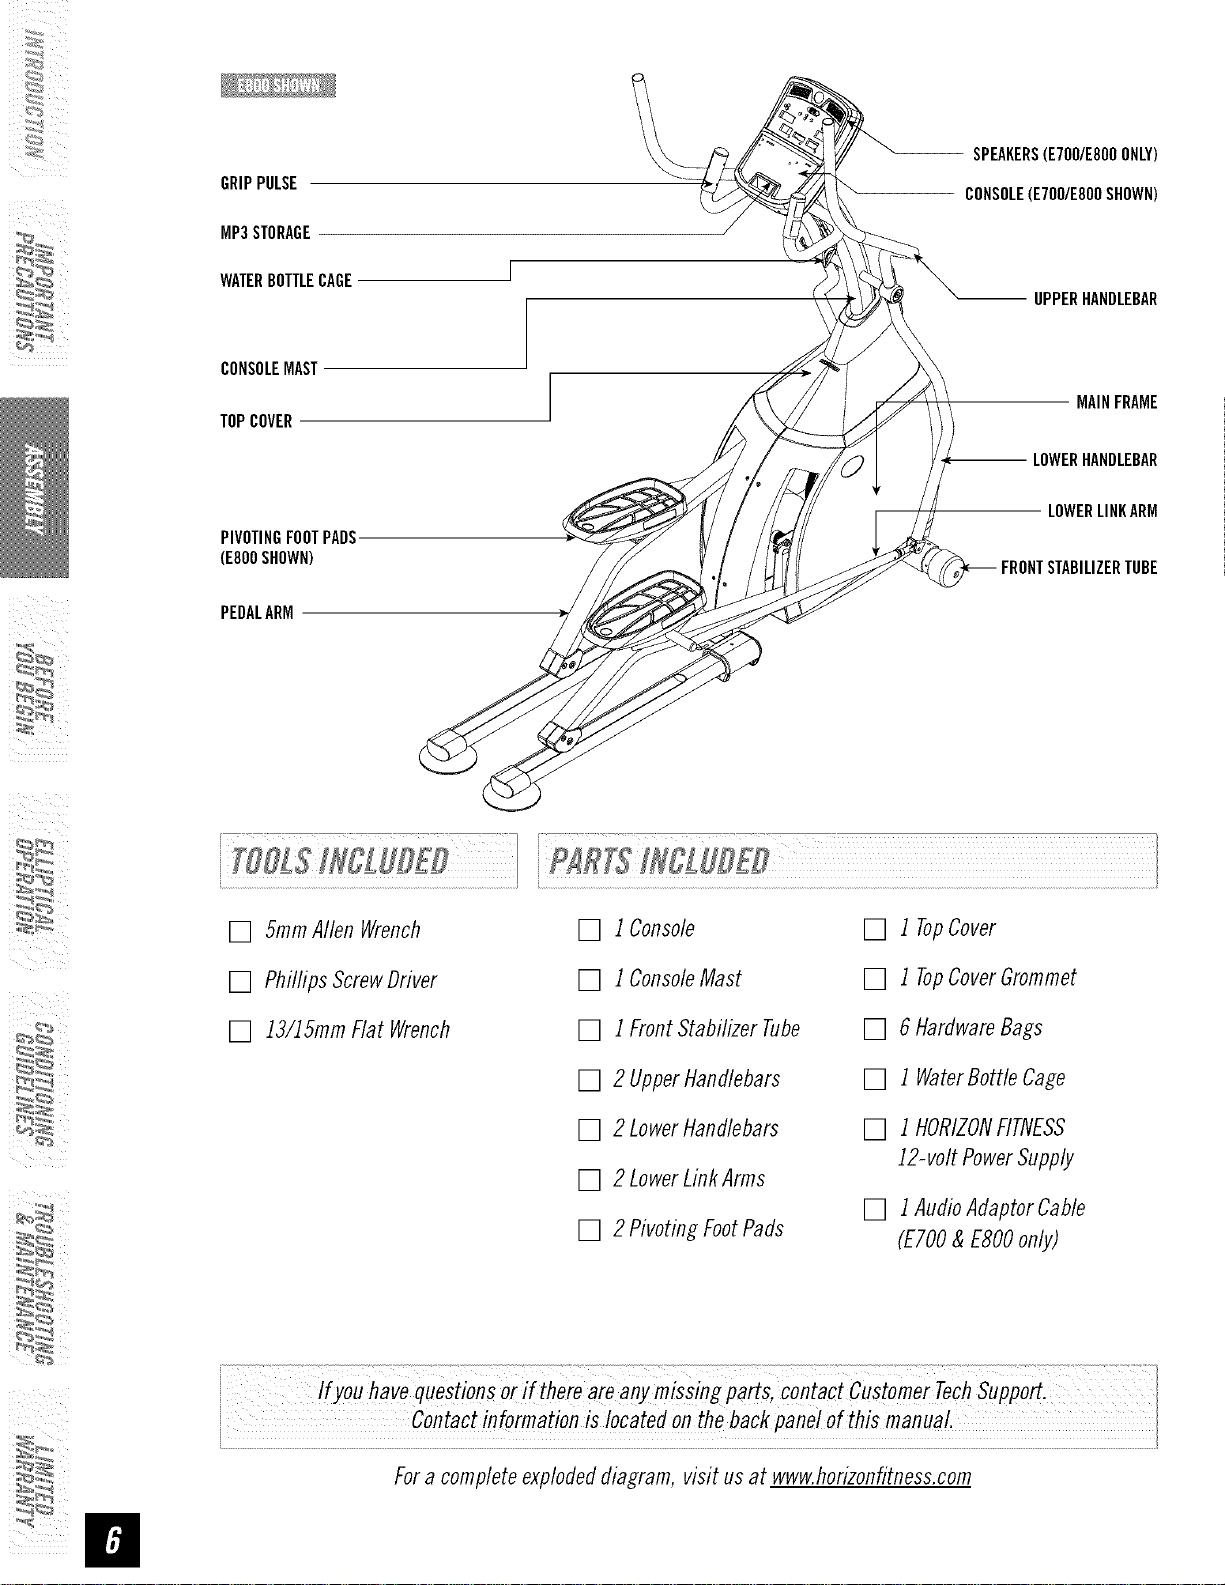
SPEAKERS(E7OO/E800ONLY)
GRIPPULSE
MP3STORAGE
CONSOLE(E7OO/E800SHOWN)
WATERBOTTLECAGE
CONSOLEMAST
TOPCOVER
PIVOTINGFOOTPADS.
(E800SHOWN)
PEDALARM
UPPERHANDLEBAR
MAINFRAME
LOWERHANDLEBAR
LOWERLINKARM
FRONTSTABILIZERTUBE
i iI
:_
[] 5ramAllen Wrench
[] Phillips ScrewDriver
[] 13/15mmFlat Wrench
Ifyou have questions or i( there are any misSing parts, Contact cUstomer TechsuPp_.
Fora completeexplodeddiagram, visit us at www.horizonfitness.com
[] 1Console
[] 1ConsoleMast
[] 1FrontStabilizerTube
[] 2 UpperHandlebars
[] 2 LowerHandlebars
[] 2 LowerLinkArms
[] 2 PivotingFootPads
[] 1 TopCover
[] 1 TopCoverGrommet
[] 6 HardwareBags
[] 1 WaterBottleCage
[] 1 HORIZONFITNESS
12-voltPowerSupply
[] 1AudioAdaptorCable
(ETO0& ESO0only)
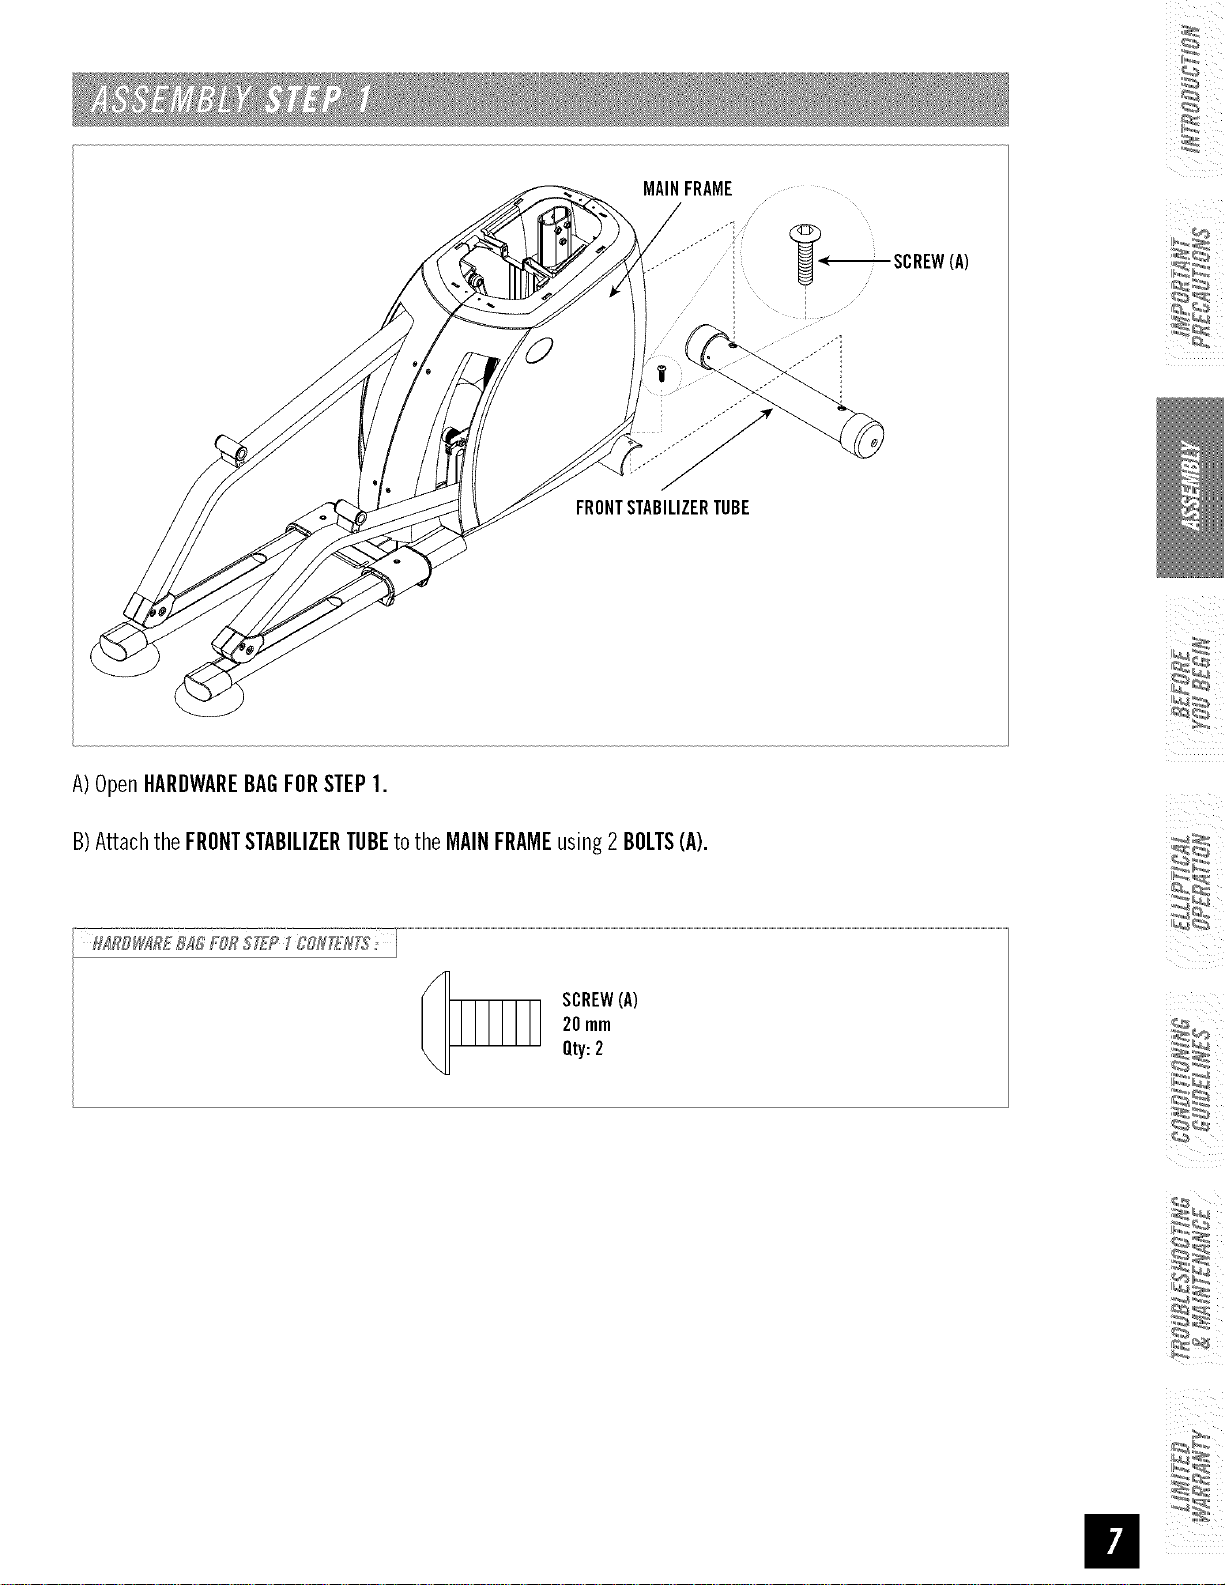
MAINFRAME
.............. : SCREW(A)
; I
FRONTSTABILIZERTUBE
I
A)OpenHARDWAREBAGFORSTEP1.
B)Attachthe FRONTSTABILIZERTUBEto the MAINFRAMEusing2BOLTS(A).
20mm
SCREW(A)
Qty:2
ii
SCREW(B) MAIN
-- REARSTABILIZER
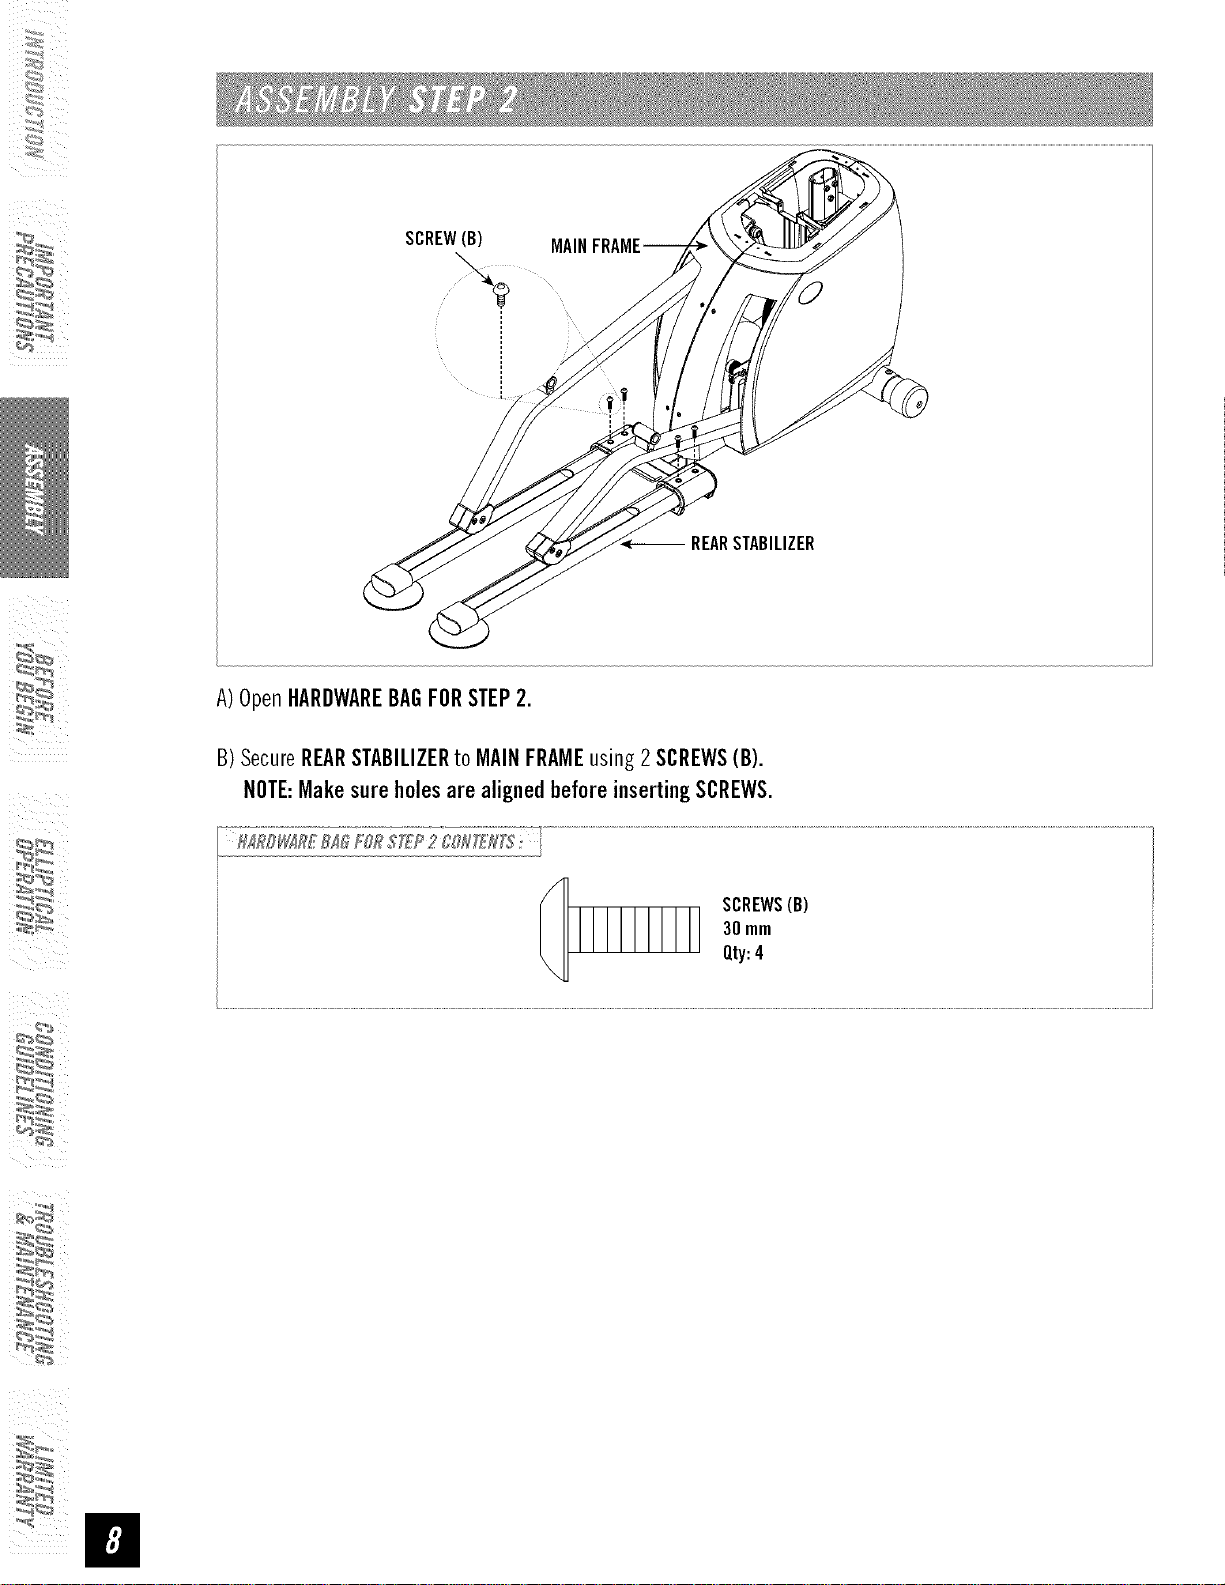
A)OpenHARDWAREBAGFORSTEP2.
B)SecureREARSTABILIZERto MAINFRAMEusing 2SCREWS(B).
NOTE:Makesureholesare alignedbeforeinsertingSCREWS.
30mm
SCREWS(B)
Qty:4
:_
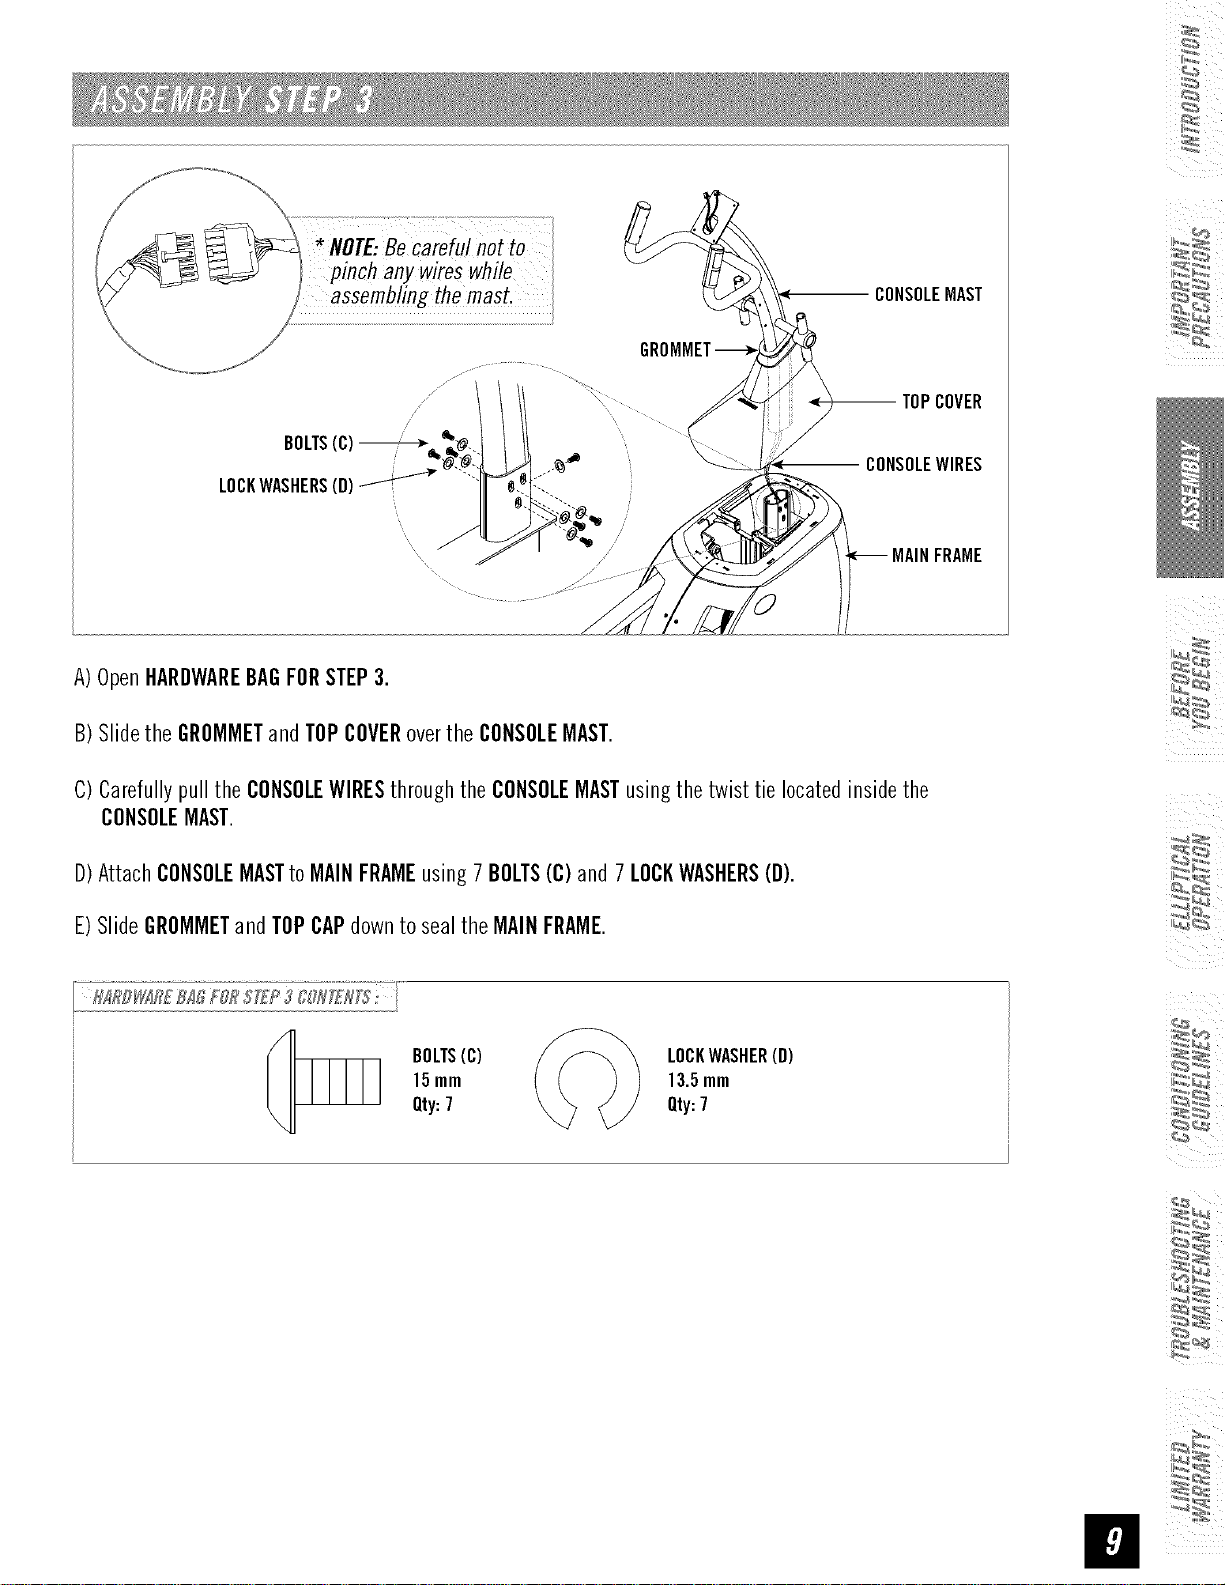
NOTE:Becareful not to
pinch anywires while
assembling themast.
CONSOLEMAST
--TOP COVER
CONSOLEWIRES
MAINFRAME
A)OpenHARDWAREBAGFORSTEP3.
B)Slidethe GROMMETandTOPCOVERoverthe CONSOLEMAST.
C)Carefullypull the CONSOLEWIRESthroughthe CONSOLEMASTusingthetwist tie locatedinsidethe
CONSOLEMAST.
D)AttachCONSOLEMASTto MAINFRAMEusing7 BOLTS(C)and 7 LOCKWASHERS(D).
E)SlideGROMMETandTOPCAPdownto sealthe MAINFRAME.
BOLTS(C)
15mm
Qty:7
LOCKWASHER(D)
13.5mm
Qty:7
ii
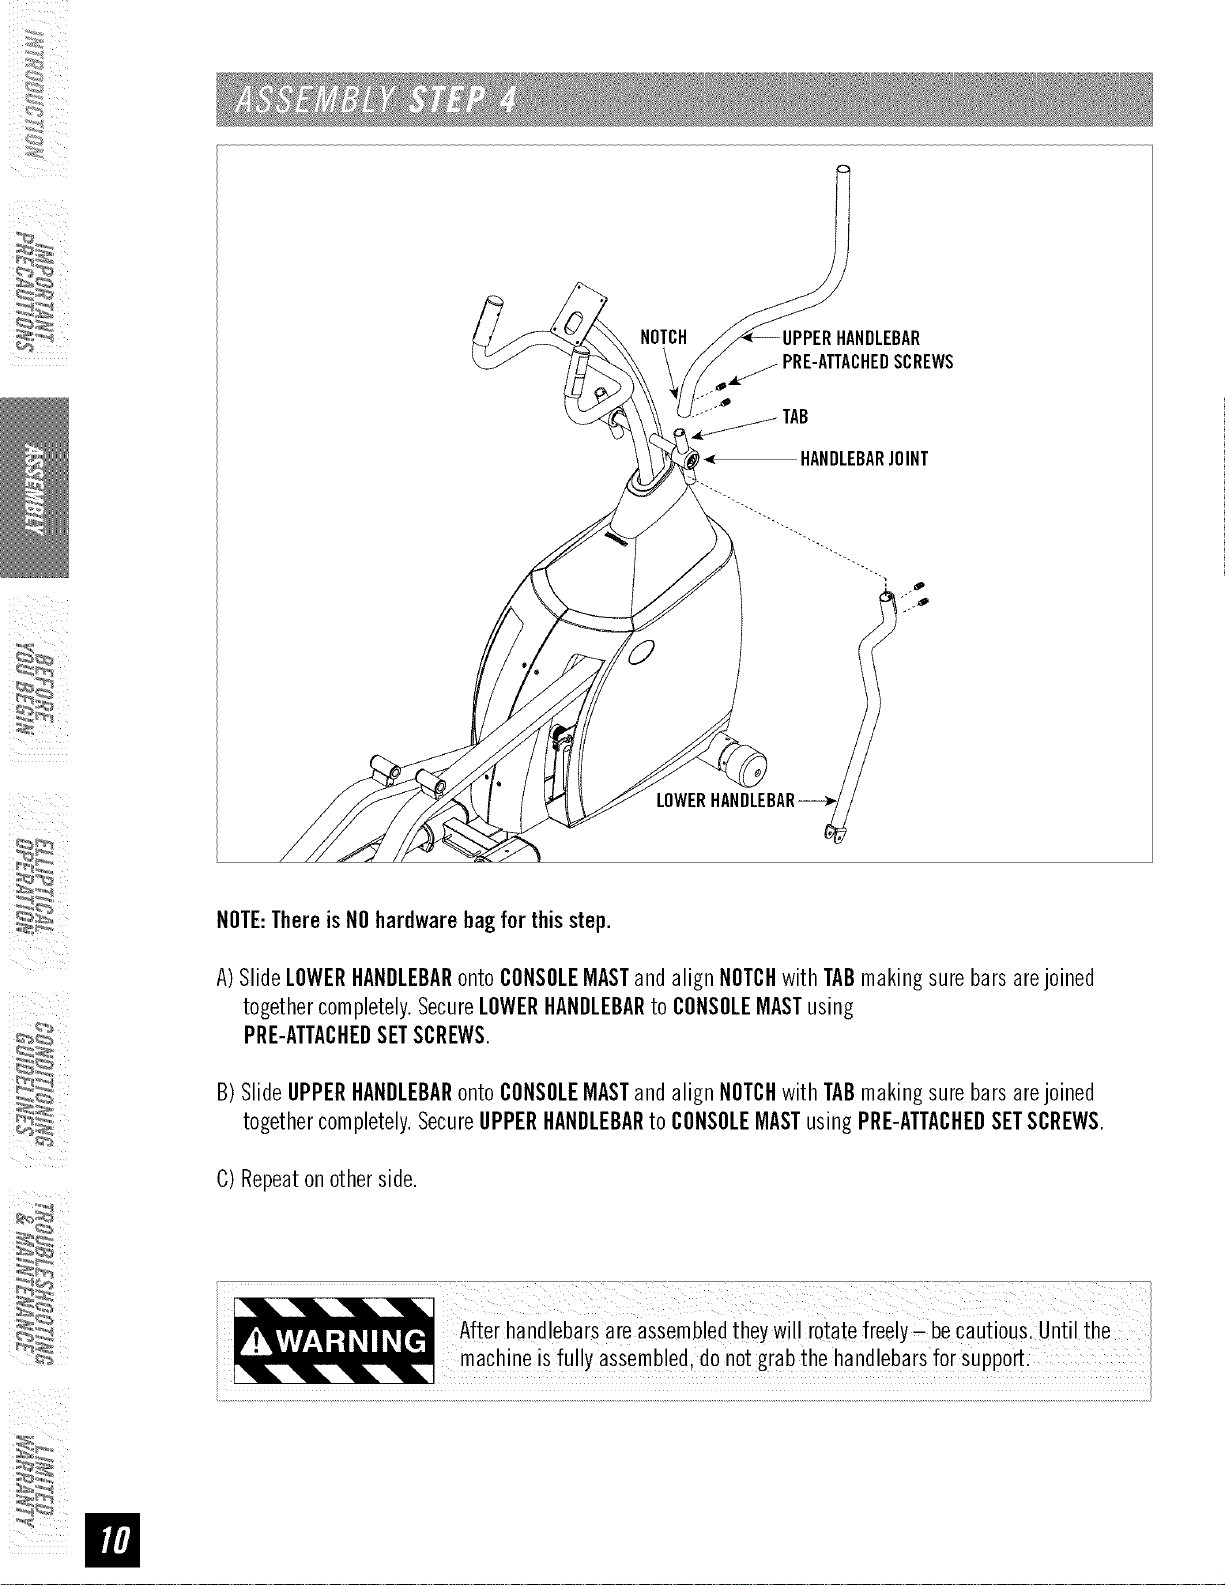
NOTCH
TAB
< HANDLEBARJOINT
LOWER
NOTE:ThereisNOhardwarebagforthisstep.
A)SlideLOWERHANDLEBARonto CONSOLEMASTandalign NOTCHwithTABmakingsurebarsarejoined
togethercompletely.SecureLOWERHANDLEBARto CONSOLEMASTusing
PRE-ATTACHEDSETSCREWS.
B)SlideUPPERHANDLEBARonto CONSOLEMASTandalign NOTCHwithTABmakingsurebarsarejoined
togethercompletely.SecureUPPERHANDLEBARto CONSOLEMASTusing PRE-ATTACHEDSETSCREWS.
C)Repeatonotherside.
_/: : : :: :ii_¸ i il : i_!!:::_i:!:!J? / /
After handlebarsareassembledtheywillrotate freelyCbe cautious: until the
machineis fully assembled,donotgrab thehandlebarsfor SUPport.
\
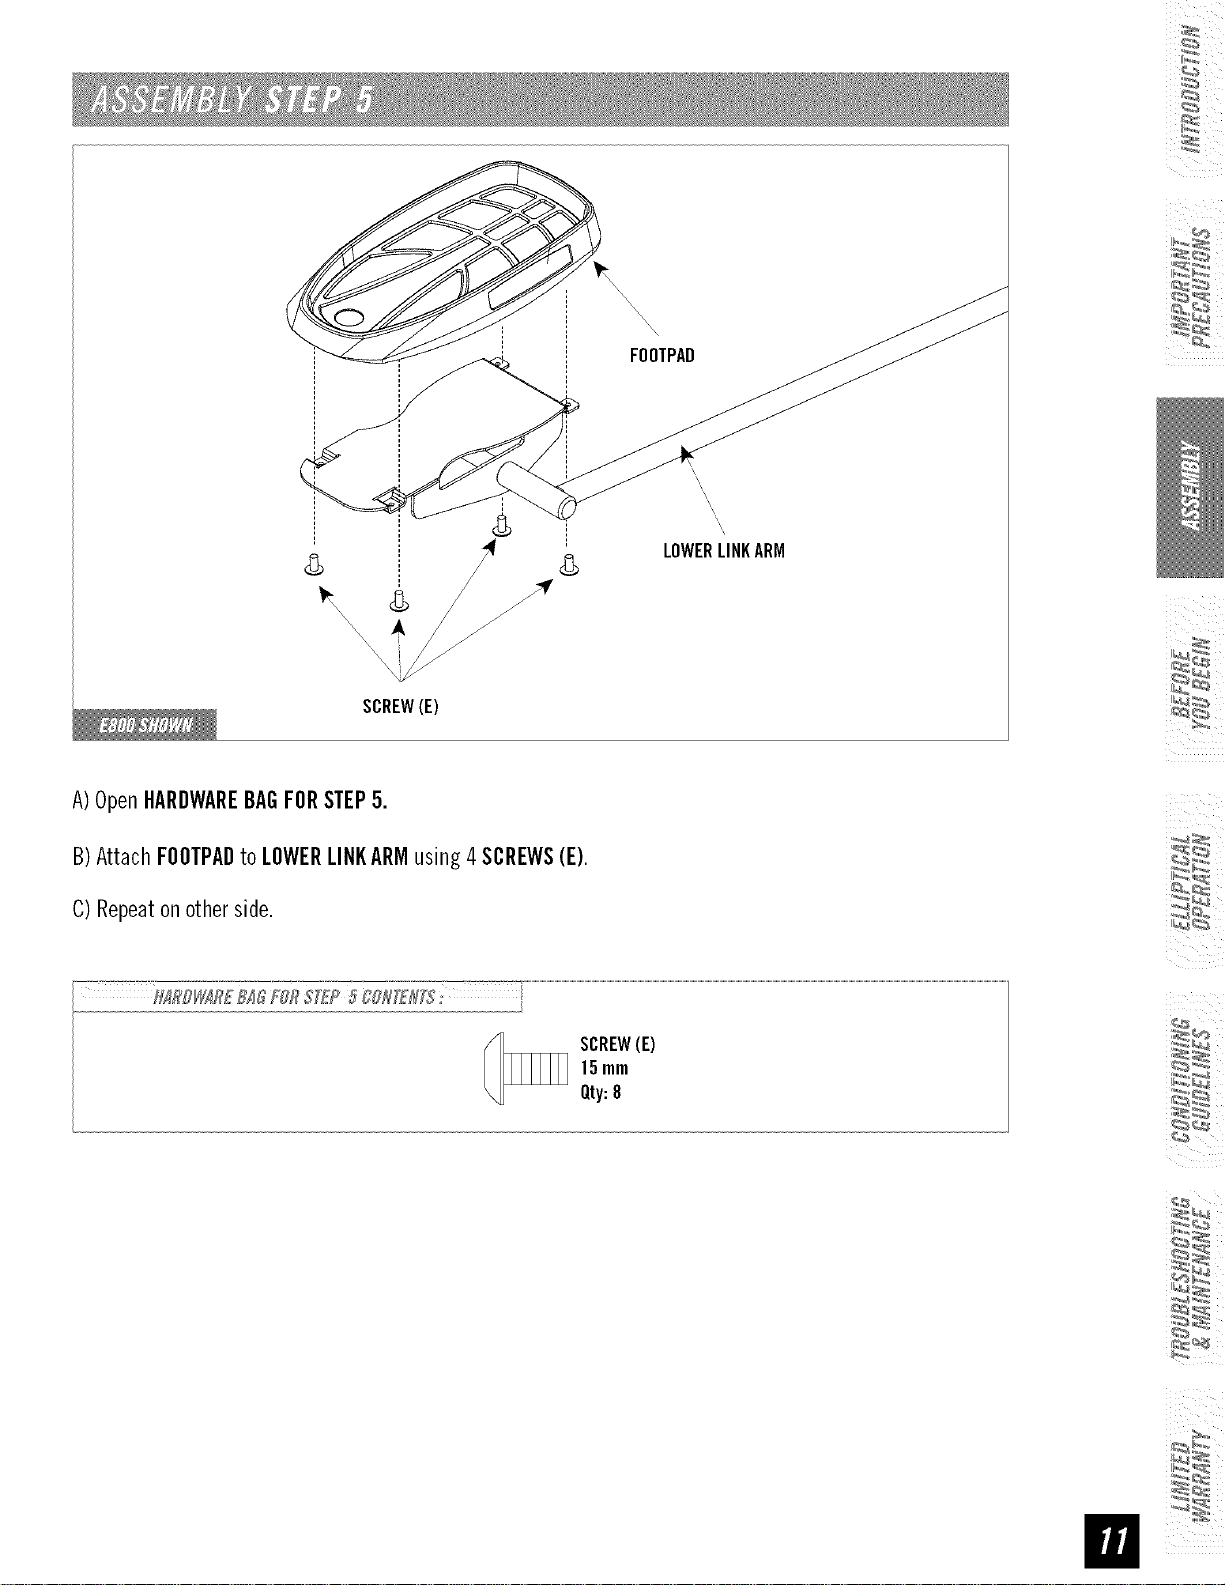
FOOTPAD
\
'\\
8
_r
\\\\\\
SCREW(E)
A)OpenHARDWAREBAGFORSTEP5.
B)AttachFOOTPADto LOWERLINKARMusing 4SCREWS(E).
C)Repeatonotherside.
[
LOWERLINKARM
SCREW(E)
15mm
Qty:8
ii
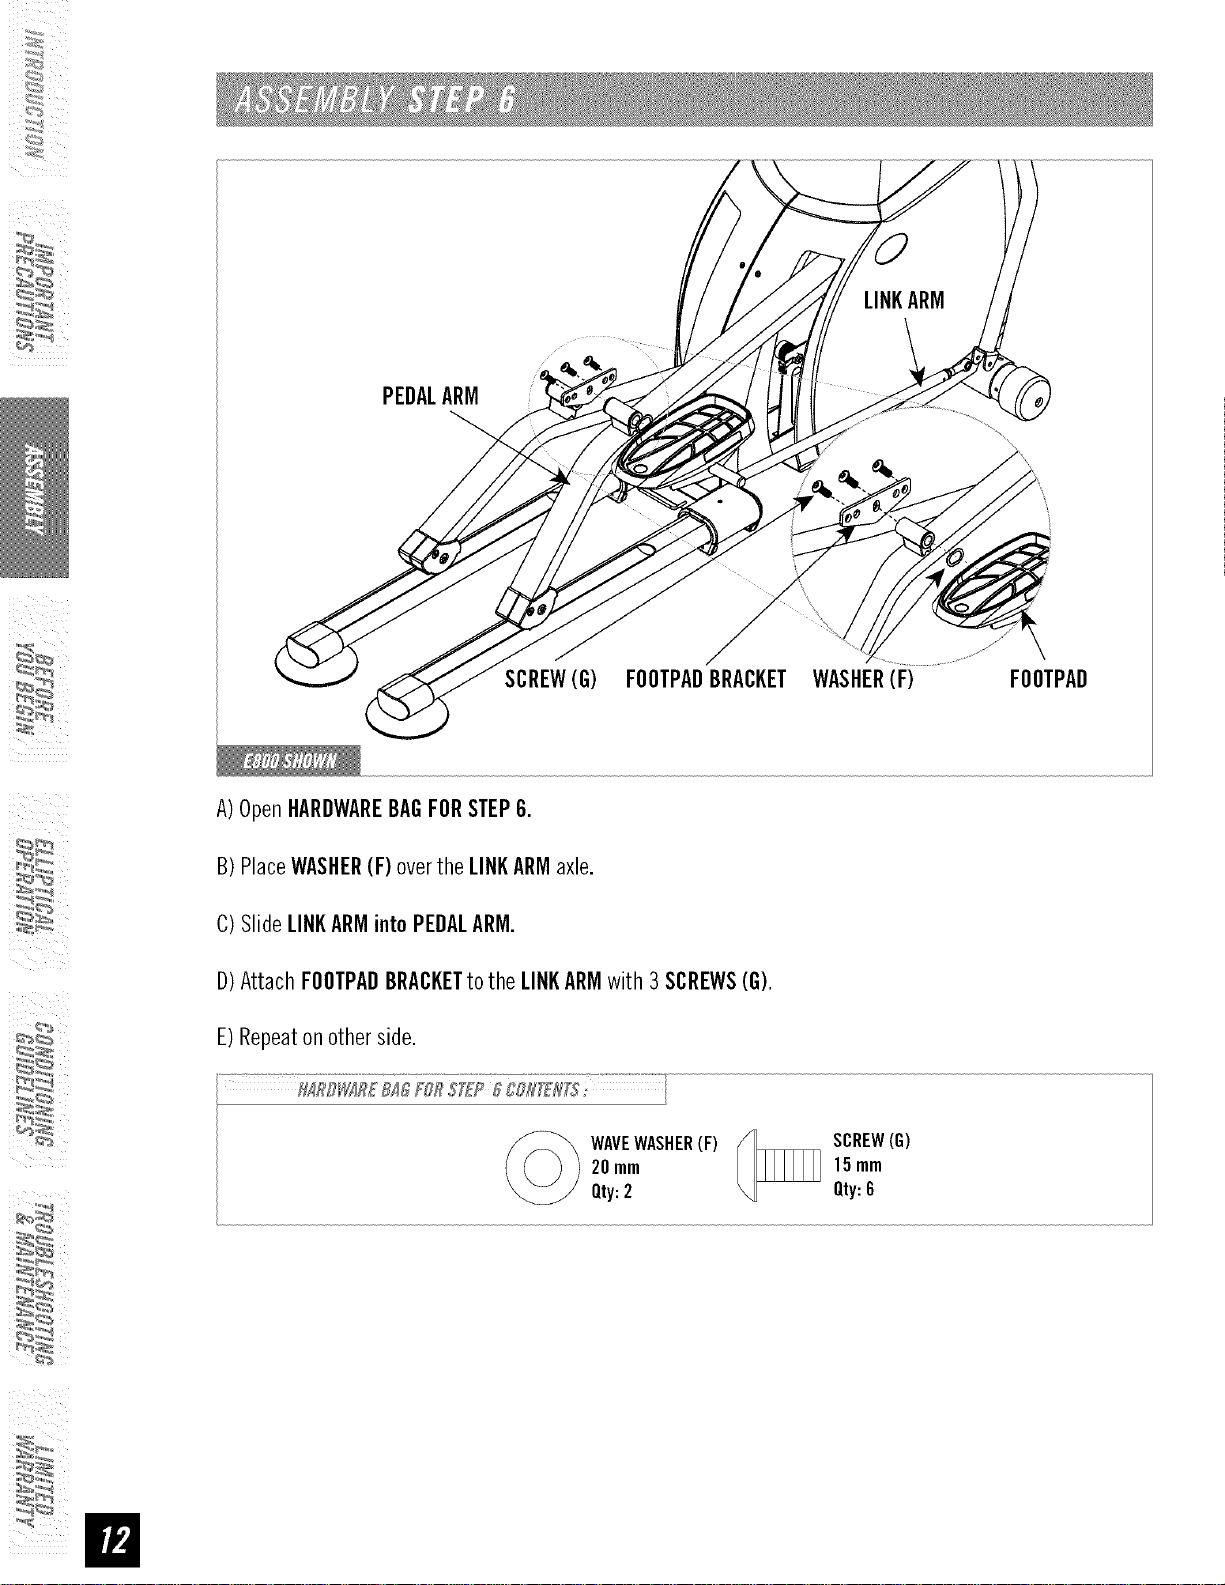
PEDALARM
SCREW(G) FOOTPADBRACKET WASHER(F) FOOTPAD
A)OpenHARDWAREBAGFORSTEP6.
B)PlaceWASHER(F) overtheLINKARMaxle.
C)Slide LINKARMintoPEDALARM.
D)AttachFOOTPADBRACKETtothe LINKARMwith3 SCREWS(G).
E)Repeaton otherside.
WAVEWASHER(F)
20mm
Qty:2
SCREW(G)
15mm
Qty:6
:_
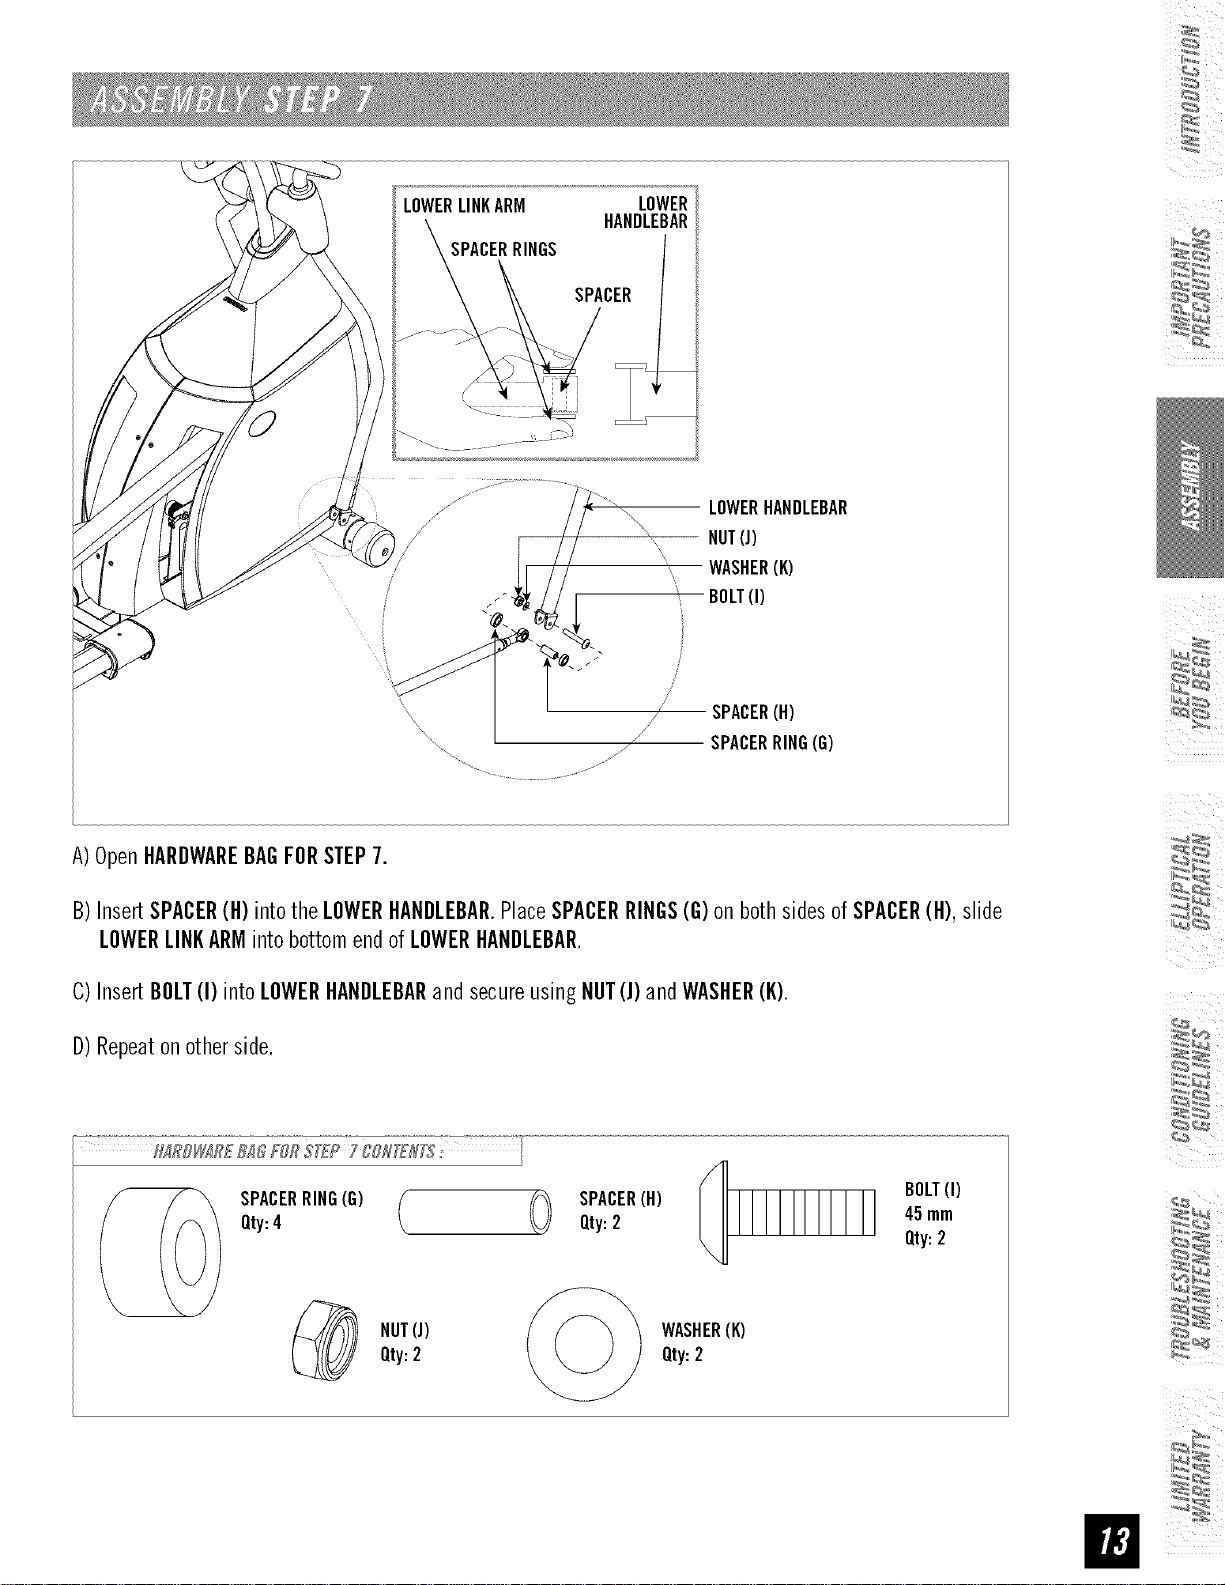
LOWERLINKARM LOWER
HANDLEBAR
SPACERRINGS
SPACER
j_
LOWERHANDLEBAR
-- NUT(J)
/
WASHER(K)
BOLT(I)
SPACER(H)
" _ SPACERRING(G)
A)OpenHARDWAREBAGFORSTEP7.
B)InsertSPACER(H) intothe LOWERHANDLEBAR.PlaceSPACERRINGS(G)on bothsidesof SPACER(H), slide
LOWERLINKARMintobottomendof LOWERHANDLEBAR.
C)InsertBOLT(I) intoLOWERHANDLEBARandsecureusingNUT(J)andWASHER(K).
D)Repeatonotherside.
[
Qty:4 / _ Qty:2 45mm
Qty:2
NUT(J) WASHER(K)
Qty:2 Qty:2

ii
NOTE:Thereis NOhardwarebagfor thisstep.
A)Attach CONSOLEMASTWIRESto the CONSOLEWIRES.
B)Carefullytuck the CONSOLEMASTWIBESintothe CONSOLEMAST.
C)AttachCONSOLEonto CONSOLEMASTusingthe 4 PBE-ATTACHEDSCBEWS.
NOTE:Becarefulnot topinchany wireswhileassemblingtheconsole.
:_
 Loading...