

Horizon 23616-RE7.6, RE7.6 Owner’s Manual
ELL/PTICAL ASSEMBLY&
USER'S GUIDE
I RE7.6 Rev.l.3.indd 1
7/17/06 4:54:14 PM
!ii........................................................................................................................................................................................i_:_!!!!!!!!!!!!!!!!!!!!!!!!!!!!!!!!!!!!!!!!!!!!!!i
CONGRATULATIONSand TttANKYOUforyourpurchaseof this HorizonFitnessefliptical/
Whetheryour goal is to win races or simply enjoy a fuller, healthier fifestyle, a Horizon Fitness elliptical
can help you attain it- adding club-quafity performance toyour at-home workouts, with the ergonomics
and innovative features you need to get stronger and healthier, faster. Because we're committed to
designing fitness equipment from the inside out, we use only the highest quafity components. It's a
commitment we back with one of the strongest frame-to-brake warranty packages in the industry.
Youwant exerciseequipment that offers the most comfort, the best reliability and the highest quality
in its class.
HorizonFitnessdelivers.
Important Precautions 4
Assembly 5
Before YouBegin 17
Elliptical Operation i8
Conditioning Guidelines 28
Troubleshooting & Maintenance 34
Limited Warranty 38
CONTACTINFORMATION Back Cover
m
I RE7.6 Rev.l.3.indd 2-3 7/17/06 4:54:14 PM I
I
i i i
SAVETHESEINSTRUCtiONS
Readall instructions before using this elliptical. Whenusing an electrical product, basic precautions
shouldalwaysbefollowed,including thefollowing:Readaft instructionsbeforeusingthiselliptical It is the
responsibifityof the ownerto ensurethat aft usersof this efliptical areadequatelyinformedof aft warnings
and precautions.If you haveanyquestionsafter reading this manual, contactSearsat thenumberlisted
on thebackcoverof this manual
o If you experience any kind of pain, including, but not limited to chest pains, nausea, dizziness, or
shortness of breath, stop exercising immediately and consult your physician before continuing.
e Maintain a comfortable pace. Do not sprint above 80 rpms on this machine.
o Tomaintain balance, it is recommended to keep a grip on the handlebars while exercising, mounting or
dismounting the machine.
o Donot wear clothes that might catch on any part of the elliptical
o Donot turn pedal arms by hand.
o Make sure handlebars are secure before each use.
o Donot insert or drop any object into any opening.
• Unplug elliptical before moving or cleaning it. Toclean, wipe surfaces down with soap and slightly damp
cloth only,:never use solvents. (SeeMAINTENANCE)
o This elliptical should not be used by persons weighing more than 250 pounds. Failure to comply will void
the warranty.
o This elliptical is intended for in-home use only. Do not use this elliptical in any commercial, rental, school
or institutional setting. Failure to comply will void the warranty.
o Donot use elliptical in any location that is not temperature controlled, such as but not limited to garages,
porches, pool rooms, bathrooms, carports or outdoors. Failure to comply may void the warranty.
o Use the elliptical only as described in this manual
IMPORTANT..READTHESESAFETYINSTRUCtiONSBEFOREUSE!
iii_!ii_ii_i_i!i!ili_!i _ _i_iii__iii_ii_i_ii_iii, i_i_ii_iil_i_ii!_ii__ii_ii_ili_i _i_ii!!i_!i_!!ii_il _ii__i_i_i_i!i:_i_i__
Thereareseveralareasdunng the assemblyprocessof a elflpticat that specialattention must bepaid It is
i veryimportantto followtheassemblyinstructionscorrectlyand to makesureall parts arefirmly tightened,
If the assembly,instructions arenot foflowedcorrectly,the ellipticai couIdhaveframe parts that are not
i tightene_an_willseemlooseandmaycauseirritatin_nO!seslToprevenidama_etothe
i assembtyinstrucfionsmust bereviewedandcorrectiveactions shouldbetaken.
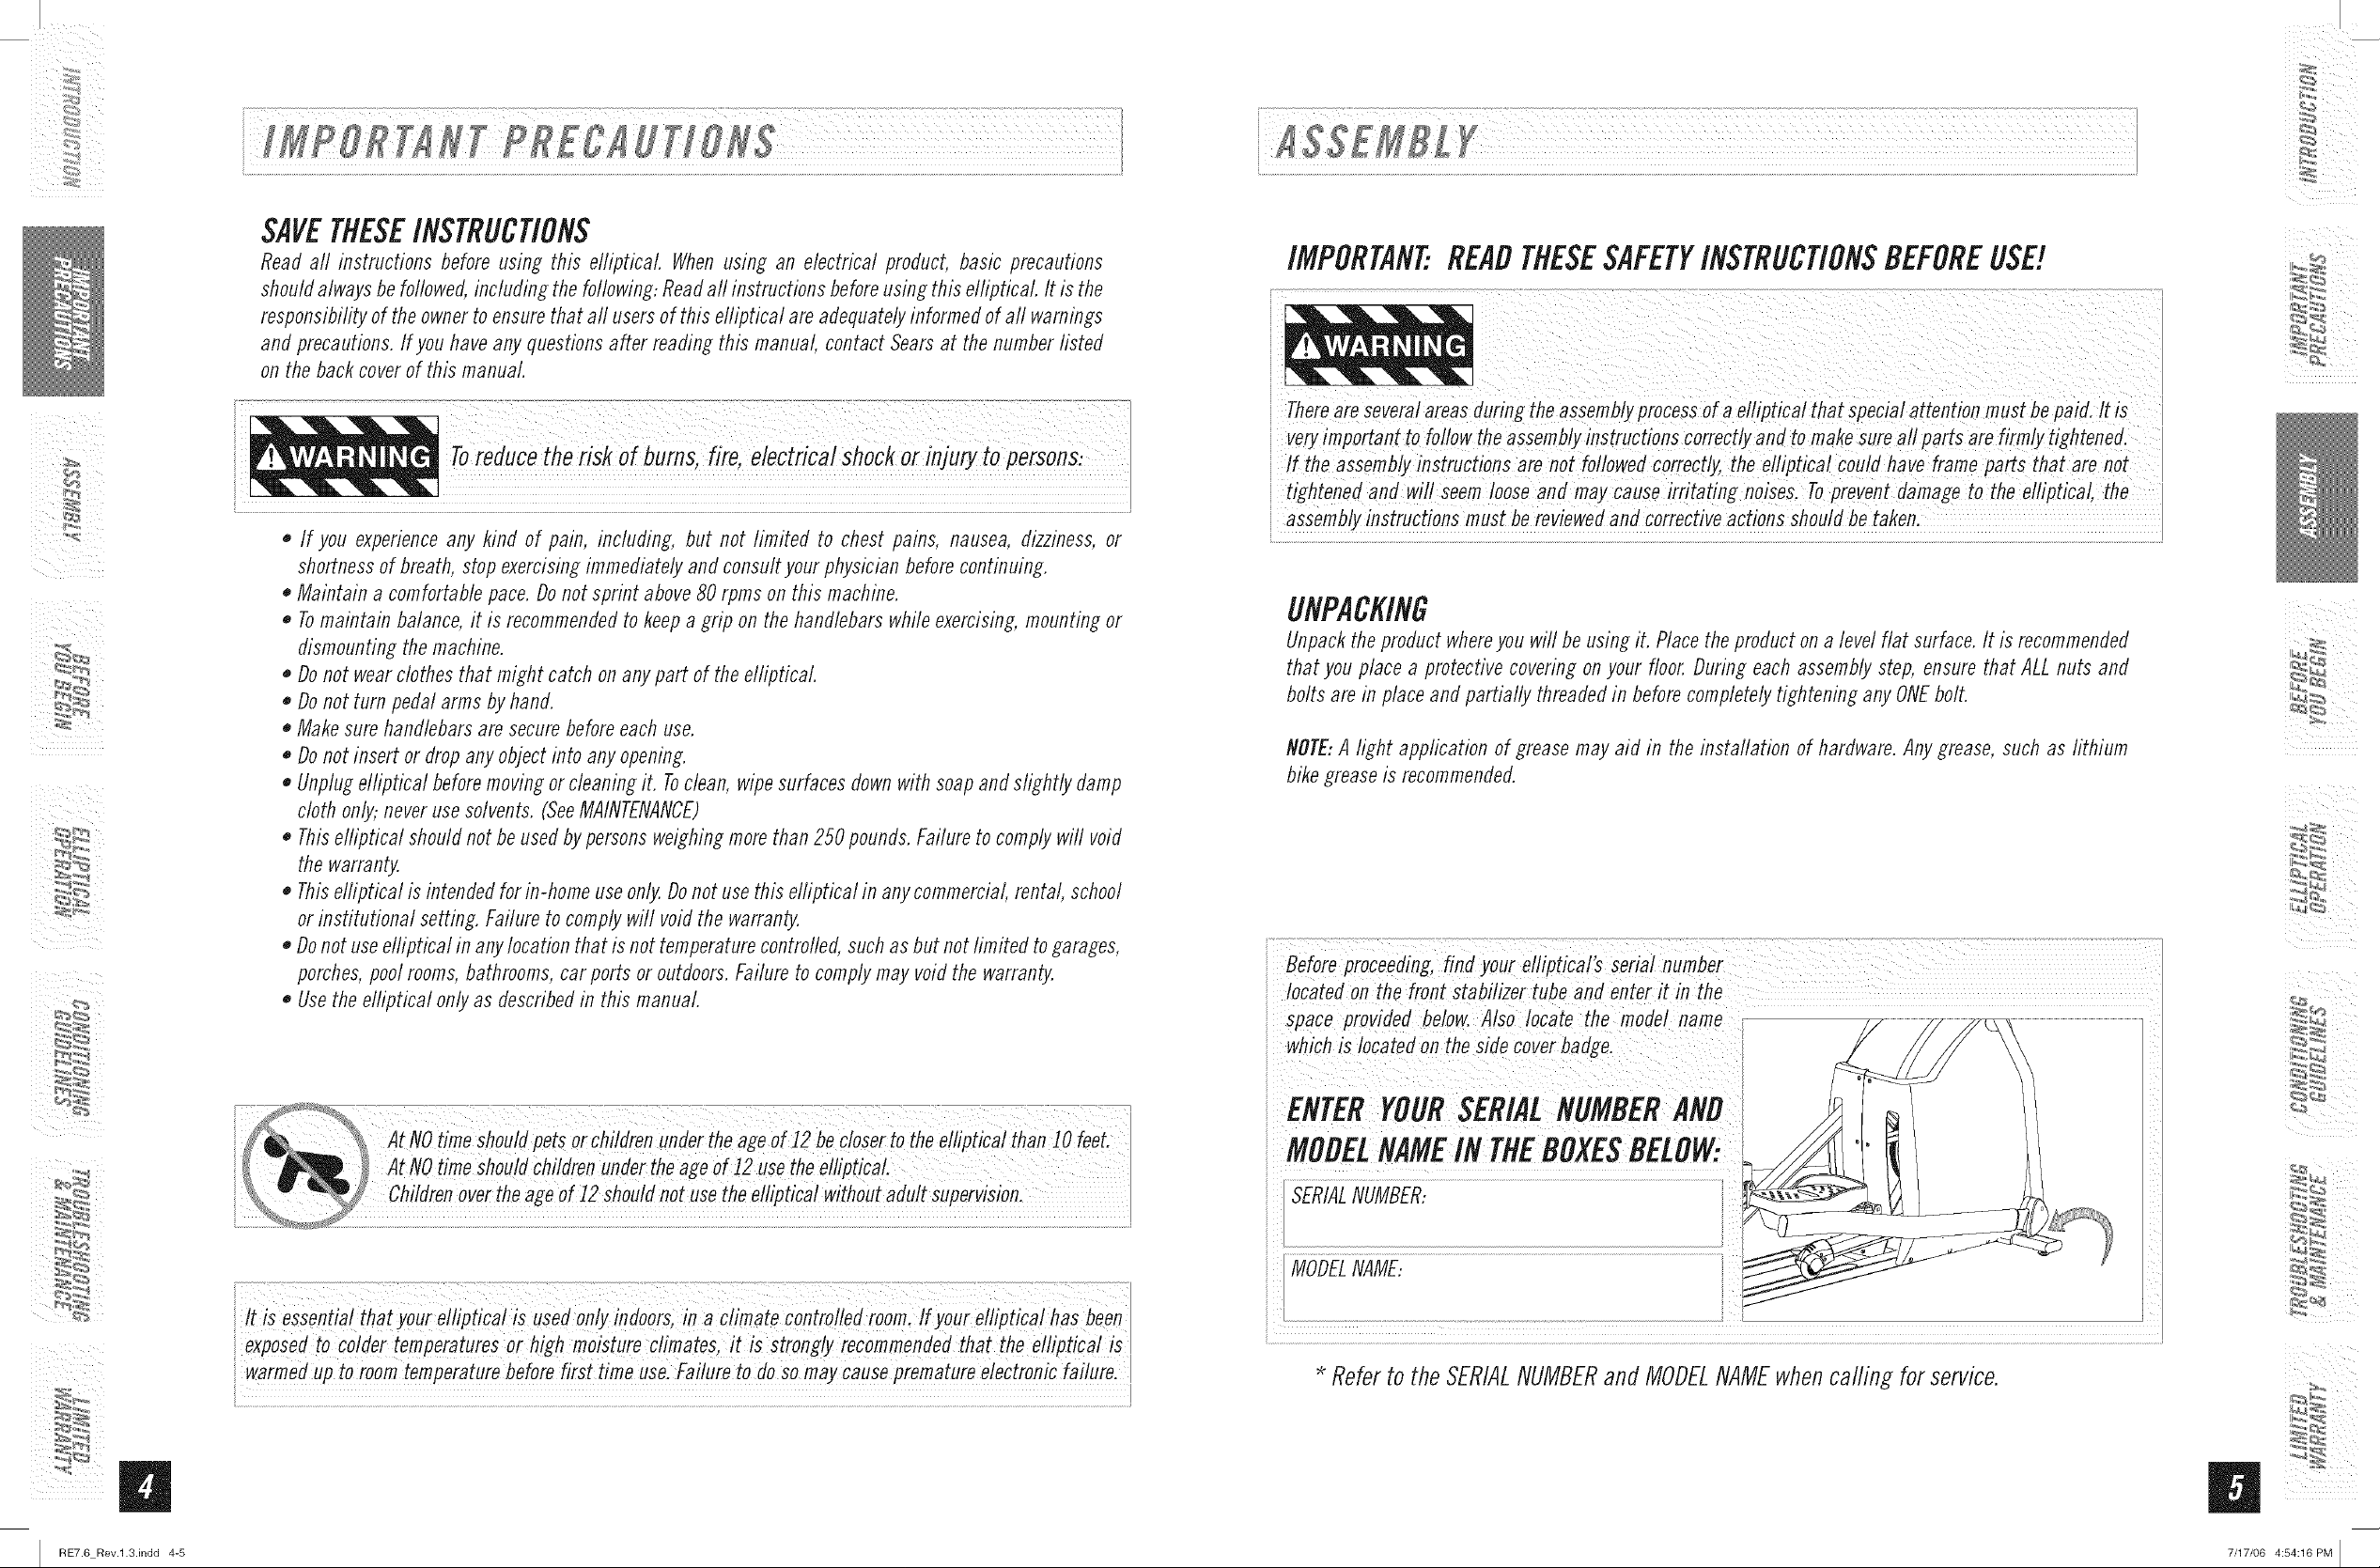
UNPACKING
Unpackthe productwhereyou will beusingit. Placetheproducton a levelflat surface.It is recommended
that you place a protectivecoveringonyour floor.During each assemblystep, ensurethat ALLnuts and
boltsare in placeandpartially threadedin beforecompletelytightening anyONEbolt.
NOTE:A light application of greasemay aid in the installation of hardware.Anygrease, suchas lithium
bikegreaseis recommended.
i ................................. .................... ........................T: ...............
i Beforeproceeding, find your ellipfica!'s serial number
iocatedonthe front stabilizer tube and enter it in the
i space providedbelow. Also!ocate the mode!name [
whichis locatedon the sidecoverbadge. I
I
ill_ i_i
m
I RE7.6 Rev.l.3.indd 4-5
At NOdine shouldpets orchildrenundertheage Off2 becloserto theelliptical than i0 feet.
At NOfime ShouidChildrenundertheageof j2 usethe ellipfical.
ChildrenOvertheageof I2 shouldnot usetheelliptical withoutaduitsupervision:
i................:
!t!sesseniiaithaiyou_e!liptica!i_,sedOnty,indoOrs,ina ha__e'
i exPoSedto coldertemperatures or high moisture climates, it isstrongly recommendedthat the el!ipfica!is
, ENTER SERIALNUMBERAND
IN TNEBOXES
SERIALNUMBER:
MODELNAME:
7/17/06 4:54:16 PM I

S _
UPPERHANDLEBAR
FAN
GRIPPULSE
CONSOLEMAST
TOPCOVER
PIVOTINGFOOTPAD
PEUALARM
WHEELCOVER
CONSOLE
HANDLEBARCOVER
MAINFRAME
LOWERHANDLEBAR
LOWERLINKARM
FRONTSTABILIZERTUBE
ELBOWCOVER
MAINFRAME_............... ,
/" _:_--.-- BOLT(A)
,_ _ SPRINGWASHER(B)
_ _WASNER(C)
. ....... l
FRONTSTABILIZERTUBE
A)OpenHARBWAREBAGFORSTEP1.
B)Attachthe FRONTSTABILIZERTUBEto the MAINFRAMEusing2 BOLTS(A),2 SPRINGWASHERS(B) and2 FLAT
WASHERS(C).
[] 5ramAllen Wrench
[] 6ramAllen Wrench
[] PhilfipsScrewDriver
[] J3/JSmmFlat Wrench
[] J Console
[] J ConsoleMast
[] J FrontStabilizer Tube
[] 2 UpperHanfllebars
[] 2 HandlebarCovers
[] 5HardwareBags
[] 2 ElbowCovers
[] WaterBottle Cage
[] 2 LowerHandlebars
[] 2 LowerLinkArms
[] 2 PivotingFootPads
[] 2 TopCovers
[] ] HORIZONFITNESS
J2-volt PowerSupply
..............................t................... .................................. m
ii yoo havequesfio_s!_ if thereareanymissi_gparts, contact j _80&4_MY-HOME®!
i Furthercontactinformafionislocateflon thebackcoverofthis manual.
BOLT(A)
20mm
Qty:2
SPRINGWASHER(B)
]8 rnm
Qty:2
FLATWASHER(C)
20turn
Qty:2
m
I RE7.6 Rev.l.3.indd 6-7
Fora completeexplodeddiagram,seeQuickStart and Parts Guide(includedin User'sGuidebag).
m
7/17/06 4:54:19 PM I

s
BOLT(A)
f
SPRINGWASHER(e) _
FLATWASHER(C)_ _i>
MAINFRAME
CONSOLEWIRES ' '
MAST
CONSOLEMASTGROMMET
'\
A)OpenHARDWAREBAGFORSTEP2.
B)Carefullypull theCONSOLEWIRESthroughthe CONSOLEMASTusingthe twist tie locatedinsidethe
CONSOLEMAST.
C)Attachthe CONSOLEMASTto the MAINFRAMEusing4 BOLTS(A),4 SPRINGWASHERS(B)and 4 FLAT
WASHERS(C).
lILT(A)
21mm
Qty:4
SPRINGWASHER(B) / _ \ FLATWASHER(C)
Qty:4 Qty:4
18rnrn 21 rnrn
D)insertthe FRONTTOPCOVER,followedbythe REARTOPCOVERand snapthemtogether.
E)SlideCONSOLEMASTGROMMETdownto sealthe consolemast hole.
L
m
I RE7.6 Rev.l.3.indd 8-9
m
7/17/06 4:54:21 PM I
/
UPPERHANDLEBAR
NOTCH_
<
PRE-ATTACHEO
SETSCREWS
PRE-ATTACHED
BOLT&WASHER
USERIGHTHANDLEBARS
UPPERHANDLEBAR
,_0__ BACKHANDLEBARCOVER
/-
COVER
CONSOLEMAST
USELEFTHANDLEBARS
HANDLEBAR
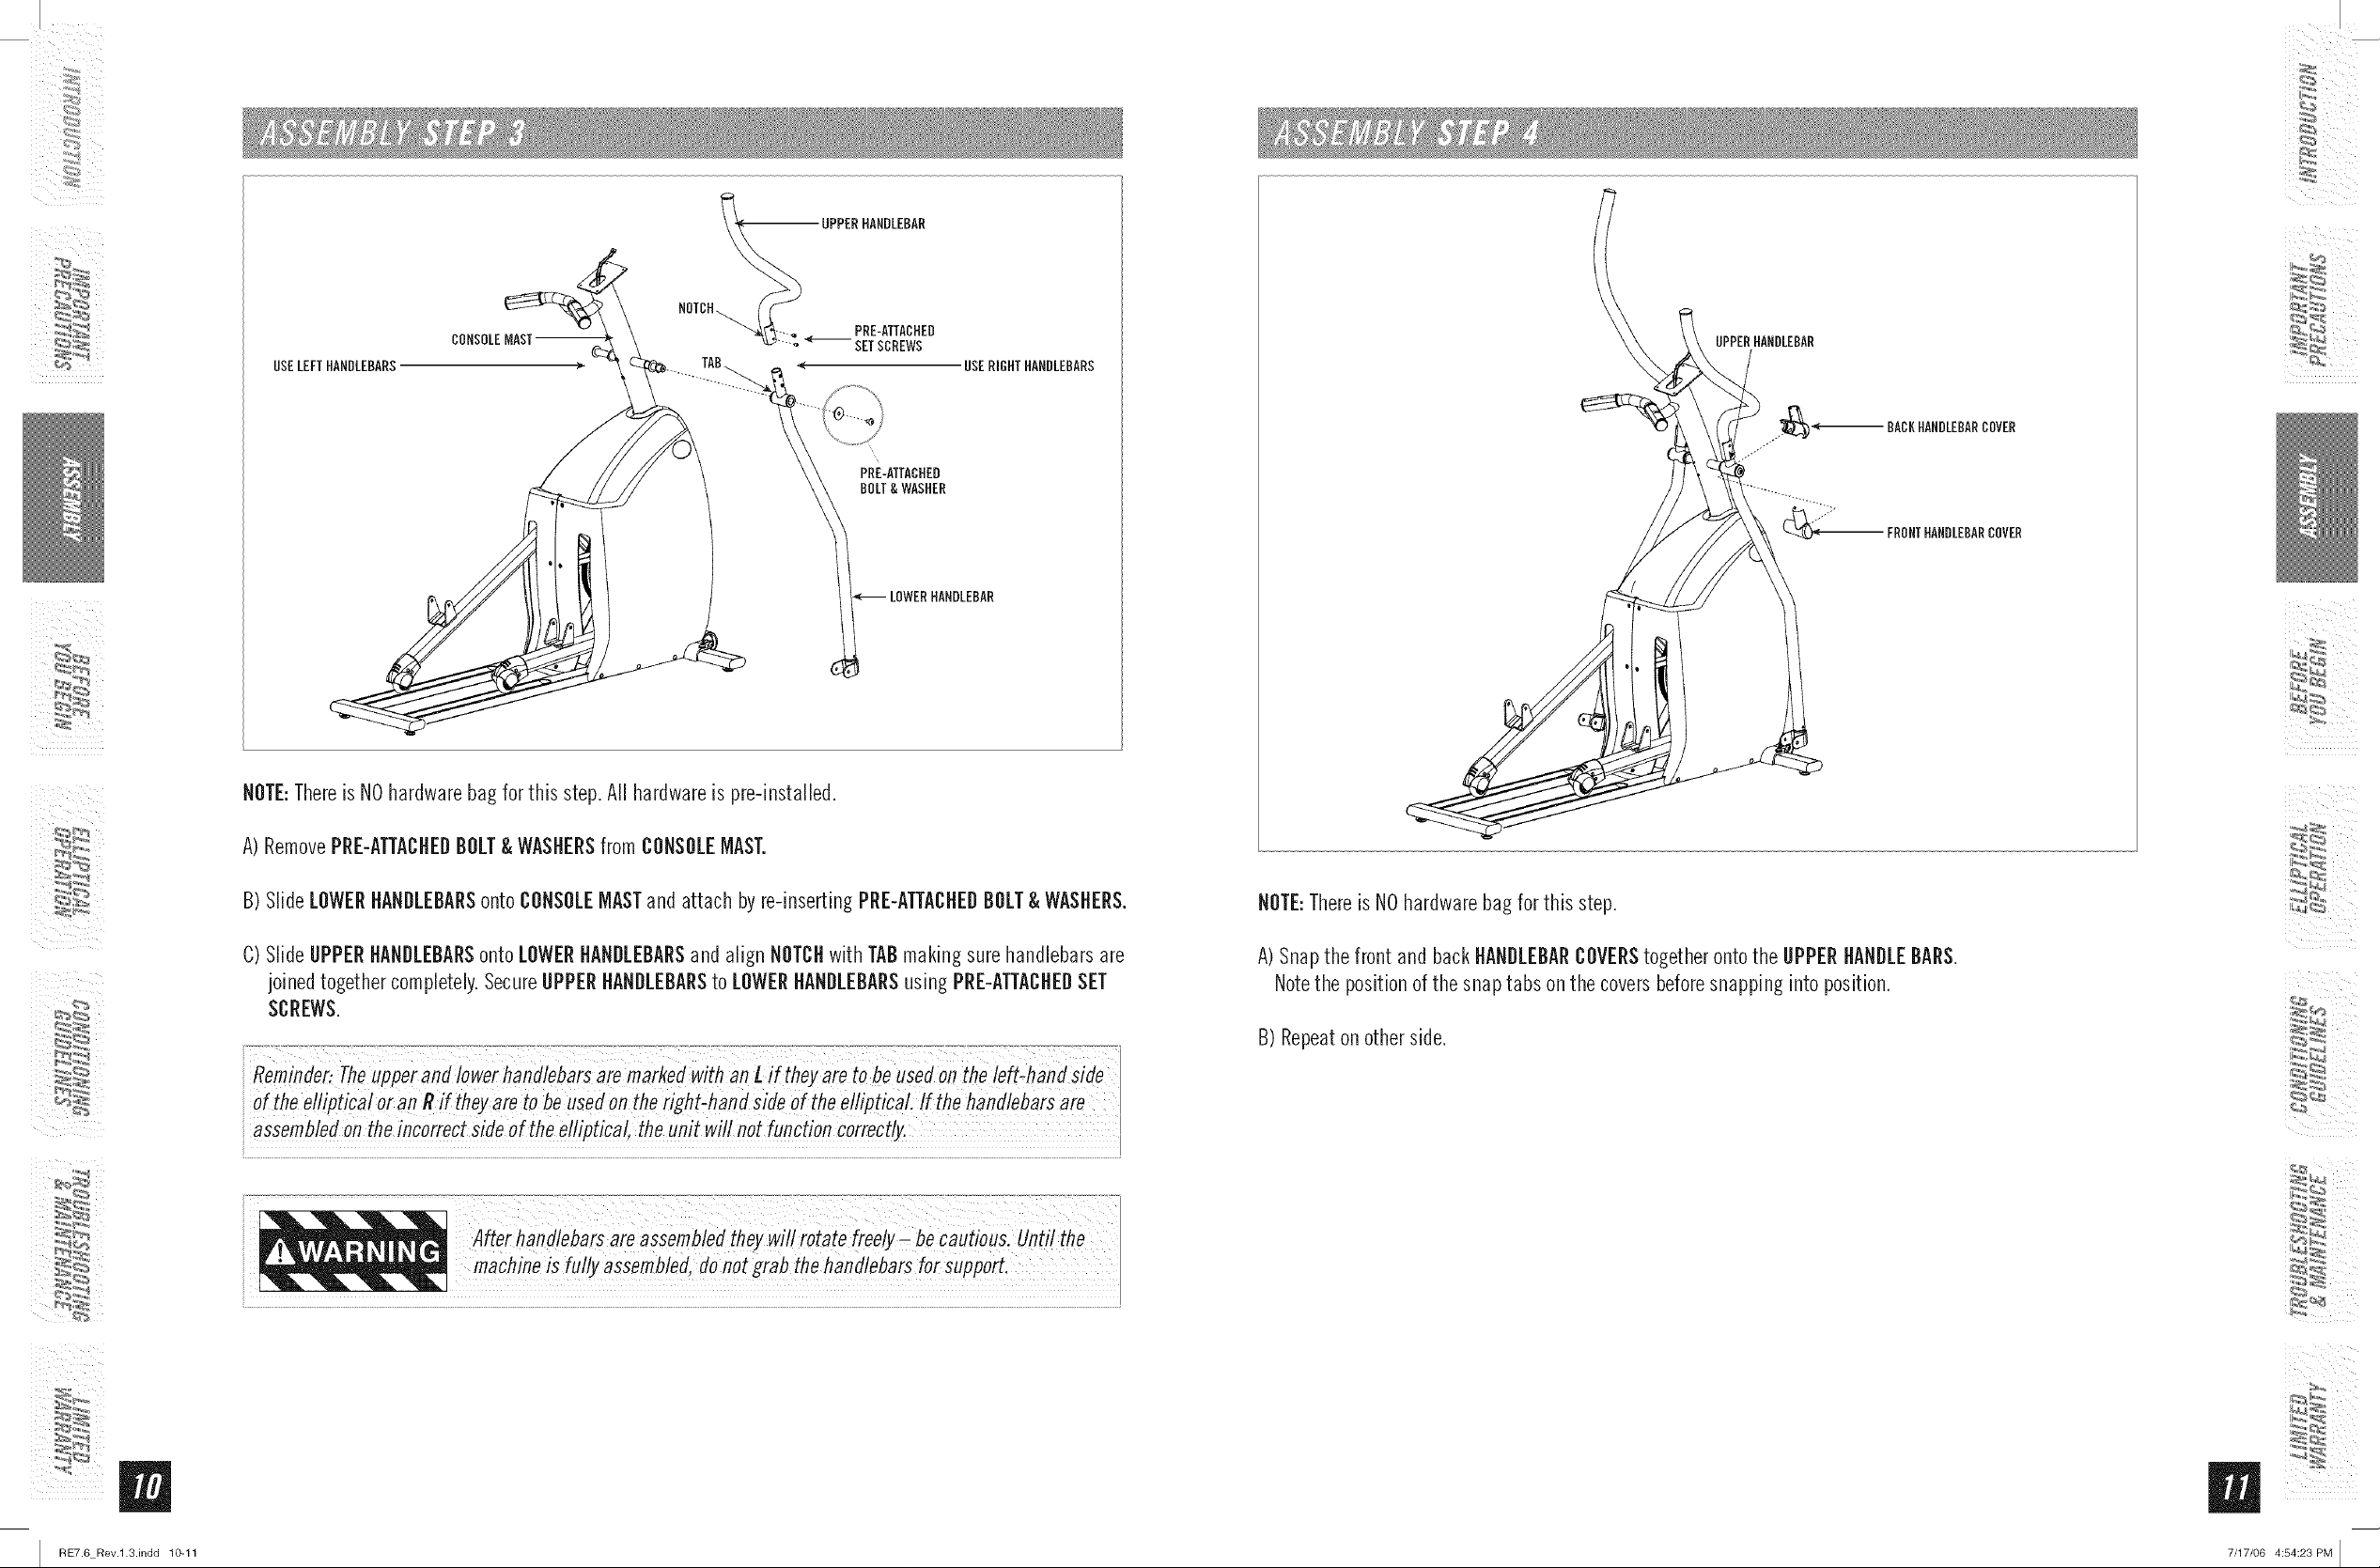
NOTE:Thereis NOhardwarebagfor this step,All hardwareis pre-instaHed.
A)RemovePRE-ATTACHEDBOLT& WASHERSfrom CONSOLEMAST.
B)Slide LOWERHANDLEBARSontoCONSOLEMASTandattach byre-insertingPRE-ATTACHEDBOLT&WASHERS.
C)SlideUPPERHANDLEBARSontoLOWER HANDLEBARSand align NOTCHwith TABmakingsurehandlebarsare
joinedtogethercompletely.SecureUPPERHANDLEBARSto LOWERHANDLEBARSusingPRE-ATTACHEDSET
SCREWS.
Reminder:ihe U_fierandlowerhandlebarsaremarkedwith a_Lif theyareto beusedonthe left_handside
i of the e!tiptica! or an R if theyareto beused onthe right:hand sideof the elliptical, !f thehandlebarsare
NOTE:Thereis NOhardwarebagfor this step.
A)Snapthe front and backHANDLEBARCOVERStogetherontothe UPPERHANDLEBARS.
Notethe positionof the snaptabs on the coversbeforesnapping into position.
B)Repeaton otherside.
i assembieflonthe incorrectSideof the eiliptical,the unit will not funcfion correcfly.
After handlebars are assembied theywi/i rotate freely_ be Caotio,s Unfii the
I RE7.6 Rev.l.3.indd 10-11 7/17/06 4:54:23 PM I
BOLT(I)
SPLITTEFLON
WASHER(M)
GUIDERAIL
LOWERLINKARM LOWER
HANDLEBAR
EOOTPLATETUBE
/
_ PLITTEFLON
WASHER(M)
LOWERLINKARM
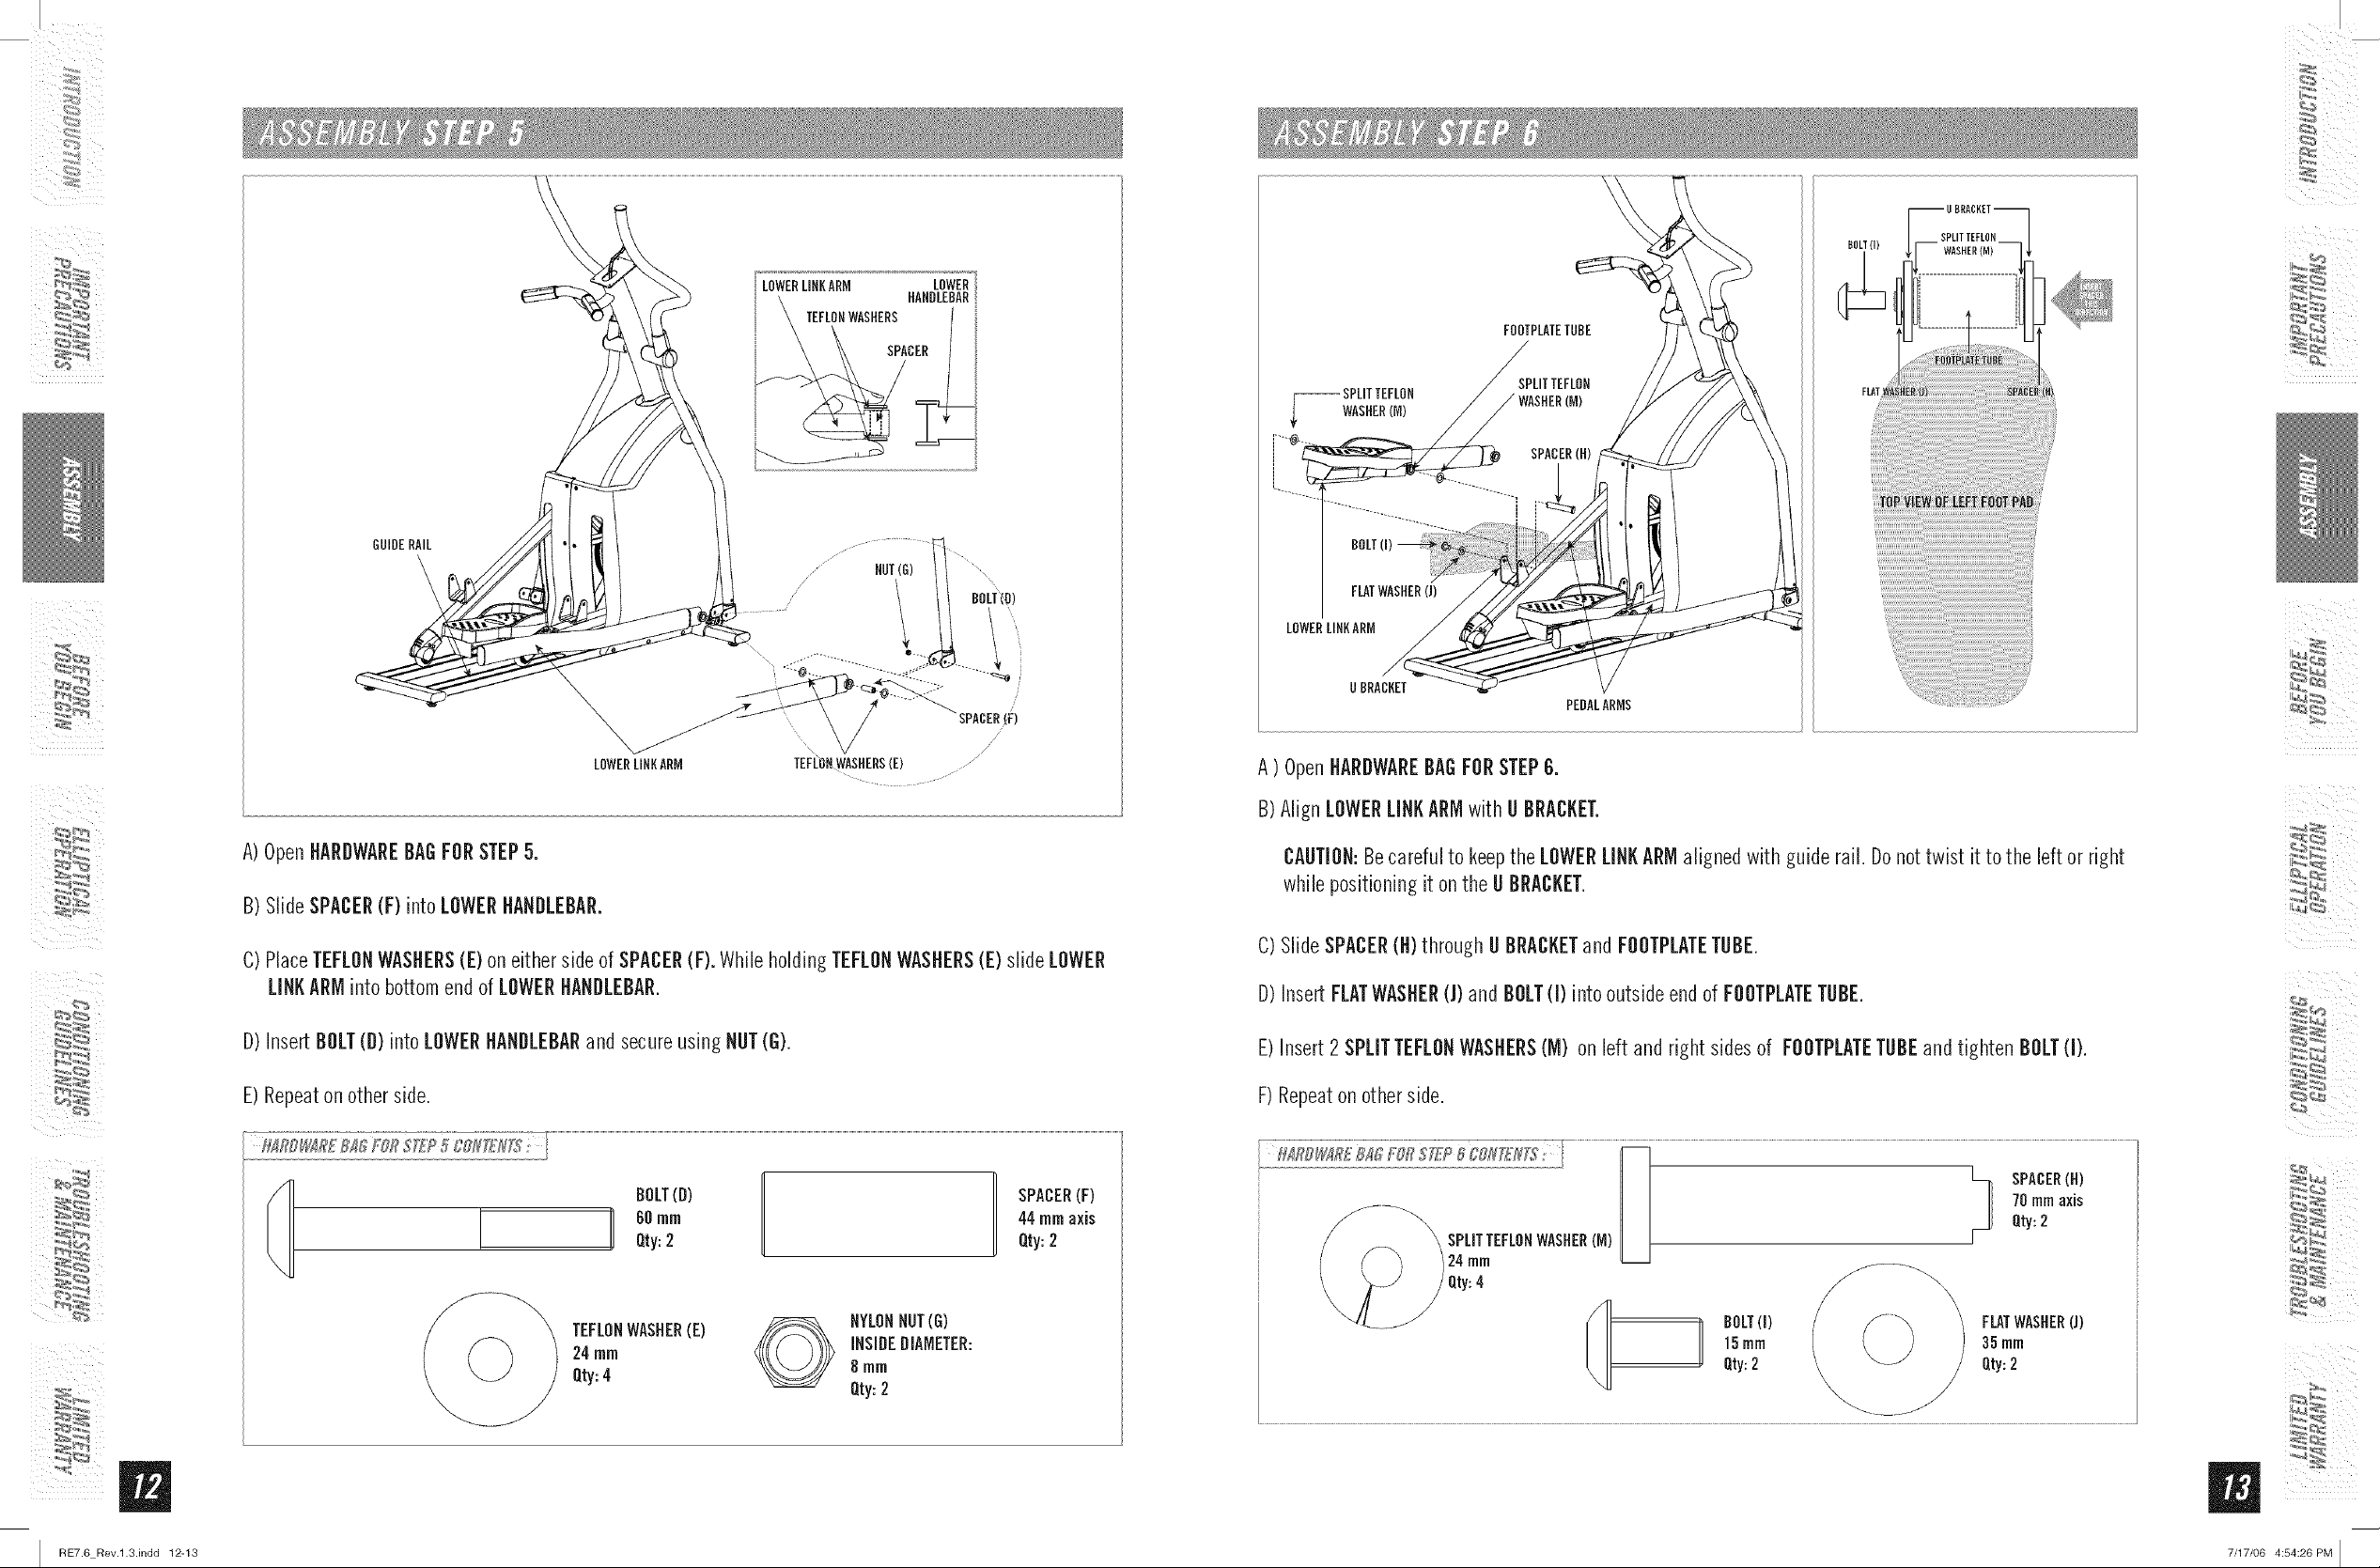
A) OpenHARDWAREBAGFORSTEP8.
B)Align LOWERLINKARMwith g BRACKET.
A)OpenHARDWAREBAGFORSTEP5.
B)SlideSPACER(F) intoLOWERHANDLEBAR.
C)PlaceTEFLONWASHERS(E)on eitherside of SPACER(F).WhileholdingTEFLONWASHERS(E) slide LOWER
LINKARMintobottomendof LOWERHANDLEBAR.
D) insert BOLT(D) into LOWERHANDLEBARand secure using NUT(G).
E) Repeat on other side.
60mm 44mmaxis
BOLT(B) I I SPACER(F)
Qty:2 Qty:2
TEFLONWASNEB(E) _ NYLONNUT(G)
24 mm _ INSIDEDIAMETER:
Qty:4 8mm
Qty:2
CAUTION:Becareful to keepthe LOWERLINKARMalignedwith guide rail. Donottwist it to the leftor right
whilepositioning it onthe g BRACKET.
C)SlideSPACER(H)throughg BRACKETandFOOTPLATETUBE.
D)insertFLATWASHER(J)and BOLT(I) intooutsideendof FOOTPLATETUBE.
E)Insert2SPLITTEFLONWASHERS(M) onleft andright sidesof FOOTPLATETUBEandtighten BOLT(I).
F)Repeatonotherside.
m
I RE7.6 Rev.l.3.indd 12-13 7/17/06 4:54:26 PM I
 Loading...