

Hopkins CWL622HCO User Manual

CWL622 • WMS & FLOOD LIGHT KIT • OWNER’S MANUAL
BLAZER-INTERNATIONAL.COM
1-800-835-0129
Patent Pending
© Copyright 2019
HOPKINS MANUFACTURING CORPORATION
428 PEYTON ST., EMPORIA, KS 66801
www.HopkinsMfg.com | 1-620-342-7320
Overview
This product is a professional, remote control, wire management system. The WMS is designed for
operating accessories (including lights, horns, warning beacons, etc.) typically used on work or off-road
vehicles (trucks, jeeps, ATV/UTV, boats, heavy equipment, farm equipment, etc.). The unit works on 12V
DC and provides output to four terminals which are protected by a 40A fuse.
Please note that the remote control can be clipped onto a visor, or conveniently stored within the
vehicle for easy access. It uses a 12V, A23 size alkaline battery included with the kit. If the
remote control is lost or broken – it can be replaced and the new remote “paired” with the existing
WMS.
Together with two flood lights, this kit will allow you to add lights for off-road in under one hour.
Installation
1. Please read these instructions carefully before installing this product. It is recommended to
consult a professional installer to prevent damage to vehicle and/or system.
2. Do not connect to 24V DC or higher voltage system, as this product is designed for a 12V DC
battery system. In case you have a larger than 12V DC system, check vehicle owner’s manual to
determine if a 12V DC output is available and how to connect in order to use it safely, otherwise,
the product will be damaged.
3. Find a suitable flat surface near the battery, clean the surface free of dirt and oil and then affix the
unit using provided adhesive strips and/or mounting holes.
4. Remove the 40A fuse from the holder and disconnect the vehicle battery.
5. Securely attach the positive (red) cable of the WMS unit to the positive terminal of the battery or
battery cable and the negative (black) cable of the WMS to the negative battery cable or chassis.
6. Identify the areas where you would like to mount the LED lights and using the included hardware,
securely mount the lamp to your vehicle.
7. Securely attach the red wire of the first LED light to the positive terminal (+) of the 2A circuit on
WMS unit and black (negative) wire to the negative (-) terminal of the circuit. Repeat this step for
the second work light using the second 2A circuit. If you would like both lights to turn on at the
same time with one button push, attach both red wires to the 18A terminal’s positive (+) terminal
and both black wires to the negative (-) terminal.
8. Attach the auxiliary lights/equipment following correct polarity on the terminals and not exceeding
the maximum amperage of the channels. See FIG 1 (on page 2)
9. Reconnect battery cables.
10. Insert the 40A fuse back into the holder and snap the cover closed.
11. Test by pressing remote button and checking accessory operation. Remote includes a 12V (A23
alkaline) battery. Recycle used battery as per local codes.
Page 1 of 12
Patent Pending
© Copyright 2019
CWL622 • WMS & FLOOD LIGHT KIT • OWNER'S MANUAL
BLAZER-INTERNATIONAL.COM
1-800-835-0129
HOPKINS MANUFACTURING CORPORATION
428 PEYTON ST., EMPORIA, KS 66801
www.HopkinsMfg.com | 1-620-342-7320
Specications
Standard design 12V , max 40A
Rated input voltage DC 13V
Working voltage DC 11-15V
Working temperature 0°F - 225°F / -17°C - 107°C
Fuse 40A
Remote control battery 12V A23 alkaline
Low-voltage protection circuit 9.8V +/- 0.3V DC. with 8 sec delay
Thermal shut off temperature 248°F / 120°C
LED Light Two LED flood lights
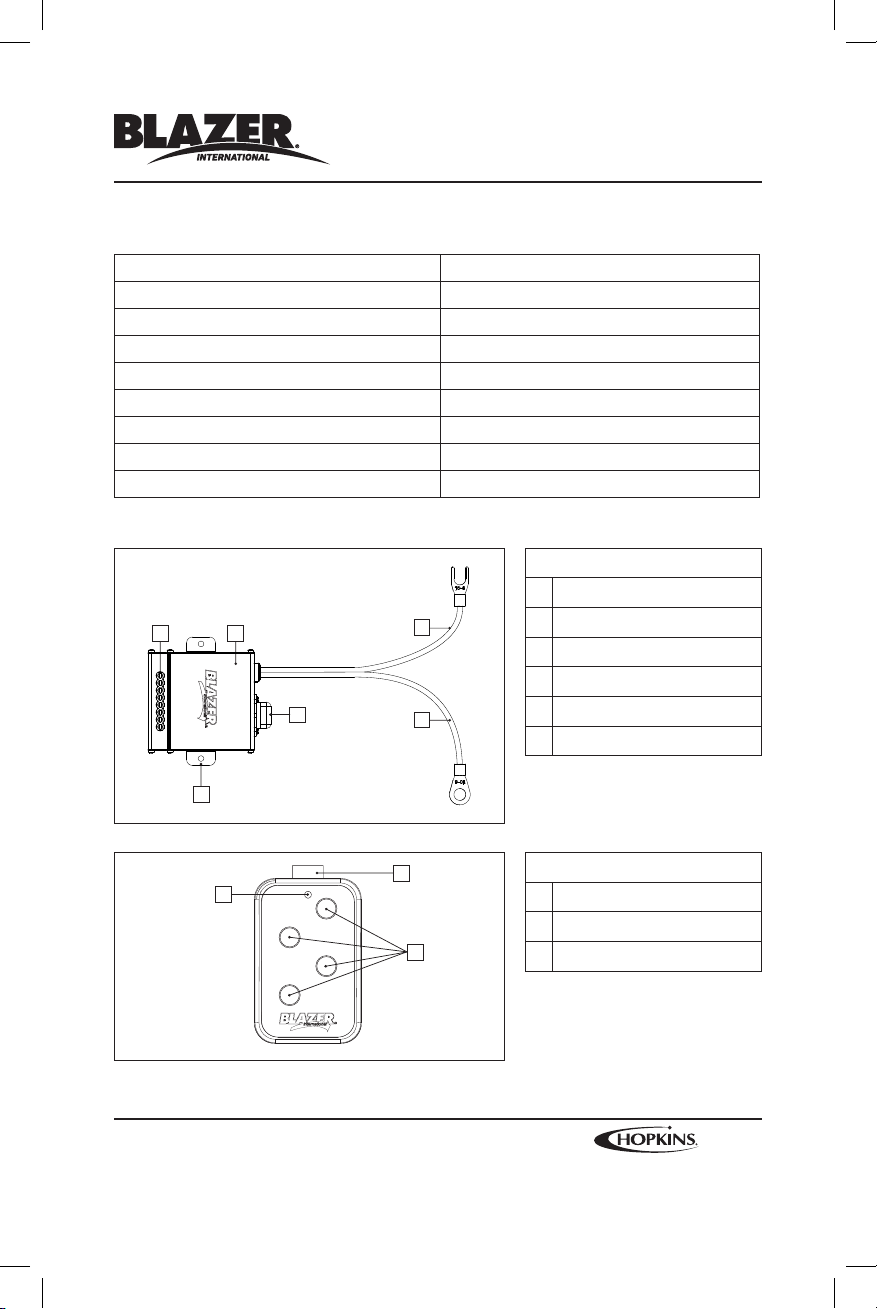
FIG 1
FIG 2
Page 2 of 12
FIG 1
Main Unit
1
Terminals
12
4
5
6
2
Eyelet for Mounting Installation
3
Fuse Holder
4
Negative Cable
5
Positive Cable
6
3
2
1
18A
2A
2A
18A
3
LED Indicator / battery power
1
Visor Clip
2
Control Buttons (on/off)
3
FIG 2
CWL622 • WMS & FLOOD LIGHT KIT • OWNER’S MANUAL
BLAZER-INTERNATIONAL.COM
1-800-835-0129
Patent Pending
© Copyright 2019
HOPKINS MANUFACTURING CORPORATION
428 PEYTON ST., EMPORIA, KS 66801
www.HopkinsMfg.com | 1-620-342-7320
Troubleshooting
Symptom Possible Cause and Solution
Battery LED light does not illuminate on the
remote control unit when buttons are pressed.
Auxiliary lights/equipment not operational when
the remote control button is pressed and the red
LED illuminates on the WMS box under the fuse.
Some accessories/lights will not come on. Check wire polarity for those items.
Light/accessory comes on momentarily. That channel is being overloaded. Make sure the
In case the remote is lost, a replacement remote can be paired with the existing module, rather than
purchasing a new system (call customer service at 800-241-3808 for assistance). Pair the new remote
to the main unit before use.
Pairing procedure (See FIG 3): (Caution: Main unit and remote control are already paired when shipped
– call 800-835-0129 before trying to pair a newly purchased CWL622 kit).
• Point the remote control towards the main unit and using a small screwdriver press the black
switch. The green light will light up on the powered WMS unit.
• Now press any one of the four buttons on the remote control to pair the remote with the WMS.
The green light should turn off indicating successful pairing.
Call technical service at 800-235-0129 for any issues related to your WMS.
Remote control battery is dead.
Replace battery (12V A23 alkaline)
1. Vehicle battery voltage below 9.8V +/- 0.3V
DC. Charge battery.
2. Main unit not connected/incorrectly
connected to the battery source. Check
connection and polarity of WMS.
3. Blown fuse/replace fuse.
4. Pairing between the remote and main unit
disrupted. Pair the system (see below).
amperage of the light is less than that stated at
the terminal (check fuse).
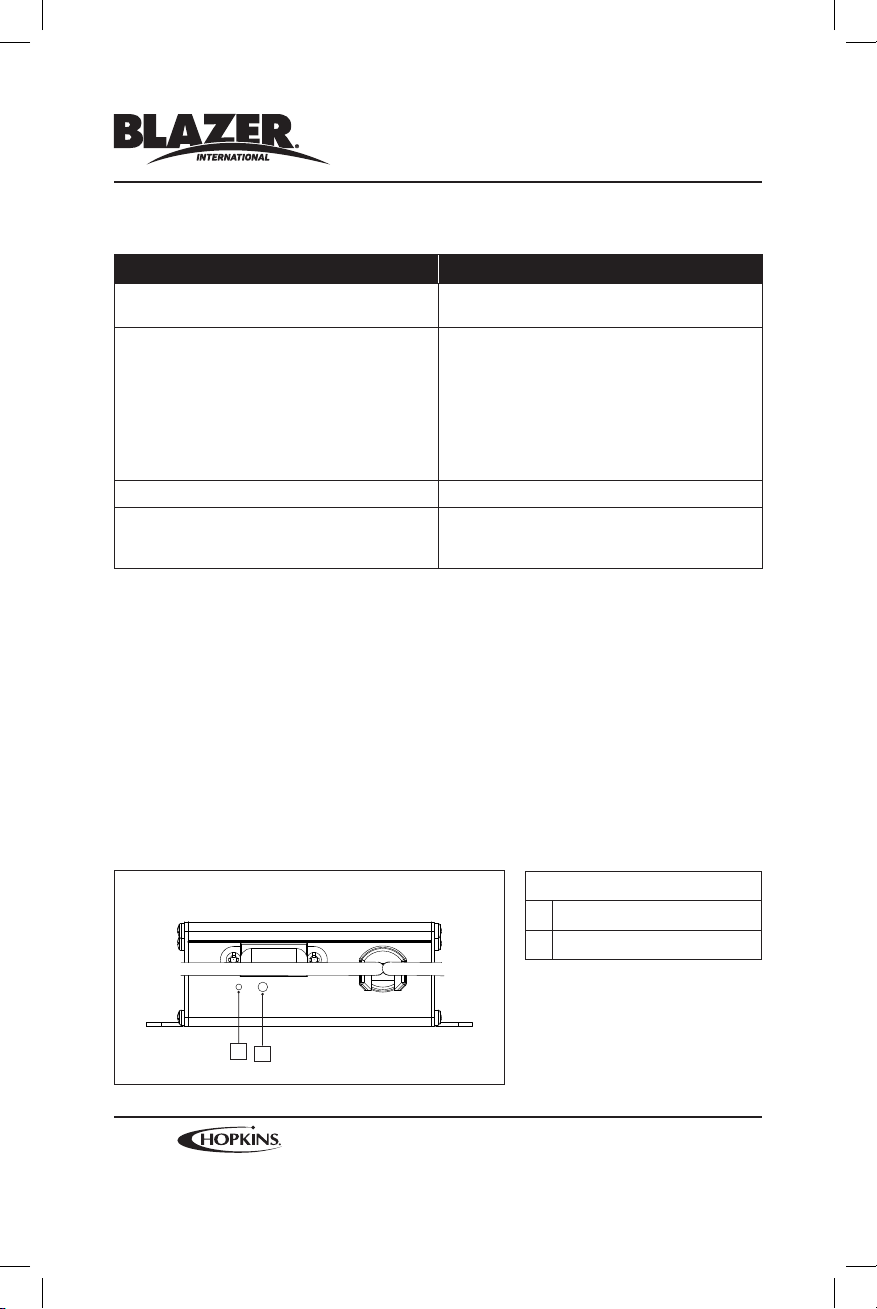
FIG 3
2
1
FIG 3
Indicator Light
1
Pairing Switch (Black)
2
Page 3 of 12
Patent Pending
© Copyright 2019
CWL622 • WMS & FLOOD LIGHT KIT • OWNER'S MANUAL
BLAZER-INTERNATIONAL.COM
1-800-835-0129
HOPKINS MANUFACTURING CORPORATION
428 PEYTON ST., EMPORIA, KS 66801
www.HopkinsMfg.com | 1-620-342-7320
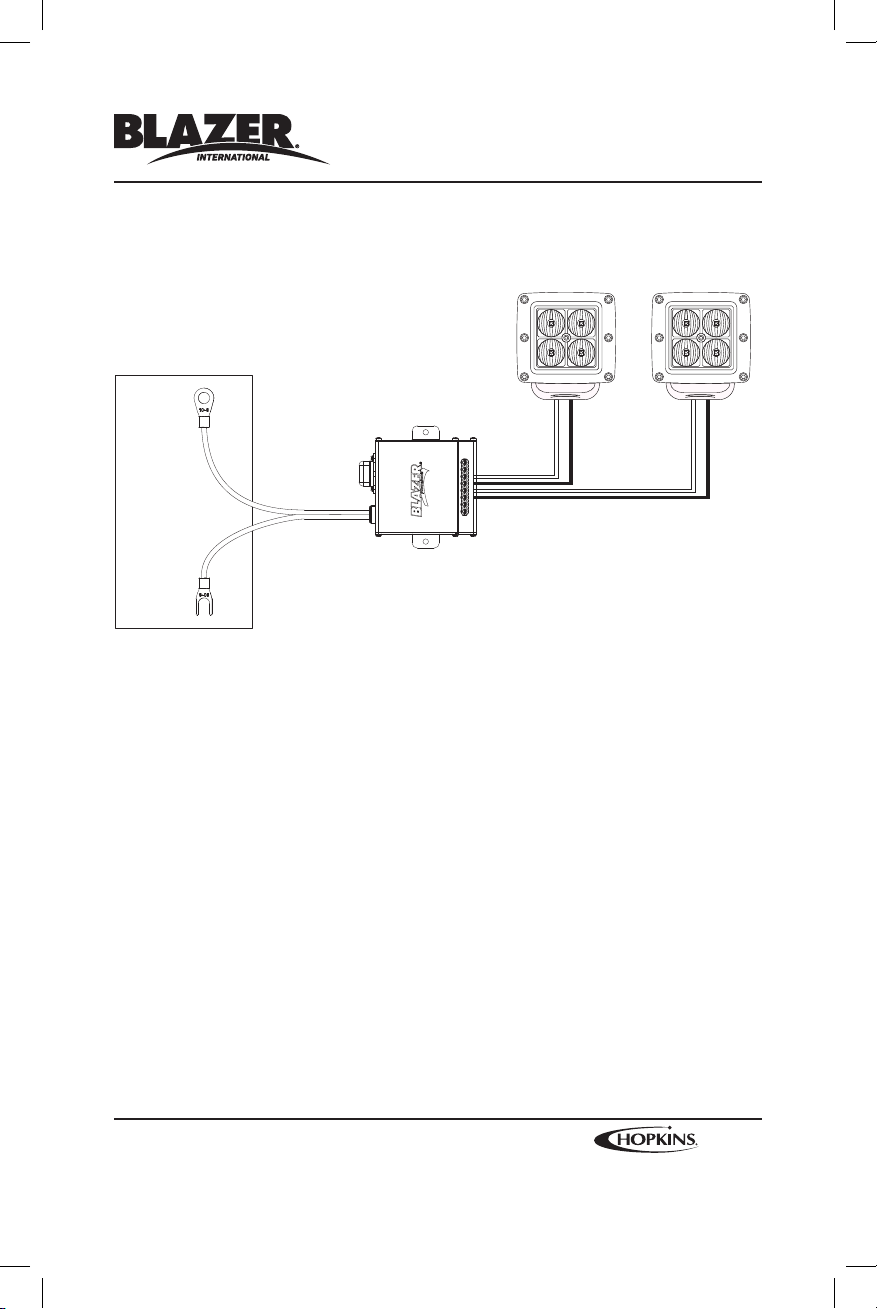
Red
Postive (+)
2" LED FLOOD LIGHTS
VEHICLE BATTERY
Black
Negative (-)
MODULE
+- +- +- +-
Postive (+)
Red
Black
Negative (-)
Red
Postive (+)
Black
Negative (-)
FCC Statement
PURSUANT TO FCC 15.21 OF THE FCC RULES, CHANGES NOT EXPRESSLY APPROVED BY TIGER ACCESSORY
GROUP MIGHT CAUSE HARMFUL INTERFERENCE AND VOID THE FCC AUTHORIZATION TO OPERATE THIS PRODUCT.
THIS PRODUCT COMPLIES WITH FCC OET BULLETIN 65 & INDUSTRY CANADA’S RSS-102 RADIATION EXPOSURE
LIMITS SET FORTH FOR AN UNCONTROLLED ENVIRONMENT.
THIS DEVICE COMPLIES WITH INDUSTRY CANADA LICENSE-EXEMPT RSS STANDARD(S). OPERATION IS SUBJECT
TO THE FOLLOWING TWO CONDITIONS: (1) THIS DEVICE MAY NOT CAUSE HARMFUL INTERFERENCE. AND (2)
THIS DEVICE MUST ACCEPT ANY INTERFERENCE RECEIVED, INCLUDING INTERFERENCE THAT MAY CAUSE
UNDESIRED OPERATION.
THIS DEVICE COMPLIES WITH PART 15 OF THE FCC RULES. OPERATION JS SUBJECT TO THE FOLLOWING TWO
CONDITIONS: (1) THIS DEVICE MAY NOT CAUSE HARMFUL INTERFERENCE, AND (2) THIS DEVICE MUST ACCEPT
ANY INTERFERENCE RECEIVED, INCLUDING INTERFERENCE THAT MAY CAUSE UNDESIRED OPERATION.
Page 4 of 12
 Loading...