

Page 1

Instruction Book
Condenser Tumble Dryer
®
English
Türkçe
40005181.qxd 19/07/2007 12:37 Page 1
Page 2
Introduction . . . . . . . . . . . . . . . . . . . . . . . . . . . . . . . . . . . 3
Delivery information . . . . . . . . . . . . . . . . . . . . . . . . . . . . . . . . 3
Unpacking the product . . . . . . . . . . . . . . . . . . . . . . . 4
Safety reminders . . . . . . . . . . . . . . . . . . . . . . . . . . . . . . 5
Installation . . . . . . . . . . . . . . . . . . . . . . . . . . . . . . . . . . . . . . . . 5
Use . . . . . . . . . . . . . . . . . . . . . . . . . . . . . . . . . . . . . . . . . . . . . . 5
The Laundry . . . . . . . . . . . . . . . . . . . . . . . . . . . . . . . . . . . . . . . 5
Environmental Issues . . . . . . . . . . . . . . . . . . . . . . . . . . . . . . . . 6
GIAS Service . . . . . . . . . . . . . . . . . . . . . . . . . . . . . . . . . . . . . . . 6
Installation . . . . . . . . . . . . . . . . . . . . . . . . . . . . . . . . . . . . 7
Electrical requirements . . . . . . . . . . . . . . . . . . . . . . . . . . . . . . . 7
Adjusting the feet . . . . . . . . . . . . . . . . . . . . . . . . . . . . . . . . . . 7
Ventilation. . . . . . . . . . . . . . . . . . . . . . . . . . . . . . . . . . . . . 8
Preparing the load . . . . . . . . . . . . . . . . . . . . . . . . . . . . 9
Clothes preparation . . . . . . . . . . . . . . . . . . . . . . . . . . . . . . . . . 9
Sorting the load . . . . . . . . . . . . . . . . . . . . . . . . . . . . . . . . . . . . 9
Drying advice. . . . . . . . . . . . . . . . . . . . . . . . . . . . . . . . . 10
Do not tumble dry . . . . . . . . . . . . . . . . . . . . . . . . . . . . . . . . . 10
Energy saving . . . . . . . . . . . . . . . . . . . . . . . . . . . . . . . . . . . . . 10
Controls and indicators . . . . . . . . . . . . . . . . . . . . . 11
Door and Filter . . . . . . . . . . . . . . . . . . . . . . . . . . . . . . . 12
Opening the door. . . . . . . . . . . . . . . . . . . . . . . . . . . . . . . . . . 12
Filter . . . . . . . . . . . . . . . . . . . . . . . . . . . . . . . . . . . . . . . . . . . . 12
Filter care indicator. . . . . . . . . . . . . . . . . . . . . . . . . . . . . . . . . 12
Water container. . . . . . . . . . . . . . . . . . . . . . . . . . . . . . 13
To remove the container . . . . . . . . . . . . . . . . . . . . . . . . . . . . 13
Condenser . . . . . . . . . . . . . . . . . . . . . . . . . . . . . . . . . . . . 14
To remove the condenser . . . . . . . . . . . . . . . . . . . . . . . . . . . . 14
Selecting the Programme. . . . . . . . . . . . . . . . . . . . 15
Operation. . . . . . . . . . . . . . . . . . . . . . . . . . . . . . . . . . . . . 16
Cancelling and resetting the programme . . . . . . . . . . . . . . . 16
Delay Start . . . . . . . . . . . . . . . . . . . . . . . . . . . . . . . . . . . . . . . 16
Cleaning and Routine Maintenance . . . . . . . . 17
Cleaning the dryer . . . . . . . . . . . . . . . . . . . . . . . . . . . . . . . . . 17
Technical specifications. . . . . . . . . . . . . . . . . . . . . . . . . . . . . . 17
Test specification . . . . . . . . . . . . . . . . . . . . . . . . . . . . . . . . . . 17
Troubleshooting. . . . . . . . . . . . . . . . . . . . . . . . . . . . . . 18
Customer Service. . . . . . . . . . . . . . . . . . . . . . . . . . . . . 19
Hoover Spares. . . . . . . . . . . . . . . . . . . . . . . . . . . . . . . . . . . . . 19
GIAS Service . . . . . . . . . . . . . . . . . . . . . . . . . . . . . . . . . . . . . . 19
Your Guarantee . . . . . . . . . . . . . . . . . . . . . . . . . . . . . . 20
Hoovercare . . . . . . . . . . . . . . . . . . . . . . . . . . . . . . . . . . . . . . . 20
2
English . . . . . . . . . . . . . . . . . . . . . . . . . . . . . . . . . . . . . . . . . . . . . . . . . . . . . . . . . . . . . . . . . . . . . 2
Türkçe . . . . . . . . . . . . . . . . . . . . . . . . . . . . . . . . . . . . . . . . . . . . . . . . . . . . . . . . . . . . . . . . . . . . . 22
40005181.qxd 19/07/2007 12:37 Page 2
Page 3
Please read and follow these instructions carefully and
operate the machine accordingly. This booklet provides
important guidelines for safe use, installation, maintenance
and some useful advice for best results when using your
machine.
Keep all documentation in a safe place for future reference or
for any future owners.
Delivery information
Please check that the following items are delivered with the
appliance:
● Instruction manual
● Guarantee card
● Energy label
● Discharge hose kit
3
Check that no damage
has occurred to the
machine during transit.
If it has, call for service
by GIAS.
Call
08705 400 600
If the appliance is not
running properly or
breaks down, switch it
off, disconnect the plug
from the socket and do
not tamper with
the appliance.
Consult GIAS Service
for possible repair.
Call
08705 400 600
Failure to comply with
the above can
compromise the safety
of the appliance. You
may be charged for a
service call if a problem
with your machine is
caused by misuse.
Introduction
40005181.qxd 19/07/2007 12:34 Page 3
Page 4
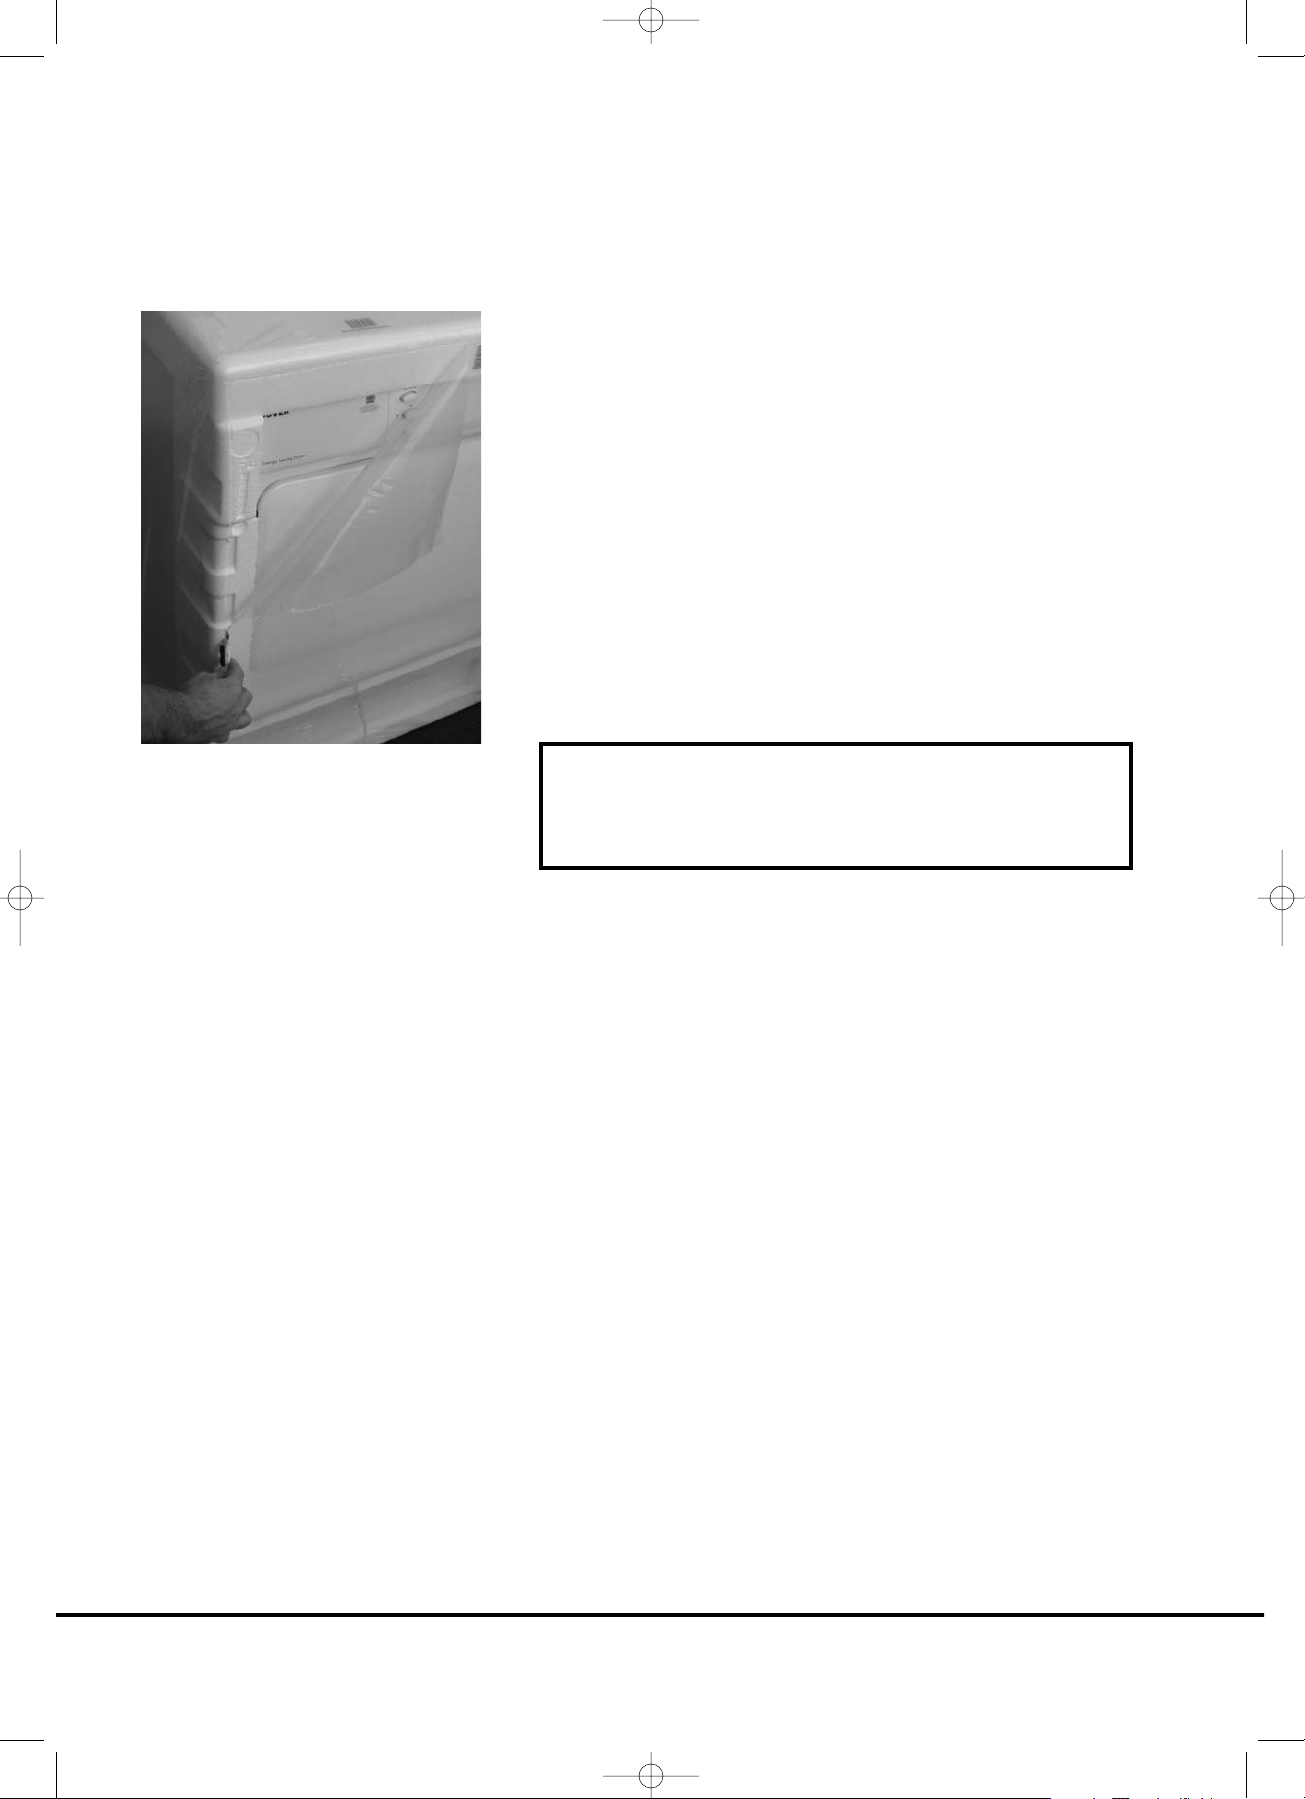
1. Cut carefully around the base of the packaging and up
one corner.
2. Remove the polythene sleeve and lift the dryer off the
polystyrene base.
4
Unpacking the product
Dispose of the packaging safely. Make sure
it is out of the reach of children, it is a
potential source of danger.
40005181.qxd 19/07/2007 12:34 Page 4
Page 5
Installation
● Check that the product has no visible signs of damage
before use. If damaged do not use and please call our
national number: 08705 400 600.
● Do not use adapters, multiple connectors and/or extensions.
● Never install the dryer against curtains and be sure to
prevent items from falling or collecting behind the dryer.
● The appliance must not be installed behind a lockable door,
a sliding door or a door with a hinge on the opposite side
of the door to that of the tumble dryer.
Use
● This appliance is not intended for use by persons (including
children) with reduced physical, sensory or mental
capabilities, or lack of experience and knowledge, unless
they have been given supervision or instruction concerning
use of the appliance by a person responsible for their
safety.
● Children should be supervised to ensure that they do not
play with the appliance.
● WARNING Misuse of a tumble dryer may create a fire
hazard.
● This machine is solely for domestic use, i.e. to dry
household textiles and garments.
● This machine should only be used for its intended purpose
as described in this manual. Ensure that the instructions for
installation and use are fully understood before operating
the appliance.
● Do not touch the appliance when hands or feet are damp
or wet.
● Do not lean on the door when loading the machine or use
the door to lift or move the machine.
● Do not allow children to play with the machine or its
controls.
● WARNING Do not use the product if the fluff filter is not in
position or is damaged; fluff could be ignited.
● WARNING Where the hot surface symbol is located
the temperature rise during operation of the tumble dryer
may be in excess of 60 degrees C.
● Remove the plug from the electricity supply. Always remove
the plug before cleaning the appliance.
● Do not continue to use this machine if it appears to be
faulty.
● Lint and fluff must not be allowed to collect on the floor
around the outside of the machine.
● The drum inside may be very hot. Always allow the dryer to
complete the cool down period before removing the
laundry.
The Laundry
● Do not dry unwashed items in the tumble dryer.
● WARNING Do not tumble dry fabrics treated with dry
5
Safety reminders
40005181.qxd 19/07/2007 12:34 Page 5
Page 6
cleaning fluids.
● WARNING Foam rubber materials can, under certain
circumstances, when heated become ignited by spontaneous
combustion. Items such as foam rubber (latex foam), shower
caps, waterproof textiles, rubber backed articles and clothes
or pillows fitted with foam rubber pads MUST NOT be dried
in the tumble dryer.
● Always refer to the laundry care labels for directions on
suitability for drying.
● Clothes should be spin dried or thoroughly wrung before
they are put into the tumble dryer. Clothes that are dripping
wet should NOT be put into the dryer.
● Lighters and matches must not be left in pockets and NEVER
use flammable liquids near the machine.
● Glass fibre curtains should NEVER be put in this machine.
Skin irritation may occur if other garments are
contaminated with the glass fibres.
● Items that have been soiled with substances such as cooking
oil, acetone, alcohol, petrol, kerosene, spot removers,
turpentine, waxes and wax removers should be washed in
hot water with an extra amount of detergent before being
dried in the tumble dryer.
● Fabric softeners, or similar products, should be used as
specified by the fabric softener instructions.
Enviromental Issues
● All packaging materials used are environmentally-friendly
and recyclable. Please help dispose of the packaging via
environmentally-friendly means. Your local council will be
able to give you details of current means of disposal.
● To ensure safety when disposing of an old tumble dryer
disconnect the mains plug from the socket, cut the mains
power cable and destroy this together with the plug. To
prevent children shutting themselves in the machine break
the door hinges or the door lock.
GIAS Service
● To ensure the continued safe and efficient operation of this
appliance we recommend that any servicing or repairs are
only carried out by an authorised GIAS service engineer.
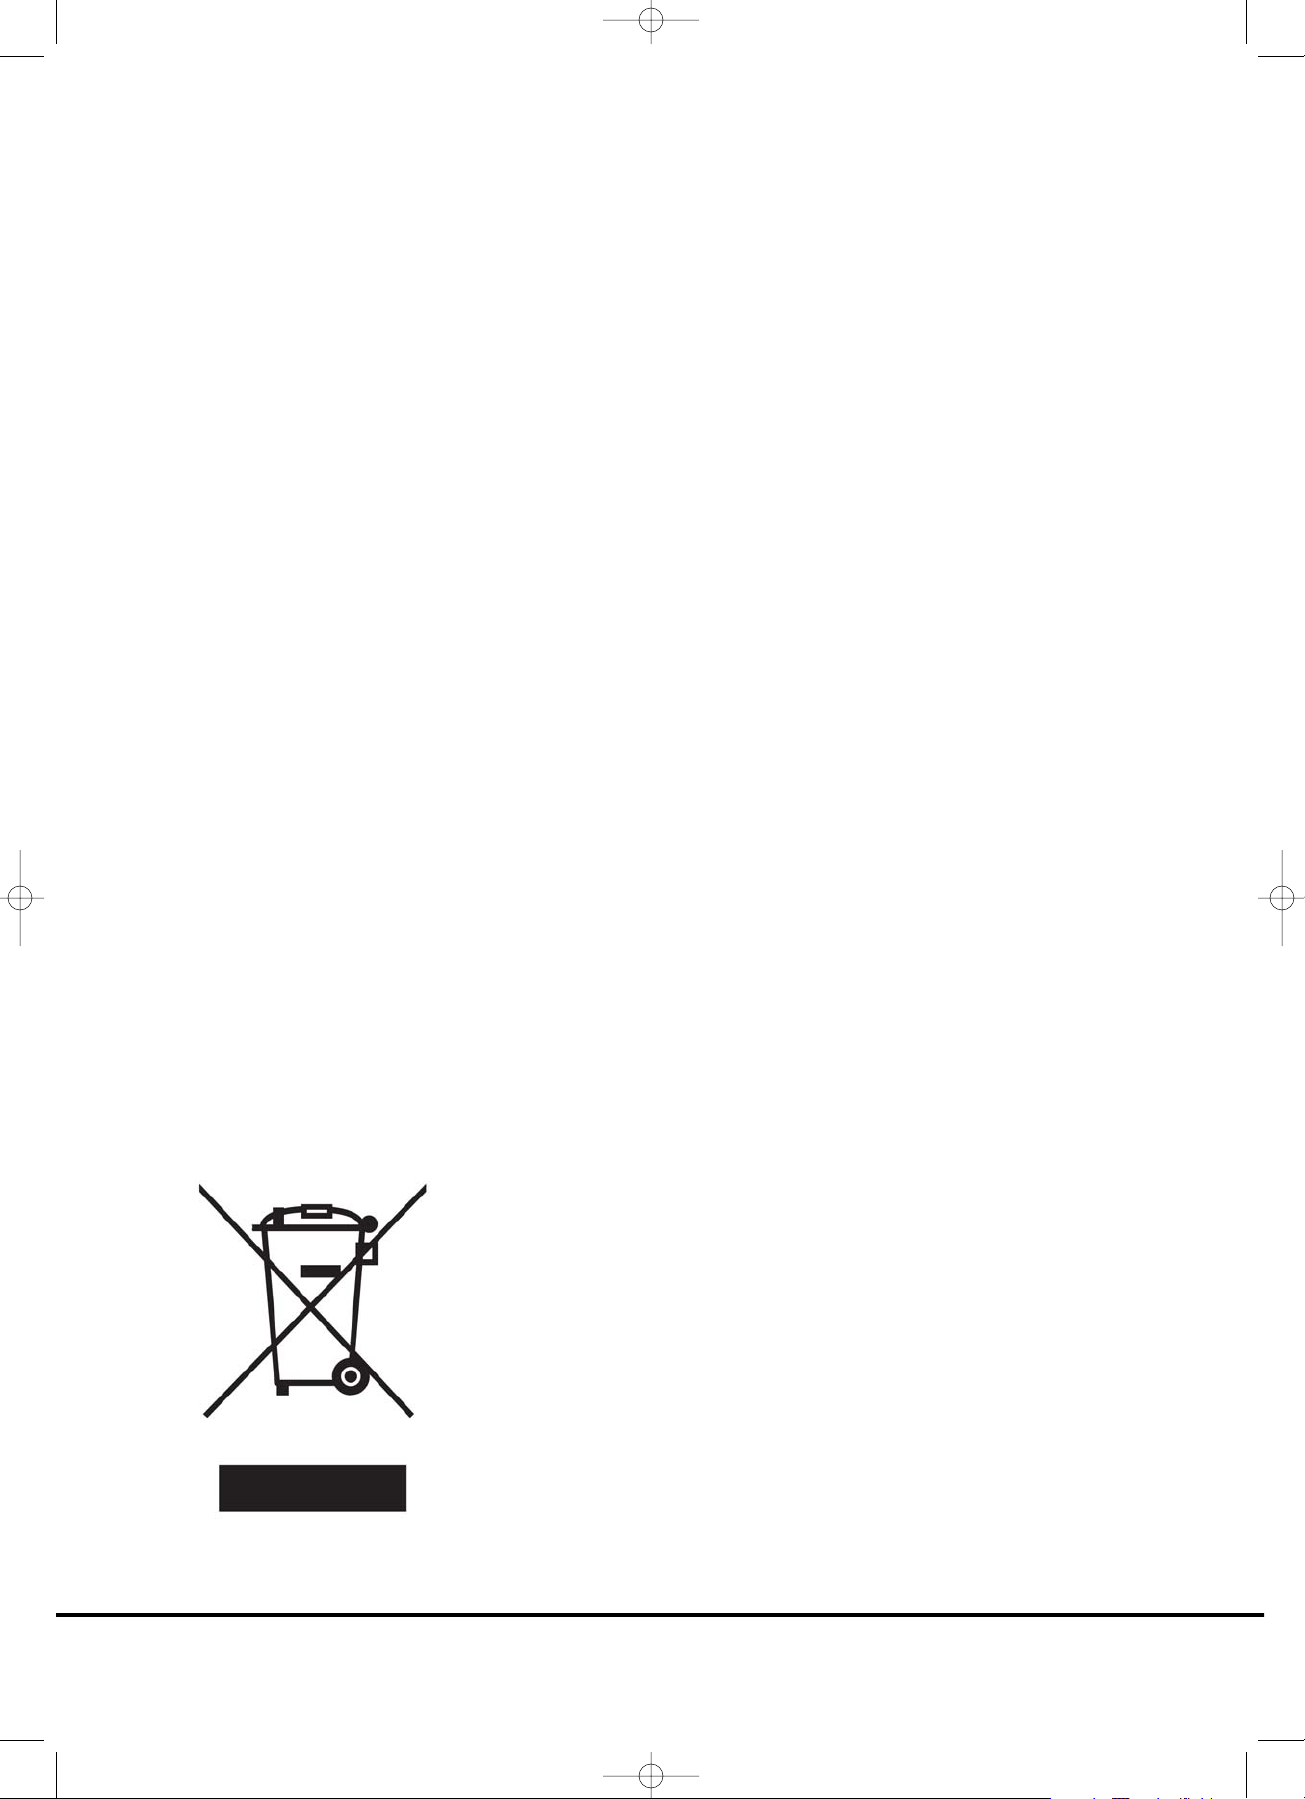
European Directive 2002/96/EC
This appliance is marked according to the European Directive
2002/96/EC on Waste Electrical and Electronic Equipment (WEEE).
By ensuring this product is disposed of correctly, you will help
prevent potential negative consequences for the environment
and human health, which could otherwise be caused by
inappropriate waste handling of this product.
The symbol on the product indicates that this product may not
be treated as household waste. Instead it shall be handed over to
the applicable collection point for the recycling of electrical and
electronic equipment
Disposal must be carried out in accordance with local
environmental regulations for waste disposal.
For more detailed information about treatment, recovery and
recycling of this product, please contact your local city office,
your household waste disposal service or the shop where you
purchased the product.
6
40005181.qxd 19/07/2007 12:35 Page 6
Page 7
Electrical requirements
Tumble dryers are supplied to operate at a voltage of
230-240V, 50 Hz single phase. Check that the supply circuit is
rated to at least 13A.
This appliance is fitted with a moulded-on non-rewireable plug
which is already equipped with a BS 1362 ASTA approved 13A
fuse. Any replacement must be the same rating and
specification. If the fuse cover is lost, do not use the plug until
it is replaced.
Electricity can be extremely dangerous.
This appliance must be earthed.
The socket outlet and the plug on the appliance must be of
the same type.
Do not use multiple adapters and/or extension leads.
The plug should be accessible for disconnection after the
appliance has been installed.
The wires in the mains lead are coloured in accordance with
the following codes:
Blue NEUTRAL
Brown LIVE
Green and Yellow EARTH
CE Appliance complies with European Directive 89/336/EEC,
73/23/EEC and subsequent amendments.
Adjusting the feet
Once the machine is in place the feet should be adjusted to
ensure that the machine is level.
7
Installation
Do not plug the
machine in and switch
it on at the mains until
the installation is
completed.
You may be charged for
a service call if a
problem with your
machine is caused by
incorrect installation.
If the mains cord on
this appliance is
damaged, it must be
replaced by a special
cord which is ONLY
obtainable from the
Hoover spares service.
It must be installed by a
competent person.
Call
01204 556111
40005181.qxd 19/07/2007 12:35 Page 7
Page 8
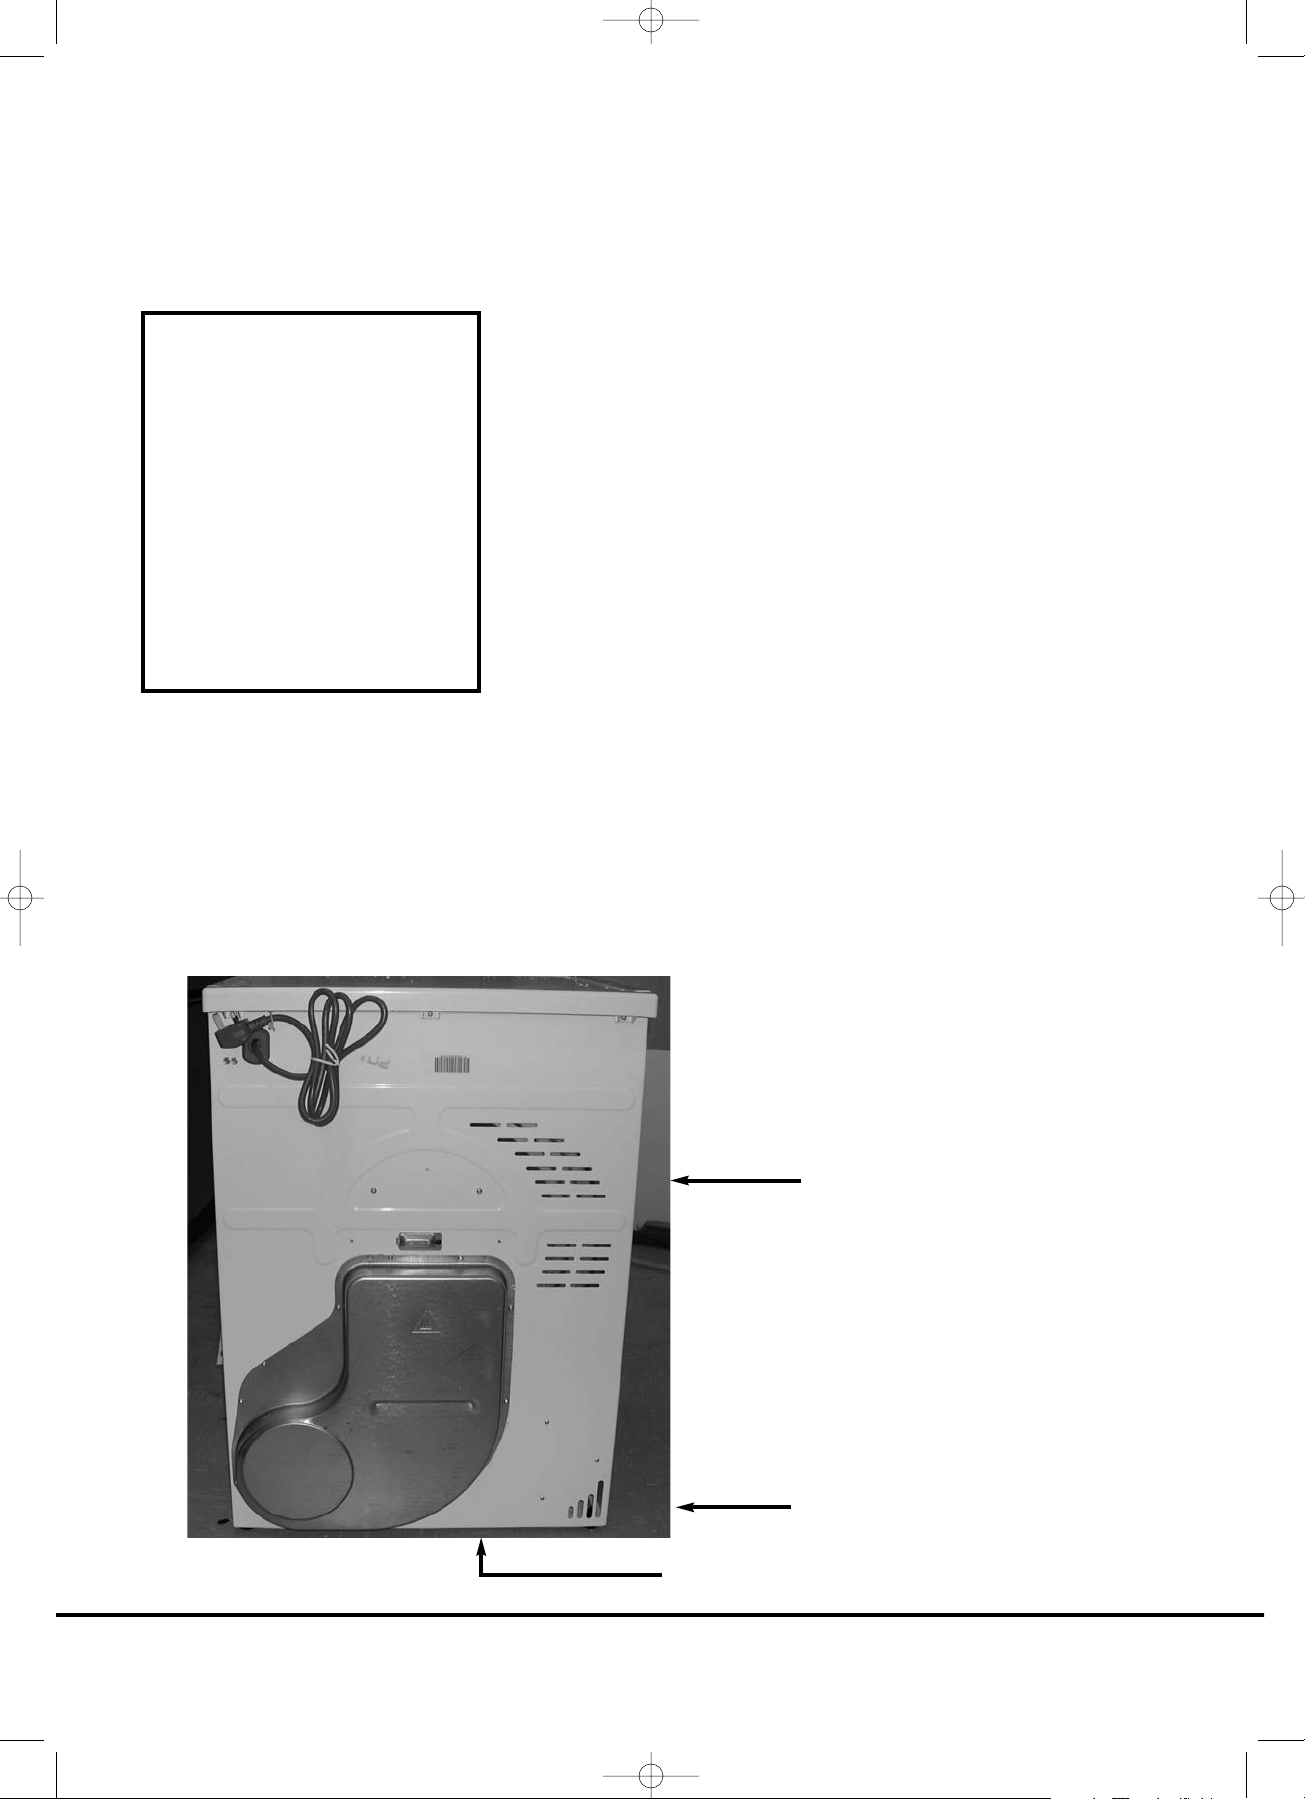
Adequate ventilation must be provided in the room where the
tumble dryer is located to prevent gases from appliances
burning other fuels, including open fires, being drawn into the
room during operation of the tumble dryer.
● Exhaust air must not be discharged into a flue which is
used for exhausting fumes from appliances burning gas or
other fuels.
● Check regularly that the air flowing through the dryer is
not restricted.
● Check the fluff filter after use, and clean, if necessary.
● The inlet and outlets should be kept free from
obstructions. To ensure adequate ventilation the space
between the bottom of the machine and the floor must
not be obstructed. There should be a gap of at least
12mm between the machine and any obstructions.
● Prevent items from falling or collecting behind the dryer
as these may obstruct the air inlet and outlet.
● NEVER install the dryer up against curtains.
8
Ventilation
For your safety, this
dryer must be correctly
installed.
If there is any doubt
about installation, call
the national GIAS
Service number for
advice.
08705 400 600
(Eire 018301 666)
AIR OUTLETS
AIR OUTLETS IN
THE BASE
AIR INLET VENTS
40005181.qxd 19/07/2007 12:35 Page 8
Page 9
Before using the tumble dryer for the first time:
● Please read this instruction book thoroughly.
● Remove all items packed inside drum.
● Wipe the inside of the drum and door with a damp cloth
to remove any dust which may have settled in transit.
Clothes preparation
Make sure that the laundry you are going to dry is suitable for
drying in a tumble dryer, as shown by the care symbols on each
item.
Check that all fastenings are closed and that pockets are
empty. Turn the articles inside out. Place clothes loosely in the
drum to make sure that they don’t get tangled.
Maximum drying weight
● Cottons Max. 9 kg
● Synthetics Max. 4 kg
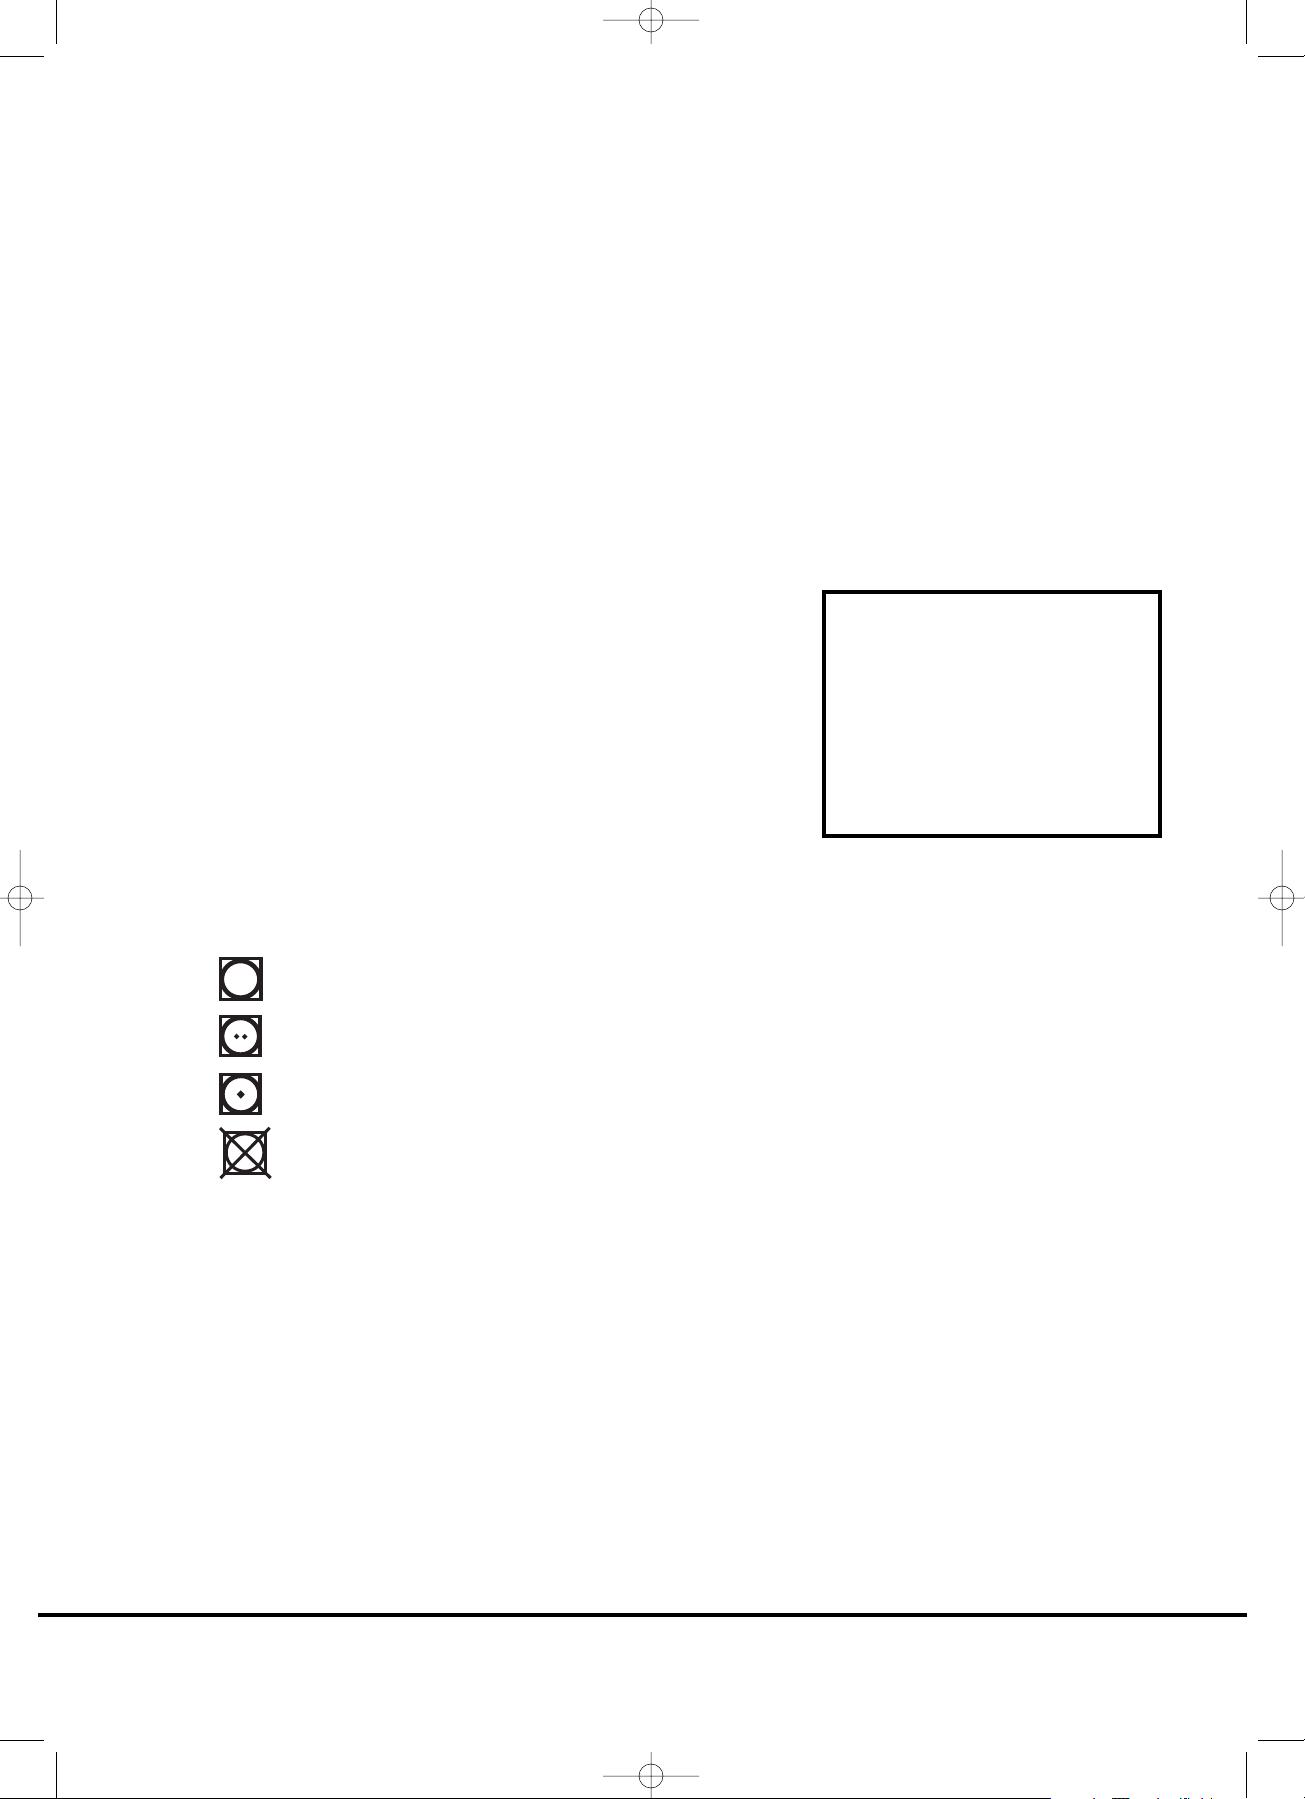
Sort the load as follows:
● By care symbols
These can be found on the collar or inside seam:
Suitable for tumble drying.
Tumble drying at high temperature.
Tumble drying at low temperature only.
Do not tumble dry.
If the item does not have a care label it must be
assumed that it is not suitable for tumble drying.
● By amount and thickness
Whenever the load is bigger than the dryer capacity,
separate clothes according to thickness (e.g. towels from
thin underwear).
● By type of fabric
Cottons/linen: Towels, cotton jersey, bed and table linen.
Synthetics: Blouses, shirts, overalls, etc. made of polyester
or polyamid, as well as for cotton/synthetic mixes.
● By drying level
Sort into: iron dry, cupboard dry, etc. For delicate articles
press the ‘Acrylic/Synthetic’ button to select low drying
temperature.
9
Preparing the load
Do not overload the
drum, large items when
wet can exceed the
maximum admissible
clothes load
(for example: sleeping
bags, duvets).
40005181.qxd 19/07/2007 12:35 Page 9
Page 10
Do not tumble dry:
Woollens, silk, delicate fabrics, nylon stockings, delicate
embroidery, fabrics with metallic decorations, garments with
PVC or leather trimmings, training shoes, bulky items such as
sleeping bags, etc.
Energy saving
Only put into the tumble dryer laundry which has been
thoroughly wrung or spin-dried. The drier the laundry the
shorter the drying time thus saving electricity.
ALWAYS
● Try to dry the maximum weight of laundry, this will save
time and electricity.
● Check that the filter is clean before every drying cycle.
NEVER
● Exceed the maximum weight, this will waste time and
electricity.
● Put dripping wet items into the tumble dryer, this may
damage the appliance.
10
Drying advice
During the last 15 minutes the load
is always tumbled in cool air.
IMPORTANT: Do not dry
articles which have
been treated with a dry
cleaning fluid or rubber
clothes (danger of fire
or explosion).
40005181.qxd 19/07/2007 12:35 Page 10
Page 11
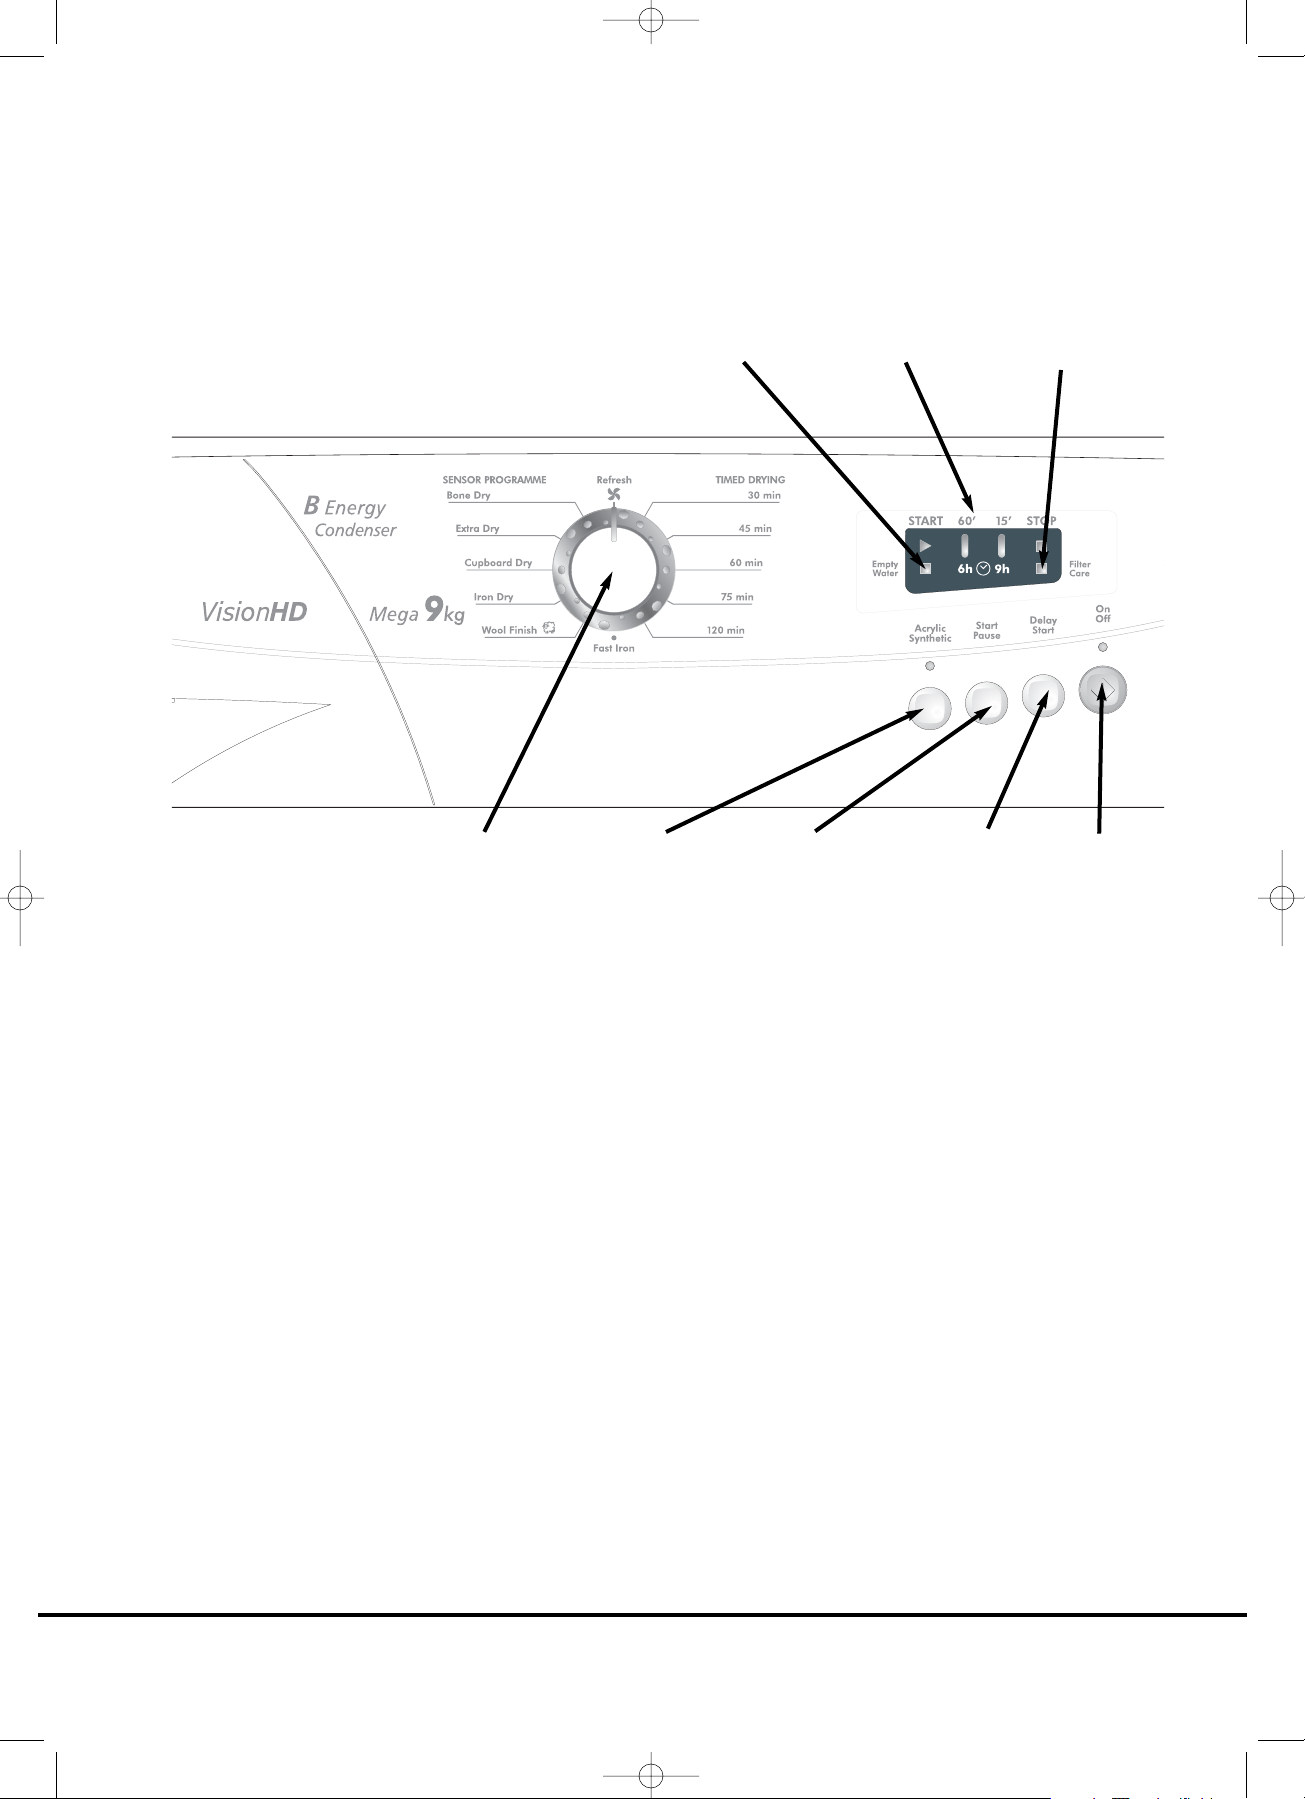
Control panel and indicator lights
Programme Selector – Select the required programme
On/Off button and indicator – Press to switch on, the indicator will light
Delay Start – Allows the user to delay the start of the drying cycle (see details of Operation on page 16)
Start/Pause – Press Start/Pause to commence the selected drying programme
Acrylic/Synthetic button – Press to reduce the heat level for delicate items, the indicator above the
button will light up. To change the heat setting the programme must be reset
Low Heat – Indicator light ON
High Heat – Indicator light OFF
Empty Water indicator – lights when the water container is full
Filter Care indicator – lights when the filter needs cleaning
Progress display
START – When the dryer is switched On the START indicator will flash, when the programme starts the
START indicator will light up
60' – Indicator lights when there is less than 60 minutes left until completion of the programme
15' - Indicator lights when there is less than 15 minutes left until completion of the programme. At this
stage of the drying cycle the machine enters the Cool Down phase
STOP - Indicator lights when the programme is finished.
11
Controls and indicators
ACRYLIC/
SYNTHETIC
BUTTON
ON/OFF
BUTTON
FILTER CARE
INDICATOR
EMPTY WATER
INDICATOR
START/PAUSE
BUTTON
PROGRESS
DISPLAY
DELAY START
BUTTON
PROGRAMME
SELECTOR
40005181.qxd 19/07/2007 12:35 Page 11
Page 12
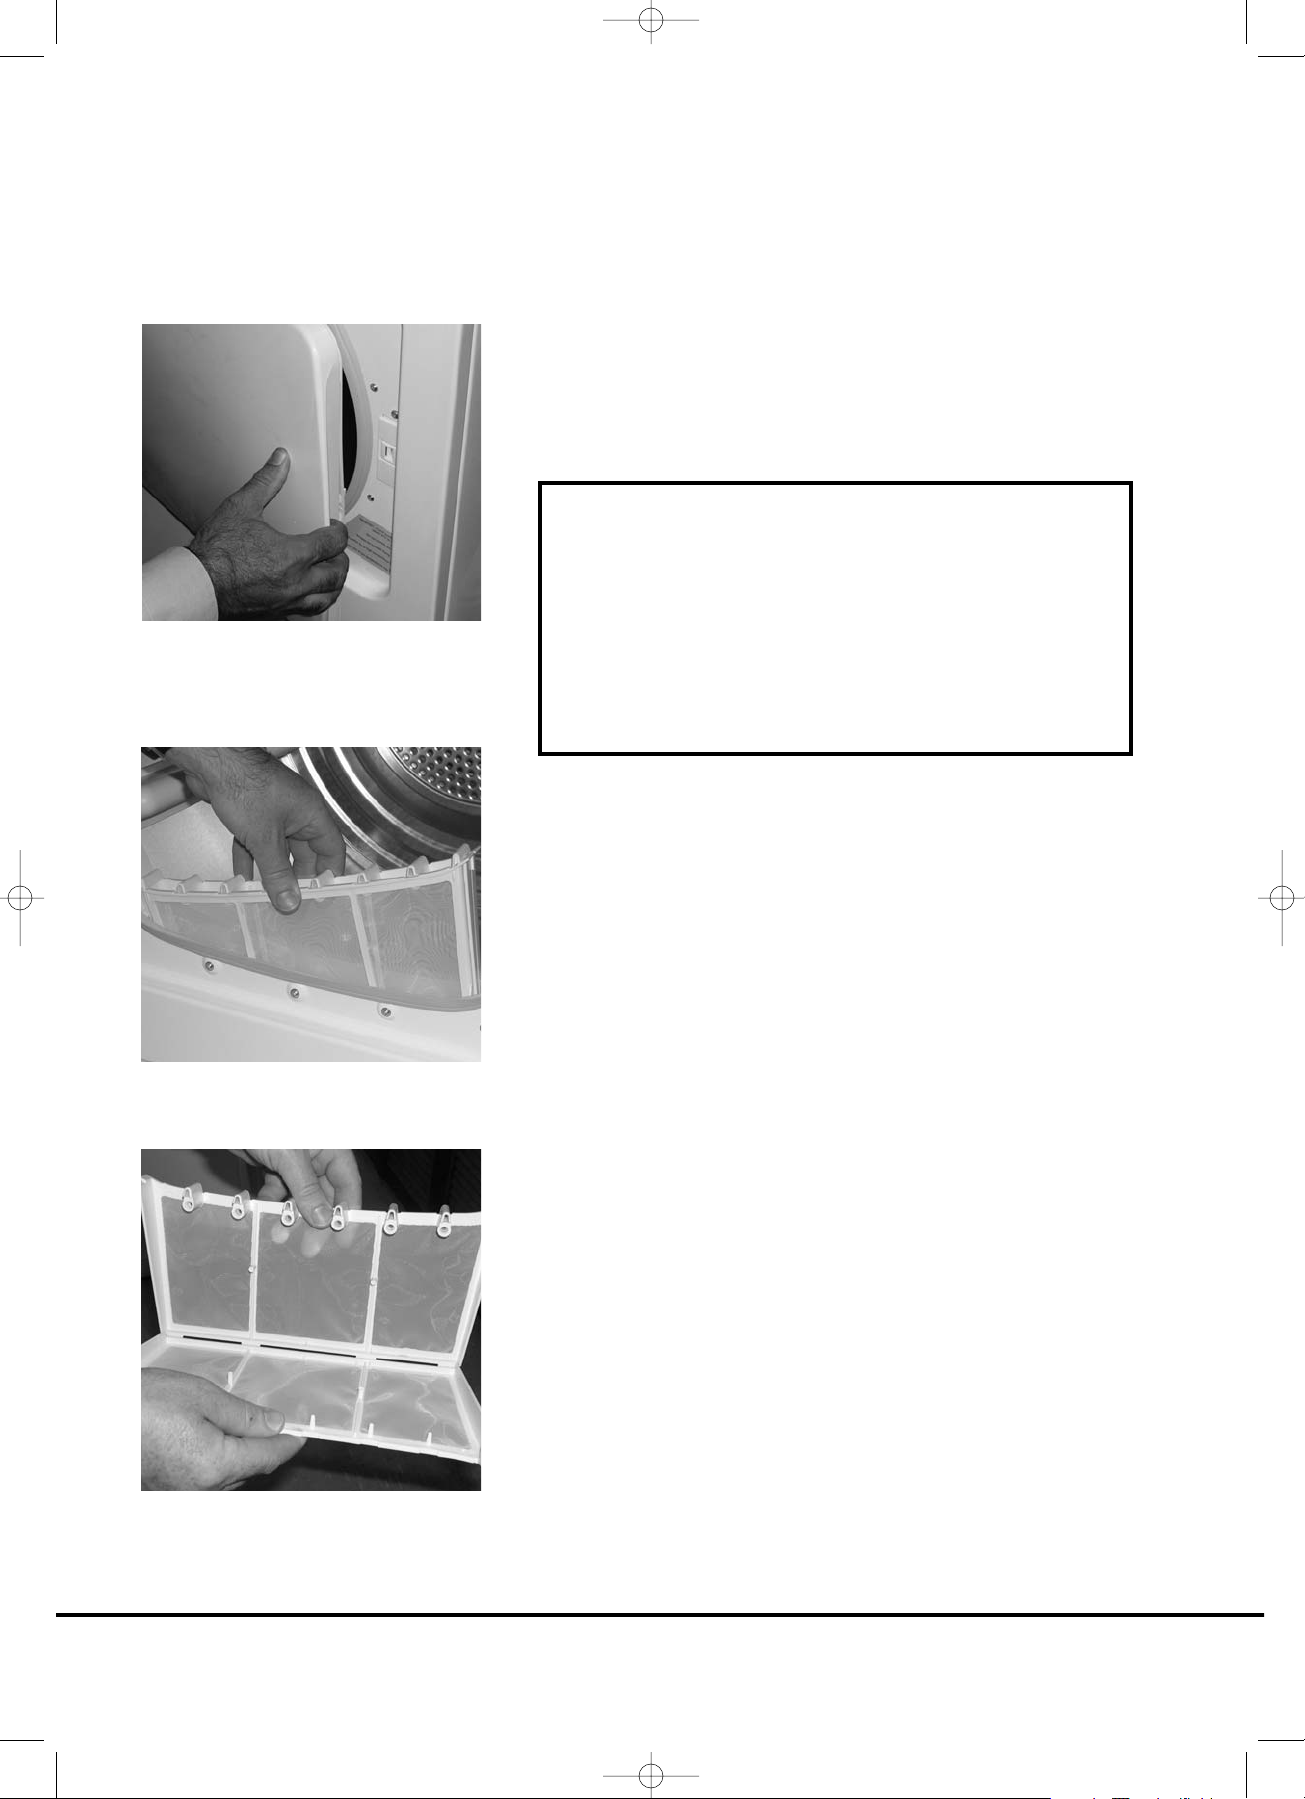
Opening the door
Pull on handle to open the door.
To restart the dryer, close the door and press the Start/Pause
button.
Filter
IMPORTANT: To maintain the efficiency of the dryer check that
the fluff filter is clean before each drying cycle.
1. Pull the filter upwards.
2. Open filter as shown.
3. Gently remove lint using a soft brush or your fingertips.
4. Snap the filter together and push back into place.
Filter Care Indicator
Lights when the filter needs cleaning.
If the laundry is not drying check that the filter is not clogged.
12
Door and Filter
WARNING!
When the tumble dryer is in use the drum
and door may be VERY HOT. Never stop a
tumble dryer before the end of the drying
cycle unless all items are quickly removed
and spread out so that the heat is
dissipated.
40005181.qxd 19/07/2007 12:36 Page 12
Page 13
The water removed from the laundry during the drying cycle is
collected in a container at the bottom of the dryer.
When the container is full the ‘EMPTY WATER’ indicator on the
control panel will light, and the container MUST be emptied.
However, we recommend that the container is emptied after
each drying cycle.
NOTE: Very little water will collect during the first few cycles
of a new machine as an internal reservoir is filled first.
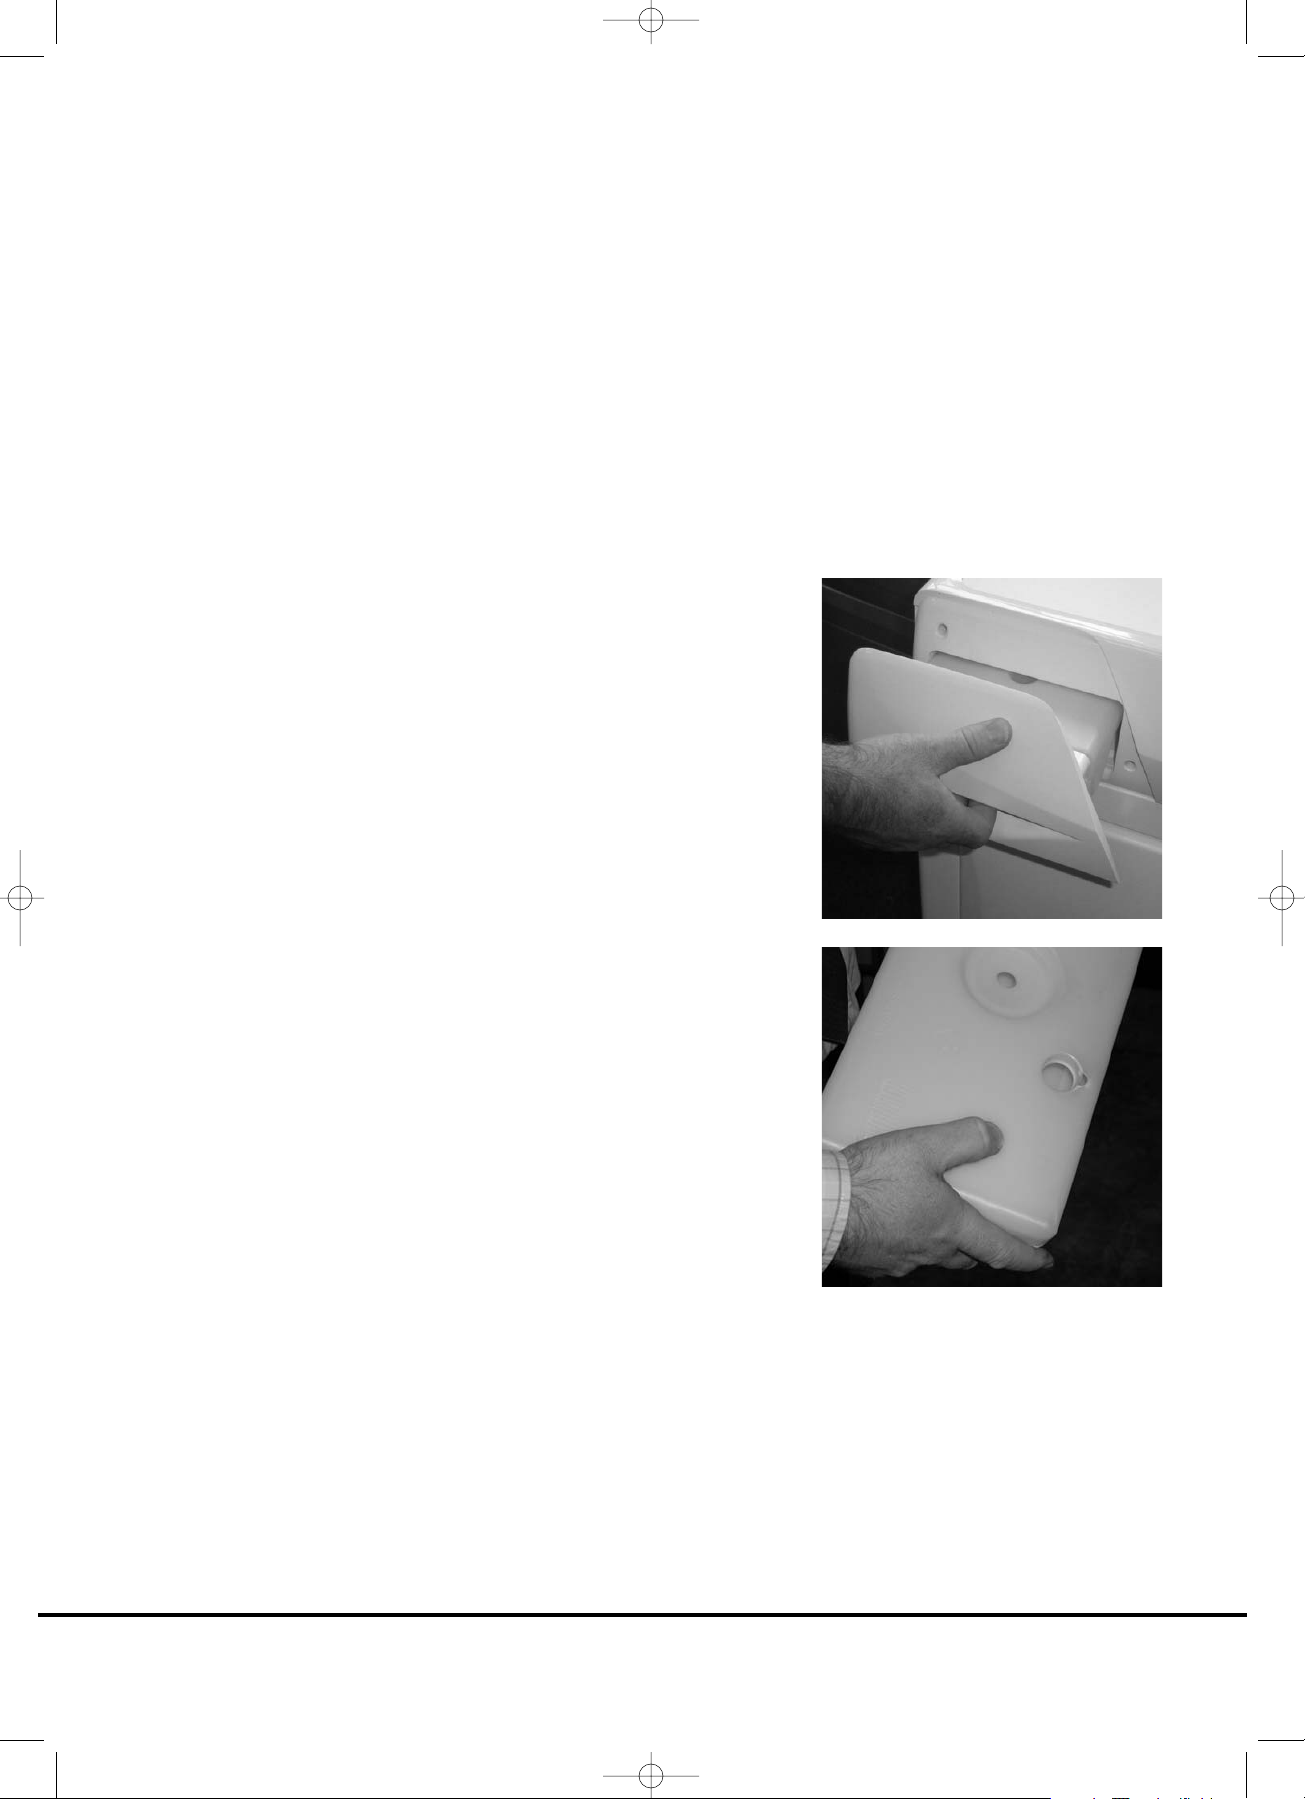
To remove the container
1. Gently pull out the tray until it is completely removed.
Support the tray with both hands. When it is full the
water container will weigh about 4kg.
2. Empty the water from the outlet in the rear of the
container. Slide the water container back into position.
PUSH FIRMLY INTO PLACE.
NOTE: If you have the option of drainage near the dryer it is
possible to use the discharge kit to provide a permanent drain
for the water collected by the dryer. This will remove the need
to empty the water tray. All the information for assembly of
the kit is contained in the kit envelope.
13
Water Container
40005181.qxd 19/07/2007 12:36 Page 13
Page 14

To remove the condenser
1. Gently pull the bottom of the kickplate so that it unclips
from the dryer. The top section can then be unhinged
allowing the kickplate to be completely removed.
2. Turn the two locking levers anti-clockwise and pull out
the condenser.
3. Pull out the condenser unit.
4. Gently remove any dust or fluff with a cloth, then wash
the unit by holding it under a running tap turning it so
that water flows between the plates, to remove any dust
or fluff.
5. Refit the condenser ensuring it is in the correct way (as
indicated by the arrow) and pushed firmly into place. Lock
the two levers by turning them clockwise.
6. Refit the kickplate.
14
Condenser
40005181.qxd 19/07/2007 12:36 Page 14
Page 15

The Hoover Sensor Dry machine gives many options for drying
the laundry to suit all circumstances.
The table below lists the programmes and the function of each
programme.
Note: The sensor may not detect a small load of small articles.
For small loads and separate items or pre-dried fabrics with
low moisture content, use the timed programmes. Set the
programme between 30 and 75 minutes depending on the
load size and dryness required, and select high or low heat
depending upon the fabric type.
If the sensor does not detect the item the dryer will only
operate for 10 minutes before going into cooldown.
If the load is too large or too wet to tumble dry the dryer will
automatically go into cooldown after 185 minutes.
15
Selecting the Programme
Programme
Bone Dry
Extra Dry
Cupboard Dry
Iron Dry
Wool Finish
Fast Iron
120'
75'
60'
45'
30'
Refresh
Description
Select the degree of dryness that you require.
This ranges from Bone Dry for bath towels and bathrobes, through
Cupboard Dry for items that will be put away without ironing, to the
programmes that leave the laundry suitable for ironing.
A gentle programme specially created to get woollens softer after airdrying.
This delicate warm air cycle, lasting 12 minutes, can also be used to get
woollens 'refreshed' after being stored in the wardrobe.
The Fast Iron programme provides a conditioning and anticrease function.
The dryer will heat the load for 9 minutes followed by a 3 minute cool
down period and is especially good for garments which may have been
left for some time prior to ironing, in a linen basket for example.
Garments may also become stiffened when dried outside on a washing
line or inside on radiators. The Fast Iron process relaxes the creases in the
fabric making ironing quicker and easier.
120 minutes of drying
75 minutes of drying
60 minutes of drying
45 minutes of drying
30 minutes of drying
Tumbling of laundry in cool air for 30 minutes
40005181.qxd 19/07/2007 12:36 Page 15
Page 16

1. Open the door and load the drum with laundry. Ensure
that garments do not hinder closure of the door.
2. Gently close the door pushing it slowly until you hear the
door 'click' shut.
3. Press the On/Off button to switch on the dryer. The
On/Off indicator will light up and the START indicator will
flash.
4. Turn the Programme Selector dial to select the required
drying programme (see Programme Guide).
5. If drying synthetics, acrylics or delicate items, press the
Acrylic/Synthetic button to reduce the heat level.
The light above the push button will light up when the
machine is in low heat setting. To deselect this status the
machine must be reset.
6. Press the Start/Pause button. The dryer will start
automatically and the START indicator will be
continuously lit.
7. The display will show the drying progress in terms of time
remaining.
8. If the door is opened during the programme to check the
laundry, it is necessary to press Start/Pause to recommence
drying after the door has been closed.
9. When the 15' indicator is lit the machine will enter the
cool down phase, the clothes will be tumbled in cool air
allowing the load to cool down.
10. When the programme is complete the STOP indicator will
light.
11. Following the completion of the cycle the drum will
rotate intermittently to minimise creasing. This will
continue until the machine is reset or switched OFF.
Cancelling and resetting the
programme
To cancel a programme switch the machine off and on again.
The machine will indicate that it has been reset by the START
indicator flashing.
Delay Start
The Delay Start function allows the user to delay the start of
the drying cycle by 6 or 9 hours.
When the function is first selected the display will show a
delay of 6 hours, a subsequent press of the button will increase
the delay to 9 hours.
To commence the programme press Delay Start and the
appliance will complete the drying cycle at the end of this
time. The 6 or 9 hour indicator light will flash to indicate that
the start delay is in progress.
16
Operation
WARNING!
The drum, door and
load may be very hot.
40005181.qxd 19/07/2007 12:36 Page 16
Page 17

Cleaning the dryer
● Clean the filter and empty the water container after every
drying cycle.
● Regularly clean the condenser.
● After each period of use, wipe the inside of the drum and
leave the door open for a while to allow circulation of air
to dry it.
● Wipe the outside of the machine and the door with a soft
cloth.
● DO NOT use abrasive pads or cleaning agents.
● To prevent the door sticking or the build up of fluff
periodically clean the inner door and gasket with a damp
cloth.
Technical specifications
Drum capacity 115 litres
Maximum load 9 kg
Height 85cm
Width 60cm
Depth 60cm
Energy Label Band B
Test specification
Ref. EN 61121 - Directive 95/13 CEE
Programme Cupboard Dry
Load 9 kg
Install and use discharge kit to evacuate the condensed water.
17
Cleaning and Routine Maintenance
IMPORTANT
Always switch off and
remove the plug from
the electricity supply
before cleaning this
appliance.
For electrical data
refer to the rating
label on the front of
the dryer cabinet
(with the door open).
40005181.qxd 19/07/2007 12:36 Page 17
Page 18

What might be the cause of...
Defects you can remedy yourself
Before calling GIAS Service for technical advice please run
through the following checklist. A charge will be made if the
machine is found to be working or has been installed
incorrectly or used incorrectly. If the problem persists after
completing the recommended checks, please call the GIAS
Service (tel: 08705 400 600), they may be able to assist you
over the telephone.
Drying time is too long/clothes are not dry
enough…
● Have you selected the correct drying time/programme?
● Were the clothes too wet? Were the clothes thoroughly
wrung or spin-dried?
● Does the filter need cleaning?
● Does the condenser need cleaning?
● Is the dryer overloaded?
● Are the inlets, outlets and base of the dryer free from
obstructions?
● Has the Acrylic/Synthetic option been selected from a
previous cycle?
The dryer does not operate…
● Is there a working electricity supply to the dryer? Check
using another appliance such as a table lamp.
● Is the plug properly connected to the mains supply?
● Is there a power failure?
● Has the fuse blown?
● Is the door fully closed?
● Is the dryer switched on, both at the mains supply and at
the machine?
● Has the drying time or the programme been selected?
● Has the machine been switched on again after opening
the door?
● Has the dryer stopped operating because the water tray is
full and needs emptying?
The dryer is noisy…
● Switch off the dryer and contact the GIAS service number
08705 400 600 for advice.
The Filter Care Indicator is on…
● Does the filter need cleaning?
● Does the condenser need cleaning?
Empty Water Indicator is on…
● Does the water container need emptying?
18
Troubleshooting
40005181.qxd 19/07/2007 12:36 Page 18
Page 19

Note:
If the supply cord on this appliance is damaged, it must be
replaced by a special cord which is only available from GIAS
Service or an authorised Hoover Dealer.
Should there still be a problem with your dryer after
completing all the recommended checks, please call the
national GIAS Service number for advice. They may be able to
assist you over the telephone or arrange for a suitable
appointment for an engineer to call under the terms of your
guarantee. However, a charge may be made if any of the
following applies to your machine:
● Is found to be in working order.
● Has not been installed in accordance with the installation
instructions.
● Has been used incorrectly.
HOOVER Spares
Always use genuine Hoover spares, available direct from GIAS
Service.
GIAS Service
For service and repairs call your local engineer on our national
number.
19
Customer Service
Phone GIAS on
08705 400 600
Eire-018301 666
GIAS Service - Tel: 08705 400 600
Support Service for Eire - Tel: 018301 666
Hoover Spares Service
Tel: 01204 556111
40005181.qxd 19/07/2007 12:36 Page 19
Page 20

For a period of one year from the date of purchase the
appliance is covered by a guarantee which allows you to call
GIAS Service free of charge.
Remember to send off the guarantee certificate for validation
within 10 days of the date of purchase.
You should retain the receipt issued by the retailer when you
purchased the machine to show to the call out engineer,
should you need to consult one.
If your appliance shows signs of a defect or is not working
properly, before you contact GIAS Service we recommend you
carry out the checks detailed within the Troubleshooting
section.
If the problem with the appliance persists after completing all
the recommended checks, please dial the GIAS Service number.
You will be connected directly to GIAS. It is important you tell
the GIAS advisor your product's model number and serial
number, which you will find on the rating label (16 characters,
beginning with the number 3), found on the front of the
appliance (door area). By doing this, your enquiry will be
responded to more efficiently.
Hoover guarantees all parts of this product for 5 years from
the date of purchase. During that time Hoover will replace or
repair all defective parts free of charge, except for parts
subject to fair wear and tear such as belts. The call out fee and
labour costs are chargeable after the first 12 months. To
qualify for benefits under the guarantee, you must be able to
provide proof of date of purchase and the appliance must have
been installed and used in accordance with the instructions
described in this manual. Consequential losses and accidental
damage to the machine is not covered by the guarantee.
Hoover cannot be responsible for the results of using this
machine for any purposes other than those described in this
manual.
This guarantee does not affect your statutory or common law
rights.
Note: If repair work has been completed by an unauthorised
engineer the product guarantee may become invalid.
Hoovercare
To maintain your Hoover product in peak condition you may
wish to take out a Hoovercare policy, which for an annual
payment provides a comprehensive maintenance and repair
scheme. For more information please call 08705 400 600.
The Hoovercare scheme is not available in Eire.
The manufacturer declines all responsibility in the event of any
printing mistakes in this booklet. The manufacturer also
reserves the right to make appropriate modifications to its
products without changing the essential characteristics.
Your Guarantee
20
40005181.qxd 19/07/2007 12:36 Page 20
Page 21

21
40005181.qxd 19/07/2007 12:36 Page 21
Page 22

Giri¬ . . . . . . . . . . . . . . . . . . . . . . . . . . . . . . . . . . . . . . . . . . . . . 23
Teslimat bilgisi. . . . . . . . . . . . . . . . . . . . . . . . . . . . . . . . . . . . . . 23
Ürünün paketinden çıkarılması. . . . . . . . . . . . . . 24
Güvenlik hatırlatmaları . . . . . . . . . . . . . . . . . . . . . . . 25
Kurulum . . . . . . . . . . . . . . . . . . . . . . . . . . . . . . . . . . . . . . . . . . . 25
Kullanım . . . . . . . . . . . . . . . . . . . . . . . . . . . . . . . . . . . . . . . . . . . 25
Çama¬ır. . . . . . . . . . . . . . . . . . . . . . . . . . . . . . . . . . . . . . . . . . . . 25
Çevresel Konular . . . . . . . . . . . . . . . . . . . . . . . . . . . . . . . . . . . . 26
Servis . . . . . . . . . . . . . . . . . . . . . . . . . . . . . . . . . . . . . . . . . . . . . 26
Kurulum . . . . . . . . . . . . . . . . . . . . . . . . . . . . . . . . . . . . . . . . 27
Elektrik gereksinimleri. . . . . . . . . . . . . . . . . . . . . . . . . . . . . . . . 27
Ayakların ayarlanması. . . . . . . . . . . . . . . . . . . . . . . . . . . . . . . . 27
Havalandırma . . . . . . . . . . . . . . . . . . . . . . . . . . . . . . . . . . 28
Yükün hazırlanması. . . . . . . . . . . . . . . . . . . . . . . . . . . 29
Çama¬ırın hazırlanması. . . . . . . . . . . . . . . . . . . . . . . . . . . . . . . 29
Yükün ayrılması . . . . . . . . . . . . . . . . . . . . . . . . . . . . . . . . . . . . . 29
Kurutma tavsiyesi. . . . . . . . . . . . . . . . . . . . . . . . . . . . . 30
Dönerek kurutma yapmayın . . . . . . . . . . . . . . . . . . . . . . . . . . . 30
Enerji tasarrufu . . . . . . . . . . . . . . . . . . . . . . . . . . . . . . . . . . . . . 30
Kontroller ve göstergeler . . . . . . . . . . . . . . . . . . . . 31
Kapak ve Filtre. . . . . . . . . . . . . . . . . . . . . . . . . . . . . . . . . 32
Kapaœın açılması . . . . . . . . . . . . . . . . . . . . . . . . . . . . . . . . . . . . 32
Filtre . . . . . . . . . . . . . . . . . . . . . . . . . . . . . . . . . . . . . . . . . . . . . . 32
Filtre bakım göstergesi . . . . . . . . . . . . . . . . . . . . . . . . . . . . . . . 32
Su haznesi . . . . . . . . . . . . . . . . . . . . . . . . . . . . . . . . . . . . . 33
Hazneyi çıkarmak için . . . . . . . . . . . . . . . . . . . . . . . . . . . . . . . . 33
Kondansör. . . . . . . . . . . . . . . . . . . . . . . . . . . . . . . . . . . . . . 34
Kondansörü çıkarmak için . . . . . . . . . . . . . . . . . . . . . . . . . . . . 34
Programın Seçilmesi. . . . . . . . . . . . . . . . . . . . . . . . . . 35
Çalı¬tırma . . . . . . . . . . . . . . . . . . . . . . . . . . . . . . . . . . . . . . 36
Programın iptal edilmesi ve sıfırlanması. . . . . . . . . . . . . . . . . 36
Gecikmeli Ba¬langıç . . . . . . . . . . . . . . . . . . . . . . . . . . . . . . . . . 36
Temizleme ve Düzenli Bakım. . . . . . . . . . . . . . . . 37
Kurutucunun temizlenmesi. . . . . . . . . . . . . . . . . . . . . . . . . . . . 37
Teknik özellikler . . . . . . . . . . . . . . . . . . . . . . . . . . . . . . . . . . . . 37
Test spesifikasyonu . . . . . . . . . . . . . . . . . . . . . . . . . . . . . . . . . . 37
Sorun giderme. . . . . . . . . . . . . . . . . . . . . . . . . . . . . . . . . 38
Garanti Belgesi . . . . . . . . . . . . . . . . . . . . . . . . . . . . . . . . 39
Çama¬ır Kurutma Makinesi . . . . . . . . . . . . . . . . . . . . . . . . . . . 39
Mü¬teri Servisi . . . . . . . . . . . . . . . . . . . . . . . . . . . . . . . . 41
22
çindekiler
40005181Tur.qxd 4/10/07 3:20 pm Page 22
Page 23

Lütfen bu talimatları dikkatle okuyarak uygulayın ve makineyi
buna göre çalı¬tırın. Bu kitapçık güvenli kullanım, kurulum ve
bakım konularında önemli talimat ve makinenizi kullanırken
en iyi sonuçları elde etmeniz için faydalı tavsiyeler saœlar.
Bütün belgeleri ileride tekrar ba¬vurmak üzere ya da yeni
kullanıcılar için güvenli bir yerde saklayın.
Teslimat bilgisi
Lütfen makineyle birlikte a¬aœıdakilerin teslim edilip
edilmediœini kontrol edin:
● Kullanım kılavuzu
● Garanti belgesi
● Enerji etiketi
● Bo¬altma hortumu kiti
23
Ta¬ıma sırasında
makinenin hasar görüp
görmediœini kontrol
edin. Eœer görmü¬se
yerel servisinizi arayın.
Makine düzenli
çalı¬maz ya da
arızalanırsa, cihazı
kapatın, fi¬i prizden
çekin ve cihazı
kurcalamayın.
Onarım için yerel
servisinize ba¬vurun.
Yukarıda yazılanlara
uyulmaması halinde
makinenin emniyeti
tehlikeye girebilir. Eœer
yanlı¬ kullanım sonucu
makinenizde bir sorun
çıkarsa servis ücreti
ödemek zorunda
kalabilirsiniz.
Giri¬
40005181Tur.qxd 4/10/07 3:20 pm Page 23
Page 24

1. Paketin taban çevresini ve bir kö¬esinden yukarıya doœru
dikkatlice kesin.
2. Politen kılıfı çıkarın ve kurutucuyu polistiren tabandan
kaldırın.
24
Ürünün paketinden çıkarılması
Paketi güvenli bir ¬ekilde atın. Çocukların
ula¬amayacaœı bir yerde bulunduœundan
emin olun; tehlike kaynaœı olabilir.
40005181Tur.qxd 4/10/07 3:20 pm Page 24
Page 25

Kurulum
● Kullanmadan önce üründe gözle görülür hasar belirtileri olup
olmadıœını kontrol edin. Hasarlıysa kullanmayın ve lütfen
yerel servisinizi arayın.
● Adaptör, çoklu konektör ve/veya uzatma kullanmayın.
● Kurutucuyu asla perdelerin kar¬ısına kurmayın ve nesnelerin
kurutma makinesinin arkasına dü¬mesini veya burada
birikmesini engelleyin.
● Makine kilitlenebilir bir kapının, sürgülü bir kapının veya
mente¬esi döner hazneli kurutma makinesine göre ters tarafta
olan bir kapının arkasına kurulmamalıdır.
Kullanım
● Bu makine güvenliklerinden sorumlu bir ki¬i tarafından
makinenin kullanımıyla ilgili gözetim ve talimat verilmediœi
sürece kısıtlı fiziksel, algısal veya zihinsel yeteneklere veya
yetersiz deneyim veya bilgiye sahip olan ki¬ilerce (çocuklar
dahil) kullanılmamalıdır.
● Çocuklar makineyle oynamadıklarından emin olmak için
gözetim altında tutulmalıdırlar.
● UYARI Döner hazneli kurutma makinesinin yanlı¬ kullanımı
yangın tehlikesi yaratabilir.
● Bu makine sadece ev içi kullanıma yöneliktir, örn. ev tekstili
ve giysilerin kurutulması için.
● Bu makine sadece bu el kitabında tanımlanan amaçlar
doœrultusunda kullanılmalıdır. Makineyi çalı¬tırmadan önce
kurulum ve kullanım talimatlarının tamamen anla¬ıldıœından
emin olun.
● Makineye elleriniz ve ayaklarınız ıslak veya nemliyken
dokunmayın.
● Makineyi doldururken kapaœa yaslanmayın ve makineyi
kaldırmak veya hareket ettirmek için kapaœı kullanmayın.
● Çocukların makineyle veya kontrolleriyle oynamasına izin
vermeyin.
● UYARI Tüy filtresi yerine oturmamı¬sa veya hasarlıysa ürünü
kullanmayın; tüyler alev alabilir.
● UYARI Sıcak yüzey sembolünün bulunduœu yerde döner
hazneli kurutma makinesinin çalı¬tırılması sırasındaki sıcaklık
60 santigrat dereceden fazla olabilir.
● Fi¬i elektrik kaynaœından çekin. Makineyi temizlemeden önce
daima fi¬i çekin.
● Bozuk gibi görünüyorsa makineyi kullanmaya devam etmeyin.
● Makinenin etrafında yerde tiftik veya tüy toplanmamasına
dikkat edin.
● çerideki hazne çok sıcak olabilir. Çama¬ırı çıkarmadan önce
daima kurutma makinesinin soœuma sürecini tamamlamasına
izin verin.
Çama¬ır
● Yıkanmamı¬ parçaları döner hazneli kurutma makinesinde
kurutmayın.
● UYARI Kuru temizleme sıvısı uygulanmı¬ kuma¬ları döner
hazneli kurutma makinesinde kurutmayın.
25
Güvenlik hatırlatmaları
40005181Tur.qxd 4/10/07 3:20 pm Page 25
Page 26

● UYARI Belirli ¬artlar altında köpüklü lastik materyaller
ısıtıldıklarında kendiliœinden tutu¬arak alev alabilir. Köpüklü
lastik (lateks köpük), du¬ ba¬lıkları, su geçirmeyen tekstil
ürünleri, lastik tabanlı nesneler ve köpük lastik pedlerle
tutturulmu¬ kıyafet veya yastık gibi parçalar döner hazneli
kurutma makinesinde KURUTULMAMALIDIR.
● Kurutmaya uygunluk konusundaki talimat için daima çama¬ır
bakım etiketlerine bakın.
● Döner hazneli kurutma makinesine konmadan önce kıyafetler
çama¬ır makinesinde çevirmeli kurutmadan geçmeli veya
tamamen sıkılmalıdır. Su damlatan kıyafetler kurutucuya
KONMAMALIDIR.
● Çakmak ve kibritleri ceplerde bırakmayın ve ASLA makine
yakınında yanıcı sıvılar kullanmayın.
● Cam elyaf perdeler ASLA bu makineye konmamalıdır. Diœer
giysilere cam elyaf bula¬ırsa deride tahri¬ meydana gelebilir.
● Yemek yaœı, aseton, alkol, benzin, gazyaœı, leke çıkarıcı,
turpentin, cilalar ve cila çıkarıcılar gibi maddelerle ıslatılmı¬
parçalar döner hazneli kurutma makinesi ile kurutulmadan önce
fazladan deterjan kullanılarak sıcak suda yıkanmalıdır.
● Kuma¬ yumu¬atıcılar veya benzer ürünler kuma¬ yumu¬atıcı
talimatında belirtildiœi ¬ekilde kullanılmalıdır.
Çevresel Konular
● Kullanılan bütün ambalaj malzemeleri çevre dostu olup geri
dönü¬ümlüdür. Lütfen ambalajların çevreye zarar vermeyecek
¬ekilde atılmasına yardımcı olunuz. Belediyenizden yürürlükte
olan atma yolları hakkında detaylı bilgi alabilirsiniz.
● Eskimi¬ döner hazneli kurutma makinenizi güvenli bir ¬ekilde
elden çıkarmak için elektrik fi¬ini prizden çıkarın, elektrik
kablosunu kesin ve kabloyu fi¬le birlikte yok edin. Çocukların
kendilerini makineye kapatmalarını önlemek için kapak
mente¬elerini ya da kapaœın kilidini kırın.
Servis
● Makinenin sürekli olarak güvenli ve etkili bir ¬ekilde
çalı¬tıœından emin olmak amacıyla gerekebilecek servis veya
onarım i¬lemlerinin sadece yerel servisiniz tarafından
gerçekle¬tirilmesini tavsiye ediyoruz.
Avrupa Direktifi 2002/96/EC
Bu cihaz Atık Elektrikli veya Elektronik Ekipmanlar (WEEE)
konusundaki Avrupa Direktifi 2002/96/EC ile uyumlu olarak
etiketlenmi¬tir.
Bu ürünün doœru bir ¬ekilde atılmasını saœlayarak, uygunsuz atık
i¬leme yöntemlerinin yaratabileceœi çevresel ve insan saœlıœı
konularındaki olası olumsuz sonuçları engellemeye yardımcı
olursunuz.
Ürünün üzerindeki sembol bu ürünün evsel atık olarak ele
alınamayacaœını gösterir. Bunun yerine elektrikli veya elektronik
ekipmanların geri dönü¬ümünü saœlayan uygun bir toplama
noktasına teslim edilmelidir.
Atma i¬lemi atıkların atılması konusundaki yerel düzenlemelere
uygun bir ¬ekilde gerçekle¬tirilmelidir.
Bu ürünün muameleden geçirilmesi, tekrar kullanıma verilmesi ve
geri dönü¬ümü hakkında daha ayrıntılı bilgi için lütfen yerel ¬ehir
idareniz, evsel atık atma servisiniz veya ürünü aldıœınız maœazayla
baœlantı kurunuz.
26
40005181Tur.qxd 4/10/07 3:20 pm Page 26
Page 27

Elektrik gereksinimleri
Döner hazneli kurutma makineleri 230-240V, 50 Hz tek fazlı
voltajda çalı¬acak ¬ekilde tedarik edilir. Destek devresinin en
az 13A sınıflandırmasına sahip olup olmadıœını kontrol edin.
Cihaza BS 1362 ASTA onaylı bir 13A sigortayla donatılmı¬,
kalıp halinde yerle¬tirilmi¬ ve tekrar baœlantı yapılamaz bir fi¬
takılı durumdadır. Yapılacak yenilemeler aynı sınıflandırma ve
özelliklere sahip olmalıdır. Eœer sigorta kapaœı kaybedilirse
yenilenene kadar fi¬i kullanmayın.
Elektrik son derece tehlikeli olabilir.
Bu cihazın topraklanması gerekir.
Elektrik prizi ile cihazın fi¬i aynı türden olmalıdır.
Çoklu adaptör ve/veya uzatma kabloları kullanmayın.
Cihaz kurulduktan sonra baœlantının kesilebilmesi için fi¬
eri¬ilebilir bir konumda olmalıdır.
Elektrik kablosundaki teller a¬aœıdaki kodlara uygun olarak
renklere ayrılmı¬tır:
Mavi NÖTR
Kahverengi ELEKTRKL
Ye¬il ve Sarı TOPRAK
CE i¬areti sahibi olan Cihaz, 89/336/EEC ve 73/23/EEC Avrupa
Direktifine ve sonraki deœi¬ikliklere uygundur.
Ayakların ayarlanması
Makinenin yerle¬tirildikten sonra dengeli olduœundan emin
olmak için ayaklar ayarlanmalıdır.
27
Kurulum
Kurulum tamamlanana
kadar makineyi fi¬e
takmayın ve ana
elektrik düœmesinden
çalı¬tırmayın.
Eœer yanlı¬ kurulum
sonucu makinenizde bir
sorun çıkarsa servis
ücreti ödemek zorunda
kalabilirsiniz.
Eœer cihazın üzerindeki
elektrik kablosu hasar
görmü¬se, SADECE
Hoover yedek parça
servisinden elde
edilebilen özel bir
kabloyla
deœi¬tirilmelidir. Kablo
deneyimli bir ki¬i
tarafından takılmalıdır.
Yerel servisinizi arayın.
40005181Tur.qxd 4/10/07 3:20 pm Page 27
Page 28

Açık ate¬ dahil diœer yakıtları kullanan cihazlardan çıkan
gazların döner hazneli kurutma makinesinin çalı¬ması
esnasında odaya çekilmesini engellemek için kurutucunun
bulunduœu odada yeterli havalandırma saœlanmalıdır.
● Dı¬arı atılan hava gaz veya diœer yakıtları kullanan
cihazlardan dumanların atılmasında kullanılan bir baca
içerisine salınmamalıdır.
● Kurutucu içerisinde dola¬an havanın tıkanmamı¬
olduœunu düzenli olarak kontrol edin.
● Kullanımdan sonra tüy filtresini kontrol edin ve gerekirse
temizleyin.
● Giri¬ ve çıkı¬lar tıkanmalara kar¬ı korunmalıdır. Yeterli
havalandırmanın saœlanması için makinenin tabanı ile yer
arasındaki bo¬luk tıkalı olmamalıdır. Makine ve herhangi
bir tıkayıcı nesne arasında en az 12 mm bo¬luk
bulunmalıdır.
● Hava giri¬ ve çıkı¬ını engelleyebileceœi için kurutma
makinesinin arkasına nesnelerin dü¬mesine veya burada
birikmesine izin vermeyin.
● ASLA kurutma makinesini perdelerin kar¬ısına kurmayın.
28
Havalandırma
Güvenliœiniz için bu
kurutma makinesinin
doœru bir ¬ekilde
kurulması gerekir.
Kurulumla ilgili bir
endi¬eniz varsa yerel
servisinizi arayın.
HAVA ÇIKI¤LARI
TABANDAK HAVA ÇIKI¤LARI
HAVA GR¤ DELKLER
40005181Tur.qxd 4/10/07 3:20 pm Page 28
Page 29

Döner hazneli kurutma makinesinin ilk kullanımından önce:
● Lütfen bu talimat kitapçıœını ba¬tan sona okuyun.
● Çama¬ır haznesi içerisindeki tüm paketlenmi¬ parçaları
çıkarın.
● Ta¬ıma esnasında birikmi¬ olabilecek tozları çıkarmak için
çama¬ır haznesinin içini ve kapaœı nemli bir bezle silin.
Çama¬ırların hazırlanması
Kurutacaœınız çama¬ırların her bir parçanın üzerindeki
sembollerde gösterildiœi gibi döner hazneli kurutma
makinesiyle kurutmaya uygun olduœundan emin olun.
Tutturucuların kapalı ve ceplerin bo¬ olup olmadıœını kontrol
edin. Nesnelerin iç kısmını ters çevirin. Dola¬madıklarından
emin olmak için kıyafetleri çama¬ır haznesine seyrek bir
¬ekilde yerle¬tirin.
Maksimum kurutma aœırlıœı
● Pamuklular Maks. 9 kg
● Sentetikler Maks. 4 kg
Yükü a¬aœıdaki ¬ekilde ayırın:
● Bakım sembollerine göre
Bunlar yaka üzerinde veya iç diki¬ yerlerinde bulunabilir:
Döner hazneli kurutma makinesinde kurutmaya
uygun.
Yüksek sıcaklıkta döner hazneli kurutma
makinesinde kurutma.
Sadece dü¬ük sıcaklıkta döner hazneli kurutma
makinesinde kurutma.
Döner hazneli kurutma makinesinde kurutmayın.
Eœer parçaların bakım etiketleri yoksa bunların
döner hazneli kurutma makinesinde kurutmaya
uygun olmadıœı varsayılabilir.
● Miktar ve kalınlıœa göre
Yükün kurutma makinesi kapasitesinden daha fazla
olduœu durumlarda kıyafetleri kalınlıklarına göre ayırın
(örn. havluları ince iç çama¬ırlarından).
● Kuma¬ türüne göre
Pamuklu/keten: Havlular, pamuklu kazak, yatak ve keten
masa örtüsü.
Sentetikler: Polyester veya poliyamit yanı sıra
pamuklu/sentetik karı¬ımından yapılmı¬ bluzlar,
gömlekler, tulumlar, vb.
● Kurutma derecesine göre
¤u ¬ekilde ayırın: hafif nemli, kuru, vb. Hassas nesnelerde
dü¬ük kurutma sıcaklıœını seçmek için ‘Akrilik/Sentetik’
düœmesine basın.
29
Yükün hazırlanması
Hazneyi a¬ırı
yüklemeyin; büyük
parçalar ıslandıklarında
maksimum kabul
edilebilir kıyafet yükü
a¬ılabilir
(örneœin: uyku
tulumları, yorganlar).
40005181Tur.qxd 4/10/07 3:20 pm Page 29
Page 30

A¬aœıdakileri döner hazneli
kurutma makinesinde
kurutmayın:
Yünlüler, ipek, hassas kuma¬lar, naylon çoraplar, hassas
i¬lemeler, metalik dekorasyonlu kuma¬lar, PVC veya deri
süslemeli giysiler, spor ayakkabılar, uyku tulumu gibi hacimli
parçalar, vb.
Enerji tasarrufu
Döner hazneli kurutma makinesine sadece tamamen sıkılmı¬
veya çama¬ır makinesinde çevrilerek kurutulmu¬ çama¬ırları
koyun. Çama¬ır ne kadar kuru olursa kurutma zamanı da o
kadar az olur ve böylece elektrikten tasarruf saœlanır.
DAMA
● Maksimum çama¬ır kurutma aœırlık kapasitesini
kullanmaya çalı¬ın; bu zamandan ve elektrikten tasarruf
saœlayacaktır.
● Kurutma evresinden önce filtrenin temiz olup olmadıœını
kontrol edin.
ASLA
● Maksimum aœırlıœı a¬mayın; bu zaman ve elektriœi
bo¬una harcayacaktır.
● Su damlatan parçaları döner hazneli kurutma makinesine
koymayın; bu cihaza zarar verecektir.
30
Kurutma tavsiyesi
Son 15 dakika boyunca yük
daima serin havada döndürülür.
ÖNEML: Kuru
temizleme sıvısı
uygulanmı¬ nesneleri
ve lastik kıyafetleri
kurutmayın (yangın
veya patlama tehlikesi).
40005181Tur.qxd 4/10/07 3:20 pm Page 30
Page 31

Kontrol paneli ve gösterge ı¬ıkları
Program Seçici – Gerekli programı seçin
Açık/Kapalı düœmesi ve göstergesi – Çalı¬tırmak için basın, gösterge ı¬ıœı yanacaktır
Gecikmeli Ba¬langıç – Kullanıcının kurutma evresinin ba¬langıcını geciktirmesine izin verir (i¬lemin
ayrıntıları için sayfa 36‘ya bakın)
Ba¬lat/Duraklat – Seçilen kurutma programını ba¬latmak için Ba¬lat/Duraklat düœmesine basın
Akrilik/Sentetik düœmesi – Hassas parçalarda sıcaklık seviyesini dü¬ürmek için buna basın; düœmenin
üstündeki gösterge yanacaktır. Sıcaklık ayarlarını deœi¬tirmek için program sıfırlanmalıdır
Dü¬ük Sıcaklık – Gösterge ı¬ıœı AÇIK
Yüksek Sıcaklık – Gösterge ı¬ıœı KAPALI
Suyu Bo¬alt göstergesi – su haznesi dolduœunda yanar
Filtre Bakım göstergesi – filtrenin temizlenmesi gerektiœinde yanar
lerleme göstergesi
BA¤LAT – Kurutucu Açık durumda olduœunda BA¤LAT göstergesi yanıp sönecektir, program
ba¬latıldıœında ise BA¤LAT göstergesi yanacaktır
60‘ – Programın tamamlanmasına 60 dakikadan daha az bir zaman kaldıœında bu gösterge yanar
15‘ – Programın tamamlanmasına 15 dakikadan daha az bir zaman kaldıœında bu gösterge yanar.
Kurutma evresinin bu a¬amasında makine Soœuma fazına geçer
DURDUR – Program tamamlandıœında bu gösterge yanar.
31
Kontroller ve göstergeler
AKRLK/
SENTETK
DÜŒMES
AÇIK/KAPALI
DÜŒMES
FLTRE BAKIM
GÖSTERGES
SUYU BO¤ALT
GÖSTERGES
BA¤LAT/DURAKLAT
DÜŒMES
LERLEME
GÖSTERGES
GECKMEL
BA¤LANGIÇ
DÜŒMES
PROGRAM
SEÇC
40005181Tur.qxd 4/10/07 3:20 pm Page 31
Page 32

Kapaœın açılması
Kapaœı açmak için tutacaœından çekin.
Kurutucuyu yeniden ba¬latmak için kapaœı kapatın ve
Ba¬lat/Duraklat düœmesine basın.
Filtre
ÖNEML: Kurutma makinesinin etkinliœini korumak için her
kurutma evresi öncesinde tüy filtresinin temiz olup olmadıœını
kontrol edin.
1. Filtreyi yukarı doœru çekin.
2. Filtreyi gösterildiœi gibi açın.
3. Yumu¬ak bir fırça veya parmak uçlarınızı kullanarak tiftiœi
yava¬ça çıkarın.
4. Filtreyi tekrar kenetleyin ve yerine itin.
Filtre Bakım Göstergesi
Filtrenin temizlenmesi gerektiœinde yanar.
Eœer çama¬ır kurumuyorsa filtrenin tıkalı olup olmadıœını
kontrol edin.
32
Kapak ve Filtre
UYARI!
Döner hazneli kurutma makinesi çalı¬ır
durumdayken hazne ve kapak ÇOK SICAK
olabilir. Kuruma evresinin bitiminden önce
döner hazneli kurutma makinesini asla
durdurmayın veya sıcaklıœın daœılması için
parçaları hızla çıkarıp serin.
40005181Tur.qxd 4/10/07 3:21 pm Page 32
Page 33

Kurutma evresi sırasında çama¬ırdan çıkarılan su kurutma
makinesinin altında yer alan bir hazne içerisinde toplanır.
Hazne dolduœunda kontrol paneli üzerindeki ‘EMPTY WATER
(SUYU BO¤ALT)’ göstergesi yanacaktır ve bu durumda hazne
bo¬altılmak ZORUNDADIR. Ancak biz haznenin her kurutma
evresinin ardından bo¬altılmasını tavsiye ediyoruz.
NOT: lk önce bir iç rezervuar doldurulduœu için yeni bir
makinenin ilk birkaç evresinde çok az su birikecektir.
Hazneyi çıkarmak için
1. Tamamen çıkana kadar tepsiyi yava¬ça dı¬arı çekin.
Tepsiyi iki elinizle destekleyin. Dolu durumdayken su
haznesi yakla¬ık 4 kg aœırlıœındadır.
2. Haznenin arkasındaki çıkı¬tan suyu bo¬altın. Su haznesini
tekrar yerine sürün. YERNE OTURMASI ÇN YCE TN.
NOT: Eœer kurutma makinesi yakınında bir atık su hattınız
varsa kurutma makinesi tarafından biriktirilen suyun sürekli
olarak atılmasını saœlayan bo¬altma kitini kullanabilirsiniz. Bu
su tepsisini bo¬altma ihtiyacını ortadan kaldıracaktır. Kitin
montajı için gereken tüm bilgiler kit zarfında mevcuttur.
33
Su Haznesi
40005181Tur.qxd 4/10/07 3:21 pm Page 33
Page 34

Kondansörü çıkarmak için
1. Kurutucudan ayrılana kadar alt kapaœın tabanını hafifçe
çekin. Sonra alt kapaœın tamamen çıkarılması için üst
kısım mente¬esinden ayrılabilir.
2. ki kilitleme kolunu saat yönünün tersine çevirin ve
kondansörü dı¬arı çekin.
3. Kondansör ünitesini dı¬arı çekin.
4. Olabilecek toz veya tüyleri bir bezle yava¬ça çıkarın ve
daha sonra kalan toz ve tüyleri çıkarmak için suyun
tabakalar arasından geçmesine izin verecek ¬ekilde
çevirerek üniteyi akan musluk altında yıkayın.
5. Doœru ¬ekilde oturmasına dikkat ederek kondansörü
tekrar tutturun (okla gösterildiœi gibi) ve yerine doœru
iyice itin. Saat yönünde çevirerek iki kolu kilitleyin.
6. Alt kapaœı tekrar takın.
34
Kondansör
40005181Tur.qxd 4/10/07 3:21 pm Page 34
Page 35

35
Programın Seçilmesi
Program
Bone Dry (Çok Kuru)
Extra Dry
(Ekstra Kuru)
Cupboard Dry (Kuru)
Iron Dry
(Ütü için Hafif Nemli)
Wool Finish
(Yünlüler)
Fast Iron (Hızlı Ütü)
120‘
75‘
60‘
45‘
30‘
Refresh (Tazeleme)
Tanım
stediœiniz kuruluk derecesini seçin.
Bu, banyo havluları ve bornozlar için Bone Dry (Çok Kuru), ütülenmeden
kaldırılacak olan nesneler için Cupboard Dry (Kuru) ve çama¬ırı ütüye
uygun halde bırakan programlar arasında deœi¬mektedir.
Hava ile kurutmanın ardından yünlüleri daha yumu¬ak hale getirmek için
özel olarak tasarlanmı¬ hafif bir program.
12 dakika süren bu hassas ılık hava evresi gardropta saklanmı¬ yünlülerin
‘tazelenmesi‘ için de kullanılabilir.
Fast Iron (Hızlı Ütü) programı bakım ve kırı¬ıklık önleme i¬levleri saœlar.
Yükün 9 dakika boyunca ısıtılmasının ardından 3 dakikalık bir soœuma
devresi gelir ve bu örneœin ütüleme öncesinde bir sepet içerisinde bir
süre bekletilmi¬ olan giysiler için özellikle yararlıdır. Ayrıca giysiler
dı¬arıda bir çama¬ır ipi üzerinde veya ev içerisindeki radyatörler üzerinde
kurutulduœunda sertle¬ebilirler. Hızlı Ütü i¬lemi kuma¬ üzerindeki
kırı¬ıklıkları yumu¬atarak ütülemeyi daha hızlı ve kolay bir hale getirir.
120 dakikalık kurutma
75 dakikalık kurutma
60 dakikalık kurutma
45 dakikalık kurutma
30 dakikalık kurutma
Çama¬ırın 30 dakika boyunca serin havada döndürülmesi
Hoover Sensörlü Kurutma makinesi bütün ¬artlarda kurutma
saœlamak için birçok seçenek sunar.
A¬aœıdaki tabloda programlar ve her programın i¬levi
listelenmektedir.
Not: Sensör küçük nesnelerden olu¬an küçük bir yükü
algılamayabilir. Küçük yükler ve ayrı parçalar ya da ön
kurutma uygulanmı¬ dü¬ük nem içerikli kuma¬lar için zaman
ayarlı programları kullanın. Yükün büyüklüœüne ve gereken
kuruluœa baœlı olarak programı 30 ile 75 dakika arasına kurun
ve kuma¬ın türüne göre yüksek veya dü¬ük sıcaklık seçin.
Eœer sensör parçayı tespit etmezse kurutucu soœuma sürecine
geçmeden önce sadece 10 dakika çalı¬acaktır.
Eœer yük döner hazneli kurutma makinesiyle kurutma için çok
büyük veya çok ıslaksa 185 dakika sonra kurutucu otomatik
olarak soœumaya geçecektir.
40005181Tur.qxd 4/10/07 3:21 pm Page 35
Page 36

1. Kapaœı açın ve hazneyi çama¬ırla doldurun. Çama¬ırın
kapaœın kapanmasını engellemediœinden emin olun.
2. Kapının kapanınca ‘tıklama‘ sesini duyana kadar yava¬ça
iterek kapaœı kapatın.
3. Kurutma makinesini çalı¬tırmak için Açık/Kapalı
düœmesine basın. Açık/Kapalı göstergesi yanacak ve
START (BA¤LAT) göstergesi yanıp sönecektir.
4. Gereken kurutma programını seçmek için Program Seçici
kadranını çevirin (Program Kılavuzuna bakınız).
5. Eœer sentetik, akrilik veya hassas parçaları kurutuyorsanız
sıcaklık seviyesini azaltmak için Akrilik/Sentetik
düœmesine basın.
Makine dü¬ük sıcaklık ayarındayken düœmenin üstündeki
ı¬ık yanacaktır. Bu durumu iptal etmek için makinenin
sıfırlanması gerekir.
6. Start/Pause (Ba¬lat/Duraklat) düœmesine basın. Kurutma
makinesi otomatik olarak ba¬layacak ve START (BA¤LAT)
göstergesi sürekli olarak yanacaktır.
7. Gösterge kalan zaman açısından kurutmanın ilerleyi¬ini
gösterecektir.
8. Eœer program sırasında çama¬ırı kontrol etmek için kapak
açılırsa, kapaœın açılmasından sonra kurutmayı yeniden
ba¬latmak için Start/Pause (Ba¬lat/Duraklat) düœmesine
basılması gerekir.
9. 15‘ (15 dakika) göstergesi yandıœında makine soœuma
fazına geçecek, yükün soœumasına izin vermek için
kıyafetler serin havada döndürülecektir.
10. Program tamamlandıœında STOP (DURDUR) göstergesi
yanacaktır.
11. Evrenin tamamlanmasının ardından çama¬ır haznesi
kırı¬mayı en aza indirmek için aralıklı olarak dönecektir.
Bu, makine sıfırlanıncaya veya kapatılıncaya kadar devam
edecektir.
Programın iptal edilmesi ve
sıfırlanması
Bir programı iptal etmek için makineyi kapatıp tekrar açın.
START (BA¤LAT) göstergesi yanıp sönerek makinenin
sıfırlandıœını gösterecektir.
Gecikmeli Ba¬langıç
Gecikmeli Ba¬langıç fonksiyonu kullanıcının kurutma evresinin
ba¬langıcını 6 veya 9 saat geciktirmesini saœlar.
Fonksiyon ilk defa seçildiœinde gösterge 6 saatlik bir gecikme
gösterecek, düœmeye tekrar basılması ise gecikmeyi 9 saate
çıkaracaktır.
Programı ba¬latmak için Gecikmeli Ba¬langıç düœmesine
basın. Böylece cihaz kurutma evresini bu zamanın sonunda
tamamlayacaktır. Gecikmeli ba¬langıcın devam ettiœini
göstermek için 6 veya 9 saat göstergesi yanıp sönecektir.
36
Çalı¬tırma
UYARI!
Çama¬ır haznesi, kapak
ve yük çok sıcak
olabilir.
40005181Tur.qxd 4/10/07 3:21 pm Page 36
Page 37

Kurutucunun temizlenmesi
● Her kurutma evresinin ardından filtreyi temizleyin ve su
haznesini bo¬altın.
● Kondansörü düzenli olarak temizleyin.
● Her kullanım devresinin ardından çama¬ır haznesinin
içerisini silin ve kuruması için hava dola¬ımı saœlamak
amacıyla kapaœı bir süre açık bırakın.
● Makinenin dı¬ını ve kapaœı yumu¬ak bir bezle silin.
● A¬ındırıcı pedler veya temizleme ajanları KULLANMAYIN.
● Kapaœın sıkı¬masını veya tüy birikimini önlemek için iç
kapaœı ve contasını düzenli olarak nemli bir bezle
temizleyin.
Teknik özellikler
Çama¬ır haznesi kapasitesi 115 litre
Maksimum yük 9 kg
Yükseklik 85 cm
Geni¬lik 60 cm
Derinlik 60 cm
Enerji Etiket Bandı B
Test spesifikasyonu
Ref. EN 61121 – Direktif 95/13 CEE
Program Kuru
Yük 9 kg
Bo¬altma kitini yoœu¬mu¬ suyu bo¬altmak için kurun ve
kullanın.
37
Temizlik ve Düzenli Bakım
ÖNEML
Temizlemeden önce
makineyi daima kapatın
ve fi¬i elektrik
kaynaœından çıkarın.
Elektrikle ilgili bilgiler
için kurutma makinesi
kabininin önündeki
sınıflandırma etiketine
bakın (kapak açık
konumdayken).
40005181Tur.qxd 4/10/07 3:21 pm Page 37
Page 38

Sebep ne olabilir...
Kendi kendinize giderebileceœiniz arızalar
Teknik yardım için yerel servisinizi aramadan önce lütfen
a¬aœıdaki listeye bir göz atın. Eœer makine çalı¬ır durumdaysa
veya kurulumu yanlı¬ yapıldıysa ya da yanlı¬ kullanıldıysa,
ücret alınacaktır. Tavsiye edilen kontrollerin yapılmasının
ardından sorun devam ederse lütfen yerel servisinizi arayın,
belki size telefondan yardım edebilirler.
Kurutma süresi çok uzun/kıyafetler
yeterince kuru deœil...
● Doœru kurutma süresi/programını seçtiniz mi?
● Kıyafetler çok mu ıslaktı? Kıyafetler tamamen sıkılmı¬
veya çama¬ır makinesinde çevirmeli kurutmadan geçmi¬
miydi?
● Filtrenin temizlenmesi gerekiyor mu?
● Kondansörün temizlenmesi gerekiyor mu?
● Kurutucu a¬ırı mı yüklü?
● Giri¬ler, çıkı¬lar ve kurutucunun tabanında tıkanma var
mı?
● Daha önceki bir evreden Akrilik/Sentetik seçeneœi seçilmi¬
durumda mı?
Kurutucu çalı¬mıyor...
● Kurutucunun elektrik kaynaœı çalı¬ır durumda mı? Bir
masa lambası gibi ba¬ka bir cihazı çalı¬tırmayı deneyin.
● Fi¬ elektrik kaynaœına düzgün bir ¬ekilde takılmı¬ mı?
● Bir elektrik kesintisi var mı?
● Sigorta atmı¬ mı?
● Kapak tam olarak kapanmı¬ mı?
● Hem elektrik kaynaœında hem de makine üzerinde
kurutucu açık konumda mı?
● Kurutma süresi veya program seçildi mi?
● Kapaœı açtıktan sonra makine tekrar açık konuma getirildi
mi?
● Su tepsisi dolduœundan ve bo¬altılması gerektiœinden mi
kurutucu çalı¬mayı bıraktı?
Kurutucu gürültü yapıyor...
● Kurutma makinesini kapatın ve bilgi için yerel servisinizi
arayın.
Filtre Bakım Göstergesi yanıyor...
● Filtrenin temizlenmesi gerekiyor mu?
● Kondansörün temizlenmesi gerekiyor mu?
Suyu Bo¬alt Göstergesi yanıyor...
● Su haznesinin bo¬altılması gerekiyor mu?
38
Sorun Giderme
40005181Tur.qxd 4/10/07 3:21 pm Page 38
Page 39

ÇAMA¤IR KURUTMA MAKNES
Hoover Çama¬ır Kurutma Makinesi’nin kullanma kılavuzunda gösterildiœi ¬ekilde kullanılması ve yetkili
kıldıœımız servis elemanları dı¬ındaki ¬ahıslar tarafından bakımı, onarımı veya ba¬ka bir nedenle
müdahale edilmemi¬ olması ¬artıyla bütün parçaları dahil olmak üzere tamamı malzeme, i¬çilik ve
üretim hatalarına kar¬ı ürünün teslim tarihinden itibaren 3 (ÜÇ) YIL SÜRE LE GARANT EDLM¤TR.
Ürünün garanti kapsamı içinde malzeme, i¬çilik ve montaj hatalarından dolayı arızalanması halinde
yapılan i¬lemler için i¬çilik masrafı, deœi¬tirilen parça bedeli ya da ba¬ka bir ad altında hiçbir ücret talep
edilmeyecektir. Garanti süresi içinde yapılacak onarımlarda geçen süre, garanti süresine ilave edilir.
Tamir süresi 30 (otuz) i¬ günüdür. Bu süre mamulün yetkili servis atölyelerimize, yetkili servis
atölyelerimizin bulunmaması durumunda yetkili satıcılarımıza veya firmamıza bildirildiœi tarihten
itibaren ba¬lar. Ürünün arızasının 15 i¬ günü içerisinde giderilememesi halinde Doruk Ev Gereçleri San.
Tic. Ltd. ¤ti. ürünün tamiri tamamlanıncaya kadar, benzer özelliklere sahip ba¬ka bir ürünü, mü¬terinin
kullanımına tahsis edecektir.
Arızanın giderilmesi konusunda uygulanacak teknik yöntemlerin tespiti ile deœi¬tirilecek parçaların
saptanması tamamen firmamıza aittir. Arızanın giderilmesi için yapılacak faaliyetler ürünün bulunduœu
yerde veya yetkili servis atölyesinde yapılabilir. Mü¬terinin buna onayı ¬arttır.
A¬aœıda belirtilen üç ko¬uldan birinin olu¬ması halinde sırasıyla yetkili satıcılarımız, bayi, acente
temsilciliœimizden birisinin bölgeye en yakın servis yetkilisiyle birlikte veya firmamız yetkilisince
düzenlenecek raporla, arızanın tamirinin mümkün bulunmadıœının belirlenmesi durumunda, ürün
ücretsiz olarak yenisiyle deœi¬tirilecektir.
1. Ürünün teslim tarihinden itibaren garanti süresi içinde kalmak kaydıyla, 1 (Bir) yıl içerisinde aynı
arızayı ikiden fazla tekrarlaması veya farklı arızaların dörtten fazla ortaya çıkması sonucu, üründen
yararlanamamanın süreklilik kazanması.
2. Ürünün tamiri için gerekli sürenin a¬ılması.
3. Ürüne hizmet verecek yetkili servis istasyonunun mevcut olmaması.
Garanti ¬artları ile ilgili olarak çıkabilecek sorunlar için Sanayi ve Ticaret Bakanlıœı, Tüketicinin ve
Rekabetin Korunması Genel Müdürlüœü’ne ba¬vurulabilir.
Bu Garanti Belgesi’nin kullanılmasına 4077 sayılı Tüketicinin Korunması Hakkında Kanun ile bu Kanun’a
dayanılarak yürürlüœe konulan Garanti Belgesi Uygulama Esaslarına Dair Tebliœ uyarınca, T.C. Sanayi ve
Ticaret Bakanlıœı, Tüketicinin ve Rekabetin Korunması Genel Müdürlüœü tarafından izin verilmi¬tir.
DORUK EV GEREÇLER SAN. VE TC. LTD. ¤T.
Bu Belge, Sanayi ve Ticaret bakanlıœı’nın 043557 no’lu ve 09.08.2007 izin tarihli belgesine göre düzenlenmi¬tir.
Bu bölümü, ürünü aldıœınız Yetkili Satıcı imzalayacak ve ka¬eleyecektir.
GARANT BELGES
39
Model :
Seri No :
Teslim Tarihi Yeri :
Fatura Tarihi No :
Satıcı Firma Ünvanı :
Genel Müdür
Adres :
Tel -Fax :
Satıcı Firma (Ka¬e ve mza) :
40005181Tur.qxd 4/10/07 3:21 pm Page 39
Page 40

40
Ürününüzle ilgili yetkili servis hizmet talebiniz olduœunda a¬aœıdaki telefon numarasından satı¬ sonrası
hizmet merkezimize ula¬abilirsiniz
Ürünlerimizle ilgili genel öneri, talep ve ¬ikayetlerinizi a¬aœıdaki ücretsiz mü¬teri hizmetleri hattımızdan
bizlere ula¬tırabilirsiniz
Hoover tarafından saœlanan garanti ¬artları a¬aœıdaki ko¬ullarda geçersiz olacaktır,
– Ürüne yetkili servis dı¬ındaki ki¬iler tarafından müdahele edilmesi
– Kullanım hatalarından dolayı olu¬an arıza ve hasarlar
– Ürünün mü¬teriye ula¬tırılması sonrası yapılan ta¬ıma i¬lemine baœlı arıza ve hasarlar
– Doœal afetler veya yangın sonucu olu¬an arıza ve hasarlar
– Hatalı elektrik tesisatı, ürünün üzerinde belirtilen voltajdan farklı voltajda kullanılması veya ¬ebeke
voltajındaki dalgalanmalar sonucu olu¬an arıza ve hasarlar
Yukarıda belirtilen arızaların giderilmesi ücret kar¬ılıœında yapılır.
Ürününüzün kullanım ömrü 10 yıldır. (Ürünün i¬levlerini yerine getirebilmesi için gerekli yedek parça
süresi)
Doruk Ev Gereçleri San. ve Tic. Ltd. ¤ti.
ADRES
Organize Sanayi Bölgesi 8 Cd. Eski¬ehir / Türkiye Posta Kodu: 26110
Sayin Mü¬terımız
0 222 444 03 98
0 800 341 48 00
MALATÇI FRMA :
CANDY Elettrodomestici S.r.l.
Via Privata E. Fumagalli 20047 Brugherio (MI)/ITALY
Tel: 039 2086 1
Fax: 039 2086 403
THALATÇI FRMA :
DORUK EV GEREÇLER SAN.
TC. LTD. ¤T. EYÜP BULVARI
NO: 42/B / EYÜP/STANBUL
Tel: 0212 4933232
Fax: 0212 4934754
40005181Tur.qxd 4/10/07 3:21 pm Page 40
Page 41

Yukarıda belirtilmi¬ olan önerilen kontrollerin hepsini
tamamlamanızdan sonra kurutma makinenizin sorunu hala
devam ediyorsa, lütfen Yetkili Servisi arayın ve onlara danı¬ın.
Size telefonda yardımcı olabilmeleri mümkün olabileceœi gibi,
garanti ko¬ullarınıza baœlı olarak bir teknisyen ile uygun bir
randevu alınması da mümkün olabilir. Ancak, kurutma
makinenize ili¬kin olarak a¬aœıdakilerden birinin söz konusu
olması durumunda sizden bir servis bedeli tahsil edilecektir:
● Kurutma makinenizin normal çalı¬ır durumda olduœunun
saptanması.
● Kurutma makinenizin montaj talimatlarına uygun olarak
monte edilmemi¬ olması.
● Kurutma makinenizin yanlı¬ kullanılmı¬ olması.
Yedek parçalar
Daima doœrudan Yetkili Servisten temin edilebilen orijinal
yedek parçaları kullanın.
Yetkili Servis
Cihazın servisi ve tamiri için bölgenizdeki Yetkili Servis
teknisyenini arayın.
41
Mü¬teri Servisi
40005181Tur.qxd 4/10/07 3:21 pm Page 41
Page 42

Üretici, bu kitapçıkta baskı hataları olması durumunda hiçbir
sorumluluk üstlenmemektedir. Ayrıca üretici ürünlerinde asıl
niteliœini deœi¬tirmeksizin uygun deœi¬iklikler yapma hakkını
da saklı tutmaktadır.
42
40005181Tur.qxd 4/10/07 3:21 pm Page 42
Page 43

40005181
40005181.qxd 19/07/2007 12:36 Page 22
 Loading...