

Page 1

Self-Propelled
Review this manual before
operating cleaner
Page 2
When using an electrical appliance, basic precautions should
always be followed, including the following:
READ ALL INSTRUCTIONS BEFORE USING THIS APPLIANCE
n
To reduce the risk of fire, electric shock, or
Warning. injury:
.
Do not use outdoors or on wet surfaces.
.
Close supervision is necessary when any appliance is used by or
near children. Do not allow vacuum cleaner to be used as a toy or to
run unattended at any time.
.
Keep hair, loose clothing, fingers, feet and all parts of body away
Do
from openings, rotating agitator and any other moving parts.
operate cleaner in bare feet or when wearing open toe shoes or
sandals.
.
Do not pull or carry by cord, use cord as a handle, close door on cord
or pull cord around sharp edges or comers. Do not run appliance
over cord. Keep cord away from heated surfaces.
.
Do not pick up anything that is burning or smoking, such as cigarettes, matches, or hot ashes.
.
Do not use to pick up flammable or combustible liquids such as
gasoline or use in areas where they may be present.
.
Avoid picking up hard, sharp objects with the cleaner. They may
damage the cleaner and the bag.
.
Unplug cleaner when not in use. Turn off all controls before unplug-
NW
.
Always disconnect cord from electrical outlet before servicing the
cleaner.
.
Do not use without dust bag and/or filters in place. Change bag
quently when picking up very fine materials such as powder.
.
Use extra care when cleaning on stairs.
.
Do not put any
obJect
into openings.
Do not use with any opening
blocked; keep free of dust, lint, hair, and anything that may reduce air
flow.
.
Grasp the plug to disconnect from wall outlet to avoid damage to the
cord, plug, prongs, or receptacle. Never handle plug or appliance
with wet hands.
.
If
the cleaner has a cord reel, hold on to plug while cord is being
rewound to prevent cord from whipping.
.
The use of an extension cord is not recommended.
.
Do not use with damaged cord or plug. If appliance is not working as
it should, has been dropped, damaged, left outdoors, or dropped into
water, take it to a Hoover Factory
SeMce
Center or Authorized
Hoover Warranty Service Dealer (Depot).
.
Use vacuum cleaner only for its intended use as described in the
instructions.
Use only attachments recommended by The Hoover
Company; others may cause hazards.
not
fr*
Save these instructions!
2
Page 3

Unpacking
Unpack the cleaner from the
carton and identify the parts
shown. Remove and dispose
of the cardboard packing.
G
cl
A. Hose
B. Furniture Nozzle
C. Crevice Tool
D. Dusting Brush
E. Wands
F. Paper Bag
G. Fragrance Tablet
(some models only)
c
1
2
3
8
9
The assembled cleaner will
look like the drawing above.
Side-mounted hose
trademark of The
Hoover Company
‘
Page 4

. Cleaner Description
1. Self Propel Handle Grip
2. OFF-ON-‘Power Surge’ Switch
3. Self Propel Control Button
4. Cord
of cloth bag. Upper hook rotates for easy cord release.
5. Bag Spring:
6.
Air
fragrance tablet and release a pleasant scent during cleaning.
7.
Cloth
8. Variable Speed:
9. Carrying Handle
10. Tool Cover:
11. Handle Release Pedals:
either operating or low position.
12. Twin Headlight:
13. Carpet Height Adjustment Lever:
“PLUSH”, or “DEEP PILE” setting.
14. Furniture Guard
15. Edge cleaning:
side of the cleaner; standard edge cleaning is provided on the left
side.
Storage
Freshener Dispenser:
Bag
Hooks:
place spring ring over hook to support the bag.
Jacket:
pull out top edge of cover to open.
brushed edge cleaning is provided on the right
located on back of handle and lower edge
(some models only) designed to hold a
covering for paper bag.
available on some models.
step on either pedal to lower handle to
available on some models.
choose “BARE FLOOR/LOW,
16. Hose Door:
17. Hose and Wand Rack
18. Extension Wands
19. Hose
20. Furniture nozzle
21. Crevice tool
22. Dusting brush
Note:
quently.
Operate
of cleaner.
This cleaner is intended for household use.
If using cleaner on new carpet, be sure to change bag fre-
See “Maintenance” section for bag replacement
cleaner only at voltage specified on date plate on bottom
open door to connect hose to cleaner.
Page 5

1
How to Assemble
I
1,
Attach hose
With cleaner handle in lowest
position, open hose door and
insert hose end with tabs into
cleaner.
Turn hose end to lock in place.
To remove hose, turn in opposite
direction.
Stretch hose over hose rack and
push opposite hose end
into “cup” in rack.
firmly
Note:
the rack is a necessary design
element and will not
cleaner’s performance.
When cleaning floors,
should remain attached to
cleaner and rack.
2m
Position wands in side of hose
rack and snap into place.
The hole in the “cup” in
inhibit
hose
Attach tools
the
5
Page 6
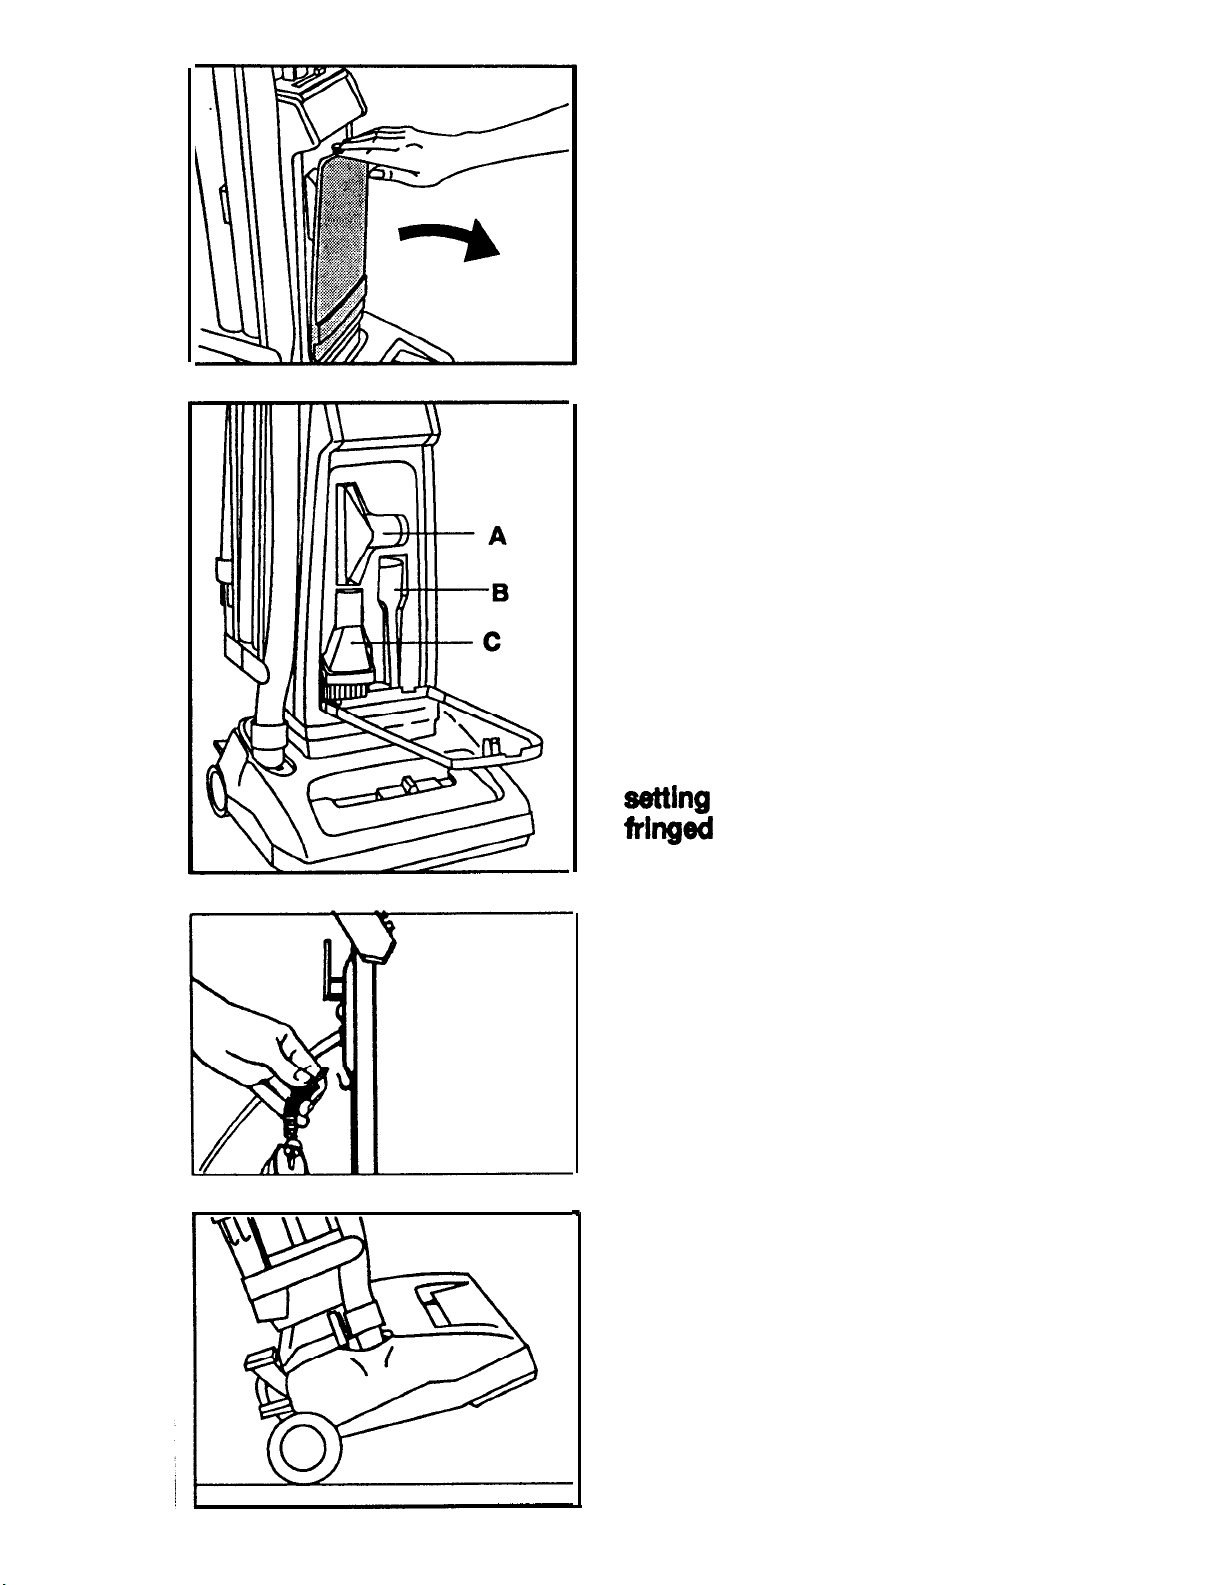
Pull open tool cover.
Snap furniture nozzle (A), crevice
tool (B), and dusting brush (C)
into front of cleaner as shown.
Close tool cover.
CAUTION: When cleaner is
turned on, agitator will continue to rotate while cleaner
handle is in upright position.
Avoid tipping cleaner or
settlng
trlnged
during tool use.
it on carpeted stairs,
area rugs, or furniture
Place bag spring ring over hook
located on handle.
.
How
to use
To transport
To move your cleaner from room
to room, put handle in upright
position, tilt cleaner
large rear wheels and push
forward.
back
on
Page 7
Your cleaner also has a convenient carrying handle located just
above the tool cover.
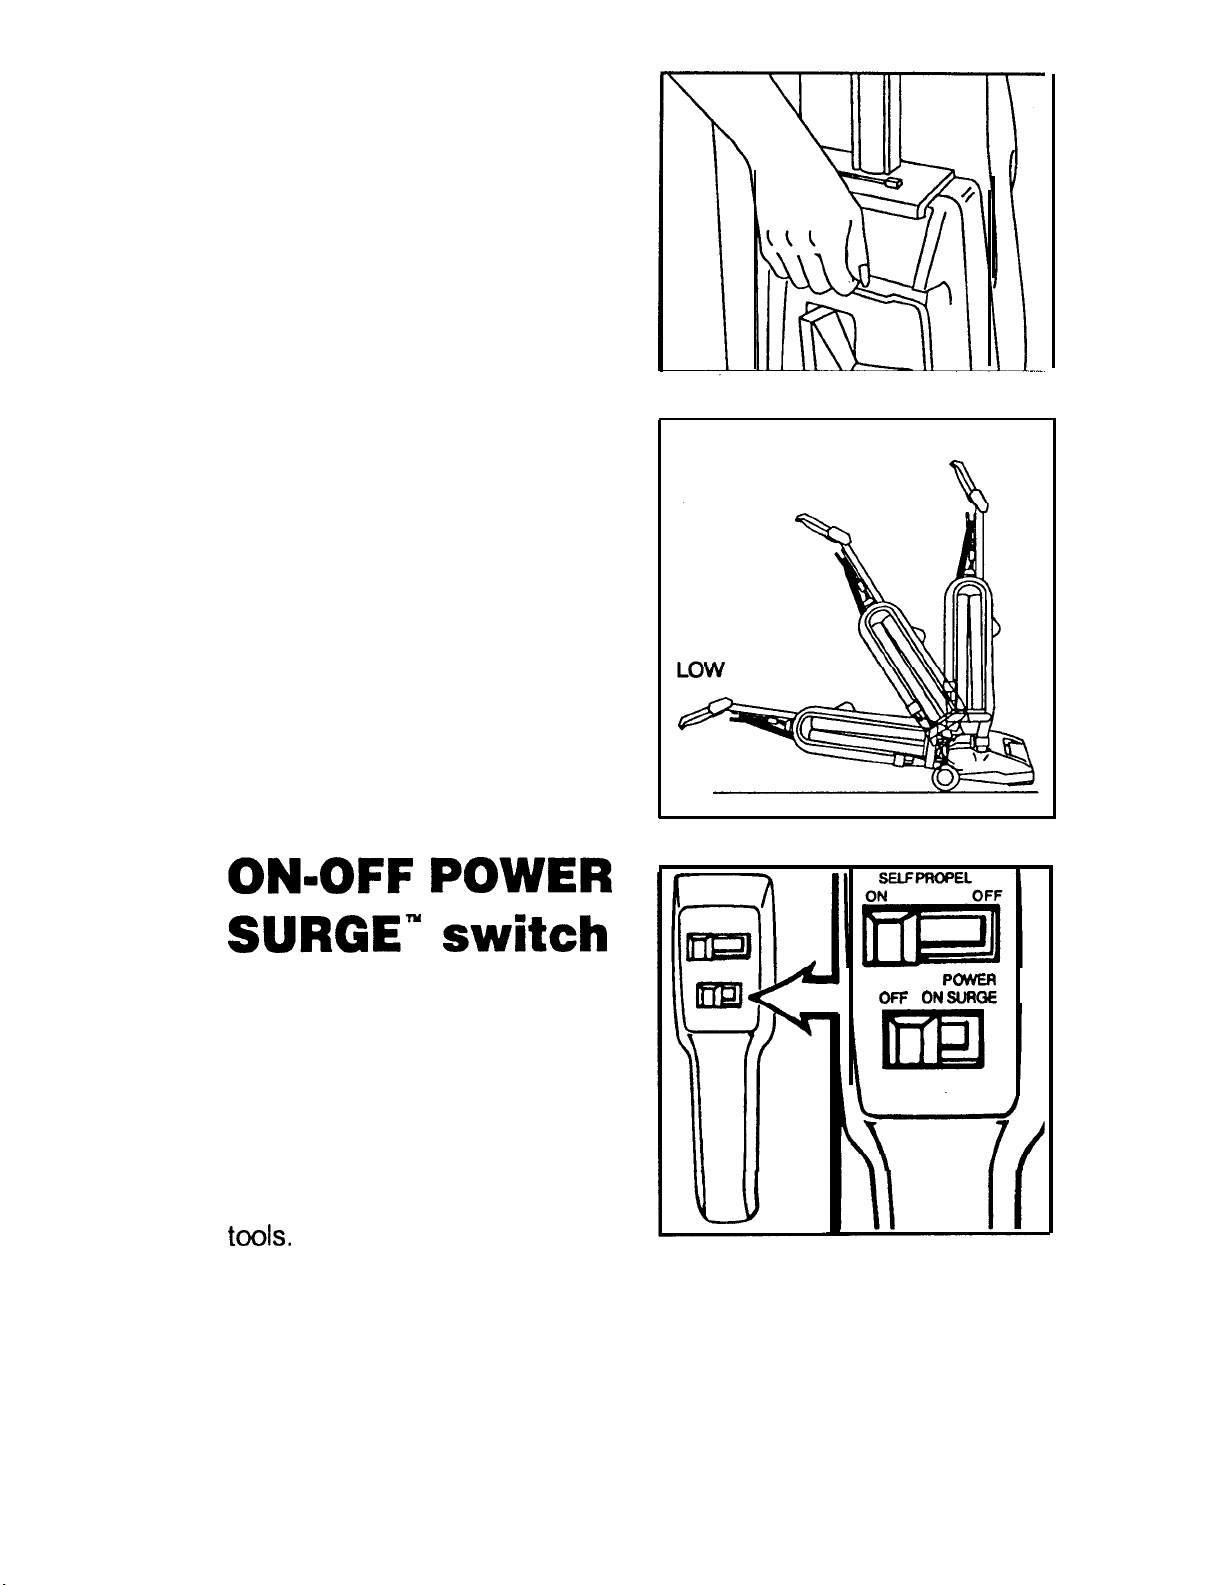
Handle positions
The handle of your cleaner has
three positions:
storage and tool use;
for general operation on carpet
and floors; low for cleaning
under low furniture. Lower
handle by stepping on either
pedal at rear of cleaner.
When putting the handle into the
upright position, two clicks may
be heard. This is a normal
design characteristic of your
cleaner and can be expected.
upright
for
operating
UPRIGHT
OPERATING
ON-OFF POWER
SURGE- switch
Operate your cleaner at normal
power by pushing the switch to
the ON position. To turn
cleaner off, push switch back to
the OFF position.
Normal power is to be used for
regular cleaning of carpet and
rugs and when using cleaning
tools.
Your cleaner also has a
‘POWER SURGE’ feature for
extra cleaning power on heavily
soiled carpet. To use this
feature slide switch to the right
as far as possible and hold it in
that position. When released, it
will return to the ON position.
7
OFF ONSWIM
POWER
Page 8
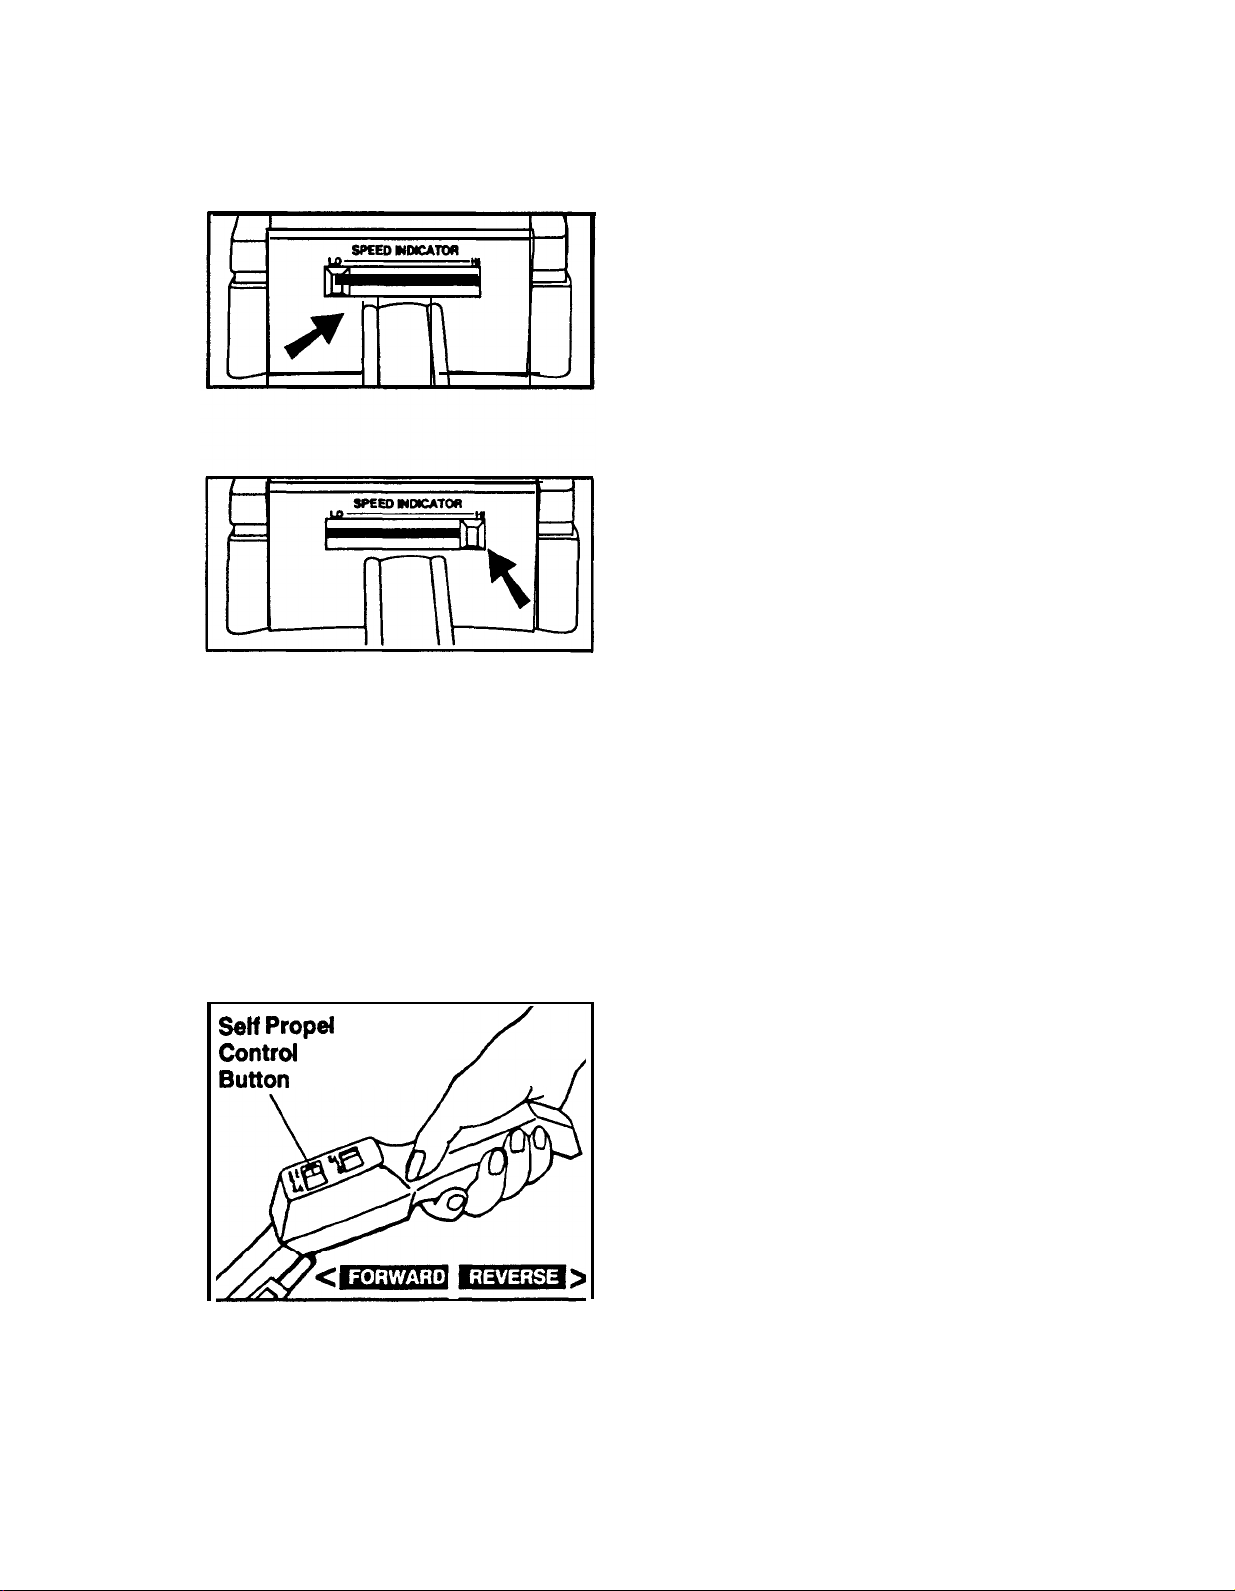
Variable speed models
Some cleaners are equipped with a variable speed control.
To decrease
which significantly reduces
energy consumption and noise
level, slide button toward LO
setting. At a decreased speed,
cleaner will also move slower and
allow the user more control in
maneuvering in small areas.
To increase
very large areas and to provide
maximum cleaning power when
needed, slide the button toward
the HI setting until the desired
speed is obtained.
NOTE:
SURGE’ feature at any speed
setting.
You may use the ‘POWER
cleaner speed,
cleaner speed for
Self Propel feature
Note: The Self Propel feature will operate only when motor is
turned on.
This feature moves the cleaner forward and backward at a variable
rate of speed controlled entirely by you.
Self Propel
Control
Button
To move forward
Push handle grip forward and
guide cleaner in front of you.
The cleaner will move in a
forward direction with little
effort.
To move backward
Gently pull handle grip back and
guide the cleaner toward you.
Guide cleaner carefully at first until
you have adjusted to the ease of
operation.
Continued on next page.
a
Page 9

Self Propel control button
For increased
such as around and under furniture, or on non-carpeted floors
set the cleaner on the lowest speed setting, or push the control
button to OFF to disengage the Self Propel mechanism.
control
of the Self Propel feature in tight places
Special features
Edge cleaning
Brushed
provided on the right side of the
cleaner to remove embedded
dirt in the carpet near
baseboards and furniture.
Guide right side of cleaner
parallel to edge of carpet or
furniture for brushed edge
cleaning.
Standard
provided on the left side of
cleaner to remove surface dust
and litter.
edge cleaning is
edge cleaning is
Adjustment for
carpet pile height
The cleaning of carpet and rugs
takes place at the nozzle.
The adjustment lever on the
front of the cleaner is used to
raise and lower the nozzle to
three different self-adjusting
ranges.
I
.
NOZZLE
It is recommended that the
BARE FLOOR/LOW range be
used on all carpet types.
However, on dense plush or
shag carpet, the cleaner may
be difficult to push. In this
case, reposition the adjustment
lever on the PLUSH or DEEP
PILE setting.
9
Page 10

When cleaning non-carpeted floors, set the adjustment lever to
BARE FLOOR/LOW and use low speed, if available on your cleaner.
If greater control on non-carpeted floors is desired, push the Self
Propel control button to the OFF position.
Disconnect cleaner from
electrical outlet before making nozzle adjustment.
For ease in sliding knob, the
handle should be in the upright
position.
The nozzle will not move into
the adjusted position until
the cleaner handle is lowered
to the operating position.
Mln
Max
II
Air freshener dis-
penser
Some models only.
Lift drawer in bag cap on
cleaner bag and insert the air
freshener tablet that has been
packed with the cleaner. Push
drawer down into position.
The amount of fragrance
released is regulated by sliding
the control to one of three
settings shown on top of bag
cap.
Air freshener tablets may be
obtained from your local
authorized Hoover Dealer
(Depot), a Hoover Factory
Service Center, or by using the
I
mail order form packed with
your cleaner.
10
Page 11

Quick cord release
To
release the cord, rotate top
cord
be repositioned for wrapping
the cord.
hook. The hook can then
Cleaning tools
Use tools
locked in upright position.
The cleaning tools have many
uses. Select the
for the cleaning task from the
descriptions below.
1.
Dusting brush
for
cawed
books, lamps, lighting fixtures,
Venetian blinds, baseboards,
shutters, and registers.
2. Furniture nozzle
used for upholstered furniture,
draperies, tapestries, mattresses,
clothing, automobile interiors,
and carpeted stairs.
with
cleaner handle
tool
best suited
may be used
furniture, table tops,
may be
2
A
3. Crevice tool
tight spaces, corners and along
edges in such places as dresser
drawers, upholstered furniture,
stairs, and baseboards.
4. Wands
length to your hose. Attach them
to any of the above tools.
are used to give extra
may be used in
How to attach wand
and tools
The tools are attached to the
hose or the wand in the same
manner.
Push tool firmly onto hose; twist
tool slightly to tighten or loosen
connection.
Use tools with cleaner handle
in upright position.
3
4
.
11
Page 12

How to clean tools
To clean the hose, wipe off dirt with a cloth dampened in a liquid
detergent. Rinse with a damp cloth. Cleaning tools may be washed
in warm water with a detergent. Rinse and air dry before using.
How to attach tool cover
The tool cover is designed with
a “break-away” feature which
allows it to snap off if it is
pushed open too far. To reattach, align hinges of cover
with slots below tool storage
area; press cover back into
place.
Maintenance
The following sections are concerned with proper maintenance of
the cleaner. Familiarize yourself with these home maintenance tasks
and keep this owner’s manual in a convenient place where you can
refer to it when needed. Proper use and care of your cleaner will
ensure continued cleaning effectiveness.
The bag
When to replace
Check bag from time to time.
the bag when it is filled to the dotted line. If more dirt than this
accumulates, your cleaner may not operate effectively. Change
bag frequently when using cleaner on new carpet, due to rapid
accumulation of carpet fluff. Also check dirt duct (see section
following belt replacement) for fluff accumulation.
Where to buy
Bags may be purchased from your local Authorized Hoover Dealer
(Depot) or from a Hoover Factory Service Center or use the mail
order form packed with your cleaner.
sure to give the model number of your cleaner.
It is recommended that you change
When ordering bags, be
12
Page 13

What to buy
inal
In order to maintain the
cleaner,
A
disposable bags. These bags are constructed with filter material
use
only
HOOVE 8 Breathe Easy” Micro Filtration Type
ori
I!
which removes 99.9% of dust down to 5 microns, and,aids in
returning clean air to the room.
cleaning effectiveness of your
Regular
HOOVER@
Tpye A
disposable bags also fit your cleaner.
To assure that your HOOVER cleaner operates
at peak performance, it is imperative that you
use only genuine HOOVER paper bags made
by The Hoover Company. HOOVER bags can
be identified by the trademarks -
-
How to change bag
Disconnect cleaner from electrical outlet.
1. To remove old bag, put tingers
behind bag collar and pull back.
Note: Do not
clean out old bag
and reuse. Discard used bag.
13
Page 14

3. Position bottom of collar, and
then top, onto tube. Push collar
firmly onto tube.
4. Tuck remainder of bag into
outer jacket. Zip closed.
The headlight
Some models
What to buy
This cleaner uses two 12 volt, wedge base bulbs.
Hoover part No. 27313105
only.
How
Disconnect cleaner from electrical outlet.
1. Lower handle until cleaner is
positioned with bag flat on floor.
to replace
2. Place screwdriver into one of
the slots at top edge of lens.
Twist screwdriver while lifting up
lens. Repeat procedure in
second slot.
Page 15

3.
Lift out lens.
4. Pull old bulbs straight out of
sockets. Push each new bulb
straight into socket until locked in
place.
required.
Excessive force is not
5. Replace lens by inserting
plastic projections into openings in cleaner.
The belts
There are two belts on your
cleaner. One belt drives the
agitator; the other operates the
Power Drive”” pulley, which
operates the Self Propel
feature.
When buying new belts, you
should always insist on genuine
YOOVER
may not meet the Hoover
design and quality control
standards. They may not
operate the agitator or ‘Power
Drive’ transmission correctly
and may cause damage.
parts. Other belts
6. Press lens firmly at center
and sides while lifting slotted
edge with screwdriver.
‘POWER
DRIVE’
BELT-
BELT
15
Page 16

When to replace belts
Check from time to time to be sure the belts are in good condition.
If they are stretched, cut, or broken, they should be replaced.
What to buy
Agitator belt - Hoover part No. 38528008
‘Power Drive’ belt - Hoover part No. 160147
How to replace
Agitator belt
Disconnect cleaner from electrical outlet and detach hose from
cleaner.
Place cleaner on the floor. For ease in installation, follow the direc-
tions given below, positioning yourself to the
cleaner.
left, rear
of the
CLIPS
1. Turn cleaner over. Release
handle to lowest position.
Remove plate on bottom of
cleaner by releasing clips.
illustration.)
(See
2. Then lift off bottom plate.
16
Page 17

3. To remove agitator, use a
screwdriver placed as shown.
4. Use one hand to remove the
agitator as you use the end of
the screwdriver for leverage.
Remove old belt.
MOTOR
PULLEY
5. If the end plates have
loosened, tighten them by
turning in opposite directions.
BELT
-
6. Place new belt over metal
motor pulley, with
beit
visible and not against
lettering on
pulleys.
AGITATOR END
PlATk
7. Slip plastic pulley end of
agitator through belt. (See
illustration.)
17
8. Grasp a
one hand.QBe sure you can
itator firmly with
see agitator end plate.) For
leverage, place screwdriver in
groove as shown.
Page 18

9. Lift and pull, using screwdriver as a lever. Guide end
opposite belt into position first.
10. Roll other side of agitator
into place.
11. Press firmly to be sure
agitator is secure.
13. Maintaining front connec-
tion, rotate bottom
elate
to
covkr bottom of cleaner. Make
sure dirt duct is in position
under
elate.
Press firmlv.
12. The bottom plate attaches
in a hinge-like manner. Place
groove on front of bottom plate
over notched edge on front of
cleaner.
14. Lift and snap retaining
clips into place.
18
Page 19

How to replace ‘Power Drive’ belt
Disconnect cleaner from electrical outlet and detach
hose from cleaner.
To replace the (small) ‘Power Drive’ belt it is necessary to first
remove the bottom plate, agitator and the larger
shown on the previous pages.
Note: It may not be necessary to change both belts at the same
time.
Remove old ‘Power Drive’ belt.
Place new belt on motor pulley
first, then on drive pulley.
PULLEY*
agitator’belt,
as
Lettering on belt should be
visible and not against pulleys.
Replace agitator belt, agitator
and bottom plate, following
instructions under “How to
replace agitator belt”.
19
Page 20

Clearing obstructions
To maintain the cleaning effectiveness of your cleaner, remove large
items from surfaces before vacuuming. However, if an object larger
than can be exhausted in the bag is picked up, it can get caught in
the dirt duct or dirt tube.
First, check dirt duct; then dirt tube.
found or removed, contact your Hoover Factory Service Center
or Authorized Hoover Warranty Service Dealer (Depot).
if an obstruction cannot be
To check dirt duct
Disconnect cleaner from electrical outlet and detach hose from
cleaner.
if an obstruction occurs
during tool use,
hose from cleaner. Open hose
door and carefully remove any
visible obstruction. If no
obstruction is found, check
hose and tools. Remove any
obstruction. To continue using
tools reattach hose to cleaner.
disconnect
if an obstruction occurs
during floor cleaning,
hose from cleaner and turn
cleaner to expose underside.
Remove bottom plate and
agitator as shown in “The belts”
section. Carefully remove any
obstruction from dirt duct.
remove
20
Page 21

To check dirt tube
Disconnect cleaner from electrical outlet.
1. Remove paper bag. Remove
dirt tube by pushing to either
side to release clips. Lift dirt
tube up and out.
3. To replace dirt tube, position
it over lower seal and push
down. Insert one side against
retention clip. Push to snap
other side into position.
Replace paper bag.
2. Clean out dirt tube.
j 21
Page 22

Agitator brushes
When to replace
Disconnect cleaner from
electrical outlet and detach
hose from cleaner before
checking brushes.
When agitator brushes are worn
they should be replaced.
To check condition of brushes,
move the edge of a card across
agitator opening while turning
agitator. To maintain cleaning
effectiveness, replace brushes
if they do not touch card.
What to buy
When purchasing new brushes,
ask for HOOVER part No.
48445015.
On some models, the agitator
takes four brushes; other
models have a two-brush
agitator. Note the number of
brushes your cleaner needs.
How to replace
Disconnect cleaner from
electrical outlet.
Remove bottom plate, belt and
a
itator following directions in
“?he belts” section.
1. Hold agitator as shown.
Turn end plates in opposite
dr~ex~; untrl
one end plate
.
22
Page 23

2. Pull or pry out end sections
as shown in illustration.
Note: Pulley end should be
removed by pulling straight out.
3. Note position of bar/brush
assemblies to insure correct
replacement.
Pull bar/brush assemblies out
of agitator slots, using pliers if
necessary.
The word “BAR” is stamped
near slots on agitator. Match
bar side of brush with “BAR” on
agitator shell. Push new
brushes all the way into slots,
tapping end lightly if necessary.
4. Line up locator on end
sections with slot on agitator.
Push end sections into position.
Screw on end plates and
tighten.
Note: If bearing should fall out
of end section during disassembly of agitator, reassemble
as shown.
5. Replace belt, agitator and
bottom plate.
END SECTION
23
Page 24

I
If you have a problem
/
This appliance was inspected thoroughly and was in good operat-
;
ing condition when it was shipped from the factory. If a minor
j
problem occurs, it usually can be solved quite easily when the
cause is found. Therefore, this check list is provided for your
convenience.
Problem Possible cause Possible solution
Cleaner
won’t 2. No voltage In wall plug.
TM
Cleaner
won’t
pick up
1. Not firmly plugged in.
3. Blown
breaker.
1. Broken or worn agitator
belt.
2. Agitator brushes worn.
3. Bag full
4.
Obstruction in cleaner.
fuseMpped
5. Bag not opening.
6. Incorrect carpet height
setting.
Cleaning
tools won’t
pick up
Cleaner
won’t
self propel 2. Self Propel control button 2. Slide button to ON.
1. Hose clogged.
1. ‘Power Drive’ belt broken 1. Replace belt.
or worn.
in OFF position.
1. Plug cord in firmly.
2. Check fuse or breaker.
3.
Replace fuse/reset
breaker.
1. Replace belt.
2. Replace brushes.
3. Change paper bag.
4. Clear dirt duct
and/or dirt tube.
5. Check for firm bag
connection.
6. Move nozzle control
lever to type of carpet
being cleaned.
1. Remove hose and tools;
remove obstruction.
Lubrication
The motor is equipped with self-lubricated bearings.
lubricant to the motor; it could cause damage.
The agitator is equipped with two ball bearings that should be
lubricated periodically by a Hoover Factory Service Center or an
Authorized Hoover Warranty Service Dealer (Depot).
Do not
add
24
Page 25

1
Service
If
the problem persists,
I
book under “Vacuum Cleaners - Household” for your nearest
!
I
Hoover Factory Service Center or Authorized Warranty Service
Dealer (Depot)
where approved HOOVER service and genuine
check the Yellow Pages of your telephone
HOOVER replacement parts may be obtained. The warranty
provided with this product has a listing of the Hoover Factory
Service Centers. If you are unable to obtain the information you
need from the Yellow Pages, contact a Hoover Factory Service
Center to find your nearest Authorized Warranty Service Dealer
(Depot). For service under warranty, follow the instructions in the
warranty provided with this product.
Do not
send your cleaner to The Hoover Company in North Canton
for service as this will only result in a delay.
Always identify your cleaner by the
complete
model number when
requesting information or ordering parts. (The model number
appears on the bottom of the cleaner.)
If further assistance is needed, contact
The Hoover Company
Consumer Response Center, North Canton, Ohio 44720,
1-800-9449200.
In Canada, contact Hoover Canada,
Burlington, Ontario
L7R 4A8.
1-800-263-6376
25
Page 26

Energy saving tips
1.
Replace paper bag promptly, before overfilled. Use a genuine
HOOVER bag made for your cleaner.
2.
To maintain effective cleaning, replace agitator brush roll and
belt when necessary.
3. Turn cleaner off when not in use, such as when moving furniture.
4. Keep your cleaner operating at peak performance
tion and service performed by a Hoover Factory Service Center or
an Authorized Hoover Warranty Service Dealer (Depot).
-
have inspec-
26
Page 27

The Hoover Company wants to quickly resolve any
concerns about your cleaner or questions regarding its
use. However,
Company in North Canton for service. This will only
result in a delay.
If you are not completely satisfied
provided with the product for your local Hoover Factory
Service Center or in the Yellow Pages under “Vacuum
Cleaners - Household” for an Authorized Warranty Ser-
vice Dealer nearest you or call:
do not
send your cleaner to The Hoover
look on the list
I -8OOm944m9200
(U.S.
only)
1p
V&f
HOOVER and
THE HOOVER COMPANY, NORTH CANTON, OHIO 44720
R2 6-92
U3721-910/37-910/45-910
0
are registered trademarks
Litho
USA
5651 l-371
 Loading...