

Page 1
USER MANUAL
C
M
Y
CM
MY
CY
CMY
K
®
Page 2
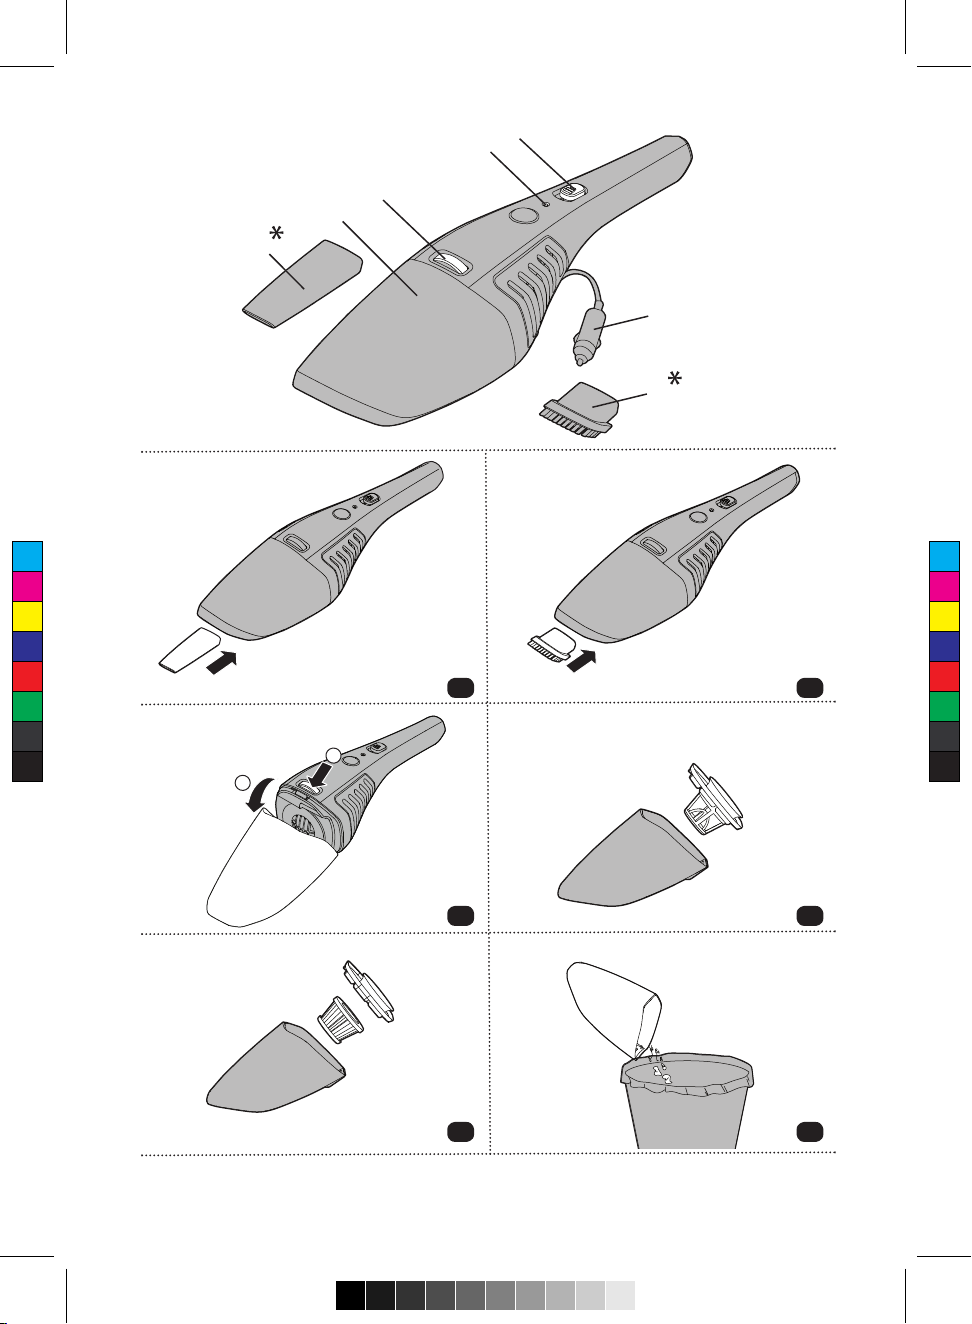
A
B
C
E
D
F
G
C
M
Y
CM
MY
CY
CMY
K
1
2
1* 2*
3 4*
3* 4
*Certain Models only
Page 3

INSTRUCTIONS FOR SAFE USE
This appliance should only be used for domestic cleaning, as
described in this user guide. Please ensure that this guide is
fully understood before operating the appliance.
Always switch o and remove the car plug from the socket
before cleaning the appliance or any maintenance task.
This appliance can be used by children aged from 8 years and
above and persons with reduced physical, sensory or mental
capabilities or lack of experience and knowledge if they have
been given supervision or instruction concerning use of the
appliance in a safe way and understand the hazards involved.
Children shall not play with the appliance. Cleaning and user
C
M
Y
CM
MY
CY
CMY
K
maintenance shall not be made by children without
supervision.
If the power cord or plug is damaged stop using the appliance
immediately. To avoid a safety hazard, an authorised Hoover
service engineer must replace the power cord and plug.
Never touch the appliance with wet hands.
Use only attachments, consumables or spares recommended
or supplied by Hoover.
Do frequently clean the dust bin and lter assembly when
picking up ne powder.
Do not pick up liquids, hard or sharp objects, matches, hot
ashes, cigarette ends or other similar items.
Do not spray with or pick up ammable liquids, cleaning
uids, aerosols or their vapours.
Do not continue to use your appliance if it appears faulty.
Hoover service: To ensure the continued safe and ecient
operation of this appliance we recommend that any servicing
or repairs are only carried out by an authorised Hoover service
engineer.
Do not use the appliance to clean animals or people.
Do not unplug the car plug by pulling on the power cord.
Page 4

Do not use your appliance out of vehicle or on any wet surface
or for wet pickup.
The Car cleaner model does NOT contain batteries and can
only be operated via a car battery rated at 12V D.C. This
model is supplied with a cord tted with a plug only suitable
for insertion into a car cigarette/cigar lighter socket
supplied by the car battery (on some cars this is now
labelled Power Outlet). The red indicator light is On when
the ON/OFF switch is in the On position.
The Environment
The symbol on this appliance indicates that this appliance may not be treated as
household waste. Instead it must be handed over to the applicable collection
point for the recycling of electrical and electronic equipment. Disposal must be
C
M
Y
CM
MY
CY
CMY
K
carried out in accordance with local environmental regulations for waste
disposal. For more detailed information about treatment, recovery and recycling of this
appliance, please contact your local city oce, your household and waste disposal
service or the shop where you purchased the appliance.
This product complies with the European Directives 2014/35/EU, 2014/30/EU
and 2011/65/EU.
CANDY HOOVER GROUP S.r.l. Via Privata Eden Fumagalli, 20861 Brugherio (MB) Italy
Page 5

FEATURES
A. On/o Switch
B. On/o Indicator
C. Dust Container Release Button
D. Crevice Tool*
E. Dust Container
F. Car Plug
G. Dusting Brush*
HOW TO USE
TO USE: Insert Car Plug into Car Supply (DC 12V). Slide the power switch to the ON position. Empty and clean the unit and
lter after each use or when the unit becomes full.
ATTACHMENTS
Crevice Tool*
Fit the crevice tool onto the dust cup to clean corners and hard to reach areas. [1]
Dusting Brush*
Fit the dusting brush onto the dust cup to clean keyboards and other delicate areas. [2]
DUST CONTAINER & FILTER: REMOVAL and REPLACEMENT
IMPORTANT: FOR BEST RESULTS CLEAN THE FILTER AFTER EACH USE
C
M
Y
CM
MY
CY
CMY
K
Depress the release button and remove dust cup assembly. [3]
Hold dust container over waste bin and gently remove lter or HEPA lter*. [4,5]
Empty dust container. Brush the dust and dirt o the Filter* /HEPA lter* or shake the lter inside the waste bin. [6]
The Filter* may be washed in warm soapy water, make sure the Filter* is completely dry before replacing in your cleaner.
The HEPA lter* should be washed in warm water only. Do not use any detergent, make sure the HEPA lter* is completely
dry before replacing in your cleaner.
Replace the lter*/HEPA Filter* into the dust container and re-assemble the dust container to the cleaner
NOTE: Should you experience any diculties in dismantling the unit or for more detailed information about treatment,
recovery and recycling of this product, please contact your local city oce, your household waste disposal service.
YOUR GUARANTEE
The guarantee conditions for this appliance are as dened by our representative in the country in which it is sold. Details
regarding these conditions can be obtained from the dealer from whom the appliance was purchased. The bill of sale or
receipt must be produced when making any claim under the terms of this guarantee.
HOOVER spares and Consumables
Always replace parts with genuine HOOVER spares. These are available from your local HOOVER dealer or direct from
HOOVER. When ordering parts always quote your model number.
Cloth lter - T110 35601348
HEPA Filter - T111 35601349
*Certain Models only
Page 6

C
M
Y
CM
MY
CY
CMY
K
®
PRINTED IN P.R.C
48020783
 Loading...