

Page 1
ENGLISH ➜ pp. 1-14
®
ESPAÑOL ➜ pág. 16-24
™
™
Your HOOVER®Carpet
Cleaner is fully assembled
and
ready to begin cleaning!
SteamVac™ Carpet Cleaner
cleans carpet fibers by applying,
scrubbing and removing hot tap
water and cleaning solution.
www.hoover.com
Page 2
Important Safeguards!
When using an electrical appliance, always follow basic precautions,
including the following:
READ ALL INSTRUCTIONS BEFORE USING APPLIANCE.
WARNING:
o reduce the risk of fire, electric
T
shock, or injury:
• Use indoors only.
• Use only on surfaces moistened
by the cleaning process. Do not
immerse product.
• Connect to a properly grounded
outlet only. See “Grounding
Instructions”.
• Do not clean over floor electrical
outlets.
• Do not use without tanks in place.
• Use extra care when cleaning on
stairs. Do not place carpet cleaner on
stairs.
• Use carpet cleaner only for its
intended use as described in the
instructions.
• Use only attachments recommended by Hoover; others may
cause hazards.
• The use of an extension cord is
not recommended. If an extension
cord is absolutely necessary, use at
least a 16 gauge 3-wire cord which
has a 3-prong grounding type plug
and a 3-pole receptacle that accepts
the machine plug.
• Unplug carpet cleaner when not
in use. Turn off all controls before
unplugging.
• Unplug carpet cleaner before connecting the powered hand tool.
• Always disconnect cord from electrical outlet before servicing the carpet
cleaner.
• Do not unplug by pulling on
cord. To unplug, grasp the plug, not
the cord.
• Never handle plug or appliance
with wet hands.
• Do not pull or carry by cord, use
cord as a handle, close door on cord
or pull cord around sharp edges or
corners. Do not run appliance over
cord. Keep cord away from heated
surfaces.
• Do not use with damaged cord or
plug. If appliance is not working as
Save these instructions!
2
it should, has been dropped, damaged, left outdoors, or dropped into
water, take it to a Hoover Sales &
Service Center or Authorized
Hoover Warranty Service Dealer.
• Close supervision is necessary
when any appliance is used by or
near children. Do not allow carpet
cleaner to be used as a toy or to run
unattended at any time.
• Do not point tools toward people
or pets.
• Use only commercially available
Hoover SteamVac™ cleaners
intended for machine application.
Do not use any type of wax with
carpet cleaner.
• Keep detergents and other cleaners out of children's reach.
• Do not use to pick up flammable
or combustible liquids such as
gasoline or use in areas where they
may be present.
• Do not pick up chlorine bleach,
drain cleaner, gasoline or any other
toxic material with this appliance.
• Do not pick up anything that is
burning or smoking, such as cigarettes, matches, or hot ashes.
• Avoid picking up hard, sharp
objects with the carpet cleaner.
They may damage the machine.
Keep hair, loose clothing, fingers,
•
feet and all parts of body away
from openings and moving parts.
Do not put any object into open-
•
ings. Do not use with any opening
blocked; keep free of dust, lint,
hair, and anything that may reduce
air flow.
• To help prevent matting and
resoiling, avoid contact with carpets
until they are dry. Keep children
and pets away from carpets until
they are completely dry.
• Store in a dry place. Do not expose machine to freezing temperatures.
Grounding
Instructions
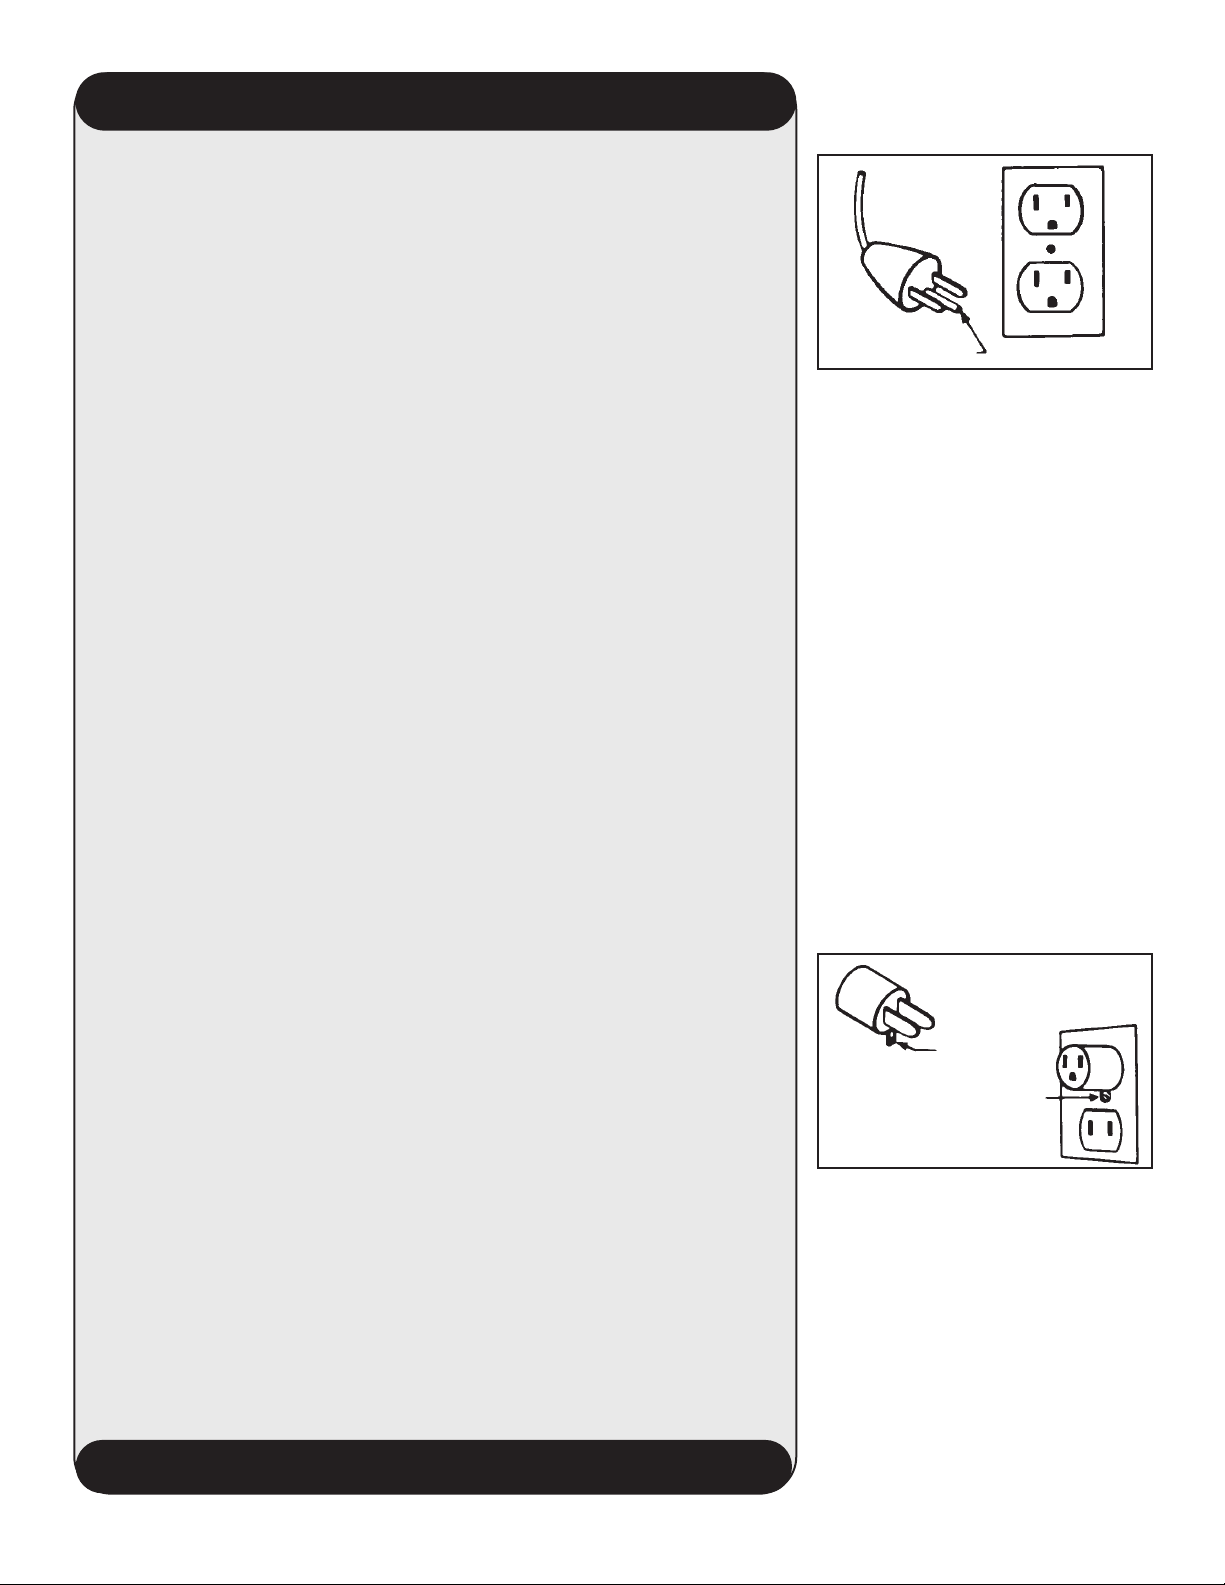
A
This appliance must be grounded. If it
should malfunction or breakdown,
grounding provides a path of least resistance for electrical current to reduce the
risk of electric shock. This appliance is
equipped with a cord having an equipment-grounding conductor (C) and
grounding plug (A). The plug must be
plugged into an appropriate outlet (B)
that is properly installed and grounded
in accordance with all local codes and
ordinances.
B
C
DANGER-
Improper connection of the equipmentgrounding conductor can result in the
risk of electric shock. Check with a qualified electrician or service person if you
are in doubt as to whether the outlet is
properly grounded. Do not modify the
plug provided with the appliance - if it
will not fit the outlet, have a proper outlet installed by a qualified electrician.
This appliance is for use on a nominal
120 volt circuit and has a grounding
plug that looks like the plug illustrated
in sketch (A).
D
A
temporary adapter (D) may be used to
connect this plug to a 2-pole receptacle
(E) if a properly grounded outlet is not
available. The temporary adapter should
be used only until a properly grounded
outlet (B) can be installed by a qualified
electrician. The green colored rigid ear,
lug, or the like (F) extending fr
adapter must be connected to a perma
nent ground (G) such as a properly
grounded outlet box cover. Whenever
the adapter is used, it must be held in
place by a metal screw.
Canada, the use of a temporary adapter
is not permitted by the Canadian
Electrical Code.
F
G
E
om the
-
NOTE: In
Page 3
To contact us:
Contents
• www.hoover.com
• 1-800-944-9200 - automated service
dealer locator
• 1-330-499-9499 - our Consumer
Response Center (8 AM to 5 PM
Monday - Friday)
Fill in and Save
For your records, enter the model number and
serial numbers in the spaces provided. These
numbers are located on the data label on the back
of the cleaner.
Model No. ____________________________
Serial No. _____________________________
Save your sales receipt and attach it to this
manual. Proof of date of purchase may be
required for warranty service of your cleaner.
Important safeguards . . . . . . . . 2
Carton contents . . . . . . . . . . . . . . 3
Cleaner description. . . . . . . . . . . 4
Carpet cleaner basics . . . . . . . . . 5
Filling the tank . . . . . . . . . . . . . 5
Emptying the recovery tank. . 6
Attaching the hose . . . . . . . . . 7
Selecting & attaching tool . . . 7
Draining & storing hose. . . . . 8
Cleaning carpet . . . . . . . . . . 10-11
Cleaning upholstery . . . . . . 11-12
Basic steps for cleaning . . . . . . 13
Warranty . . . . . . . . . . . . . . . . . . . 14
Parts & accessories mail order
form. . . . . . . . . . . . . . . . . . . . . . . 25
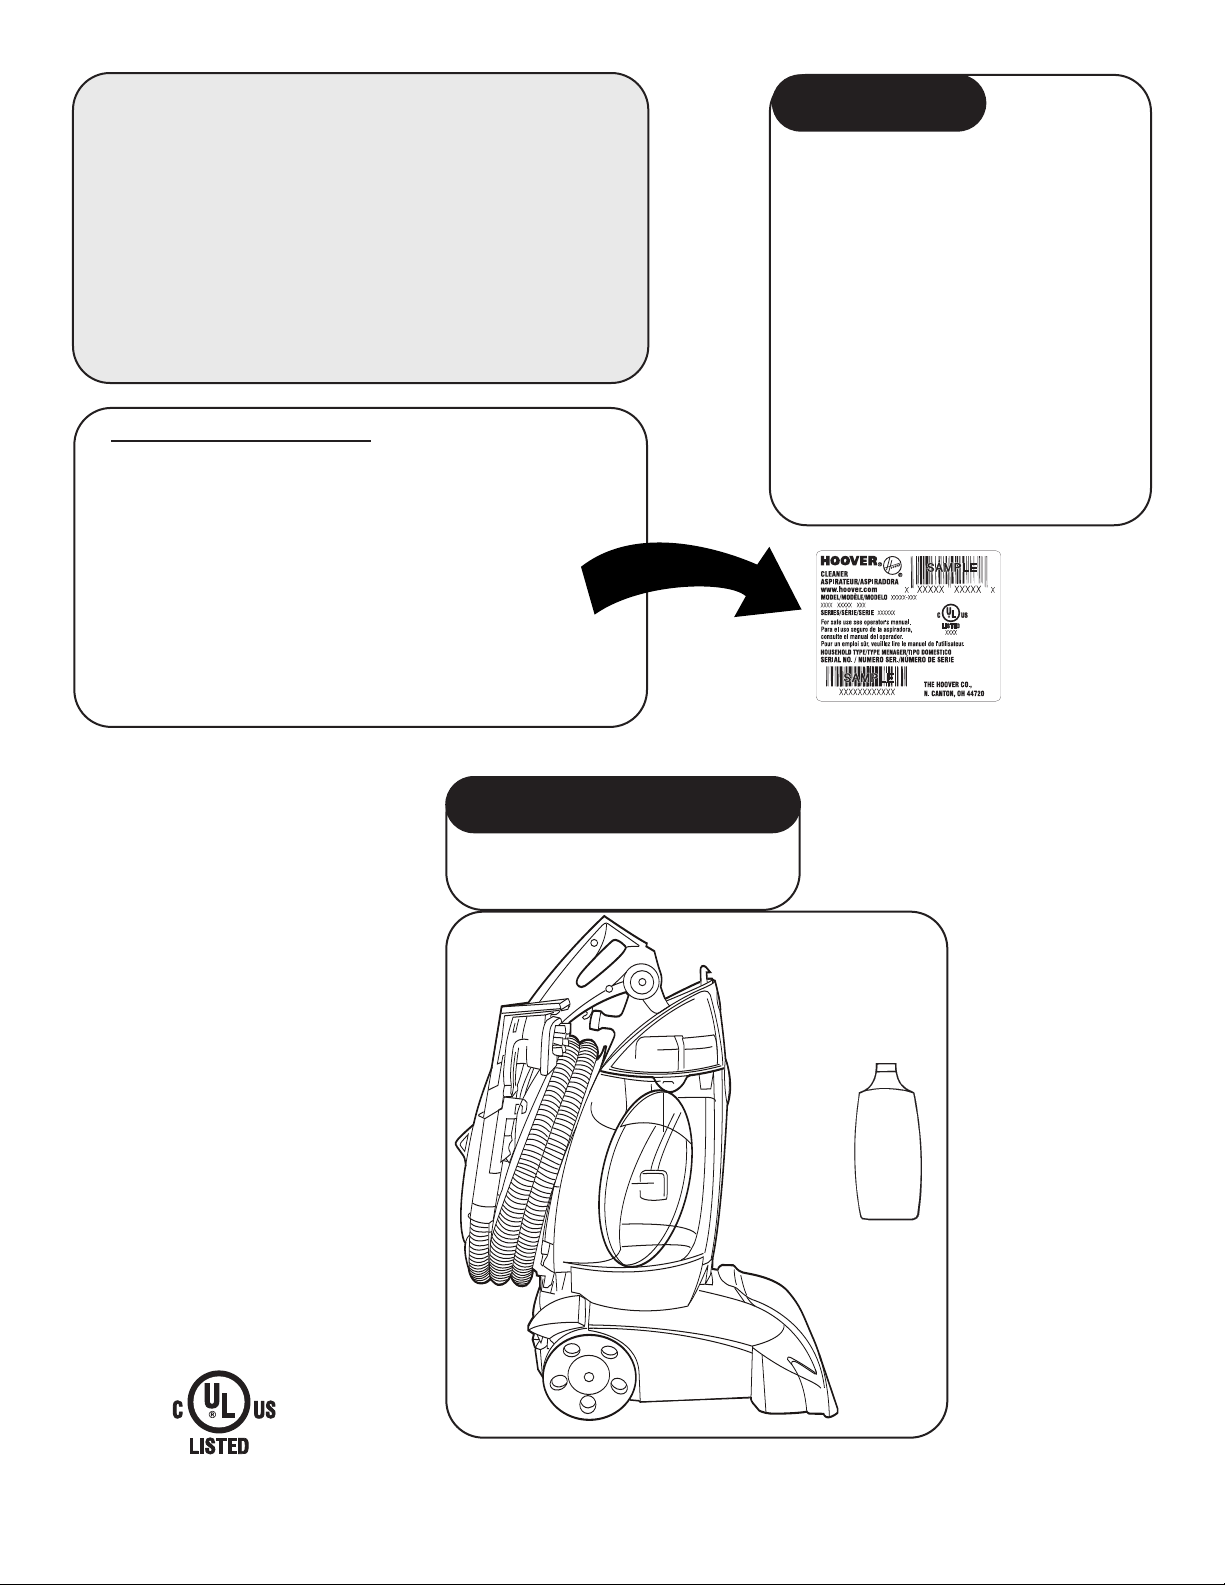
Carton Contents
A.Carpet cleaner
B. Hoover Detergent
B
The Hoover Company
2006
©
.hoover
www
.com
A
Continued
➜
3
Page 4
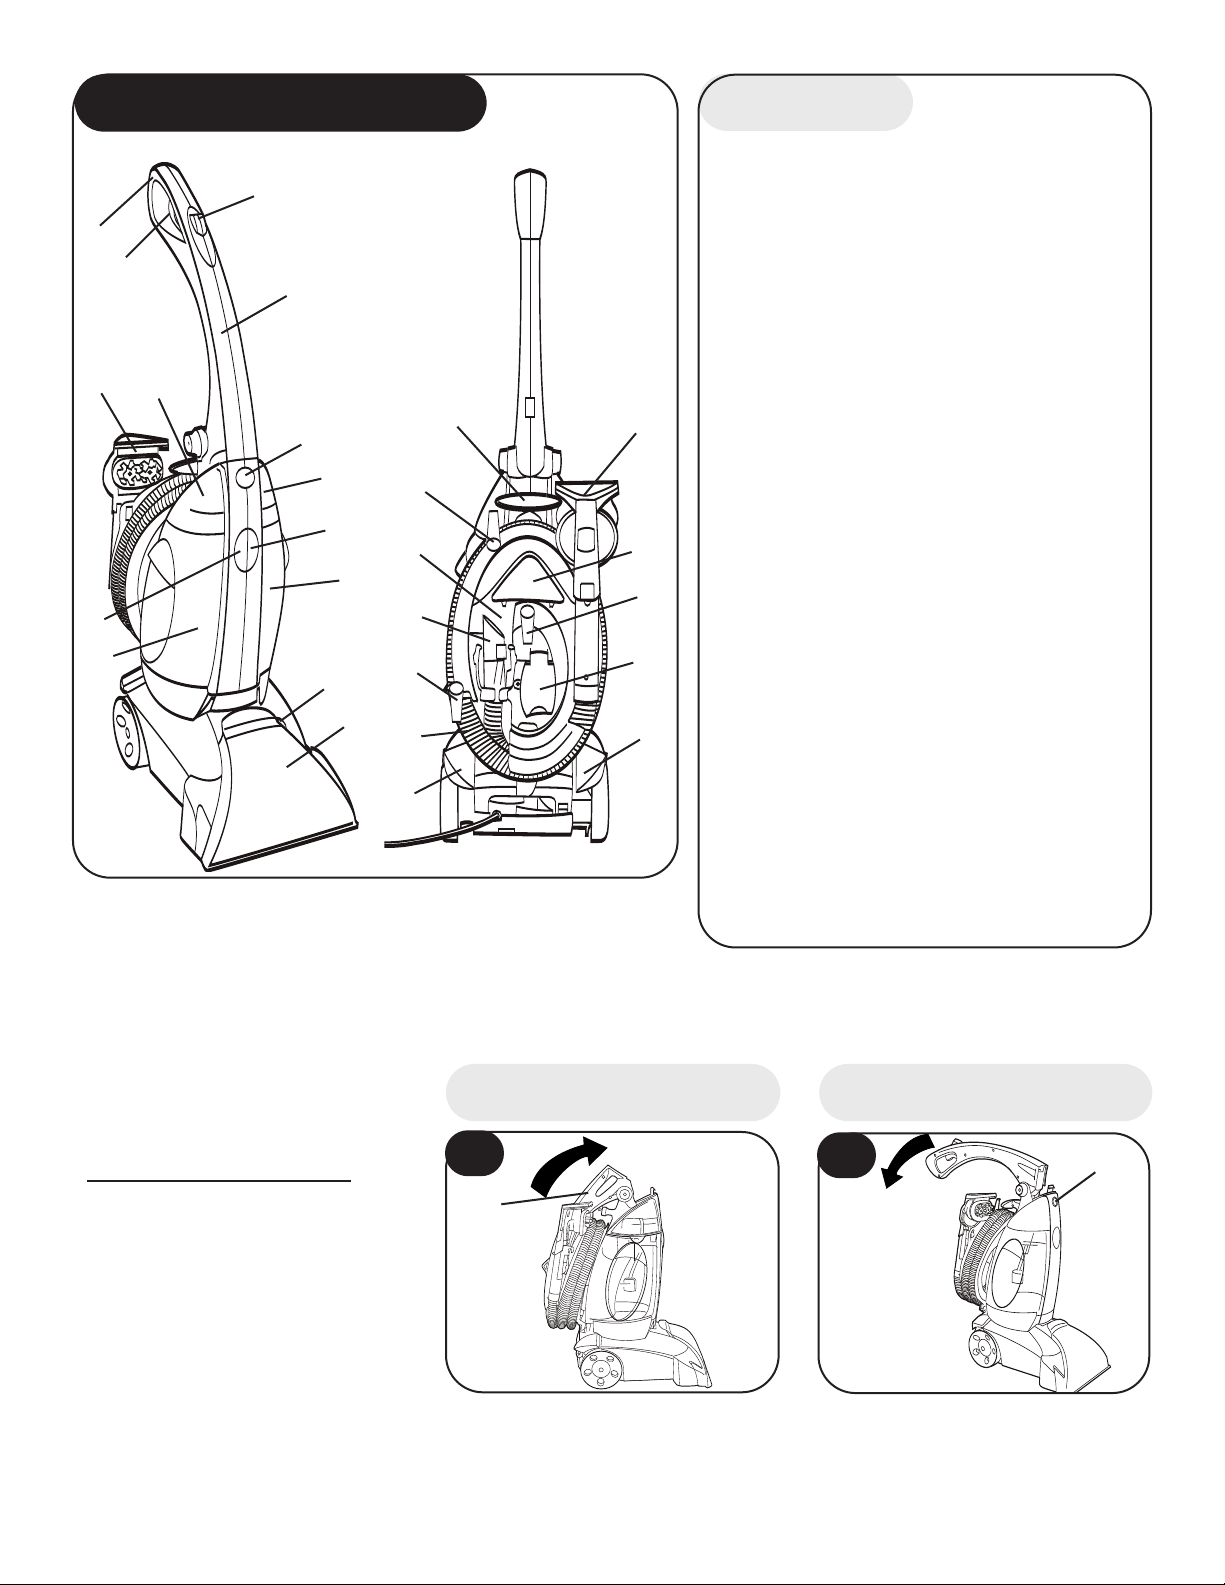
Cleaner Description
3
1
2
4
13
12
14
5
6
7
8
11
9
10
23
22
21
20
21
16
13
15
16
17
18
Features
1. Hand grip
2. Solution trigger: press to release
cleaning solution
3. Clean Surge™ button
4. Upper handle
5. Upper handle release button
6. Solution tank cap/measuring cup
7. Solution tank release button
8. Solution tank
9. Brush setting selector
10. Nozzle
11. Recovery tank
12. Recovery tank release button
13. Powered hand tool
14. Recovery tank cap
15. Stair/upholstery nozzle
16. Cord hooks (tool caddy removed)
17. Hose door
18. Handle release pedal
19. ON/OFF pedal
20. Hose
21. Cord hooks (tool caddy stored on
cleaner)
22. Hose connector
23. Tool caddy
19
Your HOOVER
®
Carpet Cleaner is
fully assembled and
ready to begin
cleaning!
This carpet cleaner is intended for
household use.
Operate carpet cleaner only at voltage
specified on data plate on back of
cleaner. Plug carpet cleaner into a prop-
erly grounded outlet.
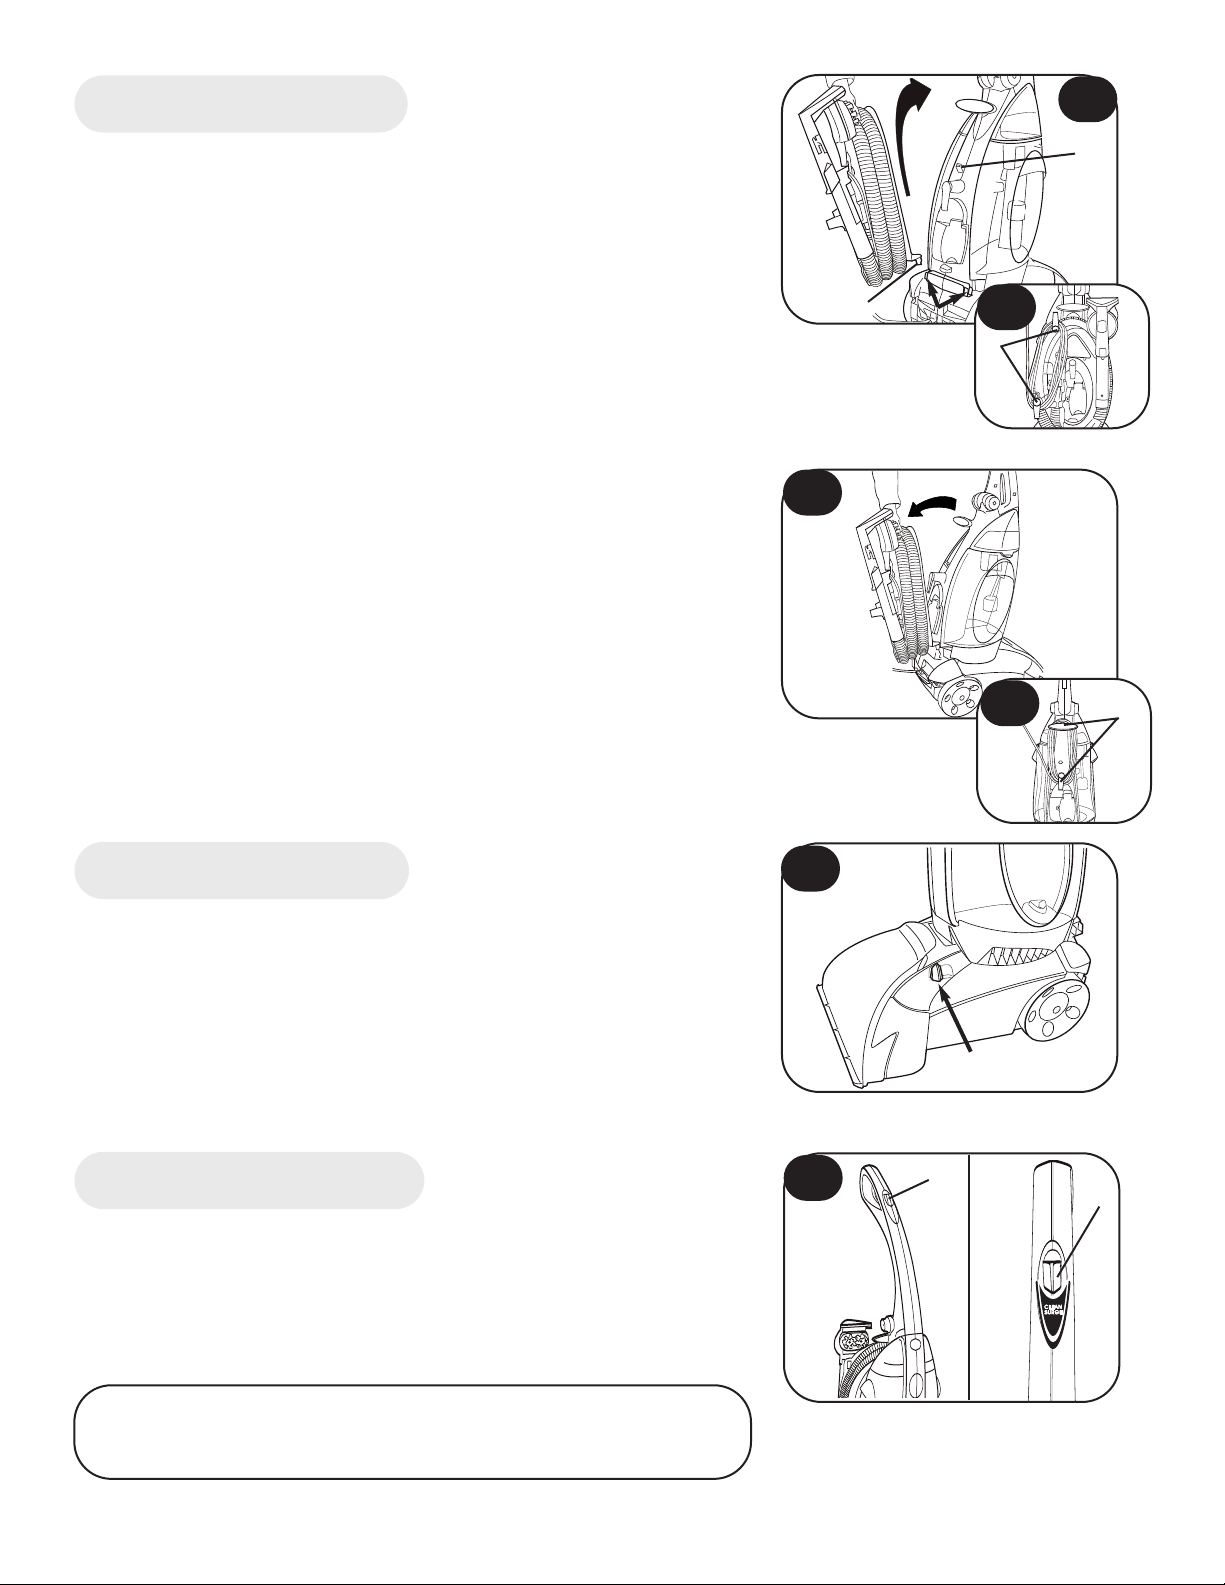
How to fold handleUnfold handle
1
A
2
B
Raise upper handle (A) to
upright position until it
locks in place.
4
Press upper handle release
button (B) to fold handle.
Page 5
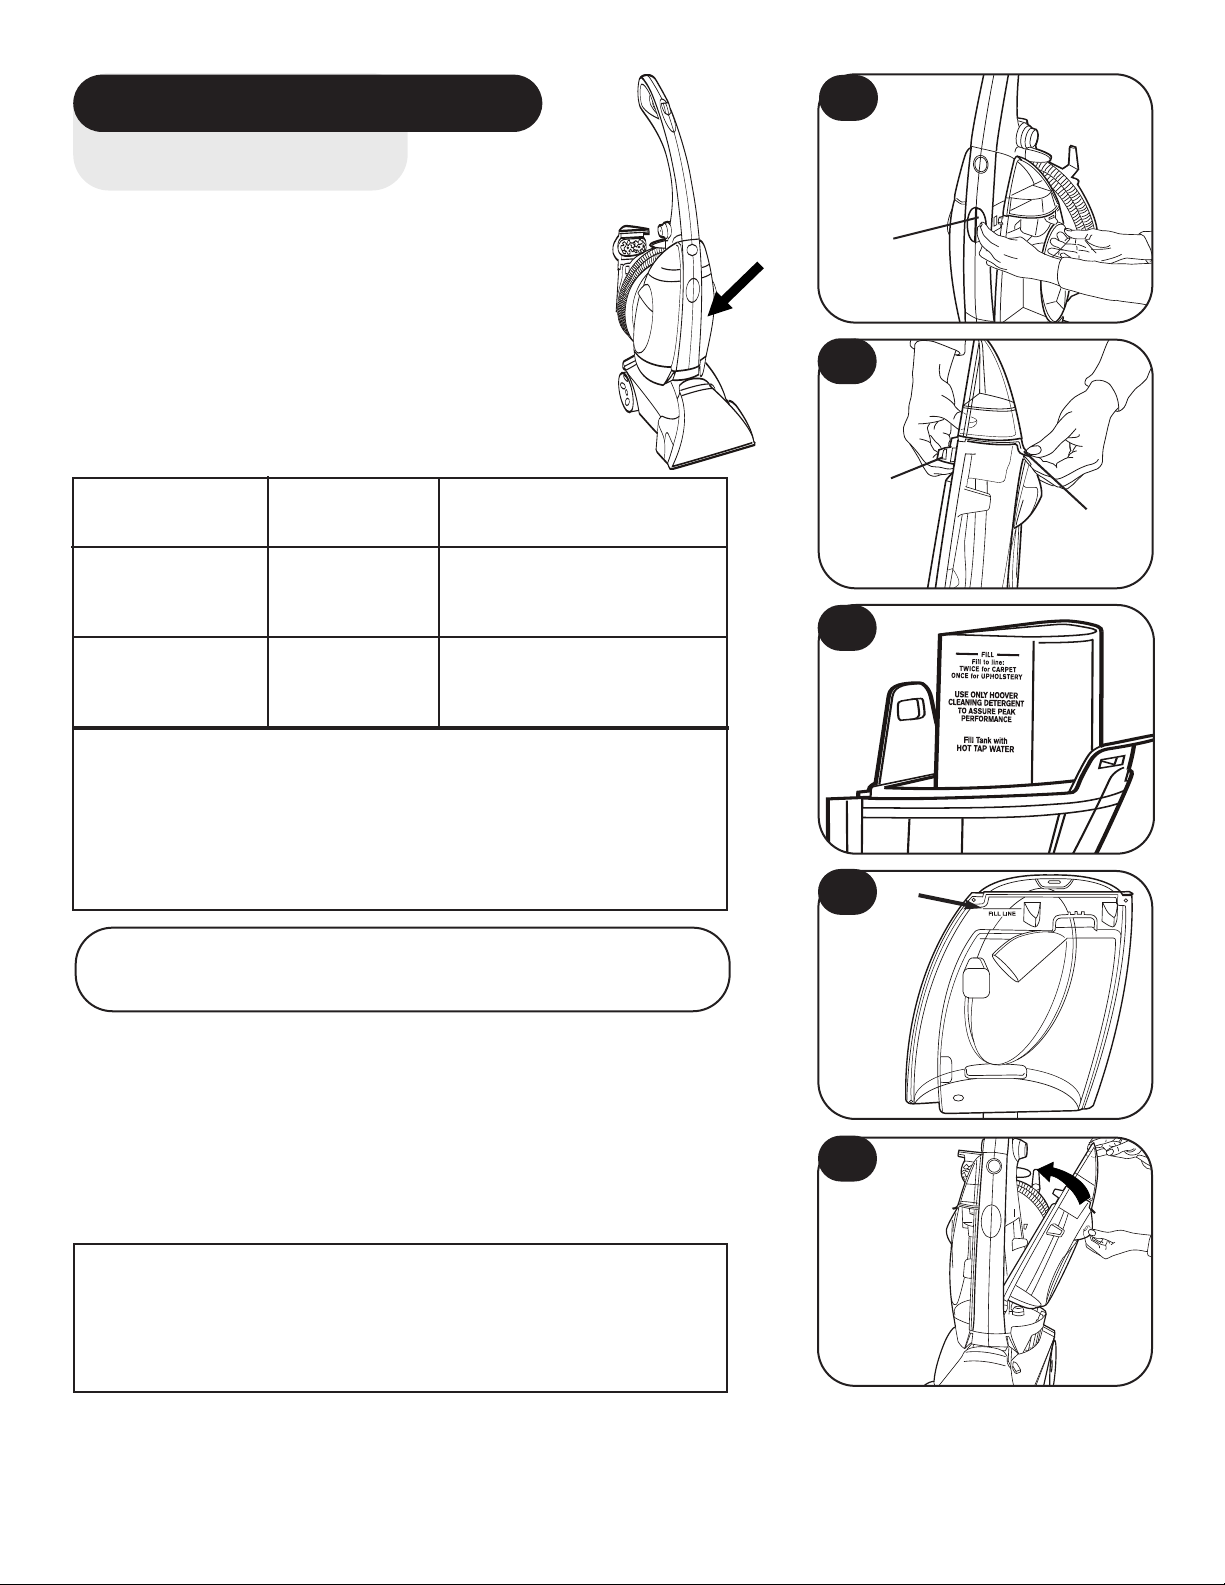
Carpet Cleaner Basics
Fill the solution tank
Unplug carpet cleaner from
electrical outlet.
✓✓
Press button (A) and remove solution
tank (Fig. 3)
✓✓
Release latches (B) on tank cap and
remove (Fig. 4)
✓✓
Use cap (Fig. 5) on solution tank to measure the proper amount of HOOVER
detergent according to the chart below:
3
A
4
Amount of
Surface detergent Type of detergent
Carpet two HOOVER Carpet/
caps Upholstery Detergent
Upholstery one HOOVER Carpet/
cap
For heavy traffic areas: Pre-treat with HOOVER Spot
and Stain Spray (available at additional cost if not
included with your model)
OR
Use 4 caps of Carpet/Upholstery detergent.
NOTE: For best results, use only Hoover detergents.
They are specifically formulated for use with your
SteamVac™ Carpet Cleaner.
✓✓
Pour detergent into tank
Upholstery Detergent
B
B
5
6
C
✓✓
Fill tank to fill line (C) (approx. 1 gallon) with hot tap water
(Fig. 6)
✓✓
Replace cap. Secure both latches (B) (Fig. 4)
✓✓
Place bottom of tank onto cleaner. Pivot top of tank and
snap in place (Fig. 7)
Caution: Detergents contain Anionic and Nonionic
Surfactants. Avoid contact with the eyes and skin. In case
of contact with eyes, flush with cold water for 15 minutes.
In case of contact with skin, wash with water. If irritation
persists, call a physician.
7
Continued
➜
5
Page 6
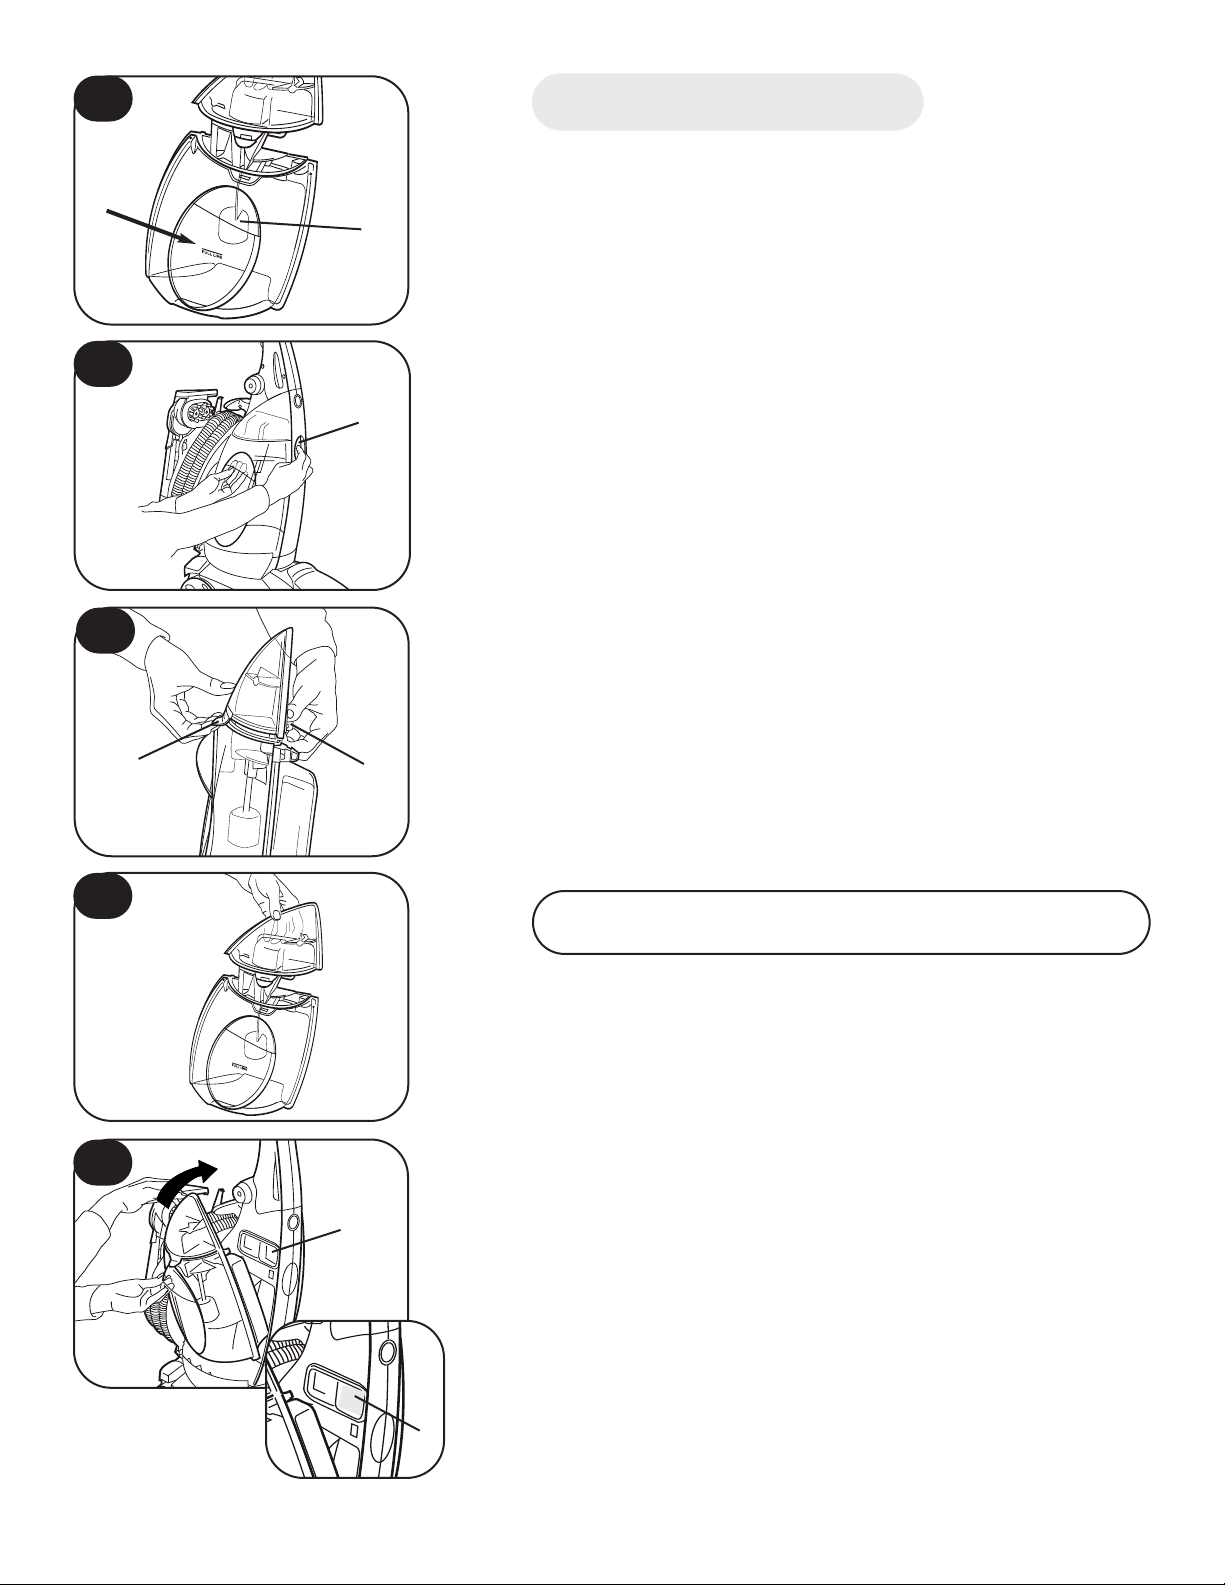
8
Empty the recovery tank
Unplug carpet cleaner from electrical outlet.
A
9
10
D
B
C
D
✓ An automatic shut-off device prevents the cleaner
from picking up more dirty water than it can hold in
the recovery tank.
You will know the tank needs to be emptied --
• The amount of dirty water has reached the full line
(A).
• When the motor sound rises in pitch.
• You do not see dirty solution coming up through
the nozzle.
• The float (B) inside the recovery tank has risen to
the top of the tank (Fig. 8).
✓ Press button (C) and remove tank (Fig. 9).
✓ Release latches (D) on tank cap and remove cap (Fig.
10).
✓ Empty tank.
11
12
✓ Replace cap (Fig. 11). Secure both latches (D) (Fig. 10).
For full suction, it is important that the recovery
tank cap is properly secured before cleaning.
✓ Remove any debris that has collected on lint filter (E)
on cleaner body (Fig. 12 and inset).
✓ Place bottom of tank onto cleaner. Pivot top of tank
and snap in place (Fig. 12).
E
E
6
Page 7
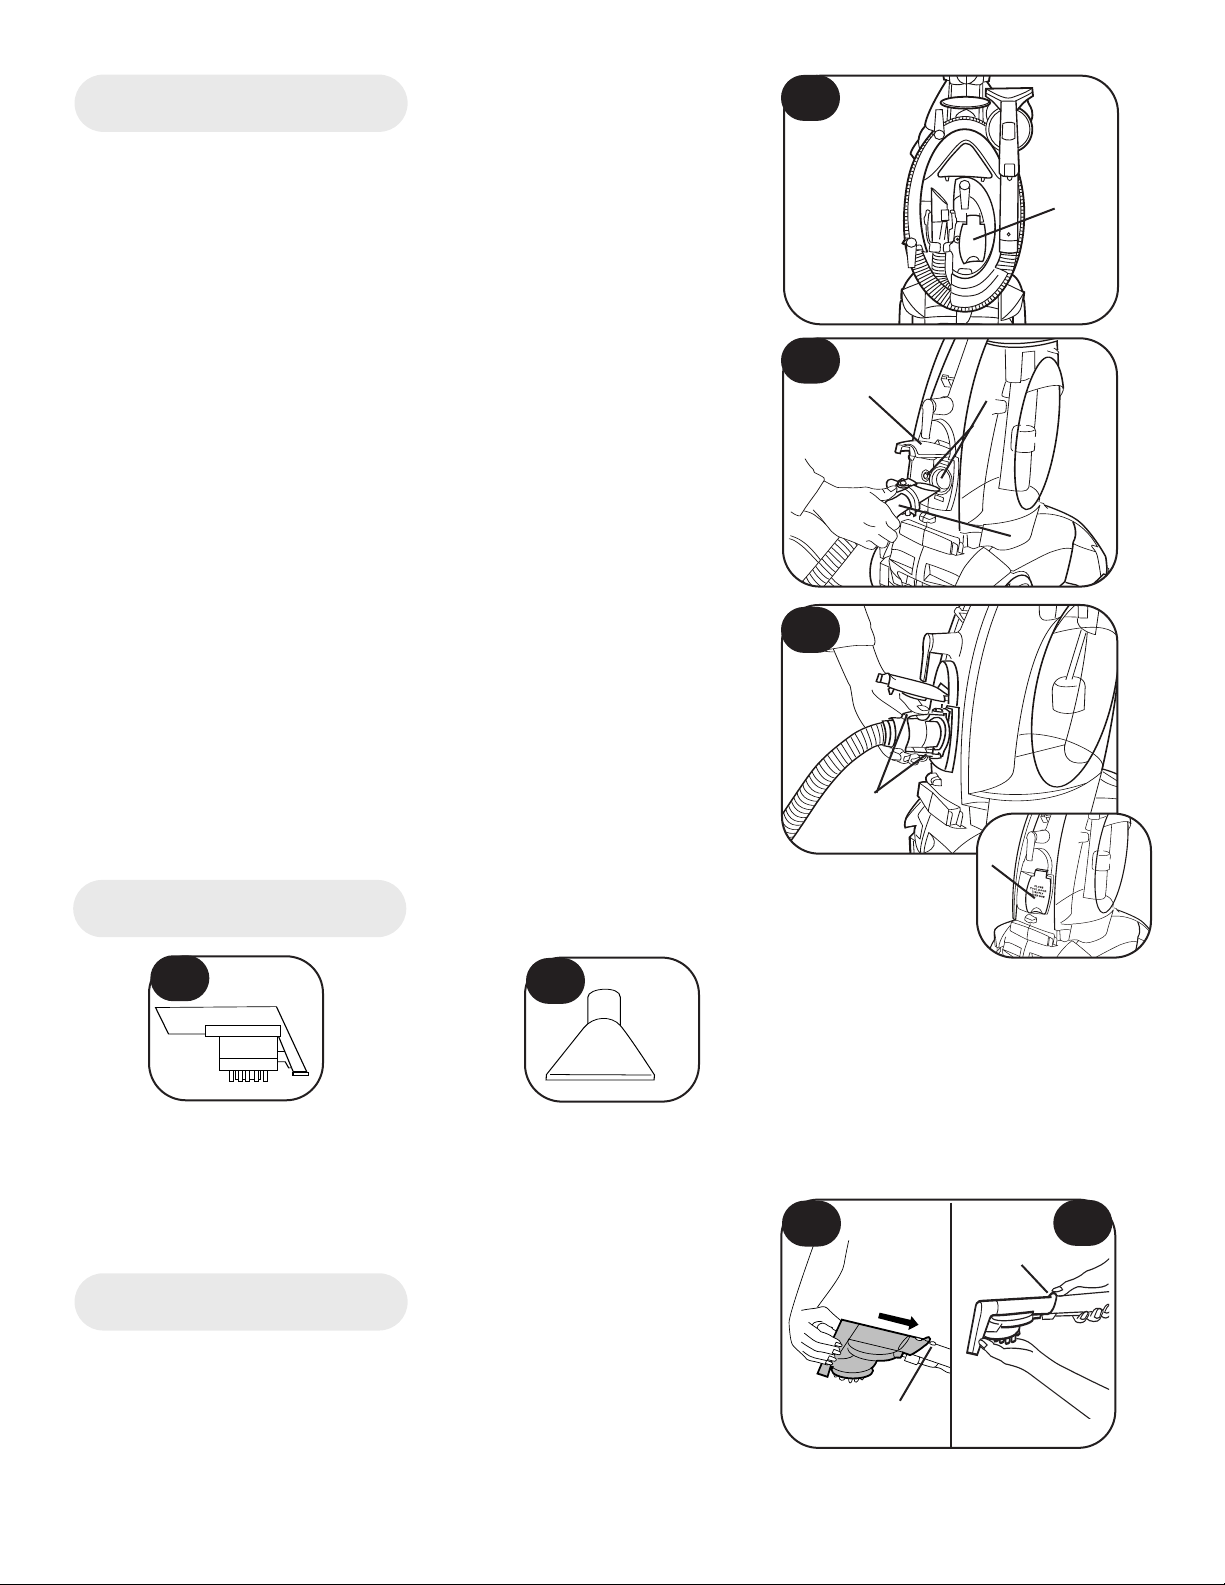
Attach the hose
Unplug carpet cleaner from electrical outlet.
13
✓ Place handle in upright position.
✓ The hose and tool caddy can be removed from the
cleaner if you desire.
✓ Remove hose from tool caddy.
✓ Open hose door (A) on back of carpet cleaner (Fig. 13).
✓ Align hose connector with hose and solution ports (C)
(Fig. 14).
✓ Push hose into port and lock in place.
✓ To remove hose: Squeeze latches (D) on top and bottom
of hose. Remove hose from port (Fig. 15).
✓ Close hose door (A) tightly (inset).
14
15
A
A
C
B
Select tool
16
SpinScrub™ hand tool
• Rotating brushes
• Use on carpet to clean
spots, small areas or
stairs
Stair/Upholstery nozzle
• Built-in brush
• Use on upholstery
17
Attach tool
Unplug carpet cleaner from electrical outlet.
18
D
A
19
F
✓ Slide tool onto hose. Snap tool over tab (E) on hose (Fig 18).
✓ To remove tool: Push forward and up on latch (F) (Fig. 19).
Slide tool off hose.
E
Continued
➜
7
Page 8
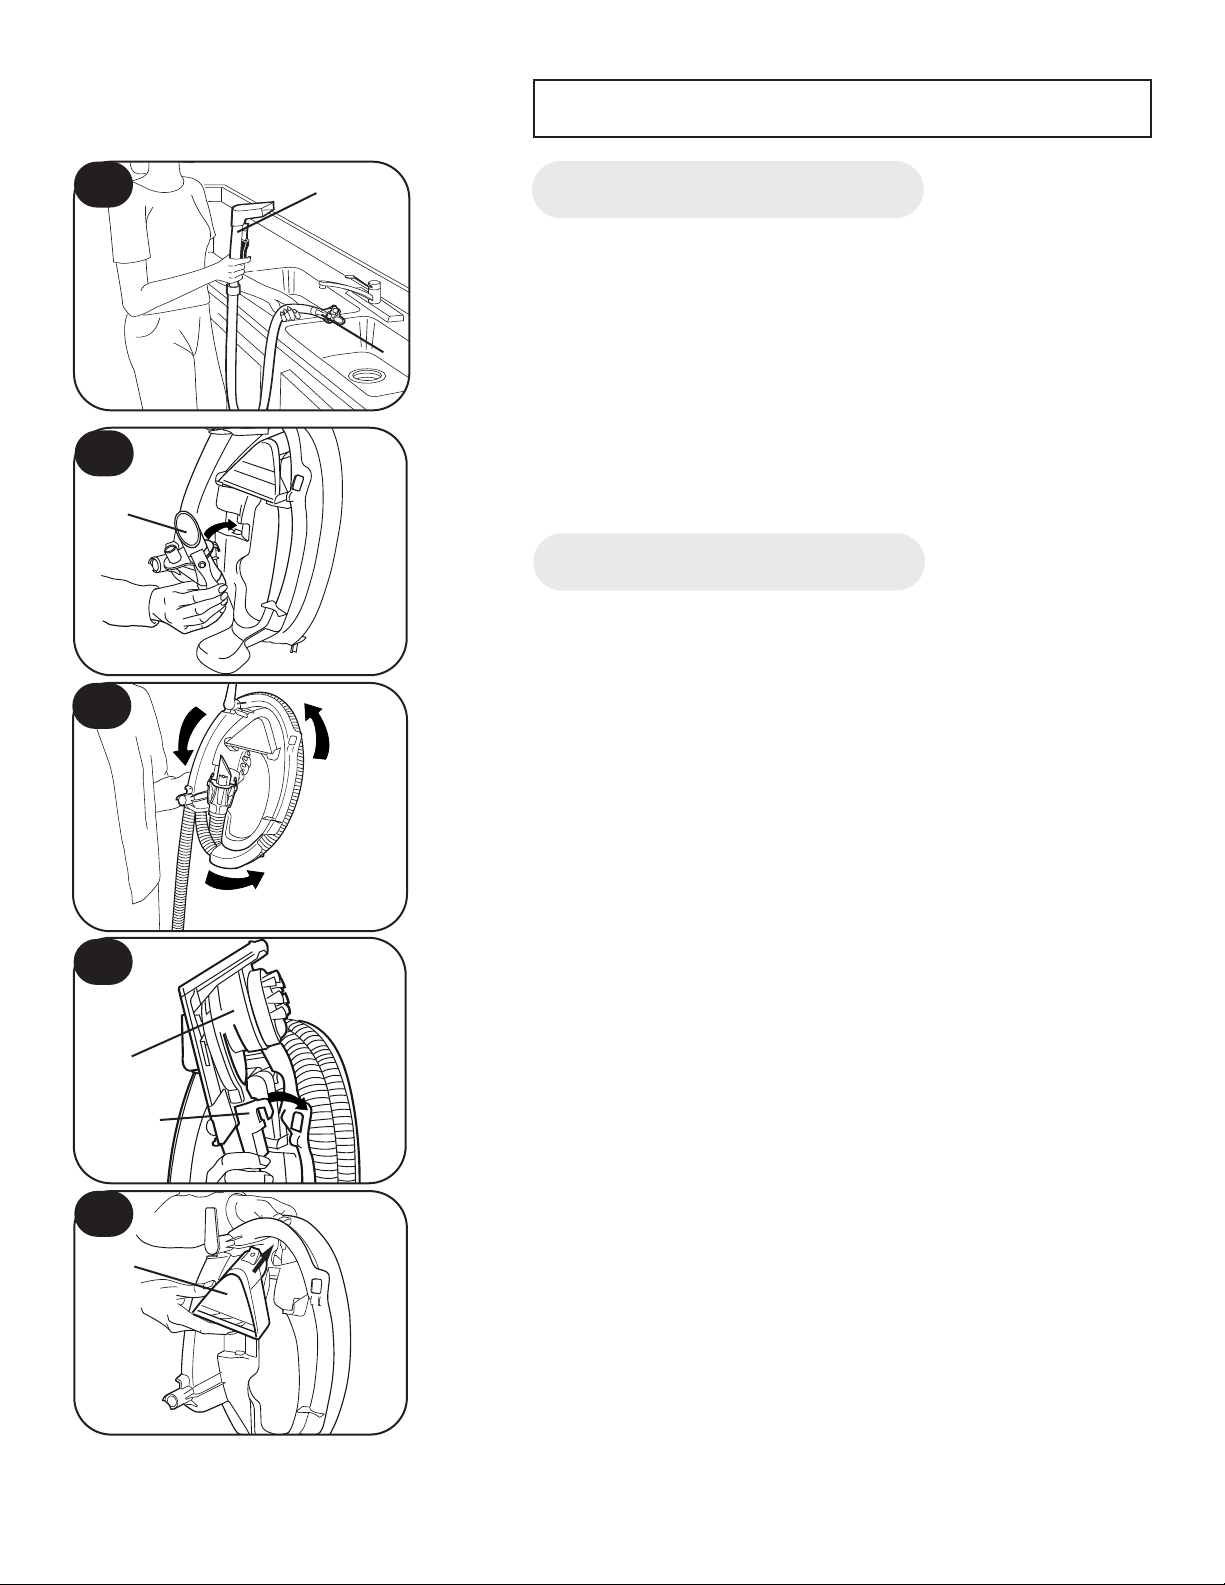
The handle must be in the upright position in order to
get cleaning solution through the hose.
20
21
22
C
A
B
Drain the hose
When finished using the hose and tool, remove water
from the hose.
✓ Turn carpet cleaner on and hold end of hose up for
several seconds (A). Do not press trigger. (Fig. 20)
✓ Turn carpet cleaner off and unplug it.
✓ Hold hose connector in sink and press trigger to
remove solution from hose (B) (Fig. 20).
Store hose
Unplug carpet cleaner from electrical outlet.
➤ Hook hose connector (C) into caddy (Fig. 21).
➤ Wrap hose around caddy in a counterclockwise
direction (Fig. 22).
23
24
➤ Hook tool connector (D) and SpinScrub™ tool (E)
onto caddy (Fig. 23).
➤ Snap upholstery tool (F) into caddy (Fig. 24).
E
D
F
8
Page 9
Hose caddy
25
You can either store the hose caddy on the cleaner or remove it
to store separately.
To store caddy on the cleaner:
➤ Slide tabs (G) on caddy into slots on back of cleaner (Fig.
25).
➤ Hook top of caddy to cleaner (H).
➤ Wrap cord around cord hooks (I) on caddy (Fig. 26). Rotate
top hook to release cord.
To remove caddy from the cleaner:
➤ Lift caddy off cleaner (Fig. 27).
➤ Wrap cord around cord hooks (J) on back of cleaner (Fig.
28). Rotate bottom hook to release cord.
27
G
H
26
I
28
J
Brush speed selector
Choose ON for normal cleaning of carpet.
Choose
OFF when brushing is not desired.
Clean Surge™ button
Push Clean Surge™ button (K) to release extra cleaning solution.
Use the Clean Surge™ button when cleaning heavily soiled areas
of carpet (traf
No cleaning solution removes all stains fr
Stain removal varies with the type of spill, time passed before
removal, carpet material, and carpet type.
fic areas, spots, etc.)
om all carpets.
29
30
K
K
Continued
➜
9
Page 10

Cleaning carpet
Remove lightweight furniture (tables, lamps, etc.) from area to be cleaned.
1
Protect any remaining furniture by pinning up furniture skirts and placing
aluminum foil or plastic under legs.
31
32
33
Vacuum carpet thoroughly to remove loose dirt, hair, lint and other debris
2
(Fig. 31).
Test detergent for colorfastness on a hidden area of carpet.
3
Wet a white cloth or paper towel with some detergent. Gently rub onto a
hidden area of carpet. Wait ten minutes. Blot with white cloth or paper towel
and check for color transfer.
Pretreat spots, stains and high traffic areas with HOOVER Spot and Stain
4
Spray (Fig. 32).
Spray spot or area with Spot and Stain Spray. Then proceed with the next
cleaning steps.
For stubborn spots or stains, refer to the stain guide included with your
cleaner.
Fill solution tank
5
detergent (see page 5) (Fig. 33).
Use only HOOVER brand detergents in your carpet cleaner. Other brands
may damage the carpet cleaner.
Plan your cleaning to avoid walking on wet carpet.
6
room farthest from the exit and work in small sections (Fig. 34).
with hot tap water and proper amount of HOOVER
Start at the end of the
B
34
35
Start
Exit
A
7
8
9
10
11
12
Step on handle release pedal and lower handle. Turn cleaner ON.
Squeeze and hold trigger (A) to release cleaning solution (Fig. 35). Push
cleaner forward SLOWLY then pull it back SLOWLY.
Use Clean Surge™ button (B) in heavily soiled areas (Fig. 35).
Let go of trigger and push cleaner over same area to pick up dirty solution
without putting down more solution. Continue using dry strokes until you
see only a little solution coming up thr
Do not make the carpet too wet! Use no mor
backward strokes while releasing solution. Always follow with dry strokes the more the better.
Listen carefully! When the motor sound changes (rises in pitch), the recovery
tank needs to be emptied.
When water has reached the full line in the recovery tank, the cleaner will
NOT pick up dirty solution.
void walking on the carpet until it is dry
.
Allow carpet to dry
Increased air circulation (open doors, turn on fans, etc.) will help carpet dry
oughly to pr
thor
A
event the gr
owth of
ough the nozzle (fr
e than two sets of forwar
mold or mildew
ont of cleaner).
d and
.
.
10
13
Vacuum thoroughly after carpet has dried. This will reduce any shading left
ushes.
by the carpet cleaner
’s br
Page 11

Cleaning upholstery
TH
E
UPH
OL
S
TER
Y
C
OM
P
A
NY
L
I
C
ENS
E
N
UM
B
ER
:
S
T
A
M
P
H
ER
E
A
L
L
NEW
M
A
TER
I
A
L
UND
ER
PEN
A
L
TY
OF
L
A
W
W
C
1
heck fabric cleaning code (Fig. 36).Look on the furniture manufacturer’s
tag for a ‘W’ or ‘WS’ code. These codes indicate that it is alright to use your
carpet cleaner to clean the upholstery.
Do not use the carpet cleaner on upholstery marked ‘S’, ‘X’ or ‘Dry Clean
Only’.
36
Vacuum upholstery thoroughly with your vacuum cleaner’s attachments.
2
Test detergent for colorfastness on a hidden area of upholstery.
3
Wet a white cloth or paper towel with some detergent. Gently rub onto a
hidden area of upholstery. Wait ten minutes. Blot with white cloth or paper
towel and check for color transfer.
Pretreat spots and stains with HOOVER Spot and Stain Spray (Fig. 37).
4
Spray spot or ar
ea with Spot and Stain Spray. Then proceed with the next
cleaning steps.
For stubborn spots or stains, refer to the stain guide included with your
cleaner.
Fill solution tank
5
gent (see page 5)(Fig. 38).
with hot tap water and proper amount of HOOVER deter
Use only HOOVER brand detergents in your carpet cleaner. Other brands
may damage the carpet cleaner.
Attach hose and tool
as described in Figs. 13-19 (Fig. 39).
6
Place handle in full upright position. Turn cleaner ON.
7
37
38
-
39
8
9
10
11
12
Squeeze and hold trigger (A)
to release cleaning solution.
Gently pr
into fabric and slowly pull the tool over the fabric (Fig. 40).
Let go of trigger and pull tool over same area to pick up dirty solution without putting down more solution. Continue using dry strokes until you see
only a little solution coming up through the tool.
Do not make the upholstery too wet! Use no more than two strokes while
releasing solution. Always follow with dry strokes - the more the better.
Listen carefully! When the motor sound changes (rises in pitch), the recovery
tank needs to be emptied.
When water has reached the full line in the recovery tank, the cleaner will
NOT pick up dirty solution.
Allow upholstery to dry
void using upholstery until it is dry
.
A
.
Increased air circulation (open doors, turn on fans, etc.) will help upholstery
dry thoroughly to prevent the growth of mold or mildew.
ess tool
A
Continued
➜
40
11
Page 12

41
A
Routine care for your Carpet Cleaner
Clean the nozzle
Unplug carpet cleaner from electrical outlet.
➤ Remove solution and recovery tanks to prevent possible leaks.
➤ Lift up on top of nozzle (A) and slide off cleaner (Fig. 41).
42
43
44
➤ Wipe debris off nozzle and front of cleaner with a damp cloth.
B
➤ Tilt cleaner back, raising front of cleaner off floor. Slide nozzle
(B) up from bottom of cleaner (Fig. 42).
➤ Press on upper portion of nozzle to snap in place.
Clean the brushes
Unplug carpet cleaner from electrical outlet.
➤ Remove solution and recovery tanks to prevent possible leaks.
➤ Tilt cleaner back so handle rests on the floor.
➤ Pull brush assembly firmly to r
➤ Rinse brushes under running water.
D
E
F
➤ Align posts (C) on brush assembly with slots (D) in cleaner
(Fig. 44).
emove (Fig. 43).
12
45
C
G
➤ Turn br
(F) in cleaner (Fig. 44).
➤ Press brush assembly firmly and snap in place.
ushes slightly to align square post (E) with square hole
Clean the brush filter
Unplug carpet cleaner from electrical outlet.
➤ Remove solution and recovery tanks to prevent possible
leaks.
➤ Tilt cleaner back so handle rests on the floor.
➤ Squeeze filter frame (G) and pull it out until it stops (Fig. 45).
➤ Wipe debris off filter.
➤ Slide filter back into place.
Page 13

Storing your Carpet Cleaner
✓ Empty solution tank and rinse thoroughly.
✓ Place empty solution tank on carpet cleaner. Turn carpet cleaner ON. Squeeze trigger and push
carpet cleaner forward and back several times. This will clear any solution remaining inside the
cleaner.
✓ Empty recovery tank, rinse thoroughly and let air dry.
✓ Allow brushes and underside of carpet cleaner to air dry thoroughly before storing carpet
cleaner on a carpeted or wood surface.
Lubrication
The motor is equipped with bearings which contain sufficient lubrication for the life of the motor.
The addition of lubricant could cause damage. Do not add lubricant to motor bearings.
Service
To obtain approved HOOVER service and genuine HOOVER parts, locate the nearest Hoover Sales
and Service Center or Authorized Hoover Warranty Service Dealer (Depot) by:
✓ Checking the Service Section of Hoover on-line at www.hoover.com OR
✓ Checking the list of Sales and Service Centers provided with this cleaner OR
✓ Checking the Yellow Pages under “Vacuum Cleaners - Household” OR
✓ Calling 1-800-944-9200 for an automated referral of authorized service outlet locations
(U.S. only)
Do not send your cleaner to Hoover in North Canton for service; this will only result in delay.
If further assistance is needed, contact the Consumer Response Center, Phone: 330-499-9499.
In Canada, contact Hoover Canada, Burlington, Ontario L7R 4A8, Phone: 1-800-263-6376.
Always identify your cleaner by the complete model number when requesting information or order-
ing parts. (The model number appears on the back of the cleaner.)
Continued
➜
13
Page 14

Troubleshooting
Use the list below to help solve minor problems.
What’s the What to do
problem?
Carpet cleaner won’t run ✓ Make sure the cleaner is
plugged in firmly.
✓ Check the fuse or breaker.
Low suction ✓ Empty the recovery tank; it
may be full and the automatic shut-off engaged.
✓ Make sure recovery tank cap
is securely latched.
✓ Make sure tool door is
closed.
Cleaning solution won’t ✓ Make sure solution tank is
dispense
Brushes won’t rotate ✓ Clean brush filter as
Low suction in hose during ✓ Make sure recovery tank cap
tool use is securely latched.
securely in place
✓ Refill the solution tank if it is
empty
described in Fig. 45.
✓ Set Brush Speed Selector to
ON.
✓ Disconnect hose from cleaner
and check for blockage in
hose.
Full One Year
Warranty
(Domestic Use)
Your HOOVER® appliance is warranted in normal household use, in
ccordance with the Owner’s
a
Manual against original defects in
material and workmanship for a
period of one full year from date of
purchase. This warranty provides, at
no cost to you, all labor and parts to
place this appliance in correct operating condition during the warranted
period. This warranty applies when
the appliance is purchased in the
United States including its territories
and possessions, or in Canada or
from a U. S. Military Exchange.
Appliances purchased elsewhere are
covered by a limited one year warranty which covers the cost of parts
only. This warranty does not apply if
the appliance is used in a commercial
or rental application.
This warranty only applies when the
product is in use in the country or
territory in which it is purchased.
Warranty service can only be
obtained by presenting the appliance
to one of the following authorized
warranty service outlets. Proof of
purchase will be required before service is rendered.
1. Hoover Sales and Service
Centers.
2. Hoover Authorized Warranty
Service Dealers (Depots).
For an automated referral of authorized service outlets in the U.S.A.,
phone 1-800-944-9200 OR
visit Hoover on-line at
www.hoover.com
This warranty does not cover pick
up delivery, or house calls; however,
if you mail your appliance to a
Hoover Sales and Service Center for
warranty service, transportation will
be paid one way.
While this warranty gives you specific legal rights, you may also have
other rights which vary fr
state.
If further assistance is needed, or if
there are questions concerning this
warranty or the availability of warranty service outlets, write or phone
the Consumer Response Center,
Phone 1-330-499-9499.
In Canada, contact Hoover Canada,
Burlington, Ontario L7R 4A8,
1-800-263-6376.
om state to
14
Page 15

15
Page 16

HOOVER
®
ENGLISH ➜ pp. 1-14
ESPAÑOL ➜ pág. 16-24
Instrucciones para
conexión a tierra
Este aparato debe tener conexión a tierra. Si
llegara a funcionar mal o a descomponerse, la
conexión a tierra da un camino de menor
resistencia a la corriente eléctrica para reducir
el riesgo de choque eléctrico. Este aparato está
equipado con un cordón que tiene un conductor (C) para conectar a tierra el equipo y un
enchufe con conexión a tierra (A). El enchufe
se debe enchufar a una toma de corriente adecuada (B) que esté instalada y conectada a
tierra adecuadamente, de acuerdo a todos los
códigos y ordenanzas locales.
PELIGRO-
La conexión inadecuada del conductor para
conectar a tierra el equipo puede resultar en
un riesgo de choque eléctrico. Consulte con
un electricista calificado o con una persona de
servicio si tiene dudas sobre si la toma de corriente está conectada a tierra adecuadamente.
No modifique el enchufe que viene con el
aparato; si no encaja en la toma de corriente
haga que un electricista calificado instale una
toma de corriente adecuada. Este aparato es
para usarse en un circuito con tensión nominal de 120 voltios y tiene un enchufe de
conexión a tierra que tiene el aspecto que se
ilustra en el diagrama (A).
Si no se dispone de una toma de corriente
conectada a tierra adecuadamente, se puede
usar un adaptador temporal (D) para conectar
este enchufe a un r
El adaptador temporal se debe usar solamente
hasta que un electricista calificado pueda
instalar una toma de corriente conectada a
tierra adecuadamente (B). La or
rígida, la extensión o el dispositivo similar (F)
que sale del adaptador se debe conectar a una
conexión a tierra permanente (G) como puede
ser la tapa de la caja de una toma de corriente
conectada a tierra adecuadamente. Cuando se
use el adaptador
lugar con un tornillo de metal.
Código de electricidad de Canadá no permite
el uso de adaptador
eceptáculo de 2 polos (E).
ejuela ver
, se debe mantener en su
es temporales.
NOT
A:
de y
El
¡Salvaguardias importantes!
™
™
Al usar un aparato eléctrico, observe siempre las precauciones básicas,
incluyendo las siguientes:
LEA TODAS LAS INSTRUCCIONES ANTES DE USAR ESTE APARATO.
ADVERTENCIA:
ara reducir el riesgo de incendios, choques eléctricos o lesiones:
P
• Úsela sólo en el interior.
• Úsela solamente en superficies
humedecidas por el proceso de limpieza.
No la sumerja.
• Conéctela solamente a una toma de
corriente conectada a tierra adecuadamente. Vea las instrucciones para
conexión a tierra.
• No limpie sobre tomas de corriente
eléctrica que estén en los pisos.
• No la use sin que los tanques estén
en su lugar.
• Tenga especial cuidado al limpiar
escaleras. No coloque la limpiadora para
alfombras sobre los escalones.
• Use la limpiadora para alfombras
solamente para lo que ha sido diseñada
según se describe en las instrucciones.
• Use solamente los accesorios
recomendados por Hoover; el uso de
otros accesorios puede ser peligroso.
• No se recomienda el uso de cordones
de extensión. Si es indispensable un
cordón de extensión, debe tener por lo
menos tres alambres de grosor 16 con
enchufe de tres patillas con conexión a
tierra y un receptáculo de tres polos que
acepte ese tipo de enchufe.
• Desenchufe la limpiadora en
profundidad cuando no esté en uso.
Antes de desenchufarla, apague todos
los controles.
• Desenchufe la limpiadora para alfombras antes de conectar el accesorio de
mano turboaccionado.
Desconecte siempre el cordón de la
•
toma de corriente eléctrica antes de
prestar servicio a la limpiadora para
alfombras.
No la desenchufe tirando del cordón.
•
Para desenchufarla, sujete el enchufe y
no el cordón.
• Nunca toque el enchufe ni el aparato
con las manos mojadas.
• No tire de ella ni la transporte por el
cordón, ni tampoco use el cordón como
mango, no cierre la puerta sobre el
cordón ni tire del mismo alrededor de
los bordes agudos ni esquinas. No pase
el aparato sobre el cordón. Mantenga el
cordón alejado de las superficies
calientes.
No la use si el cordón o el enchufe
•
está dañado. Si el aparato no está fun-
cionando apropiadamente, se ha dejado
caer, ha sido dañado, se ha dejado a la
intemperie o se ha dejado caer en agua,
llévelo a un Centro de servicio de fábrica de Hoover o al Concesionario autorizado de servicio de garantía de Hoover.
• Es necesaria una supervisión estricta
cuando cualquier aparato es utilizado
por los niños o cerca de ellos. No permita que la limpiadora para alfombras
sea usada como un juguete ni que funcione sin atención en ningún momento.
• No apunte los accesorios hacia
personas o mascotas.
• Use solamente los limpiadores para
piso SteamVac™ de Hoover disponibles
en comercios y diseñados para ser
aplicados con máquina. No use ningún
tipo de cera con la limpiadora en
profundidad.
• Mantenga los detergentes y otros
limpiadores fuera del alcance de los
niños.
• No la use para recoger líquidos
inflamables o combustibles, como
gasolina, ni en áreas donde puedan
estar presentes dichos líquidos.
• No la use para recoger lejía, líquidos
para destupir, gasolina ni ningún otro
material tóxico.
• No aspire nada que se esté quemando o echando humo, como cigarrillos,
fósfors o cenizas calientes.
• Evite aspirar objetos duros o afilados
con la limpiadora para alfombras. Éstos
pueden dañar el aparato.
• Mantenga el cabello, la ropa holgada,
los dedos de las manos y pies y todas
las partes del cuerpo alejados de las
aberturas y las piezas en movimiento.
• No coloque ningún objeto en las
aberturas. No la use con ninguna
abertura obstruida; manténgala libre de
polvo, pelusa, cabello o cualquier cosa
que pueda reducir el flujo de aire.
• Evite el contacto con las alfombras
hasta que estén secas, para evitar que
queden opacas y se vuelvan a ensuciar.
Mantenga a los niños y a las mascotas
alejados de las alfombras hasta que
estén completamente secas.
• Guárdela en un lugar seco. No
exponga la máquina a temperaturas de
congelación.
16
¡Guarde estas instrucciones!
Page 17

Índice
Salvaguardias importantes . . . . . . 16
Contenido de la caja . . . . . . . . . . . . . 17
Descripción de la limpiadora. . . . . 17
Características esenciales de la
limpiadora para alfombras . . . . . . . 18
Llenado del tanque . . . . . . . . . . . . 18
Vaciado del tanque de
recuperación . . . . . . . . . . . . . . . . . . 18
Colocación de la manguera . . . . 19
Selección y colocación del
accesorio . . . . . . . . . . . . . . . . . . . . . . 19
Escurrido y almacenamiento
de la manguera . . . . . . . . . . . . . . . . 19
Limpieza de alfombras . . . . . . . . . . 20
Limpieza de tapicería . . . . . . . . . . . 21
Pasos básicos para la limpieza. . . . 24
Garantía . . . . . . . . . . . . . . . . . . . . . . . . 24
Formulario de pedido de piezas y
accesorios por correo
Para comunicarse
con nosotros:
• www.hoover.com
• 1-800-944-9200 ubicador automatizado
de concesionarios de servicio
• 1-330-499-9499 nuestro Centro de
respuesta al cliente
(lunes a viernes de
8 de la mañana a
5 de la tarde)
USE ESTAS INSTRUCCIONES
JUNTO CON LAS FIGURAS
ASO-A-P
P
EN EL MANUAL DE INGLÉS
ASO PROVIST
Contenido de la caja
A. Limpiadora para alfombras
B. Detergente Hoover
Desdoble el mango
. . . . . . . . . . 26
AS
Anote y guarde
Para sus archivos, anote los números de modelo y serie
en los espacios provistos. Estos números se encuentran
en la etiqueta de datos que está en la parte posterior de
la limpiadora.
Número de modelo ____________________________
Número de serie ____________________________
Guarde su recibo de compra y adjúntelo a este manual.
Para obtener el servicio de garantía de su limpiadora
puede requerirse un comprobante de la fecha de compra.
Descripción de la limpiadora
Características
1. Asidero de mano
2. Gatillo para dispensar la solución: se oprime para dispensar la
solución de limpieza
3. Botón Clean Surge™
4. Mango superior
5. Botón para soltar el mango superior
6. Tapa del tanque para la solución/taza para medir
7. Botón para soltar el tanque para la solución
8. Tanque para la solución
9. Selector de la posición de las escobillas
10. Boquilla
11. Tanque de recuperación
12. Botón para soltar el tanque de recuperación
13. Accesorio de mano turboaccionado
14. Tapa del tanque de recuperación
15. Boquilla para escaleras y tapicería
16. Ganchos para el cordón (portaaccesorios sacado)
17. Puerta para la manguera
18. Pedal para soltar el mango
19. Pedal de encender/apagar
20. Manguera
21. Ganchos para el cordón (portaaccesorios guardado en la
limpiadora)
Conector para la manguera
22.
23. Portaaccesorios Ganchos para el cordón en el portaaccesorios
Esta limpiadora para alfombras está diseñada para uso en el hogar
Haga funcionar la limpiadora para alfombras solamente al voltaje
especificado en la placa de datos que está en la parte posterior de la
limpiadora. Enchufe la limpiadora para alfombras a una toma de
corriente conectada a tierra adecuadamente.
.
Levante el mango superior (A)
a la posición vertical hasta que
se trabe en su lugar (fig. 1).
Cómo doblar el mango
Presione el botón para soltar el
mango superior (B) para
doblar el mango (fig. 2).
¡Su limpiadora para alfombras HOOVER
está completamente ensamblada y lista
para comenzar la limpieza!
The Hoover Company
2006
©
.com
.hoover
www
Continua
➜
17
Page 18

Características esenciales de
la limpiadora para alfombras
Llene el tanque para la solución
Desenchufe la limpiadora para alfombras
de la toma de corriente eléctrica.
✓✓
Presione el botón (A) y saque el tanque para la solución
(fig. 3)
✓✓
Suelte las trabas (B) en la tapa del tanque y sáquela (fig. 4)
✓✓
Use la tapa en el tanque para la solución (fig. 5) para
medir la cantidad adecuada de detergente HOOVER de
acuerdo con la siguiente tabla:
Cantidad de
Superficie detergente Tipo de detergente
Alfombra dos
tapas
Tapicería
Para áreas de mucho tráfico: Haga un tratamiento previo
con el rociador para manchas de HOOVER (disponible a
un costo adicional si no está incluido con su modelo)
Use 4 tapas de detergente para alfombras y tapicería.
NOTA: Para obtener los mejores resultados, use
solamente detergentes Hoover. Han sido específica
mente formulados para usarse con su limpiadora en
profundidad SteamVac™.
✓✓
Vierta el detergente en el tanque
✓✓
Llene el tanque hasta la línea de llenado (C) (1 galón
aproximadamente) con agua caliente del grifo (fig. 6)
una
tapa
O
Detergente HOOVER
para alfombras y
tapicería
Detergente HOOVER
para alfombras y
tapicería
Vacíe el tanque de
recuperación
Desenchufe la limpiadora
para alfombras de la toma
de corriente eléctrica.
✓ Un dispositivo de apagado
automático evita que la
limpiadora recoja más agua
sucia de la que puede caber en
el tanque de recuperación.
Sabrá que el tanque está lleno --
• Cuando la cantidad de agua
sucia ha alcanzado la línea
de llenado (A).
• Cuando el sonido del motor
es más agudo.
• Si no ve que sube solución
sucia por la boquilla.
• Si el flotador (B) dentro del
tanque de recuperación ha
subido a la parte superior
del tanque (fig. 8).
✓ Presione el botón (C) y saque
el tanque (fig. 9).
✓ Suelte las trabas (D) en la tapa
del tanque y sáquela (fig. 10).
✓ Vacíe el tanque.
✓ Vuelva a colocar la tapa
(fig. 11). Asegure ambas
trabas (D) (fig. 10).
Para obtener una succión
completa, es importante
que la tapa del tanque de
recuperación esté bien
asegurada antes de limpiar.
✓✓
Vuelva a colocar la tapa. Asegure ambas trabas (B) (fig. 4)
✓✓
Coloque la parte inferior del tanque sobre la limpiadora.
Gire la parte superior del tanque y encájela en su lugar
(fig. 7)
Precaución: Los detergentes contienen surfactantes
aniónicos y no iónicos. Evite el contacto con los ojos y la
piel. En caso de contacto con los ojos, enjuáguelos con
agua fría por 15 minutos. En caso de contacto con la piel,
lávela con agua. Si persiste la irritación, llame a un
médico.
18
✓ Saque cualquier r
se haya acumulado en el filtro
para pelusas (E) en el cuerpo
de la limpiadora (fig. 12 y
encarte).
✓ Coloque la parte inferior del
tanque sobr
e la parte superior del
Gir
tanque y encájela en su lugar
(fig. 12).
e la limpiadora.
esiduo que
Page 19

Coloque la manguera
Coloque el accesorio
Portamanguera
Desenchufe la limpiadora
para alfombras de la toma
de corriente eléctrica.
✓ Coloque el mango en posición
vertical.
✓ Si lo desea, la manguera y el por-
taaccesorios se pueden sacar de
la limpiadora.
✓ Saque la manguera del portaac-
cesorios.
✓ Abra la puerta de la manguera
(A) en la parte posterior de la
limpiadora para alfombras (fig.
13).
✓ Alinee el extr
manguera con el orificio de
entrada para la manguera (B) y
el orificio de entrada para la
solución (C) (fig. 14).
✓ Empuje la manguera dentro del
orificio de entrada y trábela en
su lugar.
✓ Para sacar la manguera: Apriete
las trabas (D) en las partes superior e inferior de la manguera.
Saque la manguera del orificio
de entrada (fig. 15).
✓ Cierre bien la puerta de la
manguera (A) (encarte).
Seleccione el accesorio
Accesorio de mano SpinScrub™ (fig.
16)
• Escobillas giratorias
emo de la
Desenchufe la limpiadora
para alfombras de la toma
de corriente eléctrica.
✓ Deslice el accesorio sobre la
anguera. Encaje el accesorio
m
obre la lengüeta (E) de la
s
manguera (fig. 18).
✓ Para sacar el accesorio: Empuje
la traba (F) hacia delante y hacia
arriba (fig. 19). Deslice el accesorio para sacarlo de la manguera.
El mango debe estar en la posición
vertical para que la solución de
limpieza pueda pasar a través de la
manguera.
Deje que escurra
el agua de la manguera
Cuando termine de usar la
manguera y el accesorio, vacíe el
agua de la manguera.
✓ Encienda la limpiadora para
alfombras y sostenga el extremo
de la manguera hacia arriba por
algunos segundos (A). No opri-
ma el gatillo (fig. 20).
✓ Apague la limpiadora en
profundidad y desenchúfela.
✓ Mantenga el extremo de la
manguera en el fregadero y presione el gatillo para vaciar la solu
ción de la manguera (B) (fig. 20).
Guarde la manguera
Puede guardar el portamanguera en
la limpiadora o sacarlo para
guardarlo por separado.
ara guardar el portamanguera en
P
a limpiadora:
l
➤ Deslice las lengüetas (G) del
portamanguera en las ranuras
de la parte posterior de la
limpiadora (fig. 25).
➤ Enganche la parte superior del
portamanguera a la limpiadora
(H).
➤ Enrolle el cordón alrededor de
los ganchos para el cordón (I) en
el portamanguera (fig. 26). Gire
el gancho superior para soltar el
cordón.
Para sacar el portamanguera de la
limpiadora:
➤ Levante el portamanguera de la
limpiadora para sacarlo (fig. 27).
➤ Enrolle el cordón alrededor de
los ganchos para el cordón (J) en
la parte posterior de la limpiadora (fig. 28). Gire el gancho inferior para soltar el cordón.
Selector de veloci-
dad de las escobillas
Elija ON (encender) para la limpieza
normal de alfombras (fig. 29).
-
Elija OFF (apagar) cuando no desee
usar las escobillas.
Úselo en las alfombras para
•
limpiar manchas, en áreas
pequeñas o escaleras
Boquilla para escaleras y tapicería
(fig. 17)
Escobilla incorporada
•
• Úsela para tapicería
Desenchufe la limpiadora para
alfombras de la toma de corriente
eléctrica.
➤ Enganche el conector para la
manguera (C) en el portaaccesorios (fig. 21).
➤ Enrolle la manguera alrededor
del portaaccesorios en sentido
contrario a las agujas del reloj
(fig. 22).
➤ Enganche el conector para acceso-
rios (D) y el accesorio “Spin
Scrub” (E) en el portaaccesorios
(fig. 23).
➤ Encaje el accesorio para tapicería
(F) en el portaaccesorios (fig. 24).
Botón Clean Surge™
Oprima el botón Clean Surge™ (K)
para dispensar solución de limpieza
adicional (fig 30).
Use el botón Clean Sur
limpie áreas muy sucias de las
alfombras (áreas de tráfico, manchas,
etc.).
Ninguna solución de lim-
pieza saca todas las manchas de
todas las alfombras. La eliminación
de manchas varía con el tipo de
derrame, el tiempo que ha trans
currido antes de que se saque, y el
material y tipo de alfombra.
Continua
ge™ cuando
➜
19
Page 20

Limpieza de alfombras
Saque los muebles livianos (mesas, lámparas, etc.) del área que se va a limpiar.
1
Proteja los muebles restantes recogiendo las faldillas de los muebles con alfileres y colocando papel
de aluminio o plástico debajo de las patas.
Pase bien una aspiradora por la alfombra para eliminar la suciedad suelta, cabellos, pelusas y otros
2
residuos (Fig. 31).
Pruebe el detergente para ver si destiñe el color en un área escondida de la alfombra.
3
Moje un paño blanco o una toalla de papel con un poco de detergente. Frote suavemente en un área
escondida de la alfombra. Espere diez minutos. Seque sin frotar con un paño blanco o una toalla de
papel y vea si se ha transferido el color.
Haga un tratamiento previo sobre las manchas y las áreas de mucho tráfico con el rociador para
4
manchas de HOOVER (Fig. 32).
Rocíe la mancha o el área con el rociador para manchas. Luego continúe con los siguientes pasos de
limpieza.
Para manchas difíciles, consulte la guía de manchas incluida con su limpiadora.
5
6
7
8
9
10
11
Llene el tanque para la solución
HOOVER (vea la página 18). (Fig. 33)
Use solamente detergentes de la marca HOOVER con su limpiadora para alfombras. Otras marcas
pueden dañar la limpiadora para alfombras.
Planifique su limpieza para evitar caminar sobre la alfombra mojada.
cuarto más alejado de la puerta y limpie en secciones pequeñas (Fig. 34).
Pise el pedal para destrabar el mango y baje el mango. Encienda la limpiadora.
Apriete y mantenga apretado el gatillo (A) para dispensar la solución de limpieza (Fig. 35). Empuje
la limpiadora hacia delante LENTAMENTE y tire de ella para hacerla retroceder LENTAMENTE.
Use el botón Clean Surge™ (B) en las áreas muy manchadas (Fig. 35).
Suelte el gatillo y empuje la limpiadora sobre la misma área para recoger la solución sucia sin dispensar más solución. Continúe usando pasadas de secado hasta que vea que solamente sube un poco
de solución por la boquilla (parte delantera de la limpiadora).
¡No moje demasiado la alfombra! No use más de dos pares de pasadas hacia delante y hacia atrás
mientras dispensa la solución. Siga siempre con pasadas secas – cuantas más, mejor.
¡Escuche con atención! Cuando el sonido del motor cambia (es más agudo), el tanque de recuperación necesita ser vaciado.
Cuando el agua ha alcanzado la línea de llenado en el tanque de recuperación, la limpiadora NO
recoge la solución sucia.
con agua caliente del grifo y la cantidad adecuada de detergente
Comience en el extremo del
20
12
13
Deje que seque la alfombra.
El aumento de la circulación de aire (puertas abiertas, ventiladores encendidos, etc.) ayudará a que la
alfombra se seque a fondo para evitar el moho.
Pase bien ua aspiradora después de que la alfombra se haya secado. Esto r
breado que hayan podido dejar las escobillas de la limpiadora para alfombras.
Evite caminar sobr
e la alfombra hasta que esté seca.
educirá cualquier som
-
Page 21

Limpieza de tapicería
R
1
2
evise el código de limpieza de la tela (Fig.
36). Busque un código ‘W’ o ‘WS’ en la eti-
queta del fabricante del mueble. Estos códigos indican que puede usarse la limpiadora
para alfombras para limpiar la tapicería.
No use la limpiadora para alfombras en
tapicería marcada ‘S’, ‘X’ o ‘Dry Clean Only’
(limpieza en seco solamente).
Pase bien la aspiradora por la tapicería con
los accesorios de su aspiradora.
Conecte la manguera y el accesorio como se
6
describe en las figuras 13-19 (Fig. 39).
Coloque el mango en la posición completa-
7
mente vertical. Encienda la limpiadora.
Apriete y mantenga apretado el gatillo (A)
8
para dispensar la solución de limpieza.
Presione suavemente el accesorio en la tela y
haga retroceder el accesorio lentamente sobre
la tela (Fig. 40).
Pruebe el detergente para ver si destiñe el
3
color en un área escondida de la tapicería.
Moje un paño blanco o una toalla de papel
con un poco de detergente. Frote suavemente
en un ár
diez minutos. Seque sin frotar con un paño
blanco o una toalla de papel y vea si se ha
transferido el color
Haga un tratamiento previo sobre las man-
4
chas con el rociador para manchas de
HOOVER (Fig. 37).
Rocíe la mancha o el área con el rociador para
manchas. Luego continúe con los siguientes
pasos de limpieza.
Para manchas difíciles, consulte la guía de
manchas incluida con su limpiadora.
Llene el tanque para la solución
5
caliente del grifo y la cantidad adecuada de
deter
38).
Use solamente detergentes de la marca
HOOVER con su limpiadora para alfombras. Otras marcas pueden dañar la
limpiadora para alfombras.
ea escondida de la tapicería. Espere
.
gente HOOVER (vea la página 18) (Fig.
con agua
9
10
11
12
Suelte el gatillo y empuje el accesorio sobre
la misma área
sin dispensar más solución. Continúe usando
pasadas de secado hasta que vea que solamente sube un poco de solución por el accesorio.
¡No moje demasiado la tapicería! No use
más de dos pasadas mientras dispensa la
solución. Siga siempre con pasadas de secado
– cuantas más, mejor.
¡Escuche con atención! Cuando el sonido del
motor cambia (es más agudo), el tanque de
recuperación necesita ser vaciado.
Cuando el agua ha alcanzado la línea de
llenado en el tanque de recuperación, la
limpiadora NO recoge la solución sucia.
Deje que seque la tapicería.
tapicería hasta que esté seca.
El aumento de la cir
abiertas, ventilador
dará a que la tapicería se seque a fondo para
evitar el moho.
para recoger la solución sucia
Evite usar la
culación de air
es encendidos, etc.) ayu
e (puertas
-
Continua
➜
21
Page 22

Cuidado rutinario de su limpiadora para alfombras
Limpie la boquilla
Desenchufe la limpiadora para alfombras de la
toma de corriente eléctrica.
➤ Saque los tanques de solución y de recu-
peración para evitar posibles fugas.
➤ Levante la parte superior de la boquilla (A)
y deslícela para sacarla de la limpiadora
(fig. 41).
➤ Limpie los residuos de la boquilla y la parte
delantera de la limpiadora con un paño
húmedo.
➤ Incline la limpiadora hacia atrás, levantan
do la parte delantera de la limpiadora del
piso. Deslice la boquilla (B) hacia arriba
desde la parte inferior de la limpiadora (fig.
42).
➤ Presione sobre la porción superior de la
boquilla para encajarla en su lugar.
-
Limpie las escobillas
Desenchufe la limpiadora para alfombras de
la toma de corriente eléctrica.
➤ Saque los tanques de solución y de
recuperación para evitar posibles fugas.
➤ Incline la limpiadora hacia atrás para que el
mango descanse en el piso.
➤ Tire del conjunto de escobillas firmemente
para sacarlo (fig. 43).
Limpie el filtro de las escobillas
Desenchufe la limpiadora para alfombras de
la toma de corriente eléctrica.
➤ Saque los tanques de solución y de recu-
peración para evitar posibles fugas.
➤ Incline la limpiadora hacia atrás de modo
que el mango descanse en el piso.
➤ Apriete el marco del filtro (G) y tire de él
para sacarlo hasta que se detenga (fig. 45).
➤ Limpie los residuos del filtro.
➤ Deslice el filtro para volver a ponerlo en su
lugar.
Para guardar su limpiadora para
alfombras
✓ Vacíe el tanque para la solución y enjuágue-
lo bien.
✓ Coloque el tanque para la solución vacío en
la limpiadora para alfombras. Encienda la
limpiadora para alfombras. Apriete el gatillo y empuje la limpiadora para alfombras
hacia delante y hacia atrás varias veces.
✓ Vacíe el tanque de recuperación, enjuáguelo
bien y déjelo secar al aire.
✓ Deje que las escobillas y la parte de abajo
de la limpiadora para alfombras se sequen
al aire completamente antes de guardarla
en una superficie alfombrada o de madera.
➤ Enjuague las escobillas bajo un chorro de
agua.
➤ Alinee los postes (C) del conjunto de
escobillas con las ranuras (D) de la
limpiadora (fig. 44).
➤ Gire las escobillas ligeramente para alinear
el poste cuadrado (E) con el agujero cuadrado (F) de la limpiadora (fig. 44).
➤ Presione el conjunto de escobillas firme-
mente y encájelo en su lugar.
22
Lubricación
El motor tiene cojinetes que cuentan con suficiente lubricación para la vida útil del motor.
La adición de lubricantes podría causar daños.
Por lo tanto, no añada lubricante a los
cojinetes del motor.
Page 23

Servicio
Para obtener el servicio aprobado HOOVER y piezas genuinas HOOVER, localice el Centro de ventas y de servicio de Hoover o el Concesionario autorizado de servicio de garantía de Hoover
(depósito) más cercano:
✓ Consultando la sección “Service” (Servicio) de Hoover en línea en www.hoover.com O
✓ Consultando la lista de centros de ventas y de servicio provista con esta limpiadora O
✓ Consultando las páginas amarillas de la guía de teléfonos, bajo “Vacuum Cleaners-
Household” (“Aspiradoras - Artículos del hogar”) O
✓ Llamando al 1-800-944-9200 para obtener una referencia automatizada de las ubicaciones de
los centros de servicio autorizados (solamente en EE.UU.)
No envíe su limpiadora a Hoover en North Canton para obtener servicio; esto sólo resultará en
demoras.
Si necesita asistencia adicional, comuníquese con Consumer Response Center.
Teléfono: 330-499-9499.
En Canadá, comuníquese con Hoover Canada, Burlington, Ontario L7R 4A8, teléfono: 1-800-263-6376.
Al solicitar información u ordenar piezas, identifique siempre su limpiadora por el número comple-
to de modelo. (El número de modelo figura en la parte posterior de la limpiadora).
Identificación y solución de problemas
Use lista a continucación para resolver problemas menores.
¿Cuál es el problema? Qué hacer
La limpiadora para alfombras no funciona
Succión baja
La máquina no dispensa la solución de limpieza
Las escobillas no giran
✓ Asegúrese de que la limpiadora está bien
enchufada.
✓ Revise el fusible o el disyuntor.
✓ Vacíe el tanque de recuperación; puede estar lleno
y el apagado automático está activado.
✓ Asegúrese de que la tapa del tanque de recu-
peración está bien trabada.
✓ Asegúr
✓ Asegúrese de que el tanque para la solución esté
bien fijo en su lugar
✓ Llene el tanque para la solución si está vacío
✓ Limpie el filtr
en la fig. 45.
✓ Coloque el selector de velocidad de las escobillas
en ON (Encender).
ese que la puerta de accesorios esté cerrada.
o de las escobillas como se describe
Succión baja en la manguera mientras se usan los
accesorios
✓ Asegúr
peración está bien trabada.
ese de que la tapa del tanque de recu-
✓ Desconecte la manguera de la limpiadora y veri-
fique si hay una obstrucción en la manguera.
Continua
➜
23
Page 24

Garantía de un año
completo
u aparato HOOVER® está garantizado para uso
S
doméstico normal, según el Manual del propietario,
contra defectos originales en el material y la fabri-
ación por el período de un año completo a partir de
c
la fecha de compra. La presente garantía cubre gratuitamente toda la mano de obra y las piezas necesarias para dejar este aparato en buen estado de funcionamiento durante el período de garantía. Esta
garantía es válida si el aparato fue comprado en los
Estados Unidos, en sus territorios y posesiones o en
Canadá o en una tienda situada en una base militar
de los EE.UU. Los aparatos comprados en otros
lugares están cubiertos por una garantía limitada de
un año que cubre solamente el costo de las piezas.
Esta garantía no es válida si el aparato es utilizado
para uso comercial o de alquiler.
Esta garantía solamente es válida cuando el pr
se usa en el país o territorio en el cual fue comprado.
El servicio bajo garantía se puede obtener solamente
al presentar el aparato en uno de los centros autorizados de servicio de garantía indicados a continuación.
Puede requerirse la presentación de un comprobante
de compra antes de efectuar el servicio.
1. Centros de ventas y de servicio de Hoover.
2. Concesionarios autorizados de servicio de
garantía de Hoover (Depósitos).
Para obtener una referencia automatizada de las
ubicaciones de los centros autorizados de servicio
para productos en los Estados Unidos, llame al
1-800-944-9200 O
visite Hoover en línea en www.hoover.com
Esta garantía no cubre la recogida, la entrega, ni las
visitas a domicilio; sin embargo, si envía su aparato a
un Centro de ventas y de servicio de Hoover para un
servicio de garantía, el transporte se pagará en una
sola dirección.
Esta garantía le otorga derechos legales específicos,
usted puede tener otros derechos que varían de esta
do a estado.
Si necesita asistencia adicional o si tiene preguntas
e esta garantía, o la disponibilidad de centr
sobr
servicio de garantía, escriba o llame al Centro de
respuesta al cliente, Consumer Response Center,
Teléfono 1-330-499-9499.
En Canadá, comuníquese con Hoover Canada,
Burlington, Ontario L7R 4A8. Canadá.
1-800-263-6376.
(Uso doméstico)
oducto
os de
Pasos básicos para la limpieza
Pase bien la aspiradora por la alfombra para
✔
eliminar la suciedad suelta.
Pruebe el detergente para ver si destiñe el color
✔
en un área escondida de la alfombra o la
tapicería.
Haga un tratamiento previo sobre las manchas y
✔
las áreas de mucho tráfico con el rociador para
manchas de HOOVER. Seque las manchas sin
frotar para eliminar la mancha lo más posible.
Llene el tanque para la solución con agua
✔
caliente del grifo y la cantidad adecuada de
detergente HOOVER.
Use solamente detergentes de la marca
HOOVER con su limpiadora para alfombras.
Otras marcas pueden dañar la limpiadora.
Limpie la alfombra o la tapicería.
✔
• Apriete y mantenga apretado el gatillo.
Mueva la limpiadora hacia delante y hacia
atrás.
• Suelte el gatillo y pase por la misma área para
recoger la solución sucia. Use pasadas de
secado adicionales para recoger más solución
sucia.
• Las manchas difíciles pueden necesitar un
tratamiento adicional con el rociador para
manchas.
¡Escuche con atención! Cuando el sonido del
✔
-
motor cambia (es más agudo), el tanque de recuperación necesita ser vaciado.
Cuando el tanque de recuperación está lleno, la
limpiadora ya no recoge la solución sucia.
Dé tiempo para que la alfombra o la tapicería se
✔
seque. Evite caminar sobr
e la alfombra o usar la
tapicería hasta que esté completamente seca.
24
Cuando la alfombra y/o tapicería está seca, pase
✔
la aspiradora una vez.
Page 25

Mail orders limited to U.S. residents only.
®
®
Hoover Sales & Service Centers, on-line at www.hoover.com, or by completing this order form.
Please allow 3-4 weeks for delivery.
The Hoover Company,
101 East Maple St.,
North Canton, OH 44720
Attn: Sales & Service Center
Replacement parts and accessory items may be purchased from your Authorized Hoover Dealer, Leading Retailers,
Nozzle Clean-out Tool 39514001 1 $ 2.49
Floor-to-Floor™ Hard Floor Cleaning
Solution - 32 oz. 40303032 1 $ 7.99
Bare Floor Cleaning Tool 48417003 1 $ 7.99
Premium Pet Formula Carpet/Upholstery
16 oz. 40322016 1 $ 8.59
Detergent - 48 oz. 40321050 1 $14.99
Pet Stain & Odor Remover - 32 oz. 40325032 1 $15.99
Orange Essence™ Carpet/Upholstery
Spot and Stain Spray Cleaner - 32 oz. 40322032 1 $13.99
Detergent - 48 oz. 40321049 1 $12.99
Detergent - 128 oz. 40321128 1 $21.99
Deep Cleansing Carpet/Upholstery
48 oz. 40321048 1 $11.99
Ultra Carpet/Upholstery Detergent - 48 oz. 40301448 1 $15.99
Item Description
PARTS & ACCESSORIES MAIL ORDER FORM
ADD YOUR APPLICABLE STATE TAX +
SHIPPING & HANDLING + $ 7.50
TOTAL COST $
TOTAL MERCHANDISE $
Part No.
No. in Cost/ No.of
Pack Per Pack Packs TOTAL
✂
✂
Daytime Phone & Area Code______________________
Signature (Required)_______________________________
Number__________________________ Exp. Date_______
Name on Card___________________________________
❑ Visa ❑ MasterCard ❑ Discover
❑ Check or Money Order made payable to:
PAYMENT METHOD:
The Hoover Company
City_____________________________________________
State__________ Zip_____________
Street___________________________________________
Name___________________________________________
SHIP
TO:
Please print your name and address
carefully in ink.
ADD
YOUR APPLICABLE STATE TAX +
T
OT
AL
COST
$
T
OT
AL
SHIPPING & HANDLING + $7.50
MERCHANDISE
$
48417003
39514001 $ 2.49
$ 7.99
40321050 $14.99
40325032
40303032 $ 7.99
$15.99
40321049 $12.99
40322032 $13.99
40322016 $ 8.59
40321128 $21.99
40321048
40301448 $15.99
Part No. Per Pack Packs Total
THE HOOVER COMPANY
North Canton, OH 44720
101 East Maple St.
Attn: Sales & Service Center
$11.99
Cost No. of
Detach this section and mail to:
✂
25
Page 26

No. en Costo/ No.de
®
Paqte. por Paqte. Paqte. TOTAL
de pieza
Número
MERCANCIA TOTAL $
GASTOS DE ENVIO + $7.50
COSTO TOTAL $
ACCESORIOS POR CORREO
AÑADA SU IMPUESTO ESTATAL CORRESPONDIENTE +
FORMULARIO DE PEDIDO DE PIEZAS Y
✂
Desprenda esta sección y envíela por
26
Descripción del artículo
alfombras y tapicería - 128 oz. 40321128 1 $21.99
Detergente para limpieza profunda de
48 oz. 40321048 1 $11.99
Detergente Ultra para alfombras y tapicería 40301448 1 $15.99
Detergente Orange Essence™ con esencia de
naranja para alfombras y tapicería - 48 oz. 40321049 1 $12.99
16 oz. 40322016 1 $ 8.59
Detergente de gran calidad formulado para manchas
de mascotas en alfombras y tapicería - 48 oz. 40321050 1 $14.99
olores causados por los mascotas-32 oz. 40325032 1 $12.99
Floor-to-Floor™ - 32 oz. 40303032 1 $ 7.99
Accesorio para limpiar pisos desnudos 48417003 1 $ 7.99
Limpiador para manchas - 32 oz. 40322032 1 $13.99
$ 8.59
$15.99
40321128 $21.99
40321048 $11.99
40301448 $15.99
40321049 $12.99
40322032 $13.99
40322016
40321050 $14.99
40325032
de pieza por Paqte. Paqte. Total
correo a:
THE HOOVER COMPANY
Número Costo/ No. en
101 East Maple St.
North Canton, OH 44720
40303032 $ 7.99
Solución limpiadora para pisos
Rociador para eliminar manchas y
48417003 $ 7.99
39514001 $ 2.49
de la boquilla 39514001 1 $ 2.49
Tornillo de la herramienta de limpieza
imprenta con bolígrafo.
Escriba su nombre y dirección en letra de
ENVIAR A:
MERCANCIA TOTAL $
COSTO TOTAL $
AÑADA SU IMPUESTO ESTATAL CORRESPONDIENTE +
GASTOS DE ENVIO + $7.50
Calle______________________________________________
Nombre y Apellido___________________________________
Estado__________ Codigo postal_____________
Ciudad____________________________________________
cipales tiendas, los Centros de ventas y servicio de Hoover, en Internet en www.hoover.com, o rellenando este for-
Las piezas y accesorios de repuesto se pueden comprar a través del concesionario autorizado de Hoover, las prin-
FORMA DE PAGO:
❑ Cheque o giro postal pagadero a: The Hoover Company
Se aceptan pedidos hechos por correo de residentes de EE.UU. solamente.
mulario de pedido.
❑ Visa ❑ MasterCard ❑ Discover
Permita de 3 a 4 semanas para la entrega.
Nombre en la tarjeta__________________________________
No. tarjeta_____________________Fecha de venc_________
North Canton, OH 44720
101 East Maple St.,
The Hoover Company,
✂
eléfono diurno y código de
Firma (Requerida)____________________________________
T
área________________________
Page 27

27
Page 28

®
®
HOOVER and are registered trademarks
HOOVER y son marcas registradas
8-06 F6213-910 Printed in U.S.A. 56518-201
 Loading...