

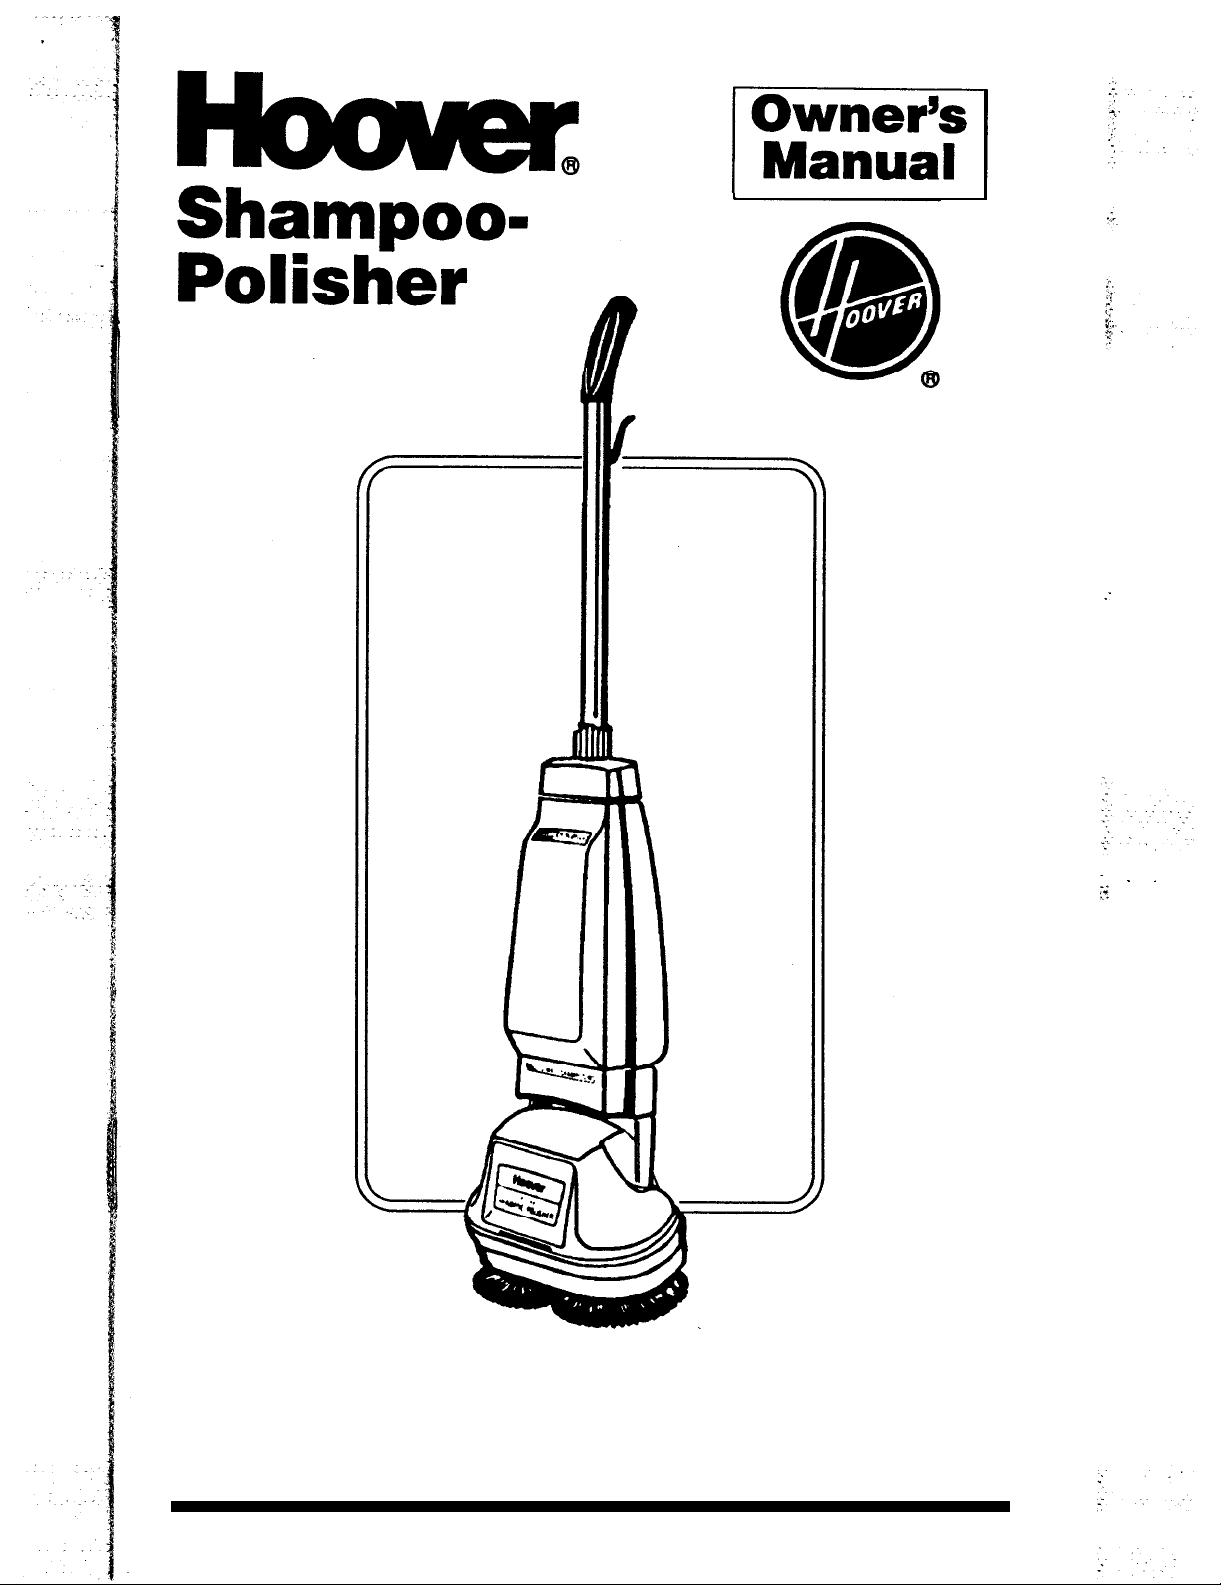
Page 1
:
. . .
. .
:t
Review this manual before
operating appliance
Page 2
This cleaner was inspected and packaged carefully before being
shipped from the factory. If you should happen to need assistance
during assembly or operation, call
l-800-944-9200
outlet locations (U.S. only) or
for automated referral of authorized service
l-330-499-9499
Response Center.
to speak with a representative in our Consumer
DO NOT RETURN THIS PRODUCT TO THE STORE.
Fill in and retain
The model and serial number are located on the rear wheel cover of
polisher.
For your personal records, please enter the COMPLETE model and
serial number in the spaces provided and retain this information.
Your cleaner is model
and has serial number
It is suggested that you attach your sales receipt to this owner’s
manual.Verification of date of purchase may be required for warranty
service of your Hoover product.
Save!
Index
Accessories
Assembly
Dry-Cleaning
Floor Care Hints
Floor
How To Use
If You Have A Problem
Important Safeguards
Lubrication
Maintenance
Service
Unpacking
1
Cleaning/Waxing
Cleaning Floors
Polishing&Buffing
Shampooing Carpet
Waxing Floors
...............................................
.........................................................
&
Carpet
............................................
...................................................
.....................................................
..............................................
......................................................
........................................................
Rugs
.................................
...................................
..................................
.....................................
Chart
Floors
&
Rugs
3,23
........................
......................
II-13
..............
..............
14-15
7-10
13-14
15-16
ma
0
1978,199O
5
IO
19
12
5-7
Go
UL
0
17
2
18
3
The Hoover Company
I:
Page 3
IMPORTANT SAFEGUARDS!
When using an electrical appliance, always follow
basic precautions, including the following:
READ ALL INSTRUCTIONS BEFORE USING THIS APPLIANCE
To reduce the risk of fire, electric shock, or
WARNING:
Use indoors only.
This appliance is provided with double insulation. Use only identical replacement parts. See instructions for servicing of
insulated appliance under “Service”.
Close supervision is necessary when any appliance is used by or
near children. Do not allow this appliance to be used as a toy or to
run unattended at any time.
Keep hair, loose clothing, fingers, feet and all parts of body away
from openings and other moving parts. Do not operate polisher in
bare feet or when wearing open toe shoes or sandals.
Do not use with flammable or combustible liquids such as gasoline
or use in areas where they may be present.
When using chemicals with this machine, be certain area is well
ventilated.
Follow manufacturer’s instructions for all chemicals used with this
machine. Do not exceed recommended mixing ratios.
Use only commercially available floor cleaners and waxes intended
for machine application.
Use extra care when cleaning on stairs.
Do not put any object into openings. Do not use with any opening
blocked; keep free of dust, lint, hair, or anything that may reduce air
flow.
Unplug the cord from outlet when not in use or when taking off or
putting on brushes or pads. Be sure handle is in upright position
before attaching or removing plug from outlet.
Always disconnect cord from electrical outlet before servicing the
polisher.
Do not unplug by pulling on cord. To unplug, grasp the plug, not
the cord. Never handle plug or appliance with wet hands.
Do not pull or carry by cord, use cord as a handle, close door on
cord or pull cord around sharp edges or corners. Do not run
appliance over cord. Keep cord away from heated surfaces.
The use of an extension cord is not recommended. If an extension
cord is absolutely necessary, use one with an electrical rating equal
or greater than the voltage and amperes specified on the data plate
located on the wheel cover.
Do not use with damaged cord or plug. If appliance is not working
as it should, has been dropped, damaged, left outdoors, or dropped
into water, take it to a Hoover Factory Service Center or Authorized
Hoover Warranty Service Dealer (Depot).
injury
double-
Use appliance for its intended use as described in this owner’s
manual. Use only attachments recommended by The Hoover
Company; others may cause hazards.
SAVES
THESE INSTRUCTIONS!
-
- -
2
Page 4
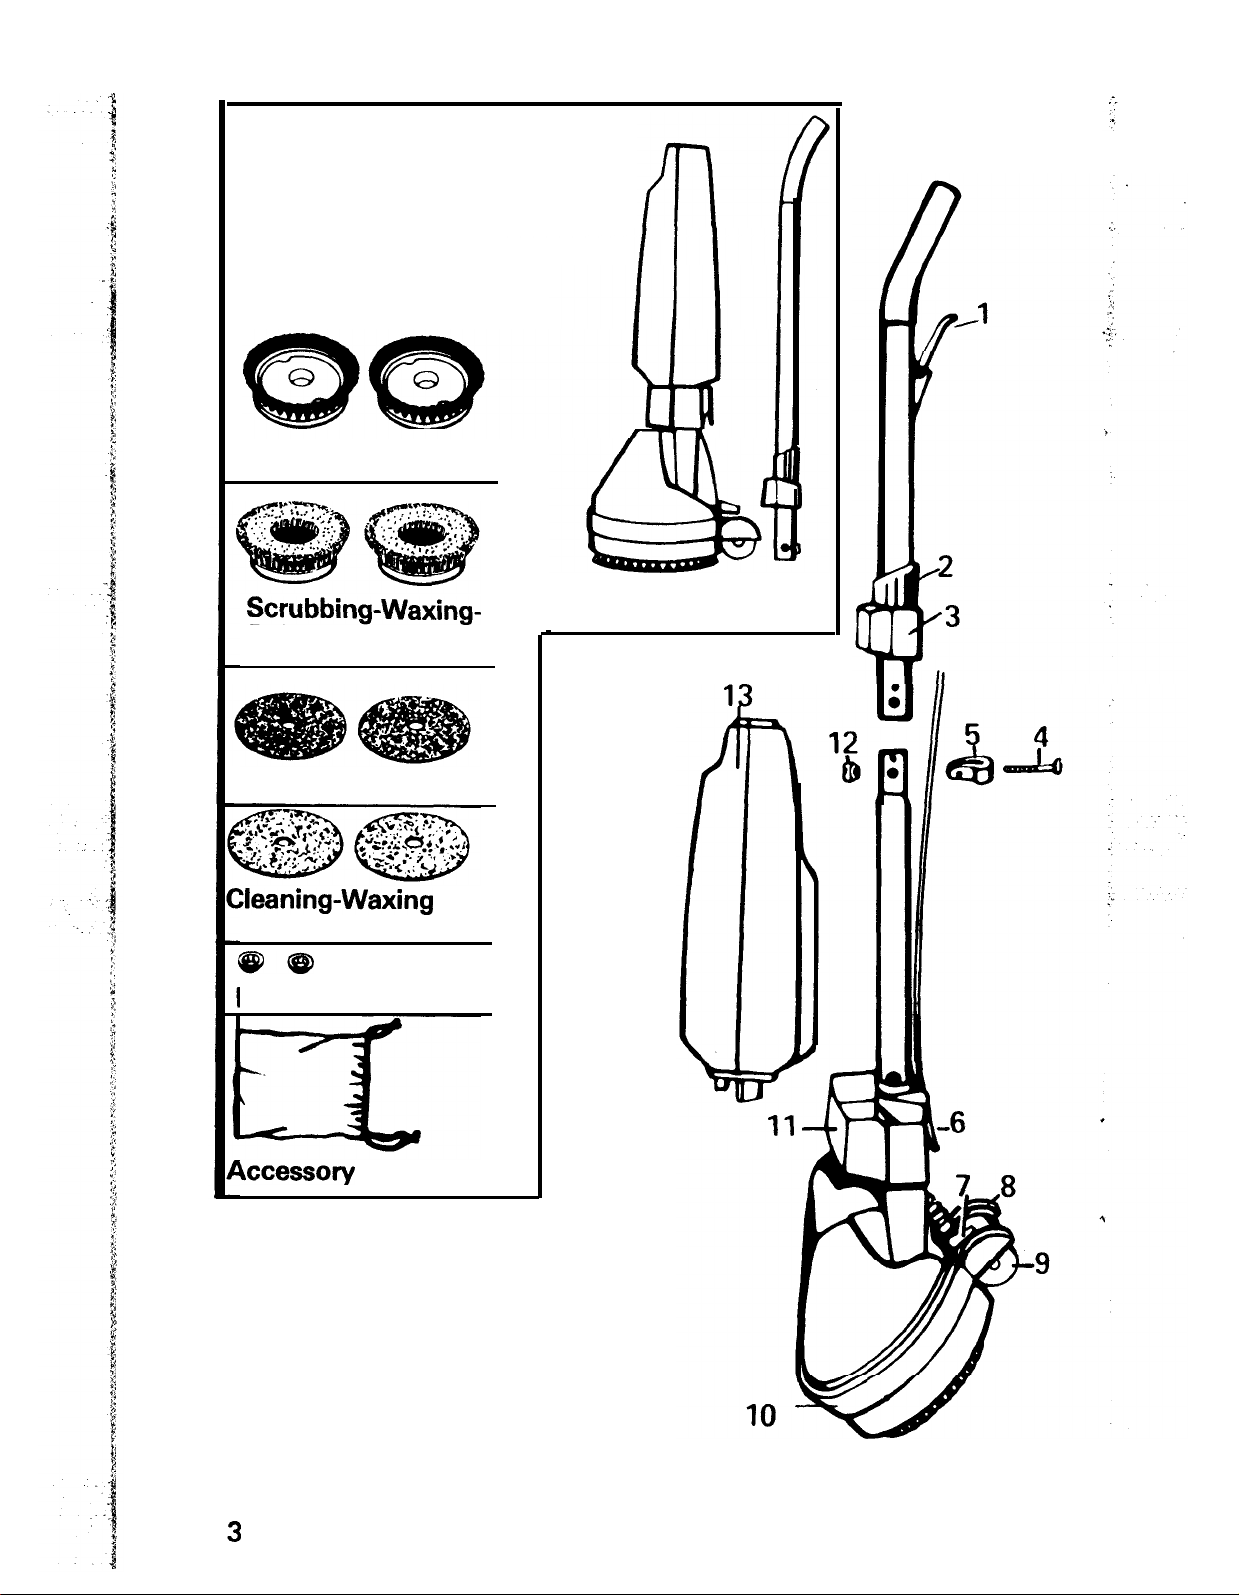
UnpackingUnpacking
Unpack the shampoo-polisherUnpack the shampoo-polisher
and identify the accessoriesand identify the accessories
shown. Remove and dispose of
shown. Remove and
the cardboard packing.
Shampoo Brushes
Scrubbing-waxing-
Polishing Brushes
Felt Buffing Pads
Zleaning-Waxing
Pads
@@B
Fasteners
kcessory
Bag
Shampoo-Polisher
J
Page 5

,
1 Questions or Concerns?
;
The Hoover Company wants to quickly resolve any concerns about your
i
cleaner or questions regarding its use. Look on the list provided with the
product for your local
Pages under “Vacuum Cleaners - Household” for the nearest
Hoover Warranty Service Dealer
Hoover-Factory
(Depot) or call:
Service Center
or in the Yellow
Authorized
l-888-944-9280
authorized service locations (U.S. only)
l-330-499-9499
in our Consumer Response Center.
DO NOT RETURN THIS PRODUCT TO THE STORE OR SEND IT TO
NORTH CANTON FOR SERVICE.
1.
Trigger:
or scrubbing solution on hard surface floors.
2. Tank cap lock
3.
Tank cap:
4. Bolt
5.
Cord clip:
6.
Cord storage hook:
7.
Handle release:
8.
.,’
Rear wheel cover
squeeze to dispense shampoo solution on carpets and rugs
holds tank securely in place during use,
holds cord in place.
for an automated referral of
OR
to speak with a representative
used with trigger to wrap cord for storage.
press with foot to release handle from lock position.
9.
Wheels:
to another.
10. Splash guard:
11. Tank support:
12. Nut
13. Tank:
cleaning solution for scrubbing floors.
Operate only at voltage specified on rear wheel cover.
This appliance is intended or household use.
To reduce the risk of electric shock, this appliance has a polarized plug
(one blade is wider than the other). This plug will fit in a polarized outlet
only one way. If the plug does not fit fully in the outlet, reverse the plug. If it
still does not fit, contact a qualified electrician to install the proper outlet. Do
not change the plug in any way.
allow shampoo-polisher to be tilted and moved from one area
prevents solution from splashing baseboards.
holds the tank.
holds shampoo solution for shampooing carpets and rugs; holds
4
Page 6
Assembly
1. Remove tank from shampoopolisher and remove nut, bolt and
cord clip from top of lower handle section.
2. Join upper and lower handles,
lining up holes. Place cord clip
around cord with flat side toward
handle and holes to front.
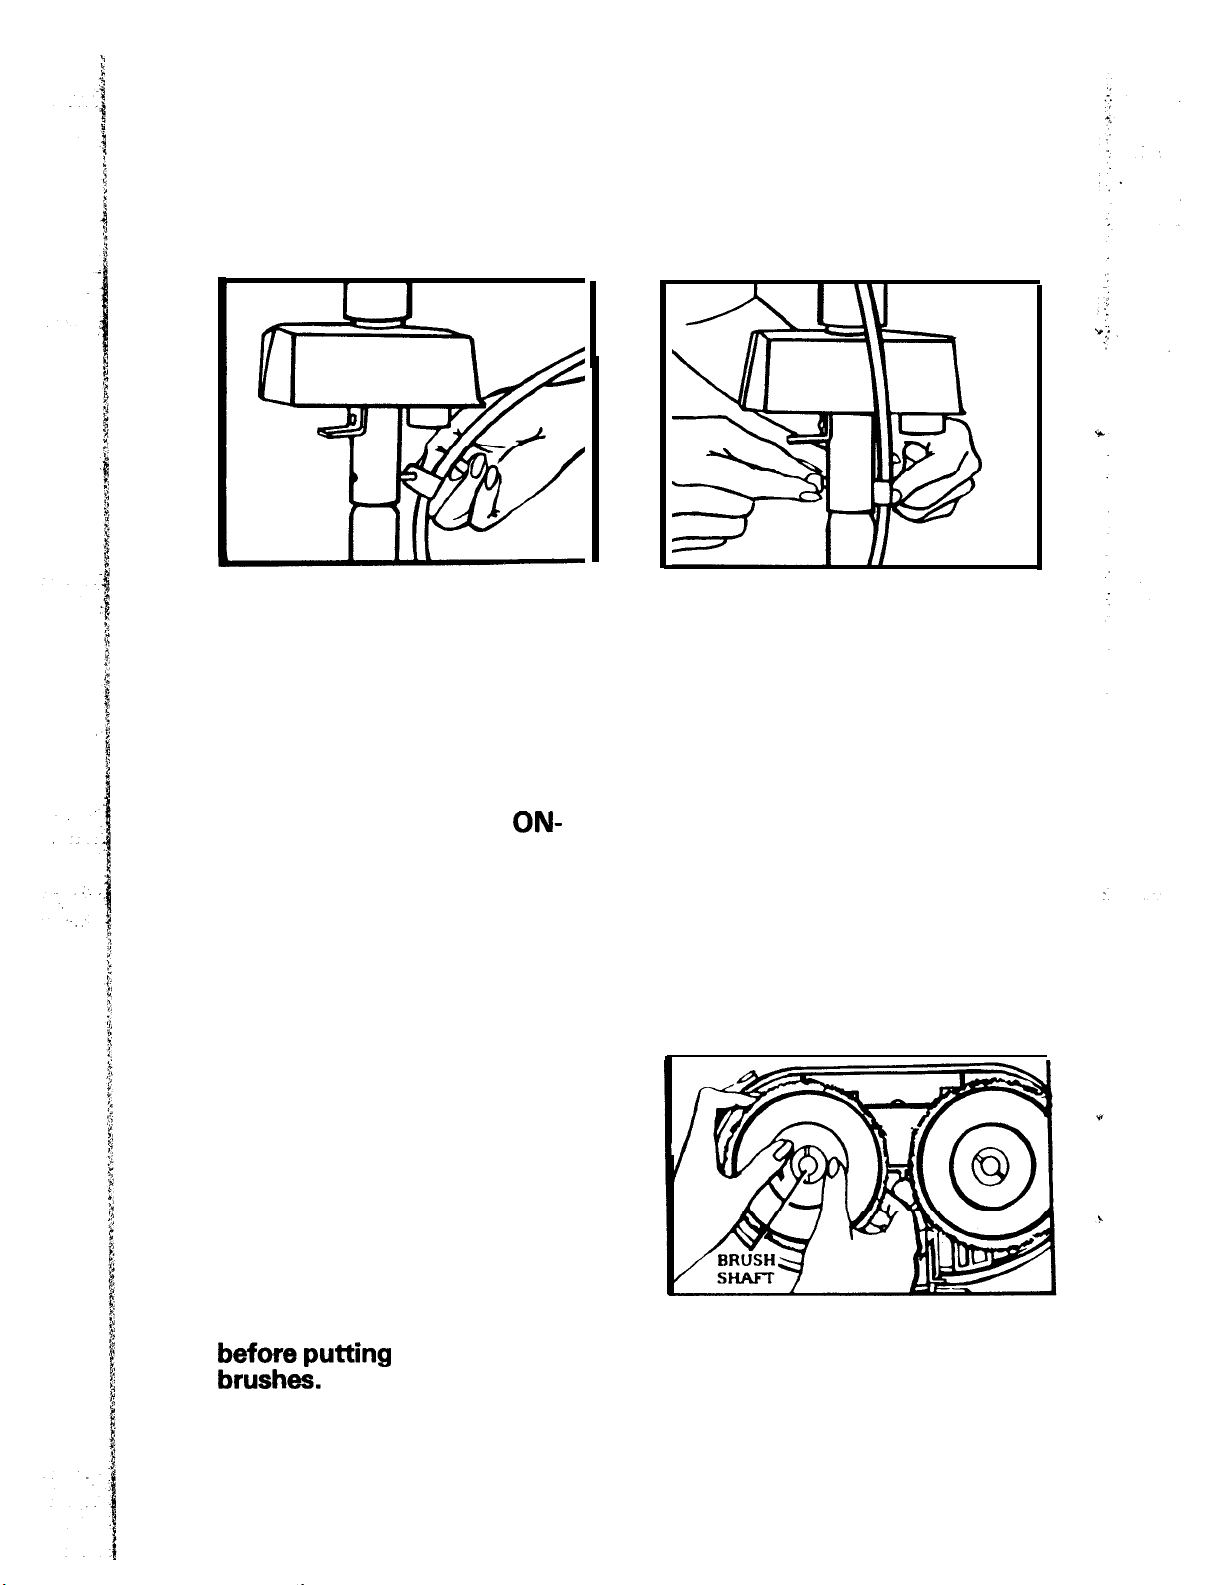
How to use
The shampoo-polisher’s
OFF switch is internal and is
operated by lowering and raising the handle. Be sure handle is
in lock (upright) position before
connecting power cord to wall
outlet.
Start shampoo-polisher by press-
ing handle release lever and
lowering handle. Raise handle to
lock position to stop shampoopolisher.
ON-
3. Insert bolt through cord clip,
and through small holes of handle; secure with nut. Pull up slack
in cord and tighten nut with
screwdriver.
To attach and
remove brushes
and pads
Disconnect from electric circuit
kWrheMputting
.
Place shampoo-polisher upside
down on flat surface.
5
on or removing
To attach brushes press each
brush down firmly over brush
shaft, rotating brush until it clicks
into position. To remove -grasp
center of brush with thumb and
fingers and lift up.
Page 7
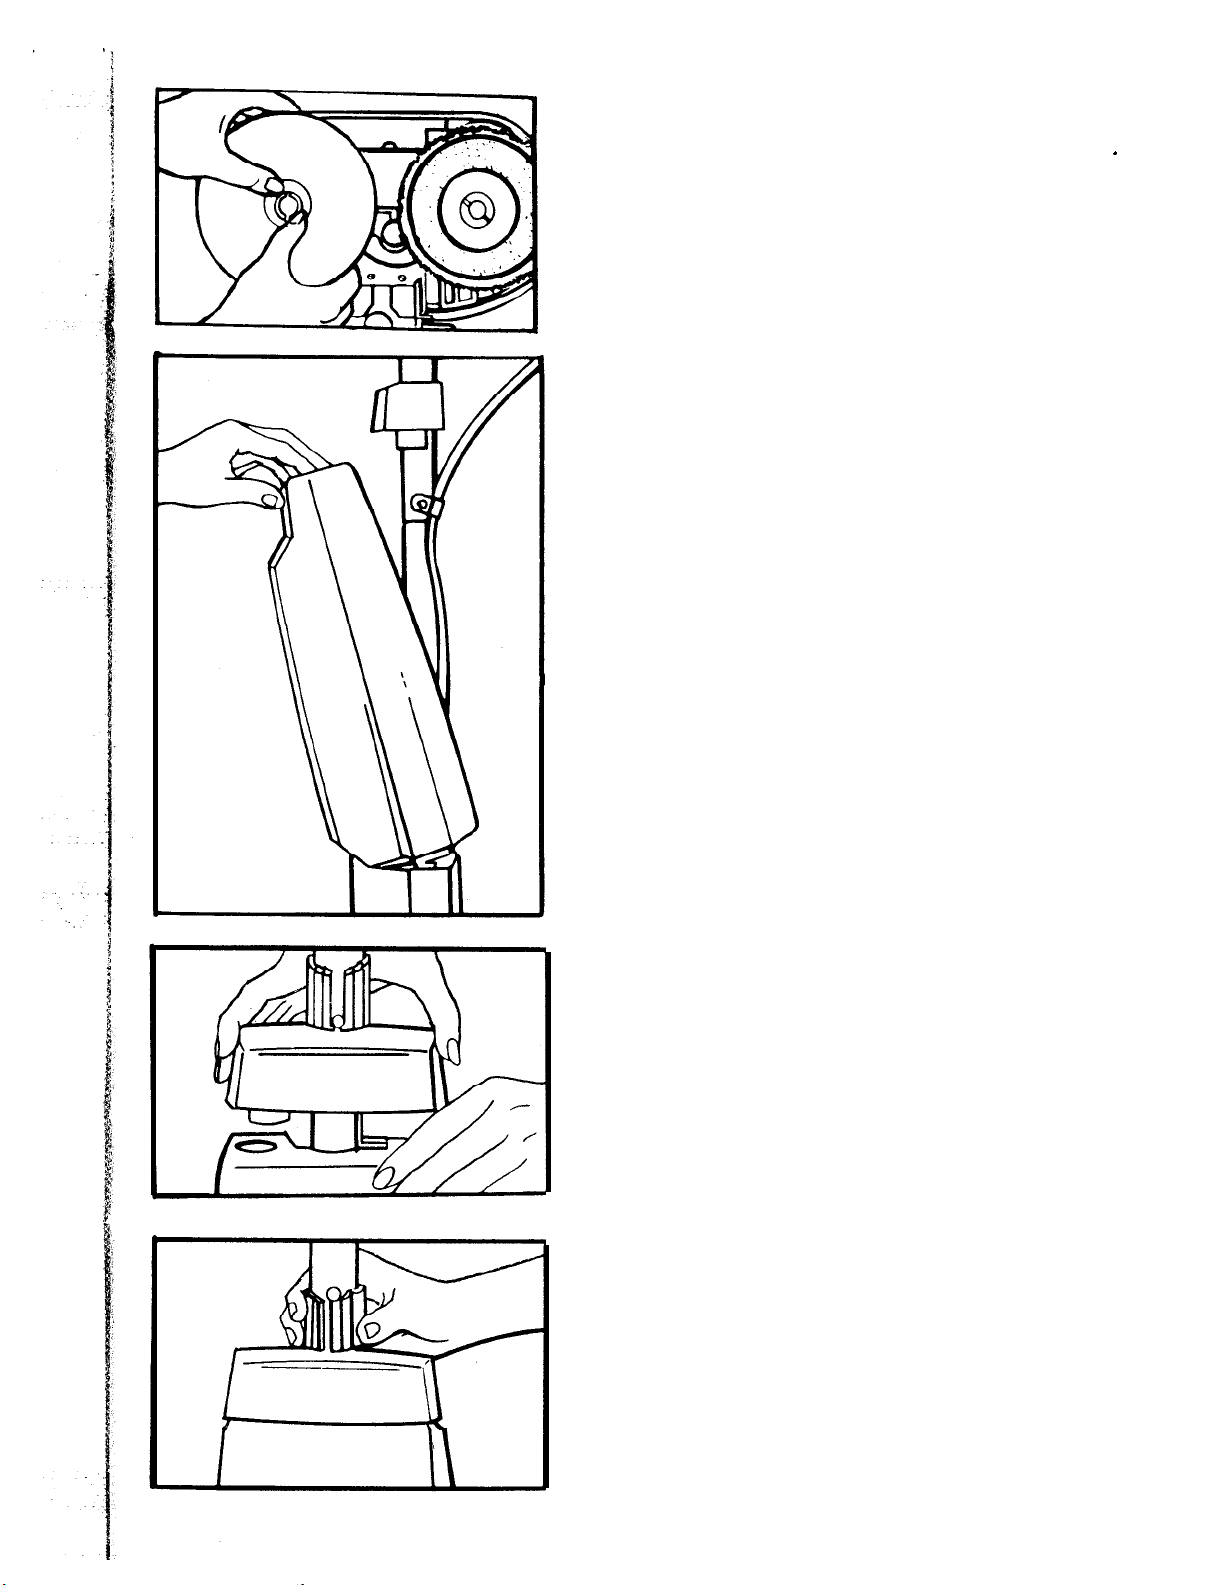
To attach pads,
fastener through opening in pad.
Place pad over
insert end of
scrubbing-wax-
ing-polishing brushes only.
The fastener fits around the
brush shaft. Press the fastener to
snap into place. Unsnap fastener
to remove pad.
To attach tank
Attach brushes and pads before
attaching tank.
Set bottom of tank into tank support.
.
Turn tank cap lock until the rivet
is directly above slot. Raise tank
cap lock and tank cap. Snap tank
against handle.
Push tank cap down. Slide cap
lock down and turn right or left to
lock tank and cap into position.
6
Page 8

To dispense solution
Squeeze trigger to dispense
cleaning solution onto carpet,
rug or floor.
To remove tank
Turn tank cap lock until the rivet
is directly above slot. Lift up lock
and tank cap.
-
Pull top of tank forward; lift tank
from shampoo-polisher.
1
Shampooing carpet and rugs
Use a carpet shampoo designed specifically for rotary and foam type
carpet shampooers.
Use shampoo only in concentration as recommended on container.
Use shampoo brushes only on
carpet and rugs.
Shampoo Brushes
Shampoo in dry weather or when your home is heated to insure fast dry-
ing of carpet.
Wool, wool blends and synthetic fiber can be shampooed successfully.
Cotton fibers are non-resilient,
water, and dry very slowly. Because of-these characteristics, it is not
recommended that you shampoo cotton rugs or carpet with your
shampoo-polisher.
7
“mat?” easily, absorb large quantities of
Page 9

Before you begin
1. Test for colorfastness
Apply some shampoo solution to a small inconspicuous area of the
carpet and rub with a white cloth. Check to see that color does not come
off on the cloth and that the color of the carpet is satisfactory after the
area dries.
2. Check effect of shampoo brushes
Attach shampoo brushes to shampoo-polisher. Prepare a small amount
of shampoo solution in the tank following directions on the shampoo
container. Attach tank and guide the shampoo-polisher over a small area
of the carpet. After shampooing this area, brush the pile in one direction
and let dry. Examine carpet for change in texture. Some carpets or rugs
with loop or twist pile show a change of texture when any cleaning ap-
pliance is used. If this change is not too great, it will not be apparent
after the entire area has been shampooed. The shampoo-polisher, used
according to directions, will leave carpet clean and bright with a
minimum of texture change. If these two tests have proven successful,
proceed with the following steps.
3,
Move furniture
Place plastic or aluminum foil pads under legs of furniture too heavy to
move, so metal slides or wood finishes will not stain carpet. If furniture is
moved back on damp carpet, place pads under legs. to avoid marks and
rust stains.
4. Vacuum thoroughly
Vacuum carpet to remove dust, sand, and lint. The quality of the shampooing job depends, to a great extent, on how thoroughly the dirt is
removed before shampooing.
5.
Remove stains
Special stain removal products are available for carpet and rugs. You
may also pretreat heavily soiled or stained areas by using the shampoo,
according to the instructions on the container.
Use dry cleaning fluid to remove spots which are not soluble in water,
such as grease or chewing gum.
Do not use shampoo-polisher to apply dry cleaning fluid.
Note: Some stains cannot be removed, such as ink, fruit, animal stains
and stains which have been on the carpet for a long time. Those stains
may become more apparent when the film of dirt has been removed by
shampooing.
6. Shampoo inaccessible areas
Dip a hand brush into a bowl of the shampoo solution and brush in-
accessible areas, such as under radiators. Do not pour leftover solution
in your shampoo-polisher. The lint in the solution may plug the tank.
8
Page 10

Using the shampoo
polisher
1. Attach shampoo
brushes.
Do not use scrubbing-waxing-
polishing brushes on carpet or
rugs. (Shampoo brushes are very
soft to protect fine rugs and
carpet.)
2. Fill tank
Prepare shampoo solution following directions on container.
Fill tank according to the area being shampooed. The tank holds a
maximum of 4 quarts (3.75 liters).
Each quart (liter) of solution will
shampoo an area approximately 3
ft.
x9ft. Umx3m).
CAUTION: Do not use all-purpose detergents, soaps, ammonia, or
washing soda. They can cause colors to run and may damage carpet
fibers. Liquid household detergents will not give satisfactory cleaning
results. The shampoo solution should be cool or lukewarm, as a hot
solution may fade colors or cause shrinkage.
1
liters
-2-
3. Shampoo carpet
Start at one end of the room and
work toward a door so that it will
not be necessary to walk on the
damp carpet. It is recommended
that an area 3 ft. x 3 ft.
be shampooed before moving to
another area. Start the shampoo-
polisher by lowering the handle.
Squeeze trigger intermittently to
apply the solution. Apply spar-
ingly in order not to soak the
carpet. The type of fiber, surface
texture, and height of pile will
determine how much solution
should be used. Guide shampoo-
polisher slowly, slightly overlap-
ping the strokes. Move forward
and backward until the 3 ft. x 3 ft.
area
(Im
x Im) is covered with
(Im
x
Im)
9
Page 11

foam. Crisscross area to work
foam uniformly into the carpet
(see illustration) until the foam
disappears. The final strokes over
each area should always be in the
same direction.
Repeat the process over another 3 ft. x 3 ft. area
the areas bv several inches. Continue until a 3 ft. (Im)
the carpet or rug has been cleaned.
(Im
x Im), overlapping
length the width of
4. Brush pile
Brush pile in one direction with a
long-handled brush, This speeds
the drying and gives a uniform
appearance. Use a forward and
backward stroke. After determin-
ing which direction looks best,
the last strokes should be in the
same direction on all areas of the
carpet. Repeat the process of
shampooing and brushing until
the entire carpet or rug has been
cleaned.
5. Allow carpet to dry
The length of time for drying varies; however, overnight drying is
desirable whenever possible. The use of an electric fan to speed drying is
helpful. If it is necessary to walk on the carpet before it is dry, place
towels or white cloths on the traffic areas. If furniture must be replaced
before the carpet is dry, use plastic or aluminum foil pads under legs
. .
of furniture so metal slides or wood finishes will not stain the carpet
or rug.
6. Vacuum dry carpet
Vacuum area thoroughly after it is dry to remove the dry detergent
and the dirt loosened by the cleaning process. Frequent vacuuming
during the first week after shampooing will enhance the appearance of
the carpet.
Drydeaning
The shampoo-polisher may be used to work dry-cleaning compounds or
powders into carpet or rugs. Do not put these substances into the tank
and be sure shampoo brushes are dry. Test a small area of carpet for col-
orfastness by sprinkling a small amount of powder and wiping with a
white cloth. Then check for texture change by using shampoo-polisher
with dry brushes in the same area. If color and texture are not affected,
follow directions on container for amounts to use and drying time. After
compound has dried, vacuum area thoroughly. Install a new disposable
bag in vacuum cleaner to insure complete removal of cleaning com-
pound and dirt. Frequent bag changes may be necessary when a
powdered dry-cleaning compound is used.
carpet
10
Page 12

Cleaning floors
There are two methods of cleaning hard surface floors:
1.
t
Water method - used for all floors that can be cleaned with soap or
detergent and water solution.
2. Solvent or solvent cleaning wax method - used for wood and sealed
cork floors that may be damaged by water solutions.
Water method
Linoleum, asphalt, rubber, vinyl, masonry and stone floors may be clean-
ed with a soap or detergent and water solution. Use the shampoo-
polisher to dispense cleaning solution and to scrub floor.
Do not use the water cleaning method on wood or cork floors.
1. Vacuum floor to remove loose dirt and litter.
2. Attach scrubbing-waxing-polishing brushes. If there is a heavy
accumulation of wax to remove, snap cleaning-waxing pads with
fasteners over brushes.
3. Remove tank. Fill with warm water mixed with 2 tablespoons medium
sudsing detergent or as directed on detergent container. Replace tank.
Concentrated ammonia solution must be used to remove some wax. If
using a product specifically for wax removal, read caution label and
follow instructions on container.
.’
.’
_:
4. Connect cord to a wall receptacle. Press handle release lever and start
shampoo-polisher by lowering the handle.
5. Start at the end of a room and apply solution to a 3 ft. x 6 ft.
area by squeezing the trigger
the area as necessary. When removing
remain on the floor 3-5 minutes. Do not
Wipe up suds with a dampened mop, sponge, or cloth.
6. Rinse floor thoroughly to completely remove cleaning solution and
eliminate dulling and streaking. Scrub and rinse each section of the floor
the same way.
7. Let the floor dry before waxing. Brushes should be rinsed to remove
detergent and allowed to dry before using them to polish or buff.
11
occasjonally..~Releasatthe,tr~igger
hardened wax,#$lciw~solution
letsolutibn,dry ort$he
(Im
x 2m)
and scrub
to
floor.
\
c
Page 13

Check this chart for floor care methods recommended for your floor.
Floors
Wood
Cleaning method
Solvent cleaning wax
Wax*
Solvent-Base
method - Use solvent
base liquid wax.
Linoleum
Water method - Use
Water-Base
mild soap or detergent and water solu-
tion.
Rubber tile Water method - Clean Water-Base
with detergent or
soap and water solu-
tion.
Vinyl
Water method - Clean Water-Base
with detergent or
soap and water solution.
Asphalt tile Water method - Use Water-Base
detergent or soap and
,
water solution.
Sealed cork
Ceramic, brick, slate,
terrazzo - Unglazed or
glazed.
No wax vinyl
*Never put any typ
e of wax in tank.
Solvent cleaning wax Solvent-Base
method - Clean with
solvent base liquid
wax, Floor must be
sealed.
Water method - Use
Solvent or Water-Base
soap or detergent (Wax only glazed or
solution.
Water method - Use
mild soap or deter-
sealed floor)
Only as specified by
manufacturer.
gent solution. Always
rinse.
12
Page 14

i
Check this chart for floor care methods recommended for your floor.
t
:
Floors
Cleaning method
Wax*
Wood
Solvent cleaning wax Solvent-Base
method - Use solvent
base liquid wax.
Linoleum
Water method - Use
Water-Base
mild soap or detergent and water
solu-
tion.
Rubber tile
Water method - Clean Water-Base
with detergent or
soap and water solution.
Vinyl Water method - Clean Water-Base
with detergent or
soap and water solution.
Asphalt tile
Water method - Use
Water-Base
detergent or soap and
water solution.
j
Sealed cork
I
!
I
I
.I
Solvent cleaning wax Solvent-Base
method - Clean with
solvent base liquid
wax. Floor must be
sealed.
t
Ceramic, brick, slate,
i
terrazzo - Unglazed or
i
glazed.
j
No wax vinyl
*Never put any typ
e of wax in tank.
Water method - Use Solvent or Water-Base
soap or detergent
solution.
Water method - Use
mild soap or deter-
(Wax only glazed or
sealed floor)
Only as specified by
manufacturer.
gent solution. Always
rinse.
12
Page 15

Solvent cleaning wax method
I
.I
Wood and sealed cork floors may be damaged by using water solutions;
therefore, use only those cleaners and waxes recommended specifically
for wood or cork.
The following directions are for cleaning wood or cork floors with a
cleaning polishing solvent base liquid wax.
1. Vacuum floor to remove loose dirt and litter. Wipe up sticky spots with
a damp cloth.
2. Apply wax-cleaner according to manufacturer’s instructions on the
container. Do not dispense wax from tank. Do not use shampoo-
polisher to apply solvent base liquid wax to the floor.
3. Refer to “Polishing and buffing floors”.
2
‘I
.-.
$
Waxing floors
There are two types of wax to use
solvent base.
on tlard surface floors: water-baselard surface floors: water-base
Water-base wax
Water-base wax is a self-polishing wax which does not contain a petroleum solvent. It can
be used on all hard surface floors
except wood and cork.
Follow the directions on the
container to apply. Do not
polish or buff this wax.
SELFSELF
POLlSHlNGPOLlSHlNG
WAXWAX
Water BaseWater Base
uu
Solvent-base wax
Solvent-base wax can be identified by the caution statement: “Flam-
mable” or “Combustible” on the label. It is used on wood or cork floors
and can be polished and buffed when dry. Do not use
on asphalt or rubber tile or other hard surface floors unless specified
by the manufacturer.
solGent-base
wax
Page 16

FLOOR
WAX
Solvent
Base
There are two kinds of solvent-
base wax: paste wax and liquid
polishing wax.
Paste wax
To spread wax evenly, attach
scrubbing-waxing-polishing
brushes to shampoo-polisher and
snap on cleaning-waxing pads.
Spread a thin coat of wax on
pads or spread a small amount on
floor with spatula. Start by pressing handle release lever and
lowering handle. Apply wax to
floor, by guiding in straight lines
or with grain of the wood, until
the wax is spread evenly.
Cleaning, polishing wax
This type of wax is used to clean
as well as wax floors. Apply wax
according to instructions on the
container. Use the shampoo-
polisher only to polish floors
when this type of wax is used.
Refer to section “Cleaning floors
-Solvent cleaning wax method”.
Polishing and
buffing floors
Floors waxed with solvent-base
wax may be polished and buffed
with the shampoo-polisher.
1. Be sure wax is thoroughly dry
before polishing. This usually
takes 20-30 minutes but may take
longer in damp weather.
2. Use
polishing brushes to polish floor.
Press handle release and start by
lowering handle. Guide the
shampoo-polisher in straight lines
or with the grain of the wood.
3. A double coat of wax will give
floors more protection. Let wax
dry thoroughly and polish after
each application.
scrubbing-waxing-
14
Page 17

To achieve a high lustre finish
1.
Attach felt buffing pads over scrubbing-waxing-polishing brushes using
fasteners. Polish to a soft shine by guiding shampoo polisher in straight lines
or with the grain of the wood. If more shine is desired proceed to step
2. Remove felt buffing pads and attach high lustre polishing pads
(available at additional cost). Once again, guide the handle in straight
lines or with the grain of the wood to achieve a high lustre finish.
2.
To keep floors bright and shiny
Floor should be buffed frequently to restore sheen and remove scratches
and marks. This lengthens the time between waxings. Before buffing,
use a vacuum cleaner to remove dust and dirt and damp cloth to remove
sticky particles. Stubborn spots, such as black heel marks, can be
removed by rubbing gently with very fine steel wool dampened with
wax.
If traffic areas need to be rewaxed and polished, and a solvent-base wax
has been used on the floor, apply wax only to these areas then buff the
entire floor.
,’
’
:
v
,.
Maintenance
The following section is concerned with proper maintenance. Familiarize
yourself with-these home maintenance tasks and keep this owner’s
manual in a convenient place where you can refer to it when needed.
Proper use and care will assure continued cleaning effectiveness.
Splash guard
Wipe splash guard with dry cleaning fluid or liquid soap to remove wax
and dirt after each use.
Tank and tubing
Wash and rinse tank after each
use. Occasionally unscrew the
cap on the bottom of the tank
and rinse cap with clear water to
prevent clogging of the opening.
Remove tubing occasionally to
wash and rinse.
. .
15
Page 18

Shampooer base
Remove brushes and dry bottom of shampoo-polisher with a paper towel
or cloth before storing.
Brushes
The brushes need to be washed in warm water and detergent to remove
wax. Rinse well. Shake to remove excess water. To dry, place on paper
towels with brushes turned toward towels. Let brushes dry before reattaching. To clean shampoo brushes, hold under warm water to remove any lint
that has collected. Wash cleaning-waxing pads the same way as brushes;
rinse, and shake water from them.
Felt and high lustre
polishing pads
The pads should be washed oc-
casionally to remove wax. If
shampoo-polisher does not glide
easily when buffing floors, it may
be due to an accumulation of
wax on the pads. Pads should be
washed in the same way as
brushes. Shake the high lustre
polishing pads several times
while drying to restore fluffiness.
Let pads dry thoroughly before
using. Felt pads will be damaged
if used while damp and neither
felt nor high lustre polishing pads
will polish well if they are not dry.
Storage
Wrap cord around cord storage
hook located at the bottom of the
tank housing, and then around
the trigger.
Store your shampoo-polisher in a
cleaning closet or convenient
place, ready for use. Hang it on
the wall or remove brushes and
store it with the handle in the
upright position. Never store it on
the brushes.
16
Page 19

If you have a problem
This appliance was inspected thoroughly and was in good operating condition
when it was shipped from the factory. If a minor problem occurs it usually can
be solved quite easily when the cause is found. Therefore, this check list is
provided for your convenience.
Problem Possible cause
Sham-
poo-Pol-
isher
won’t run
Sham-
poo-Pol-
isher
won’t
pense
solution
Shampoo-Polisher
does not
glide easily
1. Not firmly plugged in.
2. No voltage in wall plug.
3. Blown fuse/tripped
breaker.
1. Tank valve clogged.
dis-
1. Brushes and pads not properly attached.
2. Accumulation of wax on
felt pads.
Possible solution
1. Plug unit in firmly.
2. Check fuse or breaker.
3. Replace fuse/ reset
breaker.
1. Unscrew cap on bottom
of tank and rinse cap
with water to clear
obstruction.
1. Attach brushes and pads
properly.
2. Wash and dry pads
thoroughly.
Service
To obtain approved HOOVER service and genuine HOOVER parts, locate
the nearest
Warranty Service Dealer (Depot)
Hoover Factory Service Center or Authorized Hoover
by:
0
checking the Yellow Pages under “Vacuum Cleaners
Household” OR
l
checking the list of Factory Service Centers provided
with this cleaner OR
l
calling l-800-944-9200 for an automated referral of
authorized service outlet locations (U.S. only)
-
-
-
v.
i
Do not
service, this will only result in delay.
If further assistance is needed,
Response Center, North Canton, Ohio
In Canada,
Phone:
Always identify your cleaner by the
ing information or ordering parts. (The model number appears on the rear
wheel cover of the shampoo-polisher.)
17
send your cleaner to The Hoover Company in North Canton for
contact The Hoover Company Consumer
44720
contact Hoover Canada, Burlington, Ontario
1-800-263-6376.
complete
Phone:
model number when request-
330-499-9499.
L7R 4A8,
Page 20

-3
3
?
:
t
pr
/
<
I.
I
Servicing of Double-Insulated
Appliances
This appliance is double insulated. In a double-insulated appliance, two
systems of insulation are provided instead of grounding. No grounding
means is provided on a double-insulated appliance, nor should a means for
grounding be added. Servicing a double-insulated appliance requires
extreme care and knowledge of the system, and should be done only by
qualified service personnel.
those part being replaced.
the words “DOUBLE-INSUlATION” or “DOUBLE INSULATED”. The
symbol q may also be marked on the appliance.
Replacement parts must be identical to
A double-insulated appliance is marked with
Lubrication
The motor is equipped with two sleeve bearings. These bearings contain
sufficient lubrication for the life of the motor. The addition of lubricant could
cause damage.
Therefore, do not add lubricant to either motor bearing.
-,
:
18
Page 21

Floor care hints
Floors may be difficult to care for when not treated properly. Refer to the
chart below for solutions to floor problems.
Problem
ZiJ)“W
Dull floor
Streaked
Floor
Cause
Too much wax. Remove wax. Apply thin even coat.
Detergent not
ed from floor.
Floor not dry when
wax applied. ly before rewaxing.
Floor not polished Polish with polishing brushes; then
properly.
Not enough wax.
Floor not dry when
wax applied.
Floor not clean
when wax applied.
Uneven application
of wax.
Heavy build-up of
wax.
Applying one type
of wax over
another.
rins-
Solution
Remove wax. Rinse detergent from
floor before rewaxing.
Remove wax. Let floor dry thoroug-
buff.
Apply another thin coat of wax.
Polish and buff.
Clean and rewax floor.
Clean and rewax floor.
Clean and rewax floor. Apply wax
evenly.
Remove wax, then apply thin coat.
Clean and rewax floor. (Use only
one type of wax on floor.
1
Floor not properly
cleaned or rinsed.
Oil mop used on
floor.
Yellow or Too many
Grayed
Fioors
Scratched
Floor
Black
Marks
Powdering
of wax
tions of wax.
Too much wax in Clean and rewax floor. (Apply only
areas of light
fit.
Gritty dirt on floor.
Scuffing from
ber heels.
Self-polishing wax
applied over
vent-base wax.
applica-
traf-
rub-
sol-
Clean and rewax floor.
Clean and rewax floor. (Do not use
oil mop on waxed floor.
Clean and rewax floor. Apply thin
coat of wax.
one coat of wax in these areas.
Clean and rewax floor. If floor is
waxed, only wax gets scratched.
(Use vacuum cleaner to remove
dirt.)
To remove from waxed floor,
dampen fine steel wool with wax
and rub spots. Polish.
Clean and rewax floor. (Do not mix
waxes.)
1
1
19
Floor not clean
when wax applied.
Clean and rewax floor.
Page 22

:.
;.
Accessories
(Available at your Hoover Dealer
(Depot) or Hoover Factory Service
Center at a slight additional cost.)
,.
Steel wool pads
vent-base paste wax. Snap on
over
scrubbing-waxibg-polishing
for applying sol-
High lustre polishing pads
for
polishing furniture and floors.
Snap on over
scrubbing-waxing-
brushes. polishing brushes.
.^”
HOOVER and
are registered trademarks
THE HOOVER COMPANY, NORTH CANTON, OHIO 44720
R6 3-96 F4255, F4255-040
Litho
USA
56518-060 ;
.-
-,
 Loading...