

Hoover SH40055 Owner’s Manual
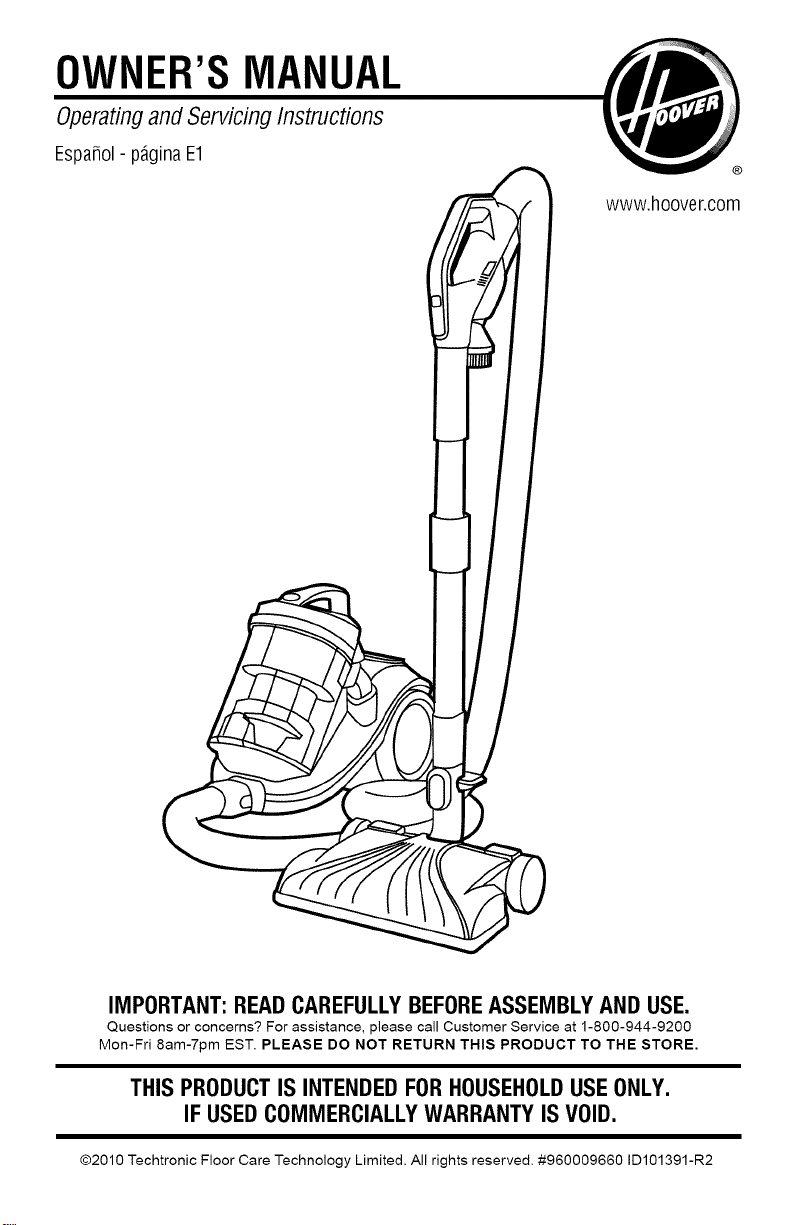
OWNER'SMANUAL
Operatingand Servicing Instructions
Espa_ol- pdginaE1
®
www.h00ver.c0m
IMPORTANT:READCAREFULLYBEFOREASSEMBLYAND USE.
Questions or concerns? For assistance, please call Customer Service at 1-800-944-9200
Mon-Fri 8am-7pm EST. PLEASE DO NOT RETURN THIS PRODUCT TO THE STORE.
THIS PRODUCTIS INTENDEDFORHOUSEHOLDUSEONLY.
IF USEDCOMMERCIALLYWARRANTYIS VOID.
@2010 Techtronic Floor Care Technology Limited. All rights reserved. #960009660 ID101391-R2
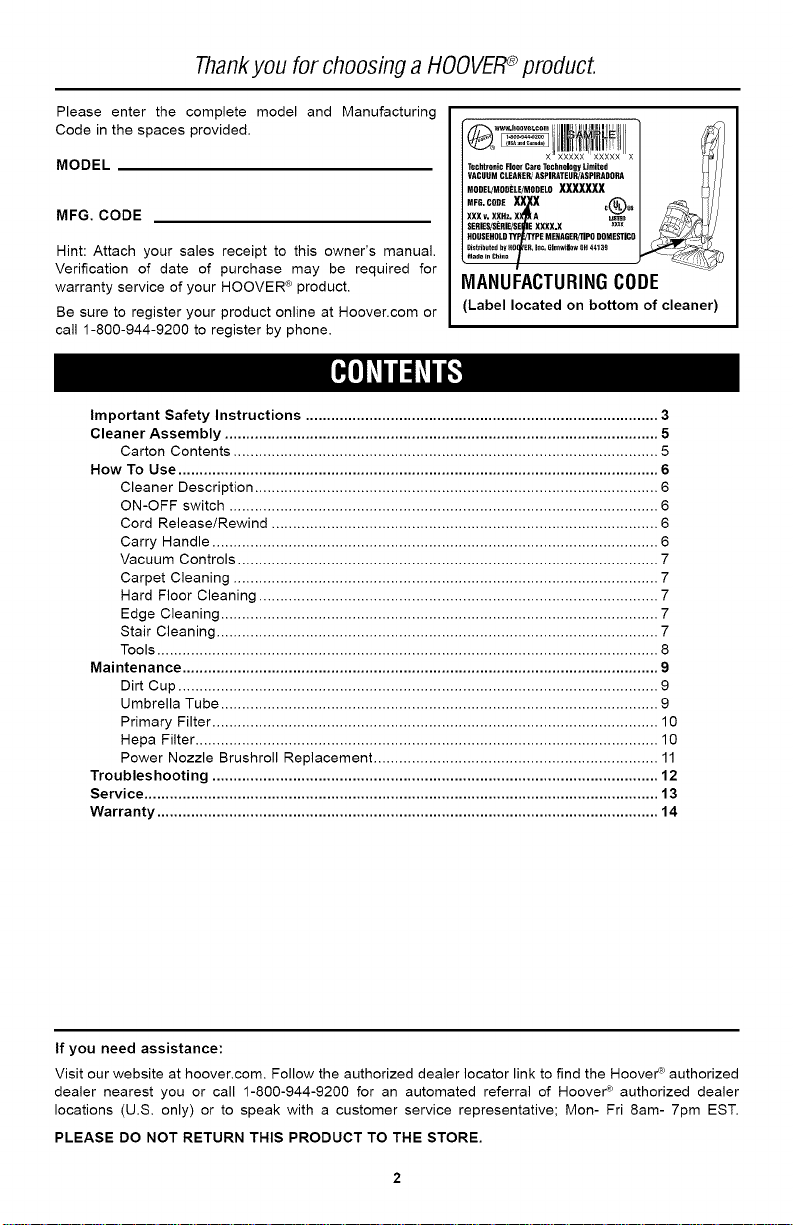
Thankyou for choosing a HOOVER_ product.
Please enter the complete model and Manufacturing
Code in the spaces provided.
MODEL
MFG. CODE
Hint: Attach your sales receipt to this owner's manual.
Verification of date of purchase may be required for
warranty service of your HOOVER ® product.
Be sure to register your product online at Hoover.com or
call 1-800-944-9200 to register by phone.
Important Safety Instructions ................................................................................... 3
Cleaner Assembly ...................................................................................................... 5
Carton Contents .................................................................................................... 5
How To Use ................................................................................................................. 6
Cleaner Description ............................................................................................... 6
ON-OFF switch ..................................................................................................... 6
Cord Release/Rewind ........................................................................................... 6
Carry Handle ......................................................................................................... 6
Vacuum Controls ................................................................................................... 7
Carpet Cleaning .................................................................................................... 7
Hard Floor Cleaning .............................................................................................. 7
Edge Cleaning ....................................................................................................... 7
Stair Cleaning ........................................................................................................ 7
Tools ...................................................................................................................... 8
Maintenance ................................................................................................................ 9
Dirt Cup ................................................................................................................. 9
Umbrella Tube ....................................................................................................... 9
Primary Filter ......................................................................................................... 10
Hepa Filter ............................................................................................................. 10
Power Nozzle Brushroll Replacement ................................................................... 11
Troubleshooting ......................................................................................................... 12
Service ......................................................................................................................... 13
Warranty ...................................................................................................................... 14
Techtronio Floor CaTe Teohnelegy Limited
VACUUM CLEANER/ASPIRATE UR/ASPIUADORA
MODEi/MOUELE/MOUELO
,FUOU. 0¢0,
XXXv, XXUz,
SEUIES!SERIE/SESE_EXEXXXX.X xxxx
HOUSEHOLD 1 IrF_rfPE MENAGER/T]PO DOMESTiCO
MANUFACTURINGCODE
(Label located on bottom of cleaner)
If you need assistance:
Visit our website at hoover.com. Follow the authorized dealer Iocator link to find the Hoover e_authorized
dealer nearest you or call 1-800-944-9200 for an automated referral of Hoover ® authorized dealer
locations (U.S. only) or to speak with a customer service representative; Mort- Fri 8am- 7pm EST.
PLEASE DO NOT RETURN THIS PRODUCT TO THE STORE.
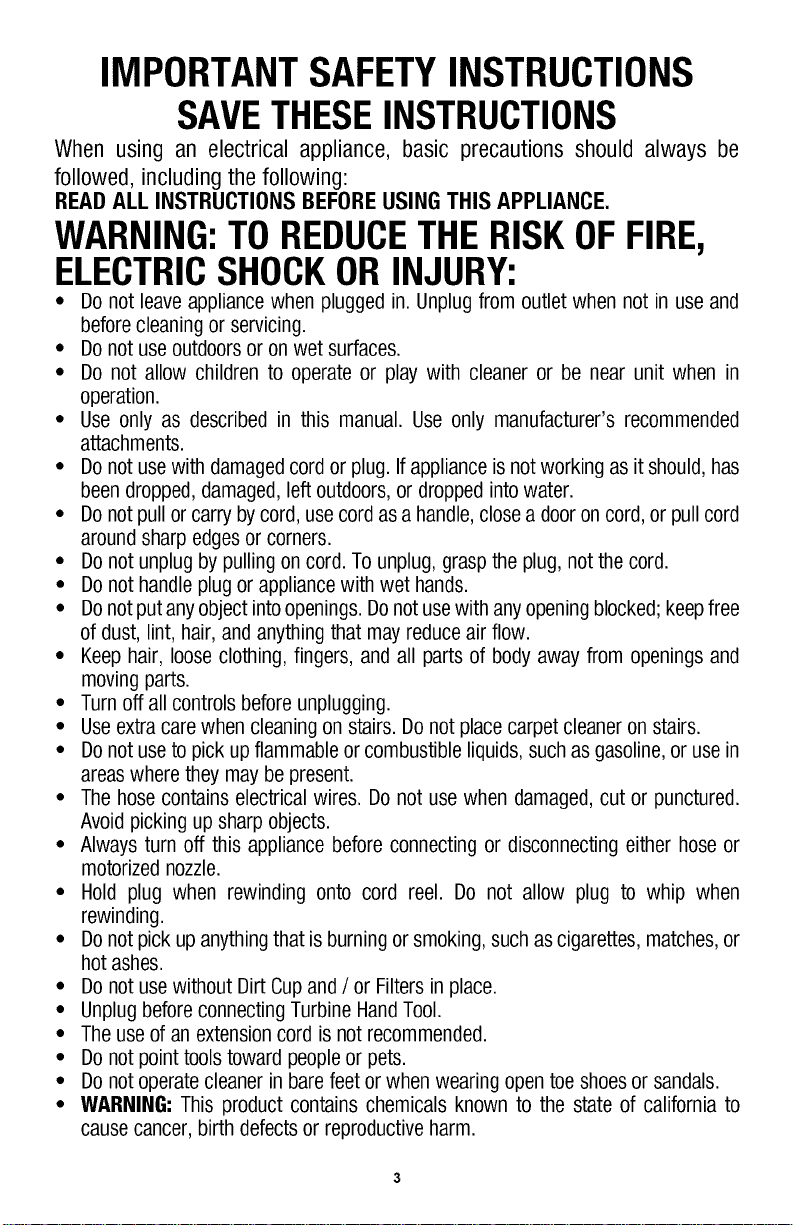
IMPORTANTSAFETYINSTRUCTIONS
SAVETHESEINSTRUCTIONS
When using an electrical appliance, basic precautions should always be
followed, including the following:
READ ALL INSTRUCTIONS BEFORE USING THIS APPLIANCE.
WARNING:TOREDUCETHERISKOFFIRE,
ELECTRICSHOCKORINJURY:
• Do not leaveappliance when plugged in. Unplug from outlet when not in useand
before cleaning or servicing.
• Do not use outdoors or on wet surfaces.
• Do not allow children to operate or play with cleaner or be near unit when in
operation.
• Use only as described in this manual. Use only manufacturer's recommended
attachments.
• Do not use with damaged cord or plug. Ifappliance is not working as it should, has
been dropped, damaged, left outdoors,or droppedinto water.
• Do notpull or carry by cord, use cord asa handle, close a dooron cord, or pullcord
around sharp edgesor corners.
• Do not unplug by pulling on cord. Tounplug, graspthe plug, not the cord.
• Donot handle plug or appliance with wet hands.
• Donot put anyobject into openings. Do not usewith anyopeningblocked; keep free
of dust, lint, hair, and anything that may reduce air flow.
• Keep hair, loose clothing, fingers, and all parts of body away from openings and
moving parts.
• Turn off all controls before unplugging.
• Useextra care when cleaningon stairs. Donot place carpet cleaneron stairs.
• Donot useto pickup flammable or combustible liquids, suchas gasoline, or use in
areas where they may be present.
• The hose contains electrical wires. Do not usewhen damaged, cut or punctured.
Avoid picking up sharp objects.
• Always turn off this appliance before connecting or disconnecting either hose or
motorized nozzle.
• Hold plug when rewinding onto cord reel. Do not allow plug to whip when
rewinding.
• Donot pick up anything that is burning or smoking, such as cigarettes, matches,or
hot ashes.
• Donot use without Dirt Cupand / or Filtersin place.
• Unplug before connecting Turbine Hand Tool.
• The use of an extension cord is not recommended.
• Donot point tools toward peopleor pets.
• Donot operate cleaner in bare feet or when wearing open toe shoes or sandals.
• WARNING"This product contains chemicals known to the state of california to
cause cancer, birth defectsor reproductive harm.

Aninternalthermalprotectorhasbeendesignedintoyourcleanertoprotectitfrom
overheating.Whenthethermalprotectoractivates,thecleanerwillstoprunning.If
thishappens,proceedasfollows:
1.TurnthecleanerOFFanddisconnectitfromtheelectricaloutlet.
2.CheckPrimaryFilter,HEPAFilter,andUmbrellaTubefordirtaccumulation.
3.Referto"Troubleshooting"section.
4.Whencleanerisunpluggedandthemotorcoolsfor30minutes,thethermal
protectorautomaticallyresetsandcleaningmaycontinue.
Ifthethermalprotectorcontinuestoactivateafterfollowingtheabovesteps,your
cleanermayneedservicing(see"Service"section).
CAUTION:
TO REDUCETHERISKOFDAMAGE:
• Avoidpicking up hard,sharpobjects with this product,asthey maycausedamage.
• Store in a dry place. Do not expose machine to freezing temperatures.
• Do not use sharp objects to clean out hoseas they can cause damage.
WARNING:
• To reducethe risk of electric shock, this appliance has a polarizedplug (one blade
is wider than the other).This plug will fit ina polarizedoutlet only one way. If the
plug does not fit fully in the outlet, reverse the plug. If it still does not fit, contact a
qualified electricanto install the proper outlet. Donot change the plug in any way.
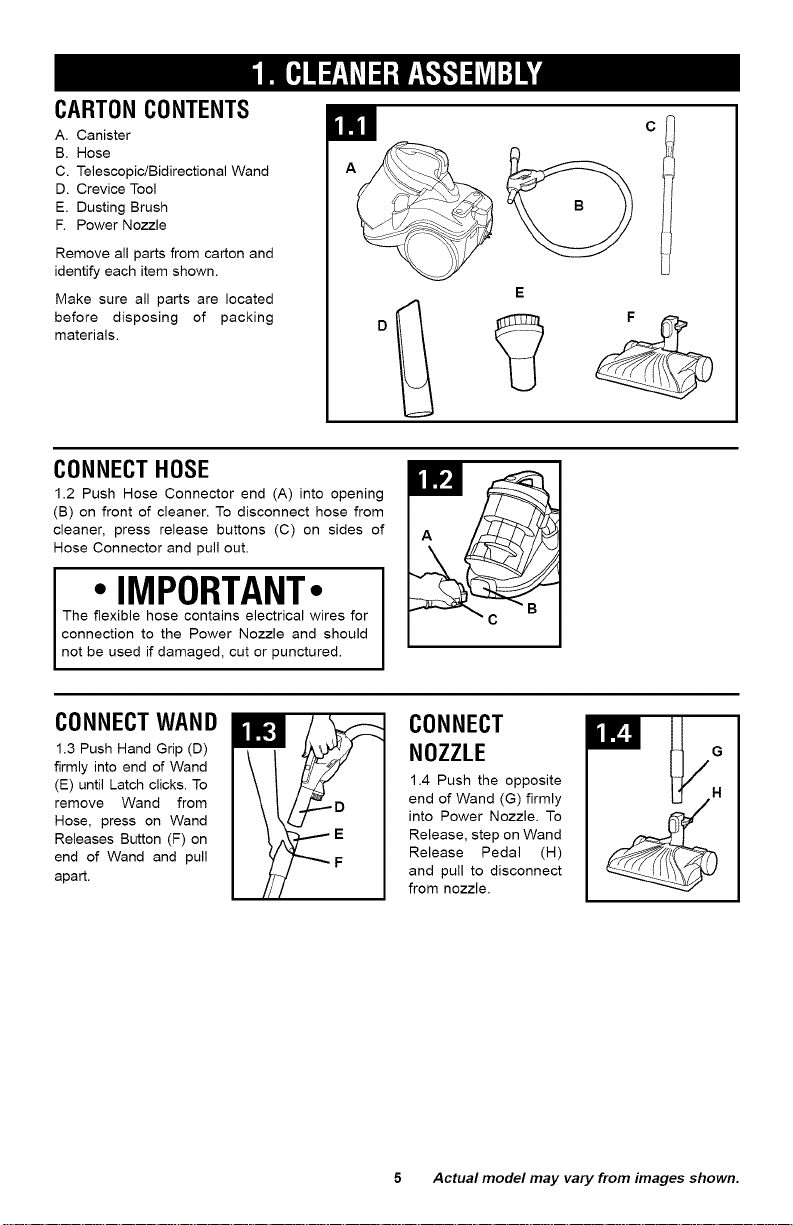
CARTON CONTENTS
A. Canister
B. Hose
C. Telescopic/Bidirectional Wand
D. Crevice Tool
E. Dusting Brush
R Power Nozzle
Remove all parts from carton and
identify each item shown.
Make sure all parts are located
before disposing of packing
materials.
CONNECTHOSE
1.2 Push Hose Connector end (A) into opening
(B) on front of cleaner. To disconnect hose from
cleaner, press release buttons (C) on sides of
Hose Connector and pull out.
• IMPORTANT-
The flexible hose contains electrical wires for
connection to the Power Nozzle and should
not be used if damaged, cut or punctured.
E
CONNECTWAND
1.3 Push Hand Grip (D)
firmly into end of Wand
(E) until Latch clicks. To
remove Wand from
Hose, press on Wand
Releases Button (F) on
end of Wand and pull
apart.
CONNECT
NOZZLE
1.4 Push the opposite
end of Wand (G) firmly
E
F
into Power Nozzle. To
Release, step on Wand
Release Pedal (H)
and pull to disconnect
from nozzle.
5 Actual model may vary from images shown.
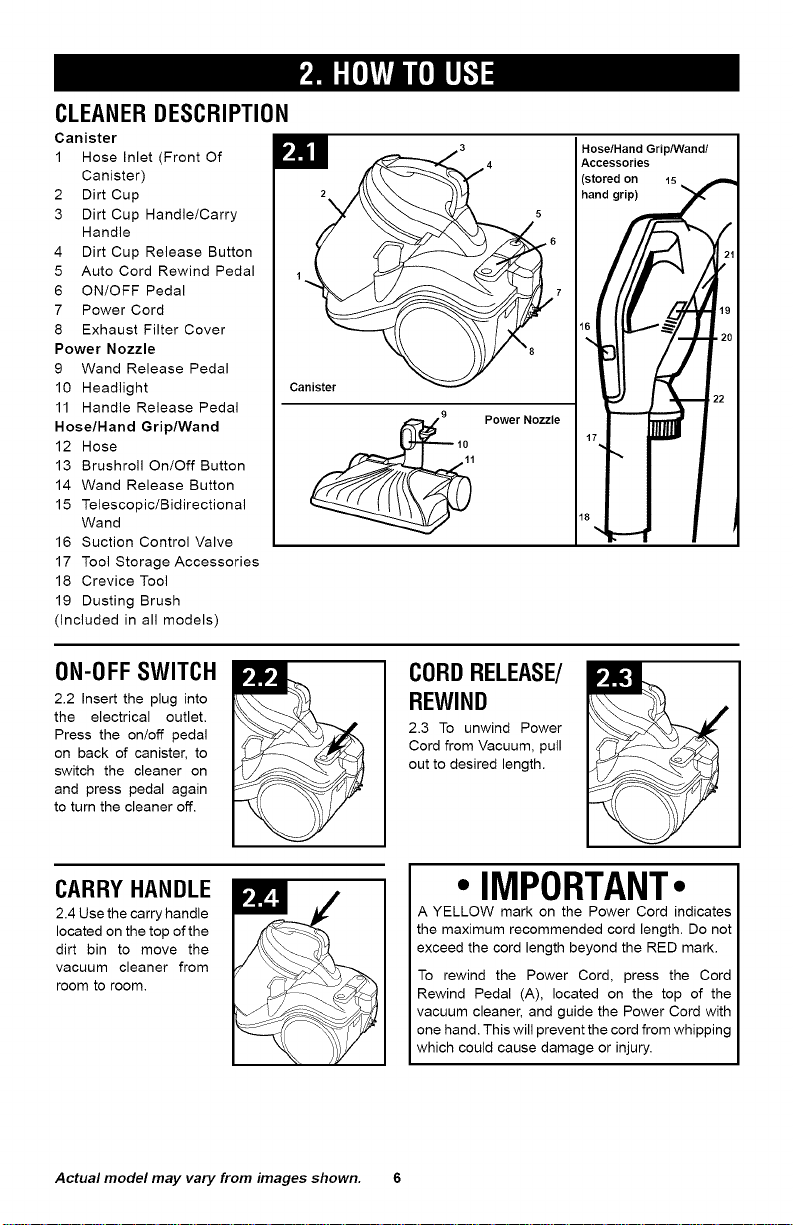
CLEANERDESCRIPTION
Canister
1 Hose Inlet (Front Of
Canister)
2 Dirt Cup
3 Dirt Cup Handle/Carry
Handle
4 Dirt Cup Release Button
5 Auto Cord Rewind Pedal
6 ON/OFF Pedal
7 Power Cord
8 Exhaust Filter Cover
Power Nozzle
9 Wand Release Pedal
10 Headlight
11 Handle Release Pedal
Hose/Hand Grip/Wand
12 Hose
13 Brushroll On/Off Button
14 Wand Release Button
15 Telescopic/Bidirectional
Wand
16 Suction Control Valve
17 Tool Storage Accessories
18 Crevice Tool
19 Dusting Brush
(included in all models)
Canister
9
Power Nozzle
Hose/Hand GripNVand/
Accessories
stored on 15
hand grip)
17
1
ON-OFF SWITCH
2.2 Insert the plug into
the electrical outlet.
Press the on/off pedal
on back of canister, to
switch the cleaner on
and press pedal again
to turn the cleaner off.
CARRY HANDLE
2.4 Use the carry handle
located on the top of the
dirt bin to move the
vacuum cleaner from
room to room.
Actual model may vary from images shown. 6
CORDRELEASE/
REWIND
2.3 To unwind Power
Cord from Vacuum, pull
out to desired length.
• IMPORTANT.
A YELLOW mark on the Power Cord indicates
the maximum recommended cord length. Do not
exceed the cord length beyond the RED mark.
To rewind the Power Cord, press the Cord
Rewind Pedal (A), located on the top of the
vacuum cleaner, and guide the Power Cord with
one hand. This will prevent the cord from whipping
which could cause damage or injury.
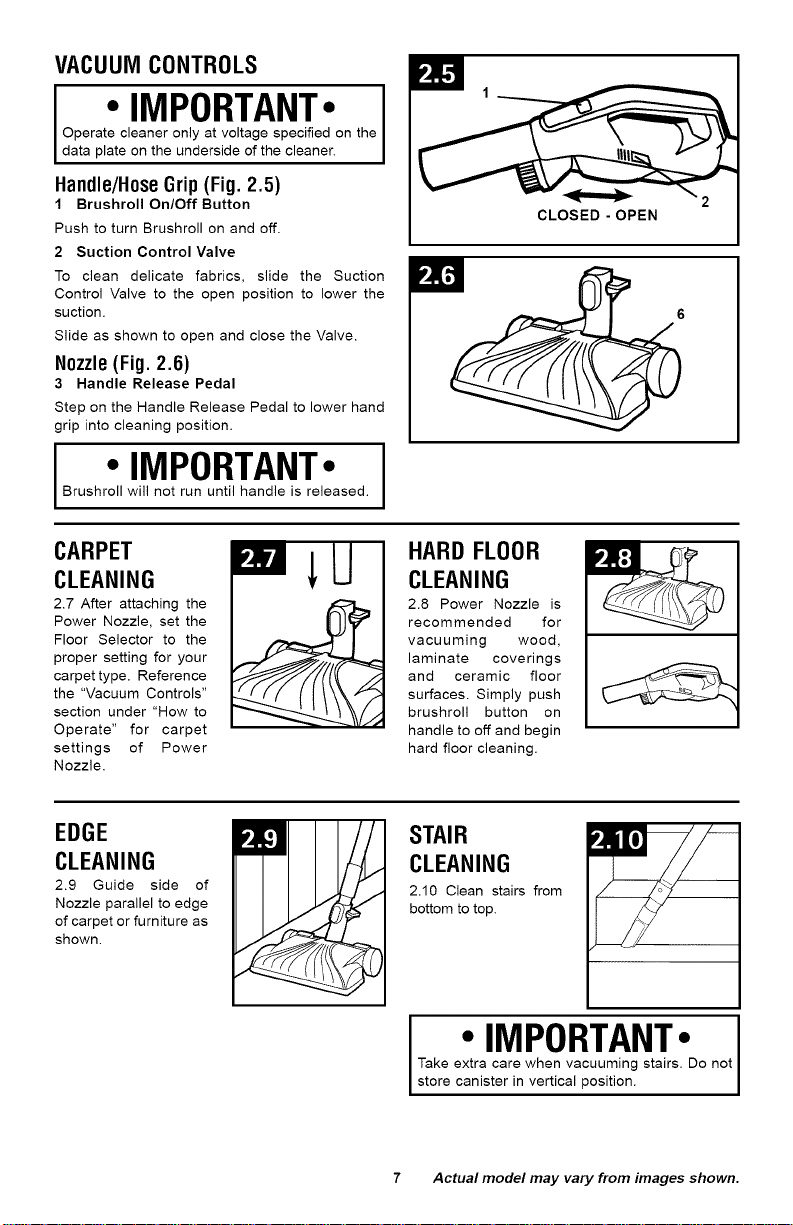
VACUUM CONTROLS
Operate cleaner only at voltage specified on the
I • IMPORTANT. I
data plate on the underside of the cleaner.
Handle/HoseGrip (Fig. 2.5)
1 Brushroll On/Off Button
Push to turn Brushroll on and off.
2 Suction Control Valve
To clean delicate fabrics, slide the Suction
Control Valve to the open position to lower the
suction.
Slide as shown to open and close the Valve.
Nozzle(Fig. 2.6)
3 Handle Release Pedal
Step on the Handle Release Pedal to lower hand
grip into cleaning position.
• IMPORTANT. IBrushroll will not run until handle is released.
CLOSED-OPEN
CARPET
CLEANING
2.7 After attaching the
Power Nozzle, set the
Floor Selector to the
proper setting for your
carpet type. Reference
the "Vacuum Controls"
section under "How to
Operate" for carpet
settings of Power
Nozzle.
EDGE
CLEANING
2.9 Guide side of
Nozzle parallel to edge
of carpet or furniture as
shown.
HARD FLOOR
CLEANING
2.8 Power Nozzle is
recommended for
vacuuming wood,
laminate coverings
and ceramic floor
surfaces. Simply push
brushroll button on
handle to off and begin
hard floor cleaning.
STAIR
CLEANING
2.10 Clean stairs from
bottom to top.
Take extra care when vacuuming stairs. Do not
• IMPORTANT. I
store canister in vertical position.
7 Actual model may vary from images shown.
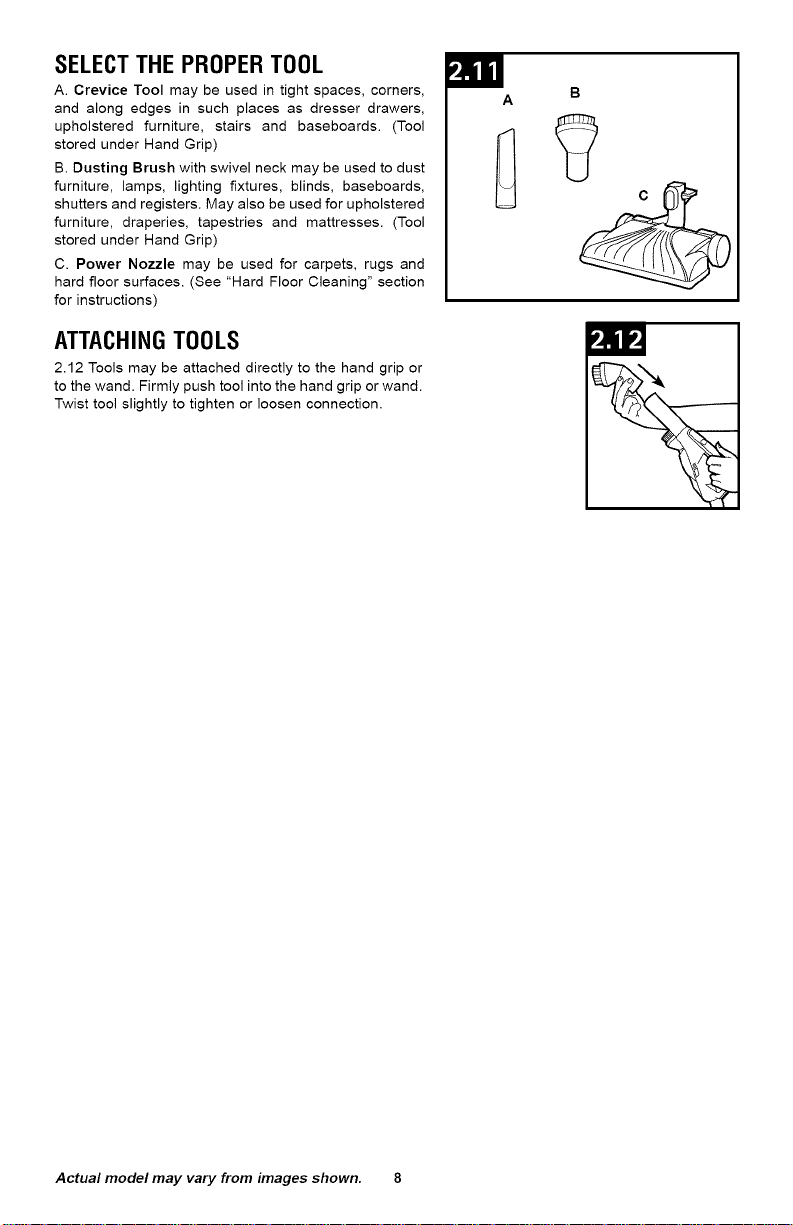
SELECTTHE PROPER TOOL
A. Crevice Tool may be used in tight spaces, corners,
and along edges in such places as dresser drawers,
upholstered furniture, stairs and baseboards. (Tool
stored under Hand Grip)
B. Dusting Brush with swivel neck may be used to dust
furniture, lamps, lighting fixtures, blinds, baseboards,
shutters and registers. May also be used for upholstered
furniture, draperies, tapestries and mattresses. (Tool
stored under Hand Grip)
C. Power Nozzle may be used for carpets, rugs and
hard floor surfaces. (See "Hard Floor Cleaning" section
for instructions)
ATTACHINGTOOLS
2.12 Tools may be attached directly to the hand grip or
to the wand. Firmly push tool into the hand grip or wand.
Twist tool slightly to tighten or loosen connection.
i_lJJ
Actual model may vary from images shown. 8
Familiarizeyourselfwiththesehomemaintenancetasksasproperuseandcareofyourcleanerwillensure
continuedcleaningeffectiveness.
Anyotherservicingshouldbedonebyanauthorizedservicerepresentative.
CAUTIONA
Always unplug the vacuum cleaner from the electrical outlet before performing any general
maintenance.
Do not use cleaner without Dirt Cup, Umbrella Tube or Filters in place.
It is recommended that you clean the Filters every time the Dirt Cup is emptied for consistent cleaning
performance of your machine.
Very fine materials, such as face powder or cornstarch, may clog the filter and cause a reduction in
performance. When using the cleaner for this type of dust, empty the cup and clean the filters often.
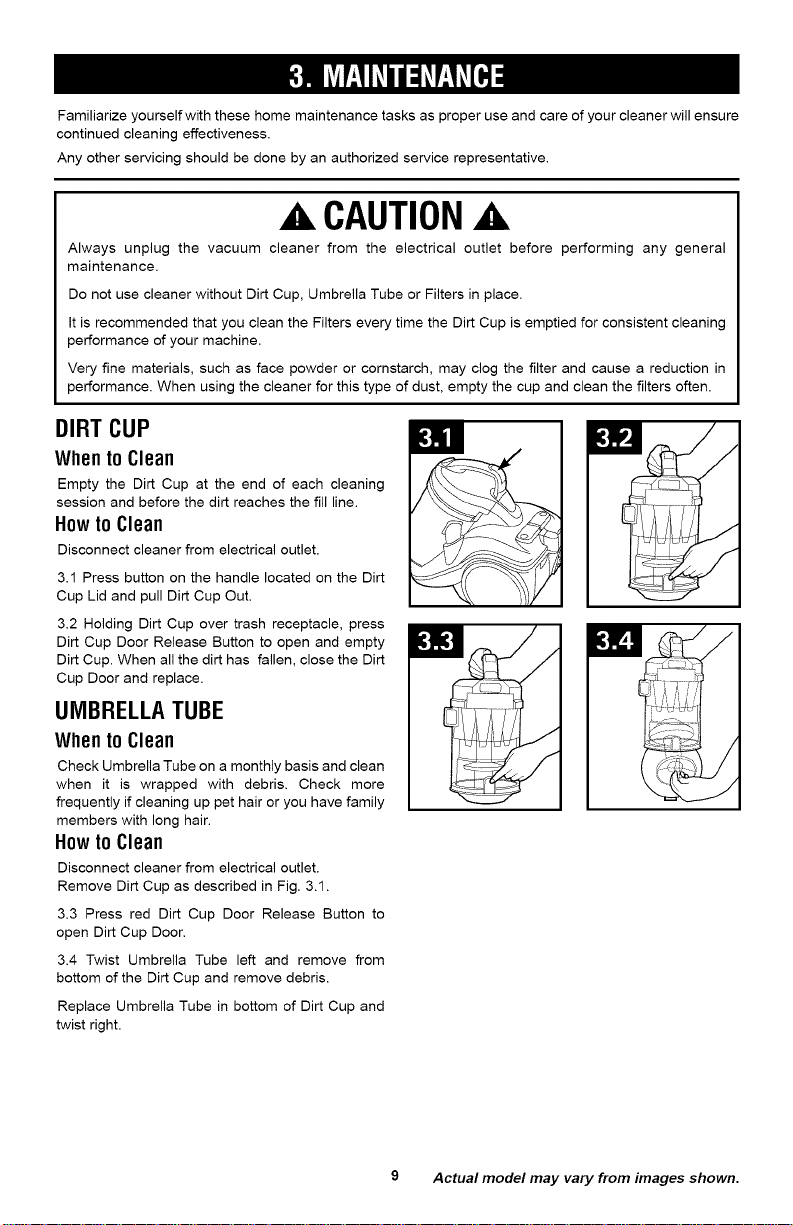
DIRT CUP
Whento Clean
Empty the Dirt Cup at the end of each cleaning
session and before the dirt reaches the fill line.
Howto Clean
Disconnect cleaner from electrical outlet.
3.1 Press button on the handle located on the Dirt
Cup Lid and pull Dirt Cup Out.
3.2 Holding Dirt Cup over trash receptacle, press
Dirt Cup Door Release Button to open and empty
Dirt Cup. When all the dirt has fallen, close the Dirt
Cup Door and replace.
UMBRELLATUBE
Whento Clean
Check Umbrella Tube on a monthly basis and clean
when it is wrapped with debris. Check more
frequently if cleaning up pet hair or you have family
members with long hair.
Howto Clean
Disconnect cleaner from electrical outlet.
Remove Dirt Cup as described in Fig. 3.1.
3.3 Press red Dirt Cup Door Release Button to
open Dirt Cup Door.
3.4 Twist Umbrella Tube left and remove from
bottom of the Dirt Cup and remove debris.
Replace Umbrella Tube in bottom of Dirt Cup and
twist right.
9 Actual model may vary from images shown.
 Loading...