

Hoover SE71WR01 Instruction Manual
®
®
PRINTED IN P.R.C.
48003015
INSTRUCTION MANUAL
SPRINT BAGLESS
S*
W
1
V*
A
B
C
D
T*
U*
H
I*
E
F
J
K*
L
M
N
O
P
Q
R
G
ENGLISH GB
SLOVENČINA SK
MAGYAR HU
POLSKI PL
ČESKY CZ
*pouze některé modely
*len niektoré modely
*certain models only
*csak bizonyos típusoknál
*tylko w wybranych modelach

1
IMPORTANT SAFETY REMINDERS
This cleaner should only be used for domestic cleaning, as described in this user guide.
Please ensure that this guide is fully understood before operating the appliance. Use only
attachments recommended or supplied by Hoover.
WARNING: Electricity can be extremely dangerous. This appliance is double insulated
and must not be earthed. This plug is tted with a 13 amp fuse (UK only).
IMPORTANT: The wires in the mains power lead are coloured in accordance with the
following code: Blue – Neutral Brown – Live
STATIC ELECTRICITY: Some carpets can cause a small build up of static electricity.
Any static discharge is not hazardous to health.
AFTER USE: Switch the cleaner off and remove the plug from the electricity supply.
Always switch off and remove the plug before cleaning the appliance or attempting any
maintenance task.
SAFETY WITH CHILDREN, ELDERLY OR THE INFIRM: Do not let children play with
the appliance or its controls. Please supervise the use of the appliance by older children,
the elderly or the inrm.
HOOVER SERVICE: To ensure the continued safe and efcient operation of this appliance
we recommend that any servicing or repairs are only carried out by an authorised Hoover
service engineer.
IT IS IMPORTANT THAT YOU DO NOT:
• Position the cleaner above you when cleaning the stairs.
• Use your cleaner out of doors or on any wet surface or for wet pick up.
• Pick up hard or sharp objects, matches, hot ashes, cigarette ends or other
similar items.
• Spray with or pick up flammable liquids, cleaning fluids, aerosols or their vapours
as this may cause risk of fire / explosion.
• Run over the supply cord when using your cleaner or remove the plug by pulling
on the supply cord.
• Stand on or wrap the power cord around arms or legs when using the cleaner.
• Use the appliance to clean people or animals.
• Continue to use your cleaner if it appears to be faulty. If the supply cord is damaged
stop using the cleaner IMMEDIATELY. To avoid a safety hazard, an authorised
Hoover service engineer must replace the supply cord.
In the unlikely event that any item is missing or you experience any problems with the
product DO NOT TAKE IT BACK TO THE SHOP.
Please contact the Hoover customer helpline: 08444 995 599
Email: customer.services@hoovercandy.com
Should any faults occur with your cleaner during the rst 12 months contact the Hoover
Customer Helpline on the number above. If you are having difculty in obtaining lters
or any other accessories for your cleaner contact the Hoover Customer helpline or order
online at www.hooverspares.com
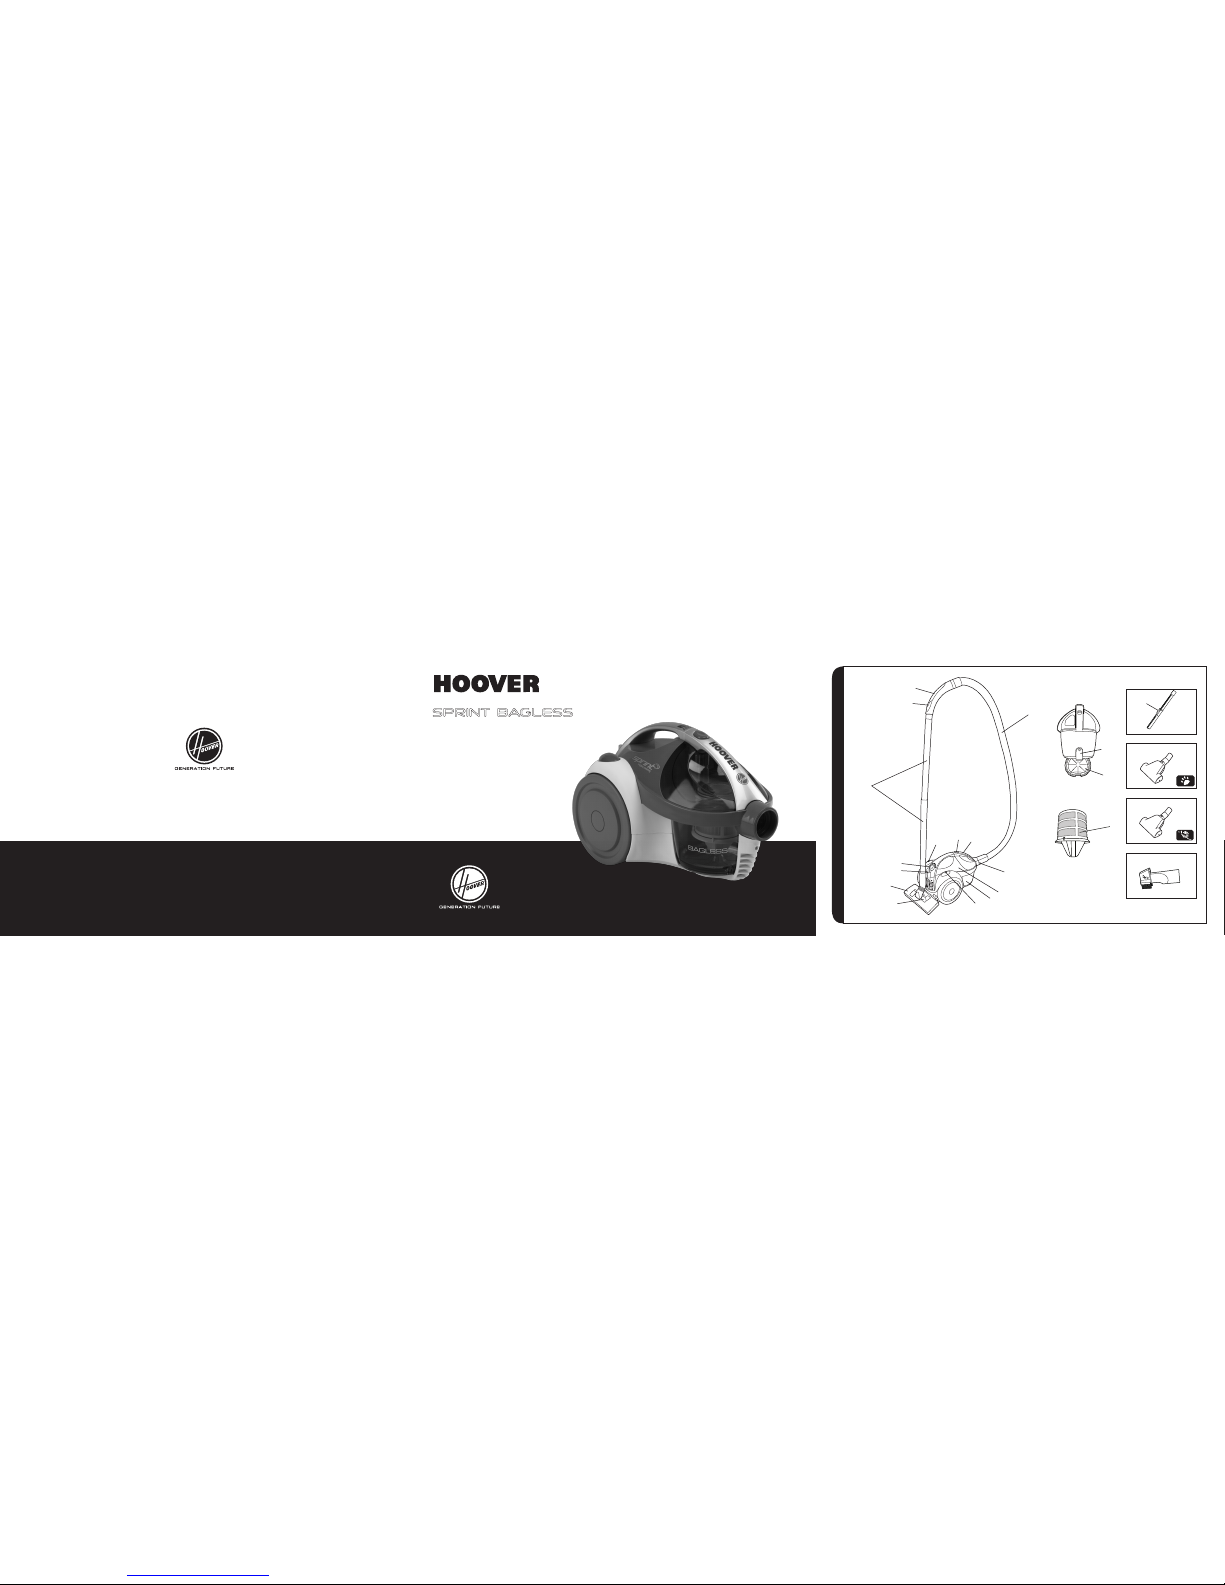
GETTING TO KNOW YOUR CLEANER
A. Cleaner main body
B. Dust Container
C. Dust Container Handle
D. Dust Container Release Button
E. Dust Container Flap Opening Button
F. Dust Container Flap
G. Pre-Motor Filter
H. On/Off Button
I. Variable Power Control Knob*
J. Cord Rewind Button
K. Plastic Tubes*
L. Hose
M. Hose Release Buttons
N. Hose Handle
O. Suction Regulator
P. Carpet & Floor Nozzle
Q. Floor Type Selector Pedal
R. Nozzle Parking Slot
S. Telescopic Tube*
T. Telescopic Tube Adjuster*
U. Pet Hair Remover Mini Turbo Nozzle*
V. Allergen Remover Mini Turbo Nozzle*
W. 2 in 1 Tool (Crevice Tool/Dusting Brush)
ASSEMBLING YOUR CLEANER
Remove all components from the packaging.
1. Connect the hose to the cleaner main body, ensuring it clips and locks into position.
To release the hose: simply press the two hose release buttons on the hose end
and pull it out. [2]
2. Connect the hose handle to the tube upper end [3].
3. Connect the tube lower end to the carpet and oor nozzle. [4]
(*Certain Models Only)
GB
4800XXXX - Sprint - Multi 5lang IM.indd 1 24/09/2010 01:15:12

2
USING YOUR CLEANER
1. Extract power cord and plug it into the power supply. [5] Do not pull the cord beyond
the red marker.
2. Carpet & Floor Nozzle. Press the oor type selector pedal on the nozzle [6] to select
the ideal cleaning mode for the oor type.
Hard Floor – Brushes are lowered to protect the oor.
Carpet – Brushes are raised for the deepest clean.
3. Switch the cleaner on by pressing the On/Off button on the cleaner main body. [7]
4. Switch off at the end of use by pressing the On/Off button. [7] Unplug and press the
cord rewind button to wind the power cord back into the cleaner. [8]
5. To store your cleaner, park the nozzle in the parking slot at the rear of the cleaner
main body. [9] If the cleaner has the telescopic tube*, adjust it to the lowest height
setting and park the nozzle in the parking slot at the rear of the cleaner main body.
During usage and if your cleaner is equipped you can:
A. Adjust the telescopic tube* to the desired height by moving the telescopic tube
adjuster up and raise or lower the handle to the most comfortable cleaning position. [10]
B. Adjust the power level by rotating the Variable Power Control Knob* to the de-
sired level. [11]
C. Vary the suction as desired by closing or opening the suction regulator on the
hose handle. [12]
CLEANER MAINTENANCE
Emptying the Dust Container
When the dust reaches the max level indicator on the container, empty the dust
container.
IMPORTANT: To maintain optimum performance, do not allow the dust to sit higher than
the max level.
1. Release the Dust Container by pressing the Dust Container Release Button and
remove the Dust Container from the cleaner main body. [13]
2. Before emptying the Dust Container, gently tap it against the side of a bin to
release any excess dust from the lter.
3. To empty the Dust Container, hold the Dust Container over a bin with one hand and
use the other hand to press the Dust Container Flap Opening Button to release the
dust into the bin. [14]
4. Close the Dust Container Flap and ret the Dust Container to the cleaner main
body.
Cleaning the Washable Filters
The cleaner is tted with a pre-motor lter. To maintain optimum cleaning performance,
regularly clean the lters. Remove excess dust from the lters by gently tapping them
against the side of a bin. The lters should be washed after every 5 container empties.
IMPORTANT: Regularly check and maintain the lters.
IMPORTANT: Always ensure the lter packs are fully dry before use.
To access the pre-motor lter:
Empty the Dust Container as described in ‘Emptying the Dust Container’. Then, keeping
the Dust Container Flap open:
1. Remove the pre-motor lter by rotating it anti-clockwise at the bottom of the Dust
Container. [15]
2. Separate the protective mesh from the lter. [16] Gently tap both the protective
mesh and the lter against the side of a bin to remove excess dust and wash both
of them under warm water. [17] Do not use hot water or detergents.
3. Remove excess water from the lter and leave it to dry fully before reusing. [20]
4. Once the lter is fully dry, reassemble the lter pack (protective mesh and lter) and
ret to cleaner.
IMPORTANT: Do not use the product without the pre-motor lter pack tted.
To access the exhaust lter:
1. Unclip the exhaust grid from the rear of the cleaner. [18]
2. Separate the lter from the grid and wash the lter under warm water. [19] Do not
use hot water or detergents.
3. Remove excess water from the lter and leave to dry fully before reusing. [20]
4. Remount the lter into the grid and ret it to the cleaner.
Remember: Do not use hot water or detergents. In the unlikely event of the lters
becoming damaged, t a Genuine Hoover consumable. Do not try and use the product
without a lter tted.
(*Certain Models Only)
GB
4800XXXX - Sprint - Multi 5lang IM.indd 2 24/09/2010 01:15:12

3
Removing a Blockage
1. Check if the Dust Container is full. If so refer to ‘Emptying The Dust Container’.
2. If the Dust Container is empty, but suction is still low;
A. Do the lters need cleaning? If so refer to ‘Cleaning the Washable Filters’.
B. Check if there is any other blockage in the system - Use a rod or a pole to re-
move any blockage from the tubes or hose.
C. Check for and clear any blockage in the Nozzle
Warning - If the cleaner is used for a signicant period of time with a blockage, a thermal
cut out will switch the cleaner off to prevent overheating. The bag check indicator turn
green once the cleaner has switched off to signal that the thermal cut out has been activated. If this should happen, switch the cleaner off, unplug and correct the fault. It will
take about 45 minutes for the cut out to automatically reset.
ACCESSORIES
All accessories can be tted to the hose handle or the end of the tubes.
2 in 1 Tool combines several functions into one tool [21]:
Crevice Tool – For corners and hard to reach areas.
Dusting Brush – For bookshelves, frames, keyboards and other delicate areas.
Pet Hair Remover Mini Turbo Nozzle* - Use the mini turbo nozzle on stairs or for deep
cleaning on textile surfaces and other hard to clean areas. Particularly suitable for pet
hairs removal.[1U]
Allergen Remover Mini Turbo Nozzle* – Use the mini turbo nozzle on stairs or for
deep cleaning on textile surfaces and other hard to clean areas. Particularly suitable for
allergen removal.[1V]
IMPORTANT: Do not use the Mini Turbo Nozzles on rugs with long fringes, animal hides
and carpet pile deeper than 15mm. Do not keep the nozzle stationary while the brush is
rotating.
USER CHECKLIST
Should you have a problem with the product, complete this simple user checklist
before calling your local Hoover service.
• Is there a working electricity supply to the cleaner? Please check with another
electrical appliance.
• Is the Bag over-filled? Please refer to ‘Cleaner Maintenance’.
• Is the filter blocked? Please refer to ‘Cleaner Maintenance’.
• Is the hose or nozzle blocked? Please refer to ‘Removing a Blockage’.
• Has the cleaner overheated? If so, it will take approximately 45 minutes to
automatically reset.
IMPORTANT INFORMATION
Hoover Spares and Consumables
Always replace parts with genuine Hoover spares. These are available from your local
Hoover dealer or direct from Hoover. When ordering parts always quote your model
number.
Consumables
• Filter kit (pre-motor and exhaust): U57 - 35601115
Spares
• Carpet & Floor Nozzle: G123 - 35601113
• Hose: D124 - 35601114
• Pet Hair Remover Mini Turbo Nozzle: J46 - 35601116
• Allergen Remover Mini Turbo Nozzle: J47 - 35601117
Hoover Customer Helpline Service
Should any faults occur with your cleaner during the rst 12 months contact the Hoover
Customer Helpline on the number below.
Tel: 08444 995 599
Email: customer.services@hoovercandy.com
Hoover have a computerised nationwide service network of over 500 engineers who will
quickly respond to your call and guarantee your repair for 12 months.
(*Certain Models Only)
GB
4800XXXX - Sprint - Multi 5lang IM.indd 3 24/09/2010 01:15:13

4
Quality and the Environment
Quality
Hoover’s factories have been independently assessed for quality. Our products are
made using a quality system which meets the requirements of ISO 9001
The Environment:
This appliance is marked according to the European Directive 2002/96/EC on Waste
Electrical and Electronic Equipment (WEEE). By ensuring this product is disposed of
correctly you will help prevent potential negative consequences for the environment and
human health, which could otherwise be caused by inappropriate waste handling of this
product.
The symbol on the product indicates that this product may not be treated
as houshold waste. Instead it shall be handed over to the appliance collection point for recycling of electrical and electronic equipment. Disposal
must be carried out in accordance with the local environmental regulations for waste disposal. For more detailed information about treatment,
recovery and recycling of this product, please contact your local city ofce, your household waste disposal service or the shop where you purchased the product.
Your Guarantee
The guarantee conditions for this appliance are as dened by our representative in the
country in which it is sold. Details regarding these conditions can be obtained from the
dealer from whom the appliance was purchased. The bill of sale or receipt must be
produced when making any claim under the terms of this guarantee.
Subject to change without notice.
GB
4800XXXX - Sprint - Multi 5lang IM.indd 4 24/09/2010 01:15:13

WSKAZÓWKI DOTYCZĄCE BEZPIECZEŃSTWA
Odkurzacz ten jest przeznaczony wyłącznie do użytku domowego, zgodnie z opisem w
instrukcji obsługi. Prosimy o dokładne zapoznanie się z instrukcją przed rozpoczęciem
używania odkurzacza. Należy korzystać wyłącznie z końcówek zalecanych lub dostarczonych przez rmę Hoover.
OSTRZEŻENIE: Prąd elektryczny może stanowić poważne zagrożenie. Urządzenie to
jest podwójnie izolowane i nie wymaga dodatkowego uziemienia.
WAŻNE: Kable przewodu zasilającego oznaczone są według następujących kolorów:
Niebieski – Przewód zerowy Brązowy – Przewód fazy
ŁADUNKI ELEKTROSTATYCZNE: Odkurzanie niektórych dywanów może powodować
niewielkie naelektryzowanie się odkurzacza. Tego rodzaju ładunki elektrostatyczne nie
stanowią zagrożenia dla zdrowia.
PO ZAKOŃCZENI U PRACY: Wyłącz odkurzacz i wyjmij wtyczkę z gniazda elektrycznego. Należy zawsze wyłączać odkurzacz i wyjmować wtyczkę z sieci przed przystąpieniem
do czyszczenia urządzenia lub wykonywania jakichkolwiek czynności konserwacyjnych.
Dbanie o bezpieczeństwo dzieci, osób starszych lub niepełnosprawnych:
Nie należy pozwalać dzieciom bawić się urządzeniem lub jego przełącznikami.
Należy nadzorować korzystanie z urządzenia przez starsze dzieci, osoby starsze lub
niepełnosprawne.
SERWIS FIRMY HOOVER: Aby zapewnić bezpieczne i sprawne działanie tego
urządzenia, zalecamy zlecanie prac serwisowych lub napraw wyłącznie serwisantom
autoryzowanego punktu serwisowego rmy Hoover.
NIE WOLNO:
• Trzymać odkurzacza nad sobą podczas odkurzania schodów.
• Używać odkurzacza na zewnątrz domu, do odkurzania mokrych powierzchni lub do
zbierania wody.
• Wciągać do odkurzacza twardych lub ostrych przedmiotów, zapałek, gorącego
popiołu, niedopałków lub innych przedmiotów mogących uszkodzić odkurzacz.
• Rozpylać lub wciągać do odkurzacza substancji łatwopalnych, płynów czyszczących,
aerozoli lub ich oparów, gdyż grozi to pożarem lub wybuchem.
• Stąpać po przewodzie zasilającym podczas korzystania z odkurzacza ani wyjmować
wtyczki, ciągnąc za przewód zasilający.
• Stawać na przewodzie zasilającym ani owijać go sobie wokół rąk lub nóg podczas
korzystania z odkurzacza.
• Używać urządzenia do odkurzania ludzi lub zwierząt.
• Kontynuować eksploatacji uszkodzonego odkurzacza. Jeśli przewód zasilający
został uszkodzony, należy NATYCHMIAST przerwać korzystanie z odkurzacza. Ze
względów bezpieczeństwa, przewód zasilający powinien zostać wymieniony przez
serwisanta autoryzowanego punktu serwisowego rmy Hoover.
W przypadku kiedy zauważysz brak jakiejkolwiek części lub doświadczysz jakichkolwiek
problemów z eksploatacją urządzenia, jak i usterki w odkurzaczu w ciągu pierwszych 24
miesięcy użytkowania skontaktuj się ze sprzedawcą lub serwisem lokalnym Hoover-a.
Wykaz punktów serwisowych dostępny na odwrocie karty gwarancyjnej lub stronie www.
hoover.pl
W przypadku wszelkich trudności w nabyciu ltrów jak i innych akcesoriów do odkurzacza
należy skontaktować się z serwisem obsługi klienta. Wykaz punktów serwisowych
dostępny na odwrocie karty gwarancyjnej lub stronie www.hoover.pl
ELEMENTY ODKURZACZA:
A. Obudowa odkurzacza
B. Pojemnik na kurz
C. Uchwyt pojemnika
D. Przycisk wypięcia pojemnika
E. Przycisk otwarcia pojemnika
F. Klapa pojemnika
G. Filtr wstępny HEPA
H. Włącznik/Wyłącznik odkurzacza
I. Regulacja mocy*
J. Przycisk zwijacza przewodu
K. Rury plastikowe*
L. Waż elastyczny
M. Przycisk wypięcie węża
N. Uchwyt węża
O. Regulacja siły ssania
P. Szczotka uniwersalna
Q. Przycisk wyboru odkurzanej powierzchni
R. Uchwyt parkingowy rury
S. Rura teleskopowa*
T. Przycisk regulacji rury teleskopowej
U. Mini turbo szczotka* - do usuwania sierści
V. Mini turbo szczotka* - do usuwania alergenów
W. Szczotka 2w1 – szczelinówka i szczotka do kurzu
MONTAŻ ODKURZACZA
Wyjmij wszystkie elementy z opakowania.
1. Podłącz wąż do obudowy głównej odkurzacza, upewniając się, że został zatrzaśnięty
i zablokowany na swoim miejscu. Aby zwolnić: naciśnij dwa przyciski na końcówce
węża i pociągnij. [2]
2. Podłącz górny koniec rury do uchwytu węża. [3]
3. Podłącz dolny koniec rury do szczotki dywanowo-podłogowej. [4]
(* tylko w wybranych modelach )
PL
4800XXXX - Sprint - Multi 5lang IM.indd 5 24/09/2010 01:15:13

KORZYSTANIE Z ODKURZACZA
1. Wyciągnij przewód zasilający i podłącz go do zasilania. [5] Nie należy wyciągać
przewodu poza czerwony znacznik.
2. Ustaw wysokość umożliwiającą ochronę dywanów, naciskając przycisk nożny na
szczotce. [6]
Twarda podłoga – Szczotki są obniżone, aby chronić podłogę.
Dywan – Szczotki są uniesione, aby umożliwić głębsze odkurzanie.
3. Włącz odkurzacz, naciskając wyłącznik znajdujący się na obudowie głównej
odkurzacza. [7]
4. Po zakończeniu pracy wyłącz odkurzacz, naciskając wyłącznik. Wyjmij wtyczkę z
gniazdka i naciśnij przycisk zwijania przewodu, aby zwinąć przewód zasilający z
powrotem do odkurzacza. [8]
5. W celu schowania odkurzacza [9] ustaw rurę teleskopową na najmniejszą wysokość
i zamocuj szczotkę w pozycji zablokowanej na obudowie głównej odkurzacza.
Dodatkowe czynności:
A. Ustaw rurę teleskopową na żądaną wysokość, trzymając za uchwyt i przesuwając
środkowy zacisk do góry lub do dołu lub przesuwając przycisk zwalniania rury
teleskopowej do góry, a następnie unosząc lub obniżając uchwyt do najbardziej
wygodnej pozycji odkurzania. [10]
B. Ustaw moc poprzez przesuwanie przełącznika zmiany mocy na odpowiedni
poziom. [11]
C. Ustaw ssanie, przesuwając regulator siły ssania na odpowiedni poziom. [12]
KONSERWACJA ODKURZACZA
Opróżnianie pojemnika na kurz
Gdy poziom kurzu osiągnie maksymalny poziom na wskaźniku zapełnienia pojemnika,
należy opróżnić pojemnik na kurz
WAŻNE: Aby uzyskać optymalną wydajność, nie wolno pozwolić, aby poziom kurzu
przekroczył maksymalny poziom.
1. Zwolnij uchwyt do przenoszenia pojemnika, unosząc środkowy zatrzask, aby
odłączyć pojemnik na kurz od obudowy głównej odkurzacza, i pociągnij do góry,
aby go wyjąć. [13]
2. Przed opróżnieniem pojemnika na kurz należy delikatnie usunąć nadmiar kurzu na
ltrze .poprzez opukanie bboku kosza na śmieci
3. Przytrzymaj jedną ręką pojemnik na kurz nad koszem na śmieci, a drugą pociągnij
zaczep pojemnika na kurz, aby otworzyć pokrywę i go opróżnić. [14]
4. Zamknij pokrywę pojemnika na kurz i z powrotem zamocuj w obudowie głównej
odkurzacza. Aby zablokować na miejscu, naciśnij uchwyt do przenoszenia pojem-
nika, aż zatrzask połączy się z obudową główną odkurzacza. Po odpowiednim um-
ieszczeniu na swoim miejscu uchwyt do przenoszenia będzie wyrównany z górną
częścią odkurzacza.
Czyszczenie ltrów zmywalnych
Odkurzacz wyposażony jest w zestaw niebieskich ltrów. Aby zapewnić optymalną
wydajność odkurzania, należy regularnie czyścić ltry i opukiwać je o bok kosza na
śmieci, aby usunąć kurz. Filtry należy myć po 3 opróżnieniach pojemnika.
WAŻNE : Należy regularnie sprawdzać i konserwować ltry.
WAŻNE : Przed założeniem zestawu ltra należy zawsze upewnić się, że całkowicie
wysechł.
Aby uzyskać dostęp do ltra:
Opróżnij pojemnik na kurz jak opisano powyżej. Nie zamykaj klapy pojemnika.
1. Wyjmij ltr wstępny znajdujący się w pojemniku, przekręcając go odwrotnie do ru-
chu wskazówek zegara [15]
2. Zdejmij osłonkę ltra [16].
3. Usuń zanieczyszczenia z osłonki oraz ltra przez delikatne ostukanie o krawędź ko-
sza na śnieci. Następnie umyj oba elementy zimną wodą [17] . Nie używaj gorącej
wody ani detergentów.
4. Usuń nadmiar wody z ltra i pozostaw do pełnego wyschnięcia przed ponownym
zamontowaniem [20].
5. Po pełnym wyschnięciu ltra załóż osłonę i zamontuj ltr ponownie w pojemniku
odkurzacza.
IMPORTANT: Do not use the product without the pre-motor lter pack tted.
Aby dostać się do ltra wylotowego należy:
1. Otworzyć grill i wyjąć ltr wylotowy z tyłu odkurzacza. [18]
2. Wyjąć ltr i umyć go pod ciepłą wodą [19] Nie należy stosować gorącej wody ani
detergentów.
3. Usunąć nadmiar wody z ltra i pozostawić do całkowitego wyschnięcia przed ponownym założeniem
4. Po całkowitym wyschnięciu zmontuj zestaw ltra i zamocuj z powrotem w odkurzaczu.
Pamiętaj! Nie używaj gorącej wody ani detergentów. W przypadku uszkodzenia ltrów
używaj tylko oryginalnych części marki Hoover. Nie używaj odkurzacza w przypadku
złego zamocowania ltru.
(* tylko w wybranych modelach )
PL
4800XXXX - Sprint - Multi 5lang IM.indd 6 24/09/2010 01:15:13
 Loading...