

Hoover Scrub'n' Vac Owner's Manual
f
f
ScrubW
Vat”
Shampoo-
Polisher
R
,
Owner’s
1
Manual
1
I
0
1/)
,
I
’
vi@
@
LJ
Review this manual before
operating appliance
This cleaner was inspected and packaged carefully before being
shipped from the factory. If you should happen to need assistance
during assembly or operation, call
l-800-944-9200
for automated referral of authorized service
outlet locations (US. only) or
l-330-499-9499
to speak with a representative in our Consumer
Response Center.
DO NOT RETURN THIS PRODUCT TO THE STORE.
Fill in and retain
The shampoo-polisher you have just purchased is designed for
cleaning and waxing hard surface floors and for shampooing carpet
and rugs.
The model and serial number are located on the bottom of the
shampoo polisher.
For your personal records please enter the COMPLETE model and
serial number In the spaces provided and retain this information.
Your cleaner Is model
and has serial number
It is suggested that you attach your sales receipt to this owner’s
manual. Verification of date of purchase may be required for warranty
service of your Hoover product.
Save!
Index
Accessories
........................................................
3
,23
Assembly
..................................................................
5
Cleaner description
..............................................
3-4
Floor Care Hints
.....................................................
21
Floor Cleaning/Waxing Chart
..................................
8
How To Use
...........................................................
5-7
Cleaning
Floors
&
Removing Wax
...........
..8-10
Polishing
&
Buffing
Floors
.......................
1
l-1 2
Quick Pickups
.................................................
12
UL
@
Shampooing
Carpet&Rugs
....................
.13-16
0
Waxing Floors
............................................
10-11
If You Have a Problem
...........................................
19
Important Safeguards
..............................................
2
Maintenance
.....................................................
17-l
8
Service
...............................................................
19-20
Unpacking
.................................................................
3
1
01971,1986
The Hoover Company
IMPORTANT SAFEGUARDS!
When using an electrical appliance, always follow
basic precautions, including the following:
READ ALL INSTRUCTIONS BEFORE USING THIS APPLIANCE
To reduce the risk of fire, electric shock, or
WARNING:
injury
- -
Use indoors only.
This appliance is provided with double insulation. Use
only identi-
cal replacement parts. See instructions for servicing of double-
insulated appliance under “Service”.
Close supervision is necessary when any appliance is used by or
near children. Do not allow this appliance to be used as a toy or to
run unattended at any time.
Keep hair, loose clothing, fingers, feet and all parts of body away
from openings and other moving parts. Do not operate polisher in
bare feet or when wearing open toe shoes or sandals.
Do not use with flammable or combustible liquids such as gasoline
or use in areas where they may be present.
When using chemicals with this machine, be certain area is well
ventilated.
Follow manufacturer’s instructions for all chemicals used with this
machine. Do not exceed recommended mixing ratios.
Use only commercially available floor cleaners and waxes intended
for machine application.
Use extra care when cleaning on stairs.
Do not put any object into openings. Do not use with any opening
blocked; keep free of dust, lint, hair, or anything that may reduce air
flow.
Unplug the cord from outlet when not in use or when taking off or
putting on brushes or pads.
Always disconnect cord from electrical outlet before servicing the
polisher.
Do not unplug by pulling on cord. To unplug, grasp the plug, not
the cord. Never handle plug or appliance with wet hands.
Do not pull or carry by cord, use cord as a handle, close door on
cord.or
pull cord around sharp edges or corners. Do not run
appliance over cord. Keep cord away from heated surfaces.
The use of an extension cord is not recommended.
Avoid contact with carpets until they are dry and after thoroughly
vacuumed.
Do not use with damaged cord or plug. If appliance is not working
as it should, has been dropped, damaged, left outdoors, or dropped
into water, take it to a Hoover Factory Service Center or Authorized
Hoover Warranty Service Dealer (Depot).
Use appliance for its intended use as described in this owner’s
manual. Use only attachments recommended by The Hoover
Company; others may cause hazards.
SAVE THESE INSTRUCTIONS!
2
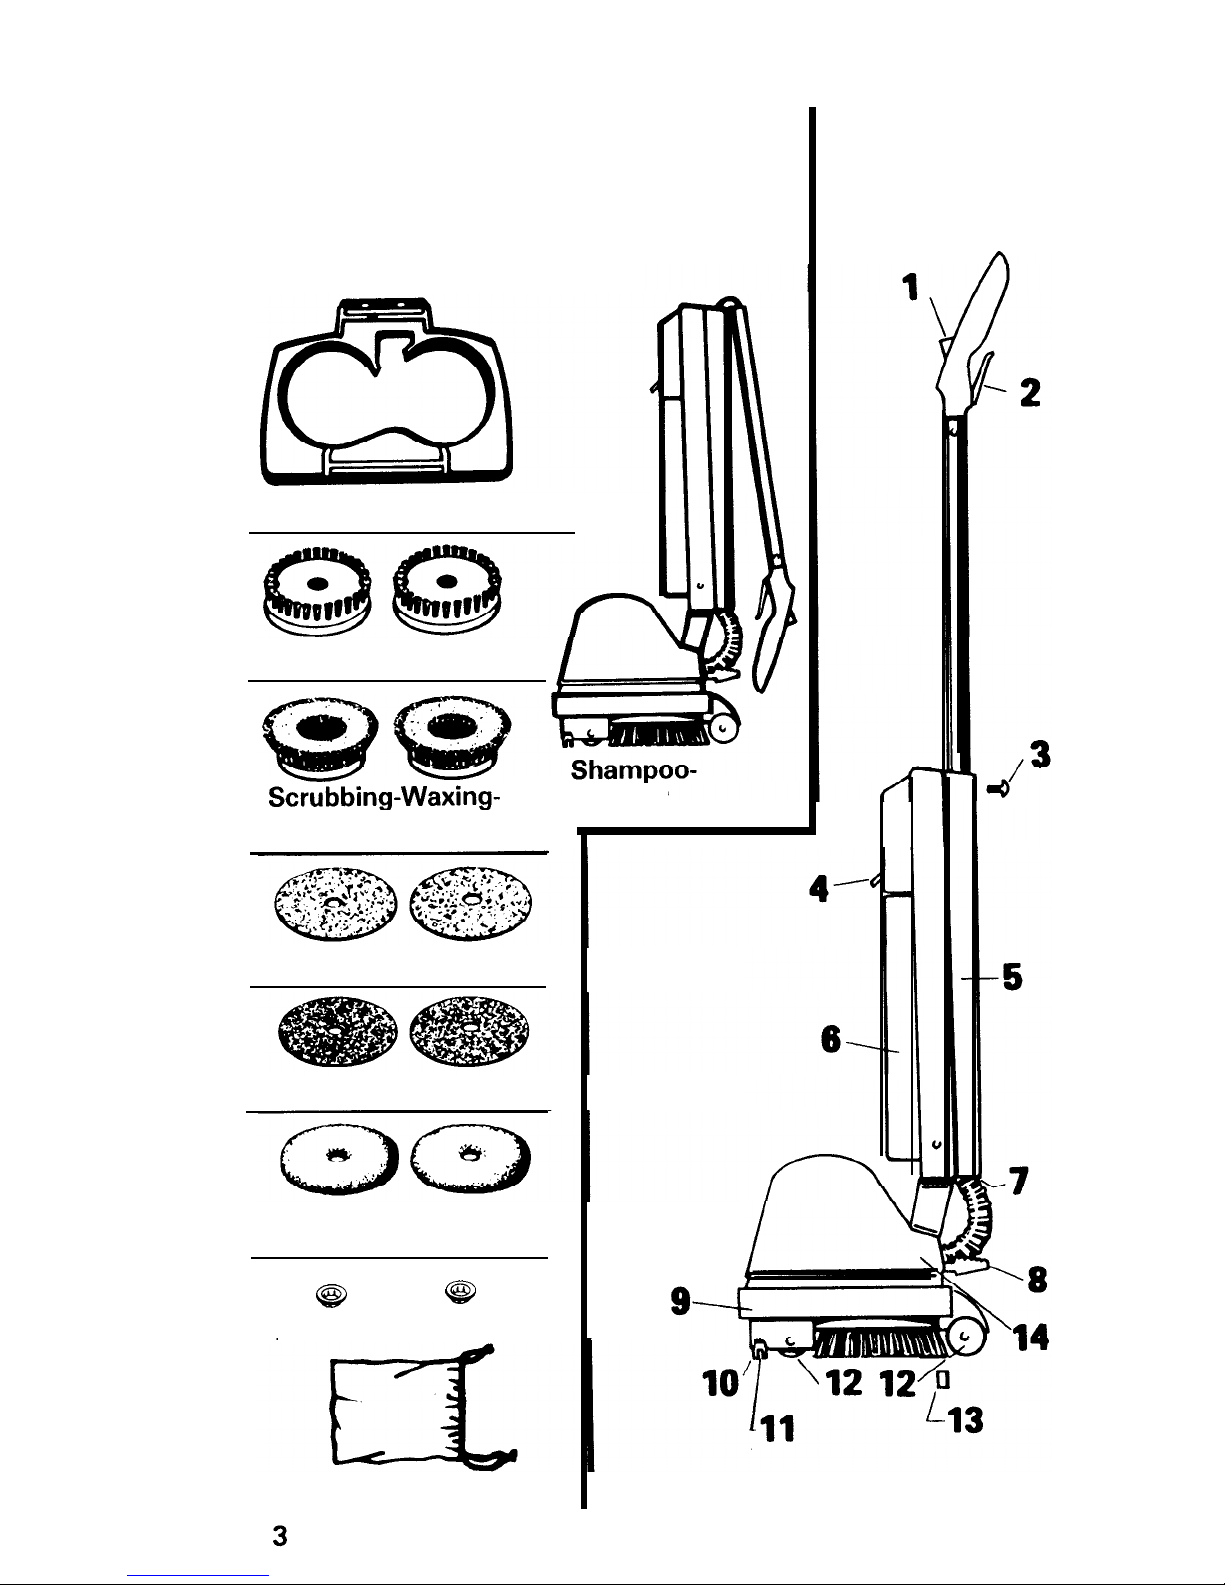
Unpacking
Unpack shampoo-polisher and
identify the accessories shown.
Remove and dispose of cardboard packing.
Rug Shampoo Accessory
Shampoo Brushes
Scrubbing-waxing-
Polisher
Polishing-Brushes
Cleaning-Waxing Pads
Felt Buffing Pads
High Lustre Polishing
Pads
@
49
Fasteners
Accessory Bag
Questions or Concerns?
The Hoover Company wants to quickly resolve any concerns about your
cleaner or questions regarding its use. Look on the list provided with the
product for your local
Hoover Factory Service Center
or in the Yellow
Pages under “Vacuum Cleaners - Household” for the nearest
Authorized
Hoover Warranty Service Dealer
(Depot) or call:
l-800-944-9200
for an automated referral of authorized service
outlet locations (US. only)
OR
l-330-499-9499 to speak with a representative in the Hoover
Consumer Response Center.
DO NOT RETURN THIS PRODUCT TO THE STORE OR SEND IT
TO NORTH CANTON FOR SERVICE.
1. Control Button:
has three positions “OFF”,
“SCRUB-POLISH-
SHAMPOO”,
“WET
PICKUP”.
2. Trigger:
press to dispense cleaning solution. Trigger is also used as
a cord storage hook when not in use.
3.
Screw:
holds handle in place.
4. Tank Handle:
press down to remove tank. Also the tank handle is
used as a carrying handle to move the shampoo-polisher from room to
room.
5. Tank Housing:
supports removable tank.
6. Tank:
holds clean and soiled cleaning solution.
7. Cord Storage Hook:
wrap cord around hook on bottom of tank
housing and then around the trigger underneath the handle for
storage.
8. Handle Release:
step on release to lower handle.
9. Furniture Guard:
protects furniture.
lO.Squeegees:
used for water pick-up from hard surface floors.
ll.Filter
Bar:
prevents lint and litter from entering the unit.
12.
Wheels:
provide ease in movement.
13. Foam Generator:
converts cleaning solution to foam.
14. Hood
Operate shampoo-polisher only at voltage specified on data plate on
bottom of shampoo-polisher.
This appliance is intended for household use.
To reduce the risk of electric shock, this appliance has a polarized plug
(one blade is wider than the other). This plug will fit in a polarized outlet
only one way. If the plug does not fit fully in the outlet, reverse the plug. If
it still does not fit, contact a qualified electrician to install the proper outlet.
Do not change the plug in any way.
4
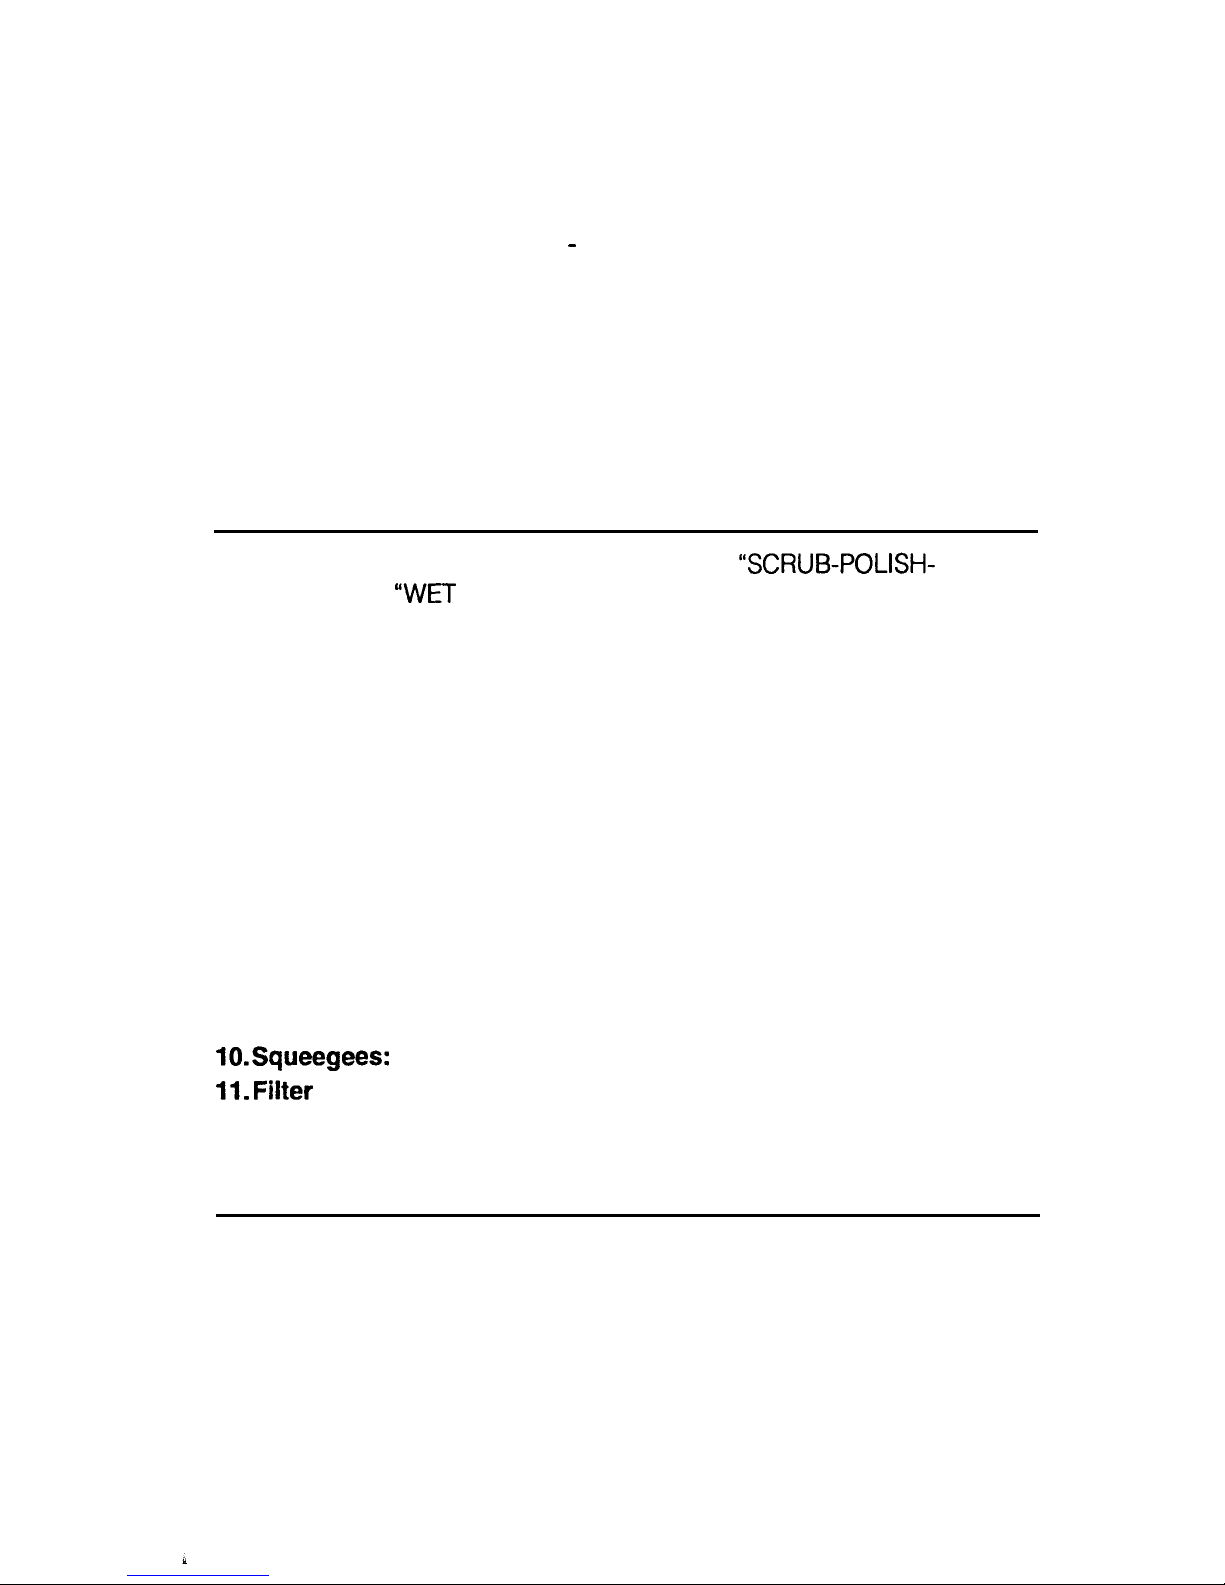
Assembly
I.
Remove bright plated (top)
screw from back of tank housing.
2. Position handle as shown lining
up holes. Push handle down firmly into place.
Do not grip trigger
or twist handle while installing.
Insert screw and tighten.
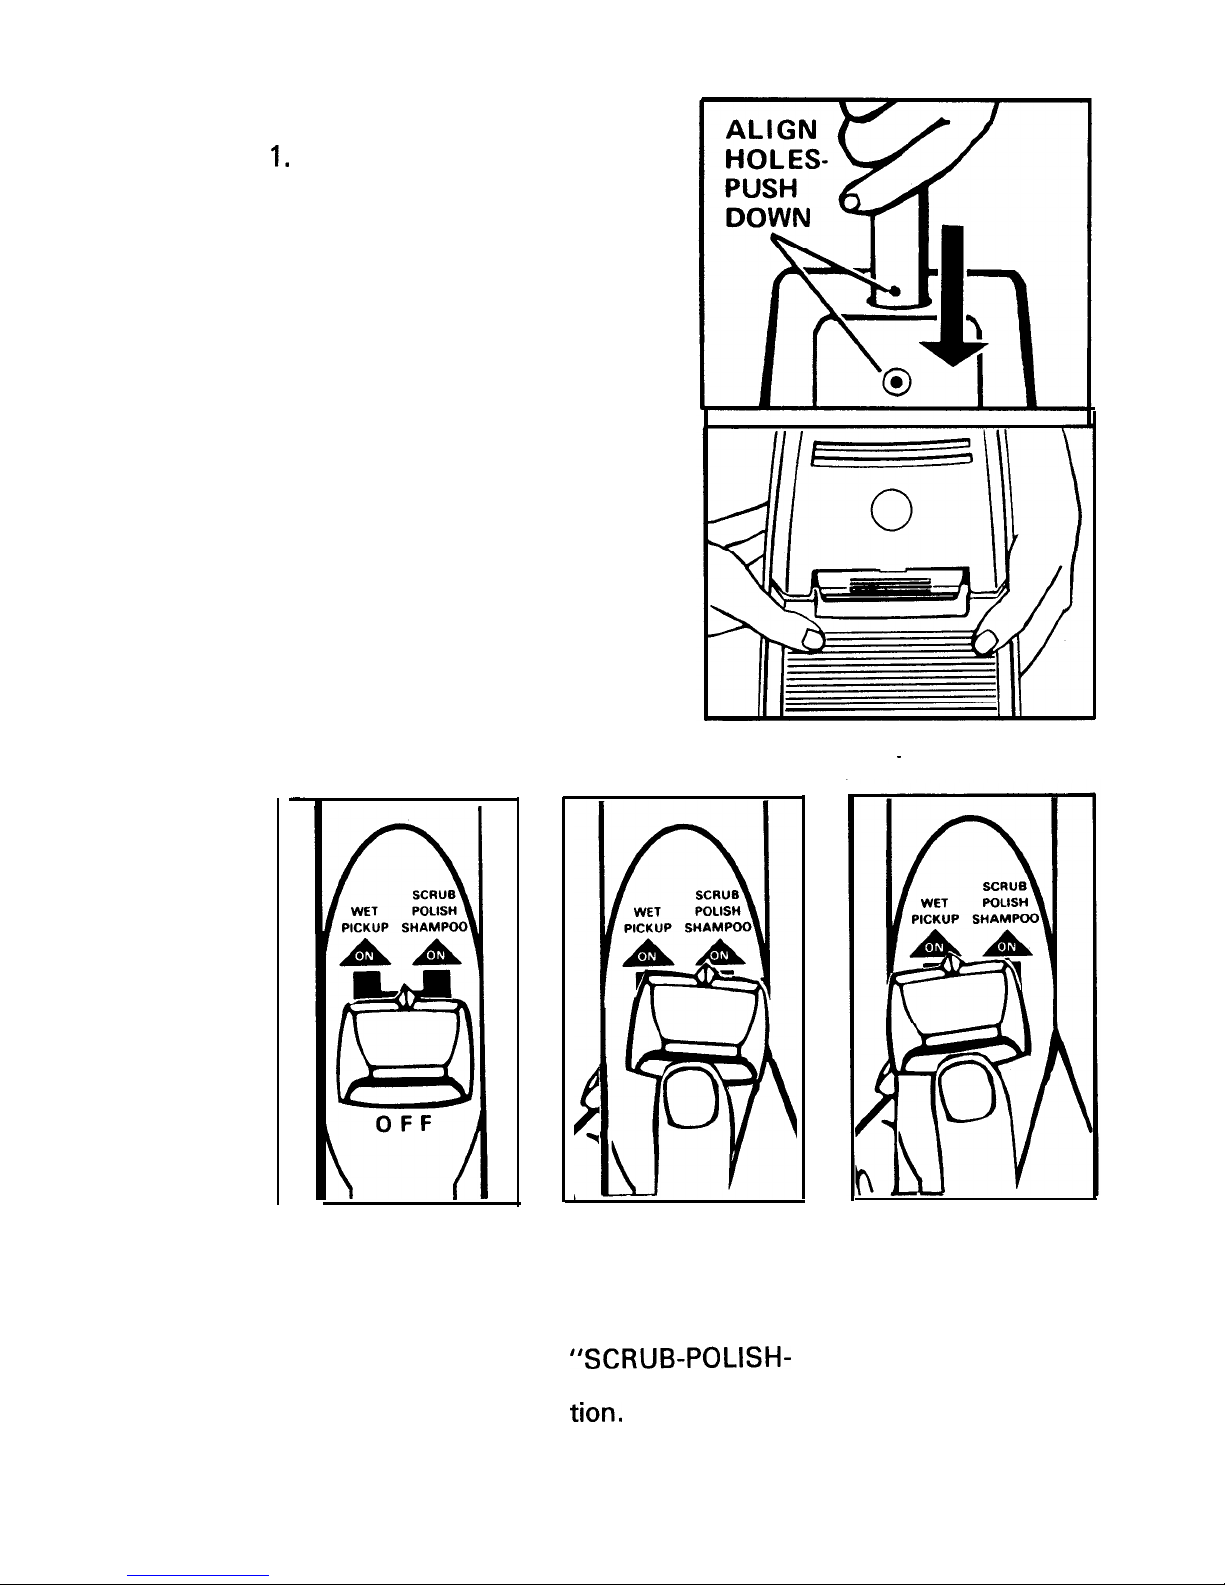
3. The tank fits into the opening
in the front of the tank housing.
Place bottom of tank into position; then push top of tank until it
clicks into place.
How to use
The control button
The control button, located on the handle, has three positions: “OFF”,
“SCRUB-POLISH-SHAMPOO”, “WET PICKUP.”
-
-
1. The unit is off
when the control
button is moved
back to the “OFF”
position.
2. To scrub, polish
or shampoo, move
the control button to
the right and then
forward to the
“SCRUB-POLISH-
SHAMPOO” posi-
tion.
3. For wet pickup,
move the control
button to the left and
then forward to the
“WET PICKUP”
position.
NOTE: Before changing from one position to the other, always return
control button to the “OFF” position.
5
The tank
The tank has one section for storage of fresh cleaning solution and
one section for storage of dirty
solution that has been picked up
from the floor.
To fill tank
A. Remove tank by pressing tank
handle down and pulling tank forward.
B. Lift cap marked “FILL”. Pour
premeasured cleaning solution
into opening marked “CLEAN
SOLUTION” until it reaches the
“FULL” line on the tank.
To empty tank
To empty dirty solution, remove
tank and pour from the opening
marked “USED SOLUTION”.
Rinse used solution container with
clear water. Clean solution may be
emptied by opening “FILL” cap
and pouring from the “CLEAN
SOLUTION” opening.
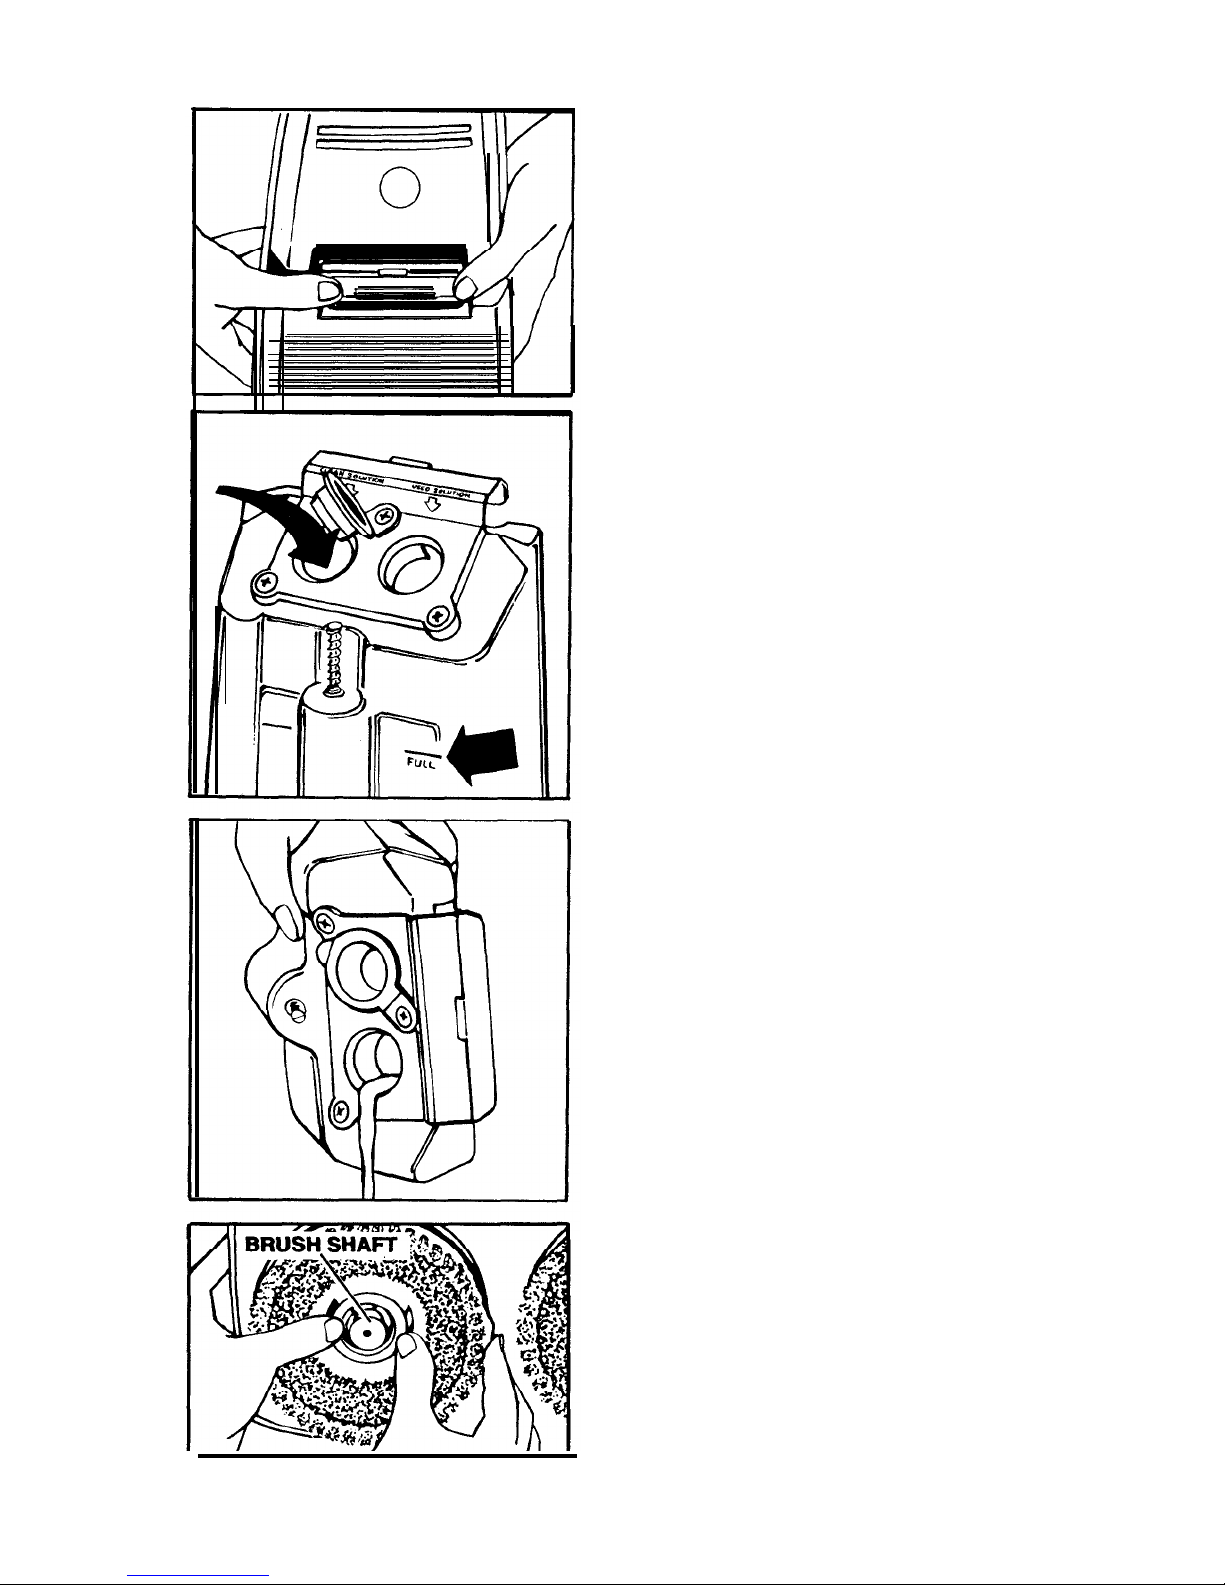
Attach and remove
brushes and pads
Disconnect from electric circuit
before putting on or removing
brushes.
Place shampoo-polisher upside
down on a flat surface. Press
each brush firmly down over
brush shaft, rotating brush until a
click indicates that it is in the correct position. To remove-grasp
center with thumb and fingers
and lift up brush.
6
 Loading...