

Page 1
Page 2

Fill in and retain!
The HOOVER vacuum cleaner you have just purchased is a combination cleaner. It has a motorized power nozzle for carpet and
floor cleaning and has cleaning tools for above the floor cleaning.
Your cleaner is a model
and
has
a serial number
For your personal records, please enter the model number and
serial number in the spaces provided above and retain in a safe
place.
The model number and serial number appear on the bottom of
the
cleaner.
Save!
Index
Assembling Cleaner
Cleaner Description
Cleaning Tools
How To Use Power Nozzle
Important Safeguards
Lubrication
Maintenance
Nozzle Hose
Replacing Agitator Brushes
Replacing Bag
Replacing Belt
Replacing Bottom Plate Brush
Replacing Headlight
Secondary Filter
Storage
To Clean Stairs
User Check List
................................................
..........................................
.............................................
..................................... 57
.....................................
...................................
.........................................
......................................
......................................
.........................
....................................
.........................................
.........................................
...............................
..........................
.......................
.
.......
3-5
9,lO
7-9
2
2
17
l7,18
12,13
14-17
19,20
20,21
14
11
11
22
Page 3
Important safeguards!
0
Read all instructions.
0
Warning: Electric shock could occur if used outdoors or on wet
surfaces.
0
Close supervision is necessary when any appliance is used by
or near children. Do not allow vacuum cleaner to be used as a toy
or to run unattended at any time.
0
Keep hands, feet, loose clothing, and hair away from rotating
agitator. Do not operate the cleaner in bare feet or when wearing
open toe shoes or sandals.
l Don’t run power nozzle over cord. It may damage insulation.
0
Do not use cleaner to pick up matches, or live ashes and
cigarette butts.
l Avoid picking up hard, sharp objects with the cleaner. They
may damage the cleaner and the bag.
l Unplug cleaner when not in use. Turn machine off at switch
before unplugging.
0
Always disconnect cord from electrical outlet before servicing
the cleaner.
0
Change bag frequently when picking up very fine materials
such as powder.
l Grasp the plug to disconnect from wall outlet to avoid damage
to cord, plug, prongs, or receptacle.
l The use of an extension cord is not recommended.
l If cleaner is in disrepair, do not attempt to operate.
l Have repairs made by the qualified personnel at Hoover Fac-
tory Service Centers or Authorized Hoover Warranty Service
Dealers.
l Use vacuum cleaner only for its intended use as described in
the instructions. The use of attachments not recommended by
the
anoliance
Save these instructions!
manufacturer may cause hazards.
uL
@I
Lubrication
0
The motor is equipped with one ball bearing and one sleeve bearing.
These bearings contain sufficient lubrication for the life of the motor.
The addition of lubricant could cause damage. Therefore, do not
add lubricant to either motor bearing.
The agitator is equipped with two ball bearings that should be
lubricated periodically. This should be done by a Hoover Factory
Service Center or an Authorized Hoover Warranty Service Dealer.
2
Page 4
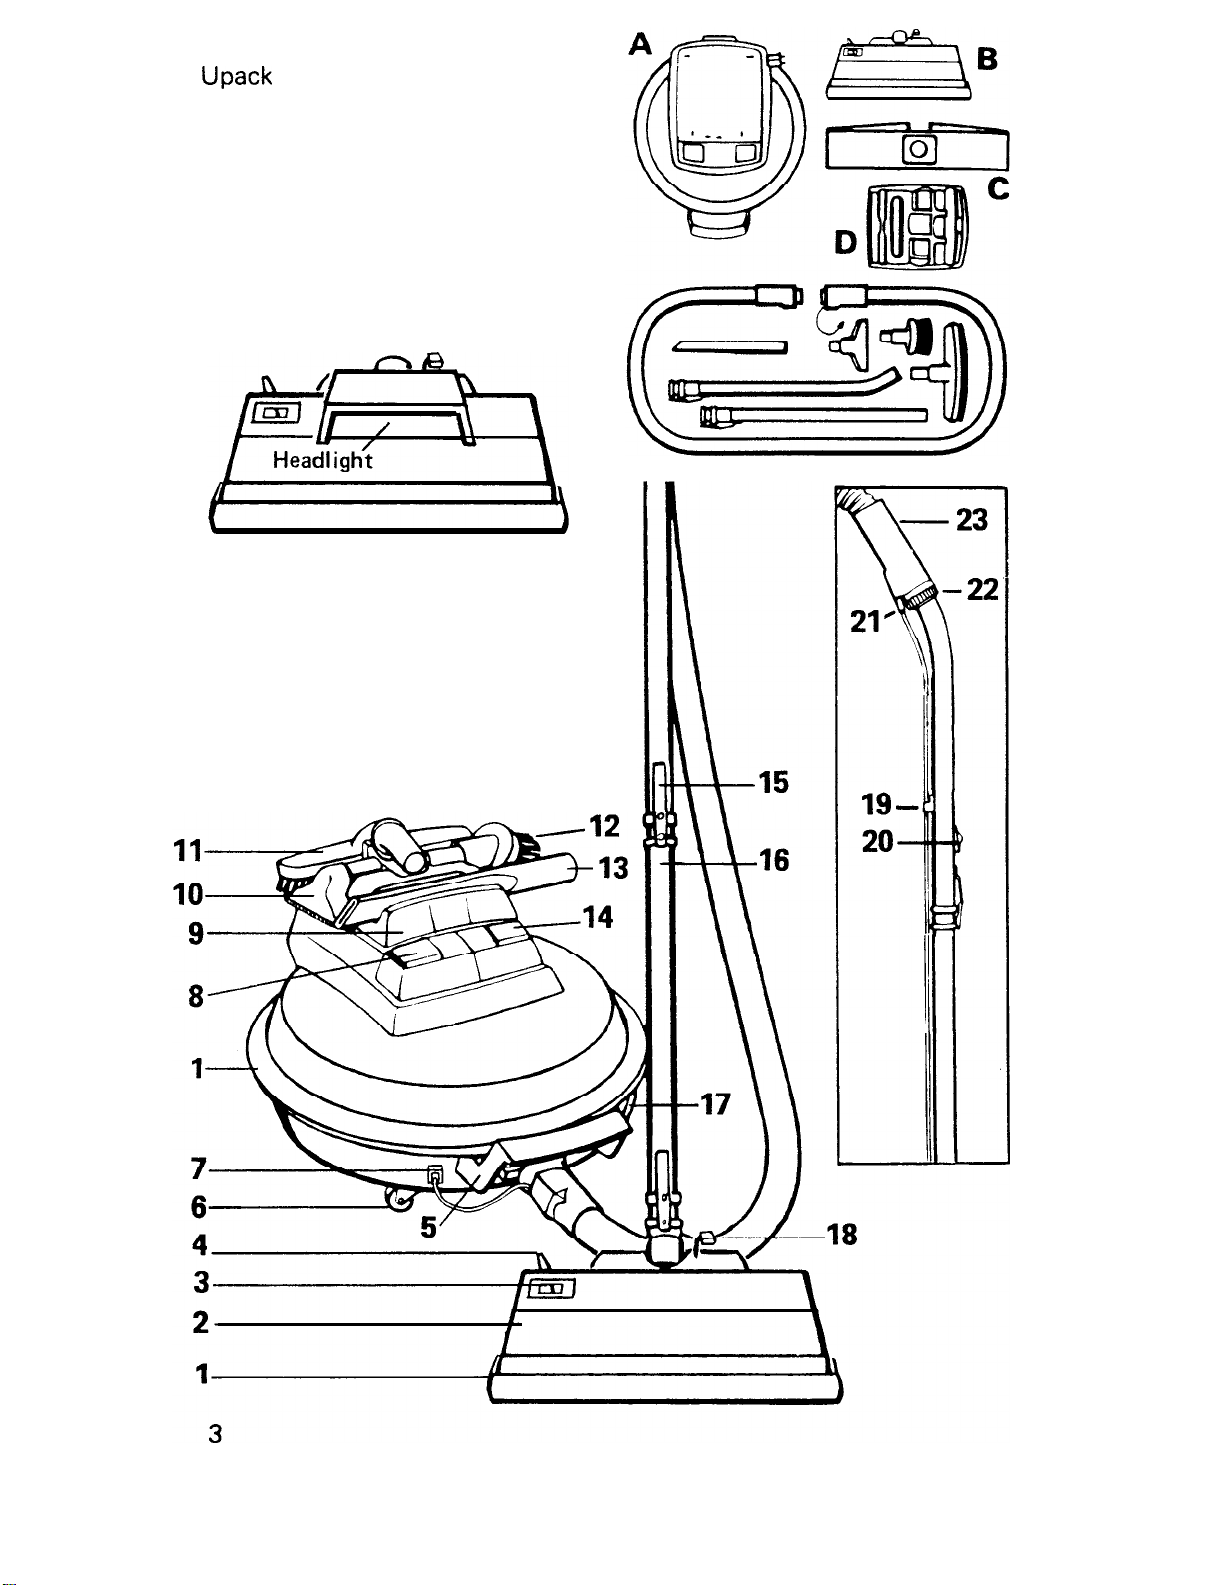
UNPACKING THE CLEANER
Upack the cleaner from the carton
and identify the parts shown.
Remove and dispose of the
cardboard packing.
A. Canister
B. Power nozzle
C. Disposable bag
D. Tools with tool storage
rack, extension wands
and hose
Power Nozzle with Headlight for
Model S3139 only
The cleaner assembled will
look like the drawing below.
Page 5

.
I.
FURNITURE GUARD
2.
COMBINATION
Around cleaner and power nozzle.
CARPET AND FLOOR POWER
NOZZLE Power nozzle automatically adjusts to different carpet
pile heights. Has setting for “Carpet” and “Bare Floor”.
SURFACE SELECTOR INDICATOR Shows “Carpet” or
3.
“Bare Floor” setting of Surface Selector Lever.
SURFACE SELECTOR LEVER Push lever with your toe to
4.
adjust the power nozzle for “Carpet” and “Bare Floors”.
CARRYING HANDLE
5.
CASTERS OR WHEELS Provide easier towing; pull cleaner
using hose to guide the cleaner easily over carpet, throw rugs and
door sills.
7.
8.
9.
IO.
12.
14.
15.
16.
17.
18.
HOSE CORD CONNECTION TO CLEANER
into cleaner base at receptacle.
Plug
hose cord
CORD REWIND CONTROL To unwind cord, pull to desired
length. Step on cord rewind control to automatically rewind for
storage.
TOOL STORAGE RACK Tool storage for crevice tool,
furniture nozzle, wall/floor brush and dusting brush. (Removable)
FURNITURE NOZZLE
DUSTING BRUSH
II. WALL/FLOOR BRUSH
13. CREVICE TOOL
ON-OFF CONTROL A convenient foot operated control on top
of cleaner.
SPRING LATCH Connects extension wands.
EXTENSION WANDS Connect to hose and power nozzle or
cleaning tools.
COVER LATCH
HANDLE ADJUSTMENT LATCH Step on the handle
adjustment latch to lower the handle.
19.
20.
21.
22.
23.
CORD CLIPS Clip nozzle cord to extension wands.
SUCTION REGULATOR Close regulator for full suction. Open
regulator for easy cleaning of some types of carpets, lightweight
flexible rugs and lightweight draperies.
NOZZLE CORD CONNECTION TO HANDLE Plug nozzle
cord into receptacle underneath handle.
PLASTIC LATCH RING Connects hose grip to extension
wand or to cleaning tools.
HOSE GRIP
4
Page 6
Operate cleaner only at voltage specified on data plate on bottom of
cleaner.
WARNING: Electrical shock could occur if used outdoors or on wet
surfaces.
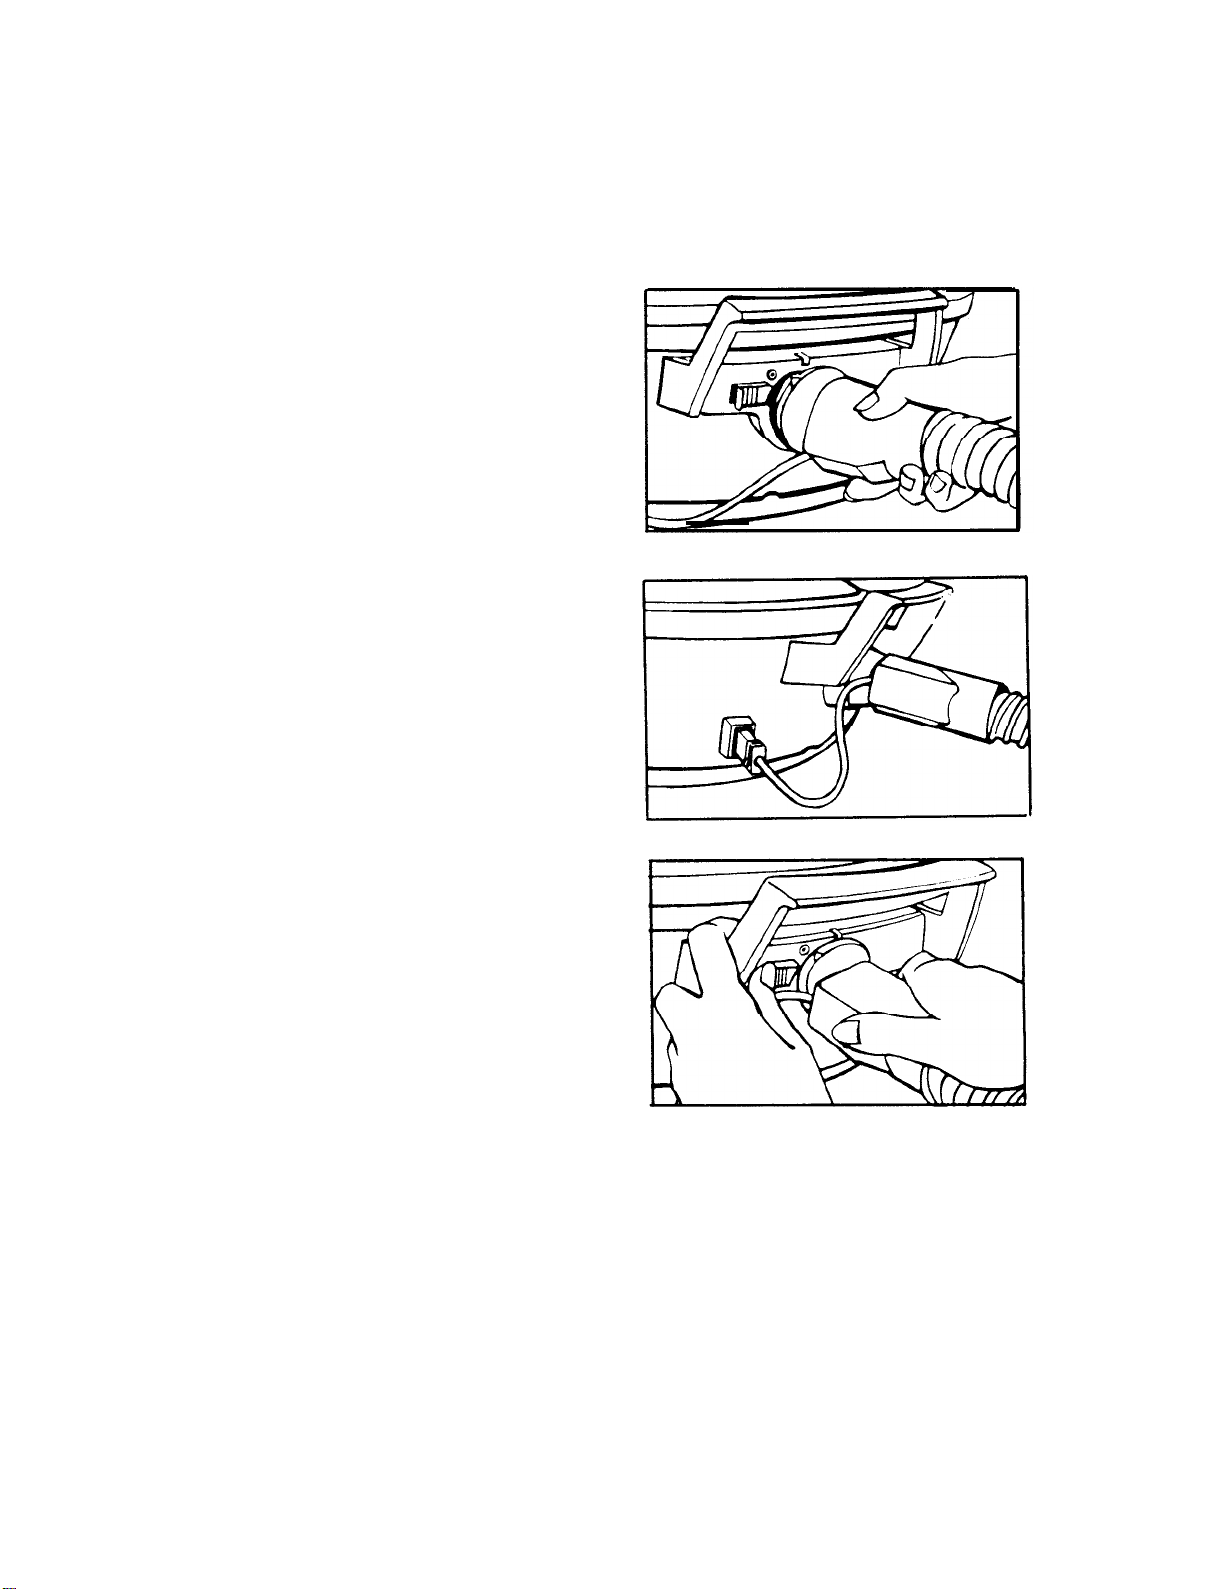
How to assemble
1. Connect hose
To connect hose, insert hose into
opening of cleaner lining up the
arrow on the hose with the dot
on the cleaner. Turn the hose
clockwise until it lines up with the
bar on the cleaner and latch locks
into place.
When the hose is attached
properly, the hose cord plug will
reach to the receptacle on the
cleaner.
Insert the plug firmly and as deep
into the receptacle as possible.
To disconnect hose, depress latch
away from hose connection
opening in cleaner. While holding
latch, turn the hose counterclock-
wise until the arrow lines up with
dot on the cleaner.
5
Page 7
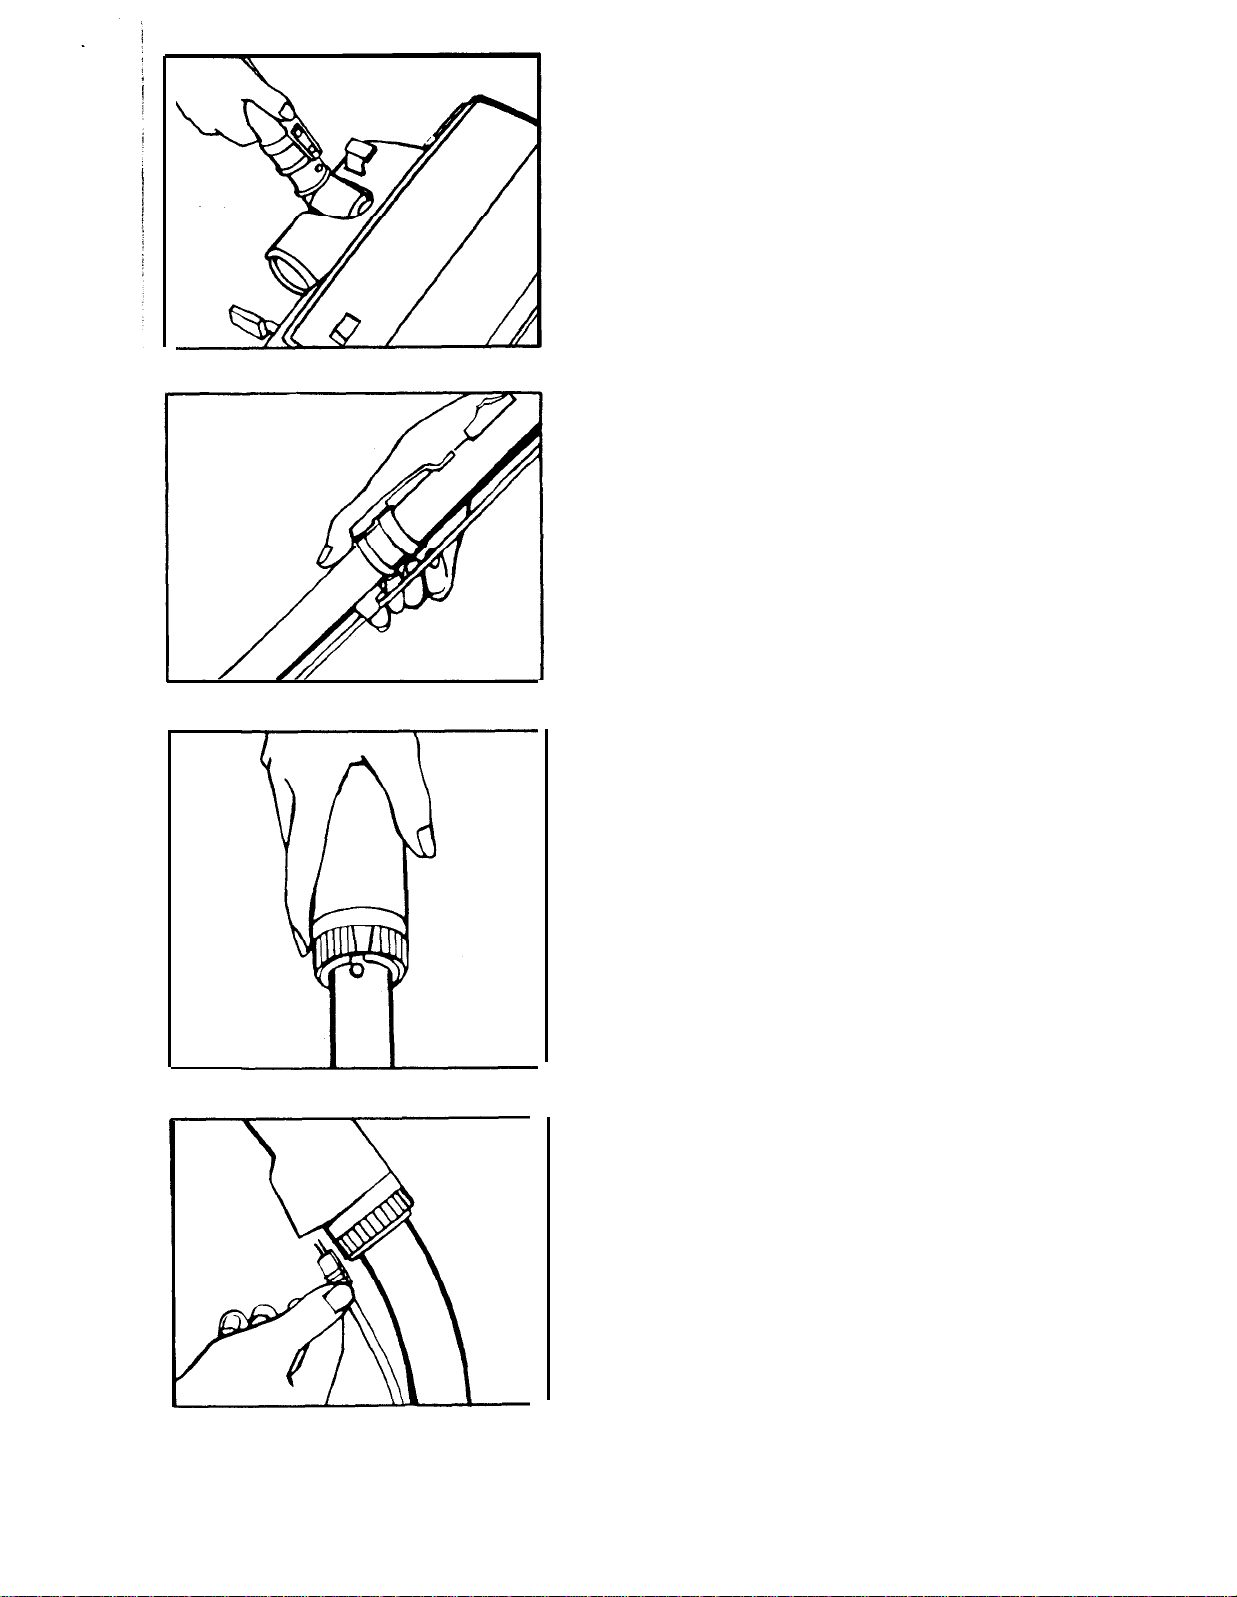
2. Attach power nozzle
a. Attach power nozzle at the
end of the extension wand. Be
sure the nozzle is locked in place.
To release, press down on the
center of the plastic spring latch
and remove nozzle.
b. Position cord into cord clips
on extension wands, placing excess cord between nozzle and
bottom cord clip.
c. To attach the hose and
extension wands, rotate the
plastic latch ring on hose grip to
accept the button projection on
the extension wands.
Push the handle over the wand
so that the button projection fits
into the slot. Turn the outer ring
on the handle to lock the handle
and wand in place.
d. Connect nozzle power cord to
receptacle underneath handle.
6
Page 8
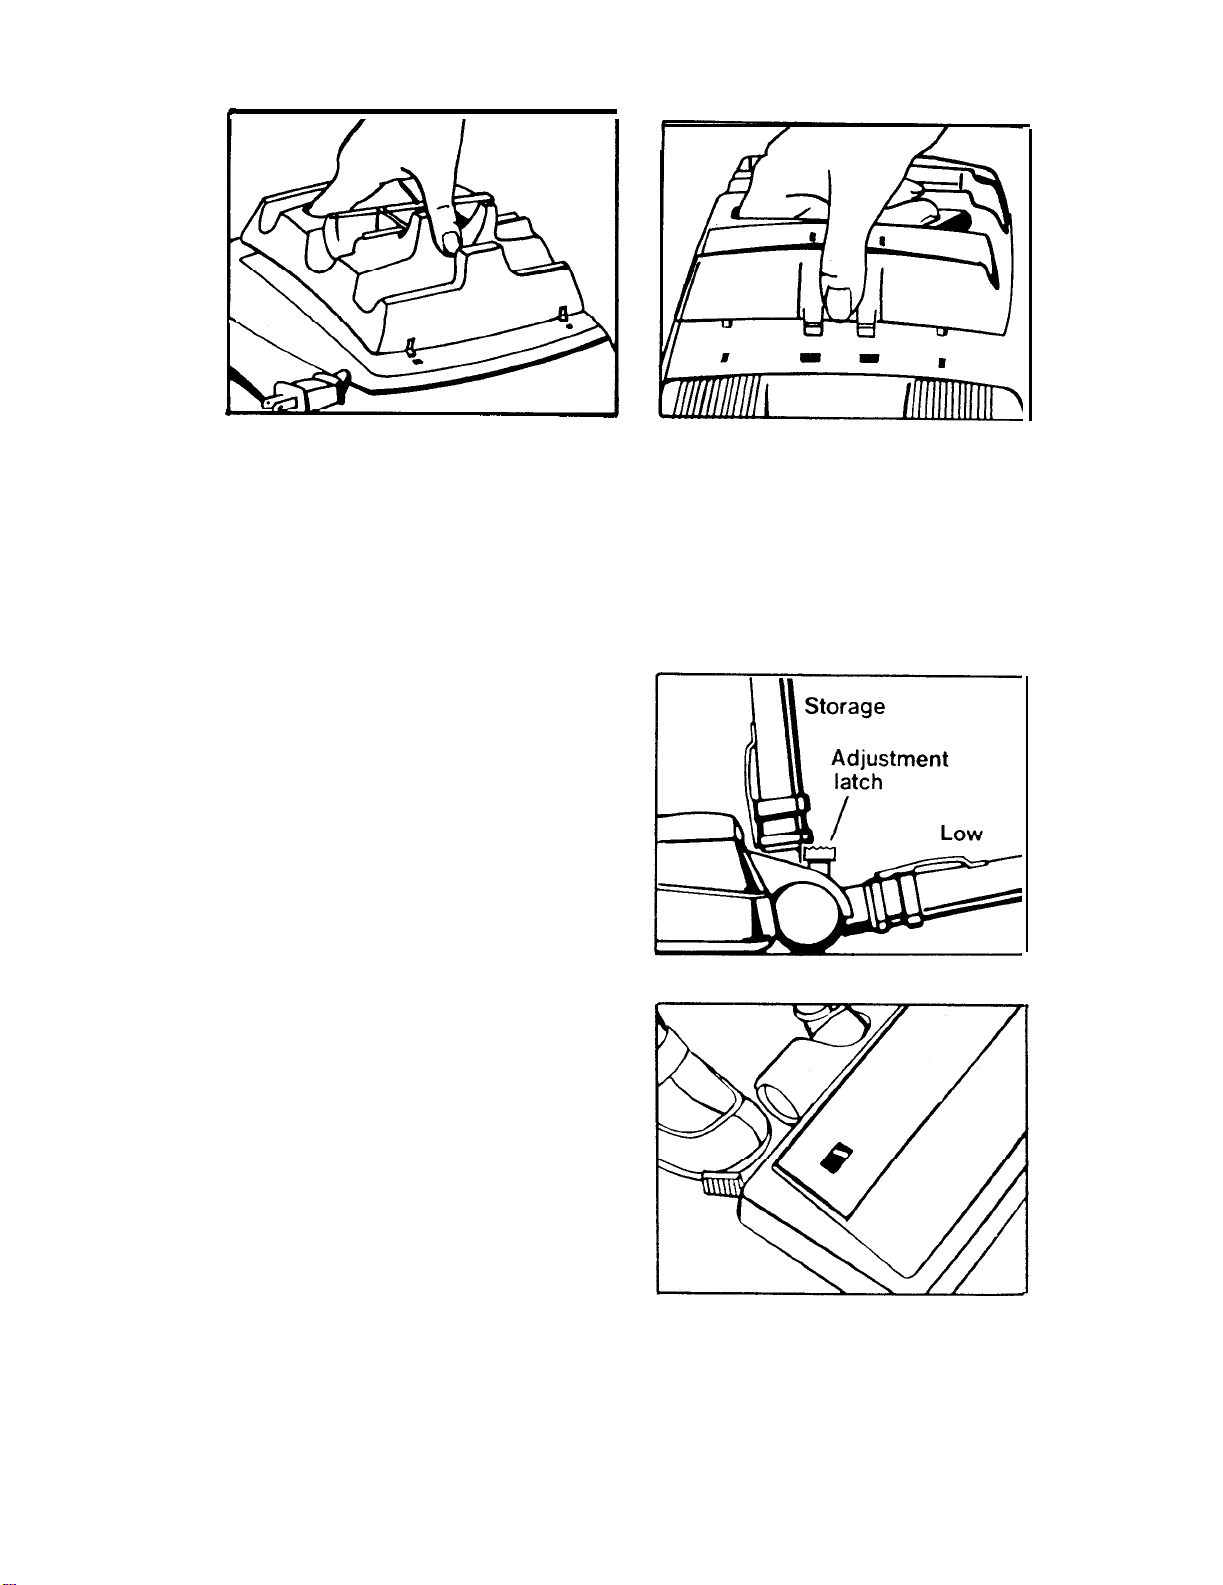
3. Attach tool storage rack
c
4
L
To attach tool storage rack, insert
rear projections of rack into the
two rear slots on top of the
cleaner. Snap front middle
section into place.
How to use
Handle adjustments
The handle has two positions
when used with the power
nozzle: Storage and Low. Step
on the Handle Adjustment Latch
to lower the handle. Use the low
position for reaching under low
furniture. Raise the handle
straight up for the storage
position.
To remove, press front middle
section and lift rack up.
Position tools in appropriate
sections on rack as indicated by
symbols.
Carpet and rug cleaning
When using the power nozzle for
carpet and rug cleaning, push the
Surface Selector Lever with your
toe to the “Carpet” setting. The
Selector Indicator should show
the lever on the “Carpet”
position.
Page 9

Automatic nozzle
adjustment
The power nozzle adjusts
automatically to the correct
cleaning height for all carpets
from low pile to shag. It is
suggested that you use the
power nozzle with the Suction
Regulator closed for full suction.
If the power nozzle is difficult to
push, open the Suction
Regulator.
Edge cleaning feature
This feature provides for cleaning
of carpet edges near baseboards
and solid furniture. Slots on the
nozzle bottom plate carry dust
from the carpet edge to the
nozzle.
Hard surface floor cleaning
The power nozzle can be used for cleaning hard surface floors such as
wood, linoleum, vinyl, asphalt and rubber tile, sealed cork, concrete
and terrazzo as well as carpet. You will find it particularly convenient
when cleaning rugs to adjust the power nozzle to “Bare Floor” and
continue cleaning the surrounding floor surfaces. The small front
wheels on the bottom of the power nozzle provide the proper nozzle
height for hard surface floors. The brush located directly behind the
nozzle opening helps to provide effective cleaning of hard surface
floors.
Adjust the Surface Selector with
your toe to the “Bare Floor”
setting. The Selector Indicator
should show the lever on the
“Bare Floor” position. As you
move from the rug surface and
begin to clean the floor, you will
hear an increase in sound as the
agitator brushes power sweep the
floor. If you prefer you may use
the Wall/Floor Brush to clean
hard surface floors. The power
nozzle is not recommended
for
8
Page 10

very irregular floor surfaces
such as brick, slate and
certain parquet floors. To clean
these floors use the
Brush.
Wa!l/Floor
Cleaning Tools
Removing and
Replacing tools
To remove tools from tool
storage rack, grasp the top of the
tool, as shown in the illustration,
and lift up.
To replace tools, position tool in
appropriate section on the tool
storage rack and snap into place.
Select the proper cleaning tool
The cleaning tools have many uses. Select the tool best suited for the
cleaning task from the descriptions below. Adjust the Suction Regula-
tor to select the amount of suction appropriate to the cleaning task.
1. Crevice tool
dresser drawers, spaces between
kitchen appliances.
2. Wall/floor brush
walls and very irregular hard
surface floors such as brick and
slate.
3.
Furniture nozzle
upholstered furniture, draperies,
tapestries, mattresses, clothing,
automobile interiors and carpeted
stairs.
4. Dusting brush
furniture, table tops, books,
lamps, lighting fixtures, Venetian
blinds, baseboards, shutters and
registers.
For radiators,
For
For
For carved
9
Page 11

To connect and
remove tools
To connect the tools, insert end
of tool into the extension wand
and snap into position. To
disconnect, press down on the
center of the white plastic spring
latch to release.
Tools may also be attached to
the hose grip by revolving the
plastic latch ring to accept the
button projection on the tool.
Then, turn the latch ring as
shown to lock the tool in place.
To remove the tool, reverse the
above procedure.
The power cord leading from the
hose connection to the receptacle
on the cleaner base need not be
connected when using the
cleaning tools. However, to
avoid damage to the cord,
leave cord connected to the
receptacle on the cleaner.
To clean hard to
reach areas
Use the curved wand with the
extension wand. The tools at-
tached to the curved wand will
enable you to clean many hard
to reach areas; especially crown
moldings, tops of drapery rods,
shelves, and picture frames.
10
Page 12

To clean stairs
Clean stairs from bottom to top.
Cleaner with large wheels
Clean stairs by standing the
cleaner on end as shown.
CARPETED
STAIRS
Cleaner with casters
Position cleaner for hard surface and carpeted stairs according to
the illustrations.
How to store
Your cleaner can be stored on
end as shown in the illustration.
Store the power nozzle with the
handle in the upright or storage
position.
NOTE: When storing the nozzle,
be sure the Surface Selector
Lever is in the “Carpet” position.
The hose, extension wands,
power nozzle and tool storage
rack can be stored separately
from the cleaner if desired.
11
Page 13

Maintenance
The following sections are concerned with proper maintenance of the
cleaner. Familiarize yourself with these home maintenance tasks and
keep this owner’s manual in a convenient place where you can refer
to it when needed. Proper use and care of your cleaner will insure
continued cleaning effectiveness.
THE BAG
When to replace
Check bag from time to time. When the bag is filled with dirt, the
cleaner will not operate efficiently. Discard used bag.
CAUTION: Very fine materials, such as face powder,
cornstarch, fireplace ashes or fireplace soot, may seal the
throw away bag and may cause it to burst even though it is
only partially full of dirt. When the cleaner is used to remove
material
Where to buy bags
Bags may be purchased from your local Authorized Hoover Dealer or
from a Hoover Factory Service Center. When ordering bags, be
sure to
of
this nature, the bag should be changed frequently.
give
the model number of your cleaner.
What bags to buy
Use HOOVER bag type H with this
cleaner.
To assure that your HOOVER cleaner
operates at peak performance, it is
imperative that you use only genuine
HOOVER throw away bags made by The
Hoover Company. HOOVER bags can be
identified by the trademarks -
-
Replacing the throw
away bag
Disconnect cord from electric
outlet before changing parts.
Open the cleaner by lifting up on
the latch to release the cover.
12
Page 14

Push used bag away from holder
and lift out.
Grasp edges of collar section and
push opening of collar section of
new bag onto holder. Make sure
collar is pushed completely up to
the ridge on the holder.
Adjust bag around the motor
housing and open the folds of the
bag to allow the bag to properly
fill. Make sure all four folds
are open.
NOTE: A bag that does not
expand properly may restrict air
flow. In this event, check the
bag, making sure all the folds
are open. High suction on some
carpet surfaces can cause the
nozzle to hug the carpet and
also restrict air flow. When this
occurs, reducing the suction
with the suction regulator may
be helpful.
13
Page 15

SECONDARY FILTER
To clean secondary filter
Disconnect cleaner from
electric circuit before
removing filter .
The secondary filter protects the
motor from dirt particles. If the
filter becomes dirty, either clean
or replace it.
To remove secondary filter, open
cover of cleaner and lift filter off
of motor housing. Clean filter by
rinsing it in water. When dry,
position filter around motor
housing with notched edge at the
bottom and to the back of the
motor housing.
When to replace the belt on power nozzle
The belt, located under the bottom plate of the power nozzle, should
be checked from time to time to be sure it is in good condition. To
check remove the bottom plate (see following section). If the belt is
stretched or cut; or if the agitator fails to rotate, replace the belt.
THE BELT
The belt in your power nozzle drives the agitator. It has been designed
specifically for use in this cleaner and is important for effective
operation. There are other belts manufactured that are similar in shape
and size but are not designed for the HOOVER power nozzle. Such
belts do not operate the agitator correctly and may create stress
which could damage your power nozzle. Use only a genuine
HOOVER Belt No.
38528-008
when a belt replacement is necessary.
How to replace the belt
Disconnect cleaner from
electrical outlet before
replacing belt and disconnect
power nozzle from extension
wand.
Turn power nozzle over. Remove
metal bottom plate by
unscrewing the 2 Phillips head
screws at the back of the nozzle.
Lift plate off to release from
nozzle housing.
14
Page 16

.
Remove the agitator to release
the worn or broken belt by first
removing the agitator dirt seal,
lifting it up and sliding it out.
Then grip agitator and pull out.
Remove old belt.
Place one end of the new belt
around agitator pulley with
smooth side of belt against the
pulley.
I
To provide space for grasping the
agitator, remove end of hose
from holder.
Line up metal projection on end
of agitator (opposite the belt1
with groove on inside wall of
nozzle. Then slide agitator into
place.
15
Page 17

Replace end of hose in holder.
Place a screwdriver under the belt
as illustrated.
Bracing the end of the screwdriver against the end of the
motor shaft, slide belt over end
of shaft. Remove screwdriver.
Check to be sure belt is not
twisted.
Rotate the agitator by hand to
properly align the belt on the
motor shaft. Agitator should
rotate freely.
16
Page 18

Replace agitator dirt seal. Place
beveled end toward front.
Replace bottom plate by fitting
the plate over the lip at the front
of the nozzle housing. Line up
the slots over the wheels and
position holes in bottom plate
over screw mountings. Replace
screws.
Nozzle hose
The Nozzle Hose carries the dirt
from the nozzle to the extension
wand and to the throw away
bag. If the hose becomes
obstructed, cleaning effectiveness
will sharply decrease. Remove
bottom plate as described in
preceding section, and slide end
of hose out of the holder. Clear
hose and reinsert into holder.
Replace bottom plate as
described in preceding section.
Agitator brushes
When brushes become worn and
bristles do not extend past the
bottom plate of the nozzle, they
should be replaced. Hold a
straight edge across the bottom
plate to check for length of
bristles. Always replace both
brushes at the same time to
maintain cleaning effectiveness.
17
Page 19

END PLATES
Replacing the agitator
brushes
Disconnect the cleaner from
electrical outlet and
disconnect power nozzle from
extension wand.
To replace worn brushes, remove
bottom plate, belt and agitator,
following directions previously
given.
Turn end plates of agitator
counterclockwise until one end
plate comes off.
Then pry out end section as
shown.
Pry out opposite end section,
removing the end plate and shaft
from the agitator as illustrated.
bb
LOCATOR
END
SECTION
Remove brushes by pulling them
from agitator with pliers. Slide
new brushes into the channels
small ends first - pushing them
in as far as possible.
Replace end plate and shaft,
lining up locator on end section
with slot in agitator. Replace
other end section and end plate
and tighten.
Should you accidentally displace
the bearing during disassembly,
reassemble as shown.
-
18
Page 20

Bottom plate brush
Periodically, check the Bottom
Plate Brush to see whether or not
bristles have become worn. Put
the Surface Selector Lever in the
“Bare Floor” position. Place a
straight edge across the brush
opening to check the length of
the bristles. The bristles should
extend beyond the bottom plate,
1:16”
or more.
How to replace the
bottom plate brush
Disconnect cleaner from
electrical outlet and
disconnect power nozzle from
extension wand.
Put the Surface Selector Lever in
the “Carpet” Position. This will
allow for easier removal of the
brush. Turn power nozzle over.
Remove bottom plate by
unscrewing the 2 Phillips head
screws at the back of the nozzle.
Lift plate off to release from
nozzle housing.
Turn inside of the bottom plate
up. Carefully slide brush out of
holders.
With the Surface Selector Lever
still in the “Carpet” position, slide
new brush into holders one at a
time supporting the holder as you
slide in the brush. Center brush in
bottom plate opening by sliding
brush in holders as necessary.
19
Page 21

Run a thin utensil such as a table
knife around the brush to make
certain all the bristles enter the
slot in the bottom plate.
Replace bottom plate by fitting
the plate over the lip at the front
of the nozzle housing. Line up
the slots over the wheels and
position holes in bottom plate
over screw mountings. Replace
screws.
Power nozzle with headlight
The headlight located on top of the power nozzle operates when the
cleaner is turned on.
How to replace the
headlight
Disconnect cleaner from
electrical outlet and
disconnect power nozzle from
extension wand.
1. Turn power nozzle over.
Remove metal bottom plate by
unscrewing the 2 Phillips head
screws at the back of the nozzle.
Lift plate off to release from
nozzle housing.
2. Remove screw on right side of
nozzle hose as shown, to release
headlight cover and lens.
20
Page 22

.
I
3. Lift up front of headlight cover.
Then remove cover and lens.
5. Position headlight lens and
cover in place, aligning projection
on cover with slots on power nozzle at front and back of nozzle.
I
4. Push bulb into socket and twist
to remove. Replace with 15 watt
bulb. Push new bulb into socket
and twist into place.
6. Press top of cover to snap projections into place.
7. Turn power nozzle over and
replace cover screw.
8. Replace bottom plate by fitting
the plate over the lip at the front of
the nozzle housing. Line up the
slots over the wheels and position
holes in bottom plate over screw
mountings. Replace screws.
21
Page 23

User check list
This appliance was inspected thoroughly and was in good operating
condition when it was shipped from the factory. If a minor problem
develops, it usually can be remedied quite easily when the cause is
identified. Accordingly, this check list is provided for your
convenience.
Problem Possible cause Possible solution
A. Cleaner
won’t run
B. Cleaner
suction
low
C. Agitator
won’t run
D. Nozzle 1. Low cleaner suction.
won’t pick 2. Obstruction in nozzle.
up
1. Not firmly plugged in.
2. No voltage in wall plug. 2. Check fuse or breaker.
3. Blown fuse/tripped breaker. 3. Replace fuse/reset breaker.
1. Bag full.
2. Obstruction in hose(s) or
cleaning tool.
3. Secondary filter dirty.
4. Bag not opening.
5. Suction regulator control
improperly set.
6. Hose not connected to
cleaner properly.
1. Hose power cord not firmly
plugged in.
2. Broken or worn belt.
3. Agitator not running.
4. Agitator brushes worn.
1. Plug unit in firmly.
1. Change throw away bag.
2. Remove foreign object.
3. Clean filter.
4. Open bag by pulling folds.
5. Check to be sure suction
regulator is set properly.
6. Insure hose connected
orooerlv.
1. Plug firmly into receptacle
on cleaner base and underneath handle.
2. Replace belt.
1. See Item B.
2. Remove foreign object.
3. See Item C.
4. Replace brushes.
If the problem persists, check the Yellow Pages of your telephone
book under “Vacuum Cleaners - Household” for your nearest Hoover
Factory Service Center or Authorized Warranty Service Dealer where
approved service and genuine HOOVER replacement parts may be obtained. The warranty provided with this product has a listing of the
Hoover Factory Service Centers. If you are unable to obtain the infor-
mation you need from the Yellow Pages, contact a Hoover Factory
Service Center to find your nearest Authorized Warranty Service
Dealer. For service under warranty, follow the instructions in the War-
ranty provided with this product.
Always identify your cleaner by model number when requesting infor-
mation or ordering replacement parts. (The model number appears on
the bottom of the cleaner.)
If further assistance is needed, contact the Hoover Company
Consumer Affairs Department, North Canton, Ohio 44720,
216-499-9200.
22
Page 24

VCMA
. .
VACUUM CLEANER MANUFACTURERS ASSOCIATION
(HOOVER _ AN ASSOCIATION MEMBER)
Servlce To The Consumer Since
This information has been compiled by the Vacuum Cleaner Manufacturers Associ-
ation from Governmental and Private Sources concerned
These basic guidelines are for your protection and convenience.
TO AVOID ELECTRIC SHOCK
Never vacuum liquids.
Never vacuum carpeting that is damp or wet.
Do not store machine outdoors.
Replace worn or frayed power cord immediately.
TO AVOID ACCIDENTS
Never vacuum live ashes or cigarette butts.
Never run machine over power cord or place sharp objects on it.
Never let children use machine as a toy.
Use extra caution when cleaning on stairs.
Keep machine on floor - not on chairs, tables, etc.
When machine is turned on, never allow fingers, hair or garments to
come near intake suction ports or revolving brushes.
Never leave machine running or cord plugged in when unattended.
Turn machine off at switch before unplugging from wall outlet.
When unplugging machine, grasp plug - not cord.
Always unplug power cord from wall outlet before servicing machine or
attaching accessories.
Store machine promptly after each use to prevent accidents from trip-
ping over power cord or machine.
Use machine and accessories only in manner intended by manufacturer.
FOR BEST PERFORMANCE
Keep your machine and all accessories clean and in good operating
condition.
Change or clean bags and/or filters as recommended by manufacturer to
maintain optimum cleaning efficiency.
Periodically check revolving brush for build-up of lint, hair or other
foreign material and remove as necessary.
Adjust or replace cleaning brushes when worn.
Buy
replacement parts from manufacturer’s authorized service center.
Have machine checked periodically by manufacturer’s authorized service
center.
Store machine carefully - in dry area - never outdoors.
For optimum cleaning performance and safety, study and follow your
Owner’s Manual - keep it in a handy and safe place for future reference.
1913
wi,th
product safety.
THE HOOVER COMPANY, NORTH CANTON, OHIO 44720
R211-79
s3137/39
Litho
USA
56513-105
 Loading...