

Page 1

IInnssttrruuccttiioonn BBooookk
®
Page 2

IInnttrroodduuccttiioonn
. . . . . . . . . . . . . . . . . . . . . . . . . . . . . . . . . . . . 3
Delivery information . . . . . . . . . . . . . . . . . . . . . . . . . . . . . . . . . 3
Do’s and Don’ts . . . . . . . . . . . . . . . . . . . . . . . . . . . . . . . . . . . . . 3
UUnnppaacckkiinngg tthhee PPrroodduucctt
. . . . . . . . . . . . . . . . . . . . . . . . 4
IInnssttaallllaattiioonn
. . . . . . . . . . . . . . . . . . . . . . . . . . . . . . . . . . . . . 6
Choose a location . . . . . . . . . . . . . . . . . . . . . . . . . . . . . . . . . . . 6
Electricity supply. . . . . . . . . . . . . . . . . . . . . . . . . . . . . . . . . . . . 7
Water supply . . . . . . . . . . . . . . . . . . . . . . . . . . . . . . . . . . . . . . 7
Connecting to the cold water supply . . . . . . . . . . . . . . . . . . . . 8
Connection of the machine to the drain . . . . . . . . . . . . . . . . . 9
Moving the machine into position . . . . . . . . . . . . . . . . . . . . . 10
Adjusting the feet . . . . . . . . . . . . . . . . . . . . . . . . . . . . . . . . . 10
TTeessttiinngg tthhee iinnssttaallllaattiioonn
. . . . . . . . . . . . . . . . . . . . . . 11
WWaasshhiinngg aanndd DDrryyiinngg aaddvviiccee
. . . . . . . . . . . . . . . . . 12
Loading your washing machine . . . . . . . . . . . . . . . . . . . . . . . 12
Sorting the laundry. . . . . . . . . . . . . . . . . . . . . . . . . . . . . . . . . 12
Drying . . . . . . . . . . . . . . . . . . . . . . . . . . . . . . . . . . . . . . . . . . . 13
TThhee DDiissppeennsseerr
. . . . . . . . . . . . . . . . . . . . . . . . . . . . . . . . 14
Detergent dosage. . . . . . . . . . . . . . . . . . . . . . . . . . . . . . . . . . 14
Dispensing instructions. . . . . . . . . . . . . . . . . . . . . . . . . . . . . . 15
TThhee CCoonnttrrooll PPaanneell
. . . . . . . . . . . . . . . . . . . . . . . . . . . . 16
WWaasshh aanndd DDrryy OOppttiioonnss
. . . . . . . . . . . . . . . . . . . . . . . 18
Automatic Features . . . . . . . . . . . . . . . . . . . . . . . . . . . . . . . . 20
PPrrooggrraammmmee SSeelleeccttoorr
. . . . . . . . . . . . . . . . . . . . . . . . . 21
Special Programmes . . . . . . . . . . . . . . . . . . . . . . . . . . . . . . . . 21
Daily Programmes. . . . . . . . . . . . . . . . . . . . . . . . . . . . . . . . . . 22
PPrrooggrraammmmee GGuuiiddee
. . . . . . . . . . . . . . . . . . . . . . . . . . . . 23
AA TTyyppiiccaall WWaasshh aanndd DDrryy CCyyccllee
. . . . . . . . . . . . . . . 24
Selecting the programme . . . . . . . . . . . . . . . . . . . . . . . . . . . . 24
Starting the cycle . . . . . . . . . . . . . . . . . . . . . . . . . . . . . . . . . . 25
CClleeaanniinngg aanndd RRoouuttiinnee MMaaiinntteennaannccee
. . . . . . . . 26
TTrroouubblleesshhoooottiinngg
. . . . . . . . . . . . . . . . . . . . . . . . . . . . . . 28
Power Failure . . . . . . . . . . . . . . . . . . . . . . . . . . . . . . . . . . . . . 30
CCuussttoommeerr SSeerrvviiccee
. . . . . . . . . . . . . . . . . . . . . . . . . . . . . 31
YYoouurr GGuuaarraanntteeee
. . . . . . . . . . . . . . . . . . . . . . . . . . . . . . 32
Hoovercare . . . . . . . . . . . . . . . . . . . . . . . . . . . . . . . . . . . . . . . 32
2
CCoonntteennttss
Page 3

IInnttrroodduuccttiioonn
PPlleeaassee rreeaadd aanndd ffoollllooww tthheessee iinnssttrruuccttiioonnss ccaarreeffuullllyy aanndd ooppeerraattee
tthhee mmaacchhiinnee aaccccoorrddiinnggllyy.. TThhiiss bbooookklleett pprroovviiddeess iimmppoorrttaanntt
gguuiiddeelliinneess ffoorr ssaaffee uussee,, iinnssttaallllaattiioonn,, mmaaiinntteennaannccee aanndd ssoommee
uusseeffuull aaddvviiccee ffoorr bbeesstt rreessuullttss wwhheenn uussiinngg yyoouurr mmaacchhiinnee..
Keep all documentation in a safe place for future reference or
for any future owners.
DDeelliivveerryy iinnffoorrmmaattiioonn
Please check that the following items are delivered with the
appliance:
● Instruction manual
● Guarantee card
● Blanking plug
● Inlet hose & hooked end support (see Unpacking and
Installation Instructions)
● Base panel & x2 push clips
● Energy Label
DDoo’’ss
● All packaging materials used are environmentally-friendly
and recyclable. Please help dispose of the packaging via
environmentally-friendly means. Your local council will be
able to give you details of current means of disposal.
● To ensure safety when disposing of an old washing
machine disconnect the mains plug from the socket, cut
the mains power cable and destroy this together with the
plug. To prevent children shutting themselves in the
machine break the door hinges or the door lock.
● This machine is solely for domestic use, i.e. to wash, rinse
and spin dry household textiles and garments.
DDoonn’’ttss
●
DDoo nnoott ttoouucchh tthhee aapppplliiaannccee wwhheenn hhaannddss oorr ffeeeett aarree ddaammpp
oorr wweett..
●
DDoo nnoott lleeaann oonn tthhee ddoooorr wwhheenn llooaaddiinngg tthhee mmaacchhiinnee oorr
uussee tthhee ddoooorr ttoo lliifftt oorr mmoovvee tthhee mmaacchhiinnee..
●
DDoo nnoott uussee aaddaapptteerrss,, mmuullttiippllee ccoonnnneeccttoorrss aanndd oorr
eexxtteennssiioonnss..
●
DDoo nnoott aallllooww cchhiillddrreenn ttoo ppllaayy wwiitthh tthhee mmaacchhiinnee oorr iittss
ccoonnttrroollss..
●
DDoo nnoott ttrryy ttoo ooppeenn tthhee ddoooorr wwhheenn wwaatteerr iiss vviissiibbllee iinn tthhee
ddrruumm oorr tthhee ddoooorr lloocckkeedd iinnddiiccaattoorr iiss OONN..
3
CChheecckk tthhaatt nnoo ddaammaaggee
hhaass ooccccuurrrreedd ttoo tthhee
mmaacchhiinnee dduurriinngg ttrraannssiitt..
IIff iitt hhaass,, ccaallll ffoorr sseerrvviiccee
bbyy GGIIAASS..
CCaallll
0088770055 440000 660000
PPLLEEAASSEE NNOOTTEE
TThhiiss mmaacchhiinnee oonnllyy
rreeqquuiirreess aa ccoolldd wwaatteerr
ssuuppppllyy
IIff tthhee aapppplliiaannccee iiss nnoott
rruunnnniinngg pprrooppeerrllyy oorr
bbrreeaakkss ddoowwnn,, sswwiittcchh iitt
ooffff,, ddiissccoonnnneecctt tthhee pplluugg
ffrroomm tthhee ssoocckkeett,, ttuurrnn
ooffff tthhee wwaatteerr ssuuppppllyy aanndd
ddoo nnoott ttaammppeerr wwiitthh
tthhee aapppplliiaannccee..
CCoonnssuulltt GGIIAASS SSeerrvviiccee ffoorr
aassssiissttaannccee..
CCaallll
0088770055 440000 660000
FFaaiilluurree ttoo ccoommppllyy wwiitthh
tthhee aabboovvee ccaann
ccoommpprroommiissee tthhee ssaaffeettyy
ooff tthhee aapppplliiaannccee.. YYoouu
mmaayy bbee cchhaarrggeedd ffoorr aa
sseerrvviiccee ccaallll iiff aa pprroobblleemm
wwiitthh yyoouurr mmaacchhiinnee iiss
ccaauusseedd bbyy mmiissuussee..
Page 4
Remove the machine from its packaging close to the final
location of the machine.
11..
Cut carefully around the base of the packaging.
22
. Lay the machine on its back and remove the base and the
two polystyrene spacers on each side of the machine. We
recommend that a second person assist in the lifting and
manoeuvring of the machine.
33
. Return the machine to the upright position, remove the
remainder of the packaging and the central screw in the
transit bar.
4
UUnnppaacckkiinngg tthhee pprroodduucctt
DDiissppoossee ooff tthhee ppaacckkaaggiinngg ssaaffeellyy.. MMaakkee ssuurree iitt
iiss oouutt ooff tthhee rreeaacchh ooff cchhiillddrreenn,, iitt iiss aa
ppootteennttiiaall ssoouurrccee ooff ddaannggeerr..
Page 5

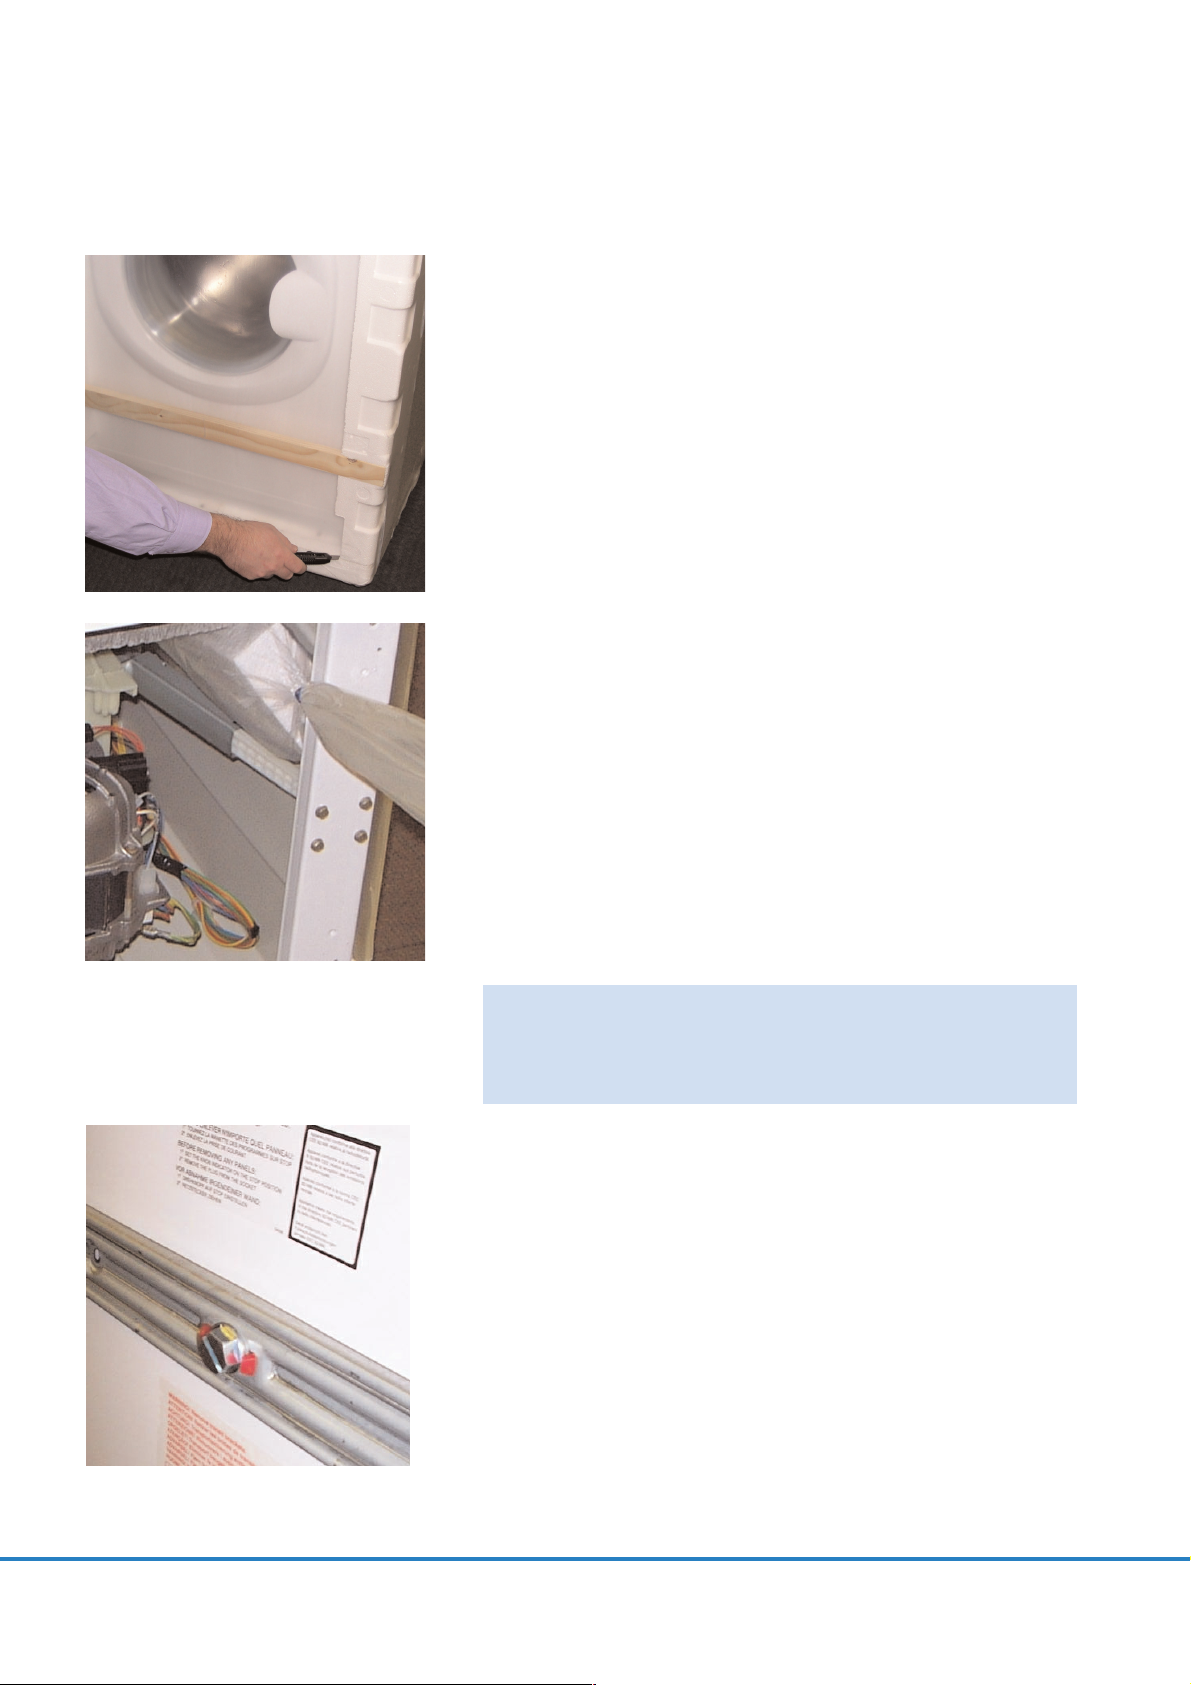
44..
Remove the four retaining screws in the transit bar and
pull out the transit bracket.
55..
Take the base panel provided and fit the two self
adhesive strips by removing the backing paper on one
side and locating the strips on each side of the base
panel.
66..
Tilt the machine forward and locate the base panel under
the front of the machine. Remove the remaining backing
paper from the self-adhesive strips and offer up the base
panel to the bottom of the cabinet.
5
WWee rreeccoommmmeenndd yyoouu kkeeeepp tthhee ttrraannssiitt bbrraacckkeett
aanndd ssccrreewwss ttoo pprrootteecctt tthhee mmaacchhiinnee ffoorr ffuuttuurree
ttrraannssiitt..
TThhee mmaannuuffaaccttuurreerrss wwiillll nnoott bbee rreessppoonnssiibbllee ffoorr
aannyy ddaammaaggee ttoo tthhee mmaacchhiinnee ccaauusseedd bbyy nnoott
ffoolllloowwiinngg tthhee iinnssttrruuccttiioonnss rreellaattiinngg ttoo
rreelleeaassiinngg tthhee ttrraannssiitt pprrootteeccttiioonn.. TThhee uusseerr iiss
rreessppoonnssiibbllee ffoorr aallll iinnssttaallllaattiioonn ccoossttss..
Page 6

77..
Take the two plastic fixing clips and fix the base panel to
the base of the machine. Bring the machine back to the
upright position.
88..
Cover the central hole in the rear of the machine with the
cap enclosed in the instruction bag.
CChhoooossee aa llooccaattiioonn
● After the machine has been installed, ensure that the
mains plug and water supply valves are easily accessible.
● Make sure there is enough space for the machine. Select a
space at least 600mm wide and 850mm high. Also leave
enough space to open the door fully so you can load and
unload it easily.
● Keep the area underneath and around the machine free
of combustible materials such as lint, paper, rags,
chemicals etc.
6
IInnssttaallllaattiioonn
DDoo nnoott pplluugg tthhee
mmaacchhiinnee iinn aanndd sswwiittcchh iitt
oonn aatt tthhee mmaaiinnss uunnttiill tthhee
iinnssttaallllaattiioonn iiss ccoommpplleetteedd..
Page 7

EElleeccttrriicciittyy ssuuppppllyy
Washing machines are supplied to operate at a voltage of
230-240V, 50 Hz single phase. Check that the supply circuit is
rated to at least 13A.
The plug is already equipped with a 13A fuse which is BS 1362
ASTA approved. Any replacement must be the same rating and
specification.
IIff tthhee ffuussee ccoovveerr iiss lloosstt,, ddoo nnoott uussee tthhee pplluugg uunnttiill
iitt iiss rreeppllaacceedd..
EElleeccttrriicciittyy ccaann bbee eexxttrreemmeellyy ddaannggeerroouuss..
TThhiiss wwaasshhiinngg mmaacchhiinnee mmuusstt bbee eeaarrtthheedd..
TThhee ssoocckkeett oouuttlleett aanndd tthhee pplluugg oonn tthhee aapppplliiaannccee mmuusstt bbee ooff
tthhee ssaammee ttyyppee..
DDoo nnoott uussee mmuullttiippllee aaddaapptteerrss aanndd//oorr eexxtteennssiioonn lleeaaddss..
The wires in the mains lead are coloured in accordance with
the following codes:
BBlluuee NNEEUUTTRRAALL
BBrroowwnn LLIIVVEE
GGrreeeenn aanndd YYeellllooww EEAARRTTHH
CE Appliance complies with European Directive 89/336/EEC,
73/23/EEC and subsequent amendments.
WWaatteerr ssuuppppllyy
● The cold water pressure should be between 0.5 and 8 bar
(0.05-0.8 Mpa).
●
DDoo nnoott ccoonnnneecctt tthhee mmaacchhiinnee ttoo aa ssiinnggllee oouuttlleett
iinnssttaannttaanneeoouuss wwaatteerr hheeaatteerr..
● The water supply tap should be accessible when the
machine is installed.
● Before connecting the fill hose, check that the water is
running from the water supply tap to be used.
7
YYoouu mmaayy bbee cchhaarrggeedd ffoorr
aa sseerrvviiccee ccaallll iiff aa
pprroobblleemm wwiitthh yyoouurr
mmaacchhiinnee iiss ccaauusseedd bbyy
iinnccoorrrreecctt iinnssttaallllaattiioonn..
IIff tthhee mmaaiinnss ccoorrdd oonn tthhiiss
aapppplliiaannccee iiss ddaammaaggeedd,, iitt
mmuusstt bbee rreeppllaacceedd bbyy aa
ssppeecciiaall ccoorrdd wwhhiicchh iiss
OONNLLYY oobbttaaiinnaabbllee ffrroomm
tthhee HHoooovveerr ssppaarreess
sseerrvviiccee.. IItt mmuusstt bbee
iinnssttaalllleedd bbyy aa ccoommppeetteenntt
ppeerrssoonn..
CCaallll GGIIAASS
0011220044 555566111111
Page 8
CCoonnnneeccttiinngg ttoo tthhee ccoolldd wwaatteerr
ssuuppppllyy
Only one hose is required to install this machine to a cold
water supply.
Cold fill is an energy efficient system. Only the water required
to wash the laundry is heated. There is no loss of heat in the
pipeline from the hot water tank or the boiler.
If your previous machine installation was hot and cold fill
ensure that the hot tap is firmly closed to prevent leakage.
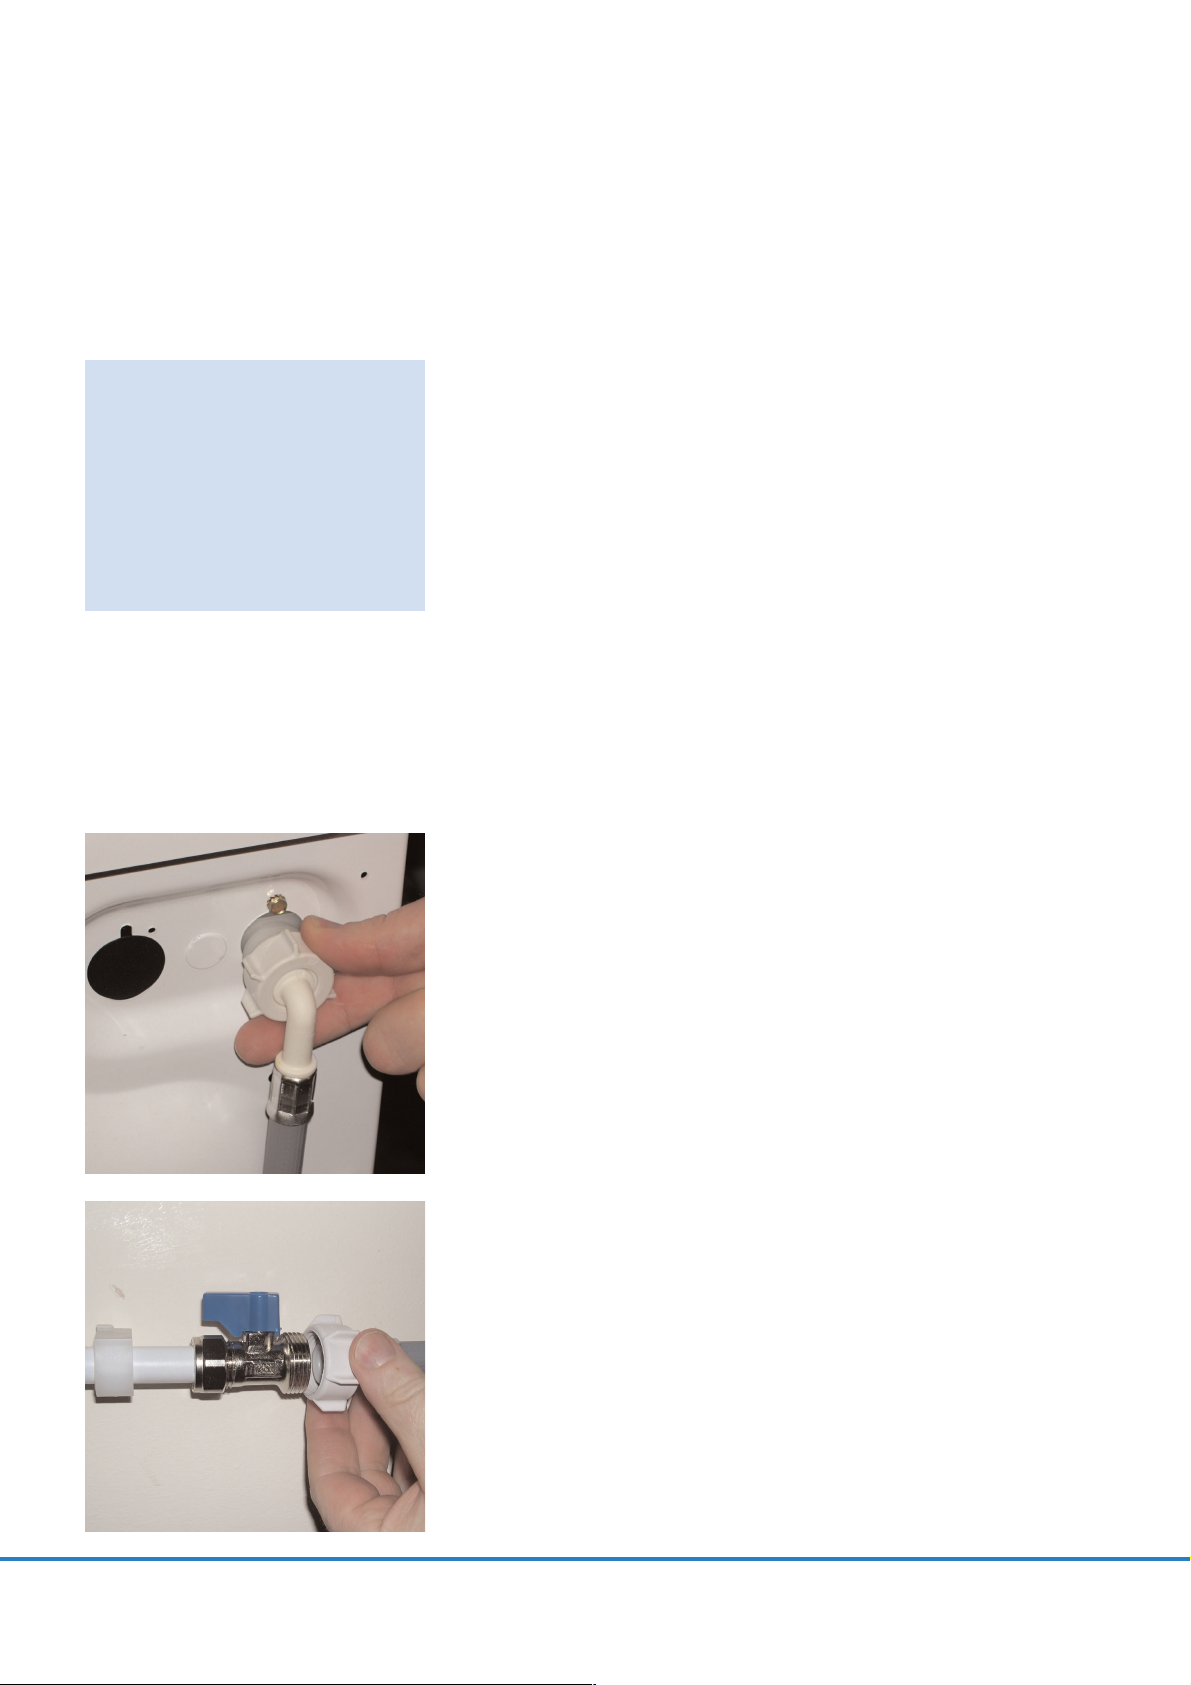
This machine has an inlet hose with a 19mm (3/4") threaded
ferrule fitted to the end, to attach between the threaded
connector on the appliance and the water supply.
Only use the new hose supplied to connect the machine and
ensure that the sealing washers are in place inside the hose
connectors.
DDoo nnoott rree--uussee oolldd hhoosseess wwhhiicchh aarree aattttaacchheedd ttoo eexxiissttiinngg
iinnssttaallllaattiioonnss..
DDoo nnoott oovveerr--ttiigghhtteenn tthhee ccoonnnneeccttiioonnss.. HHaanndd ttiigghhtt iiss ssuuffffiicciieenntt..
DDoo nnoott ttrraapp oorr kkiinnkk tthhee hhoossee..
11..
Connect the elbow end of the hose provided to the
threaded inlet on the back of the machine.
GGrreeyy ppiippee ttoo tthhee wwhhiittee tthhrreeaaddeedd iinnlleett oonn tthhee mmaacchhiinnee..
22..
Hand tighten the connector.
33..
Connect the straight ends of the pipes to the water
supply;
eennssuurree tthhaatt tthheerree aarree nnoo kkiinnkkss
.
44.. TTuurrnn oonn tthhee wwaatteerr ssuuppppllyy aanndd cchheecckk ffoorr lleeaakkss..
If there is a
leak, turn off the water supply, disconnect the hose and
check the sealing washers are in place. Refit the hose and
turn on the water supply.
8
TThhiiss AApppplliiaannccee
mmuusstt bbee
ccoonnnneecctteedd ttoo aa
CCOOLLDD WWAATTEERR
ssuuppppllyy oonnllyy..
Page 9

CCoonnnneeccttiioonn ooff tthhee mmaacchhiinnee ttoo tthhee ddrraaiinn
This machine must be connected in accordance with the water supply regulations. Water byelaws
prohibit connection to a surface water drain.
Decide which plumbing option suits you best then follow the instructions below.
OOppttiioonn 11
WWaassttee ppiippee ccoonnnneeccttiioonn ((wwaassttee ttrraapp))
Fit the hooked end support to the outlet pipe. Position at least 800mm off the floor.
After removing the blanking plug or cutting the membrane from the waste system securely fix the outlet
pipe to the drainage system, using a hose clip.
Secure the hooked end support up to at least 800mm to avoid water being drawn back into the
machine.
OOppttiioonn 22
IInnttoo aa ssttaannddppiippee
Ensure that the standpipe (minimum diameter 38mm) is not located near an electrical socket.
Fit the hooked end support to the outlet pipe. Install the hose into the standpipe ensuring that the pipe
is at least 500mm from the floor.
Insert the outlet pipe approximately 100mm into the standpipe.
9
AAllll mmaacchhiinneess aarree tteesstteedd wwiitthh wwaatteerr pprriioorr ttoo lleeaavviinngg tthhee ffaaccttoorryy ssoo aa ssmmaallll
aammoouunntt ooff wwaatteerr mmaayy rreemmaaiinn iinn tthhee ddrruumm aanndd ddrraaiinn hhoossee..
FFllooooddiinngg ccoouulldd ooccccuurr iiff aannyy ppaarrtt ooff tthhee iinnssttaallllaattiioonn iiss nnoott ccoommpplleetteedd ccoorrrreeccttllyy..
100 mm
500 mm min
800 mm
hooked end support
flexible
discharge hose
sink
hose clip
trap with hose
adaptor
Page 10

MMoovviinngg tthhee mmaacchhiinnee iinnttoo
ppoossiittiioonn
Your machine is heavy so care must be taken when moving it.
We recommend that two people move the machine to avoid
strain and possible injury.
● Take care not to damage flooring when moving the
machine.
● When moving the machine to its final position take care
not to kink or damage the hose at the back of the
machine.
AAddjjuussttiinngg tthhee ffeeeett
Once the machine is in place the feet should be adjusted to
ensure that the machine is level. If the machine is not level it
may become noisy or move.
Adjust the feet on the front corners of the machine until the
machine is firm and level.
When the machine is firm and level, tighten the locking nuts
on the two feet.
10
DDoo nnoott ddrraagg oorr lliifftt tthhee
mmaacchhiinnee bbyy iittss ddoooorr..
Page 11

Refer to the programme guide for details of how to select
programmes.
11..
Turn on the water supply and check for leaks from the fill
hose.
22..
Switch on the electricity supply.
33..
Select the spin programme and then press the
START/PAUSE button to start the machine. Allow the
programme to continue for one minute and then cancel
the programme by returning the selector to the OFF
position. This will remove any water remaining in the
machine from factory testing.
44..
To check for cold water filling to the machine:
Select the rinse programme and press the
START/PAUSE button to start the machine.
Allow the tumble action to continue until the water has
pumped out. Check that the drain outlet is not leaking or
overflowing.
55..
Switch off the machine at the end of the cycle by turning
the programme knob to the OFF position.
66..
Select the spin programme and press the
START/PAUSE button to switch the machine on. If the
machine takes longer than one minute to empty check
the drain hose for kinks.
IInnssttaallllaattiioonn tteessttiinngg iiss nnooww ccoommpplleettee..
Now you have successfully installed the machine we advise
that you run the machine to ensure the drum is thoroughly
clean after testing and storage. Select Cottons 90°C
programme and run the machine for a complete cycle using
only wash detergent and water. Ensure that the drying timer is
in the OFF position.
TThhiiss pprrooggrraammmmee wwiillll ttaakkee aapppprrooxxiimmaatteellyy 22
hhoouurrss ttoo ccoommpplleettee..
11
TTeessttiinngg tthhee iinnssttaallllaattiioonn
Page 12

The following tips are designed to assist in getting the best
results from your machine whilst utilising it in the most
environmentally-friendly and economical way. It is also
important to understand the items to avoid in your laundry, to
ensure the continued safe and reliable operation of your
machine.
LLooaaddiinngg yyoouurr wwaasshhiinngg mmaacchhiinnee
To make further reductions of energy, water and detergent
consumption, we recommend that you put a full load into
your machine. Energy savings of up to 50% can be achieved by
washing one full load compared to two half loads.
DDoo nnoott oovveerrllooaadd tthhee mmaacchhiinnee aass tthhiiss wwiillll rreedduuccee tthhee qquuaalliittyy ooff
tthhee wwaasshh aanndd mmaayy ccaauussee ddaammaaggee ttoo tthhee mmaacchhiinnee aanndd yyoouurr
llaauunnddrryy..
WWhheenn iiss pprreewwaasshhiinngg rreeaallllyy nneeeeddeedd??
Only with particularly dirty loads! Energy savings of 5 to 15%
are made by not selecting the prewash option for less dirty
laundry. Pre-treat awkward stains with a washable stain
remover.
WWhhiicchh wwaasshh tteemmppeerraattuurree sshhoouulldd yyoouu
cchhoooossee??
Using stain removers before machine washing reduces the
need to wash at temperatures over 60°C.
Using a 40°C wash temperature can make energy savings of up
to 50%.
HHeeaavviillyy ssooiilleedd llaauunnddrryy
To ensure the best performance when washing a particularly
dirty load, we recommend that you reduce the amount of
items to be put into the machine. Allowing more space in the
drum the items can circulate more freely and will wash cleaner.
SSoorrttiinngg tthhee llaauunnddrryy
IItteemmss ttoo aavvooiidd
We recommend that you
ddoo nnoott
wash underwired bras in the
machine. Should the wires become detached it could cause
damage to your clothes and the machine. If the washcare label
states that the bra is machine washable then we advise placing
it in a wash bag.
RReeccoommmmeennddaattiioonnss
AAllwwaayyss ffoollllooww tthhee wwaasshh ccaarree llaabbeelllliinngg oonn tthhee ggaarrmmeennttss..
FFaasstteenn zziippss,, ttiiee ssttrriinnggss aanndd cclloossee pprreessss ssttuuddss ttoo pprreevveenntt
12
WWaasshhiinngg aanndd DDrryyiinngg aaddvviiccee
Page 13

ttaanngglliinngg.. EEnnssuurree tthhaatt ppoocckkeettss aarree eemmppttiieedd ooff lloooossee cchhaannggee aanndd
ootthheerr ssmmaallll iitteemmss..
CChheecckk tthhaatt tthheerree aarree nnoo mmeettaall oobbjjeeccttss iinn tthhee llaauunnddrryy aass tthheessee
mmaayy ddaammaaggee tthhee llaauunnddrryy aanndd tthhee mmaacchhiinnee..
PPllaaccee ssmmaallll iitteemmss iinn aa wwaasshh bbaagg..
DDrryyiinngg
In addition to the above advice the guidelines below must be
followed when drying the clothes.
SSoorrtt tthhee llooaadd ffoorr ddrryyiinngg::
●
BByy ccaarree ssyymmbboollss::
On the collar or inside seam:
Suitable for tumble drying.
Tumble drying at high temperature.
Tumble drying at low temperature only.
DO NOT tumble dry.
●
BByy aammoouunntt aanndd tthhiicckknneessss::
Whenever the load is bigger than the dryer capacity,
separate clothes according to thickness (e.g. towels from
thin underwear).
●
BByy ttyyppee ooff ffaabbrriicc::
CCoottttoonnss//lliinneenn::
Towels, cotton jersey, bed and table linen.
SSyynntthheettiiccss::
Blouses, shirts, overalls, etc. made of polyester
or polyamid, as well as for cotton/synthetic mixes.
TThhiinnggss ttoo aavvooiidd
● Do not tumble dry woollens, silk, delicate fabrics, nylon
stockings, delicate embroidery, fabrics with metallic
decorations, garments with PVC or leather trimmings,
training shoes, bulky items such as sleeping bags, etc.
● Do not dry articles which have been treated with a dry
cleaning fluid or rubber clothes (danger of fire or
explosion).
● Foam rubber materials can, under certain circumstances,
when heated become ignited by spontaneous combustion.
Foam plastic, foam rubber and rubber-like material are
not suitable for tumble drying. Articles made from these
materials
MMUUSSTT NNOOTT
be placed in the dryer.
● Do not try to dry items that are dripping wet, this may
damage the appliance. Spin these items first.
13
DDoo nnoott uussee tthhee mmaacchhiinnee
ttoo wwaasshh oorr ddrryy iitteemmss
tthhaatt ddoo nnoott hhaavvee aa wwaasshh
llaabbeell..
DDoo nnoott wwaasshh oorr ddrryy
iitteemmss pprreevviioouussllyy ttrreeaatteedd
wwiitthh ssoollvveennttss..
Page 14

DDeetteerrggeenntt ddoossaaggee
OOnnllyy uussee ddeetteerrggeennttss wwhhiicchh aarree ssuuiittaabbllee ffoorr uussee iinn aa wwaasshhiinngg
mmaacchhiinnee..
You will obtain the best results from your wash with
the minimum use of chemical products, and the best care for
your laundry if you take into consideration the degree of
soiling as well as the type of detergent to choose.
The amount of detergent to use depends on:
●
WWaatteerr hhaarrddnneessss..
Depending on the hardness of the water and the type of
detergent used, it is possible to reduce the amount of
detergent.
TThhee ssoofftteerr tthhee wwaatteerr ssuuppppllyy,, tthhee lleessss ddeetteerrggeenntt iiss
rreeqquuiirreedd..
●
TThhee ddeeggrreeee ooff ssooiilliinngg..
It is possible to reduce the amount of detergent used
depending on the degree of soiling.
UUssee lleessss ddeetteerrggeenntt ffoorr lleessss ssooiilleedd iitteemmss..
●
AAmmoouunntt ooff llaauunnddrryy..
It is possible to reduce the amount of detergent when
washing only a small amount of laundry.
FFoorr ssmmaalllleerr llooaaddss uussee lleessss ddeetteerrggeenntt..
The dosages shown on the packaging of detergents for
washing delicates often already refer to a reduced wash size.
AAllwwaayyss ffoollllooww tthhee ddoossaaggee iinnssttrruuccttiioonnss oonn tthhee ddeetteerrggeenntt
ppaacckkaaggiinngg..
14
TThhee DDiissppeennsseerr
DDOO NNOOTT eexxcceeeedd
tthhee mmaaxxiimmuumm
ddeetteerrggeenntt ddoossaaggee
CCOOMMPPAARRTTMMEENNTT II
PPrreewwaasshh ddeetteerrggeenntt
Maximum dosage 100ml of powder
CCOOMMPPAARRTTMMEENNTT IIII
MMaaiinnwwaasshh ddeetteerrggeenntt
Maximum dosage 200ml
of powder
CCOOMMPPAARRTTMMEENNTT
FFaabbrriicc CCoonnddiittiioonneerr
Maximum dosage 100ml
Page 15

AARRIIEELL QQuuiicckk WWaasshh AAccttiioonn –– CChhoosseenn aanndd
rreeccoommmmeennddeedd bbyy HHoooovveerr
When we produce a new washing machine we subject it to
every test possible. One of the most important tests is the one
that enables our experts to identify the most suitable
detergent for solving laundry problems. Ariel Quick Wash
Action was able to meet our needs: to make the washing
machine function efficiently; not compromise the machine’s
lifespan; and produce the best wash results. Consistently
excellent results, which was the main aim of the test we
carried out, determined our choice and our recommendation.
The prime function of a detergent that answers all washing
requirements is to work with the water to remove dirt from
fabrics, holding it in suspension, until it is removed when the
water is pumped out, and to control the amount of foam
forming in the washing machine, without damaging the fibres
of the items being washed. Ariel Quick Wash Action fully
satisfies all these requirements, as it contains high quality
elements, the result of the most advanced research, ensuring
excellent results under all conditions.
DDiissppeennssiinngg iinnssttrruuccttiioonnss
The detergent drawer is split into 3 compartments:
● the first, labelled "I", is for detergent utilised during
Prewash.
● the second, labelled "II", is for detergent utilised during
the main wash.
● the third, labelled is for special additives such as
fabric softeners, fragrances, starch, brighteners etc.
DDiissppeennssiinngg iinn tthhee ddrruumm
Liquid detergents and some tablets are dispensed via the
machine drum using the recommended dispensing device
which is placed upright on top of the washload towards the
back of the drum. Some tablets are designed to be placed in
the dispenser drawer, check the detergent pack for details.
15
DDoo nnoott ppuutt aannyy iitteemmss
iinnttoo tthhee ddrraawweerr ootthheerr
tthhaann ddeetteerrggeennttss tthhaatt aarree
ddeessiiggnneedd ttoo bbee
ddiissppeennsseedd ffrroomm tthhee
ddrraawweerr aass tthheeyy mmaayy
ccaauussee bblloocckkaaggee oorr
ddaammaaggee..
Page 16

TTuurrnniinngg tthhee mmaacchhiinnee OOnn
The machine is turned ON by selecting a programme via the
programme selector. This status will be indicated by the STOP
indicator light flashing, this light will continue to flash until
the machine has started or the machine is returned to the OFF
position.
SSttaarrtt//PPaauussee
SSTTAARRTT
After selecting the programme and the required options press
the START/PAUSE button once to start the machine. The STOP
light will stop flashing and START light will illuminate and
there will be a short time delay to the start of the programme
while the machine sets the wash parameters for the selected
programme and options. If the duration of the programme
you have selected is shorter than 60 minutes, then the time
remaining indicator will illuminate accordingly. The door lock
indicator light will also illuminate a few seconds after pressing
the START/PAUSE button.
16
TThhee CCoonnttrrooll PPaanneell
COUNTDOWN Display
START/
PAUSE
OPTIONS
BUTTONS
TEMPERATURE
SELECTOR
DRYING TIME
SELECTOR
PROGRAMME
SELECTOR
TThhee pprrooggrraammmmee sseelleeccttoorr
mmuusstt bbee rreettuurrnn ttoo tthhee
OOFFFF ppoossiittiioonn ttoo rreesseett tthhee
ccoonnttrroollss bbeettwweeeenn eeaacchh
wwaasshh ccyyccllee..
WWhheenn ssttaarrttiinngg aa
ssuubbsseeqquueenntt wwaasshh ccyyccllee
tthhee pprrooggrraammmmee sseelleeccttoorr
mmuusstt bbee rreettuurrnneedd ttoo OOFFFF
pprriioorr ttoo tthhee nneexxtt
pprrooggrraammmmee bbeeiinngg
sseelleecctteedd aanndd ssttaarrtteedd..
Page 17

PPAAUUSSEE
The programme may be paused at any time during the wash
cycle by holding down the START/PAUSE button for about two
seconds. When the machine is in the paused mode, the time
remaining for the programme in the COUNTDOWN indicator
and option buttons will flash. The door lock indicator light will
remain illuminated for approximately 2 minutes. The door can
be opened when this indicator goes out. To restart the
programme, press the START/PAUSE button once again.
CCaanncceelllliinngg aanndd cchhaannggiinngg tthhee pprrooggrraammmmee
To cancel the programme the programme selector should be
rotated to the OFF position.
Select a new programme and start as detailed above.
DDoooorr LLoocckkeedd iinnddiiccaattoorr
The DOOR LOCKED indicator light is illuminated when the
door is fully closed and the machine is ON.
When START is pressed on the machine with the door closed
the indicator will flash momentarily and then illuminate. If the
door is not closed the indicator will continue to flash.
A special safety device prevents the door from being opened
immediately after the end of the cycle. Wait for 2 minutes
after the wash cycle has finished and the Door Locked light has
gone out before opening the door. As a safety measure, check
that there is no water evident in the drum. At the end of the
cycle turn the programme selector to OFF.
If the programme is paused, the door locked indicator will go
out after 2 minutes and the door can be opened. Check there
is no water evident in the drum before opening the door.
CCoouunnttddoowwnn
In order to better manage your time, this washing machine
features an indicator light system that keeps you constantly
informed on the remaining cycle time.
When a drying time is selected the COUNTDOWN display will
display the time remaining on the washing programme when
the washing is taking place and the time remaining in the
drying phase when drying is taking place.
Indicator light Start: Remaining time above 60 minutes
Indicator light 60: Remaining time less than 60 minutes
Indicator light 30: Remaining time less than 30 minutes
Indicator light 15: Remaining time less than 15 minutes
Indicator light Stop: End of the programme
17
Page 18

PPrreewwaasshh
This option is available on the cottons and synthetics programmes. Prewash is automatic on the Sports
programme. This option is particularly useful for heavily soiled loads and can be used before selecting
the main wash programme. Detergent for this programme should be added to the first compartment of
the soap drawer labelled "I" (Please refer to Detergent Drawer section of manual). We recommend you
only use 20% of the main wash detergent quantity.
TTiimmee SSaavveerr
This option can be utilised on cottons and synthetics. By selecting the Time Saver option, the wash time
may be reduced by up to 50 minutes, depending on the selected programme, temperature and load,
without giving up a good wash quality.
PPuurree RRiinnssee
This option is available on the cottons programmes. The option increases the number of rinses to five
(including the final conditioned rinse). This can help prevent skin irritation from detergent residue for
people with particularly sensitive skin. Selecting the Pure Rinse button is also recommended when
washing heavily soiled fabrics which need a lot of detergent, or when the wash load contains towelling
fabrics that have a greater tendency to retain detergent.
FFaasstt IIrroonn
This option is
oonnllyy
available on synthetics, acrylics, woolmark and silk programmes.
18
WWaasshh aanndd DDrryy OOppttiioonnss
TThhee ooppttiioonnss sshhoouulldd bbee sseelleecctteedd BBEEFFOORREE pprreessssiinngg tthhee SSTTAARRTT bbuuttttoonn
PPrrooggrraammmmee
Synthetics
Acrylics
Woollens
Silk
FFaasstt IIrroonn FFuunnccttiioonn
Programme is completed by a short,
very low spin speed.
The machine stops in the final rinse
stage with the option indicators
blinking and the load will be held
within the water in the drum, thus
reducing creasing and enabling easier
ironing.
The machine will stop in the final
rinse stage with the option indicators
blinking and the load will be held
within the water in the drum. This
reduces creasing, thus enabling easier
ironing.
The machine will stop in the final
rinse stage with the option indicators
blinking and the load will be held
within the water in the drum. This
reduces creasing, thus enabling easier
ironing.
AAccttiioonn ttoo ccoommpplleettee tthhee ccyyccllee
If a spin cycle is required please select the
appropriate spin (see Programme Guide).
Press the FAST IRON button to continue with
the programme. The machine will then pump
out the remaining water and the programme
will conclude with a short spin. Finally, the
programme carries out a brief tumbling
action to loosen the items in the load.
Press the FAST IRON button and the machine
will pump out the water and complete the
cycle with a short spin cycle.
Press the FAST IRON button and the machine
will pump out the water to complete the
cycle. The clothes load will not be spun and
will therefore be very wet.
Page 19

TTeemmppeerraattuurree SSeelleeccttoorr
The washing machine is equipped with a Temperature Selector
knob to set the temperature you require. Bigger energy
savings can be achieved by using the lower temperature
settings around the dial between and 40°C. By selecting
the position, the wash temperature is limited to the water
inlet temperature, thus reducing energy consumption further.
We recommend that the temperature shown on wash care
garments should never be exceeded.
In the case where the temperature has been accidentally set
higher than that of the chosen programme, (see Programme
Guide table), the machine will lower the temperature
automatically to protect the fabrics.
DDrryyiinngg TTiimmee SSeelleeccttoorr
For tumble drying select the appropriate drying programme
via the Programme Selector. For drying cotton fabrics select
the High Dry option and for synthetic fabrics select the Low
Dry option. Turn the drying time selector until the indicator
aligns with the desired time.
DDoo nnoott mmiixx ccoottttoonnss aanndd ssyynntthheettiiccss
ttoo aavvooiidd ddaammaaggee ttoo tthhee llaauunnddrryy..
NNoottee::
If the drying time is selected before the wash cycle is
completed the machine will automatically commence the
drying programme. Refer to the Programme Guide to identify
which drying programme will be automatically selected after
the wash programme. To protect your laundry certain
programmes (eg Silk) cannot be followed automatically by a
drying programme.The drying time can be reduced at any time
during the cycle but cannot be increased.
DDrryyiinngg TTiimmee GGuuiiddee
The times given above are indicative and will vary with the
exact level of dryness required (eg for ironing or ready to
hang) and the size and composition of the load.
19
TTyyppee ooff ffaabbrriicc
Cottons, linen
Synthetics and mixed fabrics
LLooaadd SSiizzee
4kg
2kg
2kg
1kg
11220000//11330000 rrppmm
190 minutes
80 minutes
70 minutes
50 minutes
11550000//11660000 rrppmm
170 minutes
70 minutes
60 minutes
40 minutes
SSppiinn SSppeeeedd
OOnnllyy aa mmaaxxiimmuumm ooff 44kkgg
ooff ddrryy llaauunnddrryy ccaann bbee
llooaaddeedd..
Page 20

AAuuttoommaattiicc FFeeaattuurreess
AAuuttoommaattiicc VVaarriiaabbllee CCaappaacciittyy ((HHaallff LLooaadd))
The washing machine is fitted with a self adjusting water level
system. This system enables the machine to use the optimum
amount of water needed to wash and rinse the laundry in
relation to the particular load. This results in a reduction of the
water and electricity used without in any way compromising
the washing and rinsing performance. The amount of water
and electricity used will always be appropriate for the clothes
load.
The washing machine automatically ensures excellent washing
results at minimum cost whilst respecting the environment.
OOuutt ooff BBaallaannccee pprrootteeccttiioonn
This model is fitted with an electronic sensor device that
checks if the load is balanced correctly. If the load is slightly
unbalanced the machine will re-balance it automatically to
then carry out the normal spin.
If, after several attempts, balance is not restored a reduced
spin speed will be used.
IIff llooaaddss aarree sseerriioouussllyy uunnbbaallaanncceedd tthhee ssppiinn ssttaaggee wwiillll bbee
ccaanncceelllleedd..
This helps limit vibration, reduce noise and improve
the washing machine's reliability and life.
20
Page 21

For handling the various types of fabric and their level of
soiling in your laundry the washing machine has different
programme groups according to type of wash, temperature,
spin speeds and duration (see Programme Guide).
CCoottttoonnss
The programmes are designed for maximum washing and
rinsing. With spin cycles in between, they guarantee the
laundry is rinsed perfectly. The final spin cycle ensures laundry
is spun dry as much as possible up to the maximum speed.
SSyynntthheettiiccss aanndd mmiixxeedd ffaabbrriiccss
Washing and rinsing performance is optimised through drum
rotation speeds and water levels. The delicate spin action
minimises creasing.
AAccrryylliiccss
This is a new concept in washing, with a cycle that comprises
alternate periods of activity and pauses, particularly suitable
for washing very delicate fabrics.
Washing and rinsing are carried out using a high water level to
provide the best results.
RRiinnssee,, SSppiinn aanndd DDrraaiinn
Individual programmes are available for rinsing, (including the
opportunity to add fabric conditioner), spinning, at 800rpm or
maximum spin speed, and draining the water from the
machine.
SSppeecciiaall PPrrooggrraammmmeess
DDrryyiinngg
NNoottee:: DDiissppeennsseerrss uusseedd ffoorr ccoonncceennttrraatteedd ppoowwddeerrss aanndd lliiqquuiidd
ddeetteerrggeennttss mmuusstt bbee rreemmoovveedd ffrroomm tthhee ddrruumm bbeeffoorree
ccoommmmeenncciinngg tthhee ttuummbbllee ddrryyiinngg pprrooggrraammmmeess..
The load is dried in thermostatically controlled warm air. The
drum changes direction during the drying cycle to prevent the
laundry from tangling and hence produce even drying. Cool air
is used during the last ten minutes of the drying cycle to
minimise creasing.
HHiigghh DDrryy
High temperature drying programme for Cottons and linen
items, always refer to the care label
LLooww DDrryy
Low temperature drying programme for synthetics and mixed
fibres, always refer to the care label.
21
PPrrooggrraammmmee SSeelleeccttoorr
Page 22

WWoooollmmaarrkk
A programme dedicated to washing fabrics labelled with the woolmark symbol . The cycle comprises
of alternate periods of activity and pauses. Washing and rinsing are carried out using a high water level
to provide the best results. The programme has a maximum temperature of 30°C and concludes with 3
rinses, one for fabric conditioner, and a short spin.
HHaannddwwaasshh
This programme allows a complete washing cycle for garments specified as 'Hand Wash only'. The
programme has a maximum temperature of 30°C and concludes with 3 rinses, one for fabric conditioner,
and a short spin.
SSiillkk
This programme allows a complete washing cycle for garments made from silk or specified as 'Wash as
silk' on the fabric label. The programme has a maximum temperature of 30°C and concludes with 3
rinses, one for fabric conditioner, and no final spin.
SSppoorrttss
Hoover has given sports items their own wash care programme. This washing machine has a unique
Sportswear programme. It is specially designed to wash mixed sportswear fabrics that cannot be washed
on hotter programmes and is designed to remove the soiling and staining created by participation in
sports activities.
This programme starts with a cold prewash that breaks down and loosens any excess dirt and then
washes at a cool 30°C, rinses twice (one is for fabric conditioner) and spins slowly for the best care of
your heavily soiled, delicate garments.
Detergent for the prewash part of the programme should be added to compartment I and detergent for
the mainwash should be added to compartment II. Follow the instructions given in 'The Dispenser' section.
““AA”” wwaasshh 5599''
This specially designed programme maintains the high quality wash performance identified with the “A”
rating whilst greatly reducing the wash time.
TThhee pprrooggrraammmmee iiss ddeessiiggnneedd ffoorr aa mmaaxxiimmuumm llooaadd ooff 33 kkgg
and is intended for cotton fabrics and items colourfast to 60°C. The programme concludes with 2 rinses
and a high speed spin sequence.
DDaaiillyy PPrrooggrraammmmeess
By maintaining exceptional washing performance, these programmes allow you to know in advance the
necessary time for your everyday laundry. In fact, this washing machine is equipped with two daily rapid
programmes at 40°C, that were just studied for lightly soiled fabrics and medium or small loads.
DDaaiillyy 4444''
A complete washing cycle (wash, rinse and spin), able to wash in approximately 44 minutes suitable for:
● a maximum load of 3 kgs
● lightly soiled fabrics (cotton and mixed fabrics)
With this programme we recommend that you reduce the detergent loading dose (compared to the
normal one), in order to avoid detergent waste.
DDaaiillyy 2299''
A complete washing cycle (wash, rinse and spin), able to wash in approximately 29 minutes suitable for:
● a maximum load of 2 kgs
● lightly soiled fabrics (cotton and mixed fabrics)
With this programme we recommend that you reduce the detergent loading dose (compared to the
normal one), in order to avoid detergent waste.
22
Page 23

23
PPrrooggrraammmmee GGuuiiddee
CCoottttoonnssSSyynntthheettiiccss MMiixxeedd
FFaabbrriiccss
AAccrryylliiccssSSppeecciiaall PPrrooggrraammmmeess RRiinnsseess,, SSppiinnss aanndd DDrraaiinn
Cottons
Colourfast
Non-fast
Colour
Mix
Synth’s
Mixed
Acrylics
Rinse
Final Rinse
Spin
Spin
Drain
High Dry
Low Dry
Woolmark
Delicates &
Handwash
Silk
Sports
“A” Wash
59'
Daily 44'
Daily 29'
MMaaxxiimmuumm
LLooaadd
SSiizzee ((kkgg))
6
6
6
6
2
2
2
-
-
-
-
-
4
2
1
1.5
1.5
2.5
3
3
2
FFaabbrriicc TTyyppee
Cottons, linen
Cotton, colourfast
mixed fibres
Cottons, mixed fabrics,
Coloureds Non-fast
Cottons, mixed fabrics
and synthetics
Mixed fabrics and
synthetics
Coloured mixed fabrics
and synthetics
Delicates and acrylics
Cottons, linens
Mixed Fabrics
Cottons, linens.
Maximum spin speed
Mixed Fabrics. Spin
speed of 800 rpm max.
Mixed Fabrics
Cottons and linen
Synthetics
Machine washable
wool
Delicates and 'Hand
Wash only' items
Silks
Mixed fabrics
Cottons, colourfast
mixed fabrics
Lightly soiled cottons
and mixed fabrics
Lightly soiled cottons
and mixed fabrics
MMaaxxiimmuumm
WWaatteerr
TTeemmpp ((°°CC))
90
60
40
40
50
40
40
-
-
-
-
-
-
-
40
30
30
30
60
40
40
MMaaxxiimmuumm
DDrryyiinngg
LLooaadd
4
4
4
2
2
2
-
4
2
4
2
-
4
2
-
-
-
2
3
2
2
HHiigghh
DDrryy
✔
✔
✔
✔
✔
✔
✔
LLooww
DDrryy
✔
✔
✔
✔
✔
✔
✔
✔
✔
NNoott
aavvaaiillaabbllee
✔
✔
✔
✔
✔
Energy label data based on Colourfast programme tested in accordance with CENELEC EN60456
PPrrooggrraammmmee
AAuuttoommaattiicc DDrryyiinngg CCyyccllee
Page 24

This section summarises the main points when completing a
wash cycle. For detailed explanations of features, options and
details of the machine refer to the relevant section in the
instruction manual.
PPrreeppaarriinngg tthhee llaauunnddrryy
Select and sort the laundry according to the wash care labels
found on each garment. Always check the care labels.
LLooaaddiinngg tthhee llaauunnddrryy
Open the door.
Put the laundry in the washing machine. Close the door by
pushing it until it clicks, ensuring that no items of laundry are
obstructing the lock or door seal.
PPuuttttiinngg ddeetteerrggeenntt iinn mmaacchhiinnee
Open the drawer, choose the detergent and put in the
recommended amount.
DDoo nnoott eexxcceeeedd tthhee ddoossaaggee ssttaatteedd bbeellooww
Close the drawer again.
SSeelleeccttiinngg tthhee pprrooggrraammmmee
Refer to the Programme Guide or the programme descriptions
on the front of the machine to select the most suitable
programme.
The programme is selected by turning the programme selector
and aligning the programme name with the indicator.
Check that the STOP indicator is flashing, if not check that the
door is properly closed.
Check that the tap is turned on and that the discharge hose is
positioned correctly.
SSeelleecctt tthhee rreeqquuiirreedd wwaasshh ooppttiioonnss
SSeelleecctt tthhee aapppprroopprriiaattee ddrryyiinngg ttiimmee bbaasseedd oonn
tthhee ttaabbllee ttoo bbee ffoouunndd oonn ppaaggee 1199
24
AA TTyyppiiccaall WWaasshh aanndd DDrryy CCyyccllee
MMaaxxiimmuumm
qquuaannttiittyy ooff
ppoowwddeerr//lliiqquuiidd
100ml
200ml
100ml
WWaasshh
Prewash (option)
Main Wash
(all programmes)
Fabric Conditioner
CCoommppaarrttmmeenntt
I
II
LLiiqquuiidd ddeetteerrggeennttss aanndd
ssoommee ccoonncceennttrraatteedd
ppoowwddeerrss aanndd ttaabblleettss
tthhaatt aarree ttoo bbee ppllaacceedd
ddiirreeccttllyy iinnttoo tthhee ddrruumm
sshhoouulldd uussee tthhee
rreeccoommmmeennddeedd
ddiissppeennssiinngg ddeevviiccee..
DDoo nnoott uussee ssuucchh
ppoowwddeerrss aanndd ddiissppeennssiinngg
ddeevviicceess iiff yyoouu aarree
ccoommpplleettiinngg aa ccoonnttiinnuuoouuss
wwaasshh aanndd ddrryy ccyyccllee..
Page 25

SSttaarrttiinngg tthhee ccyyccllee
Press the START/PAUSE button. The door locked indicator and
the START light illuminate, within a few seconds the
programme will begin.
DDoo nnoott ttrryy ttoo ooppeenn tthhee ddoooorr wwhheenn tthhee ddoooorr lloocckkeedd iinnddiiccaattoorr iiss
oonn..
DDoo nnoott ooppeenn tthhee ddiissppeennsseerr ddrraawweerr dduurriinngg tthhee wwaasshh
pprrooggrraammmmee..
If you wish to pause the programme press the START/PAUSE
button and after 2 minutes the door can be opened. To cancel
the programme the programme selector should be turned to
the OFF position. A new programme can be selected after
cancelling the programme.
TToo tteesstt tthhee llaauunnddrryy ffoorr ddrryynneessss
When completing the drying phase it is possible to check the
load for dryness.
Press the START/PAUSE button, the machine will go into pause
mode indicated by the COUNTDOWN display time and the
option buttons flashing.
After 2 minutes the Door Locked light will go out indicating
that the door can be opened and the load checked.
BBee vveerryy ccaarreeffuull aass tthhee llooaadd aanndd ddoooorr ggllaassss mmaayy bbee vveerryy hhoott..
To continue close the door and press the START/PAUSE button.
The programme will restart and continue for the remaining
time.
WWhheenn tthhee pprrooggrraammmmee hhaass ffiinniisshheedd
Wait for the door lock to be released.
TThhee ddoooorr lloocckkeedd
iinnddiiccaattoorr wwiillll ggoo oouutt aafftteerr aapppprrooxxiimmaatteellyy 22 mmiinnuutteess aanndd tthheenn
tthhee ddoooorr ccaann bbee ooppeenneedd..
Switch off the machine by turning the programme selector to
the OFF position before selecting the next programme (this
action resets the memory in the machine).
Open the door.
Remove the laundry.
Disconnect the plug from the mains power supply and turn off
the water supply after every use.
25
Page 26

The washing machine needs very little maintenance, but
regular attention to a few small details will ensure the
continued performance of your washing machine.
Do not use abrasive cleaners, scouring pads, solvent based
cleaners or polishes; wiping the outside of the machine with a
damp cloth will suffice.
CClleeaanniinngg tthhee ssooaapp ddiissppeennsseerr
11..
Clean the compartments occasionally to remove
detergents and additives.
22..
To do this you just need to pull the drawer out firmly
from the machine, but without forcing it.
33..
Clean the compartments and the syphon cap and cover
under warm running water.
44..
Clean the outlet of the soap dispenser to remove any
residue of soap powder
55..
Replace the drawer.
CClleeaanniinngg tthhee ddoooorr ggllaassss
Regularly clean the door glass with a damp cloth. A build up
of soiling and residues from the water may result in water
leaking from the door.
Do not use abrasive cleaners as they can scratch the surface.
26
CClleeaanniinngg aanndd RRoouuttiinnee MMaaiinntteennaannccee
Page 27

CClleeaanniinngg tthhee ffiilltteerr
The washing machine is fitted with a special filter to prevent
items such as coins, buttons, etc. blocking the discharge hose.
These may be retrieved by:
11..
Removing the kickplate by gently pulling it from the
bottom in an outwards and upwards direction.
22..
Use the kickplate to collect the water still in the filter.
33..
Use a screwdriver to loosen the screw holding the filter,
turn the filter anticlockwise until it stops, remove it and
clean it. After cleaning it, reassemble following the above
instructions in reverse order.
Replace the kickplate.
WWee rreeccoommmmeenndd tthhaatt tthhee ffiilltteerr bbee cclleeaanneedd ffrreeqquueennttllyy,, aatt lleeaasstt
oonnccee aa mmoonntthh..
MMaaiinntteennaannccee wwaasshh
Using small quantities of detergent and low temperature wash
programmes can cause the gradual build up of grease, dirt and
scale. Over time these deposits can damage your laundry and
your machine. They can also cause your machine to smell. We
recommend that you carry out a maintenance wash a couple
of times per year to keep your machine and pipe work clean
and free of these deposits. Simply run the Cottons 90°C
programme without a load and with the normal quantity of
detergent.
TThhiiss wwaasshh wwiillll ttaakkee aapppprrooxxiimmaatteellyy 22 hhoouurrss ttoo
ccoommpplleettee..
27
Page 28

WWhhaatt mmiigghhtt bbee tthhee ccaauussee ooff......
DDeeffeeccttss yyoouu ccaann rreemmeeddyy yyoouurrsseellff
Before calling GIAS Service for technical advice please run through the following checklist. A charge will
be made if the machine is found to be working or has been installed incorrectly or used incorrectly. If the
problem persists after completing the recommended checks, please call the GIAS Service (tel: 08705 400
600), they may be able to assist you over the telephone or arrange a service call.
TThhee mmaacchhiinnee wwiillll nnoott ssttaarrtt……
● Close the door. Check that there is power to the machine. Select a programme and press START.
Check if the door lock light is illuminated.
IIff iitt iiss nnoott,, cchheecckk tthhee ffoolllloowwiinngg::
11..
Is the machine connected to the electrical supply?
22..
Is the electrical supply OK, check another socket?
33..
Has the fuse on the machine blown? If so, replace it.
● If the door locked light is illuminated and the machine does not start this means that the machine
cannot fill with water, check the following:
11..
Check the programme dial is correctly aligned with the programme.
22..
Is the water supply to the machine switched on?
33..
Are the pipes kinked or restricted in any way?
WWaatteerr ddooeess nnoott ddrraaiinn aawwaayy……
● Ensure that there is not a blockage in the drain hose or the hose is not kinked.
● Is the drain hose installed correctly? If connected to the sink waste make sure you have cut the
membrane or removed the bung from the under sink drainage unit.
● Check for foreign bodies in the filter. If present, clean the filter. Before opening the filter, ensure
that the drum is not full of water. If it is full the machine may be drained using the procedure
defined on page 30.
IIff yyoouu hhaavvee ffoouunndd aannyy ooff tthhee aabboovvee pprroobblleemmss ccoorrrreecctt tthheemm aanndd rruunn tthhee mmaacchhiinnee tthhrroouugghh aa ssppiinn ccyyccllee ttoo
ddrraaiinn tthhee wwaatteerr..
● Is the FAST IRON function selected? If so, deselect the option and the programme will complete (see
page 18 for complete explanation of the function).
WWaatteerr oonn tthhee fflloooorr aarroouunndd tthhee wwaasshhiinngg mmaacchhiinnee……..
● Is the fill hose tightened? If so, replace the rubber washers and re-tighten.
● Is the standpipe or the household drain blocked? If so, clear the blockage yourself or call a plumber.
● Is there clothing or dirt between the door gasket and the door glass? Ensure that the door glass and
gasket are kept clean and free of laundry when loading the machine.
TThhee mmaacchhiinnee ddooeess nnoott ssppiinn……
● Water has not drained from the machine? Check the points highlighted above.
● Have you selected an option that changes the spin profile (FAST IRON or change of spin speed on
the selector)? Check the feature in the description of the controls.
● Is the load unbalanced? To reduce noise and vibration and improve the machine’s reliability and life,
the machine is fitted with an electronic sensor that detects if the load is unbalanced. To improve the
spin performance the load can be re-distributed by hand at the end of the cycle and then re-spun.
28
TTrroouubblleesshhoooottiinngg
Page 29

TThhee mmaacchhiinnee iiss nnooiissyy oorr vviibbrraatteess aa lloott dduurriinngg tthhee ccyyccllee……
● Has the transit system been fully removed? Check that the bracket and the polystyrene packing have
been taken off the machine.
● Are there any loose items in the pockets of clothing that can rattle in the drum and cause damage?
● Is the load unbalanced? Stop the programme, re-distribute the load and restart.
TThhee pprrooggrraammmmee ttaakkeess aa lloonngg ttiimmee……
● Some programmes do take a long time (over 2 hours). Low water pressure can increase the length of
the programme.
TThhee ddoooorr wwiillll nnoott ooppeenn……
● Has the programme finished?
Is the STOP light illuminated? If not the programme is not complete.
Has the door locked light gone out? If not wait a further couple of minutes and the light will go out
and you will be able to open the door.
● Has the programme finished but the door remains locked? The START and TIME SAVER light will flash
intermittently indicating that the water supply has been interrupted during the wash cycle. Turn the
machine to OFF to reset the machine and this will allow the door to open.
● If water remains in the drum refer to 'Water does not drain away…' above.
PPrroobblleemm wwiitthh tthhee ddiissppeennsseerr……
● Not all the detergent has been flushed away.
11..
Check the water supply tap is fully turned on.
22..
Check the inlet hose is not kinked.
● The dispenser drawer will not close properly.
11..
Check the drawer is aligned properly
22..
Check the drawer is not clogged with detergent (see Cleaning and routine maintenance)
● Steam is coming from the dispenser.
The machine is designed to vent through the drawer, this is nothing to worry about.
TThhee ccllootthheess llooaadd iiss nnoott ddrryy……
● Was sufficient time selected to dry the clothes load? (Refer to Drying Time Guide page 19.)
● Is the wash programme selected followed automatically by a drying programme? (Refer to
Programme Guide page 23.)
● Was the laundry correctly spun prior to drying? Select a spin programme to remove the excess water.
● Has the correct drying programme been selected? Refer to the laundry care label for guidance.
Remember, you may be charged for the service call if incorrect installation or misuse causes a problem
with your machine.
NNoottee::
The use of environmentally-friendly, phosphate-free detergents (check detergent information on pack)
can have the following effects:
● Waste water from rinsing may be cloudier because of the presence of a white powder (zeolites) held
in suspension, without the rinse performance being adversely affected.
● Presence of white powder on laundry after washing, which is not absorbed by the fabric and does
not alter the colour of the fabric.
● The presence of foam in the final rinsing water is not necessarily an indication of poor rinsing.
Carrying out more rinse cycles does not serve any purpose in such cases.
29
Page 30

PPoowweerr FFaaiilluurree
If there is a power failure the wash cycle will be interrupted,
and the wash programme and functions will be suspended.
When the power is restored, the wash programme and
functions will re-start from the same point and complete the
programme.
During a power failure the water can be drained and the load
can be removed from the machine as follows:
11..
Switch off the machine both via the programme knob and
the mains power supply. Remove the plug from the mains
power supply socket.
22..
Carefully move the machine so the rear of the machine is
accessible. Please follow the safety precautions which we
recommend under the Safety Notes section of this
manual.
33..
Unclip the drain hose from the rear panel of the machine
and lower the hose into a bowl on the floor. When the
bowl is full raise the end of the drain pipe to a height
higher than the top of the appliance to stop the flow of
water. Empty and replace the bowl and continue draining
the machine until empty.
44..
Once the machine is fully drained of water, clip the hose
to the rear of the machine. Press the door button and
remove the load.
The door can be opened approximately 2 minutes after the
power failure by simply pressing the door open button.
DDoo nnoott ffoorrccee ooppeenn tthhee ddoooorr..
30
Page 31

For a period of one year from the date of purchase the
appliance is covered by a guarantee which allows you to call
Hoover Service free of charge (except for the price of the call).
Remember to send off the guarantee certificate for validation
within 10 days of the date of purchase.
You should retain the receipt issued by the retailer when you
purchased the machine to show to the call out engineer,
should you need to consult one.
If your washing machine shows signs of a defect or is not
working properly, before you contact GIAS Service we
recommend you carry out the checks detailed within the
Troubleshooting section.
If the problem with the machine persists after completing all
the recommended checks, please dial the GIAS Service number.
You will be connected directly to GIAS. It is important you tell
the GIAS advisor your product's model number and serial
number, which you will find on the rating label (16 characters,
beginning with the number 3), found on the front of the
washing machine (door area). By doing this, your enquiry will
be responded to more efficiently.
31
CCuussttoommeerr SSeerrvviiccee
PPhhoonnee GGIIAASS oonn
0088770055 440000 660000
Page 32

Hoover guarantees all parts of this product for 5 years from
the date of purchase. During that time Hoover will replace or
repair all defective parts free of charge, except for parts
subject to fair wear and tear such as belts. The call out fee and
labour costs are chargeable after the first 12 months. To
qualify for benefits under the guarantee, you must be able to
provide proof of date of purchase and the appliance must
have been installed and used in accordance with the
instructions described in this manual. Consequential losses and
accidental damage to the machine is not covered by the
guarantee.
Hoover cannot be responsible for the results of using this
machine for any purposes other than those described in this
manual.
This guarantee does not effect your statutory or common law
rights.
FFoorr sseerrvviiccee aanndd rreeppaaiirrss pplleeaassee ccaallll oouurr nnaattiioonnaall nnuummbbeerr::
AAllwwaayyss uussee ggeennuuiinnee HHoooovveerr ssppaarreess,, aavvaaiillaabbllee ddiirreecctt ffrroomm GGIIAASS
SSeerrvviiccee::
HHoooovveerrccaarree
To maintain your Hoover product in peak condition you may
wish to take out a Hoovercare policy, which for an annual
payment provides a comprehensive maintenance and repair
scheme. For more information please call 08705 400 600.
The Hoovercare scheme is not available in Eire.
The manufacturer declines all responsibility in the event of any
printing mistakes in this booklet. The manufacturer also
reserves the right to make appropriate modifications to its
products without changing the essential characteristics.
YYoouurr GGuuaarraanntteeee
GGIIAASS SSeerrvviiccee -- TTeell:: 0088770055 440000 660000
SSuuppppoorrtt SSeerrvviiccee [[EEiirree 001188330011 666666]]
HHoooovveerr SSppaarreess SSeerrvviiccee
TTeell:: 0011220044 555566111111
40001105
 Loading...